

Page 1
Operation Manual
Ver 1.1
ReverseTap
WWW.REVERSETAP.COM
Page 2

What is ReverseTap?
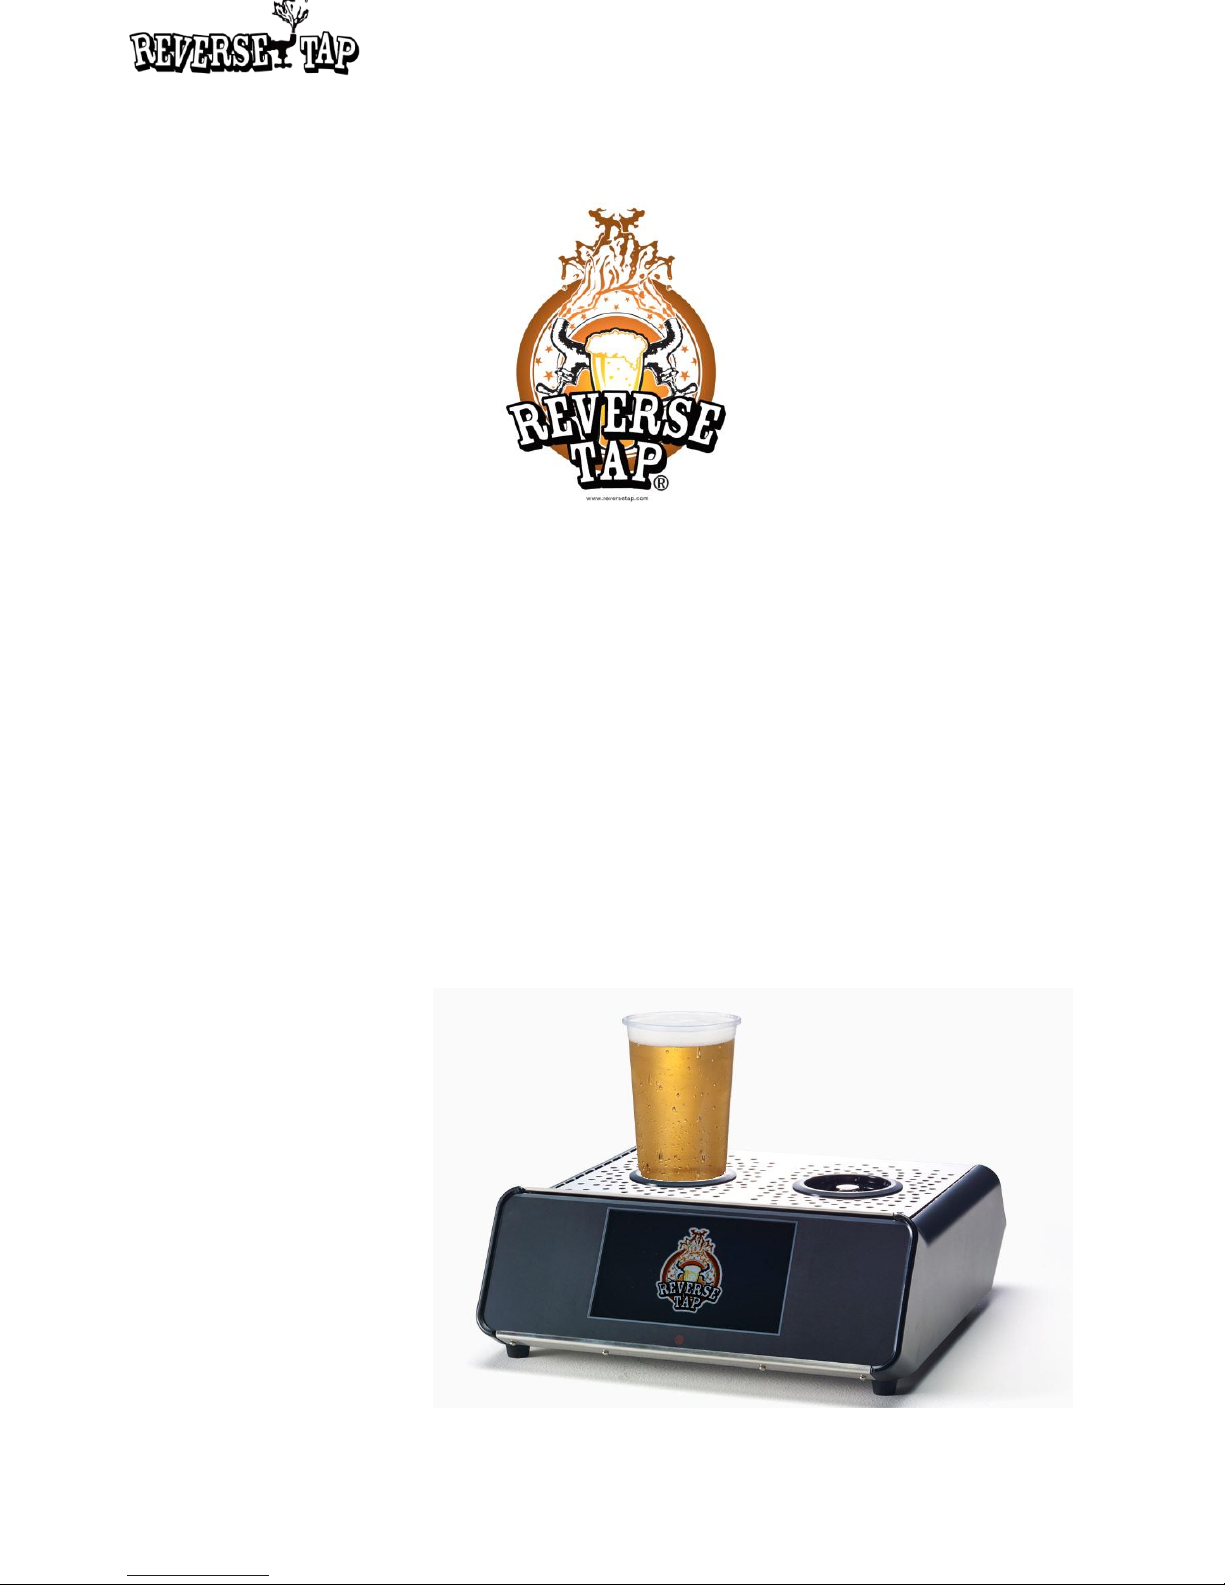
ReverseTap is an innovative beer dispensing system. It is an upward dispensing system,
different from the conventional downward dispensing system. ReverseTap dispenser
dispenses beer upward through the bottom of the cup. ReverseTap cup is uniquely
designed for this system with its patented plastic tension and sealing technology.
There are several benefits of ReverseTap compared to the conventional dispensing
system. 1) It maximizes the keg yield rate by preventing the loss of beer with its foam
amount control feature. 2) Its automatic amount control feature enhances the operator’s
productivity. 3) Its fast dispensing time enables the operator to sell more beer to more
people. It is extremely effective in a time-limited venues such as stadiums or concerts.
4) The novelty of upward dispensing concept itself is a powerful marketing tool to attract
more customers.
In conclusion, ReverseTap provides huge financial benefit to the users.
About this manual
This manual is specially designed to detail how to operate ReverseTap dispenser’s
functions and features only. Installation of the ReverseTap dispenser must be done
through the authorized service provider. Without its proper installation, the device might
not perform properly or be damaged. NPC Co., Ltd. is not liable for any damages or
injuries that may occur due to improper installation.
• Please read this manual carefully before use to ensure safe and proper usage.
• Descriptions are based on the device’s default settings.
• Images and screenshots may differ in appearance from the actual product.
• Contents of this manual may vary from actual product according to software version
and specifications of model.
• Randomly changing product software provided by ReverseTap or downloading
software obtained through unofficial paths to its product may cause failure or error of
the product.
• Software, images, and other media provided with this device are licensed for limited
use. Extracting and using these materials for commercial or other purpose is an
infringement of copyright laws.
• You can download the manual from the ReverseTap website, www.reversetap.com.
Copyright
Copyright ⓒ 2017 NPC Co., Ltd.
This guide is protected under international copyright laws. No part of this guide may be
reproduced, distributed, translated, or transmitted in any form or by any means, electronic
or mechanical, including photocopying, recording, or storing in any information storage
and retrieval system, without the prior written permission of NPC Co., Ltd.
Trademark
ReverseTap and ReverseTap logo are registered trademarks of NPC Co., Ltd.
Page 3

Important safety precaution
Please read this manual carefully before using the device to ensure safe and proper use.
• This device is not intended for use by people (including children) with reduced physical,
sensory or mental capabilities, or lack of experience and knowledge, unless they have
been given supervision or instruction concerning use of the device by a person
responsible for their safety.
• Do not disassemble the device. Repair should be made by authorized service provider.
• If there is smoke or burning smell from the device, unplug the power cord immediately
and contact service provider.
• Do not use damaged power plugs and cords.
• Do not touch the power plug with wet hands. This may cause electric shock or fire.
• Unplug the power cord from the wall outlet when the device is not in use.
• Do not place the device or power cord near heat sources such as flammable spray.
• Turn off the power if there is a risk of lightning when used outdoor.
• Keep vinyl packaging wrap of the device and other small parts out of reach of children.
• Do not put any parts into the dishwasher or use scouring powder, benzene thinner, and
chlorine bleach for cleaning. This may cause damage to the parts.
Additional usage instruction
• Recommended operating temperature: room temperature (20 ± 5 ℃ // 68 ± 9 °F)
• Recommended humidity: 40 - 70%
• Do not dispense hot beverage. (higher than 40°C //104°F). It can cause burn injuries
and malfunctioning of the device.
• Do not dispense any liquids other than drinkable beverage.
• Do not dispense any liquids containing solid ingredients such as fruit pulp. This can
cause the blockage of the hose and lead to the malfunctioning of the device.
• Always move the device with both hands. (maximum weight of the device is 17lbs)
Page 4

Contents
Getting started
5 ReverseTap dispenser type / Package contents
6 Device layout
Basic Functions
7 Control panel configuration / Basic functions with button control
8 Indicator icons & text on OLED display
9 How to set the value of each mode
10 SETUP Mode / Size setting Mode
11 FOB Mode
12 Foam Mode / Cleaning Mode
13 Shortcuts to frequently used functions
Advanced Functions
14 Advanced Mode / Unit Mode
15 Security Mode
17 TIME • VOLUME Mode
18 Tracking Mode / LED Mode
19 AUTO • MANUAL mode / FLOW SENSOR Mode
20 Maintenance
21 Troubleshooting
23 Product Specification
24 Warning on use of ReverseTap Cup
Page 5
Getting started
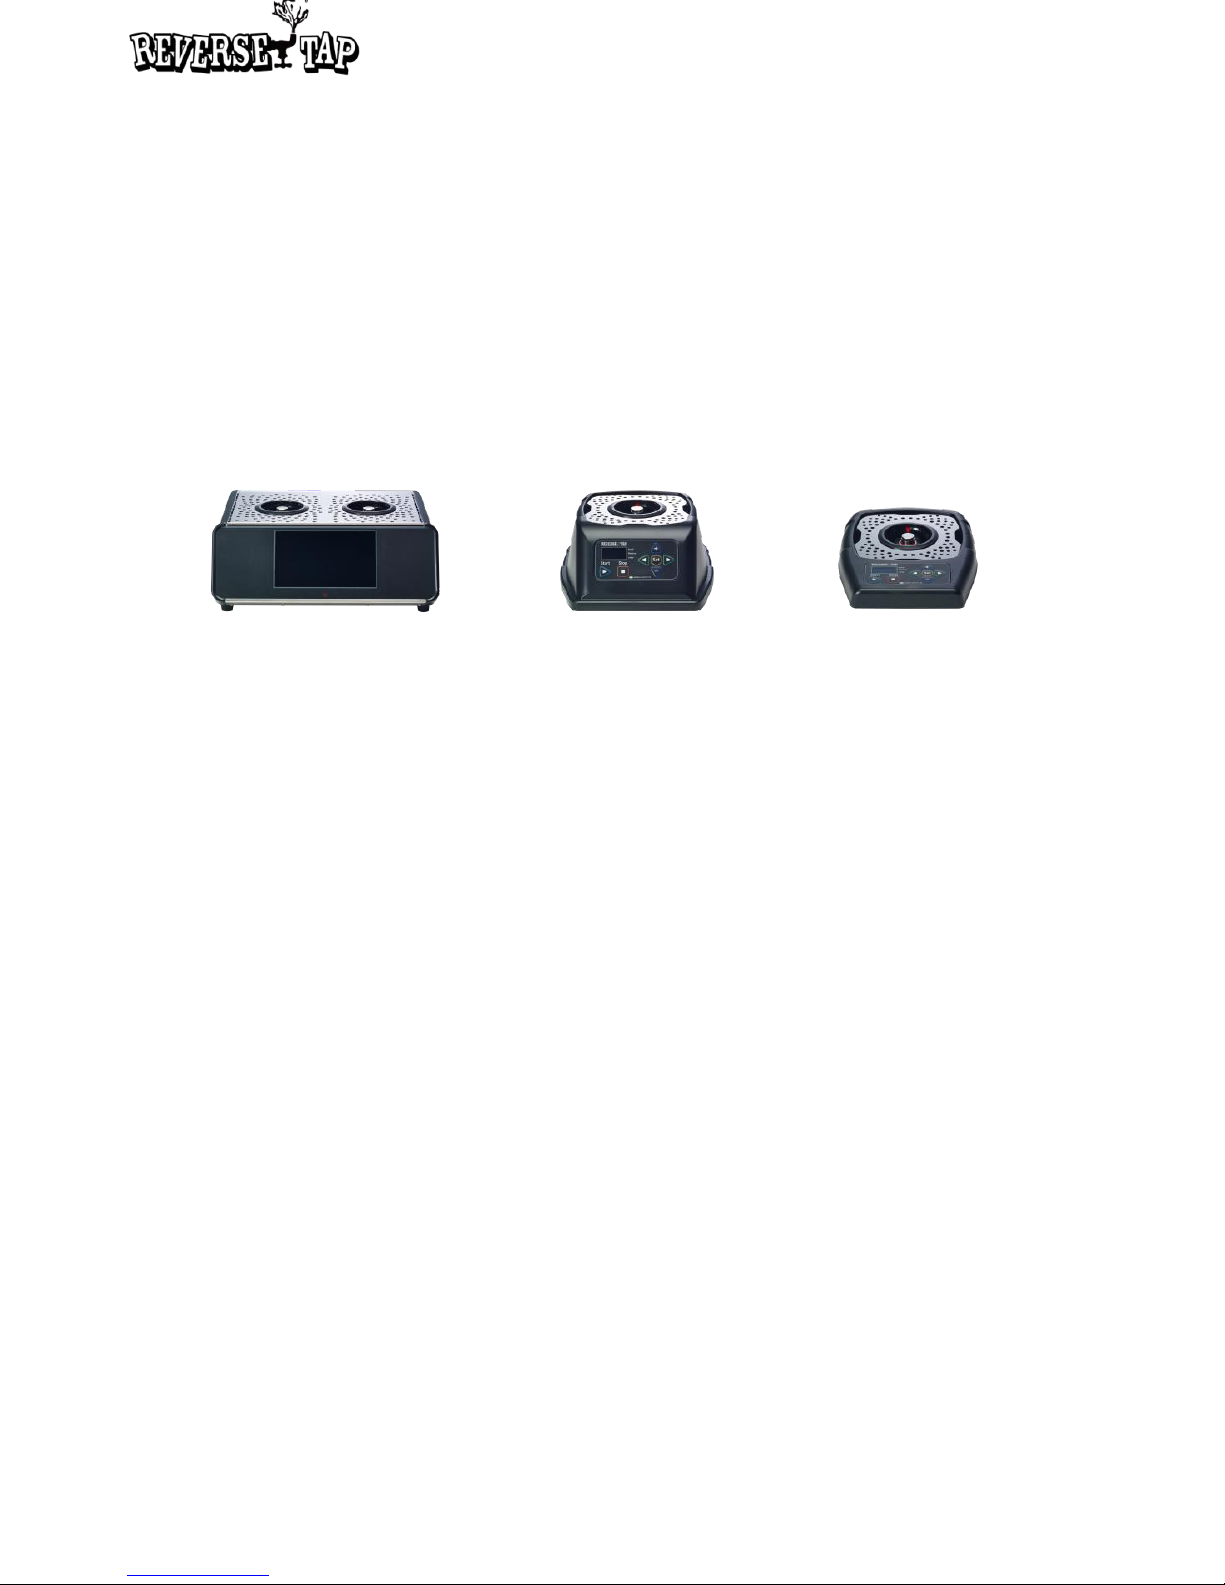
ReverseTap dispenser type
The difference between Twin and Single type is the number of dispensing nozzle and
LCD screen availability. The difference between Single Tall and Single Flat is height. All
other features are exactly same.
Package contents
Check inside of the packaging box for the list of components in a separate print
• Cover, gripper, nozzle are already assembled into the dispenser when shipped in the
packaging box.
• USB memory for LCD monitor is not included.
• Unauthorized accessories might cause damage to the device.
• Appearances and specifications are subject to change without prior notice.
• If accessory is lost or damaged, you can purchase it from the official distributor.
Twin Premium Single Tall Single Flat
5
Page 6
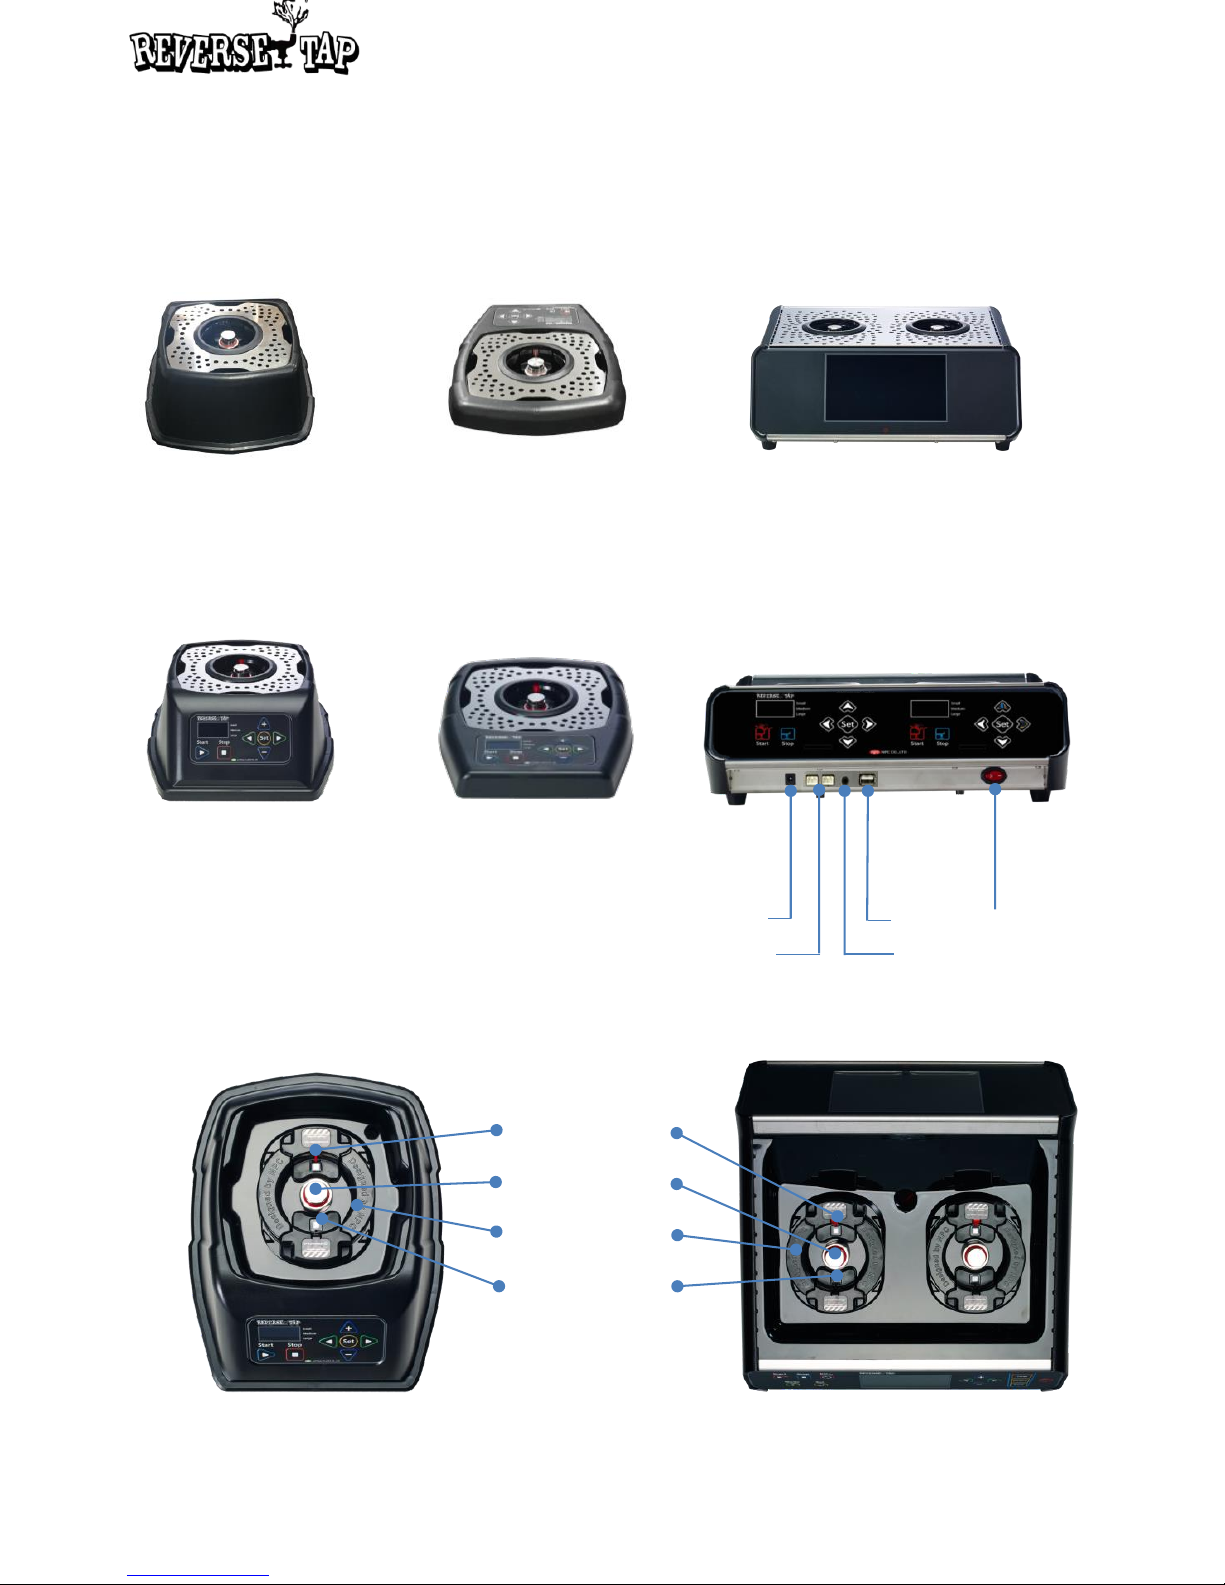
Device Layout
Front view
Back view (Control panel view)
Top view
Cup sensor
Gripper
Nozzle
LED
Single Tall
Single Flat Twin Premium
There is no power switch on Single type dispenser
.
Adapter
USB
Flow sensor
Power Switch
Audio
6
Page 7
Basic Functions
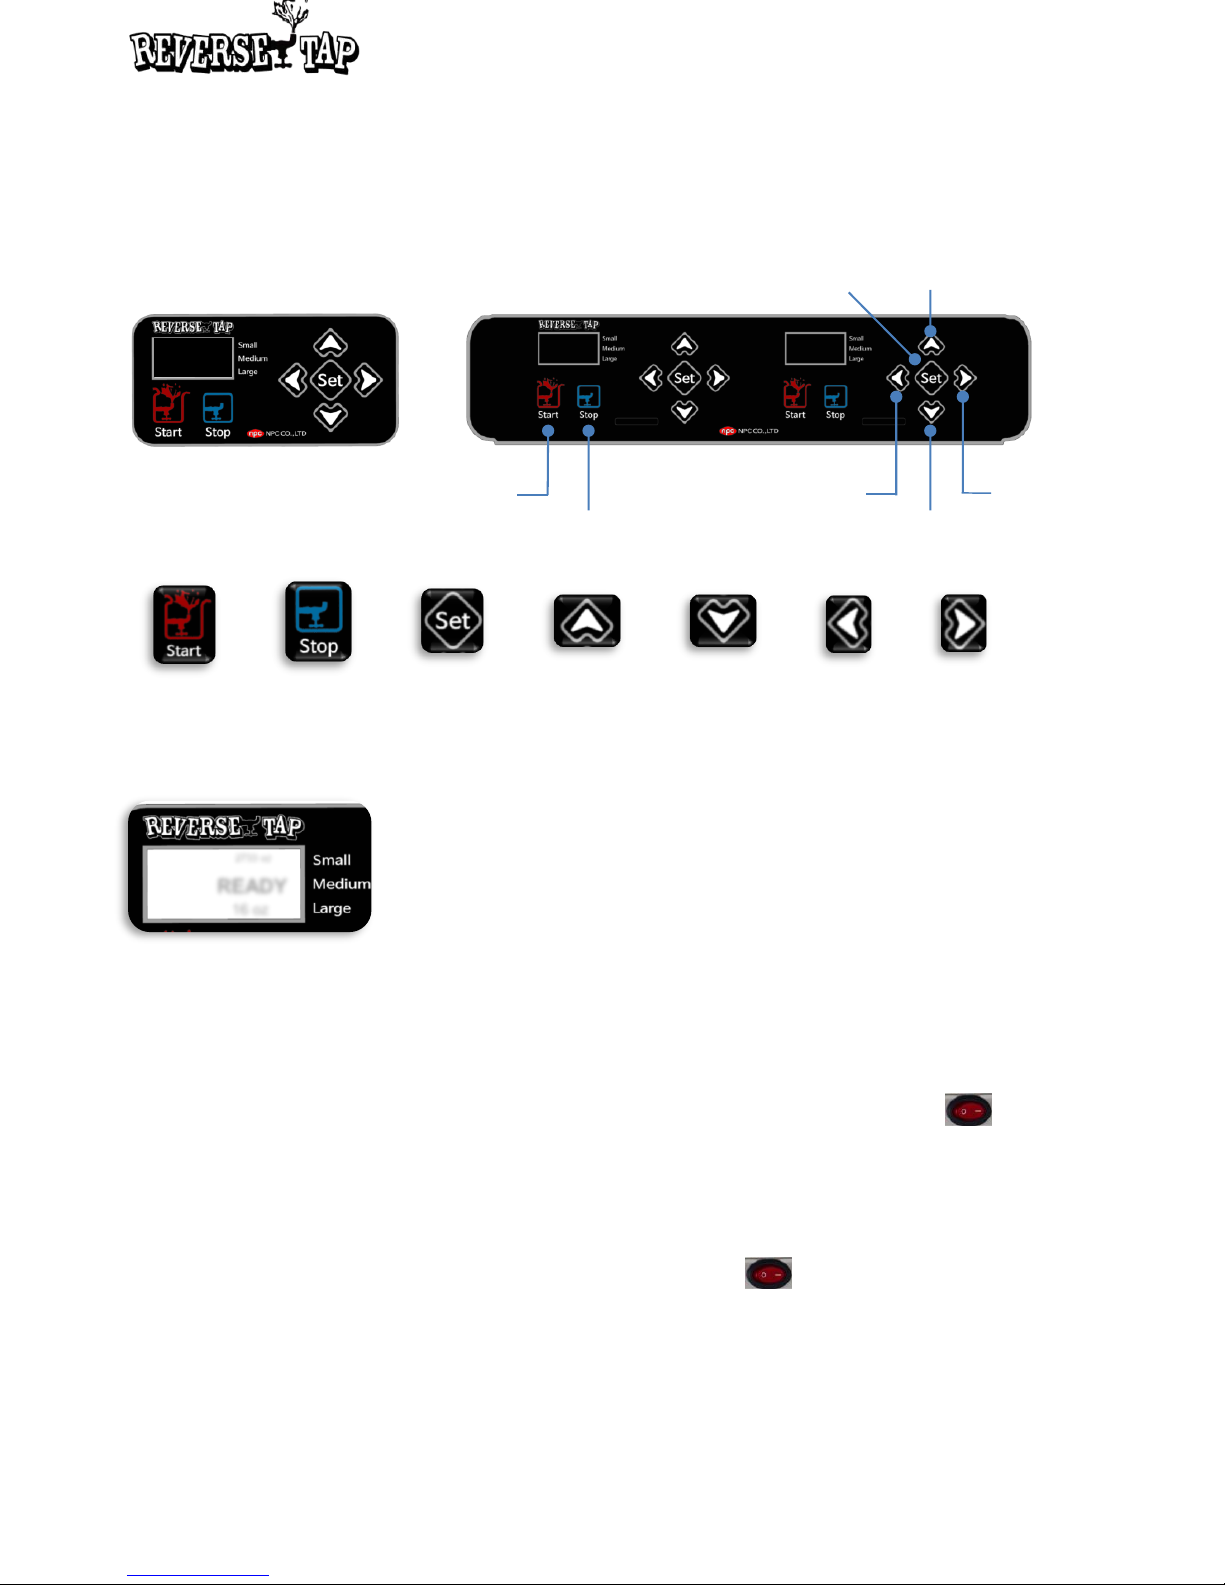
Control panel configuration
General view
Operation button
OLED display
A screen displaying the current operation status, mode selection, and various settings.
Basic functions with button control
Power off
Press and hold the Stop button at Standby status for 2 seconds, then the device will
turn off with a long beep sound.
※ For Twin Premium dispenser, we recommend using the power switch ( ) to turn off.
Stop button cannot turn off the LCD display of Twin Premium model.
Power on
Press and hold the Start button at the power off status for 2 seconds, then the device
will turn on with a long beep sound. (Only for Single model)
※ For Twin Premium dispenser, use the power switch ( ) to turn on. Start button
cannot turn on the Twin Premium model.
Reset
Press and hold both the Right and Left button at the Standby status for two seconds.
Then, if you enter correct password and press and hold set button for two seconds, all
the settings will be restored to the initial factory setting values with a long beep sound.
Reset amount tracking
Press and hold the Down button at the Standby status for 2 seconds, then the
dispensed amount number will be reset to zero.
<Single dispenser> <Twin dispenser>
.
.
FOB on
FOAM on
2733 oz
READY
16 oz
◎
Up button
Down button
Left button Right buttonStart button
Stop button
Set button
Start button Stop button Set button Up button Down button Left button Right button
7
Page 8
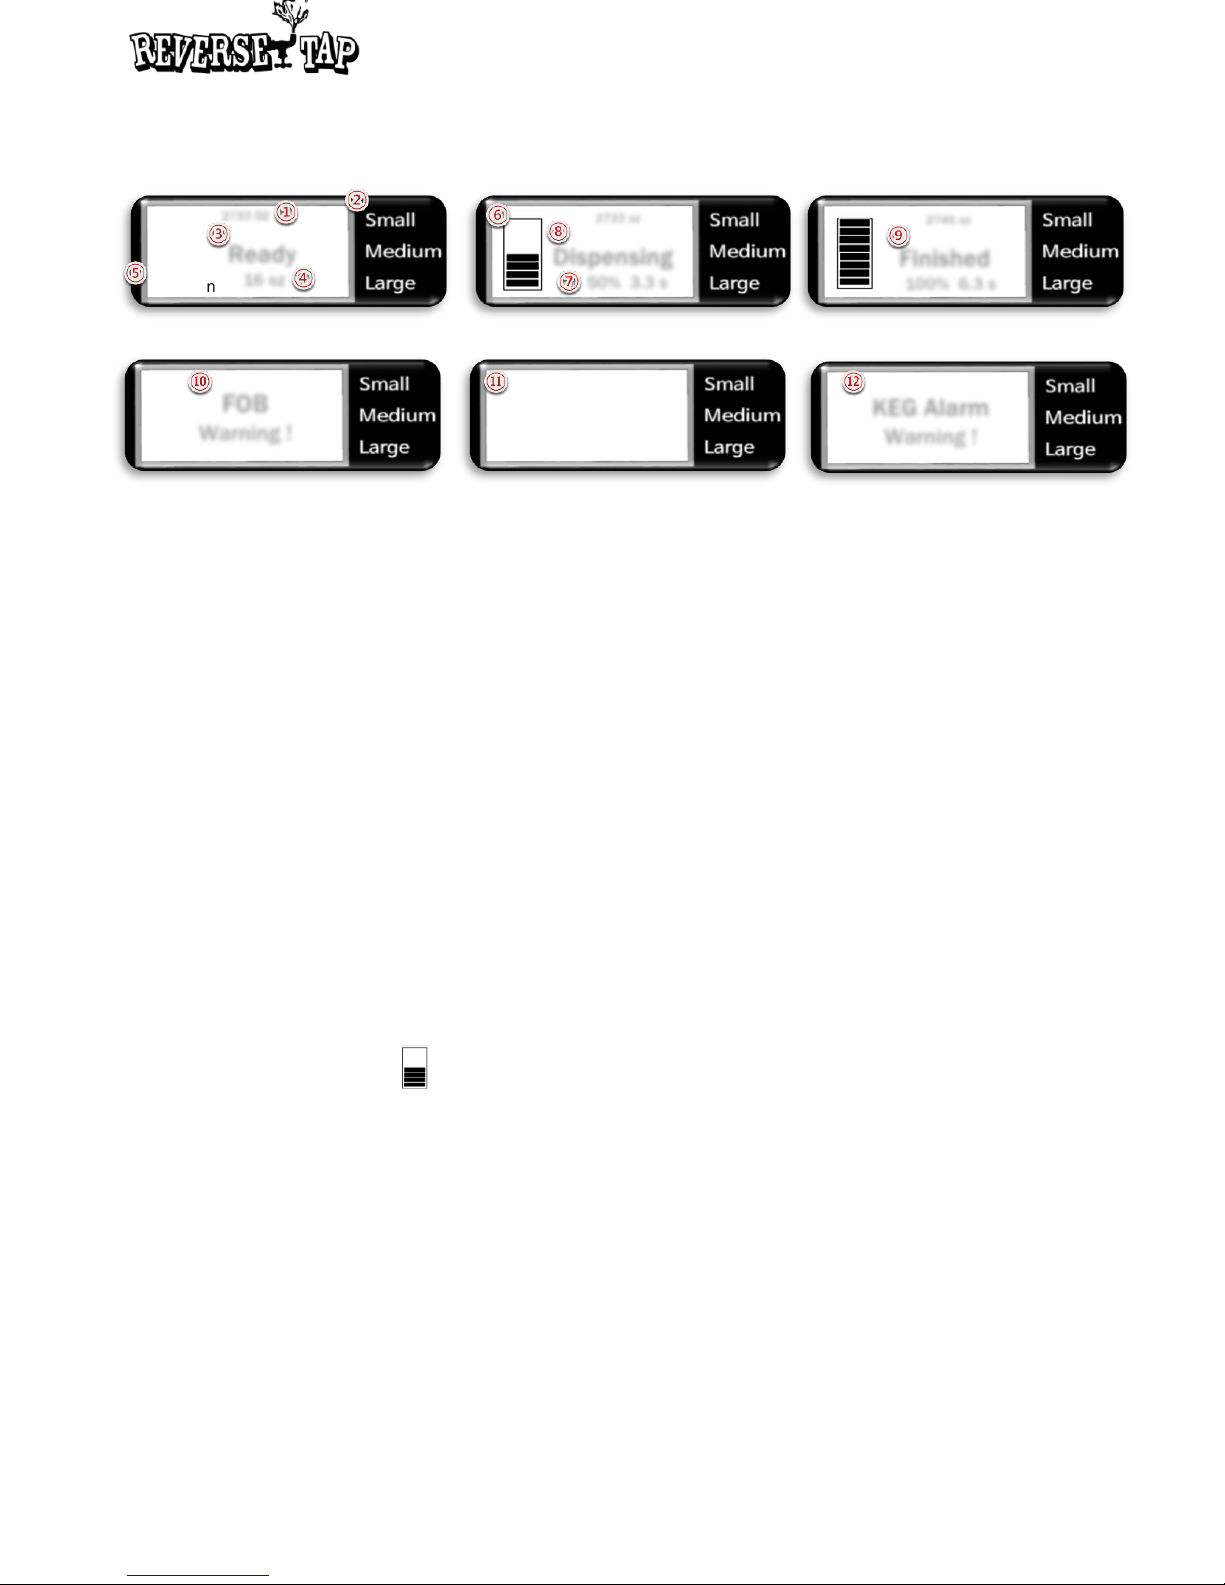
Indicator icons & text on OLED display
① Dispensed amount
This number shows how much beer has been dispensed.
② Default size
You can preset the default size as one of three different sizes, which is Small, Medium,
and Large. The circle signal (◎) indicates current default size. You can shift among
three sizes with Up and Down button at the Standby status. You can also change the
amount of each default size.
③ Ready
This text indicates the Standby status. At this status, you can insert the cup and
dispense beer.
④ Preset amount
This number shows the fixed amount of each preset default size
⑤ FOB, Foam mode
If the FOB or Foam mode is set, it is displayed as On. If deactivated, it is displayed as
Off
⑥ Dispensing status ( )
This signal indicates the amount of dispensed beer and the status that beer is being
dispensed
⑦ Percentage and time
While dispensing, the percentage and elapsed time of each beer cup is displayed
⑧ Dispensing
This text indicates the Dispensing status. It notifies that beer is being dispensed
⑨ Finished
This indicates the Finished status
⑩ FOB Mode
This text indicates the FOB status. If the sensor of the dispenser detects too much foam
in the keg, it will automatically stop dispensing beer to prevent foam explosion. Normally
this mode is activated when the KEG is almost empty
Standby status
Dispensing status
FOB On
Foam On
2733 OZ
Ready
16 oz
◎
2733 oz
Dispensing
50% 3.3 s
KEG Alarm
Warning !
FOB
Warning !
2745 oz
Finished
100% 6.3 s
Finished status
On : Push Start
Off : Push Stop
FOB status
FOB status
Keg Alarm status
8
Page 9
Screenshot of each Basic Mode
1. Setup Mode
2. Size-setting Mode
3. FOB Mode
4. Foam Mode
5. Cleaning Mode
How to change the Mode Setting
• At the Stand-by status, long press the Set button enter the Mode Setting status.
• Press the Set button in each mode to shift through changeable values as they blink.
Once you shift through all sections, the blinking will stop.
• You may change values for each blinking section by pressing Up and Down button.
• Press Left and Right button to shift to the next mode.
• Once all changes are complete, long press the Set button to save the changes and
return to the Standby status
⑪ FOB status
Once FOB mode is activated, after the warning signal, the display will show options
between Start and Stop.
⑫ KEG Alarm Mode
This text notifies that KEG Alarm mode is activated. Users can set the Alarm mode to
check how much beer is left in the keg.
Foam
Number of foam
making : 3
FOB
Detector : On
Flow Rate x 1.30
Cleaning
Stop
SETUP
Push Start
Small
362.5 mL
1. Setup Mode
2. Size-setting Mode
4. Foam Mode
5. Cleaning Mode
3. FOB Mode
9
Page 10
SETUP Mode
When users install ReverseTap dispenser for the first time, this mode must be executed.
By executing this mode, the dispenser can measure and memorize the flow rate of the
beer during dispensing. Memorizing the flow rate is important because it will enable FOB
mode to work properly. This mode should be executed every time when there is a change
of system environment such as change of cooling machine, change of CO2 pressure rate,
and change of beer brand.
• Once entered into this mode, plug the cup into the dispenser
• Double press the Start button to start dispensing the beer
• Press Stop button to finish the discharge of beer when it reaches any desired amount.
• Long press the Set button, and then the discharged amount will be automatically set as
the preset size of Medium.
• If you want to change the amount of each preset size, you can change it in Size-setting
Mode
• Pressing any other button will take you back to the initial screen of Sync Mode without
saving.
SETUP
Push Start
Size-setting Mode
In this mode, users can change and set the discharge amount of each preset size
(Small/Medium/Large)
• Once entered into this mode, you can press Up and Down button to select any of the
three preset sizes (Small/Medium/Large)
• Once you chose any preset size, you can press Set button. Then the numbers below
will start blinking. Now you can change the numbers to set the discharge amount of
preset size using Up and Down button.
Small
12.2 oz
10
Page 11
FOB Mode
FOB (Foam On Beer) refers to foam explosion. When the KEG is almost empty, only beer
foam is left in the KEG, and this foam will explosively come out of the dispenser. If users
activate FOB mode, this beer foam explosion can be prevented.
• On/Off : You can press Up and Down button to set the Mode
• Flow rate coefficient : You can change the value using Up and Down button
(Default value : 1.30)
• Meaning of Flow rate x 1.30 : FOB Mode will be activated when the speed of beer flow
becomes faster than 1.3 times of normal Flow rate
(Normal Flow rate is detected and memorized when Sync Mode is activated)
(Beer flow becomes faster when beer is dispensed together with foam)
• When the FOB Mode is activated, the below display will show up and stop dispensing
• Step-by-step procedure to replace with the new KEG
1) Check the KEG whether it is empty or not (Shake the KEG)
2) If it is empty, you need to change the KEG with the new one
3) Press Stop button to turn off FOB mode
4) Close the middle valve of CO2 tank and replace the KEG with the new one
5) If you dispense a few cups of beer with the new KEG, those beer foam remaining in
the cooler and the tube will come out. 2-3 cups will be enough to remove all the
remaining foam
6) Once the foam is cleared, go to Mode Setting and turn on the FOB mode again
• If FOB Mode is activated even when the KEG is not empty, follow the below steps
1) Execute the Sync Mode to reset the flow rate of the dispenser
2) If FOB Mode is activated again even though the beer is not empty after Sync Mode
execution, change the flow rate coefficient number higher than 1.30 (ex. 1.40)
FOB
Detector : On
Flow rate x 1.30
FOB
Warning!
On : Push Start
Off : Push Stop
11
Page 12
Foam Mode
In this mode, users can create the beer foam and change the amount of it by controlling the
number of foam making action
• Press Up and Down button to select number of foam making from 0 to 5.
(ex. 0 means no foam making action. 1 means one time foam making action)
Cleaning Mode
In this mode, users can clean the dispenser valve and beer tubes by executing cleaning
function. Daily cleaning is recommended
• To execute Cleaning Mode, the below procedure must be done
1) Change the nozzle of the dispenser to the cleaning nozzle
(Cleaning nozzle is included in the dispenser package. If lost, contact the distributor)
2) Connect the tube with the nozzle and place the end of the tube into the drain basket
3) Lock the middle valve of CO2 tank and change the beer KEG to the cleaning KEG
(Cleaning KEG and cleaning chemicals can be purchased from the market)
4) Open the middle valve of CO2 tank and press Start button twice
5) The valve will open and cleaning function will start. (Text on the display will change to
Now Cleaning)
6) After draining all the water from the cleaning KEG, stop the Cleaning Mode
7) To stop cleaning, press Stop button. Then, the valve will close and text of the display
will change back to Cleaning Push Start
• After finishing Cleaning Mode, you can disconnect the cleaning KEG and replace with
the beer KEG
Foam
Number of
foam making : 3
Cleaning
Push Start
Now Cleaning
12
Page 13
• Cleaning Mode
• Foam Mode
• Size setting Mode
• FOB Mode
FOB on
FOAM on
1650 oz
READY
16 oz
◎
Standby Status
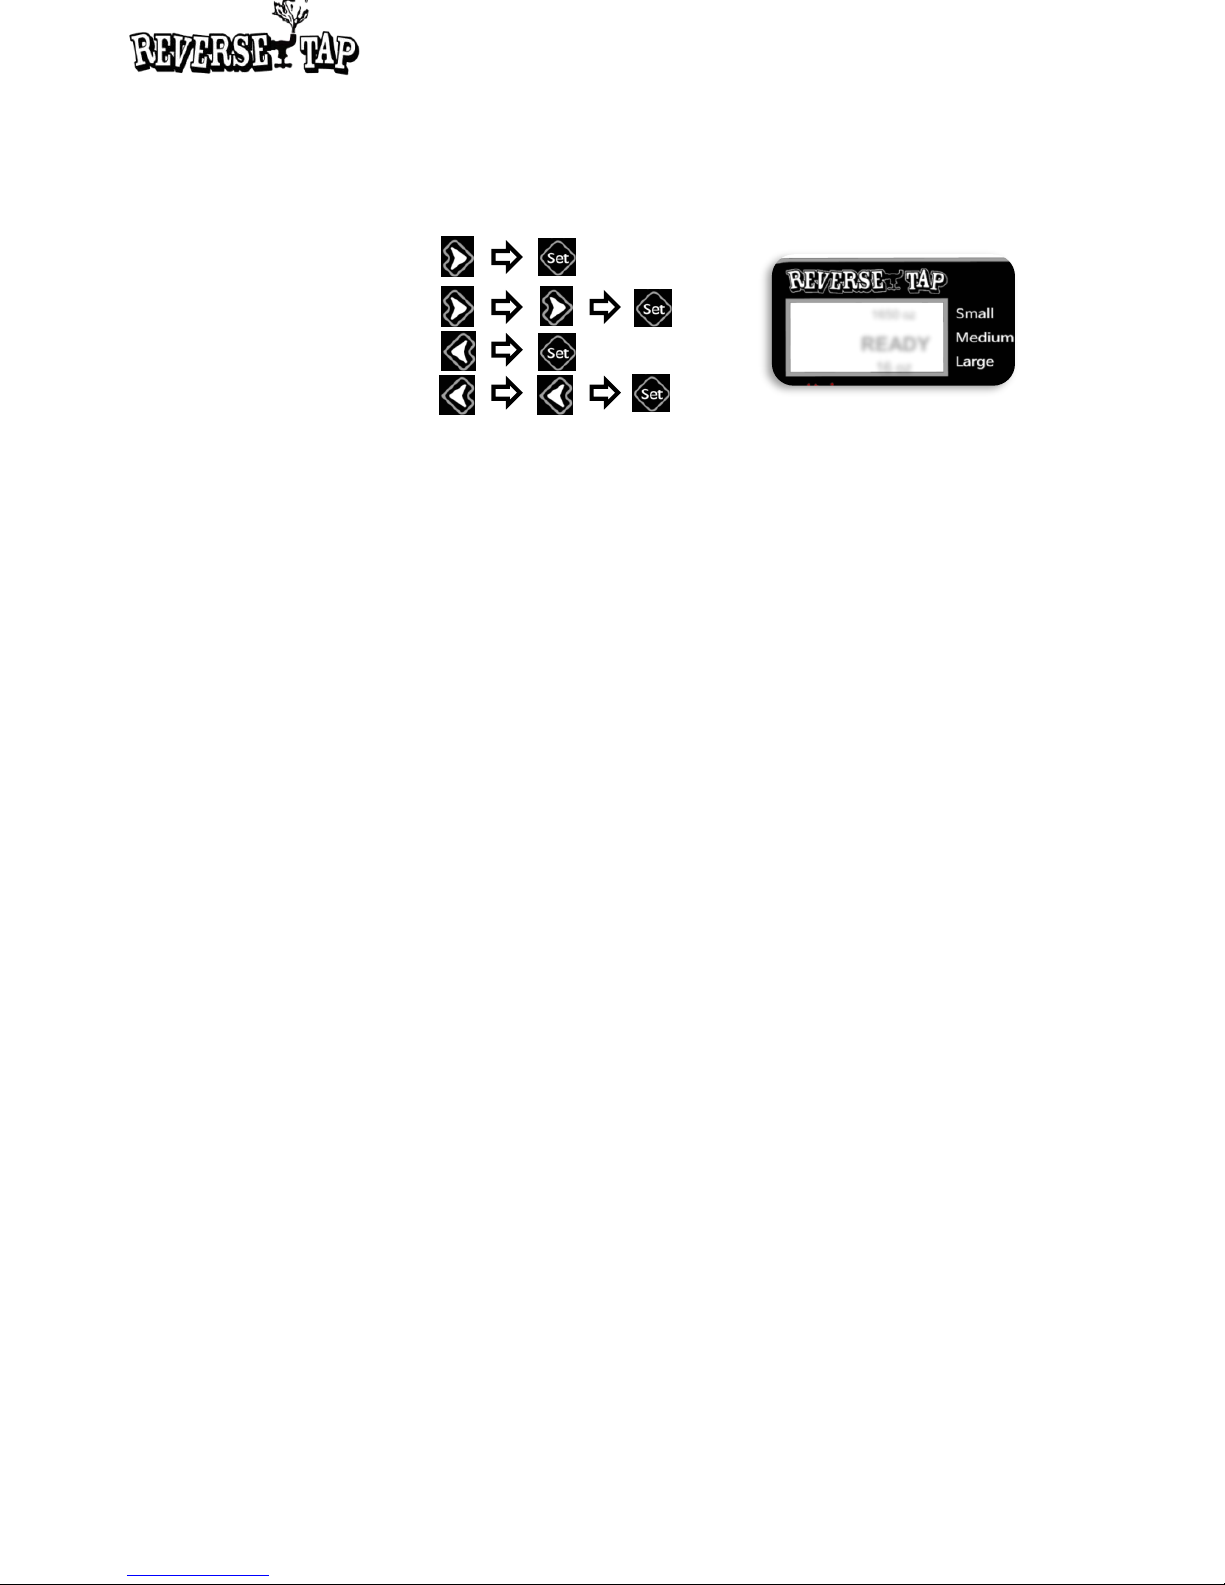
Shortcuts to frequently used functions
Please use at standby status
13
Page 14
Advanced Functions
Advanced Mode
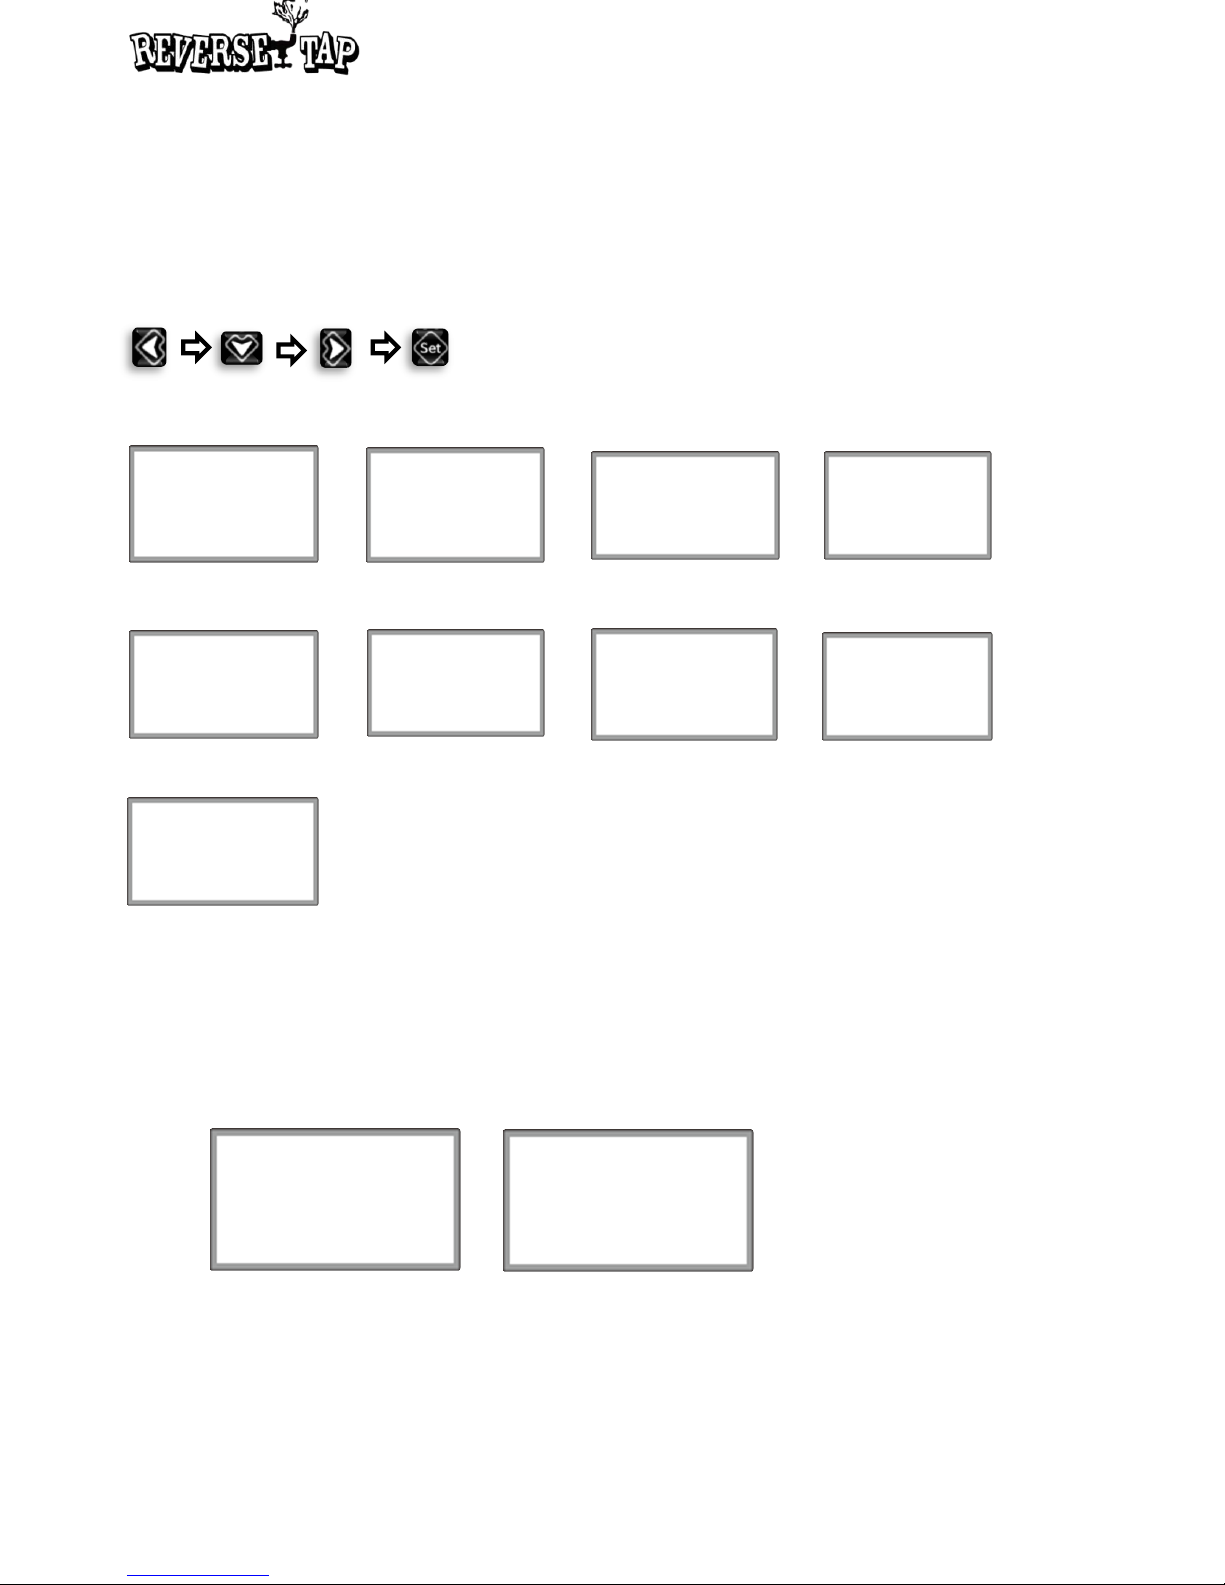
How to enter into the Advanced Modes: Press the buttons as below sequence
Screenshot of each Advanced Mode
Track A : 123mL
Track B : 345mL
1.Version : 0.9.0
2. Made by NPC
3. Last Update :
FEB 17 2016
www.reversetap.com
LED Mode
State : Dispensed
Mode : 2.Green
4. Tracking Mode
5. LED Mode
9. Information
3. Volume/Time Mode
8. Mode to change
calibration coefficient
of flow sensor
6. Auto/Manual Mode
7. KEG Alarm Mode
Flow Sensor
Coefficient : 1.15
Volume
Time
Auto
Manual
KEG Alarm
Alarm : OFF
Flow rate : 62.5 mL/s
Volume : 18000 mL
Unit
oz / ml
1. Unit Mode
Security Mode
Setting Lock : ON
Dispensing Lock : ON
Password : ****
2. Security Mode
Unit Mode
• In unit select mode, users select a unit that they will use.
• ReverseTap provides oz and ml.
UNITS
oz
UNITS
ml
• If the unit flickers after pushing Set button, select a preferable unit by pushing
Up/Down button.
14
Page 15
15
Security Mode
Security Mode
Setting Lock : OFF
Dispensing Lock : OFF
Password : ****
• Setting Lock : A function to lock the settings (Foam control, LED colors, etc.)
• Dispensing Lock : A function to lock the valve from dispensing even if a cup is inserted.
How to use Security Mode
• Turn “ON” Setting Lock or Dispensing Lock.
• Input 4-digit password. (Default password: 1234)
- Long pressing the Set button without setting any password will automatically set as
default password. Thus, you may set password only if you prefer.
• To save, long press the SET button. This will switch back to the Standby status.
How to change the settings ( while Setting Lock is ON )
• In Standby status, long press the Set button. It will ask for a password with a screen
“Settings are locked.”
• Input the correct password to enter the settings mode.
- This does not change the password. This is only for entering the settings mode.
- Setting Lock is continuously ON after entering password.
To turn this OFF, enter the Security Mode.
- If wrong password is entered, the screen will show “Incorrect password!” and return to
Standby status(Ready screen).
※ To enter the Advanced settings, you may proceed as the same process above.
Settings are locked
Password : *2**
Page 16
16
How to dispense beer ( while Dispensing Lock is ON )
• When a cup is inserted on Standby status (Ready screen), ‘Remove the cup’ will appear
on screen.
- This will continue until the cup is removed.
• After the cup is removed, it will ask for a password with ‘Dispensing is locked’ screen.
• After entering the correct password with a long press of the Set button, Dispensing Lock
will be unlocked to enable dispensing.
- If a wrong password is entered, “Incorrect password!” will appear on screen and return
to the Standby status(Ready screen).
Shortcuts for Security Mode
• Shortcut for Setting Lock : OFF → ON
- Long press the Left button on Standby status(Ready screen) to turn ON the Setting
Lock.
• Shortcut for Setting Lock : ON → OFF
- Long press the Left button on Standby status(Ready screen) and input a correct
password to turn OFF the Setting Lock.
• Shortcut for Dispensing Lock : OFF → ON
- Long press the Right button on Standby status(Ready screen) to turn ON the
Dispensing Lock.
• Shortcut for Dispensing Lock : ON → OFF
- Long press the Right button on Standby status(Ready screen) and input a correct
password to turn OFF the Dispensing Lock.
Remove the cup
Dispensing is locked
Dispensing is locked
Password : ****
Page 17
1. TIME Mode * Used when a flow sensor is lost or malfunctioning.
• Controls the dispensing amount with the duration of valve-opening time.
2. VOLUME Mode (Default)
• Controls the dispensing amount with the set volume measured by a flow sensor.
TIME / VOLUME Mode
• TIME / VOLUME : Press Up and Down button to select one of the options.
SMALL
5.8 s
11.5 oz
Size-setting Mode in
TIME Mode
How to change the PRESET size in TIME Mode
SMALL
11.5 oz
Size-setting Mode in
VOLUME Mode
TIME
VOLUME
• Small / Medium / Large : Press Up and Down button to select a size.
• s (seconds) : Press Up and Down button to input dispensing time for each size.
- In TIME Mode, press Up and Down button to adjust dispensing time by 0.1.
- Estimated volume is shown below dispensing time.
Estimate volume rate : 62.5 mL / sec.
- This rate is adjustable by adjusting Flow rate value (Keg Alarm Mode).
17
Page 18
FOB on
FOAM on
1650 oz
READY
16 oz
◎
Standby status
Tracking mode
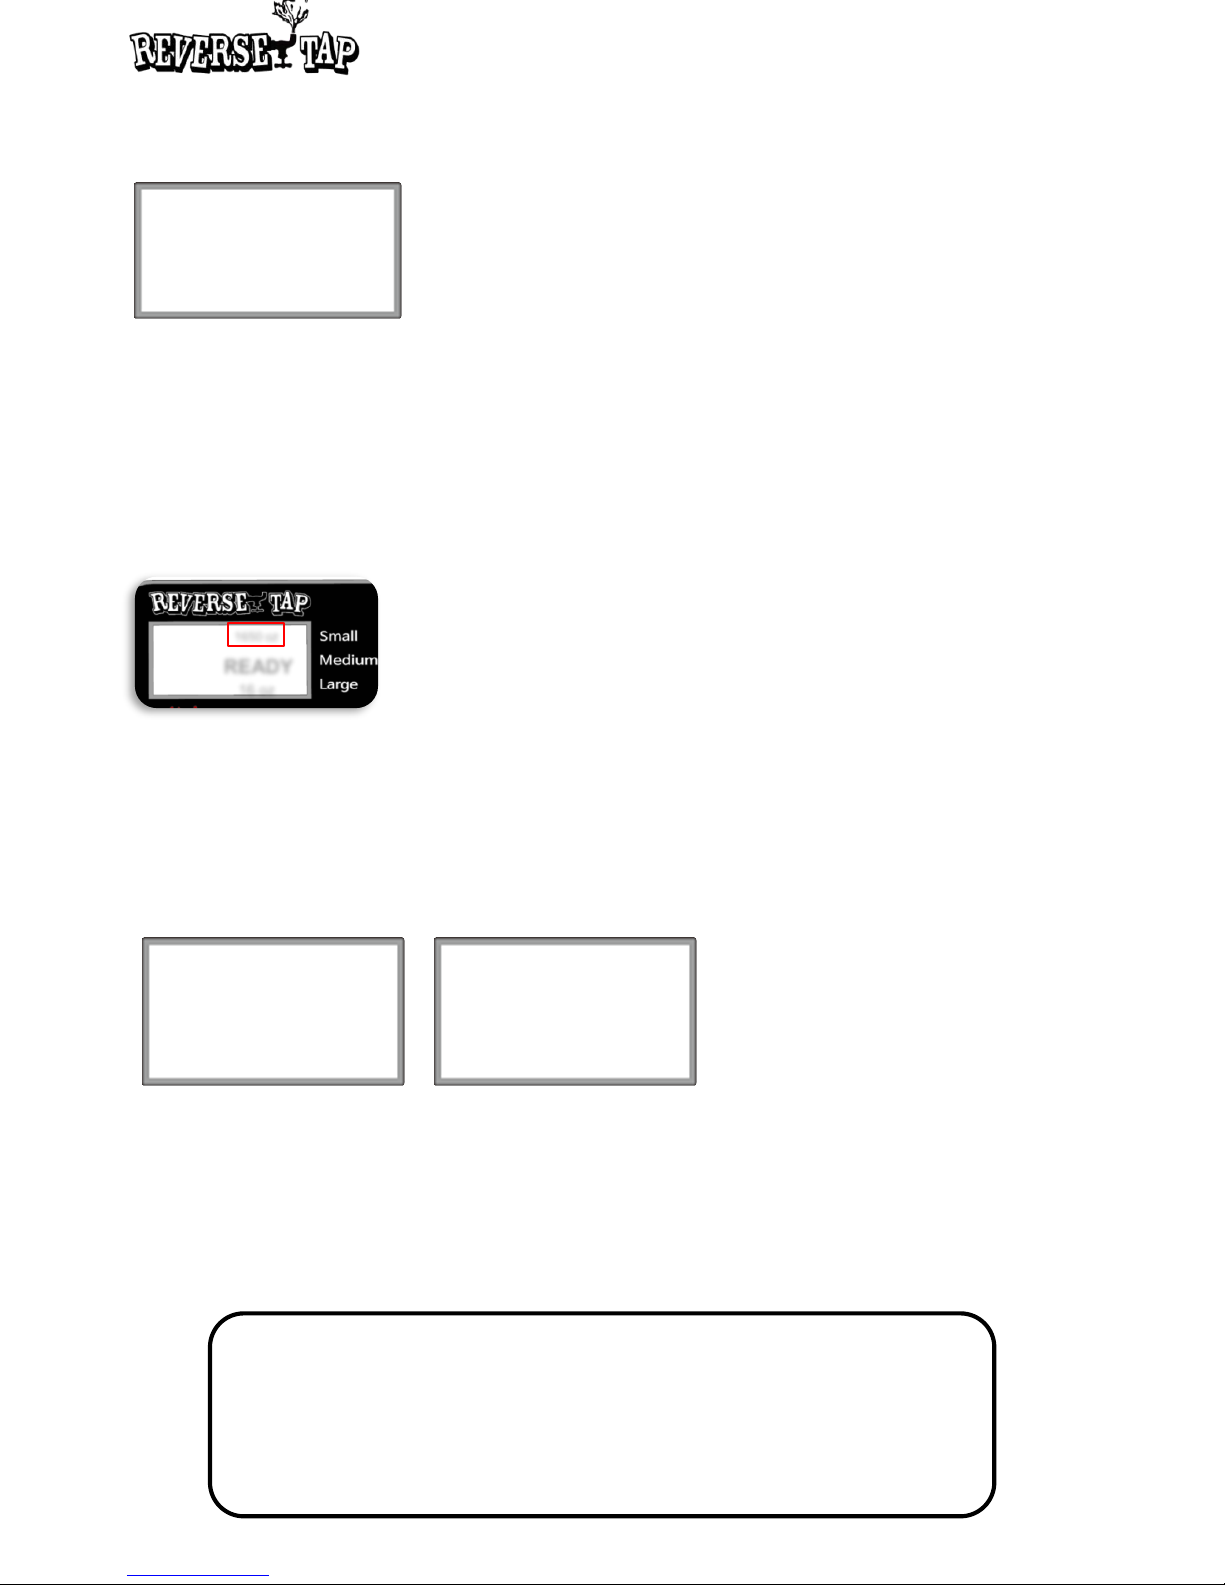
• A function of showing the total amount of dispensed beer.
• Each of Dispensed A and B can be reset.
• While one of Dispensed A and B is blinking, long press the Down button to reset with a
long beep.
• The total amount of Dispensed A shows at top of the Standby screen.
Total amount A
Total amount B
Dispensed A 1650 oz
Dispensed B 250 oz
* Long press the Down button to reset the total amount
(Dispensed A) on Standby screen.
LED Mode
A function of changing LED lights of before/during/after dispensing.
LED is lit only when a cup is inserted in ReverseTap.
• State : Press Up and Down button to select before, during, or the after (dispensing).
- Before : Set LED lighting after a cup is inserted and before dispensing.
- Dispensing : Set LED lighting during dispensing.
- Dispensed : Set LED lighting after dispensing is complete. The lighting will continue
until the cup is removed.
• Mode : Press Up and Down button to select the desired color.
LED Mode
State : Dispensing
Mode : 0.Rainbow
LED Mode
State : Dispensed
Mode : 12.Circle
Mode 0 : Rainbow LED
Mode 1 : Red Color LED
Mode 2 : Green Color LED
Mode 3 : Blue LED
Mode 4 : White LED
Mode 5 : Blink LED
Mode 6 : Yellow Color LED
Mode 7 : Purple Color LED
Mode 8 : Light Green Color LED
Mode 9 : Light blue Color LED
Mode 10 : Light purple Color LED
Mode 11 : Light yellow LED
Mode 12 : Circle LED
Mode 13 : LED OFF
18
Page 19
1. AUTO Mode (Default)
• Dispense the Preset amount (Small / Medium / Large) 0.5 seconds after the cup
detection and stops automatically.
2. MANUAL Mode
• On Manual Mode, no LED light will be lit even if a cup is inserted.
• Double press the START button to start dispensing. It will automatically stop when the
Preset amount(Small / Medium / Large ) is dispensed like the AUTO Mode.
AUTO / MANUAL Mode
• AUTO / MANUAL : Press Up and Down button to select AUTO or MANUAL.
AUTO
MANUAL
FLOW SENSOR Mode
A function to enclose the gap between the Preset volume and the actual dispensed
volume.
• Coefficient : Press Up and Down button to adjust the value. (Default : 1.15)
- If the actual volume is more than the Preset volume : Lower the coefficient.
- If the actual volume is less than the Preset volume : Raise the coefficient.
※ It is recommended to adjust from the second digit after the decimal.
• Flow rate : This shows the flow rate measured in Preset Mode. (Default : 62.5mL/s)
.
FLOW SENSOR
Coefficient : 1.15
19
Page 20

Maintenance
Cleaning of Beer Line
Notes
Warning
• Do not shoot water directly, or use benzene, thinner, chlorine bleach, alcohol, acetone, etc. for
cleaning. This may result in electric shock or fire.
• Keep control panel part of the product away from water. They are not waterproof.
• Do not use rough surface tools such as brush, pad, rough cloth and etc. when cleaning
ReverseTap.
• Disconnect ReverseTap power before cleaning. Not doing so may result in electric shock or fire.
※ For more cleaning information, please visit YouTube channel of ReverseTap,
www.youtube.com/reversetap
• Fill the cleaning keg with clean water and connect it to a coupler.
• Open CO
2
gas valve
• Switch to a cleaning nozzle and connect it to a hose to discharge to a drain or a bucket.
• Continue draining until you see clean water.
• Close CO
2
gas valve and discharge the remaining CO2gas.
• Immerse the coupler into a clean water after separating it.
※ Circulate clean water through entire beer line to clean them on daily-basis. Also, replace the
lines with new beer line regularly.
• For a long time no use, remove all beverage from the line by rinsing with clean water and
then dry.
(Proceed as the Cleaning of Beer Line, but continue discharging until CO2gas comes out.)
Cleaning of Dispenser Components
• Remove the grill plate by lifting with both hands.
• Grab the center of the ‘gripper’ and pull it diagonally.
• Twist the ‘nozzle’ counterclockwise to remove.
• Wash the disassembled parts with warm water and neutral detergent
20
Page 21
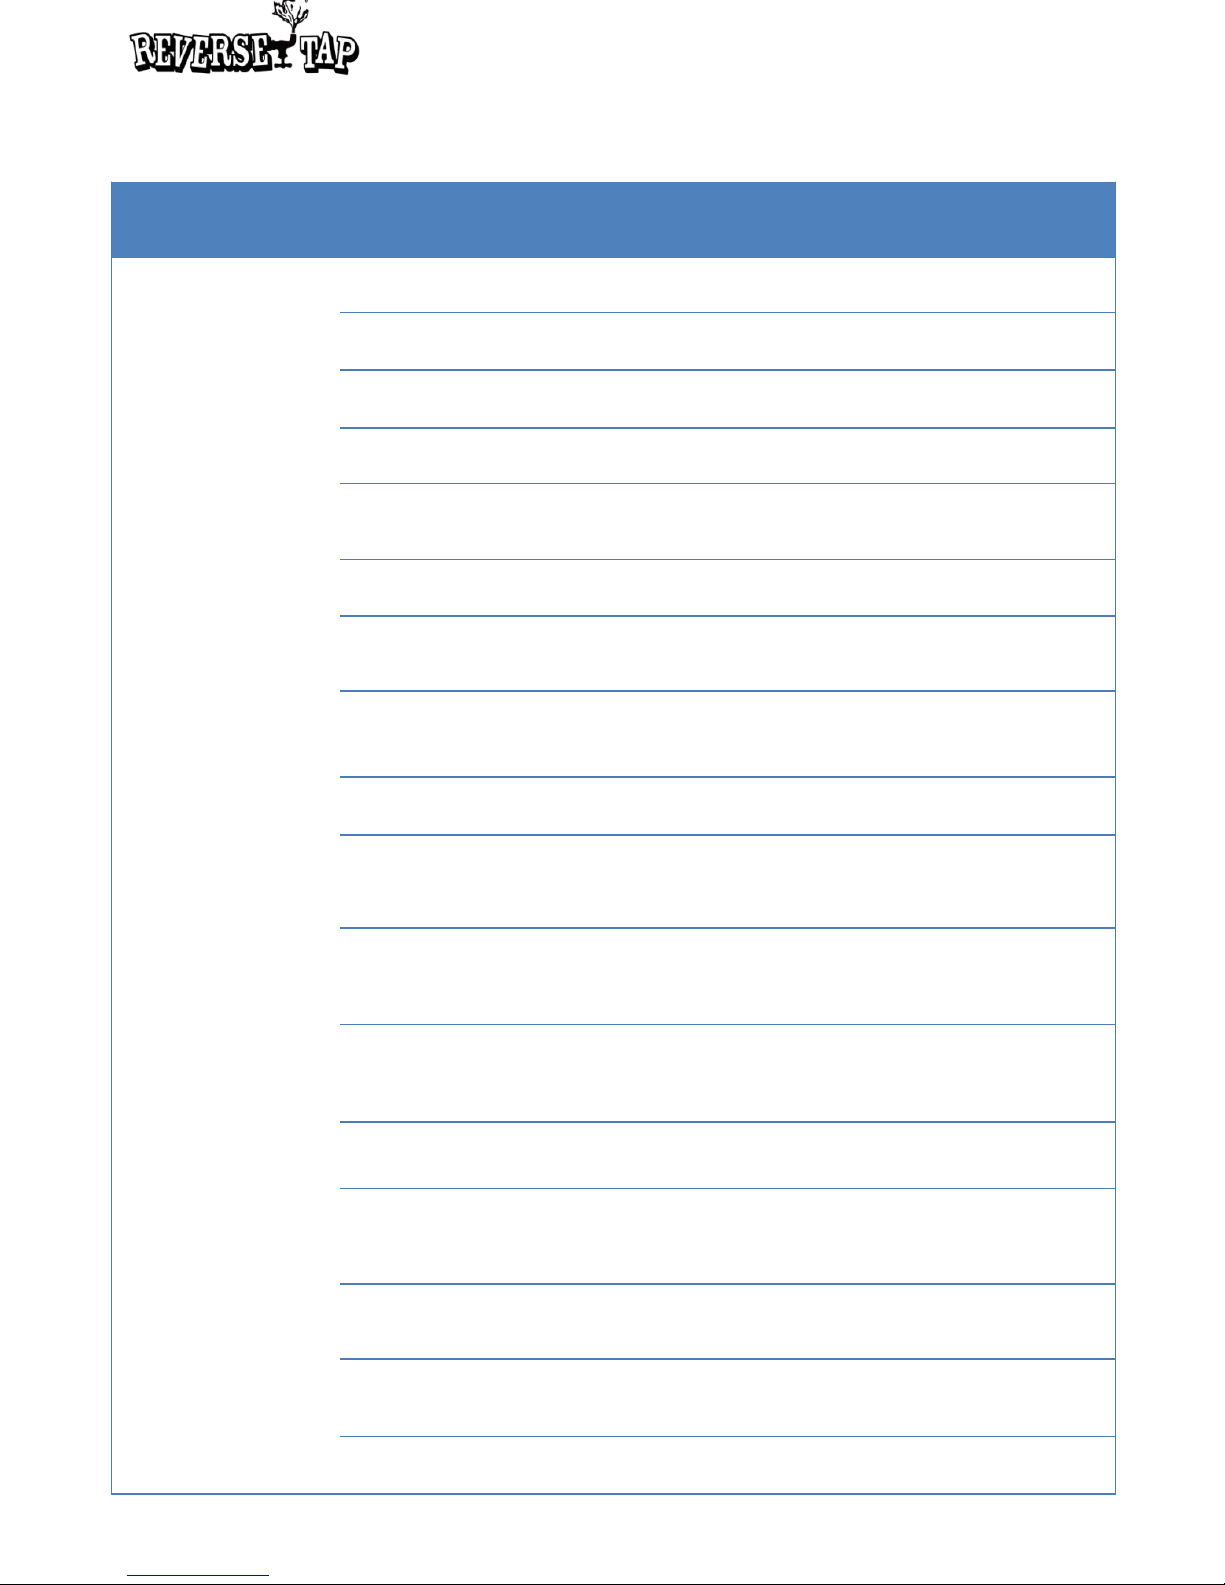
Problem Diagnose Solution
No beer dispensing?
Is not adapter unplugged? Plug power cord to adapter.
Is not the keg empty? Switch to new keg.
Is
not keg coupler connected properly
?
Connect keg coupler to the keg.
Is not CO2gas valve closed? Open CO2gas valve.
Is beer not
dispensed when you press
cup-detecting sensor?
Contact the CSC for service.
Is not ReverseTap power turned on? Turn on the ReverseTap power.
Is the inside of the chiller frozen
too much?
Contact the chiller manufacturer for service.
Are not the beverage lines bent too
much?
Straighten up the beverage lines.
Contact CSC if the lines are
not fairly straighten
up.
Too much foam?
Is not chiller power turned on?
Turn on the chiller.
Is there enough water inside the chiller?
Supply enough water to the chiller until the
water comes out from the chiller’s Overflow gate.
Is the chiller operated for
fair amount of time?
You must fill the chiller with water and operate
24 hours prior to beer dispensing for regular
beer discharge.
If using kegerators,
are the kegs cooled enough?
It varies by the beer type, but you must cool the
keg down to around 4°C for at least 24 hours
before use.
Is not the inside of the chiller frozen
too much?
Contact the chiller manufacturer for service.
Has not it been quite a while since you
first opened and used the keg?
Old kegs which are opened for a long time do
cause a lot of foam. Please switch to a new keg.
( Recommended
keg use after opening : 3 days
)
Have you leav
ed CO
2
valve opened and
connected with keg for a long time?
Too much CO2injection in a keg causes
a lot of
foam. Please switch to a new keg.
Is the CO2gas pressure within the
average range?
Adjust the pressure to an appropriate range.
( 250 ~ 300 kPa )
Is not CO2gas depleted? Contact the CO2gas supplier.
Troubleshooting
21
Page 22
After service may be paid even during warranty period on the following conditions:
• If reinstalling due to moving of the product or the place.
• If the product is damaged or failed due to external impact or dropping.
• If the product is malfunctioning due to use of any products that are not specified by the
Company.
• If the repair or customizing is done by the customer individually.
• If the product is used with inappropriate electric power.
• If the customer did not follow the caution provided in the manual.
• If the product is failed or damaged due to natural disaster ( lightning, fire, earthquake, storm
and flood damage, etc )
• If the end-life of the consumable parts ended.
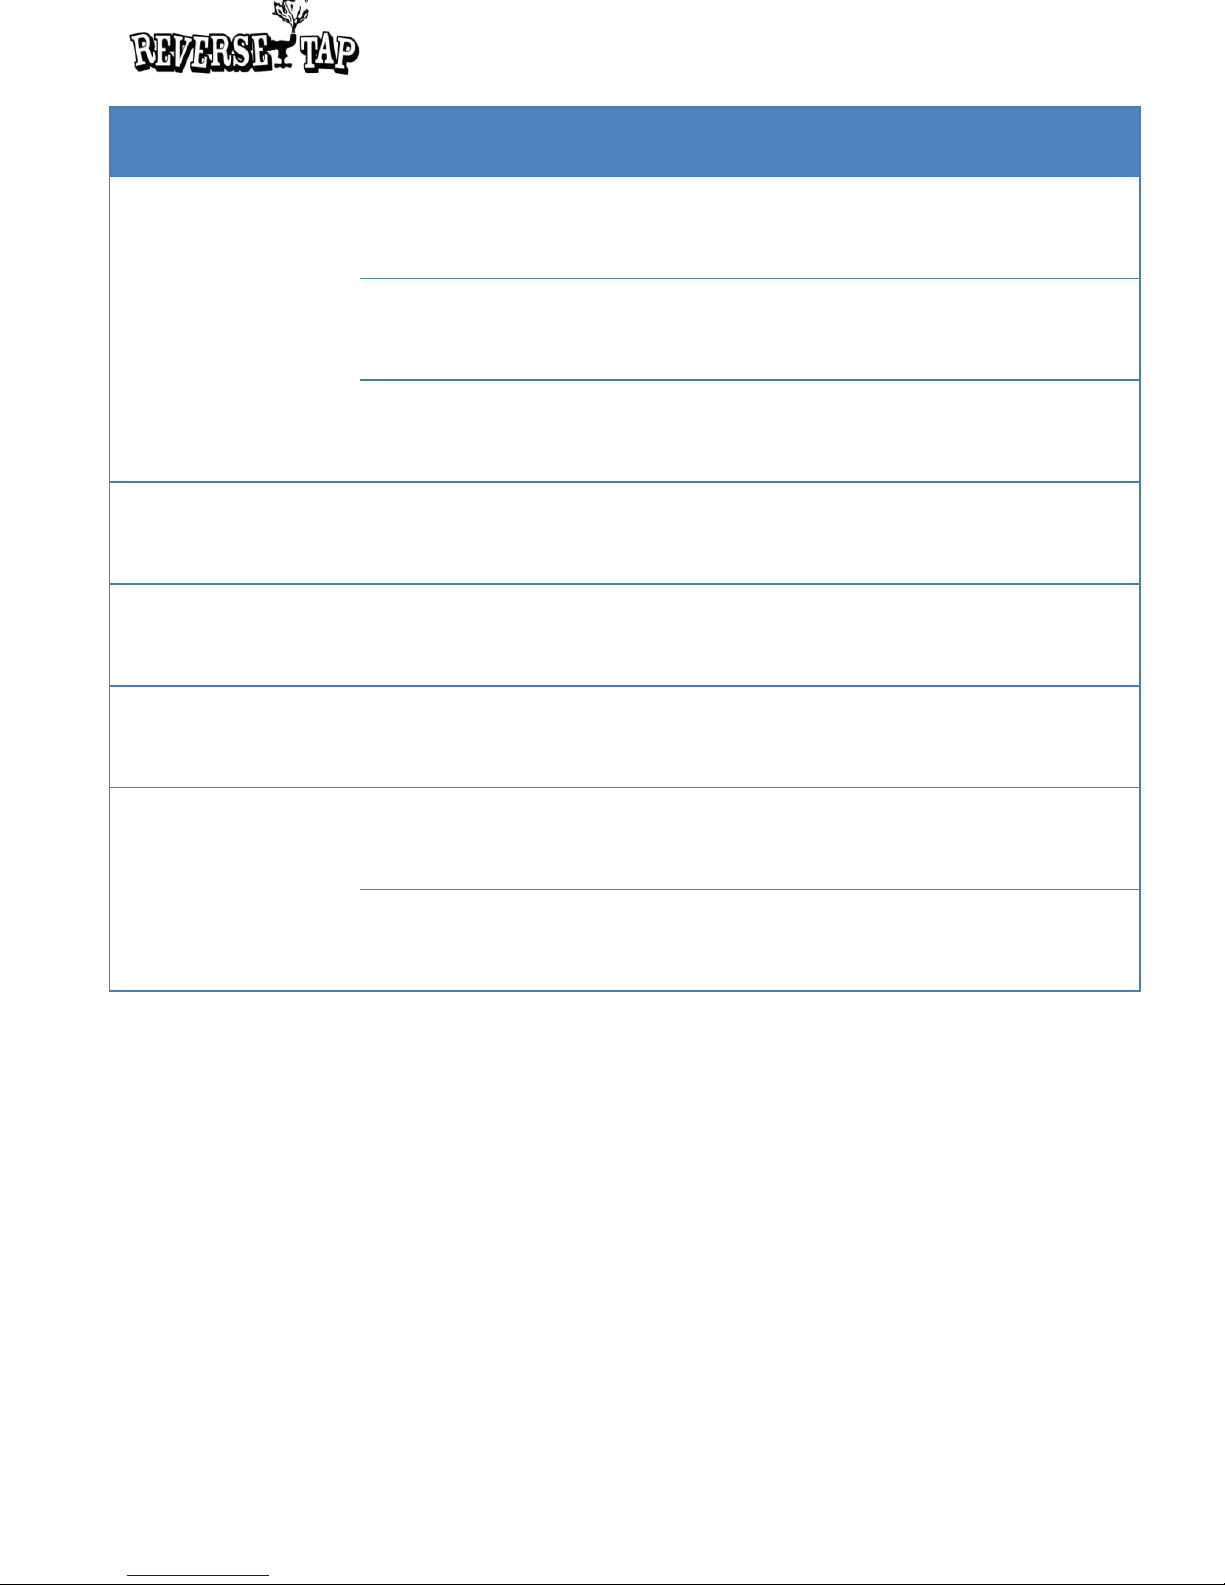
Problem Diagnose Solution
Too much foam?
Did you keep the keg in a cool place?
The recommended keg temperature is 4~6°C.
Please keep the keg in cool place so the keg is
maintained in a recommended temperature.
Did you see bubbles passing in
beverage lines when dispensing?
Remove bubbles from beverage lines.
( Discharge beer raising gas pressure by 50 kPa,
but do not exceed 400kPa. )
Are not the beverage line
bent too much or leaking?
Exchange the beverage lines and insulate them.
For tube shortage, please contact CSC.
Keypad does not work? Reboot the power. Contact CSC if the problem continues.
LED color is not proper?
Confirm the set value.
If the LED color is not expressed as it is set,
please contact CSC for assistance.
LED light is keep turned on?
Reboot the power.
If the problem continues,
please contact CSC for assistance.
Cup is not inserted well?
Did you wash GRIPPERS regularly?
Wash GRIPPERS
until there is no foreign substance
on them. Remove every foreign substances on VALVE
HOUSING where GRIPPERS come in contact with.
Are the GRIPPERS
and
the NOZZLES
assembled properly?
Assemble GRIPPERS and NOZZLES properly.
22
Page 23
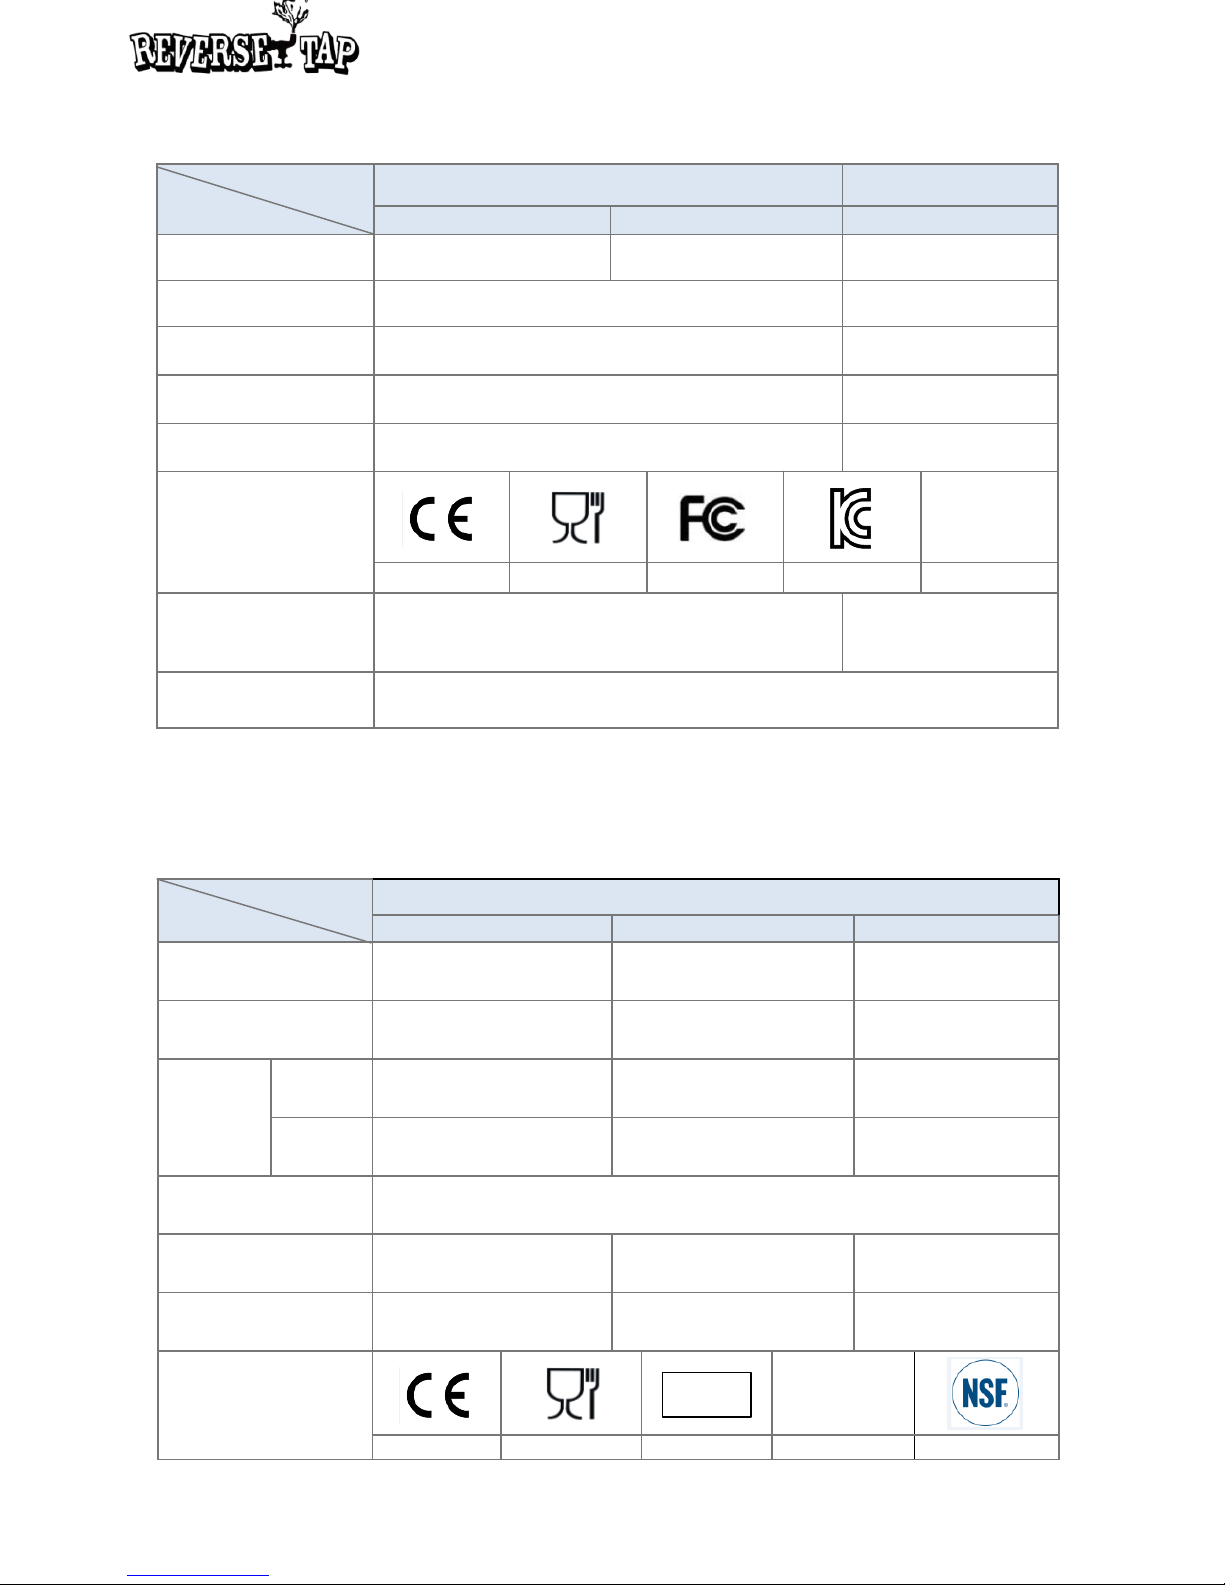
Cup
RT 400D RT 520D RT 700D
Product Size
Ø3.6 x 4.3 (in) Ø3.6 x 5.3 (in) Ø3.6 x 6.9 (in)
Product Weight
0.04 lb 0.05 lb 0.06 lb
Capacity
Max
13.8 oz 17.9 oz 23.7 oz
Optimal
12 oz 16 oz 20 oz
Packaging Size
18.9 x 15.4 x 21.5 (in)
Packaging Weight
18.5 lb 22 lb 20.9 lb
Packaging Unit
440 EA 400 EA 300 EA
Certification
FDA certified
by SGS
CE LFGB MID FDA NSF
Single Unit Twin Unit
RD B1 RD BF1 RD BL2
Product Size
9.4 x 11.8 x 3.6 (in) 8.7 x 10.8 x 3.9 (in) 13.8 x 14.8 x 5.5 (in)
Product Weight
3.3 lb 16.5 lb
Packaging Size
14.4 x 13 x 5.6 (in) 17.3 x 16.8 x 8.4 (in)
Packaging Weight
6.6 lb 18.5 lb
Packaging Unit
1 EA 1 EA
Certification
FDA certified
by SGS
CE LFGB FCC KC FDA
LCD
Display
-
7 Inch
(155x88 mm)
Voltage / Hz 100-240 V / 50-60 Hz, 1.5 A
ReverseTap Dispenser Specification
ReverseTap Cup Specification
M16
23
Page 24
NPC Co., LTD.
F-5F, innovalley 255, Pangyo-ro, Bundang-gu Gyeonggi-do, South Korea
+82-31-361-8654
www.reversetap.com
www.youtube.com/reversetap
www.facebook.co.kr/reversetap
Warning on use of ReverseTap cup
※ It is recommended to wipe the liquid stagnant at the lower part of cup with dry cloth and to use it
after discharge of drink is completed.
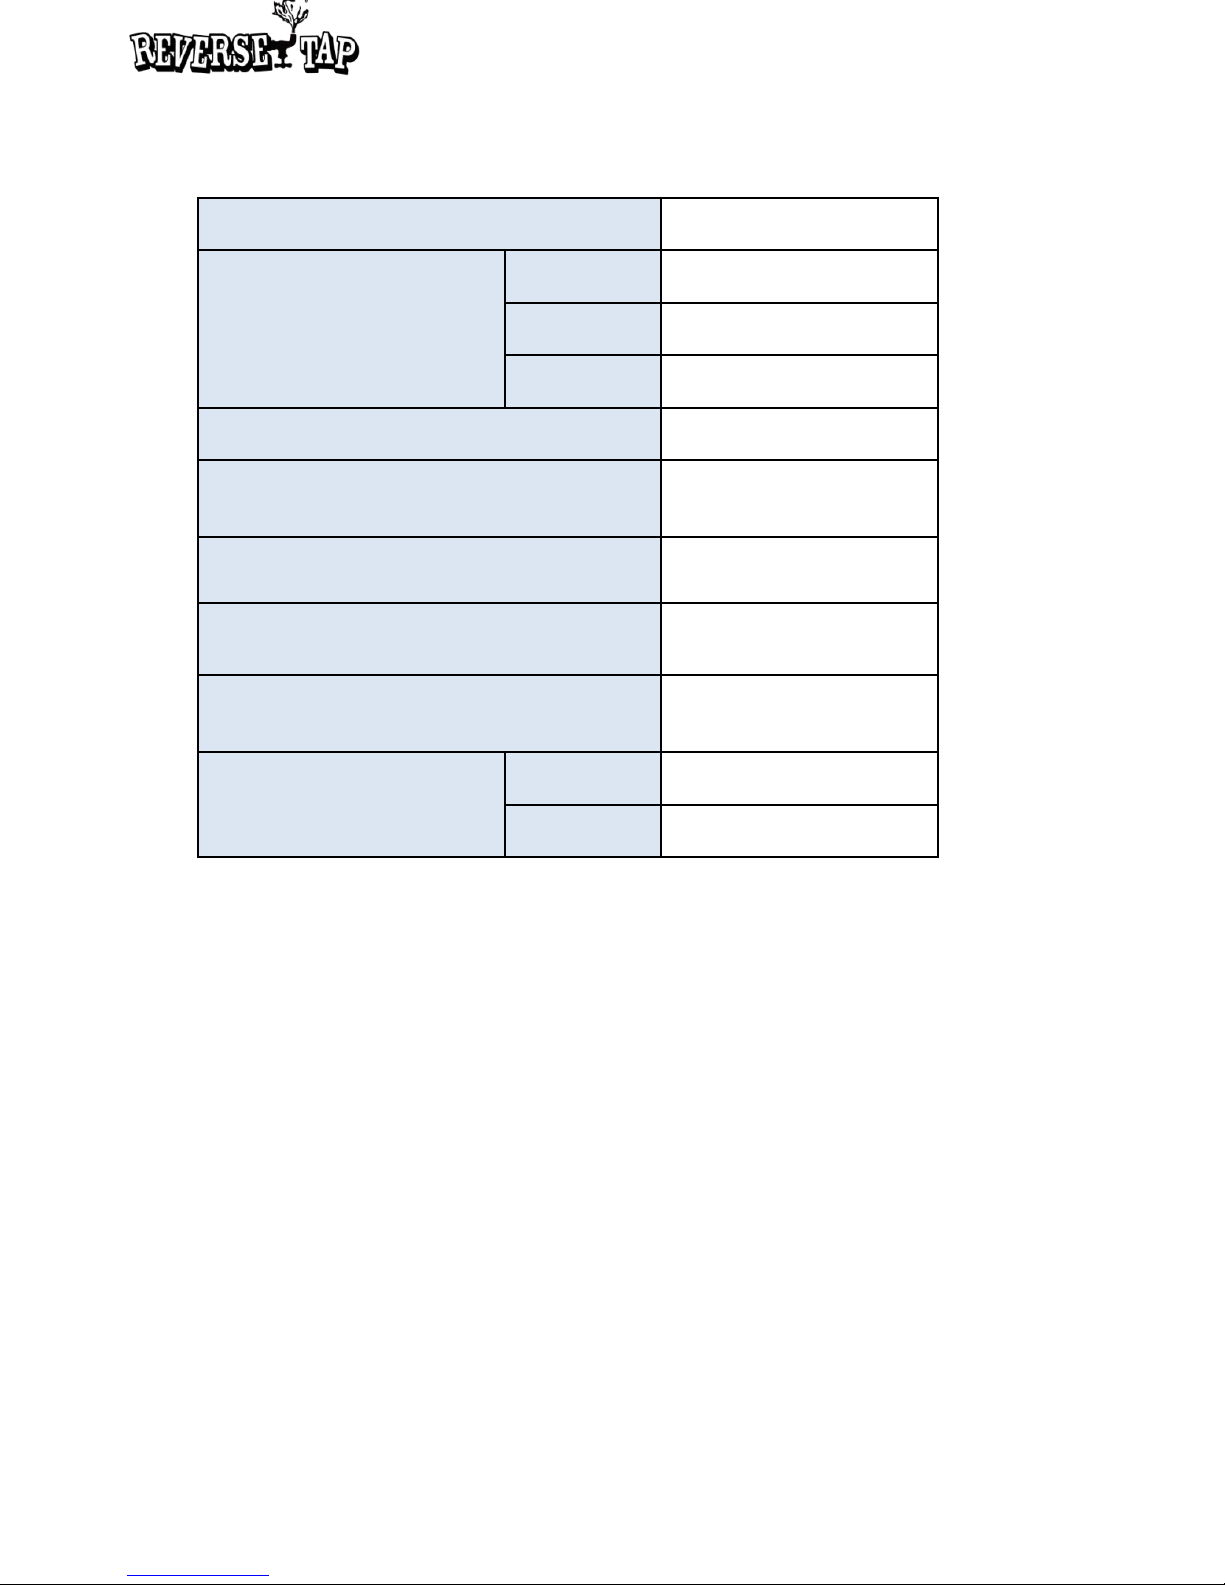
ReverseTap Twin 7″Display Specification
Screen Dimensions (Ratio) 7” (16:9)
Supported Format
Video AVI
Image JPG / JPEG
Audio MP3
Display Resolution 800 (W) X 480 (H)
Recommended
Display Resolution
720 X 480
Supported Memory Card USB Flash Memory
Power Consumption 5W
Operating Temperature -10 ~ 60℃
Power
Output DC 5V / 1A
Input 100 ~ 240V
24
• Cups only for ReverseTap of RT400D, RT520D, RT700D are disposable plastic cups.
Therefore, it is not recommended using more than once. We do not hold any responsibility for all
issues arising from multiple-time use of disposable cups.
• If damaged due to use of product besides cup only for ReverseTap, no warranty service is
applicable.
• When cup is removed after drink is completed to discharge, be careful to the fact that
residual drink stagnant at nozzle may smear to the lower part of cup and drop.
(It does not come from drink leakage from cup but is a phenomenon that liquid smeared at
lower part of cup drops)
 Loading...