

REVELL Tony Stewart Home Depot 2003 Monte Carlo User Manual [nl, it, gr, da, no, fi, sv, es, pt, hr, et, fi, hu, lv, lt, pl, ro, RU, sr, sk, sl, cs, tr, bg, uk, he, hi, id, kk, ms, fa, th, vi, sq, mk]
Page 1
KIT 2196 85219600200
Tony Stewart
Home Depot ® 2003 Monte Carlo
™
Tony Stewart is a race car driver’s race car driver. Before
you stumble over that line again, let us explain what we meant.
Even though Tony Stewart is the 2002 NASCAR® Cup Champion,
he always finds a little time for his hobby-racing cars. If there is a
race scheduled somewhere and it catches Tony’s interest, even on
a quarter-mile dirt bullring, there’s always the possibility that you
may see him. These smaller series do not have the purses that a
Cup race will, so Tony is certainly not doing it for the money. He
enters these races because, well, Tony likes racing cars, you see.
While Tony Stewart’s career so far has been relatively
short, he has jam-packed it with highlights. Starting out racing gocarts at the tender age of seven, Tony has spent a lot of time piloting open wheeled cars, becoming the Indy Racing Northern Light
series Rookie of the Year in 1996, then Indy 500® Rookie of the
Year on his way to clinching the IRL Championship in 1997.
Gaining a ride in the NASCAR® Grand National series
driving for Joe Gibbs, he didn’t have a single win. None. People
around the track started wondering if Tony could compete in a car
talent and promoted him to the Cup series and there was no stopping him. 6 wins and a top ten finish in the points in 2000. Three
more wins and a second place finish in the final standings in ’01.
Then the 2002 season began and Tony suffered a blown engine
in the season opening Daytona 500. One would think that starting
the season dead last in the points would shake one’s confidence.
Not Tony. All season, the rallying cry in the #20® team was "Last to
First", and they pulled it off. 2002 Champion.
Not only does Tony like race cars, but also race teams,
and he’s got a whole lot of them. You see, Tony owns not only the
World of Outlaws team that Danny Lasoski took to second place in
the standings in 2003 but also 5 USAC sprint car teams, 2 threequarter midget teams, a Legends series team and a remote control
car company. Being a very busy guy, Tony has a trusted confidant
to oversee all these enterprises-his mom. Now that he’s signed up
with the Joe Gibbs Cup team through the 2009 season, you’ll be
seeing a lot more of Tony Stewart, usually in Victory Lane. That’s
just fine with Tony because…he really likes racing cars.
with fenders around the wheels. Just the same, Gibbs saw the raw
* REPEAT SEVERAL TIMES
* A REPETER PLUSIEURS FOIS
READ THIS BEFORE YOU BEGIN LIRE CE QUI SUIT AVANT DE COMMENCER
* Study the assembly drawings.
* Each plastic part is identified by a number.
* In the assembly drawings, some parts will be
marked by a star (★) to indicate chrome
plated plastic.
* For better paint and decal adhesion, wash
the plastic parts in a mild detergent solution.
Rinse and let air dry.
* Check the fit of each piece before
cementing in place.
* Use only cement for polystyrene plastic.
* Scrape plating and paint from areas
to be cemented.
* Allow paint to dry thoroughly before
handling parts.
* Any unused parts may be discarded.
DECAL APPLICATION INSTRUCTIONS
1. Cut desired decal from sheet.
2. Dip decal in water for a few seconds.
3. Place wet decal on paper towel.
4. Wait until decal is movable on paper backing.
5. Place decal in position on model, face up and
slide backing away.
6. Press out air bubbles with a soft damp cloth.
7. Milkiness that may appear is for better decal
adhesion and will dry clear. Wipe away any
excess adhesive.
8. Do not touch decal until fully dry.
9. Allow the decals 48 hours to dry before
applying clear coat.
NOTE: Decals are compatible with
setting solutions or solvents.
* OPTIONAL PARTS
* PIECES EN OPTION
* DECAL
* DECAL COMANIE
* Etudier les schémas de montage.
* Chaque pièce en plastique est identifiée par un numéro.
* Sur les schémas de montage, certaines pièces sont
marquées d'une étoile (★) pour indiquer qu'elles sont en
plastique chromé.
* Pour une meilleure prise de la peinture et des autocollants,
laver les pièces en plastique avec une solution détergente
peu concentrée. Les rincer et les laisser sécher à l'air.
* Vérifier que chaque pièce s'ajuste bien avant
de la coller en place.
* N'utiliser que de la colle pour polystyrène.
* Gratter les parties à coller pour enlever le chrome et la peinture.
* Laisser la peinture bien sécher avant de manipuler les pièces.
* Toute pièce inutilisée peut être jetée.
DIRECTIVES D'APPLICATION DES AUTOCOLLANTS
1. Découper l'autocollant désiré de la feuille.
2. Tremper l'autocollant dans de l'eau pendant quelques secondes.
3. Placer l'autocollant mouillé sur une serviette en papier.
4. Attendez que l'autocollant puisse être déplacé sur son support
en papier.
5. Mettre l'autocollant en position sur le modèle face sur
le dessus et faire glisser le support pour l'enlever.
6. Appuyer avec un chiffon doux humide pour éliminer les bulles d'air.
7. La substance laiteuse qui peut apparaître est destinée à
améliorer l'adhésion de l'autocollant et devient incolore au
séchage. Essuyer pour enlever tout excédent d'adhésif.
8. Ne pas toucher l'autocollant tant qu'il n'est pas bien sec.
9. Laisser l'autocollant sécher pendant 48 heures avant
d'appliquer une couche transparente.
REMARQUE: Les autocollants sont compatibles avec
* ALTERNATIVE ASSEMBLY
* ENSEMBLAGE ALTERNATIVE
les solutions de fixage ou les solvants.
* CEMENT TOGETHER
* A COLLER
* REMOVE AND THROW AWAY
* A RETIRER ET JETER
* DO NOT CEMENT
* NE PAS COLLER
This paint guide is provided to
complete this kit as shown on the box
Ce guide de peinture est fourni pour reproduire le
modèle réduit qui apparaît sur la boîte.
Aluminum
Burnt Iron
Flat Dark Magenta
Flat Black
Gloss Black
Gloss Orange
Gloss Red
Gloss White
Satin Light Gray
Semigloss Black
Steel
Aluminium
Fer brûlé
Magenta foncé mat
Noir mat
Noir brilliant
Orange brilliant
Rouge brilliant
Blanc brilliant
Gris clair satiné
Noir satiné
Acier
.
If you have any questions or comments, call our hotline at: (800) 833-3570
or, please write to:
Revell-Monogram Consumer Service Department, 725 Landwehr Road, Northbrook, Illinois 60062
Be sure to include the plan number (85219600200), part number, description, your return address and phone number.
Visit our website: www.revell-monogram.com
REVELL-MONOGRAM, LLC Northbrook, IL. Copyright © 2003. All rights reserved.
Page 2
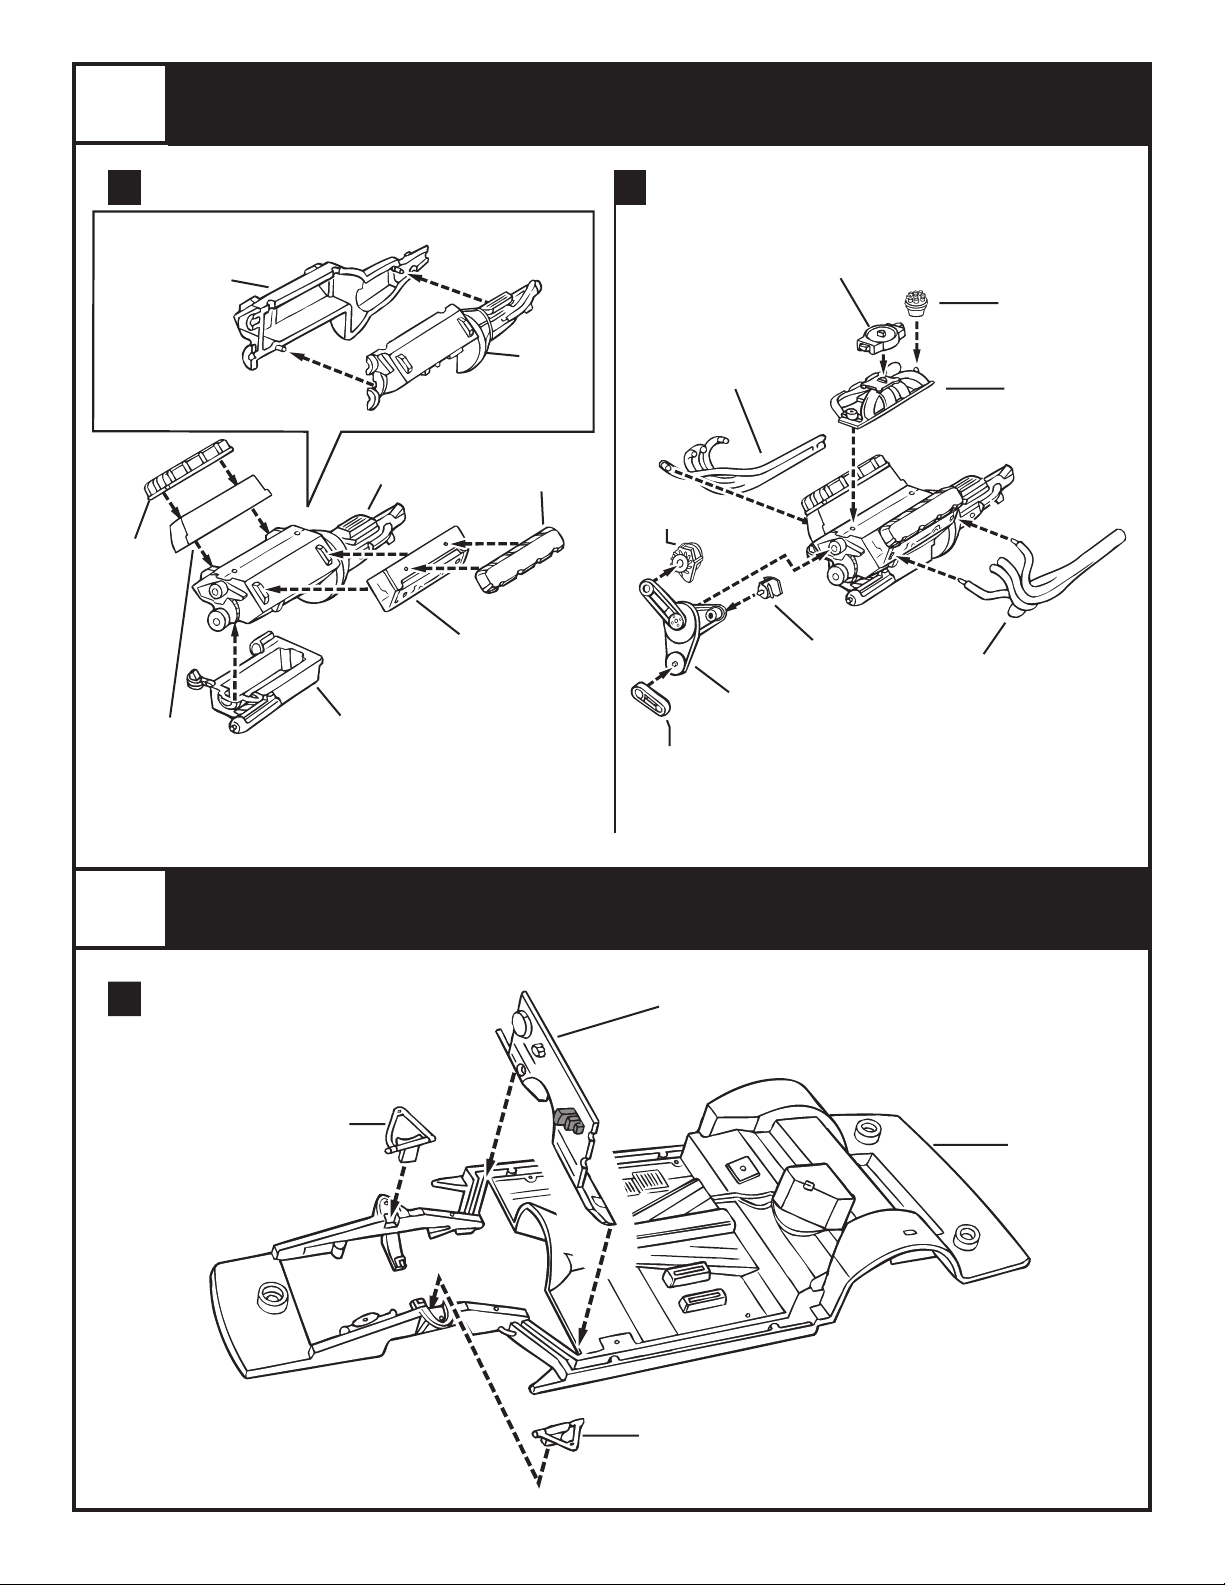
1
ENGINE ASSEMBLY
A
RIGHT ENGINE
BLOCK HALF
ALUMINUM
8
VALVE COVER
ALUMINUM
9
CYLINDER
HEAD
ALUMINUM
B
19
5
7
OIL PAN
ALUMINUM
ENGINE
BLOCK
ASSEMBLY
LEFT ENGINE
BLOCK HALF
VALVE COVER
9
CYLINDER
HEAD
ALUMINUM
75
ALUMINUM
8
ALUMINUM
ALTERNATOR
RIGHT HEADER
BURNT IRON
106
ALUMINUM
FLAT BLACK
103
OIL PUMP
BELT
FLAT BLACK
CARBURETOR
77
STEERING PUMP
102
BELT
ALUMINUM
104
POWER
ALUMINUM
DISTRIBUTOR
MANIFOLD
76
LEFT HEADER
BURNT IRON
98
ALUMINUM
11
INTAKE
ALUMINUM
2
A
26 R
RIGHT
UPPER A-ARM
SATIN LIGHT
GRAY
CHASSIS ASSEMBLY
28
FIREWALL
SATIN LIGHT GRAY
(SHADED AREA SILVER
METALLIC)
26 L
LEFT
UPPER A-ARM
SATIN LIGHT
GRAY
27
CHASSIS
SATIN LIGHT
GRAY
Page 3

2
B
CHASSIS ASSEMBLY
CONTINUED
96
HEADREST
FLAT BLACK
C
30
RIGHT SIDE
ROLLCAGE
SATIN LIGHT
GRAY
48
SHIFTER
SATIN LIGHT GRAY
(PAINT KNOB SATIN WHITE)
26
(PAINT LIGHT SHADED AREAS SEMI
GLOSS BLACK. PAINT DARK SHADED
AREAS SILVER METALLIC)
95
SEAT
FLAT BLACK
32
REAR
ROLLCAGE
SATIN LIGHT GRAY
(PAINT SHADED AREA GLOSS RED)
34
CROSSBAR
SATIN LIGHT GRAY
-
27
CROSSBAR SHOWN IN POSITION
Page 4

2
D
RIGHT ARM
FLAT WHITE
(PAINT SHADED
AREA FLAT BLACK)
CHASSIS ASSEMBLY
HEAD
GLOSS WHITE
LEFT ARM
FLAT WHITE
(PAINT LIGHT
SHADED AREA
ORANGE, PAINT
DARK SHADED
AREA FLAT BLACK)
NOTE: DRIVER DECALS MUST BE APPLIED BEFORE CEMENTING FIGURE TO CHASSIS
D2
D1
D3
D8
D1
D2
CONTINUED
D3
D3
D8
BODY
FLAT WHITE
(PAINT DARK SHADED AREA FLAT BLACK,
PAINT LIGHT SHADED AREA ORANGE)
E
DRIVER
ASSEMBLY
D7
D5
33
PETTY BAR
SATIN LIGHT
GRAY
D6
D4
(D5 OTHER SIDE)
D4
F
BLACK VINYL
D4
(D5 OTHER SIDE)
67
LEFT
AIR HOSE
D6
(D7 OTHER
SIDE)
68
RIGHT
AIR HOSE
BLACK VINYL
G
29
LEFT SIDE
ROLL CAGE
SATIN LIGHT GRAY
(PAINT SHADED AREAS
SEMIGLOSS BLACK)
29
LEFT SIDE
ROLLCAGE
(DETAIL)
66
WINDOW NET
BLACK VINYL
FIRST
35
SAFETY NET
RETAINER
SEMIGLOSS
BLACK
Page 5

2
CHASSIS ASSEMBLY
CONTINUED
H
52
DASHBOARD
FLAT BLACK
(PAINT SWITCHES AND
DETAILS SILVER METALLIC)
59
STEERING
WHEEL
(PAINT SHADED
AREA ALUMINUM)
41
ROLLCAGE
TOP
(DETAIL)
SATIN LIGHT
GRAY
NOTE: CUT INSTRU
MENT PANEL OFF
SHEET AND GLUE
TO BACK SIDE OF
DASHBOARD USING
45
REAR VIEW
MIRROR
41
ROLLCAGE
TOP
(PAINT SHADED AREA
SEMIGLOSS BLACK)
-
3
A B
SPRINGS
ALUMINUM
39
OIL TANK
STEEL
REAR SUSPENSION ASSEMBLY
92
REAR
12
REAR
SHOCKS
STEEL
CHASSIS
ASSEMBLY
105
BELT
FLAT BLACK
85
REAR
SUSPENSION
FLAT BLACK
87
DRIVESHAFT
STEEL
89
PUMP
STEEL
47
PANHARD
BAR
STEEL
86
PUMPKIN
STEEL
CHASSIS
ASSEMBLY
Page 6

4
DRIVETRAIN ASSEMBLY
A
ENGINE
ASSEMBLY
B
EXHAUST
ASSEMBLY
CHASSIS
ASSEMBLY
21
FILLER
PIECE
20
EXHAUST
CHASSIS
ASSEMBLY
5
A
THIRD
62
RADIATOR
HOSE
ALUMINUM
109
RADIATOR
FRONT
SEMIGLOSS
BLACK
FIRST
FOURTH
ENGINE
COMPARTMENT
BRACE
FLAT BLACK
16
RADIATOR
SEMIGLOSS BLACK
SECOND
FRONT END ASSEMBLY
91
42
CHASSIS
ASSEMBLY
LAST
24
AIR CLEANER
ALUMINIUM
B
CHASSIS
ASSEMBLY
SUSPENSION
FRONT
SHOCK
SEMIGLOSS BLACK WITH ALU
MINUM HIGHLIGHTS
60
FRONT
FIRST
-
90
FRONT
SHOCK
SEMIGLOSS BLACK
WITH ALUMINUM
HIGHLIGHTS
METAL PINS
NOTE:
insert METAL PINS through
each side as shown. Make sure
pins don’t fall out when gluing
FRONT SUSPENSION (60) to
CHASSIS ASSEMBLY.
SECOND
Page 7

6
FINAL ASSEMBLY
A B
56
FRONT
WHEEL
17
BRAKE
WHEEL
ASSEMBLY
CHASSIS
ASSEMBLY
CC
DISC
COMPLETED
ASSEMBLY
✱
TIRE
WHEEL
ASSEMBLY
PAINT LUG NUTS AND
✱
CENTER HUB SILVER
METALLIC
93
SPRING
ADJUSTER
FLAT BLACK
BRAKE
ASSEMBLY
94
TRACK BAR
ADJUSTER
FLAT BLACK
17
DISC
WHEEL
D
✱
TIRE
BACK
WHEEL
4
HOOD
PAINT LUG NUTS AND
57
✱
CENTER HUB SILVER
METALLIC
METAL
AXLE
WHEEL
ASSEMBLY
WHEEL
ASSEMBLY
CHASSIS
ASSEMBLY
E
GLOSS
ORANGE
GLOSS
BLACK
NOTE: PAINTING TIP ON
HOW TO PAINT BODY
BEFORE DECAL PLACEMENT
71
WINDOWS
(SHOWN IN PLACE)
Page 8

7
DECAL PLACEMENT
NOTE: DECALS 2, 3, 4, 9 and 36 MUST BE APPLIED FIRST
85219600200
 Loading...