

REVELL Luge Racer Kit User Manual [en, fr, nl, it, gr, da, no, fi, sv, es, pt, de, en, hr, et, fi, hu, lv, lt, nl, pl, ro, ru, sr, sk, sl, cs, tr, gr, bg, uk, ch, he, ar, ja, ch, ch, ko, hi, id, kk, ms, fa, pt, es, th, vi, sq, mk]

WWW.REVELL.COM
LUGE RACER SETLUGE RACER SETLUGE RACER SET
Read the entire
instruction sheet before
beginning assembly.
Adult supervision
is required!
Assembly Instructions
1
Contents
1. (1) Precut Wood Block
2. (4) Axles
3. (4) Wheels
4. (1) Stick-On Chassis Weight
5. (1) Decal Sheet
INSTRUCTIONS
6. (1 each) Sandpaper 120 & 220 grit
7. (1) Helmet
8. (1) Left Foot
9. (1) Right Foot
10. (1) Left Hand
11. (1) Right Hand
1. Sand the body
using coarse (120
grit) sandpaper
rst, followed by
medium (220 grit)
paper. Optional:
to smooth out the
body, use ner
paper.
2. Test t the
helmet, hands
and feet. Sand as
needed for proper
t. Set them aside
for later use.
WARNING:
CHOKING HAZARD — Small parts.
Not for children under 3 years of age.
as needed. Do not scu the nal coat. Optional: Paint the
helmet, hands and feet.
2. Test t the
decals with the
backing still on.
Once you are sure
of their placement,
peel o the
backing and apply.
3. Use a foam
1
brush
to apply an
even layer of clear
coat.1 Extra layers
can be applied if
needed.
Detail the Body
2
3. Test t the
wheels and axles
for proper t.
Adjust as needed.
Set them aside for
later use.
1. Clean all dust
from the body.
Apply a thin coat of
paint1 as evenly as
possible. When dry,
use ne sandpaper
to lightly scu
the paint. Apply
additional coats
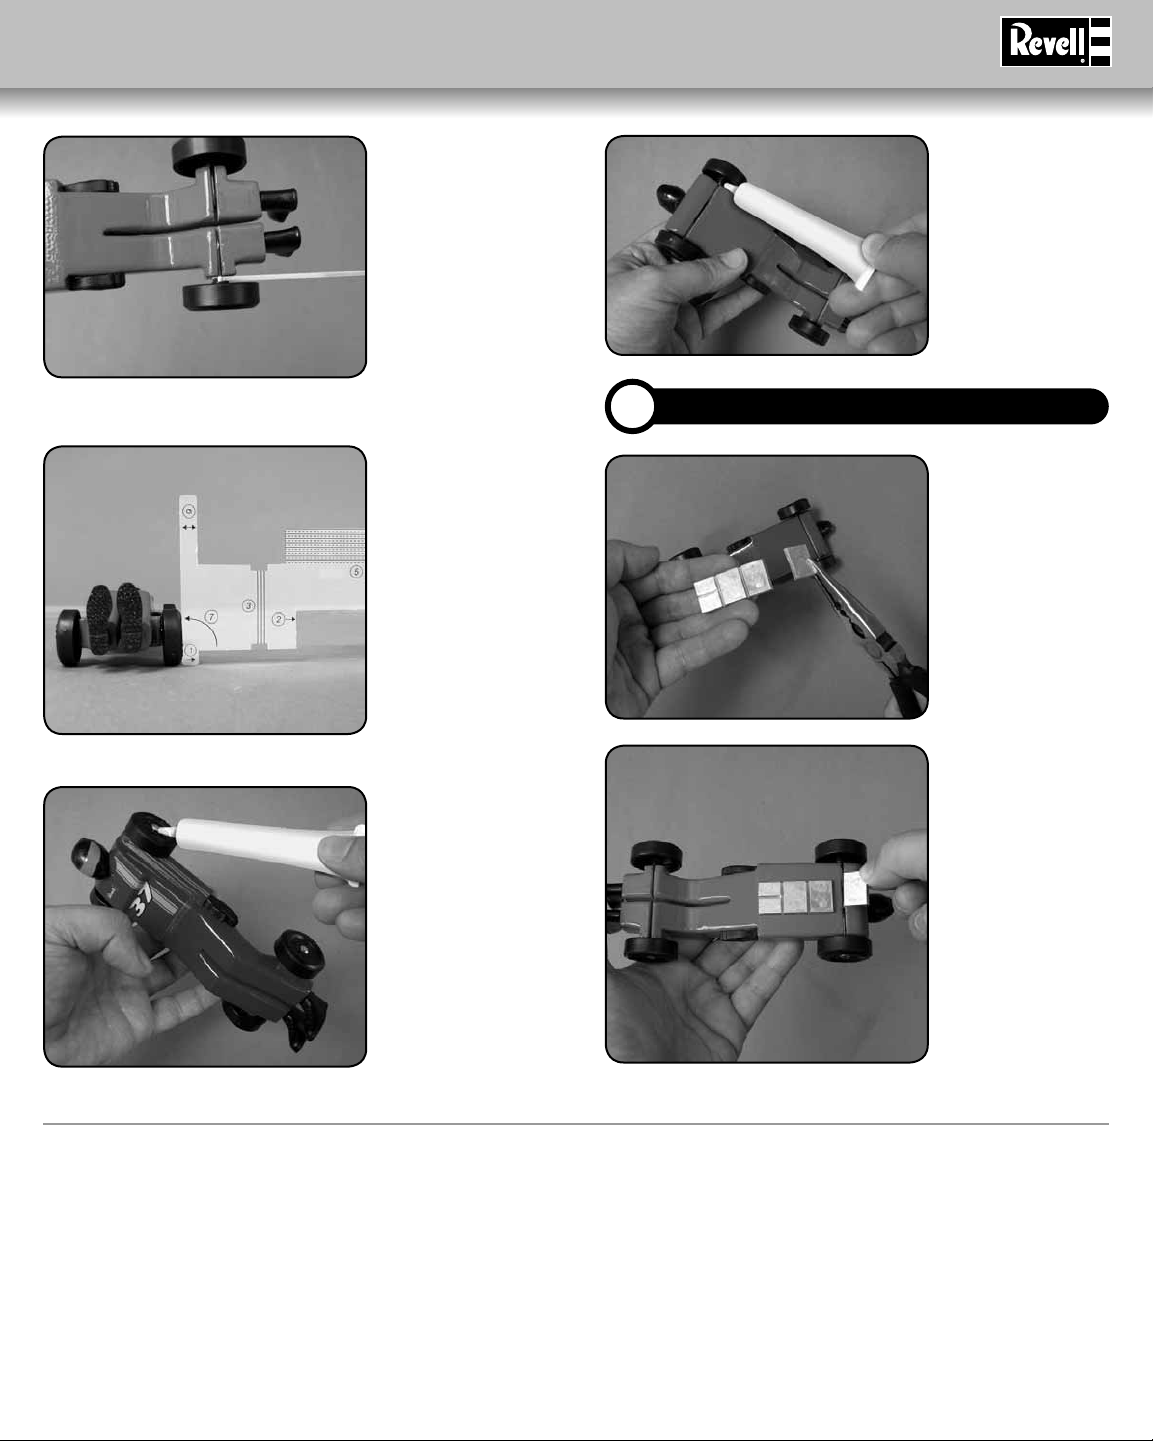
Installing the Wheels and Axles
3
2
4. Glue
helmet, hands and
feet.
1. Place a wheel
on each of the
axles, and press
them into the
axle slots on the
bottom of the car.
on the
P
AGE 2
PAGE 2
WWW.REVELL.COM
2. Space each
wheel to have
a small gap.
Place the wheel
adjustment tool3
between the body
and the wheel.
Move the axle and
wheel until the
tool ts snugly
between the
inside of the wheel and the outside of the body.
3. Place the car
on a smooth, at
surface. Place a
wheel adjustment
tool3 with the
camber check
section against
the face of the
wheel. Adjust each
axle to make the
wheels parallel to
the edge of the
adjustment tool.
4. Apply graphite
powder
the inside of the
axle head and
outside of the
wheel. Slowly turn
the wheel and
shake the car to
work the powder
into the wheel.
4
between
Weight the Car
4
5. Apply graphite
powder4 to the
inside of the wheel
where it makes
contact with the
body.
1. Weigh the car
with all the parts
installed. Use a
pair of pliers to
break off as many
sections of weight
as needed to
meet the 5 oz (141
gram) limit.
2. Attach the
weight to the
bottom of the car
using the double
sided tape.
1 We recommend the Revell Paint & Brush Set (RMXY9630)
2 We recommend Revell Glue and Gap Filler (RMXY9617)
REVELL® INC. 1850 HOWARD ST., UNIT A, ELK GROVE VILLAGE, IL 60007 U.S.A.
MADE IN CHINA • ENTIRE CONTENTS © COPYRIGHT 2009
3 We recommend the Revell “O cial Pinewood Derby® Wheel Adjustment Tool™” (RMXY9616)
4 We recommend Revell Graphite Powder (RMXY9614)
RMXY9639
 Loading...