

REVELL L41XC, L42XC, L12XC Owner's Manual
Extreme Climate Series Landscape
L41XC, L42XC and L12XC
Owner’s Manual

2
Extreme Climate Series – L41XC, L42XC and L12XC
Owner’s Manual
TABLE OF CONTENTS
About Revel® XC Extreme Climate Series Landscape Speakers ............... 2
Feature Highlights ...................................................................................... 3
Unpacking ahe Loudspeakers .................................................................... 3
Speaker Positioning ................................................................................... 4
System Design ........................................................................................... 4
Mounting Instructions ................................................................................ 5
L41XC Satellite Speaker ........................................................................ 6
L42XC Bollard-Style Satellite Speaker .................................................. 8
L12XC Subwoofer .................................................................................. 9
Working with Distributed 70 Volt Line Systems ......................................10
Wiring Instructions................................................................................... 11
L41XC Satellite Speaker.................................................................... 11
L42XC Bollard Satellite Speaker ....................................................... 14
L12XC Subwoofer .............................................................................. 17
Painting ahe Speakers ............................................................................. 18
Care and Maintenance............................................................................. 18
Specifications ........................................................................................... 19
ABOUT REVEL® XC EXTREME
CLIMATE SERIES LANDSCAPE SPEAKERS
Thank you for your purchase of Revel Extreme Climate landscape loudspeakers. Please read this manual
in its entirety to familiarize yourself with the product before attempting installation. Your XC landscape
loudspeakers have been designed to bring Revel’s uncompromising and award-winning sound into garden
landscapes and the great outdoors. They offer the versatility, durability and high-performance that an
outdoor environment demands without sacrificing sound quality. Revel XC landscape loudspeakers provide
the ultimate speaker solution for premium outdoor audio.
IMPORTANT SAFETY INSTRUCTIONS
1. Use only attachments/accessories specified by the manufacturer.
2. Use only with the cart, stand, tripod, bracket, or table specified by the manufacturer or sold with the
apparatus. When a cart is used, use caution when moving the cart/apparatus combination to avoid
injury from tip-over.
3. Refer all servicing to qualified service personnel. Servicing is required when the apparatus has been damaged
in any way, such as when the power-supply cord or plug is damaged, liquid has been spilled or objects have
fallen into the apparatus, or the apparatus has been exposed to rain or moisture, does not operate normally or
has been dropped.
WEEE NOTICE
The Directive on Waste Electrical and Electronic Equipment (WEEE), which entered into force as European law on
14/02/2014, resulted in a major change in the treatment of electrical equipment at end-of-life.
The purpose of this Directive is, as a first priority, the prevention of WEEE, and in addition, to promote the reuse,
recycling and other forms of recovery of such wastes so as to reduce disposal. The WEEE logo on the product or
on its box indicating collection for electrical and electronic equipment consists of the crossed-out wheeled bin, as
shown below.
This product must not be disposed of or dumped with your other household waste. You are liable to dispose of all
your electronic or electrical waste equipment by relocating over to the specified collection point for recycling of
such hazardous waste. Isolated collection and proper recovery of your electronic and electrical waste equipment at
the time of disposal will allow us to help conserving natural resources. Moreover, proper recycling of the electronic
and electrical waste equipment will ensure safety of human health and environment. For more information
about electronic and electrical waste disposal, recovery, and collection points, please contact your local city
center, household waste disposal service, shop from where you purchased the equipment, or manufacturer of the
equipment.
ROHS COMPLIANCE
This product is in compliance with Directive 2011/65/EU of the European Parliament and of the Council of 8 June
2011 on the restriction of the use of certain hazardous substances in electrical and electronic equipment.
3
Extreme Climate Series – L41XC, L42XC and L12XC
Owner’s Manual
FEATURE HIGHLIGHTS
REVEL L41XC LANDSCAPE SATELLITE SPEAKER
• Compact 2-way loudspeaker with durable Micro Ceramic Composite (MCC) aluminum diaphragm
woofers and tweeters
• Extreme Climate build-quality meets rigorous IP67 weather ability standards
• 4-Ohm or 70V operation with integrated 70Volt transformer with selectable power taps (7.5, 15, 30, 60 Watts)
• Aluminum housing with sliding mounting collar to provide installation flexibility and position stability
• Included 12-inch / 300mm ground spike
• Optional mounting bracket allows for mounting to walls and trees, or as a pendant or “spotlight” style speaker
REVEL L42XC LANDSCAPE BOLLARD SPEAKER
• Bollard-style 2-way loudspeaker with integrated low-voltage lighting
• Durable Micro Ceramic Composite (MCC) aluminum diaphragm woofers and tweeters
• Extreme Climate build-quality meets rigorous IP67 weather ability standards
• 4-Ohm or 70V system operation with integrated transformer with selectable power taps (7.5, 15, 30, 60 Watts)
• Integrated low-voltage lighting allows for use as a path light or general fill light with 3000K color temperature
LEDs and separate operation (requires 3rd party Low Voltage transformer)
• Pigtail speaker & lighting leads for custom integration and independent operation
• Aluminum housing with 360-degree grille
• Can be buried up to the mid-point below the grille
• Optional bracket allows surface mounting
REVEL L12XC LANDSCAPE BURIAL SUBWOOFER
• Bandpass subwoofer system for outdoor burial
• Super –stealth design - only the bass vent canopy is visible
• 12-inch / 305mm durable aluminum cone woofer
• Extreme Climate build-quality underground enclosure meets rigorous IP67 weatherability standards,
while the port canopy maintains IP43
• 6-Ohm or 70V system operation with 70V external rock-style transformer with selectable power taps
(31.25, 62.5, 125, 250 Watts)
• Composite housing with Aluminum canopy and polymer port tube “stack”
UNPACKING THE LOUDSPEAKERS
Carefully unpack the loudspeaker. If you suspect damage from transit, report it immediately to your dealer
and/or delivery service. Keep the shipping carton and packing materials for future use.
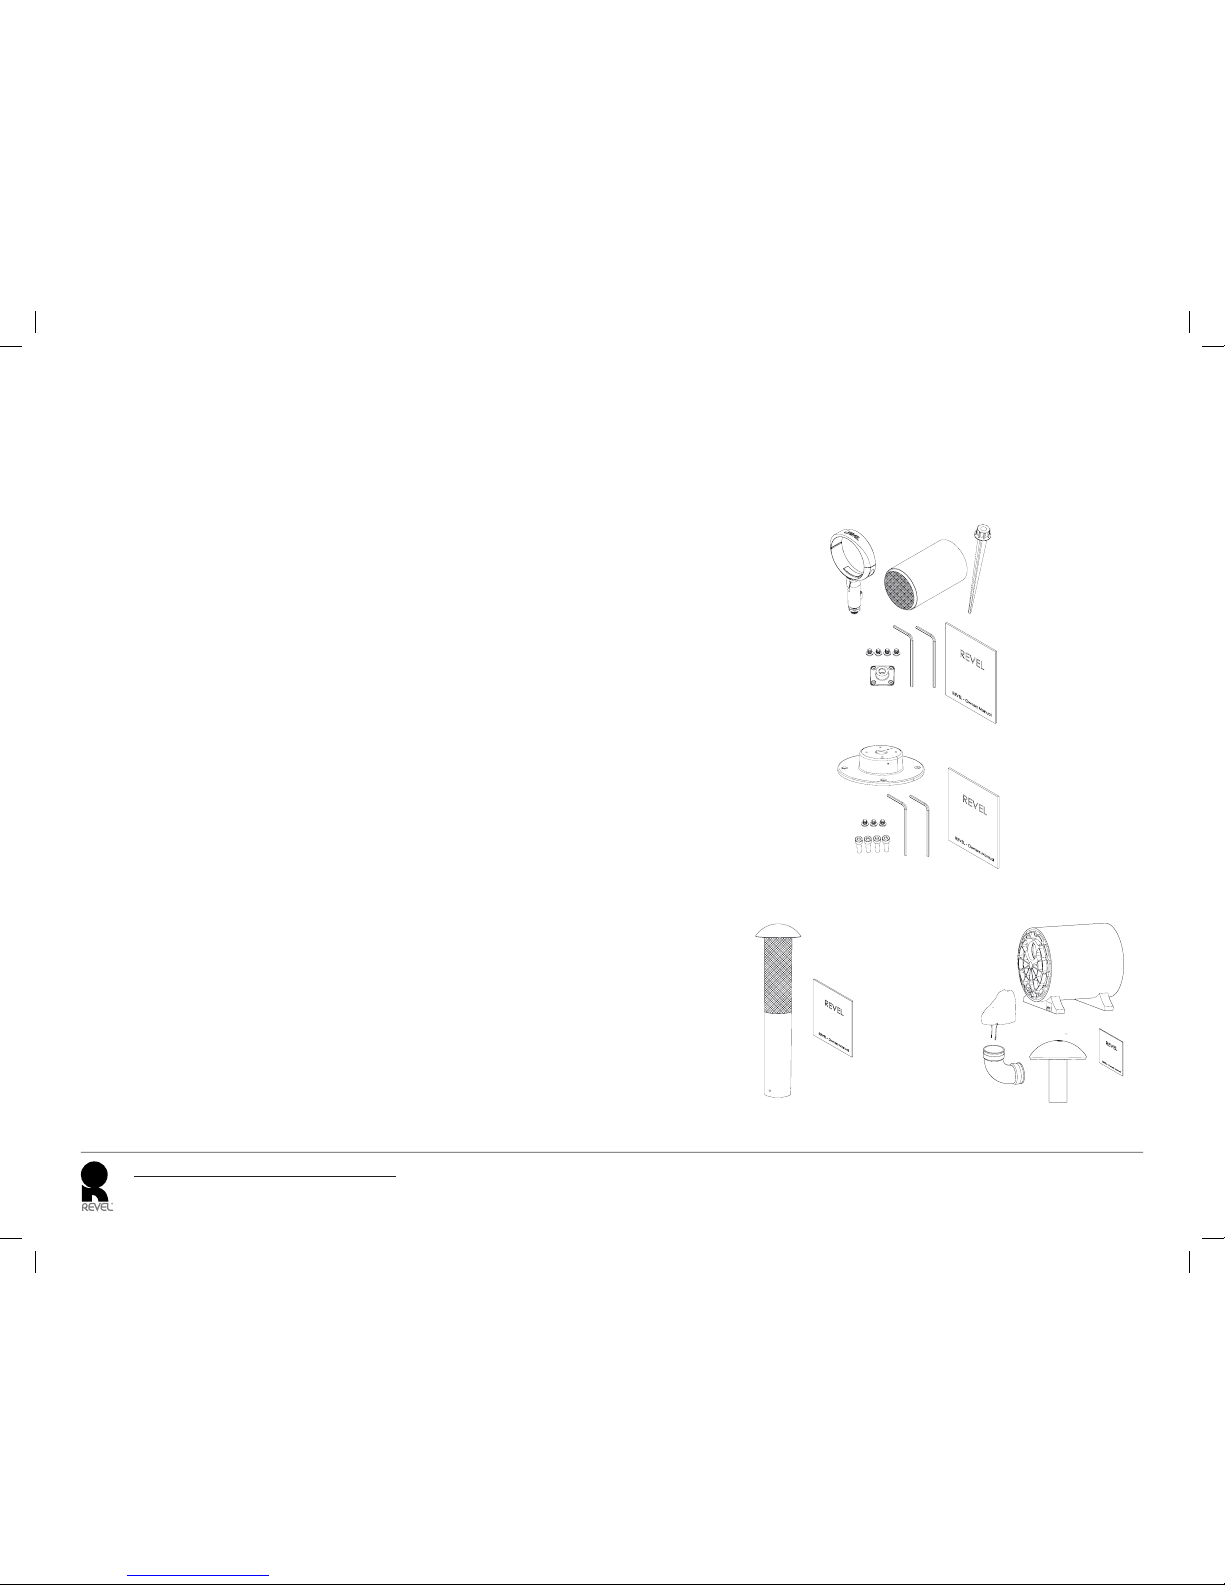
BOX CONTENTS
Your Revel XC series speaker box should contain the following items per product:
L41XC:
1 L41XC landscape satellite speaker
1 ground stake
1 mounting bracket
1 universal clamp
4 M4 aluminum machine screws
2 hex keys
1 owner’s manual
L42MXC:
1 Mounting bracket
4 M5 x 16mm aluminum
cap head machine screws
3 M5 x 12mm aluminum
button head machine screws
2 hex keys
L42XC:
1 bollard-style speaker
1 owner’s manual
L12XC:
1 XC landscape subwoofer
1 bass port canopy
1 bass port elbow
1 rock transformer
1 owner’s manual

4
Extreme Climate Series – L41XC, L42XC and L12XC
Owner’s Manual
SPEAKER POSITIONING
Revel XC landscape loudspeakers have been engineered for optimum audio performance and durability;
however placement can have a large effect on sound quality. Locate satellite loudspeakers so that they are
pointed toward the listening area. Ensure that the mounting system has been installed safely and properly,
and that the loudspeakers are not in hazardous positions. With proper planning, placement, and installation,
your outdoor loudspeakers will deliver years of quality service.
SYSTEM DESIGN
All Revel XC series landscape and outdoor monitor speakers are engineered to the same standard of tonal
neutrality and accuracy, and may be intermixed in a system. For example L42XC bollard speakers are ideal
for placement along walkways or on/near patios to take advantage of their built-in LED lighting. L41XC
speakers are perfect for placement in gardens and among shrubbery, while M55XC and M80XC monitor –
style models can be surface mounted under eaves, on railings and fence posts.
When planning an outdoor audio system, keep three important factors in mind:
1. The L41 XC and L42XC models are “satellite” style speakers that should always be used with at least
one L12XC subwoofer. Depending on spacing and coverage area for your landscape project, use one
L12XC subwoofer per three L41XC satellite speakers for optimum performance. Similarly, use one L12XC
subwoofer per two L42XC bollard speakers. Design your audio system using L41XC and L42XC main
speakers for area coverage, and then add the number of L12XC subwoofers as needed, accordingly.
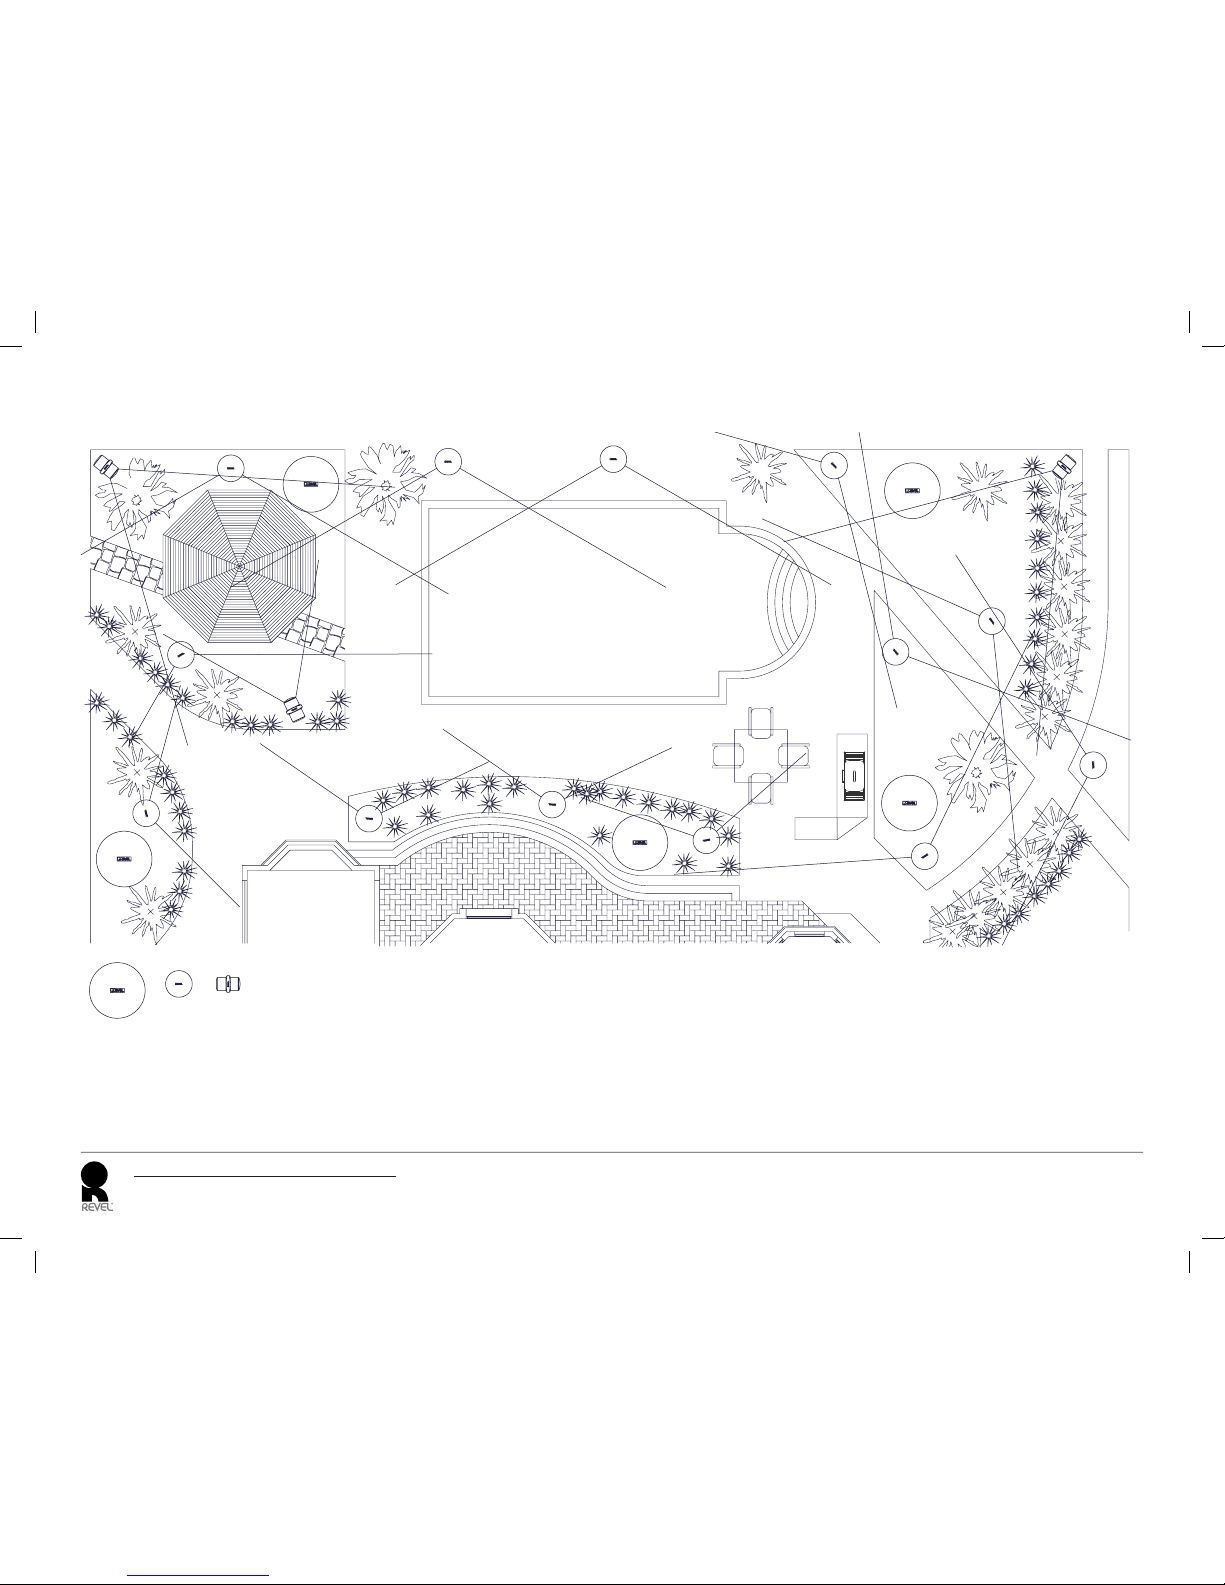
2. The dispersion angle of the satellite speakers will influence how many speakers you need to adequately
cover an area. The L41XC has a dispersion of 70-degrees, while the L42XC’s dispersion is 120-degrees.
The closer the speaker is to the listening area, the less area it will cover. It is a good practice to plan out
the system with coverage angles in mind, as we have done in Figure 1.
3. As the distance from the speaker to the listener doubles, the sound pressure level drops by 6dB. If a
listener hears 76dB sound at 1M from the speakers, a listener 2M from the same speaker will hear 70dB
and a listener at 4M will hear 64dB. This rule of thumb will help you plan speaker placement and number
of speakers needed to achieve great sound for every area.
5
Extreme Climate Series – L41XC, L42XC and L12XC
Owner’s Manual
MOUNTING INSTRUCTIONS
L12XC
L42XC L41XC
Figure 1
6
Extreme Climate Series – L41XC, L42XC and L12XC
Owner’s Manual
L41XC SATELLITE SPEAKER
The LC41XC may be mounted to any flat surface with the included mounting bracket or ground mounted
with the included ground stake.
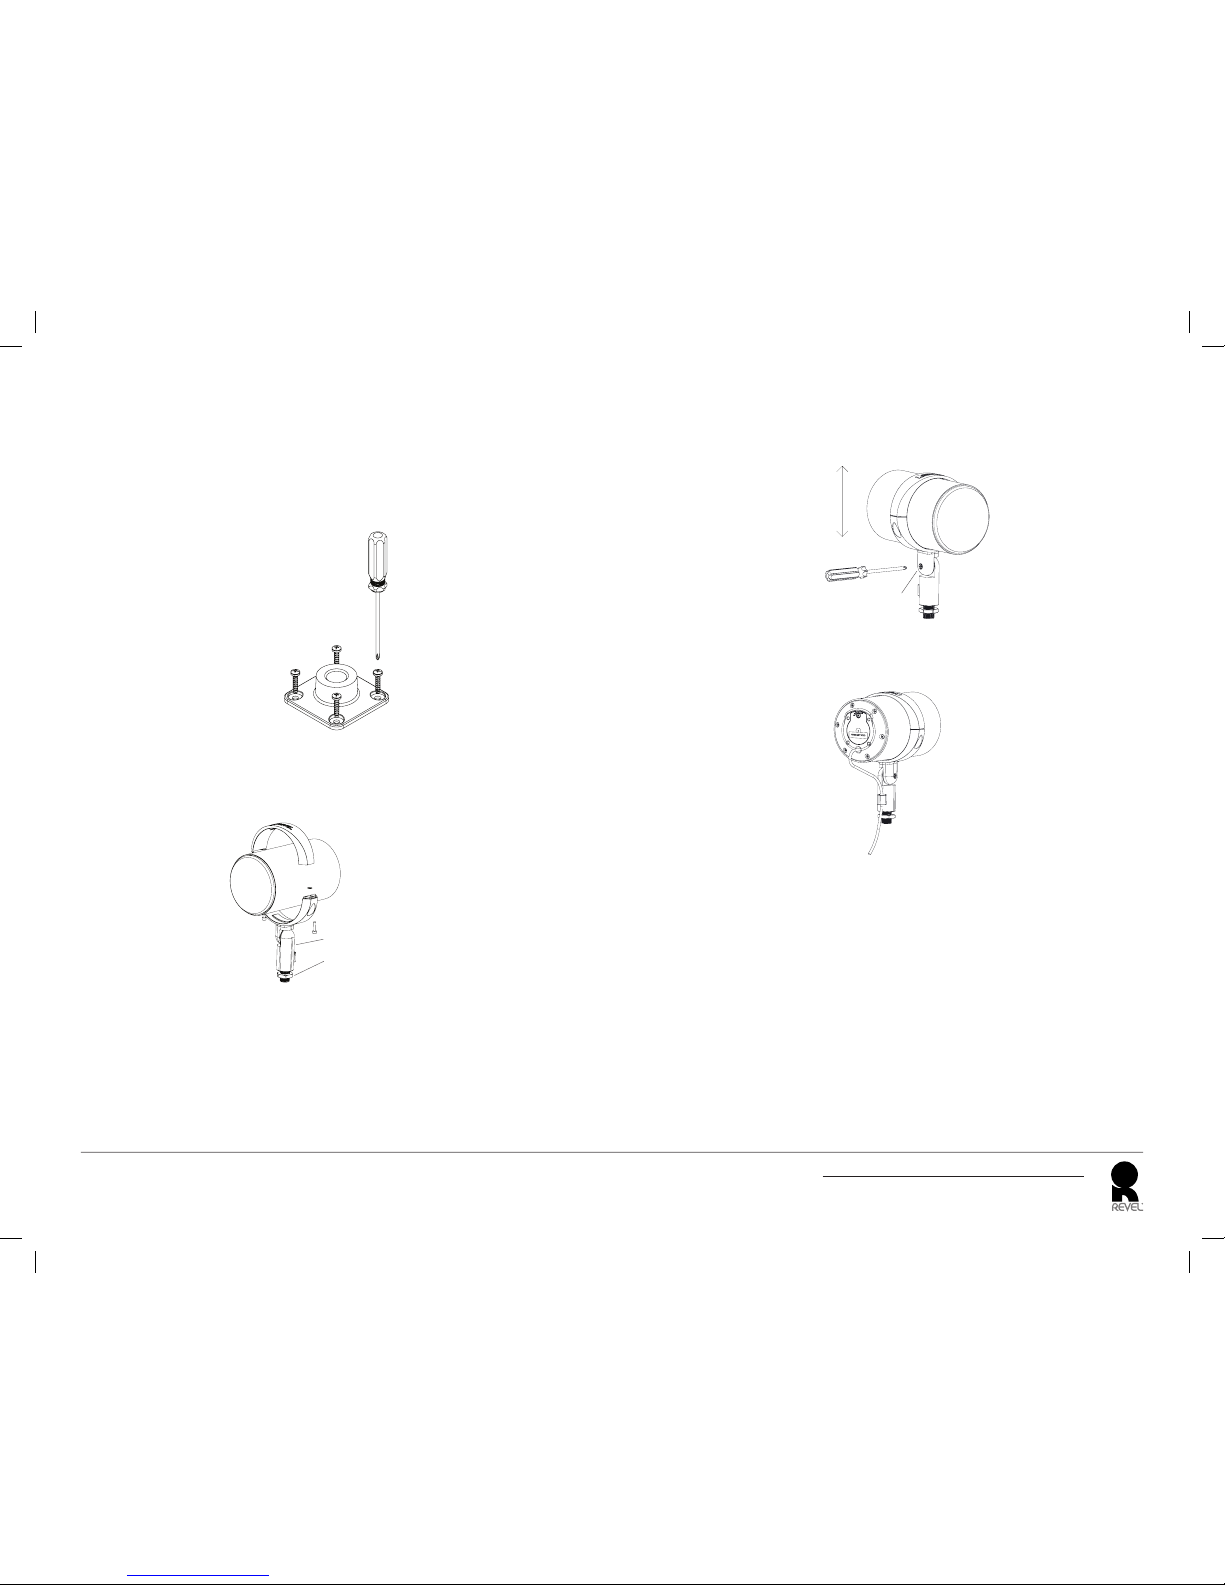
Surface Mounting
1. Use four wood screws (not supplied) to attach the mounting bracket to any wood surface. If mounting to
materials other than wood, use screws and anchors (not supplied) that are appropriate for the material
(see Figure 2).
Figure 2
2. Screw the threaded shaft of the clamp/speaker assembly onto the mounting bracket. Once oriented in
the in the desired direction, tighten the locking nut with a wrench (not supplied) to lock the position
(see Figure 3).
Clamp Assembly Shaft
Locking Nut
Figure 3
3. If needed to achieve a balanced center of gravity, loosen the clamp screws with the supplied hex key
enough to allow the speaker to slide backwards or forwards within the clamp. Position the speaker body
to achieve the best balance and stability.
4. Use the supplied hex key to fully tighten the clamp assembly. DO NOT OVER-TIGHTEN.
5. Use a Philips screwdriver (not supplied) to loosen the elevation locking screw (see Figure 4), point the
speaker to the desired elevation angle and hand tighten the locking screw. DO NOT OVER-TIGHTEN.
Elevation
Elevation Locking Screw
Figure 4
6. Thread the pigtail connecting wire through the wire guide on the clamp assembly shaft as illustrated in
Figure 5.
Figure 5
7
Extreme Climate Series – L41XC, L42XC and L12XC
Owner’s Manual
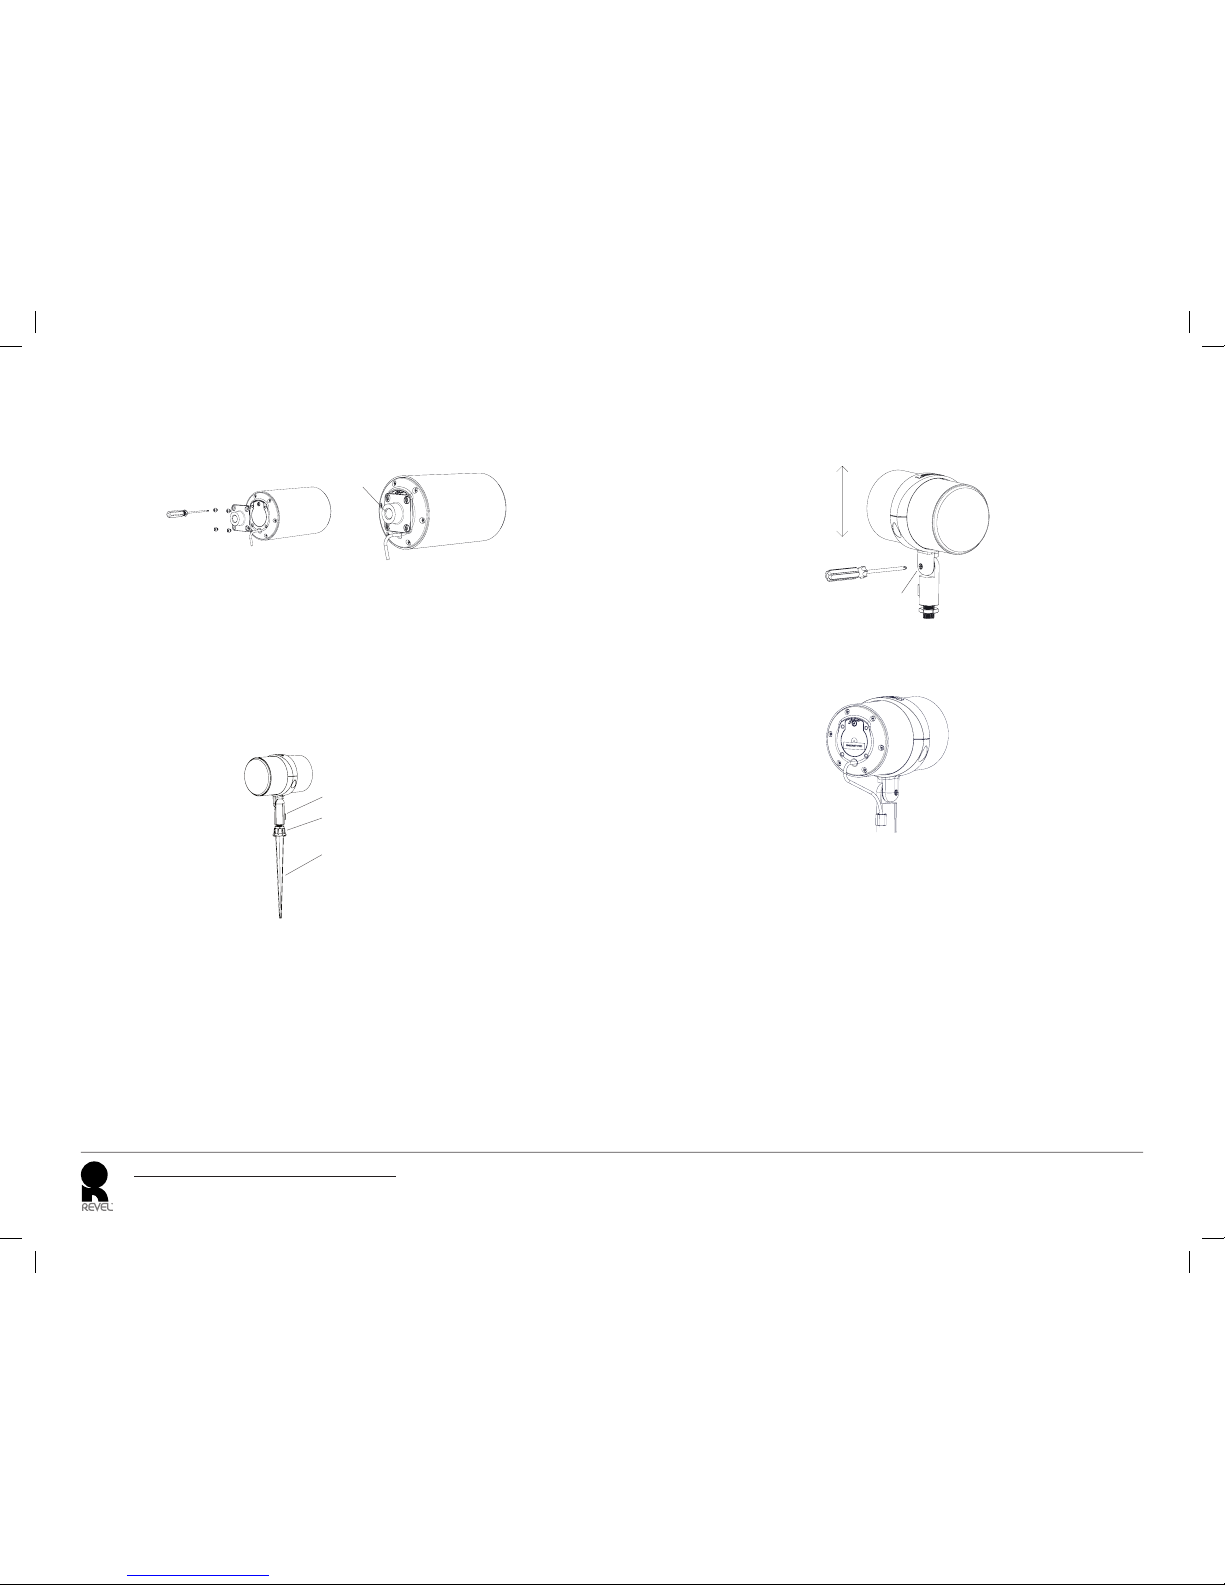
Alternative Surface Mounting
The L41XC may also be mounted to a third party (not supplied) wall mount bracket or threaded pipe with
17.25mm M20 thread. Attach the Revel mounting bracket directly to the back of the speaker with the four
supplied machine screws as shown in Figures 6 and 7.
Figure 6
Figure 7
M20 Thread
The speaker and Revel bracket can now be threaded onto any third party bracket that has a 17.25mm M20
thread. The third party bracket must be rated to hold the weight of the L41XC speaker (4.5kg (9.9 lb). Be
sure to securely affix the third party bracket to the mounting surface with materials-appropriate hardware
and follow the third party bracket manufacturer’s instructions carefully.
Ground Stake Mounting
1. Press the ground stake into the ground all the way up to the stop.
2. Screw the threaded shaft of the clamp assembly onto the ground stake as shown in Figure 8 and tighten
the locking nut with a wrench (not supplied) to lock the position.
Clamp Assembly Shaft
Locking Nut
Ground Stake
Figure 8
3. If needed to achieve a balanced center of gravity, loosen the clamp screws with the supplied hex key
enough to allow the speaker to slide backwards or forwards within the clamp. Position the speaker body
to achieve the best balance and stability.
4. Use the supplied hex key to fully tighten the clamp assembly. DO NOT OVER-TIGHTEN.
5. Use a Philips screwdriver (not supplied) to loosen the elevation locking screw (see Figure 9), point the
speaker to the desired elevation angle and hand tighten the locking screw. DO NOT OVER-TIGHTEN.
Elevation
Elevation Locking Screw
Figure 9
6. Thread the pigtail connecting wire through the wire guide on the clamp assembly shaft as illustrated in
Figure 10.
Figure 10
Route and connect the pigtail audio signal and lighting wires (see Wiring Instructions on page 11).
 Loading...