

Page 1
In the late1930's Frank Kurtis found-
ed the Kurtis Kraft company that
designed and built midget race cars
and in just a little over a twenty year
period produced over 1,100 midget
racers, 500 ready to race and 600 in
kit form. The Kurtis midget racer won
countless racing events all over the
U.S for decades and they are still running strong at vintage events today.
Your Revell Midget Racer model
features a detailed two wheel trailer
with optional up or down loading
ramps, silver Photo-Etched metal
detail parts, a removable hood with
a highly detailed Edelbrock V-8
engine and vintage style decals
with optional trim and numbers.
KIT 4267 85426700200
KURTIS MIDGET RACER
WITH OFFENHAUSER
ENGINE
* REPEAT SEVERAL TIMES
* A REPETER PLUSIEURS FOIS
READ THIS BEFORE YOU BEGIN LIRE CE QUI SUIT AVANT DE COMMENCER
* Study the assembly drawings.
* Each plastic part is identified by a number.
* In the assembly drawings, some parts will be
marked by a star (★) to indicate chrome
plated plastic.
* For better paint and decal adhesion, wash
the plastic parts in a mild detergent solution.
Rinse and let air dry.
* Check the fit of each piece before
cementing in place.
* Use only cement for polystyrene plastic.
* Scrape plating and paint from areas
to be cemented.
* Allow paint to dry thoroughly before
handling parts.
* Any unused parts may be discarded.
DECAL APPLICATION INSTRUCTIONS
1. Cut desired decal from sheet.
2. Dip decal in water for a few seconds.
3. Place wet decal on paper towel.
4. Wait until decal is movable on paper backing.
5. Place decal in position on model, face up and
slide backing away.
6. Press out air bubbles with a soft damp cloth.
7. Milkiness that may appear is for better decal
adhesion and will dry clear. Wipe away any
excess adhesive.
8. Do not touch decal until fully dry.
9. Allow the decals 48 hours to dry before
applying clear coat.
NOTE: Decals are compatible with
setting solutions or solvents.
* REPEAT PROCEDURE
* R E P E T E Z L E P R O C E D E
* OPTIONAL PARTS
`` ` ` `
* PIECES EN OPTION
* Etudier les schémas de montage.
* Chaque pièce en plastique est identifiée par un numéro.
* Sur les schémas de montage, certaines pièces sont
marquées d'une étoile (★) pour indiquer qu'elles sont en
plastique chromé.
* Pour une meilleure prise de la peinture et des autocollants,
laver les pièces en plastique avec une solution détergente peu
concentrée. Les rincer et les laisser sécher à l'air.
* Vérifier que chaque pièce s'ajuste bien avant
de la coller en place.
* N'utiliser que de la colle pour polystyrène.
* Gratter les parties à coller pour enlever le chrome et la peinture.
* Laisser la peinture bien sécher avant de manipuler les pièces.
* Toute pièce inutilisée peut être jetée.
DIRECTIVES D'APPLICATION DES AUTOCOLLANTS
1. Découper l'autocollant désiré de la feuille.
2. Tremper l'autocollant dans de l'eau pendant quelques secondes.
3. Placer l'autocollant mouillé sur une serviette en papier.
4. Attendez que l'autocollant puisse être déplacé sur son
support en papier.
5. Mettre l'autocollant en position sur le modèle face sur
le dessus et faire glisser le support pour l'enlever.
6. Appuyer avec un chiffon doux humide pour éliminer les bulles d'air.
7. La substance laiteuse qui peut apparaître est destinée à
améliorer l'adhésion de l'autocollant et devient incolore au
séchage. Essuyer pour enlever tout excédent d'adhésif.
8. Ne pas toucher l'autocollant tant qu'il n'est pas bien sec.
9. Laisser l'autocollant sécher pendant 48 heures avant
d'appliquer une couche transparente.
REMARQUE: Les autocollants sont compatibles avec
* DECAL
* DECAL COMANIE
les solutions de fixage ou les solvants.
* ASSEMBLY CAUTION
*ATTENTION D ASSEMBLEE
* CEMENT TOGETHER
* A COLLER
This paint guide is provided to complete this kit
Ce guide de peintures est fourni pour reproduire le modèle
Semi Gloss Black
Gloss Red
Gloss White
Aluminum
Leather
Gloss Yellow
Gloss Light Blue
* REMOVE AND THROW AWAY
* A RETIRER ET JETER
as shown on the box.
réduit qui apparaît sur la boîte.
Noir satiné
Rouge brillant
Blanc brillant
Aluminium
Cuir
Jaune brillant
Bleu clair brillant
* DO NOT CEMENT
* NE PAS COLLER
If you have any questions or comments, call our hotline at: (800) 833-3570
Revell Inc Consumer Service Department, 1850 Howard Street Unit A, Elk Grove Village, Illinois 60007
Be sure to include the plan number (85426700200), part number, description, your return address and phone number.
Revell Inc Elk Grove Village, IL. Copyright © 2010. All rights reserved.
or, please write to:
Visit our website: www.revell.com
Page 2

1
ENGINE ASSEMBLY
SEMI GLOSS BLACK
ALUMINUM
★55
RIGHT
CAM HOUSIING
CHROME
★54
LEFT
CAM HOUSIING
CHROME
16
RIGHT
ENGINE BLOCK
ALUMINUM
MOTOR MOUNT / MAGNETO
RIGHT SIDE
20
ALUMINUM
ENGINE BLOCK
19
TIMING COVER
ALUMINUM
15
LEFT
ALUMINUM
ENGINE TOP
ALUMINUM
SEMI GLOSS BLACK
59
GLOSS RED
84
LOWER
COOLANT HOSE
SEMI GLOSS BLACK
Kit 4267 - Page 2 Kit 4267 - Page 11
★81
UPPER
RADIATOR HOSE
CHROME
★80
INTAKE MANIFOLD
CHROME
★17
SIDE DRAFT
CARBURATORS
CHROME
USE WITH
PANEL #113
SHOWN IN
STEP #9
SIDE
★18
FUEL INJECTION
CHROME
★82
AIR INTAKE
STACKS
CHROME
Page 3
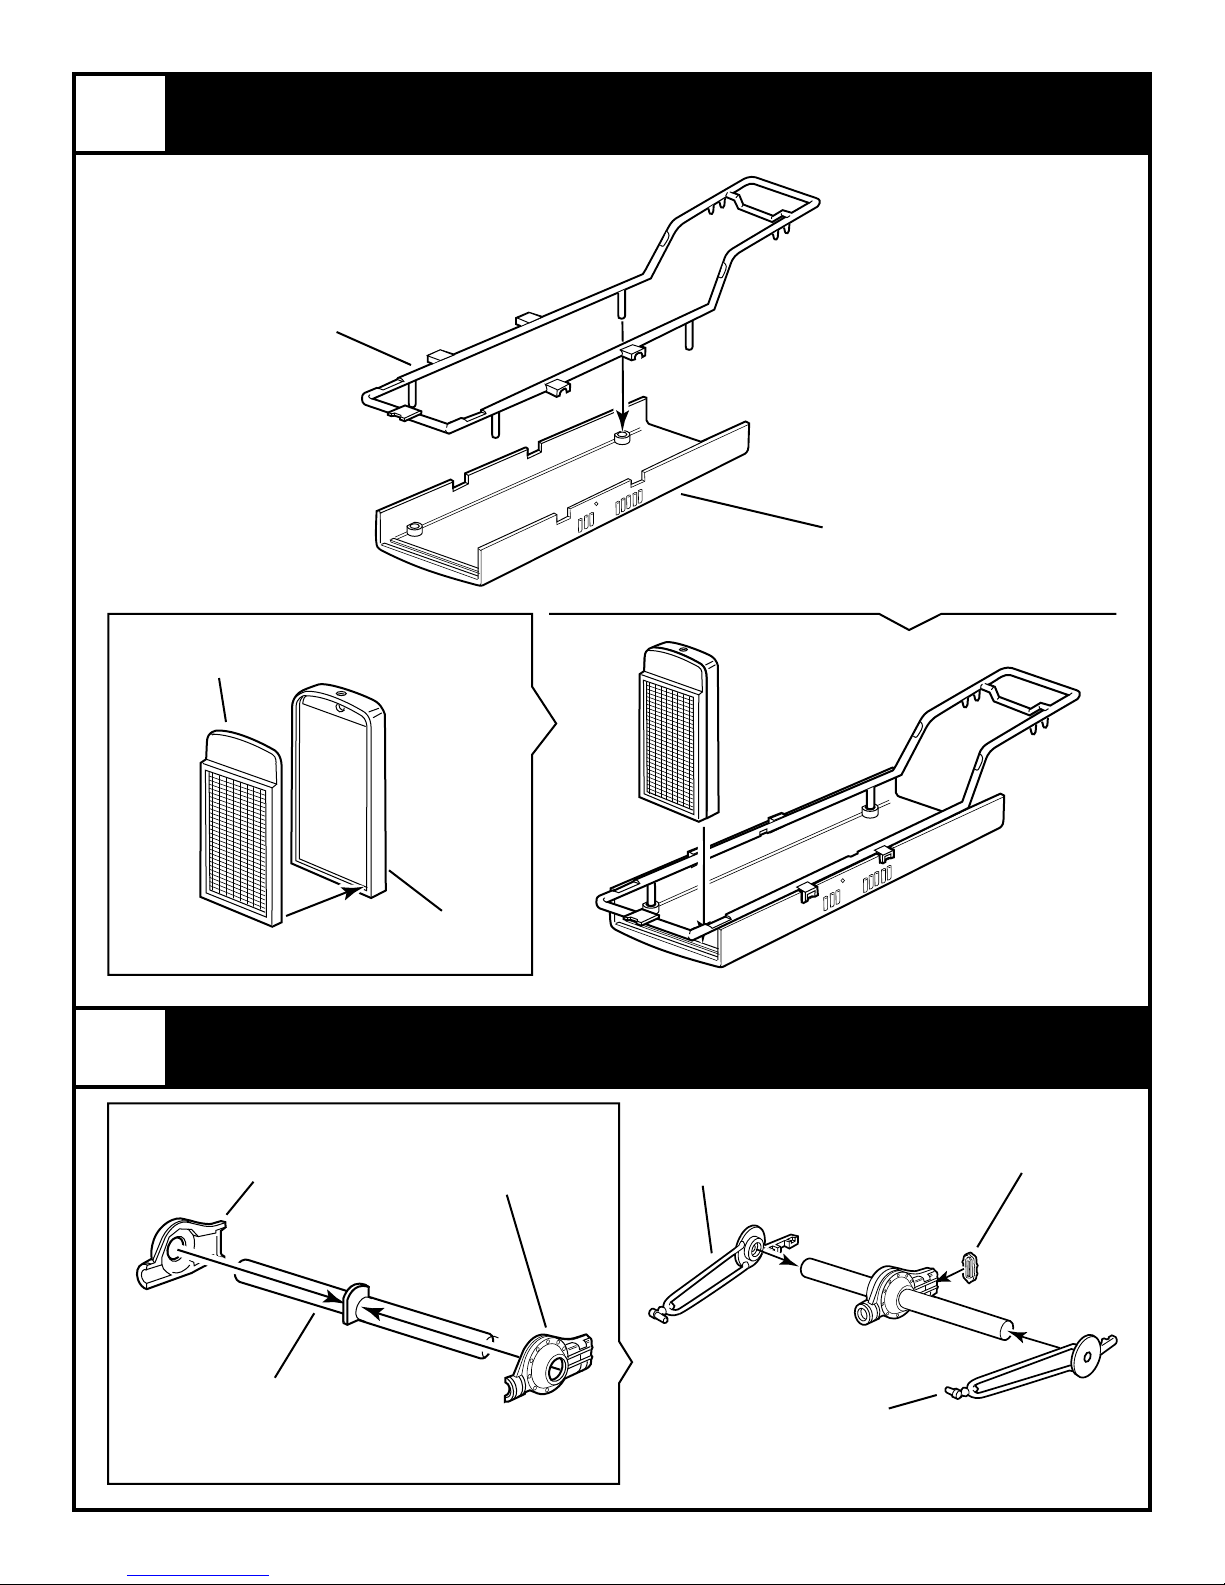
2
RADIATOR FRONT
GLOSS BLACK
111
SEMI GLOSS BLACK
FRAME / RADIATOR ASSEMBLY
21
FRAME
2
LOWER
BODY PAN
BODY COLOR
3
★37
RIGHT REAR
AXLE
CHROME
★98
REAR AXLE SHAFT
CHROME
14
RADIATOR
SEMI GLOSS BLACK
REAR AXLE ASSEMBLY
★38
LEFT REAR
AXLE
CHROME
★40
RIGHT REAR
RADIUS ROD
CHROME
★39
LEFT REAR
RADIUS ROD
CHROME
★96
REAR COVER
CHROME
Kit 4267 - Page 3Kit 4267 - Page 10
Page 4
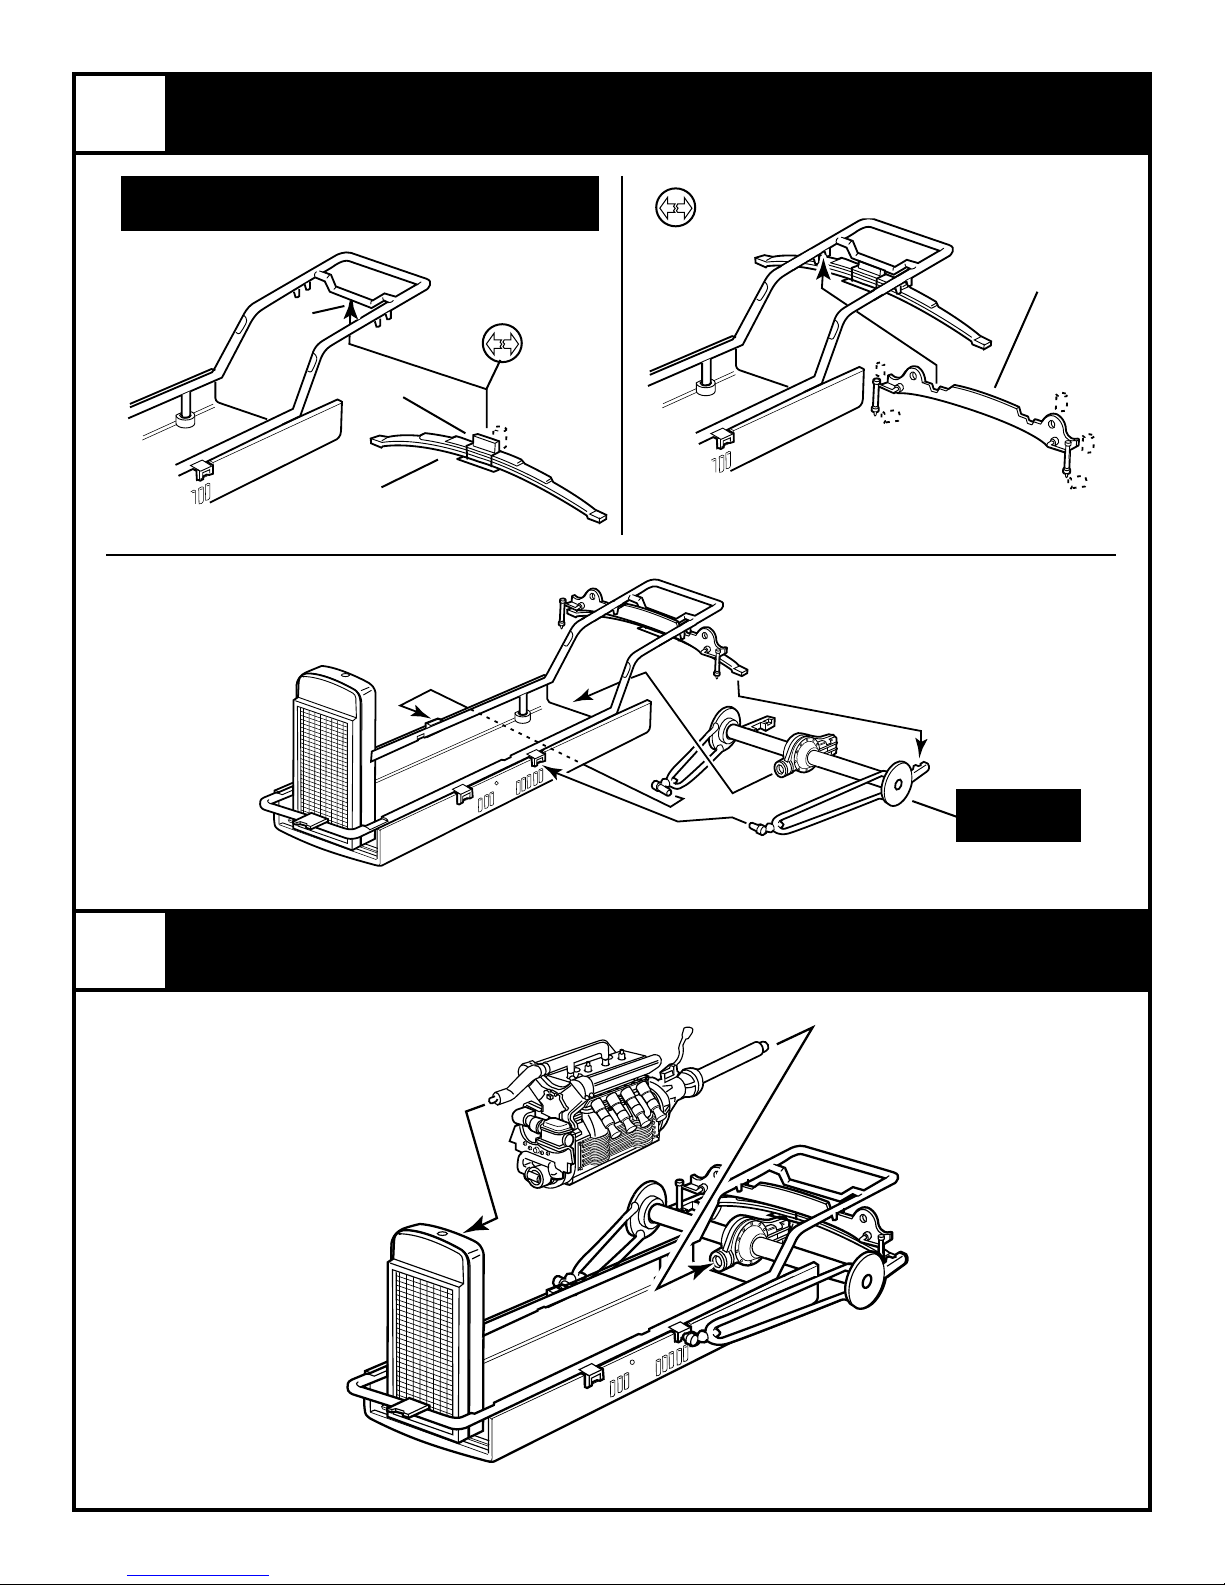
3
TAB ON REAR SPRING FITS INTO SLOT IN FRAME
REAR AXLE ASSEMBLY CONTINUED
NOTE:
*
SLOT
TAB
*
29
REAR
SHOCK MOUNT
GLOSS BLACK
*
*
4
*
28
REAR SPRING
SEMI GLOSS BLACK
COMPLETED
AXLE
ENGINE TO FRAME ASSEMBLY
*
*
Kit 4267 - Page 4 Kit 4267 - Page 9
Page 5

5
★36
RIGHT FRONT
RADIUS ROD
CHROME
TIE ROD
FRONT AXLE ASSEMBLY
★34
FRONT AXLE
★118
CHROME
CHROME
★35
LEFT FRONT
RADIUS ROD
CHROME
6
ENGINE
BULKHEAD
BODY
COLOR
★120
PEDALS
CHROME
STEERING ASSEMBLY
24
GAUGES
PHOTO ETCHED METAL
8
DECAL
(APPLY FIRST)
★25
STEERING WHEEL
CHROME
SEMI GLOSS
BLACK
(RIM)
88
INSTRUMENT
PANEL
SEMI GLOSS
BLACK
89
STEERING
GEAR
SEMI GLOSS
BLACK
FOR ADVANCE BUILDER
STEERING WHEEL RIM
SEMI GLOSS BLACK
★93
STEERING COLUMN
CHROME
STEERING WHEEL
SPOKES
PHOTO ETCHED METAL
94
SEMI GLOSS
BLACK
(RIM)
PHOTO ETCHED PARTS NOTE:
This kit contains photo etched parts for added realism. use a sharp knife to remove the parts from their tree and cut against a hard surface like a piece of glass. Stick
a piece of tape to the back of the photo etch tree so the parts don't fly off and get lost. Carefully sand the photo etch pieces to remove any remnants of their mounting
points. To attach the photo etched pieces to your model, use a toothpick or piece of wire to apply a small amount of CA superglue, two-part epoxy, or clear enamel
paint to your model. Then the photo etched pieces can be put into place using tweezers or a toothpick dipped in candle wax.
Kit 4267 - Page 5
Page 6

7
BODY / SEAT ASSEMBLY
★58
UPPER FRONT
NERF BAR
CHROME
★43
FRONT NERF BAR
WITH SHOCKS
CHROME
1
BODY REAR
BODY COLOR
COMPLETED
BULKHEAD
ASSEMBLY
26
SEAT
SEMI GLOSS
BLACK
FIRST
Kit 4267 - Page 6
Page 7

8
NERF BAR ASSEMBLY
27
LOWER
ACCESS COVER
BODY COLOR
★45
REAR NERF BAR
LOWER
CHROME
SECOND
★44
REAR NERF BAR
UPPER
CHROME
FIRST
★121
CENTER GUARD
CHROME
9
13
RIGHT
SIDE PANEL
BODY COLOR
BRAKE / PUMP / PANEL ASSEMBLY
110
HEAD REST
SEMI GLOSS
BLACK
★90
RADIATOR CAP
CHROME
★46
FUEL PUMP
CHROME
SEMI GLOSS
BLACK
★47
HAND BRAKE
CHROME
12
LEFT
SIDE PANEL
"B"
BODY COLOR
113
LEFT
SIDE PANEL
"A"
BODY COLOR
Kit 4267 - Page 7
Page 8

10
USE WITH #113 PANEL FROM STEP #9
AIR CLEANER / ARM ASSEMBLY
★56
AIR CLEANERS
CHROME
★41
STEERING ARM
CHROME
11
HOOD IN PLACE
TEMPORARILY ONLY
TO LOCATE NOSE
TAPE
GRILLE ASSEMBLY
106
NOSE
BODY COLOR
★105
GRILLE
CHROME
★57
EXHAUST HEADER
CHROME
Kit 4267 - Page 8
Page 9

12
WHEEL ASSEMBLY
★33
REAR
KNOCK OFF
CHROME
★32
FRONT
KNOCK OFF
CHROME
FRONT REAR
PINS
★30
FRONT WHEEL
CHROME
97
PIN RETAINER
SEMI GLOSS BLACK
*
PINS
*
★31
REAR WHEEL
CHROME
PIN RETAINER
SEMI GLOSS BLACK
*
97
★33
REAR
KNOCK OFF
CHROME
13
WINDSHIELD
75
CLEAR
112
PLAIN HOOD
BODY COLOR
97
PIN RETAINER
SEMI GLOSS BLACK
*
97
PIN RETAINER
SEMI GLOSS BLACK
HOOD ASSEMBLY
LINE UP BOTTOM OF HOOD STRAPS
WITH SMALL RAISED PADS ON LEFT
ENGINE SIDE PANEL PART #12
BEND ENDS
AT ANGLE
*
HOOD STRAPS
PHOTO ETCHED METAL
*
★32
FRONT
KNOCK OFF
CHROME
Page 10

14
72
TRAILER WHEEL
GLOSS RED
TRAILER ASSEMBLY
★73
HUB CAP
CHROME
124
SUPPORT
ROD
GLOSS RED
71
RIGHT
INNER RETAINER
GLOSS RED
*
69
RIGHT
OUTER RETAINER
GLOSS RED
67
WHEEL POST
GLOSS RED
70
LEFT
INNER RETAINER
GLOSS RED
*
PIN
66
TRAILER AXLE
GLOSS RED
ALUMINUM
(TREADPLATE AREAS)
68
LEFT
OUTER RETAINER
GLOSS RED
ALUMINUM
PIN
SEMI GLOSS
BLACK
★73
HUB CAP
CHROME
62
RIGHT RAMP
GLOSS RED
WITH ALUMINUM
(TREADPLATE)
LEFT RAMP
WITH ALUMINUM
(TREADPLATE)
61
GLOSS RED
60
TRAILER DECK
GLOSS RED
65
RAMP LOCK
ALUMINUM
122
TAILLIGHTS
GLOSS RED
(LENS AREA IS
TRANSPARENT RED
OVER SILVER)
123
LICENSE
PLATE
GLOSS RED
TRAILER FRONT WHEEL
GLOSS RED
74
'50 FORD PICKUP
TRAILER HITCH
SEMI GLOSS BLACK
117
WHEEL CRANK
GLOSS RED
ALUMINUM
116
★64
HITCH BALL
CHROME
SEMI GLOSS BLACK
(CASTER)
63
'48 FORD WOODY
TRAILER HITCH
SEMI GLOSS BLACK
★64
HITCH BALL
CHROME
65
RAMP LOCK
ALUMINUM
Page 11

15
DECAL PLACEMENT
Page 12

16
DECAL PLACEMENT
Kit 4267 - Page 12
 Loading...