

Page 1
READ BEFORE YOU BEGIN
• CLEAR A SPACE TO WORK ON
• STUDY THE ASSEMBLY DRAWINGS
BEFORE YOU BEGIN
• EACH PLASTIC PART IS IDENTIFIED BY A
PART NUMBER
• DO NOT OVER TIGHTEN SCREWS
• SEE NOTE ABOUT APPLYING STICKERS
IN STEP #16
CAUTION:
POSITION ALL PARTS IN THIS KIT
CAREFULLY. PARTS WILL ONLY SNAP
TOGETHER ONCE.
Á LIRE AVANT DE COMMENCER
• DÉGAGGEZ UN ESPACE POUR
TRA-VAILLER.
• ÉTUDIEZ LES ÉTAPES DE MONTAGE
AVANT DE COMMENCER.
• CHAQUE PIÉCE EN PLASTIQUE PORTE
UN NUMÉRO DE PIÉCE.
• NE SERREZ PAS TROP LES VIS.
• LISEZ LA RE MARQUE CONCERNANT
L ´APPLICATION DES AUTO COLLANTS,
´A L´ ÉTAPE 16.
MISE EN GARDE:
POSITIONNEZ AVEC PRÉCAUTION TOUTES
LES PIÉCES DE CE MODÉLE RÉDUIT, CAR
VOUS NE POUVEZLES EMBOîTER QU’UNE
SEULE FOIS.
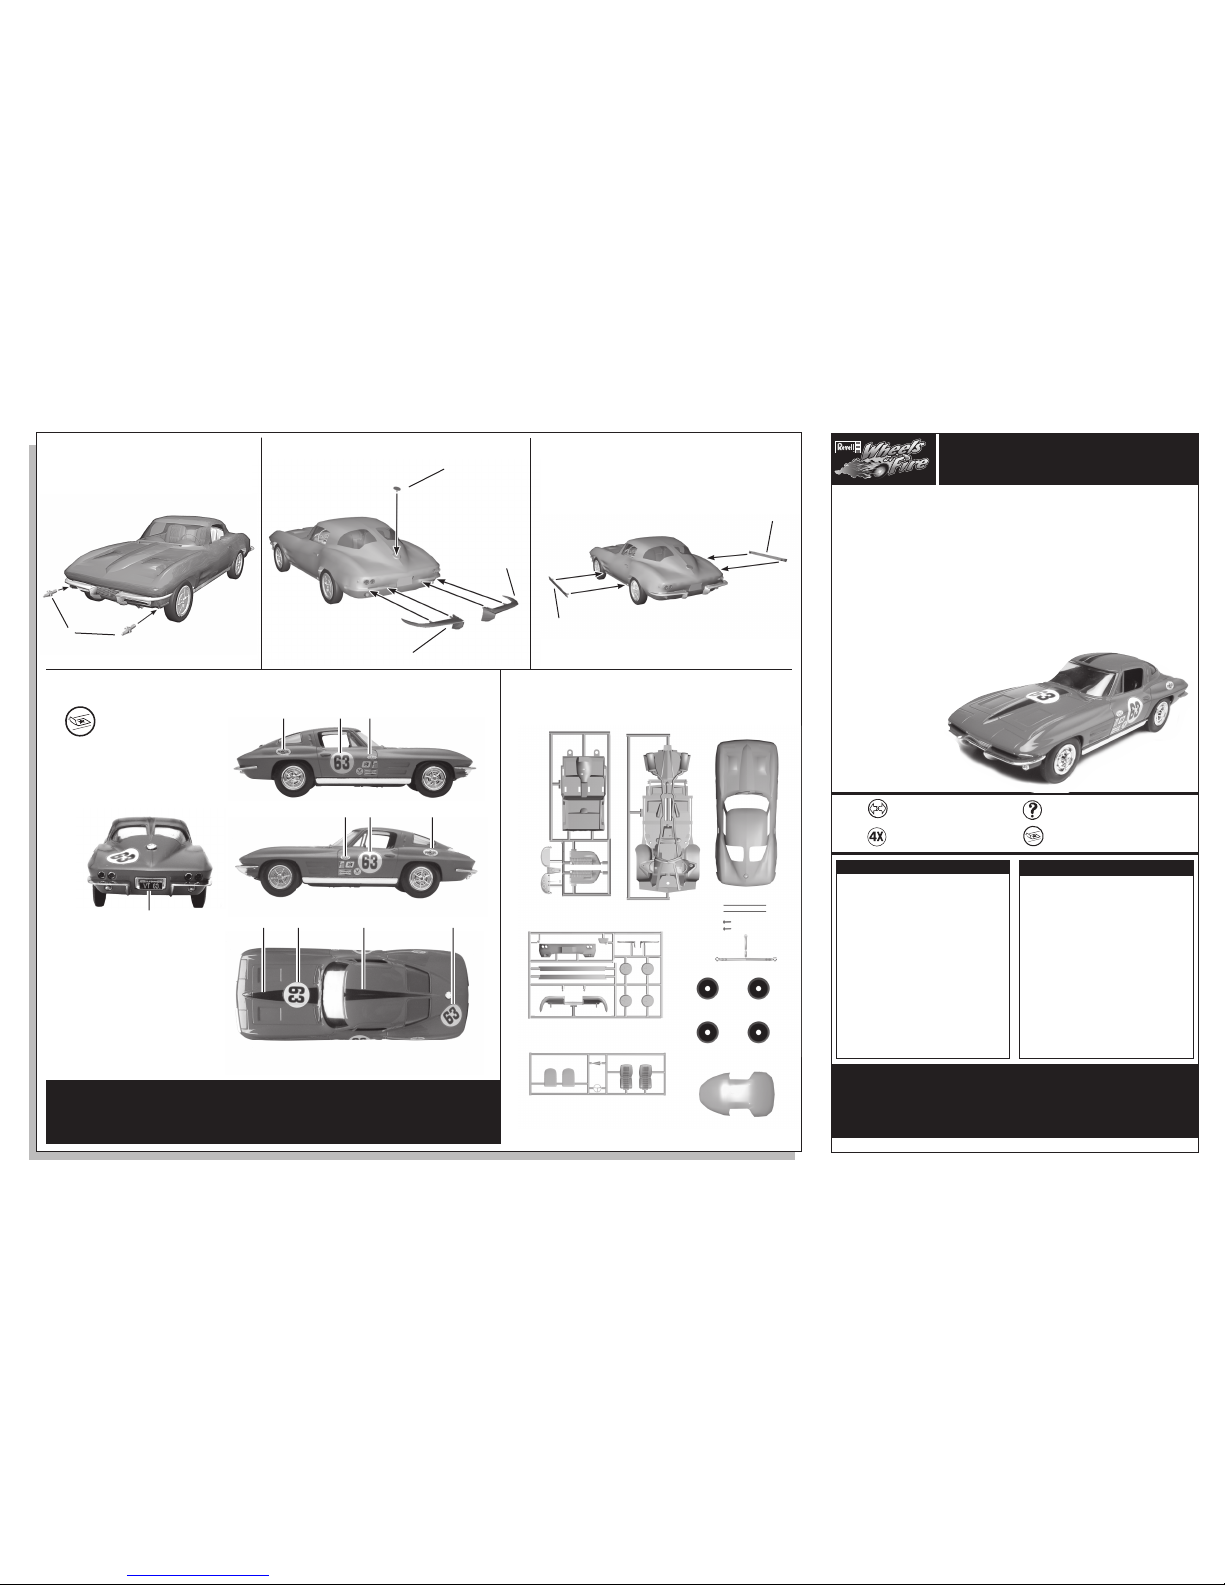
’63 Corvette® Sting
Ray
®
The 1963 Corvette is a true American classic that is widely
regarded as one of Chevrolet’s best cars ever. 1963 was
the first year the Corvette was called the Sting Ray, the first
year a fixed roof coupe was offered, and the first year for the
Corvette’s signature hidden headlights. Corvette is synonymous
with sports car, and with its 327 V-8 and all-new independent
rear suspension, the ‘63 Sting Ray did not disappoint. The new
‘63 model represented the most radical design and engineering
change in Corvette history, and the influence of its timelessly
beautiful styling can still be seen clearly in today’s Corvette.
Your Revell Wheels of Fire kit features easy snap and screw
together assembly, detailed interior and
chassis, chrome plated parts, and
colorful optional road
racing numbers and
sponsor decals.
Enjoy building
your kit of this clas- sic
Corvette!
Step 13
If you h ave a ny qu estion s or comme nts, call our h otlin e at: (800) 833-3570
or, please write to:
Revell-Monogram Consumer Service Department, 725 Landwehr Road,
Northbrook, Illinois 60062
Be sure to include the plan number (85191500200), part number, description,
your return address and phone number.
Visit our website: www.revellmonogram.com
* REPEAT SEVERAL TIMES
* A REPETER PLUSIEURS FOIS
* REMOVE AND THROW AWAY
* A RETIRER ET JETER
* APPLY STICKERS
*APPLIQUEZ LES AUTO-COLLANTS
* OPTIONAL PARTS
* PIECES EN OPTION
REVELL-MONOGRAM, LLC Northbrook, IL. Copyright © 2004. All rights reserved. Made in China
Step 16
ANY UNUSED PARTS MAY BE DISCARDED
Sticker Placement Guide
KIT 1915 85191500200
Parts Included
NOTE:
When applying stickers, avoid touching the “sticky” side to prevent finger prints on stickers. Bend sticker sheet slightly to lift edge of sticker & use a fingernail to lift
sticker from sheet. Line up sticker on body and press an edge into place, slowly working sticker with a finger nail until sticker is fully on model.
REMARQUE :
Pendant l’application des autocollants, éviter de toucher à la face collante pour ne pas laisser d’empreintes. Plier légèrement la feuille d’autocollants pour relever le
bord d’un autocollant, et le détacher de la feuille avec le bout d’un ongle. Aligner l’autocollant sur la carrosserie, appuyer pour coller un de ses bords, et continuer de
l’appliquer lentement du bout de l’ongle jusqu’à ce qu’il soit complètement collé sur le modèle réduit.
Step 14 Step 15
13
LEFT REAR
BUMPER
CHROME
14
RIGHT REAR
BUMPER
CHROME
17
GAS CAP
CHROME
11
LEFT SIDE
MOLDING
CHROME
12
RIGHT SIDE
MOLDING
CHROME
3
4
2
10
16
20
20
11
12
9
19
17
6
6
5
5
8
7
30
15
13
14
SCREWS
METAL AXLES
TIRES
25
1
3
2
4
9
4
7
5
4
6
8
18
18
TURN SIGNAL
CHROME
Page 2
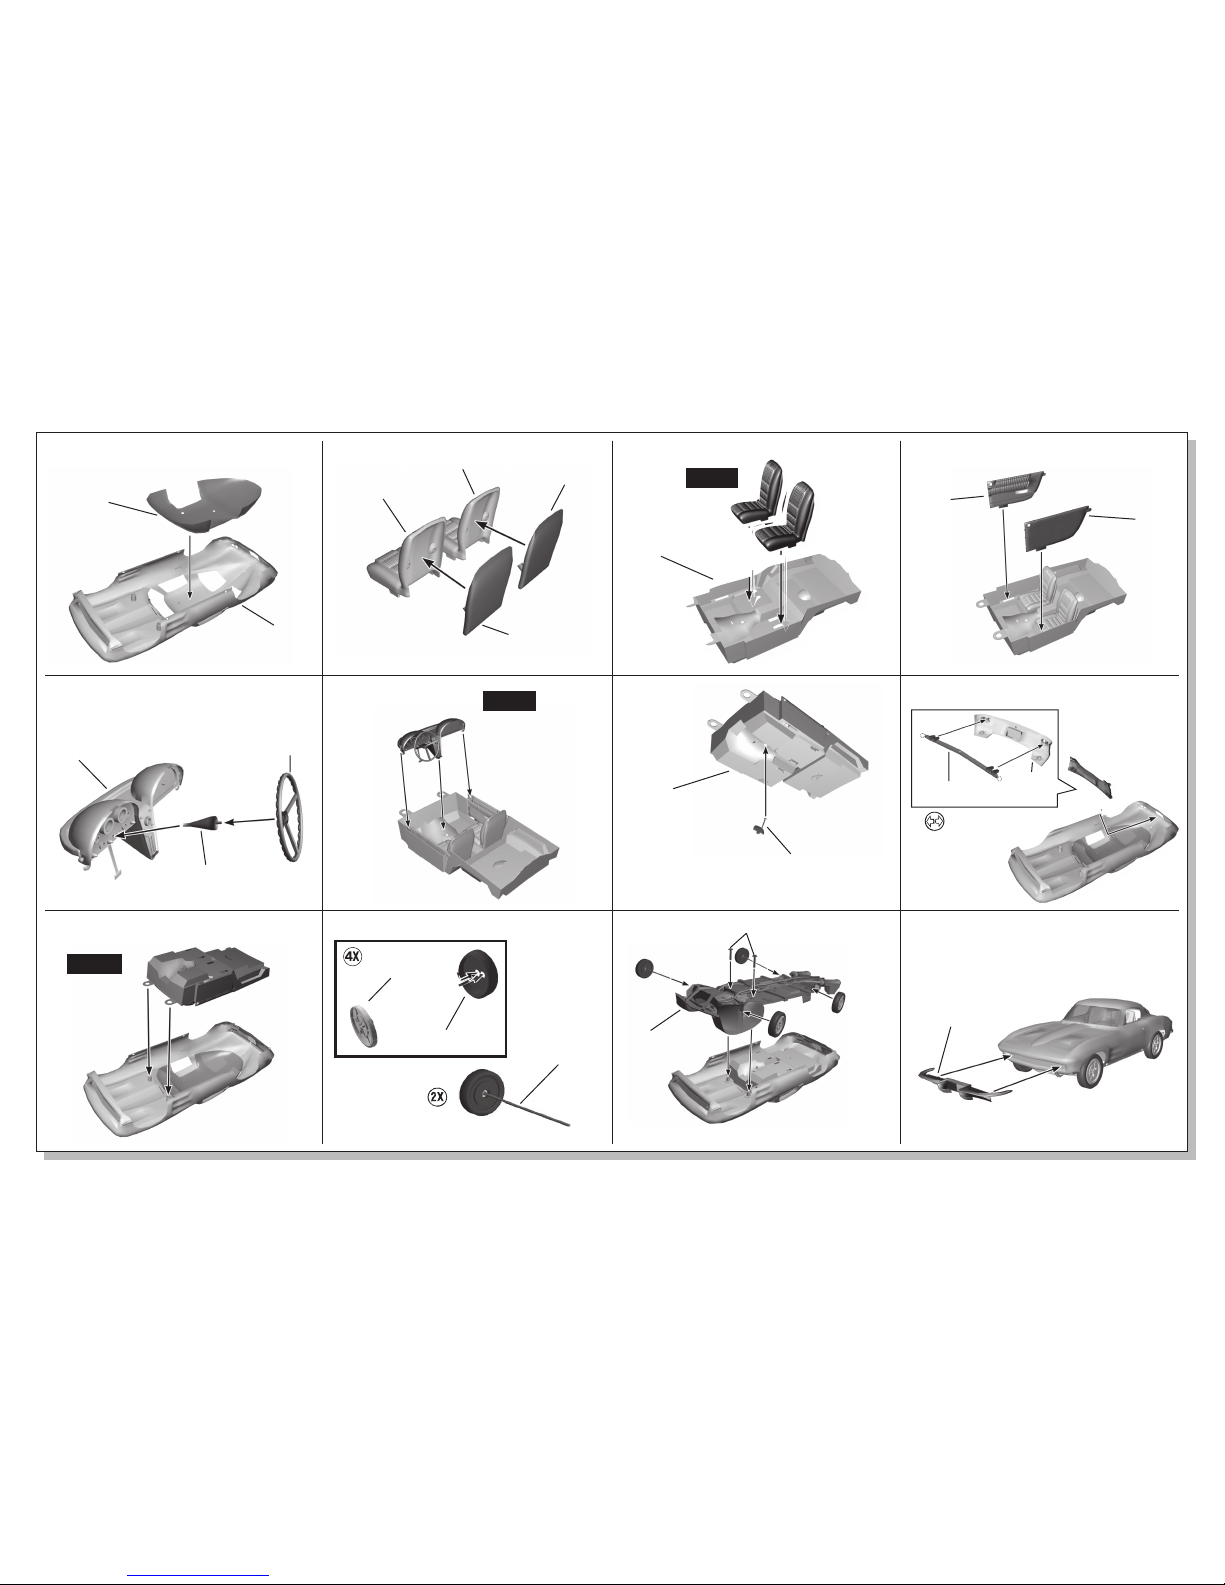
Step 1 Step 2 Step 3
Step 10
Step 7
Step 6
Step 8
Step 5
Step 9
Step 4
Step 12Step 11
85191500200
30
WINDOWS
CLEAR
8
STEERING
WHEEL
19
SHIFTER
CHROME
16
TAIL LIGHT
HOUSING
CHROME-
SCREWS
METAL AXLE
20
WHEEL
CHROME
15
FRONT BUM-
PER
CHROME
TIRE
25
TAIL LIGHT STRIP
TRANSPARENT RED
7
STEERING
COLUMN
9
DASHBOARD
4
DRIVER SIDE
DOOR PANEL
3
PASSENGER SIDE
DOOR PANEL
2
INTERIOR TUB
5
DRIVER’S SEAT
6
DRIVER’S
SEAT BACK
5
PASSENGER’S SEAT
6
PASSENGER’S
SEAT BACK
BODY
COMPLETED
SEATS
DASHBOARD
ASSEMBLY
INTERIOR TUB
ASSEMBLY
10
CHASSIS
NOTE: BE SURE TO ATTACH
WHEELS TO CHASSIS BEFORE
SCREWING CHASSIS ONTO BODY
BOTTOM OF INTERIOR TUB
✱
✱
✱
 Loading...