

REVELL Dale Earnhardt, Jr. Dale Earnhardt Tribute Conc User Manual [nl, it, gr, da, no, fi, sv, es, pt, hr, et, fi, hu, lv, lt, pl, ro, RU, sr, sk, sl, cs, tr, bg, uk, he, hi, id, kk, ms, fa, th, vi, sq, mk]
Page 1
KIT 2844 85284400200
DALE EARNHARDT, JR.
DALE EARNHARDT TRIBUTE CONCERT
MONTE CARLO
™
Chance Motorsports was formed in 1994 by Dale and Teresa
Earnhardt specifically for the purpose of helping Dale’s children
career, including educational & scholarship programs and wildlife
preservation.
Kerry, Kelley and Dale Jr. get into racing through the smaller
NASCAR® Late Model series. Talent for piloting a race car must
definitely run in the genes as Kerry and Dale Jr both excelled,
quickly moving up to the Grand National series. As a result, the
Earnhardts disbanded Chance shortly thereafter, its purpose
accomplished.
In 2003, Teresa and Dale Jr formed Chance 2 Motorsports in
twice during his Grand National career, he had never won a GN
race at the Talladega track. Using the same car that he had driven
to victory at the February race at Daytona, Dale Jr qualified in third
place on the starting grid. The race itself was packed with all the
thrills that fans expect to see at the huge Alabama track, including
a 21 car crash that Dale Jr managed to avoid.
the same spirit as the original-helping up and coming drivers and
crew members get into the sport. It was under the Chance 2 banner that the #8 Dale Earnhardt Tribute Concert Monte Carlo™ was
entered in the spring Grand National race at the Talladega superspeedway. The Dale Earnhardt Tribute Concert was held June 28,
stop, Dale Jr and the Chance 2 crew brought the specially painted
Monte Carlo™ across the finish line first. In fact, they cut it so close
that the car ran out of fuel on the cool down lap and had to be
pushed into Victory Lane by a tow truck.
2003 at the Daytona International Speedway, the first time a large
musical, rather than racing, event was held at the facility. The fund
raising concert benefited the Dale Earnhardt Foundation and chari-
ily. The very next day, the Cup series combatants also took to the
Talladega high banks. Yep, Dale Jr won that, too.
table causes the late seven-time Cup champion backed during his
* REPEAT SEVERAL TIMES
* A REPETER PLUSIEURS FOIS
READ THIS BEFORE YOU BEGIN LIRE CE QUI SUIT AVANT DE COMMENCER
* Study the assembly drawings.
* Each plastic part is identified by a number.
* In the assembly drawings, some parts will be
marked by a star (★) to indicate chrome
plated plastic.
* For better paint and decal adhesion, wash
the plastic parts in a mild detergent solution.
Rinse and let air dry.
* Check the fit of each piece before cementing
in place.
* Use only cement for polystyrene plastic.
* Scrape plating and paint from areas to be
cemented.
* Allow paint to dry thoroughly before
handling parts.
* Any unused parts may be discarded.
DECAL APPLICATION INSTRUCTIONS
1. Cut desired decal from sheet.
2. Dip decal in water for a few seconds.
3. Place wet decal on paper towel.
4. Wait until decal is movable on paper backing.
5. Place decal in position on model, face up
and slide backing away.
6. Press out air bubbles with a soft damp cloth.
7. Milkiness that may appear is for better decal
adhesion and will dry clear. Wipe away any
excess adhesive.
8. Do not touch decal until fully dry.
9. Allow the decals 48 hours to dry before
applying clear coat.
NOTE: Decals are compatible with
setting solutions or solvents.
* OPTIONAL PARTS
* PIECES EN OPTION
* DECAL
* DECAL COMANIE
* Etudier les schémas de montage.
* Chaque pièce en plastique est identifiée par un numéro.
* Sur les schémas de montage, certaines pièces sont mar
quées d'une étoile (★) pour indiquer qu'elles sont en
plastique chromé.
* Pour une meilleure prise de la peinture et des autocollants,
laver les pièces en plastique avec une solution détergente
peu concentrée. Les rincer et les laisser sécher à l'air.
* Vérifier que chaque pièce s'ajuste bien avant de la coller
en place.
* N'utiliser que de la colle pour polystyrène.
* Gratter les parties à coller pour enlever le chrome et la peinture.
* Laisser la peinture bien sécher avant de manipuler les pièces.
* Toute pièce inutilisée peut être jetée.
DIRECTIVES D'APPLICATION DES AUTOCOLLANTS
1. Découper l'autocollant désiré de la feuille.
2. Tremper l'autocollant dans de l'eau pendant quelques secondes.
3. Placer l'autocollant mouillé sur une serviette en papier.
4. Attendez que l'autocollant puisse être déplacé sur son sup
port en papier.
5. Mettre l'autocollant en position sur le modèle face sur le
dessus et faire glisser le support pour l'enlever.
6. Appuyer avec un chiffon doux humide pour éliminer les bulles
d'air.
7. La substance laiteuse qui peut apparaître est destinée à
améliorer l'adhésion de l'autocollant et devient incolore au
séchage. Essuyer pour enlever tout excédent d'adhésif.
8. Ne pas toucher l'autocollant tant qu'il n'est pas bien sec.
9. Laisser l'autocollant sécher pendant 48 heures avant
d'appliquer une couche transparente.
* ALTERNATIVE ASSEMBLY
* ENSEMBLAGE ALTERNATIVE
Although Dale Earnhardt, Jr had clinched the championship
Waiting until the very last moment to come in for their last pit
Another exciting and emotional victory for the Earnhardt fam-
* CEMENT TOGETHER
* A COLLER
* REMOVE AND THROW AWAY
* A RETIRER ET JETER
This paint guide is provided to
complete this kit as shown on the box
Ce guide de peinture est fourni pour reproduire le
modèle réduit qui apparaît sur la boîte.
Aluminum
Flat Black
Flat White
Flat Yellow
Gloss Black
Gloss Red
Gloss White
Light Gray
Satin White
Semigloss Black
Silver
Steel
* DO NOT CEMENT
* NE PAS COLLER
Aluminum
Noir mat
Blanc mat
Jaune mat
Noir brilliant
Rouge brilliant
Blanc brilliant
Gris clair
Blanc satiné
Noir satiné
Argent
Acier
.
If you have any questions or comments, call our hotline at: (800) 833-3570
or, please write to:
Revell-Monogram Consumer Service Department, 8601 Waukegan Road, Morton Grove, Illinois 60053
Be sure to include the plan number (85284400200), part number, description, your return address and phone number.
Visit our website: www.revell-monogram.com
REVELL-MONOGRAM, LLC. All rights reserved, Copyright © 2003. Made in U.S.A.
Page 2
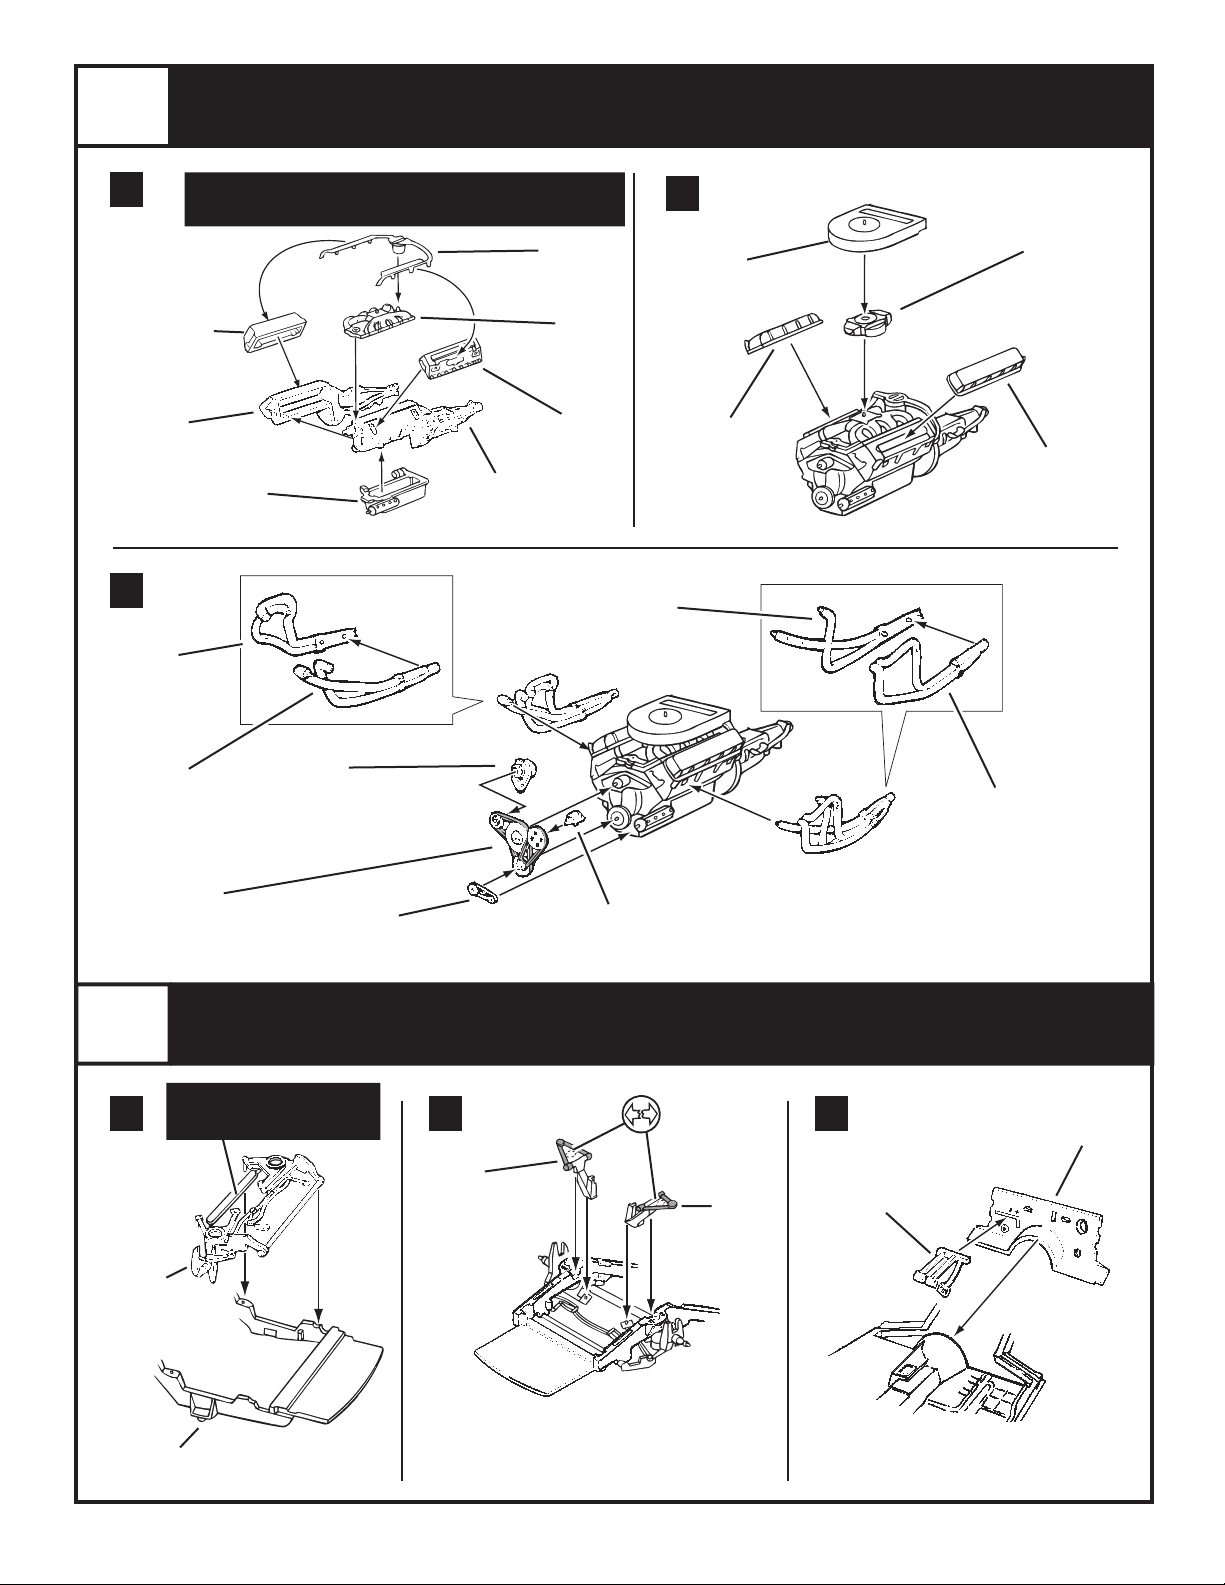
1
A
ENGINE ASSEMBLY
NOTE: BEND PLUG WIRES SO THAT LONG TABS ON
✱
WIRES FIT INTO DEPRESSIONS ON CYLINDER HEADS
DISTRIBUTOR / WIRES
65
CYLINDER
HEAD
ALUMINUM
✱
✱
36
FLAT BLACK
(PAINT WIRES YELLOW)
69
INTAKE
MANIFOLD
ALUMINUM
B
93
AIR CLEANER
ALUMINUM
70
CARBURETOR
ALUMINUM
30
ENGINE HALF
ALUMINUM
C
41
HEADER
STEEL
40
HEADER
STEEL
BELT ASSEMBLY
FLAT BLACK
OIL PAN
ALUMINUM
32
35
64
ALTERNATOR
ALUMINUM
SUMP BELT
FLAT BLACK
65
CYLINDER
HEAD
ALUMINUM
29
ENGINE HALF
ALUMINUM
39
HEADER
STEEL
33
POWER STEERING PUMP
34
ALUMINUM
67
ROCKER
COVER
ALUMINUM
38
HEADER
STEEL
66
ROCKER
COVER
ALUMINUM
2
A
LOWER FRONT
SUSPENSION
SEMIGLOSS BLACK
LEAVE SUPPORT STRAP IN
14
4
FRAME
LIGHT GRAY
CHASSIS AND INTERIOR ASSEMBLY
NOTE:
PLACE UNTIL STEP 4A
B C
15
RIGHT UPPER
ARM
LIGHT GRAY
(SHADED AREA
SEMIGLOSS BLACK)
96
LEFT UPPER
ARM
LIGHT GRAY
(SHADED AREA
GLOSS BLACK
SEMI-
)
44
PEDALS
ALUMINUM
7
FIREWALL
LIGHT GRAY
Page 3
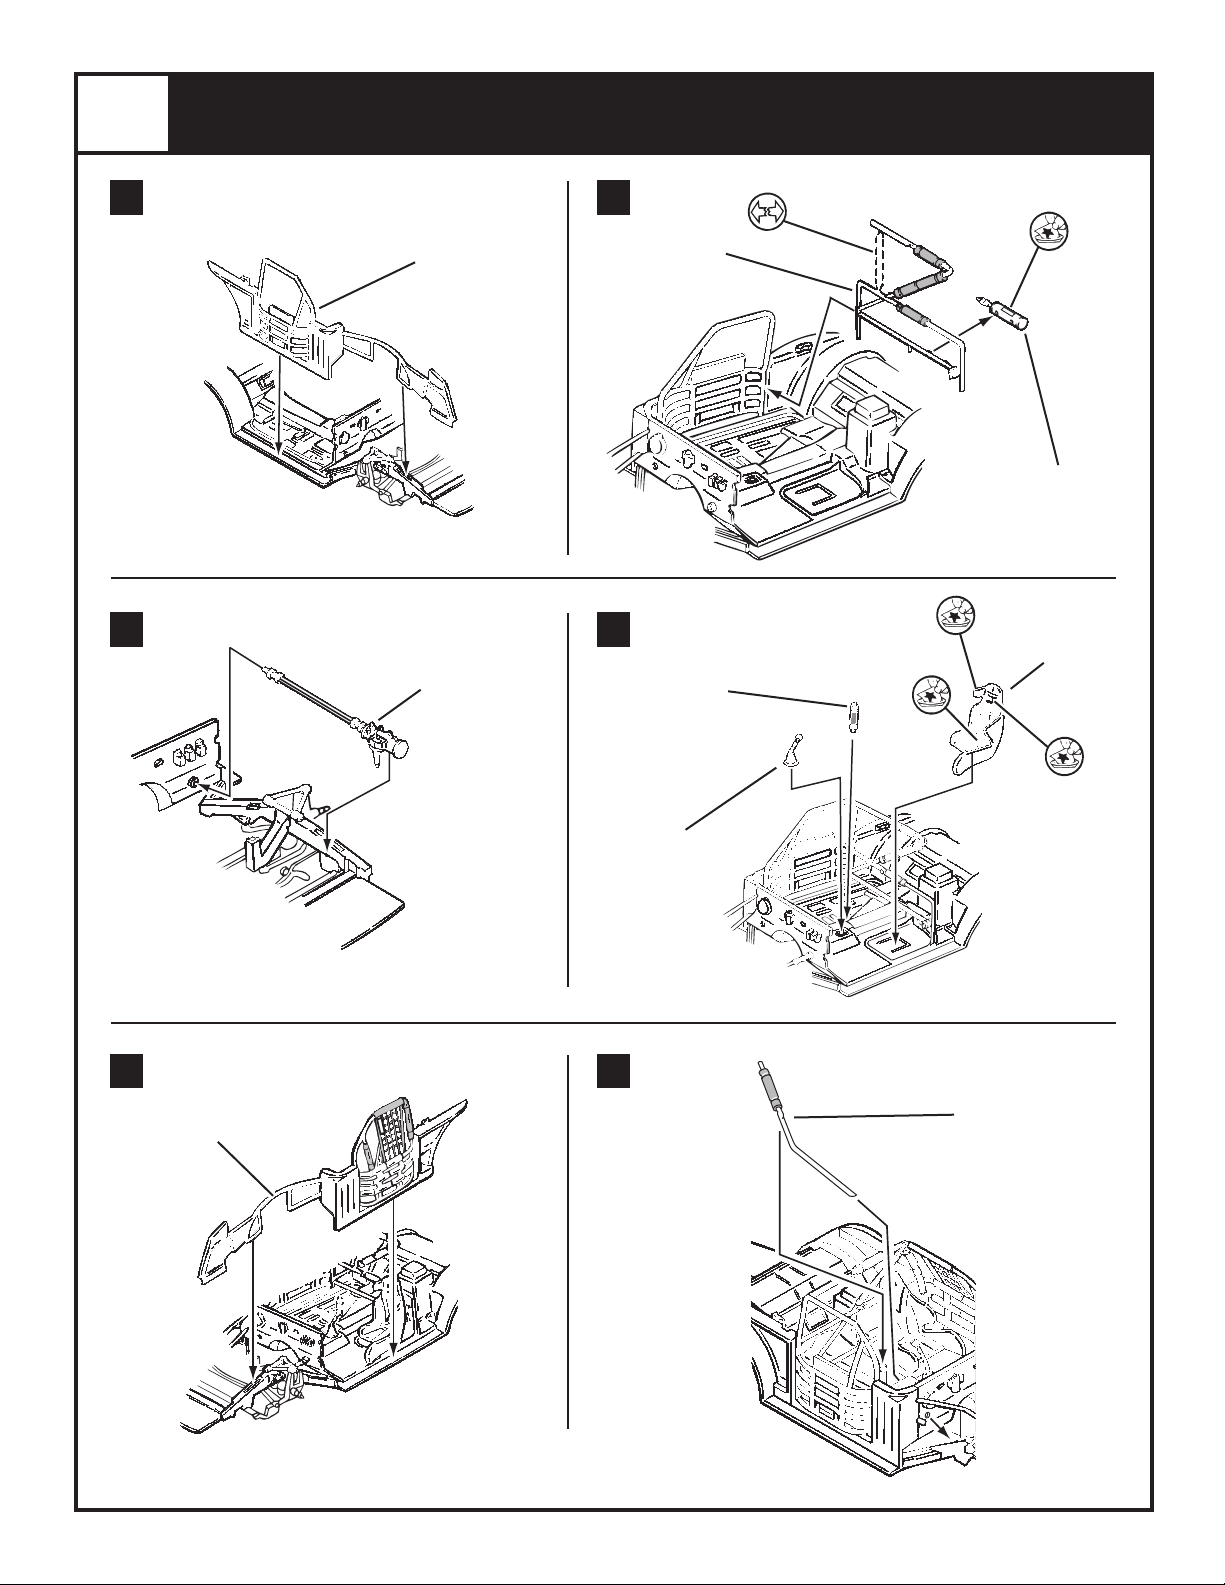
2
CHASSIS
AND
INTERIOR ASSEMBLY
D E
6
CAGE SIDE
LIGHT GRAY
8
ROLL BAR
LIGHT GRAY
(PAINT SHADED AREA
FLAT BLACK)
CONTINUED
17
F G
25
STEERING
SHAFT
STEEL
11
STIFFENER
BRACE
LIGHT GRAY
(SHADED AREA
FLAT BLACK)
52
SHIFTER
FLAT BLACK
(PAINT KNOB
SATIN WHITE)
FIRE EXTINGUISHER
16
10
49
GLOSS RED
47
SEAT
SEMIGLOSS BLACK
15
H
5
CAGE SIDE
LIGHT GRAY
(SHADED AREAS
FLAT BLACK)
I
10
STIFFENER
BAR
LIGHT GRAY
(SHADED AREA
FLAT BLACK)
Page 4

2
CHASSIS
AND
INTERIOR ASSEMBLY
CONTINUED
J K
57
PETTY BAR
LIGHT GRAY
L
TOP STIFFENER BAR
(SHADED AREA FLAT BLACK)
73
LIGHT GRAY
FIRST
9
TOP BRACE
LIGHT GRAY
(SHADED AREA
FLAT BLACK)
SECOND
72
MIRROR
FLAT BLACK
(MIRROR FACE SILVER)
M
FUEL CELL
LIGHT GRAY
(PAINT SHADED
AREA ALUMINUM)
HOSE
FLAT BLACK
51
HOSE
FLAT BLACK
56
REAR SHELF
SEMIGLOSS BLACK
THIRD
13
50
48
HOSE
FLAT BLACK
61
HOSE
FLAT BLACK
12
KICKER BAR
ASSEMBLY
LIGHT GRAY
SECOND
REAR SUSPENSION
ADJUSTMENT TUBES
92
LIGHT GRAY
3
A
FIRST
SUSPENSION AND CHASSIS ASSEMBLY
59
OILER TANK
ALUMINUM
(SHADED AREA ALUMINUM)
22
SHOCK ASSEMBLY
LIGHT GRAY
Page 5

3
SUSPENSION AND CHASSIS ASSEMBLY
CONTINUED
B
(PAINT SHADED AREA SEMIGLOSS BLACK)
21
SPRING
SEMIGLOSS
BLACK
17
ARM ASSEMBLY
LIGHT GRAY
C
21
SPRING
SEMIGLOSS
BLACK
19
FRONT AXLE
SEMIGLOSS
BLACK
18
REAR AXLE
SEMIGLOSS BLACK
4
A
37
PUMP BELT
FLAT BLACK
20
COOLANT PUMP
ALUMINUM
CHASSIS DETAIL ASSEMBLY
B
90
EXHAUST
STEEL
THIRD
16
EXHAUST
OUTLET HALF
STEEL
SECOND
43
DRIVE SHAFT
FLAT WHITE
(SHADED AREAS STEEL)
FIRST
Page 6

4
CHASSIS DETAIL ASSEMBLY
CONTINUED
C D
31
E
FAN SHROUD
ALUMINUM
54
FRAME
BRACE
LIGHT GRAY
54
FRAME
BRACE
LIGHT GRAY
63
PILLAR
BRACE
LIGHT GRAY
75
PILLAR
BRACE
LIGHT GRAY
F
STEERING
COLUMN
FLAT BLACK
104
DASHBOARD
TOP
FLAT BLACK
PAINT GAUGE FACES GLOSS
BLACK WITH SILVER DETAILS
53
46
STEERING
WHEEL
FLAT BLACK
23
DASHBOARD
FRONT
FLAT BLACK
27
UPPER HOSE
ALUMINUM
(PAINT SHADED
AREAS FLAT BLACK)
G
62
RADIATOR
ALUMINUM
FLAT BLACK
28
LOWER HOSE
ALUMINUM
16
SHOCK ASSEMBLY
LIGHT GRAY
(PAINT SHADED ALUMINUM)
Page 7

5
REMOVE
0
0
60
0
R
E
M
O
V
E
0
0
6
0
0
R
E
M
O
V
E
0 0600
A
BODY
GLOSS WHITE
FINAL ASSEMBLY
2
HOOD
GLOSS WHITE
B
REAR WINDOW
114
REAR SIDE
WINDOW
CLEAR
✱
115
SIDE WINDOW
CLEAR
113
111
CLEAR
REAR SIDE
WINDOW
CLEAR
✱
✱
✱
✱
✱
✱
NOTE: PAINT ALL WINDOW TRIM SEMIGLOSS BLACK
✱
110
WINDSHIELD
CLEAR
112
VENT DUCT
CLEAR
✱
C
76
OUTER WHEEL
(BACK)
SEMIGLOSS BLACK
26
OUTER WHEEL
(FRONT)
SEMIGLOSS BLACK
TIRE
D
95
DISC BRAKE
ALUMINUM
24
INNER WHEEL
(FRONT)
FLAT BLACK
12
INNER WHEEL
(BACK)
FLAT BLACK
Page 8

6
DECAL PLACEMENT
NOTE: DECALS 1,2,31, AND 32, MUST BE APPLIED FIRST
85284400200
 Loading...