

REVELL Corvette C5-R 2001 Daytona 24 hour User Manual [en, fr, nl, it, gr, da, no, fi, sv, es, pt, de, en, hr, et, fi, hu, lv, lt, nl, pl, ro, ru, sr, sk, sl, cs, tr, gr, bg, uk, ch, he, ar, ja, ch, ch, ko, hi, id, kk, ms, fa, pt, es, th, vi, sq, mk]
Page 1

KIT 2376 85237600200
Corvette® C5-R
™
2001 Daytona 24 hour
Dale Earnhardt, despite winning Twin 125 qualifying races, IROC races, Grand National Series races and even the Daytona 500 in 1998, still had
some unfinished business at the World Center of Racing. Until the turn of the century, he had never entered the Rolex 24 Hours of Daytona.
The plan for Pratt & Miller Racing was to enter a pair of Goodwrench Service Plus® sponsored Chevrolet® Corvette® C5-R™ race cars, with road racing
veterans Ron Fellows, Johnny O’Connell, Chris Kneifel and Frank Freon piloting the #2 car, along with Andy Pilgrim, Kelly Collins, Dale Earnhardt Jr, and
Dale Earnhardt driving the #3 car.
Both Earnhardts handled themselves extremely well, considering they had never driven in an endurance race, nor raced in the rain. The Corvette®
C5-R™ cars maintained a steady pace through the night, intermittent rain and poor visibility. The #2 Corvette® inherited the lead and kept it, when the top
running sports prototype blew an engine on Sunday morning. Under gloomy skies and drizzle, the two yellow Corvette® race cars led a parade of GT and
sports racers to the checkered flag: First overall and first in class, giving Corvette® the most significant racing victory ever. The #3 car
finished fourth, after stopping for repairs during the night.
Later in the year, during “The 24 hours of LeMans”, another battle of attrition was joined, with both C5-R™
machines out running or out lasting their competition. This day, it was Ron Fellows, Johnny O’Connell, and Scott
Pruet driving the #63 car to 8th overall and first in GTS, with Andy Pilgrim, Kelly Collins and Frank Freon not
far behind in the #64 car, second in GTS. As both Corvette® racers took the checkered flag, side by
side on that damp dreary afternoon in France, it was most appropriate that they wore black fender
flash with the famous number 3 to commemorate the team’s fallen comrade, Dale Earnhardt.
Your Revell Corvette® C5-R™ depicts the GM Goodwrench Service Plus® entries in the
historic 39th running of the Rolex 24 Hours of Daytona, as well as their victory markings from the 2001 24
Hours of LeMans. The kit features accurate decals and easy glue assembly to make this replica a standout in any
collection.
* REPEAT SEVERAL TIMES
* A REPETER PLUSIEURS FOIS
READ THIS BEFORE YOU BEGIN LIRE CE QUI SUIT AVANT DE COMMENCER
* Study the assembly drawings.
* Each plastic part is identified by a number.
* In the assembly drawings, some parts will be
marked by a star (★) to indicate chrome
plated plastic.
* For better paint and decal adhesion, wash
the plastic parts in a mild detergent solution.
Rinse and let air dry.
* Check the fit of each piece before cementing
in place.
* Use only cement for polystyrene plastic.
* Scrape plating and paint from areas to be
cemented.
* Allow paint to dry thoroughly before
handling parts.
* Any unused parts may be discarded.
DECAL APPLICATION INSTRUCTIONS
1. Cut desired decal from sheet.
2. Dip decal in water for a few seconds.
3. Place wet decal on paper towel.
4. Wait until decal is movable on paper backing.
5. Place decal in position on model, face up
and slide backing away.
6. Press out air bubbles with a soft damp cloth.
7. Milkiness that may appear is for better decal
adhesion and will dry clear. Wipe away any
excess adhesive.
8. Do not touch decal until fully dry.
9. Allow the decals 48 hours to dry before
applying clear coat.
* OPTIONAL PARTS
* PIECES EN OPTION
* DECAL
* DECAL COMANIE
* Etudier les schémas de montage.
* Chaque pièce en plastique est identifiée par un numéro.
* Sur les schémas de montage, certaines pièces sont mar
quées d'une étoile (★) pour indiquer qu'elles sont en
plastique chromé.
* Pour une meilleure prise de la peinture et des autocollants,
laver les pièces en plastique avec une solution détergente
peu concentrée. Les rincer et les laisser sécher à l'air.
* Vérifier que chaque pièce s'ajuste bien avant de la coller
en place.
* N'utiliser que de la colle pour polystyrène.
* Gratter les parties à coller pour enlever le chrome et la peinture.
* Laisser la peinture bien sécher avant de manipuler les pièces.
* Toute pièce inutilisée peut être jetée.
DIRECTIVES D'APPLICATION DES AUTOCOLLANTS
1. Découper l'autocollant désiré de la feuille.
2. Tremper l'autocollant dans de l'eau pendant quelques secondes.
3. Placer l'autocollant mouillé sur une serviette en papier.
4. Attendez que l'autocollant puisse être déplacé sur son sup
port en papier.
5. Mettre l'autocollant en position sur le modèle face sur le
dessus et faire glisser le support pour l'enlever.
6. Appuyer avec un chiffon doux humide pour éliminer les bulles
d'air.
7. La substance laiteuse qui peut apparaître est destinée à
améliorer l'adhésion de l'autocollant et devient incolore au
séchage. Essuyer pour enlever tout excédent d'adhésif.
8. Ne pas toucher l'autocollant tant qu'il n'est pas bien sec.
9. Laisser l'autocollant sécher pendant 48 heures avant
d'appliquer une couche transparente.
* ALTERNATIVE ASSEMBLY
* ENSEMBLAGE ALTERNATIVE
* CEMENT TOGETHER
* A COLLER
* REMOVE AND THROW AWAY
* A RETIRER ET JETER
* DO NOT CEMENT
* NE PAS COLLER
This optional paint guide is provided if
you choose to detail paint your model.
Ce guide de peinture vous sera fourni si vous choisissez
de peindre votre modèle en détail.
Aluminum
Satin Black
Flat Black
Gloss Black
Gloss Red
Gloss Yellow
Gloss White
Silver
Steel
Gunmetal
Jet Exhaust
Transparent Blue
Transparent Red
Turn Signal Amber
Aluminum
Noir satiné
Noir mat
Noir lustré
Rouge lustré
Jaune lustré
Blanc lustré
Argent
Acier
Bronze
Flux d’éjection
Bleu transparent
Rouge transparent
Feu de virage amber
If you have any questions or comments, call our hotline at: (800) 833-3570
or, please write to:
Revell-Monogram Consumer Service Department, 725 Landwehr, Northbrook, Illinois 60062
Be sure to include the plan number (85237600200), part number, description, your return address and phone number.
Visit our website: www.revell-monogram.com
REVELL-MONOGRAM, LLC Northbrook, IL. Copyright © 2003. All rights reserved.
Page 2
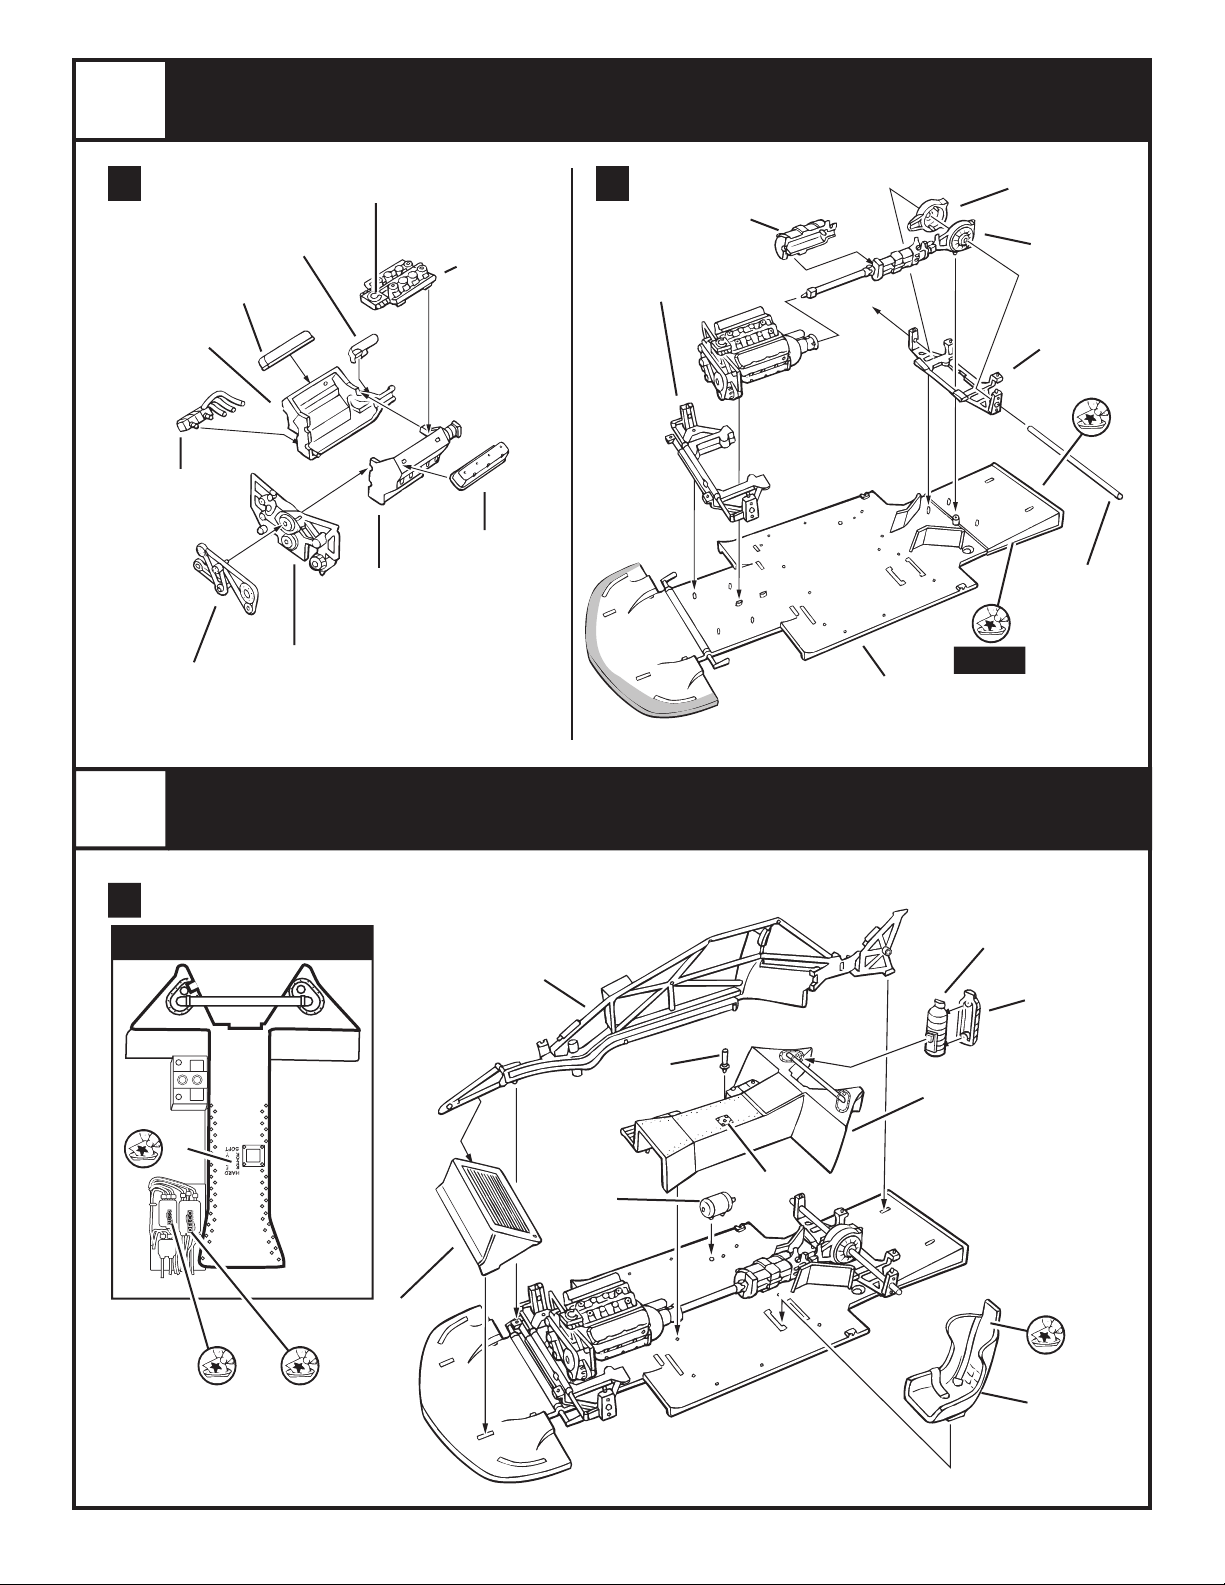
1
A B
STARTER
GLOSS BLACK
71P
VALVE COVER
8
RIGHT ENGINE
BLOCK
SATIN BLACK
16
OIL PUMP
FLAT BLACK
18
BELTS / PULLEYS
BELTS FLAT BLACK
15
17
ENGINE
FRONT
TRANSPARENT BLUE
LEFT ENGINE
SATIN BLACK
ENGINE ASSEMBLY
21
INTAKE
MANIFOLD
FLAT BLACK
71P
VALVE COVER
7
BLOCK
55
TRANSAXLE
HALF
ALUMINUM
FRONT SUSPENSION
46
SATIN BLACK
27
BELLY PAN
SHADED AREA
GLOSS YELLOW
DIFFERENTIAL
ALUMINUM
9
FIRST
57
HALF
56
TRANSAXLE /
DIFFERENTIAL
ALUMINUM
52
REAR
SUSPENSION
SATIN BLACK
METAL AXLE
5
2
A
DECAL PLACEMENT FOR #35
INTERIOR PANEL
23
22
ROLL CAGE
26
RIGHT ROLL CAGE
GUNMETAL
61
TANK
SATIN BLACK
23
RADIATOR
ALUMINUM
21
ASSEMBLY
38
SHIFTER
GLOSS WHITE
SILVER
44
OIL TANK
FRONT
SILVER
35
INTERIOR PANEL
SATIN BLACK
BELT BUCKLES SILVER
43
OIL TANK
REAR
SILVER
24
37
SEAT
FLAT BLACK,
Page 3
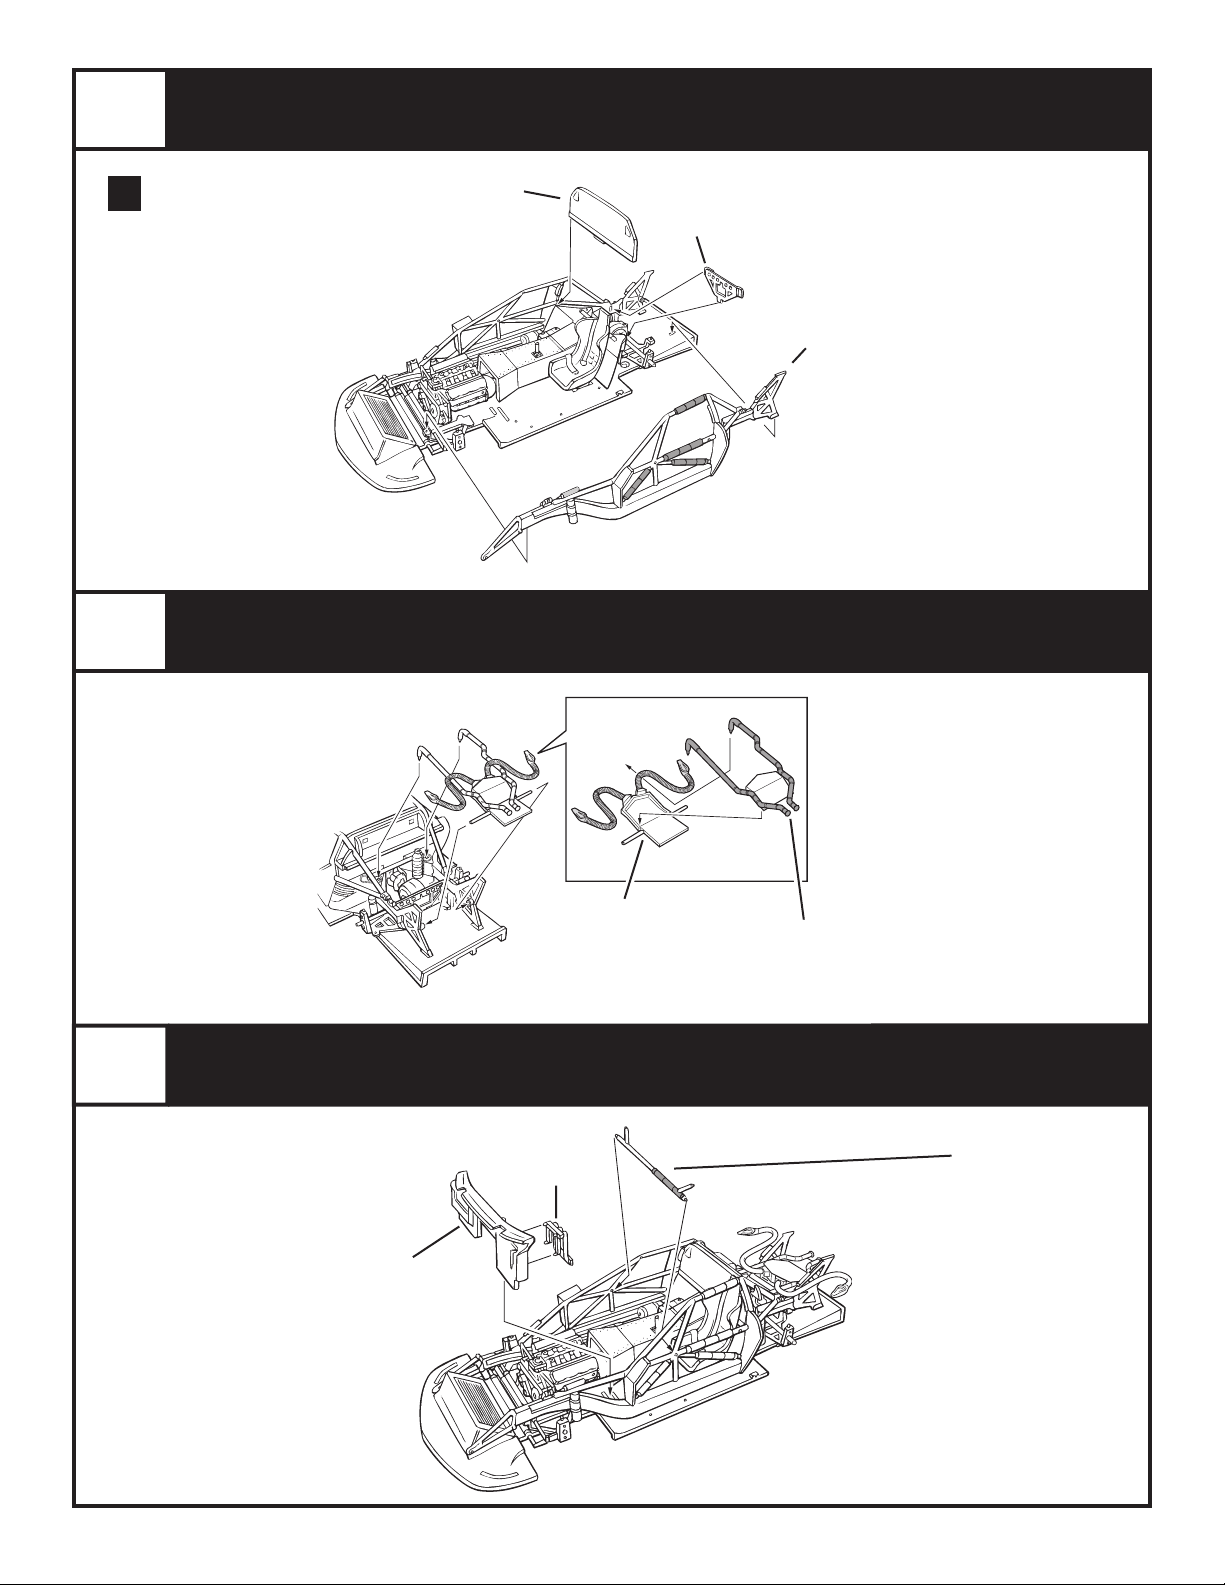
2
ROLL CAGE ASSEMBLY
CONTINUED
B
3
36
BULKHEAD
SATIN BLACK
31
REAR
CROSSMEMBER
SATIN BLACK
DARK SHADED AREAS FLAT BLACK
LIGHT SHADED AREA GLOSS RED
25
LEFT ROLL CAGE
GUNMETAL
COOLING DUCT ASSEMBLY
4
32
FIREWALL
SATIN BLACK
BOTTOM VENT SCOOP
PAINT SHADED AREA FLAT BLACK
41
GLOSS RED
42
TOP
VENT SCOOP
PAINT SHADED AREA SATIN BLACK
GLOSS RED
BRACE ASSEMBLY
60
PEDALS
STEEL
PAINT SHADED AREA FLAT BLACK
29
CENTER
CROSSMEMBER
GUNMETAL
Page 4

5
INTERIOR ASSEMBLY
DASHBOARD DECAL PLACEMENT
17-2
25
16
17-3
17-63
17-64
17
34
DASHBOARD
SATIN BLACK
39
STEERING
WHEEL
SATIN BLACK
30
ROLL CAGE TOP
GUNMETAL
PAINT SHADED AREA
FLAT BLACK
6
A
CROSSMEMBER
SATIN BLACK
SUSPENSION AND INTAKE ASSEMBLY
PAINT SHADED AREAS FLAT BLACK
28
UPPER
THIRD
UPPER RADIATOR HOSE
13
SATIN BLACK
SECOND
58
(REPEAT FOR OTHER SIDE)
BRAKE
STEEL
SHADED AREA GUNMETAL
LOWER RADIATOR HOSE
PAINT SHADED AREAS FLAT BLACK
14
SATIN BLACK
FIRST
50
COIL OVER
SHOCK
(REPEAT FOR
OTHER SIDE)
GLOSS RED
54
LEFT UPPER
A-ARM
(REPEAT FOR
OTHER SIDE
USING #53)
SATIN BLACK
B
RIGHT INTAKE BOX
SATIN BLACK
LIGHT SHADED AREA ALUMINUM
DARK SHADED AREA FLAT RED
7
10
HEADER
JET EXHAUST
22
19
8
CROSSOVER
TUBE
ALUMINUM
10
LIGHT SHADED AREA ALUMINUM
13
12
9
20
LEFT INTAKE BOX
SATIN BLACK
DARK SHADED AREA FLAT RED
9
HEADER
JET EXHAUST
Page 5

6
SUSPENSION AND INTAKE ASSEMBLY
50
COIL OVER SHOCK
(REPEAT FOR OTHER SIDE)
48
LEFT REAR
UPPER A-ARM
(REPEAT FOR
OTHER SIDE
USING #47)
SATIN BLACK
(REPEAT FOR OTHER SIDE)
SHADED AREA GUNMETAL
GLOSS RED
58
BRAKE
STEEL
51
REAR SWAY BAR
SATIN BLACK
DC
(REPEAT FOR RIGHT SIDE USING PART #12)
LEFT EXHAUST PIPE
11
JET EXHAUST
6
WINDOW NET
FLAT BLACK
33
SIDE RAIL
GUNMETAL
7
A
F
FRONT TIRE
WHEEL ASSEMBLY
B
69
FRONT
WHEEL
ALUMINUM
49
FRONT AXLE
PIN
ALUMINUM
R
REAR TIRE
70
REAR WHEEL
ALUMINUM
Page 6

8
A
✱
FLAT BLACK
3
RIGHT
MIRROR
GLOSS
YELLOW
76
HEADLIGHT
COVER
CLEAR
5
WIPER
FINAL ASSEMBLY
85
MIRROR FACE
SILVER
✱
✱
77
WINDSHIELD
CLEAR
PAINT SHADED
AREA FLAT BLACK
64
RIGHT HEADLIGHT
BUCKET
SILVER
PAINT SHADED AREA
SATIN BLACK
TURN SIGNAL
AMBER
SILVER
LEFT HEADLIGHT
PAINT SHADED AREA
63
BUCKET
SILVER
SATIN BLACK
75
HEADLIGHT
COVER
CLEAR
DRIVER SIDE
WINDOW
MIRROR FACE
4
LEFT MIRROR
GLOSS YELLOW
203
CLEAR
85
SILVER
Page 7

8
FINAL ASSEMBLY
CONTINUED
B
✱
2
REAR SPOILER
GLOSS YELLOW
59
REAR SPOILER
SUPPORTS
GLOSS YELLOW
SILVER
(IN RECESSED AREA)
80
TAILLIGHTS
TRANSPARENT
RED
TRANSPARENT RED
78
REAR WINDOW
CLEAR
PAINT SHADED AREA
FLAT BLACK
✱
204
PASSENGER
SIDE WINDOW
CLEAR
SILVER
TRANSPARENT RED
(REPEAT FOR OTHER SIDE)
C
205
FRONT LENS
CLEAR
FRONT LENS
COVER
GLOSS YELLOW
FRONT LENS
86
202
COVER
CLEAR
200
FRONT LIGHT
BEZEL
15
D
11
14
24
INTAKE
FLAT BLACK
Page 8

9
YELLOW ON THE #2 CAR
DECAL PLACEMENT
NOTE: MIRRORS ARE
85237600200
 Loading...