

REVELL CONCERTa M8 SP2, CONCERTa M8 SP5 Owner's Manual
M8 SP2/SP5
Satellite Loudspeaker Packs
Owner’s Manual
2
Revel Concerta M8 SP2/SP5
Owner’s Manual
TABLE OF CONTENTS
Introduction .............................................................................. 2
What’s In The Box .................................................................... 3
Placement................................................................................. 3
Wall-Mounting ......................................................................... 4
Speaker Connections ............................................................... 5
Operation.................................................................................. 5
Maintenance and Troubleshooting .......................................... 5
Specifications ........................................................................... 6
INTRODUCTION
REVEL® CONCERTA™ M8
The Revel
®
Concerta™ M8 2-Way satellite loudspeaker continues the longstanding
Revel commitment to accurate sound reproduction. The proprietary transducers utilizing
Micro Ceramic Composite (MCC) diaphragms, precision dividing networks, sophisticated
high-frequency waveguides and rigid enclosures all combine to deliver uncompromising
performance in any stereo or multichannel home theater system. In addition, these
speakers are magnetically shielded for safe placement near electronic devices.
The Revel Concerta M8 satellite loudspeakers are offered in the following multi-packs:
• SP2 – Features two M8 satellite loudspeakers with two wall brackets,
for use in a stereo configuration, or as extra channels in a home theatre
surround configuration
• SP5 – Features five M8 satellite loudspeakers with five wall brackets, for
use in a home theatre surround configuration. This includes a horizontal
center channel loudspeaker with a base support stand
FEATURE HIGHLIGHTS
• 1" Micro Ceramic Composite (MCC) Cone Tweeter
• 3" Micro Ceramic Composite (MCC) Cone Woofers
• Bass Reflex via Dual Front-firing Ports
• Gold-plated Binding Post Terminals
• Flexible Positioning: Tabletop Placement or Wall Mount
with Included C-brackets
• Rigid Aluminum Enclosure
• High Gloss Color Finish
• Space-Saving Design
UNPACKING THE SPEAKERS
If you suspect damage from transit, report it immediately to your dealer and/or delivery
service. Keep the shipping carton and packing materials for future use.
IMPORTANT SAFETY INSTRUCTIONS
1. Use only attachments/accessories specified by the manufacturer.
2. Use only with the cart, stand, tripod, bracket, or table specified by the
manufacturer or sold with the apparatus. When a cart is used, use
caution when moving the cart/apparatus combination to avoid injury
from tip-over.
3. Refer all servicing to qualified service personnel. Servicing is required when
the apparatus has been damaged in any way, such as when the power-supply
cord or plug is damaged, liquid has been spilled or objects have fallen into the
apparatus, or the apparatus has been exposed to rain or moisture, does not
operate normally or has been dropped.
WEEE NOTICE
The Directive on Waste Electrical and Electronic Equipment (WEEE), which entered
into force as European law on 14/02/2014, resulted in a major change in the
treatment of electrical equipment at end-of-life.
The purpose of this Directive is, as a first priority, the prevention of WEEE, and in
addition, to promote the reuse, recycling and other forms of recovery of such wastes
so as to reduce disposal. The WEEE logo on the product or on its box indicating
collection for electrical and electronic equipment consists of the crossed-out
wheeled bin, as shown below.
This product must not be disposed of or dumped with your other household waste.
You are liable to dispose of all your electronic or electrical waste equipment by
relocating over to the specified collection point for recycling of such hazardous
waste. Isolated collection and proper recovery of your electronic and electrical
waste equipment at the time of disposal will allow us to help conserving natural
resources. Moreover, proper recycling of the electronic and electrical waste
equipment will ensure safety of human health and environment. For more
information about electronic and electrical waste disposal, recovery, and collection
points, please contact your local city center, household waste disposal service, shop
from where you purchased the equipment, or manufacturer of the equipment.
ROHS COMPLIANCE
This product is in compliance with Directive 2011/65/EU of the European Parliament
and of the Council of 8 June 2011 on the restriction of the use of certain hazardous
substances in electrical and electronic equipment.
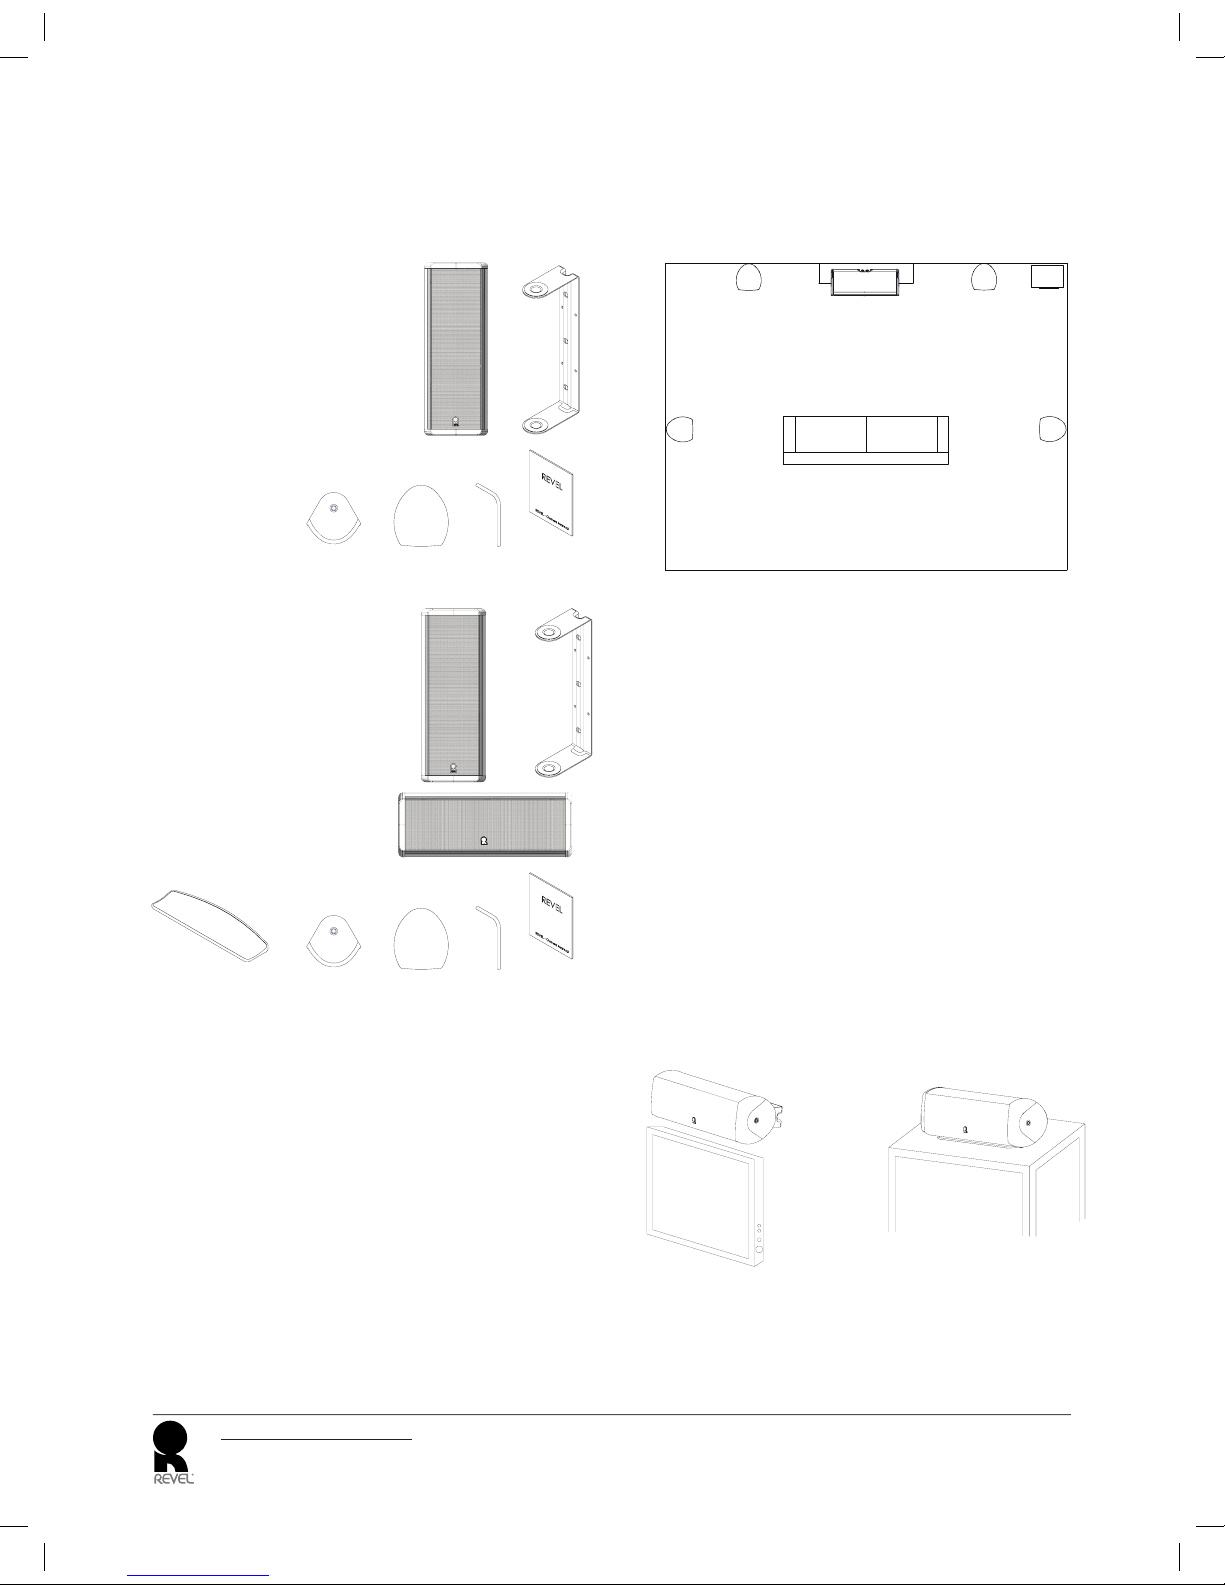
WHAT’S IN THE BOX
Please verify that the package contains the following items, depending on which Revel
M8 Multi-Pack you have purchased. Please note that the hex wrench may be tucked under
the rubber foot pads.
M8 SP2 MULTI-PACK:
• 2 – M8 Satellite Loudspeakers
• 2 – Wall Mount Brackets
• 4 – Wall Mount End Cap Plates
• 2 – Rubber Foot Pads
• 1 – Hex Wrench
• 1 – Owner’s Manual
M8 SP5 MULTI-PACK:
• 4 – M8 Satellite Loudspeakers
• 5 – Wall Mount Brackets
• 1 – M8 Center Channel Satellite Loudspeaker
• 1 – Center Channel Base Support Stand
• 10 – Wall Mount End Cap Plates
• 4 – Rubber Foot Pads
• 1 – Hex Wrench
• 1 – Owner’s Manual
NOT INCLUDED:
• Each wall bracket requires four #10 wood screws of 1-1/2 inch
(3.5 CM to 4 CM) in length
• Each M8 loudspeaker is connected to your audio system via speaker wire.
Use high-quality speaker wire to make your connections. 18-Gauge speaker
wire with polarity coding is recommended. For longer distances, 16-gauge or
heavier wire is recommended.
PLACEMENT
Regardless of whether you have the Revel M8 SP2 or SP5 multi-pack, position your
speakers so that the left and right front speakers are each placed approximately
60-degrees from the listening position, as shown in Figure 1 and Figure 4.
Left
Front
Channel
Left
Surround
Channel
Right
Surround
Channel
Subwoofer
Listening Position
Right
Front
Channel
Center
Channel
(above or below
video screen)
Figure 1: This overhead view shows a typical
wall mounted 5-channel home theater plan.
SP2 STEREO CONFIGURATION
Before deciding where to place your speakers, survey your room and think about
placement, keeping the following points in mind, using Figure 1 as a guide:
• Position each speaker so that the it is approximately at ear level
• Refer to the “Home Theater Configuration” section below if you plan to use
the speakers as part of a home theater system
SP5 HOME THEATER CONFIGURATION
Refer to Figure 1 and Figure 4 for speaker placement in a home theatre surround
configuration. Place the speakers on the included brackets (refer to the “Wall Mounting”
section below), or on bookshelves or table stands alongside the listening position.
Final placement depends on room acoustics, availability of space, and your listening
preference.
Left and Right Front Speakers – Position one speaker on the left and another on the
right, along either side of the television monitor.
Center Speaker – The dedicated center channel speaker is designed to be placed
either just above or below your TV/video monitor. You can place the center speaker
on the included center speaker base support stand. If you choose to wall mount the
center channel speaker to the wall instead of using its base support stand, please refer
to the “Wall Mounting” section below. Note: the center speaker should be positioned
horizontally (Figure 2), while all other M8 speakers should be positioned vertically.
Figure 2: This example shows the M8 mounted on its bracket above a
television and, alternatively, placed on its base above the television.
x4 x2 x1 x1
x2 x2
x2 x2
x1
x10 x4 x1 x1
x1
3
Revel Concerta M8 SP2/SP5
Owner’s Manual
 Loading...