

REVELL Chevy SSR User Manual [en, fr, nl, it, gr, da, no, fi, sv, es, pt, de, en, hr, et, fi, hu, lv, lt, nl, pl, ro, ru, sr, sk, sl, cs, tr, gr, bg, uk, ch, he, ar, ja, ch, ch, ko, hi, id, kk, ms, fa, pt, es, th, vi, sq, mk]
Page 1

KIT 7691 85769100200
®
™
Chevy SSR
Americans love to have their own individual identity
whether we’re speaking of clothing, hairstyles or anything
else. Those folks will likely love the new Chevrolet® SSR™.
The SSR, which officially stands for Super Sport Roadster,
refuses to be categorized into any existing niche. The
finished product is a pleasing combination of different flavors and shapes, unlike anything previously released by
the hood you’ll find an all-aluminum 5.3 liter V8 engine
matched to a four speed automatic, providing an exhaust
note that’ll put a smile on your face. Developing 300 horsepower, the Generation III motor propels the SSR to 60 mph
in just seven seconds. Huge wheels and tires-19" in the
front, 20" in back-fill the wheel wells and add to the aggressive look.
Chevrolet or anyone else, for that matter.
With seating capacity for two, it’s a personal sort of
vehicle, but has an abundance of room for your other stuff,
unlike "personal" vehicles. The front end styling, with its
round headlamps and horizontal grill bars, certainly recalls
Chevrolet’s trucks of the late 1940’s and early 1950’s, but
hinged in the middle, pressing one button starts the motors
that folds the top up and places it in the rear compartment,
the cover of which by now has lifted up by way of its own
hinges and electric motors. It couldn’t be cooler and the
whole process takes only twenty seconds.
it’s not a truck.
What is it? A whole lot of fun. Based on the compact
SUV chassis, the similarity with SUVs stops there. Under
* REPEAT SEVERAL TIMES
* A REPETER PLUSIEURS FOIS
READ THIS BEFORE YOU BEGIN LIRE CE QUI SUIT AVANT DE COMMENCER
* Study the assembly drawings.
* Each plastic part is identified by a number.
* In the assembly drawings, some parts will be
marked by a star (★) to indicate chrome
plated plastic.
* For better paint and decal adhesion, wash
the plastic parts in a mild detergent solution.
Rinse and let air dry.
* Check the fit of each piece before
cementing in place.
* Use only cement for polystyrene plastic.
* Scrape plating and paint from areas
to be cemented.
* Allow paint to dry thoroughly before
handling parts.
* Any unused parts may be discarded.
DECAL APPLICATION INSTRUCTIONS
1. Cut desired decal from sheet.
2. Dip decal in water for a few seconds.
3. Place wet decal on paper towel.
4. Wait until decal is movable on paper backing.
5. Place decal in position on model, face up and
slide backing away.
6. Press out air bubbles with a soft damp cloth.
7. Milkiness that may appear is for better decal
adhesion and will dry clear. Wipe away any
excess adhesive.
8. Do not touch decal until fully dry.
9. Allow the decals 48 hours to dry before
applying clear coat.
NOTE: Decals are compatible with
setting solutions or solvents.
* OPTIONAL PARTS
* PIECES EN OPTION
* DECAL
* DECAL COMANIE
* Etudier les schémas de montage.
* Chaque pièce en plastique est identifiée par un numéro.
* Sur les schémas de montage, certaines pièces sont
marquées d'une étoile (★) pour indiquer qu'elles sont en
plastique chromé.
* Pour une meilleure prise de la peinture et des autocollants,
laver les pièces en plastique avec une solution détergente
peu concentrée. Les rincer et les laisser sécher à l'air.
* Vérifier que chaque pièce s'ajuste bien avant
de la coller en place.
* N'utiliser que de la colle pour polystyrène.
* Gratter les parties à coller pour enlever le chrome et la peinture.
* Laisser la peinture bien sécher avant de manipuler les pièces.
* Toute pièce inutilisée peut être jetée.
DIRECTIVES D'APPLICATION DES AUTOCOLLANTS
1. Découper l'autocollant désiré de la feuille.
2. Tremper l'autocollant dans de l'eau pendant quelques secondes.
3. Placer l'autocollant mouillé sur une serviette en papier.
4. Attendez que l'autocollant puisse être déplacé sur son support
en papier.
5. Mettre l'autocollant en position sur le modèle face sur
le dessus et faire glisser le support pour l'enlever.
6. Appuyer avec un chiffon doux humide pour éliminer les bulles d'air.
7. La substance laiteuse qui peut apparaître est destinée à
améliorer l'adhésion de l'autocollant et devient incolore au
séchage. Essuyer pour enlever tout excédent d'adhésif.
8. Ne pas toucher l'autocollant tant qu'il n'est pas bien sec.
9. Laisser l'autocollant sécher pendant 48 heures avant
d'appliquer une couche transparente.
REMARQUE: Les autocollants sont compatibles avec
* ALTERNATIVE ASSEMBLY
* ENSEMBLAGE ALTERNATIVE
les solutions de fixage ou les solvants.
would say, "…and now for something completely different".
We think that’s exactly what Chevy® had in mind.
But the most fun is the roof. All steel in construction and
As John Cleese of the Monty Python comedy troupe
* CEMENT TOGETHER
* A COLLER
* REMOVE AND THROW AWAY
* A RETIRER ET JETER
This optional paint guide is provided if you
choose to detail paint your model.
Ce guide de peintures vous sera fourni si vous choisissez de
peindre votre modèle en détail.
Aluminum
Flat Black
Gloss Red
Semigloss Black
Steel
Transparent Red
Transparent Orange
* DO NOT CEMENT
* NE PAS COLLER
Aluminium
Noir mat
Rouge lustré
Noir satiné
Acier
Rouge transparent
Orange transparent
If you have any questions or comments, call our hotline at: (800) 833-3570
or, please write to:
Revell-Monogram Consumer Service Department, 725 Landwehr Road, Northbrook, Illinois 60062
Be sure to include the plan number (85769100200), part number, description, your return address and phone number.
Visit our website: www.revell-monogram.com
REVELL-MONOGRAM, LLC Northbrook, IL. Copyright © 2003. All rights reserved.
Page 2
1
69
RIGHT VALVE
COVER
SEMIGLOSS BLACK
43
RIGHT CYLINDER
HEAD
ALUMINIUM
RIGHT. EXHAUST
53
MANIFOLD
ALUMINIUM
ENGINE ASSEMBLY
46
INTAKE
MANIFOLD
ALUMINIUM
LEFT CYLINDER
44
LEFT VALVE
COVER
SEMIGLOSS BLACK
42
HEAD
ALUMINIUM
52
LEFT EXHAUST
MANIFOLD
ALUMINIUM
FAN BELT
FLAT BLACK
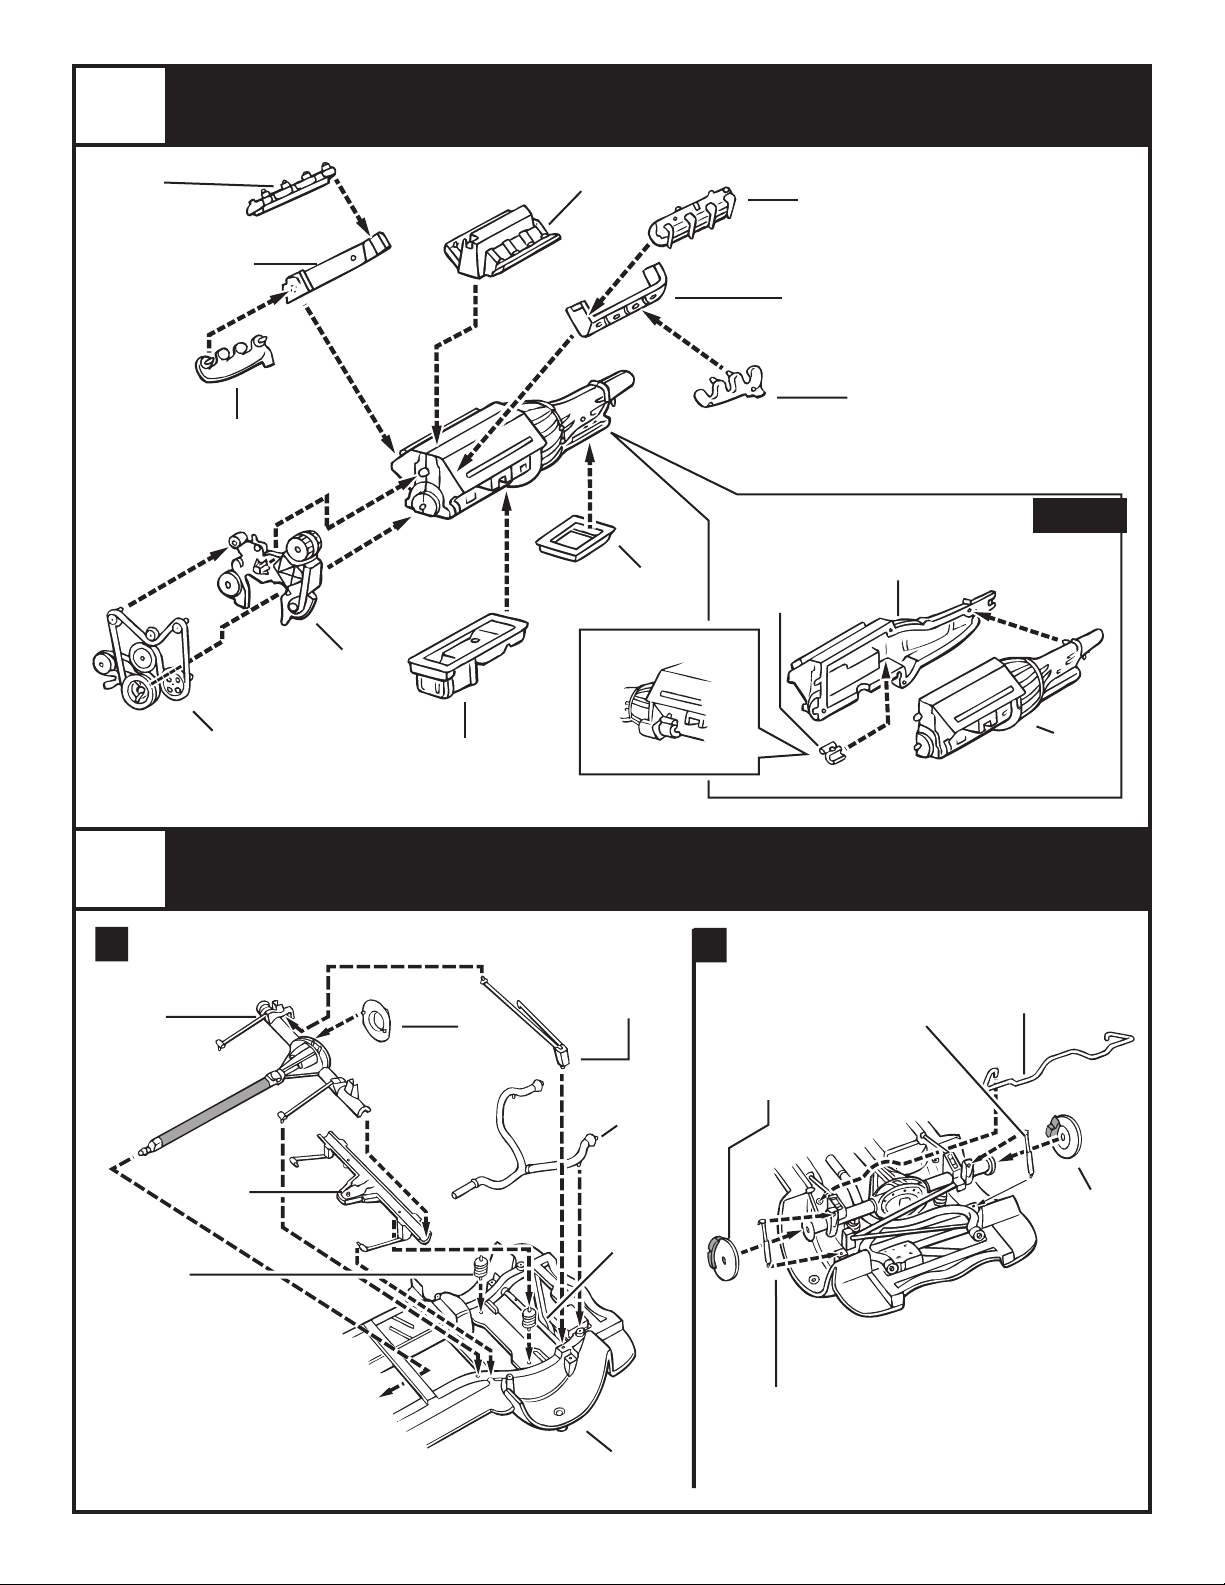
2
A
24
REAR AXLE
LOWER
SEMIGLOSS BLACK
(PAINT SHADED
AREA STEEL)
REAR AXLE
UPPER
SEMIGLOSS
BLACK
28
REAR SPRING
SEMIGLOSS BLACK
68
RIGHT ENGINE
79
TRANSMISSION
PAN
ALUMINIUM
45
ENGINE
FRONT
ALUMINIUM
62
40
OIL PAN
ALUMINIUM
( 54 SHOWN IN PLACE)
54
STARTER
SEMIGLOSS
BLACK
HALF
ALUMINIUM
REAR SUSPENSION ASSEMBLY
30
REAR TRACKING
BAR
SEMIGLOSS BLACK
25
DIFFERENTIAL
COVER
SEMIGLOSS BLACK
REAR
EXHAUST
26
ALUMINIUM
28
REAR SPRING
SEMIGLOSS
BLACK
B
29
REAR SHOCK
39
LEFT REAR BRAKE
STEEL
31
(PAINT SHADED AREA
SEMIGLOSS BLACK)
SEMIGLOSS BLACK
FIRST
LEFT ENGINE
HALF
ALUMINIUM
27
TIE ROD
SEMIGLOSS
BLACK
41
67
RIGHT REAR
BRAKE
STEEL
(PAINT SHADED
AREA SEMI
GLOSS BLACK)
-
23
CHASSIS
SEMIGLOSS
BLACK
29
REAR SHOCK
SEMIGLOSS BLACK
Page 3
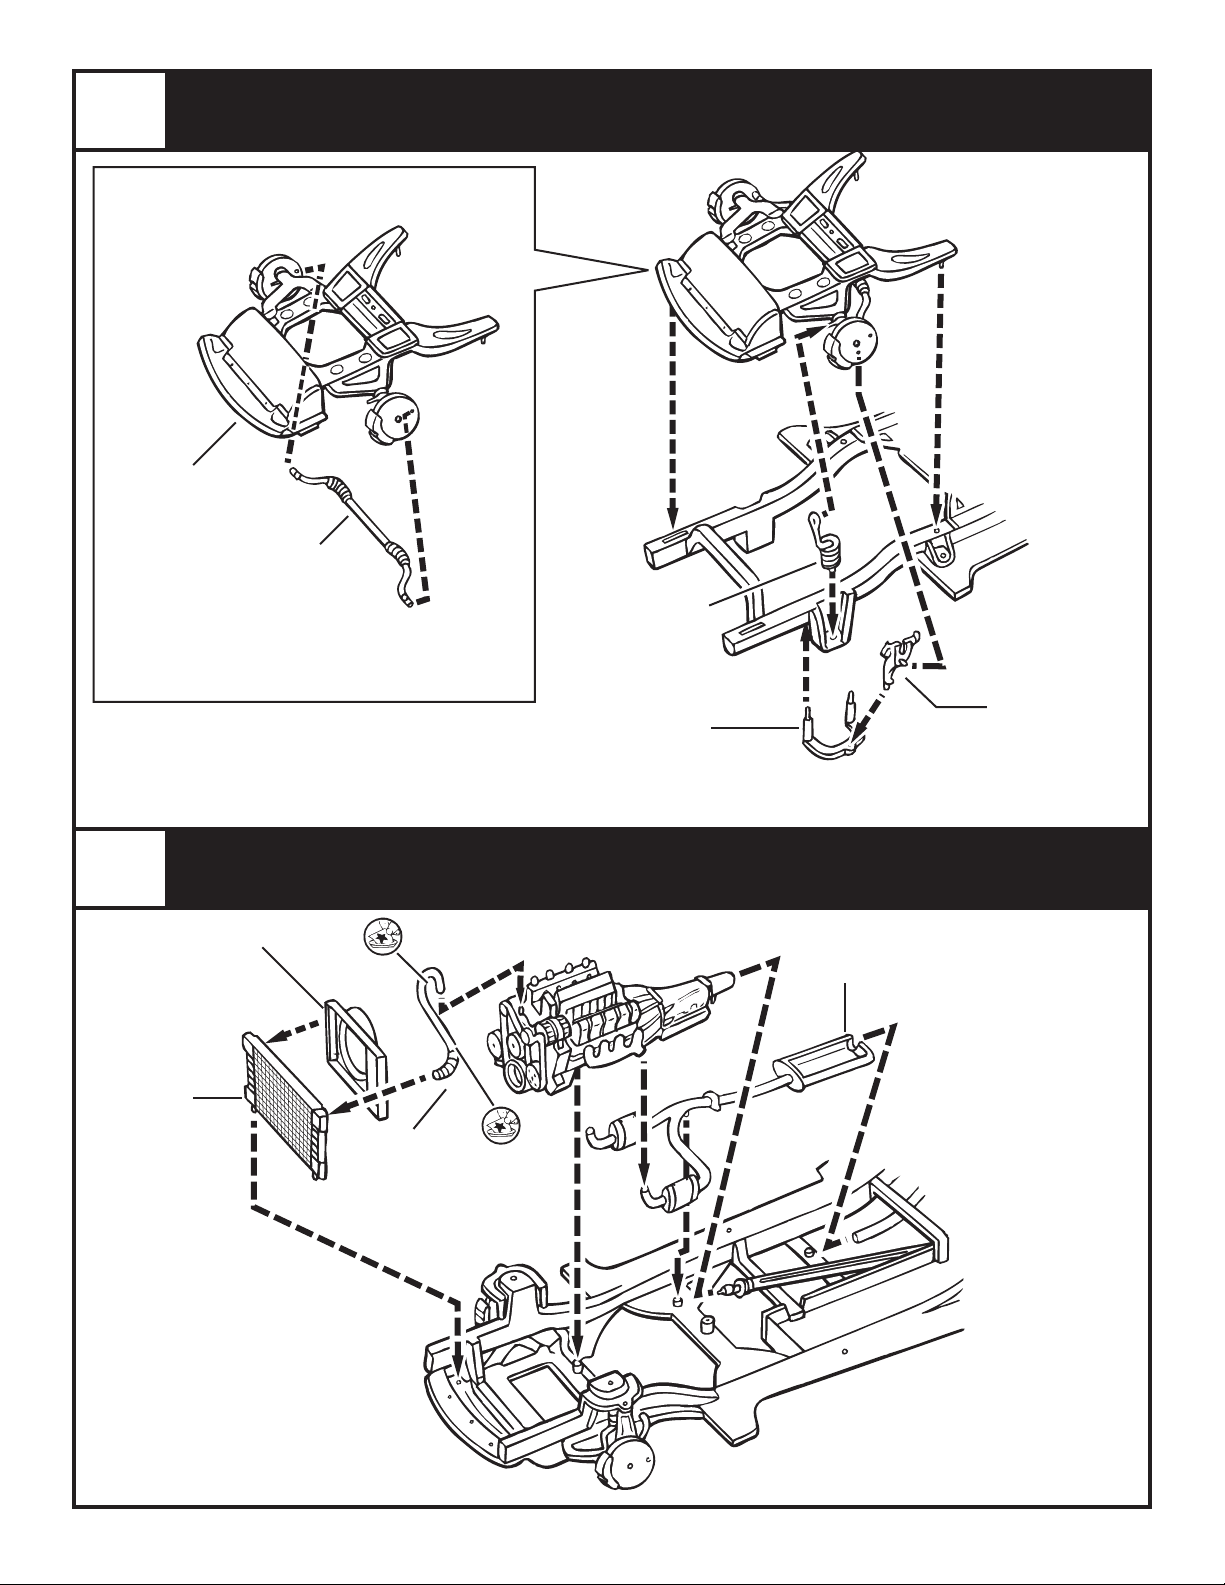
3
SUSPENSION
33
FRONT
SEMIGLOSS
BLACK
FRONT SUSPENSION ASSEMBLY
36
TIE ROD
SEMIGLOSS
BLACK
RIGHT. FRONT STRUT
REPEAT FOR OTHER
SIDE USING PART 34
35
SEMIGLOSS BLACK
4
56
RADIATOR
FLAT BLACK
93
RIGHT UPPER A-ARM
REPEAT FOR OTHER
SIDE USING PART 63
64
SEMIGLOSS BLACK
RIGHT. UPRIGHT
SEMIGLOSS BLACK
REPEAT FOR OTHER
SIDE USING PART 94
ENGINE AND CHASSIS ASSEMBLY
95
FAN
SEMIGLOSS
BLACK
30
DECAL
51
RADIATOR
HOSE
FLAT BLACK
31
DECAL
32
EXHAUST
ALUMINIUM
Page 4

5
INTERIOR ASSEMBLY
STEERING COLUMN
STEERING WHEEL
SEMIGLOSS BLACK
15
SEMIGLOSS BLACK
16
22
BACK SEAT HALF
SEMIGLOSS BLACK
(PAINT SHADED AREA
ALUMINIUM)
4
5
FRONT SEAT HALF
SEMIGLOSS BLACK
1
DECAL
13
DASH INSERT
SEMIGLOSS BLACK
98
DASH
SEMIGLOSS BLACK
6
21
(PAINT SHADED AREA ALUMINIUM)
DECAL
DECAL
17
LEFT DOOR PANEL
SEMIGLOSS BLACK
7
7
★19
SHIFTER
CHROME
3
29
DECAL
DECAL
4
20
21
DECAL
25
DECAL
24
DECAL
49
MASTER CYLINDER
ALUMINIUM
(PAINT CAP SEMIGLOSS BLACK)
55
FIREWALL
SEMIGLOSS BLACK
RIGHT DOOR PANEL
23
(SEE LEFT DOOR PANEL (17)
DECAL
22
DECAL
18
SEMIGLOSS BLACK
FOR DETAIL PAINTING)
6
WINDSHIELD AND HEADLIGHT ASSEMBLY
NOTE: THE TEMPLATE PRO
VIDED FOR THE GRILLE ON THE
BODY. PLACE THE MESH WITH
WHITE GLUE FROM THE INTE
RIOR OF THE BODY
14
INTERIOR FLOOR
SEMIGLOSS BLACK
(PAINT SHADED AREA GLOSS RED)
★61
REAR VIEW MIRROR
★76
-
-
RIGHT
HEADLIGHT BUCKET
CHROME
74
PASSENGER
HEADLIGHT
CLEAR
CHROME
DRIVER HEADLIGHT
20
HAND BRAKE
SEMIGLOSS BLACK
73
CLEAR
DECAL
PAINT SHADED AREA
SEMIGLOSS BLACK
19
★75
LEFT
HEADLIGHT BUCKET
CHROME
70
WINDSHIELD
CLEAR
Page 5

7
BODY AND CHASSIS ASSEMBLY
FIRST
METAL SCREWS
8
INDUCTION SYSTEM ASSEMBLY
BACK
SEMIGLOSS
BLACK
48
FRONT AIRBOX
SEMIGLOSS BLACK
INTAKE MANIFOLD
99
27
DECAL
47
UPPER
ALUMINIUM
28
DECAL
★05
FOG LIGHT
CHROME
50
ENGINE SHROUD
SEMIGLOSS BLACK
28
DECAL
26
DECAL
Page 6

9
A
02
HOOD
★03
HOOD BADGE
CHROME
BODY ASSEMBLY
★60
REPEAT FOR OTHER
SIDE USING PART 11
LEFT MIRROR
10
LEFT MIRROR
FACE
CHROME
REPEAT FOR OTHER
SIDE USING PART 59
★96
DOOR HANDLE
CHROME
B
★04
GRILL BAR
CHROME
REPEAT FOR OTHER
SIDE USING PART 66
65
LEFT LOWER
BODY PANEL
82
CENTER BRAKE
LIGHT
TRANSPARENT RED
METAL
EXHAUST TIPS
★12
CHEVY BOWTIE
CHROME
RIGHT TAILLIGHT
REPEAT FOR OTHER
SIDE USING PART 96
80
TRANSPARENT RED
81
LEFT TAILLIGHT
TRANSPARENT RED
72
BACK-UP LIGHTS
CLEAR
(PAINT ALUMINIUM)
07
REAR BUMPER
Page 7

10
WHEEL AND TIRE ASSEMBLY
FRONT WHEEL & TIRE
SMALL TIRE
REAR WHEEL & TIRE
LARGE TIRE
★57
FRONT
WHEEL
CHROME
★78
REAR
WHEEL
CHROME
58
RETAINER
SEMIGLOSS BLACK
METAL WHEEL PIN
METAL AXLE
11
08
HARD TOP
FINAL ASSEMBLY
PAINT SHADED
AREA SEMIGLOSS
BLACK
71
REAR
WINDSHIELD
CLEAR
60
TONNEAU
COVER
Page 8

12
DECAL PLACEMENT
85769100200
 Loading...