

REVELL Cadillac Escalade User Manual [en, fr, nl, it, gr, da, no, fi, sv, es, pt, de, en, hr, et, fi, hu, lv, lt, nl, pl, ro, ru, sr, sk, sl, cs, tr, gr, bg, uk, ch, he, ar, ja, ch, ch, ko, hi, id, kk, ms, fa, pt, es, th, vi, sq, mk]
Page 1

KIT 2189 85218910200
™
Cadillac® Escalade
You really have to admire the courage of the person that
walked into the product development meeting at Cadillac
®
a few
years ago and stated that what was needed in the line was a four
wheel drive truck. After all, throughout it’s long history the emphasis
was on luxury cars. A shiny Cadillac in one’s driveway was a sign
for everyone that this person had made it. Popular legend has it that
a pink Cadillac for his mother was one of the first purchases Elvis
Presley made with his new found wealth in the 50’s.
But times change and the very luxurious Cadillac Escalade
™
sport utility vehicle is now one of hottest selling models.
Not just Cadillac, but Mercedes, Porsche and other makes you
would never think would release an SUV, have. So what is it about
these vehicles that has made them so popular among the American
motoring public? The answer is probably rooted all the way back to
the very first four wheel drive vehicles developed for our troops in
World War II. We love cars because they can transport us to places
that we would otherwise have to walk to. Four wheel drive vehicles
took that one step further since they transported us to places we
* REPEAT SEVERAL TIMES
* A REPETER PLUSIEURS FOIS
READ THIS BEFORE YOU BEGIN LIRE CE QUI SUIT AVANT DE COMMENCER
* Study the assembly drawings.
* Each plastic part is identified by a number.
* In the assembly drawings, some parts will be
marked by a star (★) to indicate chrome
plated plastic.
* For better paint and decal adhesion, wash
the plastic parts in a mild detergent solution.
Rinse and let air dry.
* Check the fit of each piece before
cementing in place.
* Use only cement for polystyrene plastic.
* Scrape plating and paint from areas
to be cemented.
* Allow paint to dry thoroughly before
handling parts.
* Any unused parts may be discarded.
DECAL APPLICATION INSTRUCTIONS
1. Cut desired decal from sheet.
2. Dip decal in water for a few seconds.
3. Place wet decal on paper towel.
4. Wait until decal is movable on paper backing.
5. Place decal in position on model, face up and
slide backing away.
6. Press out air bubbles with a soft damp cloth.
7. Milkiness that may appear is for better decal
adhesion and will dry clear. Wipe away any
excess adhesive.
8. Do not touch decal until fully dry.
9. Allow the decals 48 hours to dry before
applying clear coat.
NOTE: Decals are compatible with
setting solutions or solvents.
* REPEAT PROCEDURE
* REPETEZ LE PROCEDE
* OPTIONAL PARTS
`` ` ` ` `
* PIECES EN OPTION
* Etudier les schémas de montage.
* Chaque pièce en plastique est identifiée par un numéro.
* Sur les schémas de montage, certaines pièces sont
marquées d'une étoile (★) pour indiquer qu'elles sont en
plastique chromé.
* Pour une meilleure prise de la peinture et des autocollants,
laver les pièces en plastique avec une solution détergente peu
concentrée. Les rincer et les laisser sécher à l'air.
* Vérifier que chaque pièce s'ajuste bien avant
de la coller en place.
* N'utiliser que de la colle pour polystyrène.
* Gratter les parties à coller pour enlever le chrome et la peinture.
* Laisser la peinture bien sécher avant de manipuler les pièces.
* Toute pièce inutilisée peut être jetée.
DIRECTIVES D'APPLICATION DES AUTOCOLLANTS
1. Découper l'autocollant désiré de la feuille.
2. Tremper l'autocollant dans de l'eau pendant quelques secondes.
3. Placer l'autocollant mouillé sur une serviette en papier.
4. Attendez que l'autocollant puisse être déplacé sur son
support en papier.
5. Mettre l'autocollant en position sur le modèle face sur
le dessus et faire glisser le support pour l'enlever.
6. Appuyer avec un chiffon doux humide pour éliminer les bulles d'air.
7. La substance laiteuse qui peut apparaître est destinée à
améliorer l'adhésion de l'autocollant et devient incolore au
séchage. Essuyer pour enlever tout excédent d'adhésif.
8. Ne pas toucher l'autocollant tant qu'il n'est pas bien sec.
9. Laisser l'autocollant sécher pendant 48 heures avant
d'appliquer une couche transparente.
REMARQUE: Les autocollants sont compatibles avec
* DECAL
* DECAL COMANIE
les solutions de fixage ou les solvants.
*ATTENTION D ASSEMBLEE
couldn’t go to in a car because there was no road. They added
something near and dear to all of us-freedom. The freedom to go
for a winter drive without waiting for the snow plow to come through.
To carry all the family members and all their stuff at once. To be
able to see above the traffic ahead.
While new and different offerings are being added to the
Cadillac product mix, one thing about them that hasn’t changed is
that helping of Cadillac luxury, and the Escalade has received a
healthy dose. Not just the expected climate control or plush leather
seats, but items that only appeared on show cars only a few years
ago-traction control, stability systems that take over if you start to
slide, satellite enabled navigation systems, even radar built into the
rear bumper to warn you if something is in your path even if you
can’t see it. Add in the handsome new corporate front end styling
and it’s easy to see why the Cadillac Escalade has become one of
the hottest rides around.
* ASSEMBLY CAUTION
* CEMENT TOGETHER
* A COLLER
This optional paint guide is provided if you
Ce guide de peintures vous sera fourni si vous choisissez de
Aluminum
Dark Gray
Gloss Black
Gloss White
Gloss White Pearl Metallic
Gray
Semigloss Black
Steel
Transparent Red
Turn Signal Amber
Wood
* REMOVE AND THROW AWAY
* A RETIRER ET JETER
choose to detail paint your model.
peindre votre modèle en détail.
Aluminium
Gris foncé
Noir brilliant
Blanc brilliant
Blanc brilliant nacré métallise
Gris
Noir satiné
Acier
Rouge transparent
Feu clignotant de direction ambre
Bois
* DO NOT CEMENT
* NE PAS COLLER
If you have any questions or comments, call our hotline at: (800) 833-3570
or, please write to:
Revell Inc Consumer Service Department, 1850 Howard Street Unit A, Elk Grove Village, Illinois 60007
Be sure to include the plan number (85218910200), part number, description, your return address and phone number.
Visit our website: www.revell.com
Revell Inc Elk Grove Village, IL. Copyright © 2010. All rights reserved.
Page 2
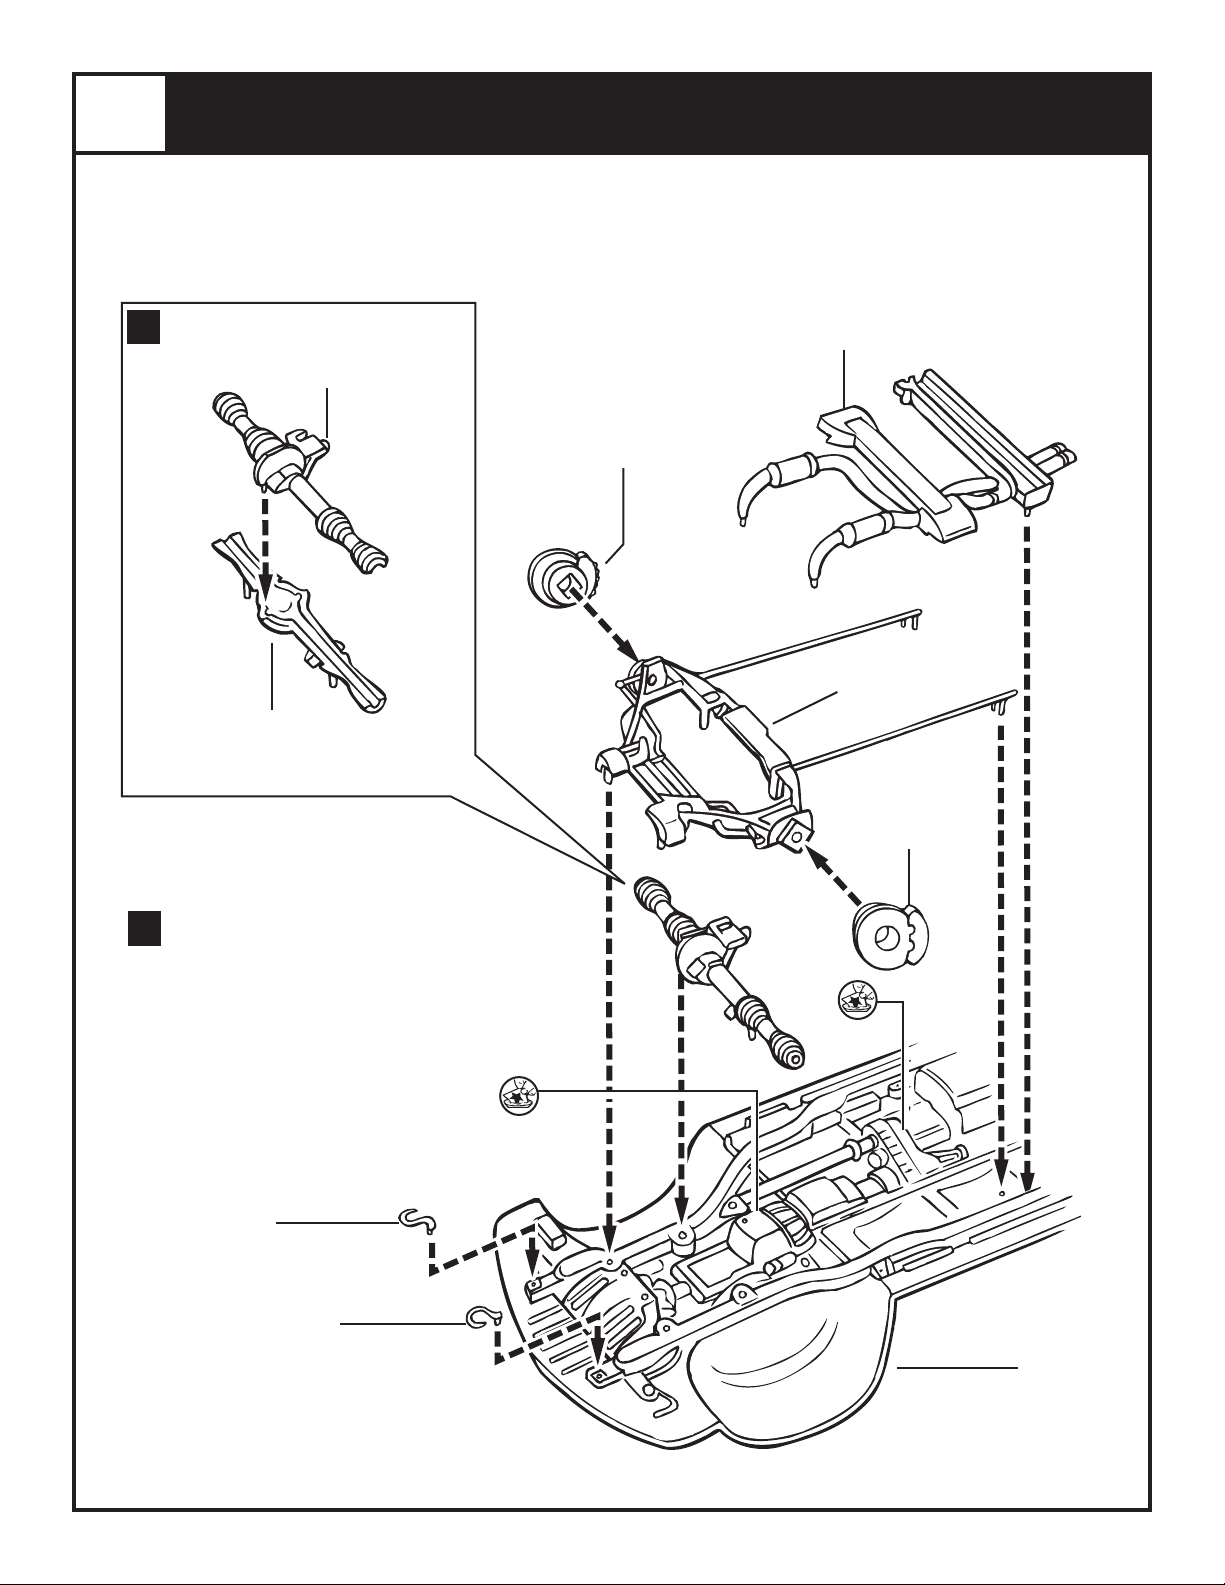
1
A
FRONT SUSPENSION ASSEMBLY
37
EXHAUST FRONT
FRONT AXLE BOTTOM
36
SEMIGLOSS BLACK
★62
FRONT DISK BRAKE
CHROME
SEMIGLOSS BLACK
B
35
FRONT AXLE TOP
SEMIGLOSS BLACK
92
LEFT TOW HOOK
SEMIGLOSS BLACK
16
OIL FILTER
FRONT SUSPENSION
34
SEMIGLOSS BLACK
★62
FRONT DISK BRAKE
CHROME
15
93
RIGHT TOW HOOK
SEMIGLOSS BLACK
33
CHASSIS
SEMIGLOSS BLACK
Page 3
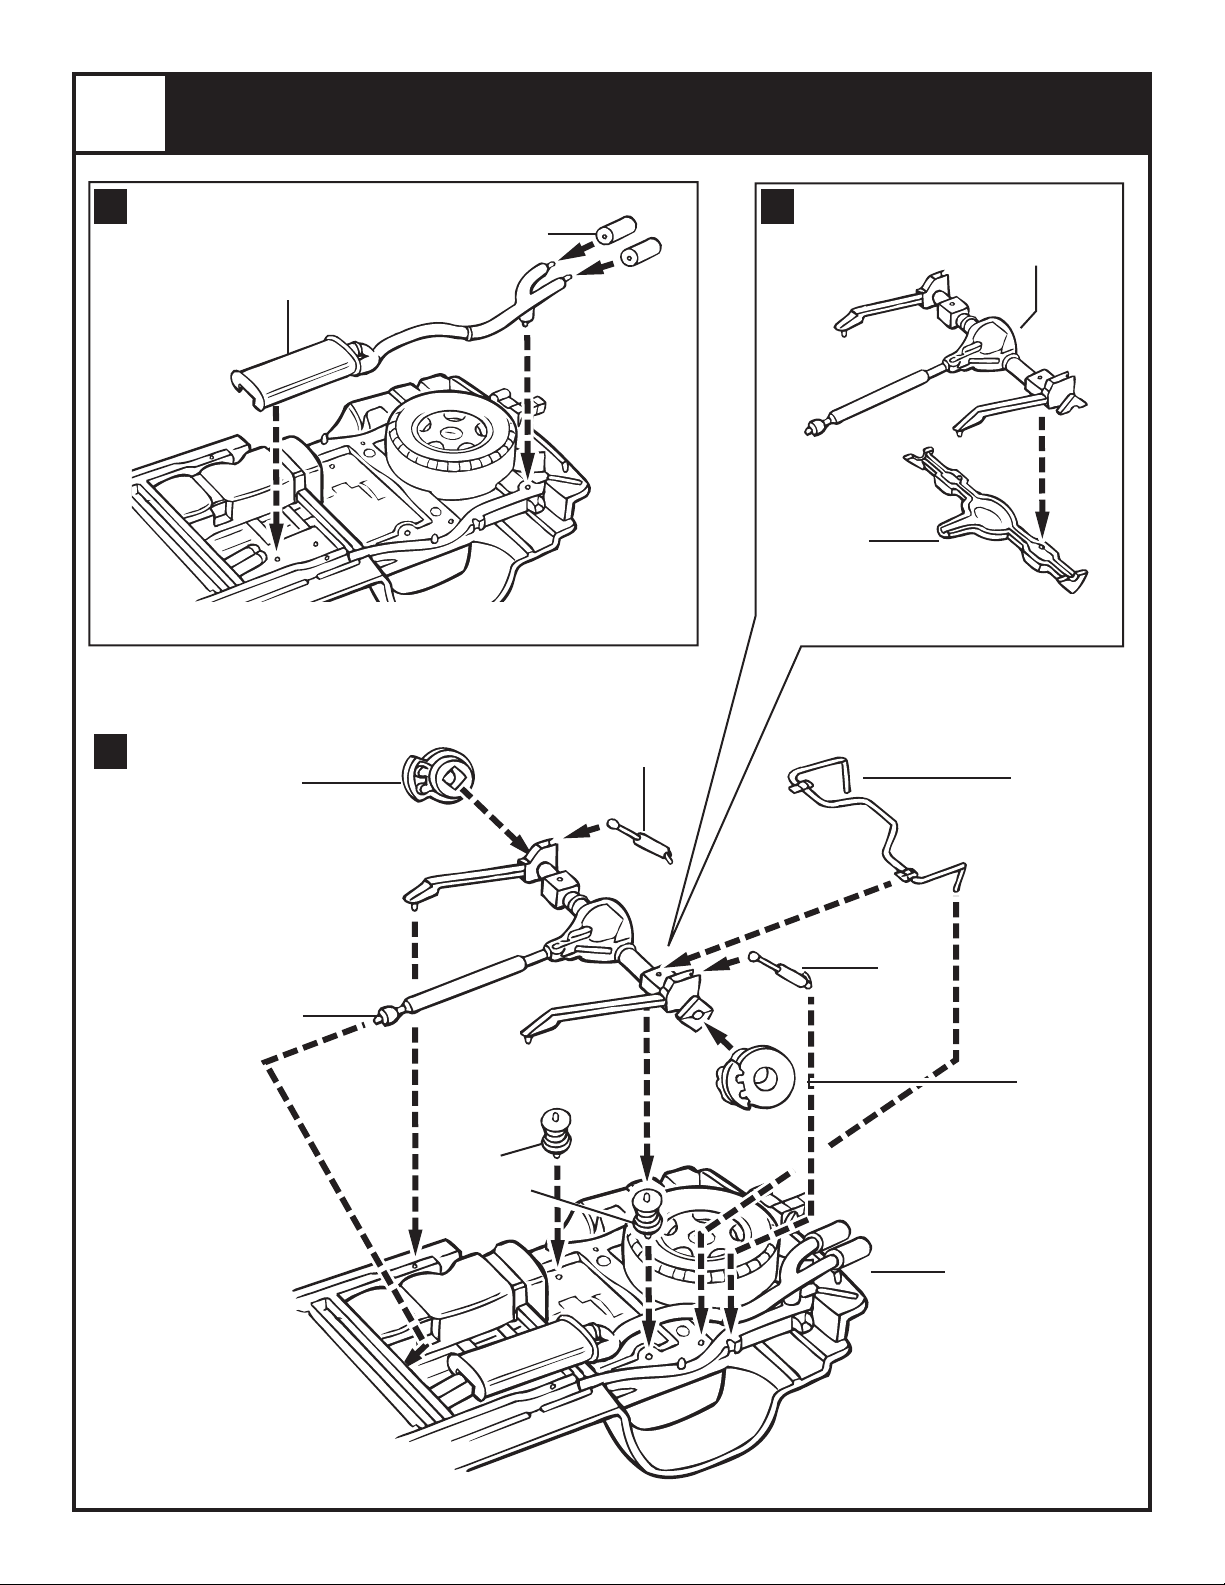
2
REAR SUSPENSION ASSEMBLY
A
C
38
REAR EXHAUST
STEEL
★96
REAR DISK BRAKE
CHROME
METAL EXHAUST TIPS
42
REAR SHOCK
GLOSS WHITE
B
REAR AXLE TOP
SEMIGLOSS BLACK
REAR AXLE BOTTOM
39
REAR STABILIZER BAR
40
SEMIGLOSS BLACK
41
SEMIGLOSS BLACK
COMPLETED ASSEMBLY
FROM STEP B
43
COIL SPRING
SEMIGLOSS
BLACK
42
REAR SHOCK
GLOSS WHITE
★96
REAR DISK BRAKE
CHROME
COMPLETED ASSEMBLY
FROM STEP A
Kit 2189 - Page 3Kit 2189 - Page 6
Page 4

3
INTERIOR ASSEMBLY
A
RIGHT SIDE FRONT
ROW SEAT BACK
15
RIGHT SIDE FRONT
ROW SEAT
GRAY
29
CONTROL PANEL
DARK GRAY
17
GRAY
RIGHT SIDE SECOND
RIGHT SIDE SECOND
13
19
ROW SEAT
GRAY
21
ROW SEAT BACK
GRAY
16
LEFT SIDE FRONT
ROW SEAT BACK
GRAY
22
THIRD ROW SEAT
GRAY
LEFT SIDE SECOND
LEFT SIDE SECOND
20
ROW SEAT BACK
GRAY
18
ROW SEAT
GRAY
THIRD ROW SEAT BACK
AUXILIARY SPEAKER
PLATFORM
DARK GRAY
23
GRAY
32
★59
AMPS
CHROME
11
LEFT SIDE FRONT
ROW SEAT
B
(REPEAT ON
PART #12)
45
DASH
DARK GRAY
GLUE DECAL FROM
BACKSIDE USING
WHITE GLUE
14
GRAY
5
1
4
(REPEAT ON PART #12
USING DECAL # 3)
46
GRAB HANDLE
DARK GRAY
80
GAUGE WINDOW
CLEAR
INTERIOR PLATFORM
(REPEAT ON PART #12
USING DECAL #
STEERING COLUMN
DARK GRAY
11
DARK GRAY
7
27
STEERING
WHEEL
DARK GRAY
(PAINT SHADED
AREA WOOD)
28
2
8
(REPEAT ON PART #12
9)
USING DECAL #
12
10)
RIGHT INTERIOR SIDE
DARK GRAY
13
(REPEAT ON
PART #12)
COMPLETED ASSEMBLY
FROM STEP A
LEFT INTERIOR SIDE
12
DARK GRAY
6
(PAINT SHADED AREA WOOD)
Page 5

4
WINDSHIELD AND WINDOWS ASSEMBLY
A
REPEAT FOR OTHER SIDE
USING PARTS 94, 81 AND 71
RIGHT REAR WINDOW
82
TRANSPARENT GRAY
LEFT TAIL LIGHT BUCKET
26
HINGE RETAINER
DARK GRAY
★52
CHROME
RIGHT MIDDLE WINDOW
95
TRANSPARENT GRAY
RIGHT SIDE WINDOW
72
CLEAR
★65
REAR VIEW MIRROR
CHROME
14
70
WINDSHIELD
CLEAR
31
T.V. SCREEN
DARK GRAY
25
HINGE
DARK GRAY
B
RIGHT TAIL LIGHT BUCKET
COMPLETED ASSEMBLY
FROM STEP A
COMPLETED INTERIOR
ASSEMBLY
COMPLETED CHASSIS
ASSEMBLY
CHROME
★53
OVERHEAD T.V. CONSOLE
30
DARK GRAY
Kit 2189 - Page 5Kit 2189 - Page 4
Page 6

5
REAR BODY ASSEMBLY
RIGHT CUSTOM TAILLIGHT
77
LEFT CUSTOM
TAILLIGHT
CLEAR
LEFT STOCK TAILLIGHT
85
TRANSPARENT RED
78
CLEAR
LEFT BACK UP LIGHT
CLEAR
86
STOCK TAILLIGHT
TRANSPARENT RED
THIRD BRAKE LIGHT
76
LEFT
BACK UP LIGHT
CLEAR
3
REAR BUMPER
75
24
TALE GATE INNER
4
TAIL GATE
87
TRANSPARENT RED
SEMIGLOSS BLACK
83
REAR WINDOW
TRANSPARENT GRAY
49
REAR WIPER
6
RIGHT SIDE ROOF RACK
ROOF RACK CROSS RAIL
LEFT SIDE ANTENNA
RIGHT SIDE ANTENNA
SEMIGLOSS BLACK
47
SEMIGLOSS BLACK
48
TOP BODY ASSEMBLY
★58
CHROME
44
SEMIGLOSS BLACK
LEFT SIDE ROOF RACK
ROOF RACK CROSS RAIL
SEMIGLOSS BLACK
LEFT MIRROR FACE
(REPEAT FOR OTHER SIDE
USING PART #
★57
CHROME
44
LEFT MIRROR HOUSING
(REPEAT FOR OTHER SIDE
★54
CHROME
5
USING PART #
55)
6)
★56
DOOR HANDLES
CHROME
(REPEAT FOR OTHER SIDE)
Page 7

7
★64
CUSTOM GRILL
cHRome
★51
RIGHT HEADLIGHT
BUCKET
cHRome
★61
STOCK GRILL
cHRome
BODY ASSEMBLY
73
RIGHT HEADLIGHT
cleaR
79
DRIVING LIGHTS
cleaR
8
★50
LEFT HEADLIGHT
BUCKET
cHRome
74
LEFT HEADLIGHT
cleaR
SIX SPOKE WHEEL
(Repeat foR otHeR side using
2
FRONT BUMPER
LEFT FRONT END CAP
paRt #
9
90)
FINAL ASSEMBLY
★60
cHRome
LEFT RUNNING BOARD
(Repeat foR otHeR side
NOTICE TREAD PATTERN
METAL AXLE
7
using paRt #
paRt #
10
91)
LEFT REAR END CAP
(Repeat foR otHeR side using
8)
TIRE
CUSTOM DAYTON WHEEL
★63
cHRome
Kit 2189 - Page 7Kit 2189 - Page 2
Page 8

9
DECAL PLACEMENT
Kit 2189 - Page 8
 Loading...