

REVELL Acura Integra R User Manual [en, fr, nl, it, gr, da, no, fi, sv, es, pt, de, en, hr, et, fi, hu, lv, lt, nl, pl, ro, ru, sr, sk, sl, cs, tr, gr, bg, uk, ch, he, ar, ja, ch, ch, ko, hi, id, kk, ms, fa, pt, es, th, vi, sq, mk]
Page 1

KIT 2572 85257200200
ACURA INTEGRA R
When is the last time you heard of a car being referred to as a “scalpel among steak knives”? Believe it or not, that’s how one writer
from a major automotive magazine described the Acura Integra R. It’s also been been described as a fabulous sports car that defines the
standards of the sports-coupe segment. Pretty impressive observations. What makes the Integra tick and what is it that’s got everybody so
excited? The key word is “handling” and in a sports car, that’s what it’s all about, especially on those twisty, country roads that sports cars
(and their drivers) just love. Throw the car into a corner and it turns in crisply with only a hint of body roll. The rigid chassis, along with the
precise steering and well-tuned suspension all combine to provide excellent stability and balance. In fact, the Acura behaves so predictably
that it would almost be difficult to lose control in a sweeping corner, thanks to the well designed chassis
and the responsive nature of the engine that allow the driver to throttle-steer during mid-turn.
The Integra has also taken on a whole new life on the Hot Hatch Euro Sedan circuit.
It’s the car of choice for the custom crowd that likes to spice up their daily driver with
splashy graphics, engine modifications or some extra-sporty wheels. A delight to
drive, nice to look at and fun to own, the Acura Integra is a car in a class all
it’s own. Your Revell kit may be built as a factory stock Acura Integra R, or
as a customized hot hatch. Included in your kit is a stock version which features stock wheels, front and rear spoilers, and Acura Integra R decals. The
custom version includes several aerodynamic packages, 3 sets of custom wheels, and
silk screened custom decals!
* REPEAT SEVERAL TIMES
* A REPETER PLUSIEURS FOIS
READ THIS BEFORE YOU BEGIN LIRE CE QUI SUIT AVANT DE COMMENCER
* Study the assembly drawings.
* Each plastic part is identified by a number.
* In the assembly drawings, some parts will
be marked by a star (★) to indicate chrome
plated plastic.
* For better paint and decal adhesion, wash
the plastic parts in a mild detergent solution.
Rinse and let air dry.
* Check the fit of each piece before cementing
in place.
* Use only cement for polystyrene plastic.
* Scrape plating and paint from areas to be
cemented.
*
Allow paint to dry thoroughly before handling parts.
* Any unused parts may be discarded.
DECAL APPLICATION INSTRUCTIONS
1. Cut desired decal from sheet.
2. Dip decal in water for a few seconds.
3. Place wet decal on paper towel.
4. Wait until decal is movable on paper back-
ing.
5. Place decal in position on model, face up and
slide backing away.
6. Press out air bubbles with a soft damp cloth.
7. Milkiness that may appear is for better decal
adhesion and will dry clear. Wipe away any
excess adhesive.
8. Do not touch decal until fully dry.
9. Allow the decals 48 hours to dry before applying
clear coat.
(If applicable)
* OPTIONAL PARTS
* PIECES EN OPTION
* DECAL
* DECAL COMANIE
* Etudier les schémas de montage.
* Chaque pièce en plastique est identifiée par un numéro.
* Sur les schémas de montage, certaines pièces sont mar
quées d'une étoile (★) pour indiquer qu'elles sont en plastique chromé.
* Pour une meilleure prise de la peinture et des autocollants,
laver les pièces en plastique avec une solution détergente
peu concentrée. Les rincer et les laisser sécher à l'air.
* Vérifier que chaque pièce s'ajuste bien avant de la coller
en place.
* N'utiliser que de la colle pour polystyrène.
* Gratter les parties à coller pour enlever le chrome et la
peinture.
* Laisser la peinture bien sécher avant de manipuler les pièces.
* Toute pièce inutilisée peut être jetée.
DIRECTIVES D'APPLICATION DES AUTOCOLLANTS
1. Découper l'autocollant désiré de la feuille.
2. Tremper l'autocollant dans de l'eau pendant quelques secondes.
3. Placer l'autocollant mouillé sur une serviette en papier.
4. Attendez que l'autocollant puisse être déplacé sur son
support en papier.
5. Mettre l'autocollant en position sur le modèle face sur le
dessus et faire glisser le support pour l'enlever.
6. Appuyer avec un chiffon doux humide pour éliminer les bulles d'air.
7. La substance laiteuse qui peut apparaître est destinée à
améliorer l'adhésion de l'autocollant et devient incolore au
séchage. Essuyer pour enlever tout excédent d'adhésif.
8. Ne pas toucher l'autocollant tant qu'il n'est pas bien sec.
9. Laisser l'autocollant sécher pendant 48 heures avant
d'appliquer une couche transparente.
* ALTERNATIVE ASSEMBLY
* ENSEMBLAGE ALTERNATIVE
* CEMENT TOGETHER
* A COLLER
* REMOVE AND THROW AWAY
* A RETIRER ET JETER
* DO NOT CEMENT
* NE PAS COLLER
This paint guide is provided to
complete this kit as shown on the box
Ce guide de peinture est fourni pour reproduire le
modèle réduit qui apparaît sur la boîte.
Aluminum
Flat Black
Gloss Black
Gloss Red
Gloss White
Gloss Yellow
Satin Black
Steel
Turn Signal Amber
Transparent Red
Aluminum
Noir mat
Noir lustré
Rouge lustré
Blanc lustré
Jaune lustré
Noir satin
Acier
Feu de virage ambre
Rouge transparent
.
If you have any questions or comments, call our hotline at: (800) 833-3570
or, please write to:
Revell-Monogram Consumer Service Department, 725 Landwehr, Northbrook, Illinois 60062
Be sure to include the plan number (85257200200), part number, description, your return address and phone number.
Visit our website: www.revell-monogram.com
REVELL-MONOGRAM, LLC Northbrook, IL. Copyright © 2003. All rights reserved.
Page 2
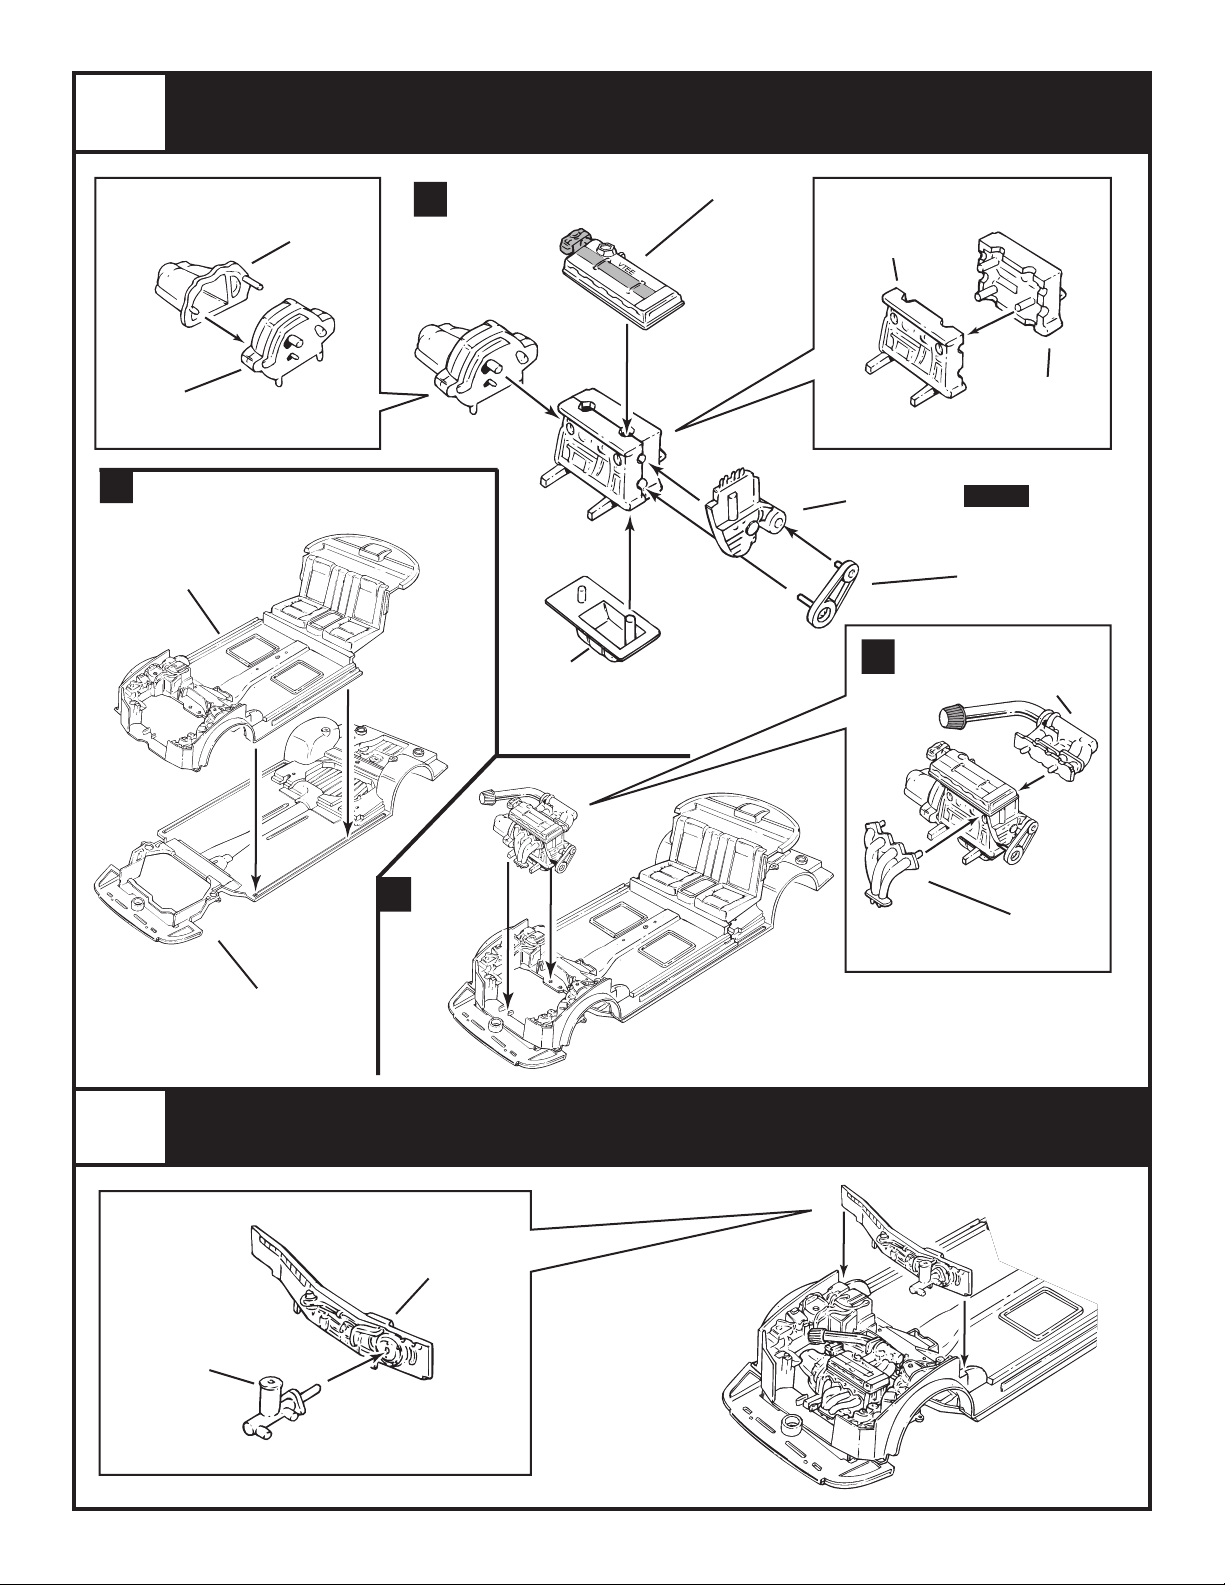
1
70
TRANSAXLE CASE
ALUMINUM
ENGINE ASSEMBLY
60
A
CYLINDER
HEAD
GLOSS RED
(LIGHT SHADED
AREA ALUMINUM,
DARK SHADED
AREA SATIN BLACK)
55
ENGINE BLOCK
FRONT
SATIN BLACK
59
BELL HOUSING
ALUMINUM
C
(ENGINE COMPARTMENT
GLOSS YELLOW WITH SATIN
18
INTERIOR
SATIN BLACK
BLACK DETAILS)
D
64
OIL PAN
SATIN BLACK
57
TIMING COVER
SATIN BLACK
B
56
ENGINE BLOCK
REAR
SATIN BLACK
FIRST
58
BELT / PULLEYS
BELTS FLAT BLACK
PULLEYS SATIN BLACK
★62
INTAKE MANIFOLD
CHROME
(SHADED AREA FLAT BLACK)
61
EXHAUST HEADER
STEEL
2
53
MASTER CYLINDER
ALUMINUM
(PAINT CANISTER FLAT
WHITE, CAP SATIN BLACK)
33
CHASSIS
GLOSS RED
FIREWALL ASSEMBLY
52
FIREWALL
SATIN BLACK
Page 3

3
65
RADIATOR HOSE
FLAT BLACK
RADIATOR ASSEMBLY
66
RADIATOR
SATIN BLACK
73
GRILLE
FLAT BLACK
76
SUPPORT BAR
ALUMINUM
(SHADED AREAS SATIN BLACK)
4
A
44
DRIVER SIDE
FRONT STRUT
SATIN BLACK
C
FRONT SUSPENSION ASSEMBLY
69
DRIVER SIDE
HALF SHAFT
SATIN BLACK
LINKAGE GETS
“CLIPPED” TO THE
51
FRONT
SUBFRAME
SATIN BLACK
GLUE STRUT
#44 AT THIS TIME
TO PIN
ON SUSPENSION
ARM
45
PASSENGER SIDE
FRONT STRUT
SATIN BLACK
DO NOT GLUE
THE STRUTS
AT THIS TIME,
PUT IN PLACE
B
D
TAB
68
PASSENGER
SIDE
HALF SHAFT
SATIN BLACK
42
DRIVER SIDE
SUSPENSION ARM
ALUMINUM
FIRST
46
STEERING LINKAGE
SATIN BLACK
Page 4

4
43
PASSENGER SIDE
SUSPENSION ARM
ALUMINUM
SUSPENSION ASSEMBLY
CLIP
SUSPENSION
ARM TO
STEERING
LINKAGE
34
EXHAUST FRONT
STEEL
TAIL PIPE
CHROME
CONTINUED
★35
5
38
DRIVER SIDE
REAR STRUT
SATIN BLACK
GLUE STRUT
#45 AT THIS
TIME
REAR SUSPENSION ASSEMBLY
39
PASSENGER SIDE
REAR STRUT
SATIN BLACK
REAR SUSPENSION
37
SATIN BLACK
Page 5

6
A
SHIFTER
SATIN BLACK
22
CONSOLE
SATIN BLACK
23
24
HAND BRAKE
SATIN BLACK
INTERIOR ASSEMBLY
25
ARM REST
SATIN BLACK
27
PASSENGER
FRONT SEAT
SATIN BLACK
B
29
PASSENGER
SEAT BACK
SATIN BLACK
26
DRIVER
FRONT SEAT
SATIN BLACK
28
DRIVER
SEAT BACK
SATIN BLACK
C
D
21
DASHBOARD
SATIN BLACK
20
DOOR PANEL
SATIN BLACK
19
DOOR PANEL
SATIN BLACK
30
STEERING
COLUMN
SATIN BLACK
DO NOT WET DECAL, CUT
DECAL FROM SHEET AND
GLUE INTO PLACE USING
WHITE GLUE
1a OR 1b
31
STEERING WHEEL
SATIN BLACK
109
GAUGE PANEL
CLEAR
Page 6

7
BODY / FRONT / REAR ASSEMBLY
A
WINDOWS
CLEAR
C
100
FIRST
★32
MIRROR
CHROME
★75
HEAD LIGHT
REFLECTOR
CHROME
104
OUTER LOW
BEAM LENS
CLEAR
102
INNER HIGH
BEAM LENS
CLEAR
B
106
TURN SIGNAL
1
BODY
GLOSS YELLOW
TURN SIGNAL AMBER
★6
HEAD LIGHT
REFLECTOR
CHROME
101
INNER HIGH
BEAM LENS
CLEAR
TURN SIGNAL AMBER
TURN SIGNAL
103
OUTER LOW
BEAM LENS
CLEAR
105
D
E
★3
TAILLIGHT
REFLECTOR
CHROME
★74
TAILLIGHT
REFLECTOR
CHROME
5
CUSTOM
SPOILER
GLOSS YELLOW
4
SPOILER
GLOSS
YELLOW
16
REAR BUMPER
GLOSS YELLOW
2
CUSTOM
REAR BUMPER
GLOSS YELLOW
14
F
REAR WIPER
SATIN BLACK
G
COMPLETED
CHASSIS
TO
BODY
PLACE FROM INSIDE
OF BODY
107
TAILLIGHT LENS
CLEAR
(PAINT SHADED AREA
TRANSPARENT RED)
108
TAILLIGHT LENS
CLEAR
(PAINT SHADED AREA
TRANSPARENT RED)
Page 7

8
WHEEL / FINAL ASSEMBLY
A
METAL
AXLE PIN
B
BRAKES 47, 48, 49, 50
SEE CORRECT POSITIONS
IN ILLUSTRATIONS AT RIGHT
★7
CUSTOM
WHEEL
CHROME
★8
CUSTOM
WHEEL
CHROME
★9
CUSTOM
WHEEL
CHROME
TIRE
METAL EXHAUST
TIP MAY BE
USED AS A
PUSHING TOOL
APPLY DOWNWARD
PRESSURE TO SECURE
AXLE PIN IN PLACE
80
STOCK
WHEEL
STEEL
(CALIPER GLOSS RED)
C
APPLY GLUE
TO THE
RAISED
SURFACES
ONLY
48
DRIVER SIDE
DISC BRAKE
ALUMINUM
PASSENGER SIDE
DISC BRAKE
(CALIPER GLOSS RED)
47
ALUMINUM
50
DRIVER SIDE
REAR BRAKES
ALUMINUM
(CALIPER GLOSS RED)
PASSENGER SIDE
REAR BRAKES
ALUMINUM
(CALIPER GLOSS RED)
49
D
E
71
REAR WING
GLOSS YELLOW
17
CUSTOM
REAR WING
GLOSS YELLOW
REAR WING CENTER
F
11
PASSENGER SIDE
MIRROR HOUSING
GLOSS YELLOW
54
GLOSS YELLOW
REAR WING
GLOSS YELLOW
40
END
41
REAR WING
END
GLOSS YELLOW
★13R
PASSENGER SIDE
MIRROR
CHROME
★12L
DRIVERS SIDE
MIRROR
CHROME
METAL
EXHAUST TIP
15
HOOD
GLOSS YELLOW
10
DRIVERS SIDE
MIRROR HOUSING
GLOSS YELLOW
Page 8

9
DECAL PLACEMENT
85257200200
 Loading...