

REVELL 77 Jeep CJ-7 Renegade 2’N 1 Assembly Manual
KIT2180 85218010200
Intercopy
`77 Jeep® CJ-7
Renegade 2’N 1
The vehicle we all know as the Jeep® originally started out as an idea, a sketch and an open challenge to America’s auto manufacturers. Aware of rising tensions in Europe,
the US Army was in the process of modernizing the armaments and equipment used by our armed forces.
One of the concepts the Army desired was an all-purpose small vehicle capable of carrying from 1 to 4 occupants as well as the ability to have smaller weapons mounted.
Because the potential areas that this vehicle was to be used might have poor or non-existent roadways, it had to have a four wheel drive or similar system.
The Army’s call for respondents among the auto makers as to whom would submit designs and running prototypes for the new "general purpose" vehicle resulted in three companies in the running for this potentially lucrative contract. In the end, the design from
Willys, a small American manufacturer, was the Army’s choice. Because of Willys’ limited production capability, the Army contracted Ford to produce the Jeep
War II. They were tough, dependable and got more than a few American servicemen out of tight situations.
News of the Jeep’s® strong performance in the war effort traveled far and wide. In fact, at the end of WWII many servicemen wanted to bring their beloved Jeep® back home with them. There were also large numbers of people
back home that wanted their own. So as soon as was possible, Willys started production on the first CJ,
which stood for Civilian Jeep
that was what the first post-war buyers wanted. These were basic, almost spartan vehicles, but also
great fun and unlike anything available to the American motoring public at the time.
Over the years, Jeeps® have undergone many changes but the basic concept remains the
same. Your Revell kit builds up to an authentic replica of the CJ-7 model, which was first introduced in 1976. The CJ-7 had a wheelbase over a foot longer than the original military version
which, when combined with more advanced tires and suspension, made for a much more comfortable ride. This was also the first Jeep
options.
You have two versions available of your Jeep
"suburban" version seen on streets and in parking lots across America. Or add some of the extra off- road parts we’ve included
®
based on the Willys design for the government. Over 640,000 were built during World
®
. Those first CJs were not far removed from the military version, but
®
to offer automatic transmissions, hardtops and doors as factory
®
CJ-7 Renegade to build. You can go with the hard- top equipped
* REPEAT SEVERAL TIMES
* A REPETER PLUSIEURS FOIS
READ THIS BEFORE YOU BEGIN LIRE CE QUI SUIT AVANT DE COMMENCER
* Study the assembly drawings.
* Each plastic part is identified by a number.
* In the assembly drawings, some parts will be
marked by a star (★) to indicate chrome
plated plastic.
* For better paint and decal adhesion, wash
the plastic parts in a mild detergent solution.
Rinse and let air dry.
* Check the fit of each piece before
cementing in place.
* Use only cement for polystyrene plastic.
* Scrape plating and paint from areas
to be cemented.
* Allow paint to dry thoroughly before
handling parts.
* Any unused parts may be discarded.
DECAL APPLICATION INSTRUCTIONS
1. Cut desired decal from sheet.
2. Dip decal in water for a few seconds.
3. Place wet decal on paper towel.
4. Wait until decal is movable on paper backing.
5. Place decal in position on model, face up and
slide backing away.
6. Press out air bubbles with a soft damp cloth.
7. Milkiness that may appear is for better decal
adhesion and will dry clear. Wipe away any
excess adhesive.
8. Do not touch decal until fully dry.
9. Allow the decals 48 hours to dry before
applying clear coat.
NOTE: Decals are compatible with
setting solutions or solvents.
* OPTIONAL PARTS
* PIECES EN OPTION
* DECAL
* DECAL COMANIE
* Etudier les schémas de montage.
* Chaque pièce en plastique est identifiée par un numéro.
* Sur les schémas de montage, certaines pièces sont
marquées d'une étoile (★) pour indiquer qu'elles sont en
plastique chromé.
* Pour une meilleure prise de la peinture et des autocollants,
laver les pièces en plastique avec une solution détergente
peu concentrée. Les rincer et les laisser sécher à l'air.
* Vérifier que chaque pièce s'ajuste bien avant
de la coller en place.
* N'utiliser que de la colle pour polystyrène.
* Gratter les parties à coller pour enlever le chrome et la peinture.
* Laisser la peinture bien sécher avant de manipuler les pièces.
* Toute pièce inutilisée peut être jetée.
DIRECTIVES D'APPLICATION DES AUTOCOLLANTS
1. Découper l'autocollant désiré de la feuille.
2. Tremper l'autocollant dans de l'eau pendant quelques secondes.
3. Placer l'autocollant mouillé sur une serviette en papier.
4. Attendez que l'autocollant puisse être déplacé sur son support
en papier.
5. Mettre l'autocollant en position sur le modèle face sur
le dessus et faire glisser le support pour l'enlever.
6. Appuyer avec un chiffon doux humide pour éliminer les bulles d'air.
7. La substance laiteuse qui peut apparaître est destinée à
améliorer l'adhésion de l'autocollant et devient incolore au
séchage. Essuyer pour enlever tout excédent d'adhésif.
8. Ne pas toucher l'autocollant tant qu'il n'est pas bien sec.
9. Laisser l'autocollant sécher pendant 48 heures avant
d'appliquer une couche transparente.
REMARQUE: Les autocollants sont compatibles avec
* ALTERNATIVE ASSEMBLY
* ENSEMBLAGE ALTERNATIVE
les solutions de fixage ou les solvants.
* CEMENT TOGETHER
* A COLLER
* REMOVE AND THROW AWAY
* A RETIRER ET JETER
* DO NOT CEMENT
* NE PAS COLLER
This optional paint guide is provided if
you choose to detail paint your model.
Ce guide de peinture vous sera fourni si vous choisis-
sez de peindre votre modèle en détail.
Aluminum
Engine Blue
Flat Black
Flat Brown
Flat White
Gloss Black
Gloss Red
Gloss Yellow
Jet Exhaust
Semigloss Black
Steel
Tan
Transparent Red
Turn signal Amber
Aluminum
Bleu motuer
Noir mat
Brun mat
Blanc mat
Noir lustré
Rouge lustré
Jaune lustré
Flux d’éjection
Noir satiné
Acier
Havane
Rouge transparent
Feu de virage ambre
If you have any questions or comments, call our hotline at: (800) 833-3570
or, please write to:
Revell-Monogram Consumer Service Department, 725 Landwehr Road, Northbrook, Illinois 60062
Be sure to include the plan number (85218010200), part number, description, your return address and phone number.
Visit our website: www.revell-monogram.com
REVELL-MONOGRAM, LLC Northbrook, IL. Copyright © 2004. All rights reserved. Made in China
1
Intercopy
A
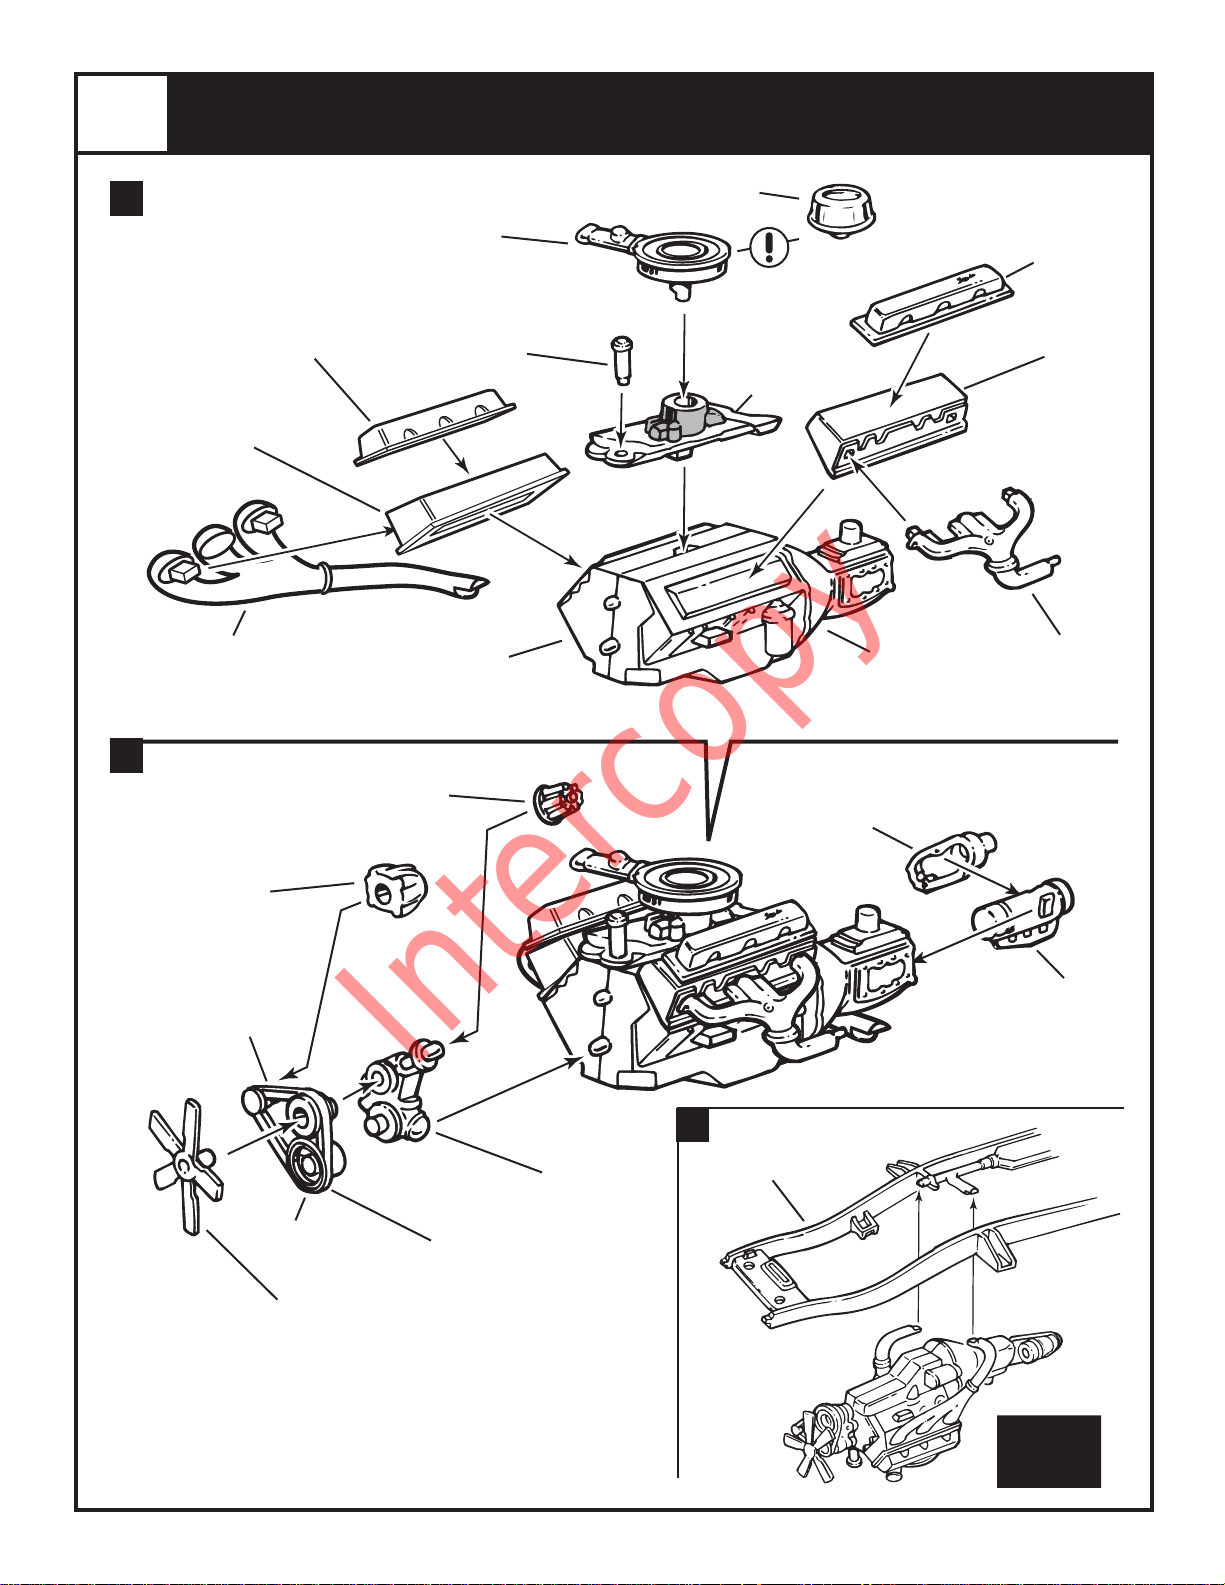
ENGINE ASSEMBLY
★82
OFF ROAD AIR
CLEANER
★107
AIR CLEANER
CHROME
CHROME
★32
ROCKER
COVERS
CHROME
B
31
RIGHT
HEAD
ENGINE BLUE
46
RIGHT
EXHAUST
HEADER
STEEL
★32
ROCKER
COVERS
CHROME
34
DISTRIBUTOR
GLOSS YELLOW
60
OIL FILLER
PIPE
ALUMINUM
93
RIGHT
ENGINE HALF
ENGINE BLUE
59
MANIFOLD
ENGINE BLUE
(PAINT SHADED
AREA ALUMINUM)
CASE HALF
ENGINE BLUE
LEFT
ENGINE HALF
ENGINE BLUE
95
TRANSFER
31
LEFT
HEAD
ENGINE BLUE
30
39
LEFT
EXHAUST
HEADER
STEEL
★35
ALTERNATOR
CHROME
FLAT BLACK
FLAT BLACK
SEMIGLOSS
BLACK
37
FAN
38
FAN BELT
SEMIGLOSS
BLACK
61
WATER PUMP
ENGINE BLUE
C
25
FRAME
BODY COLOR
42
TRANSFER
CASE HALF
ENGINE BLUE
COMPLETED
ENGINE
ASSEMBLY
2
Intercopy
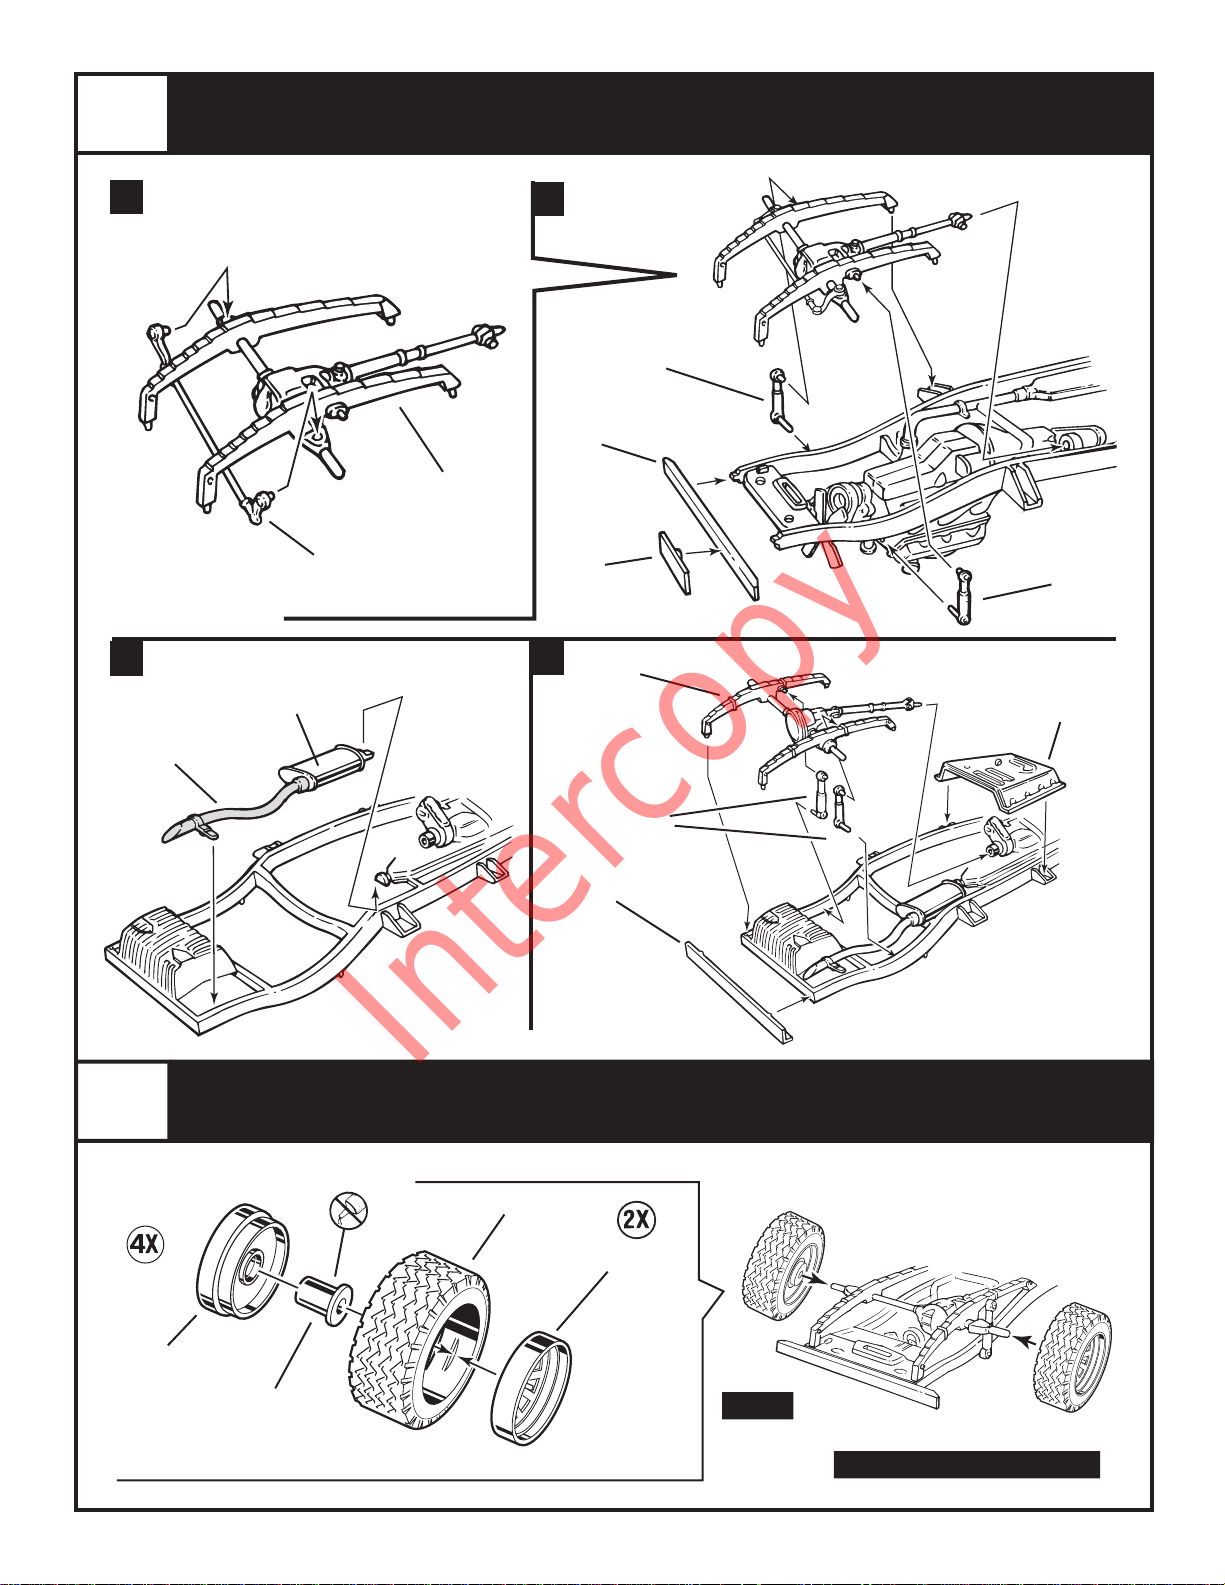
SUSPENSION ASSEMBLY
A
C
EXHAUST
58
PIPE
STEEL
TIE ROD
STEEL
ALUMINUM
B
41
SHOCK
ABSORBER
STEEL
57
FRONT
43
AXLE AND
SPRINGS
SEMIGLOSS
47
BLACK
BUMPER
GLOSS BLACK
★24
LICENSE
PLATE
CHROME
D
REAR AXLE
AND SPRINGS
SEMIGLOSS
44
BLACK
41
SHOCK
ABSORBER
STEEL
49
TRANSFER CASE
SKID PLATE
SEMIGLOSS BLACK
3
27
INSIDE WHEEL
SEMIGLOSS
BLACK
28
WHEEL
RETAINER
41
SHOCK
ABSORBERS
STEEL
23
REAR
BUMPER
GLOSS BLACK
WHEEL ASSEMBLY
TIRE
★26
OUTER
WHEEL
(FRONT)
CHROME
★51
OUTER
WHEEL
(REAR)
CHROME
FRONT
REPEAT FOR REAR WHEELS
 Loading...