

REVELL 38 ELLIOTT SADLER m&m's TAURUS STOCK CAR Assembly Manual
KIT 2845
Intercopy
ELLIOTT SADLER
TAURUS STOCK CAR
85284500200
For Elliott Sadler, this is the start of something really big.
But then, Elliott is a really big guy. Like his teammate Dale Jarrett,
Elliott is unusually large for a NASCAR® driver. That only means
there’s a bigger foot mashing down the accelerator; something
Elliott has picked up quite nicely, thank you.
Like many of his peers, Elliott got his start running the
small bullrings of NASCAR’s
®
touring series. At his home track in
South Boston, Virginia, Elliott was crowned Late Model Stock Car
champ in 1995 at the tender age of 20. Moving up to the Grand
National series, Elliott won three races and finished his rookie season in the series fifth in the standings. That feat caught the eyes of
many Cup series team owners and it wasn’t long before Elliott hit
the big time.
With the start of the 1999 campaign, Elliott found another
yellow rookie stripe on the rear bumper of his ride. Only this time
it was attached to a car owned by the legendary Wood Brothers,
one of NASCAR’s
®
first teams way back in the beginning. Being a
some bumps along the way, but Elliott still held his own, clinching
his only victory in the 2001 Food City 500 race at the always challenging Bristol Motor Speedway.
2003 finds Elliott in the best ride of his life, driving for the
mighty Robert Yates owned #38 team sponsored by M&M’s
candies. Surrounded by the best equipment money can buy, the
vast experience of the Yates crews and having 1999 Champion
Dale Jarrett as your mentor and teammate will do wonders for
your driving ability. So far in 2003, Elliott has been using up every
bit of that expertise-nine Top 10 finishes including two Top 5’s and
two pole positions. Elliott was in the front pack at the EA 500 at
Talladega vying for the win when he was bumped at 190 mph,
sending the M&M’s
crashes that appears on all the newscasts and in all the papers.
Elliott crawled out, shaken but unhurt. Like we said, a big guy
indeed.
rookie in one of the most competitive sports in the world promises
* REPEAT SEVERAL TIMES
* A REPETER PLUSIEURS FOIS
READ THIS BEFORE YOU BEGIN LIRE CE QUI SUIT AVANT DE COMMENCER
* Study the assembly drawings.
* Each plastic part is identified by a number.
* For better paint and decal adhesion, wash
the plastic parts in a mild detergent solution.
Rinse and let air dry.
* Check the fit of each piece before cementing
in place.
* Use only cement for polystyrene plastic.
* Scrape plating and paint from areas to be
cemented.
* Allow paint to dry thoroughly before
handling parts.
* Any unused parts may be discarded.
DECAL APPLICATION INSTRUCTIONS
1. Cut desired decal from sheet.
2. Dip decal in water for a few seconds.
3. Place wet decal on paper towel.
4. Wait until decal is movable on paper backing.
5. Place decal in position on model, face up
and slide backing away.
6. Press out air bubbles with a soft damp cloth.
7. Milkiness that may appear is for better decal
adhesion and will dry clear. Wipe away any
excess adhesive.
8. Do not touch decal until fully dry.
9. Allow the decals 48 hours to dry before
applying clear coat.
NOTE: Decals are compatible with
setting solutions or solvents.
* OPTIONAL PARTS
* PIECES EN OPTION
* DECAL
* DECAL COMANIE
* Etudier les schémas de montage.
* Chaque pièce en plastique est identifiée par un numéro.
* Pour une meilleure prise de la peinture et des autocollants,
laver les pièces en plastique avec une solution détergente
peu concentrée. Les rincer et les laisser sécher à l'air.
* Vérifier que chaque pièce s'ajuste bien avant de la coller
en place.
* N'utiliser que de la colle pour polystyrène.
* Gratter les parties à coller pour enlever le chrome et la peinture.
* Laisser la peinture bien sécher avant de manipuler les pièces.
* Toute pièce inutilisée peut être jetée.
DIRECTIVES D'APPLICATION DES AUTOCOLLANTS
1. Découper l'autocollant désiré de la feuille.
2. Tremper l'autocollant dans de l'eau pendant quelques secondes.
3. Placer l'autocollant mouillé sur une serviette en papier.
4. Attendez que l'autocollant puisse être déplacé sur son sup
port en papier.
5. Mettre l'autocollant en position sur le modèle face sur le
dessus et faire glisser le support pour l'enlever.
6. Appuyer avec un chiffon doux humide pour éliminer les bulles
d'air.
7. La substance laiteuse qui peut apparaître est destinée à
améliorer l'adhésion de l'autocollant et devient incolore au
séchage. Essuyer pour enlever tout excédent d'adhésif.
8. Ne pas toucher l'autocollant tant qu'il n'est pas bien sec.
9. Laisser l'autocollant sécher pendant 48 heures avant
d'appliquer une couche transparente.
REMARQUE: Les autocollants sont compatibles avec
* ALTERNATIVE ASSEMBLY
* ENSEMBLAGE ALTERNATIVE
®
Taurus barrel-rolling wildly. It was one of those
* CEMENT TOGETHER
* A COLLER
®
brand
* REMOVE AND THROW AWAY
* A RETIRER ET JETER
This paint guide is provided to
complete this kit as shown on the box
Ce guide de peinture est fourni pour reproduire le
modèle réduit qui apparaît sur la boîte.
Aluminum
Flat Black
Flat White
Gloss Black
Gloss Dark Blue
Gloss Gray
Gloss Red
Gloss Yellow
Jet Exhaust
Rust
Semigloss Black
Steel
Transparent Blue
Transparent Red
* DO NOT CEMENT
* NE PAS COLLER
Aluminum
Noir mat
Blanc mat
Noir brilliant
Bleu foncé brilliant
Gris brilliant
Rouge brilliant
Jaune brilliant
Flux d’éjection
Rouille
Noir satiné
Acier
Bleu transparent
Rouge transparent
.
If you have any questions or comments, call our hotline at: (800) 833-3570
or, please write to:
Revell-Monogram Consumer Service Department, 725 Landwehr, Northbrook, Illinois 60062
Be sure to include the plan number (85284500200), part number, description, your return address and phone number.
Visit our website: www.revell-monogram.com
REVELL-MONOGRAM, LLC Northbrook, IL. Copyright © 2003. All rights reserved.

1
Intercopy
A
29
ENGINE BLOCK
HALF
ALUMINUM
CYLINDER HEAD
STEEL
65
ALUMINUM
101
OIL PAN
GLOSS DARK
BLUE
ENGINE ASSEMBLY
70
65
CYLINDER HEAD
ALUMINUM
ENGINE BLOCK
HALF
ALUMINUM
30
CARBURETOR
B
DISTRIBUTOR &
PLUG WIRES
FLAT BLACK
ALUMINUM
36
67
VALVE COVER
ALUMINUM
100
AIR CLEANER
FLAT WHITE
69
INTAKE MANIFOLD
ALUMINUM
VALVE COVER
68
BREATHER
ALUMINUM
66
ALUMINUM
HEADER
JET EXHAUST
41
HEADER HALF
JET EXHAUST
2
LEAVE SUPPORT STRAP IN
PLACE UNTIL STEP 5
14
LOWER ARMS
SEMIGLOSS BLACK
64
ALTERNATOR
ALUMINUM
SUMP BELT
FLAT BLACK
RADIATOR / SUSPENSION ASSEMBLY
NOTE:
40
HALF
33
C
39
HEADER
HALF
JET EXHAUST
POWER STEERING PUMP
ALUMINUM
PULLEYS
32
BELT ASSEMBLY
FLAT BLACK
FAN SHROUD
ALUMINUM
31
34
ALUMINUM
15
UPPER ARM
(SHADED AREA SEMIGLOSS BLACK)
GLOSS GRAY
✱
(SHADED AREA SEMIGLOSS
38
HEADER HALF
JET EXHAUST
96
UPPER ARM
GLOSS GRAY
BLACK)
5
FRAME
GLOSS GRAY
62
RADIATOR
ALUMINUM
✱
✱
✱
✱
✱
3
Intercopy
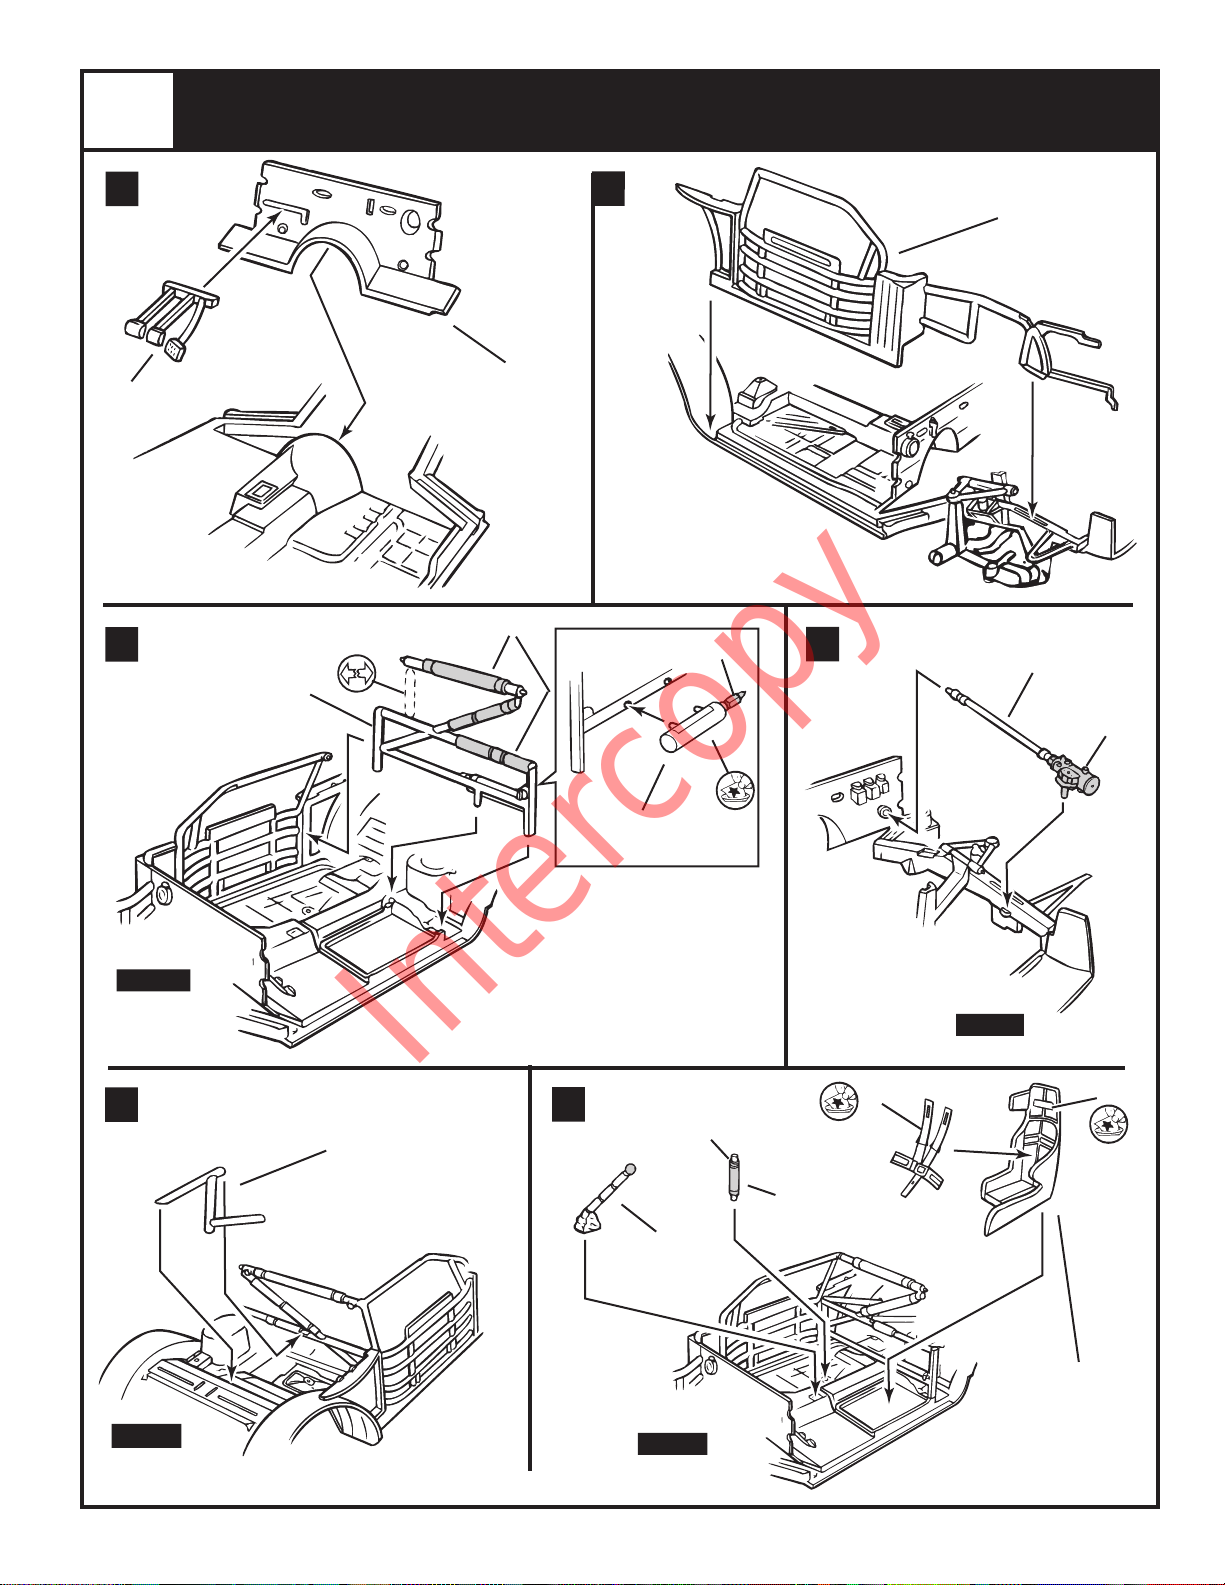
CHASSIS ASSEMBLY
A
44
PEDALS
ALUMINUM
C
B
7
FIREWALL
8
ROLL BAR
GLOSS GRAY
GLOSS GRAY
FLAT BLACK
ALUMINUM
D
STEERING SHAFT
48
CAGE SIDE
GLOSS GRAY
25
STEEL
ALUMINUM
FRONT
E
REAR
57
PETTY BAR
GLOSS GRAY
FIRE EXTINGUISHER
49
GLOSS RED
F
5
11
STIFFENER
GLOSS GRAY
BRACE
FRONT
22
24
FLAT BLACK
52
SHIFTER
FLAT BLACK
(PAINT SHADED
AREA ALUMINUM
47
SEAT
FLAT BLACK
FRONT
 Loading...