

REVELL KIT 2453, Beer Wagon Show Rod, 2453, BEER WAGON Assembly Manual
KIT2453 85245300200
BEER WAGON
SHOW ROD
The “ Beer wagon” is a mod rod version of a
vintage delivery truck. It has been compacted into
an everyday street rod using the latest rod
techniques. The original flavor of the vintage truck
has been retained in the wild custom fiberglass
hood,cab and fenders. A box rail frame supports
a cobra engine-hydro combination which feeds
into a truck transmission. A chrome chain unit
drives the deep-dished chromed Astro wheels with
extra wide slicks. The front suspension features
The interior styling is a work of art. Tufted
naugahyde bucket seats actually form a booth. In
the center of this booth is a console with a beer
barrel complete with spigot and two Bavarian beer
steins. A hot rod steering wheel padded
headrests, stein shift lever and Maltese cross rear
window finish off the strictly first-class interior.
Injector stacks, chrome pony gas tanks, custom
exhaust pipes and old railroad lantern tail lights
round out this little jewel.
a dropped front axle, air springs, chromed radius
rods and deep-dished wheels with wide
faced weenies.
* REPEAT SEVERAL TIMES
* A REPETER PLUSIEURS FOIS
READ THIS BEFORE YOU BEGIN LIRE CE QUI SUIT AVANT DE COMMENCER
* Study the assembly drawings.
* Each plastic part is identified by a number.
* In the assembly drawings, some parts will be
marked by a star (★) to indicate chrome
plated plastic.
* For better paint and decal adhesion, wash
the plastic parts in a mild detergent solution.
Rinse and let air dry.
* Check the fit of each piece before
cementing in place.
* Use only cement for polystyrene plastic.
* Scrape plating and paint from areas
to be cemented.
* Allow paint to dry thoroughly before
handling parts.
* Any unused parts may be discarded.
DECAL APPLICATION INSTRUCTIONS
1. Cut desired decal from sheet.
2. Dip decal in water for a few seconds.
3. Place wet decal on paper towel.
4. Wait until decal is movable on paper backing.
5. Place decal in position on model, face up and
slide backing away.
6. Press out air bubbles with a soft damp cloth.
7. Milkiness that may appear is for better decal
adhesion and will dry clear. Wipe away any
excess adhesive.
8. Do not touch decal until fully dry.
9. Allow the decals 48 hours to dry before
applying clear coat.
NOTE: Decals are compatible with
setting solutions or solvents.
* OPTIONAL PARTS
* PIECES EN OPTION
* DECAL
* DECAL COMANIE
* Etudier les schémas de montage.
* Chaque pièce en plastique est identifiée par un numéro.
* Sur les schémas de montage, certaines pièces sont
marquées d'une étoile (★) pour indiquer qu'elles sont en
plastique chromé.
* Pour une meilleure prise de la peinture et des autocollants,
laver les pièces en plastique avec une solution détergente
peu concentrée. Les rincer et les laisser sécher à l'air.
* Vérifier que chaque pièce s'ajuste bien avant
de la coller en place.
* N'utiliser que de la colle pour polystyrène.
* Gratter les parties à coller pour enlever le chrome et la peinture.
* Laisser la peinture bien sécher avant de manipuler les pièces.
* Toute pièce inutilisée peut être jetée.
DIRECTIVES D'APPLICATION DES AUTOCOLLANTS
1. Découper l'autocollant désiré de la feuille.
2. Tremper l'autocollant dans de l'eau pendant quelques secondes.
3. Placer l'autocollant mouillé sur une serviette en papier.
4. Attendez que l'autocollant puisse être déplacé sur son support
en papier.
5. Mettre l'autocollant en position sur le modèle face sur
le dessus et faire glisser le support pour l'enlever.
6. Appuyer avec un chiffon doux humide pour éliminer les bulles d'air.
7. La substance laiteuse qui peut apparaître est destinée à
améliorer l'adhésion de l'autocollant et devient incolore au
séchage. Essuyer pour enlever tout excédent d'adhésif.
8. Ne pas toucher l'autocollant tant qu'il n'est pas bien sec.
9. Laisser l'autocollant sécher pendant 48 heures avant
d'appliquer une couche transparente.
REMARQUE: Les autocollants sont compatibles avec
* ALTERNATIVE ASSEMBLY
* ENSEMBLAGE ALTERNATIVE
les solutions de fixage ou les solvants.
* CEMENT TOGETHER
* A COLLER
* REMOVE AND THROW AWAY
* A RETIRER ET JETER
This optional paint guide is provided if
you choose to detail paint your model.
Ce guide de peinture vous sera fourni si vous choisis-
sez de peindre votre modèle en détail.
Aluminium
Dark Brown
Engine Orange
Flat Black
Flat White
Gloss Blue
Gloss Red
Gloss Yellow
Gloss White
Semigloss Black
Silver
Steel
Wood
* DO NOT CEMENT
* NE PAS COLLER
Aluminium
Brun foncé
Orange moteur
Noir mat
Blanc mat
Bleu brilliant
Rouge brilliant
Jaune brilliant
Blanc brilliant
Noir satiné
Argent
Acier
Bois
If you have any questions or comments, call our hotline at: (800) 833-3570
Revell-Monogram Consumer Service Department, 725 Landwehr Road, Northbrook, Illinois 60062
Be sure to include the plan number (85245300200), part number, description, your return address and phone number.
REVELL-MONOGRAM, LLC Northbrook, IL. Copyright © 2004. All rights reserved. Made in China
or, please write to:
Visit our website: www.revell-monogram.com
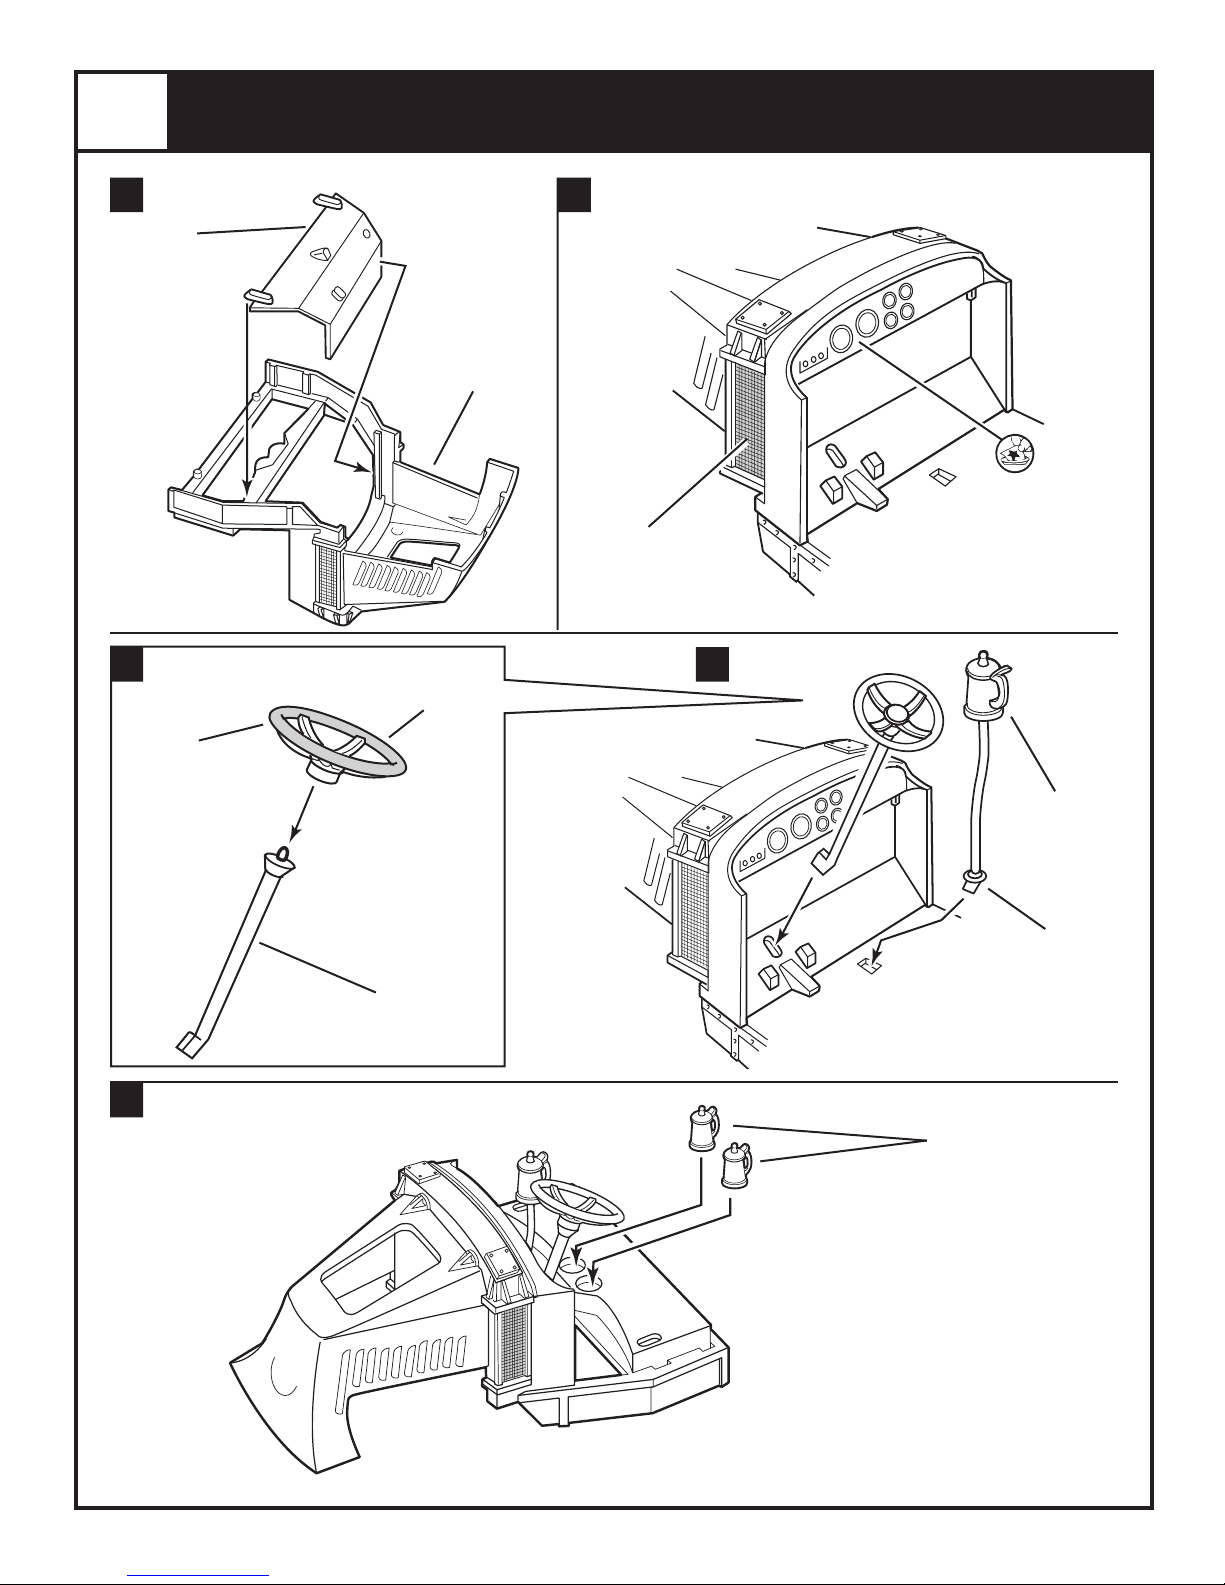
1
CAB ASSEMBLY
A
Y1
FLOORBOARD
FLAT BLACK
C
★P8
STEERING
WHEEL
CHROME
DARK BROWN
Y2
HOOD
B
FLAT BLACK
D
3
PAINT GLOSS WHITE WITH
SMALL BLUE,RED AND
YELLOW SPOTS.
E
STEERING COLUMN
Y9
SEMIGLOSS BLACK
SHIFT LEVER
★
P3
STEINS
(PAINT GLOSS WHITE WITH SMALL
BLUE,RED AND YELLOW SPOTS.)
CHROME
★
P7
CHROME
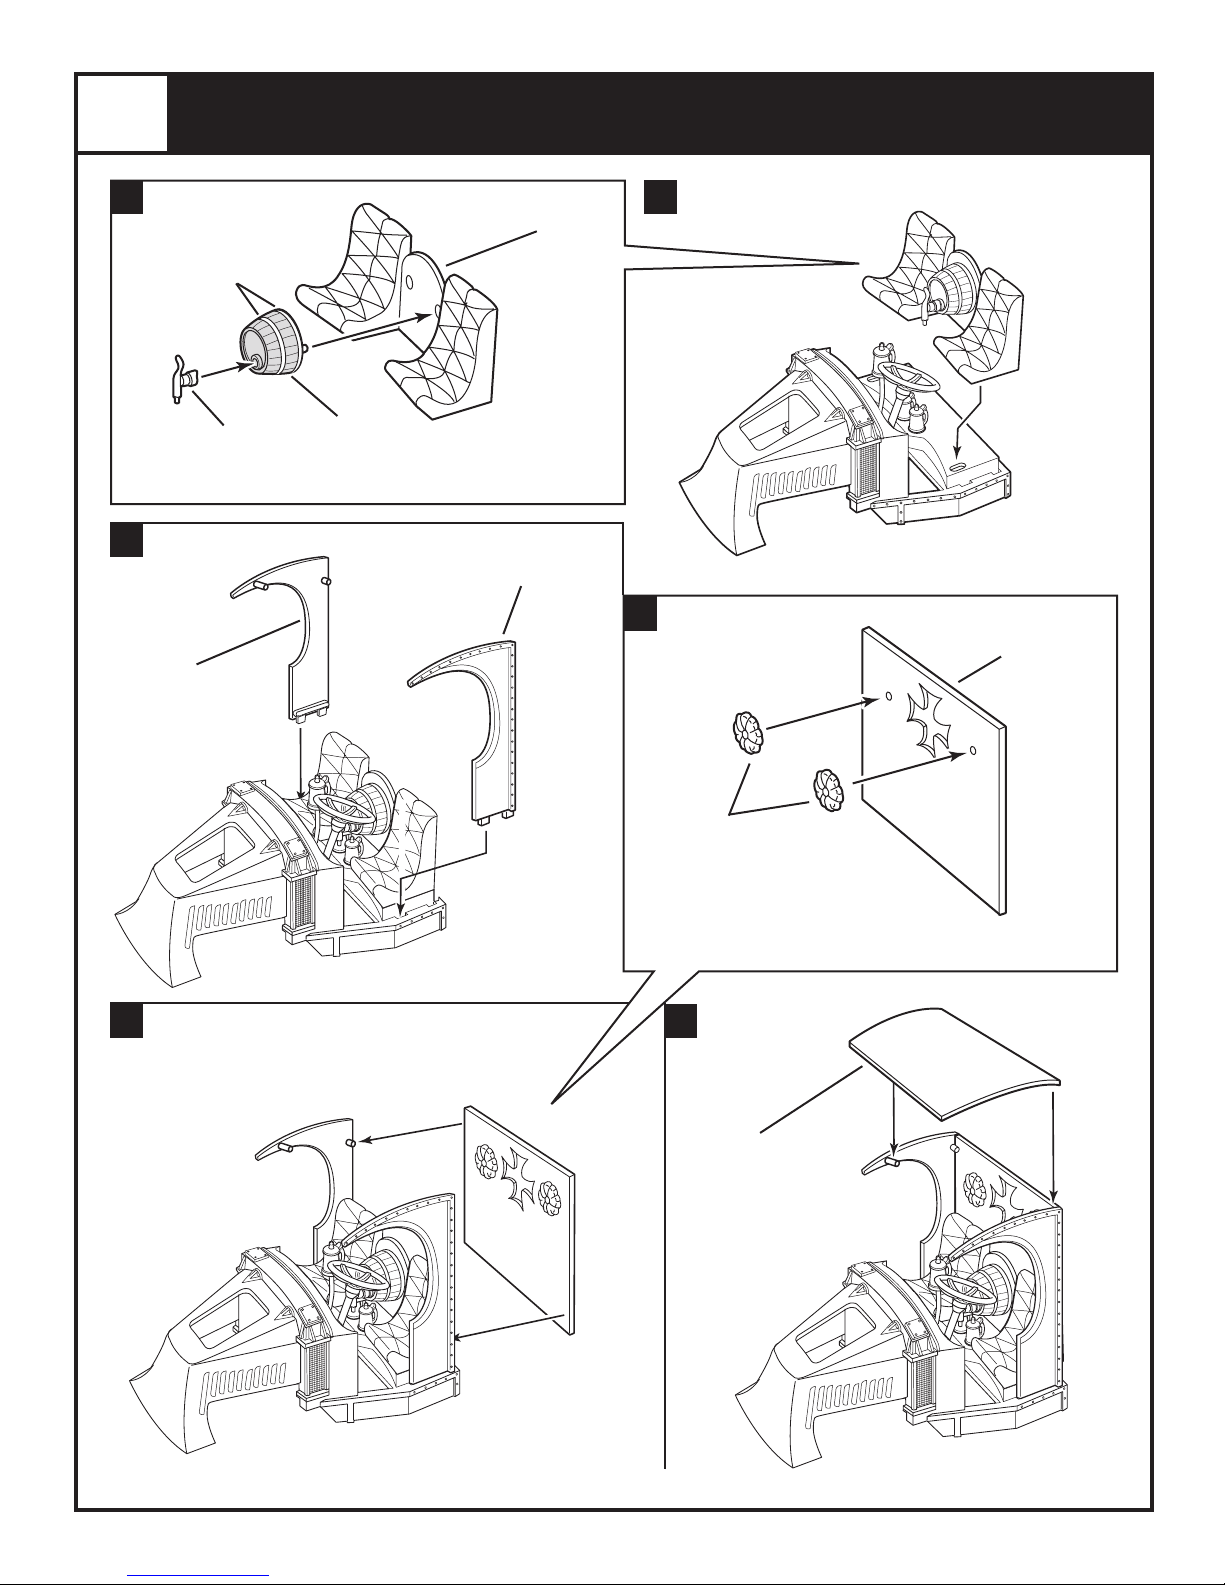
1
CAB ASSEMBLY
F G
Y5
SEATS
SILVER
SEMIGLOSS
BLACK
CONTINUED
H
SPIGOT
CHROME
Y10
CAB SIDE
★P6
Y4
CASK
DARK BROWN
Y11
CAB SIDE
I
HEADRESTS
Y13
CAB BACK
Y12
SEMIGLOSS
BLACK
J
K
Y14
CAB ROOF
 Loading...