

Page 1
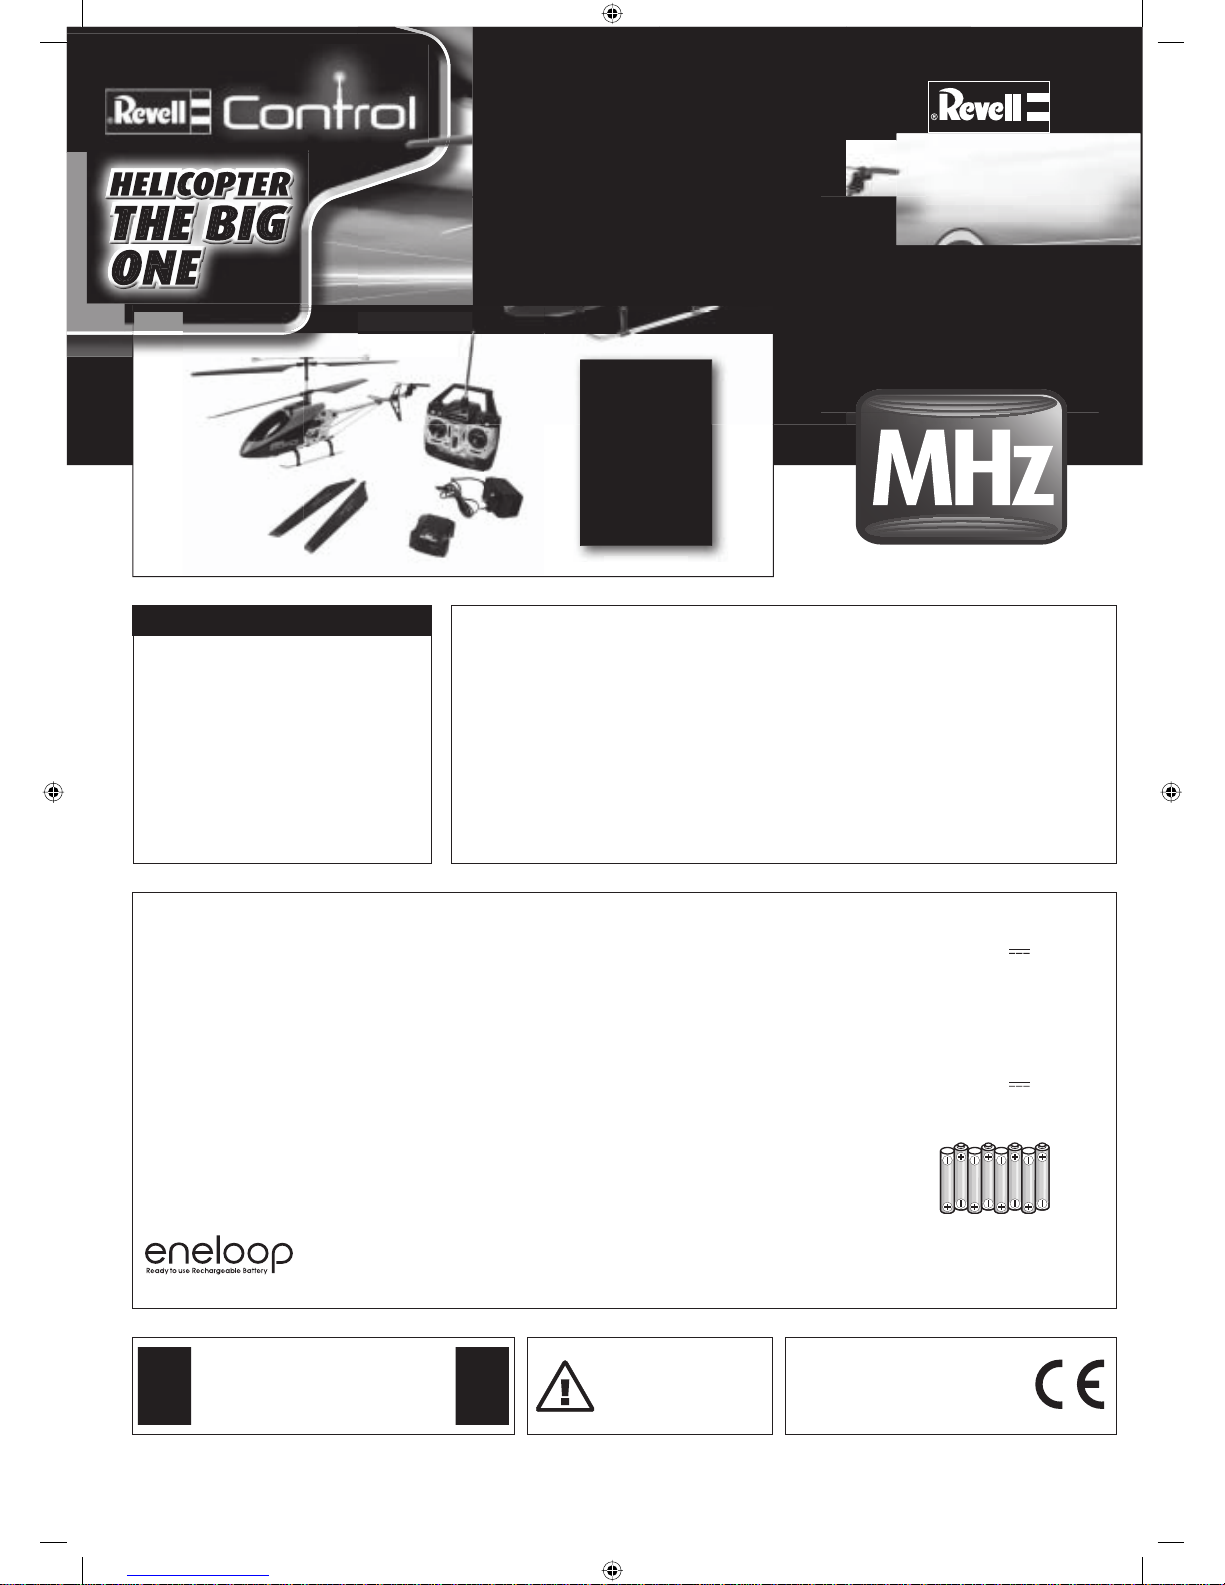
Instruction Manual
27 MHz RADIO CONTROL
24056
Main Features
Helicopter The Big One:
• Sturdy aerodynamic aluminium fuselage
• Replaceable, rechargeable LiPo (lithium-polymer) battery
• New coaxial rotor system with electronic gyro for
excellent fl ying
• Easy battery recharging with the supplied charger
Controller:
• 3-channel MHz controller
• Trim function for fi ne tuning
• LED indicator
Safety Precautions:
• Keep these instructions for future reference.
• Always follow these instructions when operating the helicopter.
• Do not fl y the helicopter near people, animals, water or power cables.
• The LiPo battery charger is made specifi cally for charging the
helicopter battery. Only use it for this purpose. Do not use it to
charge other batteries.
• This appliance is not intended for use by persons (including children)
with reduced physical, sensory or mental capabilities, or lack of
experience and knowledge, unless they have been given supervision
or instruction concerning use of the appliance by a person
responsible for their safety.
• The helicopter should not be used in temperatures above
45°C/113°F or below 10°C/50°F.
• This product is designed to be used indoors only. Do not use it
outdoors unless there is absolutely no wind and no gusts.
• This helicopter is suitable for ages 15 and above. Parental
supervision is necessary while fl ying.
• Keep hands, face, hair and loose clothing away from the
rotor blades.
• Turn off the controller and helicopter when not in use.
• Remove batteries from the controller when not in use.
• Always keep the helicopter in sight to avoid loss of control.
• We recommend using new alkaline-manganese batteries
or eneloop rechargeable batteries for the controller.
• Insert new batteries in the controller as soon as any function
becomes diminished.
Care and Maintenance:
• Use a clean, damp cloth to wipe the helicopter.
• Keep the helicopter and batteries away from direct sunlight and/or
direct heat sources.
• Never let the helicopter come into contact with water, as this may
damage the electronics.
Controller Battery Safety Advice:
• Do not charge non-rechargeable batteries.
• Rechargeable batteries must be removed from the controller before charging.
• Rechargeable batteries must only be charged under adult supervision.
• Do not use different types of batteries or mix old and new batteries.
• Only use the recommended batteries or batteries of an equivalent type.
• To help the environment, consider replacing the disposable batteries for
this controller and for other household electronic items with rechargeable
batteries. We recommend eneloop rechargeable batteries from Sanyo.
• Insert batteries following the correct polarity (+ and -).
• Remove dead batteries from the controller.
• Do not short-circuit the supply terminals. Remove batteries from the
controller when it is not used for a long period of time.
Battery Requirements
for the Helicopter:
Power Supply:
Rating: DC 7,4V / 1300 mAh
Batteries: One 7.4 V rechargeable
LiPo battery (included)
Battery Requirements
for the Controller:
Power Supply:
DC 12 V
Batteries: 8 x 1.5 V “AA”
(included)
The helicopter comes with a rechargeable lithium-polymer battery.
Always follow these safety instructions:
• Never dispose of LiPo batteries in a fi re or store near sources of heat.
• Only use the supplied Revell LiPo charger to recharge this LiPo battery. Using
a different charger may result in permanent damage to the battery and adjacent
parts, and may also cause injury!
• Never use a charger designed for NiCd/NiMH batteries!
• Always charge the battery on a fi reproof surface and in a fi re-resistant
environment.
• Never leave the battery unattended during the charging and discharging processes.
• Always make sure that the battery is fully charged, but do not charge it for
longer than 180 minutes.
• Batteries must be discharged or fully exhausted before being disposed of.
Cover exposed poles with adhesive tape to prevent short-circuiting!
• Keep the battery out of the reach of children.
Safety Precautions:
• Never carry out any modifi cations or alterations to the product as this
may result in damage or injury.
• To avoid risk of injury, never operate the helicopter while sitting on the
fl oor or on a chair. Always ensure you are able to move quickly out of
the helicopter’s fl ight path.
• Always turn the helicopter and controller off completely after use and
disconnect the helicopter’s fl ight cable.
© 2010 Revell GmbH & Co.KG,
Henschelstraße 20 – 30, D-32257 Bünde,
REVELL IS THE REGISTERED TRADEMARK
OF REVELL GMBH & Co. KG, GERMANY
THE REGISTERED TRADEMA
REVELL IS
L GMBH & Co. KG, GERMAN
Y
O
F REVEL
Contents
Never touch the spinning rotor
blades! Do not fl y the helicopter
near people, animals, water or
power cables – always fl y under
adult supervision.
WEEE: At the end of this device’s useful life, please
remove all the batteries and dispose of them separately.
Take electrical appliances to the local collection points
for waste electrical and electronic equipment. Other
components can be disposed of in domestic refuse.
Thank you for your co-operation!
Revell GmbH & Co. KG hereby declares that this
product complies with the basic requirements and
other relevant provisions of Directive 1999/5/EC.
The declaration of conformity is available at
www.revell-control.de.
www.revell-control.de
6
Big_Heli_MHz_Anleitung_06.indd 6
Big_Heli_MHz_Anleitung_06.indd 6
26.02.10 10:57
26.02.10 10:57
Page 2
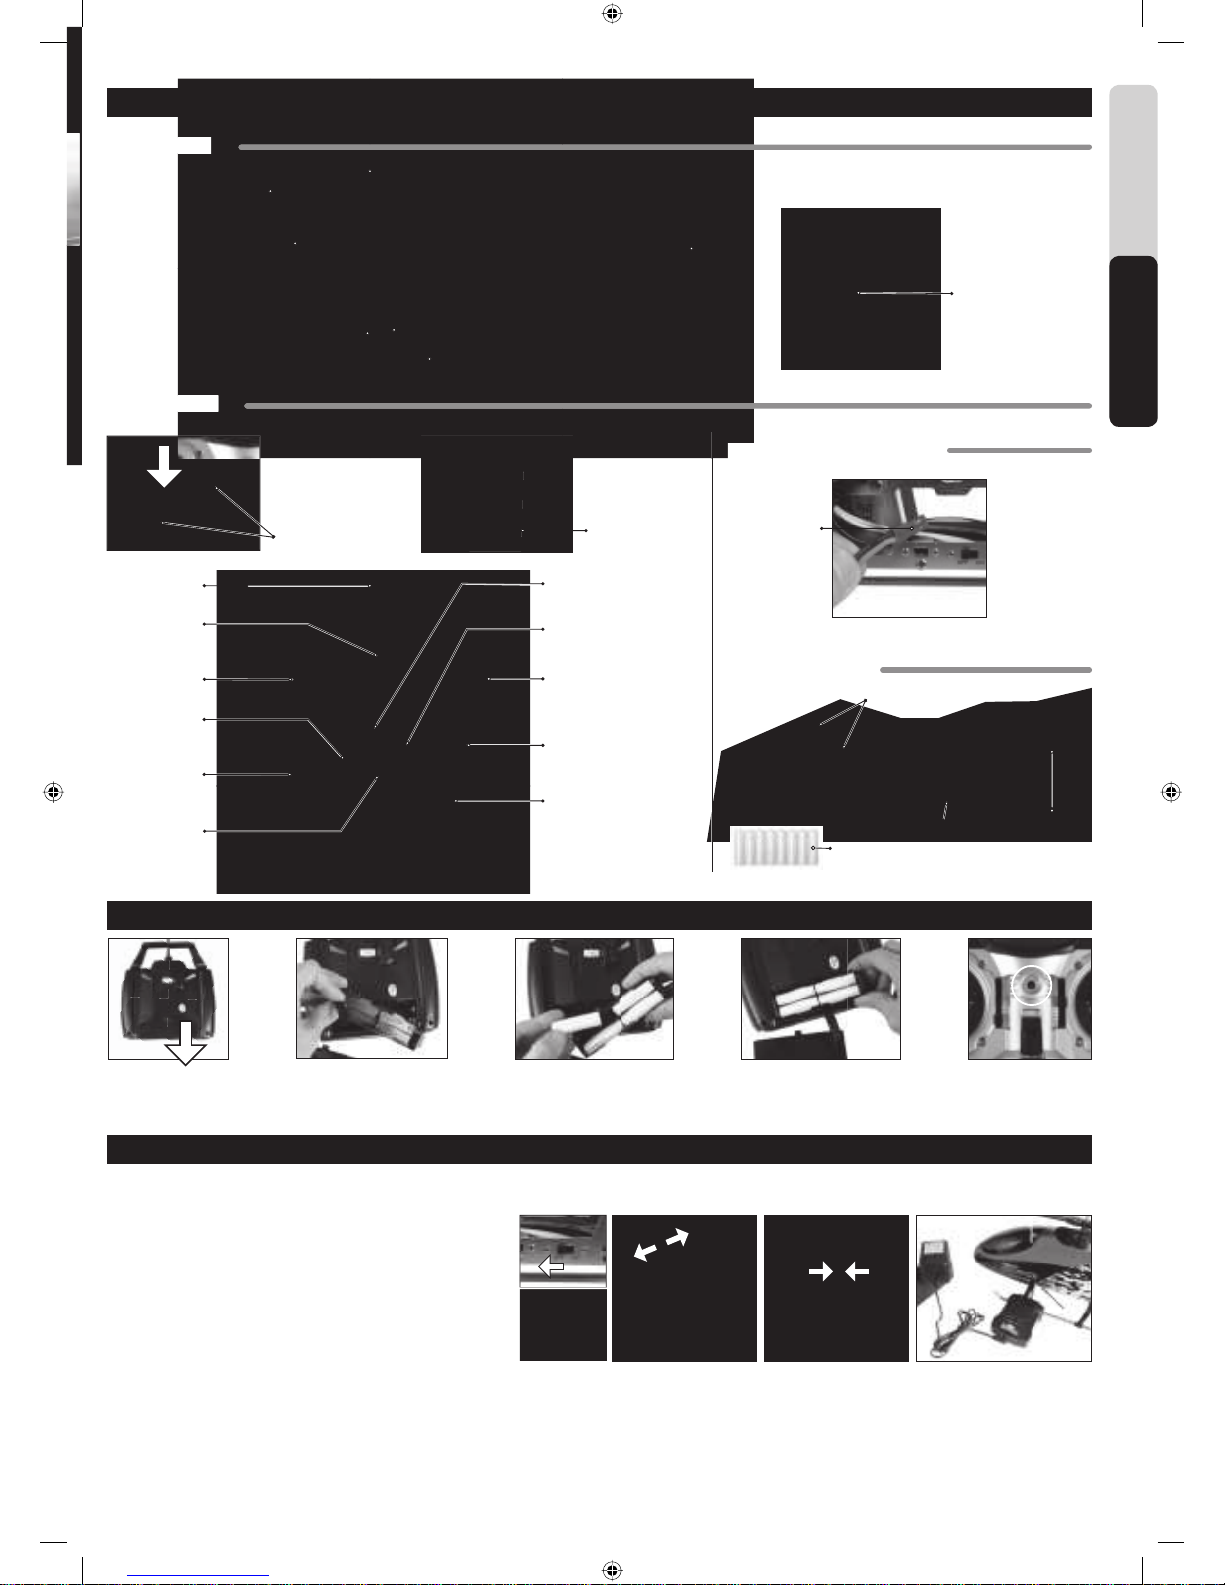
Batteries
220 V AC adapter
Antenna
Pitch trim dial
LED indicator
Forwards/backwards
fl ight (pitch)
Left/right fl ight (roll)
Left/right trim dial
(fi ne tuning)
Roll trim dial
Throttle Stick
Indicator lights
Speed selection
switch
ON/OFF-
switch
Throttle trim dial
Insert batteries
HELICOPTER
CONTROLLER
ON/OFF switch
HELICOPTER BATTERY:
Flight cable
Spare rotors
Automatic LiPo
charger
ACCESSORIES:
Starting position
Note: The throttle stick and
trimming dial must be in
the down position when
the controller is turned on.
Battery cover
Note: Before recharging and after every fl ight, always wait 15–30 minutes for the battery to cool down in order to avoid damage. Never leave the helicopter unattended when recharging.
Always charge the battery on a fi reproof surface and in a fi re-resistant environment.
1. Turn off the helicopter and the controller (Pic. 1).
2. Carefully separate the connectors on the fl ight cable on the helicopter (Pic. 2).
3. Connect the 220 V mains adapter to the LiPo charger. Insert the mains adapter into
a plug socket. The RED LED on the charger lights up.
4. Insert the white plug on the LiPo battery carefully into the LiPo charger.
Do not force (pic. 3).
5. The battery takes about 180 minutes to charge. Never leave charging batteries
unattended. As soon as the battery is completely charged, the green LED indicator on
the charger will start to blink.
The helicopter can fl y for about 10 minutes after approximately 180 minutes of charging. The battery should not need longer than 180 minutes to charge. If the LED indicator does not illuminate after
this time, stop the charging process. See if the helicopter works and, if necessary, continue to fl y the helicopter until it runs out of power or the rotors stop turning. Then repeat the charging process
described above.
Warning: The LiPo battery warms up during the charging process. If it becomes extremely hot or exhibits changes to the outer surface, stop charging immediately.
Charging the helicopter battery
Pic. 3Pic. 2
TE
R
LLER
Tail rotor
LiPo battery
Stabilizer
Landing gear
Coaxial rotor system
English
Helicopter and Controller
4. Replace the battery holder in the
compartment and slide the battery
compartment cover back up and close.
5. If the LED indicator emits
a continuous red light,
the battery charge is OK.
1. To open the battery cover,
slide it downwards
3. Insert eight 1.5 V AA batteries ac-
cording to the polarity indicated in
the battery compartment.
2. Remove the battery holder
using the strap.
Pic. 1
LED indicator
7
Big_Heli_MHz_Anleitung_06.indd 7
Big_Heli_MHz_Anleitung_06.indd 7
26.02.10 10:58
26.02.10 10:58
Page 3
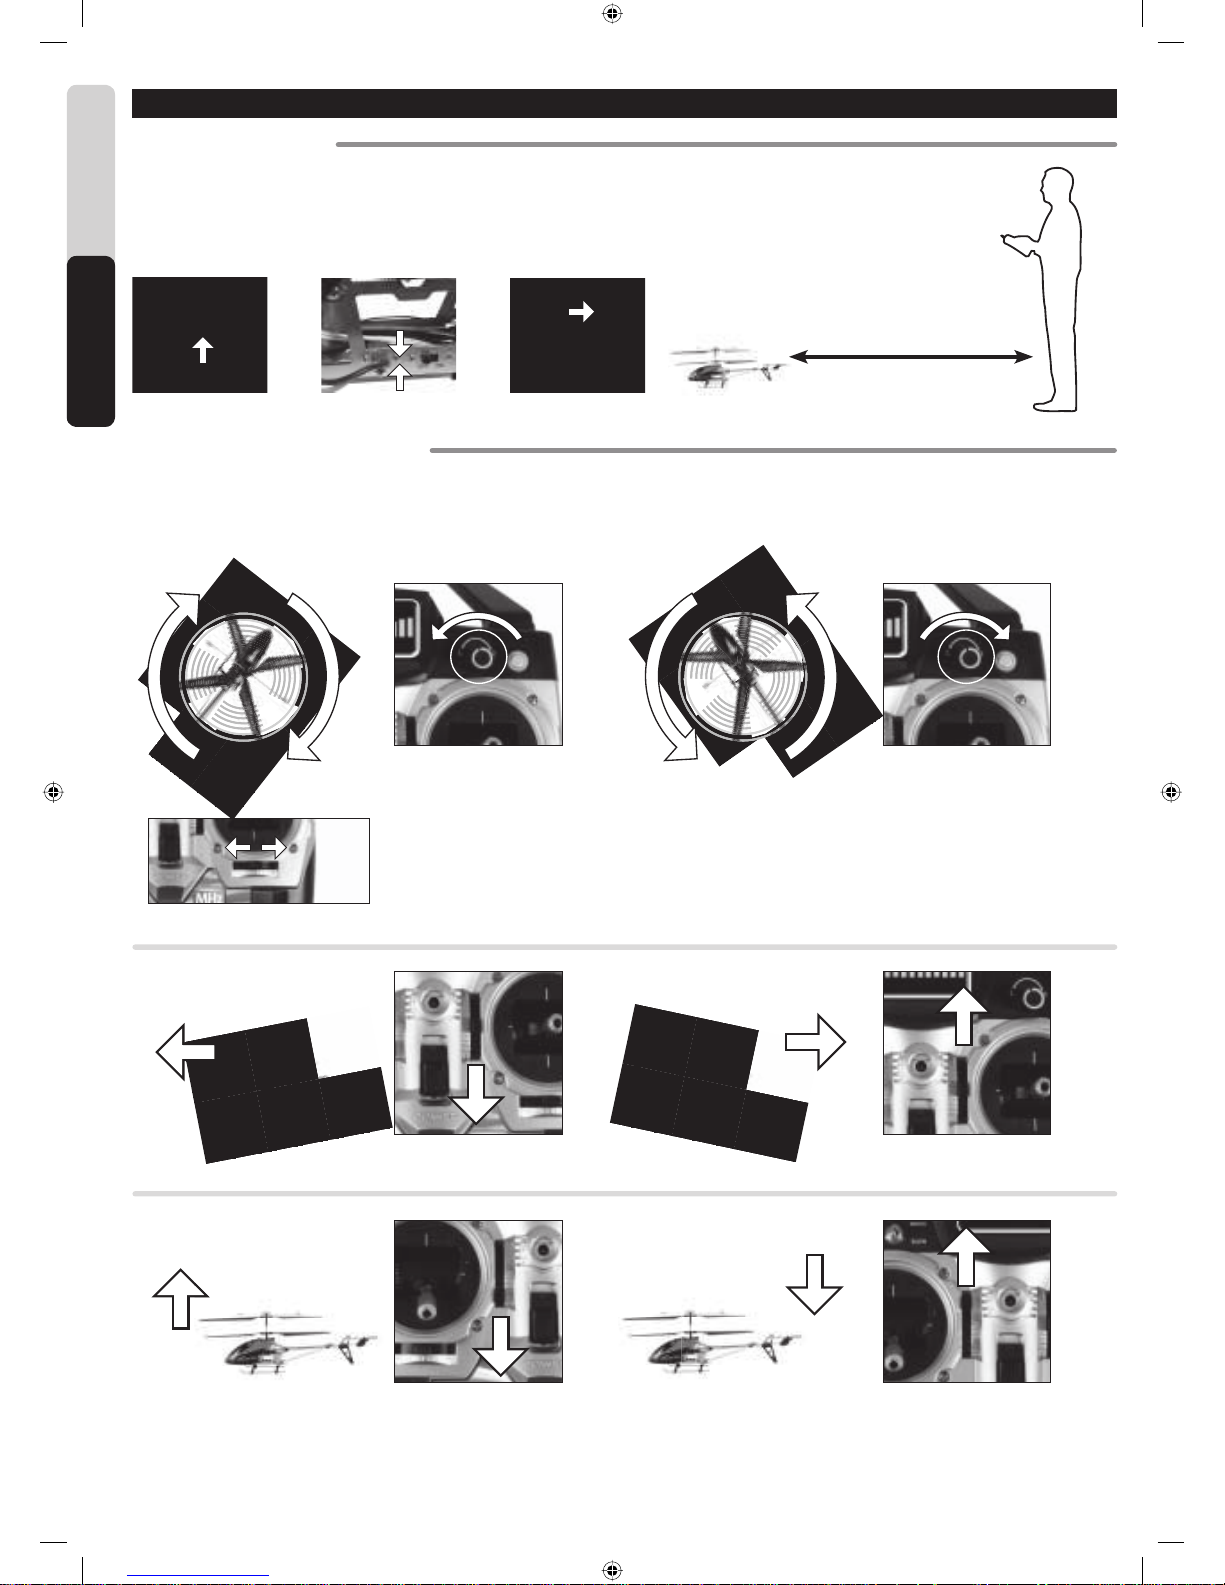
Before you start, make sure that the throttle stick (on the left of the controller) is in the down position to prevent
the helicopter from taking off unexpectedly. Move the controller’s ON/OFF switch to “ON”. Carefully connect the
two parts of the fl ight cable on the helicopter. Turn the helicopter’s ON/OFF switch to “ON”. Place the helicopter
on the fl oor at a distance of 1-2 metres with the tail pointing towards you. The controller needs around
5 seconds to synchronise with the helicopter. To start the helicopter, slowly move the throttle stick upwards
and set the trim dial to the lowest position.
Flying the Helicopter
1. GETTING STARTED:
2. TRIMMING THE CONTROLLER:
Taking time to adjust the trimming will ensure that the helicopter fl ies smoothly. It is easy to do, but does require a little patience and a light touch.
Please follow these instructions carefully: Slowly move the throttle stick up to raise the helicopter to a height of about 0.5 metres to 1 metre.
Roll trim:
If the helicopter continues to drift to one side when fl ying, try to correct this by moving the roll trim dial in the opposite
direction to the way the helicopter is drifting.
If the helicopter spirals right or keeps turning slowly to the right, turn the left and right
precision trim dial anti-clockwise until the helicopter stops turning.
If the helicopter spirals left or keeps turning slowly to the left, turn the left and right precision
trim dial clockwise until the helicopter stops turning.
If the helicopter spirals
right or keeps turning
slowly to the right…
If the helicopter spirals
left or keeps turning slowly
to the left…
Distance 2 m
If the helicopter fl ies forwards independently, move the pitch trim dial downwards until the
helicopter no longer moves forwards.
If the helicopter fl ies backwards independently, move the pitch trim dial upwards until the
helicopter no longer moves backwards.
The helicopter fl ies forwards
independently…
The helicopter fl ies backwards
independently…
If the helicopter takes off independently, move the throttle trim dial downwards until the helicopter
no longer takes off.
If the helicopter loses altitude independently, move the throttle trim dial upwards until the
helicopter no longer loses altitude.
The helicopter takes off
independently…
The helicopter loses altitude
independently…
English
8
Big_Heli_MHz_Anleitung_06.indd 8
Big_Heli_MHz_Anleitung_06.indd 8
26.02.10 10:58
26.02.10 10:58
Page 4

Safety Tips
4. GENERAL FLYING TIPS: 5. SUITABLE FLIGHT LOCATIONS:
• Always place the helicopter on a fl at surface. An uneven surface may affect the helicopter’s take-off.
• Always move the controls slowly and gently.
• Always look at the helicopter and not at the controller!
• As soon as the helicopter leaves the ground, lower the throttle stick slightly. Adjust the throttle as
necessary to maintain altitude.
• Gently push the throttle stick up if the helicopter loses height.
• Gently push the throttle stick down if the helicopter gains height.
• To turn the helicopter, the direction stick usually only needs to be moved very slightly in the
corresponding direction. Most fi rst-time users initially tend to over-steer. Always handle the direction
stick slowly and gently, and avoid fast and jerky movements.
• After adjusting the trimming setting, beginners should practise using the throttle stick correctly.
There is no need to keep the helicopter fl ying straight at the start – it is more important that you learn
how to maintain a constant altitude of about 1 metre above the ground by slightly moving the throttle
stick. Once you are able to do this, move on to practising left and right turns.
Choose a location that meets the following criteria:
1. The helicopter can be fl own outdoors, but only in perfectly calm conditions. When fl ying in
enclosed areas, make sure that there is no air movement. Where possible, avoid circulating
air from heating, air conditioning, etc.
2. The room should be at least 6 metres long, 6 metres wide and 3 metres high.
3. Never fl y the helicopter in a room containing obstacles.
4. Before take-off, ensure that all animals and people, including the pilot, are at least 1-2 metres
away from the helicopter.
5. Always watch the helicopter to prevent it from fl ying into and injuring the pilot, other people
or animals.
IMPORTANT!
Since 2005, model airplanes and helicopters that can fl y higher than 30 metres must be insured.
Contact your private liability insurer to fi nd out if your new and old models are covered. Ask your
insurer for written confi rmation and keep this in a safe place.
To make left turns, carefully push the direction stick to the left, provided that the tail
of the helicopter is pointing towards the pilot.
To make right turns, slowly push the direction stick to the right, provided that the tail
of the helicopter is pointing towards the pilot.
3. FLIGHT CONTROL:
s, carefully push the direction stic
k
To move forward, carefully push the direction stick forward. To move backwards, carefully pull the direction stick back.
To land or to make the helicopter fl y lower, simply lower the throttle stick.
The throttle stick only needs to be moved very slightly to ensure smooth fl ying.
To take off or to make the helicopter fl y higher, carefully push the throttle stick upward.
Speed selector switch:
If the switch is set to Quick, the helicopter fl ies forwards and backwards at a faster speed. If the switch is set to Slow,
the helicopter fl ies forwards and backwards at a slower speed.
T
o make r
igh
t turns, slowly pus
,yp
English
9
Big_Heli_MHz_Anleitung_06.indd 9
Big_Heli_MHz_Anleitung_06.indd 9
26.02.10 10:58
26.02.10 10:58
Page 5

pic. 1b
Operating Tips
• Immediately after a “crash landing”, move the controller’s throttle stick fully to the down position to avoid damaging the electronics and rotor blades.
• Two helicopters using the same MHz frequency cannot be used at the same time.
• Always turn the helicopter and controller off completely after use and disconnect the helicopter’s fl ight cable to avoid any unintended operation.
Changing Rotor Blades
1. Use the Phillips screwdriver to carefully remove the screws holding
the rotor blade.
2. Carefully remove the rotor blade from the fi xture.
3. Carefully insert the new rotor blade in the fi xture and replace the
screw. Note: Do not screw in too tightly. There should be a certain
amount of tolerance for the rotor blade.
If the helicopter’s rotor blades are damaged and need to be replaced, switch the controller to OFF and remove the connector from the helicopter battery. Proceed as follows:
Make sure you know where
the blades should be
mounted before you start.
The rotor blades are
marked “A” and “B” (see
pic.). Type “A” blades
should be assembled above
type “B” blades.
English
Safety Tips
Troubleshooting
Causes: • The ON/OFF switch is “OFF”.
• The battery is too weak or dead.
Solutions: • Turn the ON/OFF switch to “ON”.
•
Recharge the battery
(see “Charging the Helicopter Battery” section).
Problem: The rotor blades are not turning.
Causes: • The ON/OFF switch is “OFF”.
• The batteries were not inserted correctly.
• The batteries are too weak.
Solutions: • Set ON/OFF switch to “ON”.
• Check that the batteries are correctly inserted.
• Insert new batteries.
Problem: Radio controller is not working.
Causes: • The controller’s ON/OFF switch is “OFF”.
• The helicopter’s ON/OFF switch is “OFF”.
• The controller’s antenna is incorrectly inserted
and/or not fully extended.
Solutions: • Turn the controller’s ON/OFF switch to “ON”.
• Turn the helicopter’s ON/OFF switch to “ON”.
• Check antenna and extend to full height.
• Repeat start procedure and/or replace
and/or charge batteries.
Problem: Helicopter does not respond
to the controller.
Causes: • The rotor blades are turning too slowly.
• There is not enough battery power.
Solutions: • Push the throttle stick up.
• Recharge the battery (see “Charging the
Helicopter Battery” section).
Problem: The helicopter is not taking off.
Causes: • The battery is too weak. Solutions: • Recharge the battery
(see “Charging the Helicopter Battery” section).
Problem: The helicopter suddenly stops
fl ying and drops.
Causes: • Loss of throttle control.
• Throttle is pulled down too fast.
Solutions: • Slowly move the throttle stick to the down position.Problem: The helicopter lands too fast.
Service Information
Go to www.revell-control.de for ordering information and tips on replacing spare parts,
plus other useful information on all Revell Control models.
www.revell-control.de
Changing the LiPo battery
1. Remove the cabin from the helicopter as shown (pic. 1a/b).
2. Use a Phillips screwdriver to open the retaining clips and then remove
the battery (pic. 2).
3. To retain the helicopter’s weight distribution and fl ight characteristics,
take care to place the new LiPo battery in exactly the same position
as the old battery (pic. 3). By the way, you can fi nd suitable LiPo
batteries at www.revell-control.de/Ersatzteile.
4. If necessary, ensure secure placement of the battery with
double-sided tape. Then screw the retaining clips back into place.
Replace the cabin on the fuselage (pic. 4).
5. Note the battery disposal information on page 6.
pic. 1a
ts, odels
.
www
.re
ve
pic. 2 pic. 3
pic. 4
10
Big_Heli_MHz_Anleitung_06.indd 10
Big_Heli_MHz_Anleitung_06.indd 10
26.02.10 10:59
26.02.10 10:59
Page 6

Seite 1 von 2
Ersatzteile für / Spare parts for 24056 The Big One RTF / MHz
Art-Nr. Ersatzteilbezeichnung Bild
bestellbar
Item No. Name Picture
bestellbar ab
nicht mehr
lieferbar
44057 Kabine / Head Cover in Revell Design 13,00 €
44058 Landekufengestell / Landing skid 6,00 €
44059 Rotorhalterungen / Blade grip Set 6,00 €
44060 Rotorscheiben-Set / Fixed rotor plate 3,00 €
44061 Set Rotorblätter A & B / Blades A & B 13,00 €
44062 Heckrotorblatt / Tail blade 3,00 €
44063 Stabilisator (Paddel) / Balance Bar 6,00 €
44064 Heckmodul mit Motor / Chopper tail unit 20,00 €
44065
Haltestreben für Heckmodul /
Bars for chopper tail unit
6,00 €
44066 Zahnrad mit Aussenschaft / Outer shaft with gear 6,00 €
44067 Innere Rotorwelle / Inner Shaft 6,00 €
44068 Zahnrad A / Gear A 5,00 €
44069 Antriebszahnrad / Gear-driven 2,00 €
44070 Li-Ion Batterie / Li-Ion Battery (7,4 V / 1300 mAh) 20,00 €
44071 Motor A & B / Main motor A&B 11,00 €
Unverbindliche
Preisempfehlung
Benötigte Anzahl
Ersatzteilbestellungen bitte aufgeben über unseren Webshop www.revell-shop.de,
Ihren Fachhändler oder unser Service-Team! .
Revell GmbH Co. KG RC-Ersatzteilliste für 24056 The Big One_UP 20110426
Page 7

Seite 2 von 2
Ersatzteile für / Spare parts for 24056 The Big One RTF / MHz
Art-Nr. Ersatzteilbezeichnung Bild
bestellbar
Item No. Name Picture
bestellbar ab
nicht mehr
lieferbar
Unverbindliche
Preisempfehlung
Benötigte Anzahl
44072 Motorhalterung-Set / Fixing base for motor 4,00 €
44073
Kugel- u. Rotorwellenlager Set
(7*3*3 / 8*5*2,5 / 5*2,5*1,5)
Bearing collar & Bearing Set
(7*3*3 / 8*5*2,5 / 5*2,5*1,5)
11,00 €
44074 Alu-Haltestifte Set / Alu fixing pin set 2,50 €
44075 MHz-Fernbedienung / Controller 25,00 €
44076 Ladegerät / Charger EU 13,00 €
44077 Ladegerät / Charger UK 15,00 €
44081 Kupplung Rotorkopf / Swash linkage 2,00 €
Farbliche und technische Änderungen bleiben vorbehalten! UVP inkl. gesetzl. MWSt. plus Versandkosten!
Bitte beachten - je nach Nachfrage können bestellbare Artikel kurzfristig nicht verfügbar sein. Es gelten daher
grundsätzlich die Verfügbarkeitsangaben gemäß unseres Revell-Shops im Internet. Ebenso gelten die AGB's,
Lieferungs-, Zahlungs- und Rücksendungsbedingungen unseres Revell-Shops für den Kauf von Ersatzteilen.
Diese Informationen sind jederzeit nachzulesen unter: www.shop.revell.de
Ersatzteilbestellungen bitte aufgeben über unseren Webshop
www.revell-shop.de,
Ihren Fachhändler oder unser Service-Team! .
Revell GmbH Co. KG RC-Ersatzteilliste für 24056 The Big One_UP 20110426
 Loading...