

REVELL 24028 Owner's Manual

1
Safety Precautions:
• Keep these instructions for future reference.
• Always follow these instructions when operating the helicopter.
• Do not y the helicopter near people, animals, water or power cables.
• The LiPo battery charger is made specically for charging the
helicopter battery. Only use it for this purpose. Do not use it to
charge other batteries.
• This helicopter should only be own indoors. It is not suitable
for outdoor use.
• This helicopter is suitable for ages 15 and above. Parental
supervision is necessary while ying.
• Keep hands, face, hair and loose clothing away from the
rotor blades.
• Turn off the controller and helicopter when not in use.
• Remove batteries from the controller when not in use.
• Always keep the helicopter in sight to avoid loss of control.
• We recommend using new alkaline-manganese batteries
or eneloop rechargeable batteries for the controller.
• Insert new batteries in the controller as soon as any function
becomes diminished.
Main Features
Mini Helicopter:
• Durable plastic helicopter fuselage
• ON/OFF switch and charging port on the helicopter
• Coaxial rotor system with automatic stabilization
• Built-in rechargeable LiPo (lithium-polymer) battery
Controller:
• 3-channel infrared controller
• Trim function for ne tuning
• Charge status LED and “POWER ON” LED
• Easy battery recharging directly from the charger
integrated in the controller
Micro-
helicopter
Air pAtrol
Micro-
helicopter
Air pAtrol
Operating instructions
Care and Maintenance:
• Use a clean, damp cloth to wipe the helicopter.
• Keep the helicopter and batteries away from direct sunlight and/or
direct heat sources.
• Never let the helicopter come into contact with water, as this may
damage the electronics.
Controller Battery Safety Advice:
• Do not charge non-rechargeable batteries.
• Rechargeable batteries must be removed from the controller before charging.
• Rechargeable batteries must only be charged under adult supervision.
• Do not use different types of batteries or mix old and new batteries.
• Only use the recommended batteries or batteries of an equivalent type.
• To help the environment, consider replacing the disposable batteries for
this controller and for other household electronic items with rechargeable
batteries. We recommend eneloop batteries (Sanyo).
• Insert batteries following the correct polarity (+ and -).
• Remove dead batteries from the controller.
Battery Requirements
for the Helicopter:
Power Supply:
Rating: DC 3.7 V, 100 mAh
Batteries: 1 x 3.7 V rechargeable
LiPo battery (included)
Battery Requirements
for the Controller:
Power Supply:
DC 9 V
Batteries: 6 x 1.5 V “AA”
(included)
• Do not short-circuit the supply terminals. Remove batteries from the
controller when it is not used for a long period of time.
The helicopter comes with a rechargeable lithium-polymer battery.
Always follow these safety instructions:
• Never dispose of LiPo batteries in a re or store near sources of heat.
• Only use the controller’s in-built charger to charge the LiPo battery.
Safety Precautions:
• Never carry out any modications or alterations to the product as this
may result in damage or injury.
• To avoid risk of injury, never operate the helicopter while sitting on the
oor or on a chair. Always ensure you are able to move quickly out of
the helicopter’s ight path.
• Always switch off the helicopter and controller after use.
24028
Never touch the spinning rotor blades!
Do not y the helicopter near people,
animals, water or power cables –
always y under adult supervision.
WEEE: At the end of this device’s useful life,, please remove all the
batteries and dispose of them separately. Take electrical appliances
to the local collection points for waste electrical and electronic
equipment. Other components can be disposed of in domestic refuse.
Thank you for your co-operation!
Contents
www.revell-control.de
© 2009 Revell GmbH & Co.KG,
Henschelstraße 20 – 30, D-32257 Bünde,
REVELL IS THE REGISTERED TRADEMARK
OF REVELL GMBH & Co. KG, GERMANY
Infrared
English
Note: Before recharging and after every ight, always wait 10 to 15 minutes for the battery to cool down in order to avoid damage. Never leave the helicopter unattended when recharging.
Charging the Helicopter
Pic. 1 Pic. 2
1. Turn off the helicopter and the controller.
2. Pull out the charging cable from the bottom of
the controller (pic. 1).
3. Carefully plug the charging cable into the helicopter’s
charging port (pic. 2). The charging cable should t
easily into the charging port – DO NOT FORCE.
Inserting the charging cable incorrectly may damage
the helicopter and cause injury.
4. Turn the power switch on the controller to “ON”
(Charge) (pic. 3).
5. The charge status LED turns green and shows that
charging is in progress (Pic. 4).
6. Charging is complete when the LED turns red.
7. After charging, turn the power switch to “OFF” and
remove the charging cable from the helicopter.
The helicopter can be flown for about 8 minutes after
approximately 30 minutes of charging.
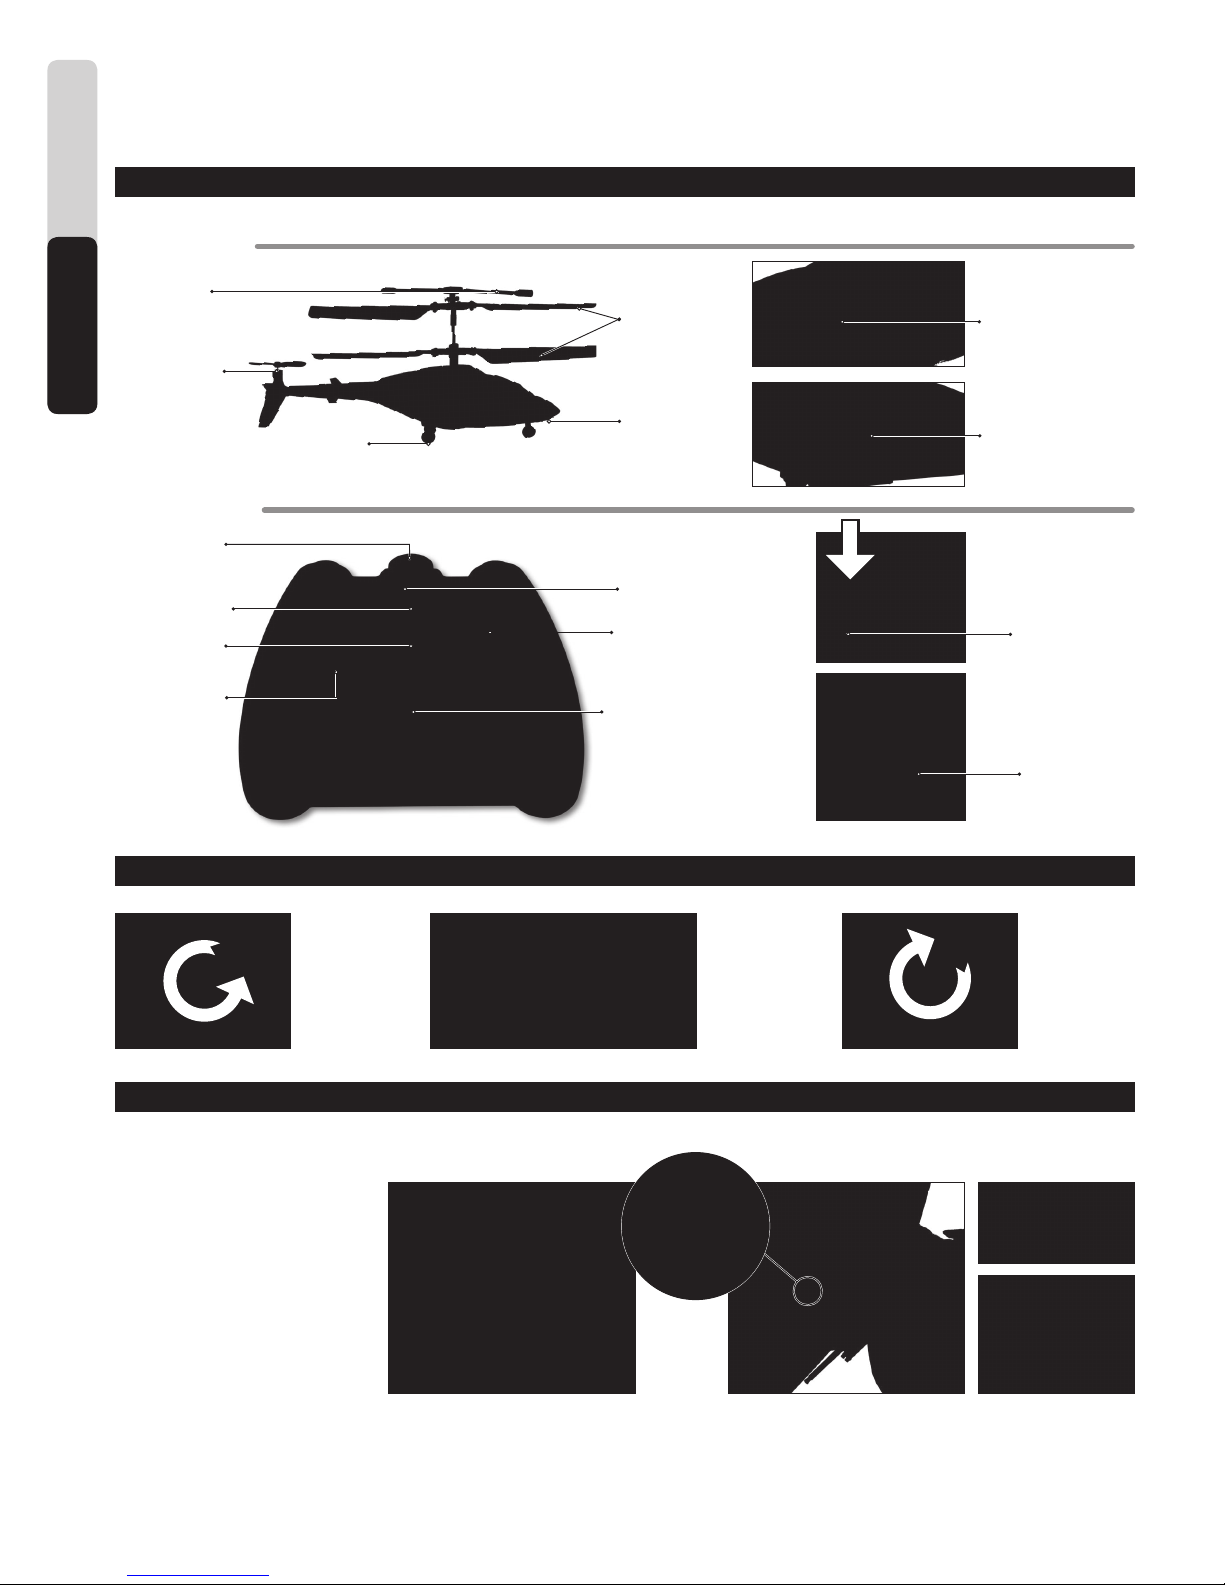
Helicopter and Controller
HELICOPTER
CONTROLLER
Insert Batteries
1. Remove the screw to
release the battery
cover and slide
downwards.
3. Slide the battery
cover upwards and
screw in place.
Pic. 4
Pic. 3
2. Insert six 1.5 V AA
batteries following the
polarity shown inside
the battery cover.
Counter-rotating
rotor blades
Stabilizer
Infrared signal emitter
Throttle stick
(up & down)
Forwards/backwards ight
Left/right ight
Charge status LED and
“POWER ON” LED
Power ON/OFF and
charge switch
Starting position
Note: Before turning
on the controller, the
throttle stick must be
in the down position.
Battery cover
ON/OFF switch
Charging port
Band selector (A, B, C)
Right and left trim dial
Tail rotor
Undercarriage
Position light
English
 Loading...