

REVELL '69 Shelby GT-500, '69 Shelby GT-500 2158, 2158 Assembly

KIT 2158 85215810200
Meijer.com
'69 Shelby GT-500™
The 1969 Ford Mustang was the first major redesign of the
wildly popular car that almost single-handedly changed the entire
automobile industry in the US. In what was undoubtedly a major
gamble seeing what the Mustang meant to Ford’s bottom line,
the new for ’69 models were longer and more flowing with sharp
body creases formerly seen on the old car, now smoothed out.
This was a period of major change for the Shelby GT-500, as
well. 1969 marked the second year of Shelby production in a Ford
assembly plant back in Michigan. For its first three years, the car
was built in Carroll Shelby’s makeshift aircraft hangar plant on the
grounds of the Los Angeles International Airport. The early Shelbys
were fierce little race cars disguised as Mustangs. Loud and raucous, they were an awful lot of fun but a handful to drive everyday.
While the 1969 restyle gave the regular Mustang models a much
more pointed nose than the first generation, the new Shelby appeared
* REPEAT SEVERAL TIMES
* A REPETER PLUSIEURS FOIS
READ THIS BEFORE YOU BEGIN LIRE CE QUI SUIT AVANT DE COMMENCER
* Study the assembly drawings.
* Each plastic part is identified by a number.
* In the assembly drawings, some parts will be
marked by a star (H) to indicate chrome
plated plastic.
* For better paint and decal adhesion, wash
the plastic parts in a mild detergent solution.
Rinse and let air dry.
* Check the fit of each piece before
cementing in place.
* Use only cement for polystyrene plastic.
* Scrape plating and paint from areas
to be cemented.
* Allow paint to dry thoroughly before
handling parts.
* Any unused parts may be discarded.
DECAL APPLICATION INSTRUCTIONS
1. Cut desired decal from sheet.
2. Dip decal in water for a few seconds.
3. Place wet decal on paper towel.
4. Wait until decal is movable on paper backing.
5. Place decal in position on model, face up and
slide backing away.
6. Press out air bubbles with a soft damp cloth.
7. Milkiness that may appear is for better decal
adhesion and will dry clear. Wipe away any
excess adhesive.
8. Do not touch decal until fully dry.
9. Allow the decals 48 hours to dry before
applying clear coat.
NOTE: Decals are compatible with
setting solutions or solvents.
* REPEAT PROCEDURE
* REPETEZ LE PROCEDE
* OPTIONAL PARTS
`` ` ` ` `
* PIECES EN OPTION
* Etudier les schémas de montage.
* Chaque pièce en plastique est identifiée par un numéro.
* Sur les schémas de montage, certaines pièces sont
marquées d'une étoile (H) pour indiquer qu'elles sont en
plastique chromé.
* Pour une meilleure prise de la peinture et des autocollants,
laver les pièces en plastique avec une solution détergente peu
concentrée. Les rincer et les laisser sécher à l'air.
* Vérifier que chaque pièce s'ajuste bien avant
de la coller en place.
* N'utiliser que de la colle pour polystyrène.
* Gratter les parties à coller pour enlever le chrome et la peinture.
* Laisser la peinture bien sécher avant de manipuler les pièces.
* Toute pièce inutilisée peut être jetée.
DIRECTIVES D'APPLICATION DES AUTOCOLLANTS
1. Découper l'autocollant désiré de la feuille.
2. Tremper l'autocollant dans de l'eau pendant quelques secondes.
3. Placer l'autocollant mouillé sur une serviette en papier.
4. Attendez que l'autocollant puisse être déplacé sur son
support en papier.
5. Mettre l'autocollant en position sur le modèle face sur
le dessus et faire glisser le support pour l'enlever.
6. Appuyer avec un chiffon doux humide pour éliminer les bulles d'air.
7. La substance laiteuse qui peut apparaître est destinée à
améliorer l'adhésion de l'autocollant et devient incolore au
séchage. Essuyer pour enlever tout excédent d'adhésif.
8. Ne pas toucher l'autocollant tant qu'il n'est pas bien sec.
9. Laisser l'autocollant sécher pendant 48 heures avant
d'appliquer une couche transparente.
REMARQUE: Les autocollants sont compatibles avec
* DECAL
* DECAL COMANIE
les solutions de fixage ou les solvants.
*ATTENTION D ASSEMBLEE
in showrooms with an entirely different front end treatment, its front
fenders and hood now formed from fiberglass to reduce the weight
from its already heavy front end. Out back, the now familiar sequential
tail lamps from the 1965 Thunderbird appeared for another season.
While some thought the Shelby Mustang was getting a bit soft
around the edges now that items such as air conditioning and the
famous Ford “rim-blow” steering wheel appeared on the available
equipment list, this was still a pretty healthy pony. Choosing the
right boxes on the option form got you a 428 cubic inch Cobra Jet
engine with functional ram air that developed 335 horsepower,
Traction-Lok rear end, an upgraded suspension and your choice
of a four speed manual or heavy-duty automatic transmission.
Your new Revell Motor City version of the ’69 Shelby
GT-500 features a custom high-rise intake for the big
engine as well as cool aftermarket style wheels and tires.
* ASSEMBLY CAUTION
* CEMENT TOGETHER
* A COLLER
This optional paint guide is provided if
you choose to detail paint your model.
Ce guide de peinture vous sera fourni si vous choisis-
Gloss Black
Gloss Orange
Flat Red
Flat White
Silver
Steel
Turn Signal Amber
Ford Engine Blue
Leather
Flat Black
Intermediate Blue
Semigloss Black
* REMOVE AND THROW AWAY
* A RETIRER ET JETER
sez de peindre votre modèle en détail.
* DO NOT CEMENT
* NE PAS COLLER
Noir brillant
Orange brillant
Rouge mat
Blanc mat
Argent
Acier
Fue clignotant de
direction ambre
Bleu moteur Ford
Cuir
Noir mat
Bleu moyen
Noir satiné
If you have any questions or comments, call our hotline at: (800) 833-3570
Revell Inc Consumer Service Department, 1850 Howard Street Unit A, Elk Grove Village, Illinois 60007
Be sure to include the plan number (85215810200), part number, description, your return address and phone number.
Revell Inc Elk Grove Village, IL. Copyright © 2010. All rights reserved.
or, please write to:
Visit our website: www.revell.com
Meijer.com
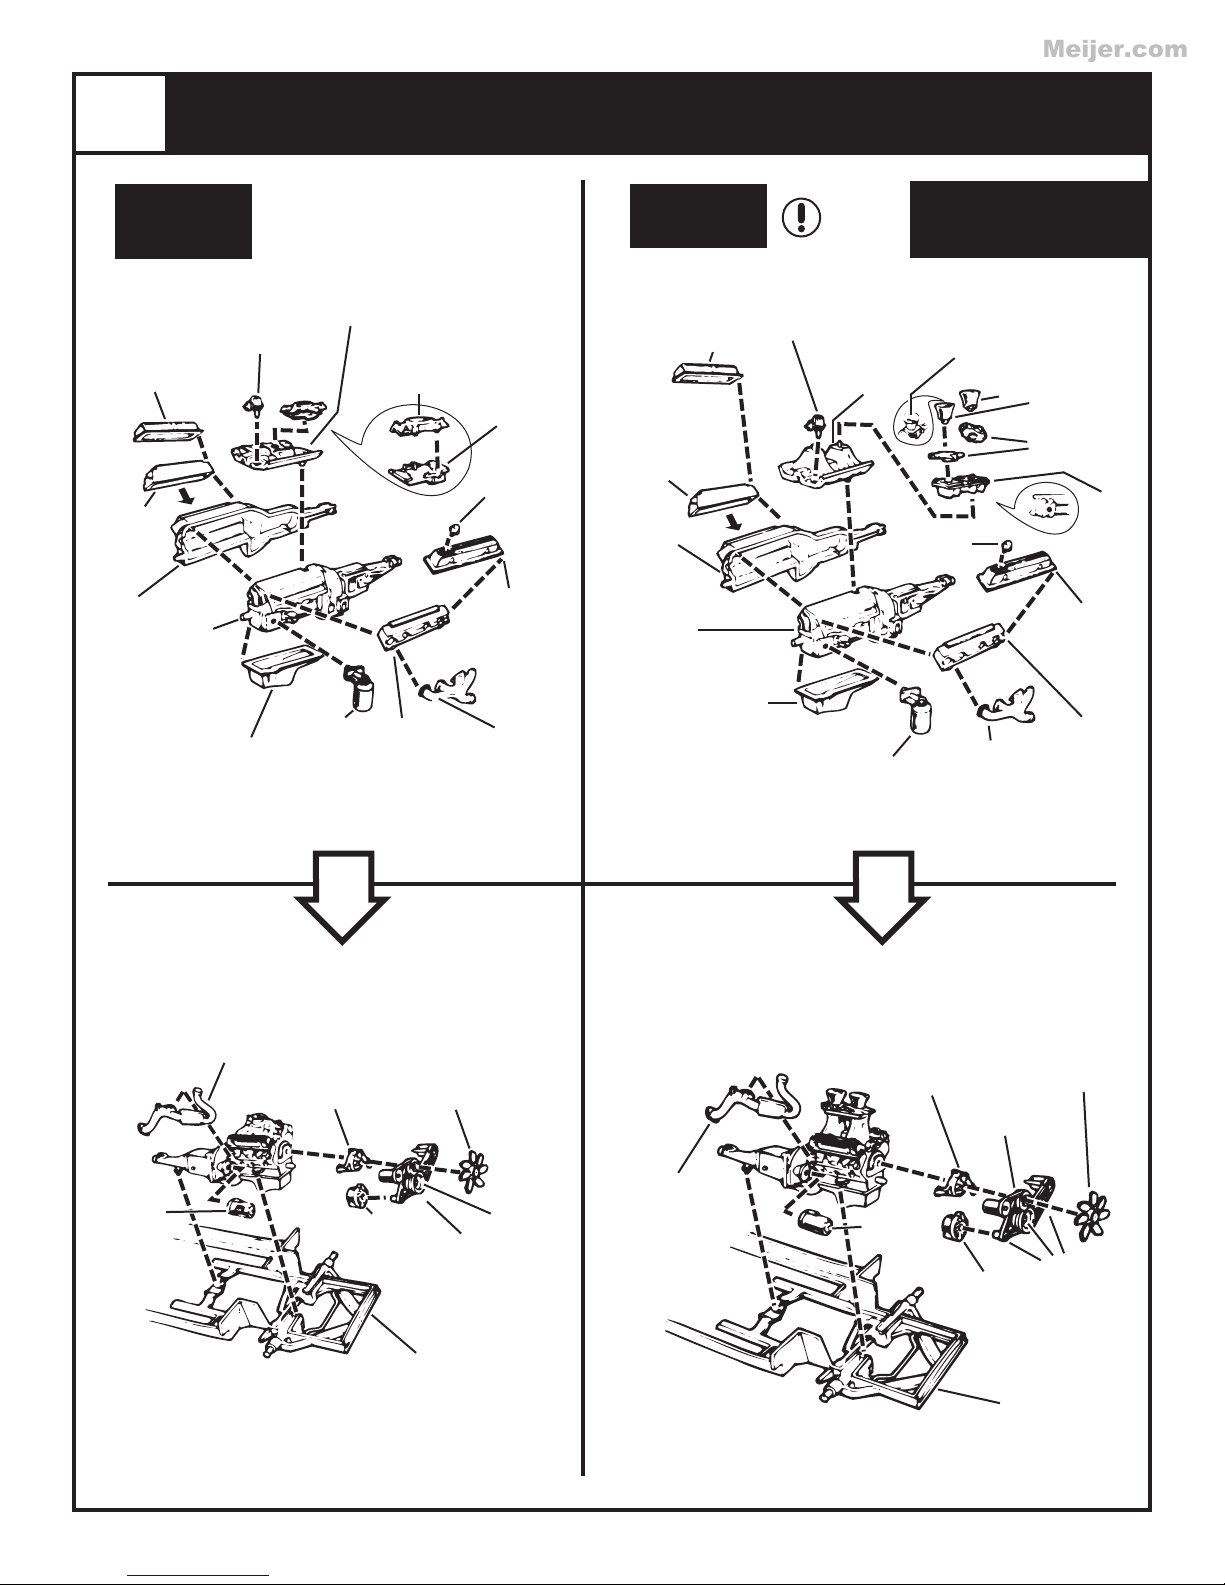
1
ENGINE ASSEMBLY
STOCK OR
MOTOR CITY
VERSION
H46
VALVE
COVER
CHROME
42
CYLINDER
HEAD
FORD ENGINE
BLUE
40
ENGINE
HALF
FORD ENGINE
BLUE
DISTRIBUTOR
GLOSS BLACK
39
ENGINE
HALF
FORD ENGINE
BLUE
43
OIL PAN
FORD ENGINE
BLUE
52
OIL FILTER
MANIFOLD
FORD ENGINE
64
FLAT RED
41
INTAKE
BLUE
CARBURETOR
CYLINDER
FORD ENGINE
STEEL
42
HEAD
BLUE
OPTIONAL
VERSION
H46
VALVE
COVER
44
18
CARBURETOR
BASE
STEEL
H53
BREATHER
CHROME
H45
VALVE
COVER
CHROME
47
EXHAUST
MANIFOLD
STEEL
SEMIGLOSS BLACK
SEMIGLOSS BLACK
CHROME
42
CYLINDER
HEAD
40
ENGINE
HALF
39
ENGINE
HALF
SEMIGLOSS BLACK
OIL PAN
SEMIGLOSS BLACK
52
DISTRIBUTOR
FLAT BLACK
43
81
RAM
INTAKE
MANIFOLD
SILVER
OIL FILTER
FLAT RED
CHROME ENGINE PARTS MAY BE
TINTED WITH TRANSPARENT
FLAT
BLACK
H53
BREATHER
CHROME
64
NOTE:
GREEN PAINT
VELOCITY
STACKS
CHROME
47
EXHAUST
MANIFOLD
STEEL
H84
H83
CARBURETOR
CHROME
PLENUM
H45
VALVE
COVER
CHROME
42
CYLINDER
HEAD
SEMIGLOSS
BLACK
82
RAM
INTAKE
SILVER
48
EXHAUST
MANIFOLD
STEEL
65
STARTER
STEEL
49
WATER PUMP
FORD
ENGINE
BLUE
H51
ALTERNATOR
CHROME
CHASSIS
FLAT BLACK
55
FAN
GLOSS BLACK
50
FAN
BELT
FLAT
BLACK
32
GLOSS
BLACK
48
EXHAUST
MANIFOLD
STEEL
49
WATER PUMP
SEMIGLOSS BLACK
65
STARTER
STEEL
ALTERNATOR
50
FAN
BELT
FLAT
BLACK
H51
CHROME
55
FAN
GLOSS BLACK
GLOSS
BLACK
32
CHASSIS
FLAT BLACK
2
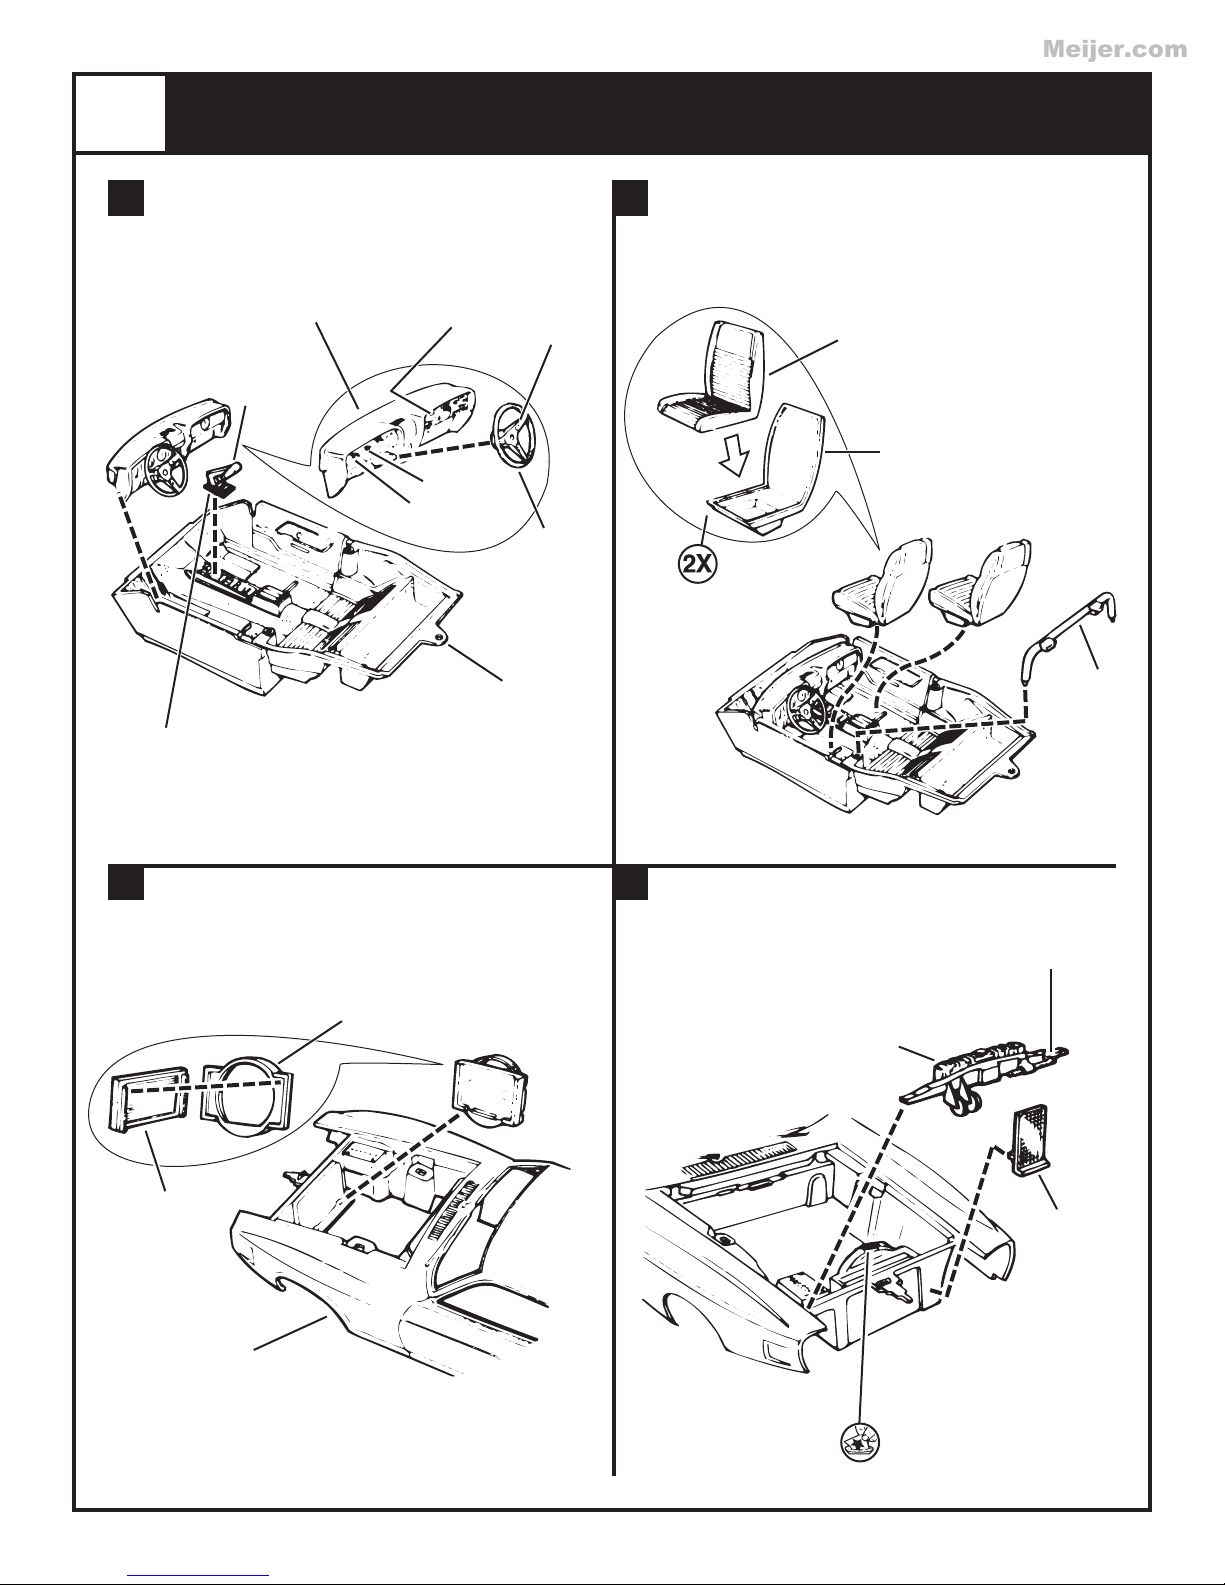
Meijer.com
INTERIOR AND CHASSIS ASSEMBLY
A B
28
DASHBOARD
SEMIGLOSS BLACK
H31
GEAR
SHIFT
CHROME
LEATHER
FLAT BLACK
FLAT WHITE
LEATHER
29
STEERING
WHEEL
LEATHER
27
BUCKET
SEAT
FLAT BLACK
OR
FLAT WHITE
38
SEAT
BACK
FLAT BLACK
OR
FLAT WHITE
21
INTERIOR
FLAT WHITE
FLAT BLACK
OR
FLAT BLACK WITH
FLAT WHITE REAR
SEAT & SIDE PANELS
C D
59
FAN
SHROUD
FLAT BLACK
58
RADIATOR
FLAT BLACK
24
ROLL
BAR
FLAT BLACK
SLIVER
57
RADIATOR
TOP
FLAT BLACK
60
OIL
COOLER
FLAT BLACK
1
BODY
DD
Kit 2158 - Page 3Kit 2158 - Page 6
 Loading...