

Page 1
Twintalker
EN USER INSTRUCTIONS
Page 2

PIC 01
1
2
3
4
5
6
7
8
9
10
11
12
13
18
19
16
17
15
14
Page 3
20
21
22
23
PIC 02
Page 4

EN~ Instructions for use
This set includes 2 walkie-talkie units: these are
communication devices which operate on mobile radio
frequencies. They come with 8/20/22(option) channels as well
as a back-lit LCD screen, enabling you to communicate over
several kilometres free-of-charge (up to 3 km in open areas)
NOTE: Please read these user instructions carefully before
using the equipment and retain for future consultation!
SPECIFIC RECOMMENDATIONS
If you carry any kind of personal medical device, consult a
doctor before use.
To avoid the risk of burns, do not use the device if the aerial
is damaged in any way.
Do not use the device in a potentially explosive setting
(e.g. around petrol pumps, on the lower deck of a boat or
around a fuel storage installation or chemical products)
If travelling in a car or by bike, stop before using the device.
Switch off the device if on an aeroplane or in a hospital.
Never use the device in close proximity to a radio to avoid
interference.
Remove the batteries if the device is not in use for an
extended period of time. Never mix used and new batteries.
Position the transmitter and antenna at least 5 cm from your
face. Direct the antenna upwards and speak normally.
Clean the device with a damp cloth. Avoid the use of cleaning
agents and solvents.
Page 5

Do no t mo dif y the d ev ice i n any w ay. In th e eve nt of dam age
occ ur rin g, en su re th at th e devic e is ch ecked b y a qua lifie d
pro fe ssi ona l.
The d ev ice c ann ot b e use d to co ntact t he em ergen cy se rvice s.
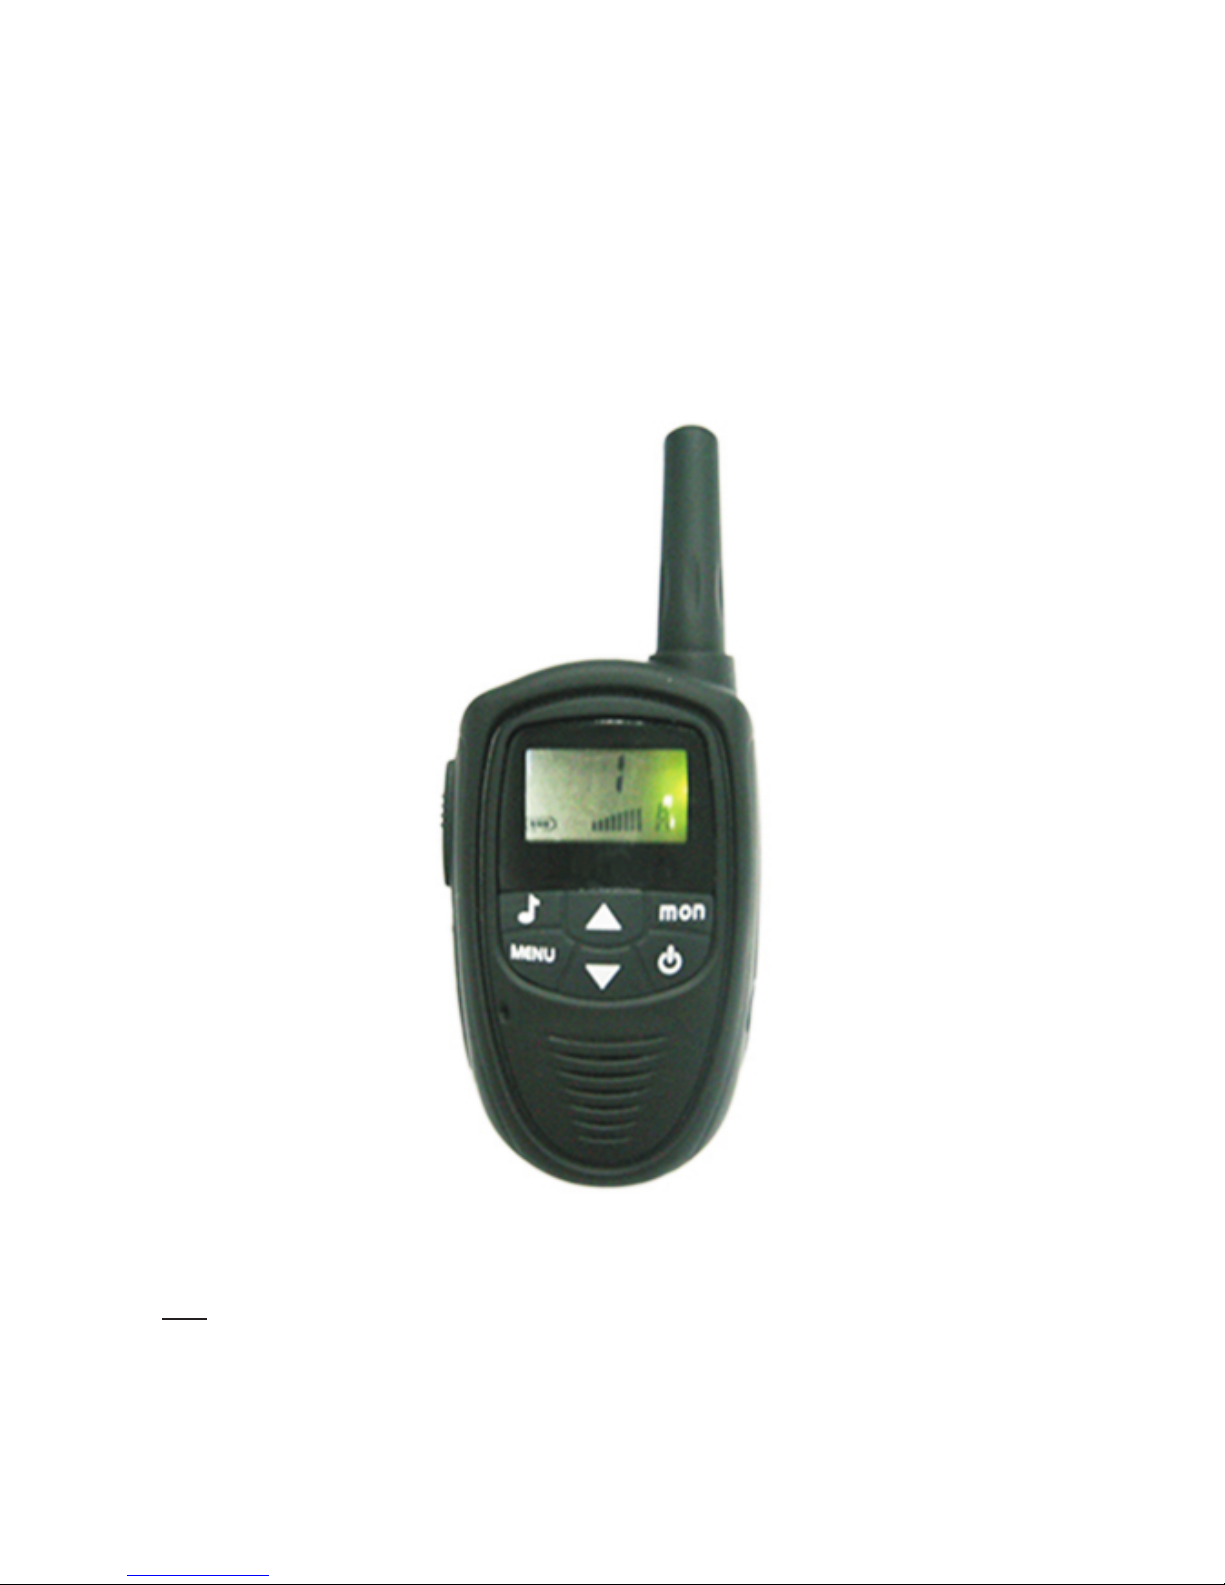
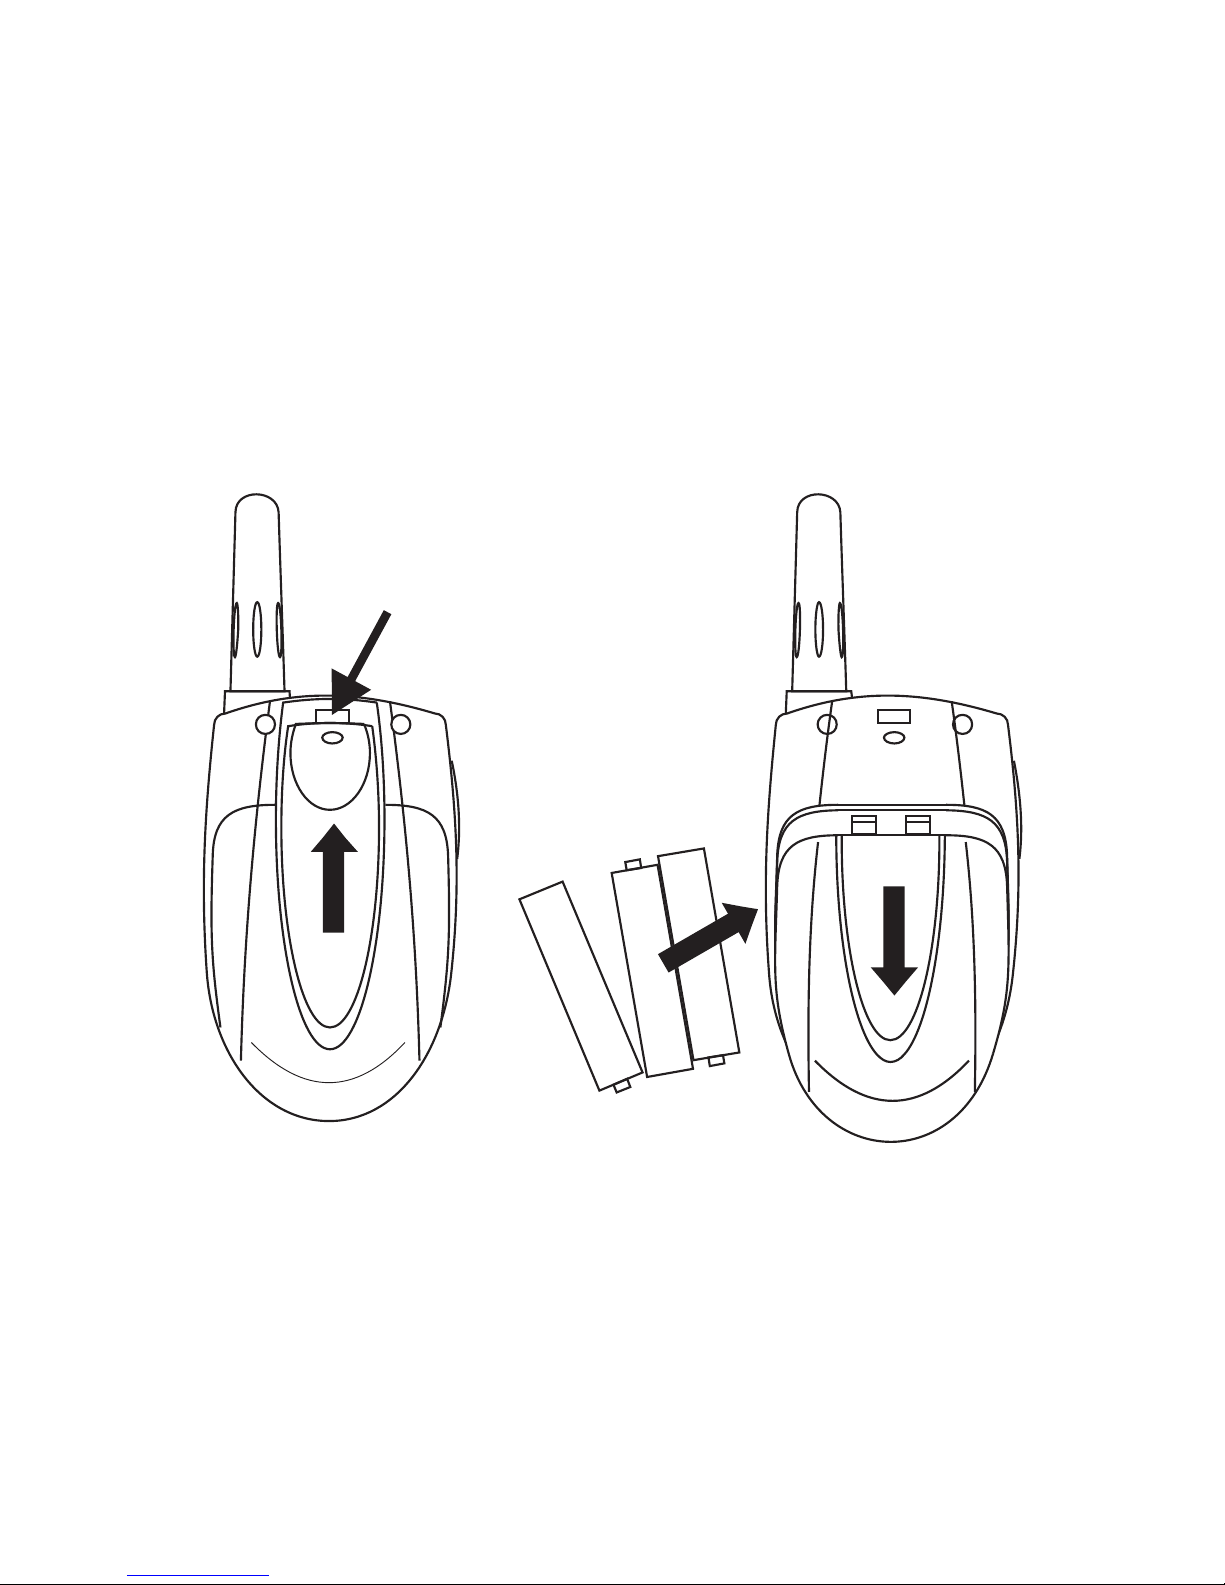
ITEM DESCRIPTION (Pic 01,02)
1. An te nna
2. RX i co n -Di spl ay ed wh en re ceivi ng
TX ico n -Disp layed w h en tra n smitt ing
3. Vo lu me le vel i nd ica tor
4. Ad ju sto r but to n Up (▲)
5. Co nt inu ed re ce pti on( )
6. On / of f but ton ( )
7. Ad ju sto r but to n Dow n (▼)
8. Ea rp hon e soc ke t
9. Lo ud s pea ker
10. Mi cro pho ne
11. M en u,En ter t he m enu s ett ings
12. C al l but ton ( )
13. K ey pad l ock i nd ica tor
14. B at ter y lev el i ndi cat or
15. P us h to ta lk (PTT) bu tto n
16. V OX i ndi cat io n
17. S ca nni ng in di cat ion ,Disp lay ed duri ng sc an mo de
18. C ha nne l/M en u ite m ind icati on
19. C TC SS / Me nu op ti on -v alu e
20. B el t att ach me nt cl ip
21. B el t att ach me nt
22. B at ter ies ( no t sup pli ed)
23. B at ter y com pa rtm ent
Page 6

BEFORE USE (Pic 02)
To insert batteries into the devices, first remove the belt
attachment: lift the attachment clip (20) and press the belt
attachment upwards (21).
Open the battery compartment (23) and insert 3 AAA batteries
(22) (not supplied), ensuring that the poles are correctly
aligned. Then close the lid.
USING THE TWINTALKER
1. Turning the device on/off: To turn the devices on or off,
hold down the on/off button (6) for 3 seconds a BEEP sound
will be played to confirm.
2. Adjusting the volume: To in cr eas e the v ol ume , pre ss
the U p ad jus tor b ut ton (4) a nd pr ess the D own (7)
but to n to de cre as e vol ume .
Not e: The volume level (3) is displayed on the screen.
3. Battery Charge Level/Low Battery Indication
The battery charge level is indicated by the number of squares
present inside the battery icon on the LCD Screen.
Battery Full
Battery 2/3 charged
Battery 1/3 charged
Battery empty
When the battery charge level is low, the battery icon will
flash and a beep will be heard to indicate that the batteries
need to be replaced or recharged.
▲ ▼
Page 7

4. Receiving/transmitting communications:
The devices are in 'Reception' mode when lit up, i.e. they are
ready to receive a call or sound transmitted on the activated
frequency.
Whe n yo u pre ss th e Ca ll to ne bu tton (12) , the d evice
swi tc hes t o 'Tr an smi ssi on' mod e. Yo u are the n
tra ns mit tin g a so und s ign al to the o the r devic e.
To se nd a v oic e mes sa ge, p res s the PTT but ton ( 15)
and s pe ak in to th e mi cro pho ne (10). Co nti nue to
pre ss t he bu tto n un til y ou ha ve fini she d
tra ns mit tin g yo ur me ssa ge.
Hold the microphone a minimum of 5 cm from your face.
Not e:
- The other device must be set to the same channel and have
set the same CTCSS code(see point 7)
- When the transmission is complete and the PTT button (15)
is no longer held down, the other device will emit a sound
(BEEP) to indicate that this device is ready to transmit.
5. Changing Channels
Pre ss t he MENU bu tto n (11) onc e, th e curre nt
cha nn el nu mbe r fl ash es on t he disp lay .
Pre ss t he - ▲ bu tto n (4) o r the - ▼ b utt on (7) to
cha ng e the c han ne l.
Pre ss t he PTT - bu tto n to ( 15) con fir m and ret urn t o
sta nd -by M ode .
Note:If no button is pressed within 15 seconds during setting,
the unit will return to standby.
6.CTCSS (Continious Tone Coded Squelch System)
License free radio's operating on the 400~470 MHz
frequency band, like the Twintalker , have 8/20/22 available
radio channels. If there are many rad io 's users in your
neighborhood, there is a chance that
Page 8

some of these users are operating on the same radio channel.
To prevent that you receive signals from other users, subchannels have been integrated.
Two radio's will only be able to communicate with each other
when they are operating on the same radio channel and when
they have selected exactly the same sub-channel.There are two
kind of sub-channels :
Con ti nuo us To ne C ode d Squ elch Sy ste m (CTCS S)
When using CTCSS, a low frequency tone (between 67 and 250
Hz) will be transmitted along with the voice signal. There are
38 available tones to choose from. You are free to choose one
of these 38 available tones. Due to filtering, these tones will
generally not be audible so they will not disturb the
communication.
7.CTCSS
Pre ss t he MENU-b utt on (11) tw ice : T he curr ent C TCSS
cod e fl ash es on t he d isp lay .
Pre ss t he ▲-b utt on (4) o r the ▼- butto n(7 ) to chan ge
to an ot her c ode .
Pre ss t he PTT-b utt on (15) to c onf irm and r etu rn to
sta nd -by m ode .
Not e: To di sab le C TCS S, se lect co de "0 F for CTC SS in
the m en u.W hen t he e ntr y is co nfirm ed, " OF" wil l be
dis pl aye d.
8.Monitor
You can use the monitor feature to check for weaker signals in
the current channel.
Pre ss t he MON-b utt on t o act iva te chan nel
mon it ori ng.
Pre ss t he MON-b utt on t o sto p cha nnel mo nit oring .
Not e: Dur ing c ha nne l mon itori ng th e recei ver c ircui t
in th e Ra dios w ill n ot l ist en to C TCSS co des .
Page 9

9. VOX Selection
The R ad ios is c apa bl e of vo ice a ctiva ted ( VOX)
tra ns mis sio n. I n VOX m ode , the rad io wi ll tran smi t a
sig na l whe n it is a ct iva ted b y your vo ice o r other
sou nd a rou nd yo u. V OX op era tion is n ot
recommended if you plan to use your radio in a noisy or windy
environment.
Note:VO X mo de wi ll be o ve rri ded w hen you p res s the
PTT - b ut ton .
Pre ss t he MENU- bu tto n thr ee t ime s, th e
cur re nt VO X set ti ng fl ash es on the d isp lay and t he
VOX i co n is di spl ay ed.
Pre ss ▲- but ton (4 ) to se t the V OX sens iti vity le vel
bet we en 1 an d 3 (le ve l 3 is th e mos t sensi tiv e level ).
Pre ss ▼- but ton (7 ) unt il OF a ppe ars o n th e
dis pl ay, to tu rn V OX OF F.
Pre ss t he PTT-b utt on (15) to c onf irm and r etu rn to
sta nd -by m ode .
10. Scanning for an active radio channel
Pre ss a nd ho ld th e -b utt on( 12) : The ' Scan'
fun ct ion i ndi ca tor ( 17) wil l appea r on th e scree n and
the c ha nne l (18) w ill s can con tin uou sl y fro m 1 to
8/2 0/ 22.
Pre ss t he ▼-b utt on (7) t o sta rt the ch ann el scan
fro m 8/ 20/ 22 to 1 .
Once an active channel is found, the scanning will stop and
you can listen to the transmission.
When the transmission on the found channel stops, the
scanning will resume automatically.
NOTE:If you press the PTT button(15) while listening to a
found channel, the Radios will go back in stand-by mode on
the found channel.
15
(11)
Page 10

11. Call Tones
A call tone alerts others that you want to start talking.
11.1Setting the Call Tone
The Twintalker has 10 call tones.
Pre ss t he fou r ti mes , CA is
dis pl aye d and t he c urr ent c all ton e is fl ashin g.
Pre ss t he ▲-b utt on (4) o r the ▼- butto n(7 ) to
cha ng e to an oth er C all T one .
Pre ss t he PTT - bu tto n( 15) t o con firm an d ret urn to
sta nd -by M ode .
11.2 Sending a call Tone
Press the - bu tto n(1 2) briefly. The call tone will be
transmitted on the set channel.
12. Key-Tone On/Off
When a button is pressed, the unit will beep briefly.
To set the key-tone.
Pre ss t he MENU- bu tto n( 11) fiv e tim es. tO wil l be
dis pl aye d.
Pre ss ▲ t o ena ble (ON) o r ▼ di sab le th e Key Ton es
(OF).
Pre ss t he PTT - bu tto n( 15) t o con firm yo ur se lecti on
and r et urn t o the s ta ndb y mod e.
13. Roger Beep On/Off
After the PTT-button is released, the unit will send out a roger
beep to confirm that you have stopped talking.
To set the Roger Beep.
Pre ss t he MENU- bu tto n( 11) six t ime s. rO wil l be
dis pl aye d.
Pre ss ▲ t o ena ble (ON) o r ▼ di sab le th e Roger B eep
(OF).
Pre ss t he PTT - bu tto n( 15) t o con firm yo ur se lecti on
and r et urn t o the s ta ndb y mod e.
MENU- but to n(11)
Page 11

14.Button Lock
Pres s and hol d the for tw o
seco nds to
activate the Button lock mode. The button lock icon is
displayed on the LCD Screen.
Pres s and hol d the MENU- bu tto n(11) again f o r
two se conds
deactivate button lock
Note:The PTT - button(15) , the -button(12), MONbutton(5) and the on/off button (6) will still be functional
when the Button Lock is activated.
15. Display back light
To activate the backlight of the LCD display, press any button
except the MENU- button(11) or theMON-button(5) .
The LCD backlight will light up for 5 seconds.
16. Earpiece connection
The Twintalker can be used with the included earpiece.
The connector is located on the upper side of the unit(8) .
Insert the earpiece plug into the connector (2,5mm jack).
The small button on the earpiece has the same function as
the PTT - button(15) on the unit
When you use the PTT - button (15 )from the Earpiece, you
must also use the microphone from the earpiece to talk into.
Not e:Do not connect other earpieces. This may damage your
device.
17. Battery saving function:
When the device has not been used for 6 seconds, the
economy mode is automatically activated. This does not
affect the reception of transmissions and the standard mode
is automatically re-activated as soon as a signal is detected.
MENU- but to n(11)
Page 12

18 Technical specifications
Channels 8/20/22
Sub-code C T CSS 38
Frequency 40 0 - 470MH z
Range U p to 3 Km (Op en fiel d)
Battery 3xAAA
Transmission Powe =< 5 00mW ER P
Modulation Type FM - F 3E
Channel spacing 12 ,5/25 k Hz
Duo Charger adapter Ou tput : 7, 0 V DC /
350m A
Disposal of Old Electrical & Electronic
Equipment (Applicable in the European
Union and other European countries
with
separate collection systems)This
symbol
on the product or on its packaging
indicates that this product shall not be
treated as household waste. Instead it
shall
Be handed over to the applicable
collection
point for the recycling of electrical and
electronic equipment. By ensuring this product is disposed
of correctly, you will help prevent potential negative
consequences for the environment and human health,
which could otherwise be caused by inappropriate waste
handling of this product. The recycling of materials will
help to conserve natural resources. For more detailed
information about recycling of this product, please contact
your local city office or your household waste disposal
service.
 Loading...