

Page 1

User's manual
Rt35
Kids walkie talkies
Page 2

Mode RT 35
Precautions
This unit conforms to telecommunications management
standards, please observe the following rules when using.
1. When Using this machine, you should not cause harmful
interference and must accept any received signal.
2. Any operation without permission is illegal, and maybe violet
the telecommunications management standards.Such as: change
the frequency, change the transmit power, extend the antenna,
and so on.
3.This machine cannot be used in a hazardous environment,
because it may cause an explosion or fire.The hazardous
environment include: gas stations, hospitals, airports, the place
without electrical shielding and so on.
4.Do not use soft cloth with detergent or solvent to wipe or clean
the machine, use the dry, acid-free soft cloth only.
5.In order to ensure the best voice quality, please keep 5cm
distance between your mouth and the machine and use your
normal voice intensity. To get a better voice quality, please turn
the antenna upward.
6.The battery of this machine has an internal protect function.
www.retevis.com
1
Page 3

Battery Usage
The mini walkie-talkie built-in lithium ion battery. The fittings
include USB charger that can charge the lithium battery, the
charging method is as follows:
1.The charging jack is at the right side of the machine.
2.Connect the USB charger to a standard power socket.
3.Then connect the USB charger to the charging jack or
headphone jack. During charging, the battery indicator will be
cycle moving. And when charging complete, the cycle moving
will be stopped.
Preface
Welcome to use this mini walkie-talkie, please read this user
manual carefully in order to understand all the operating function.
Walkie talkie 2
Battery 2
Clip 2
Double connector USB line 1
User’s Manual
1
www.retevis.com
2
Page 4
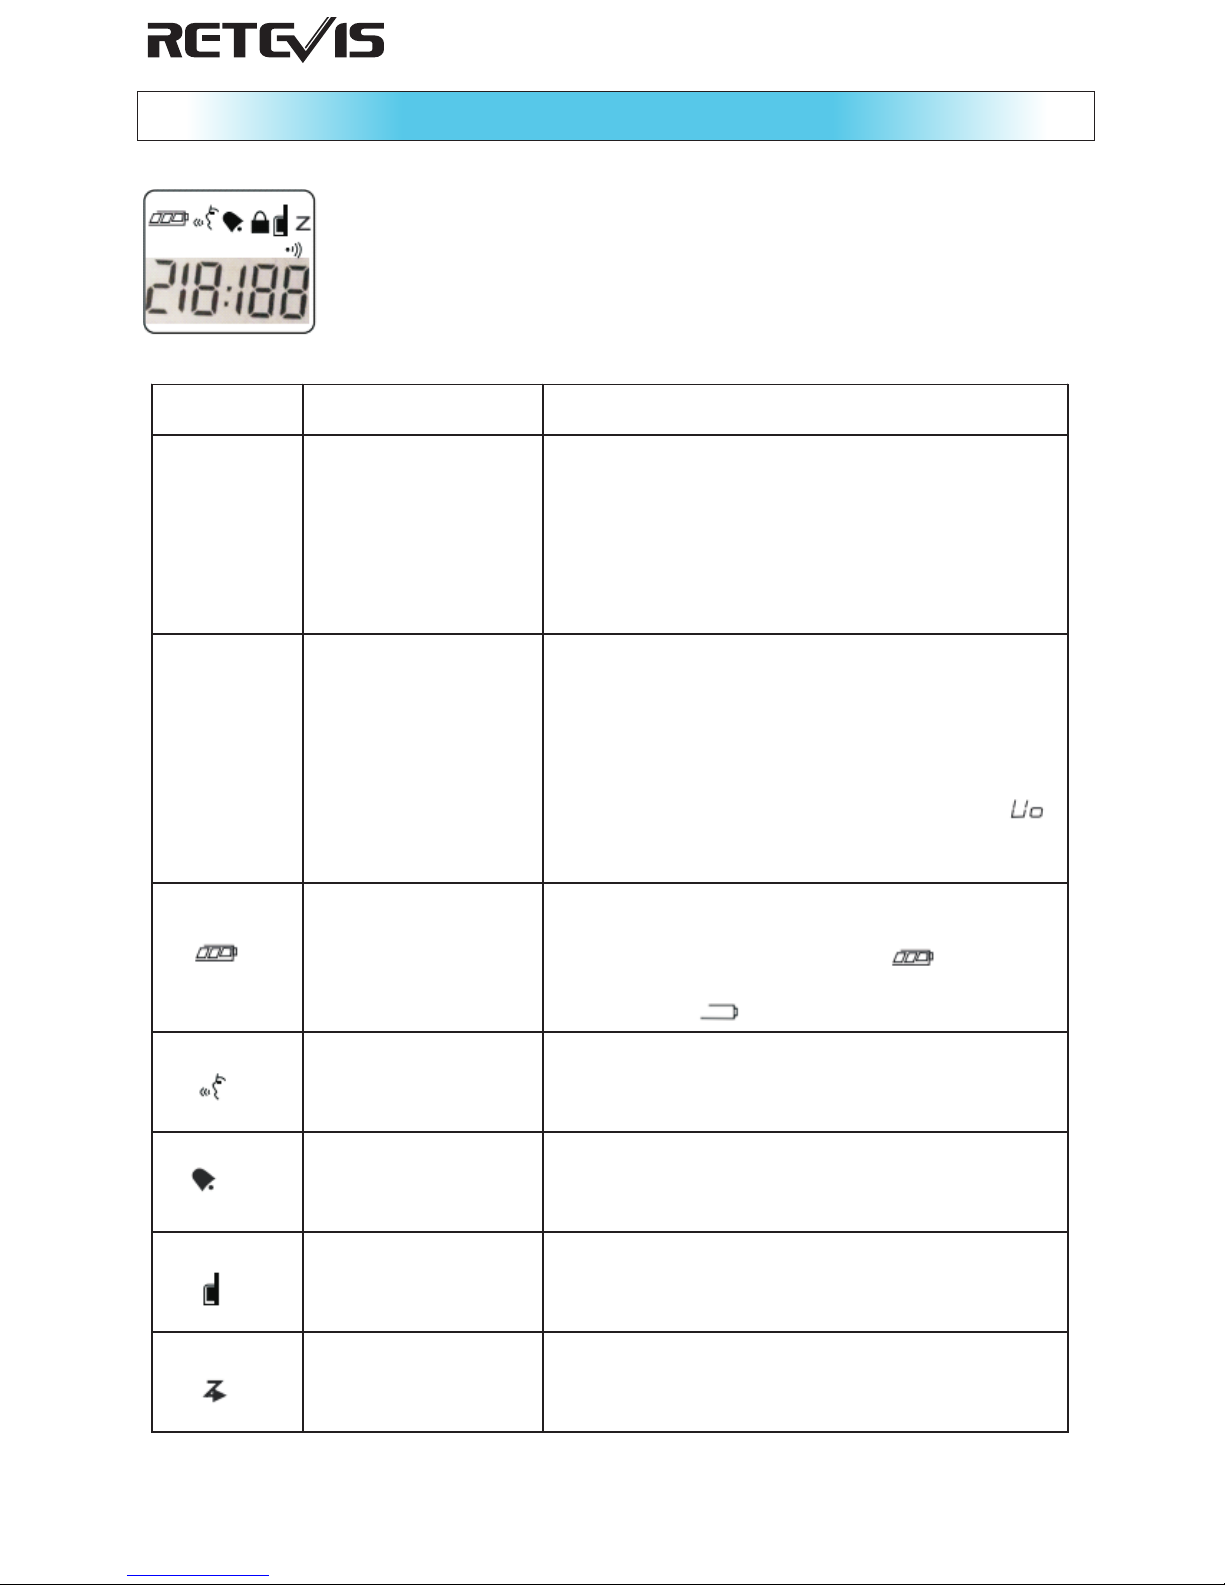
Menu mode LCD instructions
www.retevis.com
3
indicator name content
218
Channel
programming/
clock / volume
level
Channel programming / clock / volume level.
When the volume level is displayed in the
number of standby Press up or down key
188
CTCSS / DCS
programming
/volume
When the minutes standby, press PPT key
to display after the current CTCSS / DCS
programming number.
Standby display the volume indication
press up key or down key.
Battery power
display
Show the number of cells, the more power
the more foot: High power
low battery
Hands - free
instructions
Display when the unit is in the VOX mode of
operation.
Alarm indication
Display when the unit is in the alarm mode
of operation.
Open the intercom
function indication
Display when the unit is in the open mode.
When close will not show this icon.
Scanning
instructions
Display when the walkie-talkie under scan
function.
Page 5

ITEM DESCRIPTION
Notice:
This radio come with a dedicated charger, To avoid damage your
radio and lithium ion batteries, please do not use other chargers.
Please do not transmit when charging.
The new battery should be charger around 12hours when use it
first time..
www.retevis.com
4
N
u
mb
e
r
Na
m
e
Desc
r
ip
t
io
n
1
P
o
we
r
/M
e
nu
B
utto
n
L
o
n
g
p
r
e
ss thi
s b
utt
on c
a
n
op
e
n
/
clo
s
e
r
ad
io
;
s
h
ort
pr
ess t
o e
n
ter the ra
dio fu
nc
tion s
e
tt
i
ng
.
2
PT
T
k
ey
Pr
ess a
n
d h
ol
d
thi
s b
ut
to
n
t
o
tr
a
n
smi
t i
nf
o
r
ma
t
i
o
n
qui
ckl
y p
r
ess t
w
ice t
o s
e
nd ca
l
li
n
g s
o
und
.
3
U
p ke
y
Use th
i
s b
u
t
to
n to ad
ju
s
t vol
ume
o
r
fun
cti
on se
ttin
g
c
h
oosi
n
g.
4
Do
w
n k
e
y
Use
t
h
i
s b
u
t
t
o
n
t
o
a
d
jus
t vol
u
m
e or
fu
nct
i
on s
e
t
t
i
n
g
c
h
o
o
si
n
g.
5
S
ca
n
/
L
a
mp
e
L
o
n
g
p
r
ess t
o
e
n
t
e
r
t
h
e
sca
n
nin
g ch
an
ne
l
, s
h
ort
pr
ess t
o e
n
ter the il
l
umi
nati
o
n
.
6
Mo
nito
r
/
Loc
k bu
t
t
o
n
L
ong
p
r
es
s t
o en
t
e
r
the i
n
t
e
r
-
lock, sh
or
t p
r
es
s en
t
e
r
mo
n
i
tor fun
c
ti
o
n
.
7
MI
C
B
u
il
t
-
in micr
op
h
o
ne
.
8
Sp
eake
r
B
u
i
l
t
-i
n s
p
e
a
ker.
9
An
ten
n
a
En
ha
nc
ed si
g
na
l rece
p
t
i
on an
d e
miss
io
n
.
1
0
U
S
B
I
n
t
e
r
f
ac
e
It
i
s
a
walk
ie
-
talkie
ch
a
r
gi
n
g i
n
t
e
r
face.
1
1
E
a
r
pi
e
c
e
Ja
ck
I
t is a wa
l
k
i
e
-
ta
l
k
ie h
e
a
dse
t j
a
c
k.
1
2
F
l
a
sh
l
igh
t
It is
a wal
ki
e
-
ta
lk
ie l
i
g
hts.
1
3
L
E
D
It i
s a w
a
l
ki
e
-t
a
l
kie L
E
D.
Page 6

The main features of walkie-talkie
1.A plurality of selectable channels.
2.Automatic squelch.
3.Auto save power.
4.It has an internal voice intercom (speakerphone) function.
5.Having a channel scan function.
6.24-hour time display.
7.Alarm reminders appear.
8.Backlit display.
9.Use BL-5B lithium batteries
www.retevis.com
5
Page 7

Battery low power tips
When the unit is low battery in the talk mode and standby mode,
power indication start Flashes. Remind you to recharge.
Using the walkie-talkies
1.Press and hold the Power / Menu button about 3 seconds, the
unit will power on to speak mode, The display shows the
icon under intercom mode.
2.Press the Power / Menu button to access the function settings.
Activated icon will begin blinking.
Press repeatedly this button, explore other menu functions until
back to the intercom mode. Every time you press the Power /
Menu button, the function or icon will show on the screen.
3.After activate a function icon, press the up or down key to
select menu options.
4.Press PTT-button to save and back to standby.
Select channel
1.When the radio is Standby, press the Power / Menu button again
until the current channel starts flashing on the LCD screen, you
can change the Channel.
2.Press the up or down key to select the channel number.
3.Press the Power / Menu button to save the settings and return
to the receiving status.
4.Press the PTT-button to save and return to the receiving status.
www.retevis.com
6
Page 8

Note: CTCSS / DCS cannot make your talking content keep
secret, it can only make you unable to receive calls from other
CTCSS / DCS users.
1.When standby, press the Power / Menu button twice, until the
mute code of current channel starts flashing, thus you can reset
status of CTCSS/DCS.
Press the up key or down key to select the privacy code.
Long press the up key or down key to select the privacy code
quickly.
2. Press the PTT / CALL to save the settings. Or press the
power / menu button to enter next function option.
CTCSS/DCS
Select CTCSS/DCS which allows you to receive calls from
members of the same group (same mute code) issued, avoiding
the same frequency interference from other users.
Channel scan
Scan fucntion lets you scan all channels occupancy.
1.When standby, press the Scan button to activate scan function,
the machine satarts to scan all channel activities), when there are
voices in scanned channel, it will stay 4~5s in this channel, then
continue to scan next channel.)
2Press theScan to exit the channel scan.button
Transmission and reception
1.On receiving status once power on.
www.retevis.com
7
Page 9

Adjust the volume
This machine has eight adjustable volume. Press the up or down
key to adjust the volume when the walkie talkie is under standby.
Call Tone
This machine has 10 call alerts sound available.
Call Tone Setting
1. When Standby, repeatedly press the Power / Menu key to call
setting on the LCD screen.
2.Press the up or down key to select a call tone.
3.Press the Power / Menu button to save the settings and then
enter other function setting, or press PTT key to save and return
to standby.
Send call alerts sound
1.When you need to send call alerts, press the PTT key twice
quickly, Call alarm will be send automatically.
2.When call alerts sound transmit complete, you can hear a
short confirmation sound, the unit will be back to radio standby
status.
3.After speaking, release the speaking PTT key,
the machine is in the receiving status.
2.Press the PTT key,and use the normal voice to speak,
there should be 5 cm between mouth and microphone.
www.retevis.com
8
Page 10

Hands-free function
The machine is equipped with hands-free function, no need to
press PTT key , it can automatically send voice.
1.When Standby, repeatedly press the Power / Menu button until
the LCD hands-free function label appears.
2.Press the up or down key to switch hands-free on / off function,
alternately shows "0,1,2,3",Appears on the display Hands-free
indicator .
(0: close hands-free function; 1: noisy environments; 2: Under
normal circumstances use: 3: quiet environments)
High/Low Power Selection
Standby, repeatedly press the Power / Menu button until the
display the flashing LO or HI (LO for small power 0.5W; HI for
high-power 1W) .Then, click PTT to save.
Use earplugs (optional)
1.The walkie-talkie is set to non-hands-free mode.
2.Open the headset/charger jack on the side of the machine.
Insert the headset.adjust the microphone position.
Automatic power saving feature
The machine is equipped with a unique circuit that can extend
battery life,If you do not receive any signal transmission within
5 seconds, it will automatically switch to energy-saving mode, in
this mode, you can still receive the signal)
www.retevis.com
9
Page 11

Automatic squelch
The machine has automatic squelch function, provide
high-quality voice effects, you can hear more clearly.
Backlit display
Press any key, the LCD backlight is automatically displayed for
five seconds.
Set the time
The unit has a 24-hour clock function set as follows:
1.Standby, press the Power / Menu button eight times until the
hour digits displayed.
2.Press the up or down key to increase or decrease hour digits,
time can be set from 0 to 24 hours.
3. Press the power / menu button until the minute digits displayed.
4.Press the up or down key to increase or decrease the minute
digits.
5.Press the power / menu button to enter other feature settings
or press PTT key to save.
Set the alarm
1,Standby, repeatedly press the Power / Menu button until the
alarm symbol appears on the LCD screen. Press the
up or down key to select turn off or turn on the alarm function.
2.Press the Power / Menu button to enter the set alarm hour time
setting. Hours start flashing, press the up key or down key to set
alarm hours. Press the Power / Menu button starts blinking
minutes, Press up key or down key to set alarm minutes.
www.retevis.com
10
3.Press PTT key to save.
Page 12

Key tone
1.Standby, press the
key or down key to select turn on or turn off the key tone..
Power / Menu button seven times press up
2.Press PTT key to save.
Channel frenquency
www.retevis.com
11
USA channel Frequ en cy
Channel 1 2 3 4 5 6
Fre quenc y 462.5625 462.5875 462.6125 462.6375 462.6625 462.6875
Channel 7 8 9 10 11 12
Fre quenc y 462.7125 467.5625 467.5875 467.6125 467.6375 467.6625
Channel 13 14 15 16 17 18
Fre quenc y 467.6875 467.7125 462.5500 462.5750 462.6000 462.6250
Channel 19 20 21 22
Fre quenc y 462.6500 462.6750 462.7000 462.7250
EU channel Frequency
Channel 1 2 3 4
Fre quency 446.00625 446.01875 446.03125 446.04375
Channel 5 6 7 8
Fre quency 446.05625 446.06875 446.08125 446.09375
Page 13

Malfunction and troubleshooting
www.retevis.com
12
Malfunction Troubleshooting
No power
supply
1、The battery may be low.
2、Use the special charger to charge the battery.
3、Battery may be damaged, replacement of the lithium-ion
battery.
Received
signal Poor
1、Press the up key to increase the volume.
2、The received signal may be weak signal, otherwise out
of range.
3、Check the antenna . For getting the best call quality,
make the antenna up.
We cannot
change the
channel
1、When you at channel mode, press the power / menu
button until the channel number flashes up on the screen.
2、Press the up or down key to change the channel.
3、The battery may be low.
Reception
range limited,
sound
distortion.
1、The battery may be low. If indicate low battery, recharge
the battery.
2、Effective reception range affect by terrain and
environmental .
3、Check the antenna . For getting the best call quality,
make the antenna up.
4、the reception range of the car will be seriously affected
by Shade trees, the plant building.
6、When transmit a signal, keep 5 cm distance between
the mouth and the microphone, speak in a normal voice.
7、When receiving signal, adjust the volume level.
8、The caller should maintain a minimum distance of 3
meters,even father.
9、If far away between caller and respondent, obstacle will
be affect the signal transmission. If there no
obstacle ,communicate range can reach to 3km.
Page 14

www.retevis.com
E-mail: kam@retevis.com
Shenzhen Retevis Technology Co.,Ltd
RECYCLED PACKAGING
 Loading...