

Page 1
www.respironics.com
R
Provider Manual
R
Page 2

BiPAP systems are the subject of one or more of U.S. Patents #5148802, #5239995, #531937,
#5433193, Canadian Patent #2, 024, 477, European Patent #EP0425092, German Patent
#69021681.5-08, and other pending U.S. and foreign patents. BiPAP is a registered trademark of
Respironics, Inc.
© 2002 Respironics, Inc. All Rights Reserved
Page 3

l
Table of Contents
Chapter 1: Warnings and Cautions .......................................................................1-1
1.1 Warnings ..............................................................................................................................1-1
1.2 Cautions................................................................................................................................1-3
1.3 Intended Use.........................................................................................................................1-4
1.4 Contraindications ................................................................................................................1-4
1.5 Patient Precautions..............................................................................................................1-4
1.6 Communication Statements for Optional Modem ........................................................... 1-5
TYPES OF SERVICE............................................................................................................................................................ 1-5
TELEPHONE COMPANY PROCEDURES .................................................................................................................................. 1-5
IF PROBLEMS ARISE .......................................................................................................................................................... 1-5
1.7 Industry Canada Notice ......................................................................................................1-6
Chapter 2: Introduction..........................................................................................2-1
2.1 Synchrony Overview ...........................................................................................................2-1
2.2 Modes of Operation ............................................................................................................. 2-2
2.2.1 CPAP MODE ....................................................................................................................................................... 2-2
2.2.2 S MODE .............................................................................................................................................................. 2-2
2.2.3 S/T MODE ........................................................................................................................................................... 2-3
2.2.4 PRESSURE CONTROL MODE ................................................................................................................................... 2-3
2.2.5 TIMED MODE ....................................................................................................................................................... 2-3
2.2.6 MODE SUMMARY.................................................................................................................................................. 2-4
2.3 Digital Auto-T rak Sensitivity™ ..........................................................................................2-4
2.3.1 LEAK TOLERANCE ................................................................................................................................................ 2-4
2.3.2 SENSITIVITY ......................................................................................................................................................... 2-4
2.4 Access Levels ........................................................................................................................ 2-7
2.5 Symbol Key .......................................................................................................................... 2-8
2.6 Definitions, Acronyms, and Abbreviations ........................................................................ 2-9
2.7 Service...................................................................................................................................2-9
i
Chapter 3: Controls and Displays..........................................................................3-1
3.1 Control Panel .......................................................................................................................3-1
3.1.1 DISPLAY SCREEN .................................................................................................................................................. 3-1
3.1.2 CONTROL KEYS .................................................................................................................................................... 3-2
3.1.3 INDICATORS .......................................................................................................................................................... 3-2
3.2 Navigating the Screens ........................................................................................................3-5
3.3 Display Data .........................................................................................................................3-6
3.4 Patient Circuit Connection ................................................................................................. 3-7
3.5 Optional Oxygen Valve........................................................................................................3-7
3.6 Rear Panel ............................................................................................................................3-8
R
Provider Manua
Page 4

ii
l
Chapter 4: Setting up and Starting the Synchrony ..............................................4-1
4.1 Preparing the Synchrony ....................................................................................................4-1
4.1.1 SUMMARY OF SETUP OPERATIONS .......................................................................................................................... 4-1
4.1.2 INSTALLING THE AIR FILTERS................................................................................................................................. 4-2
4.1.3 ASSEMBLING THE PATIENT CIRCUIT ........................................................................................................................ 4-3
4.1.4 SUPPLYING POWER TO THE SYNCHRONY.................................................................................................................. 4-4
4.1.5 OPTIONAL INTERNAL MODEM ................................................................................................................................ 4-5
4.1.6 PERFORMANCE VERIFICATION ................................................................................................................................ 4-5
4.2 Setting Up the Synchrony ...................................................................................................4-5
4.3 Connecting the Patient ........................................................................................................4-5
4.4 Operating the System ..........................................................................................................4-6
4.5 Patient Operating Instructions...........................................................................................4-7
4.5.1 SETTING THE RISE TIME ........................................................................................................................................ 4-7
4.5.2 DIALING THE PROVIDER ........................................................................................................................................ 4-8
4.5.3 DATA TRANSMISSION ERRORS ................................................................................................................................ 4-9
4.5.4 USING THE RAMP FUNCTION ............................................................................................................................... 4-10
Chapter 5: Changing Parameters ..........................................................................5-1
5.1 Summary of Change Parameters Operations ................................................................... 5-1
5.2 Change Parameters Screens ............................................................................................... 5-2
5.2.1 CPAP MODE ....................................................................................................................................................... 5-2
5.2.2 S MODE .............................................................................................................................................................. 5-3
5.2.3 T , PC, AND S/T MODES ....................................................................................................................................... 5-3
5.3 Changing Synchrony Parameters ......................................................................................5-4
Chapter 6: Changing Modes...................................................................................6-1
6.1 Summary of Change Mode Operations ............................................................................. 6-1
6.2 Change Mode Setup Screens .............................................................................................. 6-2
6.2.1 CPAP MODE SETUP SCREEN................................................................................................................................. 6-2
6.2.2 S MODE SETUP SCREENS ...................................................................................................................................... 6-2
6.2.3 T , PC, AND S/T MODES SETUP SCREENS ............................................................................................................... 6-2
6.3 Changing the Synchrony Mode.......................................................................................... 6-3
Chapter 7: Options ..................................................................................................7-1
7.1 Summary of Options Operations .......................................................................................7-1
7.2 Synchrony Options Menu ................................................................................................... 7-2
7.2.1 TIME AT PRESSURE................................................................................................................................................ 7-2
7.2.2 SYSTEM CODES .................................................................................................................................................... 7-3
7.2.3 PATIENT ALARM HISTORY ..................................................................................................................................... 7-4
7.2.4 MODEM SETTINGS ................................................................................................................................................ 7-5
7.2.5 PEV SETTING ...................................................................................................................................................... 7-9
7.2.6 CHANGING THE ACCESS LEVEL ............................................................................................................................ 7-10
7.2.7 UNLOCKING THE ACCESS LEVEL .......................................................................................................................... 7-10
7.2.8 CHANGING THE LANGUAGE ................................................................................................................................. 7-11
7.2.9 CHANGING THE ALARM VOLUME ......................................................................................................................... 7-12
7.2.10 EXITING THE OPTIONS MENU .............................................................................................................................. 7-12
R
Provider Manua
Page 5

l
Chapter 8: Alarms ...................................................................................................8-1
8.1 Alarm Introduction .............................................................................................................8-1
8.2 Setting Alarm Parameters...................................................................................................8-2
8.2.1 ALARM PARAMETER OPERATION SUMMARY ............................................................................................................ 8-2
8.2.2 CHANGING THE ALARM PARAMETERS ..................................................................................................................... 8-3
8.3 Summary of Alarm Behavior .............................................................................................8-6
8.3.1 ALARM SOUNDS BEHAVIOR ................................................................................................................................... 8-6
8.3.2 ALARM LED BEHAVIOR ....................................................................................................................................... 8-7
8.3.3 DISPLAY BEHAVIOR ............................................................................................................................................... 8-7
8.4 Summary of User Actions During Alarm ..........................................................................8-8
8.5 Alarm Tables ........................................................................................................................8-9
8.5.1 HIGH PRIORITY ALARMS ....................................................................................................................................... 8-9
8.5.2 MEDIUM PRIORITY ALARMS ................................................................................................................................ 8-10
8.5.3 LOW PRIORITY ALARMS ...................................................................................................................................... 8-11
8.5.4 ALARM DEFINITIONS ........................................................................................................................................... 8-12
Chapter 9: Communications...................................................................................9-1
9.1 Communicating via Optional Modem ...............................................................................9-1
9.2 Communicating with Encore Software..............................................................................9-1
iii
Chapter 10: Adding Supplemental Oxygen.........................................................10-1
10.1 Adding Supplemental Oxygen..........................................................................................10-1
10.2 Supplemental Oxygen Concentrations ............................................................................10-3
Chapter 11: Cleaning and Maintenance .............................................................. 11-1
11.1 Cleaning the Synchrony .................................................................................................... 11-1
11.2 Cleaning or Replacing the Inlet Filters............................................................................ 11-1
11.3 Maintenance ....................................................................................................................... 11-2
Chapter 12: Circuits and Accessories...................................................................12-1
12.1 Circuit Configurations ...................................................................................................... 12-1
12.2 Circuits and Accessories....................................................................................................12-2
12.3 Masks, Exhalation Ports, and Related Accessories ........................................................ 12-2
12.4 Humidifiers ........................................................................................................................12-2
12.5 Software..............................................................................................................................12-2
Chapter 13: Operational V erification...................................................................13-1
13.1 S Mode Verification ...........................................................................................................13-1
13.2 S/T Mode Verification .......................................................................................................13-2
13.3 Alarm Verification ............................................................................................................. 13.3
Chapter 14: Specifications ....................................................................................14-1
Appendix A: External Modem Requirements...................................................... A-1
A.1 Serial Cable ......................................................................................................................... A-1
A.2 Modem Commands ............................................................................................................ A-1
A.3 Example Initialization Strings........................................................................................... A-2
Appendix B: Error Codes ...................................................................................... B-1
Index ......................................................................................................................... I-1
R
Provider Manua
Page 6

iv
l
R
Provider Manua
Page 7

l
Package Contents
• BiPAP Synchrony
• power cord
• flexible tubing (1.8 m x 2 mm I.D.)
• filter cap
• pollen filters
• ultra-fine filter
• optional modem cable (4.27 m)
• User Guide*
R
BiPAP Synchrony
Filter Cap
Ultra-fine Filter
Pollen Filters
R
User Guide
User Guide*
www.respironics.com
Power Cord
Flexible Tubing
Optional Modem
Cable
* Not included with all models.
R
Provider Manua
Page 8

R
l
Provider Manua
Page 9

l
Chapter 1: Warnings and Cautions
WARNING: Indicates the possibility of injury to the patient or the operator.
CAUTION: Indicates the possibility of damage to the device.
CAUTION! US federal law restricts this device to sale by or on the order of a physician.
NOTE: Places emphasis on an operating characteristic.
1-1
1.1 Warnings
• This manual serves as a reference. The instructions in this manual are
not intended to supersede the health care professional’s instructions
regarding the use of the Synchrony.
• The operator should read and understand this entire manual before
using the Synchrony.
• The Synchrony provides positive pressure ventilation and is indicated
for assisted ventilation. The Synchrony does not provide ventilation
with guaranteed tidal volume delivery. Patients requiring ventilation
at predetermined tidal volumes are not candidates for pressure support
ventilation.
• The Synchrony should be used only with masks and connectors
recommended by Respironics or with those recommended by the
health care professional or respiratory therapist. See Chapter 12 for
approved patient circuits. A mask should not be used unless the
Synchrony is turned on and operating properly. The exhalation port(s)
associated with the mask should never be blocked.
Explanation of the Warning: The Synchrony is intended to be used
with special masks or connectors that have exhalation ports to allow
continuous flow of air out of the mask. When the Synchrony is turned
on and functioning properly, new air from the Synchrony flushes the
exhaled air out through the mask exhalation port. However, when the
Synchrony is not operating, enough fresh air will not be provided
through the mask, and exhaled air may be rebreathed. Rebreathing of
exhaled air for longer than several minutes can in some circumstances
lead to suffocation.
• In the event of a power or device failure, audible and visual alarm
signals will activate. The Synchrony must be disconnected from the
patient immediately. As is the case with most ventilators with passive
exhalation ports, when power is lost, sufficient air will not be provided
through the circuit and exhaled air may be rebreathed.
• At low EPAP pressures, the flow through the exhalation port may be
inadequate to clear all exhaled gas from the tubing. Some rebreathing
may occur.
• If supplemental oxygen is added to the breathing circuit, the optional
oxygen valve must be installed and used as shown in Chapter 10. The
valve automatically stops the flow of oxygen when the blower is off.
• If oxygen is used with the Synchrony, the oxygen flow must be turned
off when the Synchrony is not operating.
Explanation of the Warning: When the Synchrony is not in operation,
and the oxygen flow is left on, oxygen delivered into the ventilator
tubing may accumulate within the Synchrony’s enclosure. Oxygen
accumulated in the ventilator enclosure will create a risk of fire.
• Oxygen supports combustion. Oxygen should not be used while
smoking or in the presence of an open flame.
R
Provider Manua
Page 10

1-2
l
W arnings (continued)
• When administering fixed-flow supplemental oxygen, the oxygen
concentration may not be constant. The inspired oxygen concentration
will vary, depending on the IPAP and EPAP settings, patient breathing
pattern, and the leak rate. Substantial leaks around the mask may
reduce the inspired oxygen concentration to less than the expected
concentrations shown in Chapter 10. Appropriate patient monitoring
should be used.
• Operation of the Synchrony may be adversely affected by
—electromagnetic fields exceeding the level of 10 V/m in the test
conditions of EN 60601-1-2
—the operation of high frequency (diathermy) equipment
—defibrillators, or short wave therapy equipment
—radiation (e.g., x-ray, CT)
—magnetic fields (e.g., MRI).
• The Synchrony is not suitable for use in the presence of flammable
mixtures such as gases, anesthetics and liquids.
• Do not use the Synchrony at room temperatures above 35°C. If the
Synchrony is used at room temperatures above 35°C, the temperature
of the airflow may exceed 41°C, which could cause thermal irritation
or injury to the patient’s airway.
• Do not operate the Synchrony in direct sunlight or near a heating
appliance because these conditions can increase the temperature of the
airflow delivered to the patient.
• To reduce the risk of contamination, a low resistance main flow
bacteria filter may be placed in-line between the Synchrony and
the patient.
• The Synchrony does not have an alarm to detect occlusion of the
exhalation port. Before each use, inspect the patient circuit to verify
that the port is not occluded. Occlusion or partial occlusion can reduce
airflow and result in rebreathing of exhaled air.
• Do not use antistatic or electrically conductive hoses or tubing with the
Synchrony.
• When the Synchrony is used with a humidifier, position the humidifier
such that the water level in the humidifier is lower than the patient, and
the humidifier is on the same level or lower than the Synchrony.
• If you detect any unexplained changes in the performance of the
Synchrony, if the Synchrony is dropped or mishandled, if water is
spilled into the enclosure, or if the enclosure is broken, seek the
assistance of Respironics or an authorized service center.
• Repairs and adjustments must be performed by Respironics or an
authorized service center. Service done by inexperienced or
unqualified personnel, or installation of unauthorized parts could cause
injury, invalidate the warranty, or result in costly damage.
• Electrical cords and cables should be periodically inspected for
damage or signs of wear.
• To avoid electrical shock, unplug the Synchrony before cleaning it.
• Verify the operation of the patient disconnect alarm with any changes
in the patient circuit.
R
Provider Manua
Page 11

1-3
l
Warnings (continued)
1.2 Cautions
• Verify that the Patient Disconnect alarm is active if required for
medical reasons.
• The Synchrony may only be operated at temperatures between 5°C and
35°C.
• Do not immerse the Synchrony or allow any liquid to enter the
enclosure or the inlet filter.
• Condensation may damage the Synchrony. Always allow the
Synchrony to reach ambient temperature before use.
• Use the AC cable retainer to keep the AC power cord from falling out.
Additional Warnings, Cautions, and Notes are located throughout
this manual.
R
Provider Manua
Page 12
1-4
l
1.3 Intended Use
WARNING! Do not connect any equipment to the Synchrony unless recommended by Respironics or the health care
professional. Verify that an exhalation port is present to exhaust CO2 from the circuit. If circuit accessories other than those recommended by Respironics are connected to the Synchrony, then pressures must
be verified. Use of these accessories may alter the pressure received, reducing the effectiveness of
treatment.
1.4 Contraindications
The Synchrony is intended to provide noninvasive ventilation in adult patients
(>30 kg) for the treatment of respiratory insufficiency (a condition in which the
patient can continue without ventilation for some period, such as overnight) or
obstructive sleep apnea. The Synchrony may be used in the hospital or home.
The Synchrony is intended for use with nasal masks and full-face masks as
recommended by Respironics.
The use of the Synchrony is contraindicated on patients without a spontaneous
respiratory drive.
The use of the Synchrony for noninvasive positive pressure therapy may be
contraindicated on patients
• unable to maintain a patent airway or adequately clear
secretions,
• at risk for aspiration of gastric contents,
• with acute sinusitis or otitis media,
• with a history of allergy or hypersensitivity to the mask materials
where the risk from allergic reaction outweighs the benefit of
ventilatory assistance,
• with epistaxis, causing pulmonary aspiration of blood, or
• with hypotension.
NOTE: When assessing the relative risks and benefits, the health care professional should understand that the
Synchrony can be set to deliver pressures up to 30 cm H2O. Also, in the unlikely event of certain fault
conditions, a maximum static pressure of 40 cm H2O is possible.
1.5 Patient Precautions
• Advise the patient to immediately report any unusual chest discomfort,
shortness of breath, or severe headache.
• If skin irritation or breakdown develops from the use of the mask,
refer to the mask instructions for appropriate action.
• The following are potential side effects of noninvasive positive
pressure therapy:
—ear discomfort
—conjunctivitis
—skin abrasions due to noninvasive interfaces
—gastric distention (aerophagia).
R
Provider Manua
Page 13

l
1.6 Communication Statements for Optional Modem
NOTE: An optional internal modem is available in models of the Synchrony sold in the United States and
Canada. If your model does not have this feature, you can connect the Synchrony to an external modem.
The following statements apply to use of the Synchrony with a modem through U.S. telephone lines.
1-5
TYPES OF SERVICE
TELEPHONE COMPANY
PROCEDURES
IF PROBLEMS ARISE
The Synchrony optional internal modem is designed to be used on standard
device telephone lines. It connects to the telephone line by means of a standard
jack called the USOC RJ-11C (or USOC FJ45S). Connection to telephonecompany-provided coin service (central office implemented systems) is
prohibited. Connection to party lines service is subject to state tariffs.
The goal of the telephone company is to provide you with the best service it
can. In order to do this, it may occasionally be necessary for them to make
changes in their equipment, operations or procedures. If these changes might
affect your service or the operation of your equipment, the telephone company
will give you notice, in writing, to allow you to make any changes necessary to
maintain uninterrupted service. In certain circumstances, it may be necessary
for the telephone company to request information from you concerning the
equipment that you have connected to your telephone line. Upon request of the
telephone company, provide the FCC registration number and the ringer
equivalence number (REN); both of these items are listed on the equipment
label. The sum of all the RENs on your telephone lines should be less than five
in order to assure proper service from the telephone company. In some cases, a
sum of five may not be usable on a given line.
If any of your telephone equipment is not operating properly, you should
immediately remove it from your telephone line, as it may cause harm to the
telephone network. If the telephone company notes a problem, they may
temporarily discontinue service. When practical they will notify you in advance
of the disconnection. If advance notice is not feasible, you will be notified as
soon as possible. When you are notified, you will be given the opportunity to
correct the problem and informed of your right to file a complaint with the
FCC. Contact your telephone company if you have questions about your phone
line. In the event repairs are ever needed on the Synchrony, they should be
performed by Respironics or an authorized representative of Respironics. For
information contact Respironics. (See page 2-9.)
R
Provider Manua
Page 14

1-6
l
1.7 Industry Canada Notice
NOTICE: The Industry Canada Label identifies certified equipment. This certification means that the equipment meets
telecommunications network protective, operational, and safety requirements as prescribed in the appropriate Terminal
Equipment Technical Requirements documents. The Department does not guarantee the equipment will operate to the
user’s satisfaction.
Before installing this equipment, users should make sure that it is permissible to be connected to the facilities of the local
telecommunications company. The equipment must also be installed using an acceptable method of connection. The
customer should be aware that compliance with the above conditions may not prevent degradation of service in some
situations.
Repairs to certified equipment should be coordinated by a representative designated by the supplier. Any repairs or
alterations made by the user to this equipment, or equipment malfunctions, may give the telecommunications company
cause to request the user to disconnect the equipment.
Users should ensure for their own protection that the electrical ground connections of the power utility, telephone lines
and internal metallic water pipe system, if present, are connected together. The precaution may be particularly important
in rural areas.
CAUTION: Users should not attempt to make such connections themselves, but should contact the appropriate electric
inspection authority, or electrician, as appropriate.
Ringer Equivalence Number (REN): The REN assigned to each terminal device provides an indication of the maximum number of terminals allowed to be connected to a telephone interface. The termination on an interface may consist
of any combination of devices subject only to the requirement that the sum of the Ringer Equivalence Numbers of all the
devices does not exceed 5.
R
Provider Manua
Page 15

l
Chapter 2: Introduction
2.1 Synchrony Overview
WARNING: The Synchrony can operate on AC or DC power. The DC power option is not intended as a battery
backup during use of AC power.
CAUTION: When DC power is obtained from a vehicle battery, the Synchrony should not be used while the
engine of the vehicle is running. Damage to the vehicle may occur.
NOTE: The Synchrony is available in two models. The BiPAP Synchrony Lab System is for use by
clinicians in a sleep lab setting. The BiPAP Synchrony Ventilatory Support System is for use in a
hospital or home setting. Throughout this manual, references to “Synchrony” will apply to both the
Lab System and the Ventilatory Support System unless otherwise noted.
NOTE: Throughout this manual, references to Bi-Flex apply only to the Synchrony Lab System.
The Synchrony, shown in Figure 2-1, is a low-pressure, electrically driven
ventilator system with electronic pressure control. The Synchrony’s pressure
controls are adjusted to deliver pressure support for patient ventilatory
R
Figure 2-1 Synchrony
assistance.
The Synchrony is intended to augment patient breathing by supplying
pressurized air through a patient circuit. It senses the patient’s breathing effort
by monitoring airflow in the patient circuit and adjusts its output to assist in
inhalation and exhalation. This assistance is provided by the administration of
two levels of positive pressure. During exhalation, pressure is variably positive
or near ambient. During inspiration, pressure is variably positive and always
higher than the expiratory level.
2-1
The Synchrony responds reliably to patient flow rates that indicate movement
to inhalation or exhalation, even in the presence of most normal leaks in the
patient circuit. Automatic adjustment of this trigger threshold in the presence of
leaks makes the system ideal for mask-applied ventilation assistance. The
patient-controllable Rise Time may enhance patient-ventilator synchrony and
patient comfort.
If the patient interface is disconnected, the Synchrony automatically reduces the
output flow to a low level. When the interface is replaced, therapy will typically
resume when the patient starts to breathe. If therapy does not resume when the
patient starts to breathe, the patient should press the RAMP/ALARM SILENCE
button to resume therapy.
A modem allows the patient to provide compliance data to the home care
provider with a few simple key presses. A communications port provides
communication to the Respironics Encore® or Encore Pro Data Management
Software.
The Synchrony operates in the following modes:
• Continuous Positive Airway Pressure (CPAP)
• Spontaneous (S)
• Spontaneous/Timed (S/T)
• Timed (T)
• Pressure Control (PC).
R
Provider Manua
Page 16
2-2
l
2.2 Modes of Operation
2.2.1 CPAP MODE
2.2.2 S MODE
In the Continuous Positive Airway Pressure (CPAP) mode, the Synchrony
delivers a continuous pressure support ventilation at one pressure level.
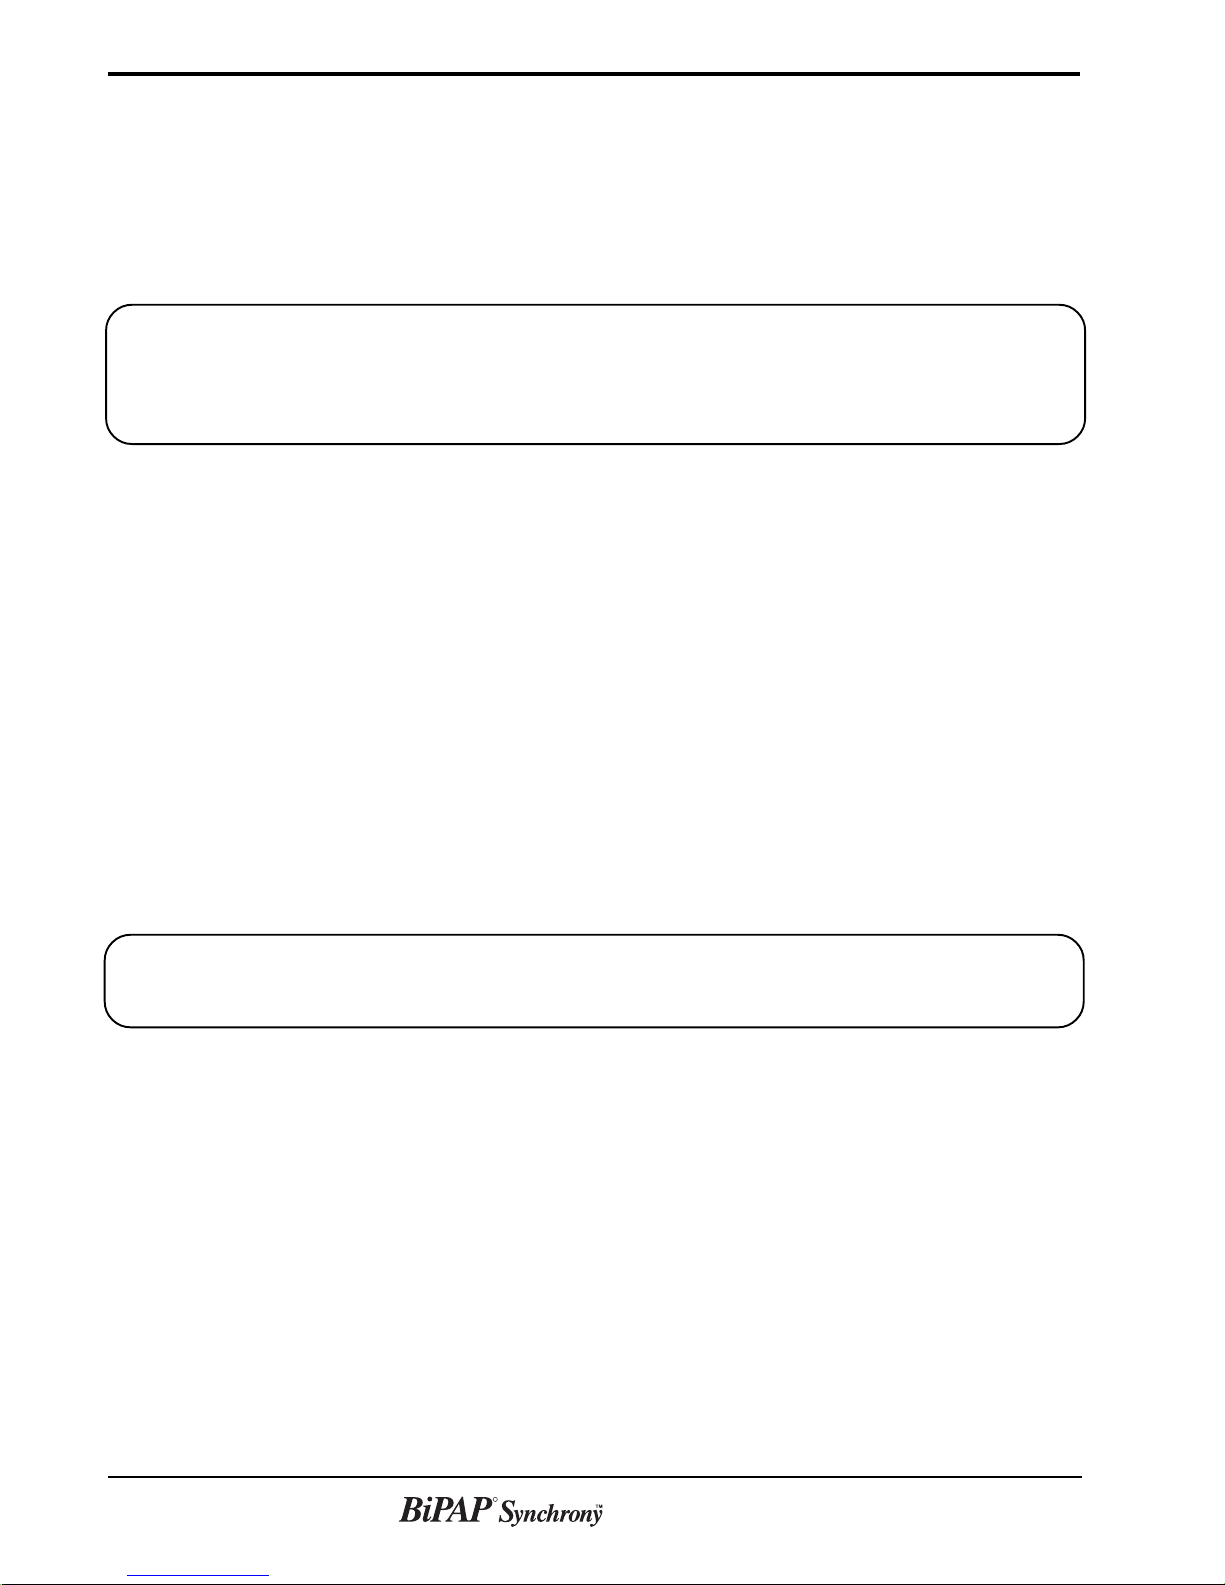
The Spontaneous (S) mode of the Synchrony delivers bi-level pressure support.
The unit triggers to Inspiratory Positive Airway Pressure (IPAP) in response to
spontaneous inspiratory effort and cycles to Expiratory Positive Airway
Pressure (EPAP) during exhalation. Figure 2-2 illustrates the trigger and cycle
concepts.
Cycle
Inspiration
Trigger
Expiration
IPAP
EPAP
Rise Time
Inspiratory Time
Figure 2-2 Triggering and Cycling in S Mode
The level of pressure support (PS) delivered is determined by the difference
between the IPAP and EPAP settings (PS = IPAP - EPAP).
Bi-Flex
The Synchrony Lab System provides the Bi-Flex feature in S mode. The BiFlex attribute adjusts therapy by inserting a small amount of pressure relief
during the latter stages of inspiration and during active exhalation (the
beginning part of exhalation). In the following diagram, the bold lines represent
Bi-Flex in comparison to the dashed line representing normal BiPAP therapy.
Bi-Flex levels of 1, 2, or 3 progressively reflect increased pressure relief that
will take place at the end of inspiration and at the beginning of expiration.
IPAP
EPAP
Bi-Flex
BiPAP
1
2
3
Time
Figure 2-3 Bi-Flex in Comparison to Traditional Bi-level Therapy
R
Provider Manua
Page 17
2-3
l
2.2.3 S/T MODE
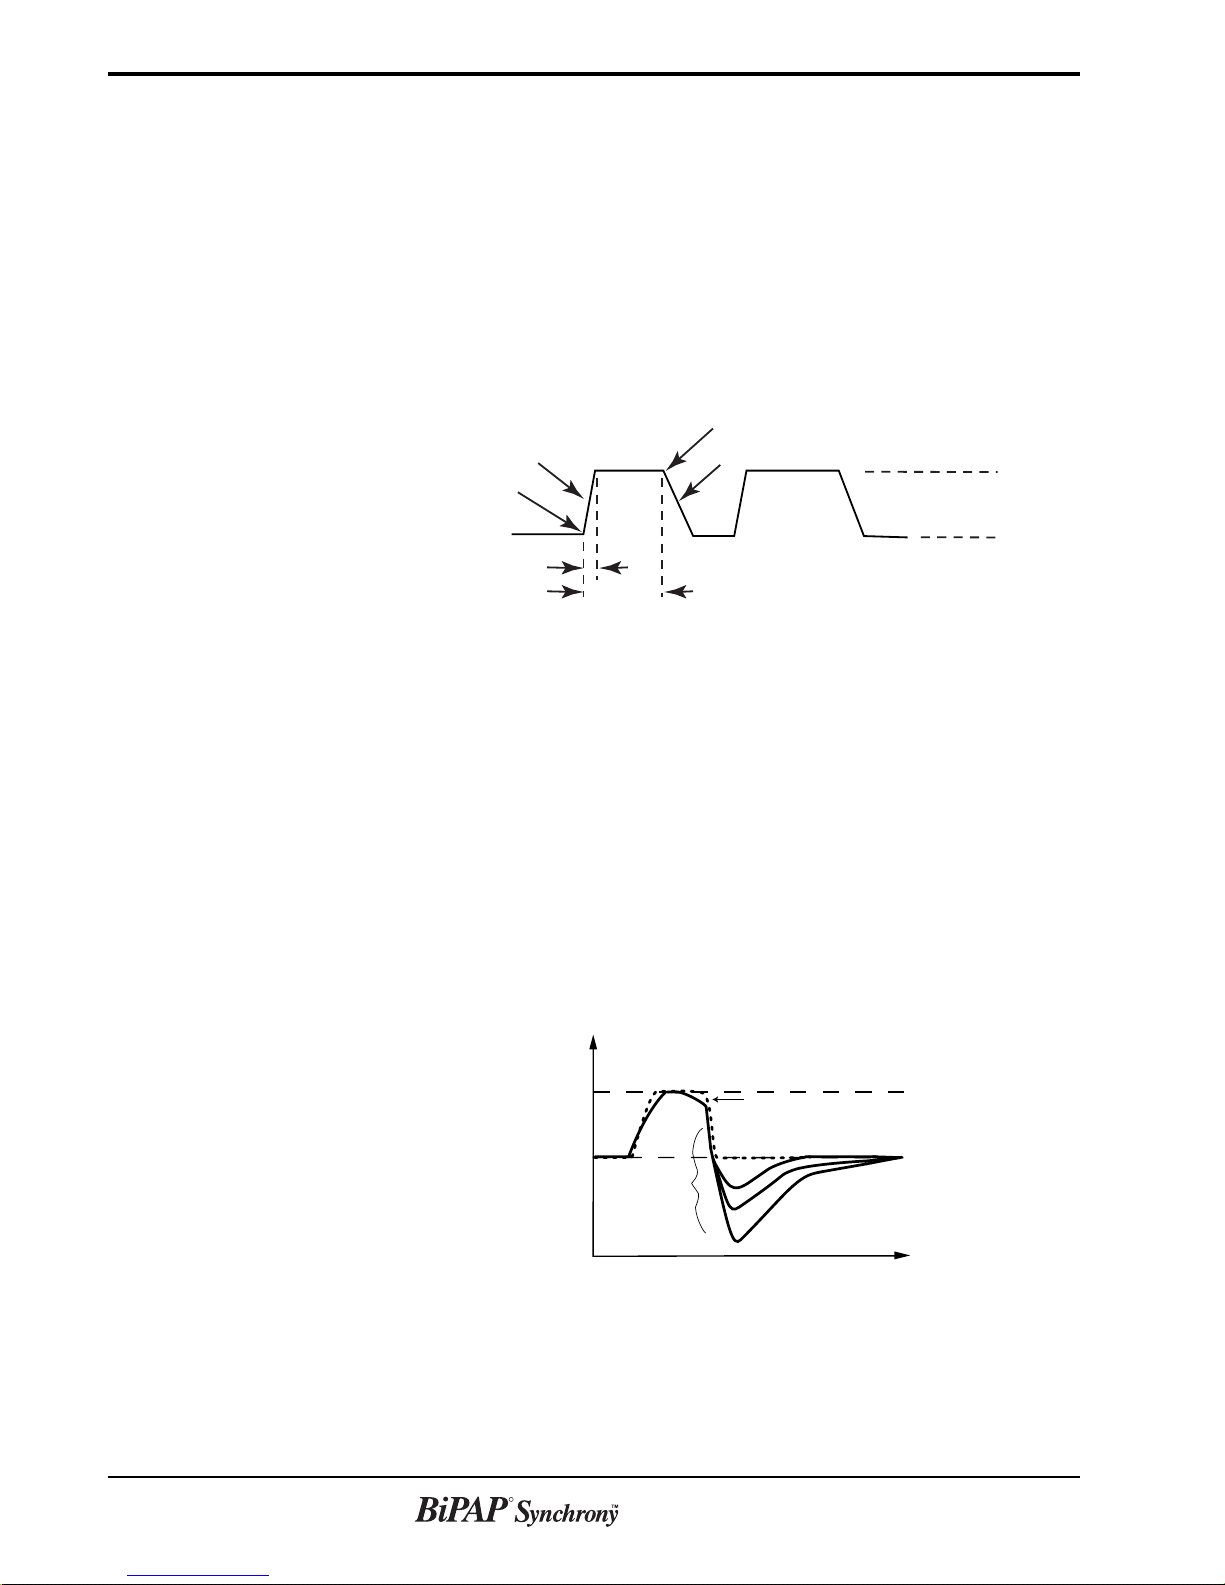
The Spontaneous/Timed (S/T) mode of the Synchrony is similar to the S mode,
except that it also can deliver a machine-triggered breath if the patient does not
spontaneously breath within a set time.
The S/T mode ensures that patients will receive a minimum number of breaths
per minute based on the Rate setting. If the patient fails to initiate an inspiration
within the interval determined by the Rate control, the unit triggers a timed (or
machine-triggered) breath resulting in a pressure-control (pressure-limited,
time-cycled) breath at the set IPAP level. The rate of timed breaths is
adjustable. The duration of each timed breath is controlled by an Inspiratory
Time control. See Figure 2-4 for an example of patient-triggered and machinetriggered breaths.
Example:
IPAP = 14 cm H2O
EPAP = 6 cm H2O
Rate = 10 BPM
PS = 8 cm H2O
Time Interval
Exceeds Rate Setting
(approx. 6 sec)
P
(cm H2O)
11 1
Vol
(ml)
11 2
2
1
2.2.4 PRESSURE CONTROL
MODE
2.2.5 TIMED MODE
1 = Spontaneously-triggered pressure support breaths.
2 = Time-triggered, pressure-limited, time-cycled breath.
Figure 2-4 Example of Patient-Triggered and Machine-Triggered Breaths
The Pressure Control (PC) mode is similar to the S/T mode, except that all
breaths are machine-cycled. The PC mode is a pressure-limited, machine- or
patient-triggered, time-cycled mode. Therefore, the inspiratory pressure may be
triggered by the patient or by the Synchrony, but IPAP will be pressure-limited
with a set cycle time determined by the Inspiratory Time control.
The Timed (T) mode provides mandatory pressure assist with bi-level
pressures. All breaths are machine-triggered and machine-cycled; the patient’s
breathing rate has no effect on the machine rate or pressure levels. The trigger
to IPAP is determined by the Rate control, and the cycle time is determined by
the Inspiratory Time control.
R
Provider Manua
Page 18

2-4
l
2.2.6 MODE SUMMARY
2.3 Digital Auto-T rak
Sensitivity™
2.3.1 LEAK TOLERANCE
Table 2-1 summarizes the initiation of triggers and cycles for each bi-level
mode.
Mode Trigger Limit Cycle
S Patient Pressure Patient or Device
S/T Patient or Machine Pressure Patient or Device
PC Patient or Machine Pressure Device
T Machine Pressure Device
Table 2-1 Initiation of Triggers and Cycles for Synchrony Modes
An important characteristic of the Synchrony is its ability to recognize and
compensate for unintentional leaks in the system and to automatically adjust its
trigger and cycle algorithms to maintain optimum performance in the presence
of leaks. This feature is known as Digital Auto-Trak Sensitivity. The
following sections examine this function in detail by describing the leak
tolerance function and sensitivity.
A microprocessor monitors the total flow of the patient circuit and calculates
patient flow values.
2.3.2 SENSITIVITY
1. Leak Estimation—Average and Parabolic
The Synchrony uses two leak estimation algorithms. A conservation of mass
algorithm is used to compute the average leak for a given pressure support
relationship. This average leak is used when large leak variations are present in
the system. Average leak is a high estimate during EPAP pressure and a low
estimate during IPAP pressure.
A better leak estimate, enabled by the digital system, is the parabolic leak
algorithm. Parabolic leak is proportional to the square of the patient pressure;
therefore, the leak estimate is correlated to the changing patient pressure. Both
algorithms include unintentional circuit leak and are averaged over several
breaths.
2. Patient Flow
The total circuit flow is comprised of the circuit leak and the patient flow. The
calculated patient flow is the total flow minus the circuit leak. Patient flow is a
primary input into the triggering and cycling mechanisms.
An essential feature of the Synchrony while operating in the S, S/T, and PC
modes is its ability to effectively sense spontaneous breathing efforts, which
causes the ventilator to trigger to IPAP and cycle to EPAP. Because no preset
sensitivity threshold can assure patient and machine synchrony with changing
breathing efforts and circuit leaks, the Synchrony continuously tracks patient
breathing patterns and automatically adjusts sensitivity thresholds to ensure
optimum sensitivity as breathing patterns change or as circuit leaks change.
The algorithms used to ensure optimum sensitivity are the Volume Trigger,
Shape Signal, and the Spontaneous Expiratory Threshold (SET).
R
Provider Manua
Page 19
2-5
l
Volume Trigger
(EPAP to IPAP)
Shape Trigger/Shape Cycle
(EPAP to IPAP)
(IPAP to EPAP)
The volume trigger is one method used to trigger IPAP during spontaneous
breathing in the S, S/T, and PC modes. The volume trigger threshold is 6 cc of
accumulated patient inspiratory volume. When patient effort generates
inspiratory flow causing 6 cc of volume, IPAP is triggered.
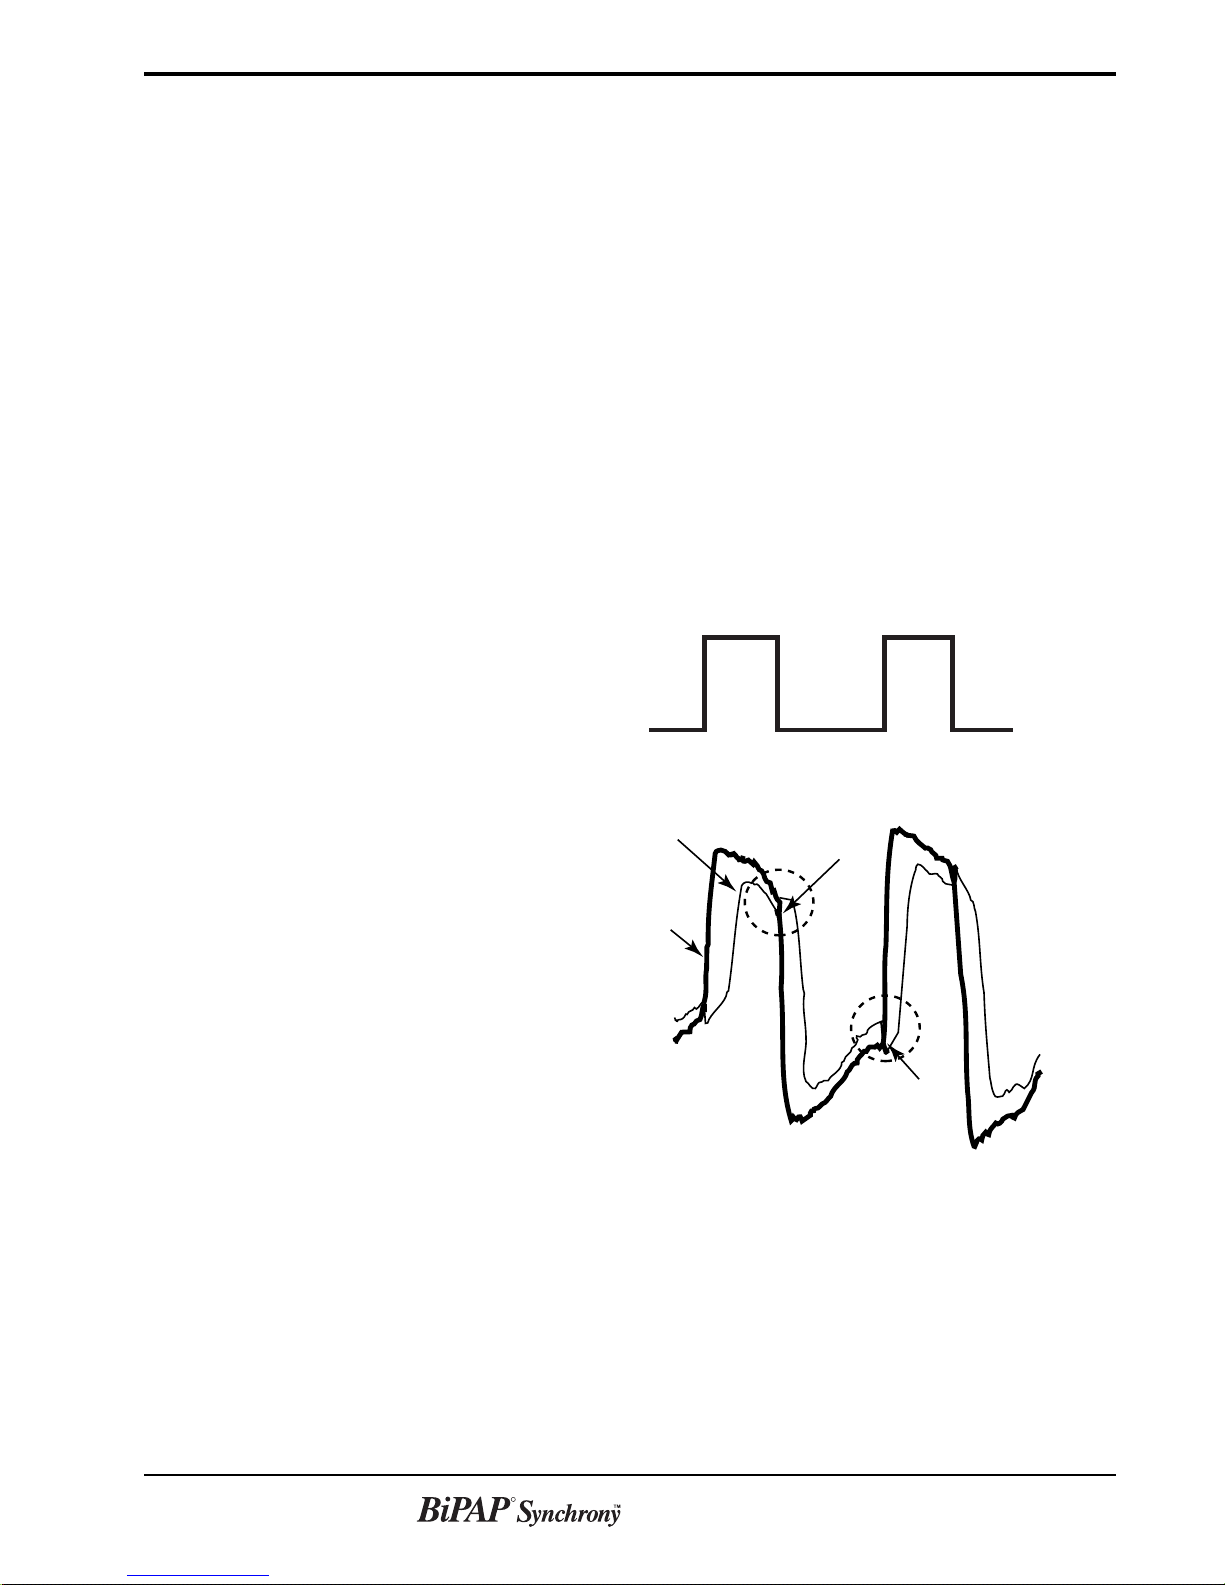
The shape trigger/cycle is another method used to trigger IPAP and/or cycle
from IPAP to EPAP during spontaneous breathing in the S, S/T, and PC modes.
This method continuously tracks patient inspiratory and expiratory flow and
adjusts the spontaneous trigger and cycle thresholds for optimum sensitivity.
The Shape Signal appears as a shadow image of the patient’s actual flow. The
shape signal functions as a sensitivity threshold at either inspiration or
expiration. When the patient’s flow rate crosses the shape signal the unit
changes pressure levels. Figure 2-5 illustrates how the shape signal is
superimposed onto the actual waveform to trigger and cycle off IPAP.
The shape signal is created by offsetting the signal from the actual patient flow
by 15 L/min and delaying it for a 300 msec period. This intentional delay
causes the shape signal to be slightly behind the patient’s flow rate. A sudden
change in patient flow will cross the shape signal, causing the pressure level to
change.
IPAP
PRESSURE
EPAP
Cycle to
EPAP
Crossover
Point
Trigger to
IPAP
Crossover
Point
FLOW
Shape
Signal
Estimated
Patient
Flow
Figure 2-5 Shape Signal
Tracking the patient’s flow pattern with the Shape Signal provides a sensitive
mechanism to trigger to IPAP or cycle to EPAP in response to changing
breathing patterns and circuit leaks.
R
Provider Manua
Page 20
2-6
l
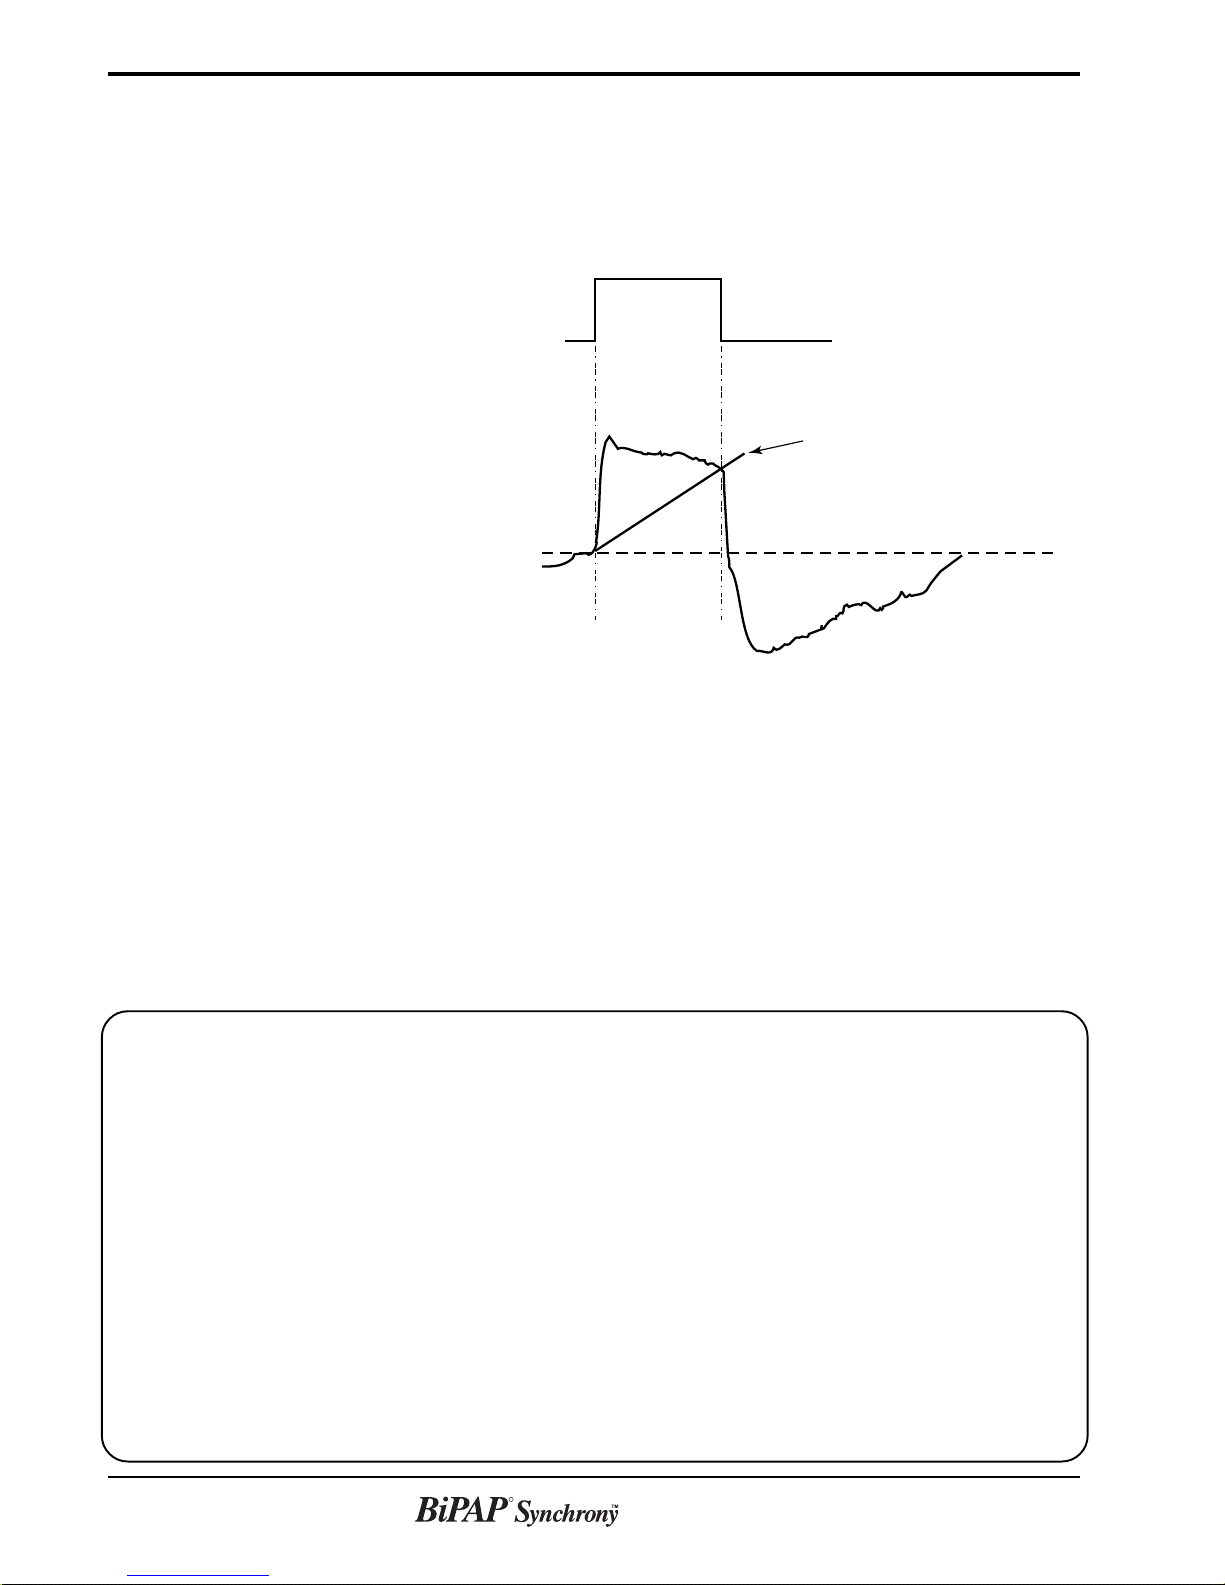
Spontaneous Expiratory
Threshold
(IPAP to EPAP)
A second method used to cycle off IPAP during spontaneous breathing in the
S, S/T, and PC modes is called Spontaneous Expiratory Threshold (SET). The
SET rises in proportion to the inspiratory flow rate on each breath. When the
Spontaneous Expiratory Threshold (SET) and actual patient flow value are
equal, the unit cycles to EPAP.
IPAP
PRESSURE
EPAP
Spontaneous
Expiratory
Threshold
FLOW
Maximum IPAP Time
(IPAP to EPAP)
Flow Reversal
(IPAP to EPAP)
Summary
Figure 2-5 Spontaneous Expiratory Threshold
A maximum IPAP time of 3.0 seconds acts as a safety mechanism to limit the
time spent at the IPAP level during spontaneous breathing in the S, S/T, and PC
modes. Once the time limit is reached, the unit automatically cycles off IPAP
to the EPAP level.
As flow begins to decrease during IPAP, a flow reversal can occur due to a
large leak around the mask or because the patient’s mouth is open. When the
Synchrony unit senses this flow reversal, the unit automatically cycles to the
EPAP level.
The sensitivity criteria for spontaneous breathing in the S, S/T, and PC modes
can be summarized as follows:
Spontaneous Trigger to IPAP
A transition from EPAP to IPAP will occur when one of the following
conditions is met:
• Patient flow exceeds the shape signal
• 6 cc inspired patient volume
Cycle to EPAP
The transition from IPAP to EPAP will occur when one of the following
conditions is met:
• Patient flow is less than the shape signal
• Spontaneous Expiratory Threshold (SET) is achieved
• A 3.0 second maximum IPAP time has occurred (safety feature)
• Flow reversal occurs during IPAP (safety feature)
R
Provider Manua
Page 21

2-7
l
2.4 Access Levels
The Synchrony can be set to a Lockout mode so that certain settings and
displays cannot be accessed. In the Lockout mode, the IPAP Rise Time can be
adjusted if Bi-Flex is not enabled. If Bi-Flex is enabled, then it is adjustable in
Lockout Mode. Rise Time cannot be adjusted in Lockout mode when Bi-Flex is
enabled. Only the IPAP, EPAP, and Respiratory Rate are displayed in Lockout
Mode.
In the Full Access level, all ventilator functions and displays are accessible.
Section 7.2.6 describes the procedure to set the access level.
R
Provider Manua
Page 22

2-8
l
2.5 Symbol Key
Symbol Meaning
The following symbols are used on the Synchrony:
AC Power Indicator
DC Power Indicator
Alarm Indicator
Type BF Applied Part
Class II for Protection Against Electric Shock
Attention, consult accompanying documents
Standby Key (Start/Stop)
Up Key
Down Key
Enter Key
Ramp Start/Alarm Silence Key
R
Provider Manua
Page 23

l
2.6 Definitions, Acronyms, and Abbreviations
The following terms are used in this manual:
Bi-Flex—A therapy feature that establishes a level of pressure relief taking
place at the end of inhalation and at the start of exhalation.
BiPAP—Bi-level Positive Airway Pressure
CPAP—Continuous Positive Airway Pressure
Cycle—The transition from inspiration to expiration
EPAP—Expiratory Positive Airway Pressure
High Priority Alarm—Alarm signal indicating a condition that requires
immediate attention
IPAP—Inspiratory Positive Airway Pressure
Low Priority Alarm—Signal indicating an information message
2-9
2.7 Service
Medium Priority Alarm—Alarm signal indicating a condition that requires
operator awareness
OSA—Obstructive Sleep Apnea
Ramp—A feature that may increase patient comfort when therapy is started.
The Synchrony IPAP starts at the EPAP level and is increased gradually (breath
by breath over several breaths) until the IPAP prescription pressure is reached.
RR—Respiratory Rate
Trigger—The transition from expiration to inspiration
If you need product support, call Respironics’ Customer Service Department:
1-800-345-6443 (USA or Canada only) or 1-724-387-4000.
R
Provider Manua
Page 24

2-10
l
R
Provider Manua
Page 25
l
Chapter 3: Controls and Displays
This chapter describes the control panel and displays, the patient circuit
connections, and the rear panel connections.
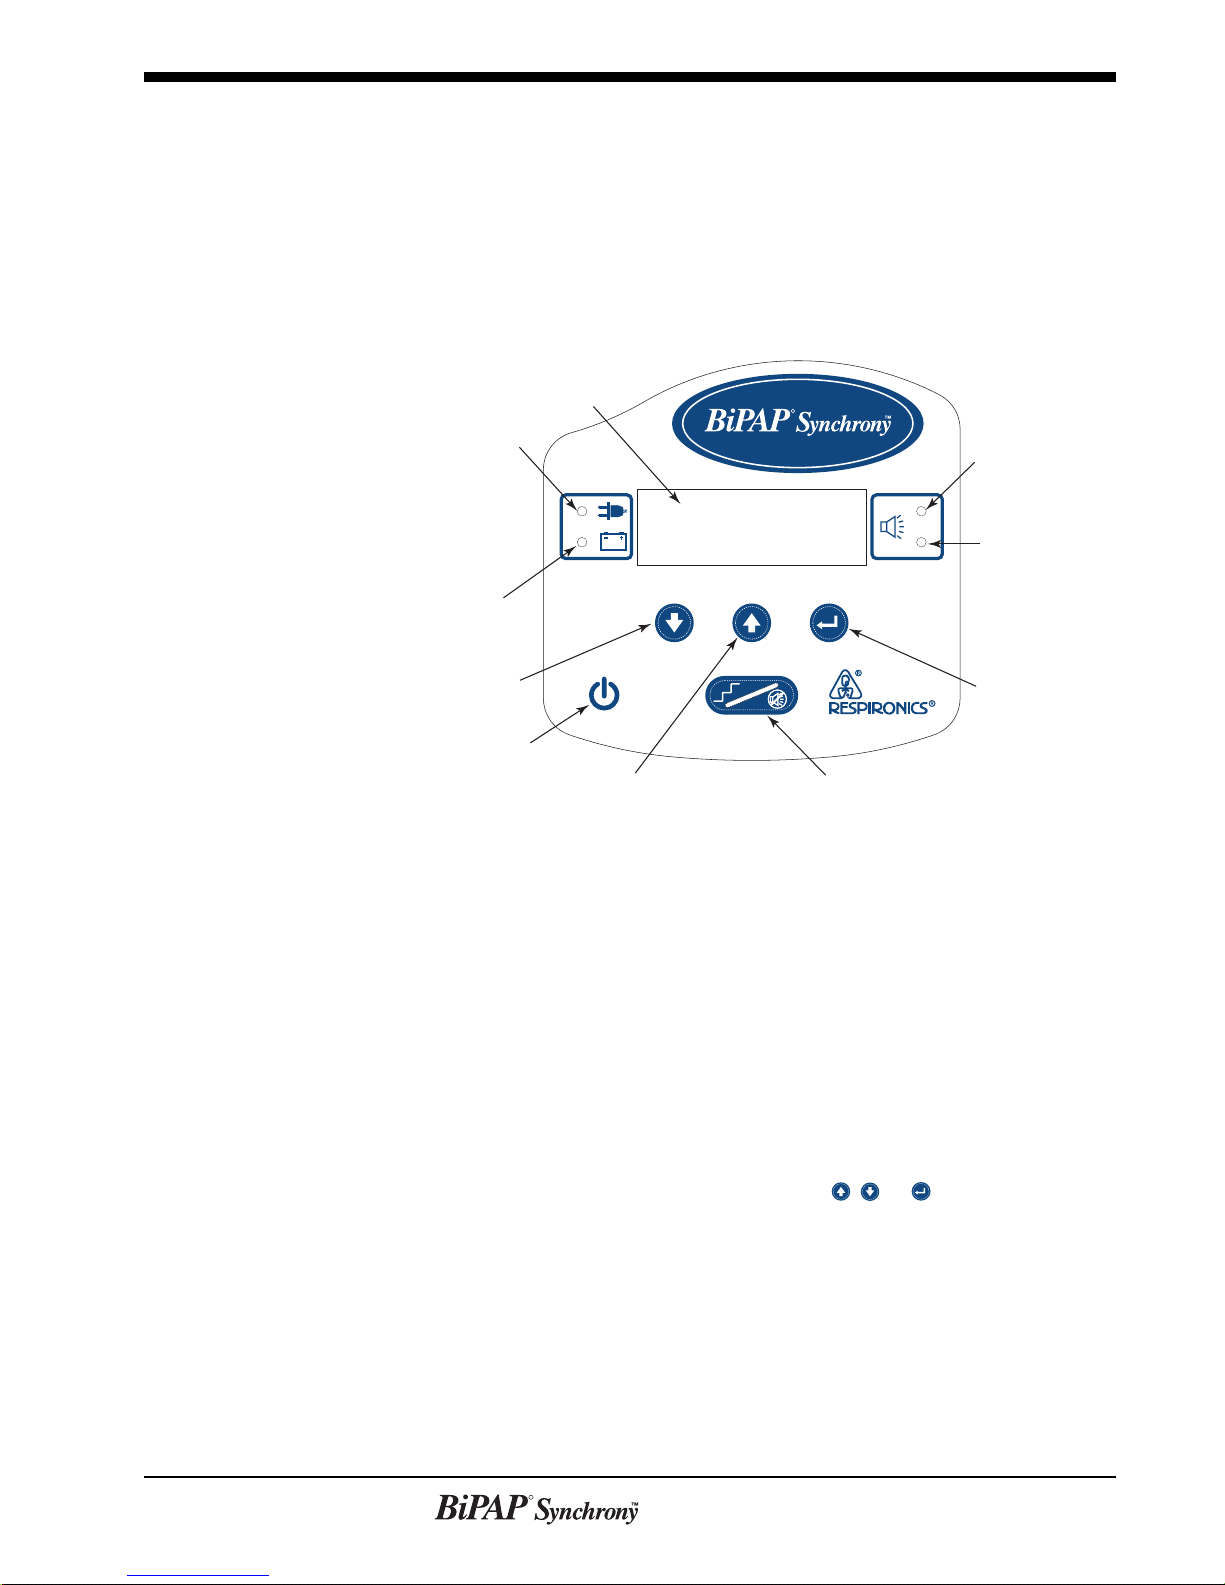
3.1 Control Panel
Display
Screen
AC Power
Indicator
DC Power
Indicator
3-1
R
Red
Alarm Indicator
Yellow
Alarm Indicator
3.1.1 DISPLAY SCREEN
Down
Key
Standby
Key
Up
Key
Figure 3-1 The Synchrony Control Panel
Figure 3-1 illustrates the Synchrony control panel. The control panel includes:
• display screen
• control keys
• alarm indicators
• power indicators.
The display screen is used to display operating parameters, instructions, and
messages. A backlight is activated when the , , or key is pressed, and
remains on until there are no keystrokes for one minute. If the backlight is off,
the first press of any of these keys will only turn the backlight on; the normal
key action is suppressed until the key is pressed a second time.
Ramp/
Alarm Silence
Key
Enter
Key
R
Provider Manua
Page 26
3-2
l
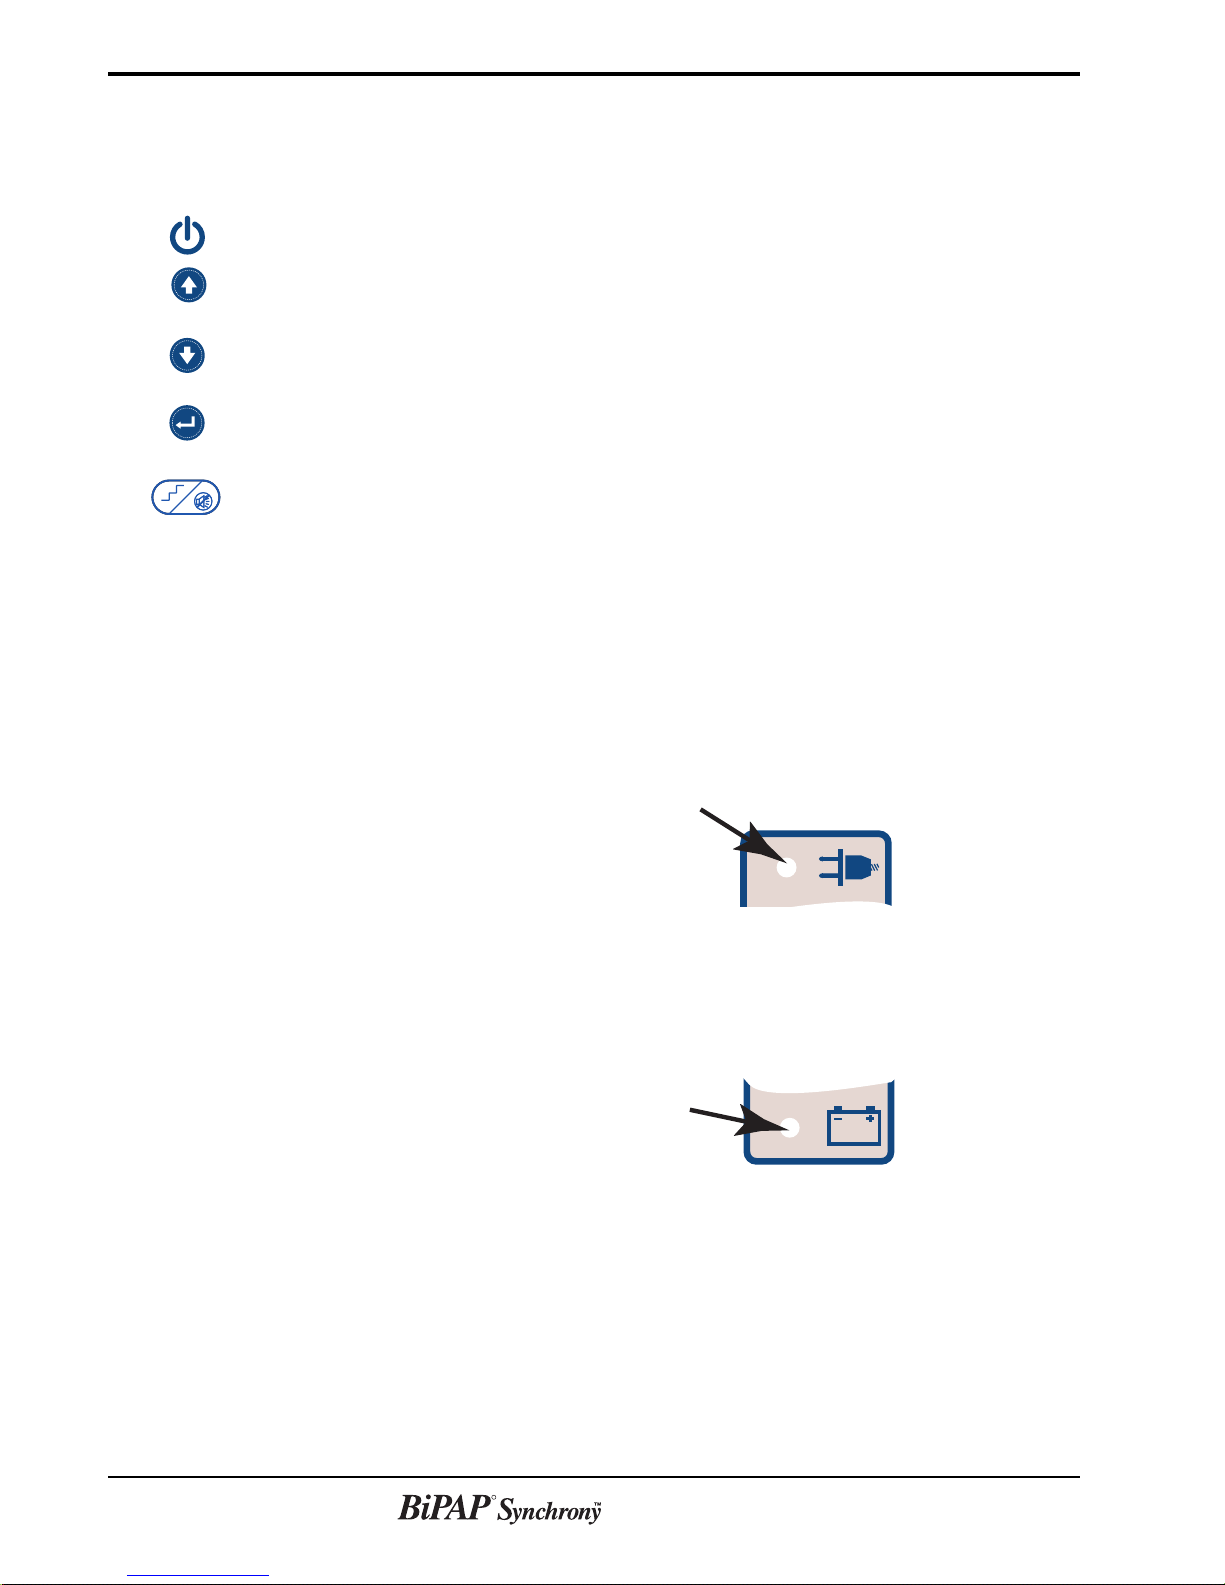
3.1.2 CONTROL KEYS
Standby Key
Down Key
Enter Key
Ramp/Silence Key
3.1.3 INDICATORS
Up Key
The Synchrony control panel has five membrane-type switches that perform
different functions depending on the screen selected, alarm status, and
access level:
Starts and stops the Synchrony. The key must be pressed and released.
Navigates between screens or increases the value of a selected parameter by one
increment.
Navigates between screens or decreases the value of a selected parameter by
one increment.
Switches the function of the Up and Down keys between screen navigation and
parameter adjustment, and implements changes.
Activates ventilation ramp and silences the audible alarm signal.
The Synchrony uses four LED indicators on the control panel for alarm
indications and power indications. It also uses five indicators on the display
screen.
AC Power Indicator
DC Power Indicator
Green LED that illuminates when the Synchrony is connected to AC power.
See Figure 3-2.
Green
Figure 3-2 AC Power Indicator
Green LED that illuminates when the Synchrony is connected to DC power.
See Figure 3-3.
Green
Figure 3-3 DC Power Indicator
R
Provider Manua
Page 27

3-3
l
Red Alarm Indicator
Yellow Alarm Indicator
Attention or Activity Indicator
( )
• When flashing indicates a new high priority alarm has occurred.
• When on continuously indicates a loss of power or silenced high priority
alarm.
• When flashing indicates a new medium priority alarm.
• When on continuously indicates a low priority alarm or silenced medium
priority alarm.
Red
Yellow
Figure 3-4 Alarm Indicators
Used in several screens to indicate pressure level, machine-triggered breaths, or
alarm messages:
• When appears next to EPAP or IPAP on the display, it
indicates the current pressure phase. See Figure 3-5.
• When appears next to an alarm message, it indicates that the
alarm is active. See Figure 3-6.
• When appears next to RR on the display, it indicates that the
current pressure phase was device-triggered. See Figure 3-7.
MODE: S 1/2
IPAP 15 cm H2O
EPAP 9 cm H2O
RR 20 BPM
Figure 3-5 EPAP Indicator
ALARM: 1/1
Patient Disconnect
Figure 3-6 Alarm Indicator
MODE: S/T 1/4
IPAP 15 cm H2O
EPAP 9 cm H2O
RR 20 BPM
Figure 3-7 Device-Triggered Breath
Indicator
R
Provider Manua
Page 28
3-4
l
Selection Indicator ( )
Navigation Indicator ( )
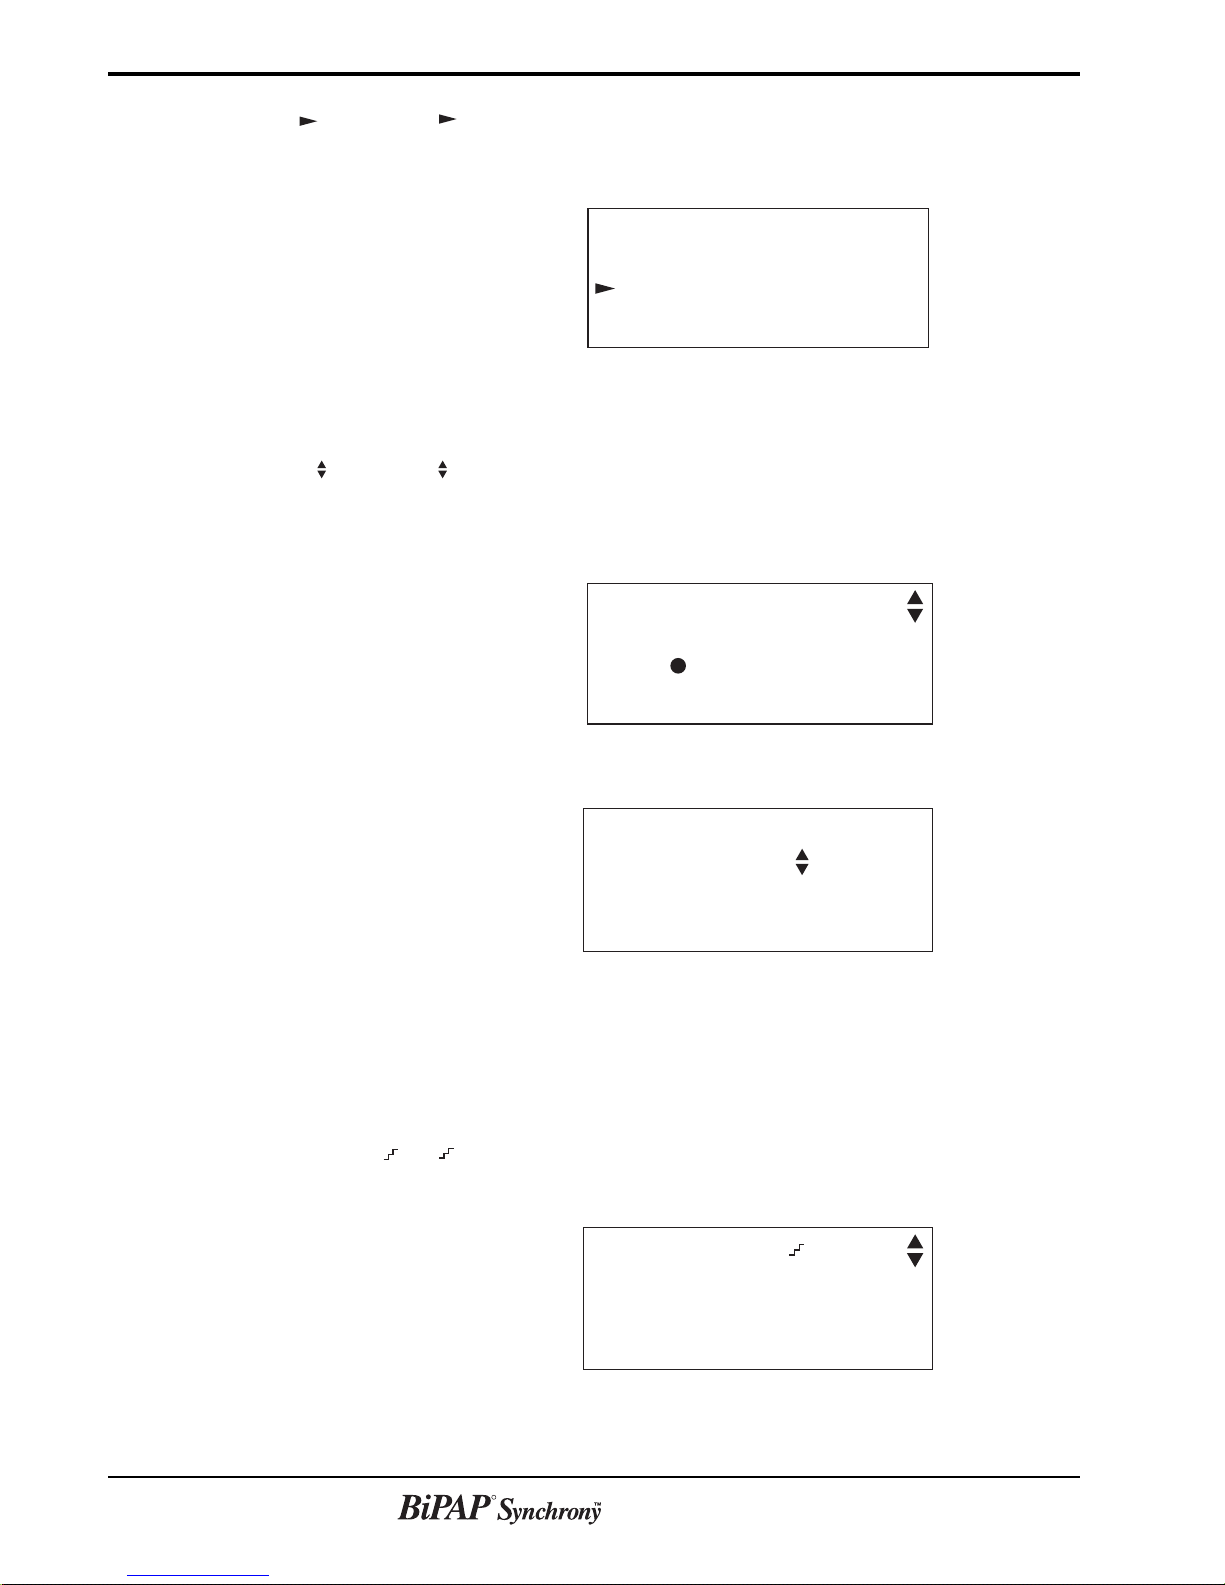
appears next to the item that can be selected with the ENTER key, as shown
in Figure 3-8. The indicator is moved by pressing the UP or DOWN key.
S PARAMETERS: 1/2
IPAP 15 cm H2O
EPAP 9 cm H2O
Rise Time 3
Figure 3-8 Selection Indicator; Pressing
the ENTER Key will Select EPAP for
Adjustment
appears next to a page number display to indicate that the UP and DOWN
keys can be used to change pages, as shown in Figure 3-9. If it appears next to a
value, it flashes and indicates that the UP and DOWN keys can be used to
adjust the value, as shown in Figure 3-10.
MODE: S 1/2
IPAP 15 cm H2O
EPAP 9 cm H2O
RR 20 BPM
Ventilation Ramp Indicator ( )
Figure 3-9 Page Indicator
S PARAMETERS: 1/2
IPAP 15 cm H2O
EPAP 9 cm H2O
Rise Time 3
Figure 3-10 Value Adjust Indicator; IPAP
can be adjusted with the UP or DOWN key
appears at the top of the display when ventilation ramp has been initiated.
See Figure 3-11.
MODE: S 1/2
IPAP 15 cm H2O
EPAP 9 cm H2O
RR 20 BPM
Figure 3-11 Ventilation Ramp Indicator
R
Provider Manua
Page 29

3-5
l
Progress Indicator ( )
Alarm Enabled Indicator (A)
The consists of seven segments that empty from top to bottom to indicate the
progress of certain operations. See Figure 3-12. The four indicators work
simultaneously.
SYSTEM SELF TEST
VER:X.XX XXXXX.X HRS
XXX XXX XXX XXX XXX
XXX XXX XXX XXX XXX
Figure 3-12 Progress Indicators
The A appears in the Monitoring screen if any of the patient alarms (Patient
Disconnect, Apnea, or Low Minute Ventilation) is enabled (see Chapter 8).
Indicates a Patient
Alarm is Enabled
MODE: S/T 1/4
IPAP 15 cm H2O
EPAP 9 cm H2O
RR 20 BPM
A
3.2 Navigating the
Screens
Figure 3-13 Monitoring Screen with
Alarm Enabled Indicator
When the screen indicates that there are multiple pages (1/3, 2/4, etc. appear in
the upper right corner), you can scroll through the pages by pressing either the
DOWN arrow key when the last item on the screen is selected, or by pressing
the UP arrow key when the first item is selected.
Total Number
Page
Indicator
NEW MODE: S/T 2/3
Timed Insp 1.0 sec
Rise Time 3
Figure 3-14 Example of Page Indicator on Screen
of Pages
In the example of Figure 3-14, if you press the UP key, the Synchrony displays
page 1 of 3; if you press the DOWN key twice, the Synchrony displays page 3
of 3.
R
Provider Manua
Page 30

3-6
l
3.3 Display Data
NOTE: The Estimated Exhaled Tidal
Volume and the Estimated Exhaled
Minute Ventilation displays represent
estimates. There are some circumstances, such as low tidal volumes,
erratic breathing, or rapidly changing
leak where the accuracy of the
estimates will vary greatly. The
Estimated Exhaled Tidal Volume and
the Estimated Exhaled Minute
Ventilation displays will flash during
some transient conditions.
The display screen is used to display measured parameters in the Monitoring
screens. The data changes depending on the access level and the mode of
operation.
The Synchrony is capable of displaying:
• CPAP, IPAP, and EPAP - These displays are estimates of measure-
ments at the patient connection. Displays are updated as follows:
CPAP is updated at the end of inspiration; IPAP is updated at the end
of IPAP; and EPAP is updated at the end of EPAP.
• RR (Respiratory Rate) - The breathing rate is a running average from
the six previous breaths. If the Synchrony is operating in a mode that
supports machine-triggered breaths, this display will be the total
breathing rate (spontaneous + machine). The display value is updated
at the end of each expiration.
• VTE (Estimated Exhaled Tidal Volume) - Displays an estimated
exhaled tidal volume measurement for the previous breath. The display
is updated at the end of each breath. The estimated exhaled tidal
volume is obtained by integration of patient flow.
• MinVent (Estimated Exhaled Minute Ventilation) - Displays the
estimated exhaled minute ventilation based on an average of the
previous six breaths. The display is updated at the end of each breath.
• Leak - Displays the average leak value calculated during the previous
breath cycle. The display value is updated after each breath.
Table 3-1 summarizes the displayed parameters.
Parameter ModeUnits
CPAP
IPAP
EPAP
RR
VT
E
MinVent
Leak
Different display screens are available based on the access level:
Full Access—
Screen 1/4 Monitoring Screen Page 1
Screen 2/4 Monitoring Screen Page 2
Screen 3/4 Patient Controls
Screen 4/4 Caregiver Menu
Lockout—
Screen 1/2 Monitoring Screen Page 1
Screen 2/2 Patient Controls
cm H2O
cm H2O
cm H2O
BPM
ml
L/min
L/min
Table 3-1 Displayed Parameters
Access Level
BOTH
BOTH
BOTH
BOTH
FULL
FULL
FULL
CPAP
S, T, PC, S/T
S, T, PC, S/T
ALL
ALL
ALL
ALL
See Section 4.4 for illustrations of these screens.
R
Provider Manua
Page 31

3-7
l
3.4 Patient Circuit
Connection
The patient circuit is connected to the patient interface port shown in
Figure 3-15. The patient interface port accepts a bacteria filter or a tubing
connector for reusable or disposable tubing.
R
Patient
Interface
Port
Oxygen
Valve
(Optional)
3.5 Optional Oxygen
Valve
Figure 3-15 Synchrony Patient Interface Port and
Optional Oxygen Valve
The Synchrony optional oxygen valve is mounted under one side of the
Synchrony, as shown in Figure 3-15. The valve must be used if oxygen is to be
titrated into the breathing circuit. See Chapter 10 for instructions.
R
Provider Manua
Page 32

3-8
l
3.6 Rear Panel
Figure 3-16 shows the rear panel of the Synchrony.
Telephone
Communications
Connector
DC Cord
Retainer
(optional internal
modem only)
DC
Inlet
AC
Cord
Retainer
Jack
AC
Inlet
Filter &
Filter Cap
Figure 3-16 The Synchrony Rear Panel
The rear panel contains
• the AC inlet that accepts the AC power cord
• the DC inlet that accepts the DC power cord
• the filter cap that is removed to inspect the inlet air filters (see Chapter
11)
• the RS-232 communications connector that accepts the Respironics
Communications Cable for computer and external modem communication
• the RJ-11 telephone jack, provided with Synchrony devices having an
optional internal modem, for remote data readings
• the DC power cord retainer that provides strain relief for the DC power
cord
• the AC cord retainer that provides strain relief for the AC power cord.
R
Provider Manua
Page 33

l
Chapter 4: Setting up and Starting the Synchrony
4.1 Preparing the Synchrony
4.1.1 SUMMARY OF SETUP OPERATIONS
4-1
R
R
Step 1 Install the inlet air filters.
See Section 4.1.2.
Step 2 Assemble and attach the patient circuit.
R
R
See Section 4.1.3
R
See Sections 4.1.4 to 4.1.6.
R
Step 4 Set up the patient parameters using the control panel.
Step 3 Provide power and set up the patient.
See Section 4.2.
R
Provider Manua
Page 34

4-2
l
4.1.2 INSTALLING THE AIR
FILTERS
The Synchrony uses one or two removable filters at the air inlet. You must
install the gray foam filter before operating the Synchrony. The gray foam filter
is washable and reusable. The disposable white ultra-fine filter is optional.
CAUTION: A properly installed, undamaged gray foam inlet filter is required for proper operation.
STEP 1 Place the gray foam filter on top of the ultra-
R
fine filter (if using the ultra-fine filter).
STEP 2 Slide the filters into the air inlet at the rear of
Reusable Gray
Foam Filter
Air Filter
Cover
Disposable Ultra-fine
Filter
STEP 3 Place the bottom of the air filter cover into the
STEP 4 Swing the top of the cover into place and press
See Chapter 11 to clean or replace the filters.
the Synchrony and push them down into the
recess as shown in Figure 4-1.
bottom of the air inlet opening, making sure
that the catches engage the lip of the opening.
down on the cover to engage the catches in the
air inlet opening. See Figure 4-2.
Figure 4-1 Installing the Air Filters
R
Figure 4-2 Replacing the Air Filter Cover
R
Provider Manua
Page 35

l
4.1.3 ASSEMBLING THE
PATIENT CIRCUIT
WARNING: The exhalation device (e.g., the Whisper Swivel® II) or exhalation port (on masks with integrated
exhalation port) is designed to exhaust CO2 from the patient circuit. Do not block or seal the ports on the
exhalation device.
WARNING: The oxygen valve must be installed and used if oxygen is to be titrated to the patient circuit. See
Chapter 10 for complete details.
STEP 1 Assemble the patient circuit according to the configurations
presented in Chapter 12.
STEP 2 If required, connect a bacteria filter to the patient interface port
(shown in Figure 4-3), and connect the patient tubing to the outlet of
the bacteria filter.
• If the bacteria filter is not required, connect the patient tubing directly
to the patient interface port.
4-3
• If oxygen is to be used, connect it according to Chapter 10.
• If a humidifier is to be used, connect the inlet to the bacteria filter
outlet or to the patient interface port.
A completed assembly is shown in Figure 4-3.
Patient Interface
(Typical)
Exhalation Port
(Typical)
R
Circuit
Tubing
Oxygen
Valve
(Optional)
Bacteria
Filter
(Optional)
Patient
Interface
Port
Figure 4-3 An example of a Respironics-approved circuit
R
Provider Manua
Page 36

4-4
l
4.1.4 SUPPLYING POWER TO THE SYNCHRONY
WARNING: The Synchrony can operate on AC or DC power. The DC power option is not intended as a battery
backup during use of AC power.
CAUTION: When DC power is obtained from a vehicle battery, the Synchrony should not be used while the
engine of the vehicle is running. Damage to the vehicle may occur.
AC OPERATION
R
Figure 4-4 Plugging in the AC Cord
DC OPERATION
Plug the electrical cord into the AC inlet in the back of the
Synchrony, then plug the electrical cord into an outlet that is not controlled by a
wall switch.
NOTE: Use the AC cord retainer to provide strain relief for the AC power cord.
STEP 1 Plug the DC cord connector into the rear of the Synchrony.
STEP 2 Leaving a small amount of slack in the cord, press the cord into the
DC cord retainer.
STEP 3 Connect the DC cord to the appropriate DC source.
CAUTION: Only use a Respironics-
supplied DC cord.
DC Cord
Retainer
Figure 4-5 Plugging in the DC Cord
Refer to the DC cord instruction sheet for recommended DC power
sources.
R
R
R
Provider Manua
Page 37

4-5
l
4.1.5 OPTIONAL INTERNAL
The optional internal modem is set up as shown in Chapter 7.
MODEM
4.1.6 PERFORMANCE
VERIFICATION
When the initial setup is complete, perform the performance verification as
described in Chapter 13.
4.2 Setting Up the Synchrony
Before using the Synchrony on a patient, set the prescription:
4.3 Connecting the Patient
SYNCHRONY
S
MR. SMITH
(C)2002 Respironics
NOTE: If your device is a system
for home use, “S” or “S/T”
will appear on the startup
screen--depending on the
model.
If your device is a Lab
System, “LAB” will appear
before “S” or “S/T” on the
startup screen.
STEP 1 Press and release the Standby key.
STEP 2 If a Plateau Exhalation Valve (PEV) is used, enable the PEV option
STEP 3 If oxygen is being used, turn on the oxygen flow. Always turn the
1. To change the mode of operation, see Chapter 6.
2. To change the parameters, see Chapter 5.
3. To view or change the options, see Chapter 7.
4. Set the necessary alarms (see Section 8.2).
The start-up screen is displayed, then the Synchrony initiates a selftest. Both alarm LED indicators light momentarily, the audible
alarm beeps twice to verify that the audible alarm is functioning.
The start-up screen is then displayed, followed by the self-test
screen. If the indicators do not light, or the audible alarm does not
beep twice, the Synchrony requires service.
(see Section 7.2.5).
Synchrony on before turning on the oxygen, and always turn the
oxygen off before turning off the Synchrony.
NOTE: If you have entered a
patient ID for the device
(see Section 7.2.4), that text
will also appear on the
startup screen.
STEP 4 Place the mask on the patient.
STEP 5 When the setup is complete place the Synchrony in Lockout
(see Section 7.2.6).
See Chapter 8 for alarm information.
See Chapter 10 if you are administering oxygen to the patient.
NOTE: Before placing the patient
on the Synchrony,
check the integrity of the
patient circuit, the
exhalation port, and the
alarms.
R
Provider Manua
Page 38

4-6
l
4.4 Operating the System
Full Access Lockout
During operation, the screen shows Monitoring Screen 1 (see Section 3.3). To
change patient controls, go to the Patient Controls screen. To change
parameters, go to the Caregiver Menu screen. The display returns to Monitoring
Screen 1 if no keys are pressed for one minute.
R
MODE: S 1/4
IPAP XX cm H2O
EPAP XX cm H2O
RR XXX BPM
R
MODE: S 2/4
Vt
e
1570 ml
MinVent 20 L/min
TotLeak 7 L/min
Monitoring
Screen 1
Monitoring
Screen 2
R
MODE: S 1/2
IPAP XX cm H2O
EPAP XX cm H2O
RR XXX BPM
R
CONTROLS: 2/2
Rise Time: 3
Dial Provider
Monitoring
Screen
Patient
Controls
CONTROLS: 3/4
Rise Time: 3
Dial Provider
X2
SETUP: 4/4
Parameters
Alarms
Mode Options
R
Patient
Controls
NOTE: If the backlight is off, the first press of the , ,
or key will only turn the backlight on. All
R
procedures assume the backlight is
already on.
Provider
Menu
R
Provider Manua
Page 39

l
4.5 Patient Operating Instructions
With the Synchrony in Lockout, the patient is restricted to viewing only the
pressure levels and the respiratory rate. The patient may change the Rise Time,
dial the provider with the modem, and initiate the ventilation ramp.
4-7
4.5.1 SETTING THE RISE
TIME
The Rise Time parameter is adjustable so that the patient can find the most
comfortable setting. To change the Rise Time:
PATIENT ACTION RESULT
STEP 1 From the Monitoring Screen, press the DOWN
key to display the Patient Controls
R
MODE: S 1/4
IPAP 12 cm H2O
EPAP 05 cm H2O
RR 18 BPM
STEP 2 Press the ENTER key to activate the Rise Time
control.
NOTE: If the backlight is off, the first press of the , ,
or key will only turn the backlight on. All
procedures assume the backlight is
already on.
CONTROLS: 3/4
Rise Time: 3
Dial Provider
CONTROLS: 3/4
Rise Time: 3
Dial Provider
STEP 3 Press the DOWN or UP key to adjust the Rise
Time.
STEP 4 Allow the machine to cycle several times to see
if it feels better. Press ENTER to return to the
control selection screen.
CONTROLS: 3/4
Rise Time: 3
Dial Provider
CONTROLS: 3/4
Rise Time: 4
Dial Provider
R
Provider Manua
Page 40

4-8
l
4.5.2 DIALING THE
PROVIDER
When instructed to do so, the patient can upload data from the Synchrony with
the modem. The instructions to program the modem are in Section 7.2.4. The
Synchrony can be in use by the patient while downloading data.
PATIENT ACTION RESULT
STEP 1 If you are using an external modem, attach the
RS 232 cable from the Synchrony to the
modem.
If you are connecting an external modem
through a telephone line, plug a telephone line
from the rear of the Synchrony to a convenient
telephone outlet.
NOTE: Items within the dashed line must be at
least six feet away from the patient.
NOTE: See Appendix A for external modem
requirements.
2
To A C
Power Source
6-ft RS232
Cable
R
1
Internal Modem Connection
Telephone
To
Modem
RS232
Connector
Telephone
Outlet
External Modem Connection
R
R
R
STEP 2 From the Monitoring Screen, press the DOWN
key to display the Patient Controls
R
MODE: S 1/4
IPAP 12 cm H2O
EPAP 05 cm H2O
RR 18 BPM
STEP 3 Press the DOWN key to select the Dial Provider
command, then press ENTER to dial the
caregiver and send the report.
CONTROLS: 3/4
Rise Time: 3
Dial Provider
SENDING REPORT
STATUS: Dialing
ABORT
The STATUS changes from “Dialing” to “Connected” to
“Complete” under normal circumstances.
If you press ENTER when ABORT is displayed in the Call
screen, the call will stop and the screen will go to
STATUS: Complete.
NOTE: The word “Provider” on the Synchrony display screen can be replaced by an alphanumeric string you enter. See
the Section 7.2.4 for details.
R
Provider Manua
Page 41

l
To send a report before therapy is started:
4-9
PATIENT ACTION
STEP 1 With the Synchrony not running, press the
STANDBY key.
STEP 2 When the self-test screen appears, press the
UP key.
STEP 3 Press the UP or DOWN key to select the Dial
Provider Command, then press ENTER.
The start-up screen is displayed, followed by the self-test
screen.
The Dial Provider screen is displayed.
The STATUS changes from “Dialing” to “Connected” to
“Complete” under normal circumstances.
If you press ENTER when ABORT is displayed in the Call
screen, the call will stop and the screen will go to
STATUS: Complete.
4.5.3 DATA TRANSMISSION
ERRORS
STATUS Possible
Message Cause What to Do
No Modem Modem is not installed Call your home care provider.
properly or not connected
correctly.
RESULT
No Dial Tone A phone is off the hook Press to exit, check the telephone line connection. Lift the receiver of
or telephone line is your telephone to make sure that you have a dial tone.
not working.
Line Busy The provider’s line is The Synchrony will try to make the connection again after a slight delay.
in use. Press if you wish to stop the redialing. You should set the modem to try
several times before stopping.
Send Failed 1. If occurs shortly after 1. Press to exit. Provide a phone number.
first try, the Synchrony
does not have a phone
number entered into it.
2. If occurs after many 2. Press to exit; try again later.
“Line Busy” and “Retry”
messages, the Synchrony
tried too many times,
with the line busy.
R
Provider Manua
Page 42

4-10
l
4.5.4 USING THE RAMP
FUNCTION
The Synchrony is equipped with a ramp function that starts the IPAP pressure
at the EPAP level. The IPAP pressure is increased at each breath until the full
prescription level is reached. You set the increment per breath and enable or
disable the ramp as shown in
Section 5.2.
Figure 4-6 illustrates the ramp function.
IPAP
LEVEL
EPAP
Ramp
Increment
(Set by
Home Care
Provider)
LEVEL
1 Breath
Figure 4-6 The Synchrony Ramp Function
To start the Ramp feature, press . The Ramp indicator will be shown at
the top of the display.
R
Provider Manua
Page 43

l
Chapter 5: Changing Parameters
5.1 Summary of Change Parameters Operations
Full Access Only
R
MODE: S 1/4
IPAP 15 cm H2O
EPAP 6 cm H2O
RR 20 BPM
X
5-1
NOTE: The “X” shown in the hand
means that multiple presses
are required to attain the
next screen shown.
S Mode
S PARAMETERS: 1/2
IPAP 19 19 cm H2O
EPAP 5 5 cm H2O
Rise Time 3
S PARAMETERS: 2/2
VentRamp OFF
Bi-Flex OFF
EXIT
R
SETUP: 4/4
Parameters
Alarms
Mode Options
CPAP Mode
CPAP PARAMETERS:
CPAP 10 10 cm H2O
VentRamp OFF
EXIT
T, PC, S/T Modes
XX PARAMETERS: 1/3
IPAP 19 19 cm H2O
EPAP 5 5 cm H2O
Rate 20 20 BPM
XX PARAMETERS: 2/3
Timed Insp 1.0 sec
Rise Time 3
NOTE: If the backlight is off, the first press of the ,
, or key will only turn the backlight on; the
normal key action is suppressed until the key is
pressed a second time. All procedures assume
the backlight is already on.
XX PARAMETERS: 3/3
VentRamp OFF
EXIT
R
Provider Manua
Page 44

5-2
l
5.2 Change Parameters Screens
5.2.1 CPAP MODE
CPAP PARAMETERS:
CPAP 10 10 cm H2O
VentRamp OFF
EXIT
Parameter Range of Change
CPAP 4 to 20 cm H2O 1 cm H2O
Ventilation Ramp Disabled, 0.5, 1.0, 2.0, 3.0 cm H2O per breath Discrete values as listed
Increment
5.2.2 S MODE
S PARAMETERS: 1/2
IPAP 19 19 cm H2O
EPAP 5 5 cm H2O
Rise Time 3
Screen Increment
Number Parameter Range of Change
Screen 1 of 2 IPAP 4 to 30 cm H2O 1 cm H2O
EPAP 4 to 25 cm H2O 1 cm H2O
Rise Time 1 to 6 1
Screen 2 of 2 Ramp Disabled, 0.5, 1.0, 2.0, 3.0 cm H2O per breath Discrete values as listed
Bi-Flex OFF, 1, 2, 3 Discrete values as listed
S PARAMETERS: 2/2
VentRamp OFF
Bi-Flex OFF
EXIT
NOTE: IPAP cannot be set lower than EPAP.
When Bi-Flex is enabled, Rise Time is set to 3 (0.3 seconds).
When Bi-Flex is enabled, then IPAP and EPAP are limited to 20 cm.
The Rise Time of 1 to 6 corresponds to tenths of a second (e.g., a setting of 4 equals 0.4 second rise time).
R
Provider Manua
Page 45

l
5.2.3 T, PC, AND S/T MODES
XX PARAMETERS: 3/3
VentRamp OFF
EXIT
5-3
XX PARAMETERS: 1/3
IPAP 19 19 cm H2O
EPAP 5 5 cm H2O
Rate 20 20 BPM
XX PARAMETERS: 2/3
Timed Insp 1.0 sec
Rise Time 3
Screen Increment
Number Parameter Range of Change
Screen 1 of 3 IPAP 4 to 30 cm H2O 1 cm H2O
EPAP 4 to 25 cm H2O 1 cm H2O
Rate 0 to 30 BPM (PC and S/T) 1 BPM
4 to 30 BPM (T) 1 BPM
Screen 2 of 3 Timed Inspiration 0.5 to 3.0 sec 0.1 sec
Rise Time 1 to 6 1
Screen 3 of 3 Ramp Disabled, 0.5, 1.0, 2.0, 3.0 cm H2O per breath Discrete values as listed
NOTE: IPAP cannot be set lower than EPAP.
The Rate and Timed Inspiration controls are linked so that the inspiratory time is never longer than the
expiratory time. If the Rate or Timed Inspiration are set to values that would cause the I:E ratio to exceed
1:1, the Timed Inspiration is automatically reduced to maintain a 1:1 I:E ratio.
The Rise Time of 1 to 6 corresponds to tenths of a second (e.g., a setting of 4 equals 0.4 seconds rise time).
WARNING! High EPAP pressures could cause discomfort to the patient. Carefully evaluate the patient if you set
the EPAP level above 15.
R
Provider Manua
Page 46

5-4
l
5.3 Changing Synchrony Parameters
This section details the steps required to change parameters while in a given
operating mode. For this example, the Synchrony is operating in the S mode.
YOUR ACTION
STEP 1 From the Monitoring screen, press the DOWN
key until the Setup screen is displayed.
R
MODE: S 1/4
IPAP 15 cm H2O
EPAP 6 cm H2O
RR 20 BPM
X
STEP 2 Press the ENTER key to activate the Change
Parameters screen, then press the ENTER key
to activate the IPAP parameter for change.
RESULT
SETUP 4/4
Parameters
Alarms
Mode Options
S PARAMETERS: 1/2
IPAP 19 19 cm H2O
EPAP 5 5 cm H2O
Rise Time 3
S PARAMETERS: 1/2
IPAP 19 19 cm H2O
EPAP 5 5 cm H2O
Rise Time 3
STEP 3 Press the UP or DOWN key change the value.
Each key press changes the value by one
increment. Press the ENTER key to select the
next parameter.
STEP 4 Continue changing parameters: press the UP or
DOWN key to select a parameter, press the
ENTER key to activate the parameter for
change, use the UP or DOWN key to change
the value, and press the ENTER key to retain
the change.
When you reach the last parameter on a page,
press the DOWN key to scroll to the next page.
R
S PARAMETERS: 1/2
IPAP 19 15 cm H2O
EPAP 5 5 cm H2O
Rise Time 3
S PARAMETERS: 1/2
IPAP 15 15 cm H2O
EPAP 5 5 cm H2O
Rise Time 3
NOTE: To move from one screen to another, press the
DOWN key when the selection indicator is at
the last selectable item on the screen; or press
the UP key when the selection indicator is at the
first item.
Provider Manua
Page 47

5-5
l
YOUR ACTION
STEP 5 Scroll to page 2 of the S Parameters screens.
Select the EXIT command and press the
ENTER key to return to the Setup screen.
RESULT
S PARAMETERS: 2/2
VentRamp OFF
Bi-Flex OFF
EXIT
SETUP 4/4
Parameters
Alarms
Mode Options
R
Provider Manua
Page 48

5-6
l
R
Provider Manua
Page 49

l
Chapter 6: Changing Modes
6.1 Summary of Change Mode Operations
Full Access Only
6-1
MODE: S 1/4
IPAP XX cm H2O
EPAP XX cm H2O
RR XXX BPM
X
CONTROLS: 3/4
Rise Time: 3
Dial Caregiver
X
SETUP: 4/4
Parameters
Alarms
Mode Options
X2
R
R
MODE: S
New Mode: S/T
EXIT
Select using
UP or DOWN
key
R
R
NOTE: The “X” shown in the hand
MODE: S
New Mode: S/T
EXIT
means that multiple presses
are required to attain the
next screen shown.
R
S Mode
SETUP MODE: S 1/2
IPAP 12 cm H2O
EPAP 6 cm H2O
Rise Time 3
CPAP Mode
SETUP MODE: CPAP
CPAP 10 cm H2O
VentRamp OFF
START ABORT
R
SETUP: 4/4
Parameters
Alarms
Mode Options
R
MODE: S
New Mode: S/T
EXIT
SETUP MODE: S 2/2
VentRamp OFF
Bi-Flex OFF
START ABORT
NOTE: If the backlight is off, the first press of the , , or
key will only turn the backlight on; the normal
key action is suppressed until the key is pressed a
second time. All procedures assume the backlight is
already on.
R
T, PC, S/T Modes
SETUP MODE: X 1/3
IPAP 12 cm H2O
EPAP 6 cm H2O
Rate 10 BPM
SETUP MODE: X 2/3
Timed Insp 1.0 sec
Rise Time 3
SETUP MODE: X 3/3
VentRamp OFF
START ABORT
Provider Manua
Page 50

6-2
l
6.2 Change Mode Setup Screens
6.2.1 CPAP MODE SETUP SCREEN
SETUP MODE: CPAP
CPAP 10 cm H2O
VentRamp OFF
START ABORT
6.2.2 S MODE SETUP SCREENS
See Section 5.2.1 for parameter ranges and increments.
SETUP MODE: S 1/2
IPAP 12 cm H2O
EPAP 6 cm H2O
Rise Time 3
SETUP MODE: S 2/2
VentRamp OFF
Bi-Flex OFF
START ABORT
6.2.3 T, PC, AND S/T MODES SETUP SCREENS
SETUP MODE: X 1/3
IPAP 12 cm H2O
EPAP 6 cm H2O
Rate 10 BPM
SETUP MODE: X 2/3
Timed Insp 1.0 sec
Rise Time 3
See Section 5.2.2 for parameter ranges and increments.
SETUP MODE: X 3/3
VentRamp OFF
START ABORT
See Section 5.2.3 for parameter ranges and increments.
R
Provider Manua
Page 51

l
6.3 Changing the Synchrony Mode
This section details the steps required to change the operating mode. For this
example, the Synchrony is operating in the CPAP mode and will be changed to
the S mode.
6-3
YOUR ACTION
STEP 1 From the CPAP monitoring screen, press the
DOWN key until the Mode command is
selected in the Setup screen.
R
MODE: CPAP 1/4
CPAP 10 cm H2O
RR 20 BPM
Vt 1570 ml
X
R
STEP 2 Press the ENTER key twice to activate the
Change Mode screen and the New Mode
command.
RESULT
SETUP: 3/3
Parameters
Alarms
Mode Options
MODE: CPAP
New Mode: CPAP
EXIT
X2
STEP 3 Press the UP key once to select S, then press the
ENTER key to implement the change.
MODE: CPAP
New Mode: CPAP
EXIT
MODE: CPAP
New Mode: S
EXIT
SETUP MODE: S 1/2
IPAP 12 cm H2O
EPAP 6 cm H2O
Rise Time 3
R
Provider Manua
Page 52

6-4
l
YOUR ACTION
STEP 4 a. Press the ENTER key to activate the IPAP
parameter for change
b. Press the UP or DOWN key to change the
IPAP value. Each key press changes the value
by one increment (see Section 5.3).
c. Press the ENTER KEY to implement the
change.
STEP 5 Continue changing parameters: press the UP or
DOWN key to select a parameter, press the
ENTER key to activate the parameter for
change, use the UP or DOWN key to change
the value, and press the ENTER key to implement the change.
RESULT
SETUP MODE: S 1/2
IPAP 12 cm H2O
EPAP 6 cm H2O
Rise Time 3
SETUP MODE: S 1/2
IPAP 11 cm H2O
EPAP 6 cm H2O
Rise Time 3
SETUP MODE: S 1/2
IPAP 11 cm H2O
EPAP 6 cm H2O
Rise Time 3
NOTE: To move from one screen to another, press the
DOWN key when the selection indicator is at
the last selectable item on the screen; or press
the UP key when the selection indicator is at the
first item.
STEP 6 Scroll to page 2 of 2 and press the DOWN key
to select the START command.
SETUP MODE: S 2/2
VentRamp OFF
Bi-Flex OFF
START ABORT
NOTE: To exit the setup mode without initiating a new
mode, press the DOWN key to select the ABORT
command, then press the ENTER key.
STEP 7 Press the ENTER key to implement the
S mode at the selected settings.
NOTES: The current mode remains active until the START command is implemented with the ENTER key.
MODE: S 1/4
IPAP 15 cm H2O
EPAP 5 cm H2O
RR 20 BPM
R
Provider Manua
Page 53

l
Chapter 7: Options
7.1 Summary of Options Operations
R
MODE: S 1/4
IPAP 15 cm H2O
EPAP 6 cm H2O
RR 20 BPM
X
7-1
NOTE: The “X” shown in the hand means that multiple
presses are required to attain the next screen
shown.
R
SETUP 4/4
Parameters
Alarms
Mode Options
X3
R
SETUP 4/4
Parameters
Alarms
Mode Options
OPTIONS: 1/3
Time at P 100hrs
System Codes
Pt Alarm History
NOTE: If the backlight is off, the first press of the ,
, or key will only turn the backlight on; the
normal key action is suppressed until the key is
pressed a second time. All procedures assume
the backlight is already on.
OPTIONS: 2/3
Modem
PEV: NO
Lockout: NO
OPTIONS: 3/3
Language: ENGLISH
Alarm: LOUD
EXIT
R
Provider Manua
Page 54

7-2
l
7.2 Synchrony Options Menu
The Options menu allows you to:
• view and reset the Time at P (Time at Pressure)
• view and clear the System Codes and the Pt Alarm History (Patient
Alarm History)
• view and change the Modem settings
• adjust leak determination for the Plateau Exhalation Valve (PEV)
• change the access level
• modify the language
• modify the alarm volume
7.2.1 TIME AT PRESSURE
The Time at P display shows the time, in hours, that the Synchrony has run at
the prescribed pressure. The time is accumulated for bi-level modes when the
IPAP pressure is within 2 cm H2O of the set pressure; for the CPAP mode, time
is accumulated when a breath is triggered. The time can be cleared.
To view or clear the Time at P display:
YOUR ACTION RESULT
STEP 1 From the Options menu, press the UP or
DOWN key to select the Time at P display.
R
OPTIONS: 1/3
Time at P 25hrs
System Codes
Pt Alarm History
OPTIONS: 1/3
Time at P 25hrs
System Codes
Pt Alarm History
STEP 2 Press the ENTER key to activate the Time at P
reset screen then press the UP key to select the
CLEAR command.
STEP 3 Press the ENTER key to reset the Time at
Pressure hours.
TIME AT P:
25.1 hours
CLEAR EXIT
TIME AT P:
25.1 hours
CLEAR EXIT
OPTIONS: 1/3
Time at P 0hrs
System Codes
Pt Alarm History
R
Provider Manua
Page 55

7-3
l
7.2.2 SYSTEM CODES
The Synchrony stores the system error codes in the system alarm log. These
codes can be used by authorized service representatives to troubleshoot the
ventilator. The Synchrony can store five pages of 10 codes per page. Appendix
B lists the error codes.
The Error Code Screen also allows you to clear all the currently-stored codes.
YOUR ACTION RESULT
STEP 1 From the Options menu, press the DOWN key
until the System Codes command is selected,
then press the ENTER key to display the
System Codes screen.
R
OPTIONS: 1/3
Time at P 25 hrs
System Codes
Pt Alarm History
OPTIONS: 1/3
Time at P 50hrs
System Codes
Pt Alarm History
SYSTEM CODES: 1/1
067 011 009
CLEAR EXIT
STEP 2 Press the ENTER key to Exit the screen. If
there are more than one page of codes, press the
DOWN key to scroll through the screens. The
final screen will display the EXIT command.
To exit the system codes, press ENTER. To
clear the system codes when the CLEAR
command is displayed, press the UP key then
the Enter key.
OPTIONS: 1/3
Time at P 50hrs
System Codes
Pt Alarm History
R
Provider Manua
Page 56

7-4
l
7.2.3 PATIENT ALARM
HISTORY
The Synchrony stores the patient alarms such that the most recent alarm
appears first in the patient alarm log. The Synchrony can store 20 pages with
two alarm messages per page.
YOUR ACTION RESULT
STEP 1 From the Options menu, press the DOWN key
until the Patient Alarm History command is
selected, then press the ENTER key to activate.
R
OPTIONS: 1/3
Time at P 25hrs
System Codes
Pt Alarm History
X
STEP 2 Press the ENTER key to Exit the screen. If
there are more than one page of history, press
the DOWN key to move to the Exit screen, then
press ENTER. To clear the alarm history when
the CLEAR command is displayed, press the
UP key then the Enter key.
OPTIONS: 1/3
Time at P 25hrs
System Codes
Pt Alarm History
PT ALARMS: 1/1
Apnea
CLEAR EXIT
OPTIONS: 1/3
Time at P 25hrs
System Codes
Pt Alarm History
R
Provider Manua
Page 57

7-5
l
7.2.4 MODEM SETTINGS
The Modem Settings screens display and allow you to change the modem type
(external or internal), modem speed, phone number to be dialed, and the modem
initialization string. (See Appendix A for external modem considerations.)
YOUR ACTION RESULT
STEP 1 From the Options menu, press the DOWN key
until the Modem command is selected, then
press the ENTER key to activate the Modem
Settings screen.
R
OPTIONS: 1/3
Time at P 25 hrs
System Codes
Pt Alarm History
X
STEP 2 Press the ENTER key to activate the Type for
change.
OPTIONS: 2/3
Modem
PEV: NO
Lockout: NO
MODEM SETTINGS: 1/6
Type: Ext. 19200
Dial:
ATDT*70,4125551212
MODEM SETTINGS: 1/6
Type: Ext. 19200
Dial:
ATDT*70,4125551212
STEP 3 Press the UP or DOWN key to toggle the
modem types.
STEP 4 Press the ENTER key when your modem type
is displayed. If your Synchrony was purchased
with the optional internal modem, select
Internal.
R
The choices are:
• Internal
• External 57600
• External 38400
• External 9600
• External 2400
• None
• External 19200
NOTE: For all screens, you can hold in the UP or
DOWN key to quickly scroll through
the choices.
MODEM SETTINGS: 1/6
Type: Ext. 19200
Dial:
ATDT*70,4125551212
Provider Manua
Page 58

7-6
l
NOTE: In the remainder of the modem setup steps, you can select a
press the ENTER key when the
to the left of the
↵↵
↵ are accepted.
↵↵
↵↵
↵ is displayed, all characters to the right of the
↵↵
YOUR ACTION RESULT
STEP 5 Press the ENTER key to activate the Dial
parameters for change.
STEP 6
The first parameter under Dial sets the type of line service
the patient will be using. Press the UP or DOWN key to
scroll through the options:
• ATDT for tone dialing
• ATDP for pulse dialing
• ↵ to leave the phone number blank
Press the ENTER key when the desired setting is displayed. The Navigation Indicator moves one character to
the right.
↵↵
↵ character in the text string selections. If you
↵↵
↵↵
↵ are deleted; all characters
↵↵
MODEM SETTINGS: 1/6
Type: Ext. 19200
Dial:
ATDT 70,4125551212
MODEM SETTINGS: 1/6
Type: Ext. 19200
Dial:
ATDT* 0,4125551212
STEP 7
The remaining characters are selected one at a time, and
are used to set the number to dial. This includes any
prefixes, such as *70. Use the UP or DOWN arrow keys to
scroll through:
• 1 to 9
• , (comma)
Press the ENTER key when the desired character is
displayed; the Navigation Indicator moves one character to
the right.
• * (asterisk)
• ↵ (enter)
STEP 8
At the final digit of the phone number, press the ENTER
key to move one character to the right; scroll to the ↵
symbol.
Press the ENTER key, then the DOWN key. The Modem
Settings screen scrolls to page 2 of 6.
NOTE: The comma is used to place a pause between
inputs, such as after *70; the * is used to access
special phone options, such as disabling call
waiting. No dashes are used in the phone
number. The maximum number of characters
is 15.
MODEM SETTINGS: 1/6
Type: Ext. 19200
Dial:
ATDT*7 ,4125551212
MODEM SETTINGS: 1/6
Type: Ext. 19200
Dial:
ATDT*70,4125551212↵
MODEM SETTINGS: 2/6
INIT 1:
AT&FV0E1Q0
R
Provider Manua
Page 59

l
YOUR ACTION RESULT
STEP 9
If you have the internal modem installed, the modem
initialization strings are automatically entered, and cannot
be changed. Press the DOWN key twice and skip to
Step 11.
For external modems, see Appendix A for recommended
initialization strings.
Press the ENTER key to activate the Initialization String 1
for change.
The navigation of the string works the same as for the
phone number entry of Step 7, except the character set is:
7-7
• A to Z
• 0 to 9
• & (ampersand)
• % (percent)
• # (pound sign)
The maximum number of characters is 20. When you have
entered the desired initialization string, move one character
to the right, scroll to the ↵ symbol, and press the ENTER
key then press the DOWN key. The screen scrolls to
Page 3 of 6, Init 2.
• = (equal)
• + (plus)
• - (minus)
• \ (backslash)
• ↵ (enter)
STEP 10
Enter the Init 2 string as shown in Appendix A. The
navigation and change operation is the same as in
Step 9.
The maximum number of characters is 20. When you have
entered the desired initialization string, move one character
to the right, scroll to the ↵ symbol, and press the ENTER
key. The screen scrolls to page 4 of 6, Patient ID.
MODEM SETTINGS: 3/6
INIT 2:
AT&FV0E1Q0
MODEM SETTINGS: 4/6
Patient ID:
MR. SMITH
STEP 11
The Patient ID screen is used to identify the patient for
your records. The navigation of the ID string works the
same as for the phone number in Step 7, except the
character set is:
• A to Z
• 0 to 9
• _ (underscore)
• # (pound sign)
NOTE: The patient ID text will appear on the
start-up screen. (See Section 4.3).
• (space)
• - (minus)
• . (period)
• ↵ (enter)
R
Provider Manua
Page 60

7-8
l
YOUR ACTION RESULT
The maximum number of characters is 20. When you have
entered the desired initialization string, move one character
to the right, scroll to the ↵ symbol, and press the ENTER
key. The screen scrolls to page 5 of 6, Provider.
STEP 12
The Provider screen is used to identify your company to
the patient. It is shown in place of “Provider” in the Call
Provider screen. The navigation of the ID string and the
character set are the same as for the Patient ID of Step 10.
The maximum number of characters is 20. When you have
entered the desired initialization string, move one character
to the right, scroll to the ↵ symbol, and press the ENTER
key then press the DOWN key. The screen scrolls to page
6 of 6, Serial Number.
STEP 13
The Serial Number is the serial number of the Synchrony.
It is factory-set and cannot be changed. You may use the
number for tracking purposes.
MODEM SETTINGS: 5/6
Provider:
HEALTH CARE
MODEM SETTINGS: 6/6
Serial Number:
012345
EXIT
Press the ENTER key to exit the Modem Setting screens
and return to the Options menu.
OPTIONS: 2/3
Modem
PEV: NO
Lockout: NO
R
Provider Manua
Page 61

7-9
l
7.2.5 PEV SETTING
The PEV parameter is provided to compensate for the different leak
characteristics when using a Respironics Plateau Exhalation Valve (PEV). The
PEV setting is stored in memory and must be changed if you are changing from
or to a PEV after restarting the Synchrony.
WARNING: The PEV parameter must be set to YES if a PEV is in the patient circuit. Failure to set the parameter
correctly can result in inaccurate leak and tidal volume measurements.
YOUR ACTION RESULT
STEP 1 From the Options menu, press the DOWN key
until the PEV parameter is selected, then press
the ENTER key.
R
OPTIONS: 1/3
Time at P 25 hrs
System Codes
Pt Alarm History
OPTIONS: 2/3
Modem
PEV: NO
Lockout: NO
X
STEP 2 Press the UP or DOWN key to toggle the value
of the PEV parameter.
STEP 3 Press the Enter key to accept the change to the
PEV parameter.
OPTIONS: 2/3
Modem
PEV: YES
Lockout: NO
OPTIONS: 2/3
Modem
PEV: YES
Lockout: NO
R
Provider Manua
Page 62

7-10
l
7.2.6 CHANGING THE
ACCESS LEVEL
YOUR ACTION RESULT
STEP 1 From the Options menu, press the DOWN key
until the Lockout command is selected, then
press the ENTER key.
R
OPTIONS: 1/3
Time at P 25 hrs
System Codes
Pt Alarm History
X
STEP 2 Press the UP or DOWN key to toggle the
Lockout command between YES and NO.
STEP 3 Press the ENTER key to implement the
Lockout command.
OPTIONS: 2/3
Modem
PEV: YES
Lockout: NO
OPTIONS: 2/3
Modem
PEV: YES
Lockout: NO
OPTIONS: 2/3
Modem
PEV: YES
Lockout: YES
OPTIONS: 2/3
Modem
PEV: YES
Lockout: YES
7.2.7 UNLOCKING THE
ACCESS LEVEL
NOTE: The Lockout command change does not take
effect until you exit the Options menu.
After the unit is set to Lockout, you may access the Setup screen by
simultaneously pressing and holding the RAMP and ENTER keys for
one second.
R
Provider Manua
Page 63

l
7.2.8 CHANGING THE
LANGUAGE
YOUR ACTION RESULT
STEP 1 From the Options menu, press the DOWN key
until the Language command is selected, then
press the ENTER key.
R
OPTIONS: 1/3
Time at P 25 hrs
System Codes
Pt Alarm History
X
7-11
OPTIONS: 3/3
Language: ENGLISH
Alarm: LOUD
EXIT
OPTIONS: 3/3
Language: ENGLISH
Alarm: LOUD
EXIT
STEP 2 Press the UP or DOWN key to scroll through
the available languages, then press the ENTER
key to implement the language change.
OPTIONS: 3/3
Language: FRAN AIS
Alarm: LOUD
EXIT
R
Provider Manua
Page 64

7-12
l
7.2.9 CHANGING THE
ALARM VOLUME
YOUR ACTION RESULT
STEP 1 From the Options menu, press the DOWN key
until the Alarm command is selected, then press
the ENTER key.
R
OPTIONS: 1/3
Time at P 25 hrs
System Codes
Pt Alarm History
X
STEP 2 Press the UP or DOWN key to toggle between
LOUD and SOFT, then Press the ENTER key
to implement the Alarm volume change.
OPTIONS: 3/3
Language: ENGLISH
Alarm: LOUD
EXIT
OPTIONS: 3/3
Language: ENGLISH
Alarm: LOUD
EXIT
OPTIONS: 3/3
Language: ENGLISH
Alarm: SOFT
EXIT
OPTIONS: 3/3
Language: ENGLISH
Alarm: SOFT
EXIT
7.2.10 EXITING THE
OPTIONS MENU
YOUR ACTION RESULT
STEP 1 Press the UP or DOWN key to return to
Options screen 3/3.
STEP 2 Press the UP or DOWN key to select EXIT,
then press the ENTER key.
OPTIONS: 3/3
Language: ENGLISH
Alarm: LOUD
EXIT
OPTIONS: 3/3
Language: ENGLISH
Alarm: LOUD
EXIT
R
Provider Manua
Page 65

l
Chapter 8: Alarms
8.1 Alarm Introduction
8-1
This chapter describes the Synchrony alarms, describes how to set them, and
lists corrective actions for the alarm conditions.
The Synchrony provides three alarm levels: high, medium, and low priority.
High priority alarms require immediate operator response. The alarm signal
consists of a red LED and a high priority sound. The display has the message
“ALARM” at the top of the screen.
Medium priority alarms require prompt operator response. The alarm signal
consists of a yellow LED and a medium priority sound. The display has the
message “WARNING” at the top of the screen.
Low priority alarms require operator awareness. The alarm signal consists of a
yellow LED and a low priority sound. The display has the message “INFO” at
the top of the screen.
Some audible indicators are self-cancellable. This means that the alarm sound
will stop when the cause of the alarm is corrected. See Section 8.3 for detailed
descriptions of the alarm LEDs and sounds.
Figure 8-1 identifies the alarm LED locations on the control panel.
R
High Priority
Alarm LED
Low/Medium Priority
Alarm LED
Figure 8-1 Synchrony Alarm Indicators
R
Provider Manua
Page 66

8-2
l
8.2 Setting Alarm Parameters
8.2.1 ALARM PARAMETER
OPERATION
SUMMARY
X
R
MODE: S 1/4
IPAP 15 cm H2O
EPAP 6 cm H2O
RR 20 BPM
R
NOTE: The “X” shown in the hand
means that multiple presses
are required to attain the
next screen shown.
NOTE: If the backlight is off, the
first press of the , , or
key will only turn the
backlight on; the normal
key action is suppressed
until the key is pressed a
second time. All procedures assume the backlight
is already on.
SETUP: 4/4
Parameters
Alarms
Mode Options
z
SETUP: 4/4
Parameters
Alarms
Mode Options
ALARMS 1/2
Disconnect:OFF
Apnea: OFF
ALARMS 2/2
LowMinVent:OFF
EXIT
R
Provider Manua
Page 67

8-3
l
8.2.2 CHANGING THE
ALARM PARAMETERS
CHANGING THE PATIENT
The Patient Disconnect Alarm Delay, the Apnea Alarm, and the Low Minute
Ventilation Alarm are adjustable on the Synchrony. When any of these alarms
are enabled, an inverse “A” appears at the top of the Monitoring screen. See
Chapter 3 for details.
DISCONNECT ALARM DELAY
YOUR ACTION
STEP 1 From the Monitoring screen, press the DOWN
key until the Alarms command is selected.
MODE: S 1/4
IPAP 15 cm H2O
EPAP 6 cm H2O
RR 20 BPM
X
RESULT
SETUP 4/4
Parameters
Alarms
Mode Options
STEP 2 Press the ENTER key to activate the Alarms
screen, then press the ENTER key again to
activate the Disconnect parameter for change.
STEP 3 Press the UP or DOWN key to change the
parameter, then press the ENTER key to
implement the change.
STEP 4 Press the DOWN key twice, the press the
ENTER key to exit the Alarms screen.
ALARMS
Disconnect:OFF
Apnea:OFF
ALARMS 1/2
Disconnect:OFF
Apnea: OFF
The settings are OFF, 15 seconds, and 60 seconds.
ALARMS
Disconnect: 15 sec
Apnea: OFF
ALARMS
Disconnect: 15 sec
Apnea: OFF
ALARMS 2/2
LowMinVent:25 L/MIN
EXIT
X2
SETUP 4/4
Parameters
Alarms
Mode Options
R
Provider Manua
Page 68

8-4
l
CHANGING THE APNEA ALARM
NOTE: If you disable the apnea alarm, the system will not produce an
audible alarm. A record of the apnea will not appear in the
Synchrony alarm log. However a record will appear in the Encore/
Encore Pro alarm log.
YOUR ACTION
STEP 1 From the Monitoring screen, press the DOWN
key until the Alarms command is selected.
MODE: S 1/4
IPAP 15 cm H2O
EPAP 6 cm H2O
RR 20 BPM
X
STEP 2 Press the ENTER key to display the Alarms
screen, press the DOWN key to select the
Apnea parameter, then press the ENTER key to
activate.
RESULT
SETUP 4/4
Parameters
Alarms
Mode Options
ALARMS 1/2
Disconnect:OFF
Apnea: OFF
STEP 3 Press the UP or DOWN key to change the
parameter, then press the ENTER key to
implement the change.
STEP 4 Press the DOWN key twice, then press the
ENTER key to exit the Alarms screen.
X2
R
The settings are OFF, 10, 20, 30, 40 seconds.
ALARMS 1/2
Disconnect: 15 sec
Apnea: OFF
EXIT
ALARMS 1/2
Disconnect: 15 sec
Apnea: 20 sec
ALARMS 2/2
LowMinVent:25 L/MIN
EXIT
SETUP 4/4
Parameters
Alarms
Mode Options
Provider Manua
Page 69

l
CHANGING THE LOW MINUTE
VENTILATION ALARM
8-5
YOUR ACTION
STEP 1 From the Monitoring screen, press the DOWN
key until the Alarms command is selected.
MODE: S 1/4
IPAP 15 cm H2O
EPAP 6 cm H2O
RR 20 BPM
X
STEP 2 Press the ENTER key to display the Alarms
screen, press the DOWN key twice to select the
LowMinVent parameter, then press the ENTER
key to activate.
RESULT
SETUP 4/4
Parameters
Alarms
Mode Options
X2
STEP 3 Press the UP or DOWN key to change the
parameter, then press the ENTER key to
implement the change.
STEP 4 Press the ENTER key to exit the Alarms screen.
ALARMS 2/2
LowMinVent:OFF
EXIT
The settings are OFF, 1 to 99 L/MIN.
ALARMS 2/2
LowMinVent:20 L/MIN
EXIT
ALARMS 2/2
LowMinVent:25 L/MIN
EXIT
SETUP 4/4
Parameters
Alarms
Mode Options
R
Provider Manua
Page 70

8-6
l
8.3 Summary of Alarm Behavior
Alarm conditions are signaled by the Synchrony in three ways: a sound, an
LED, and a display message. Each signal type behaves differently depending on
the type of alarm.
8.3.1 ALARM SOUNDS
BEHAVIOR
High Priority Sounds:
High Priority: The sound repeats a pattern of three beeps followed by two
beeps until the RAMP/SILENCE key is pressed. The silence period is one
minute. This pattern is indicated in Section 8.5 by
Loss of Power: The sound is continuous for two minutes without user
intervention. If the user presses the STANDBY key, the sound will terminate. There is no silence period for this sound. This pattern is indicated in
Section 8.5 by
Synchrony Failure: In the event of a Synchrony failure, the alarm sounds
in single beeps until power is removed from the Synchrony. It cannot be
silenced except by removing power. This pattern is indicated in Section 8.5
by
Medium Priority Sound:
The sound repeats a pattern of three beeps every 20 seconds until the
RAMP/SILENCE key is pressed. The silence period is one minute. The
pattern is indicated in Section 8.5 by
Low Priority Sound:
The alarm repeats a pattern of two beeps every 30 seconds until the RAMP/
SILENCE key is pressed. The audible alarm will not reoccur. The pattern is
indicated in Section 8.5 by
Silence Period
The alarm silence period, when applicable, is one minute. When the alarm
sound is silenced, a flashing LED becomes continuous (see 8.3.2). If the
alarm condition is not corrected by the end of the silence period, the alarm
sound is repeated; the LED is not affected. If a new high or medium priority
alarm condition occurs during this time, the appropriate LED will flash.
New low priority alarms will not cause the LED to flash.
R
Provider Manua
Page 71

8-7
l
8.3.2 ALARM LED
BEHAVIOR
Red LED
• Flashing red LED indicates a new high priority alarm. The
LED changes to continuous when the alarm sound is silenced
or the alarm condition is corrected. The LED will resume
flashing during the silence period if a new alarm occurs. The
LED goes off when the alarm message is cleared.
• Continuous red LED indicates a loss of power or a silenced
high priority alarm.
Yellow LED
• Flashing yellow LED indicates a new medium priority alarm.
The LED changes to continuous when the alarm sound is
silenced or the alarm condition is corrected. The LED will
resume flashing during the silence period if a new medium
priority alarm occurs. The LED goes off when the alarm
message is cleared.
• Continuous yellow LED indicates a low priority alarm or a
silenced medium priority alarm.
8.3.3 DISPLAY BEHAVIOR
The indicator is displayed next to an alarm message to indicate an active
alarm condition. When the condition is corrected, the indicator is cleared.
For High Priority Alarms, the displays shows “ALARM” and the name of the
alarm.
For Medium Priority Alarms, the display shows “WARNING” and the name of
the alarm.
For Low Priority Alarms, the display shows “INFO” and the name of the alarm.
The display can contain multiple pages of alarms. The page number in the
upper right of the display will indicate the page you are on and the total pages
(e.g., 1/3). To access the other pages, press the UP or DOWN key.
R
Provider Manua
Page 72

8-8
l
8.4 Summary of User Actions During Alarm
The following steps apply to most alarm conditions. The patient or operator
should follow this sequence unless otherwise directed by the alarm table in
Section 8.5.
STEP 1 Look at the alarm indicators and listen to the alarm sound.
STEP 2 Look at the display for text.
STEP 3 Press the RAMP/SILENCE key.
(Note color and
whether LED is
flashing or solid)
ALARM 1/1
Apnea
If more than one alarm is
listed, the indicator shows
which alarm is still active.
ALARM 1/1
Apnea
CLEAR
STEP 4 Press the Enter key to clear the alarm.
ALARM 1/1
Apnea
CLEAR
NOTE: For High and Medium Priority Alarms,
the indicator will go off when the
alarm condition is corrected.
STEP 5 Look up the alarm in the alarm tables and
perform the Patient Action.
MODE: S 1/4
IPAP 15 cm H2O
EPAP 6 cm H2O
RR 20 BPM
Alarm CLEAR
Screen is displayed
Alarm LED is solid
indicator is off
Alarm LED is
solid
Alarm is reset
Display returns to
screen that was
showing at time of
alarm
R
Provider Manua
Page 73

l
8.5 Alarm Tables
Sections 8.5.1 to 8.5.3 detail the alarms, display messages, Synchrony actions, possible causes, and patient and provider
actions. The tables are arranged alphabetically, by priority. Note that the LED and Audible columns represent the
conditions when the alarm is activated; all LEDs will be on and the audible will be silenced after you press the RAMP/
SILENCE key. Section 8.5.4 provides definitions for the alarms.
8.5.1 HIGH PRIORITY ALARMS
8-9
Red Solid
Red Flash
Red Flash
Red Flash
Display
AudibleLED
Message
Blank Screen
Synchrony
Action
Shuts down Device failure.Red Flash
Possible
Cause
Patient
Action
Cannot be silenced;
remove power from
the device, and
Provider
Action
Replace the
device.
contact home care
provider.
Blank Screen
Shuts down
Power was lost
while the device
was providing
None.Press to silence,
restore power.
therapy.
1
Apnea
High Pressure Malfunctioning
Operates Report alarm to
Operates None. If alarm
Apnea event
occurred during
therapy.
device.
your home care
provider.
continues call your
Verify patient
status.
Replace device.
home care provider.
Invalid
Prescription
Call
Provider
Shuts down The prescription
data is corrupted.
Do not use the
device; call your
home care provider.
Re-enter
prescription data
or replace the
device.
Red Flash
Red Flash
1
Optional
Low Pressure Excessive leak or
Operates Check for the
blockage.
Patient
Disconnect
1
Operates Reconnect the
Patient circuit is
disconnected or has
a large leak.
following: dirty inlet
filters, blocked air
intake, excessive
leak in patient
circuit. If alarm
continues, call your
home care
provider.
patient circuit or
correct the leak.
NOTE: If therapy does
not resume after you start
breathing, (1) silence the
alarm using the RAMP
key, (2) clear the alarm
using the ENTER key,
and (3) press the RAMP
key again to resume
therapy. If the alarm
continues, contact your
home care provider.
Replace the
device.
Reconnect the
patient circuit or
fix the leak. If
the alarm
continues,
replace the
device.
R
Provider Manua
Page 74

8-10
l
AudibleLED
Display
Message
Red Flash
Red Flash
Red Flash
Red Flash
1
Optional
2
The error codes can be viewed upon start-up of the Synchrony on the self-test screen. The codes can also be viewed by
displaying the System Codes screen as described in Section 7.2.2. Appendix B lists the error codes and their descriptions.
Low Pressure
Support
Low Minute
Ventilation
Ventilator
Inoperative
(Displays Codes)
Ventilator
Inoperative
Battery Failure
1
Synchrony
Action
Operates
Operates
Shuts down Remove power
2
Shuts down Remove DC power
Possible
Cause
Device
is malfunctioning.
Device sensed minute
ventilation below
alarm setpoint.
Internal device
failure.
Battery is
discharged.
Patient
Action
Call your home
care provider.
Report alarm
to your home care
provider.
from the device.
Call your home
care provider.
source from the
Synchrony, replace
the battery, restore
power to the
Synchrony; or seek
reliable AC power
source.
Provider
Replace the
device.
Verify patient
status.
Replace the
Synchrony.
Replace the
battery.
Action
8.5.2 MEDIUM PRIORITY ALARMS
Display
AudibleLED
Yellow
Flash
Yellow
Flash
Message
Battery Voltage
Too High
Low Battery Battery nearly
Synchrony
Action
Operates Remove DC power
Operates
Possible
Cause
Wrong or
malfunctioning
battery or charger.
discharged.
Patient
Action
from the device,
use on AC, or call
home care provider.
If on battery, replace
battery; if on AC,
exchange the battery
and charge.
Provider
Action
Replace the
battery.
Replace the
battery.
R
Provider Manua
Page 75

l
8.5.3 LOW PRIORITY ALARMS
8-11
Yellow
Solid
Yellow
Solid
Yellow
Solid
Yellow
Solid
Display
AudibleLED
Message
Battery in Use Operates
Call for Service
(Codes are
displayed)
Momentary Loss
of Power
Power
Failure, Battery in
Use
Synchrony
1
Action
Operates
Operates
Possible
Cause
On start-up,
information
message that battery
is being used to
provide power.
Minor internal
error.
Power was lost for
less than two
minutes while the
Synchrony was
providing therapy.
Line (AC) power
was lost, the device
is now operating on
battery (DC) power.
Patient
Action
Press to confirm
that you wish to
operate on battery
power.
Continue to use,
write down error
code, call your
home care provider.
Press to clear the
information
message.
Check AC power,
seek reliable power
source.
Provider
Action
None.
Record the error
code or message,
replace the unit.
None.Operates
None.
1
The error codes can be viewed upon start-up of the Synchrony on the self-test screen. The codes can also be viewed by
displaying the System Codes screen as described in Section 7.2.2. Appendix B lists the error codes and their descriptions.
R
Provider Manua
Page 76

8-12
l
8.5.4 ALARM DEFINITIONS
The following table lists each patient alarm with its purpose, detection parameters, and termination parameters.
Alarm
Apnea
High Pressure
Low Pressure
Patient Disconnect
Purpose
The apnea alarm detects the
cessation of spontaneous
breathing.
The high pressure alarm
limits pressure to the
patient.
The low pressure alarm
detects when the patient is
not receiving adequate
pressure therapy.
The patient disconnect
alarm detects when the
patient is no longer
connected to the Synchrony.
Detection
Alarm is detected when the
time between spontaneous
breaths exceeds the Apnea
alarm time setting. The
alarm is not detected during
Flow Limit Control (FLC).
Alarm is detected when the
pressure exceeds the IPAP
setpoint by 5 cm H2O for a
continuous 0.5 second.*
Alarm is detected when the
pressure is below 5 cm H2O
for 60 continuous seconds.
Alarm is detected when the
Synchrony is in FLC and
the Patient Disconnect
Alarm is enabled. There is a
10-second delay between
the time the Synchrony
enters FLC and the alarm is
generated.
Termination
The alarm is terminated
when two consecutive
spontaneous breaths occur
within the Apnea alarm time
setting.
The alarm is terminated
when the pressure is within
5 cm H2O of the IPAP
setpoint for a continuous 0.5
second.
The alarm is terminated
when the pressure is within
5 cm H2O for a continuous
0.5 second.
The alarm is terminated
when the Synchrony is no
longer in FLC.
Low Pressure Support
Low Minute Ventilation
The low pressure support
alarm detects when the
patient is not receiving
adequate pressure therapy.
The low minute ventilation
alarm detects when the user
is not receiving a specified
volume of air on a per
minute basis.
Alarm is detected when
RXPS - MeasPS > PSmin
cm H2O for 60 continuous
seconds.**
Alarm is detected when the
calculated minute
ventilation ≤ the alarm
setting. The alarm is not
detected during FLC.
Alarm is terminated when
RXPS - MeasPS ≤ PSmin
cm H2O for 5 continuous
seconds.
Alarm is terminated when
the calculated minute
ventilation > the alarm
setting.
Synchrony waits 6 breaths
after machine is started or
after exiting FLC before
detection.
* The Synchrony shuts down if the pressure exceeds IPAP by 5 cm H
** MeasPS = Measured Pressure Support (Attained IPAP - Attained EPAP); R
The following conditions must be satisfied for the Synchrony to be examined for a Low Pressure Support condition:
• RXPS > 3 cm H2O and RXPS < 10 cm H2O
• The Synchrony is not performing the Ramp function
• The Synchrony is not in FLC
• The respiratory rate is non-zero
R
O for 10 seconds.
2
PS = Prescription Pressure Support; PSmin = (RxPS + 2 cm H2O)/3
X
Provider Manua
Page 77

l
Chapter 9: Communications
This chapter describes the ability of the Synchrony to communicate with the
caregiver using the optional modem.
9.1 Communicating Via Optional Modem
The modem setup is described in Chapter 7.
Section 4.5.2 provides instructions to connect the Synchrony to a phone line
and dial the provider.
9-1
9.2 Communicating With Encore
NOTE: Respironics Encore or Encore Pro software is required to extract compliance data.
The Encore or Encore Pro software can extract compliance data from the Synchrony.
Use the Respironics-supplied RS-232 cable to connect the Synchrony to an IEC950,
EN60950, or UL1950 approved device or computer with the Encore or Encore Pro
software loaded. Figure 9-1 shows a typical setup.
See the Encore or Encore Pro software help files for information on running the
software.
RS-232 Communication Connector
®
or Encore Pro Data Management Software
Figure 9-1 Typical Configuration for connecting a Synchrony to a Computer.
R
Provider Manua
Page 78

9-2
l
R
Provider Manua
Page 79

l
Chapter 10: Adding Supplemental Oxygen
You may add oxygen to the patient circuit using the optional oxygen valve. This chapter describes the method of oxygen
delivery and shows the oxygen concentrations attained at various IPAP and EPAP settings and oxygen flow rates.
WARNING: Oxygen should be administered only on the order of a physician.
WARNING: Supplemental oxygen should not be added to the breathing circuit by placing the source where the gas will be
entrained through the inlet filter on the rear of the device.
WARNING: Never attach oxygen tubing or any positive pressure source to the Pressure Line Port on the front panel of the
Synchrony ventilator.
WARNING: Continuous patient monitoring is recommended while administering oxygen. Patient monitoring should consist of,
at a minimum, patient observation and pulse oximetry. Arterial blood gas measurements should be used when
necessary.
WARNING: Oxygen supports combustion. Oxygen should not be used while the patient is smoking or in the presence of an
open flame.
WARNING: When administering fixed-flow supplemental oxygen, the oxygen concentration may not be constant. The inspired
oxygen concentration will vary, depending on the IPAP and EPAP settings, patient breathing pattern, and the leak
rate. Substantial leaks around the mask may reduce the inspired oxygen
concentration to less than the expected concentrations shown in Section 10.2. Appropriate patient monitoring
should be implemented.
10-1
WARNING: When you are using oxygen with this system, the oxygen supply must comply with the local regulations for
medical oxygen.
WARNING: If oxygen is used with the Synchrony, the oxygen flow must be turned off when the Synchrony is not operating.
Explanation of the Warning: When the ventilator is not in operation, and the oxygen flow is left on, oxygen
delivered into the ventilator tubing may accumulated within the ventilator enclosure. Oxygen accumulated in the
ventilator enclosure will create a risk of fire. This warning applies to most types of bi-level devices.
WARNING: Oxygen accelerates fires. Keep the Synchrony and the oxygen container away from heat, open flames, any oily
substance, or other sources of ignition. DO NOT smoke in the area near the Synchrony or the oxygen.
WARNING: If supplemental oxygen is added to the breathing circuit, the optional oxygen valve must be installed and used
as shown in Figure 10-1.
10.1 Adding Supplemental Oxygen
The delivered oxygen concentration varies with changes in flow in the circuit.
The following may have an impact on oxygen concentration:
• Pressure settings
• Patient Tidal Volume
WARNING: If supplemental
oxygen is added to the breathing
circuit, the optional oxygen valve
must be installed and used as
shown in Figure 10-1.
• Peak Inspiratory Flow
• I:E Ratio
• Respiratory rate
• Circuit leak rate
• Oxygen flow rate
• Site where oxygen is added to the circuit.
To add oxygen to the circuit, the oxygen supply must comply with the local
regulations for medical oxygen. The oxygen flow into the oxygen valve cannot
exceed 15 L/min and the pressure cannot exceed 50 psi.
R
Provider Manua
Page 80

10-2
l
Step 1 As shown in Figure 10-1, attach oxygen tubing from the oxygen
source to the “In” port on the oxygen valve.
Step 2 Connect a section of oxygen tubing to the “Out” valve port, then to
one of the ports on the mask (if so equipped) or to an O2 enrichment
adaptor positioned in the patient circuit.
Step 3 Turn the Synchrony on.
Step 4 Set the oxygen flow to the desired value.
R
Circuit
Tubing
O
2
Enrichment
Adaptor
From Oxygen
Source
Oxygen Tubing
From Oxygen
Oxygen
Valve
Valve
Figure 10-1 Methods of Adding Oxygen to the Patient Circuit
Exhalation
Port
R
Provider Manua
Page 81

l
10.2 Supplemental Oxygen Concentrations
Figures 10-2 and 10-3 illustrate the potential range of oxygen concentration
available to the patient at a given tidal volume, supplemental oxygen flow, and
pressure setting. These figures represent bench test results without inadvertent
mask leaks when oxygen is administered at the mask. Substantial leaks around
the mask may reduce the expected oxygen concentration to below the levels
shown in Figures 10-2 and 10-3. This guideline may be used as a starting point
for initiating oxygen therapy. Oxygen flow should be gradually adjusted until
the patient’s oxygen needs are adequately met.
100
90
80
70
60
50
2 L/min
Supplemental O2 Flows:
10 L/min
10-3
15 L/min
40
Oxygen Concentration (%)
30
20
10
0
IPAP/EPAP Settings
600 cc Tidal Volume. Respiratory Rate: 20 BPM
Figure 10-2 Oxygen Concentration for 600cc Tidal Volume
Supplemental O
2 L/min
100
90
80
70
60
50
40
Flows:
2
10 L/min
30/520/510/5
15 L/min
Oxygen Concentration (%)
30
20
10
0
IPAP/EPAP Settings
1000 cc Tidal Volume. Respiratory Rate: 20 BPM
Figure 10-3 Oxygen Concentration for 1000cc Tidal Volume
R
Provider Manua
30/520/510/5
Page 82

10-4
l
R
Provider Manua
Page 83

l
Chapter 11: Cleaning and Maintenance
R
R
11.1 Cleaning the Synchrony
WARNING: To avoid electrical shock, always unplug the Synchrony power cord before cleaning the Synchrony.
CAUTION: Do not immerse the Synchrony in liquid or allow any liquid to enter the enclosure, inlet filter, or
any openings.
Unplug the Synchrony and clean the front panel and exterior of the enclosure as
needed using a cloth dampened with water and a mild detergent. Allow the
Synchrony to dry completely before plugging in the power cord.
The mask and tubing should be cleaned daily. For details on cleaning your
mask and accessories, refer to the cleaning instructions packaged with the
accessories.
11-1
CAUTION: Dirty inlet filters may cause high operating temperatures that may affect Synchrony performance.
Regularly examine the inlet filters as needed for integrity and cleanliness.
11.2 Cleaning or Replacing the Inlet Filters
The Synchrony uses two removable filters at the air inlet. The gray foam filter
is washable and reusable. The optional white ultra-fine filter is disposable. The
gray foam filer should be cleaned at least once every two weeks under normal
usage and should be replaced with a new one every six months.
STEP 1 If the Synchrony is operating, stop the Synchrony by pressing the
STANDBY key. Disconnect the Synchrony from the power source.
STEP 2 Remove the filter cover by pressing down on the top of the cover to
release the tabs, then swinging the cover out from the
Synchrony’s body.
STEP 3 Remove the filters from the enclosure. The top filter is the reusable
gray foam filter. The bottom filter is the optional disposable white
ultra-fine filter.
R
STEP 4 Examine the filters regularly for cleanliness and integrity.
Reusable Pollen
Filter
Disposable Ultra-fine
Filter
STEP 5 If needed, wash the gray foam filter in warm water with a mild
detergent. Rinse thoroughly to remove all detergent residue. Allow
the filter to completely dry before reinstalling it. If the foam filter is
torn, replace it. (Only Respironics supplied filters should be used as
replacement filters.)
R
Provider Manua
Page 84

11-2
l
STEP 6 If the ultra-fine filter is dirty or torn, replace it.
STEP 7 Reinstall the filters, with the ultra-fine filter on the bottom. Slide the filters into the air
inlet at the rear of the Synchrony and push them down into the recess.
CAUTION: Never install a wet filter into the Synchrony. We recommend that you clean the used filter in the
morning and alternate use of the two pollen filters provided with the system. This will allow
enough drying time for the cleaned filter.
STEP 8 Reinstall the filter cover.
11.3 Maintenance
WARNING: Electrical cords or cables should be periodically inspected for damage or signs of wear.
See the Synchrony Service Manual for recommended periodic maintenance.
R
Provider Manua
Page 85

l
Chapter 12: Circuits and Accessories
This chapter details the Respironics-approved breathing circuits and
accessories.
WARNING: Refer to each accessory’s instruction sheets for the applicable warnings, cautions, and notes.
12.1 Circuit Configurations
WARNING: The Synchrony requires an intentional leak port, either built into the mask or on a separate exhalation
device (e.g., Whisper Swivel II, Plateau Exhalation Valve [PEV], or Disposable Exhalation Valve) to
remove exhaled air from the circuit. Therefore, specific masks and circuits using an intentional leak
port are required for normal operation. The pressurized air from the Synchrony causes a continuous
flow of air to exhaust from the leak port to flush the exhaled air from the circuit. The Synchrony
should be turned on and the intentional leak port should be checked before using the Synchrony.
12-1
The Synchrony is intended for use with Respironics-approved patient circuits.
Typical components are:
• bacteria filter (optional)
• 22 mm reusable circuit tubing
• exhalation device
• Respironics patient interface (e.g., mask)
• humidifier (optional)
Additional accessories may be added to the circuit to meet specific needs.
R
Provider Manua
Page 86

12-2
l
12.2 Circuits and Accessories
—Reusable or Disposable Circuit
Reusable smooth inner lumen circuit tubing, exhalation port.
Disposable smooth inner lumen circuit tubing, exhalation port.
—Circuit Accessories:
6" disposable circuit tubing
18" disposable circuit tubing
72" disposable circuit tubing
O2 enrichment attachment
bacteria filter
—Synchrony Accessories:
oxygen valve
DC power cord
12.3Masks, Exhalation Ports, and Related Accessories
—Masks:
Respironics mask with built-in exhalation port or Respironics mask
with separate exhalation device.
—Accessories:
disposable headgear
reusable headgear
chin strap
Comfort Flap® mask accessory
WARNING: The PEV option must be enabled if a Plateau Exhalation Valve (PEV) is used.
12.4Humidifiers
—Respironics Pass-over humidifier
—Respironics H2 Heated Humidifier
12.5Software
Respironics Encore® and Encore Pro Data Management Software for reading
compliance data.
R
Provider Manua
Page 87

l
Chapter 13: Operational Verification
WARNING: If the Synchrony system fails to perform within the stated specifications of Chapter 14, have the system
serviced by a qualified Respironics-approved service facility.
NOTE: If the backlight is off, the first press of the , , or key will only turn the backlight on; the normal key
action is suppressed until the key is pressed a second time. All procedures assume the backlight is already on.
NOTE: This procedure does not verify performance of the optional Oxygen Valve. If this valve is installed and a
performance verification is required, refer to the Synchrony Service Manual.
NOTE: If the indicator does not move when you are simulating breaths, press the RAMP key to exit flow limit
control.
13-1
13.1 S Mode Verification
The operational verification allows the home care provider to verify that the
Synchrony is functioning properly. Operational verification should be completed before each new patient setup.
STEP 1 Connect the patient circuit to the Synchrony as described in Chapter
4 of this manual.
STEP 2 Connect a water column or digital manometer to a mask port.
STEP 3 Connect the AC inlet to the Synchrony and connect the AC line to
the appropriate power source. The AC power LED should be
illuminated.
STEP 4 Press the Standby key to start the Synchrony.
STEP 5 Set the parameters to the following:
• Mode = S
• Bi-Flex = OFF
• IPAP = 20 cm H2O
• EPAP = 4 cm H2O
• IPAP Rise Time = 1
• Patient Disconnect Alarm Delay = OFF
• Apnea = OFF
• LowMinVent = OFF
STEP 6 Simulate a breathing pattern by occluding and opening the patient
outlet.
• Verify that the indicator appears next to the “IPAP” display
during the inspiratory phase and appears next to the “EPAP”
display during the expiratory phase.
• Verify the IPAP and EPAP pressures displayed on the Synchrony
screen agree with the pressures indicated on the manometer.
If you wish to verify the performance of the patient alarms, see Section 13.3.
R
Provider Manua
Page 88

13-2
l
13.2 S/T Mode
Verification
STEP 1 Connect the patient circuit to the Synchrony as described in Chapter
4 of this manual.
STEP 2 Connect a water column or digital manometer to a mask port.
STEP 3 Connect the AC inlet to the Synchrony and connect the AC line to
the appropriate power source. The AC power LED should be
illuminated.
STEP 4 Press the Standby key to start the Synchrony.
STEP 5 Set the parameters to the following:
• Mode = S/T
• IPAP = 20 cm H2O
• EPAP = 4 cm H2O
• Rate = 6 BPM
• Timed Inspiration = 1.5 sec
• IPAP Rise Time = 1
• Patient Disconnect Alarm Delay = OFF
• Apnea = OFF
• LowMinVent = OFF
STEP 6 Simulate a breathing pattern by occluding and opening the patient
outlet.
• Verify that the indicator appears next to the “IPAP” display
during the inspiratory phase and appears next to the “EPAP”
display during the expiratory phase.
STEP 7 When you have established an IPAP/EPAP pattern, occlude the
patient circuit.
STEP 8 Wait for the Synchrony to establish a breathing pattern according to
the settings of Step 5.
• Verify that the indicator appears next to the ”Rate” display
when the Synchrony initiates a breath.
• Verify the IPAP and EPAP pressures displayed on the Synchrony
screen agree with the pressures indicated on the manometer.
If you wish to verify the performance of the patient alarms, see Section 13.3.
R
Provider Manua
Page 89

13-3
l
13.3 Alarm Verification
STEP 1 Keep the patient circuit and parameter setups as used in the S or S/T
verification.
STEP 2 Set the Patient Disconnect Alarm Delay to 15 sec.
STEP 3 Exit to the Monitoring screen. Open the patient circuit to
atmosphere.
• Verify that the Patient Disconnect Alarm occurs in 15 seconds.
STEP 4 Press the RAMP key to silence the alarm. Then clear the alarm
screen using the ENTER key. Next simulate a breathing pattern by
occluding and opening the patient outlet to correct the alarm
condition.
NOTE: The red high priority alarm indicator light will appear solid when the
alarm condition has subsided. It will take several breaths to correct the
alarm condition. The light will remain solid until the alarm has been
cleared.
STEP 5 Set the following alarms:
• Patient Disconnect Alarm = OFF
• Apnea = 10 sec
STEP 6 Exit to the Monitoring screen. To ensure that Flow Limit Control is
not active, simulate a breathing pattern until the IPAP/EPAP activity
indicator ( ) moves; then occlude the patient outlet.
• Verify that the Apnea Alarm occurs in 10 seconds.
STEP 7 Clear the alarm; set the following alarms:
• Apnea = OFF
• LowMinVent = 20 L/min
STEP 8 Exit to Monitoring screen 2 (to display Minute Ventilation).
STEP 9 Simulate 6 breaths by alternately occluding and opening the patient
outlet.
STEP 10 After 6 breaths, alter the breathing pattern to lower the minute
ventilation below the alarm setpoint of 20 L/min.
• Verify that the LowMinVent alarm occurs.
STEP 11 Clear the alarm.
STEP 12 While the Synchrony is still operating, disconnect the power cord
from the Synchrony.
• Verify that a continuous alarm sounds for at least two minutes.
Adjust the Synchrony to the appropriate patient settings after the Performance
Verification and before patient use.
R
Provider Manua
Page 90

13-4
l
R
Provider Manua
Page 91

l
Chapter 14: Specifications
ENVIRONMENT AL
14-1
PHYSICAL
ELECTRICAL
Temperature
Humidity
Atmospheric Pressure
Dimensions:
Weight:
AC Voltage:
DC Voltage:
AC Current:
12" L x 7" W x 6" H
Approximately 6 lb
100 to 240 V , 50/60 Hz
12 V
1.25 A maximum
Operating
41 °F to 95 °F
15 to 95% Relative
(non-condensing)
83 to 102 kPa
(5600 feet to sea level)
Storage
-4 °F to 140 °F
15 to 95% Relative
(non-condensing)
50 kPa to 106 kPa
(20000 feet to sea level)
DC Current:
Protection against electric shock:
Degree of protection against
electric shock:
Degree of protection against
harmful ingress of water:
Modes of Operation:
Electromagnetic
Compatibility:
PRESSURE
5.5 A maximum
Class II
Type BF Applied Part
Ordinary Equipment, IPX0
Continuous
The BiPAP Synchrony Ventilatory Support System meets the requirements of
EN 60601-1-2.
Fuses:
Output: 4 to 30 cm H2O
There are no user-replaceable fuses.
R
Provider Manua
Page 92

14-2
l
Specifications
CONTROL ACCURACY
Parameter Range Accuracy
IPAP 4 to 30 cm H2O** ± 2 cm H2O*
EPAP 4 to 25 cm H2O** ± 2 cm H2O*
CPAP 4 to 20 cm H2O ± 2 cm H2O*
Breath Rate 0 to 30 BPM (PA and S/T); Greater of 1 BPM or ± 10% of setting when
4 to 30 BPM (T) measured over a four minute period.
Timed Inspiration 0.5 to 3.0 sec ± (0.1 + 0.10 of setting) sec
Rise Time 1 to 6 ± 25%*
Ventilation Ramp Disabled, 0.5, 1.0, 2.0, 3.0 cm H2O per breath ± (0.1 + 0.25 of setting) cm H2O/breath.
Measured over the full duration of the
programmed ramp.
* Measured at the patient end of circuit with a Whisper Swivel II exhalation port and no patient flow. Dynamic pressure
accuracy is ± 5 cm H2O measured at the patient end of the circuit with a Whisper Swivel II and varying flow conditions.
The range of values correspond to hundreds of milliseconds (e.g., a setting of 4 indicates a Rise Time of .4 seconds).
* Limited to 4 to 20 cm H2O for IPAP/EPAP when Bi-Flex is enabled.
TRIGGER
Spontaneous
Trigger:
Spontaneous
Cycle:
—Shape Trigger
—Volume 6 cc above V
—Spontaneous Expiratory Threshold (SET)
—Shape Cycle
—IPAP maximum of 3.0 sec
—Flow Reversal - A flow reversal event causes the machine to cycle to EPAP
leak
ACCURACY OF MEASURED AND CALCULATED PARAMETERS
PARAMETER
Respiratory Rate
Exhaled Tidal Volume
Exhaled Minute Ventilation
Greater of ±1 BPM or ±10% of reading when measured over a four
minute period
± (25 + 0.15 of reading) ml
± (1 + 0.15 of reading) L/min
ACCURACY
Leak Rate
CONNECTOR
The patient interface port is a 22 mm tapered connector.
± (5 + 0.15 of reading) L/min
R
Provider Manua
Page 93

l
Pressure Drop Versus Flow for Patient Circuits
The Synchrony automatically compensates for pressure drops associated with a 6-foot smooth bore tube.
Additional pressure drop will occur when restrictive elements are added to the patient circuit. The following graph
shows the additional pressure drop when adding: 1. a bacteria filter; 2. a bacteria filter and a Respironics pass-over
humidifier.
Note: Always use a manometer to verify patient mask pressure.
Pressure Drop VersusFlow for Patient Circuits
Bacteria Filter Bacterial Filter and Oasis Humidifier
10
9
8
7
6
5
4
3
2
1
0
0 20 40 60 80 100 120 140 160 180
Flow LPM
14-3
Maximum Pressure Drop for Patient Disconnect Alarm
The Patient Disconnect alarm relies on a fixed relationship between the patient pressure settings and the open circuit
flow of the patient circuit. The alarm should work properly if your circuit is less restrictive than the circuit parameters
shown below.
Most Restrictive Circuit for Patient Disconnect
180.00
160.00
140.00
120.00
100.00
80.00
60.00
40.00
20.00
0.00
NOTE: You must verify that the Patient Disconnect Alarm operates properly with the prescribed patient pressures
and circuit.
Pressure
R
Provider Manua
Page 94

14-4
l
R
Provider Manua
Page 95

l
Appendix A: External Modem Requirements
This chapter explains requirements for using an external modem with the
Synchrony.
A-1
A.1 Serial Cable
The Synchrony is equipped with a 9-pin RS-232 port. The serial cable for
connecting the external modem to the Synchrony must be a DTE-to-DCE cable
(i.e., “straight-through” cable). This is the serial cable that normally comes with
a modem, however, a diagram is shown in Figure A-1 for verification.
1
2
3
4
5
6
7
8
9
Figure A-1 Serial Cable Requirements
DCD
RX
TX
DTR
GND
DSR
RTS
CTS
RI
1
2
3
4
5
6
7
8
9
A.2 Modem Commands
The Synchrony makes the following assumptions regarding modem commands:
• The modem must be Hayes compatible and recognize the AT
command set.
• The ATZ[CR] command will reset the modem, where [CR] represents
a carriage return (ASCII 13).
• The ATH0[CR] command will hang up the modem.
• The escape code sequence is a one-second guard time where no data is
sent to the modem followed by the +++ command.
The Synchrony software uses the DTR line on the RS-232 port to aid in
hanging up the modem. It is strongly recommended that the external modem be
configured to monitor the DTR line. Normally, this is the default operation for
the modem. If it is not, you should add the &D2 option in the modem
initialization string.
The Synchrony software requires that modem commands and modem result
codes are echoed back to the Synchrony. Normally, this is the default operation
for the modem. If not, you should add the E1, X4, AND Q0 options in the
modem initialization string.
R
Provider Manua
Page 96

A-2
l
The Synchrony software handles both numerical (short-form) and verbose
(long-form) result codes. However, it will only recognize the verbose result
codes that contain the following words in English: OK, ERROR, CONNECT,
RING, NO CARRIER, NO DIALTONE, NO DIAL TONE, BUSY, NO
ANSWER. Normally, the default option for the modem verbose result codes,
which is typically configured with the V1 option. If not, the V0 option specifies
numerical result codes. In either case, it is recommended that you specify this
option in the initialization string.
The Synchrony software currently does not handle the answering of incoming
calls. Therefore, you should configure the modem by setting the S0 register to
zero (i.e., S0=0 in the initialization string).
A.3 Example
Initialization Strings
The Synchrony requires that you specify two initialization strings. The following recommendations work with U.S. Robotics modems and should work with
others:
• Init String 1: AT&FX4V1E1Q0D2
• Init String 2: ATS0=0
To turn off the modem’s speaker, add the M0 option. The initialization strings
would appear as follows:
• Init String 1: AT&FX4V1E1Q0D2
• Init String 2: ATM0S0=0
R
Provider Manua
Page 97

l
Appendix B: Error Codes
This appendix lists the definitions for the displayed error codes (see Section 7.2.2)
B-1
ERROR DEFINITION
CODE
1 ERR_SOFTWARE
2 CPU_FAILURE
3 STACK_OVERFLOW_FAILURE
4 STACK_UNDERFLOW_FAILURE
5 STACK_RESERVE_FAILURE
6 RAM_FAILURE
7 STUCK_KEY_FAILURE
8 CORRUPT_RX_MODE_FAILURE
9 CORRUPT_RX_PARM_IN_MODE_FAILURE
10 CORRUPT_RX_PARM_OUT_MODE_FAILURE
11 CORRUPT_ALARM_PARM_FAILURE
12 CORRUPT_SYSTEM_DATA_FAILURE
13 CORRUPT_MODEM_PARM_FAILURE
14 CORRUPT_USAGE_LOG_DATA_FAILURE
15 CORRUPT_SW_VERSION_DATA_FAILURE
16 SOFTWARE_CHANGE_FAILURE
17 DATA_FLASH_ERASE_FAILURE
18 DATA_FLASH_WRITE_FAILURE
19 DATA_FLASH_OVERLAP_PAGE_1_FAILURE
20 DATA_FLASH_OVERLAP_PAGE_2_FAILURE
21 DATA_FLASH_OVERLAP_PAGE_3_FAILURE
22 DATA_FLASH_OVERLAP_PAGE_4_FAILURE
23 BUZZER_SOUND_FAILURE
24 LCD_CUST_CHAR_FAILURE
25 RED_ALARM_LED_FAILURE
26 YELLOW_ALARM_LED_FAILURE
27 GREEN_DC_POWER_LED_FAILURE
28 GREEN_AC_POWER_LED_FAILURE
29 RTC_NOT_TICKING_FAILURE
30 RTC_BATTERY_LOW_FAILURE
31 RTC_DATA_CORRUPT_FAILURE
32 WATCHDOG_FAILURE
33 GET_THERAPY_LOG_DATA_ERR1
34 BREAKPOINT_EXCEPTION_FAILURE
35 BUS_ERROR_EXCEPTION_FAILURE
36 SOFTWARE_INTERRUPT_FAILURE
37 ILLEGAL_INSTRUCT_EXCEPT_FAILURE,
38 DIVIDE_BY_ZERO_EXCEPTION_FAILURE
39 UNUSED_INTERRUPT_FAILURE
40 UNINIT_INTERRUPT_FAILURE
41 SPURIOUS_INT_EXCEPTION_FAILURE
42 HIGH_PRIORITY_THREAD_INACTIVE
43 LOW_PRIORITY_THREAD_INACTIVE
44 BACKGROUND_THREAD_INACTIVE
45 FRONT_PANEL_TEST_NO_KEY_FAILURE
46 FRONT_PANEL_TEST_UP_KEY_FAILURE
47 FRONT_PANEL_TEST_DOWN_KEY_FAILURE
48 FRONT_PANEL_TEST_ENTER_KEY_FAILURE
49 FRONT_PANEL_TEST_RAMP_KEY_FAILURE
50 FRONT_PANEL_TEST_SECRET_KEY_FAILURE
51 LCD_DISPLAY_CTRL_TIMEOUT
52 LCD_DISPLAY_DATA_TIMEOUT
53 LCD_DISPLAY_READ_TIMEOUT
54 ADC_CONVERSION_FAILURE
55 SYS_DATA_BAD_RANGE_FAILURE
56 LOSS_AC_OPER_DC_POWER
57 MOMENTARY_LOSS_OF_POWER
58 BATTERY_IN_USE_ALARM
59 LOW_BATTERY_ALARM
ERROR DEFINITION
CODE
60 BATTERY_FAILURE_ALARM
61 HIGH_BATTERY_ALARM
62 LOW_MIN_VENT_ALARM
63 EXHALATION_PORT_ALARM
64 APNEA_ALARM
65 PATIENT_DISCONNECT_ALARM
66 HIGH_PRESSURE_ALARM
67 LOW_PRESSURE_ALARM
68 PROX_LINE_ALARM
69 WAIT_FOR_TRIG_ERR1
70 COMPUTE_MINVENT_ERR1
71 COMPUTE_PERCENT_TI_ERR1
72 COMPUTE_BPM_ERR1
73 COMPUTE_PAT_TRIG_BREATHS_ERR1
74 COMPUTE_TIME_AT_P_ERR1
75 COMPUTE_TIME_AT_P_ERR2
76 GET_CALC_PARAM_ERR1
77 ROM_CRC_FAILURE
78 VREF_12000_FAILURE
79 AUDIBLE_ALARM_VCAP_FAILURE
80 FRONT_PANEL_TEST_STANDBY_KEY_FAILURE
81 UI_ALARM_QUEUE_FULL_FAILURE
82 CAL_DATA_CRC_FAILURE
83 AIR_STREAM_OVER_TEMP
84 AIR_STREAM_UNDER_TEMP
85 AUDIBLE_ALARM_VOLTAGE_FAILURE
86 MOTOR_FAILURE
87 DEFAULT_SWITCH_MODEM_HANGUP
88 DEFAULT_SWITCH_MODEM_INIT
89 EXECUTION_SEQUENCE_FAILURE
90 DEFAULT_SWITCH_MODEM_REGAINCONTROL
91 RESICALC_UNIT_ID
92 DEFAULT_SWITCH_MODEM_ESCAPE_SEQ
93 CORRUPT_KNOWN_LEAK_DATA
94 DEFAULT_SWITCH_MODEM_PROCESS_CMD
95 BARO_PRESSURE_FAILURE
96 BAD_RESISTANCE_TABLE
97 DRIFT_TOO_HIGH
98 DRIFT_HIGH
99 DRIFT_CRC_FAILURE
100 MAX_RESETS_OVER_TIME
101 CORRUPT_ACCESS_KEY_DATA_FAILURE
102 CORRUPT_TLOG_STORAGE_DATA_FAILURE
103 INVALID_TEST_CALL
104 UNRECOGNIZED_BOARD_REVISION_BY_SW
105 BLOWER_ERROR_SIGNAL_FAILED
106 BLOWER_CURRENT_FAILED_HIGH
107 BLOWER_CURRENT_FAILED_LOW
108 BLOWER_RPM_FAILED_HIGH,
109 BLOWER_RPM_FAILED_LOW
110 VALVE_ENABLE_FAILURE
111 VREF_1250_FAILURE
112 COMPUTE_AVG_LEAK_ERR1
113 BACKGROUND_THREAD_DEFAULT_SWITCH
114 COPY_FLASH_FUNCTIONS_FAILURE
115 UI_EVENT_QUEUE_FULL_FAILURE
116 RISE_RATE_RANGE_FAILURE
117 PRESSURE_RANGE_FAILURE
118 IRFLOW_STUCK_SENSOR
R
Provider Manua
Page 98

B-2
l
ERROR DEFINITION
CODE
119 PATM_STUCK_SENSOR
120 PP_STUCK_SENSOR
121 PV1_STUCK_SENSOR
122 PV2_STUCK_SENSOR
123 ERASE_SECTOR_FAIL
124 WRITE_FLASH_FAIL
125 UNRECOGNIZED_ACCESS_KEY_VERSION
126 PV1_PV2_SENSOR_FAILURE
127 DATA_LOGGING_ERR1
128 SCAN_EVENTS_ERR
129 LOG_INITIAL_VALUES_ERR1
130 LOG_EVENT_ERR1
131 DATA_FLASH_ERR
132 SYS_PT_ALARM_LOG_CHECKSUM_ERR
133 CORRUPT_SYS_ALARM_LOG_DATA_FAILURE
134 CORRUPT_PT_ALARM_LOG_DATA_FAILURE
135 BLOWER_DEFAULT_ERR1
136 BLOWER_OFF_CURRENT_HIGH
137 UNRECOGNIZED_CAL_VERSION_BY_SW
138 UNIT_TYPE_FAILURE
139 TLOG_WRITE_QUEUE_BAD_DATA
140 UNEXPECTED_WATCHDOG_RESET
141 VALVE_DEFAULT_ERR1
142 DRIFT_DEFAULT_ERR1
143 UI_HIGH_PRIORITY_ALARM_TEST
144 UI_2_HIGH_PRIORITY_ALARM_TEST
145 UI_MEDIUM_PRIORITY_ALARM_TEST
146 UI_2_MEDIUM_PRIORITY_ALARM_TEST
147 UI_LOW_PRIORITY_ALARM_TEST
148 UI_2_LOW_PRIORITY_ALARM_TEST
149 LOW_PRESSURE_SUPPORT_ALARM
150 INVALID_DRIFT_INDEX_AT_CAL
151 INVALID_TCAL_AT_CAL
152 INVALID_MODE_IN_CURRENT_MODEL
153 UNSUPPORTED_FEATURE_SET
154 LOW_TIDAL_VOLUME_ALARM
155 VTE_TARGET_SETPOINT_ZERO
156 ERR_BRMODEL_MAX_AMPLITUDE
157 ERR_RAMP_DEFAULT1
158 INVALID_ALARM_CODE
R
Provider Manua
Page 99

l
Index
I-1
A
Abbreviations 2-10
AC Inlet 3-8
AC Operation 4-4
AC Power Indicator 3-2
Access Levels 2-8
Changing 7-10
Unlocking 7-10
Accessories 12-2
Accuracy Specifications 14-2
Acronyms 2-10
Air Filters
Cover 3-8
Installation 4-2
Alarm
Actions During 8-8
Defintions 8-12
Description 8-1
Display 8-6
High Priority 8-9
History 7-4
LEDs 8-7
Low Priority 8-11
Medium Priority 8-10
Sounds 8-6
Tables 8-9
Alarm Enabled Indicator 3-5
Alarm Parameters
Apnea 8-4
Changing 8-3
Patient Disconnect Alarm Delay 8-3
Setting 8-2
Alarm Volume 7-12
Apnea Alarm 8-4
Changing 8-5
Assembling the Patient Circuit 4-3
Attention or Activity Indicator 3-3
Auto-Trak Sensitivity 2-4
B
backlight 3-1
Bi-Flex 2-2
BiPAP Defined 2-10
C
Cable A-1
Cautions 1-3
Change Mode Operations 6-1
Change Mode Setup Screens 6-2
Change Parameters Operations 5-1
Change Parameters Screens 5-2
Changing
Access Level 7-10
Alarm Volume 7-12
Language 7-11
Mode 6-3
Parameters 5-4
Circuit Configurations
Patient 12-1
Cleaning
Filters 11-1
Synchrony 11-1
Codes, System 7-3
Commands
Modem A-1
Communication Statements 1-5
Communications 9-1
Encore Software 9-1
Optional Modem 9-1
Port 3-8
Concentrations of Oxygen 10-3
Connecting the Patient 4-5
Connections
AC Inlet 3-8
Communications Port 3-8
DC Inlet 3-8
Patient Circuit 3-7
RS232 Port 3-8
Telephone Jack 3-8
Contraindications 1-4
Control Keys 3-2
Down Key 3-2
Enter Key 3-2
Ramp/Silence Key 3-2
Standby Key 3-2
Up Key 3-2
Control Panel 3-1
Controls and Displays 3-1
AC Power Indicator 3-2
Attention or Activity Indicator 3-3
Control Keys 3-2
Control Panel 3-1
DC Power Indicator 3-2
Display Data 3-6
Display Screen 3-1
Down Key 3-2
Enter Key 3-2
Indicators 3-2
Navigation Indicator 3-4
Progress Indicator 3-5
Ramp/Silence Key 3-2
Rear Panel 3-8
R
Provider Manua
Page 100

I-2
l
Selection Indicator 3-4
Standby Key 3-2
Up Key 3-2
Ventilation Ramp Indicator 3-4
CPAP
Defined 2-10
Mode 2-2
Mode Parameter Screen 5-2
Mode Setup Screen 6-2
Cycle Defined 2-10
Cycle to EPAP 2-7
D
Data Transmission Errors 4-9
DC Inlet 3-8
DC Operation 4-4
DC Power Cord Retainer 3-8
DC Power Indicator 3-2
Definitions 2-10
Alarm 8-12
Bi-Flex 2-9
BiPAP 2-10
CPAP 2-10
Cycle 2-10
EPAP 2-10
High Priority Alarm 2-10
IPAP 2-10
Low Priority Alarm 2-10
Medium Priority Alarm 2-10
OSA 2-10
Ramp 2-10
Trigger 2-10
Description
Alarms 8-1
Design
Flow Analysis 2-8
Maximum IPAP Time 2-7
Sensitivity 2-5
Shape Signal 2-6
Spontaneous Expiratory Threshold 2-7
Volume Trigger 2-6
Dialing the Provider 4-8
Display
Alarm 8-6
Display Data 3-6
Down Key 3-2
E
Electrical
AC Operation 4-4
DC Operation 4-4
Electrical Specifications 14-1
Encore 2-1, 9-1
Enter Key 3-2
Environmental Specifications 14-1
EPAP Defined 2-10
Errors
Data Transmission 4-9
Estimated Exhaled Minute Ventilation 3-6
Estimated Exhaled Tidal Volume 3-6
Example Initialization Strings
Modem A-2
Expiratory Flow Rate Adjustment 2-4
External Modem Requirements A-1
F
Filters, Replacing/Cleaning 11-1
Flow Analysis 2-8
Flow Reversal 2-7
Full Access 2-8
H
High Priority Alarms
Actions 8-9
Defined 2-10
Humidifiers 12-2
I
Indicators 3-2
AC Power Indicator 3-2
Alarm Enabled Indicator 3-5
Attention or Activity Indicator 3-3
DC Power Indicator 3-2
Navigation Indicator 3-4
Progress Indicator 3-5
Selection Indicator 3-4
Ventilation Ramp Indicator 3-4
Industry of Canada Notice 1-6
Initialization Strings
Modem A-2
Installing the Air Filters 4-2
Intended Use 1-4
Introduction 2-1
IPAP Defined 2-10
L
Lab System 2-1, 2-2, 4-5, 5-1, 6-1
Language 7-11
Leak 3-6
Leak Tolerance 2-4
LEDs
Alarm 8-7
Lockout 2-8
Low Priority Alarms
Actions 8-11
Defined 2-10
M
Maintenance 11-1
Masks, Exhalation Ports 12-2
Maximum IPAP Time 2-7
R
Provider Manua
 Loading...