

Page 1
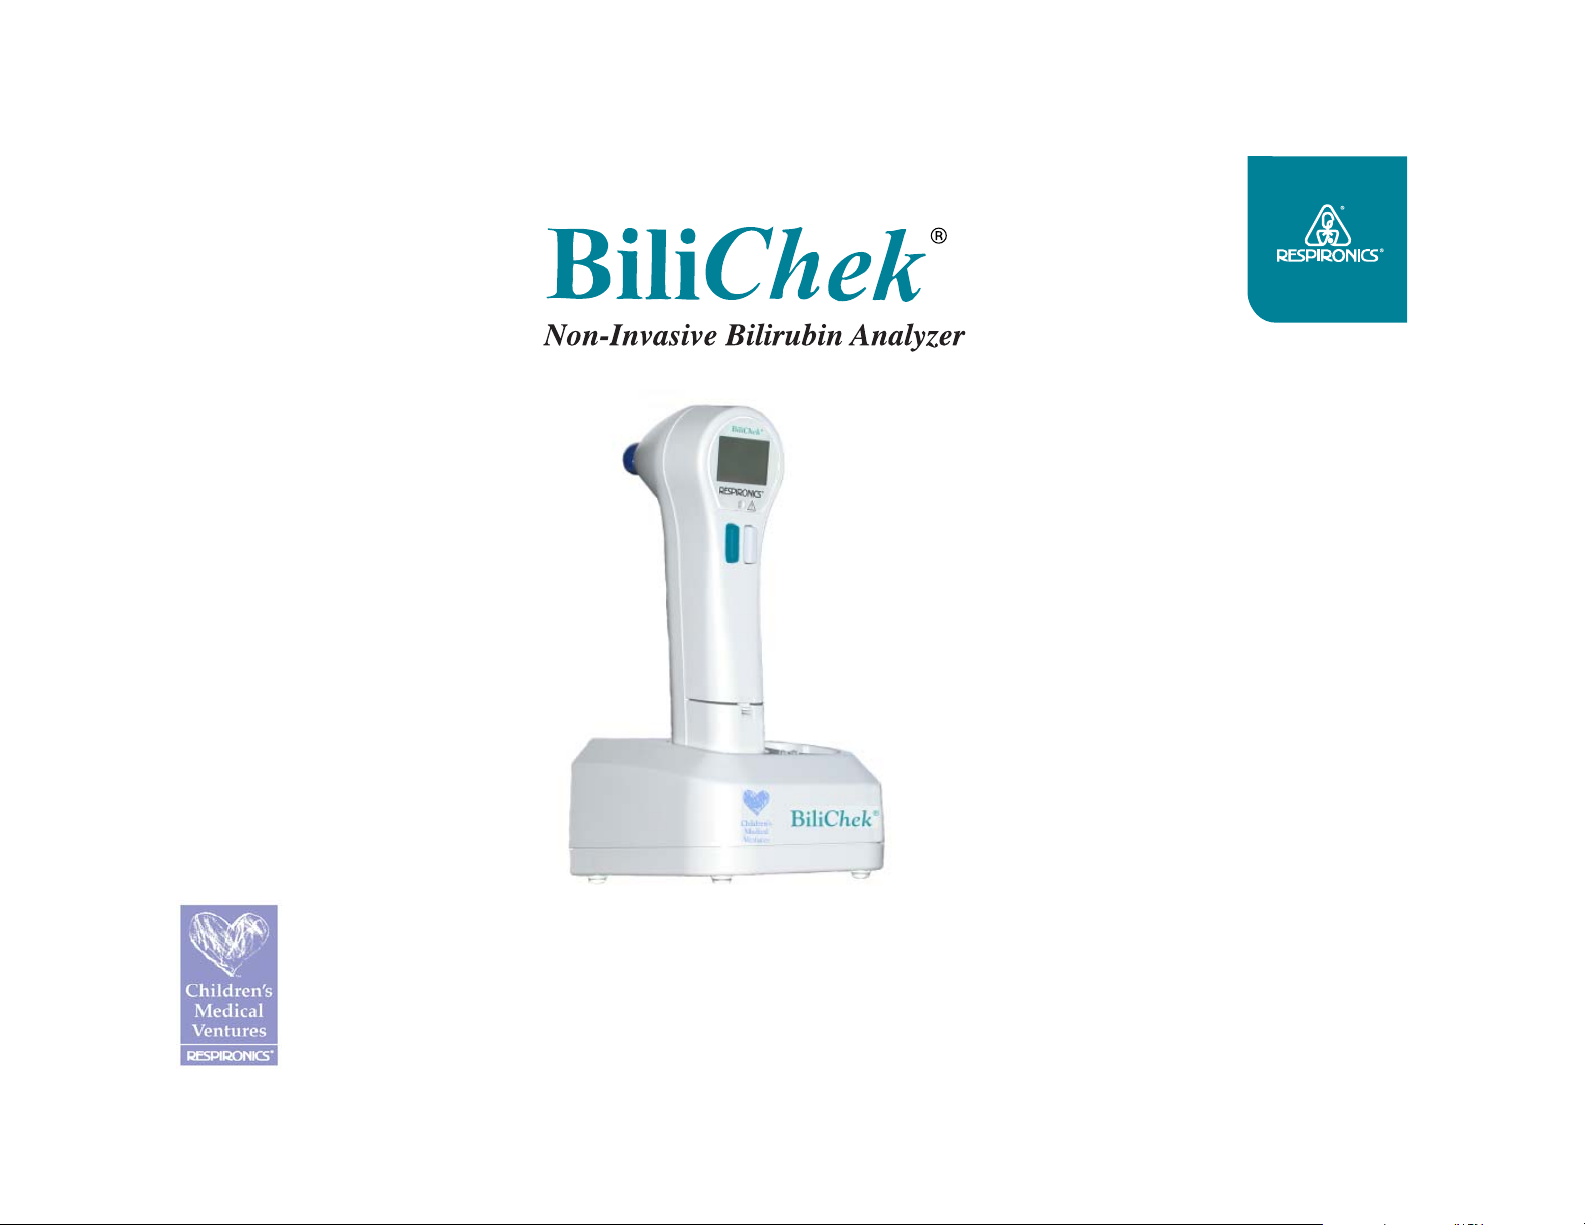
www.respironics.com
Service Manual
Page 2

This BiliChek system is the subject of U. S. Patent #US patent 5.353.790 5,792,049 5,860,421 5,924,981 6.002.482
6,045,502 6,192,734 and patents pending. BiliChek is a trademark of Respironics, Inc.
1014988
BiliChek Service Manual
2
Page 3

Limited Warranty
Respironics warrants that the BiliChek® device shall be free from defects of workmanship and materials and will perform in
accordance with the product specifications for a period of one year from the date of sale by Respironics. If the product fails to
perform in accordance with the product specifications, Respironics will repair or replace -at its option - the defective material or
part. Respironics will pay customary freight charges from Respironics to the dealer location only. This warranty does not cover
damage caused by accident, misuse, abuse alteration, and other defects not related to materials or workmanship.
Respironics disclaims all liability for economic loss, loss of profits, overhead, or consequential damages which may be claimed
to arise from any sale or use of this product. Some states do not allow the exclusion or limitation of incidental or consequential
dames, so the above limitation or exclusion may not apply to you.
This warranty is given in lieu of all other express warranties. In addition, any implied warranty, including any warranty of
merchantability or fitness for the particular purpose, is limited to years. Some states do not allow limitations on how long an
implied warranty lasts, so the above limitation may not apply to you. This warranty gives you specific legal rights, and you may
also have other rights which vary from state to state.
The warranty for repairs is ninety days for labor and one year on the part(s) that was replaced.
To exercise your rights under this warranty, contact Respironics Inc. at 1-800-345-6443 (US and Canada only) or 1-724-387-
4000.
1014988
Visit Respironics Home Page on the World Wide Web: www.respironics.com
BiliChek Service Manual
3
Page 4

Table of Contents
1.0 Symbols ............................................................. 5
2.0 Purpose of the Device ....................................... 6
3.0 Theory of Operation ......................................... 6
11.1 Troubleshooting Guide ....................................... 18
11.2 Troubleshooting Flow Chart ...................... 20
11.3 Drawings and Schematics .......................... 22
11.3.1 Battery Pack Electrical Schematic ......... 22
11.3.2 Charger Base Exploded View Drawing . 23
11.3.3 Charger Base PCB Schematic ................ 24
11.3.4 Charger Base PCB Component Layout 28
11.4 HHU Error Code List................................. 29
4.0 Warnings and Precautions ............................... 8
5.0 Description of the BiliChek® System................ 9
6.0 System Specifications ....................................... 10
7.0 Functional Description ..................................... 11
8.0 Initial Set-up...................................................... 13
9.0 Set-up Mode ...................................................... 14
10.0 Operation of the Device .................................... 17
10.1Performing a Calibration.......................... 17
10.2Performing a Measurement ...................... 17
11.0 Troubleshooting ................................................ 18
1014988
BiliChek Service Manual
12.0 Routine Operator Cleaning ................................... 33
13.0 Maintenance and Repair/Replacement ................ 33
13.1 HHU Measurement Bulb Replacement .... 33
13.2 Charger Base Repair .................................. 34
13.3 Hand Held Unit (HHU) Repair ................. 35
13.4 Power Supply Repair/Replacement .......... 35
13.5 Battery Pack Repair/Replacement ............ 35
14.0 Software Upgrades ................................................. 35
14.1 Upgrade Instructions .................................. 35
15.0 Customer Service and Product Support
Contact Information ............................................... 36
4
Page 5

1.0 Symbols
• Symbol for Attention. • Symbol for Battery Deep Discharge
See Instructions For Use and Recharge
• Symbol for Use With • Symbol for battery Charging
Table of Contents
• Symbol for Do Not Reuse • Symbol for Rechargeable Battery
• Symbol for Use By • Symbol for Do Not Throw in Trash
• Symbol for Batch Code • Symbol for Nickel Cadmium Battery
• Symbol for Recycle • Symbol for Indoor Use
• Symbol for Serial Number • Symbol for Class B
• Symbol for Catalog Number • Symbol for Date of Manufacture Mfd:
• Symbol for Storage Conditions • Denotes this system is ETL Listed
Recycle Corporation
and conforms to ANSI/UL STD.
2601. Certified to CAN/CSA C22.2
STD. NO. 601.1.
1014988
BiliChek Service Manual
5
Page 6

2.0 Purpose of the Device
The BiliChek®Non-Invasive Bilirubin Analyzer accurately
determines bilirubin levels in newborn patients without a
blood sample regardless of their skin color, gestational age,
or post-natal age. This product provides rapid, point-of-care
bilirubin measurements as a replacement for traditional
clinical chemistry methods. These results are achieved with
no trauma to the patient, no risk of infection, and potentially
reduced cost of monitoring serum bilirubin by minimizing the
use of hospital personnel and supplies.
3.0 Theory of Operation
The BiliChek works by directing white light into the skin of the
newborn and measuring the intensity of the specific wavelengths
which are returned. By knowing the spectral properties of the
components within the skin, one can subtract out the interfering
components and determine the concentration of bilirubin.
Each photon has a characteristic wavelength. As light enters
skin tissue it can collide with the structural components such as
collagen fibers. When a collision occurs, the photon loses energy
and direction of travel is changed. This is called a scattering
event. If enough of these scattering events occur, the photon
completely loses its energy and is absorbed. If a photon is
scattered such that it is re-emitted from the skin, it is reflected.
Photons with longer wavelengths (in the red region of the
spectrum) are scattered less than photons with shorter
wavelengths (in the blue region of the spectrum). This
phenomenon is called wavelength-dependent scattering and
explains why the skin appears red when you shine a bright light
through it. It is also one of the reasons why the optical properties
of the newborns skin changes with advancing gestational and
post-natal age. As the skin matures, it becomes thicker and
there is greater keratinization of the cell membranes which
increases the scattering of incident light.
Photons of specific wavelengths are also preferentially absorbed
by certain molecules. By plotting the absorption against the
wavelength one can visualize characteristic absorption spectra
of the particular molecules. For example, melanin has a nearlinear absorption spectrum in the visible spectrum and, like the
scattering phenomenon, there is greater absorption of photons
with shorter wavelengths than in the red region of the spectrum.
Conversely, hemoglobin is a much more complicated absorber
which is compounded by the fact that oxyhemoglobin and
deoxyhemoglobin have different profiles. The peak absorption
of photons by bilirubin occurs at a wavelength of 460nm. This
is in the blue portion of the spectrum and is the reason why blue
lights are sometimes preferred for phototherapy. It is also in
the region of the spectrum at which hemoglobin absorption is
relatively low.
1014988
BiliChek Service Manual
6
Page 7
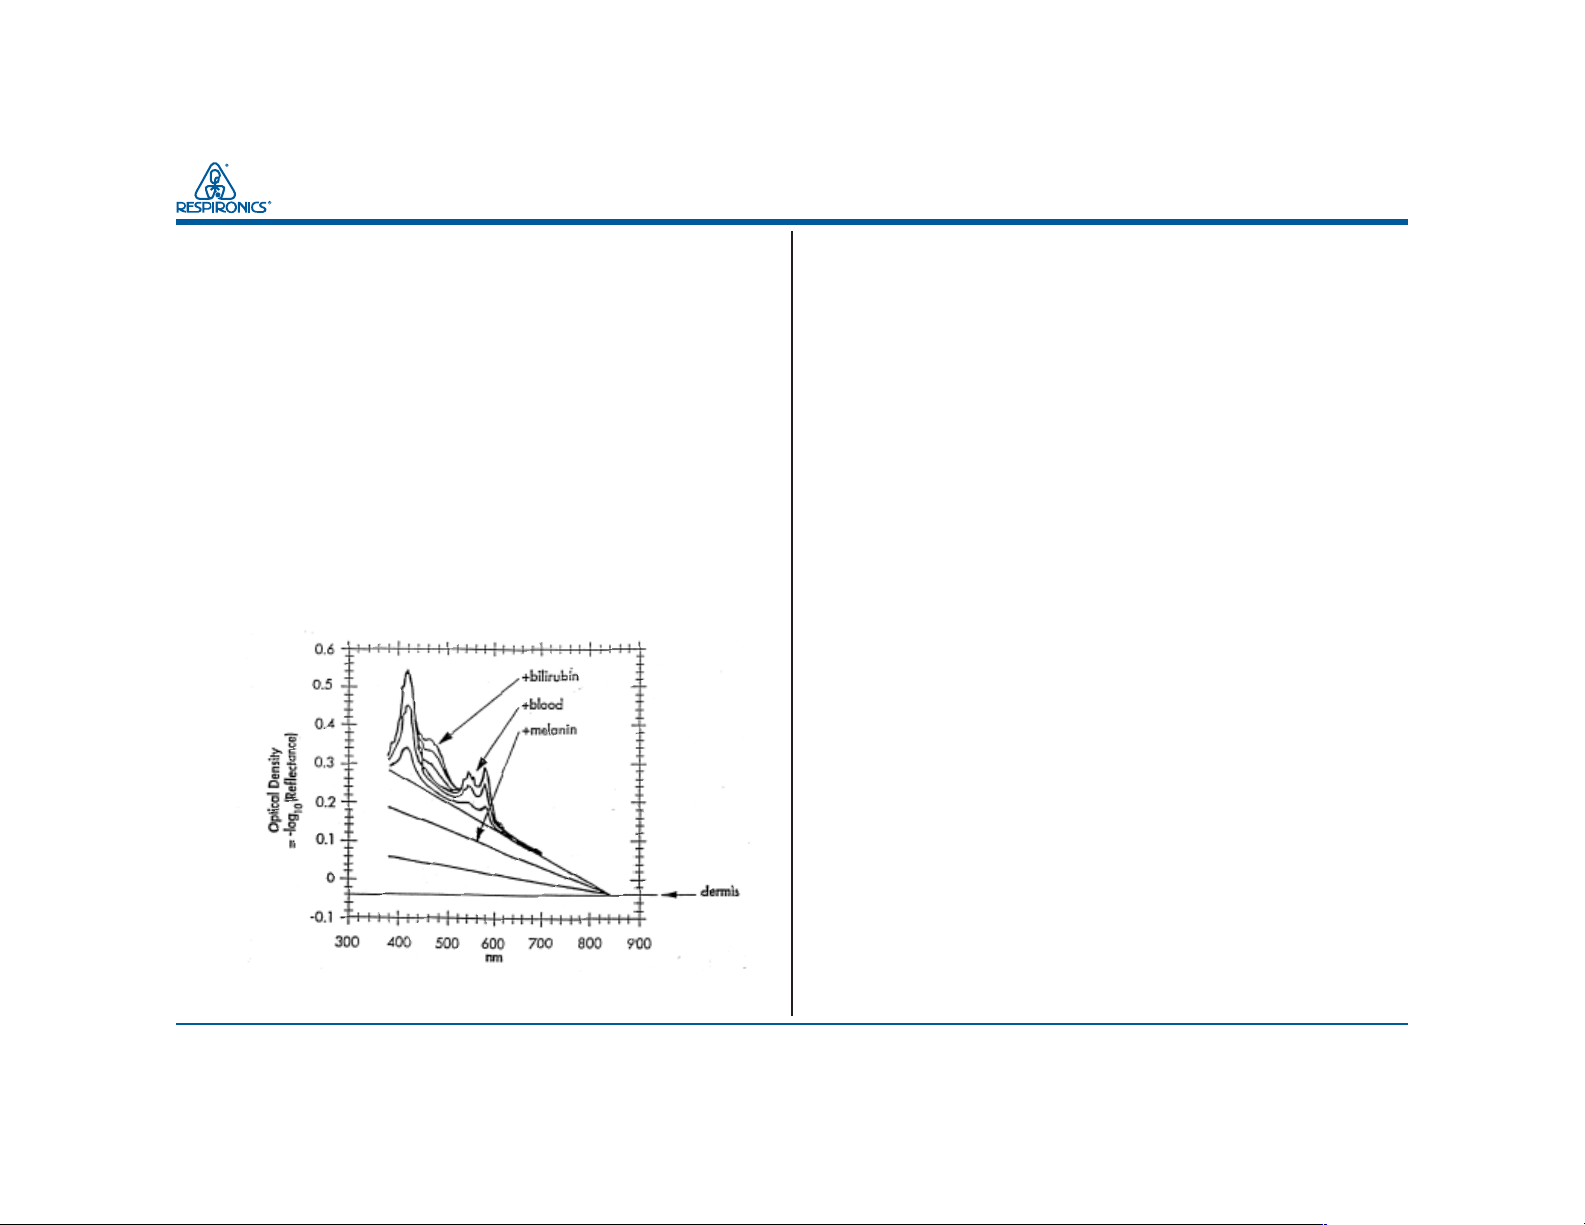
Theory of Operation (continued)
The light reflected from the skin of neonates and collected by
the BiliChek Non-Invasive Bilirubin Analyzer is analyzed with
a highly sophisticated, proprietary algorithm to generate a serum
bilirubin measurement. The major skin components which
impact the spectral reflectance in newborns are (1) dermal
maturity, (2) melanin, (3) hemoglobin, and (4) bilirubin. The
intensity of the reflected light is converted to absorbance units,
Optical Density (OD), for analysis. The total OD at each
measured wavelength is equal to the sum of the component ODs.
This is represented mathematically as: OD
OD
MEL
+OD
HEME
+OD
By utilizing known spectral
BILI
TOTAL
= OD
DERM
+
characteristics of each component, the contribution to the total
OD can be sequentially subtracted until bilirubin is all that is
remaining.
Non-Invasive Skin Spectral Components
1
Each of these components have also been considered in the
development of the algorithm by which the BiliChek NonInvasive Bilirubin Analyzer computes the bilirubin measurement.
By measuring the intensity of the reflected light at more than
100 individual wavelength bands across the visible spectrum, a
spectral analysis can be performed. By normalizing against a
reference standard, the BiliCal® Individual Calibration tip, the
variations over time of the bulb and the photo-detectors are
eliminated. The peak absorption of the bilirubin is at
approximately 460nm as measured by subtracting the absorption
of the other components from the total skin absorption. This is
represented by the equation below.
OD
BILI
= OD
TOTAL
-OD
MEL
-OD
HEME
-OD
DERM
The absorption of light by a molecule is proportional to its
concentration. Therefore, the absorption of bilirubin, as
calculated above, is proportional to the concentration of bilirubin
in the subcutaneous capillary beds and subcutaneous tissue. By
subtracting the contribution of the aforementioned components,
the bilirubin absorbance can be quantified and is correlated to
the laboratory total serum bilirubin levels.
1
Jacques, S., Saidi, I., Ladner, A., and D. Oelberg. Developing and optical
fiber reflectance spectrometer to monitor bilirubinemia in meonates.
1014988
BiliChek Service Manual
7
Page 8

4.0 Warnings and Cautions
Caution: US Federal Law restricts this device to sale
by or on the order of a physician.
Warnings
The BiliChek Hand-Held Unit is to be operated only in
conjunction with Respironics approved charger base,
battery packs, power supply, and BiliCal Individual
Calibration Tips.
Do not point at eyes while taking a measurement.
Not suitable for use in the presence of a flammable
anesthetic mixture with air or with nitrous oxide.
Do not use in areas of the skin with visible brusing.
If you suspect BiliChek is interfering with other electronic
devices or vice versa, try the following measures to
correct it:
Relocate the device until the interference stops.
Move the BiliChek further away from the device.
Plug the BiliChek power supply into a different
power outlet so that the BiliChek power supply
and the device are on different breaker or fuse
circuits.
Do not puncture or incinerate the battery pack or dispose
of in a landfill. Batteries should be disposed of properly
according to local guidelines.
Do not use outdoors or place in direct sunlight.
The charger base unit (battery charger) should be plugged
into a properly grounded outlet. Do not operate with
damaged plug or cord.
Cautions
The BiliCal Individual Calibration Tip should not be
exposed to light for extended periods of time. Keep
BiliCal Tip in package prior to use.
If the product is dropped and frequent error messages
occur, it should be inspected for proper operation by an
authorized service representative.
Do not immerse in water or other liquid.
Do not let power cord hang over edge of counter or table
as this may pose a tripping hazard.
Contraindications
Avoid using measurement sites when the following
conditions since they can produce erroneous results:
Brusing
Birthmarks
Hematomas
Excessive hairiness
The BiliChek should not be used on patients who have
undergone an exchange transfusion.
1014988
BiliChek Service Manual
8
Page 9

5.0 Description of the BiliChek® System
-40
°C
60
°C
The BiliChek System (REF B809 or B801) consists of a hand-held unit (REF B800-13) and the following items:
Quantity Description REF Number
2 Rechargeable Battery Packs B800-20
1 Charger Base B800-21
1 Power Supply (International) B800-17
1 Power Supply (Domestic) B800-16
1 Table Top Power Supply (100/250V) 47/63Hz (optional) B800-18
1 Bag of 10 Disposable Calibration Tips B800-10
1 Bag of 10 BilEclipse Phototherapy Protective Patch B800-12
1 User Instruction Manual B800-19
1 BiliChek Manual, International 1 B800-23
1 BiliChek Manual, International 2 B800-24
Bag of 10
10
BiliCal Disposable Calibration Tips
ili
B
l
a
C
™
ip
T
n
tio
a
libr
a
C
le
b
sa
o
p
is
D
k
e
h
iliC
B
0
-1
0
0
8
r: B
e
b
m
u
er N
rd
o
e
R
1
2
4
,
0
6
8
,
5
9
4
0
,
2
9
7
,
5
.
o
N
t
n
e
t
a
P
1
4
5
,
6
2
2
,
6
2
8
4
,
2
0
0
,
6
1
8
9
,
4
2
9
,
5
g
n
i
d
n
e
P
s
t
n
e
t
a
P
d
n
a
60°C60°C
2
-40°C-40°C
Bag of 10
1014988
BiliChek Service Manual
9
Page 10

6.0 System Specifications
BiliChek System:
♦Total Weight ............................................... 974g
BiliChek Hand-Held Unit:
♦Weight (with battery pack) ........................ 346g
♦Dimensions ................................................ See figure below
Battery Packs:
♦Type ........................................................... Ni-Cd
♦Dimensions
♦Height ............................................ 6.5cm
♦Depth ............................................. 4.8cm
♦Width ............................................. 3.5cm
♦Weight ............................................ 147g
♦Voltage ....................................................... 6V
♦Capacity ..................................................... 700mA Hrs
♦Measurements per full charge.................... Minimum 100
on a single
charge
♦Life Span.................................................... Minimum 1 year
♦Recharge Cycle .......................................... 4.6 hours
maximum
♦Discharge and Recharge Cycle .................. 9.2 hours
maximum
Charger Base:
♦Dimensions
♦Height ............................................ 7.6cm
♦Depth ............................................. 12.1cm
♦Width ............................................. 12.4cm
♦Weight ........................................................ 264g
Light Bulb:
♦Type ........................................................... Tungsten
♦Bulb Life .................................................... Minimum
measurements
Power Supply:
Domestic
♦Input ............................................... 120V, 60Hz
♦Output ............................................ 12 VDC, 0.75 Amp
International
♦Input ............................................... 100-240 VAC ± 10%
47-63 Hz
♦Output ............................................ 12 VDC, 2.75 Amp
Environmental Conditions for Use:
BiliChek System and BiliCal Individual Calibration Tip may
be stored at -40°C to 60°C (-40°F to 140°F) with
noncondensing relative humidity of 95% for a duration of at
least 24 hours.
BiliChek System and BiliCal Individual Calibration Tip are
intended to operate between temperatures of 5°C to 40°C
(41°F to 104°F) with 0% to 85% relative humidity without
condensation.
1014988
BiliChek Service Manual
10
Page 11
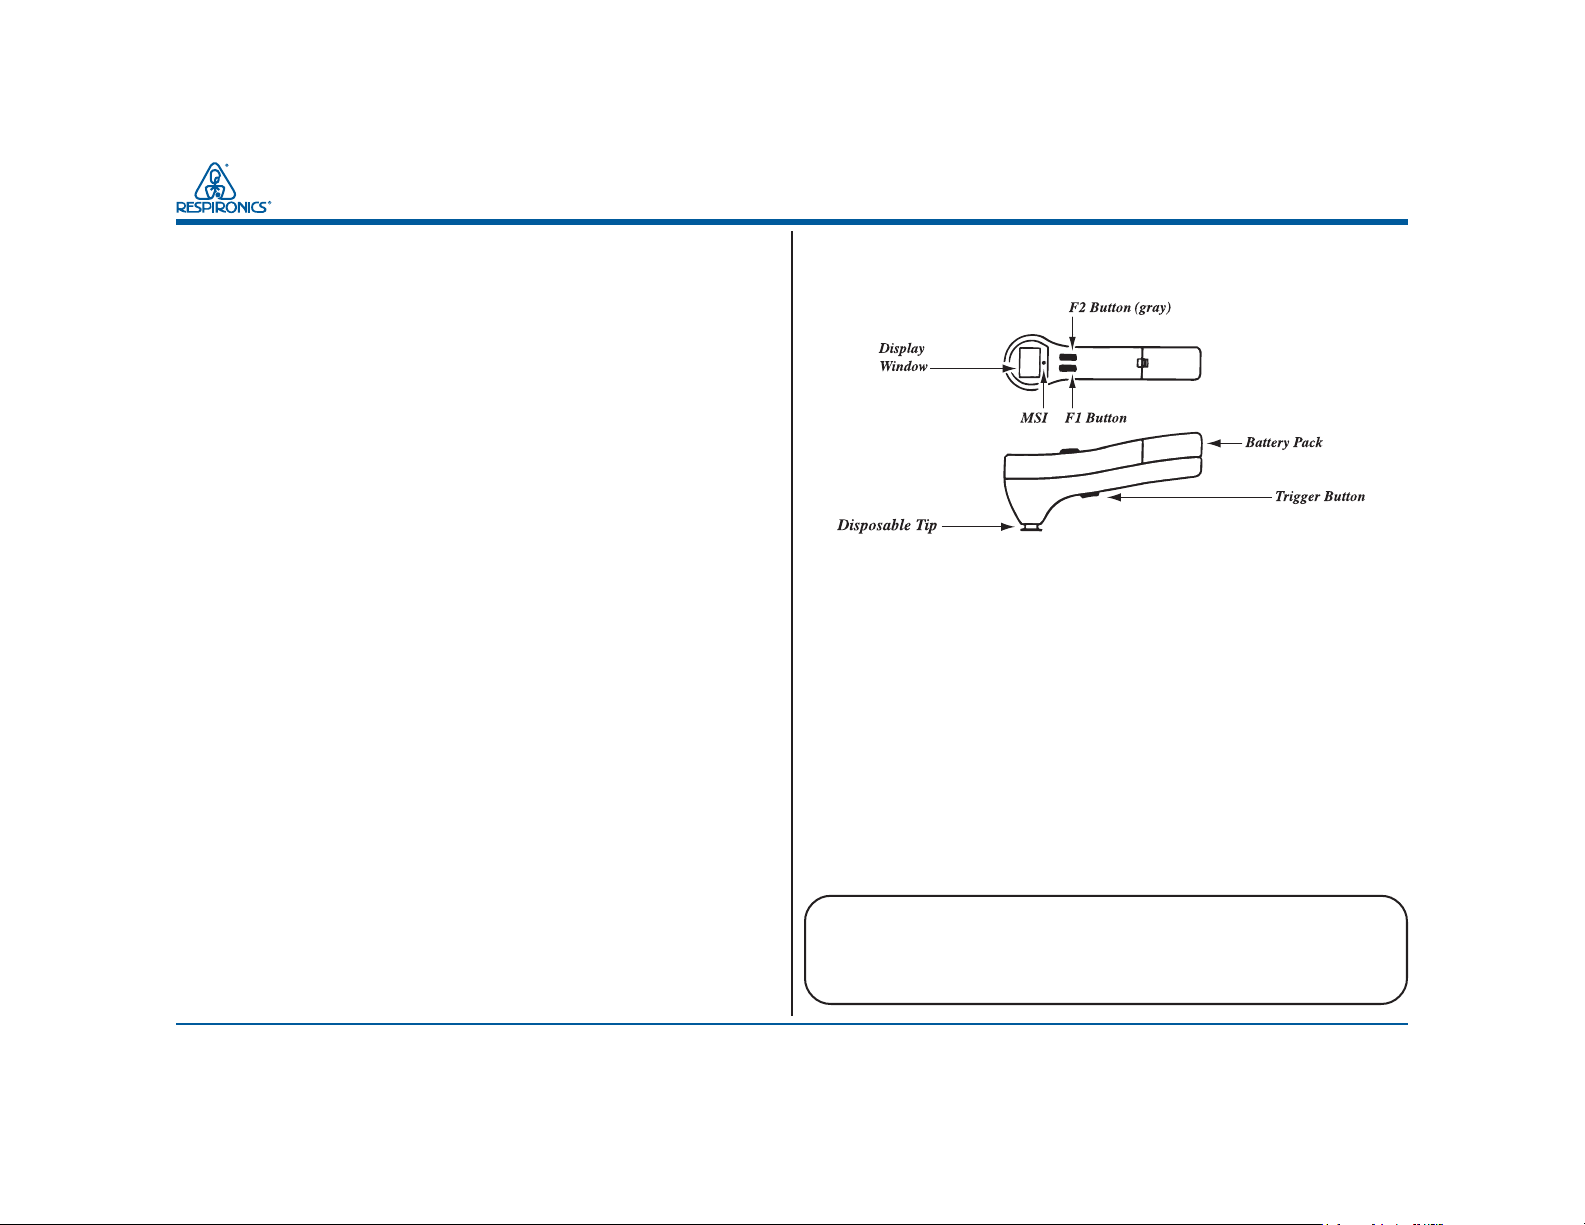
7.0 Functional Description
BiliChek Hand-Held Unit (HHU):
The BiliChek Hand-Held Unit consists of the following functional components:
5. Battery Pack - Located in the bottom portion of the
handle,it provides the electrical energy to operate the
variouscomponents
1. TRIGGER button - The single button on the bottom of
the unit is called TRIGGER. It is used to initiate
calibration and patient measurement.
2. FUNCTION buttons - The two buttons on the top side
are FUNCTION buttons. The teal button on the left is
referred to as F1, and the gray button on the right as F2.
These are used to initiate non-routine functions such as
set-up, changing time and date etc.
3. BiliCal Individual Calibration Tip - This tip serves five
purposes:
a. device calibration before each patient measurement.
b. protection of the fiber-optic probe,
c. protection of the surface of the calibration material,
d. positioning aid to ensure proper placement of the
probe.
e. a clean surface for each patient measurement.
4. Display window - The display window shows the
bilirubin measurement, time and date, audio and
battery icons, Measurement Status Indicator (MSI) as
well as other system and error messages.
.
(teal)
Charger Base:
The charge base contains two wells, A and B, which
recharge the battery pack in the BiliChek HHU and a spare
battery pack, respectively. The two small lights on the
front of the charger base (Battery Status Indicators or BSI)
indicate the operation of the battery charger and battery
charge status.
♦ The BiliChek HHU is placed in the left hand well
A with the display window facing the operator.
♦ The spare battery pack is placed in the right hand
well B with the latch up and facing the operator.
Caution: The BiliChek Hand-Held unit will not fit in well
B of the charger base. The battery pack can fit into well
A, but may not make correct connection to the charger
base.
1014988
BiliChek Service Manual
11
Page 12

In order to maintain optimal battery performance and battery
life, the battery packs should periodically be fully drained of
power. The charger base has the ability to manually drain the
battery by using the Charge/Deep Discharge switch located
on the bottom of the charger base. It is recommended by the
manufacturer to discharge each battery pack every month. To
drain a battery pack of power, place the Deep Discharge switch
in the right ( ) position and place the battery pack in the
charger base. The discharge/recharge cycle will take approximately 4.6 to 9.2 hours depending on the amount of the charge
in the battery pack.
The green light will illuminate when the battery pack has
completely discharged and recharged. After both battery packs
have been discharged, place the Deep Discharge switch in the
left ( ) position.
Caution: Leaving the Deep Discharge switch in the right
( ) position at all times will drain the battery pack before
every recharge. This will increase the duration of the recharging cycle and may reduce the overall life of the battery packs.
NOTE: If the battery pack is moved or bumped during the
recharge phase of the deep discharge cycle, the deep discharge
cycle may begin again.
BiliCal
Individual
Calibration Tip
The Battery Status Indicator (BSI)
BSI Color Battery Charger Mode Solutions
OFF
Green
Amber
Amber Flashing
Battery pack not sensed in
well or charger base not
properly connected to power
supply.
Battery pack is fully charged.
Battery pack in the well is
charging but not ready for use.
Battery pack in the well is
deep discharging.
Ensure battery pack is
properly seated in
well, check power
connections. Try
another battery if BSI
is still off. If BSI is
still off with second
battery, the Charger
base itself has
malfunctioned and
requires service.
Battery pack is ready
for use.
Continue charging
until BSI color is
green.
Continue discharging
and recharging until
BSI color is green.
NOTE: BSI will
become steady amber
when deep discharge
phase of cycle is
ended and charging is
in progress.
1014988
Red Flashing
BiliChek Service Manual
Bad battery pack in the
charger base.
Replace the battery
pack. If the problem
is still present with a
new battery pack, the
charger base itself has
malfunctioned and
requires service.
12
Page 13

NOTE: When Deep Discharging the battery pack, the BSI
will blink amber during the discharge cycle, become constant
amber when recharging, and then green when fully charge.
NOTE: IF the BSI is flashing red when the battery pack is in
place, try resetting the battery pack in the charging well. If the
problem persists, try another battery pack. If the problem
continues, the charger base has malfunctioned and needs
service.
8.0 Initial Set-Up
♦ Visually inspect that all components are without
physical damage.
♦ Plug the power cord into the power supply and then
into a grounded outlet.
♦ To install the battery pack, insert the bottom of the
battery pack into the bottom of the BiliChek
hand held unit and then rotate battery and snap it into
place.
♦ To remove the battery pack press the release latch at
the top of the battery pack and rotate it out of the
BiliChek hand-held unit.
♦ Connect the power supply to the charger base by
inserting the plug into the socket on the rear of the
charger base. The Battery Status Indicator (BSI) lights
will flash red, green, amber, and then off (approxi
mately 1 second each) to indicate proper operation.
1014988
BiliChek Service Manual
Before the initial use, both battery packs should be fully
charged. After installing one of the battery packs into the
BiliChek hand-held unit, insert the hand-held unit into the
charger base well A, as shown on page 12 of this manual.
The indicator light will glow amber to indicate that the battery
pack is being charged (consult section 11.2 Troubleshooting
Flow Chart of this manual if the indicator is blinking red or
not illuminated). Now insert the auxiliary battery pack into
well B as shown on page 12 of this manual. The BSI will
glow amber to indicate that it is charging. Charge both battery
packs fully until green lights are displayed on both BISs
(page 12)
13
Page 14

9.0 Set-Up Mode
To initially set up the BiliChek® or to customize it for a specific institution, the following list of features can be changed
from the initial factory settings.
♦ Select audio On/Off
♦ Select the measurement units (mg/dl or µmol/L)
♦ Set the automatic power-off time interval
(60 or 120 seconds)
♦ Select the time format (12H or 24H)
♦ Set the current time
♦ Select the date format (MO/DA or DA/MO)
♦ Set the current date
To Turn The Unit On
♦ Install a fully charged battery pack. Ensure that the
battery pack is fully in place and latched. If EOO is
displayed, see Section 11.0 of this manual.
♦ Press and release either F1 or F2
♦ The unit will turn on and boot up the system. During
this boot-up, the software checks the main software,
activates the measurement light bulb, Measurement
Status Indicator, and all LCD indicators. The current
software revision and current configuration are dis
played. The boot-up will end at the home screen dis
playing the last measurement, time and date, or display
an error code message.
NOTE: The BiliChek hand-held unit does not have an OFF
switch. The power will automatically shut off if it is left idle
for a specified period of time (60 or 120 Seconds).
1014988
BiliChek Service Manual
(teal)
14
Page 15

To Access the User Set-Up Function
♦ Press F1 and F2 at the same time, hold for one second,
(until the display changes) and then release to access
the set-up mode.
♦ Use the F1 button to advance to the next item and the
F2 button to change the value of the current item.
♦ To exit the set-up mode, press F1 and F2 at the same
time. All changes that were made will be saved and
displayed.
Audio On/Off
♦ This function allows the user to turn the internal beeper
on or off.
♦ Press F2 to toggle the speaker (beeper) on and off, and
F1 to accept your choice and advance to the next
function.
♦ Press F2 to toggle between values, and F1 to accept
your choice and advance to the next function.
Automatic power-off time interval
To conserve battery power, the unit has an automatic time-out
feature which turns the unit off if it is idle for a specified time
period.
NOTE: The default time is set at 120 seconds.
♦ Press F2 to toggle between the 60 or 120 second
choices, and F1 to accept your choice and advance to
the next function.
Setting the measurement units.
The display will read SET, and either mg/dL or µmol/L will
be displayed
NOTE: The default value is mg/dL.
1014988
BiliChek Service Manual
Selecting the time format
The system will display time in either the 12 hour or 24 hour
format.
NOTE: The 12 hour format is the default setting.
15
Page 16

♦ Press F2 to toggle between the formats, and F1 to
accept your choice and advance to setting the time.
Setting the time
After choosing the time format SET appears on the display
and the current clock time will be shown.
♦ The hour digits will be flashing
♦ Press F2 to scroll through the hours.
♦ Press F1 to accept the hour and the minute digits will
begin flashing.
♦ Press F2 to scroll through the minutes.
♦ Press F1 to accept your choice and advance to the next
function.
♦ Press F2 to toggle between the formats, and F1 to
accept and to advance to setting the date.
Setting the date
Depending on the format selected, the current month or day
digit will flash.
♦ Press F2 to scroll through the choices.
♦ Press F1 to accept and the next digit will begin
flashing.
♦ Press F2 to scroll through the choices.
♦ Press F1 to accept, and the first year digit will begin
flashing.
♦ Press F2 to scroll through the digits.
♦ Press F1 to accept and the second year digit will begin
flashing.
♦ Press F2 to scroll the digits.
♦ Press F1 to accept and the date will be saved and the
display will return to the home screen.
Selecting the date format
The unit will display the date in the Month/Day format or the
Day/Month format.
NOTE: the Month/Day format is the default setting.
1014988
BiliChek Service Manual
16
Page 17

10.0 Operation Of The Device
10.1 Performing A Calibration
♦ Apply a new BiliCal Individual Calibration Tip
to the unit.
♦ Firmly press the BiliCal tip onto the BiliChek hand-
held unit to ensure proper seating of the Tip.
♦ Press and release either F1 or F2.
The unit will perform its self test displaying all
LCD indicators and end at the home screen
♦ Press and release the TRIGGER to start the
calibration cycle.
♦ Three dashes (---) will flash in the display window
and the MSI will be amber if a BiliCal Tip is in
place, indicating the system is ready to calibrate. If
a BiliCal Tip is not in place the MSI will be red,
indicating that a new BiliCal tip should be applied.
♦ Press and release the TRIGGER button. The dashed
lines will stop flashing indicating that the unit is
calibrating.
♦ When calibration is complete the MSI will be
amber, you will hear a beep (if the audio is on), and
the display window will read "005".
NOTE: If an error message is displayed during calibration,
refer to section 11.0 of this manual for troubleshooting.
WARNING: It is critical to calibrate the unit and apply a new
BiliCal Individual Calibration Tip immediately prior to performing a test. Inaccurate test results will occur if this is not
done. Removal of the tip after calibration and prior to a
patient measurement will result in loss of calibration. The
entire calibration sequence must be repeated with a new
calibration tip.
10.2 Performing A Measurement
♦ After performing a calibration, peel the protective
cover from the BiliCal Individual Calibration Tip and
dispose of it.
♦ Press and release the TRIGGER button. The unit is
now activated and ready to take a measurement.
Gently press the tip against the infants forehead. The
Measurement Status Indicator (MSI) will change
from amber to green when proper pressure is applied.
Do not continue to increase pressure, this will result in
an E04 error message.
♦ The display will read 005 and will stop blinking
when proper pressure has been applied. The measure
ment should take less than 2 seconds. At the end of the
measurement, a beep will sound (if audio is on) and
the display will change to "004".
♦ Take 005 readings by lifting and replacing the tip on
the forehead and pressing the TRIGGER button for
each measurement. The current measurement will be
indicated on the display (005-004-003-002-001)
♦ When the 5 measurements are complete, a beep will
sound (if the audio is on) and the results will be dis
played with the current date and time.
♦ Place the protective cover onto the BiliChek per
manufacturer's recommendation. (If the protective cap
is lost a BiliCal may be used to protect the fiberoptic
probe.)
♦ The unit will turn off automatically.
1014988
BiliChek Service Manual
17
Page 18

11.0 Troubleshooting Guide
11.1 Troubleshooting Guide
Display
Display Window Indication Solution
Window
E00 No user set-up information identified. Install a charged battery pack into the HHU. Press
E01 Calibration measurement is unacceptable. Press and release F1 and F2 at the same time.
E02 Patient measurement is unacceptable. Press and release F1 and F2 at the same time. Take another
E03 BiliCal Individual Calibration Tip removed Press and release F1 and F2 at the same time.
between calibration and measurement scan. Remove the BiliCal Individual Calibration Tip.
E04 Too much movement during measurement. Press and release F1 and F2 at the same time.
E05 High Measurement is out of clinically proven range. Obtain a Total Serum Bilirubin level (TSB)
E10 Light bulb is burned out. Replace measurement light bulb (see section 14.1 for instructions). If
E99 System error is detected. Call for Service.
Low battery pack. Maximum of 10 measurements left. Replace current battery pack with a fully
Discharged Battery pack. Replace current battery pack with a fully charged one from the charger
No measurements can be taken. base. Place the discharged battery pack into well B for charging.
Indication
Solution
F1 and F2 at the same time, hold for one second and then release. This
places the HHU in the Set-up mode. Enter settings specific to your
institution. See section 10.0 of this manual for Set-up Mode
instructions.
Ensure BiliCal tip is in place and retry the calibration. If the error
continues: 1. Place a fully charged Battery Pack in the HHU, install a
new BiliCal Tip, and try again to calibrate several times.
2. Remove and rotate the BiliCal tip and retry. 3. Replace the measurement
light bulb (see Section 14.1 for instructions) and retry. If the error is still
present, the HHU has malfunctioned and requires service. Call
Respironics or your distributor.
measurement. If E02 occurs again, replace the BiliCal tip, repeat
calibration and retry the measurement. If the error is still present, the
HHU has malfunctioned and requires service. Call
Respironics or your distributor.
Replace with a new tip and recalibrate.
Perform another measurement.
error continues, the HHU has malfunctioned and requires service. Call
Respironics or your distributor.
charged battery pack from the charger base and place the discharged
battery in well B for charging.
1014988
BiliChek Service Manual
18
Page 19

11.2 Troubleshooting Flow Chart
A
B
Hand Held Unit (HHU)
Make sure there is a fully
charged battery pack in the
HHU
Press and release eith er
button on top of the HHU
(F1 or F2).
the MSI light glow ? See
The HHU is operating
correctly, and can be
returned t o use.
Does
section 10.0 of this
manual
Yes
Does the
display come
on?
Yes
Record the display
information.
Refer to
Troubleshooting
guide, Section 11.1
Will the HHU
calibrate
Yes
Take 5 skin
measurements .
OK ?
Yes
NOTE: After the second
battery pack try, check the
battery pack output with a
multimeter. It should be
between 7 and 7.5 Volts DC.
Try another
Battery pack.
No
NOTE: If the display is
fragmented ( segments
missi ng), the H HU is
defectiv e. Contac t your
distributor for ins tructions on
the retur n of defective HH U
to Respironics for repair..
Try several times. If still no
calibration, remove and rotate the
BiliCal tip and try again to calibrate. If
the error is s till present, change the
measurement light bulb and try to
calibrate. NOTE:
No
trys to calibrate after a light bulb
change. If the err or is st ill presen t,
record the error/sub error code
information found in section 11.0 and
conta ct you r dis tribu tor to reques t
instructions for returning the
defective HHU to Respironics for repair.
No
B
It will take several
If the HHU will not take
skin measurements,
contact your distributor
and request instructions
for returning th e defectiv e
H H U t o Respironics fo r
repair.
No
Place a batter y
pack in the HHU
and place the H HU
in the ch arger
base left hand
well. Well "A"
Charger Base
Place a batter y
pack in the
charger base in
the right hand well.
Well "B".
Does the r ight hand
BSI ligh t glow ?
Does the left h and
BSI ligh t glow ?
No
Remove all battery packs
and unplu g the charger
base. Reconnect the
charger base to power
while observing the BSI
lights.
The BSI light
sequence should
be: BOTH
- Red - Gree n Amber - Off
Insert a battery
pack into t he
charger base right
hand well. Well "B".
LIGHTS
OK ? No
Yes
C
NOTE: The indicator ligh t will
take about 3 seconds to
illuminate.
Yes
Observe the color of
indicator:
Amber = charging
Green = Fully charged
Yes
Red = Defective Battery
pack
(See page 12 for amplification)
C
The charger
base or the
power supply
is defect ive.
D
1014988
BiliChek Service Manual
19
Page 20

Troubleshooting Flow Chart (continued)
C
Is the BSI
illuminated ?
Yes
Is the BSI
Green ?
NOTE: Allow about 3
seconds for the BSI light(s)
to illuminate.
Check to ensure that the
batte ry pac k is sea ted i n the
well and power is applied to
the charger base. Try a nother
battery pack. If the BSI
No
illuminates w ith the second
battery pack , first battery pac k
is defective. Order a
replacement ba ttery pack fr om
your distributor.
The battery pack is fully
Yes
charged and is ready
for use in an HHU.
D
Test the power supply in the following
manner. Check the incoming line voltage
from the mains circ uit. It will be either
115 VAC or 220 VAC depending on your
locale. If the incoming power is OK , plug
in the power supply and check it's output
voltage at the connector that plugs into
the charger base. It should be approx. 12
VDC. If the output is incorrect, the power
supply is defective and must be replaced.
Contact your distributor for a
replacement.
1014988
No
Is the BSI
Amber ?
No
Is
the BSI
blinking
Red ?
If the power supply is operating correctly,
connec t the pow er suppl y to the char ger
The battery pack is
charging. Leave it in
the charger base untill
Yes
the BSI light glows
green. See note 1.
below.
Try another battery pack. If the second
battery pac k gives the prop er indication,
the first battery pack is defective. Order
a replacement battery pack from your
Yes
distributor. If the BSI continues blinking
red with the second battery pack, t he
charger base is defect ive and must be
repaired or replaced.
NOTES:
1. Ensure that the black switch located on the bottom of the
charger base is in the left ( ) position (charge only). If the
BSI is blinking amber, the charger is in the deep discharge/
recharge mode and the battery pack is discharging. The BSI will
glow steady amber w hen the battery pack is charging, and gree n
when the battery pack is fully charged.
2. Ensure that all contacts on both the battery pack and the
charger base are clean, not bent over or broken off, and free of
any obstructions.
base. If the BS I lights do not illuminate,
the charger base is defective and must
be repaired or replaced. For repair, see
section 11.3 of this manual (schematics
and drawings), and for replacement
contact your distributor.
BiliChek Service Manual
20
Page 21

11.3 Drawings and Schematics
Votage Readings
11.3.1 Battery Pack Electrical Schematic
Using a standard Digital Voltmeter, the following voltage
readings will be obtained from a fully charged battery:
Pin 1 to Pin 4 = 7.0 VDC (± depending on polarity of leads)
Pin 5 to Pin 7 = 7.0 VDC (± depending on polarity of leads)
Pin 5 to Pin 6 = 7.0 VDC (± depending on polarity of leads)
Pin 6 to Pin 7 = 0.0 VDC
NOTE: The battery packs have three (3) contacts on one end
and four (4) contacts on the other end. Holding the battery pack
with the contacts towards you, the contacts are numbered from
left-to-right.
1014988
BiliChek Service Manual
21
Page 22

11.3.2 Charger Base Exploded Views
Charger Base Assembly
REF: B800-21
12V
BiliChek
C
ETL LISTED 9800845
CONFORMS TO
ANSI/UL-2601
CERTIFIED TO
CAN/CSA C22.2 NO. 601.1
Rx ONLY
100-250V ~ 50/60 Hz
, .75 - 2.75 A
SN
1014988
BiliChek Service Manual
22
Page 23

11.3.3 Charger Base PCB Schematic
1014988
BiliChek Service Manual
23
Page 24

Charger Base PCB Schematic (continued)
5
D D
COAX POWER
J1
J3
1
2
3
C C
B B
A A
4
5
6
7
8
9
10
*
C9
18pF
C10
18pF
+5V
C14
.1uF
R51
10K
1%
1
OSC1
R43
10M
Y1
4Mhz
2
OSC2
20
RESET
19
IRQ
9
+5V
Vdd
10
Vss
R16
2.05K
1%
+3V +1.7V +0.5V
R17
R52
1.05K
15K
1% 1%
1%
5
1
2
3
U1
68HC05J1
R53
9.53K
1%
R54
1.05K
MRA4003
PA7
PA6
PA5
PA4
PA3
PA2
PA1
PA0
PB5
PB4
PB3
PB2
PB1
PB0
4
+V
R49
D8
68
1/4 W
D7
P6SMB15AT3
IRQ*
11
12
13
14
15
16
17
18
3
4
5
6
7
8
D12
+
C1
8.2v
10
10uF
MR2*
MR1*
J2
1
2
3
4
5
6
7
8
9
MMSZ5237BT1
RD1
GN1
+5V
3
A1
TPS7350
3
IN1
4
IN2
C2
.1uF
RD2
GN2
EN2GND1RST
8
SENSE
OUT2
OUT1
OT2*
7
6
5
+
C17
C4
C3
.1uF
.1uF
10uF
R50 10K
R34
RST*
R35 10K
PF2*
R36 10K
MM2*
R37 10K
CM2*
R38
R39
R40 10K
R41
PF1*
2
REV CN DESCRIPTION DATE DRAWN BY CHECKED BY APPROVED BY
0 EDMS INITIAL, WAS SPECTRX 1001062 6/2/03 C.HALLWIRTH EDMS EDMS
+5V +5V
C18
.1uF
+5V
1K
10K
10K
10K
R42
10K
OT1*
CM1*
MM1*
+V
2
3
4
5
6
7
8
9
1
19
+5V
+V
GND
U2
A1
A2
A3
A4
A5
A6
A7
A8
G1
G2
MM74HC541
18
RED1
Y1
17
Y2
16
GREEN1
Y3
15
Y4
14
GREEN2
Y5
13
Y6
12
RED2
Y7
11
Y8
+5V
20
+5V
1
*
NOTES:
1. - INDICATES ITEMS NOT INSTALLED.
*
THIS SCHEMATIC WAS CREATED
USING ORCAD TO REPLACE THE
SCHEMATIC DEVELOPED USING
SCHEMA. THIS SCHEMATIC WAS
NOT USED FOR BOARD LAYOUT.
4
3
2
Title
Size D ocument Number Rev
Date: Sheet
RESPIRONICS
BILICHEK CHARGER PCA
S1014726
13Wednesday, October 30, 2002
1
0
of
1014988
BiliChek Service Manual
24
Page 25

Charger Base PCB Schematic (continued)
5
Q1
IRLML2402
+5V
A4
ICS1702
OPRF
SEL0
SEL1
AUX0
AUX1
DTSEL
RC
MRN
3
1
A2
LM317
VIN
ADJ
VSS8AVSS
20
VDD
9
Q2
1
2
R15
16K
C15
.1uF
R55
1K
C7
100pF
SW1
IRLML5103
R1
10K
+5V
4
3
5
+1.7V
17
7
10
14
15
13
12
11
+V
D D
C C
+5V
B B
J8
2
1
*
+5V
A A
VOUT
C12
.1uF
DCHG
THERM
CHG
PFN
MMN
CMN
OTN
4
R3
D1
6.8
2
1W
MRA4003
+
1
2
18
VIN
16
3
PF1*
4
MM1*
5
CM1*
6
OT1*
R4A
62
1W 1W 1W 1W 1%
C5
1uF
R5
10K
+.05V
3
REV CN DESCRIPTION DATE CHECKED BY APPROVED BY
R4B
R4C
62
Q3
IRLML2402
R23
10K
R22
10K
R57
10K
R56
10K
R4D
62
62
+3V
R6
12.1K
R7
3.01K
1%
R24
1M
5
+
6
-
R58
1M
3
+
2
-
SEE SHEET 1
+5V
+5V
84
A6B
7
LM393A/SO
+5V
84
A6A
1
LM393A/SO
+5V
R19
100K
1%
R46
6.19K
1%
R45
*
MMBD914LT1
2
D3
P6SMB6.8AT3
R25
10K
D10
GREEN1
RED1
DRAWN BY
D4
P6SMB15AT3
R27
1K
R26
1K
1
POGO PINS
1
1
1
1
1
1
J6
3
2
1
*
3
2
1
MOLEX 3
PP1
PP2
PP3
J4
RESPIRONICS
Title
Size Document Number Re v
4
3
Date: Sheet
BILICHEK CHARGER PCA
S1014726
2
of
23Wednesday, October 30, 2002
1
0
1014988
BiliChek Service Manual
25
Page 26

Charger Base PCB Schematic (continued)
5
3
1
Q4
IRLML2402
A3
LM317
VIN
ADJ
VOUT
Q5
R59
1K
C16
.1uF
IRLML5103
R8
10K
+V
D D
C C
4
R10
D2
6.8
2
1W
MRA4003
+
C6
1uF
R11A
62
1W 1W 1W 1W 1%
R12
10K
3
REV CN DESCRIPTION DATE CHECKED BY APPROVED BY
R11D
R11B
R11C
62
62
Q6
IRLML2402
SEE SHEET 1
+5V
R13
62
12.1K
R14
3.01K
1%
R21
100K
1%
R47
*
R48
6.19K
1%
2
D5
P6SMB6.8AT3
DRAWN BY
D6
P6SMB15AT3
1
POGO PINS
1
1
1
1
1
1
J7
3
2
1
PP4
PP5
PP6
1014988
+5V
R20
16K
+5V
C8
100pF
J9
B B
2
1
*
A A
+1.7V
A5
ICS1702
17
OPRF
7
SEL0
10
SEL1
14
AUX0
15
AUX1
13
DTSEL
12
RC
11
MRN
5
C13
+5V
.1uF
20
VDD
VSS8AVSS
9
CHG
DCHG
THERM
PFN
MMN
CMN
OTN
1
2
18
VIN
16
3
PF2*
4
MM2*
5
CM2*
6
OT2*
4
+.05V
R29
R30
10K
R28
10K
R61
10K
R60
10K
1M
5
6
R62
1M
3
2
3
+3V
+5V
R31
10K
D11
MMBD914LT1
GREEN2
RED2
R33
1K
R32
1K
+
-
+
-
+5V
84
A7B
LM393A/SO
+5V
84
A7A
LM393A/SO
7
1
RESPIRONICS
Title
Size Document Number Re v
Date: Sheet
BILICHEK CHARGER PCA
S1014726
2
33Wednesday, October 30, 2002
*
J5
3
2
1
MOLEX 3
0
of
1
BiliChek Service Manual
26
Page 27

11.3.4 Charger Base PCB Component Layout
1014988
BiliChek Service Manual
27
Page 28

11.4 Hand Held Unit (HHU) Error Code List with Explainations
NOTE: All sub errors are displayed in the date field unless specified otherwise in each section. See Illustration at the top of
page 32.
Error: E01 Calibration
Sub Errors Description
000001 Reference component out of range. Install a fully charged battery pack and try several calibrations with
new BiliCal tips. If error persists, HHU requires service.
000002 Dynamic integration time out of range. Install a fully charged battery pack and try several calibrations
with new BiliCal tips. If error persists install a new measurement light bulb and try calibration several
times. If the error still persists, the HHU requires service.
000004 Shape index above threshold. Try a fully charged battery pack and a new BiliCal tip. If error persists,
HHU requires service.
000008 Peak pixel not found. Install a fully charged battery pack and try several calibrations with new BiliCal
tips. If error persists, HHU requires service.
008192 Stray Light Slope Error. Install a fully charged battery pack and try several calibrations with new BiliCal
NOTE: Firware
Version ≥ 2.4/3.8
Only
016384 Mean of dark scan data above threshold. Install a fully charged battery pack and try several calibrations
tips. If error persists, HHU requires service.
with new BiliCal tips. If error persists, HHU requires service.
1014988
BiliChek Service Manual
28
Page 29

Error: E02 - Measurement
Sub Errors Description
000001 Light intensity below lower threshold specified in data configuration parameters. Try several calibrations
and measurements. If error persists, try on another patient. If error persists on several patients, HHU
requires service.
000002 Light intensity above upper threshold specified in data configuration parameters. Same as in 000001.
000008 BiliChek bilirubin measurement below lower limit. Same as in 000001.
008192 Stray Light Slope Error. Try several calibrations and several BiliCal tips. If error persists, HHU requires
NOTE: Firware
Version ≥ 2.4/3.8
Only
service.
016384 Mean of dark scan data above threshold. Try several calibrations and measurements. If error persists,
HHU requires service.
Error: E03 - Disposable
Disposable tip removed after calibration and before measurements completed. Ensure tip is firmly attached an try another
calibration and measurement. NOTE: This error can also occur if HHU is operated in sunlight or other bright light. Cover the
IRDA port on the front of the HHU and perform another calibration and another measurement.
Error: E04 - Movement
Excessive movement detected during measurement. Take another measurement ensuring no movement of the BiliChek hand-
held unit while the MSI is green.
Error: E05 - BiliChek Bilirubin Measurement High
BiliChek Bilirubin measurement is above the upper threshold. The BiliChek Non-Invasive Bilirubin Analyzer has an upper
threshold of 20 mg/dl or 340 µmol/L set in the software. If readings are above this threshold, a blood sample must be
taken to measure the TSB level.
1014988
BiliChek Service Manual
29
Page 30

HHU Error Code list with Explanations (continued)
Error: E10 - No Lamp Current
Measurement lamp burned out. Replace measurement lamp and perform several calibrations until HHU calibrates. If HHU
will not calibrate after numerous tries, HHU requires service.
Error: E99 - Fatal
Fatal software error. The HHU must be returned for service. Contact your distributer to request instructions to return to
Respironics for repair.
The following tables are for information only. If an E99 occurs, record the sub error and place a note with the HHU when
returning it for service.
Error: E99 - Fatal (Sub Error Tables)
Sub Errors Description
0001 System configuration parameters are not valid
0002 Timer could not be allocated
0004 Audio could not be initialized
0008 RTC could not be initialized
0016 Serial port could not be initialized
0032 LCD could not be initialized
0064 Switches could not be initialized
0128 Microspectrometer configuration data is not valid
0256 Internal reference voltage is out of range
0512 System RAM check failed
1024 Checksum error in boot firmware
2048 Checksum error in main firmware
4096 Firmware version in boot block not found
8912 Watchdog timer could not be initialized
16384 Watchdog timer timed-out
1014988
BiliChek Service Manual
30
Page 31

NOTE: The following sub errors are displayed in the date field.
Firmware version 2.3/3.6 and below
Sub Errors Description
0256 External reference voltage outside of limits
0512 5V analog supply below limit
1024 Programming voltage below limit
2048 Clinical Error
4096 Internal system error detected during clinical testing
8192 Microspectrometer SN = 000000
Firmware version 2.4/3.8 and above
Sub Errors Description
0016 Peak pixel range > 25
0032 External reference voltage outside of limits
0064 5V analog supply below limit
0128 Programming voltage below limit
0256 Clinical error
0512 Internal system error detected during clinical testing
1024 Microspectrometer SN = 000000
1014988
BiliChek Service Manual
31
Page 32

12.0 Routine (Operator) Cleaning
13.0 Maintenance and Repair and
The BiliChek System is made of an easy-to-clean material
with a smooth, textured surface. One of the following cleaning agents is recommended for cleaning the exterior of the
HHU, Battery Charger Base, and Battery Packs:
♦ KleenaSeptic
♦ Cavicide
♦ 70 to 90% Isopropyl Alcohol solution
♦ 1% Bleach solution
Spray the cleaning agent on a soft damp cloth and wipe clean
the BiliChek system. The same procedure can be used to
clean the display window.
Caution: Clean the measurement tip with 90% or higher
Isopropyl Alcohol using a soft optical surface cleaning wipe.
WARNING: Do not immerse any part of the system in water
or other liquid. If liquids spill onto the unit, wipe with a damp
cloth and allow to dry prior to using the system.
WARNING: Do not attempt to clean and/or reuse the
BiliCal Individual Calibration Tip.
®
®
Replacement
13.1 Hand Held Unit (HHU) Measurement Light Bulb
Replacement
If the instrument bulb is not working and error code E01 or
E10 (refer to the troubleshooting section 11.4) is displayed, it
is necessary to replace the measurement light bulb. A Replacement Bulb Kit (RI P/N B800-22) is available from
Respironics or your local distributor.
WARNING: The BiliChek® Non-Invasive Bilirubin
Analyzer is to be used only with the approved Replacement
Bulb Kit from Respironics. Do not over-tighten the lamp
cap.
♦ Remove the battery pack from the bottom of the HHU.
♦ Remove the protective label covering the lamp
assembly.
♦ Remove the lamp cap using a flat tip screwdriver.
♦ Grab the loop of the light bulb with forceps or similar
tool/instrument and gently pull to remove the lamp
assembly.
♦ Insert the replacement lamp assembly using caution
not to touch bulb with fingers. Be sure to place bulb
into socket firmly. DO NOT use the lamp
cap to tighten bulb into place.
♦ Apply the new lamp cap and protective label furnished
in the kit.
♦ Insert a fully charged battery pack into the bottom of
the HHU.
1014988
BiliChek Service Manual
32
Page 33

13.1 HHU Measurement Light Bulb Replacement (continued)
♦ Attach a new BiliCal Individual Calibration Tip to
the BiliChek hand held unit.
♦ Turn the instrument on and perform repeated calibra
tions as outlined in Section 10.1 of this manual, until a
successful calibration is achieved.
WARNING: There are no serviceable components in the
HHU. Removal of the junction screw and attempting to
separate the upper and lower housings of the HHU can cause
irreversible damage to the internal fiber-optics and will
invalidate the manufacturers warranty.
13.2 Charger Base Repair and
Replacement
The BiliChek charger base is a micro-processor controlled
smart charger with Deep Discharge and Recharge capabilities. It requires a 12VDC 0.75 Amp (Domestic) input from
the power supply.
Defective charger bases will be replaced at no charge during
the warranty period. After the warranty period, if desired, the
charger base may be repairable, however, attempts to remove
the main PCB can cause permanent damage to the charger.
To open and inspect/repair the charger base the following
procedure must be followed. To reassemble, reverse the
procedure.
♦ Gently remove the 4 clear plastic feet to expose the
4 assembly screws.
♦ Using a small tipped Philips screwdriver, remove the
4 screws.
♦ Gently separate the upper and lower case.
♦ Inspect the LED connections to ensure that they are
securely connected.
♦ Connect the charger base to the power supply being
careful not to short the PCB to tools etc. Note: AntiStatic protection is required to prevent possible
damage to the micro-processor.
♦ Using the Schematic in Section 11.3.3 of this manual,
a standard Digital Multi-meter, Oscilloscope, and
small electronic service hand tools perform problem
diagnosis and repair.
♦ Re-apply power to the charger base and place battery
in well. Monitor BSI for correct indication (see
section 12). Reassemble the charger base.
The small spring-loaded battery contact pins in the
charger base wells can be removed and replaced in the
event they become bent or broken.
NOTE: Use only the power supply specified by Respironics.
1014988
BiliChek Service Manual
33
Page 34

♦ Gently grasp the pin with a pair of small needle-nose
pliers or equivalent and pull straight up. Once the pin
is removed, a new pin can be inserted in the same
manner. New pins (RI P/N 1014776) can be ordered
from Respironics or your local distributor.
13.3 Hand-Held Unit (HHU) Repair
The Hand-Held unit (HHU) is not field-serviceable with the
exception of the measurement light bulb. The unit must be
returned to Respironics for service. If the HHU is opened, the
accuracy of the instrument cannot be guaranteed and any
remaining warranty will be voided.
13.4 Power Supply Repair/Replacement
The power supply has no serviceable components. In the
event of failure, it must be replaced. If the failure occurs
during the warranty period of the system, it will be replaced at
no charge by Respironics. Out of warranty replacements can
be purchased from Respironics or your local distributor.
13.5 Battery Pack Repair/Replacement
The BiliChek battery pack contains 5 Ni-Cd batteries and is a
sealed unit. Any attempt to open will destroy the pack. It is
not repairable and will be exchanged at no charge during
warranty. Out of warranty replacements may be purchased
from Respironics or your local distributor.
NOTE: For diagnosis of suspected battery pack failure, see
section 11.1 and section 11.3.1.
NOTE: Batteries must be disposed of properly and in accordance with local ordinance. Do not incinerate or throw in
trash or land fills.
14.0 Software Upgrades
As software upgrades are required for system options or
enhancements, instructions, software, and any required tools
or equipment needed for the upgrade will be sent if requested.
NOTE: There may be a charge for software upgrades that are
not required for product safety or effectiveness. Check with
your local distributor for information regarding upgrades.
1014988
BiliChek Service Manual
34
Page 35

15.0 Respironics Customer Service and
Product Support Contact
Information
Respironics is committed to customer satisfaction and may be
contacted with any questions or for technical support. For
technical assistance contact Respironics Customer Satisfaction
US and Canada
Phone: 1-800-345-6443
Fax: 1-800-886-0245
International
Phone: 1-724-387-4000
Fax: 1-724-387-5012
Visit respironics Home Page on the World Wide Web at:
1014988
www.respironics.com
or e-mail:
service@respironics.com
or
clinical@respironics.com
BiliChek Service Manual
35
Page 36

www. respironics.com
Reorder # B800-25 Revision# 1014988
DS 07/14/03
 Loading...