

Page 1
Instructions For Use
Measures peak expiratory flow
in order to monitor respiratory
conditions such as asthma.
For single patient use or
multi-patient use when used
with disposable mouthpieces.
This product should be used
under the supervision of a
physician or licensed
healthcare professional.
This package contains:
• ASSESS®Peak Flow Meter
with Asthma Management
Zone System
• Instructions For Use
• Daily Record Chart
• Mouthpiece
With Zone
Management
NDC 08373-0710-00
Made for:
Respironics New Jersey, Inc.
5 Wood Hollow Road
Parsippany, NJ 07054
Global Headquarters: Pittsburgh, Pennsylvania USA
Customer Service: 800-962-1266 or 724-387-4000
Fax: 1-724-387-5270
www.respironics.com
U.S. Patent No. 4,944,306/Design Patent 254,443
Made in the U.S.A.
© 2007 Respironics, Inc. and its affiliates. All rights reserved. 1047166
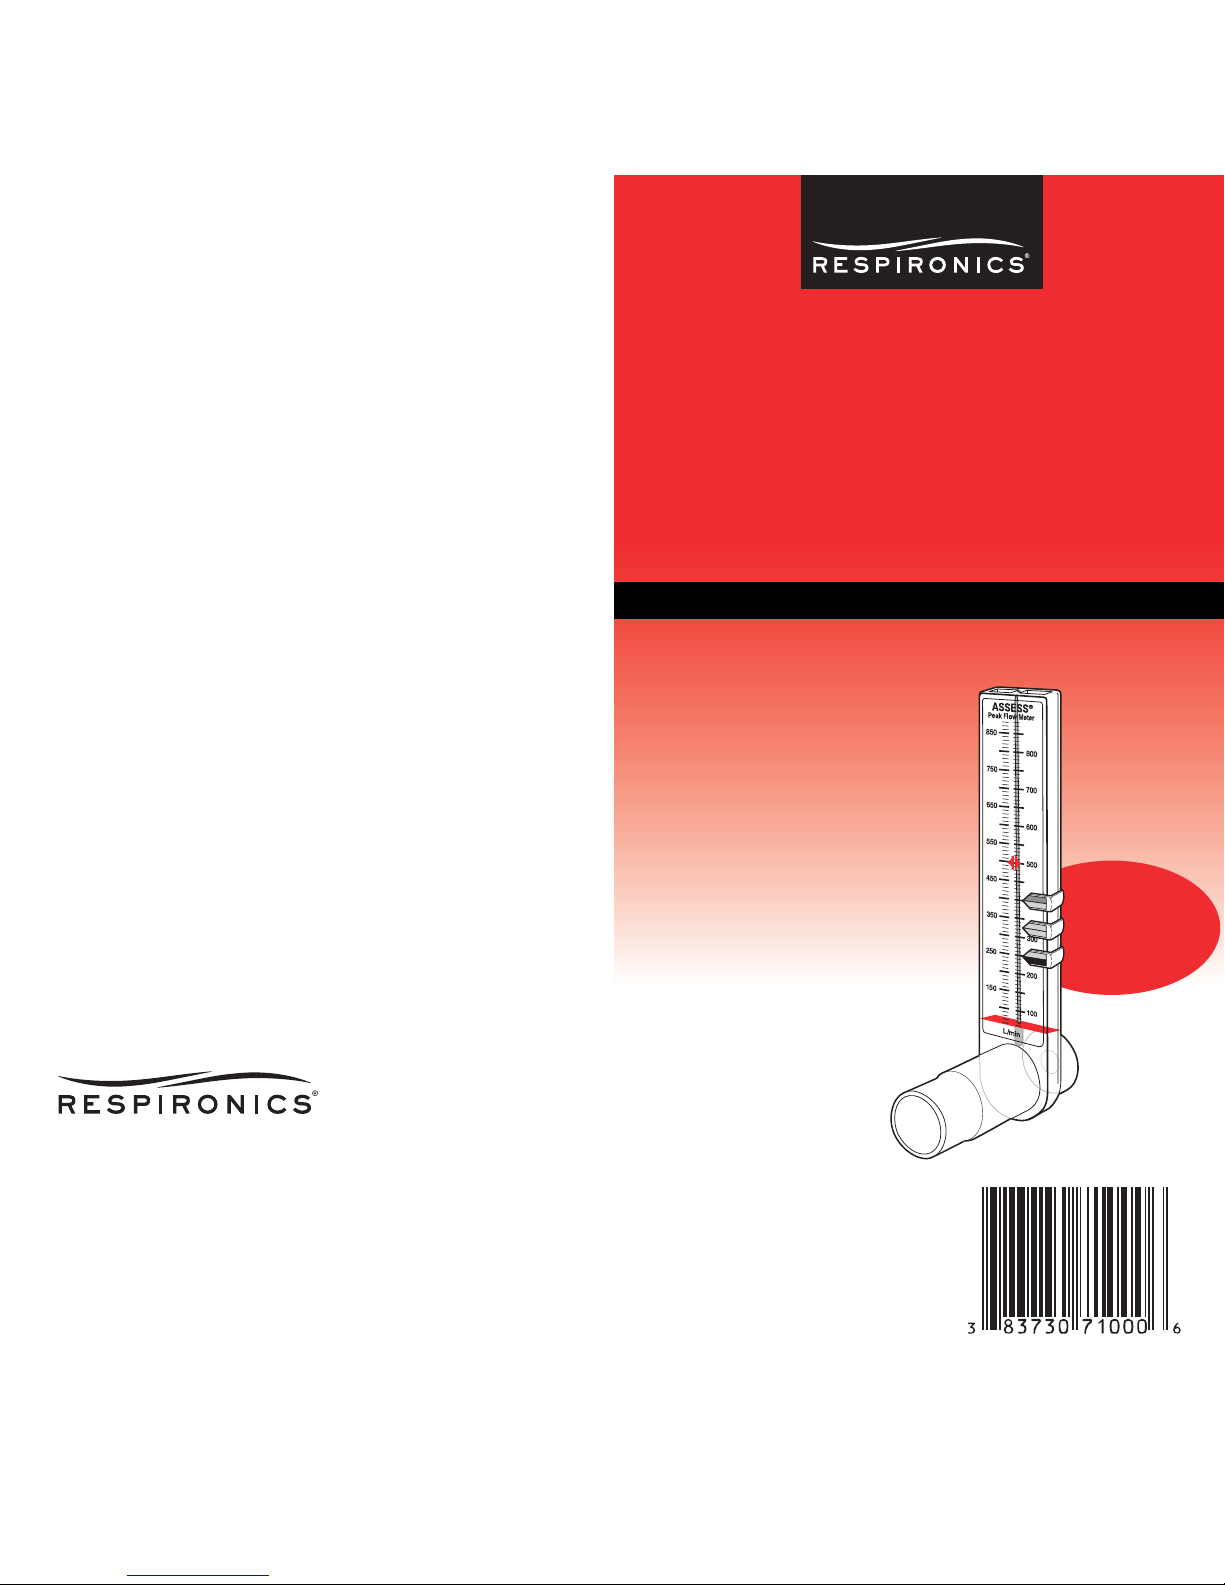
Peak Flow Meter
with Asthma Management
Zone System
ASSESS
®
Reorder No. HS710
Full Range 60-880 L/min
Respironics New Jersey, Inc.
Parsippany, NJ 07054
Page 2

Introduction
The ASSESS®Full Range Peak Flow Meter measures your
“peak expiratory flow rate” (PEFR) – the fastest speed at
which you can blow air out of your lungs after taking in as big a
breath as possible. PEFR can tell you how well you are
breathing by measuring how well air is moving through the
airways in your lungs.
If you have a breathing condition such as asthma, your
doctor or healthcare provider may recommend that you use
an ASSESS peak flow meter to monitor changes
in your
airflow. He or she will give you a treatment plan that will tell
you what actions to take when you have a change in airflow.
In addition, you should keep a record of your peak flow
measurements (see the “Daily Record Chart” section) and
review them with your doctor in order to determine the best
treatment plan for you.
When you blow into
ASSESS, your breath
pushes a piston inside the
meter up a scale. When
the piston rises, it carries
the indicator with it and
the indicator remains at
your peak flow value. A
high number usually
means that air is moving
easily through your lungs.
When you have an asthma
episode or attack, your
airways are narrowed and air cannot move easily. Therefore,
a peak flow meter will help measure the openness of
your airways.
Daily peak flow readings can help detect subtle changes in
your lung function... sometimes even before you are aware of
them. Changes in your airflow may require your doctor to
adjust your treatment plan.
Read these Instructions for Use thoroughly and, if the
instructions are not clearly understood, please call
Respironics Customer Service for further explanation. Your
doctor will tell you when and how often to use your peak flow
meter. It is generally recommended to monitor your peak
flow in the morning when you wake up. The peak flow meter
should also be used when you are feeling symptoms of
breathing problems, in order to let you and your doctor know
how serious the breathing problem is and how well your
asthma treatment plan is working.
How To Use Your ASSESS
Peak Flow Meter
Follow these step-by-step directions:
ASSESS can be used without a mouthpiece, but if
you prefer, place the white mouthpiece on the peak flow
meter. Do not bite down on the mouthpiece.
Make sure that the red indicator is at the bottom of
the scale.
Hold the peak flow meter upright as shown, being careful
that your fingers do not block the opening in the back.
Stand up, if possible. Inhale as deeply as you can and
place your mouth firmly around the mouthpiece, making
sure your lips form a tight seal.
Blow out as hard and fast as you can. This will cause the
red indicator to move up the scale. The final position of
the red indicator is your peak flow rate.
Take three readings and record the highest value along
with the date and time in the Daily Record Chart section
provided with your peak flow meter. (Your doctor will
show you how to record your readings correctly.)
To repeat the test, slide the red indicator back to the
bottom of the scale.
500
400
550
450
350
Scale (L/min)
Piston
Opening
Red Indicator
Spring
Mouthpiece
1
2
3
4
5
6
7
Page 3
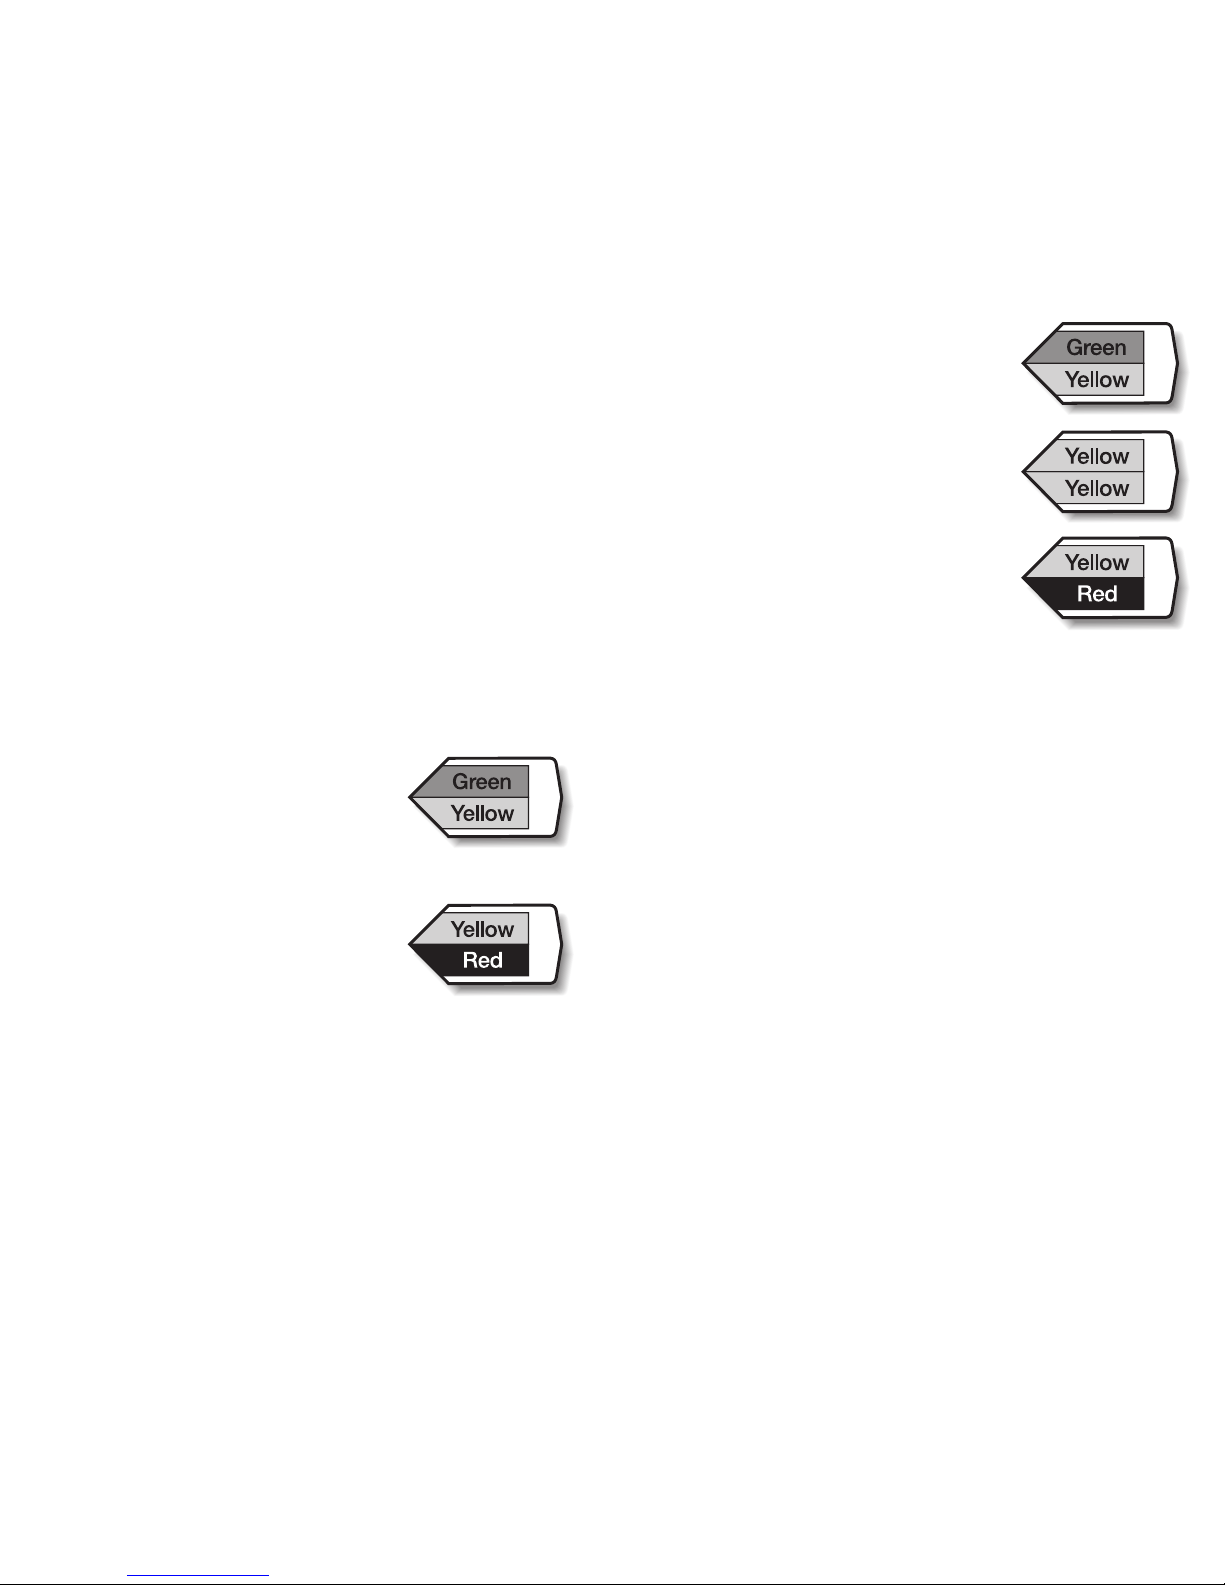
Asthma Management
Zone Systems
Zone clips have been attached to the right side of your
ASSESS peak flow meter. These clips will help you
understand your peak flow readings by making it simple
to locate your personal “safety,” “caution,” and “danger”
peak flow zones.
■ Three-Zone Asthma Management System
In the management of asthma, many doctors recommend
a
Three-Zone Asthma Management System. This system is
based on the
highest peak flow measurement you can
achieve
on a day when your asthma is under good control.
This is called your
personal best peak flow rate. For this
type of asthma management system, peak flow readings
are divided into
three zones – green, yellow, and red.
If your doctor uses a Three-Zone System, remove the
center all-yellow zone clip and discard it.
Think Of These Zones As Traffic Symbols
Green means go.
Your asthma is under
control, so go ahead with your regular
activities and medication plan.
Yellow means caution. Your condition
is not as stable as it should be and a
change in your medication may be
necessary. Your doctor will give you
instructions on how to change your
medication should your peak flow rate
fall into the yellow zone.
Red means stop. You’re headed for an
asthma episode and emergency care may
be required. Get medical help immediately.
Your goal should be to stay in the green zone as long as
possible. Follow the actions prescribed by your doctor for
each zone you enter.
■ Four-Zone Asthma Management System
Your doctor may choose to divide your zones into a
Four-Zone Asthma Management System. This system is
based on the
highest peak flow
measurement you can achieve
on a day
when your asthma is under good control.
This is called your
personal best peak
flow rate. For this type of asthma
management system, peak flow readings
are divided into
four zones – green, high
yellow, low yellow, and red.
If your
doctor uses a Four-Zone System, you will
use the 3 zone clips attached to your
ASSESS Peak Flow Meter. Think Of
These Zones As Traffic Symbols
Green means go.
Your asthma is under
control, so go ahead with your regular
activities and medication plan.
Yellow means caution. Your condition is not as stable as it
should be and a change in your medication may be
necessary. Your doctor will give you instructions on how to
change your medication should your peak flow rate fall into
the yellow zone. From the point of the all-yellow clip to the
point of the green-yellow clip is your high yellow zone. From
the point of the all-yellow clip to the point of the yellow-red
clip is your low yellow zone. Your doctor will tell you the
differences between these caution zones.
Red means stop. You’re headed for an asthma episode and
emergency care may be required. Get medical help
immediately.
Your goal should be to stay in the green zone as long as
possible. Follow the actions prescribed by your doctor for
each zone you enter.
Your Peak Flow Readings
• Consult your doctor to ensure you are recording your
values correctly.
• Make sure that you keep your records up-to-date.
• Your doctor will provide you with a management plan
based on your peak flow measurements. Contact your
doctor when changes in readings occur that may indicate
worsening of your condition, as per his or her instructions.
• Taking daily peak flow readings will help your doctor make
important decisions about your asthma treatment.
Page 4
Caring For Your ASSESS
Peak Flow Meter
Cleaning the Instrument
It is not necessary to clean your personal meter after each
use. Once each week should be enough. Cleaning is simple
and is important to maintain the accuracy of ASSESS.
• The removable white mouthpiece can be cleaned by
rinsing with warm water and thoroughly drying.
• The whole instrument can also be cleaned by rinsing with
warm water and a mild liquid soap. Then, rinse the meter
with clean warm water. Shake out the water and let the
instrument air dry before use.
• ASSESS can be safely cleaned on the top rack only of your
dishwasher. After dishwashing, shake out any remaining
water and allow to air dry thoroughly before use.
•
Never boil the instrument.
Checking Your Meter
You should examine your meter periodically to see if it is
functioning properly. Since ASSESS is made of clear
plastic, it is easy to see if it is operating correctly.
A damaged meter should not be used.
Warranty
ASSESS comes with a one-year unconditional replacement
warranty. If the instrument is not operating
for any reason, please contact Respironics Customer Service
for return authorization. With proper care your ASSESS
should last at least two years.
ASSESS Full Range and its accompanying literature meet
the Technical Standards established by the National
Asthma Education and Prevention Program (NAEPP).
Consult Your Doctor
It is important that the ASSESS Full Range Peak Flow
Meter is used as medically directed, i.e., in consultation
and conjunction with professional medical advice.
CAUTION: Do not allow children to play with the ASSESS
Peak Flow Meter. Allowing them to do so may alter its
function and/or overall reliability.
Height Males & Height Males &
Females Females
43 109 147 55 140 307
44 112 160 56 142 320
45 114 173 57 145 334
46 117 187 58 147 347
47 119 200 59 150 360
48 122 214 60 152 373
49 124 227 61 155 387
50 127 240 62 157 400
51 130 254 63 160 413
52 132 267 64 163 427
53 135 280 65 165 440
54 137 293 66 168 454
Height
Age
(in) 60" 65" 70" 75" 80"
(Years) (cm) 152 165 178 191 203
20 554 575 594 611 626
25 580 603 622 640 656
30 594 617 637 655 672
35 599 622 643 661 677
40 597 620 641 659 675
45 591 613 633 651 668
50 580 602 622 640 656
55 566 588 608 625 640
60 551 572 591 607 622
65 533 554 572 588 603
70 515 535 552 568 582
75 496 515 532 547 560
Normal Males*
Normal Children and Adolescents
†
* Nunn AJH, Gregg I: Brit Med J 298:1068-70, 1989.
† Polgar G, Promadhat V: Pulmonary Function Testing in Children: Techniques and Standards.
Philadelphia, W.B. Saunders Company, 1971.
NOTE: All tables are averages and are based on tests with a large number of people. The peak flow rate
of an individual can vary widely. Individuals at altitudes above sea level should be aware that peak
flow readings may be lower than those at sea level, which are provided in the tables.
Normal Predicted Average Peak Expiratory Flow (L/min)
The National Asthma Education and Prevention Program recommends that a
patient’s “personal best” be used as his/her baseline peak flow. “Personal best” is
the maximum peak flow rate that the patient can obtain when his/her asthma is
stable or under control. The following tables are intended as guidelines only.
Height
Age
(in) 55" 60" 65" 70" 75"
(Years) (cm) 140 152 165 178 191
20 444 460 474 486 497
25 455 471 485 497 509
30 458 475 489 502 513
35 458 474 488 501 512
40 453 469 483 496 507
45 446 462 476 488 499
50 437 453 466 478 489
55 427 442 455 467 477
60 415 430 443 454 464
65 403 417 430 441 451
70 390 404 416 427 436
75 377 391 402 413 422
Normal Females*
(In) (Cm) (In) (Cm)
Page 5

1
2
3
4
Note to Healthcare Professionals
For Multi-Patient Use
As a reminder to healthcare providers, note that when a
single ASSESS unit is used repeatedly as a screening
device, patients should be instructed to inhale
before
placing the instrument to their mouths.
Always use
disposable mouthpieces for this application
(Safety One-Way Valve Disposable Mouthpieces, Reorder
No. HS713; Pediatric Disposable Mouthpieces, Reorder
No. HS712; Adult Disposable Mouthpieces, Reorder No.
HS711).
The meter may be exposed to ethylene oxide (EtO)
sterilization methods (cycle temperatures not to exceed
120° F). Recommended aeration time is eight hours.
Never boil or autoclave the instrument.
Zone Clips
The three-zone asthma management system
recommended by the NAEPP helps patients comply
with treatment regimens. The color-coded zone clips
(attached to the right side of the scale) can be adjusted
to delineate a patient’s green, yellow and red zones.
(These indicators have been designed to be difficult to
move inadvertently.)
ASSESS Zone Clips give you the flexibility of using
either the Three or Four-Zone Asthma Management
System.
In order to use a Four-Zone Asthma Management
System, use the all-yellow clip provided with ASSESS
to divide the yellow zone into “high” and “low” areas.
The area from the point of the all-yellow clip to the
point of the green-yellow clip is “high yellow,” and the
area from the point of the all-yellow clip to the point of
the yellow-red clip is “low yellow.” If you prefer to use
the Three-Zone System, remove the all-yellow zone clip
and discard it.
Record each patient’s zones and medication instructions
on an Asthma Information Card for their easy reference.
How to Use Zone Clips
A patient’s zones can be determined from their personal
best peak expiratory flow rate.
Refer to the Zone
Reference Chart for the Three-Zone Asthma
Management System.
Locate the patient’s personal best value on the chart.
The values directly below this number indicate where
to place the ASSESS
®
Zone Clips.
Slide the green-yellow clip along the right side
of the meter until it points to the patient’s
green-yellow value.
Slide the yellow-red clip along the right side of the
meter in the same way, until it points to the patient’s
yellow-red value.
For example, on the meter of
a patient with a personal best
of 550 L/min, a green-yellow
clip should be attached at
the 440 L/min mark (80%),
and a yellow-red clip should
be attached at the 275 L/min
mark (50%).
(Optional) To indicate
the difference between
the “high” and “low” yellow
zones, slide the all-yellow
clip along the meter to divide
the yellow zone.
Peak Flow Meter
ASSESS
R
500
400
800
700
600
850
750
650
550
450
350
300
250
200
Page 6

Taking daily peak flow readings and recording them in
this booklet will provide a permanent record to help
your doctor make important decisions about your
asthma treatment.
1.
Fill in your name and baseline reading below. Your
doctor will help you obtain this value.
2.
Record the date at the top of the page.
3. Fill in the time of your reading. Space is provided for
three per day.
4.
Record your reading as illustrated in the example shown.
5. Use the space provided at the bottom of each page for
your notes
(questions for your doctor, symptoms,
medications, etc.)
CAUTION: When the peak flow meter is used to monitor a lung
condition such as asthma, the user should be under the care of a
physician or other licensed healthcare professional. A licensed
healthcare professional’s advice is required to understand the
meaning and importance of the measures you get with your peak
flow meter, and to help decide on an appropriate treatment plan.
Name
Baseline Reading
850
800
750
700
650
600
550
500
450
400
350
300
250
200
15 0
10 0
Date
Time
Daily Record Chart
Example
✗
✗
✗
✗
✗
✗✗
✗
✗
✗
Date
Time
Name
10/8
Jane Smith
749749749749
10/9 10/10 10/11
350
300
Page 7

850
800
750
700
650
600
550
500
450
400
350
300
250
200
15 0
10 0
850
800
750
700
650
600
550
500
450
400
350
300
250
200
15 0
10 0
Date
Time
Date
Time
Page 8

850
800
750
700
650
600
550
500
450
400
350
300
250
200
15 0
10 0
850
800
750
700
650
600
550
500
450
400
350
300
250
200
15 0
10 0
Date
Time
Date
Time
Page 9

850
800
750
700
650
600
550
500
450
400
350
300
250
200
15 0
10 0
850
800
750
700
650
600
550
500
450
400
350
300
250
200
15 0
10 0
Date
Time
Date
Time
Page 10

850
800
750
700
650
600
550
500
450
400
350
300
250
200
15 0
10 0
850
800
750
700
650
600
550
500
450
400
350
300
250
200
15 0
10 0
Date
Time
Date
Time
Page 11

850
800
750
700
650
600
550
500
450
400
350
300
250
200
15 0
10 0
850
800
750
700
650
600
550
500
450
400
350
300
250
200
15 0
10 0
Date
Time
Date
Time
Page 12

850
800
750
700
650
600
550
500
450
400
350
300
250
200
15 0
10 0
850
800
750
700
650
600
550
500
450
400
350
300
250
200
15 0
10 0
Date
Time
Date
Time
 Loading...