

Outdoor Bullet Camera
Quick Start Guide
SAVE THIS MANUAL FOR FUTURE REFERENCE

Setup
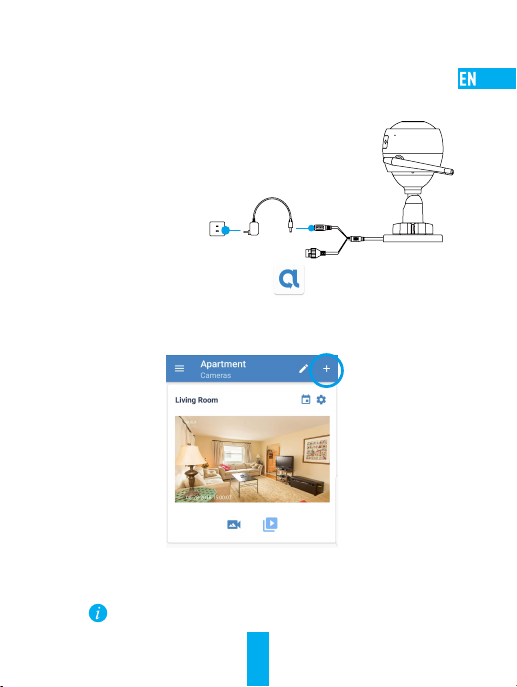
Step 1 Power-on
Plug the power cable into the camera and to the power adapter
and then into a power outlet, as shown in the figure below. The
LED indicator will flash red and blue, or rapid blue when the
camera is ready for setup.
Power Cable
Power Socket
Step 2 Camera Setup
- Add a camera to the Alula app
• Log in to your account using the Alula app.
• From the Alula app Camera screen, tap “+” on
the upper-right hand corner to go to the scan QR
code interface.
- Scan the QR Code on the bottom of the camera.
- Enter the verification code located on the bottom of the camera.
- Follow the app wizard to finish Wi-Fi configuration.
If you want to change your camera's Wi-Fi, press and
hold the reset button for 10s and repeat this part.
1

- Scan the QR code on the body of the camera.
Step 3 Choose network connection
- Choose Wi-Fi (2.4GHz Wi-Fi Only) or wired connection.
(Recommended) For Wi-Fi connection, enter Wi-Fi name
and password to configure Wi-Fi for the camera.
For wired connection, connect the camera to the router with a
network cable.
Router
N3
Network Cable
- Enter the correct time zone and date format.
If the memory card status displays as Uninitialized, tap to
initialize it.
Hold the RESET button for 10 seconds when camera is
running if either adding cameras or Wi-Fi connection fails.
2
N3

Step 3 Camera Installation
You can install the camera on the wall
or ceiling.
Make sure the wall is strong enough to withstand three times the
weight of the camera.
1
Installing the Camera
- Place drill template onto the surface you have chosen to mount
the camera.
- (For the cement wall/ceiling only) Drill screw holes according to
the template, and insert three expansion screws.
- Use three metal screws to fix the camera base according to the
template.
Mounting
Template
Expansion Screws
2 Adjusting the Surveillance Angle
- Loosen the adjusting screw.
- Adjust the surveillance angle as your
desired place.
- Tighten the adjusting screw.
Make sure the microSD card slot facing downward.
Metal Screws
3

Appendix
Box Content
Internet Camera x1
Adjusting Screw
0°-90°
0°-360°
Power Adapter x1
Quick Start Guide x1
Mounting Template x1 Screw Kit x1
4
Waterproof Kit x1

Basics
LED Indicator
Name Description
MIC For audio in.
Speaker For audio out.
LED Indicator • Steady Red: Camera is starting up.
MicroSD Card Slot
RESET
Power Input
• Steady Blue: Video is being viewed or played back in
Alula App.
• Slowly Flashing Blue: Camera is running properly.
• Slowly Flashing Red: Wi-Fi connection has failed.
• Fastly Flashing Red: MicroSD card error.
• Flashing Red and Blue OR Rapidly Flashing Blue:
Camera is ready for the Wi-Fi connection.
MicroSD card not included in the Box Contents.
Recommended compatibility: Class 10, Max.128GB.
After inserting the microSD card, initialize it in the
Alula app, and then video files can be stored in the
SD card.
Hold the RESET button for 10 seconds when the
camera is running. The camera restarts, and resets all
parameters to default.
1A 12V
5
MIC
MicroSD
Card Slot
RESET
Speaker

Troubleshooting
Q: “The device is offline.” or “The device is not registered.” prompts
when adding
the camera by Alula app.
A: 1. Make sure the network, that the camera is connected to, is
normal and the DHCP of router is enabled.
2. Hold down the RESET button for 10 seconds to reset the
parameters if you manually changed the network parameters.
Q: How to use the microSD card for local storage?
A: 1. Make sure there is a microSD card inserted and the camera is
added to your Alula account. Log in the Alula app and enter
the “Device Details” interface, if the “Initialize Storage Card”
button appears, you need to initialize the microSD card first.
2. The microSD card recording for the motion detection is
enabled by default.
Q: The mobile phone cannot receive alarm prompts when the
camera is online.
A: 1. Make sure the Alula app is running on your mobile phone
and the Motion Detection Notification is enabled.
2.For Android system, make sure the app is running in
background; and for iOS, enable the message push
function in “Settings > Notification”.
3. If still no alarm prompts, hold down the RESET button for
10 seconds restore the camera settings.
Q: Live view or playback failed.
A: Make sure your network is well connected. Viewing live video
needs a good
bandwidth. You can refresh the video, or change a network and
try again.
Q: How to connect to another Wi-Fi?
A: Hold the RESET button on the camera for 10 seconds to reset and
restart the camera and reconnect the Wi-Fi about 1 minute later.
6

This device complies with Part 15 of the FCC Rules. Operation is subject
to the following two conditions:
(1) This device may not cause harmful interference, and
(2) This device must accept any interference received, including
interference that may cause undesired operation.
Note: This product has been tested and found to comply with the limits
for a Class B digital device, pursuant to Part 15 of the FCC Rules. These
limits are designed to provide reasonable protection against harmful
interference in a residential installation. This product generates, uses,
and can radiate radio frequency energy and, if not installed and used in
accordance with the instructions, may cause harmful interference to
radio communications. However, there is no guarantee that interference
will not occur in a particular installation. If this product does cause
harmful interference to radio or television reception, which can be
determined by turning the equipment off and on, the user is encouraged
to try to correct the interference by one or more of the following
measures:
—Reorient or relocate the receiving antenna.
—Increase the separation between the equipment and receiver.
—Connect the equipment into an outlet on a circuit different from that
to which the receiver is connected.
—Consult the dealer or an experienced radio/TV technician for help.
Please take attention that changes or modification not expressly
approved by the party responsible for compliance could void the user’s
authority to operate the equipment.
This equipment complies with FCC/IC RSS-102 radiation exposure limits
set forth for an uncontrolled environment. This equipment should be
installed and operated with minimum distance 20cm between the
radiator & your body.

This device complies with Industry Canada license-exempt RSS
standard(s). Operation is subject to the following two conditions:
(1) this device may not cause interference, and
(2) this device must accept any interference, including interference that
may cause undesired operation of the device.
Le présent appareil est conforme aux CNR d'Industrie Canada applicables
aux appareils radioexempts de licence. L'exploitation est autorisée aux
deux conditions suivantes:
(1) l'appareil ne doit pas produire de brouillage, et
(2) l'utilisateur de l'appareil doit accepter tout brouillage radioélectrique
subi, même si le brouillage est susceptible d'en compromettre le
fonctionnement.
Under Industry Canada regulations, this radio transmitter may only
operate using an antenna of a type and maximum (or lesser) gain
approved for the transmitter by Industry Canada. To reduce potential
radio interference to other users, the antenna type and its gain should be
so chosen that the equivalent isotopically radiated power (e.i.r.p.) is not
more than that necessary for successful communication.
Conformément à la réglementation d'Industrie Canada, le présent
émetteur radio peut fonctionner avec une antenne d'un type et d'un gain
maximal (ou inférieur) approuvé pour l'émetteur par Industrie Canada.
Dans le but de réduire les risques de brouillage radioélectrique à
l'intention des autres utilisateurs, il faut choisir le type d'antenne et son
gain de sorte que la puissance isotrope rayonnée équivalente (p.i.r.e.) ne
dépasse pas l'intensité nécessaire à l'établissement d'une communication
satisfaisante.
This equipment complies with FCC/IC RSS-102 radiation exposure limits
set forth for an uncontrolled environment. This equipment should be
installed and operated with minimum distance 20cm between the
radiator & your body.
ce matériel est conforme aux limites de dose d'exposition aux
rayonnements, FCC / CNR-102 énoncée dans un autre
environnement.cette eqipment devrait être installé et exploité avec
distance minimale de 20 entre le radiateur et votre corps.
 Loading...