


Indoor Mini Camera
Quick Start Guide
SAVE THIS MANUAL FOR FUTURE REFERENCE

EN
Setup
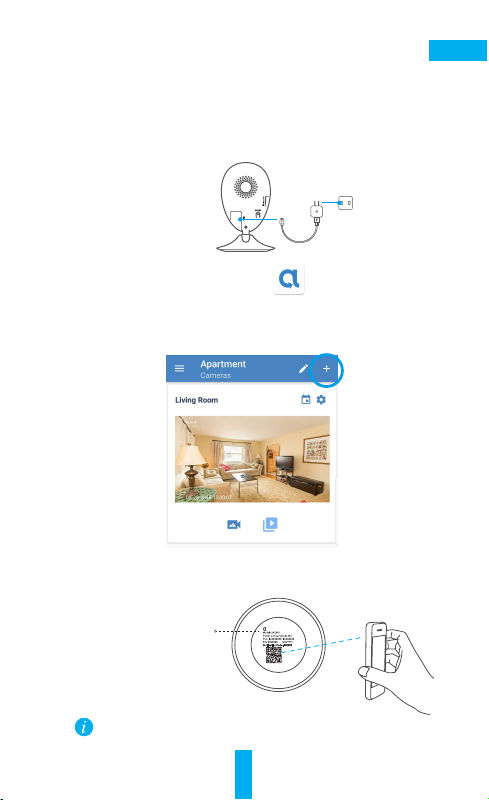
Step 1 Power-on
Plug the power cable into the camera and to the power adapter
and then into a power outlet, as shown in the figure below. The
LED indicator will flash red and blue, or rapid blue when the
camera is ready for setup.
Power Cable
Power Outlet
Step 2 Camera Setup
- Add a camera to the Alula app
• Log in to your account using the Alula app.
• From the Alula app Camera screen, tap “+” on
the upper-right hand corner to go to the scan QR
code interface.
- Scan the QR Code on the bottom of the camera.
- Enter the verification code located on the bottom of the camera.
- Follow the app wizard to finish Wi-Fi configuration.
Bottom of the Camera
If you want to change your camera's Wi-Fi, press and
hold the reset button for 10s and repeat this part.
Alula
1
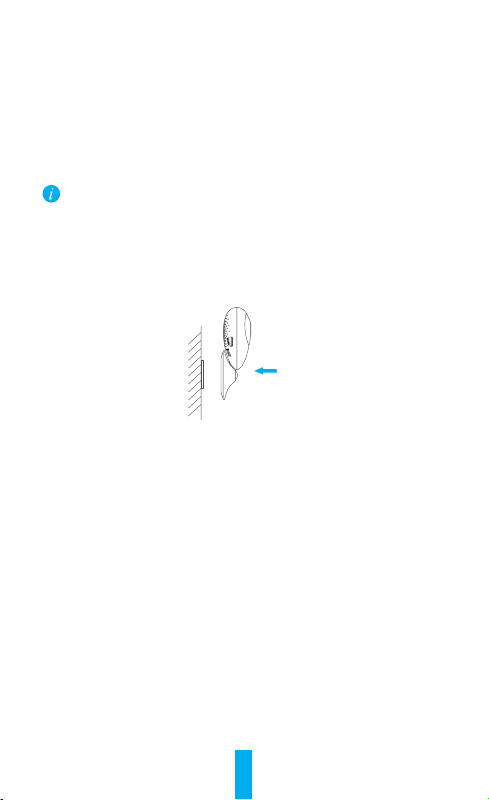
Installation
Step 1 Installing the Metal Plate (Optional)
Pick a clean and flat surface and secure the metal plate to the
desired position with the foam stickers or screws (not included).
There’s a magnet piece inside the camera. You can skip this step if the surface is made
of metal.
Step 2 Installing the Camera
Secure the camera magnetically to the metal plate or metal surface (see figure below).
Step 3 Completing Installation
Adjust the camera angle as required.
2
EN
Appendix
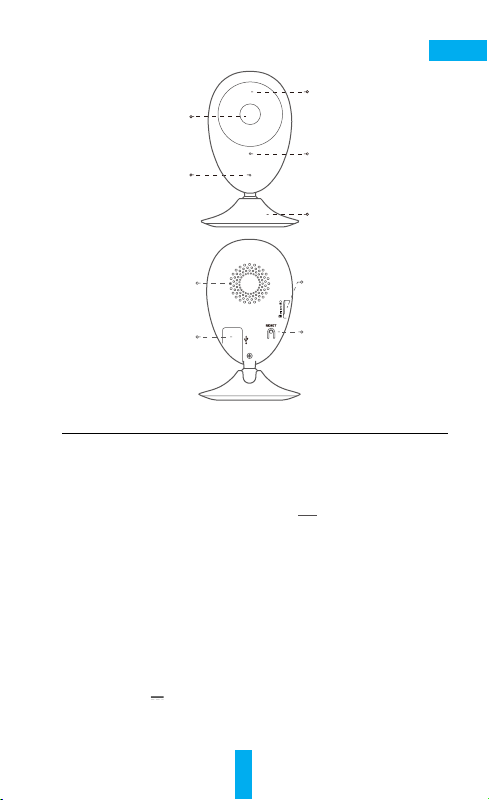
Basics
IR Light
Lens
Microphone
Speaker
Power Input
Name Description
IR Light
LED Indicator
RESET
Power Input
Speaker
Auto light source for dark environment.
camera video has two modes: color (for
daylight recording) and black and white with IR
illuminator (for night condition).
• Blinking Red and Blue OR Rapidly Blinking
Blue: The camera is ready for Wi-Fi connection.
• Steady Red: The camera is starting up.
• Steady Blue: The camera is connected by a user.
• Slowly Blinking Blue The camera is running
properly.
• Slowly Blinking Red: The Wi-Fi connection has
failed.
• Rapidly Blinking Red: MicroSD card error.
Hold down the RESET button for 10seconds
while the camera is running, the camera restarts
and all parameters are reset to default.
5V±10%
Two-way talk.
LED Indicator
Magnetic Base
microSD Card Slot
RESET
The
3
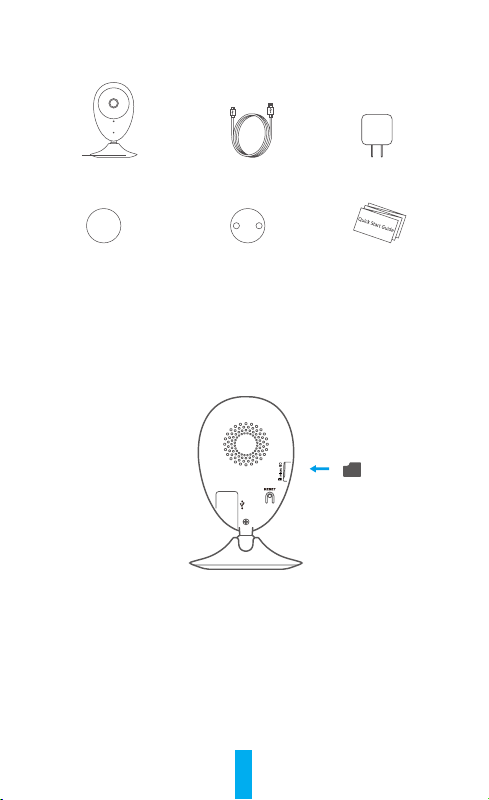
Box Contents
Internet Camera (x1)
Foam Sticker X2
Installing Memory Card
Insert a microSD card into the slot until
you hear a click.
USB Cable (x1)
Metal Plate X1
(3.5mm Hole Diameter)
Power Adapter (x1)
Quick Start Guide X1
4

EN
Troubleshooting
Q: "The device is offline.” or “The device is not registered.”
prompts appear when adding the camera using the Alula App.
A: 1. Make sure the network, which the camera is connected to
is working properly and the router’s DHCP is enabled.
Hold down the RESET button for 10s to reset the settings if you
2.
change the network parameters.
Q: The mobile phone cannot receive alarm prompts when the
camera is online.
A: 1. Make sure the Alula app is running on your mobile phone.
2. For Android OS mobile phone, make sure the app is running
in the background; and for iOS mobile phones, enable the
message push function in “Settings > Notification”.
Q: Does the camera support power via USB devices or a
portable battery.
A: It’s advised to use the Alula standard power adapter to provide
a stable voltage supply.
5

Configuración
Paso 1 Encendido
Conecte el cable de alimentación a la cámara y al adaptador de
corriente y después a una toma. Consulte la siguiente figura. Cuando
la cámara esté preparada para la configuración, el indicador LED se
Paso 2 Configuración de la cámara
1.
Agregue una cámara a Alula
-
Inicie sesión en la app Alula.
-
Desde la pantalla de inicio de la app Alula, toque el símbolo
“+” situado en la esquina superior derecha para entrar en la
interfaz de escaneo del código QR.
- Escanee el código QR que figura en la parte inferior de la cámara.
- Introduzca el código de verificación que figura en la parte inferior de
para finalizar la configuración.la cámara.
- Introduzca la zona horaria Correcta e información DST y toque
“Finish” (Finalizar)
iluminará en rojo y azul.
Toma de alimentación
Cable de alimentación
Parte inferior de
la cámara
Alula
6

Instalación
Paso 1 Instalación de la placa de metal (Opcional)
Seleccione una superficie lisa y limpia y coloque la placa de metal en la
posición deseada con los adhesivos de espuma o tornillos (no incluidos).
superficie está hecha de metal, puede omitir este paso.
Paso 2 Instalación de la cámara
Monte la cámara en la placa de metal o superficie metálica con el
imán (consulte la siguiente figura).
Paso 3 Fin de la instalación
Ajuste el ángulo de la cámara según sea necesario.
7

Anexo
Conceptos básicos
Lentes
Luz IR
Micrófono
Altavoz
Alimentación
Nombre Descripción
Luz IR
Indicador LED
Ranura para
tarjeta microSD
REINCIAR
Alimentación
Altavoz
Luz automática para ambientes oscuros. La videocámara
tiene dos modos: color (para grabación durante el día) y
blanco y negro con luz IR (para ambiente nocturno).
• Parpadeo rojo y azul: La cámara está preparada para la
conexión Wi-Fi.
• Azul fijo: Un usuario ha conectado la cámara.
• Parpadeo azul lento: La cámara funciona correctamente.
• Rojo fijo: La cámara se está iniciando.
• Parpadeo rojo lento: Hay un error en la red Wi-Fi.
• Parpadeo rojo rápido: Error de tarjeta MicroSD.
Para la tarjeta microSD (no incluida con este producto).
Puede adquirirla por separado. Compatibilidad
recomendada: Clase 10,
insertar la tarjeta SD, puede grabar con la cámara.
Mantenga pulsado el botón de REINICIO durante 10
segundos con
la cámara en marcha. La cámara se reiniciará y los
parámetros se restablecerán a los valores predefinidos.
5V±10 %
Intercomunicador.
Indicador LED
Base magnética
Ranura para tarjeta microSD
REINCIAR
espacio máximo de 128 GB. Tras
8

Contenido del paquete
Cámara de Internet (x1) Cable USB (x1) Adaptador de corriente (x1)
Adhesivo de espuma X2
Instalación de la tarjeta de memoria
Inserte la tarjeta microSD en la ranura hasta encajarla.
Placa metálica X1
(con orificios de 3,5 mm de diámetro)
9
Guía de inicio rápido x1

Solución de problemas
P: Al agregar la cámara usando la app Alula se muestra el mensaje “The
device is offline.” (El dispositivo está sin conexión.) o “The device is not
registered.” (El device dispositivo no está registradox).
R: 1. Compruebe si funciona correctamente la red a la que está conectada la
cámara y si está activado el DHCP del router.
2. Mantenga pulsado el botón de REINICIO durante 10 segundos para
restablecer los ajustes si cambia los parámetros de la red.
El teléfono móvil no recibe mensajes de alarma cuando la cámara
P:
está en línea.
R: 1. Asegúrese de que la app Alula esté funcionando en su teléfono.
2. En teléfonos móviles con sistema operativo Android, la app funciona en
segundo plano; y en teléfonos móviles con iOS, active la función de
notificación automática desde “Settings > Notification” (Ajustes >
Notificación).
¿La cámara soporta alimentación con dispositivos USB o batería portátil.
P:
R: Se recomienda utilizar el adaptador de corriente estándar de Alula
para garantizar una alimentación eléctrica estable.
Para obtener más información, visite www.alula.net
10

Mise en place
Étape 1 Mise sous tension
Branchez le câble d’alimentation à la caméra puis l’adaptateur
d’alimentation à une prise électrique, comme illustré dans la figure cidessous. L’indicateur LED clignotera en rouge et bleu quand la caméra
est prête à être configurée.
Prise électrique
Câble d’alimentation
Étape 2 Configuration de la caméra
1. Ajouter une caméra à Alula
- Connectez-vous dans l’application Alula.
- Depuis l’écran d’accueil de l’application Alula, appuyez sur «+» dans
le coin supérieur droit pour accéder à l’interface de lecture du code QR.
- Scannez le code QR situé sur le fond de la caméra.
- Saisissez le code de vérification situé sur le fond de la caméra.
- Saisissez le bon fuseau horaire et les informations d’heure d’été, puis
appuyez sur «Finish» (Terminer) pour terminer la configuration.
Fond de la caméra
Alula
11

Installation
Étape 1 Installation de la plaque métallique (facultatif)
Choisissez une surface plane et propre, puis fixez la plaque métallique à la
position souhaitée à l’aide des autocollants expansés ou des vis (non fournis).
La caméra dispose d’un élément magnétique interne. Ignorez cette
étape si la surface est métallique.
Étape 2 Installation de la caméra
Fixez à l’aide de sa partie magnétique la caméra sur la plaque ou la surface
métallique (voir la figure ci-dessous).
Étape 3 Fin de l’installation
Ajustez l’angle de la caméra le cas
échéant.
12

Annexe
Notions de base
Éclairage IR
Objectif
Microphone
Indicateur LED
Base magnétique
Haut-parleur
Entrée d’alimentation
Nom Description
Éclairage IR Source lumineuse automatique pour les lieux sombres. La
Indicateur LED
Logement de carte
microSD
Réinitialisation
Entrée d’alimentation
Haut-parleur Conversation bidirectionnelle.
caméra dispose de deux modes vidéo: couleur (pour
l’enregistrement en lumière du jour) et noir et blanc avec
l’éclairage IR (fonctionnement de nuit).
• Clignotement en rouge et bleu: la caméra est prête
pour la connexion Wi-Fi.
• Solide bleu: la caméra a été connectée par un
utilisateur.
• Clignotement lent en bleu: la caméra fonctionne
correctement.
• Solide rouge: la caméra est en cours de démarrage.
• Clignotement lent en rouge: la connexion Wi-Fi a
échoué.
• Clignotement rapide en rouge: erreur de carte
microSD.
Pour carte microSD (non fournie avec ce produit). Vous
pouvez l’acheter séparément. Compatibilité
recommandée: classe 10, capacité maximale de 128Go.
Après avoir inséré la carte, vous pouvez enregistrer
l’événement sur la caméra.
Maintenez enfoncé le bouton de RÉINITIALISATION
pendant 10s alors que la caméra fonctionne. La caméra
redémarrera et tous les paramètres seront réinitialisés aux
valeurs par défaut.
5V ± 10%
13
Logement de carte microSD
Réinitialisation

Contenu de l’emballage
1caméra Internet 1câble USB 1adaptateur
1plaque métallique
2autocollants expansés
Installation d’une carte mémoire
Insérez une carte microSD dans le logement jusqu’à entendre un clic.
(diamètre des trous de 3,5mm) 1guide de
prise en main
d’alimentation
14

Résolution des problèmes
Q: Le message «The device is offline» (l’appareil est hors ligne) ou «The
device is not registered» (L’appareil n’est pas inscrit) apparaît au moment de
l’ajout de la caméradans l’application Alula.
R: 1. Vérifiez que le réseau, auquel la caméra est connectée, fonctionne
correctement et que le service DHCP du routeur est activé.
2.
Maintenez enfoncé le bouton de RÉINITIALISATION pendant 10s pour
réinitialiser les réglages si vous avez modifié les paramètres de réseau.
Q: Le téléphone portable ne reçoit pas les messages d’alarme lorsque la caméra
est hors ligne.
R: 1. Vérifiez que l’application Alula est en exécution sur votre téléphone mobile.
2. Pour un téléphone mobile sous système Android, vérifiez que l’application
s’exécute en arrère-plan. Pour un téléphone mobile sous système iOS,
activez la fonction de message direct (push) dans «Settings >
Notification» (Réglages > Notification).
La caméra peut-elle être alimentée via des dispositifs USB ou une
Q:
batterie portable?
R: Il est conseillé d’utiliser l’adaptateur d’alimentation Alula standard pour
fournir une tension électrique stable.
Pour plus d’informations, veuillez visiter le site Web www.alula.net
15

This device complies with Part 15 of the FCC Rules. Operation is subject
to the following two conditions:
(1) This device may not cause harmful interference, and
(2) This device must accept any interference received, including
interference that may cause undesired operation.
Note: This product has been tested and found to comply with the limits
for a Class B digital device, pursuant to Part 15 of the FCC Rules. These
limits are designed to provide reasonable protection against harmful
interference in a residential installation. This product generates, uses,
and can radiate radio frequency energy and, if not installed and used in
accordance with the instructions, may cause harmful interference to
radio communications. However, there is no guarantee that interference
will not occur in a particular installation. If this product does cause
harmful interference to radio or television reception, which can be
determined by turning the equipment off and on, the user is encouraged
to try to correct the interference by one or more of the following
measures:
—Reorient or relocate the receiving antenna.
—Increase the separation between the equipment and receiver.
—Connect the equipment into an outlet on a circuit different from that
to which the receiver is connected.
—Consult the dealer or an experienced radio/TV technician for help.
Please take attention that changes or modification not expressly
approved by the party responsible for compliance could void the user’s
authority to operate the equipment.
This equipment complies with FCC/IC RSS-102 radiation exposure limits
set forth for an uncontrolled environment. This equipment should be
installed and operated with minimum distance 20cm between the
radiator & your body.

This device complies with Industry Canada license-exempt RSS
standard(s). Operation is subject to the following two conditions:
(1) this device may not cause interference, and
(2) this device must accept any interference, including interference that
may cause undesired operation of the device.
Le présent appareil est conforme aux CNR d'Industrie Canada applicables
aux appareils radioexempts de licence. L'exploitation est autorisée aux
deux conditions suivantes:
(1) l'appareil ne doit pas produire de brouillage, et
(2) l'utilisateur de l'appareil doit accepter tout brouillage radioélectrique
subi, même si le brouillage est susceptible d'en compromettre le
fonctionnement.
Under Industry Canada regulations, this radio transmitter may only
operate using an antenna of a type and maximum (or lesser) gain
approved for the transmitter by Industry Canada. To reduce potential
radio interference to other users, the antenna type and its gain should be
so chosen that the equivalent isotopically radiated power (e.i.r.p.) is not
more than that necessary for successful communication.
Conformément à la réglementation d'Industrie Canada, le présent
émetteur radio peut fonctionner avec une antenne d'un type et d'un gain
maximal (ou inférieur) approuvé pour l'émetteur par Industrie Canada.
Dans le but de réduire les risques de brouillage radioélectrique à
l'intention des autres utilisateurs, il faut choisir le type d'antenne et son
gain de sorte que la puissance isotrope rayonnée équivalente (p.i.r.e.) ne
dépasse pas l'intensité nécessaire à l'établissement d'une communication
satisfaisante.
This equipment complies with FCC/IC RSS-102 radiation exposure limits
set forth for an uncontrolled environment. This equipment should be
installed and operated with minimum distance 20cm between the
radiator & your body.
ce matériel est conforme aux limites de dose d'exposition aux
rayonnements, FCC / CNR-102 énoncée dans un autre
environnement.cette eqipment devrait être installé et exploité avec
distance minimale de 20 entre le radiateur et votre corps.
 Loading...