

Resolution RE6100, RE6110, RE6120 Install Manual
RE6100 Series Helix™ Security and Automation Platform
I
N
S
T
A
L
L
G
U
I
D
E
I
Meet Helix
Helix is a professional wireless security panel designed
to deliver home security and automation services. A
secured and supervised Ethernet connection comes
standard. Optional Cellular and Wi-Fi cards provide
primary or backup communication channels. Its
long-range encrypted wireless receiver easily provides
whole home coverage. Wireless arming stations and
mobile devices uncouple Helix from the entry wall
and allow it to be installed at a location convenient for
Internet and power connections.
FEATURES
• Cellular, Wi-Fi, or Ethernet communication channels
• Control from a user’s mobile device
• Industry-leading wireless range
• Up to 50 users
• Up to 96 zones
• 5 year warranty
ITEMS INCLUDED IN THE BOX
• The Helix panel
• Rechargeable backup battery
• 12-Volt power adapter
• 6-foot Ethernet cable
• Table-top mounting base
• A screw to secure the cover (required for UL installations)
• Installation guide
• Conguration guide
• Interactive services provider insert
EXPANSION CARDS FOR INTERNET CONNECTIVITY
• Wi-FiTM Card
• CDMA Cellular Card (Verizon, Sprint)
• GSM Cellular Card (AT&T, T-Mobile)
OTHER EXPANSION CARDS
• Z-WaveTM Card
• Existing Security Sensor Translator Card (allows Helix to receive signals from existing
wireless security sensors)
• Combo Z-Wave & Existing Sensor Translator Card
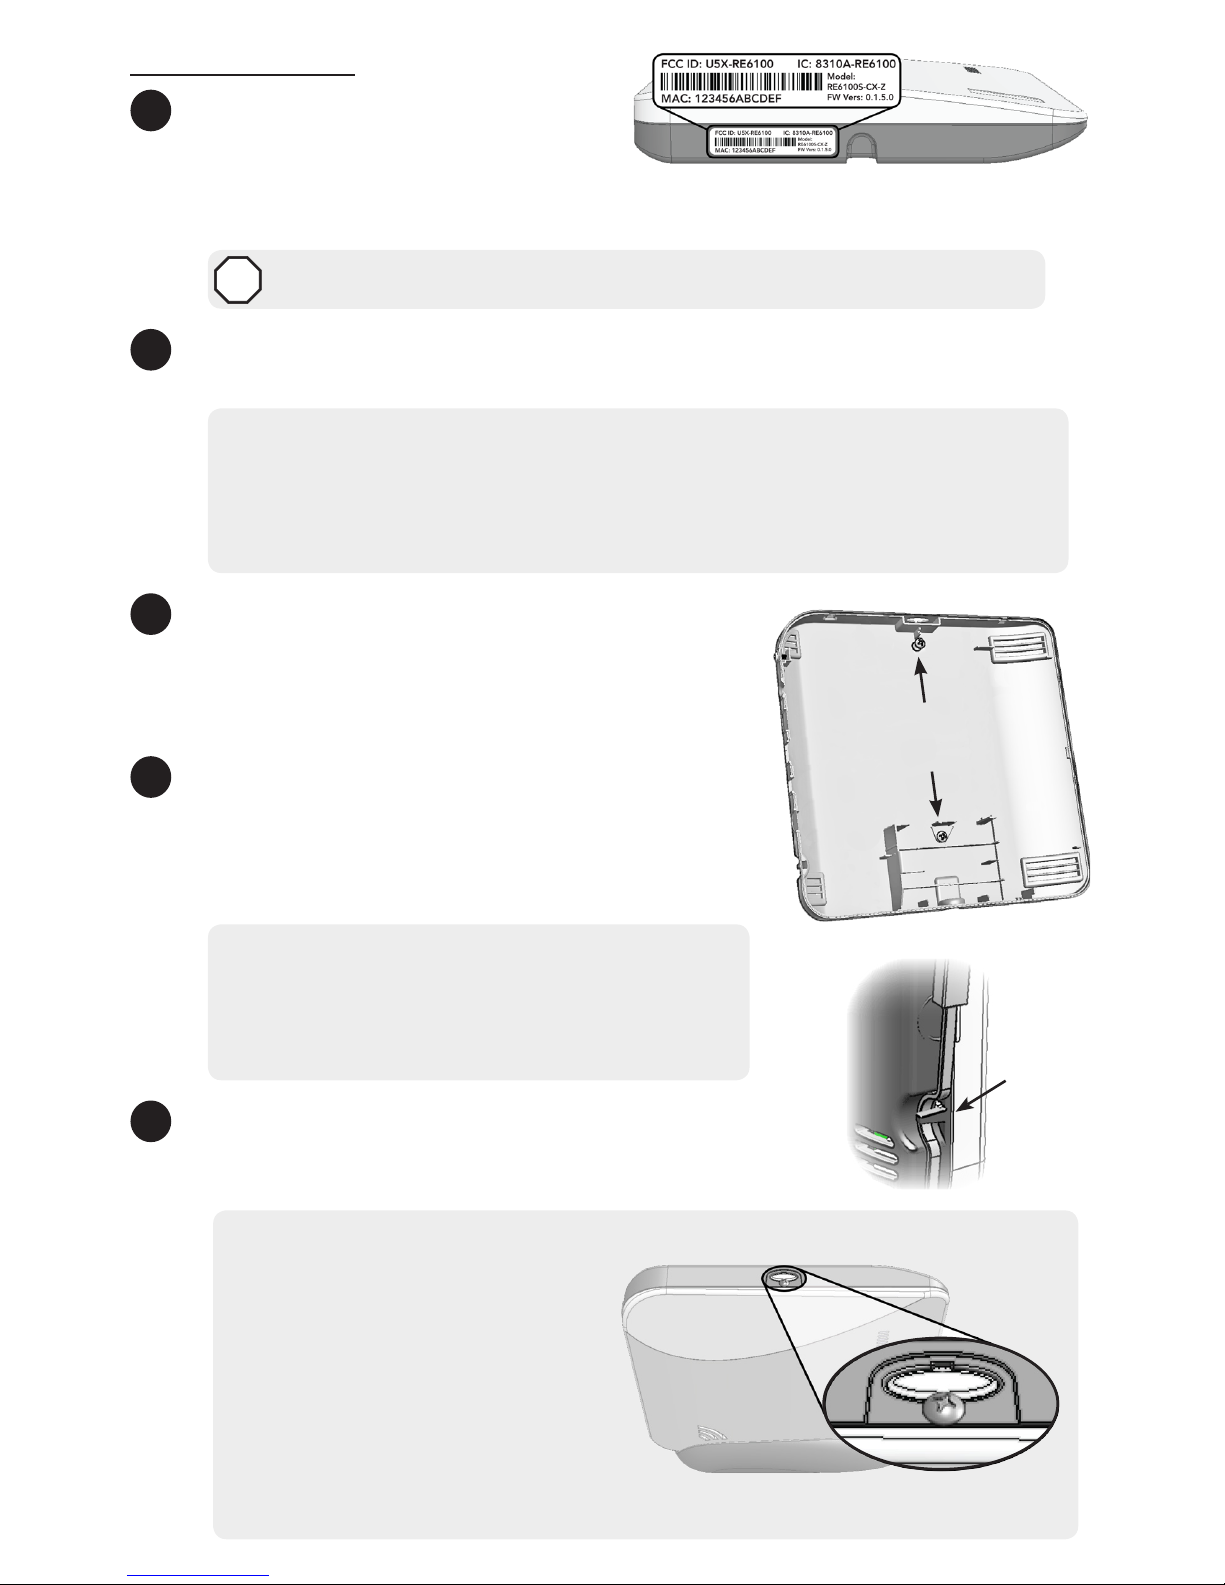
System Setup
1
Set up a new account with your
interactive services provider by
following the instructions on the
included interactive service provider insert. The interactive services provider will
need the Helix MAC address which is located on the bottom of Helix.
DO NOT PROCEED UNTIL YOU HAVE FINISHED STEP 1
STOP
2
Find a location for Helix, keeping in mind it needs AC power and at least one
network connection.
Wireless Installation Guidelines
• Locate Helix centrally on the main oor.
• Avoid mounting Helix below ground level.
• Do not mount Helix near ducts, appliances, or other large metal objects.
• Do not mount Helix directly adjacent to other RF devices.
3
Mount Helix by sliding it downward into the table-
top base. Alternatively, Helix can be mounted to
a wall using the mounting holes in the back cover.
You will need to remove the backup battery to
reveal the lower mounting hole.
4
Connect Helix to the Internet by wiring the Helix
Ethernet port to the home router, or by installing a
Cellular or Wi-Fi expansion card (or any combination
of the above). The Wi-Fi approach requires
enrollment into the home Wi-Fi router.
• If you are using Wi-Fi, then connect the Helix
Wi-Fi card to your existing home router by
holding the Enroll/WPS button until Helix beeps
twice (roughly ten seconds) and then pressing
the WPS button on the router.
5
Power up Helix by inserting the power supply barrel into
the power jack on the side of the Helix. Route the power
cable under the strain relief peg.
UL Installation Requirements
• Install the cover-securing screw.
• Do not connect Helix to an AC
power receptacle controlled by
a switch.
• The power supply must be
secured to an outlet if installed
in the USA.
• The power supply must NOT be
secured to an outlet if installed
in Canada.
Cover Securing Screw
Strain
Relief
Peg
Wall Mounting
Holes

6
Enroll sensors and peripherals by pressing the Enroll/WPS button on the side of
Helix until it beeps once (roughly 3 seconds) and then sending an enrollment signal
from the sensor or peripheral. Alternatively, a device can be enrolled by scanning its
bar code using the HeliLink app or by entering its 8-character serial number on the
interactive services provider’s web portal.
Enrollment Tips
• Enrollment signals are typically triggered by
removing the battery tab or tampering the device.
See the specic device manual for more information.
• The HeliLink mobile app can be used to enroll and
congure sensors.
• Your interactive services provider’s web portal may
provide a way to enter and exit wireless enrollment
mode.
• Wireless enrollment mode will end 5 minutes after
the last sensor is enrolled.
• Enrolling a HeliPad or other 2.4GHz peripheral will
automatically end wireless enrollment mode.
• Tapping the Enroll/WPS button will end wireless
enrollment mode.
7
Install your sensors & peripherals in desired locations around the house. Refer to
the specic device manual for more information regarding installation and use.
Typical Burglary Protection Installation
8
Congure Helix, sensors, and peripherals using the HeliLink mobile app or the
interactive services provider’s web portal. Conguration options are described in the
conguration guide.
9
Finally, test the system after nishing installation, enrollment, and conguration.
Verify proper operation of all installed sensors and peripherals using the HeliLink app
or the interactive services provider’s web portal. All sensors and peripherals should
score at least one bar on the RF signal strength indicator. See Pro Tips - RF Signal
Strength.
Enroll/WPS
Ethernet Port
Power Jack
Power Strain
Relief
 Loading...