

Outdoor Door/Window Sensor
I
Resolution Compatibles
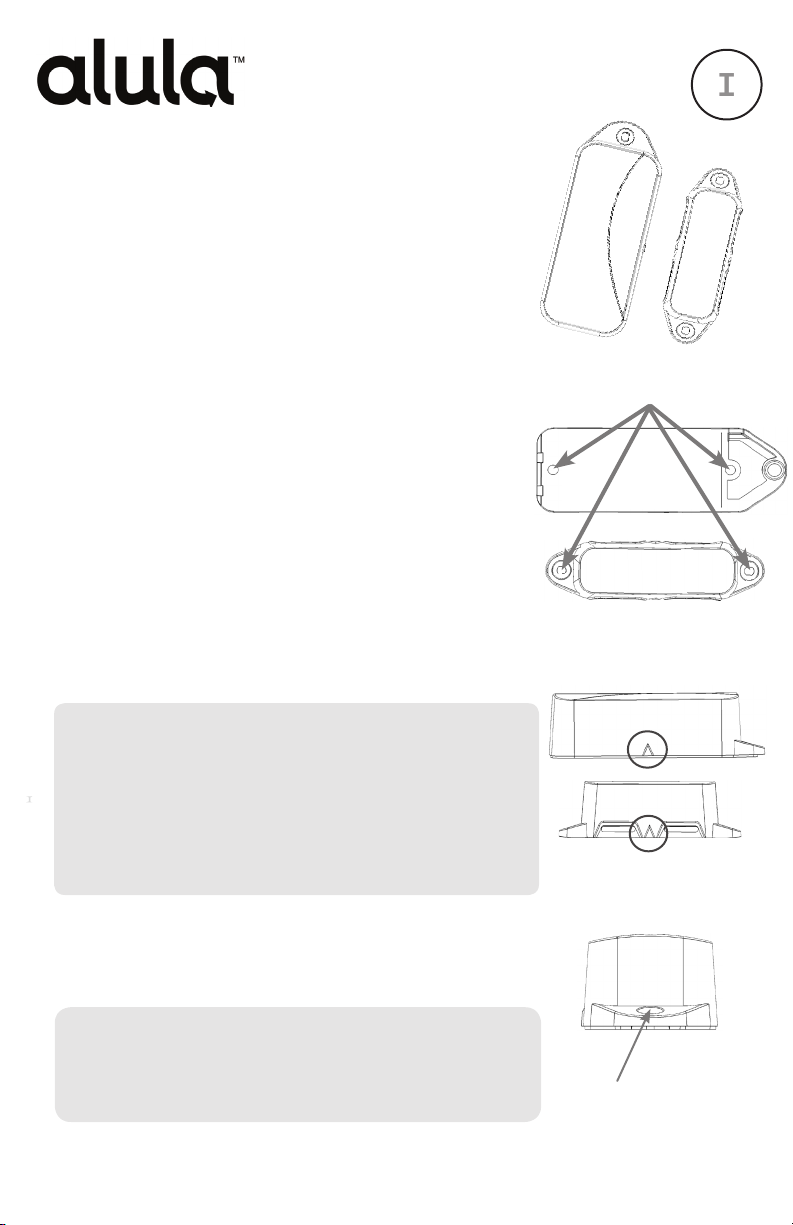
Outdoor Door/Window Sensor is a full-featured security
transmitter with industry-leading wireless range and battery
life. It is designed to sense the opening and closing of
gates, sheds, and other outdoor open/close applications.
An alarm signal will be transmitted when the magnet is
pulled away from the sensor, or when an external contact is
opened.
Features
• Industry-leading wireless range and battery life
• Wide magnetic gap distance
• Two built-in external contact zones
• Secure encrypted wireless transmissions
• IP67 waterproof enclosure rating
• 5-year warranty
Enroll by placing the panel into wireless enrollment mode
and transmitting an enrollment signal from the sensor.
Interlogix, Qolsys, DSC, and Cryptix sensors can be
enrolled by pulling the battery tab or tampering the unit.
Honeywell and 2GIG sensors can be enrolled by tripping
the unit 3 times or holding the tamper and powering
up the device by pulling the battery tab. Honeywell
and 2GIG sensors must be enrolled as Loop 2 sensors.
Alternatively, all sensors can be enrolled by manually
entering the sensors serial number.
N
I
G
Mounting Screw Holes
Magnet
A
T
S
L
L
E
U
D
I
Enrollment Signal
• Interlogix External 2
• Power up the sensor while holding the tamper
• Honeywell & 2GIG External 1 & 2
• Should be enrolled as Loop 1 and Loop 3,
respectively. Enroll each external by tripping 3
times
• DSC Externals
• Trip desired external to enroll
Install by rst attaching the mounting plate and magnet to a
door, window, or fence using screws (provided) or cable ties
(not provided).
Mounting Tips
• Face of mounting plate marked “Flat Mount” is to be
mounted against at surfaces (e.g. square wood post).
• Face of mounting plate marked “Pole Mount” is to be
mounted against round surfaces (e.g. fence post).
Use the panel installation guide to verify proper system setup.
Alignment Marks
Cover-Securing Screw Hole
Make sure to align the alignment marks on the sensor and magnet
when mounting. Finish by latching the sensor to the mounting
plate and tightening the cover-securing screw to secure the sensor
in place.
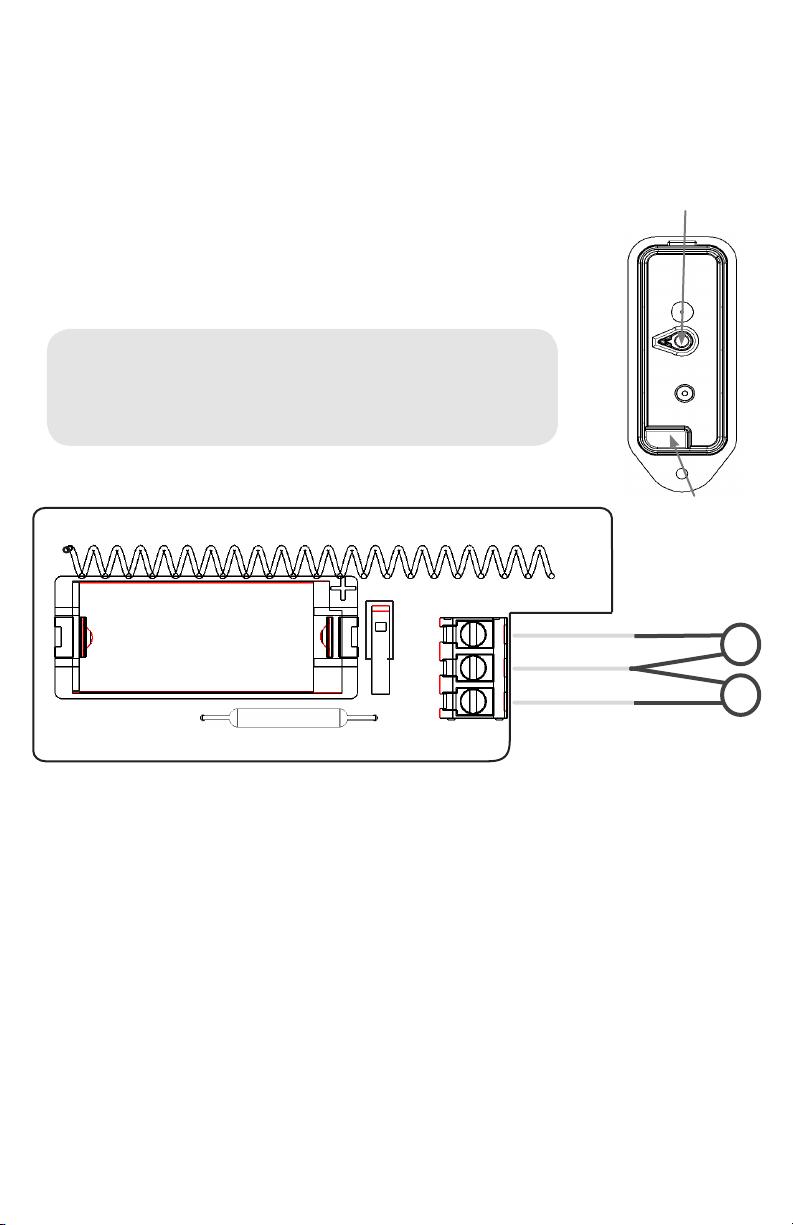
Removal Tamper is implemented by screwing the provided
screw with rubber washer through the removal tamper screw
hole in the base and into the mounting surface. Remove the
battery for access to the removal tamper screw hole.
External Contacts can be installed by routing the wires through
the back of the enclosure. A thinned area in the enclosure must be
punched out with a screwdriver to allow the wires through. After
routing and connecting the wires, reseal the hole with silicone
• Use normally-closed contacts because the sensor will
transmit a signal when it sees an external contact open.
• Do not use End-of-Line Resistors.
• Wire the contact to one or both outside terminals using
the center terminal as common.
Removal tamper
screw hole
Thinned area for external
contact wires
Battery
Reed Switch
Pro Tips
Metal installs should include pre-drilling holes before using
screws to secure the mounting plate and magnet.
Wireless performance is optimized when mounted near the top
of the gate or door in a vertical orientation.
External 2
Common
External 1

Magnet Gap Specications
Non-Ferromagnetic Surface (e.g. Wood, Vinyl, etc.)
Nominal Mounting Distance
X Axis - Make
Y Axis - Make
Z Axis - Make
Ferromagnetic Surface (e.g. Iron, Nickle, etc.)
Nominal Mounting Distance
X Axis - Make
Y Axis - Make
Z Axis - Make
2.70 inches (6.86 cm)
2.80 inches (7.11 cm)
Break
2.85 inches (7.24 cm)
3.50 inches (8.89 cm)
Break
3.55 inches (9.02 cm)
3.27 inches (8.31 cm)
Break
3.33 inches (8.46 cm)
1.90 inches (4.83 cm)
2.00 inches (5.08 cm)
Break
2.05 inches (5.21 cm)
2.50 inches (6.35 cm)
Break
3.00 inches (7.62 cm)
2.32 inches (5.89 cm)
Break
2.37 inches (6.02 cm)
Y Axis
X Axis
Z Axis
X Axis

Specications
Physical
Housing Dimensions
Weight with Battery
Mounting Fasteners
Removal Tamper Fastener
Environmental
Operating Temperature
Maximum Humidity
Ingress Protection Rating
Sensor Specications
Frequency
Replacement Battery
Nominal Battery Life
Battery Voltage
Current Draw
Max Wire Length
Transmitted Indications
Certication
RE107, RE207, RE207T, RE307 FCC, IC
3.3 x 1.3 x 2.8 inches (8.4 x 3.3 x 7.1 cm)
5.7 ounces (161.6 grams)
Four 1 inch stainless steel screws (provided)
One 1
-40° to 158°F ( -40° to 70°C)
100% Relative Humidity (RH)
IP67
433.92 MHz, 319.5MHz, 345MHz
One Panasonic CR123A Lithium Battery
10 years
3.0 VDC (Nominal), 2.2 VDC (Low)
20 mA (Maximum), 0.6 uA (Quiescent)
7.5 feet
Cover Tamper, Removal Tamper, Low Battery, Supervision
1/4
inch stainless steel screw with rubber washer (provided)
Specications subject to change without notice
WARRANTY
Alula will replace non-portable products that are defective in their
rst ve (5) years and all portable products in their rst two (2)
years.
IC NOTICE
This device complies with Industry Canada license-exempt RSS
standard(s). Operation is subject to the following two conditions:
(1) This device may not cause interference, and
(2) This device must accept any interference, including interference
that may cause undesired operation of the device.
Le présent appareil est conforme aux cnr d’Industrie Canada
applicables aux appareils radio exempts de licence. L’exploitation
est autorisée aux deux conditions suivantes:
(1) L’appareil ne doit pas produire de brouillage, et
(2) L’utilisateur de l’appareil doit accepter tout brouillage
radioélectrique subi, même si le brouillage est susceptible d’en
compromettre le fonctionnement.
IC: 8310A-RE107, 8310A-RE207, 8310A-RE307
Tech Support Line • (888) 88-ALULA • (888) 882-5852
47-0060-00 • REV A • 2018-11-07
alula.net
FCC NOTICE
This device complies with Part 15 of the FCC rules. Operation is
subject to the following two conditions:
(1) This device may not cause harmful interference.
(2) This device must accept any interference that may be received,
including interference that may cause undesired operation.
Changes or modications not expressly approved by Alula could
void the user’s authority to operate this equipment.
FCC ID: U5X-RE107, U5X-RE207, U5X-RE307
TRADEMARKS
ALULA IS A TRADEMARK OWNED BY ALULA HOLDINGS, LLC.
INTERLOGIX, HONEYWELL, DSC, QOLSYS, AND 2GIG
ARE TRADEMARKS OWNED BY UNITED TECHNOLOGIES
ELECTRONIC CONTROLS INC., HONEYWELL INTERNATIONAL
INC., TYCO SAFETY PRODUCTS CANADA LTD, QOLSYS INC.
AND 2GIG, RESPECTIVELY. ALULA PRODUCTS WILL FUNCTION
WITH ONE OF EITHER INTERLOGIX (FORMERLY GE), QOLSYS,
HONEYWELL, DSC, OR 2GIG SYSTEMS. HOWEVER, NO ALULA
PRODUCT IS PRODUCED BY, ENDORSED BY, NOR IS OFFICIALLY
ASSOCIATED WITH INTERLOGIX (FORMERLY GE), QOLSYS,
HONEYWELL, DSC OR 2GIG. ALULA RECOMMENDS VERIFYING
PROPER ENROLLMENT AND OPERATION, PER CONTROL PANEL
INSTALLATION INSTRUCTIONS, AT INSTALLATION.
01
 Loading...