

Page 1

HeliTouch is an intuitive touchscreen interface for
the Helix security panel. It is AC-powered
and communicates wirelessly.
Features
• Real time status
• 7-inch color display
• Wall or table mounting
• 2-Year warranty
Overview of Installation Steps
1. Conrm Helix has a WiFi DeviceLink communication card installed
2. Choose a mounting location (wall or table) within reach of the 10-foot power cable
3. Verify signal strength at the proposed location before drilling
4. Enroll into Helix
5. Finish mounting on the wall (if opting for wall mounting)
6. Test
Table Mounting
For table mounting slide the feet onto the underside of the plastic enclosure. The
t is intended to be quite snug so some force may be required for the feet to “click”
into place.
RE657 CryptiX™ HeliTouch
I
N
S
T
A
L
L
G
U
I
D
E
I
Page 2
Signal Strength
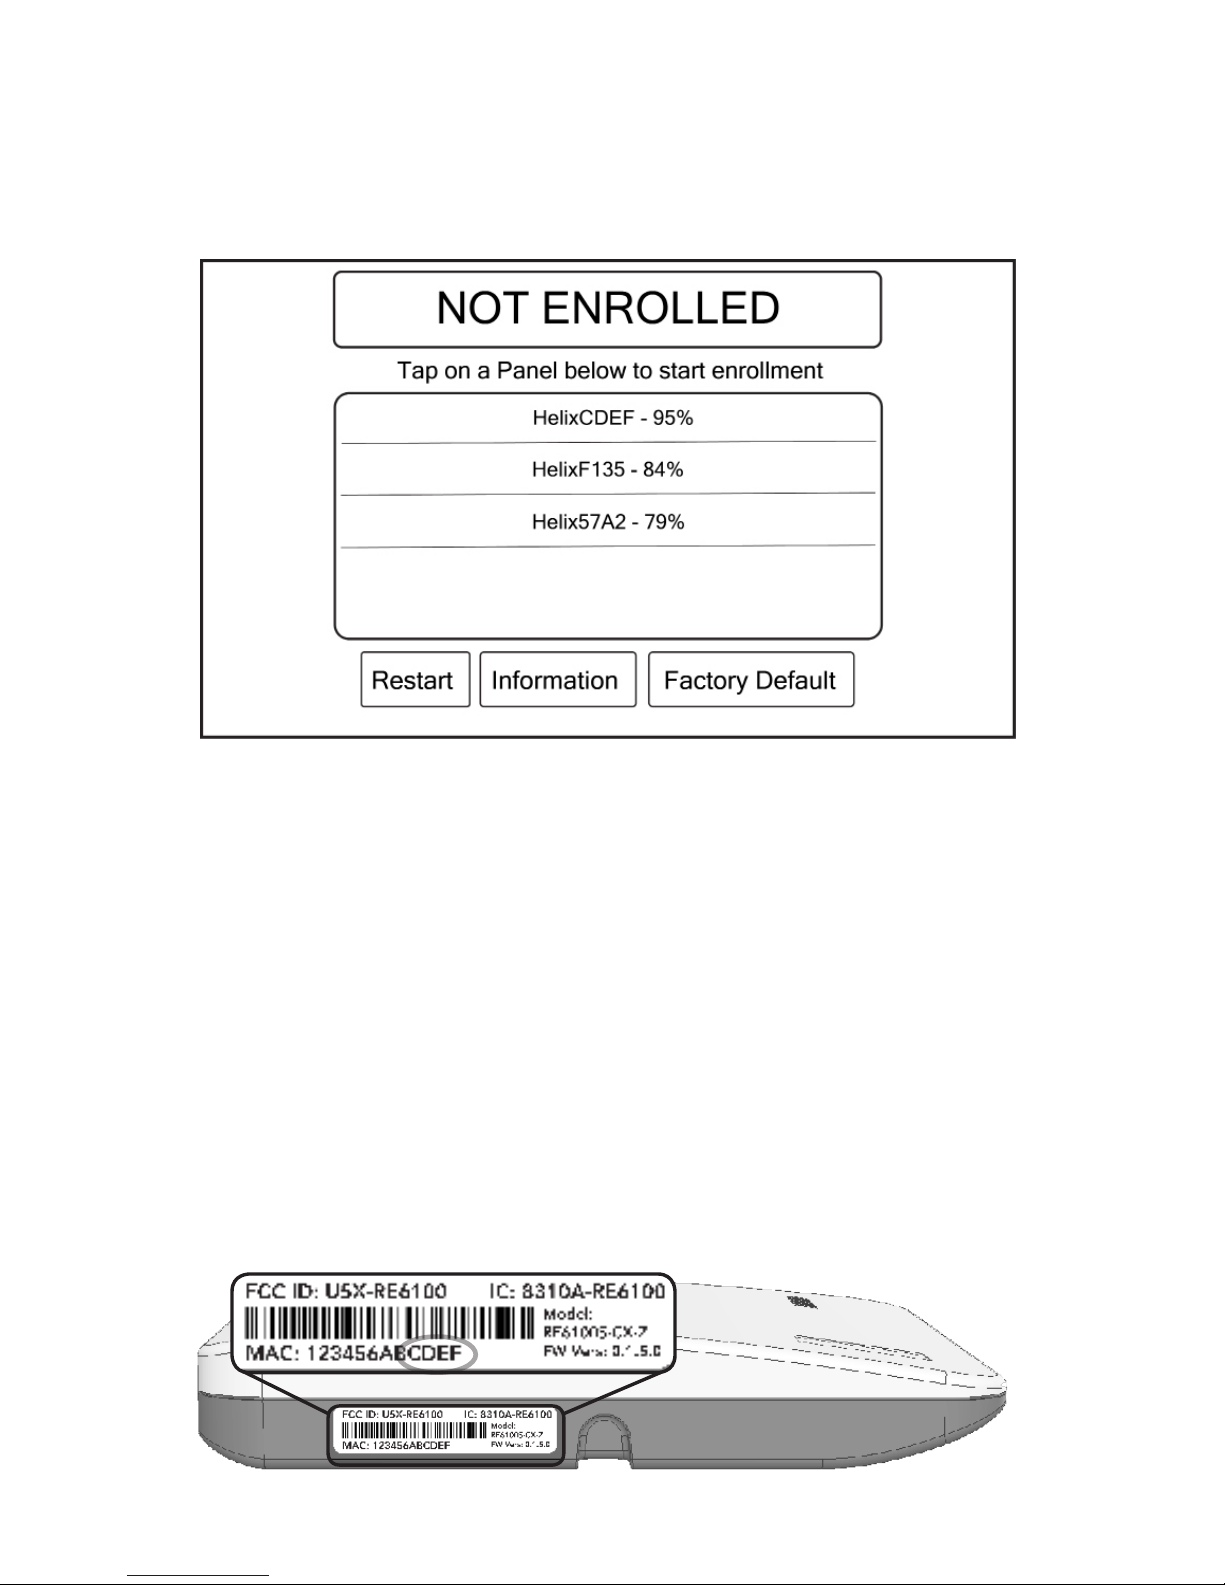
Signal strength should be veried before commiting to a location. Power HeliTouch
with the included power adapter. HeliTouch should display “NOT ENROLLED”. If it
does not then hold the “Factory Default” button for ve seconds to clear enrollment
memory.
Make sure Helix is powered up. Temporarily place HeliTouch in the desired mounting
location. If your target Helix reports a signal strength less than 25% then
relocate HeliTouch.
Tips
• HeliTouch lists all Helix panels within range, not just the ones in enrollment mode.
• Typically only one Helix will be listed because only one Helix is in range.
• Helix “names” include the last four characters of the Helix MAC address. The
Helix MAC address is printed on a label on the bottom of Helix. In the example
on this page the last four characters are “CDEF”.
• The signal strength percentages do not update very quickly. Tap “Restart” to
force an update of signal strength.
• If the target Helix does not appear on the list then conrm that Helix has a WiFi
DeviceLink installed and is powered.
Page 3
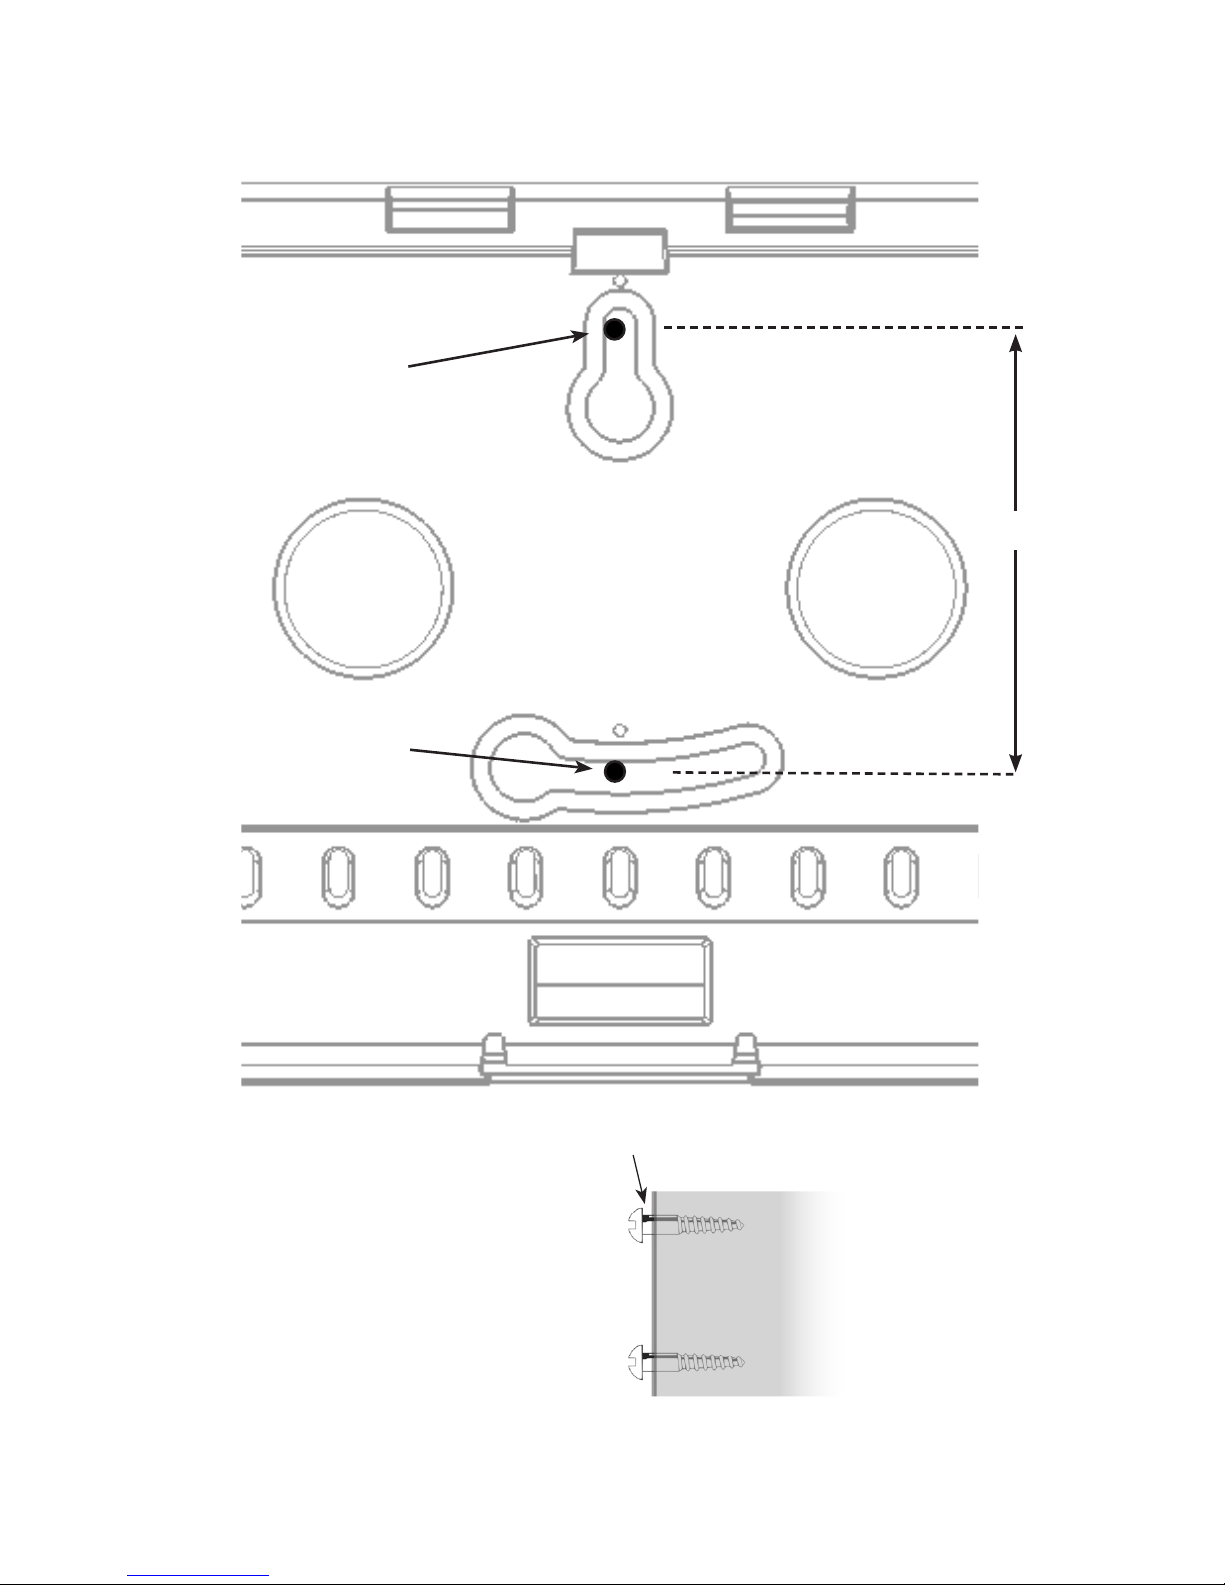
Wall Mounting Option One → Using the Template
1. Put the below template on the wall and drill holes through the two black dots.
2. Put the screws in the wall but leave a gap to accommodate the HeliTouch plastic.
3. Position HeliTouch over the top screwhead rst and then tilt HeliTouch to allow
the lower screwhead to slip through the lower plastic keyhole.
4. Rotate HeliTouch into place until level. Adjust screw gap and repeat to ensure a
tight t.
Template
2 3/8 Inches
Page 4

Wall Mounting Option Two → Involving Dissassembly
This approach requires removing the enclosure in order to access the mounting holes.
The plastic enclosure cover is hinged at the top, and latched at the bottom. Open
the enclosure by lifting at the two spots shown below.
The tablet is held in place with a latch on top and two latches on the bottom. Release
the tablet by pushing upward on the upper latch and tipping the tablet outward.
Unplug the USB power connector from the tablet and set the tablet aside.
After removing the tablet the wall mounting holes will be visible.
The power cable can exit the enclosure through the rectangular hole (typical) or can
be completely hidden by drilling a third (big) hole in the wall inside one of the big
round holes in the plastic. This will require shing the wire behind the drywall to a
location with an AC power outlet. Regardless, during reassembly, be sure to use
strain relief channels for the power cable. Details on this are found on the “More
Tips” page of this document.
Page 5

Enrollment
After conrming the signal strength is good, enroll HeliTouch by putting Helix into
enrollment mode and tapping on the desired Helix name on the HeliTouch screen.
HeliTouch will progress through stages of discovery and authentication and upon
success will show the below disarmed screen.
If you made a mistake and tapped the wrong Helix then press the Restart button.
Some troubleshooting steps if enrollment fails:
• Conrm Helix is in enroll mode
• Tap the Restart button and try again
• Check whether Helix already has the maximum of four HeliTouches enrolled
Page 6

The time zone is
congured online
The main banner indicates Helix status such as
“DISARMED” or “ARMED STAY”
Tap to disable entry delay
Tap before arming to arm silently
Tap one of the arming buttons to arm Helix
Tap for information on Helix
Tap for information on Zones
Tap to access settings such as
volume, screen brightness &
chime.
Press and hold for
two seconds to
trigger re alarm
Press and hold for
two seconds to
trigger panic alarm
Page 7

More Tips
• To remove the optional HeliTouch feet open the enclosure and remove the tablet
and locate and depress each foot’s locking tab while sliding the foot off the enclosure.
• The power cable arrives properly routed for strain relief. Always make sure the
power cable is routed through the strain relief channels in the upper left corner of
the enclosure.
• If HeliTouch is not used for a while (10 minutes) then HeliTouch turns its screen
off. It turns back on when the screen is touched or when a non-panic alarm occurs.
The screen can be manually turned off with a button found inside the
gear menu.
• On the top left of the tablet is a physical volume rocker. It is not used. HeliTouch
volume is set inside the gear menu.
• On the top left of the tablet is a power button. This button is typically never used.
It can, however, be pressed and held for several seconds to reboot HeliTouch.
• There are two ways to unenroll HeliTouch. If Helix is nearby then put Helix in
enrollment mode. When Helix is in enrollment mode then HeliTouch will display an
unenrollment button in the gear menu. If Helix is NOT nearby then HeliTouch
will display a factory default button that can be pressed to unenroll HeliTouch.
• Helix can support up to four HeliTouches.
Page 8

47-0036-00 • RevA • 2017-08-021
Tech Support Line (877) 260-5578
www.ResolutionProducts.com
WARRANTY
Resolution Products, Inc. will replace all non-portable products
that are defective in their rst ve (5) years, and all portable
products that are defective in their rst two (2) years.
IC NOTICE
This device complies with Industry Canada license-exempt
RSS standard(s). Operation is subject to the following two
conditions:
(1) This device may not cause interference, and
(2) This device must accept any interference, including
interference that may cause undesired operation of the
device.
Le présent appareil est conforme aux cnr d’Industrie
Canada applicables aux appareils radio exempts de licence.
L’exploitation est autorisée aux deux conditions suivantes:
(1) L’appareil ne doit pas produire de brouillage, et
(2) L’utilisateur de l’appareil doit accepter tout brouillage
radioélectrique subi, même si le brouillage est susceptible
d’en compromettre le fonctionnement.
IC: 21031-ANANDAT1
FCC NOTICE
This device complies with Part 15 of the FCC rules. Operation is
subject to the following two conditions:
(1) This device may not cause harmful interference.
(2) This device must accept any interference that may be
received, including interference that may cause undesired
operation.
Changes or modications not expressly approved by the
Resolution Products, Inc. could void the user’s authority to
operate this equipment.
FCC ID: 2AASJSTP-103
CE DECLARATION OF CONFORMITY
Hereby, Resolution Products, Inc. declares that this is in
compliance with the essential requirements and other relevant
provisions of directive 1999/5/EC.
(This declaration can be translated to other languages via a
myriad of translation tools found on the Internet.)
Specications
Physical Specications
Dimensions With Feet
Dimensions Without Feet
Weight
Mounting Fasteners
8.8 x 4.8 x 3.3 inches (22 x 12 x 8.4 cm)
8.8 x 4.8 x 1.2 inches (22 x 12 x 3.0 cm)
18 oz (510 grams)
#4 or #6 screws (not included)
Environmental Specications
Operating Temperature
Maximum Humidity
32°F to 120°F (0°C to 49°C)
85% non-condensing relative humidity
Device Specications
Battery Life
Wireless Range
Screen Resolution
Screen Size
4 Hours
300 feet in open air
1024 x 600 pixels
7 inches diagonally
Accessories
Power Supply
WiFi DeviceLink
RE012-13
RE926RX
Certications
RE657 FCC, IC
Specications subject to change without notice
 Loading...