

Page 1

BGUIDE
®
MANUAL
1
Page 2
Using your new BGUIDE® you will be able to guide and docu ment your buffing and cushion gum application, with its
combination of advanced sensor and computer technology.
BGUIDE
® gives you an until now unseen positioning accuracy in order to avoid crashing into the steel belt during final
buffing sequences, as the BGUIDE
® gives you the precise distance between the buffed tyre surface and the steel belt /
breaker on the full crown area, with an accuracy of +/- 0,3 mm
If you uses your BGUIDE
® for cushion gum application control the measuring accuracy is +/- 0,0 mm.
The BGUIDE
® performs 30 individual measurements per sec. at a distance up 6.5 mm from the buffed surface.
Contents:
1 pc BGUIDE®
1 pc Charge holder, Charger and cable 24 Volt
1 pc Transport security Box
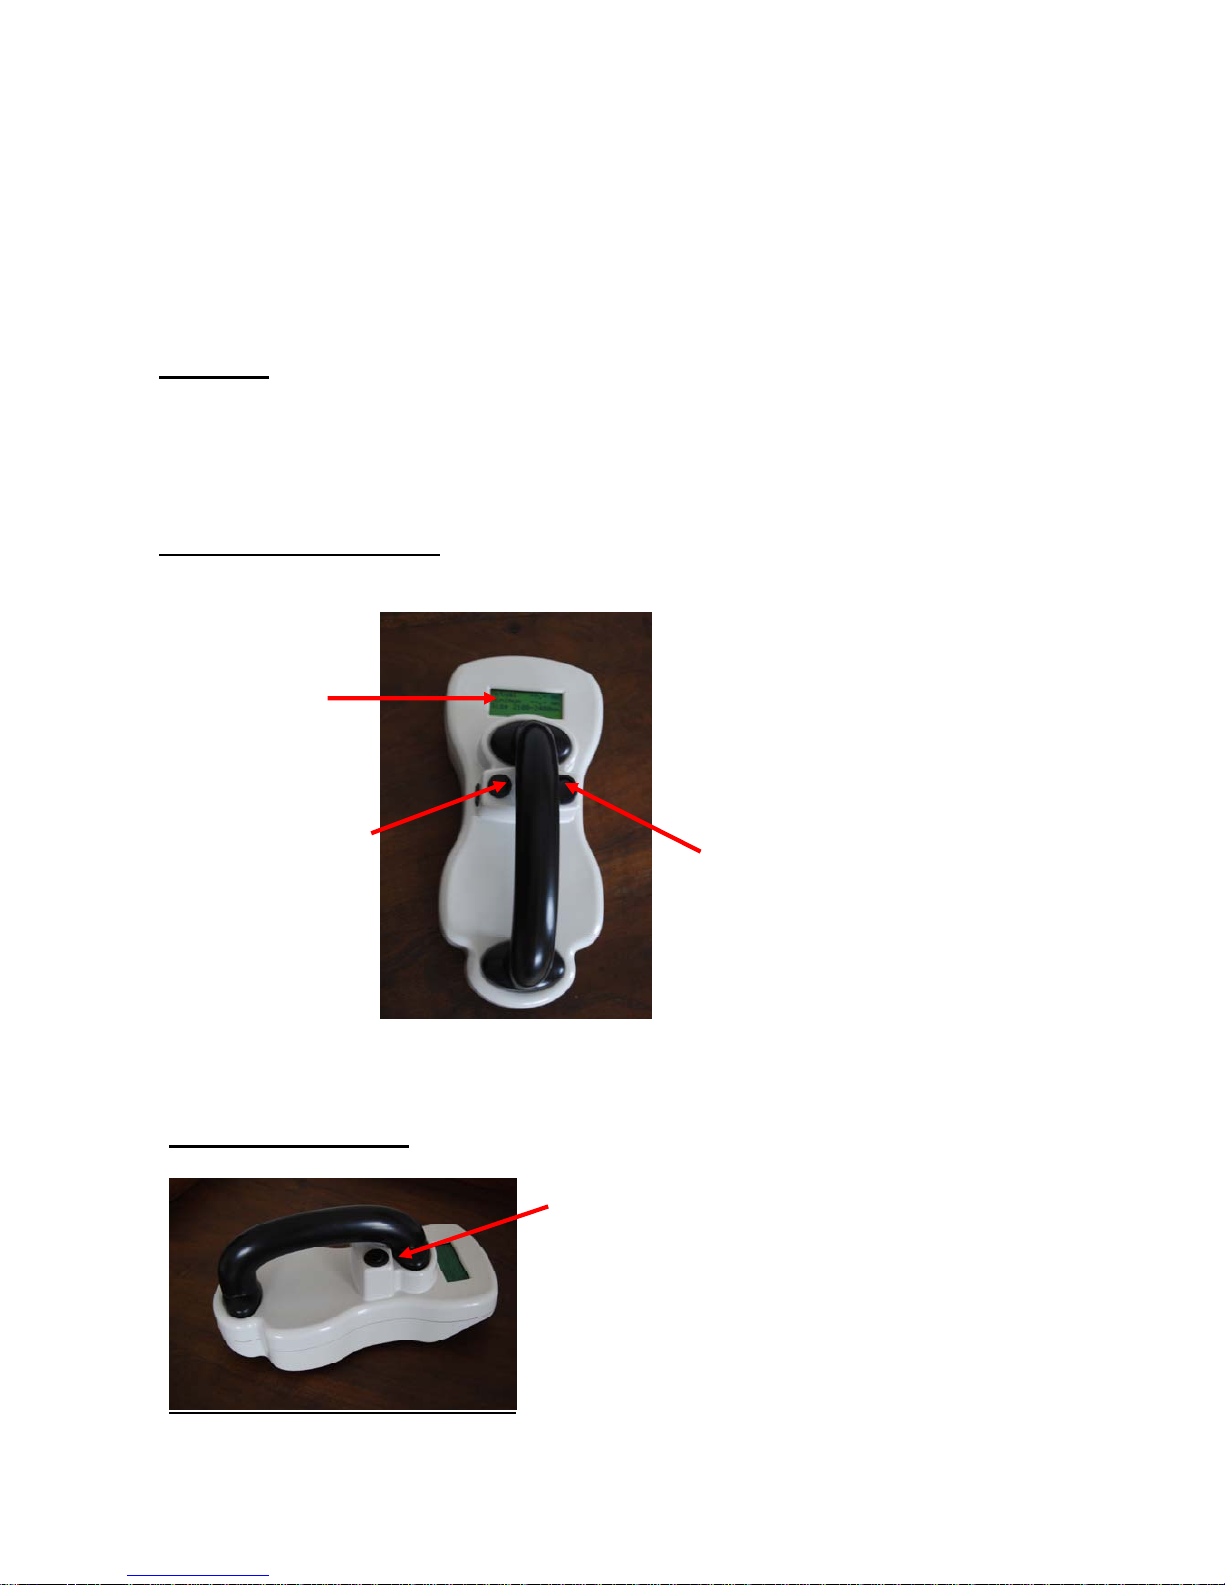
Function of the BGUIDE®
DISPLAY
DUAL FUNCTION
BUTTON
ON /OFF
BUTTON
ON / OFF BUTTON:
The ON / OFF button allows the operator to turn the
BGUIDE
® ON and OFF in order to minimize consumption
of power from the batteries.
In order to obtain full accuracy the BGUIDE
® should be
powered ON for a period of app. 40 minutes before
operation. (Used before 40 minutes could add +/- 0,2 mm
to the accuracy)
Please note that for recharging of batteries the BGUIDE
®
should be turned ON.
2
Page 3
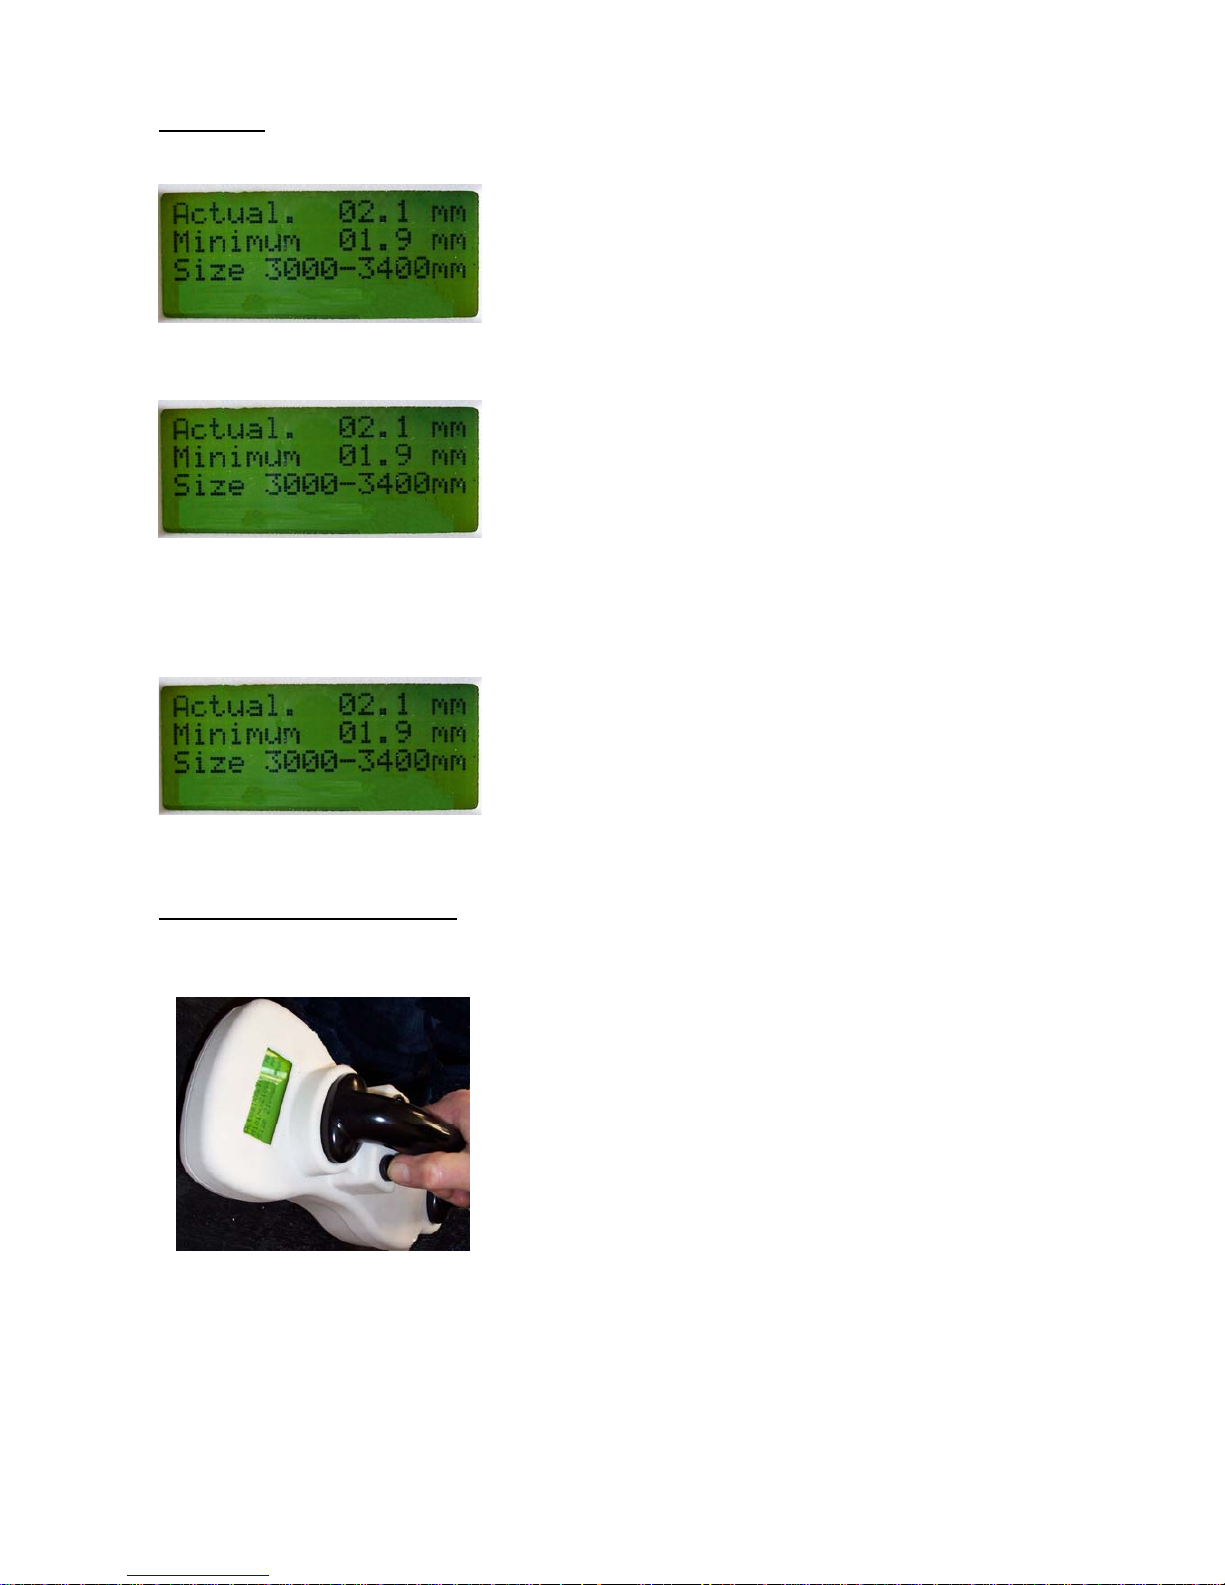
DISPLAY:
Actual
: This figure shows the actual distance between the
surface and the steel belt.
OBS 1 If the distance is above the measuring
range “
--- “ will show in the display.
OBS 2 Just behind the “l” a flashing dot appears
indicating that the measuring circuit is
operational. If the dot disappears reset
the BGUIDE (see below)
Minimum: This figure shows the minimum measured distance
between the surface and the steel belt since last
resetting.
The measured minimum value will show until a
manual resetting is performed. (for resetting see
below ).
Size
: In this line the selected size of casing measured
by circumference is shown. For resetting of size
see below.
DUAL FUNCTION BUTTON:
First function: A short push on the button the will make the latest
registered Minimum value disappear and “ - - - “
will appear, ready to measure e new minimum
value.
OBS. Every new measurement should start with
the resetting as described above.
Second function: In order to increase the overall accuracy,
measuring with the BGUIDE
® is carried out in 4
different areas, each related to the actual tyre
circumference.
The different areas are shown in the line Size.
The 4 areas are:
Area 1: 2100 – 2400 mm
Area 2: 2401 – 2700 mm
Area 3: 2701 – 3000 mm
Area 4: 3001 – 3500 mm
3
Page 4

Selecting the wanted areas is done via the dualfunction buttons scroll-function. Keeping pressure
on the button will shift the area, and when the
wanted area shows in the display, take the
pressure off the button.
OPERATION:
BUFFING CONTROL
(Only start measuring after any pattern has been buffed off)
Step 1. Take the BGUIDE
® out of the charge holder / Turn the
BGUIDE
® ON
Step 2. Reset the minimum value with a short push on the Dual
Function Button.
Step 3. Choose the relevant Size / area of the tyre by means of the
Dual Function Button
Step 4. Hold the BGUIDE® onto the tyre when it is
rotating, as illustrated, and make sure that all 4
wheels are in contact with the tyre surface.
Move the BGUIDE
® sideways over the
selected crown area, and observe the figures
shown in the display.
Use the values shown to guide your remaining
buffing.
Make sure that the tyre has made at least one
full rotation when the BGUIDE
® has been
moved sideways over the crown area, in order
to have as reliable a measurement as possible.
Hints:
• The more rotations → the more measured points.
• More measured points = higher accuracy.
• One rotation per 2 seconds = 60 measuring points.
• Worn rasp knives increase the distance between tyre surface and steel belt; caused by rough
surface.
Warning: in order to protect the operator from being hit by part of the tyre; actual measuring
with the BGUIDE
® should not be performed when rasp knives are in direct contact with the tyre.
4
Page 5

CUSHION GUM CONTROL:
1)Mount the casing on the Extruder
(extruder/builder combination)
Left
2) Hold the BGUIDE® on to the casing and let
it rotate full 360º in minimum 3 positions:
Middle
Right
3) Make a note of the “Min value” for each of
the 3 positions.
4) Apply cushion Gum
Left
5) Rotate the casing again, and place the
BGUIDE® on to the casing again on same
3 positions as described above:
Middle
Right
5
Page 6
6) Make a note of the “Min value” for each of
the 3 positions.
7) Compare the values noted under paragraph
3 and the ones noted under paragraph 6.
Differences are equal to the cushion gum
thickness.
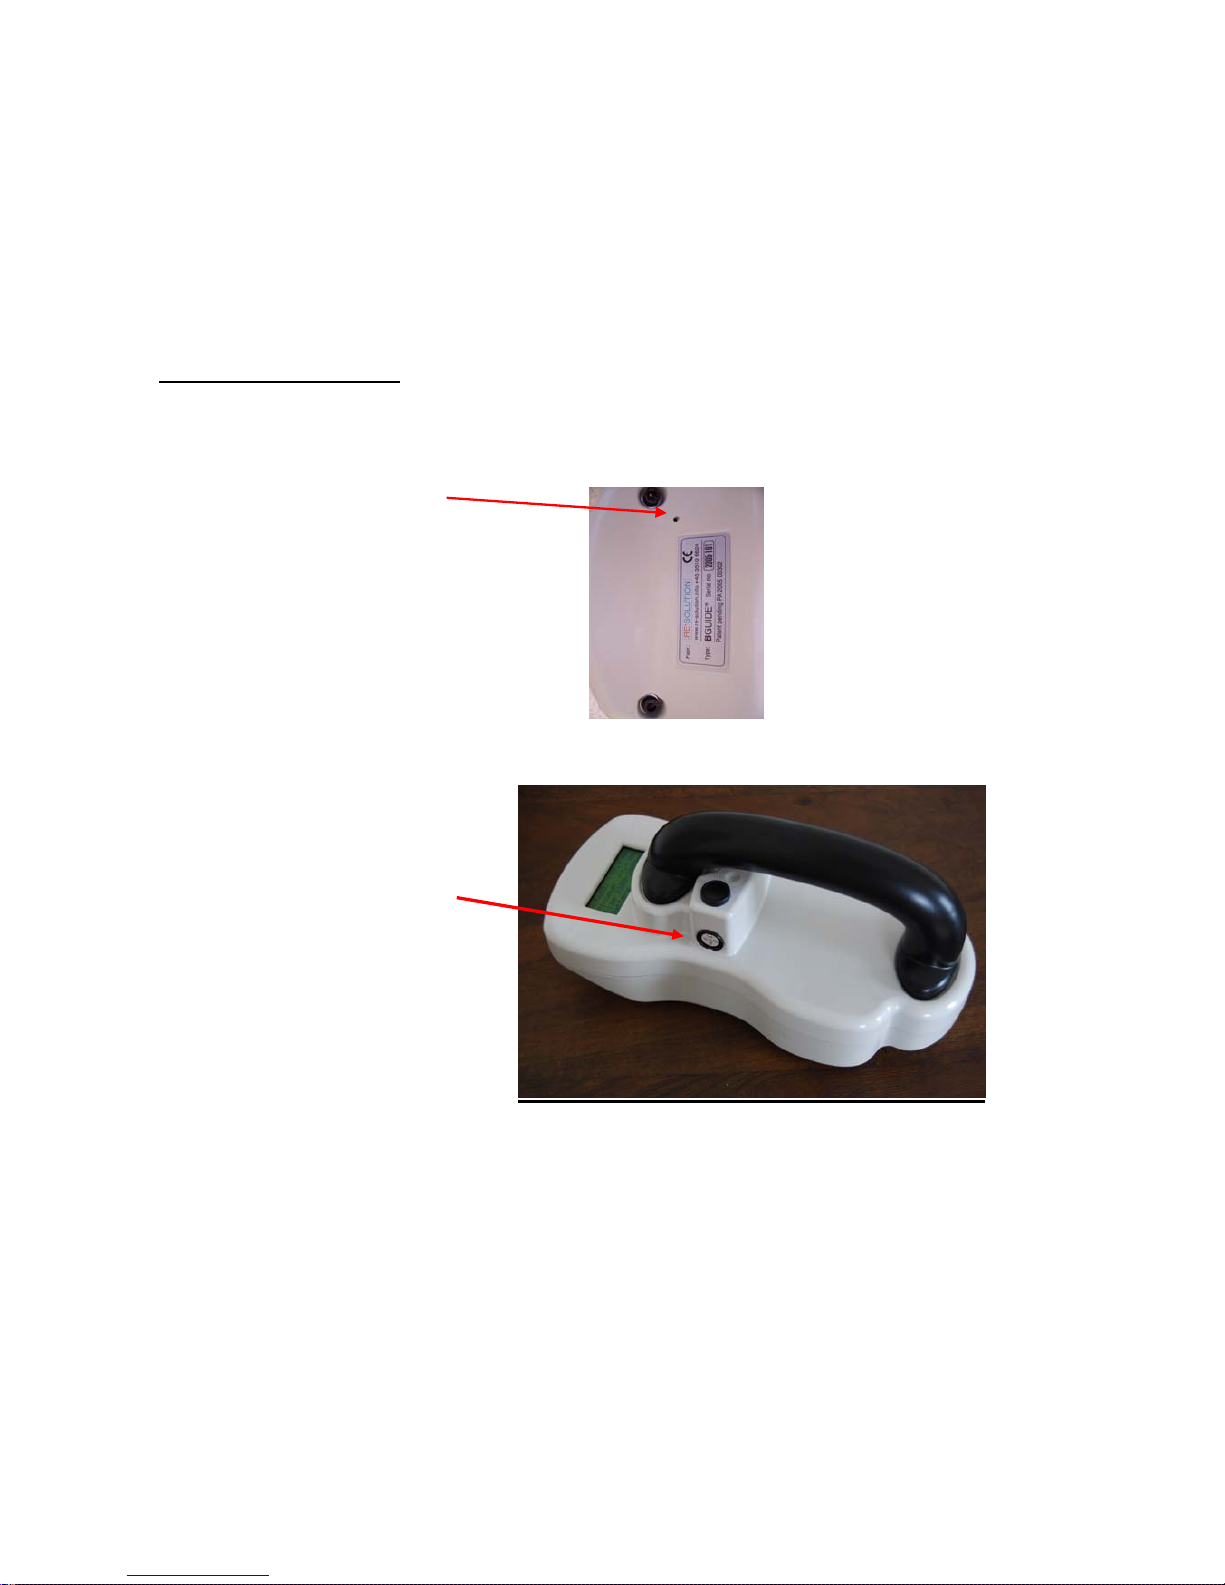
General information:
Resetting:
For resetting a “resetting button” is
placed inside the device and can be
reached via a small hole placed just
above the type identification.
For any resetting use a small pick (tooth)
or similar.
Resetting should only be necessary in
very special cases – such as a freezing
display or similar.
DIN socket:
The DIN socket is fitted for internal
calibration of the BGUIDE
® only.
6
Page 7

Mounting of charge holder:
It is advised to “park” the BGUIDE® in the charge holder when not in use.
The charge holder should be mounted with screws through the
3 holes.
OBS: When selecting a place to for the charge holder access to 230/110 Volt power supply
should be taken into consideration.
If for any reason the BGUIDE® has not been kept recharged for more than 5 hours recharging in accordance with point
1 ( below ) should be carried out.
If the rechargeable batteries have to be replaced, follow the procedure below.
Handling batteries:
Recharging can only take place when the BGUIDE® is placed in the charge holder, the BGUIDE® is turned ON, and
the charge unit is connected to the main power system.
The BGUIDE
® is powered via 10 1.5 Volt rechargeable batteries type AA. These batteries have to be recharged
following these instructions:
1. For a 100 % ( full ) recharge, the batteries should be recharged for a period of minimum 24 hours.
2. When not using it for measuring purposes place the BGUIDE
® in the charge holder and it will automatically
be kept recharged at operational level.
1.
Place the
BGUIDE® upside
down and remove the 5 Allen
screws. Then take off the bottom
cover plate.
2.
Disconnect the battery cassette
from the wire connector. Replace
the used batteries with new ones of
same rechargeable type. Make sure
that new batteries are placed
exactly as illustrated on the battery
cassette (+/-)
3.
Remount the wire connector and
remount the battery cassette in its
base position, between the special
guides
.
4. Finally remount the bottom
cover plate, and tighten the 5 Allen
screws.
7
Page 8

Technical specification:
Length: 290 mm
Width: 130 mm
Height: 150 mm
Weight: 1,8 kg
Power: 100 - 230Volt / 24 Volt – 50 HZ
Battery: 10 pc – 1.5 Volt rechargeable type AA
Contact:
Vellingvej 9
DK- 8654 Bryrup
Denmark
Phone: +45 35 10 66 24
Mail: contact@re-solution.info
8
 Loading...