

Page 1
VPAP™III & III ST
User Manual
English •Deutsch •Français •Italiano
•
Español
Português •Nederlands
Page 2
248129/2
05 10
VPAP III & III ST
USER
EUR 1
Global leaders in sleep and respiratory medicine www.resmed.com
Page 3
VPAP™III & III ST
Illustrations / Abbildungen /
Illustrations / Illustrazioni / Figuras /
Ilustrações / Illustraties
Component of 248129/2
HUMIDIFIERS / ATEMLUFTBEFEUCHTER / HUMIDIFICATEURS / UMIDIFICATORI /
HUMIDIFICADORES / HUMIDIFICADORES / BEVOCHTIGERS
A
B
12
4
Removable front cover /
Abnehmbare Frontabdeckung
/ Capot avant amovible /
Coperchio frontale estraibile /
Cubierta delantera
desmontable / Tampa da
frente removível /
Afneembare frontkap
SETTING UP THE VPAP / AUFSTELLEN DES VPAP / INSTALLATION DE LA
VPAP / CONFIGURAZIONE DEL VPAP / CONFIGURACIÓN DEL VPAP /
MONTAGEM DO VPAP / OPSTELLEN VAN DE VPAP
D
1
2
4
LCD Screen / LCD-Display /
Ecran LCD / Schermo a cristalli
liquidi / Visor LCD / Mostrador
LCD / LCD-scherm
Handle / Tragegriff / Poignée /
Maniglia / Asa / Pega / Hendel
Control Panel / Bedienoberfläche /
Panneau de contrôle / Pannello di
controllo / Panel de control / Painel
de controle / Bedieningspaneel
Air Outlet / Luftauslassöffnung /
Sortie d’air / Presa di uscita
dell’aria / Salida de aire / Saída de
ar / Luchtuitlaat
Air filter cover /
Luftfilterabdeckung / Couvercle
du logement du filtre à air /
Coperchio del filtro dell’aria /
Cubierta del filtro de aire /
Tampa do filtro de ar /
Afdekkap luchtfilter
Serial communications port (9-pin) /
Serieller Kommunikationsanschluss
(9-Pin) / Port série de communication
(9 broches) / Porta di comunicazione
seriale (9 piedini) / Puerto serial de
comunicaciones (9 clavijas) / Porta de
comunicações de série (9-pinos) /
Seriële communicatiepoort (9-pens)
Power switch /
Hauptschalter / Interrupteur
principal / Interruttore di
accensione / Interruptor
principal / Interruptor /
Elektriciteitsschakelaar
Power socket /
Netzanschlussbuchse / Prise
d’alimentation / Presa del cavo
di alimentazione / Entrada de
corriente / Tomada /
Aansluitpunt
© 2005 ResMed Ltd.
© 2005 ResMed Ltd. © 2005 ResMed Ltd.
© 2005 ResMed Ltd.
OTHER ACCESSORIES / SONSTIGES ZUBEHÖR / AUTRES ACCESSOIRES /
ALTRI ACCESSORI / OTROS ACCESORIOS / OUTROS ACESSÓRIOS /
OVERIGE ACCESSOIRES
C
3
SYSTEM COMPONENTS / SYSTEMKOMPONENTEN / COMPOSANTS DU
SYSTEME / COMPONENTI DEL SISTEMA / COMPONENTES DEL SISTEMA /
COMPONENTES DO SISTEMA / SYSTEEMCOMPONENTEN
1
2
Auxiliary port (15-pin) / Aux-Anschluss
(15-Pin) / Port auxiliaire (15 broches) / Porta
ausiliaria (15 piedini) / Puerto auxiliar
(15 clavijas) / Porta auxiliar (15-pinos) /
Hulppoort (15-pens)
34 5
2 m
HumidAire 2i
™
HumidAire 2iC
™
HumidAire
™ ResMed Passover
1
3 m
2
52 cm
3
HUMIDAIRE 2i AND VPAP / HUMIDAIRE 2i UND VPAP / HUMIDAIRE 2i ET
VPAP / HUMIDAIRE 2i E VPAP / HUMIDAIRE 2i Y VPAP / HUMIDAIRE 2i E VPAP /
HUMIDAIRE 2i EN VPAP
E
HUMIDAIRE 2iC AND VPAP / HUMIDAIRE 2iC UND VPAP / HUMIDAIRE 2iC
ET VPAP / HUMIDAIRE 2iC E VPAP / HUMIDAIRE 2iC Y VPAP / HUMIDAIRE 2iC E
VPAP / HUMIDAIRE 2iC EN VPAP
F
© 2005 ResMed Ltd. © 2005 ResMed Ltd.
Docking station /
Andock-Station /
Support / Unità di
alloggiamento /
Estación de carga /
Estação de
ancoragem /
Docking-station
Water chamber /
Befeuchterkammer /
Réservoir / Camera
dell’acqua / Cámara
de agua / Câmara de
água / Waterkamer
Docking station /
Andock-Station /
Support / Unità di
alloggiamento / Estación
de carga / Estação de
ancoragem /
Docking-station
Water chamber /
Befeuchterkammer /
Réservoir / Camera
dell’acqua / Cámara de
agua / Câmara de água /
Waterkamer
Page 4
ATTACHING A PASSOVER HUMIDIFIER / ANSCHLUSS EINES PASSOVERATEMLUFTBEFEUCHTERS / FIXATION D'UN HUMIDIFICATEUR PASSOVER /
CONNESSIONE DI UN UMIDIFICATORE PASSOVER / CONEXIÓN DE UN
HUMIDIFICADOR PASSOVER / CONEXÃO DE UM HUMIDIFICADOR PASSOVER /
BEVESTIGING VAN EEN PASSOVER BEVOCHTIGER
H
4
© 2005 ResMed Ltd.
3
ATTACHING A HUMIDAIRE HUMIDIFIER / ANSCHLUSS EINES
HUMIDAIRE ATEMLUFTBEFEUCHTERS / FIXATION D'UN HUMIDIFICATEUR
HUMIDAIRE / CONNESSIONE DI UN UMIDIFICATORE HUMIDAIRE /
CONEXIÓN DE UN HUMIDIFICADOR HUMIDAIRE / CONEXÃO DE UM
HUMIDIFICADOR HUMIDAIRE / BEVESTIGING VAN EEN HUMIDAIRE
BEVOCHTIGER
G
© 2005 ResMed Ltd.
12
4
3
12
(2 m/3 m)
(52 cm)
(2 m/3 m)
(52 cm)
REPLACING THE AIR FILTER / AUSWECHSELN DES LUFTFILTERS /
REMPLACEMENT DU FILTRE A AIR / SOSTITUZIONE DEL FILTRO DELL’ARIA /
CAMBIO DEL FILTRO DE AIRE / SUBSTITUIÇÃO DO FILTRO DE AR / VERVANGING
VAN HET LUCHTFILTER
I
© 2005 ResMed Ltd.
1
2
3
Page 5
VPAP™ III & III ST
User’s Manual 1
Bedienungsanleitung 47
Manuel utilisateur 99
Manuale per l’utente 149
EnglishDeutschItaliano Français
Manual del Usuario 199
Manual do Utilizador 247
Handleiding voor de Gebruiker 295
248129/2 05 10
EspañolPortuguêsNederlands
Page 6

Manufactured by:
ResMed Ltd 1 Elizabeth MacArthur Drive Bella Vista NSW 2153 Australia
Tel: +61 (2) 8884 1000 or 1 800 658 189 (toll free) Fax: +61 (2) 8883 3114 Email: reception@resmed.com.au
Distributed by:
ResMed Corp 14040 Danielson Street Poway CA 92064-6857 USA
Tel: +1 (858) 746-2400 or 1-800-424-0737 (toll free) Fax: +1 (858) 746-2900 Email: reception@resmed.com
ResMed (UK) Limited 65 Milton Park Abingdon Oxfordshire OX14 4RX UK
Tel: +44 (1235) 862 997 Fax: +44 (1235) 831 336 Email: reception@resmed.co.uk
ResMed Asia Pacific Ltd 97 Waterloo Road North Ryde NSW 2113 Australia
Tel: +61 (2) 9886 5000 or 1 800 991 900 (toll free) Fax: +61 (2) 9889 1471 Email: reception@resmed.com.au
ResMed Austria GmbH Purtscherstraße 18, 9500 Villach Österreich
Tel: 43 (4242) 430 830 Fax: +43 (4242) 430 830-4 Email: reception@resmed.at
ResMed BV Nieuwe Parklaan 86, 2587 BV Den Haag Nederland
Tél: +31 (70) 358 6263 Fax: +31 (70) 358 4333 Email: receptiondh@resmed.nl
ResMed Finland Oy Eteläinen Salmitie 2 Masala 02430 Suomi
Tel: +358 9 8676820 Fax: +358 9 86768222 Email: reception@resmed.fi
ResMed GmbH & Co. KG Fraunhoferstraße 16, 82152 Martinsried Deutschland
Tel: +49 (0) 89/99 01-00 Fax: +49 (0) 89/99 01-10 55 Email: reception@resmed.de
ResMed Hong Kong Limited Room 1714, Miramar Tower 132-134 Nathan Road Tsim Sha Tsui Hong Kong
Tel: +852 2366 0707 Fax: +852 2366 4546 Email: reception@resmed.com.hk
ResMed Japan 17F, Fukokuseimei Building, 2-2-2, Uchisaiwai-cho, Chiyoda-ku Tokyo 100-0011 Japan
Tel: +81 (3) 3592 9555 Fax: +81 (3) 3592 9555
ResMed Malaysia Sdn Bhd Suite E-10-20, Plaza Mon’t Kiara No. 2 Jalan 1/70C Mon’t Kiara 50480 Kuala Lumpur
Malaysia Tel: +60 3 6201 7177 Fax: +60 3 6201 2177 Email: reception@resmed.com.my
ResMed Middle East 66 Ahmed Shawki St. Mostafa Kamel, Alexandria 21111 Egypt
Tel: +20 3 546 8825 Fax: +20 3 544 6984
ResMed NZ Ltd PO Box 51-048 Pakuranga Auckland New Zealand
Tel:+64 274 737 633 Fax:+64 9 239 0193 Email: reception@resmed.co.nz
ResMed SA Parc de la Bandonnière 2, rue Maurice Audibert 69800 Saint-Priest France
Tél. : +33 (0) 4 37 251 251 Fax : +33 (0) 4 37 251 260 Email: reception@resmed.fr
ResMed Schweiz Thannerstrasse 57 CH-4054 Basel Schweiz
Tel: +41 (061) 307 9711 Fax: +41 (061) 307 9722 Email: info@resmed.ch
ResMed Singapore Pte Ltd 238A Thomson Road #12-03/04, Novena Square, Tower A Singapore 307684
Tel: +65 6284 7177 Fax: +65 6284 7787 Email: reception@resmed.com.sg
ResMed Spain SL C/Arturo Soria, 245 28033 Madrid España
Tel: +34 (93) 5908154 Fax: +34 (93) 5908153 Email:angelo@resmed.es
ResMed Sweden AB Industrigatan 2 S-461 37 Trollhättan Sverige
Tel: +46 520 420 110 Fax: +46 520 397 15 Email: reception@resmed.se
US DESIGNATED AGENT: ResMed Corp
EU AUTHORISED REPRESENTATIVE: ResMed (UK) Ltd
Internet: www.resmed.com
Protected by patents: AU 697652, AU 699726, AU 713679, EP 0661071, EP 0858352, US 4944310, US 5199424,
US 5522382, US 6213119, US 6240921, US 6705315. Other patents pending.
Protected by design registrations: AU 147283, AU 147335, AU 147336, CH 128.709, CH 128.710, CH 128.711,
CH 128.712, DE 40201723, DE 40202007, DE 40202008, DE 40202020, ES 153514, ES 153515, ES 153516, ES 153518,
ES 156135, ES 156136, FR 02 1407, GB 3001791, GB 3001819, GB 3001820, GB 3001821, JP 1164087, JP 1164265,
JP 1164266, JP 1164267, JP 3638613, SE 75598, SE 75599, SE 75600, SE 75715, US D467335, US D468011,
US D476077, US D477868, US D487311, US D503796. Other designs pending.
VPAP, Activa, HumidAire, HumidAire 2i, Mirage, SmartStart, Smart Data, Ultra Mirage and Vista are trademarks of
ResMed Ltd, and VPAP, Activa, HumidAire, HumidAire 2i, Mirage, SmartStart, Ultra Mirage and Vista are
registered in U.S. Patent and Trademark Office.
© 2005 ResMed Ltd.
Page 7

VPAP™ III & III ST
User Manual
English
English
1
Page 8

2
Page 9

Contents
Introduction . . . . . . . . . . . . . . . . . . . . . . . . . . . . . . . . . . . . . . . . . . . . . . . 5
User/Owner Responsibility 5
Medical Information . . . . . . . . . . . . . . . . . . . . . . . . . . . . . . . . . . . . . . . 5
What the VPAP III and VPAP III ST are Intended for 5
Contraindications 5
Warnings 6
Cautions 6
Adverse Effects 7
The VPAP System . . . . . . . . . . . . . . . . . . . . . . . . . . . . . . . . . . . . . . . . . . 9
Masks 9
Humidifiers 10
Accessories 10
Setting up the VPAP System . . . . . . . . . . . . . . . . . . . . . . . . . . . . . . 11
Setting Up The VPAP 11
Attaching a Humidifier 11
Using the LCD Screen and Keypad 13
Starting Treatment . . . . . . . . . . . . . . . . . . . . . . . . . . . . . . . . . . . . . . . . 15
Stopping Treatment 16
Using the HumidAire 2i Warm-Up Feature 16
Using the Mask-Fitting Feature 16
Cleaning and Maintenance . . . . . . . . . . . . . . . . . . . . . . . . . . . . . . . . 19
Daily Cleaning 19
Weekly Cleaning 19
Periodic Cleaning 19
Replacing the Air Filter 20
Servicing 20
How to Use the VPAP Menus . . . . . . . . . . . . . . . . . . . . . . . . . . . . . . 21
Ramp Screen 21
How to Use the Standard Menu 21
How to Use the Detailed Menu (if enabled by your clinician) 22
Menu Functions (Detailed menu only) 24
Treatment Screens 27
Helpful Hints . . . . . . . . . . . . . . . . . . . . . . . . . . . . . . . . . . . . . . . . . . . . . 29
Using a Battery and an Inverter 29
Troubleshooting . . . . . . . . . . . . . . . . . . . . . . . . . . . . . . . . . . . . . . . . . . 31
System Specifications . . . . . . . . . . . . . . . . . . . . . . . . . . . . . . . . . . . . 35
Limited Warranty . . . . . . . . . . . . . . . . . . . . . . . . . . . . . . . . . . . . . . . . . 43
Index . . . . . . . . . . . . . . . . . . . . . . . . . . . . . . . . . . . . . . . . . . . . . . . . . . . . . 45
English
3Contents
Page 10

4
Page 11

Introduction
The VPAP™ III and VPAP III ST are bilevel pressure support ventilators
specifically designed for non-invasive mask ventilation.
This user manual contains the information you need for the correct use of your
VPAP.
User/Owner Responsibility
The user or owner of this system shall have sole responsibility and liability for any
injury to persons or damage to property resulting from:
• operation which is not in accordance with the operating instructions supplied
• maintenance or modifications carried out unless in accordance with
authorised instructions and by authorised persons.
Please read this manual carefully before use.
This manual contains special terms and icons that appear in the margins to draw
your attention to specific and important information.
• Warning alerts you to possible injury.
• Caution explains special measures for the safe and effective use of the
device.
• Note is an informative or helpful note.
Medical Information
English
What the VPAP III and VPAP III ST are Intended for
The VPAP III and VPAP III ST systems are intended to provide non-invasive
ventilation for patients with respiratory insufficiency or obstructive sleep apnoea
(OSA), in the hospital or home.
Contraindications
The VPAP should not be used if you have an insufficient respiratory drive to
endure brief interruptions in non-invasive ventilation therapy. The VPAP is not a
life support ventilator and may stop operating with power failure or in the unlikely
event of certain fault conditions.
If you have any of the following conditions, tell your doctor before using the
VPAP:
• acute sinusitis or otitis media
• epistaxis causing a risk of pulmonary aspiration
• conditions predisposing to a risk of aspiration of gastric contents
• impaired ability to clear secretions
5Introduction
Page 12

• hypotension or significant intravascular volume depletion
• pneumothorax or pneumomediastinum
• recent cranial trauma or surgery.
Warnings
• The entire manual should be read before using the VPAP.
• Advice contained in this manual should not supersede instructions given by
the prescribing physician.
• The VPAP should be used with masks and accessories recommended by
ResMed or the prescribing physician. Use of incorrect masks and
accessories may adversely affect the function of the VPAP.
• The VPAP is designed for use with masks that allow exhaled gases to be
flushed out through vent holes. Exhaled gases will be rebreathed if the mask
is worn with the machine turned off, or the vent holes are occluded. If this
occurs over prolonged periods, suffocation may occur.
• In the event of power failure or machine malfunction, remove the mask.
• The VPAP can be set to deliver pressures up to 25 cm H
event of certain fault conditions, pressures up to 40 cm H
• The VPAP is not suitable for use in the vicinity of flammable anaesthetics.
• The VPAP should not be used with anaesthetised patients, whose breathing
depends on artificial ventilation.
• If oxygen is used with the VPAP, the oxygen flow should be stopped when
the device is not operating. If oxygen flow continues when the device is not
operating, oxygen may accumulate within the device and create a risk of fire.
• Do not use the VPAP if there are obvious external defects, unexplained
changes in performance or unusual noises.
• Do not open the VPAP case. There are no user serviceable parts inside.
Repairs and internal servicing should only be performed by an authorised
service agent.
O. In the unlikely
2
O are possible.
2
6
Cautions
• At low EPAP pressures, the flow through the mask vent holes may be
inadequate to clear all exhaled gases, and some rebreathing may occur.
• The air flow for breathing produced by this device can be as much as 6
higher than the temperature of the room. Caution should be exercised if the
room temperature is warmer than 32oC.
Note: The above are general warnings and cautions. Further specific warnings,
cautions and notes appear next to the relevant instructions in the manual.
o
C
Page 13

Adverse Effects
You should report unusual chest pain, severe headache or increased
breathlessness to your physician. An acute upper respiratory tract infection may
require temporary discontinuation of treatment.
The following side effects may arise during the course of therapy with the VPAP:
• drying of the nose, mouth or throat
• bloating
• ear or sinus discomfort
• eye irritation
• mask-related skin irritations
• chest discomfort.
English
7Medical Information
Page 14

8
Page 15

The VPAP System
Please refer to the illustrations in section A of the illustration sheet.
Please identify and familiarise yourself with the following components of the
VPAP unit:
• VPAP front view (A-1)
• VPAP rear view (A-2)
• Power cord (A-3)
• Carry bag (A-4)
• 2 m air tubing (A-5).
WARNING
!
• Do not connect any device to the auxiliary port. Although your health
care provider may connect specially designed devices to the auxiliary
port of the VPAP unit, connection of other devices could result in injury,
or damage to the unit.
• In the home environment, the only device that may be connected to the
communications port is a modem that is locally approved. Locally
approved modems may also be connected in the clinical environment.
• In the clinical environment any PC that is used with the VPAP system
must be at least 1.5 m away from, or at least 2.5 m above the patient. It
must also comply with IEC 60950 or equivalent.
Masks
You will also need a ResMed mask system (supplied separately).
The following ResMed mask systems are recommended for use with the VPAP:
Nasal Masks
• Ultra Mirage™ Nasal Mask
• Mirage™ Nasal Mask
• Mirage Activa™ Nasal Mask
• Mirage Vista™ Nasal Mask
• Modular Nasal Mask.
Full Face Masks
• Mirage™ Full Face Mask
• Mirage™ Full Face Mask Series 2
• Ultra Mirage™ Full Face Mask.
To select the appropriate setting for your mask, see “Settings for Mask Types”
on page 25.
Notes:
• ResMed VPAP devices have been designed and manufactured to provide
optimum performance using ResMed vented mask systems. While other
vented mask systems may be used, performance and data outputs may be
English
9The VPAP System
Page 16

affected. To select an appropriate setting for another mask system, find the
closest match to a ResMed mask in Table 3 on page 25.
• Not all masks are available in all regions.
Humidifiers
Please refer to the illustrations in section B of the illustration sheet.
A humidifier may be required if you are experiencing dryness of the nose, throat
or mouth. The VPAP is compatible for use with the following humidifiers:
• HumidAire 2i™ heated humidifier (B-1)
• HumidAire 2iC™ passover humidifier (B-2)
• HumidAire™ heated humidifier (B-3)
• ResMed Passover humidifier (B-4).
WARNING
!
Only the HumidAire 2i, HumidAire 2iC, HumidAire heated humidifier and
the ResMed Passover are compatible for use with the VPAP. Please refer to
Warnings on page 6.
Accessories
Please refer to the illustrations in section C of the illustration sheet.
The following accessories may be purchased separately:
• 3 m air tubing (C-1)
• Medium (52 cm) air tubing for the HumidAire and ResMed Passover
humidifiers (C-2).
10
Note: ResMed regularly releases new products. Please check our website at
www.resmed.com.
Page 17

Setting up the VPAP System
Please refer to the illustrations in section D of the illustration sheet.
Setting Up The VPAP
1 Place the VPAP unit on a flat surface near the head of your bed. If the unit is
placed on the floor, ensure that the area is free from dust and clear of bedding,
clothes or any other objects that could block the air inlet.
CAUTION
!
Be careful not to place the device where it can be bumped or where
someone is likely to trip over the power cord.
Connect the power cord to the socket at the rear of the flow generator. Plug the
2
other end of the power cord into a power outlet (D-1).
WARNING
!
• Make sure the power cord and plug are in good condition and the
equipment is not damaged.
• The air filter cover protects the device in the event of accidental liquid
spillage onto the device. Ensure that the air filter and air filter cover are
fitted at all times.
Connect one end of the air tubing firmly onto the air outlet of the unit (D-2).
3
WARNING
!
Only ResMed air tubing should be used with your flow generator. A
different type of air tubing may alter the pressure you actually receive and
reduce the effectiveness of your treatment.
English
Assemble your mask system according to the mask user instructions.
4
Connect your mask system to the free end of the air tubing (D-3).
5
The VPAP system is now assembled (D-4). To start treatment, see “Starting
Treatment” on page 15.
Attaching a Humidifier
WARNING
!
When using a humidifier, position it lower than you, and at the same level
or lower than the VPAP.
Attaching a HumidAire 2i Humidifier
Please refer to the illustrations in section E of the illustration sheet.
The HumidAire 2i attaches to the front of the VPAP to provide heated
humidification. No other accessories are required for its use. The VPAP
11Setting up the VPAP System
Page 18

automatically detects the presence of the HumidAire 2i. No menu changes are
required. Please refer to the HumidAire 2i User’s Manual for details.
Attaching a HumidAire 2iC Humidifier
Please refer to the illustrations in section F of the illustration sheet.
The HumidAire 2iC attaches to the front of a VPAP unit to provide passover
humidification. No other accessories are required for its use. Please refer to the
HumidAire 2iC User’s Manual for details.
Note: You must activate the humidifier option in the menus if you are using a
HumidAire, HumidAire 2iC or Passover humidifier.
Attaching a HumidAire Humidifier
Please refer to the illustrations in section G of the illustration sheet.
Medium size (52 cm) air tubing is a necessary accessory for connecting the VPAP
unit to the HumidAire humidifier.
To set up the VPAP with the HumidAire:
1. Fill the HumidAire with water as described in the humidifier manual.
2. Place the filled water chamber inside the HumidAire. Connect the medium
(52 cm) air tubing to the right connector port, and the long air tubing (2 m or
3 m) to the left connector port on the humidifier (G-1). Close the HumidAire
lid.
3. Place the VPAP on top of the HumidAire (G-2). Do not place the VPAP unit
underneath the humidifier. (This is to avoid water spilling into the unit.)
4. Connect the free end of the medium air tubing to the air outlet of the VPAP
(G-3).
5. Connect the mask system to the free end of the long air tubing. The final
assembly should look like figure G-4.
6. Plug the HumidAire power cord into a power outlet.
7. If the VPAP is not already plugged in, see Step 2 on page 11.
12
WARNING
!
Make sure that the power cord and plug are in good condition and the
equipment is not damaged.
8. Navigate to the humidifier setting (if available) in the VPAP menu and select
"HUMIDAIRE". See “How to Use the Detailed Menu (if enabled by your
clinician)” on page 22.
The VPAP is now ready for use with the HumidAire. To start treatment, see
“Starting Treatment” on page 15.
Attaching a Passover Humidifier
Please refer to the illustrations in section H of the illustration sheet.
Medium size (52 cm) air tubing is a necessary accessory for connecting the VPAP
unit to the ResMed Passover humidifier.
To set up the VPAP with the ResMed Passover:
Page 19
1. Fill the Passover with water as described in the humidifier manual.
2. Connect the medium (52 cm) air tubing to the right connector port, and the
long air tubing (2 m or 3 m) to the left connector port on the humidifier (H-1).
3. Place the VPAP on top of the Passover (H-2). Do not place the VPAP unit
underneath the humidifier. (This is to avoid water spilling into the unit.)
4. Connect the free end of the medium air tubing to the air outlet of the VPAP
(H-3).
5. Connect the mask system to the free end of the long air tubing. The final
assembly should look like figure H-4.
6. If the VPAP is not already plugged in, see Step 2 on page 11.
WARNING
!
Make sure that the power cord and plug are in good condition and the
equipment is not damaged.
7. Navigate to the humidifier setting (if available) in the VPAP menu and select
"PASSOVER". See “How to Use the Detailed Menu (if enabled by your
clinician)” on page 22.
The VPAP is now ready for use with the ResMed Passover. To start treatment,
see “Starting Treatment” on page 15.
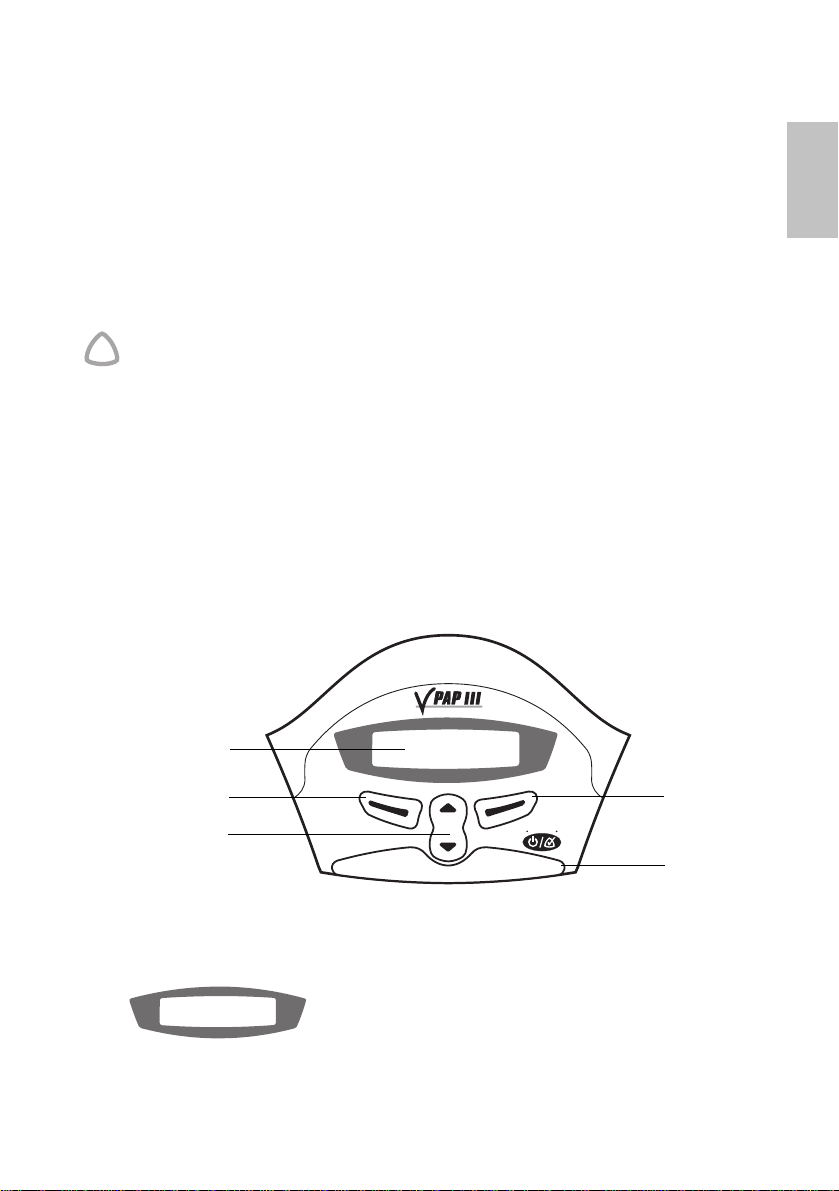
Using the LCD Screen and Keypad
The control panel of the VPAP includes an LCD screen and keypad.
English
LCD screen
Left key
Up/down key
Start/Stop
Mask-fit
Right key
Front key
LCD Screen
The LCD screen displays the menus and treatment screens.
To assist you in adjusting the VPAP, the keypad and LCD are equipped with a
backlight. The LCD backlight comes on when the unit is turned on or when you
press a key, and turns off after two minutes.
13Setting up the VPAP System
Page 20
Keypad Keys
The VPAP keypad has the following keys:
Key Function
Front
• Starts or stops treatment.
Start/Stop
Mask-fit
• Extended hold for at least three seconds starts the Mask-
Fitting feature.
Up/Down
• Allows you to scroll through the VPAP menus, submenus
and setting options.
Left (green)
• Performs the function indicated by the guiding text
displayed above it on the LCD screen. Guiding text includes
menu, enter, change and apply.
Right (red)
• Performs the function indicated by the guiding text
displayed above it on the LCD screen. Guiding text includes
exit and cancel
.
The keypad backlight is on at all times when the VPAP is powered.
14
Page 21
Starting Treatment
The VPAP unit should be assembled beside your bed with the air tubing and
mask system connected. See “Setting Up The VPAP” on page 11.
1 Turn the main power switch at the back of the unit to on (I).
Main
power
switch
When the VPAP is turned on, a welcome message is displayed on the LCD
screen. The VPAP (or Ramp) screen then appears.
Note: If you have the HumidAire 2i attached, see “Using the HumidAire 2i
Warm-Up Feature” on page 16.
Fit your mask as described in the mask user instructions.
2
Lie down and arrange the air tubing so that it is free to move if you turn in your
3
sleep.
CAUTION
!
• Do not leave long lengths of air tubing around the top of your bed. It
could twist around your head or neck while you are sleeping.
• Make sure the area around the flow generator is dry and clean. It should
also be clear of bedding, clothes and other potential blockages.
To start treatment, press the Front key
4
or
if your clinician has enabled the SmartStart function, simply breathe into the
mask and treatment will begin.
After starting treatment, you can display one of the treatment screens described
in “Treatment Screens” on page 27.
English
Ramp time
Ramp time is a feature which can be enabled by your clinician. If you have
difficulty falling asleep with full pressure, select a ramp time. The airflow will start
very gently while you fall asleep. The pressure will slowly increase to full
operating pressure over the selected ramp time. The clinician has set a
maximum ramp time; you may select any value up to the maximum.
To select a ramp time, see “Ramp Screen” on page 21.
15Starting Treatment
Page 22
Stopping Treatment
To stop treatment at any time, remove your mask and press the Front key
or
if your clinician has enabled the SmartStart function, simply remove your mask
and treatment will end (SmartStop is not applicable with the "Mir Full" mask
setting).
Using the HumidAire 2i Warm-Up Feature
If using a HumidAire 2i with the VPAP, you can use the Warm-Up feature to preheat the water in the humidifier prior to starting treatment.
After stopping treatment, the VPAP will continue to blow air gently to assist
cooling of the heater plate.
See the HumidAire 2i User’s Manual for further details.
Using the Mask-Fitting Feature
The VPAP Mask-Fitting feature can be used to help you fit your mask properly.
The mask-fitting feature delivers air pressure for a three-minute period, prior to
starting treatment, for checking and adjusting your mask fit to minimise leaks. If
a Ramp time is selected, the mask can be adjusted at a pressure closer to the
prescribed pressure. To use the mask-fitting feature:
1. Fit your mask as described in the user instructions.
2. Hold down the Front key for at least three seconds until air pressure delivery
starts.
The following display will appear on the LCD screen indicating that the MaskFitting feature is in operation. The flow generator will ramp to the Mask-Fit
pressure and will remain at this pressure for three minutes. A Mask-Fit star
rating is also displayed. See “Definitions of Mask-Fit Star Rating” on page 17.
16
Mask Fit
excelnt
Notes:
• The Mask-Fit star rating display disappears after three minutes.
• The Mask-Fitting feature can only be started from the VPAP (or Ramp)
screen.
• The Mask-Fit pressure is the set treatment pressure or 10 cm H
is greater.
3. Adjust your mask, mask cushion and headgear until you have a secure and
comfortable fit.
*****
Mask-Fit Star rating
0, whichever
2
Page 23

Once you have a secure and comfortable fit, check your Mask-Fit star rating
on the LCD screen. Definitions of the Mask-Fit star ratings are presented in
Table 1.
Note: If there is another person nearby to check your Mask-Fit star rating, you
can adjust your mask, mask cushion and headgear while lying down.
4. After three minutes, treatment will begin.
• If you do not wish to wait three minutes, hold down the Front key for at
least three seconds and treatment will begin immediately.
• If you press the Front key for less than three seconds, the unit will return
to standby mode (the VPAP or Ramp screen is displayed).
Table 1: Definitions of Mask-Fit Star Rating
Star rating Definition
***** Excellent
****- Very good
***-- Good
**--- Adjust mask
*---- Adjust mask
HIGH LEAK Adjust mask
English
17Starting Treatment
Page 24

18
Page 25

Cleaning and Maintenance
You should regularly carry out the cleaning and maintenance described in this
section.
Daily Cleaning
Mask
Clean the mask according to the instructions supplied with the mask.
Air tubing
Disconnect the air tubing from the VPAP unit (and humidifier, if used) and hang
the tubing and mask in a clean, dry place until next use.
CAUTION
!
Do not hang the air tubing in direct sunlight as the tubing may harden over
time and eventually crack.
Humidifier
If you are using a humidifier, clean it according to the instructions in the
humidifier user manual.
Weekly Cleaning
1. Remove the air tubing from the VPAP unit and the mask.
2. Wash the air tubing in warm water using mild detergent. Rinse thoroughly,
hang and allow to dry.
3. Before next use, assemble the mask and headgear according to the user
instructions.
4. Reconnect the air tubing to the air outlet and mask.
CAUTION
!
• Do not use bleach, chlorine-, alcohol- or aromatic-based solutions
(including all scented oils), moisturising or antibacterial soaps to clean
the air tubing or the VPAP. These solutions may cause hardening and
reduce the life of the product.
• Do not hang the air tubing in direct sunlight as the tubing may harden
over time and eventually crack.
English
Periodic Cleaning
1. Clean the exterior of the VPAP unit with a damp cloth and mild liquid soap.
2. Inspect the air filter to check if it is blocked by dirt or contains holes. See
“Replacing the Air Filter” on page 20.
19Cleaning and Maintenance
Page 26

WARNING
!
Beware of electric shock. Do not immerse the flow generator or power cord
in water. Always unplug the flow generator before cleaning and be sure that
it is dry before reconnecting.
CAUTION
!
Do not attempt to open the VPAP. There are no user serviceable parts
inside. Repairs and internal servicing should only be performed by an
authorised service agent.
Replacing the Air Filter
Please refer to the illustrations in section I of the illustration sheet.
Inspect the air filter every month to check if it is blocked by dirt or contains holes.
With normal use of a VPAP unit, the air filter needs to be replaced every six
months (or more often if your unit is in a dusty environment). To replace the air
filter:
1. Remove the air filter cover at the back of the VPAP (I-1).
2. Remove and discard the old air filter.
3. Insert a new filter with the blue tinted side facing out (I-2).
4. Replace the air filter cover (I-3).
WARNING
!
Do not wash the air filter. The air filter is not washable or reusable.
Note: The air filter should be inspected once a month.
20
Servicing
This product (VPAP III/VPAP III ST) should be inspected by an authorised
ResMed service centre 5 years from the date of manufacture. Prior to this, the
device is intended to provide safe and reliable operation provided that it is
operated and maintained in accordance with the instructions provided by
ResMed. Applicable ResMed warranty details are provided with the device at the
time of original supply. Of course, as with all electrical devices, if any irregularity
becomes apparent, you should exercise caution and have the device inspected
by an authorised ResMed service centre.
If you feel that your unit is not performing properly, see “Troubleshooting” on
page 31.
CAUTION
!
Inspection and repair should only be performed by an authorised agent.
Under no circumstances should you attempt to service or repair the flow
generator yourself.
Page 27
How to Use the VPAP Menus
The VPAP unit provides a set of functions arranged in menus and submenus. Via
the LCD screen, the menus and submenus allow you to view and change the
settings for a particular function. You can access the menus regardless of
whether the VPAP is in standby mode or delivering therapy.
Your clinician has preset the menu to either a standard view or a detailed view.
Both of these menus are explained below.
When the VPAP is turned on, a Welcome screen is displayed. After the device
self-checks are complete, the VPAP (or Ramp) screen appears.
Ramp Screen
If your clinician has set a maximum ramp time, the Ramp screen is displayed
after the Welcome screen. On the Ramp screen, you can immediately set a ramp
time. Ramp time is the period during which the pressure increases from a low
pressure to the prescribed treatment pressure. See “Ramp time” on page 15.
Ramp time can be altered in five minute increments (from OFF to a maximum
ramp time set by your clinician) by using the Up/Down key.
How to Use the Standard Menu
The standard menu allows you to view details about the time used and the
current software version of your VPAP. The Used (time) screen displays the total
number of hours for which the device has been used. It also displays the number
of days the VPAP was used out of the total number of days available for use.
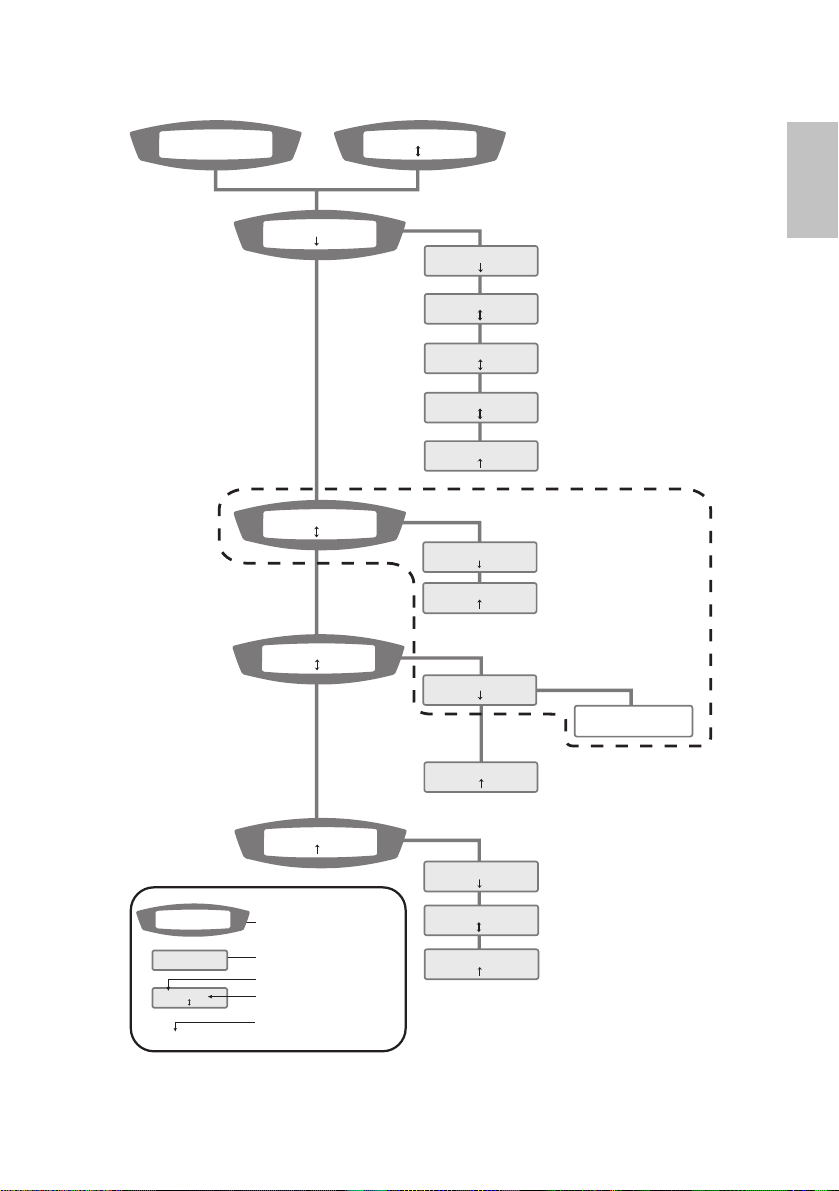
Figure 1 summarises the VPAP standard menu series.
English
VPAP screen Ramp screen
RESMED VP AP III
menu
00000hrs
USED:
00000/00000days
SW: SX3650201
exit
RAMP: 20min
menu
View only
View only
Options:
OFF, 5, 10, 15, 20, 25,
30, 35, 40, 45 min
Figure 1: VPAP Standard Menu Series
• To access the VPAP menus:
Press the Left key (menu) while the VPAP (or Ramp) screen is displayed.
• To scroll through items within the menu:
Press the Up/Down key
• To exit out of the menu:
Press the Right key (exit)
21How to Use the VPAP Menus
Page 28

How to Use the Detailed Menu (if enabled by your
clinician)
The detailed menu allows you to view and change settings such as mask type,
tube length and the humidifier used. You can also view the serial number and
current software version of your VPAP.
Figure 2 summarises the VPAP detailed menu series.
22
Page 29
VPAP screen Ramp screen
RESMED VPAP III
menu
SETTINGS
enter exit
RAMP: 20min
menu
MASK: ULTRA
change exit
TUBE LENGTH: 2m
TUBE LENGTH: 2M
change exit
HUMID: NONE
change exit
SMARTSTART: OFF
change exit
OFF, 5, 10, 15, 20, 25,
30, 35, 40, 45 min
MIRAGE, MIR FULL,
STANDARD, ULTRA
2m, 3m
NONE, PASSOVER, HUMIDAIRE.
If the HumidAire 2i is used, the above
options do not appear and H2i is
displayed.
ON, OFF
English
MASK: MIRAGE
change exit
2m, 3m
RESULTS
enter exit
OPTIONS
enter exit
SERVICING
enter exit
represents a menu item
represents a submenu item
function
setting option
Setting options—bold text
indicates default setting
MASK ALARM: OFF
change exit
MASK FIT: ∗∗∗ − −
good exit
USAGE: 4.34hrs
SMART DATA
enter exit
LANGUAGE:ENGLISH
change exit
SN:123456789123
456789 exit
PCB: NONE
exit
SW: SX3650201
exit
exit
ON, OFF
These menus appear
only if at least one
Smart Data option has
been enabled by the
clinician
AUTO APPEAR: OFF
change exit
ENGLISH, GERMAN, FRENCH,
ITALIAN, SPANISH, PORTUGUESE,
SWEDISH, DUTCH
View only
View only
View only
Figure 2: VPAP Detailed Menu Series (if enabled by your clinician)
23How to Use the VPAP Menus
Page 30

• To access the VPAP menus:
Press the Left key (menu) while the VPAP (or Ramp) screen is displayed.
• To scroll through items within a menu or submenu:
Press the Up/Down key
• To enter a submenu:
Press the Left key (enter).
• To change a setting option for a function:
1. Press the Left key (change)
2. Press the Up/Down key until the desired setting option appears.
3. Press the Left key (apply) to select the setting option.
• To exit without changing options:
Press the Right key (cancel)
• To exit out of a menu or submenu:
Press the Right key (exit)
Note: You can return to the VPAP (or Ramp) screen at any time by holding the
Right key for at least three seconds.
Menu Functions (Detailed menu only)
The VPAP menu functions are summarised in Tables 2–6 below with a brief
description of what each function does and the available setting options. To
access these functions, see “How to Use the Detailed Menu (if enabled by your
clinician)” on page 22.
Settings Menu
The Settings Menu allows you to view and change certain operating features of
the VPAP unit.
Table 2: Settings Menu Functions
24
Function Default Function Description Setting Options
Mask ULTRA Selects your mask type. See “Settings for
Mask Types” on
page 25 for details.
Tube Length 2m Selects the length of air tubing
connecting your mask to the VPAP.
Humidifier NONE Selects the type of humidifier to
be used with the VPAP.
2m / 3m
NONE, PASSOVER,
HUMIDAIRE
If the HumidAire 2i is
used, the above
setting options do
not appear and H2i is
displayed.
Page 31

Function Default Function Description Setting Options
SmartStart
Mask Alarm ON
™
OFF Turns the SmartStart function on
or off.
See “SmartStart™” on page 25.
Turns the Mask Alarm signal on or
(VPAP III ST);
OFF
(VPAP III)
off.
If enabled, the Mask Alarm feature
will alert you when a high mask
leak is detected. An audible tone
will sound and a high leak
message will appear on the LCD
screen.
ON/OFF
ON/OFF
SmartStart™
The VPAP has a function called SmartStart which can be enabled by your
clinician. If SmartStart is enabled, VPAP will start automatically when you breathe
into the mask and will stop automatically when you take your mask off. This
means you do not have to press the Front key to begin or end treatment.
Note: If you select “Mir Full” as the mask option, SmartStop is automatically
disabled. SmartStart may not work with an Ultra Mirage Full Face Mask due to
safety features of the mask.
When Mask Alarm is set to ON, SmartStart/Stop automatically reverts to OFF.
SmartStop cannot be used with Mask Alarm because if a high leak occurs,
SmartStop will stop treatment before the Mask Alarm signal is activated.
Settings for Mask Types
The following table shows the setting that should be selected for each mask
type.
Table 3: Settings for mask types
English
Settings Mask
MIRAGE Mirage Nasal Mask
ULTRA Ultra Mirage Nasal Mask
STANDARD Mirage Activa Nasal Mask
Mirage Vista Nasal Mask
Modular Nasal Mask
MIR FULL Mirage Full Face Mask
Mirage Full Face Mask Series 2
Ultra Mirage Full Face Mask
25How to Use the VPAP Menus
Page 32

Results Menu
Note: This menu appears only if at least one Smart Data™ option has been
enabled by the clinician. See the VPAP III Smart Data Diary for further details.
Table 4: Results Menu
Function Function Description Setting Options
Mask Fit
(Smart Data)
Usage
(Smart Data)
Displays a star rating corresponding to the
mask leak from the previous session.
See Table 1 on page 17 for mask-fit star
rating description.
Displays usage hours from the previous
session.
See Table 1 on page 17 for mask-fit star
rating description.
View only
View only
Options Menu
Table 5: Options Menu
Function Default Function Description Setting Options
Smart Data
–Auto
Appear
Language English Selects the language the VPAP
OFF The Smart Data menu is
displayed only if one or more of
the options have been set to
ON by the clinician.
If Auto Appear is set to ON, the
Smart Data screens are
displayed upon powering up of
the device. If Auto Appear is
set to OFF, Smart Data is
displayed in the Results menu
only.
uses for all its display text.
English is the default language.
ON/OFF
English, German,
French, Italian,
Spanish,
Portuguese,
Swedish, Dutch.
26
Page 33

Servicing Menu
Table 6: Servicing Menu
Function Function Description Setting Options
Serial
Number (SN)
Printed Circuit
Board (PCB)
Software
* This item also appears in the Standard Menu.
Displays the serial number for the VPAP. View only
Displays the printed circuit board number. View only
*
Displays the current software version
installed in the VPAP.
View only
Treatment Screens
After starting treatment, you can display one of the treatment screens below.
Press the Up/Down key to switch between views.
Ramping indicator
Treatment mode
Trigger indicator
Pressure bar graph
Figure 3: Treatment screen 1
Leak
Minute
ventilation
Figure 4: Treatment screen 2
S:RAMP 8.0–16.6
S>>>>> exit
LK: 24L/min RR: 12
MV: 12.0 VT:1000
}
Set pressure(s)
}
Respiratory rate
Tidal volume
English
Cycle indicator
(TiMn / C / TiMx)
Trigger indicator
Measured
inspiration time
Figure 5: Treatment screen 3
The treatment screens contain the following information:
Treatment mode: Mode of treatment set by your clinician. Options include:
CPAP, Spontaneous, Spontaneous/Timed (VPAP III ST) and Timed
(VPAP III ST).
S ∗ ∗ C TiMx 2.0
Ti 1.5s 1:2.5
Set IPAP Max
Measured I:E ratio
27How to Use the VPAP Menus
Page 34

Ramping indicator: Appears if the VPAP is in ramp mode. This disappears once
the ramp time has elapsed.
Set pressure(s): In CPAP mode, this displays the set treatment pressure (units:
centimetres of water). In other modes, it is exhalation and inhalation pressures
(units: centimetres of water).
Trigger indicator: How the VPAP changes the pressure when you are inhaling.
"S" (Spontaneous) indicates a patient triggered change and "T" (Timed) indicates
a device triggered change.
Pressure bar graph: Graphical display of the changing pressure.
Leak: Current mask leak (units: litres per minute).
Respiratory rate: Number of breaths per minute.
Minute ventilation: Volume of air inhaled per minute (units: litres per minute). It
is the product of respiratory rate and tidal volume.
Tidal volume: Volume of air inhaled per breath (units: millilitres per breath).
Cycle indicator: How the VPAP changes the pressure when you are exhaling. "C"
indicates a patient cycled change; "TiMn" and "TiMx" indicates a device cycled
change.
Measured inspiration time: The average inhalation time measured by the
VPAP.
Set IPAP Max: The maximum inhalation time set by your clinician.
Measured I:E ratio: The inhalation to exhalation ratio measured by the VPAP.
28
Page 35

Helpful Hints
Starting out
Mouth Leaks
If using a nasal mask, try to keep your mouth closed during treatment. Air leaks
from your mouth can decrease the effectiveness of your treatment. If mouth
leaks are a problem, a full face mask or chin strap may help. Contact your clinician
or equipment supplier for further details.
Mask Fitting
The flow generator delivers the most effective treatment when the mask is well
fitted and comfortable. Treatment can be affected by leaks, so it is important to
eliminate any leaks that may arise.
If you have problems trying to get a comfortable mask fit, contact your sleep
clinic or equipment supplier. You may benefit from a different size or style of
mask.
You can also use the Mask-Fitting feature to help you fit your mask properly. See
“Using the Mask-Fitting Feature” on page 16.
Before wearing your mask, wash your face to remove excess facial oils. This will
allow a better fit and prolong the life of the mask cushion.
Nasal Irritation
Dryness
You may experience dryness of the nose, mouth and/or throat during the course
of treatment, especially during winter. In many cases, a humidifier may resolve
this discomfort. Contact your clinician for advice.
Runny or Blocked Nose
You may experience sneezing and/or a runny or blocked nose during the first few
weeks of treatment. In many cases, nasal irritation can be resolved with a
humidifier. Consult your clinican for advice.
English
Travelling with the VPAP
International Use
Your VPAP flow generator has an internal power adapter that enables it to
operate in other countries. It will operate on power supplies of 100–240V and
50–60Hz. No special adjustment is necessary, but you may need a plug adapter
for the power outlet.
Using a Battery and an Inverter
Your VPAP can be powered by a battery using an inverter. We recommend a 12V
or 24V deep-cycle battery, and any CE or UL marked inverter with a minimum
continuous output power rating of 200W.
Note: When using the VPAP with a HumidAire 2i, use a pure sine wave inverter
not a modified sine wave inverter.
29Helpful Hints
Page 36

Please refer to the VPAP III battery power guide for battery capacities and further
details.
30
Page 37

Troubleshooting
If there is a problem, try the following suggestions. If the problem cannot be
solved, contact your equipment supplier or ResMed. Do not attempt to open the
unit.
Problem Possible Cause Solution
English
No display. Power not connected or
switch at back is not on.
Insufficient air
delivered from the
VPAP.
The VPAP does not
start when you breathe
into the mask.
Ramp Time is in use.
Air filter is dirty.
Air tubing is kinked or
punctured.
Air tubing not connected
properly.
Mask and headgear not
positioned correctly.
Plug(s) missing from access
port(s) on mask.
Pressure required for
treatment may have
changed.
Power cord not connected
properly.
Power outlet may be faulty.
The VPAP unit not switched
on.
Ensure the power cable is
connected and that the
switch at the back of the
unit is in the ON position.
Wait for air pressure to
build up.
Replace air filter.
Straighten or replace
tubing.
Check air tubing.
Adjust position of mask and
headgear.
Replace plug(s).
See your clinician to adjust
the pressure.
Connect power cord firmly
at both ends.
Try another power outlet.
Switch power switch at rear
of the VPAP to ON.
SmartStart not on. Enable SmartStart.
Mask Alarm has been
enabled; SmartStart has
automatically been
disabled.
Breath is not deep enough
to trigger SmartStart.
Disable Mask Alarm to
enable SmartStart.
Take a deep breath in and
out through the mask.
31Troubleshooting
Page 38

Problem Possible Cause Solution
There is excessive leak. Adjust position of mask and
headgear.
Plugs may be missing from
ports on mask. Replace
them.
Air tubing not connected
properly. Connect firmly at
both ends.
Air tubing kinked or
punctured. Straighten or
replace.
VPAP unit does not
stop when you remove
your mask.
SmartStart/Stop is disabled.
Use of an Ultra Mirage Full
Face Mask.
Enable SmartStart/Stop.
SmartStop does not work
with a full face mask.
SmartStart is enabled
but the flow generator
does not stop
automatically when
you remove your mask.
Display error message:
Check tube!!
Key if done
Displays error
message:
SYSTEM ERROR
Call service!
Incompatible humidifier or
mask system being used.
The air tubing is loose. Check that the air tubing is
Component failure. Return your VPAP for
Use only equipment as
recommended and supplied
by ResMed.
connected securely to your
mask and the air outlet on
the front of the VPAP.
To clear the error message,
press any key on the VPAP
keypad.
servicing.
32
Page 39

Problem Possible Cause Solution
Excessive motor noise. Component failure. Return your unit for
servicing.
Display error message:
High leak in last
session.
You have experienced
excessively high leak levels
during the night.
Check that your air tubing is
connected properly and that
your mask does not leak
excessively.
Use the mask-fitting feature
to help you to fit your mask
properly.
If this message appears
again, contact your clinician.
English
33Troubleshooting
Page 40

34
Page 41

System Specifications
Dynamic pressure characteristics
IPAP: 2 cm H2O to 25 cm H2O (measured at the end of standard 2 m air tubing)
EPAP: 2 cm H
CPAP: 4 to 20 cm H
Maximum single fault pressure: 40 cm H2O
Maximum flow (CPAP mode, measured at the end of standard 2 m air
tubing)
O to 25 cm H2O (measured at the end of standard 2 m air tubing)
2
O (measured at the end of standard 2 m air tubing)
2
English
Pressure
(cm H
O)
2
10 200
15 170
20 150
Flow
(L/min)
Sound pressure level: <30 dB (tested in accordance with the requirements of
ISO 17510-1:2002)
Dimensions (L x W x H): 270 mm x 230 mm x 141 mm
Weight: 2.3 kg
Air outlet: 22 mm taper, compatible with EN 1281-1:1997 Anaesthetic &
Respiratory Equipment - Conical Connectors
Pressure measurement: Internally mounted pressure transducer
Flow measurement: Internally mounted flow transducer
Power Supply: Input range 100–240V, 50–60Hz, 40VA (typical power
consumption), < 100VA (maximum power consumption)
Housing Construction: Flame retardant engineering thermoplastic
Environmental Conditions
Operating Temperature: +5°C to +40°C
Operating Humidity: 10%–95% non-condensing
Storage and Transport Temperature: -20°C to +60°C
Storage and Transport Humidity: 10–95% non-condensing
Electromagnetic Compatibility
Product complies with all applicable electromagnetic compatibility requirements
(EMC) according to IEC60601-1-2, for residential, commercial and light industry
environments. For further details, see “Guidance and Manufacturer’s
Declaration - Electromagnetic Emissions and Immunity” on page 39.
Air Filter: Two-layered, powder-bonded, polyester non-woven fibre
Air Tubing: Flexible plastic, 2 m or 3 m length
35System Specifications
Page 42

IEC 60601-1 Classifications
Class II (double insulation)
Type CF
Table 7: Displayed values
Val ue Range Accuracy Display Resolution
Pressure sensor at air outlet
Pressure -5 to 30 cm H2O ±0.5 cm H2O 0.1 cm H2O
Flow sensor in flow generator*
Leak 0–120 L/min ** 1 L/min
Tidal volume 100–3000 mL ** 1 mL
Respiratory rate 6–60 BPM ±0.5 BPM 0.1 BPM
Minute ventilation 0.6–60 L/min ** 0.25 L/min
* Results may be inaccurate in the presence of leaks.
** The displayed values are estimates. They are provided for trending purposes only.
Pressure Variation
25.00
36
20.00
O)
2
15.00
10.00
Pressure (cm H
5.00
0.00
0 1 2 3
2/3 Max Pressure
1/3 Max Pressure
Breaths
Max Pressure
10 BPM
15 BPM
20 BPM
Page 43

Pressure Volume curve
1/3 Max Pressure
600
500
400
300
200
Volume (mL)
100
0
6.3 6.4 6.5 6.6 6.7 6.8
Pressure (cm H
O)
2
2/3 Max Pressure
600
500
400
300
200
Volume (mL)
100
0
13.1 13.2 13.3 13.4 13.5 13.6
Pressure (cm H
O)
2
English
600
500
400
300
200
Volume (mL)
100
0
19.7 19.8 19.9 20.0 20.1 20.2
Max Pressure
Pressure (cm H
10 BPM
15 BPM
20 BPM
O)
2
Note: The manufacturer reserves the right to change these specifications
without notice.
Symbols which appear on the product
Attention, consult accompanying documents
Class II equipment
Type CF equipment
Drip Proof
Start/Stop
Mask-fit
Start/Stop or Mask-Fit
37System Specifications
Page 44

Environmental information
WEEE 2002/96/EC is a European Directive that requires the proper
disposal of electrical and electronic equipment. This device should
be disposed of separately, not as unsorted municipal waste. To
dispose of your device, you should use appropriate collection, reuse
and recycling systems available in your region. The use of these
collection, reuse and recycling systems is designed to reduce
pressure on natural resources and prevent hazardous substances
from damaging the environment.
If you need information on these disposal systems, please contact
your local waste administration. The crossed-bin symbol invites you
to use these disposal systems. If you require information on
collection and disposal of your ResMed device please contact your
ResMed office, local distributor or go to www.resmed.com/
environment.
38
Page 45

Guidance and Manufacturer’s Declaration - Electromagnetic
Emissions and Immunity
Guidance and manufacturer’s declaration – electromagnetic emissions
The VPAP is intended for use in the electromagnetic environment specified below. The customer or
the user of the VPAP should assure that it is used in such an environment.
Emissions test Compliance
RF emissions CISPR11 Group 1 The VPAP uses RF energy only for its
RF emissions CISPR 11 Class B The VPAP is suitable for use in all
Harmonic Emissions
IEC 61000-3-2
Voltage Fluctuations/Flicker
Emissions IEC 61000-3-3
Medical Electrical Equipment needs special precautions regarding EMC and needs to be installed
and put into service according to EMC information provided in this document.
Warnings: The VPAP should not be used adjacent to or stacked with other equipment.
If adjacent or stacked use is necessary, the VPAP should be observed to verify normal operation in
the configuration in which it will be used.
The use of accessories (eg humidifiers) other than those specified in this manual is not
recommended. They may result in increased emissions or decreased immunity of the VPAP.
Class A
Complies
Electromagnetic environment guidance
internal function. Therefore, its RF
emissions are very low and are not
likely to cause any interference in
nearby electronic equipment.
establishments, including domestic
establishments and those directly
connected to the public low-voltage
network that supplies buildings used
for domestic purposes.
English
39System Specifications
Page 46

Guidance and manufacturer’s declaration – electromagnetic immunity
The VPAP is intended for use in the electromagnetic environment specified below. The customer
or the user of the VPAP should assure that it is used in such an environment.
Immunity test
Electrostatic
discharge (ESD)
IEC 61000-4-2
Electrical fast
transient/burst
IEC 61000-4-4
Surge
IEC 61000-4-5
Voltage dips, short
interruptions and
voltage variations on
power supply input
lines.
IEC 61000-4-11
Power frequency
(50/60 Hz)
magnetic field
IEC 61000-4-8
NOTE: Ut is the a.c. mains voltage prior to application of the test level.
IEC60601-1-2
test level
±6 kV contact
±8 kV air
±2 kV for power
supply lines
±1 kV for input/
output lines
±1 kV differential
mode
±2 kV common
mode
<5% Ut
(>95% dip in Ut)
for 0.5 cycle
40% Ut
(60% dip in Ut)
for 5 cycles
70% Ut
(30% dip in Ut)
for 25 cycles
<5% Ut
(>95% dip in Ut)
for 5 sec
3 A/m 3 A/m Power frequency magnetic
Compliance
level
±6 kV contact
±8 kV air
±2 kV
Not Applicable
±1 kV differential
mode
±2 kV common
mode
< 12V
(>95% dip in 240V)
for 0.5 cycle
96V
(60% dip in 240V)
for 5 cycles
168V
(30% dip in 240V)
for 25 cycles
<12V
(>95% dip in 240V)
for 5 sec
Electromagnetic
environment –
guidance
Floors should be wood,
concrete or ceramic tile. If
floors are covered with
synthetic material, the
relative humidity should be
at least 30%.
Mains power quality should
be that of a typical
commercial or hospital
environment.
Mains power quality should
be that of a typical
commercial or hospital
environment.
Mains power quality should
be that of a typical
commercial or hospital
environment.
If the user of the VPAP
requires continued
operation during power
mains interruptions, it is
recommended that the
VPAP be powered from an
uninterruptible power
source
fields should be at levels
characteristic of a typical
location in a typical
commercial or hospital
environment
40
(Continued next page)
Page 47

Guidance and manufacturer’s declaration – electromagnetic immunity (Continued)
The VPAP is intended for use in the electromagnetic environment specified below. The customer or the
user of the VPAP should assure that it is used in such an environment.
Immunity
test
Conducted RF
IEC 61000-4-6
Radiated RF
IEC 61000-4-3
IEC60601-1-2
test level
3 Vrms
150 kHz to 80 MHz
10 V /m
80 MHz to 2.5 GHz
Compliance
level
3 Vrms d = 1.17 √P
10 V/m d = 0.35 √P 80 MHz to 800 MHz
Electromagnetic environment –
guidance
Portable and mobile RF communications
equipment should be used no closer to any
part of the VPAP, including cables, than the
recommended separation distance
calculated from the equation applicable to
the frequency of the transmitter.
Recommended separation distance
d = 0.70 √P 800 MHz to 2.5 GHz
where P is the maximum output power
rating of the transmitter in watts (W)
according to the transmitter manufacturer
and d is the recommended separation
distance in meters (m).
Field strengths from fixed RF transmitters, as
determined by an electromagnetic site
a
should be less than the compliance
survey,
level in each frequency range.
Interference may occur in the vicinity of
equipment marked with the following
symbol:
b
English
NOTE 1: At 80 MHz and 800 MHz, the higher frequency range applies.
NOTE 2: These guidelines may not apply in all situations. Electromagnetic propagation is affected by
absorption and reflection from structures, objects and people.
a
Field strengths from fixed transmitters, such as base stations for radio (cellular/cordless) telephones and
land mobile radios, amateur radio, AM and FM radio broadcast and TV broadcast cannot be predicted
theoretically with accuracy. To assess the electromagnetic environment due to fixed RF transmitters, an
electromagnetic site survey should be considered. If the measured field strength in the location in which
the VPAP is used exceeds the applicable RF compliance level above, the VPAP should be observed to verify
normal operation. If abnormal performance is observed, additional measures may be necessary, such as
reorienting or relocating the VPAP.
b
Over the frequency range 150 kHz to 80 MHz, field strengths should be less than 10 V/m.
41System Specifications
Page 48

Recommended separation distances between portable and mobile RF communications
equipment and the VPAP
The VPAP is intended for use in an environment in which radiated RF disturbances are controlled. The
customer or the user of the VPAP can help prevent electromagnetic interference by maintaining a minimum
distance between portable and mobile RF communications equipment (transmitters) and the VPAP as
recommended below, according to the maximum output power of the communications equipment.
Separation distance according to frequency of transmitter
m
Rated maximum output
power of transmitter
W
0.01 0.17 0.04 0.04
0.1 0.37 0.11 0.11
1 1.17 0.35 0.35
10 3.69 1.11 1.11
100 11.70 3.50 3.50
For transmitters rated at a maximum output power not listed above, the recommended separation distance
d in metres (m) can be determined using the equation applicable to the frequency of the transmitter, where
P is the maximum output power rating of the transmitter in watts (W) according to the transmitter
manufacturer.
NOTE 1: At 80 MHz and 800 MHz, the separation distance for the higher frequency range applies.
NOTE 2: These guidelines may not apply in all situations. Electromagnetic propagation is affected by
absorption and reflection from structures, objects and people.
150 kHz to 80 MHz
d = 1.17 √P
80 MHz to 800 MHz
d = 0.35 √P
800 MHz to 2.5 GHz
d = 0.35 √P
42
Page 49

Limited Warranty
ResMed warrants that your ResMed product shall be free from defects in
material and workmanship for the period specified below from the date of
purchase by the initial consumer. This warranty is not transferable.
Product Warranty Period
ResMed humidifiers, ResControl™, ResLink™, ResTraxx™ 1 Year
ResMed flow generators 2 Years
English
Accessories, mask systems (including mask frame, cushion,
headgear and tubing). Excludes single-use devices.
Note: Some models are not available in all regions.
If the product fails under conditions of normal use, ResMed will repair or replace,
at its option, the defective product or any of its components. This Limited
Warranty does not cover:
a) any damage caused as a result of improper use, abuse, modification or
alteration of the product;
b) repairs carried out by any service organization that has not been expressly
authorized by ResMed to perform such repairs;
c) any damage or contamination due to cigarette, pipe, cigar or other smoke;
d) any damage caused by water being spilled on or into a flow generator.
Warranty is void on product sold, or resold, outside the region of original
purchase. Warranty claims on defective product must be made by the initial
consumer at the point of purchase.
This warranty is in lieu of all other express or implied warranties, including any
implied warranty of merchantability or fitness for a particular purpose. Some
regions or states do not allow limitations on how long an implied warranty lasts,
so the above limitation may not apply to you.
ResMed shall not be responsible for any incidental or consequential damages
claimed to have occurred as a result of the sale, installation or use of any ResMed
product. Some regions or states do not allow the exclusion or limitation of
incidental or consequential damages, so the above limitation may not apply to
you. This warranty gives you specific legal rights, and you may also have other
rights which vary from region to region.
For further information on your warranty rights, contact your local ResMed dealer
or ResMed office.
90 Days
R001-307/2 05 06
43Limited Warranty
Page 50

44
Page 51

Index
A
Accessories 10
Air filter
20, 35
air tubing
B
Back-light, LCD and Keypad 13
C
Cautions 6
cleaning
Cleaning and Maintenance
cleaning mask
Cleaning Periodically
D
Daily Cleaning 19
definitions
Detailed Menu
Dimensions
Dryness
Dynamic pressure characteristics
E
Electromagnetic Compatibility 35
Environmental Conditions
Error Messages
F
Front Key 14
G
Glossary of Symbols 37
H
Helpful Hints 29
High Leak Message
Housing Construction
how to use the VPAP
HumidAire
HumidAire 2i
HumidAire 2iC
Humidifier
cleaning
periodic
weekly
29
cleaning
35
19
19
19
19
19
19
5
22, 23
35
35
32
25
35
11
12
11
12
10
19
35
Humidifier Use
I
IEC 60601-1 Classifications 36
International Use
K
keypad 14
Keys, functions
L
LCD screen 13
Left Key
M
Mask Alarm 25
Mask Fitting
mask settings
mask types
Mask-Fit Star Rating, definitions
Mask-Fitting Feature
Masks
9
maximum flow
Medical Information
Menu Functions
menu type
Menus, using the VPAP
Mouth Leaks
N
Nasal Irritation 29
O
Operating Instructions 15
Options Menu
P
Passover 12
periodic cleaning
Power Supply
R
Ramp Screen 21
Ramp time
Replacing the Air Filter
Responsibility, user/owner
Results Menu
11
29
14
14
29
25
25
16
35
5
24
21
21
29
26
19
35
21
20
5
26
English
17
45Index
Page 52

Right Key 14
Runny or Blocked Nose
S
Servicing 20
Servicing Menu
setting up
Settings Menu
SmartStart
Standard Menu
Starting Treatment
Stopping Treatment
System Specifications
T
Travelling 29
treatment screen
Troubleshooting
U
Up/Down Key 14
Used (time) screen
User/Owner Responsibility
Using the Mask-Fitting feature
Using the Menus
W
Weekly Cleaning 19
weekly cleaning
Weight
11
24
25
35
29
27
21
15
16
35
27
31
21
5
21
19
16
46
Page 53

VPAP™ III & III ST
Bedienungsanleitung
Deutsch
Deutsch
47
Page 54

48
Page 55

Inhalt
Einleitung . . . . . . . . . . . . . . . . . . . . . . . . . . . . . . . . . . . . . . . . . . . . . . . . 51
Verantwortung des Benutzers/Eigentümers 51
Medizinische Hinweise . . . . . . . . . . . . . . . . . . . . . . . . . . . . . . . . . . . . 51
Anwendungsgebiete des VPAP III und des VPAP III ST 51
Kontraindikationen 51
Warnungen 52
Vorsicht 53
Nebenwirkungen 53
Das VPAP-System . . . . . . . . . . . . . . . . . . . . . . . . . . . . . . . . . . . . . . . . . 55
Masken 55
Atemluftbefeuchter 56
Zubehör 56
Aufstellen des VPAP . . . . . . . . . . . . . . . . . . . . . . . . . . . . . . . . . . . . . . 57
Aufstellen des VPAP 57
Anschluss des Atemluftbefeuchters 58
Benutzung des LCD-Displays und Tastenfelds 60
Behandlungsbeginn . . . . . . . . . . . . . . . . . . . . . . . . . . . . . . . . . . . . . . 63
Beenden der Behandlung 64
Benutzung der Aufwärmfunktion des HumidAire 2i 64
Benutzung der Maskenanlegefunktion 64
Reinigung und Wartung . . . . . . . . . . . . . . . . . . . . . . . . . . . . . . . . . . . 67
Tägliche Reinigung 67
Wöchentliche Reinigung 67
Regelmäßige Reinigung 68
Auswechseln des Luftfilters 68
Wartung 68
Benutzung der VPAP-Menüs . . . . . . . . . . . . . . . . . . . . . . . . . . . . . . . 71
Rampen-Anzeige 71
Verwendung des Menüs „Standard“ 71
Benutzung des Detailmenüs (falls vom Arzt aktiviert) 72
Menüfunktionen (nur im Detailmenü) 74
Behandlungsbildschirme 78
Hilfreiche Hinweise . . . . . . . . . . . . . . . . . . . . . . . . . . . . . . . . . . . . . . . 81
Benutzung einer Batterie und eines Wechselrichters 82
Fehlersuche . . . . . . . . . . . . . . . . . . . . . . . . . . . . . . . . . . . . . . . . . . . . . . 83
Technische Daten . . . . . . . . . . . . . . . . . . . . . . . . . . . . . . . . . . . . . . . . . 87
Beschränkte Garantie . . . . . . . . . . . . . . . . . . . . . . . . . . . . . . . . . . . . . 95
Index . . . . . . . . . . . . . . . . . . . . . . . . . . . . . . . . . . . . . . . . . . . . . . . . . . . . . 97
Deutsch
49Inhalt
Page 56

50
Page 57

Einleitung
Der VPAP™ III und der VPAP III ST sind Bilevel-Beatmungsgeräte, die speziell für
die nicht-invasive Maskenbeatmung ausgelegt sind.
Diese Bedienungsanleitung enthält alle notwendigen Informationen für die
korrekte Handhabung Ihres VPAP.
Verantwortung des Benutzers/Eigentümers
Der Benutzer bzw. Eigentümer dieses Systems trägt die alleinige Verantwortung
und haftet für jegliche Personen- und Sachschäden, die auf Folgendes
zurückzuführen sind:
• Betrieb des Gerätes, der von den Anweisungen in der mitgelieferten
Bedienungsanleitung abweicht.
• Wenn das Gerät gewartet und modifiziert wurde, außer wenn diese
Wartungsarbeiten und Modifikationen auf autorisierte Anweisung hin bzw.
von einer autorisierten Person durchgeführt wurden.
Bitte lesen Sie diese Bedienungsanleitung vor der Inbetriebnahme
aufmerksam durch.
Diese Bedienungsanleitung enthält Fachbegriffe und Seitenrandsymbole, die Sie
auf bestimmte wichtige Informationen aufmerksam machen sollen.
• Warnung – Weist auf eine mögliche Verletzungsgefahr hin.
• Achtung Erklärt spezielle Maßnahmen für eine sichere und effektive
Benutzung des Gerätes.
• Hinweis – Information oder hilfreicher Hinweis.
Deutsch
Medizinische Hinweise
Anwendungsgebiete des VPAP III und des VPAP III ST
Das VPAP III und das VPAP III ST System sind für die nicht-invasive
Beatmungstherapie von Patienten mit Ateminsuffizienz bzw. obstruktiver
Schlafapnoe (OSA) im Krankenhaus oder zu Hause vorgesehen.
Kontraindikationen
Wenn Ihre Atemfunktion für kurze Unterbrechungen der nicht-invasiven
Beatmungstherapie nicht ausreicht, darf der VPAP nicht verwendet werden. Bei
dem VPAP handelt es sich nicht um ein Lebenserhaltungssystem. Im Falle eines
Stromausfalls oder einer Fehlfunktion kann es sein, dass sich das Gerät
ausschaltet.
51Einleitung
Page 58

Wenn einer der folgenden Punkte auf Sie zutrifft, informieren Sie Ihren Arzt,
bevor Sie die Behandlung mit dem VPAP aufnehmen:
• akute Sinusitis bzw. Otitis media
• Epistaxis, die ein Lungenaspirationsrisiko darstellt
• Erkrankungen, die zur Aspiration von Mageninhalten prädisponieren
• verminderte Fähigkeit, Sekretionen zu klären
• Hypotonie bzw. erhebliche intravaskuläre Volumendepletion
• Pneumothorax oder Pneumomediastinum
• vor kurzem erlittenes Schädeltrauma bzw. kürzliche Operation.
Warnungen
• Lesen Sie bitte die gesamte Bedienungsanleitung, bevor Sie die Behandlung
mit dem VPAP aufnehmen.
• Die in dieser Bedienungsanleitung enthaltenen Hinweise ersetzen keinesfalls
die Anweisungen des verschreibenden Arztes.
• Der VPAP muss mit den von ResMed oder dem verschreibenden Arzt
empfohlenen Masken und dem von ihnen empfohlenen Zubehör verwendet
werden. Die Verwendung von ungeeigneten Masken und unpassendem
Zubehör kann die Funktion des VPAP beeinträchtigen.
• Der VPAP ist für die Verwendung mit Masken vorgesehen, die mit
Luftauslassöffnungen ausgestattet sind, durch die ausgeatmete Luft
abgeführt werden kann. Wenn die Maske bei ausgeschaltetem Gerät
getragen wird oder die Luftauslassöffnungen blockiert sind, kommt es zur
Rückatmung ausgeatmeter Luft. Über einen längeren Zeitraum hinweg kann
dies zum Ersticken führen.
• Nehmen Sie im Falle eines Stromausfalls oder einer Fehlfunktion des
Systems die Maske ab.
• Der VPAP kann auf eine Druckzufuhr von bis zu 25 cm H
werden. Außerdem kann im Falle bestimmter Störungen der Druck auf bis zu
40 cm H
• Der VPAP darf nicht in der Nähe von entflammbaren Anästhetika verwendet
O ansteigen.
2
werden.
• Der VPAP darf nicht bei narkotisierten Patienten, die künstlich beatmet
werden, verwendet werden.
• Wenn der VPAP mit Sauerstoff verwendet wird, muss darauf geachtet
werden, dass die Sauerstoffzufuhr abgeschaltet wird, wenn das Gerät außer
Betrieb ist. Wenn die Sauerstoffzufuhr auch dann eingeschaltet ist, wenn das
Gerät außer Betrieb ist, kann sich Sauerstoff im Gerät ansammeln und eine
Brandgefahr darstellen.
• Verwenden Sie den VPAP nicht, wenn er offensichtliche externe Schäden
aufweist oder es zu unerklärlichen Funktionsänderungen bzw. Geräuschen
kommt.
O eingestellt
2
52
Page 59

• Öffnen Sie nicht das Gehäuse des VPAP. Im Inneren des Gerätes befinden
sich keine vom Anwender auszuwechselnden bzw. zu reparierenden
Bauteile. Reparaturen und Wartungen der inneren Komponenten müssen von
einer autorisierten Fachkraft durchgeführt werden.
Vorsicht
• Bei niedrigen EPAP-Druckwerten kann der Luftstrom durch die
Luftauslassöffnungen für das Abführen von ausgeatmeter Luft aus dem
Schlauchsystem ungenügend sein, so dass es zur Rückatmung kommt.
• Die Temperatur des Atemluftstroms, den dieses Gerät erzeugt, kann bis zu
6 oC über der Raumtemperatur liegen. Besondere Vorsicht ist geboten, wenn
die Raumtemperatur über 32
o
C liegt.
Hinweis: Diese Warnungen und Vorsichtshinweise sind allgemeiner Natur.
Spezielle Warnungen, Vorsichtshinweise und Anmerkungen erscheinen neben
der jeweiligen Anweisung in der Bedienungsanleitung.
Nebenwirkungen
Verständigen Sie Ihren Arzt bei ungewöhnlichen Schmerzen in der Brust, starken
Kopfschmerzen oder verstärkter Atemlosigkeit. Bei einer akuten Infektion der
oberen Atemwege muss die Behandlung gegebenenfalls einstweilig eingestellt
werden.
Folgende Nebenwirkungen können bei der Behandlung mit dem VPAP auftreten:
• Trockenheit von Nase, Mund oder Hals
• Unwohlsein aufgrund von verschluckter Luft
• Ohren- oder Sinusbeschwerden
• Augenreizungen
• maskenbedingte Hautreizungen
• Beschwerden im Brustbereich
Deutsch
53Medizinische Hinweise
Page 60

54
Page 61

Das VPAP-System
Illustrationen in Abschnitt A der Illustrationsseite.
Bitte machen Sie sich mit den folgenden Komponenten des VPAP vertraut:
• Frontansicht des VPAP (A-1)
• Rückansicht des VPAP (A-2)
• Stromkabel (A-3)
• Tragetasche (A-4)
• 2 m Atemluftschlauch (A-5).
WARNUNG
!
• Schließen Sie kein anderes Gerät an den Aux-Anschluss an. Ihr Arzt
kann gegebenfalls spezielle Geräte an den Aux-Anschluss des VPAP
anschließen. Der Anschluss anderer Geräte jedoch kann zu Verletzungen
oder einer Beschädigung des Systems führen.
• Das einzige Gerät, das zu Hause an den Kommunikationsanschluss
angeschlossen werden darf, ist ein regional zugelassenes Modem.
Regional zugelassene Modems können auch in der Schlafklinik
angeschlossen werden.
• In der Schlafklinik müssen PCs, die mit dem VPAP-System verwendet
werden, mindestens 1,5 m vom Patienten entfernt bzw. mindestens
2,5 m über dem Patienten aufgestellt werden. Sie müssen außerdem der
Sicherheitsbestimmung IEC 60950 oder vergleichbaren Bestimmungen
entsprechen.
Masken
Außerdem benötigen Sie ein Maskensystem von ResMed (separat erhältlich).
Die folgenden Maskensysteme von ResMed werden für die Benutzung mit dem
VPAP empfohlen:
Nasenmasken
• Ultra Mirage™ Nasenmaske
• Mirage™ Nasenmaske
• Mirage Activa™ Nasenmaske
• Mirage Vista™ Nasenmaske
• Modularnasenmaske.
Full Face Maske
• Mirage™ Full Face Maske
• Mirage™ Full Face Maske Serie 2
• Ultra Mirage™ Full Face Maske.
Um eine angemessene Einstellung für Ihr Maskensystem auszuwählen, siehe
„Einstellungen für Maskentypen“ auf Seite 76.
Deutsch
55Das VPAP-System
Page 62

Hinweise:
• Die VPAP-Geräte von ResMed wurden entworfen und hergestellt, um
zusammen mit Maskensystemen von ResMed mit Luftauslassöffnungen
eine optimale Leistung zu erbringen. Es können auch andere
Maskensysteme verwendet werden. Dies kann allerdings zur
Beeinträchtigung einiger Funktionen und Datenausgaben führen. Um eine
angemessene Einstellung für ein anderes Maskensystem auszuwählen,
finden Sie die ähnlichste Maske von ResMed in Tabelle 3 auf Seite 76.
• Einige Modelle sind nicht in allen Regionen erhältlich.
Atemluftbefeuchter
Siehe Illustrationen im Abschnitt B der Illustrationsseite.
Wenn Sie Probleme mit Trockenheit von Nase, Hals und Mund haben, kann ein
Atemluftbefeuchter hilfreich sein. Der VPAP ist mit den folgenden
Atemluftbefeuchtern kompatibel:
• HumidAire 2i™ Warmluftbefeuchter (B-1)
• HumidAire 2iC™ Passover-Atemluftbefeuchter (B-2)
• HumidAire™ Warmluftbefeuchter (B-3)
• ResMed Passover-Atemluftbefeuchter (B-4).
WARNUNG
!
Für die Benutzung mit dem VPAP können ausschließlich der HumidAire 2i,
der HumidAire2iC, der HumidAire-Warmluftbefeuchter und der ResMed
Passover verwendet werden. Lesen Sie hierzu bitte auch die Warnungen auf
Seite 52.
56
Zubehör
Siehe Illustrationen in Abschnitt C der Illustrationsseite.
Folgendes Zubehör kann separat erworben werden.
• 3 m Atemluftschlauch (C-1).
• Atemluftschlauch mittlerer Länge (52 cm) für den HumidAire und den
ResMed Passover (C-2).
Hinweis: ResMed bringt regelmäßig neue Produkte auf den Markt. Besuchen
Sie unsere Webseite unter www.resmed.de.
Page 63

Aufstellen des VPAP
Siehe Illustrationen in Abschnitt D der Illustrationsseite.
Aufstellen des VPAP
1 Stellen Sie den VPAP auf eine flache Oberfläche neben dem Kopfende Ihres
Bettes auf. Wenn Sie das Gerät auf den Boden stellen, vergewissern Sie sich,
dass der Aufstellungsort staubfrei ist und der Lufteinlass nicht mit Bettzeug,
Kleidung oder anderen Gegenständen blockiert wird.
VORSICHT
!
Stellen Sie das System so auf, dass es nicht versehentlich
heruntergestoßen werden kann bzw. dass man nicht über das Stromkabel
stolpern kann.
Stecken Sie das Netzkabel in die Buchse auf der Rückseite des
2
Atemtherapiegerätes. Stecken Sie das andere Ende in die Steckdose (D-1).
WARNUNG
!
• Vergewissern Sie sich, dass das Stromkabel und der Netzstecker in
gutem Zustand sind und die Ausrüstung keine Beschädigungen
aufweist.
• Die Luftfilterabdeckung schützt das System, falls versehentlich
Flüssigkeit über das System verschüttet wird. Vergewissern Sie sich
stets, dass der Luftfilter und die Luftfilterabdeckung ordnungsgemäß
angebracht sind.
Deutsch
Schließen Sie das eine Ende des Luftschlauches fest an die Luftauslassöffnung
3
des Gerätes an (D-2).
WARNUNG
!
Verwenden Sie ausschließlich Schläuche von ResMed für Ihr
Atemtherapiegerät. Ein anderer Schlauchtyp kann unter Umständen die
Zufuhr eines unangemessenen Druckes zur Folge haben, wodurch die
Wirksamkeit Ihrer Behandlung beeinträchtigt werden kann.
Setzen Sie Ihr Maskensystem entsprechend den Anweisungen in der
4
Bedienungsanleitung für die Maske zusammen.
Schließen Sie das Maskensystem an das freie Ende des Atemluftschlauches an
5
(D-3).
Das VPAP-System ist jetzt betriebsbereit (D-4). Um mit der Behandlung zu
beginnen, siehe „Behandlungsbeginn“ auf Seite 63.
57Aufstellen des VPAP
Page 64

Anschluss des Atemluftbefeuchters
WARNUNG
!
Wenn Sie einen Atemluftbefeuchter verwenden, muss dieser niedriger als
Ihr Körper und auf gleicher Ebene oder niedriger als der VPAP aufgestellt
werden.
Anschluss eines HumidAire 2i Atemluftbefeuchters
Siehe Illustrationen in Abschnitt E der Illustrationsseite.
Der HumidAire 2i wird vorne am VPAP angeschlossen, um
Warmluftbefeuchtung bereitzustellen.Es wird kein weiteres Zubehör benötigt.
Der VPAP stellt automatisch fest, wenn der HumidAire 2i angeschlossen ist. Es
sind keine Änderungen im Menü erforderlich. Weitere Hinweise dazu finden Sie
in der Bedienungsanleitung des HumidAire 2i.
Anschluss eines HumidAire 2iC Atemluftbefeuchters
Siehe Illustrationen in Abschnitt F der Illustrationsseite.
Der HumidAire 2iC wird vorne am VPAP angeschlossen, um
Warmluftbefeuchtung bereitzustellen. Es wird kein weiteres Zubehör benötigt.
Weitere Hinweise dazu finden Sie in der Bedienungsanleitung des HumidAire
2iC.
Hinweis: Wenn Sie einen HumidAire oder HumidAire 2iC verwenden, müssen
Sie die Atemluftbefeuchteroption im Menü aktivieren.
Anschluss eines HumidAire Atemluftbefeuchters
Siehe Illustrationen in Abschnitt G der Illustrationsseite.
Um den VPAP an den HumidAire-Atemluftbefeuchter von ResMed
anzuschließen, wird ein Luftschlauch mittlerer Länge (52 cm) benötigt.
Aufstellen des VPAP mit dem HumidAire:
1. Füllen Sie den HumidAire gemäß den Anweisungen in der
Bedienungsanleitung des Atemluftbefeuchters mit Wasser auf.
2. Setzen Sie die aufgefüllte Befeuchterkammer in den HumidAire ein.
Schließen Sie den mittellangen Atemluftschlauch (52 cm) an den rechten
und den langen Atemluftschlauch (2 bzw. 3 m) an den linken Anschluss am
Atemluftbefeuchter an (G-1). Schließen Sie dann den Deckel des HumidAire.
3. Stellen Sie den VPAP auf den HumidAire (G-2). Stellen Sie den VPAP nicht
unterhalb des Atemluftbefeuchters auf. Damit verhindern Sie, dass Wasser
in das Gerät gelangt.
4. Schließen Sie das freie Ende des Luftschlauches mittlerer Länge an die
Luftauslassöffnung des VPAP (G-3) an.
5. Schließen Sie das Maskensystem an das freie Ende des langen
Luftschlauches an. Das fertig zusammengebaute System sollte wie in
Abbildung G-4 aussehen.
6. Stecken Sie das Stromkabel des HumidAire in die Steckdose.
7. Wenn der VPAP noch nicht angeschlossen ist, siehe Schritt 2 auf Seite 57.
58
Page 65

WARNUNG
!
Vergewissern Sie sich, dass das Stromkabel und der Netzstecker in gutem
Zustand sind und die Ausrüstung keine Beschädigungen aufweist.
8. Gehen Sie ggf. im VPAP-Menü zu den Einstellungen des Atemluftbefeuchters
und wählen Sie „HUMIDAIRE“ aus. Siehe „Benutzung des Detailmenüs
(falls vom Arzt aktiviert)“ auf Seite 72.
Der VPAP und der HumidAire sind jetzt betriebsbereit. Um mit der Behandlung
zu beginnen, lesen Sie den Abschnitt „Behandlungsbeginn“ auf Seite 63.
Anschließen eines Passover-Atemluftbefeuchters
Siehe Illustrationen in Abschnitt H der Illustrationsseite.
Um den VPAP an den Passover-Atemluftbefeuchter von ResMed anzuschließen,
wird ein Luftschlauch mittlerer Länge (52 cm) benötigt.
Aufstellung des VPAP mit dem Passover-Atemluftbefeuchter von ResMed:
1. Füllen Sie den Passover gemäß den Anweisungen in der
Bedienungsanleitung des Atemluftbefeuchters mit Wasser auf.
2. Schließen Sie den mittellangen Atemluftschlauch (52 cm) an den rechten
und den langen Atemluftschlauch (2 bzw. 3 m) an den linken Anschluss am
Atemluftbefeuchter an (H-1).
3. Stellen Sie den VPAP auf den Passover (H-2). Stellen Sie den VPAP nicht
unterhalb des Atemluftbefeuchters auf. (Damit verhindern Sie, dass Wasser
in das Gerät gelangt.)
4. Schließen Sie das freie Ende des Luftschlauches mittlerer Länge an die
Luftauslassöffnung des VPAP (H-3) an.
5. Schließen Sie das Maskensystem an das freie Ende des langen
Luftschlauches an. Das fertig zusammengebaute System sollte wie in
Abbildung H-4 aussehen.
6. Wenn der VPAP noch nicht angeschlossen ist, siehe Schritt 2 auf
Seite 57.
Deutsch
WARNUNG
!
Vergewissern Sie sich, dass das Stromkabel und der Netzstecker in gutem
Zustand sind und die Ausrüstung keine Beschädigungen aufweist.
7. Gehen Sie ggf. im VPAP-Menü zu den Einstellungen des Atemluftbefeuchters
und wählen Sie „PASSOVER“ aus. Siehe „Benutzung des Detailmenüs (falls
vom Arzt aktiviert)“ auf Seite 72.
Das VPAP und der Passover von ResMed sind jetzt betriebsbereit. Um mit der
Behandlung zu beginnen, lesen Sie den Abschnitt „Behandlungsbeginn“ auf
Seite 63.
59Aufstellen des VPAP
Page 66

Benutzung des LCD-Displays und Tastenfelds
Die Bedienoberfläche des VPAP besteht aus einem LCD-Display und einem
Tastenfeld.
LCD-Display
Linke Taste
Zentrale Wipptaste
Start/Stop
Mask-fit
Rechte Taste
Fronttaste
LCD-Display
Das LCD-Display zeigt die Menüs und Behandlungsbildschirme an.
Um Ihnen das Einstellen des VPAP zu erleichtern, sind Tastenfeld und LCDDisplay mit einer Hintergrundbeleuchtung ausgestattet. Die LCD-Beleuchtung
schaltet sich automatisch ein, sobald das Gerät eingeschaltet wird oder bei
Betätigung einer Taste. Nach 2 Minuten schaltet sie sich aus.
Tasten
Das Tastenfeld des VPAP verfügt über die folgenden Tasten:
Ta st e Funktion
Fronttaste
Zentrale
Wipptaste
• Startet und stoppt die Behandlung.
Start/Stop
Mask-fit
• Startet die Maskenanlegefunktion, wenn sie mindestens 3
Sekunden lang gedrückt wird.
• Zum Blättern durch die VPAP-Menüs, -Untermenüs und
Einstellungsoptionen.
60
Page 67

Ta st e Funktion
Linke Taste
(grün)
Rechte Taste (rot)
• Führt die Funktion aus, die der Leittext auf dem über der
Taste befindlichen LCD-Display angibt. Der Leittext umfasst
Menü, Zugang, Ändern und Akzept.
• Führt die Funktion aus, die der Leittext auf dem über der
Taste befindlichen LCD-Display angibt. Der Leittext umfasst
Beend. und Abbrechen.
Die Tastenfeldbeleuchtung leuchtet, solange der VPAP eingeschaltet ist.
Deutsch
61Aufstellen des VPAP
Page 68

62
Page 69

Behandlungsbeginn
Der VPAP muss mit angeschlossenem Maskensystem und Atemluftschlauch
neben Ihrem Bett aufgestellt werden. Siehe „Aufstellen des VPAP“ auf Seite 57.
1 Schalten Sie das Gerät am Hauptschalter auf der Rückseite ein (I).
Hauptschalter
Nach dem Einschalten des VPAP erscheint auf dem LCD-Display die
Begrüßungsmeldung. Anschließend erscheint die VPAP- bzw. Rampen-Anzeige.
Hinweis: Wenn Sie einen HumidAire 2i angeschlossen haben, siehe
„Benutzung der Aufwärmfunktion des HumidAire 2i“ auf Seite 64.
Legen Sie Ihre Maske entsprechend den Anweisungen in der
2
Bedienungsanleitung für die Maske an.
Legen Sie sich hin und arrangieren Sie den Atemluftschlauch so, dass Sie beim
3
Schlafen nicht in Ihrer Bewegungsfreiheit gestört werden.
VORSICHT
!
• Achten Sie darauf, daß Sie kein zu langes Schlauchstück am Kopfende
liegen haben, das sich, während Sie schlafen, um Ihren Kopf oder Hals
wickeln könnte.
• Achten Sie darauf, dass der Bereich um das Atemtherapiegerät sauber
und trocken ist. Er darf auch nicht durch Bettzeug, Kleidung oder andere
Gegenstände, die die Luftauslassöffnungen blockieren könnten, verstellt
sein.
Deutsch
Drücken Sie entweder die Fronttaste, um die Behandlung zu starten
4
oder
atmen Sie einfach in die Maske, wenn die SmartStart-Funktion von Ihrem Arzt
aktiviert wurde.
Nach der Behandlungsaufnahme können Sie eines der im Abschnitt
„Behandlungsbildschirme“ auf Seite 78 beschriebenen Behandlungsfenster
aufrufen.
Rampenzeit
Bei der Rampenzeit handelt es sich um eine Funktion, die von Ihrem Arzt aktiviert
werden kann. Wenn Sie Schwierigkeiten haben, bei vollem Druck einzuschlafen,
stellen Sie eine Rampenzeit ein. Der Luftstrom ist beim Einschlafen zunächst nur
63Behandlungsbeginn
Page 70

sehr schwach. Der Druck steigt über die ausgewählte Rampenzeit langsam auf
den vollen Therapiedruck an. Der Arzt stellt die für Sie auswählbare maximale
Rampenzeit ein.
Um eine Rampenzeit einzustellen, siehe „Rampen-Anzeige“ auf Seite 71.
Beenden der Behandlung
Sie können die Behandlung jederzeit durch Abnehmen der Maske und Drücken
der Fronttaste unterbrechen
oder
nehmen Sie einfach die Maske ab, um die Behandlung zu unterbrechen, wenn
die SmartStart-Funktion von Ihrem Arzt aktiviert wurde. Die SmartStop-Funktion
wird automatisch deaktiviert, wenn Sie „Mir Full“ als Maskenoption auswählen.
Benutzung der Aufwärmfunktion des HumidAire 2i
Wenn Sie einen HumidAire 2i mit dem VPAP verwenden, können Sie dessen
Aufwärmfunktion zur Vorwärmung des Wassers im Atemluftbefeuchter vor
Behandlungsbeginn benutzen.
Wenn Sie die Behandlung unterbrechen, wird ein leichter Luftstrom auch nach
Behandlungsende fortgesetzt, um die Abkühlung der Heizplatte zu unterstützen.
Weitere Informationen finden Sie in der Bedienungsanleitung des HumidAire 2i.
Benutzung der Maskenanlegefunktion
Die Maskenanlegefunktion des VPAP hilft beim Anlegen der Maske. Mit der
Maskenanlegefunktion wird vor dem Behandlungsbeginn drei Minuten lang ein
bestimmter Luftdruck zugeführt. Während dieser Zeit können Sie Ihren
Maskensitz prüfen und gegebenenfalls korrigieren, um das Risiko von Leckagen
zu minimieren. Wird eine Rampenzeit ausgewählt, kann die Maske bei einem
Druck eingestellt werden, der näher am verschriebenen Druck liegt. Die
Maskenanlegefunktion wird folgendermaßen verwendet:
1. Legen Sie Ihre Maske entsprechend den Anweisungen in der
Bedienungsanleitung an.
2. Halten Sie die Fronttaste mindestens 3 Sekunden lang gedrückt, bis die
Luftdruckzufuhr beginnt.
Es erscheint die folgende Meldung auf dem LCD-Display, die signalisiert,
dass die Maskenanlegefunktion in Betrieb ist. Das Atemtherapiegerät erhöht
den Druck langsam bis auf den Maskenanlegedruck und hält diesen Druck 3
Minuten lang. Außerdem wird eine Sternchenklassifizierung zum Maskensitz
angezeigt. Siehe „Definitionen der Sternchenklassifizierung des
Maskensitzes“ auf Seite 65.
64
Maskensitz
exzell.
*****
Sternchenklassifizierung des
Maskensitzes
Page 71

Hinweise:
• Nach drei Minuten erlischt die Sternchenklassifizierung des Maskensitzes.
• Die Maskenanlegefunktion kann nur von der VPAP- bzw. Rampen-Anzeige
aus gestartet werden.
• Der Maskenanlegedruck ist der eingestellte Behandlungsdruck bzw.
mindestens 10 cm H20, je nach dem welcher Wert höher ist.
3. Korrigieren Sie den Sitz Ihrer Maske, des Maskeneinsatzes und der
Kopfbänder, bis sie sicher und bequem sitzen.
Wenn die Maske richtig sitzt, prüfen Sie die Sternchenklassifizierung des
Maskensitzes auf dem LCD-Display. Tabelle 1 enthält die Aufschlüsselung
der Sternchenklassifizierung des Maskensitzes.
Hinweis: Wenn eine andere Person für Sie die Sternchenklassifizierung ablesen
kann, können Sie Ihre Maske, Ihren Maskeneinsatz und die Kopfbänder auch im
Liegen einstellen.
4. Die Behandlung beginnt nach 3 Minuten.
• Wenn Sie keine 3 Minuten warten möchten, halten Sie mindestens 3
Sekunden lang die Fronttaste gedrückt, um die Behandlung sofort zu
starten.
• Wenn Sie die Fronttaste kurz drücken (weniger als 3 Sekunden), springt
das Gerät in den Bereitschaftsmodus zurück (es erscheint die VPAP- oder
Rampen-Anzeige).
Table 1: Definitionen der Sternchenklassifizierung des Maskensitzes
Sternchenklassifizierung Definition
Deutsch
***** Exzellent
****- Sehr gut
***-- Gut
**--- Maskensitz korrigieren
*---- Maskensitz korrigieren
STARKE LECKAGE Maskensitz korrigieren
65Behandlungsbeginn
Page 72

66
Page 73

Reinigung und Wartung
Die in diesem Abschnitt beschriebenen Reinigungs- und Wartungsabläufe
sollten regelmäßig durchgeführt werden.
Tägliche Reinigung
Maske
Reinigen Sie die Maske entsprechend den Anweisungen in der mitgelieferten
Bedienungsanleitung.
Atemluftschlauch
Nehmen Sie den Atemluftschlauch vom VPAP und gegebenenfalls vom
Atemluftbefeuchter ab und hängen Sie ihn und die Maske bis zur nächsten
Benutzung an einem sauberen, trockenen Ort auf.
VORSICHT
!
Der Atemluftschlauch darf nicht in direktem Sonnenlicht aufgehängt
werden, da dies das Material verhärten und schließlich Risse verursachen
kann.
Atemluftbefeuchter
Wenn Sie einen Atemluftbefeuchter verwenden, reinigen Sie ihn gemäß den
Anweisungen in der Bedienungsanleitung.
Wöchentliche Reinigung
1. Nehmen Sie den Atemluftschlauch vom VPAP und vom Maskensystem ab.
2. Waschen Sie den Atemluftschlauch in warmem Wasser mit einem milden
Reinigungsmittel. Gut abspülen und hängend trocknen lassen.
3. Setzen Sie die Maske und das Kopfband vor der nächsten Benutzung
entsprechend den Anweisungen in der Bedienungsanleitung wieder
zusammen.
4. Schließen Sie die Atemluftschläuche wieder an der Luftauslassöffnung und
an der Maske an.
Deutsch
VORSICHT
!
• Verwenden Sie weder chlor- oder alkoholhaltige Reinigungsmittel noch
Bleichmittel, aromatische Lösungen (einschließlich aller Duftöle) oder
feuchtigkeitsspendende bzw. antibakterielle Seifen für die Reinigung des
Maskeneinsatzes, der Maske, des Luftschlauches oder des VPAP. Diese
Mittel können das Material verhärten und somit die Lebensdauer des
Produktes verkürzen.
• Der Atemluftschlauch darf nicht in direktem Sonnenlicht aufgehängt
werden, da dies das Material verhärten und schließlich Risse
verursachen kann.
67Reinigung und Wartung
Page 74

Regelmäßige Reinigung
1. Reinigen Sie das Gehäuse des VPAP mit einem feuchten Tuch und einem
milden Reinigungsmittel.
2. Vergewissern Sie sich, dass der Filter weder durch Schmutz blockiert ist
noch Löcher aufweist. Siehe „Auswechseln des Luftfilters“ auf Seite 68.
WARNUNG
!
Achtung Stromschlaggefahr! Tauchen Sie das Atemtherapiegerät bzw. das
Netzkabel nicht in Wasser. Ziehen Sie immer zuerst den Stecker aus der
Steckdose, bevor Sie das Atemtherapiegerät reinigen, und vergewissern
Sie sich, dass es trocken ist, bevor Sie es wieder an den Strom anschließen.
VORSICHT
!
Versuchen Sie nicht, den VPAP zu öffnen. Im Inneren des Gerätes befinden
sich keine vom Anwender auszuwechselnden bzw. zu reparierenden
Bauteile. Reparaturen und Wartungen der inneren Komponenten müssen
von einer autorisierten Fachkraft durchgeführt werden.
Auswechseln des Luftfilters
Siehe Illustrationen in Abschnitt I der Illustrationsseite.
Vergewissern Sie sich einmal pro Monat, dass der Filter weder durch Schmutz
blockiert ist noch Löcher aufweist. Bei normaler Benutzung des VPAP muss der
Luftfilter alle sechs Monate ausgewechselt werden (in staubigen Umgebungen
öfter). Auswechseln des Luftfilters:
1. Entfernen Sie die Luftfilterabdeckung hinten am VPAP (I-1).
2. Nehmen Sie den alten Luftfilter heraus und entsorgen Sie ihn.
3. Setzen Sie einen neuen Filter mit der blauen Seite nach außen ein (I-2).
4. Schließen Sie die Luftfilterabdeckung wieder (I-3).
68
WARNUNG
!
Den Luftfilter nicht waschen! Er ist weder wasch- noch wiederverwendbar.
Hinweis: Der Luftfilter sollte einmal monatlich überprüft werden.
Wartung
Dieses Produkt (VPAP III/VPAP III ST) sollte 5 Jahre nach dem
Herstellungsdatum von einem autorisierten ResMed Service Centre überprüft
werden. Davor sollte das Gerät einen sicheren und verlässlichen Betrieb
bereitstellen, sofern es entsprechend den von ResMed mitgelieferten
Anweisungen betrieben und gewartet wird. Die entsprechenden
Garantiehinweise von ResMed liegen dem Gerät beim Erstkauf bei. Gehen Sie
mit dem Gerät wie bei allen elektrischen Geräten im Falle einer Störung äußerst
vorsichtig um und lassen Sie es von einem autorisierten ResMed Service-Center
untersuchen.
Page 75

Sollte das Gerät nicht ordnungsgemäß funktionieren, siehe „Fehlersuche“ auf
Seite 83.
VORSICHT
!
Inspektionen und Reparaturen dürfen nur von einem autorisierten
Kundendienst durchgeführt werden. Unter gar keinen Umständen sollten
Sie versuchen, das Atemtherapiegerät selbst zu warten oder zu reparieren.
Deutsch
69Reinigung und Wartung
Page 76

70
Page 77

Benutzung der VPAP-Menüs
Der VPAP verfügt über eine Reihe von Funktionen, auf die über die Menüs und
Untermenüs zugegriffen werden kann. Die Einstellungen für eine bestimmte
Funktion können mit Hilfe der Menüs und Untermenüs über das LCD-Display
aufgerufen und geändert werden. Sie können auf die Menüs zugreifen,
unabhängig davon, ob sich der VPAP im Bereitschafts- oder im
Behandlungsmodus befindet.
Ihr Arzt stellt das Menü entweder auf die Standard- oder die Detaildatenansicht
ein. Beide Menüs werden unten erklärt.
Nach dem Einschalten des VPAP erscheint eine Begrüßungsmeldung Nach
Abschluss der Selbsttests erscheint die VPAP- bzw. Rampen-Anzeige.
Rampen-Anzeige
Wenn Ihr Arzt eine maximale Rampenzeit eingestellt hat, erscheint nach der
Begrüßungsmeldung die Rampen-Anzeige. Auf der Rampen-Anzeige können Sie
direkt die Rampenzeit einstellen. Die Rampenzeit ist der Zeitraum, in dem der
Druck von einem niedrigen Druck auf den verschriebenen Behandlungsdruck
ansteigt. Siehe „Rampenzeit“ auf Seite 63.
Die Rampenzeit kann mit Hilfe der zentralen Wipptaste in 5-Minuten-Schritten
eingestellt werden (von AUS bis zur von Ihrem Arzt eingestellten maximalen
Rampe).
Verwendung des Menüs „Standard“
Im Menü „Standard“ können Sie Informationen über die Betriebsstunden und
die aktuelle Software-Version des VPAP aufrufen. Der Bildschirm Betriebszeit
zeigt die gesamte Anzahl der Stunden an, die der VPAP benutzt wurde. Er zeigt
außerdem die Anzahl der Tage an, die der VPAP benutzt wurde, im Vergleich zu
der Gesamtanzahl der Tage, die er zur Benutzung verfügbar war.
Abbildung 1 zeigt eine Zusammenfassung des Standardmenüs des VPAP.
Deutsch
71Benutzung der VPAP-Menüs
Page 78

VPAP-Anzeige Rampen-Anzeige
RESMED VPAP III
Menü
RAMPE: 20min
Menü
Optionen:
AUS, 5, 10, 15, 20, 25,
30, 35, 40, 45 Min.
NUTZG: 00000Std
00000/00000Tge
SW: SX3650201
Beend.
Nur zur Ansicht
Nur zur Ansicht
Figure 1: VPAP Standardmenüreihe:
• Zugriff auf die Menüs des VPAP:
Drücken Sie die linke Taste (Menü), während die VPAP- bzw. Rampen-
Anzeige angezeigt wird.
• Blättern durch die verschiedenen Menüelemente:
Drücken Sie die zentrale Wipptaste.
• Verlassen des Menüs:
Drücken Sie die rechte Taste (Beenden).
Benutzung des Detailmenüs (falls vom Arzt aktiviert)
Im Detailmenü können Einstellungen zum Maskentyp, zur Schlauchlänge und
zum verwendeten Atemluftbefeuchter aufgerufen und geändert werden.
Außerdem können Sie die Seriennummer und die aktuelle Software-Version
Ihres VPAP aufrufen.
Abbildung 2 zeigt eine Zusammenfassung des Detailmenüs des VPAP.
72
Page 79

VPAP-Anzeige Rampen-Anzeige
RESMED VPAP III
Menü
EINSTELLUNGEN
Zugang Beend.
RAMPE: 20min
Menü
MASKE: ULTRA
Ändern Beend.
SCHLAUCHLÄNGE: 2m
TUBE LENGTH: 2M
Ändern Beend.
AL-BEF: KEINER
Ändern Beend.
SMARTSTART: AUS
Ändern Beend.
AUS, 5, 10, 15, 20, 25,
30, 35, 40, 45 Min.
MIRAGE, MIR FULL,
STANDARD, ULTRA
2 m, 3 m
KEINER, PASSOVER, HUMIDAIRE.
Bei der Verwendung eines HumidAire 2i
stehen die obigen Einstellungsoptionen
nicht zur Verfügung und es erscheint
„H2i“ auf der Anzeige.
EIN, AUS
Deutsch
MASKE: MIRAGE
Ändern Beend.
2 m, 3 m
ERGEBNISSE
Zugang Beend.
OPTIONEN
Zugang Beend.
WARTUNG
Zugang Beend.
Stellt einen Menüpunkt dar
Stellt einen Untermenüpunkt dar
Funktion
Einstellungsoption
Fettdruck weist auf
Voreinstellung hin
MASKENALARM: AUS
Ändern Beend.
M.-SITZ: ∗∗∗ − −
gut Beend.
NUTZG: 4.34Std
Beend.
SMART DATA
Zugang Beend.
SPRACHE:DEUTSCH
Ändern Beend.
SN:123456789123
456789 Beend.
PCB: NONE
Beend.
SW: SX3650201
Beend.
EIN, AUS
Diese Menüs
erscheinen nur, wenn
mindestens eine
Smart Data-Option
vom Arzt aktiviert
wurde
AUTOANZEIGE: AUS
Ändern Beend.
ENGLISH, DEUTSCH, FRANÇAIS,
ITALIANO, ESPAÑOL,
PORTUGUÊS, SVENSKA,
NEDERLANDS
Nur zur Ansicht
Nur zur Ansicht
Nur zur Ansicht
Figure 2: VPAP Detailmenüreihe (falls vom Arzt aktiviert)
73Benutzung der VPAP-Menüs
Page 80

• Zugriff auf die Menüs des VPAP:
Drücken Sie in der VPAP- bzw. Rampen-Anzeige die linke Taste (Menü).
• Navigieren zwischen Menüpunkten in einem Menü bzw. Untermenü:
Drücken Sie die zentrale Wipptaste.
• Aufrufen eines Untermenüs:
Drücken Sie die linke Taste (Zugang).
• Ändern einer Einstellungsoption für eine Funktion:
1. Drücken Sie die linke Taste (Ändern).
2. Drücken Sie die zentrale Wipptaste, bis die gewünschte
Einstellungsoption erscheint.
3. Drücken Sie die linke Taste (Akzeptieren), um die Einstellungsoption
auszuwählen.
• Beenden ohne Änderungen:
Drücken Sie die rechte Taste (Abbrechen).
• Verlassen eines Menüs oder Untermenüs:
Drücken Sie die rechte Taste (Beenden).
Hinweis: Sie gelangen jederzeit zur VPAP- bzw. Rampen-Anzeige zurück, indem
Sie mindestens 3 Sekunden lang die rechte Taste drücken.
Menüfunktionen (nur im Detailmenü)
Die Menüfunktionen des VPAP sind in den Tabellen 2-6 unten
zusammengefasst. Die Tabellen enthalten kurze Beschreibungen jeder Funktion
und geben Aufschluss über die möglichen Einstellungsoptionen. Für Hinweise
zur Benutzung dieser Funktionen, siehe „Benutzung des Detailmenüs (falls vom
Arzt aktiviert)“ auf Seite 72.
74
Page 81

Das Menü „Einstellungen“
Mit dem Menü „Einstellungen“ können Sie bestimmte Betriebsfunktionen des
VPAP aufrufen und ändern.
Table 2: Funktionen des Menüs „Einstellungen“
Funktion
Maske ULTRA Wählt den Maskentyp aus. Weitere Informationen
Schlauchlänge 2 m Wählt die Länge des
Al.-befeuchter KEINER Wählt das
SmartStart
Maskenalarm EIN
Vor einstellung
™
AUS Schaltet die SmartStart-
(VPAP III ST);
AUS
(VPAP III)
Funktion
Atemluftschlauches aus, der
Ihre Maske mit dem VPAP
verbindet.
Atemluftbefeuchtermodell aus,
das zusammen mit dem VPAP
verwendet werden soll.
Funktion ein bzw. aus.
Siehe „SmartStart™“ auf
Seite 76.
Schaltet den Maskenalarm ein
bzw. aus.
Ist der Maskenalarm
eingeschaltet, werden Sie bei
einer großen Maskenleckage
alarmiert. Sie hören einen
Signalton und auf dem LCDDisplay erscheint eine
Meldung, die Sie auf eine
große Leckage aufmerksam
macht.
Einstellungsoptionen
finden Sie unter
„Einstellungen für
Maskentypen“ auf
Seite 76.
2 m / 3 m
KEINER, PASSOVER,
HUMIDAIRE
Bei der Verwendung
eines HumidAire 2i
stehen die obigen
Einstellungsoptionen
nicht zur Verfügung
und es erscheint
„H2i“ auf der
Anzeige.
EIN/AUS
EIN/AUS
Deutsch
75Benutzung der VPAP-Menüs
Page 82

SmartStart™
Der VPAP verfügt über eine Funktion, die SmartStart genannt wird. Sie kann von
Ihrem Arzt aktiviert werden. Ist diese Funktion aktiviert, startet der VPAP
automatisch, sobald Sie in die Maske atmen und stoppt automatisch, sobald Sie
diese abnehmen. Das heißt, dass Sie zum Starten und Stoppen der Behandlung
nicht mehr die Fronttaste drücken müssen.
Hinweis: Die SmartStop-Funktion wird automatisch deaktiviert, wenn Sie „Mir
Full“ als Maskenoption auswählen. Aus Sicherheitsgründen steht die
SmartStart-Funktion bei einer Ultra Mirage Full Face Maske nicht zur Verfügung.
Wenn der Maskenalarm eingeschaltet ist (EIN), schaltet sich die SmartStart/
Stop-Funktion automatisch aus (AUS). SmartStop kann nicht zusammen mit
dem Maskenalarm verwendet werden, da mit der SmartStop-Funktion die
Behandlung bei großen Leckagen vor der Aktivierung des Maskenalarms
unterbrochen wird.
Einstellungen für Maskentypen
Die folgende Tabelle zeigt die jeweilige Einstellung, die für die verschiedenen
Maskentypen ausgewählt werden sollte.
Table 3: Einstellungen für Maskentypen
Einstellungen Maske
MIRAGE Mirage Nasenmaske
ULTRA Ultra Mirage Nasenmaske
STANDARD Mirage Activa Nasenmaske
Mirage Vista Nasenmaske
Modularnasenmaske
MIR FULL Mirage Full Face Maske
Mirage Full Face Maske Serie 2
Ultra Mirage Full Face Maske
76
Page 83

Das Menü „Ergebnisse“
Hinweis: Dieses Menü erscheint nur, wenn wenigstens eine Smart Data™
Option vom Arzt aktiviert wurde. Weitere Informationen dazu finden Sie im
Smart Data Diary des VPAP III.
Table 4: Das Menü „Ergebnisse“
Funktion Funktionsbeschreibung
Maskensitz
(Smart Data)
Nutzung
(Smart Data)
Zeigt Sternchenklassifizierung an, die sich auf die
Maskenleckage der vorherigen
Behandlungssitzung bezieht.
Siehe Tabelle 1 auf Seite 65 für die
Sternchenklassifizierung.
Zeigt die Betriebsstunden der vorherigen
Behandlungssitzung an.
Siehe Tabelle 1 auf Seite 65 für die
Sternchenklassifizierung des Maskensitzes.
Das Menü „Optionen“
Table 5: Das Menü „Optionen“
Funktion
Smart Data
– Auto
Appear
Sprache Deutsch Wählt die Sprache aus, in der
Vore instellung
AUS Das Smart Data-Menü wird nur
Funktionsbeschreibung
dann angezeigt, wenn eine
oder mehrere Optionen vom
Arzt aktiviert wurden (EIN).
Ist Auto Appear eingeschaltet
(EIN), werden beim Einschalten
des Gerätes die Smart-DataFenster angezeigt. Ist Auto
Anzeige ausgeschaltet (AUS),
werden die Smart Daten nur im
Menü „Ergebnisse“ angezeigt.
alle Menüs und Meldungen
des VPAP angezeigt werden.
Deutsch ist die
Standardeinstellung für die
Sprache.
Einstellungsoptionen
Nur zur Ansicht
Deutsch
Nur zur Ansicht
Einstellungsoptionen
EIN/AUS
Englisch, Deutsch,
Französisch,
Italienisch,
Spanisch,
Portugiesisch,
Schwedisch,
Holländisch.
77Benutzung der VPAP-Menüs
Page 84

Das Menü „Wartung“
Table 6: Das Menü „Wartung“
Funktion Funktionsbeschreibung
Seriennummer (SN)
Leiterplatte
(PCB)
Software
* Dieser Menüpunkt erscheint auch im Menü Standard.
Zeigt die Seriennummer des VPAP an. Nur zur Ansicht
Zeigt die Leiterplattennummer an. Nur zur Ansicht
*
Zeigt die aktuelle Version der auf dem
VPAP installierten Software an.
Behandlungsbildschirme
Nach der Behandlungsaufnahme können Sie einen der folgenden
Behandlungsfenster aufrufen. Drücken Sie die zentrale Wipptaste, um
zwischen den Ansichten hin und her zu schalten.
Rampanzeige
Behandlungsmodus
Triggeranzeige
Druckgrafik
Figure 3: 1. Behandlungsbildschirm
S:RAMPE 8.0–16.6
}
S>>>>> Beend.
Einstelldruck
}
Einstellungsoptionen
Nur zur Ansicht
78
Leckage
Atem-
minutenvolumen
Figure 4: 2. Behandlungsbildschirm
Cycle-Anzeige
(TiMn / C / TiMx)
Trigger-Anzeige
Gemessene
Inspirationszeit
Figure 5: 3. Behandlungsbildschirm
LK: 24L/min AF: 12
MV: 12.0 Vt:1000
S
∗ ∗
S TiMx 2.0
Ti 1.5s 1:2.5
Atemfrequenz
Atemzugvolumen
Einstellen IPAP Max
Gemessenes
I:E-Verhältnis
Page 85

Die Behandlungsbildschirme enthalten die folgenden Informationen:
Behandlungsmodus: Modus der Behandlung, der vom Arzt eingestellt wird.
Folgende Optionen stehen zur Verfügung: CPAP, Spontan-,
Spontan-/Zeit- (VPAP III ST) und Zeitmodus (VPAP III ST).
Rampen-Anzeige: Erscheint, wenn der VPAP im Rampenmodus ist. Erlischt,
wenn die Rampenzeit ausgelaufen ist.
Eingestellter Druck: Im CPAP-Modus ist dies der eingestellte
Behandlungsdruck (Einheit: cm Wassersäule). In anderen Modi ist dies der
Ausatmungs- und Einatmungsdruck (Einheit: cm Wassersäule).
Trigger-Anzeige: Zeigt an, wie der VPAP III ST den Druck ändert, wenn Sie
ausatmen. „S” (Spontan) weist auf eine durch den Patienten ausgelöste
Druckänderung, „T“ (Zeitmodus) auf eine durch das Gerät ausgelöste
Druckänderung hin.
Druckgrafik: Grafische Darstellung der Druckänderungen.
Leckage: Aktuelle Maskenleckage (Einheit: Liter pro Minute).
Atemfrequenz: Anzahl der Atemzüge pro Minute.
Atemminutenvolumen: Menge der pro Minute eingeatmeten Luft (Einheit:
Liter pro Minute). Stellt die Atemfrequenz multipliziert mit dem
Atemzugvolumen dar.
Atemzugvolumen: Menge der pro Minute eingeatmeten Luft (Einheit: Milliliter
pro Atemzug).
Cycle Anzeige: Zeigt an, wie der VPAP den Druck ändert, wenn Sie ausatmen.
„C” weist auf eine durch den Patienten ausgelöste Druckänderung, „TiMn“ und
„TiMx“ weisen auf eine durch das Gerät ausgelöste Druckänderung hin.
Gemessene Inspirationszeit: Die vom VPAP gemessene durchschnittliche
Inspirationszeit.
Eingestellter IPAP Max: Die maximale, von Ihrem Arzt eingestellte
Einatmungszeit
Gemessenes I:E-Verhältnis: Das vom VPAP gemessene Verhältnis zwischen
Einatmung und Ausatmung.
Deutsch
79Benutzung der VPAP-Menüs
Page 86

80
Page 87

Hilfreiche Hinweise
Zu Beginn
Mundleckagen
Wenn Sie eine Nasenmaske verwenden, versuchen Sie Ihren Mund während der
Behandlung geschlossen zu halten. Leckagen am Mund können die Wirksamkeit
Ihrer Behandlung beeinträchtigen. Bei kontinuierlichen Mundleckagen können
eine Full Face Maske oder ein Kinnriemen hilfreich sein. Weitere Informationen
erhalten Sie von Ihrem Arzt oder Fachhändler.
Anlegen der Maske
Die Behandlung mit dem Atemtherapiegerät ist am wirksamsten, wenn die
Maske gut und bequem sitzt. Leckagen können die Behandlung beeinträchtigen.
Daher ist es wichtig, etwaige Luftaustritte zu eliminieren.
Wenn Sie Probleme haben, einen guten Maskensitz zu erzielen, wenden Sie sich
an Ihre Schlafklinik oder Ihren Fachhändler. Unter Umständen benötigen Sie eine
andere Größe oder ein anderes Maskenmodell.
Außerdem kann die Maskenanlegefunktion bei der richtigen Anpassung Ihrer
Maske hilfreich sein. Siehe „Benutzung der Maskenanlegefunktion“ auf
Seite 64.
Waschen Sie Ihr Gesicht und entfernen Sie überschüssige Hautfette, bevor Sie
die Maske aufsetzen. Dadurch sitzt die Maske besser, und gleichzeitig wird die
Lebensdauer des Maskeneinsatzes verlängert.
Nasenreizungen
Trockenheit
Besonders im Winter kann es sein, dass Sie während der Behandlung unter
Trockenheit von Nase, Mund oder Hals leiden. Oftmals kann ein
Atemluftbefeuchter bei diesem Problem helfen. Fragen Sie bitte Ihren Arzt um
Rat.
Laufende/Verstopfte Nase
Während der ersten Behandlungswochen kann es sein, dass Sie häufig niesen
müssen bzw. Ihre Nase läuft oder verstopft ist. In vielen Fällen hilft bei
Nasenreizungen ein Atemluftbefeuchter. Wenden Sie sich bitte an Ihren Arzt um
Rat.
Deutsch
Reisen mit dem VPAP
Benutzung im Ausland
Ihr VPAP-Atemtherapiegerät ist mit einem internen Leistungsadapter
ausgestattet, mit dem Sie das Gerät auch in anderen Ländern benutzen können.
Er kann bei 100-240 V und 50-60 Hz betrieben werden. Spezielle Einstellungen
sind nicht notwendig. Sie benötigen jedoch evtl. einen Adapter für die
entsprechende Steckdose.
81Hilfreiche Hinweise
Page 88

Benutzung einer Batterie und eines Wechselrichters
Ihr VPAP kann mit Batterie betrieben werden. Sie benötigen dazu einen
Wechselrichter. Wir empfehlen eine 12 V oder 24 V Deep-Cycle-Batterie und
einen Wechselrichter mit CE- oder UL-Kennzeichnung mit einer minimalen,
kontinuierlichen Ausgangsleistung von 200 W.
Hinweis: Wenn Sie den VPAP mit einem HumidAire 2i verwenden, benötigen
Sie einen reinen Sinus-Wechselrichter. Verwenden Sie bitte keinen
modifizierten Sinus-Wechselrichter.
Weitere Informationen dazu und zur Batteriekapazität finden Sie in der Anleitung
zum Batteriebetrieb des VPAP III.
82
Page 89

Fehlersuche
Wenn Sie ein Problem mit dem Gerät haben, versuchen Sie bitte zunächst, es
mit Hilfe einer der folgenden Maßnahmen zu beheben. Kann das Problem nicht
beseitigt werden, wenden Sie sich bitte an Ihren Fachhändler oder direkt an
ResMed. Versuchen Sie nicht, das Gerät selbst zu öffnen.
Problem Mögliche Ursache Lösung
Keine Anzeige. Stromkabel ist nicht richtig
angeschlossen bzw. der
Schalter auf der Rückseite
ist nicht eingeschaltet.
Der Luftstrom, der vom
VPAP zugeführt wird,
ist unzureichend.
Rampenzeit ist eingestellt.
Luftfiltereinsatz ist
verschmutzt.
Knick oder Loch im
Atemluftschlauch.
Der Atemluftschlauch ist
nicht richtig angeschlossen.
Die Maske bzw. das
Kopfband sitzt nicht richtig.
Der/die Verschlussstopfen
der Zugangsöffnung/en an
der Maske fehlt/fehlen.
Der für die Behandlung
erforderliche Druck hat sich
unter Umständen geändert.
Prüfen Sie, ob das
Stromkabel angeschlossen
und der Schalter auf der
Rückseite des Gerätes
eingeschaltet (EIN) ist.
Warten Sie, bis der
Luftdruck gestiegen ist.
Wechseln Sie den
Luftfiltereinsatz aus.
Richten Sie den
Atemluftschlauch gerade
oder wechseln Sie ihn aus.
Überprüfen Sie den
Atemluftschlauch.
Korrigieren Sie den Sitz der
Maske bzw. des
Kopfbandes.
Ersetzen Sie den/die
Verschlussstopfen.
Lassen Sie den Druck von
Ihrem Arzt verstellen.
Deutsch
VPAP startet nicht,
wenn Sie in die Maske
atmen.
Das Stromkabel ist nicht
richtig angeschlossen.
Die Steckdose ist defekt.
Schließen Sie beide Enden
des Stromkabels
ordnungsgemäß an.
Versuchen Sie, das Gerät an
eine andere Steckdose
anzuschließen.
83Fehlersuche
Page 90

Problem Mögliche Ursache Lösung
Der VPAP ist nicht
eingeschaltet.
SmartStart ist nicht
aktiviert.
Der Maskenalarm wurde
aktiviert, wodurch
SmartStart automatisch
deaktiviert wird.
Der Atemzug war nicht tief
genug, um SmartStart
auszulösen.
Übermäßig große Leckage. Korrigieren Sie den Sitz der
Schalten Sie den VPAP am
Hauptschalter auf der
Rückseite des Systems ein
(EIN).
Aktivieren Sie SmartStart.
Deaktivieren Sie den
Maskenalarm, um
SmartStart zu aktivieren.
Atmen Sie tief ein und dann
durch die Maske aus.
Maske bzw. des
Kopfbandes.
Es fehlen möglicherweise
die Verschlussstopfen der
Öffnungen an der Maske.
Setzen Sie diese wieder
ein.
Der Atemluftschlauch ist
nicht richtig angeschlossen.
Schließen Sie beide Enden
fest an.
84
Der VPAP stoppt nicht,
wenn Sie die Maske
abnehmen.
SmartStart/Stop ist
deaktiviert.
Verwendung einer Ultra
Mirage Full Face Maske.
Knick oder Loch im
Atemluftschlauch. Richten
Sie den Atemluftschlauch
gerade oder wechseln Sie
ihn aus.
Aktivieren Sie SmartStart/
Stop.
Die SmartStop-Funktion ist
deaktiviert, wenn der
Patient eine Full Face
Maske trägt.
Page 91

Problem Mögliche Ursache Lösung
Obwohl SmartStart
aktiviert ist, stoppt das
Atemtherapiegerät
nicht automatisch,
wenn Sie die Maske
abnehmen.
Fehlermeldung:
Schlauch prüfen!!
Dann Taste drück.
Fehlermeldung:
SYSTEMFEHLER
Service anford.!
Übermäßig laute
Motorgeräusche.
Fehlermeldung:
Starkes Leck bei
letzter Sitzung.
Sie verwenden einen nicht
kompatiblen
Atemluftbefeuchter oder
ein unpassendes
Maskensystem.
Der Atemluftschlauch ist
lose.
Defektes Bauteil. Geben Sie Ihren VPAP in
Defektes Bauteil. Geben Sie Ihr Gerät in
Sie hatten während der
letzten Nacht eine
übermäßig große Leckage.
Verwenden Sie
ausschließlich von ResMed
empfohlene und
hergestellte Ausrüstung.
Stellen Sie sicher, dass der
Atemluftschlauch sicher an
Ihrer Maske und am
Luftauslass an der
Vorderseite des VPAP
angeschlossen ist.
Um die Mitteilung zu
löschen, drücken Sie eine
beliebige Taste auf dem
Tastenfeld des VPAP.
Reparatur.
Reparatur.
Stellen Sie sicher, dass Ihr
Atemluftschlauch
ordnungsgemäß
angeschlossen ist und Ihre
Maske keine übermäßig
große Leckage aufweist.
Passen Sie Ihre Maske mit
Hilfe der
Maskenanlegefunktion an.
Erscheint diese Meldung
noch einmal, verständigen
Sie Ihren Arzt.
Deutsch
85Fehlersuche
Page 92

86
Page 93

Technische Daten
Eigenschaften des dynamischen Druckes
IPAP: 2 cm H2O bis 25 cm H2O (am Ende des 2 m langen Standardluftschlauches
gemessen)
EPAP: 2 cm H
Standardluftschlauches gemessen)
CPAP: 4 cm H2O bis 20 cm H2O (am Ende des 2 m langen
Standardluftschlauches gemessen)
Maximale Druckeinstellung bei einer Fehlfunktion: 40 cm H2O
Maximaler Durchfluss (CPAP-Modus, am Ende des 2 m langen
Standardluftschlauches gemessen)
O bis 25 cm H2O (am Ende des 2 m langen
2
Deutsch
Druck
(cm H
O)
2
10 200
15 170
20 150
Durchfluss
(l/Min.)
Schalldruckpegel: <30 dB (in Übereinstimmung mit den Anforderungen gemäß
ISO 17510-1:2002 getestet)
Abmessungen (L x B x H): 270 mm x 230 mm x 141 mm
Gewicht: 2,3 kg
Luftauslassöffnung: 22-mm-Konus, entspricht EN 1281-1:1997 für Anästhesie-
und Atemgeräte – Konische Konnektoren
Druckmessung: Im Atemtherapiegerät integrierter Druckwandler
Durchflussmessung: Im Atemtherapiegerät integrierter Durchfluss-
Messsensor
Eingangsbereich: 100-240 V, 50- 60 Hz, 40 VA (normale Belastung), <100 VA
(maximale Belastung)
Gehäuse: Flammenhemmendes, technisches Thermoplast
Umgebungsbedingungen
Betriebstemperatur: +5 °C bis +40 °C
Betriebsluftfeuchtigkeit: 10%-95% ohne Kondensation
Lagerungs- und Transporttemperaturen: -20 °C bis +60 °C
Lagerungs- und Transportfeuchtigkeit: 10%-95% ohne Kondensation
Elektromagnetische Verträglichkeit
Das Produkt entspricht allen zutreffenden elektromagnetischen
Verträglichkeitsanforderungen (EMV) gemäß IEC60601-1-2 für Wohn-, Handelsund Leichtindustriebereiche. Weitere Hinweise dazu finden Sie im Abschnitt
„Richtlinie und Erklärung des Herstellers über elektromagnetische Emissionen
und Verträglichkeit“ auf Seite 91.
Luftfiltereinsatz: Zwei Lagen pulvergebundenes Polyestervlies.
87Technische Daten
Page 94

Schlauchsystem: Flexibler Kunststoff, 2 m bzw. 3 m Länge
IEC 601-1 Klassifikationen
Klasse II (Doppelisolierung)
Typ CF
Table 7: Angezeigte Werte
Wert Bereich Genauigkeit Anzeige
Drucksensor an der Luftauslassöffnung
Druck -5 bis 30 cm H2O ±0,5 cm H2O 0,1 cm H2O
Durchflusssensor im Atemtherapiegerät*
Leckage 0-120 l/Min. ** 1 l/Min.
Atemzugvolumen 100–3000 ml ** 1 ml
Atemfrequenz 6-60 BPM ±0,5 BPM 0,1 BPM
Atemminutenvolumen
* Die Ergebnisse können beim Auftreten von Leckagen ungenau sein.
** Bei den angezeigten Werten handelt es sich um Schätzungen. Sie stellen lediglich
Richtwerte dar.
0,6-60 l/Min. ** 0,25 l/Min.
Druckvariationen
25,00
88
20,00
O)
2
15,00
10,00
Druck (cm H
5,00
0,00
0 1 2 3
Atemzüge
2/3 Max. Druck
1/3 Max. Druck
Max. Druck
10 BPM
15 BPM
20 BPM
Page 95

Druckkurve
1/3 Max. Druck
600
500
400
300
200
Volumen (ml)
100
0
6,3 6,4 6,5 6,6 6,7 6,8
Druck (cm H
2/3 Max. Druck
600
500
400
300
200
Volumen (ml)
100
0
O)
2
13,1 13,2 13,3 13,4 13,5 13,6
Druck (cm H
O)
2
600
500
400
300
200
Volumen (ml)
100
0
19,7 19,8 19,9 20,0 20,1 20,2
Max. Druck
Druck (cm H
10 BPM
15 BPM
20 BPM
O)
2
Hinweis: Der Hersteller behält sich das Recht vor, diese technischen Daten
ohne Vorankündigung zu ändern.
Auf dem Produkt erscheinende Symbole
Achtung: Bitte lesen Sie die beiliegenden Unterlagen.
Klasse II Ausrüstung
Typ CF Ausrüstung
Tropfwassergeschützt
Deutsch
Start/Stop
Mask-fit
Start-/Stopptaste oder Maskensitz
89Technische Daten
Page 96

Umweltinformationen
Die EU-Richtlinie WEEE 2002/96/EG definiert die ordnungsgemäße
Beseitigung von Elektro- und Elektronikgeräten. Dieses Gerät darf
nicht als Hausmüll, sondern muss separat entsorgt werden. Lassen
Sie es von einem geeigneten Entsorgungs- oder
Wiederverwertungs- bzw. Recyclingunternehmen in Ihrer Region
entsorgen. Wirksame Entsorgung entlastet natürliche Ressourcen
und verhindert, dass gefährliche Substanzen in die Umwelt
gelangen.
Weitere Informationen über Entsorgungsmöglichkeiten erhalten
Sie von Ihrer örtlichen Müllabfuhr. Das Recyclingsymbol
(durchgestrichene Mülltonne) weist Sie auf ein geeignetes
Entsorgungssystem hin. Wenn Sie Informationen zur Entsorgung
Ihres ResMed-Gerätes wünschen, wenden Sie sich bitte an Ihre
ResMed-Geschäftsstelle oder Ihren Fachhändler oder besuchen
Sie die ResMed-Webseite unter www.resmed.com/environment.
90
Page 97

Richtlinie und Erklärung des Herstellers über
elektromagnetische Emissionen und Verträglichkeit
Richtlinie und Erklärung des Herstellers über elektromagnetischen Emissionen
Der VPAP ist für die Verwendung in der unten angegebenen elektromagnetischen Umgebung
vorgesehen. Der Kunde bzw. Benutzer des VPAP sollte sicherstellen, dass das System in einer
solchen Umgebung verwendet wird.
Emissionstest Compliance
Elektromagnetische
Umgebung – Richtlinie
HF-Emissionen CISPR11 Gruppe 1 Der VPAP verwendet für seine
HF-Emissionen CISPR 11 Klasse B Der VPAP kann in allen Einrichtungen
Harmonische Emissionen
IEC 61000-3-2
Spannungsschwankungen/
Flicker Emissionen
IEC 61000-3-3
Medizinische elektrische Ausrüstung bedarf besonderer Vorsichtsmaßnahmen hinsichtlich der
elektromagnetischen Verträglichkeitsanforderungen (EMV) und muss gemäß den EMV-Hinweisen
in dieser Bedienungsanleitung installiert und in Betrieb genommen werden.
Warnungen: Der VPAP sollte nicht neben, auf oder unter anderer Ausrüstung in Betrieb
genommen werden.
Sollte die Aufstellung neben oder auf anderen Geräten dennoch notwendig sein, muss
sichergestellt werden, dass der VPAP in der beabsichtigten Aufstellungskonfiguration
ordnungsgemäß funktioniert.
Die Verwendung von anderem als dem hier angegebenen Zubehör (z. B. Atemluftbefeuchter) wird
nicht empfohlen. Dies kann zu verstärkten Emissionen bzw. zur reduzierten Verträglichkeit des
VPAP führen.
Klasse A
Entspricht den
Bestimmungen
internen Funktionen ausschließlich HFEnergie. Deshalb sind die HFEmissionen des Gerätes sehr niedrig.
Die Wahrscheinlichkeit, dass sie
Störungen in elektronischen Geräten
in der Nähe auslösen, ist sehr gering.
sowie zu Hause und in Einrichtungen
verwendet werden, die direkt an das
öffentliche Niederspannungsnetz
angeschlossen sind, das private
Haushalte versorgt.
Deutsch
91Technische Daten
Page 98

Richtlinie und Erklärung des Herstellers über elektromagnetische Verträglichkeit
Der VPAP ist für die Verwendung in der unten angegebenen elektromagnetischen Umgebung
vorgesehen. Der Kunde bzw. Benutzer des VPAP sollte sicherstellen, dass das System in einer
solchen Umgebung verwendet wird.
Verträglichkeits
-test
Elektrostatische
Entladung (ESE)
IEC 61000-4-2
Elektrischer
schneller
Übergangsvorgang
IEC 61000-4-4
Stoßleistung
IEC 61000-4-5
Spannungseinbrüche, kurze
Unterbrechungen
und
Spannungsschwankungen in den
Eingangsleitungen.
IEC 61000-4-11
IEC60601-1-2
Testebene
±6 kV Kontakt
±8 kV Luft
±2 kV für
Stromversorgungs
-leitung
±1 kV für
Eingangs-/
Ausgangsleitung
±1 kV
Differenzialmodus
±2 kV
Normalmodus
<5% Ut
(>95% Einbruch in
Ut)
für 0,5 Zyklen
40% Ut
(60% Einbruch in
Ut)
für 5 Zyklen
70% Ut
(30% Einbruch in
Ut)
für 25 Zyklen
<5% Ut
(>95% dip in Ut)
für 5 Sekunden
Normerfüllungsgrad
±6 kV Kontakt
±8 kV Luft
±2 kV
Trifft nicht zu
±1 kV
Differenzialmodus
±2 kV Normalmodus
<12 V
(>95% Einbruch in
240 V)
für 0,5 Zyklen
96 V
(60% Einbruch in
240 V)
für 5 Zyklen
168 V
(30% Einbruch in
240 V)
für 25 Zyklen
<12 V
(>95% Einbruch in
240 V)
für 5 Sekunden
Elektromagnetische
Umgebung – Richtlinie
Der Fußboden sollte aus
Holz, Beton oder
Keramikfliesen sein. Ist der
Fußboden mit
synthetischem Material
ausgelegt, sollte die relative
Luftfeuchtigkeit mindestens
30 % betragen.
Die Qualität der
Stromversorgung muss der
einer normalen Geschäftsbzw.
Krankenhausumgebung
entsprechen.
Die Qualität der
Stromversorgung muss der
einer normalen Geschäftsbzw.
Krankenhausumgebung
entsprechen.
Die Qualität der
Stromversorgung muss der
einer normalen Geschäftsbzw.
Krankenhausumgebung
entsprechen.
Muss der VPAP auch
während Unterbrechungen
der Stromzufuhr ständig in
Betrieb bleiben, sollte der
VPAP an eine
unterbrechungsfreie
Stromversorgung
angeschlossen werden.
92
Netzfrequenz
(50/60 Hz)
Magnetfeld
IEC 61000-4-8
Hinweis: Ut ist die AC-Netzspannung vor dem Einsatz der Testebene.
3 A/m 3 A/m Magnetische
(Fortsetzung nächste Seite)
Stromfrequenzfelder
sollten sich auf einem für
normale Geschäfts- bzw.
Krankenhausumgebungen
typischen Niveau befinden.
Page 99

Richtlinie und Erklärung des Herstellers über elektromagnetische Verträglichkeit
(Fortsetzung)
Der VPAP ist für die Ver wendung in der unten angegebenen elektromagnetischen Umgebung vorgesehen.
Der Kunde bzw. Benutzer des VPAP sollte sicherstellen, dass das System in einer solchen Umgebung
verwendet wird.
Verträglichkeitstest
Geleitete
HF-Signale
IEC 61000-4-6
Gestrahlte
HF-Signale
IEC 61000-4-3
IEC60601-1-2
Te s t e b e n e
3 Vrms
150 kHz bis 80
MHz
10 V /m
80 MHz bis 2,5
GHz
Normerfüllungsgrad
3 Vrms d = 1,17 √P
10 V/m d = 0,35 √P 80 MHz bis 800 MHz
Elektromagnetische Umgebung –
Richtlinie
Bei der Verwendung von tragbarer und mobiler
HF-Kommunikationsausrüstung sollte der
empfohlene Abstand zum VPAP und den
Kabeln eingehalten werden, der sich aus der für
die Frequenz des Senders geltenden Gleichung
ergibt.
Empfohlener Abstand
d = 0,70 √P 800 MHz bis 2,5 GHz
wobei entsprechend dem Hersteller des
Senders P die maximale Ausgangsleistung des
Senders in Watt (W) und d den empfohlenen
Abstand in Metern (m) darstellt.
Die Feldstärke der festen HF-Sender, die durch
eine elektromagnetische Prüfung ermittelt wird,
a
in jedem Frequenzbereich unter der
muss
Compliance-Ebene liegen.
Störungen können in der Nähe von
Ausrüstungsgegenständen auftreten, die
folgenderweise gekennzeichnet sind:
b
Deutsch
HINWEIS 1: Bei 80 MHz und 800 MHz trifft der höhere Frequenzbereich zu.
HINWEIS 2: Diese Richtwerte treffen möglicherweise nicht auf alle Situationen zu. Die elektromagnetische
Ausbreitung hängt von der Absorption und Reflexion von Strukturen, Objekten und Personen ab.
a
Die Feldstärke von festen Sendern wie Basisstationen für Radios, Mobil- und schnurlosen Telefonen sowie
Landfunkradios, Amateurradios, AM- und FM-Radiosendern und Fernsehsendern kann nicht mit Sicherheit
theoretisch vorhergesagt werden. Zur Beurteilung der elektromagnetischen Umgebung von festen HFSendern sollte unter Umständen eine elektromagnetische Prüfung durchgeführt werden. Überschreitet die
gemessene Feldstärke am Standort, an dem der VPAP verwendet wird, die entsprechende HFNormerfüllungsebene (siehe oben), muss der VPAP auf normale Betriebstätigkeit hin kontrolliert werden.
Wird eine normwidrige Funktionsweise festgestellt, sind eventuell zusätzliche Maßnahmen wie eine
Neuausrichtung bzw. Umstellung des VPAP notwendig.
b
Im Frequenzbereich 150 kHz bis 80 MHz darf die Feldstärke 10 V/m nicht überschreiten.
93Technische Daten
Page 100

Empfohlene Abstände zwischen tragbarer und mobiler HF-Kommunikationsausrüstung
und dem VPAP
Der VPAP ist für die Verwendung in einer Umgebung vorgesehen, in der gestrahlte HF-Störungen
kontrolliert werden. Der Kunde bzw. Benutzer des VPAP kann zur Verhinderung von elektromagnetischen
Störungen beitragen, indem er gemäß der Empfehlung unten, die sich nach der maximalen
Ausgangsleistung der Kommunikationsausrüstung richtet, einen minimalen Abstand zwischen der
tragbaren und mobilen HF-Ausrüstung (Sender) und dem VPAP einhält.
Abstand je nach der Senderfrequenz
m
Maximale Nennleistung
des Senders W
0,01 0,17 0,04 0,04
0,1 0,37 0,11 0,11
1 1,17 0,35 0,35
10 3,69 1,11 1,11
100 11,70 3,50 3,50
Für Sender mit einer maximalen Ausgangsleistung, die nicht oben aufgeführt ist, kann der empfohlene
Abstand d in Metern (m) mit Hilfe der entsprechenden Gleichung für die Frequenz des Senders bestimmt
werden, wobei P die maximale Ausgangsleistung des Senders in Watt (W) gemäß dem Hersteller des
Senders darstellt.
HINWEIS 1: Bei 80 MHz und 800 MHz trifft der Abstand für den höheren Frequenzbereich zu.
HINWEIS 2: Diese Richtwerte treffen möglicherweise nicht auf alle Situationen zu. Die elektromagnetische
Ausbreitung hängt von der Absorption und Reflexion von Strukturen, Objekten und Personen ab.
150 kHz bis 80 MHz
d = 1,17 √P
80 MHz bis 800 MHz
d = 0,35 √P
800 MHz bis 2,5 GHz
d = 0,35 √P
94
 Loading...