

Page 1
Global leaders in sleep and respiratory medicine www.resmed.com
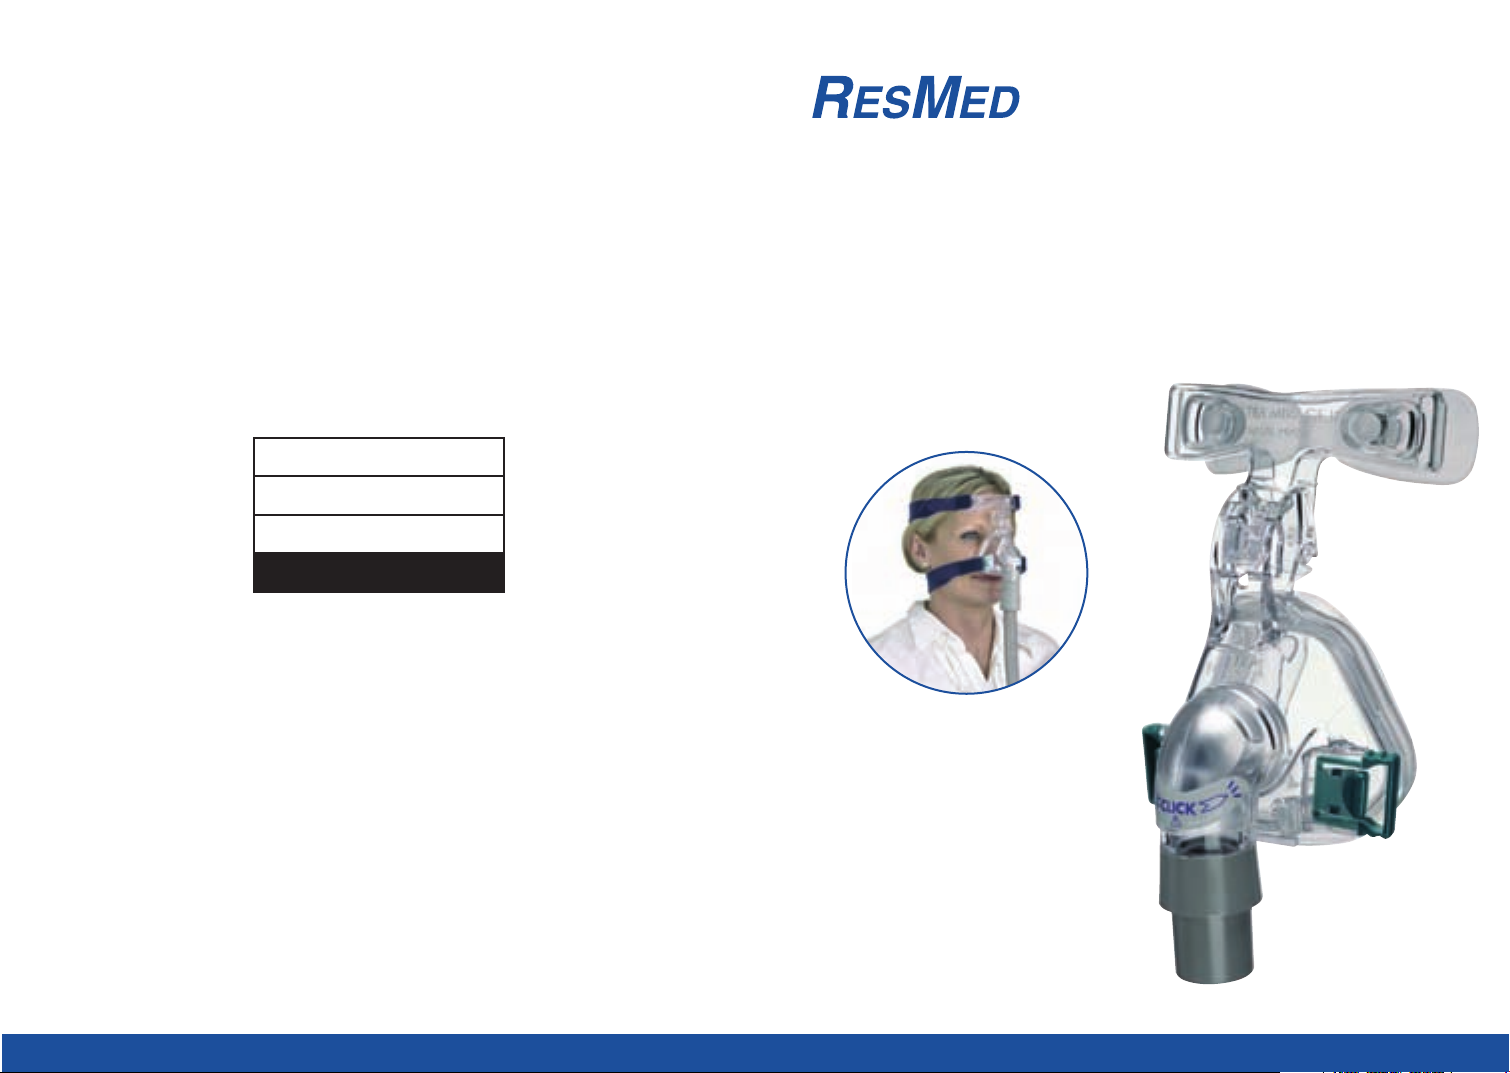
Ultra Mirage™II Nasal Mask
User Guide
English •Deutsch •Français •Italiano
Español
•
Português •Svenska •Nederlands
168143/1
05 11
Ultra Mirage II Nasal Mask
User Guide
ROW
Page 2

ResMed Ltd (Manufacturer) 1 Elizabeth MacArthur Drive Bella Vista NSW 2153 Australia
ResMed Corp (US Designated Agent) 14040 Danielson Street Poway CA 92064-6857 USA
ResMed (UK) Ltd (EU Authorized Representative) 65 Milton Park Abingdon Oxfordshire OX14 4RX UK
ResMed Offices Australia, Austria, Finland, France, Germany, Hong Kong, Japan, Malaysia, Netherlands,
New Zealand, Singapore, Spain, Sweden, Switzerland, UK, USA (see www.resmed.com for contact details).
Ultra Mirage II Nasal Mask
Protected by patents: AU 710733, AU 741003, AU 766623, AU 772832, AU 775051, AU 777033, CA 2261790,
DE 29724224, EP 0956069, EP 1187647, JP 3686609, NZ 513052, NZ 526165, NZ 526168, US 6112746,
US 6357441, US 6374826, US 6412487, US 6439230, US 6463931, US 6532961, US 6557556, US 6581602,
US 6634358, US 6691707, US 6796308, US 6860269. Other patents pending.
Protected by design registrations: AU 139764, DE 49911833, DE 40301991, FR 997839, FR 031425, JP 1117921,
JP 1197930, US D443355, US D486227, US D493522. Others pending.
Ultra Mirage, Mirage and AutoSet T are trademarks of ResMed Ltd and Mirage and AutoSet T are Registered in
U.S. Patent and Trademark Office.
Velcro is a registered trademark of Velcro Industries B.V.
© 2005 ResMed Ltd.
Page 3
C-1
C-2
Fitting / Anlegen / Ajustement / Applicazione / Colocación / Ajuste / Maskinpassning / Passend maken
1
2
3 4
D-1
D-2
Disassembling / Demontage /
Démontage / Smontaggio /
Desmontaje /
Desmontar /
Ta isär masken / Demonteren
1
E-1
E-2
E-3
E-4
E-5
1 2 3 4 2 3 4
1
2
3
4
2 3 4 2 3 4
Reassembling / Wiederzusammenbau / Remontage / Riassemblaggio / Montaje / Montagem /
Montera masken / Opnieuw monteren
12 3 4
C
D
E
B
12 3 4
N
A
S
A
L
M
A
S
K
U
L
T
R
A
M
I
R
A
G
E
I
I
Forehead support tab / Stirnbauteilsteg / Languette du support frontal / Linguetta del supporto frontale /
Lengüeta del apoyo para la frente / Lingueta do suporte da testa / Pannstödsflik / Tab van de voorhoofdsteun
Elbow clip / Kniestückclip / Clip du coude / Fermaglio del gomito /
Traba del codo / Clipe do cotovelo / Bågklämma / Bochtklem
Mask Frame / Maskenhalter / Entourage rigide / Telaio della maschera / Armazón de la mascarilla /
Armação da máscara / Maskram / Maskerframe
Swivel / Drehadapter / Pièce pivotante / Giunto rotante /
Pieza giratoria / Peça giratória / Svängtapp /
Draaibare kop
Vent cover on mask elbow / Ventilabdeckung auf dem Kniestück der Maske /
Cache des orifices de ventilation en place sur le coude du masque /
Coperchio dell'apertura per l'esalazione sul gomito della maschera /
Cubierta de la ventilación en el codo de la mascarilla / Tampa do orifício
de ventilação no cotovelo da máscara / Ventillock på maskbågen /
Ventilatiekap op maskerbocht
"Click" sticker / "Klicken"-Aufkleber / Autocollant "Click" / Adesivo "click" /
Adhesivo "Clic" / Etiqueta adesiva "Click" / "Klick" etikett / "Click"-sticker
Mask elbow / Maskenkniestück / Coude du masque / Gomito della maschera /
Codo de la mascarilla / Cotovelo da máscara / Maskbåge / Maskerbocht
Ports cap / Anschlusskappe / Bouchon d'entrées /
Coperchio delle prese / Tapón de los puertos /
Tampa das portas / Portlock / Poortafdichting
Headgear clip slot / Schlitz für den Kopfbandclip / Fente pour le clip du harnais /
Fessura del fermaglio del copricapo / Ranura del broche del arnés para la cabeza /
Ranhura do clipe do arnês / Öppning för hättans klämma / Sleuf voor
hoofdbandklem
Cushion clip / Stützring / Clip de la bulle / Fermaglio del cuscinetto /
Traba de la almohadilla / Clipe da almofada / Kuddklämma / Klem voor kussentje
Mask cushion / Maskeneinsatz / Bulle du masque / Cuscinetto /
Almohadilla de la mascarilla / Almofada da máscara / Maskkudde /
Maskerkussentje
Headgear clip / Kopfbandclip / Clip du harnais / Fermaglio del copricapo /
Broche del arnés para la cabeza / Clipe do arnês / Hättans klämma /
Hoofdbandklem
Forehead support pads / Stirnbauteilpolster / Tampons du support frontal /
Imbottiture del supporto frontale / Almohadillas del apoyo para la frente /
Almofadas de suporte da testa / Pannstödsdynor / Kussentjes van
voorhoofdsteun
Forehead support / Stirnbauteil / Support frontal / Supporto frontale / Apoyo para la frente / Suporte da testa /
Pannstöd / Voorhoofdsteun
Mask Parts / Teile der Maske / Composants du masque / Parti della maschera / Piezas de la mascarilla /
Peças da máscara / Delar i masken / Maskeronderdelen
Forehead support tab—four positions / Stirnbauteilsteg—vier Positionen / Languette du support frontal—
quatre positions possibles / Linguetta supporto frontale—quattro posizioni / Lengüeta del apoyo para la
frente —cuatro posiciones / Lingueta do suporte da testa—quatro posições / Pannstödsflik—fyra positioner /
Tab van de voorhoofdsteun—vier posities
flat side of elbow clip faces mask frame /
flache Seite des Sprengrings weist zum Maskenhalter /
partie plate du clip du coude face à l’entourage rigide /
lato piatto del fermaglio del gomito rivolto verso il
telaio della maschera / el lado plano de la traba del codo
mira hacia el armazón de la mascarilla / a face plana do clipe
do cotovelo encontra-se virada para a armação da máscara /
bågklämmans flata sida vänds mot maskramen /
platte zijde van bochtklem naar maskerframe gericht
1
1
2
3
4
1
2
3
4
1
2
3
4
1
2
3
4
1
3
4
2
a
©
2005 ResMed Ltd.
©
2005 ResMed Ltd.
©
2005 ResMed Ltd.
©
2
00
5
ResMed L
td.
Page 4

ILLUSTRATIONS SHEET / ILLUSTRATIONSBLATT / FICHE
0
10
20
30
40
50
60
70
4 5 6 7 8 9 10 11 12 13 14 15 16 17 18 19 20
D’ILLUSTRATIONS / FOGLIO DELLE ILLUSTRAZIONI / HOJA DE
FIGURAS / FOLHETO DE ILUSTRAÇÕES / ILLUSTRATIONSBLAD /
ILLUSTRATIEBLAD
Note: Note:
Note: For complete instructions, read the text section in conjunction with the illustrations
Note: Note:
on this sheet. /
Illustrationen auf diesem Blatt. /
référer au texte et aux illustrations de cette fiche. /
sezione con il testo insieme alle illustrazioni su questo foglio. /
detalladas, sírvase leer el texto en conjunto con las ilustraciones de esta hoja. /
obter informações completas, leia a secção de texto juntamente com as ilustrações que se
encontram neste folheto. /
här bladet för fullständiga anvisningar. /
tekstgedeelte en de bijbehorende illustraties op dit blad.
Hinweis: Hinweis:
Hinweis: Vollständige Anweisungen finden Sie im Textabschnitt und in den
Hinweis: Hinweis:
Remarque :Remarque :
Remarque : pour les instructions complètes, veuillez vous
Remarque :Remarque :
Nota:Nota:
Nota: Per istruzioni complete, leggere la
Nota:Nota:
Nota: Nota:
Nota: Para instrucciones
Nota: Nota:
Obs!Obs!
Obs! Läst textavsnittet tillsammans med illustrationerna på det
Obs!Obs!
Opm:Opm:
Opm: Raadpleeg voor een volledige beschrijving het
Opm:Opm:
Nota: Nota:
Nota: Para
Nota: Nota:
Pressure–Flow Curve / Druck-Durchflusskurve /
A
Courbe Pression-Débit / Curva di pressione e flusso /
Curva de Presión-Flujo / Curva de Pressão-Fluxo /
Tryck-Flödeskurvan / Druk-flow-curve
Vent flow rate / Durchflussrate an den
Luftauslassöffnungen / Débit à l’orfice de ventilation /
Coefficiente di flusso della presa per l’esalazione /
Caudal de flujo por la ventilación / Taxa de fluxo de
ventilação / Ventilflödestakt / Uitlaat-ventilatiestroom
(L/min)
Mask Pressure / Maskendruck / Pression dans le masque / Pressione della maschera /
Presión en la mascarilla / Pressão na máscara / Masktryck / Maskerdruk (cm H
©
O)
2
2005 ResMed Ltd.
Component of 168143/1 05 11
Page 5
Ultra Mirage™ II Nasal Mask
ENGLISH
Thank you for choosing ResMed’s
U
LTRA MIRAGE
II NASAL MASK.
™
This mask is similar to the original
U
LTRA MIRAGE
NASAL MASK and the two
™
masks are equivalent in performance. The
new upgraded mask includes an improved
forehead support with flexible pads that
conform to the shape of your forehead.
This user’s guide provides you with the
information you need for the correct use
of your mask.
INTENDED USE
The ULTRA MIRAGE II NASAL MASK is
intended for multipatient use for adult
patients prescribed continuous positive
airway pressure (CPAP) or bilevel therapy
in hospital, clinic and/or home
environments.
MEDICAL INFORMATION
Note: The mask system does not contain
latex materials. If you have ANY reaction to
any part of the mask system, discontinue
use and consult your sleep therapist.
. WARNINGS AND CAUTIONS
• This mask should be used only with
CPAP or bilevel systems
recommended by your physician or
respiratory therapist. A mask should
not be used unless the CPAP or bilevel
system is turned on and operating
properly. The exhaust vent should
never be blocked.
Explanation of the Warning: CPAP
and bilevel systems are intended to be
used with special masks with
connectors which may have vent holes
or separate exhaust vents to allow
continuous flow of air out of the mask.
When the CPAP or bilevel device is
turned on and functioning properly,
new air from the flow generator flushes
the exhaled air out through the
attached mask exhaust vent. However,
when the CPAP or bilevel device is not
operating, enough fresh air will not be
provided through the mask, and
exhaled air may be rebreathed.
Rebreathing of exhaled air for longer
than several minutes can in some
circumstances lead to suffocation. This
warning applies to most models of
CPAP or bilevel systems.
Page 6

• At low CPAP pressures, the flow
through the exhaust vent may be
inadequate to clear all exhaled gas from
the tubing. Some rebreathing may occur.
Explanation of the Warning: The
exhaust vent flow is lower at lower mask
pressures (see Pressure–Flow Curve in
section A on the illustrations sheet). To
avoid rebreathing it is recommended
that a mask pressure of 4 cm H
O or
2
more be used.
• The mask must be cleaned and
disinfected/sterilized if it is used
between patients. Refer to the section
“Cleaning the Mask between Patients”
for details.
• If oxygen is used with the CPAP or
bilevel device, the oxygen flow must be
turned off when the flow generator is
not operating.
Explanation of the Warning: When the
CPAP or bilevel device is not in
operation, and the oxygen flow is left
on, oxygen delivered into the ventilator
tubing may accumulate within the flow
generator enclosure. Oxygen
accumulated in the CPAP or bilevel
device enclosure will create a risk of fire.
This warning applies to most types of
CPAP or bilevel flow generators.
• Please refrain from smoking while
oxygen is in use.
Note: At a fixed rate of supplemental
oxygen flow, the inhaled oxygen
concentration will vary, depending on the
pressure settings, patient breathing pattern,
mask selection and leak rate.
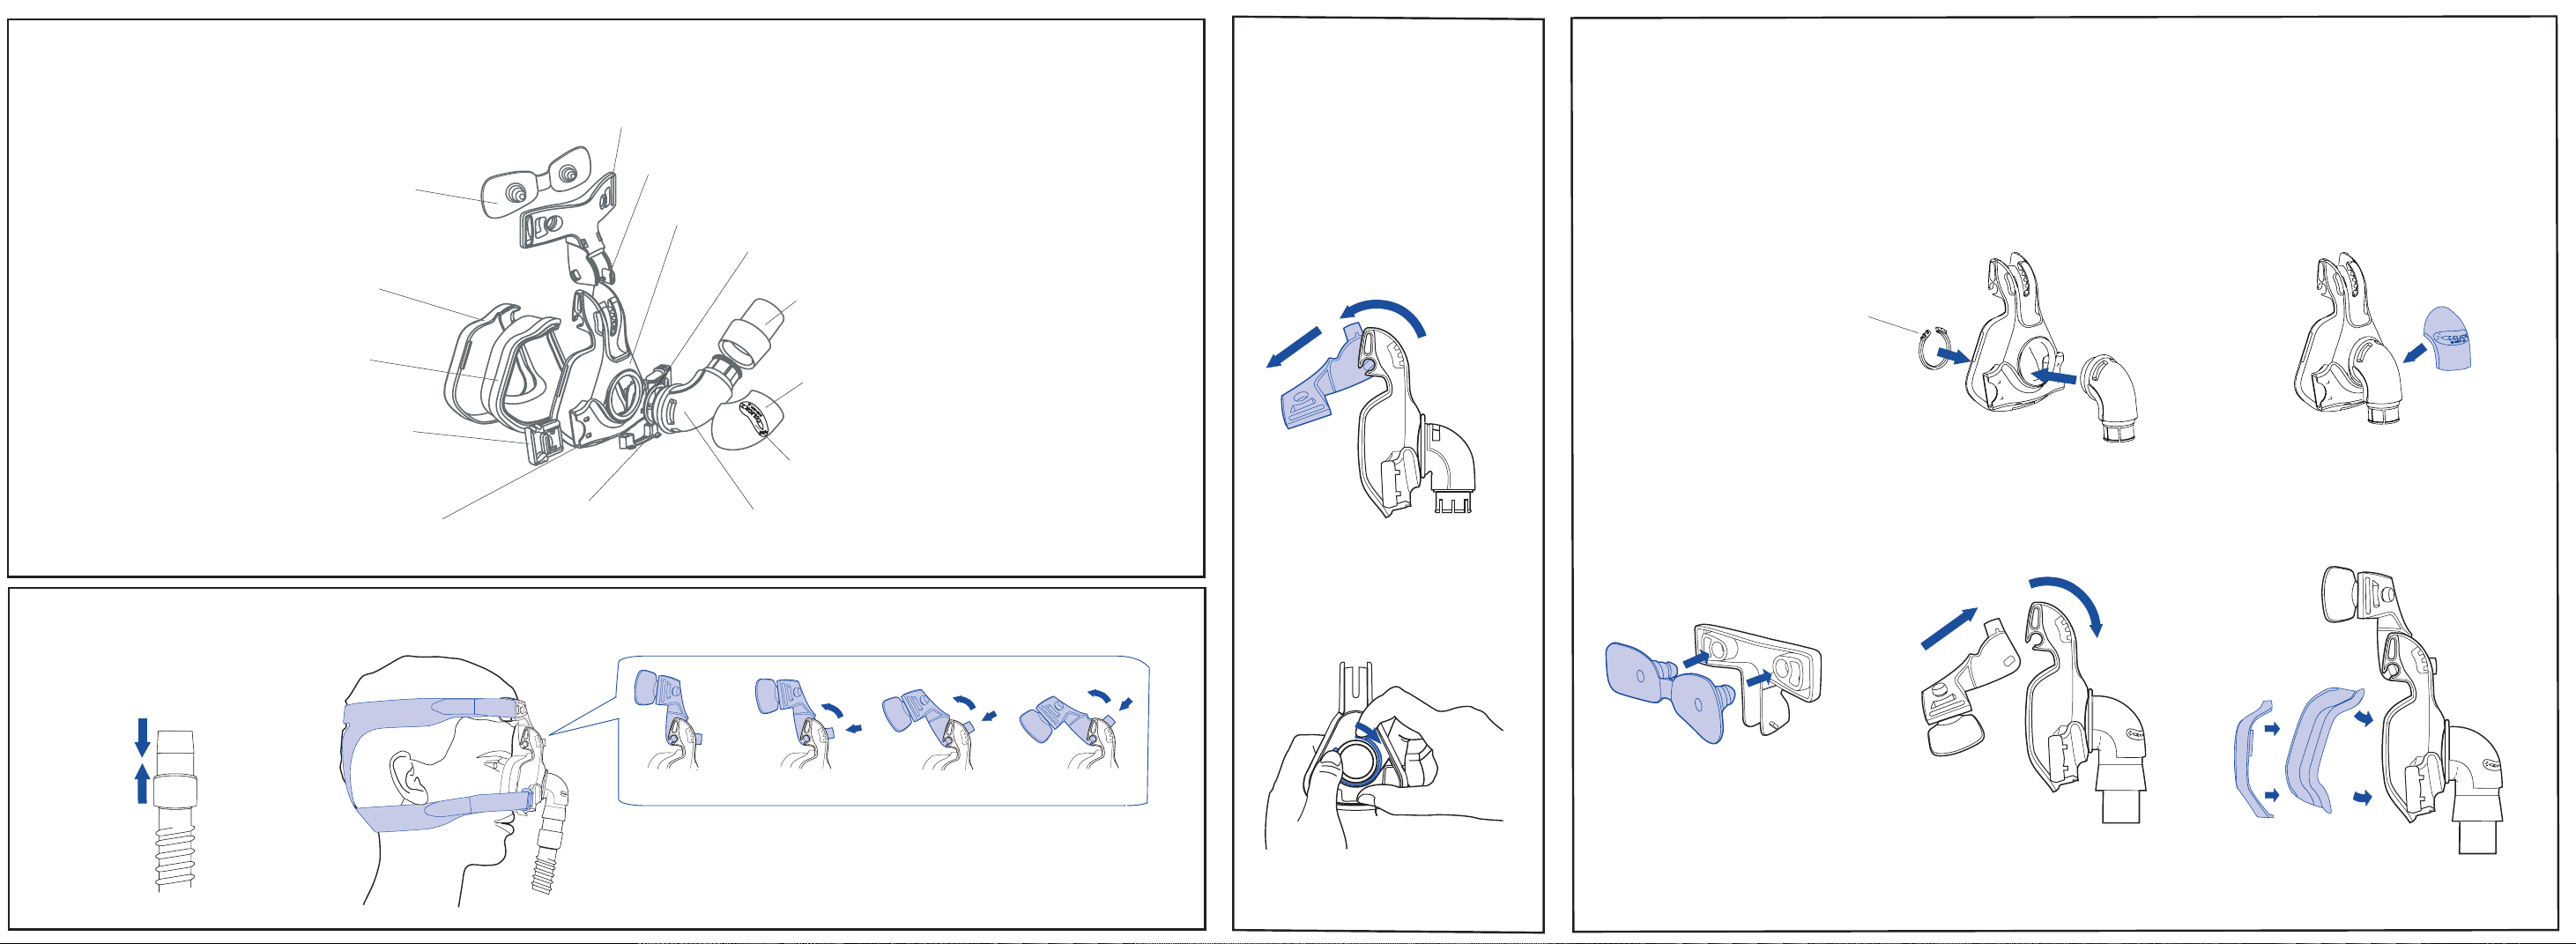
PARTS OF THE MASK
See section B on the illustrations sheet.
FITTING THE MASK
See section C on the illustrations sheet.
Note: Before fitting the mask, refer to the
section “Cleaning the Mask in the Home”.
1 Push the air tubing all the way onto the
swivel. The end of the air tubing and the
ridge of the swivel must completely
meet (Fig. C-1). Connect the other end
of the air tubing to your flow generator.
2 Place the cushion over your nose, pull
the headgear over your head and make
the straps pass below your ears.
Connect the other headgear clip to the
mask frame.
Use the Velcro
of the headgear. Do not overtighten the
straps (Fig. C-2).
3 The pads of the forehead support
should lightly touch your forehead when
the mask is in place.
Adjust the forehead support if required,
by moving it to one of the other tab
positions (Fig. C-2a). There are four tab
positions (1–4). To change a tab
position, first, loosen the headgear
straps. Then, press the forehead support
tab and move it upwards to the next
position (eg from position 1 move it to
position 2). Once again, gently tighten
the headgear straps.
4 Grasp the edges of the vent cover on
both sides of the “Click” sticker at the
same time. Firmly push the vent cover
onto the mask elbow to make sure it is
clicked securely in place.
5 Turn the flow generator on. Lie down
and check that the mask is comfortable
and there are no air leaks. If there are air
leaks, you may need to readjust the
Velcro straps (see Step 2) or forehead
support (see Step 3).
®
straps to adjust the fit
Page 7

Notes:
• If you are unable to resolve any leaks you
may need to try another cushion size.
• Select “Ultra” as the mask option when
using the U
LTRA MIRAGE II with ResMed
flow generators that have mask setting
options.
CAUTION
This mask is not compatible with those
AutoSet T
internal pressure sensor line. It is
compatible with all other ResMed
AutoSet
™
flow generators that have an
™
flow generators.
4 From the inside of the mask frame, hold
one side of the elbow clip in place and
release the other side of the clip
(Fig. D-2). Remove the clip and mask
elbow from the mask frame.
CLEANING THE MASK IN THE
OME
H
Notes:
• Wash the headgear before first time use,
as the dye may run. It is important to
always handwash the headgear.
• The headgear may be washed without
being disassembled.
ENGLISH
REMOVING THE MASK
To remove the mask, depress the tabs of
the headgear clips. This releases the
headgear clips from the mask frame. Pull
the mask and headgear away from your
head.
Notes:
• Do not pull the headgear off your head
without releasing the headgear clips first.
• Check that you can remove the headgear
clips or the headgear unaided.
DISASSEMBLING FOR CLEANING
See section D on the illustrations sheet.
1 Detach and separate the main air tubing,
headgear, headgear clips, swivel,
forehead pads, cushion clip, cushion and
ports cap.
2 Use your thumb on the side of the vent
cover to remove it from the mask
elbow.
3 Depress the forehead support tab and
move it past the top tab position. This
allows you to remove the forehead
support from the mask frame (Fig. D-1).
DAILY/AFTER EACH USE
Handwash the mask components in
lukewarm, soapy water. Use pure soap.
Rinse the components well and allow them
to air dry out of direct sunlight.
WEEKLY
Handwash the headgear in warm, soapy
water. Use pure soap. Rinse well and allow
it to air dry out of direct sunlight.
. CAUTIONS
• Do not use solutions containing
bleach, chlorine, alcohol, aromatics,
moisturisers, antibacterial agents, or
scented oils to clean any part of the
mask system or air tubing. These
solutions may cause damage and
reduce the life of the product.
• Do not expose any part of the mask
system or tubing to direct sunlight as
it may deteriorate.
• If any visible deterioration of a mask
component is apparent (cracking,
crazing, tears etc), the mask
component should be discarded and
replaced.
Page 8

CLEANING THE MASK BETWEEN
PATIENTS
The mask system is validated for
multipatient use. Clinicians should refer to
the Ultra Mirage II Nasal Mask Disinfection
Guide for details.
To clean the headgear between patients
use the method described in the previous
section “Cleaning the Mask in the Home”.
REASSEMBLING THE MASK
See section E on the illustrations sheet.
1 Insert the ports cap into the ports. Make
sure the tabs of the ports cap face away
from the mask.
2 Insert the mask elbow into the mask
frame and secure it with the elbow clip
on the inside of the frame (Fig. E-1). The
flat side of the elbow clip must face the
mask frame. If you have fitted the mask
elbow correctly, it should not move
when you try to firmly pull it away from
the frame.
3 Grasp the edges of the vent cover on
both sides of the “Click” sticker at the
same time. Firmly push the vent cover
onto the mask elbow to make sure it is
clicked securely in place (Fig. E-2).
4 Push the swivel onto the end of the
mask elbow.
5 Attach the forehead pads to the
forehead support by inserting the pad
plugs into the two holes on the back of
the forehead support (Fig E-3). Push the
pads firmly against the forehead support
to ensure that the pads fit securely into
the forehead support.
6 Reconnect the forehead support to the
mask frame. Depress the tab and move
the forehead support into one of the
four tab positions (Fig. E-4).
7 Fit the grooved edge of the nasal
cushion to the mask frame. Fit the top
section first, then work your way around
the mask, pushing the cushion onto the
frame, ensuring a good seal has been
achieved. Push the cushion clip over the
cushion onto the mask frame, ensuring it
clicks into place in all locations (Fig. E-5).
8 Connect the headgear clips to the mask
frame. Thread the headgear straps
through the slots on the forehead
support and the headgear clips. The
LTRA MIRAGE headgear label should
U
face outwards and be near your neck
when fitted. Fasten the Velcro straps.
TECHNICAL SPECIFICATIONS
PRESSURE–FLOW CURVE
See section A on the illustrations sheet.
DEAD SPACE INFORMATION
Dead space is the empty volume of the
mask up to the swivel.
The dead space of the mask varies
according to cushion sizes but is less than
135 mL.
Note: The manufacturer reserves the right
to change these specifications without notice.
REPLACEMENT PARTS
Part No. Item
16563 Cushion clip
16557 Cushion, Large
16558 Cushion, Shallow
16735 Cushion, Shallow-wide
16556 Cushion, Standard
16566 Elbow assembly
16572 Elbow clip (1 pk.)
16573 Elbow clip (10 pk.)
Page 9

Part No. Item
60123 Forehead pads (1 pk.)
60124 Forehead pads (10 pk.)
16590 Forehead support with pads
16595 Frame assembly
16733 Headgear, Standard
16118 Headgear, Small
16119 Headgear, Large
16569 Headgear clip (2 pk.)
16734 Headgear clip (10 pk.)
16560 Mask frame
16570 Ports cap/s (2 pk.)
16571 Ports cap/s (10 pk.)
16565 Swivel
16575 Vent cover
LIMITED WARRANTY
ResMed warrants that your ResMed mask
system, including its components: mask
frame, cushion, headgear, tubing and other
accessories (“Product”) shall be free from
defects in material and workmanship for a
period of ninety (90) days from the date of
purchase by the initial consumer.
For further details refer to the Warranty.
ENGLISH
Note: Translations are based on the English version in this guide. However, there may be minor
variations based on the disinfection/sterilisation procedures applicable in some countries.
ResMed has reviewed these changes and all procedures included here have been validated.
Page 10

Page 11
Ultra Mirage™ II Nasenmaske
DEUTSCH
Vielen Dank, dass Sie sich für die ResMed
U
LTRA MIRAGE
II NASENMASKE
™
entschieden haben.
Diese Maske ist ähnlich wie die
ursprüngliche U
ASENMASKE. Beide Masken weisen in
N
LTRA MIRAGE
™
etwa die gleichen Leistungsmerkmale auf.
Die neue Maske hat ein verbessertes
Stirnbauteil mit flexiblen Polstern, die sich
geschmeidig an die Stirnform anpassen.
Diese Bedienungsanleitung enthält
Informationen, die Sie zur korrekten
Benutzung der Maske benötigen.
VERWENDUNGSZWECK
Die ULTRA MIRAGE II NASENMASKE ist für
den mehrfachen Gebrauch durch
Erwachsene ausgelegt, die im Krankenhaus,
in der Schlafklinik oder zu Hause mit
kontinuierlich positivem Atemwegsdruck
(CPAP) oder einer Bilevel-Therapie
behandelt werden.
MEDIZINISCHE HINWEISE
Hinweis: Das Maskensystem ist latexfrei.
Wenn Sie gegen einen der
Maskenbestandteile in IRGENDEINER
WEISE allergisch sind, unterbrechen Sie die
Behandlung und konsultieren Sie Ihren
Schlaftherapeuten.
. WARNUNGEN UND
V
ORSICHTSHINWEISE
• Diese Maske sollte nur mit dem von
Ihrem Arzt oder Atemtherapeuten
empfohlenen CPAP- oder BilevelSystem verwendet werden. Eine Maske
sollte nur benutzt werden, wenn das
CPAP- bzw. Bilevel-System
eingeschaltet ist und ordnungsgemäß
funktioniert. Die Luftauslassöffnungen
dürfen niemals blockiert sein.
Erläuterung zur Warnung: CPAPoder Bilevel-Systeme sind für die
Verwendung mit Spezialmasken
vorgesehen, die mit integrierten oder
separat anzuschließenden
Luftauslassöffnungen ausgestattet sind,
um einen kontinuierlichen Luftfluss aus
der Maske heraus zu gewährleisten.
Wenn das CPAP- oder Bilevel-System
eingeschaltet ist und ordnungsgemäß
funktioniert, führt die vom
Flussgenerator in die Maske strömende
frische Luft die ausgeatmete Luft durch
die montierten Luftauslassöffnungen
aus der Maske heraus. Ist das CPAPoder Bilevel-System jedoch nicht in
Betrieb, wird unzureichend frische Luft
durch die Maske geführt und es kann
zur Rückatmung ausgeatmeter Luft
kommen. Die Rückatmung
ausgeatmeter Luft über mehrere
Page 12

Minuten hinweg kann u. U. zum
Ersticken führen. Diese Warnung
bezieht sich auf die meisten CPAP- bzw.
Bilevel-Modelle.
• Bei niedrigem Druck kann der Luftstrom
durch die Luftauslassöffnungen für das
Abführen von ausgeatmeter Luft aus
dem Schlauchsystem ungenügend sein.
Es besteht das Risiko der Rückatmung.
Erläuterung zur Warnung: Der Luftfluss
durch diese Auslassöffnungen ist bei
niedrigen Maskendrücken geringer
(siehe Druck-/Durchflusskurve in
Abschnitt A der Illustrationsseite). Um
eine Rückatmung zu verhindern, sollte
ein Maskendruck von mindestens
4 cm H
• Zur Vorbereitung auf einen neuen
O verwendet werden.
2
Patienten muss die Maske gereinigt und
desinfiziert/sterilisiert werden. Weitere
Informationen dazu finden Sie im
Abschnitt „Reinigung der Maske zur
Vorbereitung auf einen neuen
Patienten“.
• Wenn das CPAP- oder Bilevel-System
mit Sauerstoff verwendet wird, ist darauf
zu achten, dass die Sauerstoffzufuhr
abgeschaltet wird, wenn der
Flussgenerator außer Betrieb ist.
Erläuterung zur Warnung: Wenn die
Sauerstoffzufuhr eingeschaltet ist,
während das CPAP- bzw. BilevelSystem außer Betrieb ist, kann sich
Sauerstoff, der in die
Flussgeneratorschläuche geleitet wurde,
im Gehäuse ansammeln. In einem
CPAP- bzw. Bilevel-Gerät
angesammelter Sauerstoff kann eine
Brandgefahr darstellen. Diese Warnung
bezieht sich auf die meisten CPAP- bzw.
Bilevel-Flussgeneratoren.
• Während der Verwendung von
Sauerstoff bitte nicht rauchen.
Hinweis: Wird eine konstante Menge an
beigegebenem Sauerstoff zugeführt, ist die
Konzentration des eingeatmeten Sauerstoffs
je nach Druckeinstellung, Atemmuster des
Patienten, Maskentyp und Luftaustrittsrate
unterschiedlich.
TEILE DER MASKE
Siehe Abschnitt B des Illustrationsblattes.
ANLEGEN DER MASKE
Siehe Abschnitt C des Illustrationsblattes.
Hinweis: Lesen Sie bitte vor dem Anlegen
der Maske den Abschnitt „Reinigung der
Maske zu Hause“.
1 Schieben Sie den Hauptluftschlauch
ganz auf das Drehgelenk. Stellen Sie
sicher, dass zwischen Drehadapter und
Luftschlauch kein Zwischenraum bleibt
(Abb. C-1). Schließen Sie das andere
Ende des Luftschlauches an Ihren
Flussgenerator an.
2 Setzen Sie die Maske auf Ihre Nase,
öffnen Sie einen Kopfbandclip und
ziehen Sie die Kopfbänder vorsichtig
über Ihren Kopf. Achten Sie darauf, dass
die unteren Bänder unter den Ohren
entlang führen. Schließen Sie den
Kopfbandclip am Maskenhalter.
Passen Sie den Sitz des Kopfbandes an,
indem Sie die Klettverschlüsse lösen.
Ziehen Sie die Bänder nicht zu stramm
an (Abb. C-2).
3 Die Maske sitzt richtig, wenn die
Stirnpolster Ihre Stirn leicht berühren.
Wenn Sie den Sitz des Stirnbauteils
korrigieren möchten, schieben Sie den
Steg in eine der anderen Positionen.
(Abb. C-2a). Es gibt vier Stegpositionen
(1– 4). Um die Stegposition zu ändern,
lösen Sie zunächst die Kopfbänder.
Drücken Sie dann den Steg des
Stirnbauteils herunter und schieben Sie
Page 13

ihn nach oben in die nächste Position
(z. B. von Position 1 zu Position 2).
Ziehen Sie dann die Kopfbänder wieder
an.
4 Halten Sie die Abdeckung an beiden
Seiten des „Click“-Aufklebers fest.
Drücken Sie die Abdeckung der
Luftauslassöffnungen auf das Kniestück,
bis sie einrastet.
5 Schalten Sie den Flussgenerator ein.
Legen Sie sich hin und vergewissern Sie
sich, dass die Maske angenehm sitzt und
keine Leckagen auftreten. Bei Leckagen
müssen die Klettverschlüsse (Schritt 2)
oder gegebenenfalls der Sitz des
Stirnbauteils (Schritt 3) nochmals
korrigiert werden.
Hinweise:
• Wenn Sie nicht in der Lage sind, etwaige
Leckagen zu korrigieren, benötigen Sie
unter Umständen eine andere
Maskeneinsatzgröße.
• Wählen Sie „Ultra“ als Maskenoption aus,
wenn Sie die U
zusammen mit Flussgeneratoren von
ResMed benutzen, die über
Maskeneinstelloptionen verfügen.
LTRA MIRAGE II
VORSICHTSHINWEISE
Diese Maske ist nicht mit AutoSet T
Flussgeneratoren ohne externen
Drucksensorschlauch kompatibel. Sie
kann jedoch mit allen anderen ResMed
™
AutoSet
werden.
Flussgeneratoren verwendet
™
ABNEHMEN DER MASKE
Um die Maske abzunehmen, müssen Sie auf
den Verschluss am Kopfbandclip drücken.
Damit lösen Sie den Kopfbandclip vom
Maskenhalter. Ziehen Sie dann die Maske
und das Kopfband vom Kopf.
Hinweise:
• Ziehen Sie das Kopfband nicht vom Kopf,
ohne vorher die Kopfbandclips zu öffnen.
• Vergewissern Sie sich, dass Sie ohne Hilfe
die Kopfbandclips öffnen und das
Kopfband abnehmen können.
DEMONTAGE ZU
EINIGUNGSZWECKEN
R
Siehe Abschnitt D des Illustrationsblattes.
1 Nehmen Sie den Schlauch, das
Kopfband, die Kopfbandclips, den
Drehadapter, die Stirnpolster, den
Stützring, den Maskeneinsatz und die
Anschlusskappe ab.
2 Drücken Sie die Ventilabdeckung seitlich
mit dem Daumen vom Maskenkniestück
weg.
3 Drücken Sie den Steg des Stirnbauteils
herunter, und schieben Sie ihn über die
obere Stegposition. Anschließend
können Sie das Stirnbauteil vom
Maskenhalter abnehmen (Abb. D-1).
4 Halten Sie ein Ende des Sprengrings am
Kniestück von der Innenseite des
Maskenhalters fest, und lösen Sie die
andere Seite (Abb. D-2). Nehmen Sie
das Kniestück zusammen mit dem
Sprengring vom Maskenhalter ab.
REINIGUNG DER MASKE ZU
AUSE
H
Hinweise:
• Waschen Sie das Kopfband vor der ersten
Benutzung, da es abfärben könnte. Das
Kopfband darf nur von Hand gewaschen
werden.
• Das Kopfband kann gewaschen werden,
ohne dass es vorher auseinander gebaut
werden muss.
DEUTSCH
Page 14

TÄGLICH/NACH JEDEM GEBRAUCH
Waschen Sie die Maskenbestandteile von
Hand in einer warmen Seifenlauge.
Verwenden Sie dazu Kernseife. Die
Maskenteile gut abspülen und vor direktem
Sonnenlicht geschützt an der Luft trocknen
lassen.
WÖCHENTLICH
Waschen Sie das Kopfband von Hand in
einer warmen Seifenlauge. Verwenden Sie
dazu Kernseife. Gut abspülen und vor
direktem Sonnenlicht geschützt an der Luft
trocknen lassen.
. VORSICHTSHINWEISE
• Verwenden Sie weder chlor- oder
alkoholhaltige Reinigungsmittel noch
aromatische Lösungen, Bleichmittel,
Duftöle sowie feuchtigkeitsspendende
oder antibakterielle Mittel für die
Reinigung jeglicher Teile des
Maskensystems oder Luftschlauches.
Diese Mittel können das Material
beschädigen und somit die
Lebensdauer des Produktes
verkürzen.
• Alle Teile des Maskensystems bzw.
alle Schläuche sollten vor direkter
Sonneneinstrahlung geschützt werden,
da diese schädigend für das Produkt
sein kann.
• Weist eines der Maskenteile sichtbare
Verschleißerscheinungen auf (wie z. B.
Brüche, Risse oder andere
Verschleißerscheinungen), sollte
dieses entfernt und durch ein neues
ersetzt werden.
REINIGUNG DER MASKE ZUR
ORBEREITUNG AUF EINEN
V
NEUEN PATIENTEN
Das Maskensystem ist nachweislich für
Patienten wiederverwendbar. Weitere
Einzelheiten können vom Arzt in den
Hinweisen zur Desinfektion der Ultra Mirage
II Nasenmaske nachgelesen werden.
Reinigen Sie das Kopfband zur
Vorbereitung auf einen neuen Patienten
wie im vorherigen Abschnitt „Reinigung der
Maske zu Hause“ beschrieben.
WIEDERZUSAMMENBAU DER
ASKE
M
Siehe Abschnitt E des Illustrationsblattes.
1 Stecken Sie die Anschlusskappe in die
Anschlüsse. Achten Sie darauf, dass die
Stege der Anschlusskappe von der
Maske wegzeigen.
2 Stecken Sie das Kniestück in den
Maskenhalter, und sichern sie es mit
dem Sprengring an der Innenseite des
Maskenhalters (Abb. E-1). Die flache
Seite des Sprengrings muss zum
Maskenhalter weisen. Wenn das
Maskenkniestück richtig angebracht ist,
bewegt es sich auch dann nicht, wenn
Sie versuchen, es mit etwas Kraft vom
Maskenhalter wegzuziehen.
3 Halten Sie die Abdeckung an beiden
Seiten des „Click“-Aufklebers fest.
Drücken Sie die Ventilabdeckung auf das
Kniestück, bis sie einrastet (Abb. E-2).
4 Drücken Sie das Drehgelenk auf das
eine Ende des Maskenkniestücks.
5 Befestigen Sie die Stirnpolster am
Stirnbauteil, indem Sie die Polsterstöpsel
in die beiden Löcher an der Rückseite
des Stirnbauteils einführen (Abb. E-3).
Page 15

Drücken Sie die Polster fest auf das
Stirnbauteil, um einen sicheren Sitz zu
gewährleisten.
6 Bringen Sie das Stirnbauteil wieder am
Maskenhalter an. Drücken Sie den Steg
herunter und schieben Sie das
Stirnbauteil in eine der vier
Stegpositionen (Abb. E-4).
7 Beginnen Sie oben und drücken Sie
dann den Einsatz um die ganze Maske
herum auf den Maskenhalter, und
vergewissern Sie sich, dass er gut sitzt.
Sichern Sie den Maskeneinsatz mit dem
Maskeneinsatzclip am Maskenhalter.
Stellen Sie sicher, dass er an allen Stellen
einrastet (Abb. E-5).
8 Bringen Sie die Kopfbandclips am
Maskenhalter an. Ziehen Sie die
Kopfbänder durch die Schlitze am
Stirnbauteil und an den Kopfbandclips.
Das Etikett des U
LTRA MIRAGE-
Kopfbandes sollte nach außen zeigen
und im Nacken sitzen. Ziehen Sie die
Bänder mit den Klettverschlüssen an.
TECHNISCHE DATEN
DRUCK-FLUSS-KURVE
Siehe Abschnitt A des Illustrationsblattes.
ERSATZTEILE
Teilenr. Artikel
16563 Stützring
16557 Maskeneinsatz, Large
16558 Maskeneinsatz, Flach
16735 Maskeneinsatz, Flach-breit
16556 Maskeneinsatz, Standard
16566 Kniestück
16572 Kniestückclip (1 Stk./Pck.)
16573 Kniestückclip (10 Stk./Pck.)
60123 Stirnpolster (1 Stk./Pck.)
60124 Stirnpolster (10 Stk./Pck.)
16590 Stirnbauteil mit Polster
16595 Maskenhaltersatz
16733 Kopfband, Standard
16118 Kopfband, Small
16119 Kopfband, Large
16569 Stützring (2 Stk./Pck.)
16734 Stützring (10 Stk./Pck.)
16560 Maskenhalter
16570 Anschlusskappe/n (2 Stk./Pck.)
16571 Anschlusskappe/n (10 Stk./Pck.)
16565 Drehadapter
16575 Ventilabdeckung
DEUTSCH
INFORMATIONEN ZUM TOTRAUM
Der Totraum ist das Leervolumen der
Maske bis zum Drehadapter.
Der Totraum der Maske variiert je nach
Maskeneinsatzgröße, ist jedoch immer
kleiner als 135 ml.
Hinweis: Der Hersteller behält sich das
Recht vor, diese Technischen Daten ohne
Vorankündigung zu ändern.
BESCHRÄNKTE GARANTIE
ResMed sichert mit einer Haftungsperiode
von neunzig (90) Tagen ab Datum des
Kaufes durch den ersten Käufer zu, dass Ihr
ResMed Maskensystem, einschließlich aller
Komponenten wie Maskenhalter,
Maskeneinsatz, Kopfband, Schläuche und
anderes Zubehör („Produkt“), frei von
Material- und Verarbeitungsfehlern ist.
Weitere Einzelheiten entnehmen Sie bitte
den Garantiebedingungen.
Page 16

Hinweis: Die originale Version dieser Bedienungsanleitung ist die englische, von der alle
anderen übersetzt wurden. Die Texte können jedoch aufgrund der verschiedenen Desinfektions-/
Sterilisationsverfahren in verschiedenen Ländern geringfügige Unterschiede aufweisen. ResMed
hat diese Unterschiede geprüft und alle hier beschriebenen Verfahren wurden bestätigt.
Page 17

Masque nasal Ultra Mirage™ II
Merci d'avoir choisi le MASQUE NASAL
U
LTRA MIRAGE
II ResMed.
™
Ce masque est similaire au premier
MASQUE NASAL ULTRA MIRAGE
, et leur
™
performance est identique. La nouvelle
version du masque comprend un support
frontal amélioré avec des tampons
flexibles qui lui permettent de s'adapter à
la forme de votre front.
Ce guide utilisateur vous procure toutes
les informations dont vous avez besoin
pour utiliser votre masque correctement.
USAGE PREVU
Le MASQUE NASAL ULTRA MIRAGE II est un
masque pouvant être utilisé sur plusieurs
patients. Il est prévu pour le traitement par
pression positive continue (PPC) ou à
deux niveaux de pression des adultes en
milieu hospitalier, clinique et/ou à domicile.
INFORMATIONS MEDICALES
Remarque : le masque ne contient pas de
latex. En cas de réaction QUELCONQUE à
l’un des composants du masque, arrêtez le
traitement et consultez votre spécialiste du
sommeil.
. AVERTISSEMENTS ET
PRECAUTIONS
• Ce masque doit être utilisé uniquement
avec l’appareil de PPC ou d’aide
inspiratoire avec PEP recommandé par
votre médecin ou votre pneumologue.
Un masque ne doit être porté que si
l’appareil de PPC ou d’aide inspiratoire
avec PEP est sous tension et s’il
fonctionne correctement. Les orifices
de ventilation ne doivent jamais être
obstrués.
Explication de cet avertissement : les
appareils de PPC et d’aide inspiratoire
avec PEP ont été conçus pour une
utilisation avec des masques spécifiques
possédant des raccords avec des
orifices de ventilation ou d’autres
dispositifs de ventilation afin de
permettre l'écoulement continu de l'air
hors du masque. Lorsque l’appareil de
PPC ou d’aide inspiratoire avec PEP est
sous tension et qu’il fonctionne
correctement, de l’air propre
provenant de l’appareil expulse l’air
expiré via les orifices de ventilation du
masque. Cependant, lorsque l’appareil
de PPC ou d’aide inspiratoire avec PEP
n’est pas en marche, l’air n’est pas
renouvelé dans le masque et l’air expiré
peut être réinhalé. Dans certaines
circonstances, la réinhalation de l’air
FRANÇAIS
Page 18

expiré pendant une durée supérieure à
quelques minutes peut entraîner la
suffocation. Cet avertissement
s’applique à la plupart des appareils de
PPC et d’aide inspiratoire avec PEP.
•
Lorsque les pressions PPC sont faibles, le
débit aux orifices de ventilation peut
s’avérer insuffisant pour expulser tous les
gaz expirés hors du circuit respiratoire.
Une réinhalation peut se produire.
Explication de cet avertissement :
le
débit aux orifices de ventilation diminue
avec les pressions au masque (voir
courbe Pression/Débit de la section
A
de la fiche d'illustrations). Pour éviter
toute réinhalation, il est recommandé
d’utiliser une pression au masque de
O minimum.
4 cm H
2
• Le masque doit être nettoyé et
désinfecté/stérilisé entre les patients.
Veuillez vous référer à la section
« Nettoyage du masque entre les
patients » pour plus de détails.
• Si de l’oxygène est utilisé avec l’appareil
de PPC ou d’aide inspiratoire avec PEP,
l’alimentation en oxygène doit être
fermée lorsque l’appareil n’est pas en
marche.
Explication de cet avertissement :
lorsque l’appareil de PPC ou d'aide
inspiratoire avec PEP n’est pas en
marche et que l’alimentation en
oxygène n’est pas fermée, l’oxygène
délivré dans le circuit du ventilateur peut
s’accumuler dans l’appareil. L’oxygène
accumulé dans un appareil de PPC ou
d’aide inspiratoire avec PEP crée un
risque d’incendie. Cet avertissement
s’applique à la plupart des appareils de
PPC et d’aide inspiratoire avec PEP.
• Eviter de fumer lorsque de l’oxygène est
utilisé.
Remarque : lorsque de l’oxygène
additionnel est délivré à un débit fixe, la
concentration de l’oxygène inhalé varie en
fonction des réglages de pression, de la
respiration du patient, du masque sélectionné
ainsi que du niveau de fuite.
COMPOSANTS DU MASQUE
Voir la section B de la fiche d'illustrations.
MISE EN PLACE DU MASQUE
Voir la section C de la fiche d'illustrations.
Remarque : avant de mettre le masque en
place, veuillez vous référer à la rubrique
« Nettoyage du masque à domicile ».
1 Poussez le circuit respiratoire sur la
pièce pivotante jusqu'à la butée.
L'extrémité du circuit respiratoire et le
bord de la pièce pivotante doivent être
bord à bord (Fig. C-1). Raccordez
l'autre extrémité du circuit respiratoire à
votre appareil.
2 Placez la bulle sur votre nez, faites passer
le harnais par-dessus votre tête et les
sangles inférieures sous vos oreilles.
Fixez l’autre clip du harnais à l’entourage
rigide.
Utilisez les attaches Velcro
ajuster le harnais. Ne serrez pas trop les
attaches (Fig. C-2).
3 Les tampons du support frontal
devraient reposer légèrement sur votre
front lorsque le masque est en place.
Si nécessaire, ajustez la position du
support frontal en le mettant sur l'une
des positions disponibles (Fig. C-2a). Il y
en a quatre (1– 4). Pour changer le
support frontal de position, commencez
par desserrer légèrement les sangles du
harnais. Ensuite, appuyez sur la languette
du support frontal et mettez-la dans la
position suivante (p. ex. faites-la passer
de la position 1 à la position 2). De
®
pour
Page 19

nouveau, serrez légèrement les sangles
du harnais.
4 Prenez le cache des orifices de
ventilation par les bords, de chaque côté
de l'autocollant “Click”. Poussez
fermement le cache sur le coude du
masque pour qu'il se verrouille bien en
place.
5 Mettez l’appareil sous tension. Allongez-
vous et vérifiez que le masque est
confortable et qu’il n’y a aucune fuite
d’air. En cas de fuites, vous devrez
réajuster les attaches Velcro
(voir Etape 2) ou le support frontal
(voir Etape 3).
Remarques :
• Si les fuites persistent, essayez une autre
taille de bulle.
• Lorsque vous utilisez le MASQUE NASAL
LTRA MIRAGE II avec des appareils
U
ResMed disposant d'une fonction de
sélection du masque, sélectionnez “Ultra”
comme option de masque.
ATTENTION
Ce masque n'est pas compatible avec les
AutoSet T
pression interne. Il est compatible avec
tous les autres appareils de la gamme
AutoSet
™
possédant une prise de
™
ResMed.
RETRAIT DU MASQUE
Pour retirer le masque, appuyez sur les
pattes des clips du harnais. Les clips du
harnais se dégagent de l’entourage rigide.
Retirez le masque et le harnais.
Remarques :
• N’essayez pas de retirer le harnais avant
d’avoir détaché ses clips.
• Vérifiez que vous êtes en mesure de
détacher les clips du harnais ou de retirer
le harnais sans l'aide de personne.
DEMONTAGE POUR LE
NETTOYAGE
Voir la section D de la fiche d'illustrations.
1 Détachez et séparez le circuit
respiratoire, le harnais, les clips du
harnais, la pièce pivortante, les tampons
frontaux, le clip de la bulle, la bulle et les
bouchons d’entrée.
2 Retirez le cache des orifices de
ventilation du coude du masque à l'aide
du pouce.
3 Appuyez sur la languette du support
frontal et faites-la passer en position
supérieure. Cela vous permet de retirer
complètement le support frontal de
l’entourage rigide (Fig. D-1).
4 En procédant de l’intérieur de
l’entourage rigide, maintenez un côté du
clip du coude en place et dégagez l’autre
côté (Fig. D-2). Retirez le clip et le
coude du masque de l’entourage rigide.
NETTOYAGE DU MASQUE A
DOMICILE
Remarques :
• Lavez le harnais avant la première
utilisation car il risque de déteindre. Il est
important de toujours laver le harnais à la
main.
• Il n’est pas nécessaire de démonter le
harnais pour le nettoyer.
QUOTIDIEN/APRES CHAQUE
UTILISATION
Lavez les composants du masque à la main
dans de l’eau tiède savonneuse. Utilisez du
savon pur. Rincez tous les composants
soigneusement et laissez-les sécher à l’abri
de la lumière directe du soleil.
FRANÇAIS
Page 20

HEBDOMADAIRE
Lavez le harnais à la main dans de l’eau tiède
savonneuse. Utilisez du savon pur. Rincez
soigneusement et laissez-le sécher à l’abri
de la lumière directe du soleil.
. ATTENTION
• Ne pas utiliser de solutions contenant
de l’eau de Javel, du chlore, de l’alcool
ou des aromates, ni des agents
hydratants ou antibactériens ni
d’huiles parfumées pour nettoyer les
composants du masque ou le circuit
respiratoire. Ils risquent
d’endommager le produit et de
réduire sa durée de vie.
• Ne pas exposer les composants du
masque ou du circuit respiratoire à la
lumière directe du soleil au risque de
les détériorer.
• En cas de détérioration visible d’un des
composants du masque (p. ex. fissures,
fendillements, déchirures, etc.), le
composant en question doit être jeté
et remplacé.
NETTOYAGE DU MASQUE ENTRE
LES PATIENTS
Le masque est validé pour une utilisation
sur plusieurs patients. Les cliniciens doivent
se référer au Guide de désinfection du
masque nasal Ultra Mirage II pour de plus
amples informations.
Pour nettoyer le harnais entre les patients,
suivez l’une des méthodes décrites dans la
section précédente « Nettoyage du
masque à domicile ».
REMONTAGE DU MASQUE
Voir la section E de la fiche d'illustrations.
1 Insérez les bouchons d’entrée dans les
ports du masque. Vérifiez que les
languettes des bouchons d’entrée sont
orientées vers l’extérieur du masque.
2 Introduisez le coude du masque dans
l’entourage rigide et fixez-le de
l’intérieur de l’entourage rigide à l’aide
du clip du coude (Fig. E-1). La partie
plate du clip du coude doit se trouver
face à l’entourage rigide. Si le coude est
correctement en place, il ne doit pas
bouger lorsque vous essayez de le
retirer de l’entourage rigide en tirant
dessus.
3 Prenez le cache des orifices de
ventilation par les bords, de chaque côté
de l'autocollant “Click”. Poussez
fermement le cache sur le coude du
masque pour qu'il se verrouille bien en
place (Fig. E-2).
4 Poussez la pièce pivotante sur
l'extrémité du coude du masque.
5 Fixez les tampons frontaux au support
frontal en insérant les tiges des tampons
dans les deux trous au dos du support
frontal (Fig. E-3). Pressez fermement les
tampons contre le support frontal pour
vous assurer qu’ils sont bien en place.
6 Remettez le support frontal sur
l’entourage rigide. Appuyez sur la
languette du support frontal et mettez le
support dans l’une des quatre positions
(Fig. E-4).
7 Fixez le bord à rainure de la bulle nasale
à l’entourage rigide. Commencez par
monter la section supérieure, puis le
contour du masque tout en poussant la
bulle sur l’entourage rigide et en vous
assurant d’obtenir une bonne
étanchéité. Fixez ensuite le clip de la
bulle à l’entourage rigide en le faisant
Page 21

passer par-dessus la bulle tout en vous
assurant qu’il se verrouille partout en
position (Fig. E-5).
8 Fixez les clips du harnais à l’entourage
rigide. Faites passer les sangles du
harnais dans les fentes du support
frontal et les clips du harnais. L’étiquette
du harnais U
LTRA MIRAGE doit être
tournée vers l’extérieur et se trouver
près de votre cou lorsque le masque est
en place. Serrez les attaches Velcro.
CARACTERISTIQUES
COURBE PRESSION/DEBIT
Voir la section A de la fiche d'illustrations.
INFORMATION CONCERNANT
L’ESPACE MORT
L’espace mort correspond au volume vide
entre le masque et la pièce pivotante.
L'espace mort du masque varie en fonction
de la taille de bulle mais est inférieur à
135 ml.
Remarque : le fabricant se réserve le droit
de modifier ces caractéristiques sans
notification préalable.
PIECES DE RECHANGE
No. de
pièce
16563 Clip de la bulle
16557 Bulle, Large
16558 Bulle, Shallow
16735 Bulle, Shallow-large
16556 Bulle, Standard
Article
No. de
pièce
16566 Coude
16572 Clip du coude (par 1)
16573 Clip du coude (par 10)
60123 Tampons frontaux (par 1)
60124 Tampons frontaux (par 10)
16590 Support frontal avec tampons
16595 Entourage rigide
16733 Harnais, Standard
16118 Harnais, Petit
16119 Harnais, Large
16569 Clip du harnais (par 2)
16734 Clip du harnais (par 10)
16560 Entourage rigide
16570 Bouchon(s) d'entrée (par 2)
16571 Bouchon(s) d'entrée (par 10)
16565 Pièce pivotante
16575 Cache des orifices de
Article
ventilation
GARANTIE LIMITEE
ResMed garantit votre masque ResMed, y
compris ses composants, à savoir
l'entourage rigide, la bulle, le harnais, le
circuit respiratoire et les autres accessoires
(« Produit »), contre tout défaut de
matériaux et de main-d’œuvre pour une
période de quatre-vingt-dix (90) jours à
compter de la date d’achat par le client
d’origine.
Pour plus de détails, veuillez vous référer à
la garantie.
FRANÇAIS
Remarque : les traductions sont basées sur la version anglaise de ce guide. Néanmoins, des
variations mineures peuvent exister en fonction des procédures de désinfection/stérilisation en
vigueur dans chaque pays. ResMed a évalué ces variations et toutes les procédures incluses ont
été validées.
Page 22

Page 23

Maschera nasale Ultra Mirage™ II
Grazie per avere scelto la maschera nasale
U
LTRA MIRAGE
II DI RESMED.
™
Questa maschera è simile alla maschera
nasale U
LTRA MIRAGE
, e le sue
™
prestazioni sono ad essa equivalenti. Il
design della nuova maschera comprende
un supporto frontale più sofisticato con
imbottiture flessibili che si adattano alla
conformazione della fronte.
Questa guida per l’utente fornisce tutte le
informazioni necessarie per fare un uso
corretto della maschera.
INDICAZIONI PER L’USO
La maschera nasale ULTRA MIRAGE II è
indicata per l’uso multipaziente da parte di
pazienti adulti a cui sia stata prescritta
terapia a pressione positiva continua alle
vie aeree (CPAP) o bilevel presso un
ospedale, una clinica e/o il proprio
domicilio.
INFORMAZIONI MEDICHE
Nota: La maschera non contiene lattice.
Qualora si riscontri una QUALSIASI reazione
allergica in seguito al contatto con
componenti della maschera, interrompere
l’uso e consultare il proprio terapista del
sonno.
. AVVERTENZE E PRECAUZIONI
• La maschera va utilizzata solo con i
sistemi CPAP o bilevel consigliati dal
proprio medico o specialista nella cura
dei disturbi respiratori. La maschera
non va usata a meno che il sistema
CPAP o bilevel non sia acceso e
funzioni correttamente. I fori per
l’esalazione non vanno mai ostruiti.
Spiegazione dell’avvertenza: I sistemi
CPAP e bilevel sono concepiti per
essere utilizzati con speciali maschere
dotate di connettori che presentano
fori o dispositivi per l’esalazione tali da
permettere il flusso continuo dell’aria
fuori dalla maschera. Quando
l’apparecchio CPAP o bilevel è acceso
e funziona correttamente, il flusso di
nuova aria da esso generato permette
di eliminare l’aria espirata attraverso il
foro per l’esalazione della maschera ad
esso collegata. Tuttavia, quando
l’apparecchio CPAP o bilevel non è in
funzione, il flusso di nuova aria
attraverso la maschera diventa
insufficiente e può verificarsi la
reinalazione dell’aria precedentemente
espirata. L’inspirazione dell’aria già
espirata per più di qualche minuto può,
in alcuni casi, causare il soffocamento.
Questa avvertenza vale per la maggior
parte dei sistemi CPAP e bilevel.
ITALIANO
Page 24

• Alle basse pressioni CPAP, il flusso
attraverso il foro per l'esalazione può
risultare insufficiente a liberare
completamente il gas espirato dal tubo.
In questo caso potrebbe verificarsi
l'inspirazione di una piccola quantità di
aria già espirata.
Spiegazione dell’avvertenza: Alle
pressioni di maschera più basse, il flusso
attraverso il foro per l’esalazione è
inferiore (vedere la curva di pressione e
flusso nella sezione A del foglio delle
illustrazioni). Per evitare la respirazione
dell'aria precedentemente espirata si
consiglia di mantenere una pressione di
maschera di almeno 4 cmH
• La maschera va pulita e disinfettata/
sterilizzata se riutilizzata con un altro
paziente. Vedere la sezione “Pulizia della
maschera tra un paziente e l’altro” per
maggiori dettagli.
• Se si utilizza un apparecchio CPAP o
bilevel insieme ad ossigeno, è necessario
spegnere il flusso d’ossigeno quando il
generatore di flusso non è in funzione.
Spiegazione dell’avvertenza: Se si lascia
acceso il flusso d’ossigeno ad
apparecchio CPAP o bilevel spento, la
quantità d’ossigeno erogata nel tubo di
ventilazione può accumularsi all’interno
del generatore di flusso. L’ossigeno
accumulato all’interno dell’apparecchio
CPAP o bilevel può causare il rischio di
incendio. Questa avvertenza vale per la
maggior parte dei generatori di flusso
CPAP e bilevel.
• Si prega di non fumare quando
l’ossigeno è in uso.
O.
2
Nota: Ad un flusso fisso di ossigeno
supplementare, la concentrazione
dell’ossigeno inspirato varia a seconda delle
impostazioni di pressione, dell’andamento
della respirazione del paziente, della
maschera scelta e del coefficiente di perdite.
PARTI DELLA MASCHERA
Vedere la sezione B del foglio delle
illustrazioni.
COME INDOSSARE LA
MASCHERA
Vedere la sezione C del foglio delle
illustrazioni.
Nota: Prima di indossare la maschera,
consultare la sezione “Pulizia della maschera
a domicilio”.
1 Spingere il tubo dell’aria fino in fondo nel
giunto rotante. La parte terminale deve
venire a contatto con il rilievo sul giunto
rotante (Fig. C-1). Collegare l’altra
estremità del tubo principale dell'aria al
generatore di flusso.
2 Sistemarsi il cuscinetto sul naso, farsi
passare il copricapo sopra la testa e
verificare che le cinghie passino sotto le
orecchie. Collegare l'altro fermaglio del
copricapo al telaio della maschera.
Usare le cinghie di Velcro® per regolare
il copricapo, senza stringerle troppo
(Fig. C-2).
3 Le imbottiture del supporto frontale
devono toccare leggermente la fronte
quando la maschera è in posizione.
Regolare il supporto frontale se
necessario spostandolo in una delle altre
fessure disponibili (Fig. C-2a). Le
posizioni in totale sono quattro (1– 4).
Per cambiare posizione, per prima cosa
occorre allentare le cinghie del
copricapo. Premere quindi la linguetta
del supporto frontale e spostarla verso
l’alto fino alla posizione successiva
(ad esempio dalla 1 alla 2). Stringere
nuovamente con delicatezza le cinghie
del copricapo.
Page 25

4 Afferrare contemporaneamente
entrambi i bordi del coperchio del foro
per l’esalazione ai lati dell’adesivo
“Click”. Spingere con fermezza il
coperchio del foro per l’esalazione sul
gomito della maschera, assicurandosi di
avere udito lo scatto di posizionamento.
5 Accendere il generatore di flusso.
Sdraiarsi e verificare che la maschera sia
confortevole e che non ci siano perdite
d'aria. Se vi sono perdite d'aria potrebbe
essere necessario regolare nuovamente
le cinghie di velcro (vedi passaggio 2) o
il supporto frontale (vedi passaggio 3).
Note:
• Se non si è in grado di porre rimedio alle
perdite dalla maschera, provare un
cuscinetto di diversa misura.
• Selezionare l’opzione di maschera “Ultra”
quando si utilizza la maschera
LTRA MIRAGE II con generatori di flusso
U
ResMed dotati di tale opzione.
PRECAUZIONE
La maschera non è compatibile con i
generatori di flusso AutoSet T
sensore interno della pressione. Essa è
compatibile con tutti gli altri generatori
™
AutoSet
di ResMed.
™
dotati di
• Accertarsi di essere in grado di rimuovere
da soli il fermaglio del copricapo o il
copricapo stesso.
SMONTAGGIO PER LA PULIZIA
Vedere la sezione D del foglio delle
illustrazioni.
1 Staccare e separare il tubo principale
dell’aria, il copricapo, i fermagli del
copricapo, il giunto rotante, le
imbottiture frontali, il fermaglio del
cuscinetto, il cuscinetto e il coperchio
delle prese.
2 Fare leva col pollice sul lato del
coperchio del foro per l’esalazione per
staccarlo dal gomito della maschera.
3 Premere la linguetta del supporto
frontale e spingerla oltre la fessura
superiore. Questo consente di staccare
il supporto frontale dal telaio della
maschera (Fig. D-1).
4 Dall’interno del telaio della maschera,
tenere fermo un lato del fermaglio del
gomito e staccare delicatamente l’altro
lato (Fig. D-2). Staccare il fermaglio e il
gomito dal telaio della maschera.
PULIZIA DELLA MASCHERA A
DOMICILIO
ITALIANO
COME TOGLIERSI LA MASCHERA
Per togliersi la maschera, premere le
linguette dei fermagli del copricapo. Ciò
farà sì che i fermagli si stacchino dal telaio
della maschera. A questo punto sarà
possibile sfilarsi maschera e copricapo dalla
testa.
Note:
• Non sfilarsi il copricapo dalla testa senza
averne prima staccato uno dei fermagli.
Note:
• Lavare il copricapo prima di utilizzarlo per
la prima volta, in quanto esso potrebbe
scolorire. È importante che il copricapo sia
sempre lavato a mano.
• Il copricapo può essere lavato senza
essere smontato.
Page 26

OPERAZIONI QUOTIDIANE/DOPO
CIASCUN USO
Lavare a mano i componenti della
maschera usando acqua tiepida e sapone.
Utilizzare sapone puro. Sciacquare
accuratamente i componenti e lasciarli
asciugare all'aria e al riparo dalla luce solare
diretta.
OPERAZIONI SETTIMANALI
Lavare a mano il copricapo in acqua calda e
sapone. Utilizzare sapone puro. Sciacquare
bene e lasciare asciugare all'aria e al riparo
dalla luce solare diretta.
. PRECAUZIONI
• Per la pulizia delle parti della maschera
e del tubo dell’aria, è sconsigliato l’uso
di soluzioni a base di candeggina,
cloro, alcool o aromi, olî profumati, o
prodotti idratanti o antibatterici. Tali
soluzioni possono causare danni al
prodotto e ridurne la durata.
• Non esporre nessuno dei componenti
del sistema di maschera o della
tubazione alla luce solare diretta
poiché potrebbero deteriorarsi.
• In caso di deterioramento visibile (ad
esempio incrinature, screpolature,
strappi, ecc.) di un componente della
maschera, esso va gettato e sostituito.
PULIZIA DELLA MASCHERA TRA
UN PAZIENTE E L'ALTRO
L’uso della maschera con pazienti diversi è
ammesso. Per maggiori dettagli si invita il
medico a consultare la Guida alla
disinfezione della maschera nasale Ultra
Mirage II.
Per pulire il copricapo tra un paziente e
l’altro, seguire la procedura descritta nella
sezione precedente, “Pulizia della maschera
a domicilio”.
RIASSEMBLAGGIO DELLA
MASCHERA
Vedere la sezione E del foglio delle
illustrazioni.
1 Inserire il coperchio delle prese per
l'esalazione nelle prese stesse.
Assicurarsi che le linguette del
coperchio delle prese siano rivolte verso
l'esterno rispetto alla maschera.
Inserire il gomito nel telaio della
2
maschera ed assicurarlo con l’apposito
fermaglio alla parte interna del telaio
(Fig. E-1)
gomito deve essere orientato in
direzione della maschera. Se il gomito è
inserito correttamente, esso non si
muove quando lo si tira con forza in
direzione opposta al telaio.
3
Afferrare contemporaneamente
entrambi i bordi del coperchio del foro
per l’esalazione ai lati dell’adesivo “Click”.
Spingere con fermezza il coperchio del
foro per l’esalazione sul gomito della
maschera, assicurandosi di avere udito lo
scatto di posizionamento
4
Spingere il giunto rotante sull’estremità
del gomito della maschera.
5
Attaccare le imbottiture frontali al
supporto frontale inserendo i loro tasselli
nei due fori sulla parte posteriore del
supporto
fermezza le imbottiture contro il
supporto frontale, in modo da assicurare
che siano ben salde.
6
Riattaccare il supporto frontale al telaio
della maschera. Premere la linguetta e
posizionare il supporto frontale in una
delle quattro fessure a disposizione
(Fig. E-4)
. Il lato piatto del fermaglio del
(Fig. E-2)
(Fig E-3)
.
. Spingere con
.
Page 27

7
Inserire il lato scanalato del cuscinetto
nasale nel telaio della maschera. Inserire
prima il lato superiore e seguire poi il
contorno della maschera spingendo il
cuscinetto nel telaio e verificandone la
tenuta. Fissare quindi il cuscinetto alla
maschera con l’apposito fermaglio,
assicurandosi che scatti in posizione
lungo tutto il suo profilo
(Fig. E-5)
.
8 Collegare i fermagli del copricapo al
telaio della maschera. Infilare le cinghie
del copricapo nelle fessure del supporto
frontale della maschera e dei fermagli
del copricapo. L’etichetta
LTRA MIRAGE sul copricapo deve
U
risultare rivolta verso l’esterno e
posizionata accanto al proprio collo una
volta che la maschera è stata indossata.
Stringere le cinghie di velcro.
SPECIFICHE TECNICHE
CURVA DI PRESSIONE–FLUSSO
Vedere la sezione A del foglio delle
illustrazioni.
INFORMAZIONI SULLO SPAZIO
MORTO
Lo spazio morto è il volume vuoto della
maschera fino al giunto rotante.
Lo spazio morto della maschera varia
secondo le misure dei cuscinetti, ma è
comunque inferiore a 135 ml.
Nota: Il produttore si riserva il diritto di
cambiare queste specifiche senza preavviso.
PARTI DI RICAMBIO
N° parte Parte
16563 Fermaglio del cuscinetto
16557 Cuscinetto, Large
16558 Cuscinetto, Shallow
16735 Cuscinetto, Shallow-wide
N° parte Parte
16556 Cuscinetto, Standard
16566 Insieme dei componenti del
gomito
16572 Fermaglio del gomito (1 per cfz.)
16573 Fermaglio del gomito
(10 per cfz.)
60123 Imbottiture frontali (1 per cfz.)
60124 Imbottiture frontali (10 per cfz.)
16590 Supporto frontale con
imbottiture
16595 Complesso del telaio
16733 Copricapo, Standard
16118 Copricapo, Small
16119 Copricapo, Large
16569 Fermaglio del copricapo
(2 per cfz.)
16734 Fermaglio del copricapo
(10 per cfz.)
16560 Telaio della maschera
16570 Coperchi delle porte (2 per cfz.)
16571 Coperchi delle porte
(10 per cfz.)
16565 Giunto rotante
16575 Coperchio del foro per
l'esalazione
GARANZIA LIMITATA
ResMed garantisce la maschera e i suoi
componenti, vale a dire telaio, cuscinetto,
copricapo, tubazione e altri accessori (“il
prodotto”), da difetti dei materiali o di
fabbricazione per un periodo di novanta
(90) giorni a partire dalla data di acquisto da
parte del cliente originale.
Per maggiori dettagli vedere la Garanzia.
ITALIANO
Page 28

Nota: Le traduzioni sono basate sulla versione inglese di questa guida. Tuttavia, potrebbero
esservi piccole discrepanze dovute alle procedure di disinfezione/sterilizzazione in uso in alcuni
paesi. ResMed ha esaminato queste differenze e tutte le procedure incluse sono state
omologate.
Page 29

Mascarilla Nasal Ultra Mirage™ II
Le agradecemos que haya elegido la
Mascarilla Nasal U
ESMED.
R
LTRA MIRAGE
II DE
™
Esta mascarilla es similar a la Mascarilla
Nasal original U
LTRA MIRAGE
y ambas
™
mascarillas son de rendimiento
equivalente. La nueva mascarilla
actualizada incluye un mejorado apoyo
para la frente con almohadillas flexibles
que se adaptan a la forma de su frente.
Esta guía del usuario le proporciona la
información que necesita para el uso
correcto de su mascarilla.
USO INDICADO
La Mascarilla Nasal ULTRA MIRAGE II ha
sido diseñada para uso por parte de
múltiples pacientes adultos a los que se les
ha indicado tratamiento con presión
positiva y continua en las vías respiratorias
(CPAP) o tratamiento binivel, tanto en el
medio hospitalario como en clínicas y/o en
el domicilio.
INFORMACIÓN MÉDICA
Nota: El sistema de mascarilla no contiene
materiales de látex. Si presenta CUALQUIER
TIPO de reacción a alguna parte del sistema
de mascarilla, suspenda su uso y consulte a
su terapeuta del sueño.
. ADVERTENCIAS Y
P
RECAUCIONES
• Esta mascarilla sólo debe usarse con
sistemas CPAP o binivel recomendados
por su médico o terapeuta respiratorio.
No debe utilizarse una mascarilla salvo
que el sistema CPAP o binivel esté
encendido y funcionando
correctamente. El orificio de ventilación
no deberá estar nunca bloqueado.
Explicación de la Advertencia: Los
sistemas CPAP y binivel se han
diseñado para ser utilizados con
mascarillas especiales con conectores
que pueden tener orificios de salida o
una ventilación que permita el flujo de
aire continuo hacia afuera de la
mascarilla. Cuando el dispositivo CPAP
o binivel está encendido y funcionando
correctamente, el aire fresco del
generador de aire desplaza el aire
espirado hacia fuera a través de la
ventilación adjunta a la mascarilla. No
obstante, cuando el dispositivo CPAP o
binivel no está funcionando, puede
suceder que no se suministre suficiente
aire fresco a través de la mascarilla y es
posible que se vuelva a respirar el aire
espirado. El volver a respirar aire
espirado durante varios minutos, puede
en algunas circunstancias conducir a la
ESPAÑOL
Page 30

asfixia. Esta advertencia se aplica a la
mayoría de los modelos de sistemas
CPAP y binivel.
• A bajas presiones de CPAP, el flujo de
aire a través de la ventilación puede no
ser suficiente para eliminar del tubo
todos los gases exhalados. Puede darse
cierto grado de reinspiración.
Explicación de la Advertencia: El flujo
de la ventilación es menor a presiones
de mascarilla más bajas (ver la Curva de
Presión/ Flujo en la sección A en la hoja
de figuras). Para evitar la reinspiración se
recomienda el uso de una presión de
mascarilla de 4 cmH
• La mascarilla deberá limpiarse y
O ó más.
2
desinfectarse o esterilizarse si va a ser
utilizada por otro paciente. Remítase a la
sección “Limpieza de la mascarilla entre
pacientes” para obtener más
información.
• Si se usa oxígeno con el dispositivo
CPAP o binivel, deberá apagarse el flujo
de oxígeno cuando el generador de aire
no esté funcionando.
Explicación de la advertencia: Cuando
el dispositivo CPAP o binivel no esté
funcionando y el flujo de oxígeno se
deje encendido, el oxígeno suministrado
al tubo del ventilador se puede
acumular dentro del generador de aire.
El oxígeno acumulado en el dispositivo
CPAP o binivel creará un riesgo de
incendio. Esta advertencia se aplica a la
mayoría de los tipos de generadores de
aire CPAP o binivel.
• Evite fumar mientras se está usando
oxígeno.
Nota: A un determinado caudal de
oxígeno suplementario, la concentración de
oxígeno inhalado variará según los
parámetros de presión, el ritmo respiratorio
del paciente, la mascarilla que se utilice y el
índice de fuga.
PARTES DE LA MASCARILLA
Ver la sección B en la hoja de figuras.
AJUSTE DE LA MASCARILLA
Ver la sección C en la hoja de figuras.
Nota: Antes de ajustar la mascarilla,
consulte la sección “Limpieza de la mascarilla
en el domicilio”.
1 Presione hasta el fondo el tubo de aire
en la pieza giratoria. El extremo del tubo
de aire y el borde de la pieza giratoria
deben quedar completamente unidos
(Fig. C-1). Conecte el otro extremo del
tubo de aire a su generador de aire.
2 Coloque la almohadilla sobre su nariz,
introduzca la cabeza en el arnés y
coloque las correas por debajo de las
orejas. Conecte el otro broche del arnés
al armazón de la mascarilla.
Use las correas de Velcro® para ajustar
el arnés. No apriete las correas
demasiado (Fig. C-2).
3 Las almohadillas del apoyo para la frente
deben estar en ligero contacto con la
frente cuando la mascarilla esté ajustada
en su sitio.
Ajust e el ap oy o p ar a l a f re nt e e n caso de
ser necesario cambiándolo a otra de las
posiciones de la lengüeta (Fig. C-2a).
Hay cuatro posiciones de la lengüeta
(1– 4). Para cambiar la posición de la
lengüeta, afloje primero las correas del
arnés. Después presione la lengüeta del
apoyo para la frente y muévala hacia
arriba a la siguiente posición (ej. muévala
de la posición 1 a la posición 2). A
continuación ajuste suavemente las
correas del arnés.
Page 31

4 Sujete los bordes de la cubierta de la
ventilación en ambos lados del adhesivo
“Clic” al mismo tiempo. Presione
firmemente la cubierta de la ventilación
sobre el codo de la mascarilla para
asegurar que está bien encajada en su
lugar.
5 Encienda el generador de aire.
Acuéstese y compruebe que la
mascarilla le está cómoda y no hay fugas
de aire. Si hay fugas de aire puede que
tenga que reajustar las correas de Velcro
(ver Paso 2) o el apoyo para la frente
(ver Paso 3).
Notas:
• Si no puede solucionar las fugas puede que
tenga que probar una talla de almohadilla
distinta.
• Seleccione “Ultra” como opción de
mascarilla cuando esté usando la
LTRA MIRAGE II con los generadores de
U
aire de ResMed que tengan la opción de
configuración de mascarilla.
• Compruebe que puede retirar los broches
del arnés o el arnés mismo sin ayuda.
DESMONTAJE PARA LA LIMPIEZA
Ver la sección D en la hoja de figuras.
1 Desmonte y separe el tubo de aire
principal, el arnés, los broches del arnés,
la pieza giratoria, las almohadillas para la
frente, la traba de la almohadilla, la
almohadilla y el tapón de los puertos.
2 Use el pulgar en el lado de la cubierta de
la ventilación para retirarla del codo de
la mascarilla.
3 Presione la lengüeta del apoyo para la
frente y muévala más allá de la primera
posición de la lengüeta. Esto le permite
retirar el apoyo para la frente del
armazón de la mascarilla (Fig. D-1).
4 Desde el interior del armazón de la
mascarilla, sujete en su sitio un lado de la
traba del codo y libere el otro lado
(Fig. D-2). Retire la traba y el codo de la
mascarilla del armazón de la mascarilla.
PRECAUCIÓN
Esta mascarilla no es compatible con los
generadores de aire AutoSet T
tienen un cable sensor de presión interno.
Es compatible con todos los demás
generadores de aire AutoSet
ResMed.
™
que
™
de
PARA RETIRAR LA MASCARILLA
Para retirar la mascarilla, presione las
lengüetas de los broches del arnés. Esto
libera los broches del arnés del armazón de
la mascarilla. Tire de la mascarilla y del arnés
separándolos de la cabeza.
Notas:
• No retire el arnés de la cabeza sin liberar
primero los broches del arnés.
LIMPIEZA DE LA MASCARILLA EN
EL DOMICILIO
Notas:
• Lave el arnés antes de usarlo por primera
vez ya que puede desteñir. Es importante
lavar siempre a mano el arnés.
• Puede lavar el arnés sin necesidad de
desmontarlo.
DIARIAMENTE/DESPUÉS DE CADA
USO
Lave a mano los componentes de la
mascarilla en agua tibia con jabón. Use
jabón puro. Enjuague bien los componentes
y déjelos secar al aire fuera de la luz solar
directa.
ESPAÑOL
Page 32

SEMANALMENTE
Lave a mano el arnés en agua tibia con
jabón. Use jabón puro. Enjuáguelo bien y
déjelo secar al aire fuera de la luz solar
directa.
. PRECAUCIONES
• No utilice soluciones que contengan
lejía, cloro, alcohol, ingredientes
aromáticos o hidratantes, ni agentes
antibacterianos o aceites aromáticos
para limpiar cualquier parte del
sistema de mascarilla o del tubo de
aire. Estas soluciones pueden causar
daños o reducir la vida útil del
producto.
• No exponga ninguna pieza del sistema
de mascarilla ni el tubo de aire a la luz
solar directa, ya que podrían
deteriorarse.
• Si se advierte algún signo de deterioro
visible (como grietas, rajaduras,
roturas, etc.) en uno de los
componentes de la mascarilla, dicho
componente debería ser desechado y
sustituido por uno nuevo.
LIMPIEZA DE LA MASCARILLA
ENTRE PACIENTES
El sistema de mascarilla está validado para
ser usado por múltiples pacientes. Los
médicos deben consultar la Guía de
desinfección de la Mascarilla Nasal Ultra
Mirage II para información detallada.
Para limpiar el arnés entre pacientes,
emplee el método descrito en la sección
previa “Limpieza de la mascarilla en el
domicilio”.
PARA VOLVER A MONTAR LA
MASCARILLA
Ver la sección E en la hoja de figuras.
1 Inserte el tapón de los puertos en los
mismos. Asegúrese de que las lengüetas
del tapón de los puertos están mirando
hacia fuera de la mascarilla.
2 Inserte el codo de la mascarilla en el
armazón de la mascarilla y asegúrelo con
la traba del codo en el interior del
armazón (Fig. E-1). El lado plano de la
traba del codo debe estar de cara al
armazón de la mascarilla. Si ha ajustado
el codo de la mascarilla correctamente,
no deberá moverse cuando tire del
mismo con firmeza para intentar
separarlo del armazón.
3 Sujete los bordes de la cubierta de la
ventilación en ambos lados del adhesivo
“Clic” al mismo tiempo. Presione
firmemente la cubierta de la ventilación
sobre el codo de la mascarilla para
asegurar que está bien encajada en su
sitio haciendo un clic (Fig. E-2).
4 Presione la pieza giratoria sobre el
extremo del codo de la mascarilla.
5 Acople las almohadillas de la frente al
apoyo para la frente insertando los
tapones de las almohadillas en los dos
agujeros en la parte trasera del apoyo
para la frente (Fig. E-3). Presione las
almohadillas firmemente contra el
apoyo para la frente para asegurar que
las almohadillas están firmemente
ajustadas en el apoyo para la frente.
6 Vuelva a conectar el apoyo para la
frente al armazón de la mascarilla.
Presione la almohadilla y mueva el
apoyo para la frente colocándolo en una
de las cuatro posiciones de la lengüeta
(Fig. E-4).
7 Encaje el borde ranurado de la
almohadilla nasal al armazón de la
mascarilla. Encaje la sección superior
primero y luego siga el contorno de la
mascarilla presionando la almohadilla
Page 33

para que se acople al armazón,
asegurándose de que consigue un buen
ajuste. Presione la traba de la almohadilla
por encima de la almohadilla y contra el
armazón, asegurándose de que quede
fija en posición en cada uno de los calces
(Fig. E-5).
8 Conecte los broches del arnés al
armazón de la mascarilla. Enhebre las
correas del arnés para la cabeza en las
ranuras del apoyo para la frente y los
broches del arnés. La etiqueta del arnés
para la cabeza U
LTRA MIRAGE debe
quedar sobre el lado de afuera y
próximo a su cuello al ponérselo. Cierre
las correas de Velcro.
ESPECIFICACIONES TÉCNICAS
CURVA DE PRESIÓN / FLUJO
Consulte la sección A de la hoja de figuras.
INFORMACIÓN SOBRE EL ESPACIO
MUERTO
El espacio muerto es el volumen vacío
dentro de la mascarilla hasta la altura de la
pieza giratoria.
El espacio muerto de la mascarilla varía
dependiendo de las tallas de almohadilla, si
bien es inferior a 135 ml.
Nota: El fabricante se reserva el derecho de
cambiar estas especificaciones sin previo
aviso.
REPUESTOS
Núm. de
pieza.
16563 Traba de la almohadilla
16557 Almohadilla, Grande
16558 Almohadilla, Plana
16735 Almohadilla, Plana-ancha
16556 Almohadilla, Estándar
Artículo
Núm. de
pieza.
16566 Unidad del codo
16572 Traba del codo (paq. 1)
16573 Traba del codo (paq. 10)
60123 Almohadillas para la frente
60124 Almohadillas para la frente
16590 Apoyo para la frente con
16595 Conjunto del armazón
16733 Arnés para la cabeza, Estándar
16118 Arnés para la cabeza, Pequeño
16119 Arnés para la cabeza, Grande
16569 Broche del arnés (paq. 2)
16734 Broche del arnés (paq. 10)
16560 Armazón de la mascarilla
16570 Tapón(es) de los puertos
16571 Tapón(es) de los puertos
16565 Pieza giratoria
16575 Cubierta de la ventilación
Artículo
(paq. 1)
(paq. 10)
almohadillas
(paq. 2)
(paq. 10)
GARANTÍA LIMITADA
ResMed le garantiza que su sistema
ResMed, incluyendo sus componentes: el
armazón de la mascarilla, la almohadilla, el
arnés para la cabeza, el tubo y los demás
accesorios (“el producto”) no tendrán
defectos de material ni de mano de obra
durante un período de noventa (90) días a
partir de la fecha de compra por parte del
consumidor inicial.
Para más detalles remítase a la Garantía.
ESPAÑOL
Page 34

Nota: Las traducciones se basan en la versión en inglés de esta guía. Sin embargo, tal vez
existan pequeñas variaciones a causa de los procedimientos de desinfección y esterilización que
se aplican en los diferentes países. ResMed ha analizado estos cambios y todos los
procedimientos que se incluyen aquí han sido convalidados.
Page 35

Máscara Nasal Ultra Mirage™ II
Obrigado por ter escolhido a MÁSCARA
N
ASAL ULTRA MIRAGE
II da ResMed.
™
Esta máscara é semelhante à máscara nasal
original U
LTRA MIRAGE
e o desempenho
™
de ambas máscaras é igual. A nova máscara
possui um melhorado suporte para a testa
com almofadas flexíveis que se ajustam aos
contornos da sua testa.
Este guia do utilizador proporciona-lhe as
informações necessárias para a utilização
correcta da sua máscara.
USO DESTINADO
A MÁSCARA NASAL ULTRA MIRAGE II
destina-se a ser usada por pacientes
adultos múltiplos aos quais foi prescrito o
tratamento por pressão contínua e
positiva das vias respiratórias (CPAP) ou
por sistemas de dois níveis no hospital, na
clínica ou em casa.
INFORMAÇÃO MÉDICA
Nota: O sistema de máscara não contém
materiais em látex. Se sofrer QUALQUER
reacção a qualquer uma das partes do
sistema de máscara, deixe de usar e
consulte o seu médico de perturbações do
sono.
. AVISOS E PRECAUÇÕES
• Esta máscara só deverá ser utilizada
com sistemas CPAP ou de dois níveis
recomendados pelo seu médico ou
terapeuta de doenças respiratórias. Só
se deverá usar uma máscara no caso do
sistema CPAP ou de dois níveis se
encontrar ligado e a funcionar
adequadamente. A porta de exalação
jamais deverá ser bloqueada.
Explicação do aviso: Os sistemas
CPAP e de dois níveis são destinados a
serem utilizados com máscaras
especiais com conectores que possuem
orifícios de ventilação ou portas de
exalação independentes de modo a
proporcionarem a saída de um fluxo
contínuo de ar da máscara. Quando o
dispositivo CPAP ou de dois níveis se
encontrar ligado e a funcionar
adequadamente, o novo ar que é
proveniente do gerador de fluxo
expele o ar exalado através da porta de
exalação da máscara. Contudo, quando
o dispositivo CPAP ou de dois níveis
não se encontrar em funcionamento,
não existe a possibilidade de fornecer
suficiente ar fresco através da máscara,
sendo que o ar exalado poderá vir a ser
respirado de novo. A respiração de ar
exalado em períodos que excedam
alguns minutos pode, em certas
PORTUGUÊS
Page 36

circunstâncias, causar sufocação. Este
aviso aplica-se à maioria dos modelos de
sistemas CPAP ou de dois níveis.
• A baixas pressões de CPAP, o fluxo
através da porta de exalação pode vir a
ser inadequado na remoção de todos os
gases da tubagem. Neste caso, poderse-á dar a ocorrência de uma certa
respiração de ar exalado.
Explicação do aviso: O fluxo através da
porta de exalação é menor quando as
pressões no sistema são mais baixas (ver
a curva de Pressão/Fluxo na secção A
do folheto de ilustrações). De modo a
evitar a respiração de ar exalado,
recomenda-se o uso de uma pressão na
máscara igual ou superior a 4 cm H
• A máscara deve ser limpa e
O.
2
desinfectada/esterilizada se for utilizada
em vários pacientes. Consulte a secção
“Limpeza da máscara entre pacientes”
para obter mais informações.
• Se se utilizar oxigénio com o dispositivo
CPAP ou de dois níveis, o fluxo de
oxigénio deverá ser desligado quando o
gerador de fluxo não estiver em
funcionamento.
Explicação do aviso: Quando o
dispositivo CPAP ou de dois níveis não
estiver em funcionamento e o fluxo de
oxigénio for mantido, o oxigénio
fornecido através da tubagem do
ventilador pode acumular-se dentro do
gerador de fluxo. A acumulação de
oxigénio dentro dum dispositivo CPAP
ou de dois níveis cria o risco de
incêndio. Este aviso aplica-se à maioria
de geradores de fluxo CPAP e de dois
níveis.
• Evite fumar quando o oxigénio estiver a
ser utilizado.
Nota: Aquando da existência dum caudal
fixo do fluxo suplementar de oxigénio, a
concentração de oxigénio inalado pode variar
consoante os ajustes de pressão, o padrão de
respiração do paciente, a selecção da
máscara e o regime de fuga.
PARTES DA MÁSCARA
Ver secção B no folheto de ilustrações.
COLOCAÇÃO DA MÁSCARA
Ver a secção C no folheto de ilustrações.
Nota: Antes de colocar a máscara, consulte
a secção acerca da “Limpeza da máscara
em casa”.
1 Empurre a tubagem de ar sobre a peça
giratória. A extremidade da tubagem de
ar e a aresta da peça giratória deverão
estar em contacto (Fig. C-1). Conecte a
outra extremidade da tubagem de ar ao
seu gerador de fluxo.
2 Coloque a almofada sobre o seu nariz,
puxe o arnês sobre a sua cabeça e
certifique-se de passar as correias por
baixo das orelhas. Conecte o outro clipe
do arnês à armação da máscara.
Use as correias de Velcro
posição do arnês. Não aperte as
correias em demasia (Fig. C-2).
3 As almofadas do suporte da testa
deverão tocar ligeiramente na sua testa
quando a máscara estiver no seu lugar.
Ajuste o suporte da testa, caso seja
necessário, movendo-o para uma das
outras posições de fixação (Fig. C-2a).
Existem quatro posições de fixação
(1—4). Para mudar a posição de
fixação, desaperte as correias do arnês
em primeiro lugar. Em seguida, aperte a
lingueta do suporte da testa e mova-a
em direcção à posição seguinte (p. ex.,
da posição 1 para a posição 2). Em
seguida, volte a apertar as correias do
arnês sem as apertar em demasia.
®
para ajustar a
Page 37

4 Segure as extremidades da tampa
do orifício de ventilação em ambos
lados da etiqueta adesiva “Click”
simultaneamente. Empurre firmemente
a tampa do orifício de ventilação sobre
o cotovelo da máscara certificando-se
de que esta é bem encaixada no seu
lugar.
5 Ligue o gerador de fluxo. Deite-se e
certifique-se de que a máscara foi
colocada confortavelmente e de que
não há fugas de ar. No caso de haverem
fugas, poderá necessitar de reajustar as
correias de Velcro (ver Passo 2) ou o
suporte da testa (ver Passo 3).
Notas:
• Se for incapaz de resolver o problema de
fugas, poderá ter de usar um tamanho de
almofada diferente.
• Seleccione “Ultra” como opção de
máscara, quando estiver a usar a U
M
IRAGE II com geradores de fluxo da
ResMed que têm opções de configuração
de máscara.
LTRA
• Certifique-se de que pode remover os
clipes do arnês ou o arnês sem ajuda.
DESMONTAGEM PARA LIMPEZA
Ver a secção D no folheto de ilustrações.
1 Remova e separe o tubo de ar principal,
o arnês, os clipes do arnês, a peça
giratória, as almofadas da testa, o clipe
da almofada, a almofada e a tampa das
portas.
2 Use o seu polegar no lado da tampa do
orifício de ventilação para a remover do
cotovelo da máscara.
3 Pressione a lingueta do suporte da testa
e mova-a passando-a por cima da última
posição de encaixe. Esta acção irá
permitir-lhe remover o suporte da testa
da armação da máscara (Fig. D-1).
4 Da parte de dentro da armação da
máscara, segure um dos lados do clipe
do cotovelo em lugar e solte o outro
lado (Fig. D-2). Remova o clipe e o
cotovelo da máscara da armação da
máscara.
PRECAUÇÃO
Esta máscara não é compatível com os
geradores de fluxo AutoSet T
de sensor de pressão internas. É
compatível para uso com todos os outros
geradores de fluxo AutoSet
™
com linhas
™
da ResMed.
REMOÇÃO DA MÁSCARA
Para remover a máscara, aperte as linguetas
dos clipes do arnês. Isto faz com que os
clipes do arnês sejam soltos da armação da
máscara. Remova a máscara e o arnês da
sua cabeça.
Notas:
• Não retire o arnês da sua cabeça antes de
ter soltado os clipes do arnês.
LIMPEZA DA MÁSCARA EM CASA
Notas:
• Lave o arnês antes de o utilizar pela
primeira vez, uma vez que a tinta poderá
escorrer. É importante lavar sempre à mão
o arnês.
• O arnês pode ser lavado sem ser
desmontado.
DIARIAMENTE/APÓS CADA
UTILIZAÇÃO
Lave à mão os componentes da máscara
em água morna e sabão. Use um sabão
puro. Enxagúe bem os componentes e
deixe-os secar fora do alcance da luz solar.
PORTUGUÊS
Page 38

SEMANALMENTE
Lave à mão o arnês em água morna e
sabão. Use um sabão puro. Enxagúe bem e
deixe-o secar fora do alcance da luz solar.
. PRECAUÇÕES
• Não utilize soluções com bases de
lixívia, cloro, álcool ou aromáticas,
agentes hidratantes ou antibacterianos
ou óleos perfumados na limpeza das
peças do sistema de máscara ou da
tubagem de ar. Estas soluções podem
causar danos que irão reduzir a vida
útil do produto.
• Não exponha qualquer uma das peças
do sistema de máscara ou da tubagem
à luz directa do sol uma vez que tal
poderia deteriorar o produto.
• Se for observada a deterioração de
qualquer um dos componentes da
máscara (quebrado, rachado, rompido,
etc.), o componente da máscara
deverá ser substituído.
LIMPEZA DA MÁSCARA ENTRE
PACIENTES
O sistema de máscara pode ser utilizado
por vários pacientes. O pessoal médico
deverá consultar o Guia de Desinfecção da
Máscara Ultra Mirage II para mais
informações.
Para limpar o arnês entre pacientes, use o
método descrito na secção anterior:
“Limpeza da máscara em casa”.
REMONTAR A MÁSCARA
Ver secção E no folheto de ilustrações.
1 Introduza a tampa das portas nas portas.
Certique-se que as linguetas da tampa
das portas se encontram viradas para
fora da máscara.
2 Introduza o cotovelo da máscara na
armação da máscara e prenda-o com o
clipe do cotovelo na parte de dentro da
armação (Fig. E-1). O lado chato do
clipe do cotovelo deverá estar virado
para a armação da máscara. Se o
cotovelo da máscara tiver sido instalado
correctamente, o mesmo não se deverá
mexer quando o tentar retirar da
armação com força.
3 Segure as extremidades da tampa do
orifício de ventilação em ambos lados da
etiqueta adesiva “Click”
simultaneamente. Empurre firmemente
a tampa do orifício de ventilação sobre
o cotovelo da máscara certificando-se
de que esta é bem encaixada no seu
lugar (Fig. E-2).
4 Empurre a peça giratória na
extremidade do cotovelo da máscara.
5 Fixe as almofadas da testa ao suporte da
testa inserindo as tampas das almofadas
nos dois orifícios que se encontram na
parte de trás do suporte da testa
(Fig E-3). Empurre as almofadas
firmemente contra o suporte da testa
certificando-se que estas foram bem
presas ao suporte da testa.
6 Volte a conectar o suporte da testa à
armação da máscara. Pressione a
lingueta e mova o suporte da testa para
uma das quatro posições de encaixe
(Fig. E-4).
7 Assente a extremidade com sulco da
máscara nasal sobre a armação da
máscara. Comece por ajustar a secção
superior, continuando em seguida a
assentar o restante da almofada à volta
da máscara, empurrando para este
efeito a almofada sobre a armação da
máscara e certificando-se da obtenção
de uma boa vedação. Empurre o clipe
da almofada por cima da almofada e
Page 39

sobre a armação da máscara,
certificando-se de que este é bem
encaixado em todos os pontos de
encaixe (Fig. E-5).
8 Conecte os clipes do arnês à armação
da máscara. Introduza as correias do
arnês através das ranhuras no suporte
da testa e nos clipes do arnês. A
etiqueta do arnês da U
LTRA MIRAGE
dever-se-á encontrar virada para fora e
perto do seu pescoço depois da
máscara ser colocada. Aperte as
correias de Velcro.
ESPECIFICAÇÕES TÉCNICAS
CURVA DE PRESSÃO-FLUXO
Ver secção A no folheto de ilustrações.
INFORMAÇÃO ACERCA DE ESPAÇO
MORTO
O espaço morto é o volume vazio da
máscara até ao cotovelo.
O espaço morto da máscara varia de
acordo com os tamanhos de almofada,
sendo no entanto menor que 135 ml.
Nota: O fabricante reserva o direito de
fazer alterações a estas especificações sem
aviso prévio.
PEÇAS DE SUBSTITUIÇÃO
Número
de peça
16563 Clipe da almofada
16557 Almofada, Grande
16558 Almofada, Fina
Item
Número
de peça
16735 Almofada, Fina-larga
16556 Almofada, Standard
16566 Conjunto do cotovelo
16572 Clipe do cotovelo (1 emb.)
16573 Clipe do cotovelo (10 emb.)
60123 Almofada da testa (1 emb.)
60124 Almofada da testa (10 emb.)
16590 Suporte da testa com
16595 Conjunto da armação
16733 Arnês, Standard
16118 Arnês, Pequeno
16119 Arnês, Grande
16569 Clipe do arnês (2 emb.)
16734 Clipe do arnês (10 emb.)
16560 Armação da máscara
16570 Tampa/s das portas (2 emb.)
16571 Tampa/s das portas (10 emb.)
16565 Peça giratória
16575 Tampa do orifício de ventilação
Item
almofadas
GARANTIA LIMITADA
A ResMed garante que o seu sistema de
máscara da ResMed, incluindo todos os
seus componentes: armação da máscara,
almofada, arnês, tubagem e outros
acessórios (“Produto”) está livre de defeitos
de material e mão-de-obra durante um
período de noventa (90) dias a partir da
data de compra pelo consumidor original.
Para mais informações, consulte a Garantia.
PORTUGUÊS
Nota: As traduções são baseadas na versão inglesa deste guia. No entanto, é possível que
hajam pequenas variações no que diz respeito aos procedimentos de desinfecção/esterilização
aplicáveis em certos países. A ResMed realizou a revisão destas alterações e todos os
procedimentos aqui indicados foram validados.
Page 40

Page 41

Ultra Mirage™ II Nasal Mask
Tack för att du har valt ResMeds ULTRA
M
IRAGE
II NASAL MASK.
™
Masken liknar den ursprungliga U
M
IRAGE
NASAL MASK och prestanda för
™
LTRA
de två maskerna är likvärdiga. Den nya
uppgraderade masken har ett förbättrat
pannstöd med flexibla dynor som anpassar
sig till pannans konturer. Denna
användarguide ger dig all den information
du behöver för att du ska kunna använda
masken på rätt sätt.
AVSEDD ANVÄNDNING
ULTRA MIRAGE™ II NASAL MASK är avsedd
för vuxna patienter som har ordinerats
CPAP- (continuous positive airway
pressure) eller bilevelbehandling på
sjukhus, klinik och/eller i hemmet. Masken
är godkänd för användning mellan
patienter.
MEDICINSK INFORMATION
Obs! Masksystemet innehåller inte
latexmaterial. Om du har NÅGON reaktion
mot en del i systemet, bör du avbryta
användningen och rådgöra med din
sömnterapeut.
. VARNINGAR OCH
SÄKERHETSFÖRESKRIFTER
• Masken bör endast användas med
CPAP- eller bilevelsystem som
rekommenderas av din läkare eller
andningsterapeut och endast när
systemet är påkopplat och fungerar
ordentligt. Ventilöppningarna får aldrig
blockeras.
Förklaring: CPAP- och bilevelsystem är
avsedda att användas med speciella
anslutningar vars kopplingsdon är
försedda med ventilöppningar eller
separata utandningsventiler som
möjliggör ett kontinuerligt utflöde av
luft. När en CPAP- eller
bilevelutrustning är påkopplad och
fungerar ordentligt, kommer ny luft från
flödesgeneratorn att driva bort utandad
luft genom den anslutna
utandningsporten på masken. När
CPAP- eller bilevelutrustningen
däremot inte är i arbete, kommer en
otillräcklig mängd ny luft att tillföras via
systemet och utandad luft kan komma
att andas in på nytt. Återinandning av
utandad luft under längre tid än ett par
minuter kan under vissa
omständigheter leda till kvävning.
Denna varning gäller för de flesta
CPAP- eller bilevelutrustningar.
SVENSKA
Page 42

• Vid låga CPAP tryck kan flödet från
utandningsportarna på masken
eventuellt vara otillräckligt för att driva
bort all utandad luft från luftslangen. En
viss återinandning kan uppstå.
Förklaring: Utloppsventilflödet är lägre
vid lägre masktryck (se Tryck-/
flödeskurvan i avsnitt A på
illustrationsbladet). För att undvika
återinandning, rekommenderas ett
masktryck på 4 cm H
• Masken måste rengöras och
O eller högre.
2
desinfekteras/steriliseras om den
används av flera olika patienter. Se
avsnittet ”Rengöra masken mellan olika
patienter” för mer information.
• Om syrgas används med CPAP- eller
bilevelutrustningen, måste syrgasflödet
stängas av när flödesgeneratorn inte är i
gång.
Förklaring: Om syrgasflödet fortsätter
när CPAP- eller bilevelutrustningen inte
är i drift, kan den syrgas som levereras in
i luftslangen byggas upp inne i
flödesgeneratorn vilket kan utgöra en
brandrisk. Denna varning gäller för de
flesta CPAP- eller bilevelutrustningars.
• Rökning får inte förekomma under
syrgastillförseln.
Obs! Vid en fast flödeshastighet av
tilläggssyre kommer den inandade
syrgaskoncentrationen att variera beroende
på tryckinställningarna, patientens
andningsmönster, masktyp så väl som graden
av läckage.
DELAR I MASKEN
Se avsnitt B på illustrationsbladet.
PASSA IN MASKEN
Se avsnitt C på illustrationsbladet.
Obs! Läs avsnittet ”Rengöra masken i
hemmet” innan du passar in masken.
1 Skjut in luftslangen så långt det går i
svängtappen. Ändan på luftslangen och
kanten på svängtappen måste mötas
helt och hållet. (bild C-1). Koppla
luftslangens andra ända till
flödesgeneratorn.
2 Placera kudden över näsan och dra
hättan över huvudet. Remmarna bör
sitta under öronen. Fäst hättans andra
klämma vid maskramen.
®
Använd Velcro
remmarna för att
justera hättans passform. Dra inte åt
remmarna alltför mycket. (bild C-2).
3 Dynorna på pannstödet bör bara
snudda lätt vid pannan när masken sitter
rätt.
Justera pannstödet efter behov genom
att flytta fliken på pannstödet till en av de
andra positionerna (bild C-2a). Det finns
fyra flikpositioner (1-4). För att ändra
position: lossa först remmarna på hättan.
Tryck sedan på fliken på pannstödet och
skjut uppåt till nästa position (dvs. från
position 1 till position 2). Dra sedan
försiktigt åt remmarna på nytt.
4 Ta tag i ventillockets kanter på samma
gång på båda sidorna av ”Klick” märket.
Skjut med fast hand över ventillocket på
maskbågen och se till att det klickar in sig
på rätt plats.
5 Koppla på flödesgeneratorn. Lägg dig
ner och se till att masken sitter bekvämt
och att det inte läcker ut luft från
masken. Om du märker att det läcker,
kanske du måste justera om Velcro
remmarna (se steg 2) eller pannstödet
(se steg 3).
Obs!
• Om du inte kan få bukt med läckorna
måste du kanske försöka använda en
annan kuddstorlek.
Page 43

• Välj ”Ultra” som maskoption när du
använder U
LTRA MIRAGE II med de
flödesgeneratorer från ResMed som har
maskinställningsoptioner.
SE UPP!
Denna mask är inte kompatibel med de
flödesgeneratorer i AutoSet T
som är utrustade med en intern
trycksensorledning. Den är kompatibel
med alla andra AutoSet
flödesgeneratorer från ResMed.
™
serien
™
TA BORT MASKEN
För att ta bort masken: tryck ner flikarna på
hättans klämmor, vilket frigör klämmorna
från maskramen. Dra bort masken och
hättan från huvudet.
Obs!
• Dra inte bort hättan från huvudet utan att
först frigöra klämmorna på hättan.
• Du bör se till att du kan ta bort klämmorna
och hättan på egen hand utan hjälp.
TA ISÄR MASKEN FÖR
RENGÖRING
Se avsnitt D på illustrationsbladet.
1 Lossa och ta isär huvudluftslangen,
hättan, hättans klämmor, svängtappen,
panndynorna, kuddklämman, kudden
och portlocken.
2 Använd tummen vid kanten på
ventillockets för att ta bort det från
maskbågen.
3 Tryck ner pannstödsfliken och flytta den
till den översta flikpositionen så att du
lätt kan ta bort pannstödet från
maskramen (bild D-1).
4 Från insidan av maskramen: håll ena
sidan av bågklämman på plats och släpp
den andra sidan av klämman (bild D-2).
Ta bort klämman och maskbågen från
maskramen.
RENGÖRA MASKEN I HEMMET
Obs!
• Tvätta hättan före första användningen
eftersom färgen kan fälla. Det är viktigt att
alltid tvätta hättan för hand.
• Du kan tvätta hättan utan att ta isär den.
DAGLIGEN/EFTER VARJE
ANVÄNDNING
Handtvätta maskens delar i ljummet
tvålvatten. Använd ren tvål. Skölj delarna
noggrant och låt dem lufttorka. Utsätt dem
inte för direkt solljus.
VARJE VECKA
Handtvätta hättan i ljummet tvålvatten.
Använd ren tvål. Skölj hättan noggrant och
låt den lufttorka. Utsätt den inte för direkt
solljus.
. SE UPP!
• Använd inte lösningar innehållande
blekningsmedel, klorin, alkohol eller
aromatiska lösningar,
fuktighetsbevarande eller
bakteriedödande medel eller
parfymerade oljor för att rengöra
någon del i masksystemet eller
luftslangen. Sådana lösningar kan vara
skadliga och förkorta produktens
livslängd.
• Utsätt inga delar av masksystemet
eller slangen för direkt solljus
eftersom detta kan ha skadlig
inverkan.
SVENSKA
Page 44

• Om du kan se några uppenbara
defekter (sprickor, krakelering, revor
osv.) bör den defekta delen kasseras
och bytas ut.
RENGÖRA MASKEN MELLAN
OLIKA PATIENTER
Detta masksystem har godkänts för
användning av flera olika patienter. Klinisk
personal hänvisas till Desinfektionsguide för
Ultra Mirage II Nasal Mask för mer
information.
För att rengöra hättan mellan olika
patienter hänvisas till anvisningarna i
föregående avsnitt: ”Rengöra masken i
hemmet”.
MONTERA MASKEN
Se avsnitt E på illustrationsbladet.
1 Sätt in portlocken i portarna. Se till att
flikarna på portlocken pekar bort från
masken.
2 Sätt in maskbågen i maskramen och fäst
den med bågklämman på ramens insida
(bild E- 1). Bågklämmans flata sida måste
vara vänd mot maskramen. Om du har
passat ihop maskbågen rätt, kommer
den inte att rubbas även om du kraftigt
försöker dra bort den från maskramen.
3 Ta tag i ventillockets kanter på samma
gång på båda sidorna av ”Klick” märket.
Skjut med fast hand över ventillocket på
maskbågen och se till att det klickar in sig
på rätt plats (bild E-2).
4 Skjut upp svängtappen på ändan av
maskbågen.
5 Sätt fast panndynorna på pannstödet
genom att sätta in panndynornas pluggar
i de två hålen på baksidan av pannstödet
(bild E-3). Skjut med fast hand dynorna
mot pannstödet så att dynorna passar
stadigt in i pannstödet.
6 Sätt tillbaka pannstödet på maskramen.
Tryck ner fliken och flytta pannstödet till
en av de fyra flikpositionerna (bild E-4).
7 Passa in näskuddens räfflade kant på
maskramen. Passa först in den övre
delen och skjut sedan in kudden på
ramen hela vägen runt masken. Se till att
masken sitter tätt. Skjut kuddklämman
över kudden och upp på maskramen
och se till att den klickar in sig på rätt
plats överallt (bild E-5).
8 Fäst hättans klämmor vid maskramen.
Trä hättans remmar genom springorna
på pannstödet och hättans klämmor.
U
LTRA MIRAGE etiketten på hättan bör
peka utåt och vara nära nacken när
masken sitter rätt. Fäst med Velcro
remmarna.
TEKNISKA SPECIFIKATIONER
TRYCK-/FLÖDESKURVA
Se avsnitt A på illustrationsbladet.
INFORMATION OM DEAD SPACE
Med ”dead space” avses maskens tomma
volym upp till svängtappen.
Maskens ”dead space” varierar beroende på
kuddstorlek men är dock mindre än 135 ml.
Obs! Tillverkaren förbehåller sig rätten att
ändra dessa specifikationer utan varsel.
RESERVDELAR
Produktkod Produkt
16563 Kuddklämma
16557 Kudde, Stor
16558 Kudde, Flat
16735 Kudde, Flat -bred
16556 Kudde, Standard
16566 Bågmontering
16572 Bågklämma (1 st.)
Page 45

Produktkod Produkt
16573 Bågklämma (10 st.)
60123 Panndynor (1 st.)
60124 Panndynor (10 st.)
16590 Pannstöd med dynor
16595 Maskrammontering
16733 Hätta, Standard
16118 Hätta, Liten
16119 Hätta, Stor
16569 Klämma för hätta (2 st.)
16734 Klämma för hätta (10 st.)
16560 Maskram
16570 Portlock (2 st.)
16571 Portlock (10 st.)
16565 Svängtapp
16575 Ventillock
BEGRÄNSAD GARANTI
ResMed garanterar att ditt ResMed
masksystem, inkl. följande ingående
komponenter: ram, kudde, hätta, slang och
andra tillbehör (”Produkten”) ska vara felfri
med avseende på material och utförande
under en period på nittio (90) dagar från
det datum då den första kunden inköpte
produkten.
Se Garantin för ytterligare upplysningar.
Obs! Översättningar av guiden utgår från den engelska versionen. Vissa mindre variationer kan
dock förekomma till följd av de desinfektions-/steriliseringsmetoder som tillämpas i vissa länder.
ResMed har granskat dessa ändringar och alla metoder i guiden har godkänts.
SVENSKA
Page 46

Page 47

Ultra Mirage™ II neusmasker
Wij danken u voor uw keuze van het
U
LTRA MIRAGE™ II NEUSMASKER van
ResMed.
Dit masker is een soortgelijk masker als het
LTRA MIRAGE™ NEUSMASKER en de twee
U
maskers zijn gelijkwaardig in prestatie. Het
nieuwe masker heeft een verbeterde
voorhoofdsteun met flexibele kussentjes
die zich aanpassen aan de vorm van uw
voorhoofd.
Deze gebruikershandleiding bevat de
informatie die u nodig hebt voor het
correcte gebruik van uw masker.
BEDOELD GEBRUIK
Het ULTRA MIRAGE II NEUSMASKER is
bedoeld voor gebruik door meerdere
volwassen patiënten aan wie continue
overdrukbeademing (CPAP) therapie of
bilevel-therapie is voorgeschreven voor
gebruik in het ziekenhuis en/of in de
thuissituatie.
MEDISCHE INFORMATIE
Opm.: Het maskersysteem bevat geen
latex materialen. Als er bij u sprake is van
een reactie, welke dan ook, op het
masker, stop dan met het gebruik ervan en
raadpleeg uw arts.
. WAARSCHUWINGEN EN
OPMERKINGEN
• Dit masker mag alleen worden gebruikt
met CPAP- of bilevel-systemen die
worden aanbevolen door uw arts of
ademtherapeut. Een masker mag alleen
worden gebruikt als het CPAP- of
bilevel-systeem is ingeschakeld en op
correcte wijze functioneert. De uitlaatventilatieopening mag nooit worden
geblokkeerd.
Verklaring van de waarschuwing:
CPAP- en bilevel-systemen zijn
bedoeld om te worden gebruikt met
speciale maskers die zijn voorzien van
connectors met ventilatieopeningen of
aparte uitlaat-ventilatieopeningen voor
een continue luchtstroom uit het
masker. Wanneer het CPAP- of bilevelapparaat is ingeschakeld en correct
functioneert, doet nieuwe lucht uit de
flow-generator de uitgeademde lucht
uitstromen via de uitlaatventilatieopening in het aangesloten
masker. Wanneer het CPAP- of bilevelapparaat echter niet in werking is,
wordt er onvoldoende verse lucht
geleverd via het masker en kan de
uitgeademde lucht weer worden
ingeademd. Het langer dan enkele
minuten inademen van uitgeademde
lucht kan in sommige omstandigheden
NEDERLANDS
Page 48

leiden tot verstikking. Deze
waarschuwing is van toepassing op de
meeste modellen van de CPAP- of
bilevel-apparaten.
• Bij een lage CPAP-druk kan de
luchtstroom door de uitlaatventilatieopening onvoldoende zijn voor
het verwijderen van alle uitgeademde
gassen uit de slangen. Dan kan er sprake
zijn van enige herinademing.
Verklaring van de waarschuwing: De
stroom door de uitlaatventilatieopening is lager bij een lage
maskerdruk (zie de druk/flow-curve in
deel A van het illustratieblad). Om
herinademing te voorkomen wordt
aangeraden een maskerdruk van
O of hoger te gebruiken.
4cmH
2
• Het masker moet worden gereinigd en
gedesinfecteerd/gesteriliseerd als het
door verschillende patiënten wordt
gebruikt. Raadpleeg het hoofdstuk “Het
reiningen van het masker tussen twee
patiënten door” voor bijzonderheden.
• Als het CPAP- of bilevel-apparaat wordt
gebruikt in combinatie met zuurstof,
moet de zuurstoftoevoer worden
uitgeschakeld wanneer de flowgenerator niet aan staat.
Verklaring van de waarschuwing:
Wanneer het CPAP- of bilevel-apparaat
buiten gebruik is en de zuurstoftoevoer
niet wordt onderbroken, kan de
zuurstof uit de ventilatieslang zich in de
flow-generator ophopen. Zuurstof die
zich ophoopt in het CPAP- of bilevelapparaat kan gevaar voor brand
opleveren. Deze waarschuwing is van
toepassing op de meeste types CPAPof bilevel flow-generators.
• Niet roken terwijl de zuurstof is
ingeschakeld.
Opm.: Bij een vaste mate van
zuurstofvoorziening varieert de ingeademde
zuurstofconcentratie, afhankelijk van: de
ingestelde druk, het ademhalingspatroon van
de patiënt, het gekozen masker en de mate
van lekkage.
ONDERDELEN VAN HET MASKER
Raadpleeg deel B van het illustratieblad.
HET MASKER OPZETTEN
Raadpleeg deel C van het illustratieblad.
Opm.: Raadpleeg alvorens het masker op
te zetten het hoofdstuk “Het reinigen van het
masker in de thuissituatie”.
1 Druk de luchtslang zover mogelijk op de
draaibare kop. Het uiteinde van de
luchtslang en de rand van de draaibare
kop moeten volledig aansluiten
(Fig. C-1). Sluit het andere uiteinde van
de luchtslang aan op uw flow-generator.
2 Plaats het kussentje over uw neus, trek
de hoofdband over uw hoofd en laat de
banden onder uw oren langs lopen.
Maak de andere hoofdbandclip vast aan
het maskerframe.
Gebruik de Velcro
de pasvorm van de hoofdband aan te
passen. Haal de banden niet te strak aan
(Fig. C-2).
3 De kussentjes van de voorhoofdsteun
dienen uw voorhoofd lichtjes te raken
wanneer het masker geplaatst is. Pas de
voorhoofdsteun indien gewenst aan
door een van de andere tabposities te
gebruiken. (Fig. C-2a). Er zijn vier
tabposities (1-4). Maak om een
tabpositie te wijzigen eerst de banden
van de hoofdband los. Druk dan de tab
van de voorhoofdsteun in en verplaats
deze naar de volgende positie (bijv. van
positie 1 naar positie 2). Maak de
®
klittenbanden om
Page 49

banden van de hoofdband weer
voorzichtig vast.
4 Pak de randen van de ventilatiekap
tegelijkertijd aan beide kanten van de
“Click”-sticker vast. Druk de
ventilatiekap stevig op de maskerbocht
om er zeker van te zijn dat deze goed
op zijn plaats zit.
5 Schakel de flow-generator in. Ga liggen
en controleer of het masker
comfortabel zit en of er geen
luchtlekken zijn. Als dat wel het geval is,
dient u de klittenbanden (zie stap 2) of
de voorhoofdsteun (zie stap 3) aan te
passen.
Opmerkingen:
• Als u lekkages niet kunt verhelpen, kunt u
een ander formaat kussentje proberen.
• Selecteer “Ultra” als maskeroptie bij
gebruik van de U
ResMed flow-generators die over opties
voor maskerinstelling beschikken.
LTRA MIRAGE II bij
DEMONTAGE VOOR REINIGING
Raadpleeg deel D van het illustratieblad.
1 Ademslang, hoofdband, clips voor
hoofdband, draaibare kop,
voorhoofdkussentjes, clip voor
kussentje, kussentje en
poortafdichtingen losmaken en van
elkaar af halen.
2 Druk met uw duim op de zijkant van de
ventilatiekap om deze van de
maskerbocht te verwijderen.
3 Druk de tab van de voorhoofdsteun in
en beweeg deze voorbij de bovenste
tabpositie. Nu kunt u de
voorhoofdsteun van het maskerframe
verwijderen (Fig. D-1).
4 Houd vanuit de binnenkant van het
maskerframe één kant van de bochtclip
op zijn plaats en laat de andere zijde van
de clip los (Fig. D-2). Verwijder de clip
en de maskerbocht van het
maskerframe.
VOORZICHTIG
Dit masker is niet compatibel met
AutoSet T
inwendige druksensorlijn beschikken. Het
is compatibel met alle andere ResMed
AutoSet
™
flow-generators die over een
™
flow-generators.
HET MASKER VERWIJDEREN
Druk om het masker te verwijderen de tabs
van de hoofdbandclips in. Hierdoor komen
de clips los van het maskerframe. Trek het
masker en de hoofdband van uw hoofd.
Opmerkingen:
• Trek de hoofdband niet van uw hoofd
zonder de clips eerst los te maken.
• Controleer of u de hoofdbandclips of de
hoofdband zonder hulp kunt verwijderen.
HET REINIGEN VAN HET MASKER
IN DE THUISSITUATIE
Opmerkingen:
• Reinig de hoofdband voor het eerste
gebruik, omdat de verf misschien kan
afgeven. Het is van belang om de
hoofdband altijd op de hand te wassen.
• De hoofdband kan worden gewassen
zonder te worden gedemonteerd.
DAGELIJKS/NA IEDER GEBRUIK
Was de onderdelen van het masker op de
hand, in een lauwe zeepoplossing. Gebruik
zuivere zeep. De onderdelen goed spoelen
en laten drogen, maar niet in direct zonlicht.
NEDERLANDS
Page 50

WEKELIJKS
Was de hoofdband op de hand in een
warme zeepoplossing. Gebruik zuivere
zeep. Goed uitspoelen en laten drogen,
maar niet in direct zonlicht.
. VOORZICHTIG
• Gebruik voor de reiniging van de
onderdelen van het masker of de
luchtslangen geen oplossingen die
bleekmiddel, chloor, alcohol, aroma's,
moisturisers, antibacteriële zeep of
geuroliën bevatten. Deze oplossingen
kunnen schade veroorzaken en de
levensduur van het product bekorten.
• Stel geen enkel onderdeel van het
maskersysteem of de slangen bloot
aan direct zonlicht, omdat dat ten
koste gaat van de levensduur ervan.
• Als er sprake is van zichtbare gebreken
van een maskeronderdeel (scheuren,
haarscheuren, barsten, enz.), moet dit
worden weggegooid en vervangen.
HET REINIGEN VAN HET MASKER
TUSSEN TWEE PATIËNTEN DOOR
Het masker is gevalideerd voor gebruik
door meerdere patiënten. Artsen dienen
voor verdere bijzonderheden de
Handleiding voor desinfectie van het Ultra
Mirage II neusmasker te raadplegen.
Volg, om de hoofdband te reinigen voor
overgang naar de volgende patiënt, de
methode die wordt beschreven in het
vorige hoofdstuk “Het reinigen van het
masker in de thuissituatie”.
HET MASKER OPNIEUW
MONTEREN
Raadpleeg deel E van het illustratieblad.
1 Druk de poortafdichtingen op de
poorten. Controleer daarbij of de tabs
van de poorten van het masker af zijn
gericht.
2 Steek de maskerbocht in het
maskerframe en zet deze vast met de
bochtclip aan de binnenkant van het
frame (Fig. E-1). De platte zijde van de
bochtclip moet in de richting van het
maskerframe zijn gericht. Als u de
maskerbocht op de juiste wijze hebt
gemonteerd, beweegt deze niet als u
probeert deze krachtig van het frame te
trekken.
3 Pak de randen van de ventilatiekap
tegelijkertijd aan beide kanten van de
“Click”-sticker vast. Druk de
ventilatiekap stevig op de maskerbocht
om er zeker van te zijn dat deze goed
op zijn plaats is geklikt (Fig. E-2).
4 Druk de draaibare kop op het uiteinde
van de maskerbocht.
5 Bevestig de voorhoofdkussentjes op de
voorhoofdsteun door de kussenplugs in
de beide openingen op de achterzijde
van de voorhoofdsteun te duwen
(Fig. E-3). Duw de kussentjes stevig
tegen de voorhoofdsteun, om te
verzekeren dat deze goed vastzitten op
de voorhoofdsteun.
6 Sluit de voorhoofdsteun weer aan op
het maskerframe. Druk op de tab en
plaats de voorhoofdsteun in een van de
vier tabposities (Fig. E-4).
7 Monteer de groefrand van het
neuskussentje in het maskerframe.
Bevestig eerst de bovenkant, ga dan
verder rondom het masker en duw het
kussentje in het frame, waarbij u zorgt
voor een goede afdichting. Duw daarna
de kussenclip over het kussen heen op
het maskerframe, let er daarbij op dat de
clip overal op zijn plaats klikt (Fig. E-5).
Page 51

8 Maak de hoofdbandclip vast aan het
maskerframe. Trek de hoofdbanden
door de sleuven op de voorhoofdsteun
en door de hoofdbandclips. Het U
IRAGE-label op de hoofdband moet
M
LTRA
naar buiten zijn gericht en zich ter
hoogte van uw nek bevinden wanneer
de banden zijn geplaatst. Maak de
klittenbanden vast.
TECHNISCHE SPECIFICATIES
DRUK/FLOW-CURVE
Raadpleeg deel A van het illustratieblad.
INFORMATIE OMTRENT DODE
RUIMTE
Met ‘dode ruimte’ wordt het lege volume
van het masker tot aan de draaibare kop
bedoeld.
De dode ruimte van het masker varieert al
naar gelang de afmetingen van het
kussentje, maar is minder dan 135 mL.
Opm.: De fabrikant behoudt zich het recht
voor om deze specificaties zonder
kennisgeving te wijzigen.
VERVANGINGSONDERDELEN
Nummer Onderdeel
16563 Clip voor kussentje
16557 Kussentje, groot
16558 Kussentje, vlak
16735 Kussentje, vlak-breed
16556 Kussentje, standaard
16566 Bochtassemblage
16572 Bochtclip (1 st.)
Nummer Onderdeel
16573 Bochtclip (10 st.)
60123 Voorhoofdkussentjes (1 st.)
60124 Voorhoofdkussentjes (10 st.)
16590 Voorhoofdsteun met
kussentjes
16595 Frameconstructie
16733 Hoofdband, standaard
16118 Hoofdband, klein
16119 Hoofdband, groot
16569 Hoofdbandclip (2 st.)
16734 Hoofdbandclip (10 st.)
16560 Maskerframe
16570 Poortafdichting(en) (2 st.)
16571 Poortafdichting(en) (10 st.)
16565 Draaibare kop
16575 Ventilatiekap
BEPERKTE GARANTIE
ResMed garandeert dat uw ResMedmaskersysteem, met inbegrip van de
onderdelen maskerframe, kussentje,
hoofdband, slangen en andere accessoires
(hierna te noemen het Product), vrij is van
fouten in materialen en vakmanschap voor
een periode van negentig (90) dagen vanaf
de datum van aanschaf door de eerste
consument.
Voor meer bijzonderheden verwijzen wij u
naar de garantie.
Opm.: Vertalingen zijn gebaseerd op basis van de Engelse versie van deze gids. Er kan echter
sprake zijn van minieme variaties als gevolg van de desinfectie/sterilisatie-procedures die in
sommige landen gelden. ResMed heeft al deze wijzigingen beoordeeld en alle hierin vervatte
procedures zijn gevalideerd.
NEDERLANDS
Page 52

Component of: 168143/1 05 11
 Loading...