

Page 1

S8 Series II
S8 AutoSet™ II
Elite™ II
S8
POSITIVE AIRWAY PRESSURE DEVICES
User Guide
English • Français • Español • Português
Rx Only
Page 2

ResMed Ltd (Manufacturer) 1 Elizabeth Macarthur Drive Bella Vista NSW 2153 Australia
ResMed Corp (US Designated Agent) 14040 Danielson Street Poway CA 92064-6857 USA
ResMed (UK) Ltd (EU Authorized Representative) 96 Milton Park Abingdon Oxfordshire OX14 4RY UK
ResMed Offices Australia, Austria, Brazil, China, Finland, France, Germany, Hong Kong, India, Japan, Malaysia, Netherlands, Norway, New Zealand,
Singapore, Spain, Sweden, Switzerland, UK, USA (see www.resmed.com for contact details).
Protected by patents: AU 691200, AU 697652, AU 709279, AU 724589, AU 730844, AU 736723, AU 750095, AU 750761, AU 764761, AU 779327, AU
2002231456, CN 02804930.6, EP 0651971, EP 0661071, EP 0920845, EP 0934723, EP 1028769, EP 1126893, EP 1502618, EP 1144036, JP 3580776, JP
3778797, NZ 504595, US 5199424, US 5245995, US 5522382, US 5704345, US 6029665, US 6138675, US 6240921, US 6363933, US 6367474, US 6398739,
US 6425395, US 6502572, US 6591834, US 6635021, US 6705315, US 6745768, US 6817361, US 6988498, US 7004908, US 7040317, US 7100608, US
7141021. Other patents pending.
Protected by design registrations: AU 302180, AU 302181, AU 302182, AU 302183, AU 302184, AU 302185, AU 302186, CN 200430121212.2, CN
200430121213.7, CN 200430121211.8, CN 200430121214.1, CN 200430121215.6, CN 200430121216.0, CN 200430121217.5, EP 269436, HK 0412901.9, JP
1257662, JP 1257663, JP 1266956, JP 1266957, JP 1267270, JP 1267271, NZ 405614, NZ 406923, NZ 406924, NZ 406925, NZ 406926, NZ 406927, NZ
406928, US D544598, US D553228. Others pending.
S8, S8 AutoSet, S8 Elite and SmartStart are trademarks of ResMed Ltd and AutoSet and HumidAire are registered in U.S. Patent and Trademark Office.
©2008 ResMed Ltd. 338523/1 08 01
Page 3
S8 Series II
S8 AutoSet™ II
Elite™ II
S8
POSITIVE AIRWAY PRESSURE DEVICES
User Guide
English
English
Rx Only
©2008 ResMed Ltd. 338523-En g/1 08 01
Page 4

Contents
Indications for Use . . . . . . . . . . . . . . . . . . . . . . . . . . . . . . . . . . . . . . . . 1
S8 AutoSet II 1
S8 Elite II 1
Contraindications . . . . . . . . . . . . . . . . . . . . . . . . . . . . . . . . . . . . . . . . . . 1
Adverse Effects . . . . . . . . . . . . . . . . . . . . . . . . . . . . . . . . . . . . . . . . . . . . 1
Parts of the S8 Series II system . . . . . . . . . . . . . . . . . . . . . . . . . . . . . 1
Masks 2
Humidifiers 2
Setting up the S8 Series II . . . . . . . . . . . . . . . . . . . . . . . . . . . . . . . . . . 2
Connecting the Device 3
Selecting the Mask Type 3
Using the Mask-fitting Feature 3
Starting Treatment 4
Stopping Treatment 5
Changing the Settings on your S8 II Device . . . . . . . . . . . . . . . . . 5
The Standard Menu 5
The Detailed Menu 7
Messages on the S8 Series II LCD . . . . . . . . . . . . . . . . . . . . . . . . . . 9
Using the Data Card to Collect Data . . . . . . . . . . . . . . . . . . . . . . . . 9
Copy Data onto the Data Card 9
Cleaning and Maintenance . . . . . . . . . . . . . . . . . . . . . . . . . . . . . . . . 10
Daily 10
Weekly 10
Monthly 11
Replacing the Air Filter . . . . . . . . . . . . . . . . . . . . . . . . . . . . . . . . . . . . 11
Servicing . . . . . . . . . . . . . . . . . . . . . . . . . . . . . . . . . . . . . . . . . . . . . . . . . 11
Frequently Asked Questions . . . . . . . . . . . . . . . . . . . . . . . . . . . . . . 12
Troubleshooting . . . . . . . . . . . . . . . . . . . . . . . . . . . . . . . . . . . . . . . . . . 13
Technical Specifications 15
Limited Warranty . . . . . . . . . . . . . . . . . . . . . . . . . . . . . . . . . . . . . . . . . 18
i
Page 5

Indications for Use
S8 AutoSet II
The S8 AutoSet II self-adjusting sleep apnea system is indicated for the treatment of
obstructive sleep apnea (OSA) in adult patients. The S8 AutoSet II self-adjusting sleep
apnea system has two treatment modes: AutoSet and fixed-pressure CPAP.
The S8 AutoSet II
system is intended for home and hospital use.
S8 Elite II
The S8 Elite II continuous positive airway pressure (CPAP) system is indicated for the
treatment of obstructive sleep apnea (OSA) in adult patients.
The S8 Elite II
CPAP system is intended for home and hospital use.
Contraindications
Your S8 Series II is not a life-support device and may stop operating during power
failure or certain fault conditions. It should not be used by patients who are dependent
on continuous therapy.
Positive airway pressure therapy may be contraindicated in some patients with the
following pre-existing conditions:
• severe bullous lung disease
• pneumothorax
• pathologically low blood pressure
• dehydration
• cerebrospinal fluid leak, recent cranial surgery, or trauma.
Adverse Effects
English
Patients should report unusual chest pain, severe headache, or increased
breathlessness to their prescribing physician. An acute upper respiratory tract infection
may require temporary discontinuation of treatment.
The following side effects may arise during the course of therapy with the CPAP device:
• drying of the nose, mouth, or throat
• nosebleed
• bloating
• ear or sinus discomfort
• eye irritation
• skin rashes.
Parts of the S8 Series II system
Your S8 Series II device comprises:
• S8 Series II device
• Power cord
• Carry bag
• 2 m air tubing.
1Indications for Use
Page 6
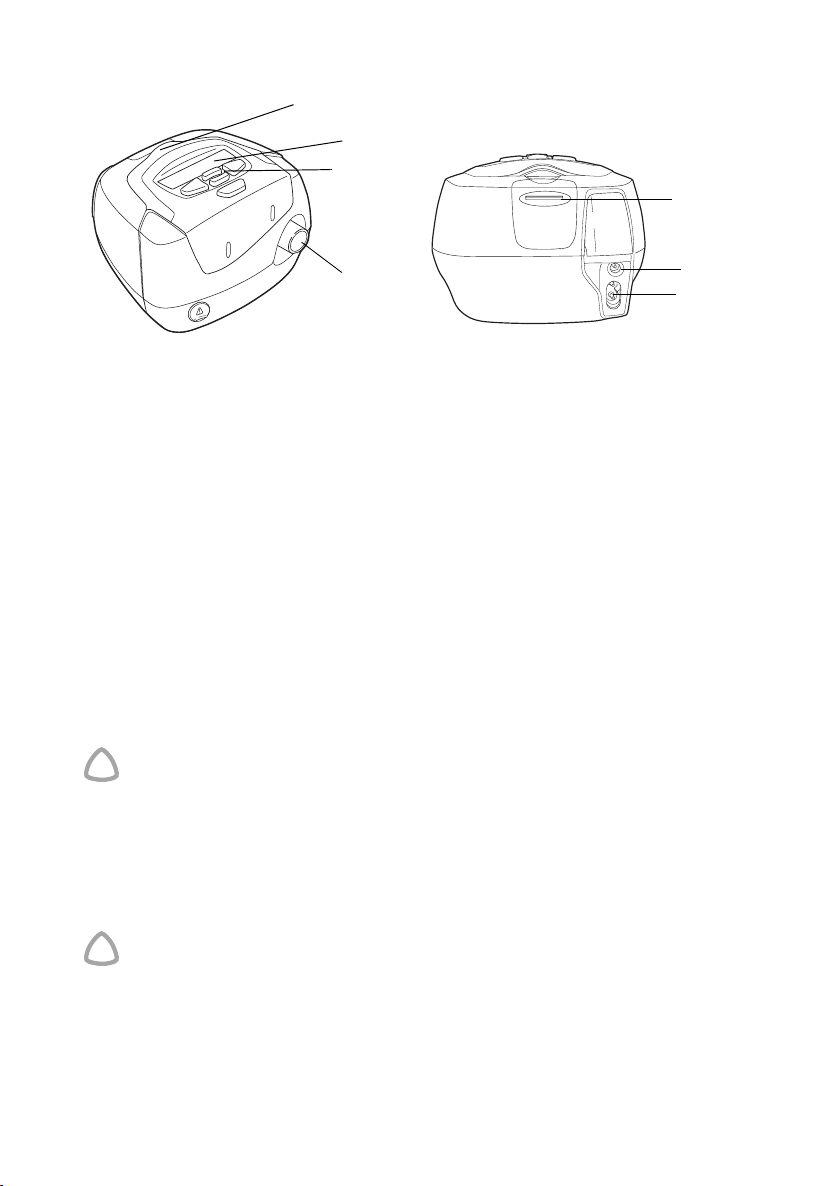
Carry handle
Screen
Keypad
Data Card
slot
Air outlet
Accessories available:
• Integrated humidifier
• Front cap
• 3 m air tubing
• DC-12 converter
• ResMed Tubing Wrap.
DC
AC
Masks
A list of masks (and their settings) compatible with these devices can be found on
www.resmed.com, on the Products page under Service and Support.
Humidifiers
A list of humidifiers compatible with ResMed devices can be found on
www.resmed.com, on the Products page under Service and Support.
Setting up the S8 Series II
WARNING
!
• Make sure the power cord and plug are in good condition and the
equipment is not damaged.
• Only ResMed air tubing should be used with the device. A different type of
air tubing may alter the pressure you actually receive and reduce the
effectiveness of your treatment.
• Blocking the hose and/or air inlet of the device while in operation could lead
to overheating of the device.
CAUTION
!
• Be careful to place the device where it cannot be bumped, and where no one
will trip over the power cord.
• If you put the device on the floor, make sure the area is free from dust and
clear of bedding, clothes or other objects that could block the air inlet.
• Make sure the area around the device is dry and clean.
2
Page 7

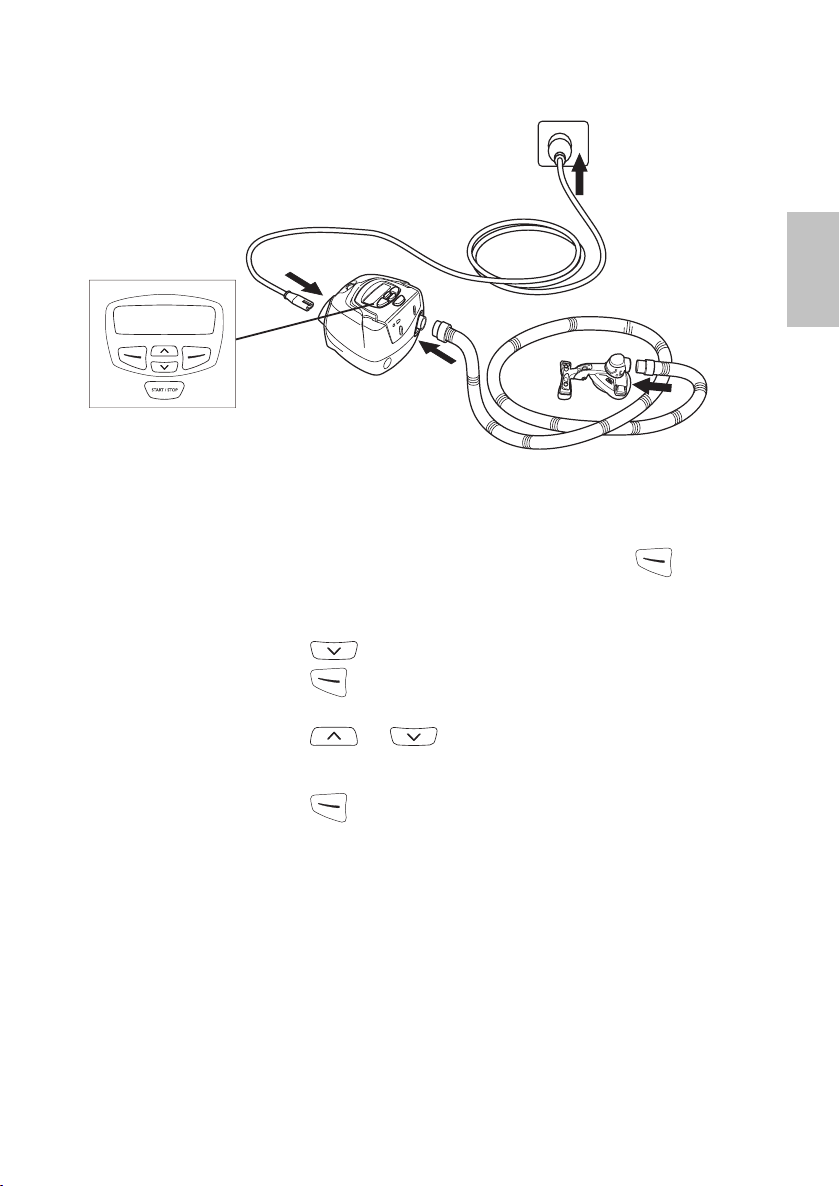
Connecting the Device
2
1
3
4
LCD and Keypad
Selecting the Mask Type
To ensure your device functions as intended with your selected mask, you need to
select the mask type that you are using.
1 With the RAMP or SETTLING screen displayed, press . (In CPAP mode, the
standby screen displays RAMP. In AutoSet mode (S8 AutoSet II only) the
standby screen displays SETTLING.)
2 Press until MASK is displayed.
English
3 Press to change the setting.
4 Press or until you see the setting that you require.
5 Press to apply.
Using the Mask-fitting Feature
You can use the S8 Series II mask-fitting feature to help you fit your mask properly. This
feature delivers air pressure for a three-minute period, prior to starting treatment,
during which you can check and adjust your mask fit to minimize leaks.
Note: Make sure that the mask setting on the MASK screen is the same as the mask you
are using.
1 Fit your mask as described in the mask user instructions.
2 With the RAMP or SETTLING screens displayed, hold down for at least
three seconds until air pressure delivery starts.
3Setting up the S8 Series II
Page 8
Your device will ramp to the mask-fit pressure and will remain at this pressure
for three minutes.
The following displays on the LCD screen indicating that the mask-fitting feature
is operating, where: ***** is an excellent fit;****- is a very good fit; ***-- is a
good fit; while **---, *---- and ----- each require you to adjust your mask.
MASK FIT:
excelnt
*****
3 Adjust your mask, mask cushion and headgear until you have a secure and
comfortable fit.
After three minutes, the pressure reverts to the set pressure and treatment will
begin. If you do not wish to wait three minutes, hold down for at least
three seconds to start treatment immediately.
If you press for less than three seconds, the unit will return to standby
mode (the RAMP or SETTLING screen).
Starting Treatment
1 Make sure the power is on. The product name is displayed briefly on the screen,
then the standby screen displays RAMP (or SETTLING). Press or to
increase or decrease the ramping (or settling) period.
2 Fit mask, lie down and arrange the air tubing so that it is free to move if you turn
in your sleep.
CAUTION
!
Do not leave long lengths of air tubing around the top of your bed. They could
twist around your head or neck while you are sleeping.
3 To start treatment, press .
If your clinician has set up the device to start delivering therapy automatically
using SmartStart™, your device will start when you breathe into your mask.
4 Fit your mask as described in the mask user instructions.
WARNING
!
A mask should not be used unless the S8 Series II device is powered and
operating properly.
When treatment begins, if ramp is set, the pressure increases from a low
pressure to the prescribed treatment pressure over the set period. Ramping is
designed to help you adjust to an increase in pressure gradually, and enhance
your comfort.
4
Page 9
Stopping Treatment
To stop treatment at any time, remove your mask and press .
If your clinician has enabled SmartStart, simply remove your mask and treatment will
end.
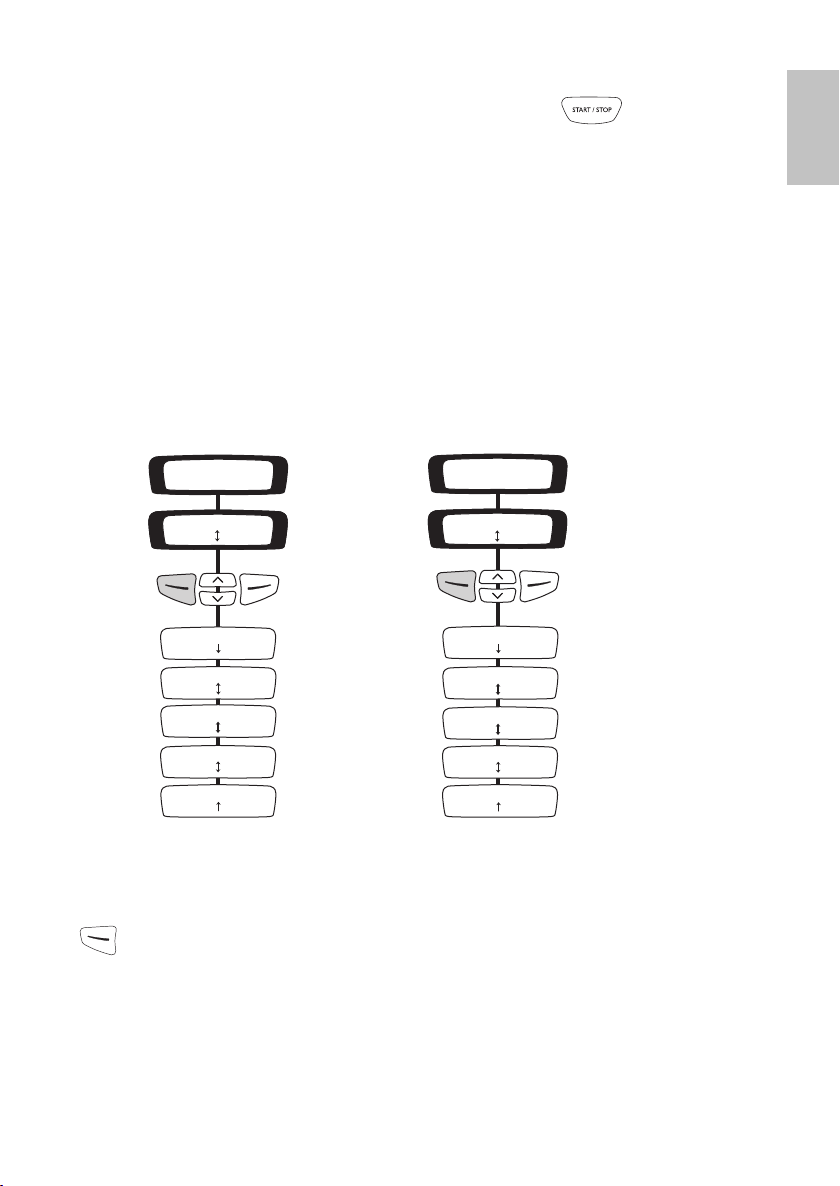
Changing the Settings on your S8 II Device
You can change settings (such as Ramp Time, EPR Level) on the S8 II by using the
keypad and LCD. When the device is in standby mode you can display a series of
screens (a menu) on the LCD screen in order to view and change the settings for a
particular function.
The Standard Menu
Your clinician will have enabled the menu on your S8 Series II device. The picture
shows the standard menu in each mode.
CPAP
AUTOSET
English
WELCOME
S8 CLASSIC
>>>>>>
S8 CLASSICRAMP: 10min
menu
EPR LEVEL: 1
change exit
USED HRS: 08000
exit
USAGE: 1000/1068
exit
MASK: ULTRA
change exit
SW: SX4800100
exit
*
WELCOME
S8 CLASSIC
>>>>>>
S8 CLASSICSETTLING: 10min
menu
EPR LEVEL: 1
change exit
USED HRS: 08000
exit
USAGE: 1000/1068
exit
MASK: ULTRA
change exit
SW: SX4800100
exit
*
* Only displayed if access set by clinician.
Note: The AutoSet menu is available on the S8 AutoSet II only.
To enter the standard menu from the standby (RAMP or SETTLING) screen, press
.
5Changing the Settings on your S8 II Device
Page 10

You can use this menu to change the:
• Expiratory Pressure Relief (EPR) settings
Your clinician may have set up your device to deliver EPR. This can be used to help
ease any discomfort you may experience when breathing out during treatment.
There are four settings: OFF (no EPR); 1 (lowest EPR); 2; and 3 (highest EPR).
The EPR LEVEL screen only appears if your clinician has enabled access to the EPR
settings.
To change the EPR level, select . Press or until you see the
setting that you require.
• Mask type – see page 3.
You can also view the total number of hours of treatment (USED HRS); the number of
sessions that the S8 Series II device was used in a usage period (USAGE); and the
current software version (SW).
6
Page 11
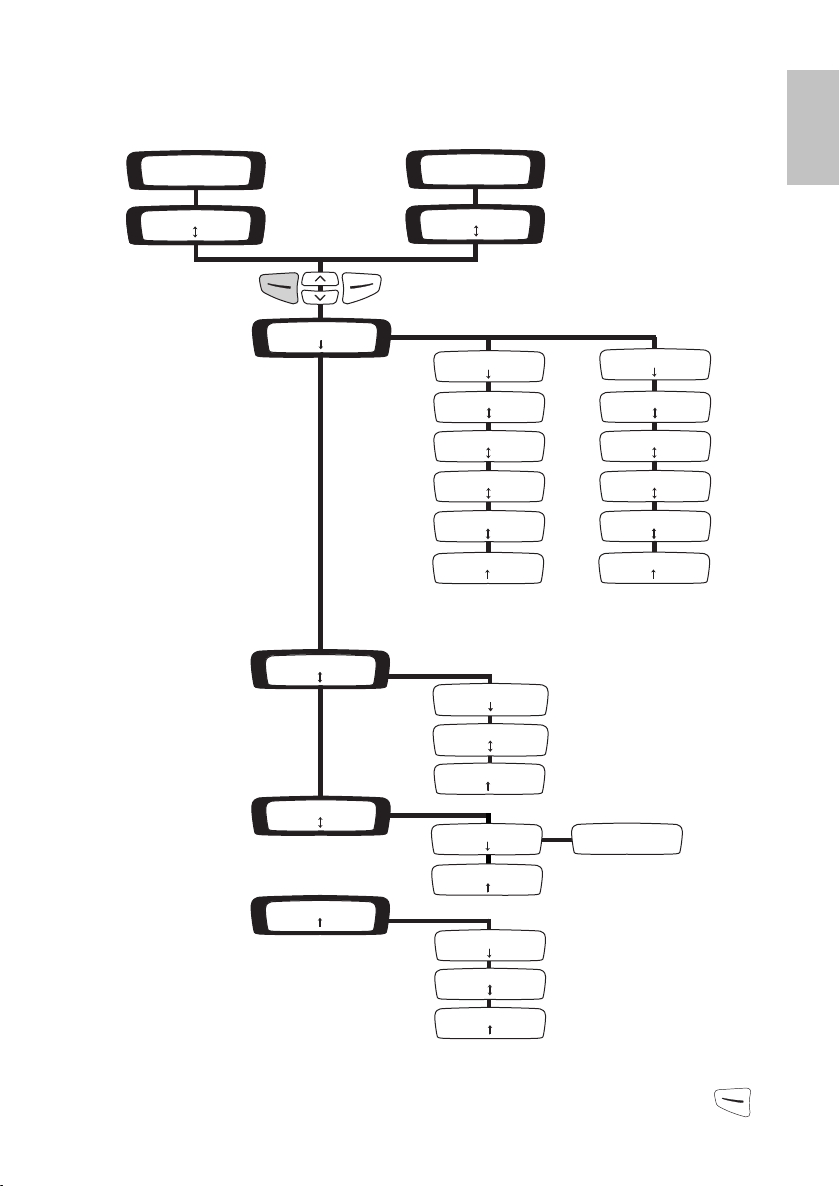
The Detailed Menu
Your clinician may have enabled a detailed menu on your S8 Series II device. The
picture shows the detailed menu in each mode.
CPAP
WELCOME
>>>>>>
AUTOSET
WELCOME
>>>>>>
English
RAMP: 10min
menu
SETTLING: 10min
menu
AUTOSETCPAP
SETTINGS
enter exit
RESULTS
enter exit
NS
OPTIO
enter exit
SERVICING
enter exit
EPR LEVEL: 1
change exit
MASK: ULTRA
change exit
TUBE LENGTH: 2m
change exit
ID: NONE
HUM
change exit
SMARTSTART: ON
change exit
LEAK ALERT: OFF
change exit
USED HRS: 08000
exit
USAGE: 1000/1068
exit
DATA
T
AR
SM
enter exit
DATA
T
AR
SM
enter exit
LANG: ENGLIS
change exit
SN: 12345678912
exit
PCB: 123456789123
4567 exit
SW: SX4800100
exit
H
**
EPR LEVEL: 1
change exit
MASK: ULTRA
change exit
TUBE LENGTH: 2m
change exit
HUM
change exit
SMARTSTART: ON
change exit
LEAK ALERT: OFF
change exit
*
APPEAR: OFF
AUTO
change cancel
ID: NONE
**
* Only displayed if access set by clinician.
Note: The AutoSet menu is available on the S8 AutoSet II only.
To enter the detailed menu from the standby (RAMP or SETTLING) screen, press .
The SETTINGS menu screen is displayed.
7Changing the Settings on your S8 II Device
Page 12

Settings Menu
Select on the Settings menu to access the options in this menu.
You can use the Settings menu to change the:
• Expiratory Pressure Relief (EPR) settings – see page 6.
• Mask type – see page 3.
• Tube length
Scroll to TUBE LENGTH and select .
Press or until you see the setting that you require.
• Front cap
You can set up your device to use the front cap accessory.
Scroll to HUMID and select .
Press or until you see the setting that you require.
• SmartStart settings
SmartStart enables your device to start automatically when you breathe into the
mask.
Scroll to SMARTSTART and select .
Press or to change the option to ON or OFF.
• Leak alert settings
Leak alert indicates when a high mask leak is present.
Scroll to LEAK ALERT and select .
Press or to change the option to ON or OFF.
Results Menu
Select on the Results menu to access the options in this menu.
You can use the Results menu to view the total number of hours of treatment (USED
HRS) and the number of sessions that the S8 AutoSet II was used in a usage period
(USAGE).
Note: Your clinician may have customized your device to display Smart Data. Contact
your clinician for further details about Smart Data.
Options Menu
Select on the Options menu to access the options in this menu.
You can use the Options menu to change the language setting. Scroll to LANG and
select . Press or until you see the setting that you require.
Servicing Menu
Select on the Servicing menu to access the options in this menu.
You can use the Servicing menu to view the device system information.
8
Page 13
Messages on the S8 Series II LCD
Your clinician may have set your S8 Series II device to remind you about important
events, such as when to replace your mask, when to insert your Data Card (if your
device is Data Card enabled) and so on.
The reminder message is displayed on the LCD and is visible if the device is not
delivering therapy. The backlight on the LCD flashes when a message is displayed.
Your clinician can set any of the following reminders on your LCD:
Message Description Action
English
INSERT
CARD
REPLACE
MASK
CALL
PROVIDER
REPLACE
FILTER
SERVICE
DUE
May appear if your device is
Data Card enabled.
May appear when your mask
is due for replacement.
May appear as a reminder to
contact your clinician, eg, to
discuss how your therapy is
going.
May appear as a reminder to
replace the air filter on your
device.
May appear as a reminder to
return your device for service.
Insert your Data Card and follow any
instructions that your clinician has given you.
When you have done this, the message will
disappear from the LCD. Pressing (Ok)
will also remove the message.
Press (Ok) to remove the message
from your LCD, and replace your mask with a
new one.
Press (Ok) to remove the message
from your LCD, and contact your clinician.
Press (Ok) to remove the message
from your LCD, and replace the air filter.
Press (Ok) to remove the message
from your LCD, and contact your clinician.
Using the Data Card to Collect Data
If your clinician needs to review your treatment, they will ask you to use the Data Card
to copy data from your S8 Series II, and to return the card to them. The Data Card will
be provided in a protective folder.
Data that is copied to a Data Card is still stored and available on the S8 Series II device.
Copy Data onto the Data Card
1 Switch on the S8 Series II and wait until you see the standby (Ramp) screen.
2 Hold the Data Card with the arrow facing up and insert it into the Data Card slot
until it stops. Data copying starts automatically.
The “Card Inserted Please Wait” message is displayed on the S8 Series II LCD
while data is being copied. Copying takes approximately five seconds.
The “Copy Complete Remove Card” message is displayed on the LCD when
copying has finished.
9Messages on the S8 Series II LCD
Page 14
3 Remove the Data Card by gripping the end of the Data Card and pulling it out.
4 Store the Data Card in its protective folder when not in use.
5 Return the card in its protective folder to your clinician using a postal envelope.
Using the Data Card to Update Settings
If your clinician has provided a Data Card with new device settings:
1 With the device in standby (Ramp) mode, insert the Data Card into the Data Card
slot. Updating will start automatically.
The “Card Inserted Please Wait” message is displayed on the LCD while
updating is in progress. Updating takes approximately five seconds.
The “Settings Success Remove Card” message is displayed on the LCD if the
settings were updated successfully.
Note: This message only appears once. If you re-insert the Data Card after you
have updated your settings, this message is not displayed.
2 Remove the Data Card from the S8 Series II.
3 Store the Data Card in its protective folder when not in use.
WARNING
!
If your clinician has told you to use this Data Card to update the settings on your
device and the “Settings Success” message does not appear, contact your
clinician immediately.
Cleaning and Maintenance
WARNING
!
Beware of electric shock. Do not immerse the device or power cord in water.
Always unplug the device before cleaning and make sure it is dry before
reconnecting.
CAUTION
!
• Do not hang the air tubing in direct sunlight as it may harden over time
and eventually crack.
• Do not use bleach, chlorine, alcohol, or aromatic-based solutions,
moisturizing or antibacterial soaps or scented oils to clean the air tubing or
the device. These solutions may cause hardening and reduce the life of the
product.
Daily
Disconnect the air tubing and hang it in a clean, dry place until next use.
Weekly
1 Remove the air tubing and wash it in warm water using mild detergent.
10
Page 15
2 Rinse thoroughly, hang, and allow to dry.
3 Before next use, reassemble the mask and headgear.
4 Reconnect the air tubing.
Monthly
• Clean the exterior of the S8 Series II with a damp cloth and mild liquid soap.
• Check the air filter for holes and blockage by dirt. Replace it every six months, or
more often in a dusty environment.
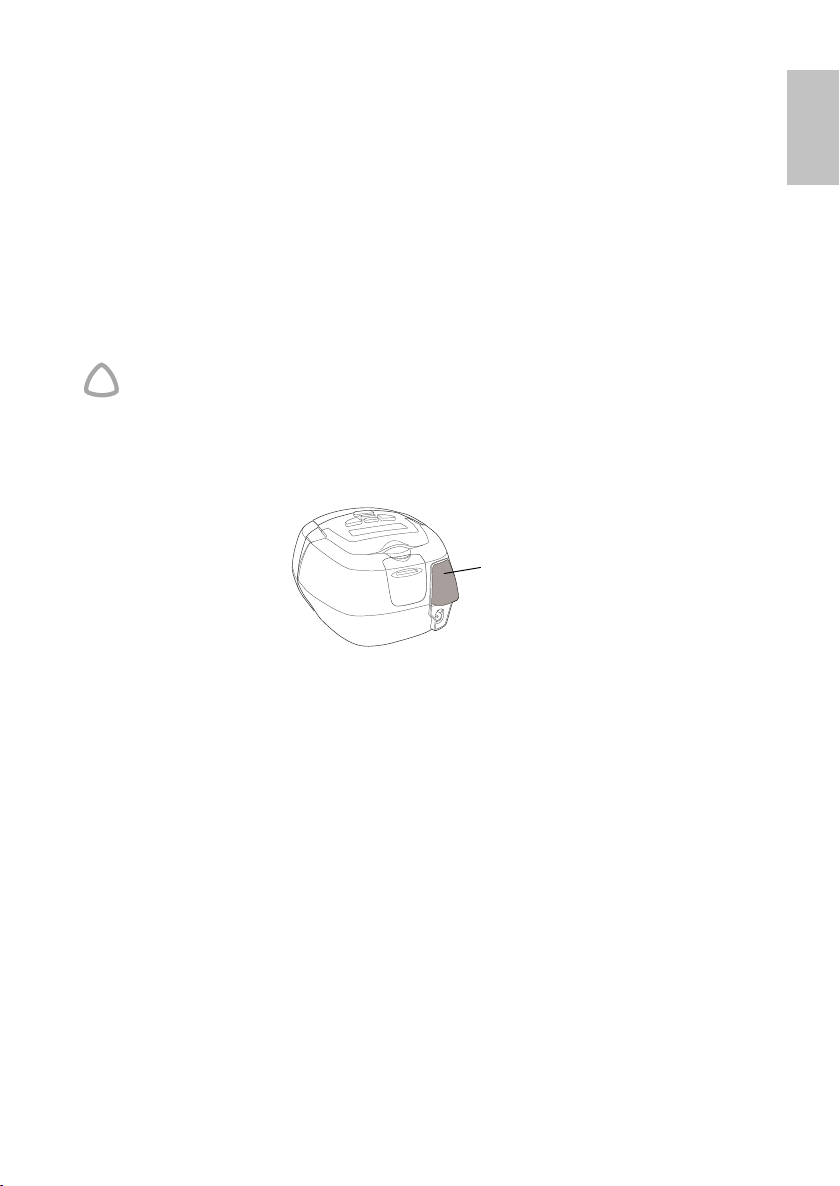
Replacing the Air Filter
CAUTION
!
• Do not wash the air filter. The air filter is not washable or reusable.
• The air filter cover protects the device in the event of accidental liquid
spillage onto the device. Ensure the air filter and air filter cover are fitted at
all times.
1 Remove the air filter cover at the back of the device.
Air filter cover
English
2 Remove and discard the old air filter.
3 Insert a new filter with the blue tinted side facing out from the device.
4 Replace the air filter cover.
Servicing
This product (S8 AutoSet II; S8 Elite II) should be inspected by an authorized ResMed
service centre five years from the date of manufacture. Prior to this, the device is
intended to provide safe and reliable operation provided that it is operated and
maintained in accordance with the instructions provided by ResMed. Applicable
ResMed warranty details are provided with the device at the time of original supply. Of
course, as with all electrical devices, if any irregularity becomes apparent, you should
exercise caution and have the device inspected by an authorized ResMed service
centre.
If you feel that your device is not performing properly, see “Troubleshooting” on
page 13.
11Replacing the Air Filter
Page 16

Frequently Asked Questions
How will it feel when I am breathing with the S8 Series II?
When you first use your S8 Series II, you may feel uncomfortable breathing against the
airflow. This is normal. You will continue to breathe normally while you sleep. The EPR
setting may also improve comfort. Take time to adjust to this new sensation.
What do I do when I want to get up in the night?
If you need to get up during the night, remove your mask and stop therapy. Always
remember to restart therapy and put your mask on when you return to bed.
What do I do if I feel air leaking out of the mask?
The S8 Series II delivers the most effective treatment when the mask is well fitted and
comfortable. Treatment can be affected by leaks, so it is important to eliminate any
leaks that may arise. For example, try repositioning the mask and adjusting the straps.
If you are using a nasal mask, try to keep your mouth closed during treatment. Air leaks
from your mouth can decrease the effectiveness of your treatment. If mouth leaks are
a problem, a full face mask or chin strap may help. Contact your clinician or equipment
supplier for further details.
If you are using a full face mask and you have problems trying to get a comfortable
mask fit, contact your clinician or equipment supplier. You may benefit from a different
size or style of mask.
Anything special I should do before putting the mask on?
Before wearing your mask, wash your face to remove excess facial oils. This will allow
a better fit and prolong the life of the mask cushion.
Do not use moisturizer when wearing a mask.
My mouth feels dry during treatment – what can I do?
You may experience dryness of the nose, mouth, and/or throat during the course of
treatment, especially during winter. In many cases, a humidifier may resolve this
discomfort. Contact your clinician for advice.
My nose is irritated during treatment – what can I do?
You may experience sneezing and/or a runny or blocked nose during the first few
weeks of treatment. In many cases, nasal irritation can be resolved with a humidifier.
Consult your clinician or equipment supplier for advice.
Can I travel with the S8 Series II?
Your S8 Series II has an internal power supply that enables it to operate in other
countries. It will operate on power supplies of 100–240V and 50/60Hz. No special
adjustment is necessary, but you will require an approved power cord for the region in
which you are using the device.
Your S8 Series II device automatically adjusts to changes in altitude up to 8500’
(2591 m).
Please consult the medical services department of your carrier if you intend to use your
S8 Series II on an aircraft. The S8 Series II complies with US FCC Part 15, Class B
requirements.
Note: Do not use your S8 Series II while the aircraft is taking off or landing.
Can I use my S8 Series II if mains (AC) power is not available?
A DC-12 converter is available to connect the S8 Series II to a 12V or 24V DC power
source. Contact your clinician for details.
12
Page 17

Troubleshooting
If there is a problem, try the following suggestions. If the problem cannot be solved,
contact your equipment supplier or ResMed. Do not attempt to open the device.
Problem/Possible Cause Solution
No display
Power is not connected. Ensure the power cable is connected and the power
switch (if available) is on.
Insufficient air delivered from S8 Series II device
Ramp or settling time is in use. Wait for air pressure to build up or change ramp or
settling time.
Air filter is dirty. Replace air filter.
Air tubing is kinked or
punctured.
Air tubing not connected
properly.
Mask and headgear not
positioned correctly.
Cap(s) missing from access
port on mask.
Pressure required for
treatment may have changed.
Device does not start when you breathe into the mask although your clinician has
enabled SmartStart.
Power cord not connected
properly.
Power outlet may be faulty. Try another power outlet.
Leak Alert has been enabled
by your clinician; SmartStart
automatically disabled.
Use of a ResMed Full Face
mask.
Breath not deep enough to
trigger SmartStart.
Excessive leak. Adjust position of mask and headgear.
Straighten or replace tubing.
Check air tubing.
Adjust position of mask and headgear.
Replace cap(s).
See your clinician to adjust the pressure.
Connect power cord firmly at both ends.
Contact your clinician.
SmartStart does not work with a full-face mask as the
anti-asphyxia valve will not allow sufficiently high
pressure on exhalation.
Take a deep breath in and out through the mask.
Replace caps if missing from ports on mask.
Air tubing may not be connected properly. Connect firmly
at both ends.
Air tubing may be kinked or punctured. Straighten or
replace.
English
13Troubleshooting
Page 18

Problem/Possible Cause Solution
Displays error message:
SYSTEM ERRxxxx Call Service! or Exxxx (where
xxxx defines an error)
Component failure. Record error number and call service.
Displays error message: Check tube!! Key if done
Air tubing is loose or blocked. Check that the air tubing is connected securely to your
mask and the air outlet to the front of the S8 Series II.
When you have checked the air tubing, press the Start/
Stop key to restart the device. If this does not clear the
message, disconnect the power cord and then
reconnect it to restart the device.
The following message is displayed on the LCD after you try to update settings
or copy data to the Data Card:
Data Card is not inserted
correctly.
The Data Card is only partly
inserted.
You may have removed the
Data Card before settings
were copied to the
S8 Escape II.
The card is not a ResScan Data
Card.
Card Error Remove Card
Check that the patient is inserting the Data Card into the
Data Card module with
Escape II is switched on and not delivering therapy
(standby mode).
Ensure that the Data Card is inserted into the Data Card
slot as far as it will go.
Reinsert the Data Card and wait for the Settings
Success Remove Card message to appear on the
LCD.
Only use a ResScan Data Card.
the arrow facing up, while the S8
The following message is displayed on the LCD after you try to update settings
or copy data to the Data Card:
There is a data error on the
Data Card.
Settings Error Remove Card
Contact your clinician immediately.
The following message is NOT displayed on the LCD after you try to update the
settings using the Data Card: Settings Success Remove Card
The settings were not
updated.
Contact your clinician immediately.
The following message is displayed on the LCD after you try to update settings
or copy data to the Data Card:
The identification details on
the Data Card do not match
the identification details on
your device.
Settings Invalid Remove Card
Contact your clinician immediately.
14
Page 19

Technical Specifications
Operating pressure range 4 to 20 cm H2O
Dimensions (H x W x D) 4.6" x 6.5" x 5.7" (112 mm x 164 mm x 145 mm)
Weight 3.1 lb (1.4 kg)
Operating Temperature +41°F to +95°F (+5°C to +36°C)
Power Supply • Input range for S8 Series II with HumidAire 3i: 100–240V, 50/60Hz;
Operating Humidity 10%–95% non-condensing
Storage and Transport
Te m p e r a t u r e
Storage and Transport
Humidity
Operating Altitude
Electromagnetic
Compatibility
Air Filter Two-layered, powder-bonded, polyester non-woven fibre
Air Tubing Flexible plastic, 6’ 6" (2 m)
Air Outlet The 22 mm conical air outlet complies with EN 1281-1
IEC 60601-1 Classifications Class II (double insulation), Type CF
Supplemental Oxygen Recommended maximum supplemental oxygen flow: 4 L/min
Housing Construction
Noise Level Radiated sound pressure is measured at <24±2 dBA at 10 cm H2O and
110V, 400Hz; 2.5A <140VA (110W) (maximum power consumption).
Instantaneous peak power consumption <340VA.
• Refer to the DC-12 converter instructions for DC ratings. Only use
the ResMed DC-12 converter for DC input.
• Typical power consumption at 20 cm H
-5°F to -140°F (-20°C to +60°C)
10%–95% non-condensing
O is 39VA or 20.7W.
2
Sea level to 8500’ (2591 m)
Product complies with all applicable electromagnetic compatibility
requirements (EMC) according to IEC60601-1-2, for residential,
commercial and light industry environments. The electromagnetic
compatibility tables for these ResMed devices can be found on
www.resmed.com, on the Products page under Service and
Support. Click on the PDF file for your device.
Flame retardant engineering thermoplastic
3’3.36” (1 m) according to ISO17510-1
English
The manufacturer reserves the right to change these specifications without notice.
Symbols which appear on the device
Attention, consult accompanying documents; Drip proof; Type CF equipment;
Dangerous voltage; Class II equipment; Start/Stop.
15Troubleshooting
Page 20

GENERAL WARNINGS AND CAUTIONS
!
A warning alerts you to possible injury.
• Read the entire guide before using the S8 Series II device.
• The advice in this guide should not supersede instructions given by the prescribing
physician.
• A patient should not connect a device to the data communication port unless
instructed to do so by their health care provider or physician. Only ResMed
products are designed to be connected to the data communication port.
Connecting other devices could result in injury, or damage to the S8 Series II
device.
• The S8 Series II device should be used with masks (and connectors)
recommended by ResMed, or by a physician or respiratory therapist. A mask should
not be used unless the S8 Series II device is turned on and operating properly. The
vent hole or holes associated with the mask should never be blocked.
Explanation: The S8 Series II device is intended to be used with special masks (or
connectors)* which have vent holes to allow continuous flow of air out of the mask.
When the device is turned on and functioning properly, new air from the device
flushes the exhaled air out through the mask vent holes. However, when the device
is not operating, insufficient fresh air will be provided through the mask, and the
exhaled air may be rebreathed. Rebreathing of exhaled air for longer than several
minutes can, in some circumstances, lead to suffocation. This applies to most
models of CPAP devices.
• In the event of power failure or machine malfunction, remove the mask.
• The S8 Series II device can be set to deliver pressures up to 20 cm H
unlikely event of certain fault conditions, pressures up to 30 cm H
• If oxygen is used with this device, the oxygen flow must be turned off when the
device is not operating. If oxygen has been left on, turn off the device, then wait
30 minutes before turning on the device.
Explanation: When the CPAP device is not in operation and the oxygen flow is left
on, oxygen delivered into the air delivery tubing may accumulate within the CPAP
machine enclosure and create a risk of fire. This applies to most types of CPAP
machines.
• Oxygen supports combustion. Oxygen should not be used while you are smoking
or in the presence of an open flame.
• Always ensure airflow is being generated by the device before the oxygen supply is
turned on.
• Always turn the oxygen supply off before stopping the airflow from the device
Note: At a fixed rate of supplemental oxygen flow, the inhaled oxygen concentration
varies, depending on where the oxygen is introduced, the pressure settings, patient
breathing pattern, mask selection and leak rate.
• Explosion hazard – do not use in the vicinity of flammable anesthetics.
• Do not open the S8 Series II case. There are no user serviceable parts inside.
Repairs and internal servicing should only be performed by an authorized service
agent.
*
O. In the
2
O are possible.
2
* Ports may be incorporated into the mask or in connectors that are near the mask.
16
Page 21

A caution explains special measures for the safe and effective use of the device.
• At low pressures, the flow through the exhalation ports of your mask may not clear
all exhaled gas from the tubing. Some rebreathing may occur.
• The airflow for breathing produced by this device can be as much as 11ºF (6ºC)
higher than the temperature of the room. Caution should be exercised if the room
temperature is warmer than 90ºF (32ºC).
• When using DC power, always use a ResMed DC-12 converter. (The DC-12
converter is available as an optional accessory. It is not supplied with all models.)
The device should not be connected to both AC and DC power sources
simultaneously.
Note: The above are general warnings and cautions. Specific warnings, cautions, and notes
appear with the relevant instructions in this User Guide.
English
17Troubleshooting
Page 22
Limited Warranty
ResMed warrants that your ResMed product shall be free from defects in
material and workmanship for the period specified below from the date of
purchase by the initial consumer. This warranty is not transferable.
Product Warranty Period
ResMed humidifiers, ResControl™, ResLink™, ResTraxx™ 1 Year
ResMed flow generators 2 Years
Accessories, mask systems (including mask frame, cushion,
headgear and tubing). Excludes single-use devices.
Note: Some models are not available in all regions.
If the product fails under conditions of normal use, ResMed will repair or replace,
at its option, the defective product or any of its components. This Limited
Warranty does not cover:
a) any damage caused as a result of improper use, abuse, modification or
alteration of the product;
b) repairs carried out by any service organization that has not been expressly
authorized by ResMed to perform such repairs;
c) any damage or contamination due to cigarette, pipe, cigar or other smoke;
d) any damage caused by water being spilled on or into a flow generator.
Warranty is void on product sold, or resold, outside the region of original
purchase.
Warranty claims on defective product must be made by the initial consumer at
the point of purchase.
This warranty is in lieu of all other express or implied warranties, including any
implied warranty of merchantability or fitness for a particular purpose. Some
regions or states do not allow limitations on how long an implied warranty lasts,
so the above limitation may not apply to you.
ResMed shall not be responsible for any incidental or consequential damages
claimed to have occurred as a result of the sale, installation or use of any ResMed
product. Some regions or states do not allow the exclusion or limitation of
incidental or consequential damages, so the above limitation may not apply to
you. This warranty gives you specific legal rights, and you may also have other
rights which vary from region to region.
For further information on your warranty rights, contact your local ResMed dealer
or ResMed office.
90 Days
R001-307/2 05 06
18
Page 23

S8 II
S8 AutoSet™ II
Elite™ II
S8
APPAREILS DE PPC
Guide utilisateur
Français
Français
Sur prescription uniquement
©2008 ResMed Ltd. 338523-FrC/1 08 01
Page 24

Sommaire
Usage prévu . . . . . . . . . . . . . . . . . . . . . . . . . . . . . . . . . . . . . . . . . . . . . . 1
S8 AutoSet II 1
S8 Elite II 1
Contre-indications . . . . . . . . . . . . . . . . . . . . . . . . . . . . . . . . . . . . . . . . . 1
Effets secondaires . . . . . . . . . . . . . . . . . . . . . . . . . . . . . . . . . . . . . . . . . 1
Composants de la S8 II . . . . . . . . . . . . . . . . . . . . . . . . . . . . . . . . . . . . 1
Masques 2
Humidificateurs 2
Installation de la S8 II . . . . . . . . . . . . . . . . . . . . . . . . . . . . . . . . . . . . . . 2
Connexion de l'appareil 3
Sélection du type de masque 3
Utilisation de la fonction d’ajustement du masque 3
Démarrage du traitement 4
Arrêt du traitement 5
Modification des réglages de votre S8 II . . . . . . . . . . . . . . . . . . . . 5
Menu standard 5
Menu détaillé 7
Messages affichés sur l'écran LCD de la S8 II . . . . . . . . . . . . . . . 9
Utilisation de la carte de données pour
collecter des données
Copie des données sur la carte de données 10
Nettoyage et entretien . . . . . . . . . . . . . . . . . . . . . . . . . . . . . . . . . . . . 11
Quotidien 11
Hebdomadaire 11
Mensuel 12
Remplacement du filtre à air . . . . . . . . . . . . . . . . . . . . . . . . . . . . . . 12
Réparations . . . . . . . . . . . . . . . . . . . . . . . . . . . . . . . . . . . . . . . . . . . . . . 12
Foire aux questions . . . . . . . . . . . . . . . . . . . . . . . . . . . . . . . . . . . . . . . 13
Stratégie de dépannage . . . . . . . . . . . . . . . . . . . . . . . . . . . . . . . . . . 14
Caractéristiques 17
Garantie limitée . . . . . . . . . . . . . . . . . . . . . . . . . . . . . . . . . . . . . . . . . . 20
. . . . . . . . . . . . . . . . . . . . . . . . . . . . . . . . . . . . . 10
i
Page 25

Usage prévu
S8 AutoSet II
La S8 AutoSet II est un appareil autopiloté prévu pour le traitement du syndrome
d'apnées obstructives du sommeil (SAOS) chez l'adulte. La S8 AutoSet II possède deux
modes de traitement : AutoSet et CPAP (pression fixe).
La S8 AutoSet II
est prévue pour une utilisation à domicile ou en milieu médical.
S8 Elite II
L’appareil de pression positive continue (PPC) S8 Elite II est prévu pour le traitement
du syndrome d’apnées obstructives du sommeil (SAOS) chez l’adulte.
La
S8 Elite II est prévue pour une utilisation à domicile ou en milieu médical.
Contre-indications
Votre S8 II n’est pas un appareil de suppléance fonctionnelle et son fonctionnement
peut être interrompu en cas de coupure de l’alimentation ou dans le cas d’une panne.
Elle ne doit pas être utilisée chez les patients dont le traitement ne peut pas être
interrompu.
Le traitement par pression positive est contre-indiqué chez certains patients présentant
l’une des pathologies préexistantes suivantes :
• affection pulmonaire bulleuse grave
• pneumothorax
• hypotension
• déshydratation
• fuite de liquide céphalo-rachidien, récent traumatisme ou intervention chirurgicale
crânienne.
Effets secondaires
Les patients doivent avertir leur médecin traitant en cas de douleurs thoraciques
inhabituelles, de maux de tête sévères ou d’une dyspnée accrue. Une infection aiguë
des voies aériennes supérieures peut nécessiter l’arrêt temporaire du traitement.
Les effets secondaires suivants peuvent apparaître au cours du traitement par PPC :
• sécheresse nasale, buccale ou de la gorge
• saignements de nez
• ballonnements
• gêne au niveau de l’oreille ou des sinus
• irritation des yeux
• érythèmes cutanés.
Français
Composants de la S8 II
Votre S8 II se compose des éléments suivants :
• S8 II
• Câble d’alimentation
• Sac de transport
• Circuit respiratoire 6' 6" (2 m).
1Usage prévu
Page 26

Poignée de transport
Écran
Clavier
Fente
d'insertion
de la carte
de données
Sortie d’air
Accessoires disponibles :
• Humidificateur intégré
• Capot avant
• Circuit respiratoire 9' 10" (3 m)
• Convertisseur DC-12
• Housse de circuit respiratoire ResMed.
CC
AC
Masques
Vous trouverez la liste des masques (et de leurs réglages) compatibles avec ces
appareils sur le site www.resmed.com, page Produits, rubrique SAV et assistance.
Humidificateurs
Vous trouverez la liste des humidificateurs compatibles avec les appareils ResMed sur
le site www.resmed.com, page Produits, rubrique SAV et assistance.
Installation de la S8 II
AVERTISSEMENT
!
• Vérifier que le câble d’alimentation et la fiche sont en bon état et que
l’équipement n’est pas endommagé.
• Seul le circuit respiratoire ResMed peut être utilisé avec l'appareil. Les
circuits respiratoires d’un autre type risquent de modifier la pression reçue
et de réduire l’efficacité du traitement.
• L'obstruction du circuit et/ou de l'entrée d'air pendant le fonctionnement
risque de causer une surchauffe de l'appareil.
ATTENTION
!
• Veiller à placer l'appareil de telle manière que personne ne puisse le faire
tomber ou se prendre les pieds dans le câble d’alimentation.
• Si l’appareil est posé sur le sol, veiller à ce qu’il le soit dans un endroit
exempt de poussière, de literie, de vêtements ou de tout autre objet
susceptible d'obstruer l'entrée d'air.
• Vérifier que la zone autour de l’appareil est propre et sèche.
2
Page 27
Connexion de l'appareil
1
2
Français
3
Écran LCD et clavier
4
Sélection du type de masque
Pour assurer un fonctionnement correct de votre appareil avec votre masque, vous
devez sélectionner le type de masque qui correspond au masque que vous utilisez.
1 Avec l'écran RAMPE ou ATTENTE affiché, appuyez sur la touche . (En mode
CPAP, le mot « RAMPE » est affiché sur l'écran d'attente. En mode AutoSet (S8
AutoSet II uniquement), c'est le mot ATTENTE qui est affiché.)
2 Appuyez sur la touche jusqu'à ce que MASQUE s'affiche.
3 Appuyez sur la touche pour modifier le réglage.
4 Appuyez sur la touche ou jusqu'à ce que le réglage souhaité
s'affiche.
5 Appuyez sur la touche pour appliquer ce réglage.
Utilisation de la fonction d’ajustement du masque
Vous pouvez vous servir de la fonction d’ajustement du masque de la S8 II pour vous
aider à mettre votre masque correctement en place. Cette fonction génère une
pression d'air pendant trois minutes avant le début du traitement pour permettre la
vérification et l'ajustement du masque dans le but de minimiser les fuites.
Remarque : assurez-vous que l'option de masque sélectionnée à l'écran MASQUE
correspond au masque que vous utilisez.
1 Mettez votre masque comme indiqué dans son mode d’emploi.
3Installation de la S8 II
Page 28

2 Avec l'écran RAMPE ou ATTENTE affiché, maintenez la touche
enfoncée pendant au moins trois secondes jusqu'à ce que la pression d'air
démarre.
Votre appareil augmente progressivement la pression jusqu'à la pression
d'ajustement du masque qu'il maintient pendant trois minutes.
Un message s'affiche sur l'écran LCD pour vous indiquer la qualité de
l'ajustement, à savoir : ***** excellent ajustement ; ****- bon ajustement ;
***-- bon ajustement, tandis que **---, *---- et ----- signifient que vous devez
ajuster votre masque.
AJUS. MSQ:
excel.
*****
3 Ajustez votre masque, la bulle du masque et le harnais jusqu’à ce que le masque
soit à la fois stable et confortable.
Au bout de trois minutes, la pression réglée est restaurée et le traitement
commence. Si vous ne voulez pas attendre trois minutes, maintenez la touche
enfoncée pendant au moins trois secondes pour démarrer le traitement
immédiatement.
Si vous appuyez sur la touche pendant moins de 3 secondes, l’appareil
retourne en mode d’attente (l’écran RAMPE ou ATTENTE s’affiche).
Démarrage du traitement
1 Vérifiez que l’appareil est sous tension. Le nom du produit s’affiche brièvement
sur l’écran LCD, après quoi l’écran RAMPE (ou ATTENTE) s’affiche. Appuyez sur
la touche ou pour augmenter ou réduire la durée de rampe (ou le
temps d'attente).
2 Mettez le masque, allongez-vous et placez le circuit respiratoire de manière à ce
qu’il puisse suivre vos mouvements pendant que vous dormez.
ATTENTION
!
Ne pas laisser de longueurs inutiles de tuyau en haut du lit. Elles risqueraient de
s’enrouler autour de votre tête ou de votre cou pendant que vous dormez.
3 Pour démarrer le traitement, appuyez sur la touche .
Si votre clinicien a configuré votre appareil pour qu'il démarre le traitement
automatiquement grâce à la fonction SmartStart™, votre appareil démarre
lorsque vous respirez dans votre masque.
4 Mettez votre masque comme indiqué dans son mode d’emploi.
4
Page 29

AVERTISSEMENT
!
Le masque ne peut être utilisé que si la S8 II est sous tension et si elle fonctionne
correctement.
Au début du traitement, si une rampe a été réglée la pression augmente d’une
pression basse confortable à la pression prescrite pour le traitement sur la durée
réglée. La rampe vous aide à vous habituer progressivement à l'augmentation de
la pression et améliore ainsi votre confort.
Arrêt du traitement
Pour arrêter le traitement à tout moment, retirez votre masque et appuyez sur la touche
. Si votre clinicien a activé SmartStart, retirez simplement votre masque pour
arrêter le traitement.
Modification des réglages de votre S8 II
Vous pouvez modifier les réglages (tels que la durée de rampe et le niveau d'EPR) de
la S8 II à l'aide du clavier et de l’écran LCD. Lorsque l'appareil est en mode d’attente,
vous pouvez afficher une série d’écrans (menu) sur l’écran LCD afin de voir et de
modifier les réglages d’une fonction particulière.
Menu standard
Votre clinicien a activé le menu sur votre S8 II. La figure représente le menu standard
dans chaque mode.
MODE
CPAP
BIENVENUE
>>>>>>
RAMPE: 10min
menu
MODE
AUTOSET
BIENVENUE
>>>>>>
ATTENTE: 10min
menu
Français
NIVEAU EPR: 1
changer quit
HRS UTIL: 08000
quit
UTILIS: 1000/1068
quit
MASQUE: ULTRA
changer quit
LOG: SX4800100
quit
*
NIVEAU EPR: 1
changer quit
HRS UTIL: 08000
quit
UTILIS: 1000/1068
quit
MASQUE: ULTRA
changer quit
LOG: SX4800100
quit
*
* S'affiche uniquement si l'accès a été activé par le clinicien.
Remarque : le menu AutoSet est disponible uniquement sur la S8 AutoSet II.
Pour ouvrir le menu standard à partir de l'écran d'attente (RAMPE ou ATTENTE),
appuyez sur la touche .
5Modification des réglages de votre S8 II
Page 30

Dans ce menu, vous pouvez modifier les paramètres suivants :
• Expiration Plus Relax (EPR)
Votre clinicien peut avoir réglé votre appareil pour qu'il délivre une EPR. Cette
fonction peut s'avérer utile pour soulager toute gêne que vous pourriez
éventuellement ressentir durant le traitement lorsque vous expirez. Quatre réglages
sont disponibles : OFF (pas d'EPR) ; 1 (EPR légère) ; 2 ; et 3 (EPR maximum).
L'écran NIVEAU EPR ne s'affiche que si votre clinicien a activé l'accès aux réglages
d'EPR.
Pour modifier le niveau d'EPR, appuyez sur la touche . Appuyez sur ou
jusqu'à ce que le réglage souhaité s'affiche.
• Type de masque – voir page 3.
Vous pouvez également afficher le nombre total d’heures de traitement (HRS UTIL), le
nombre de sessions dans la période d’utilisation de la S8 II (UTILIS) et la version du
logiciel actuellement installé sur votre appareil (LOG).
6
Page 31

Menu détaillé
*
Votre clinicien peut aussi avoir activé un menu détaillé sur votre S8 II. La figure suivante
représente le menu détaillé dans chaque mode.
MODE CPAP
BIENVENUE
>>>>>>
MODE AUTOSET
BIENVENUE
>>>>>>
RAMPE: 10min
menu
RÉGLAGES
entrée quit
RÉSULTATS
entrée quit
OPTIONS
entrée quit
ENTRETIEN
entrée quit
ATTENTE: 10min
menu
NIVEAU EPR: 1
changer quit
MASQUE: ULTRA
changer quit
LONG. TUYAU: 2m
changer quit
HUMID: AUCUN
changer quit
SMARTSTART: ON
changer quit
ALARME FUITE: OFF
changer quit
HRS UTIL: 08000
quit
UTILIS: 1000/1068
quit
SMART DATA
entrée quit
SMART DATA
entrée quit
LANGUE: FRANC.
changer quit
NS: 12345678912
quit
PCB: 123456789123
4567 quit
LOG: SX4800100
quit
* S'affiche uniquement si l'accès a été activé par le clinicien.
*
*
AFFIC. AUTO: OFF
*
changer annuler
MODE AUTOSETMODE CPAP
NIVEAU EPR: 1
changer quit
MASQUE: ULTRA
changer quit
LONG. TUYAU: 2m
changer quit
HUMID: AUCUN
changer quit
SMARTSTART: ON
changer quit
ALARME FUITE: OFF
changer quit
*
Français
Remarque : le menu AutoSet est disponible uniquement sur la S8 AutoSet II.
Pour ouvrir le menu détaillé à partir de l'écran d'attente (RAMPE ou ATTENTE), appuyez
sur la touche . L'écran RÉGLAGES s'affiche.
7Modification des réglages de votre S8 II
Page 32

Menu Réglages
Appuyez sur la touche dans le menu Réglages pour accéder aux options de ce
menu. Dans le menu Réglages, vous pouvez modifier les paramètres suivants :
• Expiration Plus Relax (EPR) – voir page 6.
• Type de masque – voir page 3.
• Longueur de tuyau
Faites défiler les options jusqu'à ce que LONG. TUYAU s'affiche, puis appuyez sur
la touche . Appuyez sur la touche ou jusqu'à ce que le réglage
souhaité s'affiche.
• Capot avant
Vous pouvez configurer votre appareil pour une utilisation avec le capot avant.
Faites défiler les options jusqu'à ce que HUMID s'affiche, puis appuyez sur la
touche . Appuyez sur la touche ou jusqu'à ce que le réglage
souhaité s'affiche.
• SmartStart
SmartStart permet à votre appareil de démarrer automatiquement lorsque vous
respirez dans le masque.
Faites défiler les options jusqu'à ce que SMARTSTART s'affiche, puis appuyez sur la
touche . Appuyez sur la touche ou pour faire passer l'option sur
ON ou OFF.
• Alarme de fuite
L'alarme de fuite vous signale la présence d'une fuite au masque élevée.
Faites défiler les options jusqu'à ce que ALARME FUITE s'affiche, puis appuyez sur
la touche . Appuyez sur la touche ou pour faire passer l'option sur
ON ou OFF.
Menu Résultats
Appuyez sur la touche dans le menu Résultats pour accéder aux options de ce
menu.
Vous pouvez également afficher le nombre total d’heures de traitement (HRS UTIL) et
le nombre de sessions dans une période d’utilisation de la S8 II (UTILIS).
Remarque : votre clinicien a peut-être personnalisé votre appareil de manière à ce qu’il
affiche les Smart Data. Contactez-le pour de plus amples informations sur les Smart
Data.
8
Page 33

Menu Options
Appuyez sur la touche dans le menu Options pour accéder aux options de ce
menu.
Dans le menu Options, vous pouvez modifier le paramètre de langue . Faites défiler les
options jusqu'à ce que LANGUE s'affiche, puis appuyez sur la touche . Appuyez
sur la touche ou jusqu'à ce que le réglage souhaité s'affiche.
Menu Entretien
Appuyez sur la touche dans le menu Entretien pour accéder aux options de ce
menu. Le menu Entretien vous permet d'afficher les informations relatives à l'appareil.
Messages affichés sur l'écran LCD de la S8 II
Votre clinicien a peut-être réglé votre S8 II pour qu’elle vous rappelle des choses
importantes, comme le moment où vous devez remplacer votre masque, le moment
où vous devez insérer votre carte de données (si votre appareil prend la carte de
données en charge), etc.
Le message de rappel s’affiche sur l’écran LCD et peut être lu même lorsque l’appareil
ne délivre pas de traitement. Le rétro-éclairage de l’écran LCD clignote lorsqu’un
message s’affiche.
Votre clinicien peut régler les rappels suivants sur votre écran LCD :
Message Description Action
INSERER
CARTE
REMPLACE
R MASQUE
Peut s’afficher si votre
appareil prend la carte de
données en charge.
Peut s’afficher lorsque votre
masque doit être remplacé.
Insérez votre carte de données et suivez les
instructions que votre clinicien vous a
données. Une fois que vous avez terminé, le
message disparaît de l’écran. Vous pouvez
aussi le faire disparaître en appuyant sur la
touche (Ok).
Appuyez sur la touche (Ok) pour
effacer le message de l’écran et remplacez
votre masque par un neuf.
Français
APPEL
CLINICIEN
REMPLACE
R FILTRE
Peut s’afficher pour vous
rappeler de contacter votre
clinicien, par exemple pour
discuter de votre traitement.
Peut s’afficher pour vous
rappeler de remplacer le
filtre à air de votre appareil.
Appuyez sur la touche (Ok) pour
effacer le message de l’écran et contactez
votre clinicien.
Appuyez sur la touche (Ok) pour
effacer le message de l’écran et remplacez
le filtre à air.
9Messages affichés sur l'écran LCD de la S8 II
Page 34

Message Description Action
ENTRETIEN
ECHU
Peut s’afficher pour vous
rappeler de retourner votre
appareil pour entretien.
Appuyez sur la touche (Ok) pour
effacer le message de l’écran et contactez
votre clinicien.
Utilisation de la carte de données pour collecter des données
Lorsque votre clinicien veut consulter les données de votre traitement, il vous demande
d’utiliser la carte de données pour copier les données de votre S8 II et de lui renvoyer
la carte. La carte de données est fournie dans un étui de protection.
Les données copiées sur une carte de données restent stockées et disponibles
dans la S8 II.
Copie des données sur la carte de données
1 Mettez la S8 II sous tension et attendez que l’écran d’attente (Rampe ou Attente)
s’affiche.
2 Tenez la carte de données avec la flèche dirigée vers le haut et insérez-la jusqu'à
la butée dans la fente prévue à cet effet. La copie des données démarre
automatiquement.
Le message « CARTE INSEREE Patientez SVP » s’affiche sur l’écran LCD de la
S8 II pendant la copie des données. La copie prend environ cinq secondes.
Le message « COPIE TERMINEE Retirez carte » s’affiche sur l’écran LCD une
fois que la copie est terminée.
3 Retirez la carte de données en la prenant par le bout qui dépasse et en tirant.
4 La carte de données doit être rangée dans son étui de protection lorsqu’elle n’est
pas utilisée.
5 Retournez la carte dans son étui de protection à votre clinicien en l'envoyant
dans une enveloppe postale.
10
Page 35

Utilisation de la carte de données pour mettre les réglages à jour
Si votre clinicien vous a fourni une carte de données qui contient de nouveaux réglages
pour votre appareil :
1 Avec l’appareil en mode d’attente (Rampe ou Attente), insérez la carte de
données dans la fente de la carte de données. La mise à jour des réglages
commence automatiquement.
Le message « CARTE INSEREE Patientez SVP » s’affiche sur l’écran LCD
pendant la mise à jour. La mise à jour prend environ cinq secondes.
Le message « CHARG. REUSSI Retirez carte » s’affiche sur l’écran LCD si la
mise à jour des réglages a réussi.
Remarque : ce message ne s’affiche qu’une seule fois. Si vous insérez la carte
de données une nouvelle fois après avoir mis vos réglages à jour, il ne s’affiche
pas.
2 Retirez la carte de données de la S8 II.
3 La carte de données doit être rangée dans son étui de protection lorsqu’elle n’est
pas utilisée.
AVERTISSEMENT
!
Si votre clinicien vous a demandé d’utiliser la carte de données pour mettre les
réglages de votre appareil à jour et si le message « CHARG. REUSSI » ne
s’affiche pas, contacter votre clinicien immédiatement.
Nettoyage et entretien
Français
AVERTISSEMENT
!
Risque de chocs électriques. Ne pas immerger l’appareil ni le câble
d’alimentation dans l’eau. Systématiquement débrancher l’appareil avant de le
nettoyer et vérifier qu’il est bien sec avant de le rebrancher.
ATTENTION
!
• Ne pas suspendre le circuit respiratoire à la lumière directe du soleil afin
d’éviter qu’il ne durcisse ou ne se fissure avec le temps.
• Ne pas utiliser d’eau de Javel, de chlore, d’alcool ou de solutions parfumées,
ni de savons hydratants ou antibactériens ou d'huiles parfumées pour le
nettoyage du circuit respiratoire ou de l'appareil. Ces solutions peuvent
causer le durcissement du matériel et réduire sa durée de vie.
Quotidien
Détachez le circuit respiratoire et suspendez-le dans un endroit propre et sec jusqu’à la
prochaine utilisation.
Hebdomadaire
1 Détachez le circuit respiratoire et nettoyez-le à l'eau tiède avec un détergent doux.
11Nettoyage et entretien
Page 36

2 Rincez soigneusement et suspendez-le pour le faire sécher.
3 Remontez le masque et le harnais avant de les réutiliser.
4 Raccordez le circuit respiratoire à nouveau.
Mensuel
• Nettoyez l’extérieur de la S8 II à l’aide d’un chiffon humide et d’un savon liquide
doux.
• Vérifiez que le filtre à air n'est ni percé ni bloqué par de la saleté. Remplacez-le tous
les six mois ou plus souvent si l'appareil est utilisé dans un endroit poussiéreux.
Remplacement du filtre à air
ATTENTION
!
• Ne pas laver le filtre à air. Il n’est ni lavable ni réutilisable.
• Le couvercle du logement du filtre à air protège l’appareil contre tout
déversement accidentel de liquides. Veiller à ce que le filtre à air et le
couvercle de son logement soient toujours en place.
1 Retirez le couvercle du logement du filtre à air à l'arrière de l'appareil.
Couvercle du
logement
du filtre à air
2 Retirez et jetez le filtre à air usagé.
3 Insérez un nouveau filtre à air avec la face bleue dirigée vers l’extérieur.
4 Remettez le couvercle du logement du filtre à air en place.
Réparations
Ce produit (S8 AutoSet II ; S8 Elite II) doit être inspecté par un service technique agréé
ResMed cinq ans après la date de fabrication. Avant cette date, l'appareil devrait
assurer un fonctionnement fiable et sûr à condition qu'il soit utilisé et entretenu
conformément aux instructions fournies par ResMed. Les informations concernant la
garantie ResMed sont fournies avec l'appareil lors de sa livraison initiale. Comme avec
tous les appareils électriques, si vous constatez un défaut quelconque, vous devez faire
vérifier l'appareil par un service technique agréé ResMed.
Si vous pensez que votre appareil ne fonctionne pas correctement, voir « Stratégie de
dépannage » page 14.
12
Page 37

Foire aux questions
Quelle sensation est-ce que je vais ressentir la première fois que je respirerai avec la S8 II ?
Lors de la première utilisation de votre S8 II, il est possible que vous ressentiez une
gêne lorsque vous respirez contre le débit d’air. Ceci est normal. Vous continuerez à
respirer normalement pendant que vous dormez. Le paramètre EPR peut également
améliorer le confort du traitement. Prenez le temps de vous habituer à cette nouvelle
sensation.
Qu’est-ce que je dois faire si j’ai besoin de me lever la nuit ?
Si vous devez vous lever pendant la nuit, retirez votre masque et arrêtez l'appareil.
N'oubliez pas de remettre le masque et de redémarrer l’appareil lorsque vous retournez
vous coucher.
Qu’est-ce que je dois faire si je sens des fuites d’air au niveau du masque ?
La S8 II délivre un traitement optimal lorsque le masque est bien ajusté et confortable
sans être trop serré. Le traitement peut être affecté par les fuites ; c'est pourquoi il est
important de les éliminer lorsqu'elles se produisent. Vous pouvez par exemple essayer
de repositionner le masque et d’ajuster les sangles.
Si vous utilisez un masque nasal, essayez de garder la bouche fermée pendant le
traitement. Les fuites d'air buccales peuvent diminuer l'efficacité de votre traitement.
Si les fuites buccales vous posent problème, vous avez la possibilité d'utiliser un
masque facial ou une mentonnière. Contactez votre clinicien ou votre prestataire de
santé pour de plus amples informations.
Si vous utilisez un masque facial et avez du mal à ajuster votre masque
confortablement, contactez votre clinicien ou votre prestataire de santé. Il est possible
qu'une autre taille ou un autre type de masque permette de résoudre votre problème.
Est-ce que je dois prendre des précautions spéciales avant de mettre le masque ?
Avant de mettre votre masque, lavez-vous le visage pour éliminer tout excès de sébum.
Cette précaution permet un meilleur ajustement du masque et prolonge la durée de vie
de la bulle du masque.
N’utilisez pas de crème hydratante lorsque vous portez le masque.
J’ai la bouche sèche pendant le traitement – Qu’est-ce que je peux faire ?
Il est possible que vous souffriez de sécheresse nasale, buccale et/ou de la gorge
pendant le traitement, notamment pendant les mois d'hiver. Dans de nombreux cas,
l'utilisation d'un humidificateur permet de pallier ce problème. Contactez votre clinicien
pour plus de détails.
J’ai le nez irrité pendant le traitement – Qu’est-ce que je peux faire ?
Il est possible que vous éternuiez et/ou que votre nez coule ou se bouche lors des
premières semaines de traitement. Dans de nombreux cas, ces symptômes d’irritation
nasale peuvent être éliminés à l’aide d’un humidificateur. Consultez votre clinicien ou
votre prestataire de santé pour plus de détails.
Est-ce que je peux emporter la S8 II avec moi en voyage ?
Votre S8 II est équipée d'une carte d’alimentation qui lui permet de fonctionner dans
différents pays. Elle peut fonctionner avec des courants de 100 – 240 V et 50/60 Hz.
Français
13Foire aux questions
Page 38

Aucun réglage spécial n'est requis, mais vous aurez besoin d'un câble d'alimentation
homologué pour le pays où vous voulez utiliser l'appareil.
Votre S8 II compense automatiquement les variations d'altitude jusqu'à 8500’
(2591 m).
Veuillez consulter le service médical de votre compagnie aérienne si vous souhaitez
utiliser votre S8 II à bord d’un avion. La S8 II est conforme aux règlements de la FCC
(USA), Partie 15, normes applicables aux équipements de Classe B.
Remarque : n'utilisez pas votre S8 II pendant le décollage ou l'atterrissage.
Est-ce que je peux utiliser ma S8 II s’il n’y a pas d’alimentation secteur (AC) ?
Un convertisseur DC-12 a été prévu pour la connexion de la S8 II à une alimentation de
12 ou 24 V CC. Contactez ResMed pour plus de détails.
Stratégie de dépannage
En cas de problème, reportez-vous aux suggestions suivantes. Si le problème persiste,
contactez votre prestataire de santé ou ResMed. N'essayez pas d’ouvrir l’appareil.
Problème/Cause possible Solution
Aucun affichage.
L’alimentation n’est pas
connectée.
Le débit d’air délivré par la S8 II est insuffisant.
La durée de rampe ou le
temps d'attente est utilisé.
Le filtre à air est sale. Remplacez le filtre à air.
Le circuit respiratoire est
entortillé ou percé.
Le circuit respiratoire n’est pas
correctement raccordé.
Le masque et le harnais sont
mal mis en place.
Un ou des bouchons
manquent au niveau des ports
du masque.
La pression requise pour le
traitement a peut-être changé.
L'appareil ne démarre pas lorsque vous respirez dans le masque bien que votre
clinicien ait activé SmartStart.
Le câble d’alimentation n’est
pas correctement branché.
La prise de courant est peutêtre défectueuse.
Vérifiez que le câble d’alimentation est branché et que
l’interrupteur de la prise de courant (le cas échéant) est
sur marche.
Attendez que la pression augmente ou modifiez la durée
de rampe ou le temps d'attente.
Désentortillez ou remplacez le circuit respiratoire.
Vérifiez le circuit respiratoire.
Ajustez la position du masque et du harnais.
Remplacez le(s) bouchon(s).
Consultez votre clinicien pour ajuster la pression.
Branchez le câble d’alimentation correctement aux deux
extrémités.
Essayez une autre prise de courant.
14
Page 39

L’alarme de fuite a été activée
par votre clinicien ; SmartStart
a donc été désactivée
automatiquement.
Vous utilisez un masque facial
ResMed.
La respiration n’est pas assez
profonde pour déclencher
SmartStart.
Fuite excessive. Ajustez la position du masque et du harnais.
Contactez votre clinicien.
SmartStart ne fonctionne pas avec un masque facial car
le niveau de pression à l’expiration permis par la valve
anti-asphyxie n’est pas suffisant.
Respirez profondément dans le masque.
Remplacez les bouchons qui manquent éventuellement
au niveau des ports du masque.
Le circuit respiratoire n'est peut-être pas raccordé
correctement. Raccordez le circuit respiratoire
correctement aux deux extrémités.
Le circuit respiratoire est peut-être entortillé ou percé.
Désentortillez ou remplacez le circuit respiratoire.
Affichage du message d'erreur : ERR SYSTEME Appel SERVICE! ou Exxxx (où
xxxx correspond à un numéro d'erreur)
Composant défectueux. Notez le numéro de l'erreur et appelez le SAV.
Français
Affichage du message d'erreur :
Le circuit respiratoire n’est pas
raccordé correctement ou est
bloqué.
Vérifier tuyaux! App. s/touche
Vérifiez que le circuit respiratoire est fermement
raccordé à votre masque et à la sortie d’air à l'avant de la
S8 II. Une fois que vous avez vérifié le circuit respiratoire,
appuyez sur la touche Marche/Arrêt pour redémarrer
l’appareil. Si le message ne disparaît pas, débranchez le
câble d'alimentation et branchez-le à nouveau pour
redémarrer l'appareil.
Le message suivant s’affiche sur l’écran LCD après que vous avez essayé de
mettre les réglages à jour ou de copier des données sur la carte de données :
ERREUR CARTE Retirez carte
La carte de données n’est pas
correctement insérée.
La carte de données est
insérée partiellement
seulement.
Vous avez peut-être retiré la
carte de données avant que
les réglages n’aient été copiés
sur la S8 II.
La carte n’est pas une carte de
données ResScan.
Vérifiez que vous insérez bien la carte de données dans
la fente de la carte de données avec
le haut et lorsque la S8 II est en marche mais qu’elle ne
délivre pas de traitement (mode d’attente).
Vérifiez que la carte de données est insérée jusqu'à la
butée dans la fente prévue à cet effet.
Insérez la carte de données à nouveau et attendez que le
message CHARG. REUSSI Retirez carte s’affiche
sur l’écran LCD.
Utilisez uniquement une carte de données ResScan.
la flèche dirigée vers
15Stratégie de dépannage
Page 40

Le message suivant s’affiche sur l’écran LCD après que vous avez essayé de
mettre les réglages à jour ou de copier des données sur la carte de données :
ERREUR REGLAGES Retirez carte
Erreur de données sur la carte
de données.
Contactez votre clinicien immédiatement.
Le message suivant ne s’affiche PAS sur l’écran LCD après que vous avez essayé
de mettre les réglages à jour à l’aide de la carte de données : CHARG. REUSSI
Retirez carte
Les réglages n’ont pas été mis
à jour.
Contactez votre clinicien immédiatement.
Le message suivant s’affiche sur l’écran LCD après que vous avez essayé de
mettre les réglages à jour ou de copier des données sur la carte de données :
REGL. INVALIDES Retirez carte
Les données d’identification de
la carte de données ne
correspondent pas à celles de
votre appareil.
Contactez votre clinicien immédiatement.
16
Page 41

Caractéristiques
Pression de fonctionnement 4 à 20 cm H2O
Dimensions (H x l x P) 4,6" x 6,5" x 5,7" (112 mm x 164 mm x 145 mm)
Poids 3,1 lb (1,4 kg)
Température de
fonctionnement
Alimentation électrique • Courant pour la S8 II avec l'HumidAire 3i : 100 – 240 V, 50/60 Hz ; 110
Humidité de fonctionnement 10 à 95 % sans condensation
Température de stockage et
de transport
Humidité de stockage et de
transport
Altitude de
fonctionnement
Compatibilité
électromagnétique
Filtre à air Deux couches de mousse à cellules ouvertes de polyester, imprégnées
Circuit respiratoire Plastique flexible, longueur 6’ 6” (2 m)
Sortie d’air Le raccord conique 22 mm de sortie d'air est conforme à la norme
Classifications CEI 60601-1 Classe II (double isolation), Type CF
Oxygène supplémentaire Le débit recommandé pour l'oxygène supplémentaire est 4 l/min.
Boîtier Thermoplastique ignifugé
Niveau de bruit Le niveau de pression acoustique est mesuré à moins de 24±2 dBA à
+41°F à +95°F (+5°C à +36°C)
V, 400 Hz ; 2,5 A < 140 VA (110 W) (consommation maximale de
courant). Puissance maximale instantanée < 340 VA.
• Veuillez vous référer au mode d’emploi du convertisseur DC-12 pour
les valeurs nominales de courant continu. Utilisez uniquement le
convertisseur DC-12 ResMed avec l’entrée CC.
• La consommation typique de courant à 20 cm H
20,7 W.
-5°F à +140°F (-20°C à +60°C)
10 à 95 % sans condensation
Niveau de la mer à 8500’ (2591 m)
Le produit est conforme à toutes les exigences de compatibilité
électromagnétique (CEM) conformément à CEI 60601-1-2, pour les
environnements commerciaux, résidentiels et l’industrie légère. Vous
trouverez les tableaux de compatibilité électromagnétique relatifs à ces
appareils sur le site www.resmed.com, page Produits, rubrique SAV
et assistance. Cliquez sur le fichier PDF de votre appareil.
de fibres polyester
EN 1281-1
O et à 3’ 3,36” (1 m) de distance conformément à ISO17510-1.
10 cm H
2
O est 39 VA ou
2
Français
Le fabricant se réserve le droit de modifier ces caractéristiques sans notification préalable.
Symboles apparaissant sur l’appareil
Attention, veuillez consulter la documentation jointe ; Protection anti-gouttes ;
Équipement de type CF ; Tension potentiellement dangereuse ;
Équipement de classe II ; Marche/Arrêt.
17Stratégie de dépannage
Page 42

AVERTISSEMENTS ET PRÉCAUTIONS D'ORDRE
!
GÉNÉRAL
Un avertissement vous met en garde contre le risque de blessure.
• Lire le manuel entièrement avant d’utiliser la S8 II.
• Les conseils donnés dans ce manuel ne remplacent pas les instructions du
médecin traitant.
• Un patient ne doit connecter aucun appareil au port de communication de données
sauf si son prestataire de santé ou son médecin lui a demandé de le faire. Seuls les
produits ResMed peuvent être connectés au port de communication de données.
La connexion d'autres appareils peut causer des blessures ou endommager la S8 II.
• La S8 II doit être utilisée avec les masques (et raccords)
ResMed, un médecin ou un kinésithérapeute respiratoire. Le masque ne peut être
porté que si la S8 II est sous tension et si elle fonctionne correctement. Les orifices
de ventilation du masque ne doivent jamais être obstrués.
Explication : la S8 II est conçue pour être utilisée avec des masques (ou raccords)*
spéciaux possédant des orifices de ventilation qui permettent l'écoulement continu
de l'air hors du masque. Lorsque l’appareil est sous tension et qu’il fonctionne
correctement, de l’air propre provenant de l’appareil expulse l’air expiré via les
orifices de ventilation du masque. Cependant, lorsque l’appareil ne fonctionne pas,
le débit d’air propre délivré dans le masque est insuffisant et une réinhalation de
l’air expiré peut se produire. Si la réinhalation de l’air expiré dure plus de quelques
minutes, elle peut, dans certains cas, entraîner une suffocation. Cela vaut pour la
plupart des appareils de PPC.
• En cas de coupure de courant ou de dysfonctionnement de l'appareil, retirer le
masque.
• La S8 II peut être réglée pour délivrer des pressions pouvant aller jusqu’à
20 cm H
jusqu’à 30 cm H
• Si de l’oxygène est utilisé avec cet appareil, l’alimentation en oxygène doit être
O. Dans le cas peu probable d’une panne, les pressions peuvent s’élever
2
O.
2
fermée lorsque l’appareil n’est pas en mode de fonctionnement. Si l'alimentation en
oxygène a été laissée ouverte, mettre l'appareil hors tension, puis attendre
30 minutes avant de le remettre sous tension.
Explication : lorsque l’appareil de PPC n’est pas en marche et que l’alimentation en
oxygène n’est pas coupée, l’oxygène délivré dans le circuit respiratoire peut
s’accumuler dans l’appareil et créer un risque d’incendie. Cela vaut pour la plupart
des appareils de PPC.
• L’oxygène est inflammable. Ne pas fumer ni approcher de flamme nue de l’appareil
lors de l’utilisation d’oxygène.
• Systématiquement vérifier qu’un débit d’air est généré par l’appareil avant d’ouvrir
l’alimentation en oxygène.
• Systématiquement couper l’alimentation en oxygène avant d’arrêter le débit d’air de
l’appareil.
*
recommandés par
* Des ports peuvent être intégrés au masque ou à des raccords proches du masque.
18
Page 43

Remarque : lorsque de l’oxygène supplémentaire est délivré à un débit fixe, la
concentration de l’oxygène inhalé varie en fonction du point d’entrée de l’oxygène, des
réglages de pression, de la respiration du patient, du masque sélectionné ainsi que du
niveau de fuite.
• Risque d’explosion — Ne pas utiliser l’appareil à proximité d’anesthésiques
inflammables.
• Ne pas ouvrir le boîtier de la S8 II. Il ne contient aucune pièce pouvant être
entretenue par l’utilisateur. Les réparations et l’entretien interne doivent être
effectués par un technicien agréé.
Une précaution (Attention) explique des mesures particulières permettant d’assurer
une utilisation efficace et sûre de l’appareil.
• À basses pressions, le débit aux orifices de ventilation de votre masque peut
s’avérer insuffisant pour expulser tous les gaz expirés hors du circuit respiratoire.
Une réinhalation peut se produire.
• La température du débit d’air produit par cet appareil peut être supérieure de 11ºF
(6ºC) à la température ambiante. Des précautions particulières devront être prises
lorsque la température ambiante est supérieure à 90ºF (32ºC).
• Lors de l'utilisation d'une alimentation CC, systématiquement utiliser le
convertisseur DC-12 ResMed. (Le convertisseur DC-12 est vendu comme
accessoire optionnel. Il n'est pas fourni avec tous les modèles.) L’appareil ne doit
pas être connecté simultanément à une alimentation AC et à une alimentation CC.
Remarque : les avertissements et précautions précédents sont d’ordre général. Les
avertissements, précautions et remarques spécifiques sont donnés avec les instructions
auxquelles ils se rapportent dans le Guide utilisateur.
Français
19Stratégie de dépannage
Page 44

Garantie limitée
ResMed garantit votre produit ResMed contre tout défaut de matériaux et de
main-d’œuvre pour la période spécifiée ci-après à compter de la date d’achat par
le client d’origine. Cette garantie n'est pas cessible.
Produit
Humidificateurs ResMed, ResControl™, ResLink™,
ResTraxx™
Appareils de traitement ResMed 2 ans
Accessoires, masques (y compris entourage rigide, bulle,
harnais et circuit respiratoire). Les appareils à usage unique
sont exclus.
Durée de la
garantie
1 an
90 jours
Remarque : certains modèles ne sont pas disponibles dans tous les pays.
En cas de défaillance du produit dans des conditions normales d’utilisation,
ResMed, à son entière discrétion, répare ou remplace le produit défectueux ou
toute pièce. Cette garantie limitée ne couvre pas :
a) tout dommage résultant d'une utilisation incorrecte, d'un usage abusif ou
d'une modification ou transformation opérée sur le produit ;
b) les réparations et l’entretien effectués par tout service de réparation sans
l'autorisation expresse de ResMed ;
c) tout dommage ou contamination causé par de la fumée de cigarette, de pipe,
de cigare ou autre ;
d) tout dommage causé par de l’eau renversée sur ou dans un appareil.
La garantie est annulée pour les produits vendus ou revendus dans un pays autre
que celui où ils ont été achetés à l'origine.
Les réclamations au titre de la garantie pour les produits défectueux doivent être
présentées au lieu d'achat par le client initial.
Cette garantie remplace toute autre garantie expresse ou implicite, y compris
toute garantie implicite de qualité marchande ou d’adéquation à un usage
particulier. Certains pays ou états n’autorisent pas les limitations de durée pour
les garanties implicites ; il est donc possible que la limitation susmentionnée ne
s’applique pas à votre cas.
ResMed ne peut être tenue pour responsable de tout dommage accessoire ou
indirect résultant de la vente, de l’installation ou de l’utilisation de tout produit
ResMed. Certains pays ou états n’autorisent ni l’exclusion ni la limitation des
dommages accessoires ou indirects ; il est donc possible que la limitation
susmentionnée ne s’applique pas à votre cas. Cette garantie vous octroie des
droits reconnus par la loi, et vous pouvez également avoir d’autres droits qui
varient en fonction du pays où vous habitez.
Pour de plus amples informations sur vos droits de garantie, veuillez contacter
votre prestataire de santé ou ResMed.
R001-307/2 05 06
20
Page 45

S8 Serie II
S8 AutoSet™ II
S8 Elite™ II
EQUIPOS DE PRESIÓN POSITIVA EN LAS VÍAS RESPIRATORIAS
Manual del usuario
Español
Español
Sólo Rx
©2008 ResMed Ltd. 338523-Sp L/1 08 01
Page 46

Índice general
Indicaciones de uso . . . . . . . . . . . . . . . . . . . . . . . . . . . . . . . . . . . . . . . . 1
S8 AutoSet II 1
S8 Elite II 1
Contraindicaciones . . . . . . . . . . . . . . . . . . . . . . . . . . . . . . . . . . . . . . . . 1
Efectos secundarios . . . . . . . . . . . . . . . . . . . . . . . . . . . . . . . . . . . . . . . 1
Piezas del sistema S8 Serie II . . . . . . . . . . . . . . . . . . . . . . . . . . . . . . . 1
Mascarillas 2
Humidificadores 2
Instalación del equipo S8 Serie II . . . . . . . . . . . . . . . . . . . . . . . . . . . 2
Conexión del equipo 3
Selección del tipo de mascarilla 3
Uso de la función de ajuste de la mascarilla 3
Inicio del tratamiento 4
Detención del tratamiento 5
Cómo modificar la configuración del equipo S8 II . . . . . . . . . . . 5
El menú estándar 5
El menú detallado 7
Mensajes en el visor del S8 Serie II . . . . . . . . . . . . . . . . . . . . . . . . . 9
Uso de la tarjeta de datos para recoger información . . . . . . . 10
Cómo copiar información a la tarjeta de datos 10
Limpieza y mantenimiento . . . . . . . . . . . . . . . . . . . . . . . . . . . . . . . . 11
Limpieza diaria 11
Limpieza semanal 11
Limpieza mensual 11
Cómo cambiar el filtro de aire . . . . . . . . . . . . . . . . . . . . . . . . . . . . . 12
Mantenimiento . . . . . . . . . . . . . . . . . . . . . . . . . . . . . . . . . . . . . . . . . . . 12
Preguntas frecuentes . . . . . . . . . . . . . . . . . . . . . . . . . . . . . . . . . . . . . 13
Solución de problemas . . . . . . . . . . . . . . . . . . . . . . . . . . . . . . . . . . . 14
Especificaciones técnicas 17
Garantía limitada . . . . . . . . . . . . . . . . . . . . . . . . . . . . . . . . . . . . . . . . . 20
i
Page 47

Indicaciones de uso
S8 AutoSet II
El sistema de ajuste automático para la apnea del sueño S8 AutoSet II está indicado
para tratar la apnea obstructiva del sueño (AOS) en pacientes adultos. El sistema de
ajuste automático para la apnea del sueño S8 AutoSet II ofrece dos modos de
tratamiento: el modo AutoSet y el modo de presión fija CPAP.
El sistema S8 AutoSet II
S8 Elite II
El sistema de presión positiva continua en las vías respiratorias (CPAP) S8 Elite II está
indicado para tratar la apnea obstructiva del sueño (AOS) en pacientes adultos.
El sistema CPAP S8 Elite II
está diseñado para uso hospitalario y domiciliario.
está diseñado para uso hospitalario y domiciliario.
Contraindicaciones
El equipo S8 Serie II no es un equipo de apoyo vital y puede dejar de funcionar si hay
un corte en el suministro de energía o si se producen determinados desperfectos. No
debe ser utilizado en pacientes que requieran un tratamiento permanente.
El tratamiento con presión positiva en las vías respiratorias puede estar contraindicado
en algunos pacientes que presenten las siguientes afecciones previas:
• enfermedad pulmonar bullosa grave
• neumotórax
• presión arterial patológicamente baja
• deshidratación
• fuga de líquido cefalorraquídeo, cirugía o traumatismo craneanos recientes.
Efectos secundarios
Los pacientes deben informar a su médico tratante si tienen algún dolor inusual en el
pecho, dolor de cabeza grave o mayor dificultad para respirar. Una infección aguda en
las vías respiratorias superiores puede requerir la suspensión temporal del tratamiento.
Durante el curso del tratamiento con el equipo CPAP pueden aparecer los siguientes
efectos colaterales:
• sequedad de la nariz, boca o garganta
• epistaxis
• hinchazón (por aerofagia)
• molestias sinusales o del oído
• irritación ocular
• erupciones cutáneas.
Español
Piezas del sistema S8 Serie II
El equipo S8 Serie II incluye los siguientes elementos:
• Equipo S8 Serie II
• Cable de alimentación
• Bolso para viaje
• Tubo de aire de 2 m.
1Indicaciones de uso
Page 48

Asa de transporte
Visor
Teclado
Ranura para
la tarjeta
de datos
Salida de
aire
Accesorios disponibles:
• Humidificador integrado
• Cubierta delantera
• Tubo de aire de 3 m
• Transformador DC-12
• Funda para el tubo ResMed.
CC
CA
Mascarillas
Se puede hallar una lista de las mascarillas (y sus configuraciones) que son compatibles
con estos equipos en el sitio web www.resmed.com, en la sección de servicio y
asistencia que se halla dentro de la página de productos.
Humidificadores
Se puede hallar una lista de los humidificadores que son compatibles con los equipos
de ResMed en el sitio web www.resmed.com, en la sección de servicio y asistencia
que se halla dentro de la página de productos.
Instalación del equipo S8 Serie II
ADVERTENCIA
!
• Asegúrese de que el cable de alimentación y la clavija estén en buenas
condiciones y que el equipo no esté dañado.
• Sólo deben usarse tubos de aire ResMed con el equipo. Un tubo de aire
diferente podría modificar la presión que de hecho recibe, lo que reduciría la
eficacia del tratamiento.
• Obstruir el tubo o la entrada de aire mientras el equipo está funcionando
podría provocar un sobrecalentamiento.
PRECAUCIÓN
!
• Tenga cuidado de no colocar el equipo en un lugar donde pueda ser
golpeado o donde alguien pueda tropezar con el cable de alimentación.
• Si coloca el equipo en el piso, asegúrese de que no haya polvo en el área y
de que no haya ropa, ropa de cama ni ningún otro objeto que pudiera
bloquear la entrada de aire.
• Asegúrese de que el área alrededor del equipo esté limpia y seca.
2
Page 49

Conexión del equipo
1
2
3
4
Visor y teclado
Selección del tipo de mascarilla
Para asegurarse de que el equipo funcione de la manera deseada con la mascarilla que
usted ha elegido, debe seleccionar el tipo de mascarilla que está utilizando.
1 Con la pantalla de RAMPA o ADAPTACIÓN en el visor, oprima . (En el modo
CPAP, la pantalla de espera muestra la palabra RAMPA. En el modo AutoSet
(sólo en el S8 AutoSet II), la pantalla de espera muestra la palabra ADAPTACIÓN.)
2 Oprima hasta que aparezca la palabra MASC.
3 Oprima para modificar la configuración.
4 Oprima o hasta ver la configuración que desee.
5 Oprima para aplicar la configuración.
Uso de la función de ajuste de la mascarilla
Puede usar la función de ajuste de la mascarilla de los equipos S8 Serie II para obtener
un ajuste adecuado. Esta función suministra presión de aire durante un lapso de tres
minutos antes de comenzar el tratamiento, durante los cuales usted puede verificar y
corregir el ajuste de la mascarilla a fin de minimizar las fugas.
Nota: Verifique que la configuración de la mascarilla que aparece en la pantalla MASC
coincida con la mascarilla que usted está usando.
Español
1 Colóquese la mascarilla según las instrucciones para el usuario.
3Instalación del equipo S8 Serie II
Page 50

2 Con la pantalla de RAMPA o ADAPTACIÓN en el visor, mantenga presionada la
tecla durante al menos 3 segundos, hasta que comience el suministro
de presión.
El equipo aumentará la presión hasta alcanzar la presión de ajuste de la mascarilla
y mantendrá esta presión durante tres minutos.
En el visor aparecerá la información que figura a continuación. Dicha información
indica que la función de ajuste de la mascarilla está funcionando y tiene el
siguiente significado: ***** es un ajuste excelente;****- es un muy buen
ajuste; ***-- es un buen ajuste; **---, *---- y ----- significan que usted debe ajustar
la mascarilla.
AJUS. MASC:
excel.
*****
3 Ajústese la mascarilla, la almohadilla y el arnés hasta lograr un ajuste firme y
cómodo.
Transcurridos 3 minutos, la presión volverá a la presión configurada y se iniciará
el tratamiento. Si no quisiera esperar tres minutos, mantenga presionada la tecla
durante al menos tres segundos y el tratamiento comenzará
inmediatamente.
Si oprime la tecla durante menos de tres segundos, la unidad volverá al
modo de espera (se verá la pantalla de RAMPA o ADAPTACIÓN).
Inicio del tratamiento
1 Asegúrese de que la alimentación esté encendida. En el visor aparecerá el
nombre del producto durante un breve lapso de tiempo, y luego la pantalla de
espera mostrará la palabra RAMPA (o ADAPTACIÓN). Oprima o
para incrementar o disminuir el período de rampa (o adaptación).
2 Colóquese la mascarilla, recuéstese y acomode el tubo de aire de forma que éste
pueda moverse libremente si usted se da vuelta mientras duerme.
PRECAUCIÓN
!
No deje largos tramos del tubo de aire alrededor de la cabecera de la cama.
Podría enrollarse alrededor de la cabeza o cuello mientras duerme.
3 Para iniciar el tratamiento, oprima .
Si el médico ha configurado el equipo para que inicie el suministro de tratamiento
de forma automática utilizando la función SmartStart™, el equipo iniciará el
tratamiento cuando usted respire en la mascarilla.
4 Colóquese la mascarilla según las instrucciones para el usuario.
4
Page 51

ADVERTENCIA
!
Las mascarillas no deben utilizarse a menos que el equipo S8 Serie II esté
encendido y funcionando correctamente.
Cuando se inicia el tratamiento, si se ha configurado un período de rampa, la
presión se va incrementando durante el período configurado, desde una presión
baja hasta la presión de tratamiento establecida. El período de rampa está
diseñado para ayudarlo a adaptarse gradualmente al incremento de presión y
brindarle más comodidad.
Detención del tratamiento
Para detener el tratamiento en cualquier momento, quítese la mascarilla y oprima
.
Si su médico ha activado la función SmartStart, simplemente quítese la mascarilla y el
tratamiento se detendrá.
Cómo modificar la configuración del equipo S8 II
Usted puede modificar la configuración del S8 II (como por ej. el período de rampa o el
nivel de APE) por medio del teclado y el visor. Cuando el equipo está en modo de
espera, puede navegar por una serie de pantallas (un menú) en el visor, a efectos de
ver y modificar la configuración de una función determinada.
El menú estándar
El médico habrá habilitado el menú en el equipo S8 Serie II. La figura muestra el menú
estándar en cada uno de los modos.
CPAP
BIENVENIDO
>>>>>>
RAMPA: 10min
menú
NIVEL APE: 1
cambiar salir
HS USADO:
08000
USO: 1000/1068
salir
MASC:
cambiar salir
VS: SX4800100
salir
salir
ULTRA
AUTOSET
*
* Esta pantalla aparece únicamente si el médico ha habilitado el
acceso.
BIENVENIDO
>>>>>>
ADAPTACIÓN:
menú
NIVEL APE: 1
cambiar salir
HS USADO:
USO: 1000/1068
salir
MASC:
cambiar salir
VS:
08000
ULTRA
SX4800100
10min
salir
salir
*
Español
5Cómo modificar la configuración del equipo S8 II
Page 52

Nota: El menú AutoSet sólo está disponible en el equipo S8 AutoSet II.
Para ingresar al menú estándar desde la pantalla de espera (RAMPA o ADAPTACIÓN),
oprima .
Puede utilizar este menú para modificar:
• La configuración del alivio de presión espiratoria (APE)
Su médico tal vez haya configurado el equipo para que suministre APE. Esto le
puede ayudar a aliviar la incomodidad que pueda experimentar al espirar durante el
tratamiento. Hay cuatro valores: APAG (no se suministra APE); 1 (el APE más
bajo);2; y 3 (el APE más alto).
La pantalla NIVEL APE sólo aparece si su médico ha habilitado el acceso a la
configuración del APE.
Para modificar el nivel del APE, seleccione . Oprima o hasta ver
la configuración que desee.
• El tipo de mascarilla – consulte página 3.
También puede ver la cantidad total de horas de tratamiento (HS USADO); la cantidad
de sesiones en las que el S8 Serie II se usó durante un determinado periodo de tiempo
(USO); y la versión de software actual (VER).
6
Page 53

El menú detallado
El médico puede haber habilitado el menú detallado en el equipo S8 Serie II. La figura
muestra el menú detallado en cada uno de los modos.
CPAP
BIENVENIDO
>>>>>>
AUTOSET
BIENVENIDO
>>>>>>
RAMPA: 10min
menú
PARÁMETROS
intro salir
RESULTADOS:
intro salir
OPCIONES
intro salir
SERVICIO
intro salir
ADAPTACIÓN: 10min
menú
CPAP
NIVEL APE: 1
cambiar salir
MASC: ULTRA
cambiar salir
LONG. TUBO: 2m
cambiar salir
HUMID: NINGUNO
cambiar salir
SMARTSTART: ENCE
cambiar salir
ALERTA FUGA: APAG
cambiar salir
HS USADO: 08000
salir
USO: 1000/1068
salir
SMART DATA
intro salir
SMART DATA
intro salir
IDIOMA: ESPAÑOL
cambiar salir
NS: 12345678912
salir
PCB: 123456789123
4567 salir
VS: SX4800100
salir
NIVEL APE: 1
*
cambiar salir
MASC: ULTRA
cambiar salir
LONG. TUBO: 2m
cambiar salir
HUMID: NINGUNO
cambiar salir
SMARTSTART: ENCE
cambiar salir
ALERTA FUGA: APAG
cambiar salir
*
*
VISUAL AUTO: APAG
cambiar cancel
AUTOSET
*
Español
*
* Esta pantalla aparece únicamente si el médico ha habilitado el acceso.
Nota: El menú AutoSet sólo está disponible en el equipo S8 AutoSet II.
7Cómo modificar la configuración del equipo S8 II
Page 54

Para ingresar al menú detallado desde la pantalla de espera (RAMPA o ADAPTACIÓN),
oprima .
Aparecerá la pantalla del menú de PARÁMETROS.
Menú de parámetros
Para acceder a las opciones de este menú, seleccione en el menú de parámetros.
Puede utilizar el menú de parámetros para modificar:
• La configuración del alivio de presión espiratoria (APE) – consulte página 6.
• El tipo de mascarilla – consulte página 3.
• La longitud del tubo
Desplácese hasta LONG. TUBO y seleccione . Oprima o hasta
ver la configuración que desee.
• La cubierta delantera
Puede configurar el equipo para utilizar la cubierta delantera.
Desplácese hasta HUMID y seleccione . Oprima o hasta ver la
configuración que desee.
• La configuración de SmartStart
SmartStart le permite al equipo iniciar el tratamiento automáticamente cuando
usted respira en la mascarilla.
Desplácese hasta SMARTSTART y seleccione . Oprima o para
modificar la opción a ENCE o APAG.
• La configuración de la alerta de fuga
La alerta de fuga avisa cuando se produce una fuga grave por la mascarilla.
Desplácese hasta ALERTA FUGA y seleccione . Oprima o para
modificar la opción a ENCE o APAG.
Menú de resultados
Para acceder a las opciones de este menú, seleccione en el menú de resultados.
Puede utilizar el menú de resultados para ver la cantidad total de horas de tratamiento
(HS USADO) y la cantidad de sesiones en las que el S8 Serie II se usó durante un
determinado periodo de tiempo (USO).
Nota: Es posible que el médico haya programado el equipo para que muestre datos de
Smart Data. Para obtener más información acerca de Smart Data comuníquese con el
médico.
Menú de opciones
Para acceder a las opciones de este menú, seleccione en el menú de opciones.
Puede utilizar el menú de opciones para modificar la configuración del idioma.
Desplácese hasta IDIOMA y seleccione .Oprima o hasta ver la
configuración que desee.
8
Page 55

Menú de servicio
Para acceder a las opciones de este menú, seleccione en el menú de servicio.
Puede utilizar el menú de servicio para ver información acerca del sistema del equipo.
Mensajes en el visor del S8 Serie II
Es posible que el médico haya configurado el S8 Serie II para que le recuerde acerca de
hechos importantes, como por ejemplo cambiar la mascarilla, cuándo insertar la tarjeta
de datos (si su equipo posee el módulo correspondiente), etc.
Los recordatorios aparecen en el visor y sólo se pueden ver cuando el equipo no está
suministrando tratamiento. Cuando el mensaje aparece en el visor, la luz de fondo de
éste parpadea.
El médico puede configurar cualquiera de los siguientes recordatorios para que
aparezcan en el visor:
Mensaje Descripción Medida a tomar
INSERTAR
TAR J
CAMBIAR
MASC
LLAMAR
PROVEE
DOR
CAMBIAR
FILTRO
REALIZAR
SERVICIO
Aparece si su equipo posee
un módulo para tarjeta de
datos.
Aparece cuando es hora de
cambiar la mascarilla.
Aparece para recordarle que
se ponga en contacto con el
médico, por ejemplo, para
conversar acerca de cómo
está marchando el
tratamiento.
Aparece para recordarle que
debe cambiar el filtro de aire
del equipo.
Aparece para recordarle que
envíe el equipo a fin de
realizarle un servicio de
mantenimiento.
Inserte la tarjeta de datos y siga las
instrucciones que su médico le haya dado.
Cuando haya hecho esto, el mensaje
desaparecerá del visor. También puede hacer
desaparecer el mensaje oprimiendo la tecla
(aceptar).
Oprima la tecla (aceptar), para que
desaparezca el mensaje del visor, y cambie la
mascarilla por una nueva.
Oprima la tecla (aceptar), para que
desaparezca el mensaje del visor, y
comuníquese con el médico.
Oprima la tecla (aceptar), para que
desaparezca el mensaje del visor, y cambie
el filtro de aire.
Oprima la tecla (aceptar), para que
desaparezca el mensaje del visor, y
comuníquese con el médico.
Español
9Mensajes en el visor del S8 Serie II
Page 56

Uso de la tarjeta de datos para recoger información
Si el médico necesita analizar su tratamiento, le pedirá que use la tarjeta de datos a
efectos de copiar información desde el equipo S8 Serie II, y que después le envíe la
tarjeta. La tarjeta de datos se suministra dentro de un desplegable de protección.
La información que se copia a la tarjeta de datos permanece almacenada y disponible
en el equipo S8 Serie II.
Cómo copiar información a la tarjeta de datos
1 Encienda el S8 Serie II y espere a que aparezca la pantalla de espera (Rampa o
Adaptación).
2 Tome la tarjeta de datos con la flecha mirando hacia arriba e insértela en la ranura
de la tarjeta de datos hasta que no avance más. El copiado de la información se
inicia automáticamente.
Mientras los datos se estén copiando, aparecerá el mensaje “TARJ. INSERTADA
Espere” en el visor del S8 Serie II. El copiado tarda aproximadamente cinco
segundos.
Una vez que éste haya finalizado, en el visor aparecerá el mensaje “COPIA
COMPLETA Quitar tarjeta”.
3 Retire la tarjeta de datos tomándola del extremo y tirando hacia fuera.
4 Cuando no la esté utilizando, guarde la tarjeta de datos en el desplegable de
protección.
5 Para enviar la tarjeta al médico, colóquela en el desplegable de protección y
utilice un sobre postal.
Uso de la tarjeta de datos para actualizar la configuración
Si el médico le ha dado una tarjeta de datos con una nueva configuración para el equipo,
realice los siguientes pasos:
1 Con el equipo en modo de espera (Rampa o Adaptación), inserte la tarjeta de
datos en la ranura del módulo para tarjeta de datos. La actualización se iniciará
automáticamente.
Durante la actualización, en el visor aparecerá el mensaje “TARJ. INSERTADA
Espere”. La actualización tarda aproximadamente cinco segundos.
Si la configuración se actualizó correctamente, en el visor aparecerá el mensaje
“CONFIG CORRECTA Quitar tarjeta”.
Nota: Este mensaje aparece sólo una vez. Si vuelve a insertar la tarjeta de datos
después de haber actualizado la configuración, el mensaje no volverá a
aparecer.
2 Retire la tarjeta de datos del S8 Serie II.
10
Page 57

3 Cuando no la esté utilizando, guarde la tarjeta de datos en el desplegable de
protección.
ADVERTENCIA
!
Si el médico le ha indicado que use la tarjeta de datos para actualizar la
configuración de su equipo y el mensaje “Configuración correcta” no aparece,
comuníquese inmediatamente con él.
Limpieza y mantenimiento
ADVERTENCIA
!
Peligro de electrocución. No sumerja el equipo ni el cable de alimentación en
agua. Siempre desenchufe el equipo antes de limpiarlo y asegúrese de que esté
seco antes de enchufarlo nuevamente.
PRECAUCIÓN
!
• No cuelgue el tubo de aire a la luz solar directa, ya que puede
endurecerse con el tiempo y terminar agrietándose.
• No utilice lejía, cloro, alcohol, soluciones aromáticas, jabones humectantes
o antibacterianos o aceites aromatizados para limpiar el tubo de aire o el
equipo. Estas soluciones podrían endurecer el producto y reducir su vida
útil.
Limpieza diaria
Desconecte el tubo de aire y cuélguelo en un lugar limpio y seco hasta el próximo uso.
Limpieza semanal
Español
1 Retire el tubo de aire y lávelo con agua tibia y detergente suave.
2 Enjuáguelo bien, cuélguelo y déjelo secar.
3 Antes de usarlo otra vez, vuelva a montar la mascarilla y el arnés.
4 Vuelva a conectar el tubo de aire.
Limpieza mensual
• Limpie el exterior de la unidad S8 Serie II con un paño húmedo y un jabón líquido
suave.
• Examine el filtro de aire para verificar que no tenga agujeros ni esté obstruido por
suciedad. Reemplácelo cada seis meses, o con mayor frecuencia si se usa en un
entorno con mucho polvo.
11Limpieza y mantenimiento
Page 58

Cómo cambiar el filtro de aire
PRECAUCIÓN
!
• No lave el filtro de aire. El filtro de aire no es lavable ni reutilizable.
• La tapa del filtro de aire protege el equipo en caso de que accidentalmente
se derrame líquido sobre él. Asegúrese de que el filtro de aire y la tapa del
filtro estén colocados en todo momento.
1 Retire la tapa del filtro de aire situada en la parte trasera del equipo.
Tapa del filtro
de aire
2 Retire y deseche el filtro de aire usado.
3 Inserte un filtro nuevo colocándolo con el lado pintado de azul hacia fuera del equipo.
4 Vuelva a colocar la tapa del filtro de aire.
Mantenimiento
Este producto (S8 AutoSet II; S8 Elite II) debe ser inspeccionado por un centro de
servicio técnico autorizado de ResMed 5 años después de la fecha de fabricación.
Hasta ese momento, el equipo está diseñado para funcionar de manera segura y
confiable, siempre que se use y se mantenga de acuerdo con las instrucciones
suministradas por ResMed. Al entregar un equipo nuevo, se brinda información acerca
de la garantía correspondiente de ResMed. Por supuesto, al igual que con cualquier
equipo eléctrico, si detecta alguna irregularidad, deberá tomar precauciones y hacer
que un centro de servicio técnico autorizado de ResMed revise el equipo.
Si considera que el equipo no está funcionando correctamente, consulte “Solución de
problemas” en la página 14.
12
Page 59

Preguntas frecuentes
¿Qué sensación se tiene al respirar con el S8 Serie II?
Puede ocurrir que la primera vez que utilice el S8 Serie II se sienta incómodo por el
hecho de respirar contra el flujo de aire. Esto es normal. Usted seguirá respirando
normalmente mientras duerme. La configuración del APE también puede ayudarlo a
sentirse más cómodo. Tómese el tiempo necesario para adaptarse a esta nueva
sensación.
¿Qué debo hacer si quiero levantarme por la noche?
Si tiene que levantarse por la noche, quítese la mascarilla y detenga el tratamiento.
Siempre recuerde volver a iniciar el tratamiento y ponerse nuevamente la mascarilla al
regresar a la cama.
¿Qué debo hacer si siento que hay fugas de aire por la mascarilla?
El tratamiento suministrado por el S8 Serie II es más eficaz cuando la mascarilla está
bien colocada y resulta cómoda. Las fugas pueden perjudicar el tratamiento, por lo que
es importante eliminar todas las que pudieran surgir. Por ejemplo, intente solucionar el
problema modificando la posición de la mascarilla y ajustando las correas.
Si utiliza una mascarilla nasal, intente mantener la boca cerrada durante el tratamiento.
Las fugas de aire por la boca pueden reducir la eficacia del tratamiento. Si las fugas por
la boca resultaran ser un problema, una mascarilla facial o una correa para el mentón
podrían ser la solución. Para obtener más información, póngase en contacto con el
médico o con el proveedor de equipos.
Si usa una mascarilla facial y tiene problemas para obtener un ajuste cómodo,
comuníquese con el médico o con el proveedor del equipo. Es probable que una
mascarilla de tamaño o estilo diferente sea mejor para usted.
¿Hay algo en especial que deba hacer antes de colocarme la mascarilla?
Antes de ponerse la mascarilla, lávese la cara para quitar el exceso de grasa facial. Esto
hará que la mascarilla se ajuste mejor y que la almohadilla dure más.
No utilice cremas hidratantes cuando vaya a ponerse la mascarilla.
Se me reseca la boca durante el tratamiento; ¿qué puedo hacer?
Es posible que experimente sequedad de la nariz, boca y/o garganta durante el curso
del tratamiento, especialmente durante el invierno. En muchos casos, un humidificador
puede resolver estas molestias. Póngase en contacto con el médico para que le
recomiende qué hacer.
Se me irrita la nariz durante el tratamiento; ¿qué puedo hacer?
Durante las primeras semanas de tratamiento es posible que estornude y que le gotee
o se le tape la nariz. En muchos casos, la irritación nasal se puede resolver usando un
humidificador. Para obtener más asesoramiento, comuníquese con el médico o
proveedor de equipos.
¿Puedo viajar con el S8 Serie II?
El S8 Serie II tiene una fuente de alimentación interna que le permite funcionar en otros
países. Puede funcionar con fuentes de alimentación de 100–240 V y 50/60 Hz. No es
necesario hacer ninguna adaptación especial, pero usted debe usar un cable de
alimentación aprobado para la región en la que esté usando el equipo.
El equipo S8 Serie II se adapta automáticamente a los cambios de altitud hasta los 2591
m (8500 pies).
Español
13Preguntas frecuentes
Page 60

Si tiene intención de usar el S8 Serie II en un avión, consulte al departamento de
servicios médicos de la aerolínea. El S8 Serie II cumple con los requisitos de la Parte
15, Clase B, de la FCC (Comisión Federal de Comunicaciones) de EE.UU.
Nota: No use el S8 Serie II cuando el avión esté despegando o aterrizando.
¿Puedo usar el S8 Serie II donde no haya una red de distribución de energía eléctrica (CA)?
Para conectar el S8 Serie II a una fuente de alimentación de 12 ó 24 V de CC, existe un
transformador DC-12. Para obtener más información, comuníquese con el médico.
Solución de problemas
Si surge algún problema, intente poner en práctica las sugerencias que figuran a
continuación. Si el problema no se resuelve, póngase en contacto con el proveedor del
equipo o con ResMed. No intente abrir el equipo.
Problema/Causa posible Solución
Pantalla en blanco.
La alimentación no está
conectada.
El S8 Serie II no proporciona suficiente aire.
Se está usando el período de
rampa o el período de
adaptación.
El filtro de aire está sucio. Cambie el filtro de aire.
El tubo de aire está torcido o
roto.
El tubo de aire no está
debidamente conectado.
La mascarilla y el arnés no
están correctamente
colocados.
Falta el tapón o los tapones del
puerto de acceso de la
mascarilla.
Tal vez se ha modificado la
presión necesaria para el
tratamiento.
El equipo no inicia el tratamiento cuando usted respira en la mascarilla, aunque
el médico ha habilitado la función SmartStart.
El cable de alimentación no
está debidamente conectado.
El tomacorriente puede estar
defectuoso.
Verifique que el cable de alimentación esté conectado y
que el interruptor de corriente (en caso de haberlo) esté
encendido.
Espere a que la presión del aire haya aumentado o
modifique el período de rampa o adaptación.
Enderece o cambie el tubo.
Revise el tubo de aire.
Ajuste la posición de la mascarilla y del arnés.
Vuelva a colocarlo(s).
Hable con el médico para que modifique la presión.
Conecte el cable de alimentación firmemente en ambos
extremos.
Pruebe con otro tomacorriente.
14
Page 61

El médico ha activado la alerta
de fuga; la función SmartStart
ha quedado automáticamente
desactivada.
Está utilizando una mascarilla
facial de ResMed.
La respiración no es lo
suficientemente profunda
como para activar la función
SmartStart.
Hay una fuga excesiva. Ajuste la posición de la mascarilla y del arnés.
Póngase en contacto con el médico.
La función SmartStart no funciona con las mascarillas
faciales, ya que la válvula antiasfixia no permite que se
genere la suficiente presión al espirar.
Inhale y exhale profundamente a través de la mascarilla.
Es posible que falten los tapones de los puertos de la
mascarilla. Vuelva a colocarlos.
Puede que el tubo de aire no esté debidamente
conectado. Conéctelo firmemente en ambos extremos.
Puede que el tubo de aire esté torcido o roto. Enderece o
cambie el tubo.
Aparece un mensaje de error en el visor: ERROR SISTxxxx ¡Llamar
servicio!
Falla de un componente. Registre el número de error y llame al servicio de
o Exxxx (en el cual xxxx define un error)
asistencia.
Español
Aparece un mensaje de error en el visor:
¡¡Revisar tubo!! Pulse c/
hecho
El tubo de aire no está bien
conectado o está obstruido.
Verifique que el tubo de aire esté firmemente conectado
a la mascarilla y a la salida de aire situada en la parte
delantera del S8 Serie II. Una vez que haya verificado el
tubo de aire, pulse la tecla inicio/detención para volver a
poner en marcha el equipo. Si esto no hace que el
mensaje desaparezca, desconecte el cable de
alimentación y después vuelva a conectarlo para poner
nuevamente en marcha el equipo.
Cuando intenta actualizar la configuración del equipo o copiar información a una
tarjeta de datos, aparece el siguiente mensaje en el visor:
ERROR TARJETA
Quitar tarjeta
La tarjeta de datos no se
insertó correctamente.
La tarjeta de datos se ha
insertado sólo parcialmente.
Verifique que esté insertando la tarjeta de datos en la
ranura para tarjeta de datos, con
mientras el S8 Serie II está encendido y sin suministrar
tratamiento (en modo de espera).
Verifique que la tarjeta de datos esté insertada hasta el
fondo en la ranura correspondiente.
la flecha hacia arriba y
15Solución de problemas
Page 62

Es posible que haya retirado la
tarjeta de datos antes de que
la configuración se haya
copiado en el S8 Serie II.
Vuelva a insertar la tarjeta de datos y espere a que
aparezca el mensaje CONFIG CORRECTA Quitar
tarjeta en el visor.
La tarjeta no es una tarjeta de
datos ResScan.
Utilice únicamente una tarjeta de datos ResScan.
Cuando intenta actualizar la configuración del equipo o copiar información a una
tarjeta de datos, aparece el siguiente mensaje en el visor:
ERROR CONFIG.
Quitar tarjeta
Hay un error en la información
contenida en la tarjeta de
datos.
Comuníquese inmediatamente con su médico.
Luego de intentar actualizar la configuración por medio de una tarjeta de datos,
NO aparece el siguiente mensaje en el visor: CONFIG CORRECTA Quitar
tarjeta
La configuración no se
actualizó.
Comuníquese inmediatamente con su médico.
Cuando intenta actualizar la configuración del equipo o copiar información a una
tarjeta de datos, aparece el siguiente mensaje en el visor:
CONFIG. INVALIDA
Quitar tarjeta
Los datos de identificación en
la tarjeta de datos no
coinciden con los datos de
identificación de su equipo.
Comuníquese inmediatamente con su médico.
16
Page 63

Especificaciones técnicas
Límites de presión de
funcionamiento:
Dimensiones (altura x ancho
x profundidad)
Peso 1,4 kg (3,1 lb)
Temperatura de
funcionamiento
Fuente de alimentación • Margen de entrada para el S8 Serie II con HumidAire 3i:100–240 V,
Humedad de funcionamiento 10–95% sin condensación
Temperatura de
almacenamiento y
transporte
Humedad de
almacenamiento y
transporte
Altitud de funcionamiento
Compatibilidad
electromagnética
Filtro de aire Dos capas de fibra de poliéster no entrelazada, con unión de polvo
Tub o de ai re Plástico flexible, 2 m (6’6”)
Salida de aire La salida de aire cónica de 22 mm cumple con la norma EN 1281-1
Clasificaciones CEI 60601-1 Clase II (doble aislamiento), Tipo CF
4 a 20 cm H2O
112 mm x 164 mm x 145 mm (4,6'' x 6,5'' x 5,7'')
+5°C a +36°C (+41°F a +95°F)
50/60 Hz; 110 V, 400 Hz; 2,5 A < 140 VA (110 W) (máximo consumo
de potencia). Máximo consumo de potencia instantánea < 340 VA.
• Para obtener los valores de CC, consulte las instrucciones del
transformador DC-12. Para recibir alimentación de CC, utilice
únicamente el transformador DC-12 de ResMed.
• El consumo de potencia habitual a 20 cm H
-20°C a +60°C (-5°F a +140°F)
10–95% sin condensación
O es 39 VA ó 20,7 W.
2
Desde el nivel del mar hasta 2591 m (8500')
El producto cumple con todos los requisitos correspondientes en
materia de compatibilidad electromagnética (EMC, por sus siglas en
inglés) de acuerdo con la CEI 60601-1-2, para entornos residenciales,
comerciales y de industria ligera. Se pueden hallar los cuadros de
compatibilidad correspondientes a estos equipos de ResMed en el sitio
web www.resmed.com, en la sección de servicio y asistencia que
se halla dentro de la página de productos. Haga clic en el archivo PDF
correspondiente a su equipo.
Oxígeno suplementario Caudal máximo de oxígeno suplementario recomendado: 4 l/m
Construcción de la carcasa
Nivel sonoro La presión acústica radiada está medida a < 24 ± 2 dBA, a 10 cm H2O y
Termoplástico de ingeniería ignífuga
1 m (3’3,36”) según la norma ISO 17510-1.
Español
El fabricante se reserva el derecho de modificar las presentes especificaciones sin previo
aviso.
Símbolos que aparecen en el producto
Atención, consultar la documentación adjunta; A prueba de goteo; Equipo tipo CF;
Tensión peligrosa; Equipo Clase II; Inicio/detención.
17Solución de problemas
Page 64

ADVERTENCIAS Y PRECAUCIONES GENERALES
!
Una advertencia alerta sobre la posibilidad de que se produzcan lesiones.
• Lea el presente manual en su totalidad antes de usar el equipo S8 Serie II.
• Las recomendaciones que figuran en el presente manual no deben sustituir las
instrucciones brindadas por el médico tratante.
• El paciente no debe conectar ningún dispositivo en el puerto de comunicación de
datos, a menos que su médico o proveedor de asistencia sanitaria así se lo indique.
Únicamente los productos ResMed han sido diseñados para conectarse al puerto
de comunicación de datos. Conectar otros dispositivos puede provocar lesiones o
daños al equipo S8 Serie II.
• El equipo S8 Serie II debe utilizarse únicamente con las mascarillas (y conectores
recomendados por ResMed o por un médico o terapeuta respiratorio. Las
mascarillas no deben utilizarse a menos que el equipo S8 Serie II esté encendido y
funcionando correctamente. Nunca se debe obstruir el o los orificios de ventilación
asociados con la mascarilla.
Explicación: El equipo S8 Serie II está diseñado para utilizarse con mascarillas (o
conectores)* especiales que tienen orificios de ventilación para que el aire fluya
permanentemente hacia fuera de ellas. Mientras el equipo está encendido y
funcionando correctamente, el aire fresco que éste proporciona hace que el aire
espirado salga hacia fuera de la mascarilla a través de los orificios de ventilación. No
obstante, cuando el equipo no está funcionando, no se suministrará suficiente aire
fresco a través de la mascarilla y es posible que se vuelva a respirar aire exhalado.
Volver a respirar aire exhalado durante más de varios minutos puede, en algunas
circunstancias, provocar asfixia. Esto se aplica a la mayoría de los modelos de
equipos CPAP.
• Si se produce un corte de energía o si el equipo está funcionando mal, quítese la
mascarilla.
• El equipo S8 Serie II puede configurarse para suministrar presiones de hasta 20 cm
H
O. En el caso improbable de que se produzcan ciertos desperfectos en el
2
funcionamiento, las presiones pueden alcanzar hasta 30 cm H
• Si se utiliza oxígeno con el equipo, el flujo de éste debe apagarse cuando el equipo
O.
2
no esté funcionando. Si el oxígeno quedó activado, apague el equipo y espere 30
minutos antes de encenderlo nuevamente.
Explicación: Si el flujo de oxígeno queda encendido cuando el equipo CPAP no está
funcionando, el oxígeno suministrado al tubo de respiración puede acumularse
dentro del equipo CPAP y generar un riesgo de incendio. Esto se aplica a la mayoría
de los tipos de equipos CPAP.
• El oxígeno favorece la combustión y no debe utilizarse en presencia de una llama
expuesta o si hay un cigarrillo encendido.
• Siempre asegúrese de que el equipo esté generando un flujo de aire antes de
encender el suministro de oxígeno.
• Apague siempre el suministro de oxígeno antes de detener el flujo de aire del
equipo.
*
)
* Es posible integrar puertos en la mascarilla o en los conectores próximos a la mascarilla.
18
Page 65

Nota: A un caudal fijo de oxígeno suplementario, la concentración de oxígeno inhalado
variará según el punto por el cual éste se introduzca, los parámetros de presión, el ritmo
respiratorio del paciente, la selección de la mascarilla y el nivel de fuga.
• Peligro de explosión: no utilizar cerca de anestésicos inflamables.
• No abra la carcasa del S8 Serie II. No hay piezas dentro que el usuario pueda
reparar. Las reparaciones y el mantenimiento interno deben ser efectuados
únicamente por un agente de servicio técnico autorizado.
Una precaución explica medidas especiales a tomar para el uso seguro y eficaz del
equipo.
• Si las presiones son bajas, el flujo de aire a través de los puertos de espiración de la
mascarilla puede no ser suficiente para eliminar del tubo todos los gases espirados.
Es posible que se vuelva a respirar parte del aire espirado.
• El flujo de aire generado por este equipo para la respiración puede alcanzar una
temperatura de hasta 6ºC (11ºF) superior a la temperatura ambiente. Hay que tomar
precauciones si la temperatura ambiente es superior a 32ºC (90ºF).
• Cuando utilice alimentación de CC, use siempre el transformador DC-12 de
ResMed. (El transformador DC-12 se puede obtener como accesorio opcional. No
se suministra con todos los modelos.) El equipo no debe conectarse a fuentes de
alimentación de CA y de CC de modo simultáneo.
Nota: Las anteriores son advertencias y precauciones generales. Las advertencias,
precauciones y notas particulares aparecen en el presente manual del usuario junto a las
instrucciones pertinentes.
Español
19Solución de problemas
Page 66

Garantía limitada
ResMed garantiza que el producto ResMed que usted posee estará libre de todo
defecto de material y mano de obra durante el plazo estipulado a continuación, a partir
de la fecha de adquisición por parte del consumidor inicial. Esta garantía no es
transferible
Producto
Humidificadores ResMed, ResControl™, ResLink™,
ResTraxx™
Generadores de aire ResMed 2 años
Accesorios, sistemas de mascarilla (incluye armazón de la
mascarilla, almohadilla, arnés y tubos). Los dispositivos
descartables no están incluidos.
Nota: Algunos modelos no se encuentran disponibles en todas las regiones.
Si el producto falla en condiciones de utilización normales, ResMed reparará o
reemplazará, a opción suya, el producto defectuoso o cualquiera de sus
componentes. Esta garantía limitada no cubre:
a) cualquier daño provocado por la utilización indebida, abuso, modificación o
alteración del producto;
b) reparaciones llevadas a cabo por cualquier organización dedicada a la reparación
que no haya sido expresamente autorizada por ResMed para efectuar dichas
reparaciones;
c) cualquier daño o contaminación provocados por humo de cigarrillo, pipa, cigarro u
otras fuentes de humo;
d) cualquier daño provocado por derramar agua sobre o hacia el interior del generador
de aire.
La garantía queda anulada si el producto se vende o revende fuera de la región en la
que fue comprado originalmente.
Las reclamaciones de garantía en relación con productos defectuosos deben ser
realizadas por el consumidor inicial en el punto de venta donde el producto fue
comprado.
La presente garantía revoca cualquier otra garantía expresa o implícita, incluso
cualquier garantía implícita de comerciabilidad o idoneidad para un propósito en
particular. Algunas regiones o estados no permiten limitaciones respecto de la
duración de una garantía implícita, por lo que es posible que la limitación estipulada
anteriormente no sea aplicable en su caso particular.
ResMed no será responsable de ningún daño incidental o emergente reclamado por
haber ocurrido como resultado de la venta, instalación o utilización de cualquier
producto de ResMed. Algunas regiones o estados no permiten la exclusión o
limitación de los daños incidentales o emergentes, por lo que es posible que la
limitación estipulada anteriormente no sea aplicable en su caso particular. La
presente garantía le otorga derechos legales específicos, y es posible que usted
tenga otros derechos que pueden variar de una región a otra.
Para obtener más información acerca de los derechos que le otorga la presente
garantía, póngase en contacto con su distribuidor local de ResMed o con una oficina
de ResMed.
.
Plazo de la
garantía
1 año
90 días
R001-307/2 05 06
20
Page 67

Dispositivo Série S8 II
S8 AutoSet™ II
Elite™ II
S8
DISPOSITIVOS DE PRESSÃO POSITIVA DAS VIAS RESPIRATÓRIAS
Manual do Usuário
Português
Somente Rx
Português
©2008 ResMed Ltd. 338523-PoB/1 08 01
Page 68

Conteúdo
Indicações de utilização . . . . . . . . . . . . . . . . . . . . . . . . . . . . . . . . . . . . 1
S8 AutoSet II 1
S8 Elite II 1
Contra-indicações . . . . . . . . . . . . . . . . . . . . . . . . . . . . . . . . . . . . . . . . . 1
Efeitos adversos . . . . . . . . . . . . . . . . . . . . . . . . . . . . . . . . . . . . . . . . . . . 1
Partes do sistema Série S8 II . . . . . . . . . . . . . . . . . . . . . . . . . . . . . . . 2
Máscaras 2
Umidificadores 2
Preparação e configuração do Série S8 II . . . . . . . . . . . . . . . . . . . 2
Conexão do dispositivo 3
Seleção do tipo de máscara 3
Utilização do recurso de ajuste da máscara 4
Início do tratamento 4
Interrupção do tratamento 5
Alteração das configurações no dispositivo S8 II . . . . . . . . . . . . 5
O menu padrão 6
O menu detalhado 7
Mensagens no visor LCD do Série S8 II . . . . . . . . . . . . . . . . . . . . . 9
Utilização do cartão de dados para coletar dados . . . . . . . . . . 10
Copiar dados para o cartão de dados 10
Limpeza e manutenção . . . . . . . . . . . . . . . . . . . . . . . . . . . . . . . . . . . 11
Diariamente 11
Semanalmente 11
Mensalmente 11
Substituição do filtro de ar . . . . . . . . . . . . . . . . . . . . . . . . . . . . . . . . 11
Manutenção . . . . . . . . . . . . . . . . . . . . . . . . . . . . . . . . . . . . . . . . . . . . . . 12
Perguntas freqüentes . . . . . . . . . . . . . . . . . . . . . . . . . . . . . . . . . . . . . 12
Resolução de problemas . . . . . . . . . . . . . . . . . . . . . . . . . . . . . . . . . . 14
Especificações técnicas 16
Garantia limitada . . . . . . . . . . . . . . . . . . . . . . . . . . . . . . . . . . . . . . . . . 19
i
Page 69

Indicações de utilização
S8 AutoSet II
O sistema de apnéia do sono S8 AutoSet II com ajuste automático é indicado para o
tratamento da apnéia obstrutiva do sono (AOS) em pacientes adultos. O sistema de
apnéia do sono S8 AutoSet II com ajuste automático tem dois modos de tratamento:
AutoSet e CPAP de pressão fixa.
O sistema
S8 AutoSet II se destina a uso domiciliar e hospitalar.
S8 Elite II
O sistema de pressão contínua e positiva das vias respiratórias (CPAP) S8 Elite II é
indicado para o tratamento da apnéia obstrutiva do sono (AOS) em pacientes adultos.
O sistema
CPAP S8 Elite II se destina a uso domiciliar e hospitalar.
Contra-indicações
Seu Série S8 II não é um dispositivo de suporte de vida e poderá parar de funcionar
devido a uma interrupção no fornecimento de energia ou no caso de certas condições
de falha. O aparelho não deve ser usado por pacientes que dependam de tratamento
contínuo.
A pressão positiva das vias respiratórias poderá ser contra-indicada em certos
pacientes que sofram das seguintes condições:
• doença bolhosa do pulmão grave
• pneumotórax
• tensão arterial patologicamente baixa
• desidratação
• fuga de líquido cerebrospinal, trauma ou cirurgia craniana recente.
Português
Efeitos adversos
O médico responsável pelo tratamento deve ser informado caso o paciente sinta dores
no peito incomuns, fortes dores de cabeça ou agravamento da falta de ar. Uma infecção
aguda no trato respiratório superior poderá exigir a interrupção temporária do
tratamento.
Os seguintes efeitos colaterais podem ocorrer durante o tratamento com o dispositivo
CPAP:
• ressecamento do nariz, boca ou garganta
• sangramento nasal
• inchaço
• mal-estar no ouvido ou seio nasal
• irritação dos olhos
• urticária.
1Indicações de utilização
Page 70

Partes do sistema Série S8 II
Seu dispositivo Série S8 II inclui os seguintes itens:
• Dispositivo Série S8 II
• Cabo de energia
• Bolsa de transporte
• Tubo de ar de 2 m.
Alça de transporte
Visor
Teclado
Ranhura
do cartão
de dados
Saída de ar
Acessórios disponíveis:
• Umidificador integrado
• Tampa frontal
• Tubo de ar de 3 m
• Transformador DC-12
• Envoltório de tubo ResMed.
CC
CA
Máscaras
Visite a página Products (Produtos), em Service and Suport (Serviço e Suporte) no
endereço www.resmed.com para obter uma lista de máscaras (e suas configurações)
compatíveis com esses dispositivos.
Umidificadores
Visite a página Products (Produtos), em Service and Suport (Serviço e Suporte) no
endereço www.resmed.com para obter uma lista de umidificadores compatíveis com
dispositivos ResMed.
Preparação e configuração do Série S8 II
AVISO
!
• Certifique-se de que o cabo de energia e o plugue estão em boas condições
e que o equipamento não se encontra danificado.
• Use somente tubos de ar da ResMed com o dispositivo. A utilização de
tubos de ar diferentes pode alterar a pressão recebida, reduzindo a eficácia
do tratamento.
• A obstrução do tubo e/ou entrada de ar do dispositivo durante seu
funcionamento pode acarretar o superaquecimento do aparelho.
2
Page 71

PRECAUÇÃO
!
• Coloque o dispositivo em local seguro, onde não seja possível derrubá-lo
acidentalmente nem tropeçar no cabo de energia.
• Se colocar o aparelho no chão, certifique-se de que o local não está
empoeirado nem contém roupa de cama, peças de vestuário ou outros itens
que possam obstruir a entrada de ar.
• Certifique-se de que a área à volta do dispositivo se encontra limpa e seca.
Conexão do dispositivo
2
1
3
4
Visor LCD e teclado
Seleção do tipo de máscara
Para garantir que o dispositivo funcione conforme o previsto, será preciso selecionar o
tipo de máscara em uso.
1 Quando a tela SUBIDA (rampa) ou ASSENT (acomodação) estiver sendo exibida,
pressione . (No modo CPAP, a tela de espera exibe a palavra SUBIDA. No
modo AutoSet (somente no S8 AutoSet II), a tela de espera exibe ASSENT.)
2 Pressione até aparecer MÁSCARA.
3 Pressione para alterar a configuração.
4 Pressione ou até ver a configuração desejada.
5 Pressione para aplicar.
Português
3Preparação e configuração do Série S8 II
Page 72

Utilização do recurso de ajuste da máscara
Pode-se usar o recurso de ajuste da máscara do dispositivo Série S8 II para auxiliar na
colocação da máscara. Esse recurso fornece ar pressurizado por três minutos antes do
início do tratamento, para que você possa verificar e ajustar a colocação da máscara de
modo a minimizar fugas.
Nota: Verifique se a configuração na tela MÁSCARA é a recomendada para a máscara em
uso.
1 Coloque a máscara da forma descrita nas instruções do usuário da máscara.
2 Quando a tela SUBIDA (rampa) ou ASSENT (acomodação) estiver sendo exibida,
mantenha o botão pressionado por pelo menos três segundos até iniciar
o fornecimento do ar pressurizado.
O dispositivo aumentará a pressão até atingir a pressão de ajuste da máscara e
a manterá por três minutos.
Você verá a imagem a seguir no visor LCD, indicando que o recurso de ajuste da
máscara está em funcionamento, onde: ***** = excelente ajuste; ****- =
ajuste muito bom; ***-- = bom ajuste; enquanto **---, *---- e ----- exigem um
melhor ajuste da máscara.
AJU MÁSC:
excelnt
*****
3 Ajuste a máscara, a almofada da máscara e o arnês até obter um posicionamento
firme e confortável.
Após três minutos, a pressão retorna à pressão definida e o tratamento é
iniciado. Se não quiser esperar três minutos, mantenha o botão
pressionado por pelo menos três segundos para iniciar imediatamente o
tratamento.
Se você pressionar o botão por menos de três segundos, a unidade
retornará ao modo de espera (tela SUBIDA ou ASSENT).
Início do tratamento
1 Certifique-se de que a unidade se encontra ligada. O nome do produto é exibido
rapidamente no visor. Em seguida, a tela de espera exibe SUBIDA (rampa) ou
ASSENT (acomodação). Pressione ou para aumentar ou reduzir o
período de rampa ou acomodação.
2 Coloque a máscara, deite-se e posicione o tubo de ar de forma que possa se
movimentar livremente, para o caso de você se virar durante o sono.
PRECAUÇÃO
!
Não deixe uma extensão de tubo de ar longa sobre a cama. O tubo pode se
enroscar na sua cabeça ou no seu pescoço durante o sono.
4
Page 73

3 Para iniciar o tratamento, pressione .
Se seu médico tiver configurado o dispositivo para iniciar automaticamente o
tratamento usando SmartStart™, o dispositivo começará a funcionar quando
você respirar pela máscara.
4 Coloque a máscara da forma descrita nas instruções do usuário da máscara.
AVISO
!
A máscara só deve ser usada com o dispositivo Série S8 II ligado e funcionando
corretamente.
No início do tratamento, se a rampa estiver ativada, a pressão subirá, durante o
período definido, de uma pressão baixa até a pressão de tratamento prescrita. O
processo de rampa foi concebido para ajudá-lo a se adaptar gradualmente ao
aumento de pressão, aprimorando o conforto.
Interrupção do tratamento
Para parar o tratamento a qualquer momento, remova sua máscara e pressione
.
Se a função SmartStart tiver sido ativada pelo médico, basta remover a máscara para
interromper o tratamento.
Alteração das configurações no dispositivo S8 II
Você pode alterar algumas configurações (p. ex., tempo de rampa, nível de APE) no S8
II usando o teclado e o visor LCD. Quando o dispositivo está no modo de espera, você
pode exibir uma série de telas (um menu) no visor LCD para visualizar e alterar as
configurações de determinada função.
Português
5Alteração das configurações no dispositivo S8 II
Page 74

O menu padrão
Seu médico já terá ativado o menu no seu dispositivo Série S8 II. A imagem mostra o
menu padrão em cada modo.
CPAP
BEM-VINDO
>>>>>>
SUBIDA: 10min
menu
AUTOSET
BEM-VINDO
>>>>>>
ASSENT:
menu
10min
NÍVEL DE APE: 1
alterar sair
USADO HRS: 08000
sair
USO: 1000/1068
sair
MÁSCARA: ULTRA
alterar sair
VS: SX4800100
sair
*
NÍVEL DE APE: 1
alterar sair
USADO HRS:
USO: 1000/1068
sair
MÁSCARA: ULTRA
alterar
VS: SX4800100
08000
*
sair
sair
sair
* Só é exibida se o acesso for ativado pelo médico.
Nota: o menu do AutoSet só está disponível no S8 AutoSet II.
Para entrar no menu padrão a partir da tela de espera (SUBIDA ou ASSENT), pressione
.
Você pode usar esse menu para alterar:
• O Alívio de Pressão Expiratória (APE)
Seu médico pode ter configurado o dispositivo para fornecer APE. Esse recurso
pode ser utilizado para reduzir eventuais desconfortos sentidos na expiração
durante o tratamento. Há quatro opções: DES (sem APE), 1 (APE mais baixo), 2, e 3
(APE mais alto).
A tela NÍVEL DE APE só aparece se seu médico tiver ativado o acesso às
configurações de APE.
Para alterar o nível de APE,selecione . Pressione ou até ver a
configuração desejada.
• O tipo de máscara – consulte a página 3.
Você também pode ver o número total de horas de tratamento (USADO HRS), o
número de sessões em que o dispositivo Série S8 II foi usado num período de utilização
(USO), e a atual versão do software (VS).
6
Page 75

O menu detalhado
Seu médico pode ter ativado um menu detalhado no seu dispositivo Série S8 II. A
imagem mostra o menu detalhado em cada modo.
CPAP
BEM-VINDO
>>>>>>
AUTOSET
BEM-VINDO
>>>>>>
SUBIDA: 10min
menu
PARÂMETROS
entrar sair
RESULTADOS
entrar sair
OPÇÕES
entrar sair
MANUTENÇÃO
entrar sair
ASSENT: 10min
menu
NÍVEL DE APE: 1
alterar sair
MÁSCARA: ULTRA
alterar sair
COMP TUBO: 2m
alterar sair
HUMID: NENHUM
alterar sair
SMARTSTART: LIG
alterar sair
ALERTA FUGA: DES
alterar sair
USADO HRS: 08000
sair
USO: 1000/1068
sair
SMART DATA:
entrar sair
SMART DATA:
entrar sair
IDIOMA: PORTUGS
alterar sair
NS: 12345678912
sair
PCB: 123456789123
4567 sair
VS: SX4800100
sair
* Só é exibida se o acesso for ativado pelo médico.
AUTOSET CPAP
NÍVEL DE APE: 1
*
alterar sair
MÁSCARA: ULTRA
alterar sair
COMP TUBO: 2m
alterar sair
HUMID: NENHUM
alterar sair
SMARTSTART: LIG
alterar sair
ALERTA FUGA: DES
alterar sair
*
AUTOVISUAL.: DES
alterar cancel
*
Português
**
Nota: o menu do AutoSet só está disponível no S8 AutoSet II.
Para entrar no menu detalhado a partir da tela de espera (SUBIDA ou ASSENT),
pressione .
7Alteração das configurações no dispositivo S8 II
Page 76

A tela do menu PARÂMETROS (configurações) é apresentada.
Menu Parâmetros
Selecione no menu Parâmetros para acessar as opções desse menu.
Você pode usar o menu Parâmetros para alterar:
• O Alívio de Pressão Expiratória (APE) – consulte a página 6.
• O tipo de máscara – consulte a página 3.
• O comprimento do tubo
Vá até COMP TUBO e selecione . Pressione ou até ver a
configuração desejada.
• A tampa frontal
Você pode configurar seu dispositivo para usar o acessório tampa frontal.
Vá até HUMID e selecione . Pressione ou até ver a configuração
desejada.
• O SmartStart
O SmartStart ativa automaticamente o dispositivo quando você respira pela
máscara.
Vá até SMARTSTART e selecione . Pressione ou para alterar a
opção para LIGADO ou DESLIG.
• O alerta de fuga
O alerta de fuga indica a presença de uma fuga de ar grande na máscara.
Vá até ALERTA FUGA e selecione . Pressione ou para alterar a
opção para LIGADO ou DESLIG.
Menu Resultados
Selecione no menu Resultados para acessar as opções desse menu.
Você pode usar o menu Resultados para ver o número total de horas de tratamento
(USADO HRS) e o número de sessões em que o Série S8 II foi usado num período de
utilização (USO).
Nota: seu médico pode ter personalizado o dispositivo para apresentar Smart Data.
Contate o médico para obter mais informações sobre Smart Data.
Menu Opções
Selecione no menu Opções para acessar as opções desse menu.
Você pode usar o menu Opções para alterar a configuração de idioma: Vá até IDIOMA
e selecione . Pressione ou até ver a configuração desejada.
8
Page 77

Menu Manutenção
Selecione no menu Manutenção para acessar as opções desse menu.
Você pode usar o menu Manutenção para ver as informações sobre o sistema do
dispositivo.
Mensagens no visor LCD do Série S8 II
Seu médico pode ter configurado o Série S8 II para lembrá-lo de eventos importantes
como, por exemplo, quando substituir sua máscara, quando inserir seu cartão de dados
(se seu dispositivo tiver sido habilitado para cartão de dados) e assim por diante.
O lembrete é exibido no visor LCD e ficará visível se o dispositivo não estiver
administrando uma terapia. A luz de fundo do visor LCD pisca quando uma mensagem
é apresentada.
Seu médico pode definir os seguintes lembretes no visor LCD:
Mensagem Descrição Ação
INSERIR
CARTÃO
SUBST
MÁSCARA
CHAMAR
SERVIDOR
SUBSTI
FILTRO
MANUTEN
ÇÃO
Poderá ser apresentada se o
dispositivo utilizar cartões de
dados.
Poderá ser apresentada
quando for hora de substituir
a máscara.
Poderá ser apresentada para
lembrá-lo de entrar em
contato com seu médico; p.
ex., para falar acerca do
progresso do tratamento.
Poderá ser apresentada para
lembrá-lo de substituir o filtro
de ar do dispositivo.
Poderá ser apresentada para
lembrá-lo de levar o
dispositivo para manutenção.
Insira o cartão de dados e siga as instruções
do seu médico. Feito isso, a mensagem
desaparecerá do visor LCD. Pressionando
(OK), a mensagem também será
removida.
Português
Pressione (OK) para remover a
mensagem do visor LCD e substitua a
máscara por uma nova.
Pressione (OK) para remover a
mensagem do visor LCD e contate o médico.
Pressione a tecla (OK) para remover a
mensagem do visor LCD e substitua o filtro.
Pressione (OK) para remover a
mensagem do visor LCD e contate o médico.
9Mensagens no visor LCD do Série S8 II
Page 78

Utilização do cartão de dados para coletar dados
Se seu médico precisar fazer uma avaliação do tratamento, ele pedirá que use o cartão
de dados para copiar os dados do Série S8 II e que envie o cartão para ele. O cartão de
dados será fornecido em um estojo de proteção.
Os dados copiados para um cartão de dados continuam armazenados e disponíveis no
dispositivo Série S8 II.
Copiar dados para o cartão de dados
1 Ligue o Série S8 II e aguarde até ver a tela de espera (Subida ou Assent).
2 Segure o cartão de dados com a seta voltada para cima e insira-o na ranhura
apropriada até o final. A cópia dos dados tem início automaticamente.
A mensagem "CARTÃO INSERI Aguarde p. f." será apresentada no visor LCD do
Série S8 II enquanto os dados são copiados. A cópia leva aproximadamente cinco
segundos.
A mensagem "CÓPIA COMPLET Retirar cartão" será apresentada no visor LCD
quando os dados tiverem sido copiados.
3 Remova o cartão de dados segurando sua extremidade e puxando-o para fora.
4 Guarde o cartão de dados no estojo de proteção quando não estiver em uso.
5 Devolva o cartão no estojo de proteção ao seu médico utilizando um envelope
postal.
Utilização do cartão de dados para atualizar configurações
Caso seu médico tenha fornecido um cartão de dados com novas configurações para o
dispositivo:
1 Com o dispositivo no modo de espera (Subida ou Assent), insira o cartão de
dados na ranhura do módulo de cartão de dados. A atualização será iniciada
automaticamente.
A mensagem "CARTÃO INSERI Aguarde p. f." será apresentada no visor LCD
durante a atualização. A atualização leva aproximadamente cinco segundos.
A mensagem “PARÂMET SUCESSO Retirar cartão" será apresentada no visor
LCD caso as configurações tenham sido atualizadas corretamente.
Nota: essa mensagem será apresentada uma só vez. Se você voltar a inserir o
cartão de dados depois de atualizar as configurações, essa mensagem não será
exibida.
2 Remova o cartão de dados do Série S8 II.
3 Guarde o cartão de dados no estojo de proteção quando não estiver em uso.
10
Page 79

AVISO
!
Se seu médico tiver dito a você para usar esse cartão de dados para atualizar as
configurações do dispositivo e a mensagem “PARÂMET SUCESSO” não for
exibida, contate o médico imediatamente.
Limpeza e manutenção
AVISO
!
Cuidado com choques elétricos. Não mergulhe o dispositivo nem o cabo de
energia em água. Antes de limpar, sempre remova o plugue de energia da
tomada e, antes de reconectá-lo, certifique-se de que está seco.
PRECAUÇÃO
!
• Não deixe o tubo de ar dependurado sob luz solar direta, pois poderá
enrijecer com o tempo e rachar.
• Ao limpar o tubo de ar e o dispositivo, não utilize soluções a base de
alvejante, cloro, álcool ou substâncias aromáticas, nem sabonetes
hidratantes ou bactericidas nem óleos perfumados. Essas soluções podem
causar enrijecimento e reduzir a vida útil do produto.
Diariamente
Desconecte o tubo de ar e pendure-o em local limpo e seco até a próxima utilização.
Semanalmente
1 Remova o tubo de ar e lave-o em água morna usando detergente suave.
2 Enxágüe bem e pendure para secar.
3 Antes da próxima utilização, monte novamente a máscara e o arnês.
4 Reconecte o tubo de ar.
Mensalmente
• Limpe o exterior do Série S8 II com um pano úmido e detergente líquido suave.
• Verifique se o filtro de ar não está perfurado ou bloqueado por impurezas. Substitua
a cada seis meses, ou em menos tempo no caso de ambientes empoeirados.
Substituição do filtro de ar
PRECAUÇÃO
!
• Não lave o filtro de ar. O filtro de ar não é lavável nem reutilizável.
• A tampa do filtro de ar protege o dispositivo no caso de algum líquido ser
acidentalmente derramado sobre o dispositivo. Certifique-se de que o filtro
de ar e a tampa do filtro de ar estejam sempre instalados.
Português
11Limpeza e manutenção
Page 80

1 Remova a tampa do filtro de ar que se encontra na parte de trás do dispositivo.
Tampa do filtro
de ar
2 Remova e jogue fora o filtro de ar usado.
3 Introduza um filtro novo, com a face azul voltada para fora.
4 Recoloque a tampa do filtro de ar.
Manutenção
Este produto (S8 AutoSet II; S8 Elite II) deve ser examinado por uma assistência técnica
autorizada da ResMed cinco anos após a data de fabricação. Antes disso, o dispositivo
deve proporcionar um funcionamento seguro e confiável, desde que utilizado e mantido
segundo as instruções fornecidas pela ResMed. Os detalhes da garantia ResMed
aplicável são fornecidos com o dispositivo na compra original. Como de hábito no caso
de dispositivos elétricos, se houver alguma irregularidade aparente, seja prudente e
encaminhe o aparelho para ser examinado por uma assistência técnica autorizada da
ResMed.
Se achar que seu dispositivo não está funcionando adequadamente, consulte
“Resolução de problemas” na página 14.
Perguntas freqüentes
Como vou me sentir quando estiver respirando com o Série S8 II?
Quando utilizar o Série S8 II pela primeira vez, você poderá sentir um certo desconforto
ao respirar contra o fluxo de ar. Isso é normal. Você continuará a respirar normalmente
enquanto dorme. A configuração de APE também pode melhorar o conforto. Habituese gradualmente a essa nova sensação.
O que devo fazer quando quiser me levantar da cama durante a noite?
Caso precise se levantar durante a noite, remova a máscara e interrompa a terapia.
Lembre-se sempre de reiniciar a terapia e colocar a máscara quando voltar para a cama.
O que devo fazer se sentir que o ar está escapando pela máscara?
O Série S8 II proporciona o tratamento mais eficaz quando a máscara se encontra bem
ajustada e confortável. O tratamento pode ser afetado por fugas de ar. Portanto, é
importante eliminar quaisquer fugas de ar que venham a ocorrer. Por exemplo,
experimente reposicionar a máscara e ajustar as correias.
Se estiver utilizando uma máscara nasal, tente manter a boca fechada durante o
tratamento. As fugas de ar pela boca podem diminuir a eficácia do tratamento. Se as
fugas de ar pela boca forem um problema, experimente usar uma máscara facial ou
uma correia para o queixo. Entre em contato com seu médico ou o fornecedor do
equipamento para mais detalhes.
12
Page 81

Se estiver usando uma máscara facial e tiver problemas ao tentar encontrar um ajuste
confortável, contate seu médico ou o fornecedor do equipamento. Você poderá se
beneficiar de um tamanho ou estilo de máscara diferente.
Devo fazer algo de especial antes de colocar a máscara?
Antes de colocar a máscara, lave o rosto para remover o excesso de oleosidade facial.
Isso permitirá um melhor ajuste e prolongará a vida útil da almofada da máscara.
Não use cremes hidratantes quando estiver usando uma máscara.
Sinto a minha boca seca durante o tratamento – o que devo fazer?
Você pode sentir um ressecamento no nariz, na boca e/ou na garganta no decorrer do
tratamento, especialmente durante o inverno. Em muitos casos a utilização de um
umidificador pode resolver o desconforto. Contate seu médico para mais informações.
Meu nariz fica irritado durante o tratamento – o que devo fazer?
Nas semanas iniciais do tratamento, você poderá sentir vontade de espirrar e/ou ter
corrimento ou obstrução nasal. Na maioria dos casos, a irritação nasal pode ser
resolvida com um umidificador. Entre em contato com seu médico ou o fornecedor do
equipamento para mais informações.
Posso viajar com o Série S8 II?
Seu Série S8 II tem uma fonte de energia interna que permite sua operação em outros
países. O dispositivo aceita fontes de alimentação de 100 a 240 V e 50 a 60 Hz. Não
requer ajuste especial, mas pode ser necessário um cabo de energia aprovado para a
região em que o dispositivo está sendo usado.
Seu Série S8 II se ajusta automaticamente a mudanças de altitude até 2.591 m (8.500
pés).
Consulte o departamento de serviços médicos da companhia aérea que for usar se
pretender utilizar o Série S8 II a bordo de uma aeronave. O Série S8 II segue os
requisitos de Classe B, Parte 15 da FCC dos EUA.
Nota: não use o Série S8 II enquanto o avião estiver decolando ou aterrissando.
Posso utilizar meu Série S8 II se não houver energia de rede elétrica (CA) disponível?
O transformador DC-12 está disponível para conectar o Série S8 II a uma fonte de
alimentação CC de 12 V ou 24 V. Contate seu médico para obter detalhes.
Português
13Perguntas freqüentes
Page 82

Resolução de problemas
Se ocorrer um problema, experimente as sugestões a seguir. Se o problema não puder
ser resolvido, contate o fornecedor do equipamento ou a ResMed. Não tente abrir o
dispositivo.
Problema/Possível causa Solução
O visor não funciona.
A unidade não se encontra
conectada a uma fonte de
energia.
O ar fornecido pelo dispositivo Série S8 II é insuficiente.
Tempo de rampa ou
acomodação está em uso.
O filtro de ar está sujo. Substitua o filtro de ar.
O tubo de ar está dobrado ou
foi perfurado.
Tubo de ar conectado
incorretamente.
Máscara e arnês não foram
posicionados corretamente.
Falta(m) a(s) tampa(s) na(s)
porta(s) de acesso da máscara.
A pressão necessária para
tratamento pode ter sido
alterada.
O diapositivo não começa a funcionar quando você respira pela máscara, embora
o médico tenha ativado o SmartStart.
O cabo de energia não foi
conectado adequadamente.
A tomada de energia pode
estar com defeito.
O alerta de fuga foi ativado
pelo médico; o SmartStart foi
desativado automaticamente.
Utilização de uma máscara
facial ResMed.
A respiração não é
suficientemente forte para
ativar o SmartStart.
Fuga excessiva. Ajuste a posição da máscara e do arnês.
14
Verifique se o cabo de energia está conectado e se o
interruptor de energia (quando disponível) está ligado.
Aguarde o aumento da pressão de ar ou ajuste o tempo
de rampa ou acomodação.
Endireite ou substitua o tubo.
Verifique o tubo de ar.
Ajuste a posição da máscara e do arnês.
Volte a colocar a(s) tampa(s).
Entre em contato com seu médico para ajustar a
pressão.
Conecte o cabo de energia firmemente nas duas
extremidades.
Experimente outra tomada.
Contate seu médico.
O SmartStart não funciona com uma máscara facial, pois
a válvula de anti-asfixia não permite pressão
suficientemente alta durante a expiração.
Respire profundamente através da máscara.
Recoloque as tampas se não estiverem nas portas da
máscara.
O tubo de ar pode não ter sido conectado
adequadamente. Conecte o tubo de ar com firmeza em
ambas as extremidades.
O tubo de ar pode estar dobrado ou perfurado. Endireite
ou substitua.
Page 83

É exibida a mensagem de erro: [ERRO SISTxxxx] Chamar manut! ou Exxxx
(onde xxxx define um erro)
Falha de componente. Registre o número do erro e ligue para a assistência
técnica.
É exibida a mensagem de erro:
O tubo de ar está solto ou
obstruído.
Verifique tubo!! Premir se o fez
Verifique se o tubo de ar está conectado com firmeza à
sua máscara e à saída de ar, na parte dianteira do Série
S8 II. Depois de verificar o tubo de ar, pressione a tecla
Iniciar/Parar para reiniciar o aparelho. Se isso não limpar a
mensagem, desconecte o cabo de energia e, em
seguida, volte a conectá-lo para reiniciar o dispositivo.
A mensagem a seguir é exibida no visor LCD depois que você tenta atualizar
configurações ou copiar dados para o cartão de dados:
ERRO CARTÃO Retirar
cartão
O cartão de dados não foi
inserido corretamente.
Certifique-se de inserir o cartão de dados na ranhura para
cartão de dados com
o dispositivo Série S8 II está ligado e sem administrar
terapia (em modo de espera).
a seta voltada para cima, enquanto
O cartão de dados só foi
introduzido parcialmente.
Você pode ter removido o
cartão de dados antes de as
configurações terem sido
copiadas para o Série S8 II.
O cartão não é um cartão de
dados ResScan.
Certifique-se de que o cartão de dados foi inserido na
ranhura do módulo até o final.
Reinsira o cartão de dados e espere até que a
mensagem PARÂMET SUCESSO Retirar cartão
apareça no visor LCD.
Use somente cartão de dados ResScan.
A mensagem a seguir é exibida no visor LCD depois que você tenta atualizar
configurações ou copiar dados para o cartão de dados:
ERRO PARÂMETROS
Retirar cartão
Existe um erro de dados no
cartão de dados.
Entre imediatamente em contato com seu médico.
A mensagem a seguir NÃO é exibida no visor LCD depois que você tenta
atualizar as configurações usando o cartão de dados: PARÂMET SUCESSO
Retirar cartão
As configurações não foram
atualizadas.
Entre imediatamente em contato com seu médico.
A mensagem a seguir é exibida no visor LCD depois que você tenta atualizar
configurações ou copiar dados para o cartão de dados:
PARÂME INVÁLIDOS
Retirar cartão
Os detalhes de identificação
no cartão de dados não
correspondem aos detalhes de
identificação no seu
dispositivo.
Entre imediatamente em contato com seu médico.
Português
15Resolução de problemas
Page 84

Especificações técnicas
Faixa de pressão operacional 4 a 20 cm H2O
Dimensões (A x L x P) 112 mm x 164 mm x 145 mm (4,6 pol x 6,5 pol x 5,7 pol)
Peso 1,4 kg (3,1 lb)
Temperatura operacional +5°C a +36°C (+41°F a +95°F)
Fornecimento de energia • Faixa de entrada para Série S8 II com HumidAire 3i:100–240 V, 50/
Umidade operacional 10 a 95% (sem condensação)
Temperatura de
armazenamento e transporte
Umidade de armazenamento
e transporte
Altitude operacional
Compatibilidade
eletromagnética
Filtro de ar Duas camadas de fibra não-tecida de poliéster, coligadas por pó
Tub o de ar Plástico flexível, 2 m (6 pés e 6 pol.)
Saída de ar A saída de ar cônica de 22 mm encontra-se em conformidade com EN
Classificações IEC 60601-1 Classe II (isolamento duplo), Tipo CF
Oxigênio suplementar Fluxo de oxigênio suplementar máximo recomendado: 4 l/min
Constituição do gabinete
Nível de ruído A pressão do som irradiada é medida a < 24 ±2 dBA a 10 cm H2O e
60 Hz; 110 V, 400 Hz; 2,5 A < 140 VA (110 W) (consumo máximo de
energia). Consumo de energia máx. instantâneo < 340 VA.
• Consulte as instruções do transformador DC-12 para informações
sobre classificações CC. Use somente o transformador DC-12 da
ResMed para entrada CC.
• Consumo de energia típico a 20 cm H
-20°C a +60°C (-5°F a +140°F)
10 a 95% (sem condensação)
O é de 39 VA ou 20,7 W.
2
Nível do mar até 2591m (8500 pés)
O produto encontra-se em conformidade com todos os requisitos de
compatibilidade eletromagnética (EMC) de acordo com IEC60601-1-2,
para áreas residenciais, comerciais e de indústria leve. As tabelas de
compatibilidade eletromagnética para estes dispositivos ResMed
podem ser encontradas em www.resmed.com, na página Products
(Produtos) em Service and Support (Serviço e Suporte). Clique no
arquivo PDF relativo ao seu dispositivo.
1281-1
Termoplástico de engenharia retardador de chamas
1 m (3 pés e 3,36 pol) segundo a norma ISO 17510-1.
O fabricante reserva-se o direito de alterar estas especificações sem aviso prévio.
Símbolos que são apresentados no dispositivo
Atenção, consulte os documentos que acompanham o produto; À prova de respingos;
Equipamento tipo CF; Tensão perigosa; Equipamento classe II; Iniciar/Parar.
16
Page 85

AVISOS E PRECAUÇÕES GERAIS
!
Um aviso alerta sobre a possibilidade de ferimentos.
• Leia todo o manual antes de utilizar o dispositivo Série S8 II.
• As orientações contidas neste manual não substituem as instruções prescritas pelo
médico.
• Os pacientes não devem conectar dispositivos à porta de comunicação de dados, a
menos que tenham sido orientados para isso pelo prestador de cuidados de saúde
ou pelo médico. A porta de comunicação de dados só deve ser conectada a
produtos ResMed. A conexão de outros dispositivos pode provocar lesões ou
danos ao dispositivo Série S8 II.
• O Série S8 II deve ser usado com máscaras (e conectores)
ResMed, por um médico ou terapeuta respiratório. Só use a máscara se o
dispositivo Série S8 II estiver ligado e funcionando adequadamente. Os
respiradouros associados à máscara nunca devem ser obstruídos.
Explicação: o Série S8 II deve ser utilizado com máscaras (ou conectores)*
especiais que tenham respiradouros, permitindo a saída contínua de fluxo de ar da
máscara. Quando o dispositivo estiver ligado e funcionando corretamente, o ar
fresco do dispositivo elimina o ar expirado através dos respiradouros. Contudo,
quando o dispositivo não está funcionando, não é fornecido ar fresco suficiente
através da máscara, e o ar expirado pode ser novamente inalado. A reinalação do ar
expirado por alguns minutos pode, em certas circunstâncias, provocar asfixia. Isso
se aplica à maioria dos modelos de dispositivos CPAP.
• Em caso de falta de energia ou defeito no aparelho, remova a máscara.
• O dispositivo Série S8 II pode ser ajustado para administrar pressões de até 20 cm
O. No caso improvável de certas condições de avaria, é possível a administração
H
2
de pressões de até 30 cm H
• Se este dispositivo for utilizado com oxigênio, quando não estiver em
2
O.
funcionamento, o fluxo do gás deverá ser desligado. Caso tenha permanecido
ligado, desligue o dispositivo e aguarde 30 minutos antes de ligá-lo novamente.
Explicação: quando o dispositivo CPAP não se encontra em funcionamento e o
fluxo de oxigênio é mantido, o gás fornecido ao tubo de ar pode se acumular no
compartimento do dispositivo e gerar risco de incêndio. Isso se aplica à maioria dos
tipos de dispositivos CPAP.
• O oxigênio favorece a combustão. Não use oxigênio quando estiver fumando nem
em presença de chamas desguarnecidas.
• Certifique-se sempre de que o dispositivo está gerando fluxo de ar antes de ligar o
fornecimento de oxigênio.
• Desligue sempre o fornecimento de oxigênio antes de interromper o fluxo de ar do
dispositivo.
Nota: caso seja utilizado um fluxo de oxigênio suplementar constante, a concentração
do oxigênio inspirado variará segundo o local de introdução do gás, as configurações de
pressão, o padrão respiratório do paciente, o tipo de máscara e o índice de fuga.
• Risco de explosão – não use na proximidade de anestésicos inflamáveis.
*
recomendados pela
Português
* Portas podem ser incorporadas à máscara ou a conectores que estejam próximos da máscara.
17Resolução de problemas
Page 86

• Não abra o gabinete do Série S8 II. Não existem peças dentro do aparelho que
possam ser reparadas pelo usuário. A manutenção e os reparos internos só devem
ser realizados por técnicos autorizados.
Uma precaução explica cuidados especiais para uma utilização segura e eficaz do
dispositivo.
• A baixas pressões, o fluxo através das portas de exalação da máscara poderá não
eliminar do tubo todo o gás expirado. Poderá ocorrer alguma reinalação.
• O fluxo de ar para respiração produzido por este dispositivo poderá estar 6ºC (11ºF)
acima da temperatura ambiente. Tome cuidado no caso de a temperatura ambiente
estar acima de 32ºC (90ºF).
• Quando usar alimentação CC, use sempre um transformador DC-12 da ResMed. (O
transformador DC-12 encontra-se disponível como acessório opcional. Não é
fornecido com todos os modelos.) Este dispositivo não deve ser conectado a fontes
de energia CA e CC simultaneamente.
Nota: os avisos e precauções acima são de cunho geral. Avisos, precauções e notas
específicas aparecerão junto às instruções relevantes neste manual.
18
Page 87

Garantia limitada
A ResMed garante que seu produto ResMed está livre de defeitos materiais e
de mão-de-obra durante o período de tempo abaixo especificado, a partir da data
de compra pelo consumidor original. Esta garantia não é transferível.
Produto
Umidificadores da ResMed, ResControl™, ResLink™,
ResTraxx™
Geradores de fluxo da ResMed 2 Anos
Acessórios, sistemas de máscara (incluindo armação da
máscara, almofada, arnês e tubo). Exceto dispositivos de
utilização única.
Período da
garantia
1 Ano
90 Dias
Nota: Alguns modelos não se encontram disponíveis em todas as regiões.
Se o produto apresentar defeito em condições normais de utilização, a ResMed
efetuará, a seu critério, o reparo ou a substituição do produto defeituoso ou de
qualquer um de seus componentes. Esta Garantia Limitada não cobre:
a) qualquer dano provocado por uso incorreto, uso abusivo, modificação ou
alteração do produto;
b) consertos efetuados por empresas de assistência técnica que não tenham
sido expressamente autorizadas pela ResMed para efetuar tais reparos;
c) qualquer dano ou contaminação provocado(a) por fumaça de cigarro,
cachimbo, charuto ou outras fontes;
d) qualquer dano provocado pelo derrame de água sobre ou dentro do gerador de
fluxo.
A garantia deixa de ser válida se o produto for vendido, ou revendido, fora da
região da compra original.
Os pedidos de reparo ou substituição de um produto defeituoso no âmbito da
garantia devem ser feitos pelo consumidor original no local de compra.
Esta garantia substitui todas as outras, explícitas ou implícitas, incluindo qualquer
garantia implícita de comerciabilidade ou de adequabilidade para determinada
utilização. Algumas regiões ou estados não permitem limitações de tempo sobre
a duração de uma garantia implícita, pelo que a limitação acima pode não se
aplicar ao seu caso.
A ResMed não é responsável por quaisquer danos incidentais ou conseqüentes
reivindicados como decorrentes da venda, instalação ou uso de qualquer produto
ResMed. Algumas regiões ou estados não permitem a exclusão ou limitação de
danos incidentais ou conseqüentes, pelo que a limitação acima pode não se
aplicar ao seu caso. Esta garantia lhe concede direitos legais específicos, e você
pode ainda ter outros direitos que variam de acordo com a região.
Para mais informações sobre seus direitos de garantia, entre em contato com o
revendedor local da ResMed ou os escritórios da ResMed.
R001-307/2 05 06
Português
19Garantia limitada
Page 88

20
 Loading...