

Page 1

S8 AutoSet Spirit™ System
INTEGRATED HUMIDIFIER / INTEGRIERTER ATEMLUFTBEFEUCHTER /
B
HUMIDIFICATEUR INTEGRE / UMIDIFICATORE INTEGRATO / HUMIDIFICADOR
INTEGRADO / HUMIDIFICADOR INTEGRADO / GEÏNTEGREERDE BEVOCHTIGER
D
SETTING UP THE S8TM/ AUFSTELLEN DES S8TM/ INSTALLATION DE LA
S8TM/ CONFIGURAZIONE DELL'S8TM/ INSTALACIÓN DEL S8TM/
MONTAGEM DO S8
TM
/ OPSTELLEN VAN DE S8
TM
Component of 33883/1
Bauteil von 338223/1 / Composant du 338223/1 /
Parte del documento 338223/1 / Componente de 338223/1 /
Componente de 338223/1 / Onderdeel van 338223/1
SYSTEM COMPONENTS / SYSTEMKOMPONENTEN / COMPOSANTS DU
A
SYSTEME / COMPONENTI DEL SISTEMA / COMPONENTES DEL SISTEMA /
COMPONENTES DO SISTEMA / SYSTEEMCOMPONENTEN
Carry handle / Tragegriff /
Poignée de transport / Maniglia
da trasporto / Asa para el
transporte / Pega de transporte /
LCD screen / LCD-Display /
Ecran LCD / Schermo a cristalli
liquidi / Visor / Mostrador
LCD / LCD-scherm
Handvat
1
Module / Modul / Module / Modulo /
Módulo / Módulo / Module
ILLUSTRATIONS
ILLUSTRATIONEN / ILLUSTRATIONS
ILLUSTRAZIONI / FIGURAS
ILUSTRAÇÕES / ILLUSTRATIES
Keypad / Tastenfeld / Clavier /
Tastierino / Teclado / Teclado /
Toetsenpaneel
Air outlet / Luftauslassöffnung
/ Sortie d'air / Presa di uscita
dell'aria / Salida de aire /
Saída de ar / Luchtuitlaat
Air filter cover / Luftfilterabdeckung
/ Couvercle du logement du filtre
à air / Coperchio del filtro dell'aria /
Cubierta del filtro de aire / Tampa do
filtro de ar / Afdekkap luchtfilter
HumidAire 3i
TM
OTHER ACCESSORIES / SONSTIGES ZUBEHÖR / AUTRES ACCESSOIRES / ALTRI
C
ACCESSORI / OTROS ACCESORIOS / OUTROS ACESSÓRIOS / ANDERE
ACCESSOIRES
3 m
1
32
© 2005 ResMed Ltd.
1
3
2
DC input / DC-Eingang / Entrée CC
/ Ingresso CC / Entrada de CC /
Entrada CC / Gelijkstroom-ingang
2
AC input / AC-Eingang / Entrée CA / Ingresso CA /
Entrada de CA / Entrada CA / Wisselstroom-ingang
Air inlet / Lufteinlassöffnung / Entrée
d'air / Presa di ingresso dell'aria /
Entrada de aire / Entrada de ar /
Luchtinlaat
2 m
34 5
Note: Some products not available in all regions. Hinweis: Einige Produkte sind nicht in allen Regionen erhältlich. Remarque : certains produits ne sont pas disponibles dans tous les
pays. Nota:Alcuni prodotti non sono disponibili in tutte le regioni. Nota:Algunos productos no están disponibles en todas las regiones. Nota: Alguns produtos não se encontram disponíveis em todas as
regiões. Opmerking: Sommige producten zijn niet in alle regio's verkrijgbaar.
© 2005 ResMed Ltd.
4
5
4
© 2005 ResMed Ltd.
© 2005 ResMed Ltd.
Page 2

E
HUMIDAIRE 3i AND S8 / HUMIDAIRE 3i UND S8 / HUMIDAIRE 3i ET S8 /
HUMIDAIRE 3i E S8 / HUMIDAIRE 3i y EL S8 / HUMIDAIRE 3i E S8 /
HUMIDAIRE 3i EN S8
H
USING THE DATA CARD / GEBRAUCH DER DATENKARTE / UTILISATION DE LA
CARTE DE DONNEES / USO DELLA DATA CARD / USO DE LA TARJETA DE
DATOS / COMO USAR O CARTÃO DE DADOS / GEBRUIK VAN DE DATA CARD
F
G
HumidAire 3i
BLANK MODULE / MODULSCHACHTABDECKUNG / MODULE VIERGE /
FALSO MODULO / MÓDULO EN BLANCO / MÓDULO EM BRANCO /
LEGE MODULE
DDaattaa ccoommmmuunniiccaattiioonnss ppoorrtt
Datenkommunikationsanschluss / Port de
communication de
données / Porta dati /
Puerto de comunicación
de datos / Dados
comunicações porta /
Data communicatie poort
1
DATA CARD MODULE / DATENKARTENMODUL / MODULE DE CARTE
DE DONNEES / MODULO PER DATA CARD / MÓDULO TARJETA DE
DATOS / MÓDULO DE CARTÕES DE DADOS / DATA CARD-MODULE
/
2
1
© 2005 ResMed Ltd.
2
3
© 2005 ResMed Ltd.
Note: Some products not available in all regions. Hinweis: Einige Produkte sind nicht in allen Regionen erhältlich. Remarque : certains produits ne sont pas disponibles dans tous les pays.
Nota: Alcuni prodotti non sono disponibili in tutte le regioni. Nota: Algunos productos no están disponibles en todas las regiones. Nota: Alguns produtos não se encontram disponíveis em todas as regiões.
Opmerking: Sommige producten zijn niet in alle regio's verkrijgbaar.
© 2005 ResMed Ltd.
12
© 2005 ResMed Ltd.
Page 3

USER’S MANUAL 1
BEDIENUNGSANLEITUNG 49
MANUEL UTILISATEUR 101
MANUALE DELL’UTENTE 153
S8 AUTOSET SPIRIT
™
ENGLISHDEUTSCHITALIANO FRANÇAISESPAÑOLPORTUGUÊS
MANUAL DEL USUARIO 203
ANUAL DO UTILIZADOR 253
M
ANDLEIDING VOOR DE GEBRUIKER 303
H
NEDERLANDS
Page 4

Manufactured by:
ResMed Ltd 1 Elizabeth Macarthur Drive Bella Vista NSW 2153 Australia
Tel: +61 (2) 8884 1000 or 1 800 658 189 (toll free) Fax: +61 (2) 8883 3114 Email: reception@resmed.com.au
Distributed by:
ResMed Corp 14040 Danielson Street Poway CA 92064-6857 USA
Tel: +1 (858) 746-2400 or 1-800-424-0737 (toll free) Fax: +1 (858) 746-2900 Email: reception@resmed.com
ResMed (UK) Limited 65 Milton Park Abingdon Oxfordshire OX14 4RX UK
Tel: +44 (1235) 862 997 Fax: +44 (1235) 831 336 Email: reception@resmed.co.uk
ResMed Asia Pacific Ltd 97 Waterloo Road North Ryde NSW 2113 Australia
Tel: +61 (2) 9886 5000 or 1 800 991 900 (toll free) Fax: +61 (2) 9889 1471 Email: reception@resmed.com.au
ResMed BV Nieuwe Parklaan 86, 2587 BV Den Haag Nederland
Tél: +31 (70) 358 6263 Fax: +31 (70) 358 4333 Email: receptiondh@resmed.nl
ResMed Finland Niittykatu 6 FIN 02200 Espoo Suomi
Puh: +358 9 8676820 Faksi: +358 9 86768222 Sähköposti: reception@resmed.fi
ResMed GmbH & Co. KG Fraunhoferstraße 16 82152 Martinsried Deutschland
Tel: +49 (0) 89 / 99 01 - 00 and +49 (0) 800 2 777 000 (gebührenfrei) Fax: +49 (0) 89 / 99 01 - 10 55
Email: reception@resmed.de
ResMed Hong Kong Limited Room 1714, Miramar Tower 132-134 Nathan Road Tsim Sha Tsui Hong Kong
Tel: +852 2366 0707 Fax: +852 2366 4546 Email: reception@resmed.com.hk
ResMed Japan Nihonbashi Hisamatsu Bldg. 4F, 2-28-1 Nihonbashi-Hamacho, Chuo-Ku, Tokyo 103-0007, Japan
Tel: +81 (3) 3662 5056 Fax: +81 (3) 3662 5040
ResMed Malaysia Sdn Bhd Suite E-10-20, Plaza Mon’t Kiara No. 2 Jalan 1/70C Mon’t Kiara 50480 Kuala Lumpur
Malaysia Tel: +60 3 6201 7177 Fax: +60 3 6201 2177 Email: reception@resmed.com.my
ResMed NZ Ltd PO Box 51-048 Pakuranga Auckland New Zealand
Tel:+64 274 737 633 Fax:+64 9 239 0193 Email: reception@resmed.co.nz
ResMed SA Parc de la Bandonnière 2, rue Maurice Audibert 69800 Saint-Priest France
Tél: +33 (0) 4 37 251 251 Fax: +33 (0) 4 37 251 260 Email: reception@resmed.fr
ResMed Singapore Pte Ltd 238A Thomson Road # 12-03/04 Novena Square Tower A Singapore 307684
Tel: +65 6284 7177 Fax: +65 6284 7787 Email: reception@resmed.com.sg
ResMed Spain SL C/Arturo Soria, 245 28033 Madrid España
Tel: +34 (93) 5908154 Fax: +34 (93) 5908153 Email: angelo@resmed.es
ResMed Sweden AB Industrigatan 2 S-461 37 Trollhättan Sverige
Tel: +46 520 420 110 Fax: +46 520 397 15 Email: reception@resmed.se
Labhardt AG Thannerstrasse 57 CH-4054 Basel Schweiz
Tel: +41 (061) 307 9711 Fax: +41 (061) 307 9722 Email: info@labhardt.ch
US DESIGNATED AGENT: ResMed Corp
EU AUTHORISED REPRESENTATIVE: ResMed (UK) Ltd
www.resmed.com
Protected by patents: AU 691200, AU 697652, AU 709279, AU 724589, AU 730844, AU 736723, AU 750095, AU
750761, AU 764761, EP 0651971, EP 0661071, EP 0920845, EP 0934723, EP 1028769, JP 3580776, NZ 504595, US
4944310, US 5199424, US 5245995, US 5522382, US 5704345, US 6029665, US 6138675, US 6240921, US 6363933,
US 6367474, US 6398739, US 6425395, US 6502572, US 6591834, US 6635021, US 6705315, US 6745768, US
6817361. Other patents pending.
Design registrations pending.
S8, HumidAire, HumidAire 3i, AutoSet, S8 AutoSet Spirit, SmartStart, Mirage, Mirage Activa, Mirage Vista,
Ultra Mirage, Mirage Swift and ResScan are trademarks of ResMed Ltd. Papillon is a trademark of MAP
Medizin-Technologie GmbH.
© ResMed Ltd 2005.
Page 5

S8 AutoSet Spirit™ System
USER’S MANUAL
English
ENGLISH
1
Page 6

2
Page 7

CONTENTS
INTRODUCTION . . . . . . . . . . . . . . . . . . . . . . . . . . . . . . . . . . . . . . . . . . . . . . . 5
OUR RESPONSIBILITY 5
Y
MEDICAL INFORMATION . . . . . . . . . . . . . . . . . . . . . . . . . . . . . . . . . . . . . . . 5
BOUT THE S8 AUTOSET SPIRIT 5
A
C
ONTRAINDICATIONS 5
W
ARNINGS 6
C
AUTIONS 7
A
DVERSE EFFECTS 7
THE S8 AUTOSET SPIRIT SYSTEM . . . . . . . . . . . . . . . . . . . . . . . . . . . . . . . . 9
UTOSET SPIRIT 9
S8 A
M
ASKS 9
H
UMIDIFIER 10
R
ESSCAN DATA CARD MODULE 10
A
CCESSORIES 10
HOW TO USE THE S8 AUTOSET SPIRIT . . . . . . . . . . . . . . . . . . . . . . . . . . 11
ET UP THE S8 AUTOSET SPIRIT 11
S
A
SSEMBLE THE MASK 11
S
TART TREATMENT 12
S
TOPPING TREATMENT 12
U
SING THE MASK-FITTING FEATURE 13
ENGLISH
HOW TO ATTACH A HUMIDIFIER . . . . . . . . . . . . . . . . . . . . . . . . . . . . . . . 15
TTACH A HUMIDAIRE 3I HUMIDIFIER 15
A
HOW TO USE THE KEYPAD . . . . . . . . . . . . . . . . . . . . . . . . . . . . . . . . . . . . . 17
OW TO CHANGE THE SETTINGS 18
H
HOW TO USE THE STANDARD MENU . . . . . . . . . . . . . . . . . . . . . . . . . . . 21
HOW TO USE THE DETAILED MENU . . . . . . . . . . . . . . . . . . . . . . . . . . . . . 23
ETTINGS MENU 24
S
R
ESULTS MENU 25
O
PTIONS MENU 25
S
ERVICING MENU 25
M
ESSAGES ON THE S8 AUTOSET SPIRIT LCD 25
S8 MODULES . . . . . . . . . . . . . . . . . . . . . . . . . . . . . . . . . . . . . . . . . . . . . . . . 27
SING A BLANK MODULE 27
U
U
SING A RESSCAN DATA CARD MODULE 27
CONTENTS
3
Page 8

CLEANING AND MAINTENANCE . . . . . . . . . . . . . . . . . . . . . . . . . . . . . . . . . 31
AILY CLEANING 31
D
W
EEKLY CLEANING 31
P
ERIODIC CLEANING 31
R
EPLACING THE AIR FILTER 32
S
ERVICING 32
FREQUENTLY ASKED QUESTIONS . . . . . . . . . . . . . . . . . . . . . . . . . . . . . . . 33
TROUBLESHOOTING . . . . . . . . . . . . . . . . . . . . . . . . . . . . . . . . . . . . . . . . . . 35
SYSTEM SPECIFICATIONS . . . . . . . . . . . . . . . . . . . . . . . . . . . . . . . . . . . . . . 39
UTOSET SPIRIT (NO ACCESSORIES) 39
S8 A
A
CCESSORIES 39
A
LL DEVICES (WHERE APPLICABLE) 40
LIMITED WARRANTY . . . . . . . . . . . . . . . . . . . . . . . . . . . . . . . . . . . . . . . . . . 45
INDEX . . . . . . . . . . . . . . . . . . . . . . . . . . . . . . . . . . . . . . . . . . . . . . . . . . . . . . 47
4
Page 9

INTRODUCTION
Thank you for choosing the S8 AUTOSET SPIRIT™ flow generator. The S8 AUTOSET
SPIRIT is a compact, all-in-one package with an inbuilt power supply and the option of
integrated data management and humidification.
This user manual contains the information you need for the correct use of your
S8 AUTOSET SPIRIT.
YOUR RESPONSIBILITY
The owner or user of this system shall have sole responsibility and liability for any injury
to persons or damage to property resulting from:
• operation which is not in accordance with the operating instructions supplied
• maintenance or modifications carried out unless in accordance with authorised
instructions and by authorised persons.
Please read this manual carefully before use.
This manual contains special terms and icons that appear in the margins to draw your
attention to specific and important information.
• Warning alerts you to possible injury.
• Caution explains special measures for the safe and effective use of the device.
• Note is an informative or helpful note.
MEDICAL INFORMATION
ABOUT THE S8 AUTOSET SPIRIT
The S8 AUTOSET S PIRIT self-adjusting sleep apnoea system is indicated for the treatment
of obstructive sleep apnoea (OSA) in adult patients. The
adjusting sleep apnoea system has two treatment modes: AutoSet and fixed-pressure
CPAP.
The
S8 AUTOSET SPIRIT system is intended for home and hospital use.
S8 AUTOSET SPIRIT self-
ENGLISH
CONTRAINDICATIONS
The S8 AUTOSET SPIRIT is not a life support device and may stop operating during
power failure or certain fault conditions. It should not be used by patients who are
dependent on continuous therapy.
Positive airway pressure therapy may be contraindicated in some patients with the
following pre-existing conditions:
• severe bullous lung disease
• pneumothorax
• pathologically low blood pressure
• dehydration
• cerebrospinal fluid leak, recent cranial surgery, or trauma.
INTRODUCTION
5
Page 10

WARNINGS
• The entire manual should be read before using the S8 AUTOSET SPIRIT.
• Advice contained in this manual should not supersede instructions given by the
prescribing physician.
• A patient should not connect a device to the data communication port unless
instructed to do so by their health care provider or physician. Only ResMed
products are designed to be connected to the data communication port.
Connecting other devices could result in injury, or damage to the
S
PIRIT device.
• The S8 AUTOSET SPIRIT should only be used with masks (and connectors)
recommended by ResMed, or by a physician or respiratory therapist. A mask
should not be used unless the
operating properly. The vent hole or holes associated with the mask should never
be blocked.
Explanation: The
(or connectors)
S8 AUTOSET SPIRIT is intended to be used with special masks
*
which have vent holes to allow continuous flow of air out of the
mask.
When the device is turned on and functioning properly, new air from the device
flushes the exhaled air out through the mask vent holes. However, when the
device is not operating, insufficient fresh air will be provided through the mask, and
the exhaled air may be rebreathed. Rebreathing of exhaled air for longer than
several minutes can, in some circumstances, lead to suffocation. This applies to
most models of CPAP devices.
• In the event of power failure or machine malfunction, remove the mask.
• The S8 AUTOSET SPIRIT can be set to deliver pressures up to 20 cm H
unlikely event of certain fault conditions, pressures up to 30 cm H
• If oxygen is used with this device, the oxygen flow must be turned off when the
device is not operating.
Explanation: When the CPAP device is not in operation and the oxygen flow is
left on, oxygen delivered into the air delivery tubing may accumulate within the
CPAP machine enclosure and create a risk of fire. This applies to most types of
CPAP machines.
• Oxygen supports combustion. Oxygen should not be used while you are
smoking or in the presence of an open flame.
• Always ensure airflow is being generated by the device before the oxygen
supply is turned on.
• Always turn the oxygen supply off before stopping the airflow from the device.
Note: At a fixed rate of supplemental oxygen flow, the inhaled oxygen concentration
will vary, depending on where the oxygen is introduced, the pressure settings, patient
breathing pattern, mask selection, and leak rate.
S8 AUTOSET SPIRIT device is turned on and
S8 AUTOSET
*
O. In the
2
O are possible.
2
* Ports may be incorporated into the mask or in connectors that are near the mask.
6
Page 11

• Do not use the S8 AUTOSET SPIRIT if there are obvious external defects or
unexplained changes in performance.
• Do not open the S8 AUTOSET SPIRIT case. There are no user serviceable parts
inside. Repairs and internal servicing should only be performed by an authorised
service agent.
• Explosion hazard—do not use in the vicinity of flammable anaesthetics.
CAUTIONS
• At low pressures, the flow through the exhalation ports of your mask may not
clear all exhaled gas from the tubing. Some rebreathing may occur.
• The air flow for breathing produced by this device can be as much as 11
higher than the temperature of the room. Caution should be exercised if the room
temperature is warmer than 90
• When AC mains power (100–240 V AC) is not available, always use a ResMed
o
F (32oC).
DC-12 converter. (The DC-12 converter is available as an optional accessory.)
• If supplied, the RESSCAN™ Data Card module is designed for use with specific
ResMed devices.
• Only use the RESSCAN Data Card module (if supplied) as specified in this manual.
Note: The above are general warnings and cautions. Specific warnings, cautions, and
notes appear with the relevant instructions in the manual.
ADVERSE EFFECTS
Patients should report unusual chest pain, severe headache or increased breathlessness
to their prescribing physician. An acute upper respiratory tract infection may require
temporary discontinuation of treatment.
The following side effects may arise during the course of therapy with the S8 device:
• drying of the nose, mouth or throat
• nosebleed
• bloating
• ear or sinus discomfort
• eye irritation
• skin rashes
• chest discomfort.
o
F (6oC)
ENGLISH
MEDICAL INFORMATION
7
Page 12

8
Page 13

THE S8 AUTOSET SPIRIT SYSTEM
The S8 AUTOSET SPIRIT device is part of a system that consists of five elements:
• S8 AUTOSET SPIRIT self-adjusting flow generator
• Mask
• Humidifier
• Data management products
• Accessories.
S8 AUTOSET SPIRIT
Please refer to the illustrations in section A of the illustration sheet.
FRONT VIEW (A-1)
Shows the keypad and LCD screen, and the air outlet.
REAR VIEW (A-2)
Shows where the module attaches, and the location of the air filter and power sockets.
POWER CORD (A-3)
Power cord to attach the S8 AUTOSET SPIRIT to the AC (mains) power.
CARRY BAG (A-4)
The S8 AUTOSET SPIRIT carry bag contains two pouches: one for storing the S8 device,
the other for storing the integrated humidifier. When storing the humidifier, always put
it in the larger, mesh pouch.
AIR TUBING (A-5)
The 2 m air tubing connects the S8 AUTOSET SPIRIT to your mask.
ENGLISH
MASKS
You will also need a ResMed mask system (supplied separately).
The ResMed mask systems that are recommended for use with the
are:
NASAL MASKS
•
MODULAR NASAL MASK
• MIRAGE VISTA™ NASAL MASK
• ULTRA MIRAGE™ NASAL MASK
• MIRAGE™ NASAL MASK
• MIRAGE ACTIVA™ NASAL MASK
• PAPILLON™.
N
ASAL PILLOWS SYSTEMS
•
MIRAGE SWIFT™ NASAL PILLOWS SYSTEM.
S8 AUTOSET SPIRIT
THE S8 AUTOSET SPIRIT SYSTEM
9
Page 14

ULL FACE MASKS
F
MIRAGE™ FULL FACE MASK
•
• MIRAGE™ FULL FACE MASK SERIES 2
• ULTRA MIRAGE™ FULL FACE MASK.
Note: Not all masks are available in all regions.
WARNING
!
In AutoSet mode, only ResMed mask systems are compatible for use with the S8
AutoSet Spirit. Please refer to “Warnings” on page 6.
HUMIDIFIER
Please refer to the illustration in section B of the illustration sheet.
A humidifier may be required if you are experiencing dryness of the nose, throat, or
mouth. The
S8 AUTOSET SPIRIT is compatible for use with the HUMIDAIRE 3i™
integrated heated humidifier.
RESSCAN DATA CARD MODULE
The RESSCAN Data Card module and RESSCAN Data Card (C-1) may be used with the
S8 AUTOSET SPIRIT either to help your clinician to monitor your treatment or to provide
you with updates to your device settings. See “Using a ResScan Data Card Module”
on page 27 for information about how to use the Data Card module and Data Card.
ACCESSORIES
Please refer to the illustrations in section C of the illustration sheet.
Other accessories for use with the
• Front cap (not available in all regions) (C-2)
• Air tubing 3 m (C-3)
• DC-12 converter (C-4)
• Blank module (C-5).
Note: ResMed regularly releases new products. Please check our website at
<www.resmed.com>.
S8 AUTOSET SPIRIT:
10
Page 15

HOW TO USE THE S8 AUTOSET SPIRIT
Please refer to the illustrations in section D of the illustration sheet.
SET UP THE S8 AUTOSET SPIRIT
1 Place the S8 AUTOSET SPIRIT on a table near the head of your bed.
CAUTION
!
Be careful not to place the device where it can be bumped or where someone is
likely to trip over the power cord.
Note: You can also place your S8 AutoSet Spirit on the floor beside or underneath your
bed. Ensure that the area is free from dust and clear of bedding, clothes or any other
objects that could block the air inlet.
2 Connect the power cord to the socket at the rear of the flow generator (D-1). Plug
the other end of the power cord into the power outlet.
WARNING
!
Make sure the power cord and plug are in good condition and the equipment is not
damaged.
3 Connect one end of the air tubing firmly onto the air outlet (D-2).
WARNING
!
• Only ResMed air tubing should be used with your flow generator. A different
type of air tubing may alter the pressure you actually receive, reducing the
effectiveness of your treatment.
• Blocking the air inlet or tubing while in operation could lead to overheating of
the device.
• In the clinical environment any personal computer that is used with your CPAP
system must be at least 1.5 m away from, or at least 2.5 m above, the patient. It
must also comply with the relevant test standard. For personal computers the
international standard is IEC 60950 or equivalent.
ENGLISH
ASSEMBLE THE MASK
1 Assemble your mask system according to the mask user instructions.
2 Connect your mask system to the free end of the air tubing (D-3).
3 Check that the mask setting on the MASK screen is the one recommended for the
mask you are using (see the table in “How to Select the Mask Type”).
The
S8 AUTOSET SPIRIT is now ready for use (D-4).
HOW TO USE THE S8 AUTOSET SPIRIT
11
Page 16

START TREATMENT
1 Make sure the power is on.
A welcome message is displayed briefly on the LCD screen, then the standby screen
appears. In CPAP mode, the standby screen displays the word “RAMP”. In AutoSet
mode, the standby screen displays the word “SETTLING”.
The key and LCD backlights also turn on.
2 Lie down and arrange the air tubing so that it is free to move if you turn in your sleep.
CAUTION
!
• Do not leave long lengths of air tubing around the top of your bed. They could
twist around your head or neck while you are sleeping.
• Make sure the area around the flow generator is dry and clean. It should also be
clear of bedding, clothes, and other potential blockages.
3 Alter the ramp or settling time if required (see “How to Change the Ramp or Settling
Time” on page 19).
To start treatment, press the Start/Stop key, unless your clinician has set up your
device to start delivering therapy automatically. If so, your device will start when you
breathe into your mask (see “SmartStart” for details).
4 Fit your mask as described in the mask user instructions.
WARNING
!
A mask should not be used unless the S8 AutoSet Spirit device is powered and
operating properly.
5 When ramping (or settling) begins, the LCD will display the word "RAMPING", (or
“SETTLING”) with the current pressure indicated as dashes. Each dash is
approximately equivalent to 2 cm H
approximately 12 cm H
O pressure.
2
O. For example, 6 dashes represents
2
SMARTSTART™
The S8 AUTOSET SPIRIT has a function called SmartStart™ that your clinician can enable.
If SmartStart is enabled, your device will start automatically when you breathe into your
mask, and will stop automatically when you take your mask off. This means you do not
have to press the Start/Stop key to begin or end treatment.
Note: Do not use SmartStart when using a mask with an anti-asphyxia valve, such as the
Mirage Full Face Mask.
STOPPING TREATMENT
To stop treatment at any time, remove your mask and press the Start/Stop key
or
12
Page 17

if your clinician has enabled SmartStart, simply remove your mask and treatment will
end.
USING THE MASK-FITTING FEATURE
You can use the S8 AUTOSET SPIRIT mask-fitting feature to help you fit your mask
properly. This feature delivers air pressure for a three-minute period, prior to starting
treatment, during which you can check and adjust your mask fit to minimise leaks.
Note: Make sure that the mask setting on the MASK screen is the same as the mask you
are using.
To use the mask-fitting feature:
1 Fit your mask as described in the mask user instructions.
2 Hold down the Start/Stop key for at least three seconds until air pressure delivery
starts.
The following display will appear on the LCD screen indicating that the mask-fitting
feature is operating. Your S8 device will ramp to the mask-fit pressure and will remain
at this pressure for three minutes.
The LCD also displays a mask-fit star rating. See “Definitions of Mask-Fit Star Rating”
on page 14.
MASK FIT:
excelnt
Note: The mask-fit star rating display disappears after three minutes.
The mask-fitting feature can only be started from the RAMP or SETTLING screen.
In AutoSet mode, the mask-fit pressure is the highest pressure that you are likely to receive
based on the previous night’s session or 10 cm H
In CPAP mode, the mask-fit pressure is the set treatment pressure or 10 cm H
whichever is greater.
*****
mask-fit star rating
O, whichever is greater.
2
0,
2
ENGLISH
3 Adjust your mask, mask cushion and headgear until you have a secure and comfortable
fit.
Once you have a secure and comfortable fit, check your mask-fit star rating on the
LCD screen. Table 4 explains the mask-fit star ratings.
Note: If there is another person nearby to check your mask-fit star rating, you can adjust
your mask, mask cushion and headgear while lying down.
4 After three minutes, the pressure reverts to the set pressure and treatment will begin.
• If you do not wish to wait three minutes, hold down the Start/Stop key for at
least three seconds to start treatment immediately.
HOW TO USE THE S8 AUTOSET SPIRIT
13
Page 18

• If you press the Start/Stop key for less than three seconds, the unit will return
to standby mode (the RAMP or SETTLING screen is displayed).
Table 1: Definitions of Mask-Fit Star Rating
Star rating Definition
***** Excellent
****- Very good
***-- Good
**--- Adjust mask
*---- Adjust mask
----- Adjust mask
14
Page 19

HOW TO ATTACH A HUMIDIFIER
ATTACH A HUMIDAIRE 3i HUMIDIFIER
Please refer to the illustration in section E of the illustration sheet, and your HumidAire 3i
manual.
The
HUMIDAIRE 3
humidification. No other accessories are required for its use
Notes:
a. Make sure the water chamber of the HumidAire 3i is empty before you attach or
detach the humidifier.
b. Remove the connector plug on the S8 AutoSet Spirit before you attach the
HumidAire 3i. Reattach the connector plug firmly after you detach the humidifier.
STORING THE HUMIDAIRE 3
Store the HUMIDAIRE 3i in the larger, mesh-top pouch of the S8 AUTOSET SPIRIT carry
bag when not in use.
i
attaches to the front of the S8 AUTOSET SPIRIT to provide heated
.
i
ENGLISH
HOW TO ATTACH A HUMIDIFIER
15
Page 20

16
Page 21

HOW TO USE THE KEYPAD
The control panel of the S8 AUTOSET SPIRIT includes an LCD screen and keypad for
navigating through the menus and delivering treatment.
LCD screen
Up key
Left key
Down key
LCD SCREEN
The LCD screen displays the menus and treatment screens.
The LCD backlight turns off after two minutes of inactivity. It turns back on when you
press a key.
KEYPAD KEYS
The S8 AUTOSET SPIRIT keypad has the following keys:
Right key
Start/Stop key
ENGLISH
Key Function
Start/Stop
Up
Down
Left
Right
• Starts or stops treatment.
• Extended hold (for at least three seconds) starts the maskfitting feature.
• Allows you to scroll through the S8 AutoSet Spirit menus and
submenus, and increase the setting options.
• Allows you to scroll through the S8 AutoSet Spirit menus and
submenus, and decrease the setting options.
• Performs the function indicated by the guiding text displayed
above it on the LCD screen. Guiding text includes menu,
change and apply.
• Performs the function indicated by the guiding text displayed
above it on the LCD screen. Guiding text includes exit and
cancel
.
HOW TO USE THE KEYPAD
17
Page 22

When the S8 device is in standby mode all keys remain lit. During therapy, the keypad
backlight turns off after two minutes of inactivity and the Start/Stop key dims.
HOW TO CHANGE THE SETTINGS
You can change settings on the S8 AUTOSET SPIRIT by using the keypad and LCD.
When the
menu) on the LCD screen in order to view and change the settings for a particular
function.
Your clinician will preset the menu to either a standard view or a detailed view.
See “How to Use the Standard Menu” on page 21 and “How to Use the Detailed
Menu” on page 23 for more information.
HOW TO ENTER THE MENU SCREENS
When the S8 AUTOSET SPIRIT standby (RAMP or SETTLING) screen is displayed you
will see the word “menu” in the left-hand corner. To select an
menu, press the Left key.
HOW TO SCROLL THROUGH THE MENU
When you are in the menu, scroll through items by pressing the Up or Down keys.
HOW TO CHANGE A SETTING OPTION
When you have scrolled to the item you require:
1. Press the Left key (Change).
2. Press the Up or Down keys until you see the setting option that you require.
3. Press the Left key (Apply) to select the setting option.
If you wish to exit without changing the option, press the Right key (Cancel).
HOW TO EXIT OUT OF A MENU
Press the Right key (Exit). This will take you back to the standby (RAMP or
SETTLING) screen.
HOW TO EXIT OUT OF AN ITEM WITHIN THE MENU
Press the Right key (Exit).
S8 AUTOSET SPIRIT is in standby mode you can display a series of screens (a
S8 AUTOSET SPIRIT
18
RAMP AND SETTLING
If your clinician has set your S8 AUTOSET SPIRIT to CPAP mode, the RAMP screen is
displayed after the Welcome screen. If your clinician has set your
AutoSet mode, the SETTLING screen is displayed after the Welcome screen.
S8 AUTOSET SPIRIT to
Page 23

Table 2: Ramp and Settling Functions
Screen Function Description Setting Options
Ramp
(CPAP Mode
only)
Settling
(AutoSet Mode
only)
Selects the ramp time.
Ramp time is the period during
which the S8 AutoSet Spirit
increases from a low pressure to
the prescribed treatment
pressure.
Selects the settling time.
Settling time is the period during
which the S8 AutoSet Spirit
maintains a minimum pressure
before it starts to adjust pressure
in response to respiratory events.
OFF–45 min; 5-minute
increments
OFF–45 min; 5-minute
increments
Note: The maximum ramp or settling time that you can set may be less than 45 minutes,
depending on what your clinician has set as the maximum time.
HOW TO CHANGE THE RAMP OR SETTLING TIME
The standby screen displays the current ramp or settling time in the right-hand corner.
To change the time, press the Up or Down key until the desired ramp or settling time
appears.
ENGLISH
HOW TO USE THE KEYPAD
19
Page 24

20
Page 25
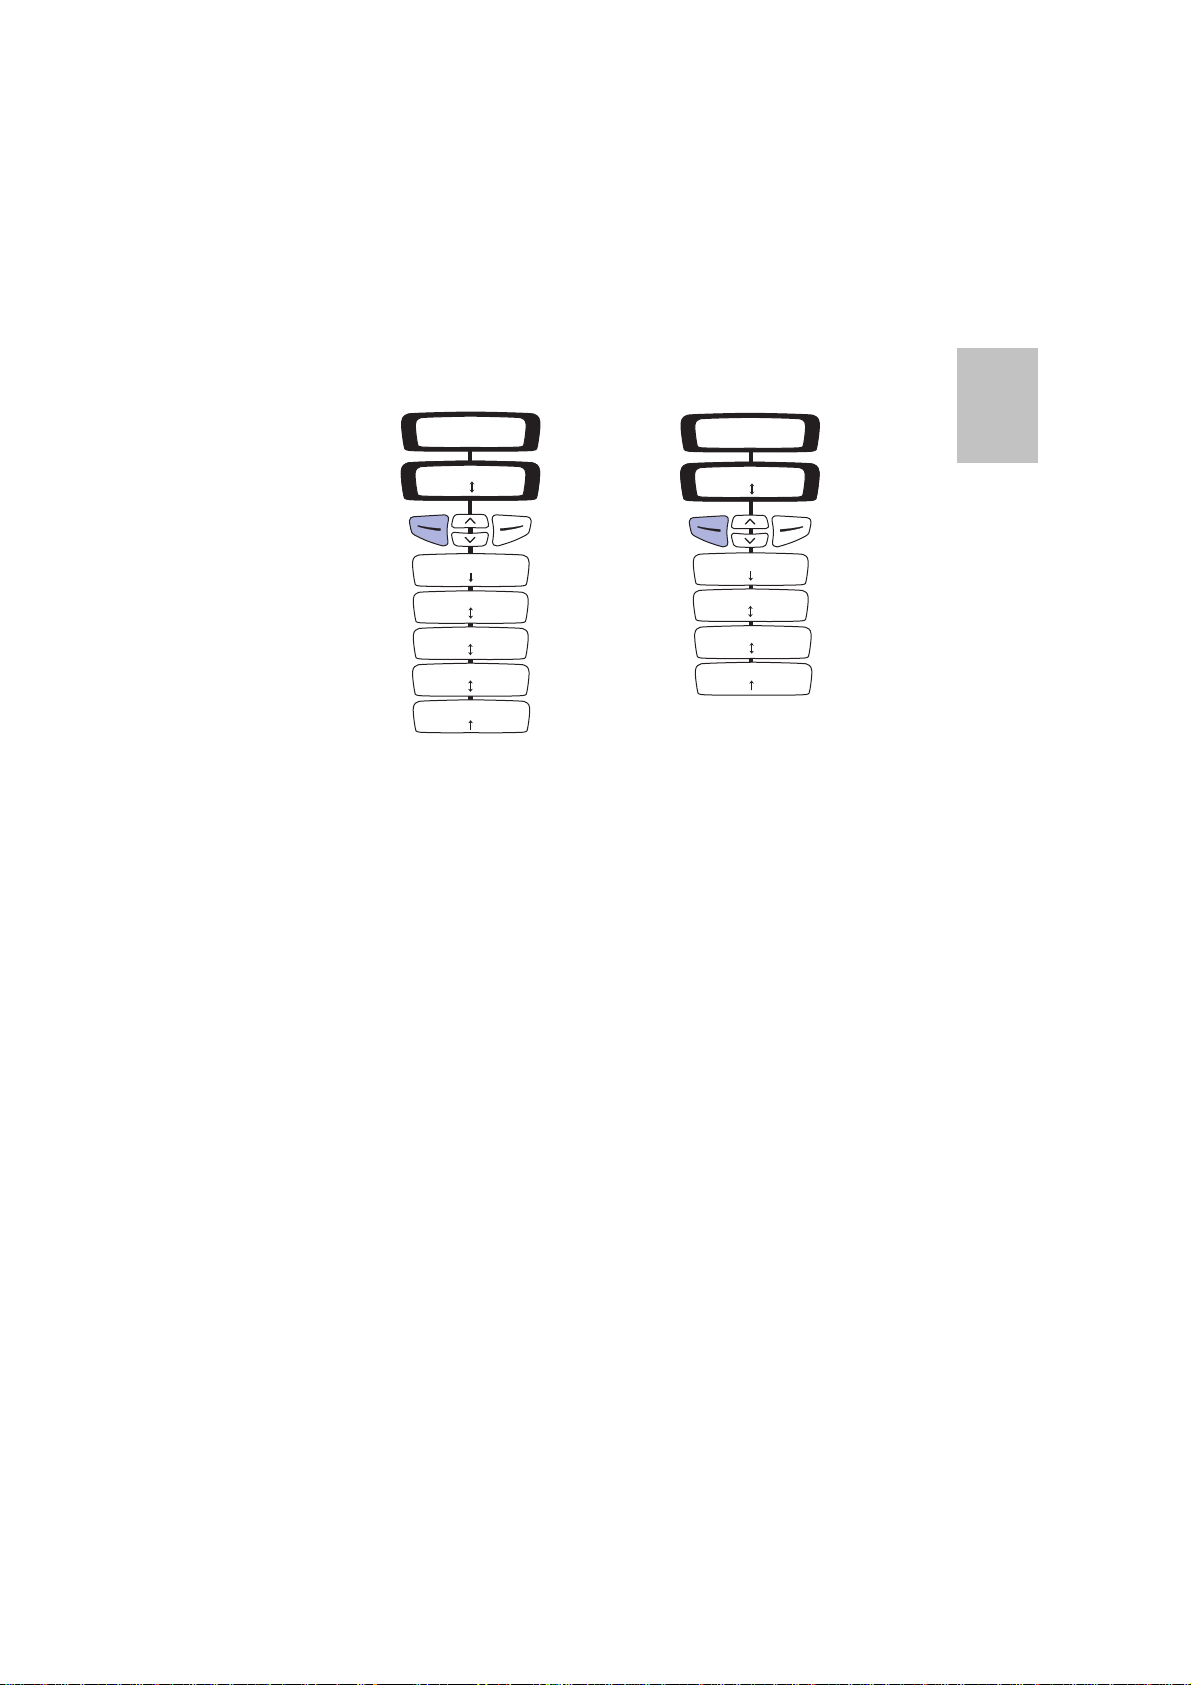
HOW TO USE THE STANDARD MENU
Figure 1 shows the standard menu.
CPAP
WELCOME
>>>>>>
RAMP: 10min
menu
EPR SETTING: 0
change exit
USED HRS: 08000
exit
USAGE: 1000/1068
exit
MASK: ULTRA
change exit
SW: SX3960200
exit
AUTOSET
WELCOME
>>>>>>
SETTLING: 10min
menu
USED HRS: 08000
exit
USAGE: 1000/1068
exit
MASK: ULTRA
change exit
SW: SX3960200
exit
Figure 1 : Standard menu screens: CPAP and AutoSet modes
You enter the standard menu from the standby (RAMP or SETTLING) screen, by
pressing the Left (Menu) key.
HOW TO CHANGE THE EXPIRATORY PRESSURE RELIEF SETTING
Note: EPR may not be available in all regions.
In CPAP mode, your clinician may have set up your device to deliver expiratory
pressure relief (EPR). This can be used to help ease any discomfort you may
experience when breathing out during treatment. There are four settings:
• OFF (no EPR)
• 1 (lowest EPR)
• 2
• 3 (highest EPR).
The EPR SETTING screen only appears if your clinician has enabled access to EPR
settings. To change the EPR setting, select Change (Left key). Press the Up or Down
keys until you see the setting that you require.
HOW TO SELECT THE MASK TYPE
Scroll to MASK and select Change (Left key). Press the Up or Down keys until you
see the mask type that you require.
ENGLISH
HOW TO USE THE STANDARD MENU
21
Page 26

The following table shows the setting that should be selected for each mask type.
Table 3: Settings for mask types
Settings Mask
ULTRA Ultra Mirage Nasal Mask
MIR FULL Mirage Full Face Mask
ACTIVA Mirage Activa Nasal Mask
SWIFT Mirage Swift Nasal Pillows System
MIRAGE Mirage Nasal Mask
STANDARD Mirage Vista Nasal Mask
Mirage Full Face Mask Series 2
Ultra Mirage Full Face Mask
Modular Nasal Mask
Papillon
OTHER VIEWABLE INFORMATION
You can also view the the total number of hours of treatment (USED HRS); the
number of sessions that the
S8 AUTOSET SPIRIT was used in a usage period (USAGE);
and the current software version (SW).
22
Page 27

HOW TO USE THE DETAILED MENU
Figure 2 shows the detailed menu.
CPAP
WELCOME
>>>>>>
RAMP: 10min
menu
SETTINGS
enter exit
RESULTS
enter exit
OPTIONS
enter exit
AUTOSET
WELCOME
>>>>>>
SETTLING: 10min
menu
EPR SETTING: 0
change exit
MASK: ULTRA
change exit
TUBE LENGTH: 2m
change exit
HUMID: NONE
change exit
SMARTSTART: ON
change exit
LEAK ALERT: OFF
change exit
USED HRS: 08000
exit
USAGE: 1000/1068
exit
LANG: ENGLISH
change exit
AUTOSETCPAP
MASK: ULTRA
change exit
TUBE LENGTH: 2m
change exit
HUMID: NONE
change exit
SMARTSTART: ON
change exit
LEAK ALERT: OFF
change exit
ENGLISH
SERVICING
enter exit
SN: 12345678912
exit
PCB: 123456789123
4567 exit
SW: SX3960200
exit
Figure 2 : Detailed menu screens
You enter the detailed menu from the standby (RAMP or SETTLING) screen, by
pressing the Left (Menu) key. The SETTINGS menu screen is displayed.
HOW TO USE THE DETAILED MENU
23
Page 28

SETTINGS MENU
Select Enter (Left key) on the Settings menu to access the options in this menu.
HOW TO CHANGE THE EXPIRATORY PRESSURE RELIEF SETTING
Note: EPR may not be available in all regions.
In CPAP mode, your clinician may have set up your device to deliver expiratory
pressure relief (EPR). This can be used to help ease any discomfort you may
experience when breathing out during treatment. There are four settings:
• OFF (no EPR)
• 1 (lowest EPR)
• 2
• 3 (highest EPR).
If you have access and want to change the EPR setting, scroll to EPR SETTING and
select Change (Left key). Press the Up or Down keys until you see the setting that
you require.
HOW TO SELECT THE MASK TYPE
Scroll to MASK and select Change (Left key). Press the Up or Down keys until you
see the mask type that you require.
The following table shows the setting that should be selected for each mask type.
Table 4: Settings for mask types
Settings Mask
ULTRA Ultra Mirage Nasal Mask
24
MIR FULL Mirage Full Face Mask
Mirage Full Face Mask Series 2
Ultra Mirage Full Face Mask
ACTIVA Mirage Activa Nasal Mask
SWIFT Mirage Swift Nasal Pillows System
MIRAGE Mirage Nasal Mask
STANDARD Mirage Vista Nasal Mask
Modular Nasal Mask
Papillon
HOW TO CHANGE THE TUBE LENGTH
Scroll to TUBE LENGTH and select Change (Left key). Press the Up or Down keys
until you see the tube length that you require.
HOW TO ADD A HUMIDIFIER OR FRONT CAP
Scroll to HUMID and select Change (Left key). Press the Up or Down keys until you
see the setting that you require. You can use the device with or without a front cap.
Page 29

HOW TO CHANGE THE SMARTSTART SETTING
SmartStart enables your device to start automatically when you breathe into the mask.
Scroll to SMARTSTART and select Change (Left key). Press the Up or Down keys
to change the option to ON or OFF.
HOW TO CHANGE THE LEAK ALERT SETTING
Leak alert indicates when a high mask leak is present.
Scroll to LEAK ALERT and select Change (Left key). Press the Up or Down keys to
change the option to ON or OFF.
RESULTS MENU
Select Enter (Left key) on the Results menu to access the options in this menu.
Note: Your clinician may have customised your device to display Smart Data. Contact
your clinician for further details about Smart Data.
VIEWING USAGE INFORMATION
You can view the total number of hours of treatment (USED HRS) and the number
of sessions that the
S8 AUTOSET SPIRIT was used in a usage period (USAGE).
OPTIONS MENU
Select Enter (Left key) on the Options menu to access the options in this menu.
HOW TO CHANGE THE LANGUAGE SETTING
Scroll to LANG and select Change (Left key). Press the Up or Down keys until you
see the language that you require.
ENGLISH
SERVICING MENU
Select Enter (Left key) on the Servicing menu to access the options in this menu.
You can view the current software version installed on your unit (SW); the serial
number of the printed circuit board in your device (PCB); and the serial number of the
device (SN).
MESSAGES ON THE S8 AUTOSET SPIRIT LCD
Your clinician may have set your S8 AUTOSET SPIRIT to remind you about important
events, such as when to replace your mask, when to insert your Data Card (if your
device is Data Card enabled) and so on.
The reminder message is displayed on the LCD and is visible if the device is not
delivering therapy. The backlight on the LCD flashes when a message is displayed.
HOW TO USE THE DETAILED MENU
25
Page 30

Your clinician can set any of the following reminders on your LCD:
Message Description Action
INSERT CARD May appear if your
device is Data Card
enabled.
REPLACE
MASK
CALL
PROVIDER
REPLACE
FILTER
SERVICE DUE May appear as a
Customised
messages
May appear when
your mask is due
for replacement.
May appear as a
reminder to contact
your clinician; for
example to discuss
how your therapy is
going.
May appear as a
reminder to replace
the air filter on your
device.
reminder to return
your device for
service.
Your clinician may
also set reminders
for other reasons;
for example to
return equipment
or to call a
particular person or
number.
Insert your Data Card (see Section H of the
illustrations sheet) and follow any instructions
that your clinician has given you. When you
have done this, the message will disappear
from the LCD. Pressing the Left (Ok) key will
also remove the message.
Press the Left (Ok) key to remove the message
from your LCD, and replace your mask with a
new one.
Press the Left (Ok) key to remove the message
from your LCD, and contact your clinician.
Press the Left (Ok) key to remove the message
from your LCD, and replace the air filter.
Press the Left (Ok) key to remove the message
from your LCD.
Press the Left (Ok) key to remove the message
from your LCD.
26
Page 31

S8 MODULES
Note: Do not remove modules while power is connected to the S8 AutoSet Spirit.
Your
S8 AUTOSET SPIRIT will have one of two modules fitted to the back: a blank
module or a
USING A BLANK MODULE
Please refer to the illustrations in section F of the illustration sheet.
The blank module is a protective cover on your
wish to remove or attach the module, for example to use another module.
To remove the blank module, pull it off the back of the
communications port (F-1).
To attach the blank module, push the blank module onto the data communications
port, until the module clicks into place (F-2).
Note: To protect the data communications port, always ensure there is a module
attached to the back of the device.
USING A RESSCAN DATA CARD MODULE
Please refer to the illustrations in section G of the illustration sheet.
The
RESSCAN Data Card module is an accessory to the S8 AUTOSET SPIRIT. Use a
RESSCAN
the
S8 AUTOSET SPIRIT. The module and card give your clinician convenient access to
data about your treatment, and can provide you with new device settings from your
clinician without your having to leave home.
RESSCAN Data Card module.
S8 AUTOSET SPIRIT. At times, you may
S8 CLASSIC to show the data
Data Card with the Data Card module to collect data and update settings in
ENGLISH
ATTACHING THE MODULE
To attach the Data Card module, push it onto the data communications port at the
back of your
S8 AUTOSET SPIRIT until it clicks into place (G-1).
REMOVING THE MODULE
To remove the Data Card module, pull it off the back of the S8 AUTOSET SPIRIT (G-2).
Note: To protect the data communications port, always ensure there is a module
attached to the device.
USING THE DATA CARD TO COLLECT DATA
Please refer to the illustrations in section H of the illustration sheet.
If your clinician needs to review your treatment, they will ask you to use the Data Card
to copy data from your
Card will be provided in a convenient mailback envelope.
Data that is copied to a Data Card is still stored and available on the
It takes up to 30 seconds to copy data onto the Data Card.
S8 AUTOSET SPIRIT, and to return the card to them. The Data
S8 AUTOSET SPIRIT.
S8 MODULES
27
Page 32

NSERT THE DATA CARD
1 I
•
Switch on the S8 AUTOSET SPIRIT and wait until you see the standby (RAMP or
SETTLING) screen.
• Hold the Data Card with the arrow facing up and insert it into the slot in the
Data Card module (H-1).
• Push the card in smoothly until it stops moving (H-2) and messages start
appearing on the LCD.
2 COPY DATA ONTO THE DATA CARD
•
Data copying starts automatically when the Data Card is inserted into the Data
Card module.
• The “Card Inserted Please Wait” message is displayed on the S8 AUTOSET
SPIRIT LCD while data is being copied. Copying takes up to 30 seconds.
• The “Copy Complete Remove Card” message is displayed on the LCD when
copying has finished.
• Remove the Data Card from the Data Card module.
3 REMOVE THE DATA CARD
Grip the end of the Data Card and pull it out of the Data Card module (H-3).
4 STORE THE DATA CARD
Your Data Card should be stored in its mailback envelope when not in use.
5 MAIL THE DATA CARD TO YOUR CLINICIAN
A bubble mailer envelope is provided to ensure safe transportation of the Data Card.
When mailing the Data Card to your clinician:
1. Insert the Data Card into the pocket provided on the mailback envelope. Fold up
the mailback envelope.
2. Place the mailback envelope containing the Data Card in the bubble mailer
envelope and seal it.
3. Make sure that your clinician’s name and address details are on the bubble mailer
envelope, and mail it back immediately.
28
USING THE DATA CARD TO UPDATE SETTINGS
If your clinician has provided a Data Card with new device settings:
• With the device in standby (RAMP or SETTLING) mode, insert the Data Card
into the slot on the Data Card module. Updating will start automatically.
• The “Card Inserted Please Wait” message is displayed on the LCD while updating
is in progress. Updating takes up to 30 seconds.
• The “Settings Success Remove Card” message is displayed on the LCD if the
settings were updated successfully.
Note: This message only appears once. If you re-insert the Data Card after you have
updated your settings, this message is not displayed.
• Remove the Data Card from the Data Card module.
• Store the Data Card in its mailback envelope when not in use.
Page 33

WARNING
!
If your clinician has told you to use this Data Card to update the settings on your
device and the “Settings Success” message does not appear, contact your clinician
immediately.
ENGLISH
S8 MODULES
29
Page 34

30
Page 35

CLEANING AND MAINTENANCE
You should regularly carry out the cleaning and maintenance described in this section.
Refer to your mask manual for detailed instructions.
DAILY CLEANING
MASK
Clean the mask according to the instructions supplied with the mask.
AIR TUBING
Disconnect the air tubing from the S8 AUTOSET SPIRIT (and humidifier, if used) and hang
the tubing and mask in a clean, dry place until next use.
HUMIDIFIER
If you are using a humidifier, remove it from the S8 AUTOSET SPIRIT and clean it
according to the instructions in the humidifier user’s manual.
WEEKLY CLEANING
1. Remove the air tubing from the S8 AUTOSET SPIRIT and the mask.
2. Wash the air tubing in warm water using mild detergent. Rinse thoroughly, hang
and allow to dry.
3. Before next use, assemble the mask and headgear according to the user
instructions.
4. Reconnect the air tubing to the air outlet and mask.
PERIODIC CLEANING
1. Clean the exterior of the S8 AUTOSET SPIRIT with a damp cloth and mild liquid
soap.
2. Check the air filter for blockage or holes (see “Replacing the Air Filter” on
page 32).
ENGLISH
WARNING
!
• Beware of electric shock. Do not immerse the unit or power cord in water.
Always unplug the unit before cleaning and be sure it is dry before plugging back
in.
• The mask system and air tubing are subject to normal wear and tear. Inspect
them regularly for damage.
CLEANING AND MAINTENANCE
31
Page 36

REPLACING THE AIR FILTER
To replace the air filter:
1. Remove the air filter cover at the back of the
2. Remove and discard the old air filter.
3. Insert a new filter with the blue tinted side facing out from the device.
4. Replace the air filter cover.
Inspect the air filter every month to check if it is blocked by dirt or contains holes. With
normal use of an
(or more often if your device is in a dusty environment).
S8 AUTOSET SPIRIT, the air filter needs to be replaced every six months
S8 AUTOSET SPIRIT.
Air filter cover
WARNING
!
• Do not wash the air filter. The air filter is not washable or reusable.
• The air filter cover protects the device in the event of accidental liquid spillage
onto the device. Ensure the air filter and air filter cover are fitted at all times.
SERVICING
CAUTION
!
• Do not attempt to open the S8 AutoSet Spirit case. There are no user
serviceable parts inside.
• Inspection and repair should only be performed by an authorised agent. Under
no circumstances should you attempt to service or repair the flow generator
yourself.
This product (
service centre 5 years from the date of manufacture. Prior to this, the device is
intended to provide safe and reliable operation provided that it is operated and
maintained in accordance with the instructions provided by ResMed. Applicable
ResMed warranty details are provided with the device at the time of original supply.
Of course, as with all electrical devices, if any irregularity becomes apparent, you should
exercise caution and have the device inspected by an authorised ResMed service
centre.
If you feel that your flow generator is not performing properly, see “Troubleshooting”
on page 35.
S8 AUTOSET SPIRIT) should be inspected by an authorised ResMed
32
Page 37

FREQUENTLY ASKED QUESTIONS
HOW WILL IT FEEL WHEN I AM BREATHING WITH THE S8 AUTOSET SPIRIT?
When you first use your S8 AUTOSET SPIRIT, you may feel uncomfortable breathing
against the airflow. This is normal. You will continue to breathe normally while you
sleep. Take time to adjust to this new sensation.
WHAT DO I DO WHEN I WANT TO GET UP IN THE NIGHT?
If you need to get up during the night, remove your mask and stop therapy. Always
remember to restart therapy and put your mask on when you return to bed.
WHAT DO I DO IF I FEEL AIR LEAKING OUT OF THE MASK?
The flow generator delivers the most effective treatment when the mask is well fitted
and comfortable. Treatment can be affected by leaks, so it is important to eliminate
any leaks that may arise. For example, try repositioning the mask and adjusting the
straps.
If you are using a nasal mask, try to keep your mouth closed during treatment. Air leaks
from your mouth can decrease the effectiveness of your treatment. If mouth leaks are
a problem, a full face mask or chin strap may help. Contact your clinician or equipment
supplier for further details.
If you are using a full face mask and you have problems trying to get a comfortable
mask fit, contact your sleep clinic or equipment supplier. You may benefit from a
different size or style of mask.
You can also use the mask-fitting feature to help you fit your mask properly. See “Using
the Mask-Fitting Feature” on page 13.
ANYTHING SPECIAL I SHOULD DO BEFORE PUTTING THE MASK ON?
Before wearing your mask, wash your face to remove excess facial oils. This will allow
a better fit and prolong the life of the mask cushion.
Do not use moisturiser when wearing a mask.
MY MOUTH FEELS DRY DURING TREATMENT—WHAT CAN I DO?
You may experience dryness of the nose, mouth and/or throat during the course of
treatment, especially during winter. In many cases, a humidifier may resolve this
discomfort. Contact your clinician for advice.
MY NOSE IS IRRITATED DURING TREATMENT—WHAT CAN I DO?
You may experience sneezing and/or a runny or blocked nose during the first few
weeks of treatment. In many cases, nasal irritation can be resolved with a humidifier.
Consult your clinician or equipment supplier for advice.
CAN I TRAVEL WITH THE S8 AUTOSET SPIRIT?
ENGLISH
INTERNATIONAL USE
Your S8 AUTOSET SPIRIT flow generator has an internal power supply that enables it to
operate in other countries. It will operate on power supplies of 100–240 V and
50/60 Hz. No special adjustment is necessary, but you may need a plug adapter for the
power outlet.
FREQUENTLY ASKED QUESTIONS
33
Page 38

ALTITUDE CHANGES
Your S8 AUTOSET SPIRIT automatically adjusts to changes in altitude up to 2591 m.
ON AN AIRCRAFT
Please consult the medical services department of your carrier if you intend to use your
S8 AUTOSET SPIRIT on an aircraft. The S8 AUTOSET SPIRIT complies with US FCC
Part 15, Class B requirements if no external data cables are used.
Note: Do not use your
S8 AUTOSET SPIRIT while the aircraft is taking off or landing.
CAN I USE MY S8 AUTOSET SPIRIT IF MAINS (AC) POWER IS NOT AVAILABLE?
You must use a ResMed DC-12 converter to connect the S8 AUTOSET SPIRIT to a 12 V
or 24 V DC power source. Contact your equipment supplier or ResMed for details.
WARNING
!
The device should not be connected to both AC and DC power sources
simultaneously.
34
Page 39

TROUBLESHOOTING
If there is a problem, try the following suggestions. If the problem cannot be solved,
contact your equipment supplier or ResMed. Do not attempt to open the device.
Problem Possible Cause Solution
No display. Power not connected. Ensure the appropriate power
Insufficient air
delivered from
S8 AutoSet Spirit.
S8 AutoSet Spirit does
not start when you
breathe into the mask.
Ramp or settling time is in use. Wait for air pressure to build up
Air filter is dirty. Replace air filter.
Air tubing is kinked or
punctured.
Air tubing not connected
properly.
Mask and headgear not
positioned correctly.
Cap(s) missing from access
port(s) on mask.
Pressure required for treatment
may have changed.
Power cord not connected
properly.
Power outlet may be faulty. Try another power outlet.
SmartStart not on. Enable SmartStart.
Leak Alert has been enabled;
SmartStart has automatically
been disabled.
Use of a Mirage or Ultra Mirage
Full Face Mask.
Breath is not deep enough to
trigger SmartStart.
cord is connected to your
S8 AutoSet Spirit and the power
switch (if available) is on.
or change ramp or settling time.
Straighten or replace tubing.
Check air tubing.
Adjust position of mask and
headgear.
Replace cap(s).
See your clinician to adjust the
pressure.
Connect power cord firmly at
both ends.
Disable Leak Alert to enable
SmartStart.
SmartStart does not work with a
full face mask as the antiasphyxia valve will not allow
sufficiently high pressure on
exhalation.
Take a deep breath in and out
through the mask.
ENGLISH
TROUBLESHOOTING
35
Page 40

Problem Possible Cause Solution
There is excessive leak. Adjust position of mask and
headgear.
Caps may be missing from ports
on mask. Replace them.
Air tubing not connected
properly. Connect firmly at both
ends.
Air tubing kinked or punctured.
Straighten or replace.
S8 AutoSet Spirit unit
does not stop when
you remove your
mask.
SmartStart is enabled
but the flow generator
does not stop
automatically when
you remove your
mask.
Pressure rises
inappropriately.
SmartStart/Stop is disabled. Enable SmartStart/Stop.
Incompatible humidifier or mask
system being used.
Talking, coughing, voluntarily
breath-holding (eg while rolling
over in bed), or intentionally
breathing in an unusual manner.
Mask cushion is buzzing against
the skin. Cushion seated
incorrectly.
Cushion seated incorrectly
causing excessive leak.
Air tubing is kinked or
punctured.
Humidifier control dial set too
high, resulting in accumulation
of water in the air tubing.
Use only equipment as
recommended and supplied by
ResMed.
Avoid talking with a nasal mask
on, and breathe as normally as
possible.
Adjust the headgear.
Adjust headgear or re-fit cushion.
Straighten or replace air tubing.
Turn humidifier control dial down
and empty the water from the air
tubing.
36
Page 41

Problem Possible Cause Solution
Display error message:
Check tube!!
Key if done
Display error message:
SYSTEM ERROR
Call service!
Display error message:
High leak in
last session
Display error message:
HIGH LEAK!!!
Adjust Mask
Display error message:
Exxxx (where xxxx
defines an error)
The air tubing is loose or
blocked.
Component failure. Return your S8 AutoSet Spirit for
You have experienced
excessively high leak levels
during the night.
You have experienced
excessively high leak levels for
more than 20 seconds.
Component failure. Return your S8 AutoSet Spirit for
Check that the air tubing is
connected securely to your mask
and the air outlet on the front of
the S8 AutoSet Spirit.
When you have checked the air
tubing, press the Start/Stop key to
restart the device.
If this does not clear the message,
disconnect the power cord and
then reconnect it to restart the
device.
servicing.
Check that your air tubing is
connected properly and that your
mask does not leak excessively.
Use the mask-fitting feature to
help you to fit your mask
properly.
If this message appears again,
contact your clinician.
Check that your air tubing is
connected properly and that your
mask does not leak excessively.
Use the mask-fitting feature to
help you to fit your mask
properly.
If this message appears again,
contact your clinician.
servicing.
ENGLISH
The following message
is displayed on the
LCD after you try to
update settings using
the Data Card:
Card Error
Remove Card
The Data Card is not inserted
correctly.
The Data Card is only partly
inserted.
Ensure that the Data Card is
inserted with the arrow facing up
and pointing towards the device.
Ensure that the device is switched
on and in standby mode before
you insert the Data Card.
Ensure that the Data Card is
inserted into the slot on the Data
Card module as far as it will go.
TROUBLESHOOTING
37
Page 42

Problem Possible Cause Solution
The following message
is displayed on the
LCD after you try to
copy data to a Data
Card:
Card Error
Remove Card
The following message
is displayed on the
LCD after you try to
update the settings
using the Data Card:
Settings Invalid
Remove Card
The following message
is displayed on the
LCD after you try to
update the settings
using the Data Card:
Settings Error
Remove Card
The following message
is NOT displayed on
the LCD after you try
to update the settings
using the Data Card:
Settings Success
Remove Card
You may have removed the Data
Card before settings were copied
to the S8 AutoSet Spirit.
The card is not a ResScan Data
Card.
The Data Card is not inserted
correctly.
The card is not a ResScan Data
Card.
You may have removed the Data
Card before data was copied to
it.
The identification details on the
Data Card do not match the
details on your device.
There is a data error on the Data
Card.
The settings were not updated. Contact your clinician
Reinsert the Data Card and wait
for the Settings Success
Remove Card message to
appear on the LCD.
Only use a ResScan Data Card.
Ensure that the Data Card is
inserted with the arrow facing up
and pointing toward the device.
Use a ResScan Data Card, as
specified in this manual.
Reinsert the Data Card and wait
for the Copy Complete
Remove Card message to
appear on the LCD.
Contact your clinician
immediately.
Contact your clinician
immediately.
immediately.
38
Page 43

SYSTEM SPECIFICATIONS
S8 AUTOSET SPIRIT (NO ACCESSORIES)
Performance: Operating pressure range: 4 to 20 cm H2O
Dimensions (H x W x D): 112 mm x 164 mm x 145 mm
Weight: 1.3 kg
Power Supply
• Input range for S8 AUTOSET SPIRIT with HUMIDAIRE 3i: 100–240 V, 50/60 Hz; 110 V,
400 Hz; 2.5A <140 VA (110 W) (maximum power consumption). Instantaneous
peak power consumption <340 VA.
• Refer to the DC-12 converter instructions for DC ratings. Only use the ResMed
DC-12 converter for DC input.
Actual power consumption will vary, depending on factors such as the use of
accessories, height above sea level and ambient temperature. Power consumption
values for typical treatment conditions (using a breathing machine set to 0.5 L and
15 breaths/min with 2 m air tubing and an
following table
ULTRA MIRAGE mask) are given in the
ENGLISH
Device
S8 AutoSet Spirit 5 18 7.6
Pressure
(cm H2O)
10 23 11.6
15 30 15.9
20 39 20.7
Power
(VA)
Power outlet for HumidAire 3i
Outlet range: 100–240 V, 50/60 Hz; 110 V, 400 Hz; 2.0A
Air Filter: Two-layered, powder-bonded, polyester non-woven fiber
Air Tubing: Flexible plastic, 2 m
Air Outlet: The 22 mm conical air outlet complies with EN 1281-1
IEC 60601-1 Classifications: Class II (double insulation), Type CF
Noise level: Radiated sound pressure is measured at <30 dBA at 10 cm H
1 m according to ISO17510
ACCESSORIES
DATA CARD
Dimensions (L x W x D): 65.04 mm x 22.15 mm x 0.85 mm
Power
(W)
O and
2
SYSTEM SPECIFICATIONS
39
Page 44

DATA CARD MODULE
Dimensions (H x W x D): 49.7 mm x 42.2 mm x 12 mm
ALL DEVICES (WHERE APPLICABLE)
Housing Construction: Flame retardant engineering thermoplastic
Environmental Conditions
Operating Temperature: +5°C to +40°C
Operating Humidity: 10%–95% non-condensing
Storage and Transport Temperature: -20°C to +60°C
Storage and Transport Humidity: 10%–95% non-condensing
Operating Altitude: sea level to 2591 m
Electromagnetic Compatibility
Product complies with all applicable electromagnetic compatibility requirements
(EMC) according to IEC60601-1-2, for residential, commercial, and light industry
environments. For further details, see “Guidance and Manufacturer’s Declaration Electromagnetic Emissions and Immunity” on page 41.
Note: The manufacturer reserves the right to change these specifications without notice.
SYMBOLS WHICH APPEAR ON THE DEVICE
Attention, consult accompanying documents
Type CF equipment
40
Class II equipment
Drip proof
Dangerous voltage
Start/Stop and mask-fit
Page 45

GUIDANCE AND MANUFACTURER’S DECLARATION - ELECTROMAGNETIC
MISSIONS AND IMMUNITY
E
Guidance and manufacturer’s declaration—electromagnetic emissions
The S8 series of devices is intended for use in the electromagnetic environment specified below. The
customer or the user of the S8 device should assure that the device is used in such an environment.
Emissions test Compliance
RF emissions CISPR11 Group 1 The S8 device uses RF energy only for its
RF emissions CISPR 11 with serial
adapter
RF emissions CISPR 11 with USB
adapter
Harmonic Emissions
IEC 61000-3-2
Voltage Fluctuations/Flicker
Emissions IEC 61000-3-3
* Class B for all system configurations except when a PC is attached to the S8 device via a serial adapter,
in which case the system is Class A compliant. Class A is suitable for use in all establishments other than
domestic and those directly connected to a low voltage power supply network which supplies buildings
used for domestic purposes.
Medical Electrical Equipment needs special precautions regarding EMC and needs to be installed and put
into service according to EMC information provided in this document.
Warnings: The S8 device should not be used adjacent to or stacked with other equipment.
If adjacent or stacked use is necessary, the S8 device should be observed to verify normal operation in
the configuration in which it will be used.
The use of accessories (eg humidifiers) other than those specified in this manual is not recommended.
They may result in increased emissions or decreased immunity of the S8 device.
Class B* The S8 device is suitable for use in all
Class B
Class A
Complies
Electromagnetic environment—
guidance
internal function. Therefore, its RF
emissions are very low and are not likely
to cause any interference in nearby
electronic equipment.
establishments, including domestic
establishments and those directly
connected to the public low-voltage
network that supplies buildings used for
domestic purposes.
ENGLISH
SYSTEM SPECIFICATIONS
41
Page 46

Guidance and manufacturer’s declaration—electromagnetic immunity
The S8 series of devices is intended for use in the electromagnetic environment specified below. The
customer or the user of the S8 device should assure that the device is used in such an environment.
Immunity test
Electrostatic
discharge (ESD)
IEC 61000-4-2
Electrical fast
transient/burst
IEC 61000-4-4
Surge
IEC 61000-4-5
Voltage dips, shor t
interruptions and
voltage variations on
power supply input
lines.
IEC 61000-4-11
Power frequency
(50/60 Hz)
magnetic field
IEC 61000-4-8
NOTE: Ut is the AC mains voltage prior to application of the test level.
IEC60601-1-2
test level
±6 kV contact
±8 kV air
±2 kV for power
supply lines
±1 kV for input/
output lines
±1 kV differential
mode
±2 kV common
mode
<5% Ut
(>95% dip in Ut)
for 0.5 cycle
40% Ut
(60% dip in Ut)
for 5 cycles
70% Ut
(30% dip in Ut)
for 25 cycles
<5% Ut
(>95%dip in Ut)
for 5 sec
3 A/m 3 A/m Power frequency magnetic
Compliance level
±6 kV contact
±8 kV air
±2 kV
Not Applicable
±1 kV differential
mode
±2 kV common
mode
< 12 V
(>95% dip in 240 V)
for 0.5 cycle
96 V
(60% dip in 240 V)
for 5 cycles
168 V
(30% dip in 240 V)
for 25 cycles
<12 V
(>95%dip in 240 V)
for 5 sec
Electromagnetic
environment—guidance
Floors should be wood,
concrete or ceramic tile. If
floors are covered with
synthetic material, the
relative humidity should be
at least 30%.
Mains power quality should
be that of a typical
commercial or hospital
environment.
Mains power quality should
be that of a typical
commercial or hospital
environment.
Mains power quality should
be that of a typical
commercial or hospital
environment.
If the user of the S8 device
requires continued operation
during power mains
interruptions, it is
recommended that the S8
device be powered from an
uninterruptible power
source.
fields should be at levels
characteristic of a typical
location in a typical
commercial or hospital
environment.
42
Page 47

Guidance and manufacturer’s declaration—electromagnetic immunity
The S8 series of devices is intended for use in the electromagnetic environment specified below. The customer or
the user of the S8 device should assure that the device is used in such an environment.
Immunity test
Conducted RF
IEC 61000-4-6
IEC60601-1-2
test level
3 Vrms
150 kHz to 80 MHz
Compliance
level
3 Vrms d = 1.17 √P
Electromagnetic environment—guidance
Portable and mobile RF communications
equipment should be used no closer to any part
of the S8 device, including cables, than the
recommended separation distance calculated
from the equation applicable to the frequency of
the transmitter.
Recommended separation distance
ENGLISH
Radiated RF
IEC 61000-4-3
NOTE 1: At 80 MHz and 800 MHz, the higher frequency range applies.
NOTE 2: These guidelines may not apply in all situations. Electromagnetic propagation is affected by absorption
and reflection from structures, objects and people.
a
Field strengths from fixed transmitters, such as base stations for radio (cellular/cordless) telephones and land
mobile radios, amateur radio, AM and FM radio broadcast and TV broadcast cannot be predicted theoretically
with accuracy. To assess the electromagnetic environment due to fixed RF transmitters, an electromagnetic site
survey should be considered. If the measured field strength in the location in which the S8 device is used exceeds
the applicable RF compliance level above, the S8 device should be observed to verify normal operation. If
abnormal performance is observed, additional measures may be necessary, such as reorienting or relocating the
S8 device.
b
Over the frequency range 150 kHz to 80 MHz, field strengths should be less than 10 V/m.
10 V/m
80 MHz to 2.5 GHz
10 V/m d = 0.35 √P 80 MHz to 800 MHz
d = 0.70 √P 800 MHz to 2.5 GHz
where P is the maximum output power rating of
the transmitter in watts (W) according to the
transmitter manufacturer and d is the
recommended separation distance in meters (m).
Field strengths from fixed RF transmitters, as
determined by an electromagnetic site survey,
should be less than the compliance level in each
frequency range.
Interference may occur in the vicinity of
equipment marked with the following symbol:
b
a
SYSTEM SPECIFICATIONS
43
Page 48

Recommended separation distances between portable and mobile RF communications
equipment and the S8 series of devices
The S8 series of devices is intended for use in an environment in which radiated RF disturbances are controlled.
The customer or the user of the S8 device can help prevent electromagnetic interference by maintaining a
minimum distance between portable and mobile RF communications equipment (transmitters) and the S8 device
as recommended below, according to the maximum output power of the communications equipment.
Separation distance according to frequency of transmitter
m
Rated maximum output
power of transmitter
W
0.01 0.17 0.04 0.07
0.1 0.37 0.11 0.22
1 1.17 0.35 0.7
10 3.69 1.11 2.21
100 11.70 3.50 7.0
For transmitters rated at a maximum output power not listed above, the recommended separation distance d in
metres (m) can be determined using the equation applicable to the frequency of the transmitter, where P is the
maximum output power rating of the transmitter in watts (W) according to the transmitter manufacturer.
NOTE 1: At 80 MHz and 800 MHz, the separation distance for the higher frequency range applies.
NOTE 2: These guidelines may not apply in all situations. Electromagnetic propagation is affected by absorption
and reflection from structures, objects and people.
150 kHz to 80 MHz
d = 1.17 √P
80 MHz to 800 MHz
d = 0.35 √P
800 MHz to 2.5 GHz
d = 0.7 √P
44
Page 49

LIMITED WARRANTY
ResMed warrants that your ResMed product shall be free from defects in material and
workmanship for the period specified below from the date of purchase by the initial
consumer. This warranty is not transferable.
Product Warranty Period
ResMed humidifiers, ResControl™, ResLink™, ResTraxx™ 1 Year
ResMed flow generators 2 Years
ENGLISH
Accessories, mask systems (including mask frame, cushion,
headgear and tubing). Excludes single-use devices.
90 Days
Note: Some models are not available in all regions.
If the product fails under conditions of normal use, ResMed will repair or replace, at its
option, the defective product or any of its components. This Limited Warranty does
not cover:
a) any damage caused as a result of improper use, abuse, modification or alteration of
the product;
b) repairs carried out by any service organization that has not been expressly
authorized by ResMed to perform such repairs;
c) any damage or contamination due to cigarette, pipe, cigar or other smoke;
d) any damage caused by water being spilled on or into a flow generator.
Warranty is void on product sold, or resold, outside the region of original purchase.
Warranty claims on defective product must be made by the initial consumer at the
point of purchase.
This warranty is in lieu of all other express or implied warranties, including any implied
warranty of merchantability or fitness for a particular purpose. Some regions or states
do not allow limitations on how long an implied warranty lasts, so the above limitation
may not apply to you.
ResMed shall not be responsible for any incidental or consequential damages claimed
to have occurred as a result of the sale, installation or use of any ResMed product.
Some regions or states do not allow the exclusion or limitation of incidental or
consequential damages, so the above limitation may not apply to you. This warranty
gives you specific legal rights, and you may also have other rights which vary from
region to region.
For further information on your warranty rights, contact your local ResMed
dealer or ResMed office.
LIMITED WARRANTY
R000-307/2 05 06
45
Page 50

46
Page 51

INDEX
A
accessories 10
air filter
9, 35
replacing
air pressure
air tubing
cleaning
connect to air outlet
kinked
positioning
aircraft
airflow
breathing with 33
B
blank module
C
carry bag
cleaning
daily 31
periodic
weekly
contraindications
D
daily cleaning
Data Card
copying data
inserting
mailback envelope
removing
Data Card module
data management products
DC-12 converter
detailed menu
down key
dryness
mouth, nose or throat
E
EPR setting
error messages
expiratory pressure relief
F
frequently asked questions
front cap
32
35
9
31
11
35
12
34
27
9
31
31
5
31
27, 37
28
28
28
28
10, 27
34
23
17
33
21, 24
37
21, 24
10, 24
27
33
H
headgear position
HumidAire 3i
attaching
storage
9, 15
humidifiers
alleviating dryness 33
cleaning
HumidAire 3i
24
type
I
international use
K
9
keypad
key functions
L
language setting
LCD
9, 12, 17
error messages
messages
leak alert setting
17
left key
M
mailback envelope
mask
air leak 33
attaching
cleaning
mask type
port
35
position
preparing to use
removing
types
9, 10
Mask screen
mask settings
mask types
mask-fit
13
star rating
medical information
menu
detailed 23
standard
menu screens
35
10
15
31
10
33
17
25
38
25
25
11
31
21, 24
35
33
13
22, 24
22, 24
14
21
18
ENGLISH
28
33
5
INDEX
47
Page 52

access 18
change
18
18
exit
scrolling
modules
attaching 9
blank
Data Card
N
nasal irritation 33
O
Options Menu
P
PCB
serial number
periodic cleaning
power cord
connecting
power sockets
power sources
power supply
printed circuit board
R
Ramp screen
ramp time
reminders
call provider
customised messages
insert card
replace air filter
replace mask
service due
ResScan Data Card module
Results Menu
right key
18
27
27
25
25
31
9, 35
11
9
34
39
25
18
12, 35
26
26
26
26
26
26
26
25
17
10
Settings Menu
settling time
SmartStart
SmartStart setting
SN
25
software version
software version number
standard menu
standby screen
start/stop key
stopping treatment
25
SW
system specifications
T
troubleshooting
tube length setting
U
up key
Usage
22, 25
use on aircraft
Used hours
W
weekly cleaning
24
35
12
25
22, 25
21
12
17
12
39
35
24
17
34
22, 25
31
25
48
S
S8 AutoSet Spirit
dimensions
servicing
setup
start treatment
travelling with
S8 modules
serial number
Servicing Menu
setting up
39, 40
32
11
27
25
11
12
33
25
Page 53

S8 AutoSet Spirit™ System
BEDIENUNGSANLEITUNG
Deutsch
DEUTSCH
49
49
Page 54

5050
Page 55

INHALT
EINFÜHRUNG . . . . . . . . . . . . . . . . . . . . . . . . . . . . . . . . . . . . . . . . . . . . . . . . 53
HRE VERANTWORTUNG 53
I
MEDIZINISCHE HINWEISE . . . . . . . . . . . . . . . . . . . . . . . . . . . . . . . . . . . . . . 53
NFORMATIONEN ZUM S8 AUTOSET SPIRIT 53
I
K
ONTRAINDIKATIONEN 54
W
ARNUNGEN 54
V
ORSICHTSHINWEISE 55
N
EBENWIRKUNGEN 56
DAS S8 AUTOSET SPIRIT . . . . . . . . . . . . . . . . . . . . . . . . . . . . . . . . . . . . . . 57
UTOSET SPIRIT 57
S8 A
M
ASKEN 57
A
TEMLUFTBEFEUCHTER 58
R
ESSCAN DATENKARTENMODUL 58
Z
UBEHÖR 58
BEDIENUNG DES S8 AUTOSET SPIRIT . . . . . . . . . . . . . . . . . . . . . . . . . . . . 59
UFSTELLEN DES S8 AUTOSET SPIRIT 59
A
Z
USAMMENBAU DER MASKE 59
B
EHANDLUNGSBEGINN 60
B
EENDEN DER BEHANDLUNG 61
B
ENUTZUNG DER MASKENANLEGEFUNKTION 61
DEUTSCH
ANSCHLUSS DES ATEMLUFTBEFEUCHTERS . . . . . . . . . . . . . . . . . . . . . . . . 63
NSCHLUSS EINES HUMIDAIRE 3I ATEMLUFTBEFEUCHTERS 63
A
VERWENDUNG DES BEDIENFELDES . . . . . . . . . . . . . . . . . . . . . . . . . . . . . . 65
NDERN DER EINSTELLUNGEN 66
Ä
VERWENDUNG DES MENÜS „STANDARD“ . . . . . . . . . . . . . . . . . . . . . . . . 69
VERWENDUNG DES DETAILMENÜS . . . . . . . . . . . . . . . . . . . . . . . . . . . . . . 71
AS MENÜ „EINSTELLUNGEN“ 72
D
D
AS MENÜ „ERGEBNISSE“ 73
D
AS MENÜ „OPTIONEN“ 73
D
AS MENÜ „WARTUNG“ 73
M
ELDUNGEN AUF DEM LCD-DISPLAY DES S8 AUTOSET SPIRIT 74
S8 MODULE . . . . . . . . . . . . . . . . . . . . . . . . . . . . . . . . . . . . . . . . . . . . . . . . . 77
ERWENDUNG EINER MODULSCHACHTABDECKUNG 77
V
V
ERWENDUNG DES RESSCAN DATENKARTENMODULS 77
INHALT
51
Page 56

REINIGUNG UND WARTUNG . . . . . . . . . . . . . . . . . . . . . . . . . . . . . . . . . . . 81
ÄGLICHE REINIGUNG 81
T
W
ÖCHENTLICHE REINIGUNG 81
R
EGELMÄSSIGE REINIGUNG 81
A
USWECHSELN DES LUFTFILTERS 82
W
ARTUNG 82
HÄUFIG GESTELLTE FRAGEN . . . . . . . . . . . . . . . . . . . . . . . . . . . . . . . . . . . . 83
FEHLERSUCHE . . . . . . . . . . . . . . . . . . . . . . . . . . . . . . . . . . . . . . . . . . . . . . . . 85
TECHNISCHE DATEN . . . . . . . . . . . . . . . . . . . . . . . . . . . . . . . . . . . . . . . . . . 91
UTOSET SPIRIT (OHNE ZUBEHÖR) 91
S8 A
Z
UBEHÖR 91
A
LLE GERÄTE (FALLS ZUTREFFEND) 92
BESCHRÄNKTE GARANTIE . . . . . . . . . . . . . . . . . . . . . . . . . . . . . . . . . . . . . . 97
INDEX . . . . . . . . . . . . . . . . . . . . . . . . . . . . . . . . . . . . . . . . . . . . . . . . . . . . . . 99
52
Page 57

EINFÜHRUNG
Vielen Dank, dass Sie sich für das S8 AUTOSET SPIRIT™ entschieden haben. Das
S8 AUTOSET SPIRIT ist ein kompaktes Therapiesystem mit eingebauter
Stromversorgung, das außerdem die Optionen einer integrierten Atemluftbefeuchtung
und eines Datenmanagements zur Verfügung stellt.
Diese Bedienungsanleitung enthält alle notwendigen Informationen für die korrekte
Handhabung Ihres
IHRE VERANTWORTUNG
Der Besitzer bzw. Benutzer dieses Systems trägt die alleinige Verantwortung und haftet
für Verletzungen von Personen oder Beschädigungen von Eigentum, die auf Folgendes
zurückzuführen sind:
• Betrieb des Gerätes, der von den in der mitgelieferten Bedienungsanleitung
angegebenen Anweisungen abweicht.
• Wartungen und Modifizierungen des Gerätes, die nicht auf authorisierte
Anweisung hin bzw. von einer authorisierten Person durchgeführt wurden.
Bitte lesen Sie diese Bedienungsanleitung vor der Inbetriebnahme
aufmerksam durch.
Diese Bedienungsanleitung enthält Fachbegriffe und Seitenrandsymbole, die Sie auf
bestimmte wichtige Informationen aufmerksam machen sollen.
• Warnung – Weist auf eine mögliche Verletzungsgefahr hin.
• Achtung – Erklärt spezielle Maßnahmen für eine sichere und effektive Benutzung
des Gerätes.
• Hinweis – Information oder hilfreicher Hinweis.
S8 AUTOSET SPIRIT.
DEUTSCH
MEDIZINISCHE HINWEISE
INFORMATIONEN ZUM S8 AUTOSET SPIRIT
Das S8 AUTOSET SPIRIT ist ein selbstregulierendes Therapiesystem für die Behandlung
von OSA (obstruktive Schlafapnoe) bei Erwachsenen. Das selbstregulierende
S8 AUTOSET SPIRIT verfügt über zwei Behandlungsmodi: AutoSet und CPAP mit
festgelegtem Druck.
S8 AUTOSET SPIRIT CPAP-System ist für die Verwendung zu Hause und im
Das
Krankenhaus vorgesehen.
EINFÜHRUNG
53
Page 58

KONTRAINDIKATIONEN
Das S8 AUTOSET SPIRIT ist kein Lebenserhaltungssystem. Im Falle eines Stromausfalls
oder einer Fehlfunktion kann es sein, dass sich das Gerät ausschaltet. Es darf nicht von
Patienten verwendet werden, die eine kontinuierliche Behandlung benötigen.
Die Behandlung mit positivem Atemwegsdruck kann bei einigen Patienten mit den
folgenden Leiden kontraindiziert sein:
• schwere bullöse Lungenerkrankung
• Pneumothorax
• pathologisch niedriger Blutdruck
• Dehydrierung
• Liquorausfluss, kürzliche Schädeloperation oder Trauma
WARNUNGEN
• Lesen Sie bitte die gesamte Bedienungsanleitung, bevor Sie die Behandlung mit
dem
S8 AUTOSET SPIRIT aufnehmen.
• Die in dieser Bedienungsanleitung enthaltenen Hinweise ersetzen keinesfalls die
Anweisungen des verschreibenden Arztes.
• Ein Patient darf sein Gerät nur auf Anweisung des Arztes an einen
Datenkommunikationsanschluss anschließen. Es können nur ResMed-Produkte an
den Datenkommunikationsanschluss angeschlossen werden. Der Anschluss
anderer Geräte kann zu Verletzungen oder zur Beschädigung des
S8 AUTOSET SPIRIT führen.
• Das S8 AUTOSET SPIRIT darf nur mit von ResMed, Ihrem Arzt oder Ihrem
Atemtherapeuten empfohlenen Masken (und Verbindungsstücken)* verwendet
werden. Die Maske darf nur bei eingeschaltetem und ordnungsgemäß
funktionierendem
-öffnungen in der Maske dürfen auf keinen Fall blockiert sein.
Erklärung: Das
(und Verbindungsstücken)
sind, um einen kontinuierlichen Luftstrom aus der Maske heraus zu gewährleisten.
Wenn das Gerät eingeschaltet ist und ordnungsgemäß funktioniert, wird die
ausgeatmete Luft von frischer Luft durch die Luftauslassöffnungen aus der Maske
herausgeführt. Ist das Gerät jedoch nicht in Betrieb, wird nur unzureichend frische
Luft durch die Maske zugeführt und es besteht das Risiko der Rückatmung. Die
Rückatmung von ausgeatmeter Luft über mehrere Minuten hinweg kann unter
bestimmten Umständen zum Ersticken führen. Dies trifft auf die meisten Modelle
von CPAP-Geräten zu.
• Nehmen Sie im Falle eines Stromausfalls oder einer Fehlfunktion des Systems die
Maske ab.
S8 AUTOSET SPIRIT angelegt werden. Die Luftauslassöffnung bzw.
S8 AUTOSET SPIRIT ist für die Verwendung mit Spezialmasken
*
vorgesehen, die mit Luftauslassöffnungen ausgestattet
54
* Die Anschlüsse können in die Maske oder in Verbindungsstücke an der Maske inte-
griert werden.
Page 59

• Das S8 AUTOSET SPIRIT kann auf eine Druckzufuhr von bis zu 20 cm H
O
2
eingestellt werden. Außerdem kann der Druck bei bestimmten Störungen, die
nicht sehr wahrscheinlich sind, auf bis zu 30 cm H
• Wenn dieses System mit Sauerstoff verwendet wird, sollte darauf geachtet
O ansteigen.
2
werden, dass die Sauerstoffzufuhr abgeschaltet wird, wenn das Gerät außer
Betrieb ist.
Erklärung: Wenn die Sauerstoffzufuhr auch dann eingeschaltet ist, wenn das
Gerät außer Betrieb ist, kann sich Sauerstoff, der in die Schläuche des
Atemtherapiegerätes geleitet wurde, im Gehäuse des CPAP-Gerätes ansammeln
und damit eine Brandgefahr darstellen. Dies trifft auf die meisten CPAP-Geräte zu.
• Sauerstoff erhöht die Explosionsgefahr. Rauchen und offenes Feuer während
der Verwendung von Sauerstoff sollten daher unbedingt vermieden werden.
• Stellen Sie stets sicher, dass das Gerät einen Luftstrom erzeugt, bevor Sie die
Sauerstoffzufuhr einschalten.
• Schalten Sie die Sauerstoffzufuhr stets aus, bevor Sie den Luftstrom vom Gerät
unterbrechen.
Hinweis: Wird eine konstante Menge an zusätzlichem Sauerstoff zugeführt, ist die
Konzentration des eingeatmeten Sauerstoffes je nach Sauerstoffzufuhrstelle,
Druckeinstellung, Atemmuster des Patienten, Maskentyp und Luftaustrittsrate
unterschiedlich.
• Verwenden Sie das S8 AUTOSET SPIRIT nicht, wenn es offensichtliche externe
Schäden aufweist oder es zu unerklärlichen Veränderungen in der Leistung kommt.
• Versuchen Sie nicht, das Gehäuse des S8 AUTOSET SPIRIT zu öffnen. Es befinden
sich im Inneren des Gerätes keine vom Anwender auszuwechselnden bzw. zu
reparierenden Bauteile. Reparaturen und Wartungen der inneren Komponenten
müssen von einer authorisierten Fachkraft durchgeführt werden.
• Explosionsgefahr. Nicht in der Nähe entflammbarer Anästhetika verwenden.
DEUTSCH
VORSICHTSHINWEISE
• Bei niedrigem Druck kann der Luftstrom durch die Luftauslassöffnungen für das
Abführen von ausgeatmeter Luft aus dem Schlauchsystem ungenügend sein. Es
besteht das Risiko der Rückatmung.
• Die Temperatur des Atemluftstroms, den dieses Gerät erzeugt, kann bis zu 6
über der Raumtemperatur liegen. Besondere Vorsicht ist geboten, wenn die
Raumtemperatur über 32
• Wenn kein Wechselstrom (100-240 V AC) zur Verfügung steht, verwenden Sie
stets einen ResMed S8 Gleichstromkonverter. (Der ResMed S8
Gleichstromkonverter ist als optionales Zubehörteil erhältlich.)
• Wenn es mitgeliefert wird, ist das RESSCAN Datenkartenmodul für den Gebrauch
mit bestimmten ResMed-Geräten vorgesehen.
• Verwenden Sie das ggf. mitgelieferte RESSCAN Datenkartenmodul ausschließlich
gemäß den Anweisungen in dieser Bedienungsanleitung.
o
C liegt.
MEDIZINISCHE HINWEISE
o
C
55
Page 60

Hinweis: Diese Warnungen und Vorsichtshinweise sind allgemeiner Natur. Spezielle
Warnungen, Vorsichtshinweise und Hinweise erscheinen neben den jeweiligen
Anweisungen in der Bedienungsanleitung.
NEBENWIRKUNGEN
Verständigen Sie Ihren Arzt bei ungewöhnlichen Schmerzen in der Brust, starken
Kopfschmerzen oder verstärkter Atemlosigkeit. Bei einer akuten Infektion der oberen
Atemwege muss die Behandlung gegebenenfalls einstweilig eingestellt werden.
Folgende Nebenwirkungen können bei der Behandlung mit dem S8-System auftreten:
• Trockenheit von Nase, Mund oder Hals
• Nasenbluten
• Unwohlsein aufgrund von verschluckter Luft
• Ohren- oder Sinusbeschwerden
• Augenreizungen
• Hautausschläge
• Beschwerden im Brustbereich.
56
Page 61

DAS S8 AUTOSET SPIRIT
Das S8 AUTOSET SPIRIT ist Teil eines Systems, das aus fünf Teilen besteht:
• S8 AUTOSET SPIRIT selbstregulierendes Atemtherapiegerät
• Maske
• Atemluftbefeuchter
• Datenmanagementprodukte
• Zubehör.
S8 AUTOSET SPIRIT
Siehe Illustrationen in Abschnitt A der Illustrationsseite.
FRONTANSICHT (A-1)
Zeigt das Bedienfeld und das LCD-Display sowie den Luftauslass.
RÜCKANSICHT (A-2)
Zeigt, wo das Datenmodul angebracht wird, und wo sich der Luftfilter und die
Stromanschlussbuchsen befinden.
STROMKABEL (A-3)
Stromkabel für den Anschluss des S8 AUTOSET SPIRIT ans Stromnetz.
TRAGETASCHE (A-4)
In der Tragetasche des S8 AUTOSET SPIRIT befinden sich zwei Innentaschen, eine für das
S8 und eine andere für den integrierten Atemluftbefeuchter. Bewahren Sie den
Atemluftbefeuchter stets getrennt vom Atemtherapiegerät in der größeren
Innentasche mit dem Netz auf.
ATEMLUFTSCHLAUCH (A-5)
Der 2 m lange Atemluftschlauch ist für den Anschluss des S8 AUTOSET SPIRIT an Ihre
Maske vorgesehen.
DEUTSCH
MASKEN
Außerdem benötigen Sie ein Maskensystem von ResMed (separat erhältlich).
Folgende ResMed-Maskensysteme werden für den Gebrauch mit dem
S8 AUTOSET SPIRIT empfohlen:
NASENMASKEN
•
MODULAR-NASENMASKE
• MIRAGE VISTA™ NASENMASKE
• ULTRA MIRAGE™ NASENMASKE
• MIRAGE™ NASENMASKE
• MIRAGE ACTIVA™ NASENMASKE
• PAPILLON™.
NASENPOLSTERSYSTEME
•
MIRAGE SWIFT™ NASENPOLSTERSYSTEM.
DAS S8 AUTOSET SPIRIT
57
Page 62

ULL FACE MASKEN
F
MIRAGE™ FULL FACE MASKE
•
• MIRAGE™ FULL FACE MASKE SERIE 2
• ULTRA MIRAGE™ FULL FACE MASKE.
Hinweis: Einige Modelle sind nicht in allen Regionen erhältlich.
WARNUNG
!
Im AutoSet-Modus können ausschließlich ResMed-Maskensysteme mit dem
S8 AutoSet Spirit verwendet werden: Lesen Sie hierzu bitte auch den Abschnitt
„Warnungen“ auf Seite 54.
ATEMLUFTBEFEUCHTER
Siehe Illustration in Abschnitt B der Illustrationsseite.
Wenn Sie Probleme mit Trockenheit von Nase, Hals und Mund haben, kann ein
Atemluftbefeuchter hilfreich sein. Das
integrierten Warmluftbefeuchter
S8 AUTOSET SPIRIT kann zusammen mit dem
HUMIDAIRE 3i™ verwendet werden.
RESSCAN DATENKARTENMODUL
Das RESSCAN Datenkartenmodul und die RESSCAN Datenkarte (C-1) können
zusammen mit dem
der Therapieüberwachung zu helfen oder um Ihre Geräteeinstellungen auf dem
aktuellen Stand zu halten. Weitere Informationen zur Verwendung des
Datenkartenmoduls und der Datenkarte finden Sie im Abschnitt „Verwendung des
ResScan Datenkartenmoduls“ auf Seite 77.
S8 AUTOSET SPIRIT verwendet werden, um entweder dem Arzt bei
58
ZUBEHÖR
Siehe Illustrationen in Abschnitt C der Illustrationsseite.
Weiteres Zubehör zum
• Frontabdeckung (nicht in allen Regionen erhältlich) (C-2)
• Atemluftschlauch 3 m (C-3)
• ResMed S8 Gleichstromkonverter (C-4)
• Modulschachtabdeckung (C-5)
Hinweis: ResMed bringt regelmäßig neue Produkte auf den Markt. Besuchen Sie unsere
Webseite unter <www.resmed.de>.
S8 AUTOSET SPIRIT:
Page 63

BEDIENUNG DES S8 AUTOSET SPIRIT
Siehe Illustrationen in Abschnitt D der Illustrationsseite.
AUFSTELLEN DES S8 AUTOSET SPIRIT
1 Stellen Sie das S8 AUTOSET SPIRIT auf einem Tisch neben dem Kopfende Ihres Bettes
auf.
VORSICHTSHINWEISE
!
Stellen Sie das System so auf, dass es nicht versehentlich heruntergestoßen werden
kann bzw. dass man nicht über das Stromkabel stolpern kann.
Hinweis: Sie können Ihr S8 AutoSet Spirit auch auf den Fußboden neben oder unter
Ihrem Bett aufstellen. Stellen Sie sicher, dass der Aufstellungsort staubfrei ist und der
Lufteinlass nicht durch Bettzeug, Kleidung oder andere Gegenstände blockiert wird.
2 Stecken Sie das Stromkabel in die Buchse auf der Rückseite des Atemtherapiegerätes
(D-1). Stecken Sie das andere Ende des Stromkabels in die Steckdose.
WARNUNG
!
Vergewissern Sie sich, dass das Stromkabel und der Netzstecker in gutem Zustand
sind und die Ausrüstung keine Beschädigungen aufweist.
3 Schließen Sie das eine Ende des Luftschlauches fest an die Luftauslassöffnung des
Gerätes an (D-2).
WARNUNG
!
• Verwenden Sie ausschließlich Schläuche von ResMed für Ihr Atemtherapiegerät.
Ein anderer Schlauchtyp kann unter Umständen zu einer Veränderung des
zugeführten Druckes führen und dadurch die Wirksamkeit Ihrer Behandlung
beeinträchtigen.
• Während des Betriebes blockierte Lufteinlassöffnungen und Schläuche können
zu einer Überhitzung des Gerätes führen.
• In der Schlafklinik müssen PCs, die mit dem CPAP-System verwendet werden,
mindestens 1,5 m vom Patienten entfernt bzw. mindestens 2,5 m über dem
Patienten aufgestellt werden. Sie müssen außerdem der einschlägigen Testnorm
entsprechen. Die internationale Norm für PCs ist IEC 60950 oder eine
vergleichbare Norm.
DEUTSCH
ZUSAMMENBAU DER MASKE
1 Setzen Sie Ihr Maskensystem entsprechend den Anweisungen in der
Bedienungsanleitung für die Maske zusammen.
2 Schließen Sie das Maskensystem an das freie Ende des Atemluftschlauches an (D-3).
3 Prüfen Sie, dass die Maskeneinstellung auf dem Bildschirm MASKE mit der von Ihnen
verwendeten Maske übereinstimmt (siehe Tabelle „Auswahl des Maskentyps“ ).
BEDIENUNG DES S8 AUTOSET SPIRIT
59
Page 64

Das S8 AUTOSET SPIRIT ist nun betriebsbereit (D-4).
BEHANDLUNGSBEGINN
1 Vergewissern Sie sich, dass das Gerät eingeschaltet ist.
Es erscheint eine kurze Begrüßungsmeldung auf dem LCD-Display. Danach schaltet
das Gerät auf den Bereitschaftsbildschirm um. Im CPAP-Modus wird auf dem
Bereitschaftsbildschirm die Meldung „RAMPE“ angezeigt. Im AutoSet-Modus erscheint
im Bereitschaftsbildschirm die Meldung „AUSREGELZEIT“.
Außerdem leuchten Bedienfeld und LCD-Display auf.
2 Legen Sie sich hin und arrangieren Sie den Atemluftschlauch so, dass Sie beim Schlafen
nicht in Ihrer Bewegungsfreiheit gestört werden.
VORSICHT
!
• Achten Sie darauf, dass Sie kein zu langes Schlauchstück am Kopfende liegen
haben, das sich, während Sie schlafen, um Ihren Kopf oder Hals wickeln könnte.
• Achten Sie darauf, dass der Bereich um das Atemtherapiegerät sauber und
trocken ist. Auch sollten Sie Bettzeug, Kleidung oder andere Gegenstände, die
die Luftauslassöffnungen blockieren könnten, vom Gerät fern halten.
3 Ändern Sie bei Bedarf die Rampen- oder Ausregelzeit (siehe „Ändern der Rampen-
bzw. Ausregelzeit“ auf Seite 67).
Drücken Sie die Start/Stopptaste, um die Behandlung zu starten, es sei denn, Ihr
Arzt hat Ihr Gerät so eingerichtet, dass die Behandlung automatisch startet. In diesem
Fall beginnt das Gerät automatisch mit der Behandlung, sobald Sie in Ihre Maske atmen
(weitere Hinweise unter „SmartStart“).
4 Legen Sie Ihre Maske entsprechend den Anweisungen in der Bedienungsanleitung für
die Maske an.
WARNUNG
!
Die Maske darf nur bei eingeschaltetem und ordnungsgemäß funktionierendem
S8 AutoSet Spirit angelegt werden.
5 Sobald die Rampenzeit (bzw. Ausregelzeit) beginnt, erscheint die Meldung RAMPE
AKTIV (oder AUSRZT AKT.) auf dem LCD-Display. Gleichzeitig wird der aktuelle
Druck anhand von Strichen angezeigt. Jeder Strich entspricht in etwa 2 cm H
Beispielsweise entsprechen sechs Striche einem Druck von ca. 12 cm H
SMARTSTART™
Das S8 AUTOSET SPIRIT verfügt über eine Funktion, die SmartStart™ genannt wird und
von Ihrem Arzt aktiviert werden kann. Ist diese Funktion aktiviert, startet das Gerät
automatisch, sobald Sie in die Maske atmen, und stoppt automatisch, sobald Sie diese
abnehmen. Das heißt, dass Sie zum Starten und Stoppen der Behandlung nicht die
Start-/Stopptaste drücken müssen.
60
2
O.
2
O.
Page 65

Hinweis: Aktivieren Sie die SmartStart-Funktion nicht, wenn Sie eine Maske mit einem
Anti-Asphyxie-Ventil, wie z. B. die Mirage Full Face Maske, verwenden.
BEENDEN DER BEHANDLUNG
Sie können die Behandlung jederzeit durch Abnehmen der Maske bzw. Drücken der
Start-/Stopptaste unterbrechen
oder
indem Sie einfach die Maske abnehmen, vorausgesetzt die SmartStart-Funktion wurde
von Ihrem Arzt aktiviert.
BENUTZUNG DER MASKENANLEGEFUNKTION
Ihr S8 AUTOSET SPIRIT ist mit einer Maskenanlegefunktion ausgestattet, die Ihnen die
richtige Anpassung Ihrer Maske erleichtert. Bei dieser Funktion wird vor
Behandlungsbeginn drei Minuten lang ein Luftdruck zugeführt, um Ihnen Zeit zu geben,
den Maskensitz zu korrigieren und so Leckagen zu minimieren.
Hinweis: Vergewissern Sie sich, dass die Maskeneinstellung auf dem Bildschirm MASKE
mit der von Ihnen verwendeten Maske übereinstimmt.
Die Maskenanlegefunktion wird folgendermaßen verwendet:
1 Legen Sie Ihre Maske entsprechend den Anweisungen in der Bedienungsanleitung für
die Maske an.
2 Halten Sie die Start-/Stopptaste mindestens 3 Sekunden lang gedrückt, bis die
Luftdruckzufuhr beginnt.
Es erscheint die folgende Meldung auf dem LCD-Display, mit der signalisiert wird, dass
die Maskenanlegefunktion in Betrieb ist. Ihr S8 erhöht den Druck langsam bis auf den
Maskenanlegedruck und setzt diesen Druck 3 Minuten lang fort.
Außerdem wird auf dem LCD-Display eine Sternchenklassifizierung zum Maskensitz
angezeigt. Siehe „Definitionen der Sternchenklassifizierung des Maskensitzes“ auf
Seite 62.
M.-Sitz:
exzell.
*****
Sternchenklassifizierung des
Maskensitzes
DEUTSCH
Hinweis: Nach 3 drei Minuten erlischt die Sternchenklassifizierung zum Maskensitz.
Die Maskenanlegefunktion kann nur vom Bildschirm RAMPE bzw. AUSREGELZEIT aus
gestartet werden.
Im AutoSet-Modus ist der Maskenanlegedruck der höchste Druck, der Ihnen
wahrscheinlich - basierend auf den Daten der letzten Nacht - zugeführt werden wird.
Er beträgt allerdings mindestens 10 cm H
Im CPAP-Modus ist der Maskenanlegedruck der eingestellte Behandlungsdruck bzw.
mindestens 10 cm H
O.
2
O.
2
BEDIENUNG DES S8 AUTOSET SPIRIT
61
Page 66

3 Korrigieren Sie den Sitz Ihrer Maske, des Maskenkissens und der Kopfbänder, bis sie
sicher und bequem sitzen.
Wenn die Maske richtig sitzt, prüfen Sie die Sternchenklassifizierung des Maskensitzes
auf dem LCD-Display. Die Sternchenklassifizierung des Maskensitzes wird in Tabelle 1
aufgeschlüsselt.
Hinweis: Wenn eine andere Person für Sie die Sternchenklassifizierung ablesen kann,
können Sie Ihre Maske, Ihr Maskenkissen und die Kopfbänder auch im Liegen einstellen.
4 Nach 3 Minuten kehrt der Druck auf den eingestellten Druck zurück und die
Behandlung beginnt.
• Wenn Sie keine 3 Minuten warten möchten, halten Sie mindestens 3 Sekunden
lang die Start-/Stopptaste gedrückt, um die Behandlung sofort zu starten.
• Wenn Sie die Start-/Stopptaste nur kurz drücken (weniger als 3 Sekunden),
springt das Gerät in den Bereitschaftsmodus zurück (es erscheint der Bildschirm
RAMPE oder AUSREGELZEIT).
Tabelle 1: Definitionen der Sternchenklassifizierung des Maskensitzes
Sternchenklassifizierung Definition
***** Ausgezeichnet
****- Sehr gut
***-- Gut
**--- Maskensitz korrigieren
62
*---- Maskensitz korrigieren
----- Maskensitz korrigieren
Page 67

ANSCHLUSS DES ATEMLUFTBEFEUCHTERS
ANSCHLUSS EINES HUMIDAIRE 3i ATEMLUFTBEFEUCHTERS
Siehe Illustrationen in Abschnitt E der Illustrationsseite und die Bedienungsanleitung des
HumidAire 3i.
Der
HUMIDAIRE 3i wird vorne am S8 AUTOSET SPIRIT angeschlossen, um
Warmluftbefeuchtung bereitzustellen. Es wird kein weiteres Zubehör benötigt.
Hinweise:
a. Vergewissern Sie sich, dass beim Anschließen oder Abnehmen des Atemluftbefeuchters
die Befeuchterkammer des HumidAire 3i leer ist.
b. Entfernen Sie vor dem Anschließen des HumidAire 3i die Kontaktabdeckung am
S8 AutoSet Spirit. Bringen Sie die Kontaktabdeckung nach dem Abnehmen des
Atemluftbefeuchters wieder an.
AUFBEWAHRUNG DES HUMIDAIRE 3i
Bewahren Sie den HUMIDAIRE 3i separat vom S8 AUTOSET SPIRIT in der größeren
Innentasche mit dem Netz auf.
DEUTSCH
ANSCHLUSS DES ATEMLUFTBEFEUCHTERS
63
Page 68

64
Page 69

VERWENDUNG DES BEDIENFELDES
Die Bedienoberfläche des S8 AUTOSET SPIRIT besteht aus einem LCD-Display sowie
einem Bedienfeld für die Navigation durch die Menüs und die Behandlungszufuhr.
LCD-Display
Pfeil-nach-oben-Taste
Linke Taste
Pfeil-nach-unten-Taste
Rechte Taste
Start-/Stopptaste
LCD-DISPLAY
Das LCD-Display zeigt die Menüs und Behandlungsbildschirme an.
Die LCD-Beleuchtung schaltet sich automatisch ab, wenn 2 Minuten lang keine Eingabe
gemacht wurde. Bei Betätigung einer beliebigen Taste schaltet sie sich wieder ein.
BEDIENFELDTASTEN
Das Bedienfeld des S8 AUTOSET SPIRIT verfügt über die folgenden Tasten:
Tas te Funktion
Start-/Stopptaste
Pfeil-nach-oben
Pfeil-nach-unten
• Startet und stoppt die Behandlung.
• Startet die Maskenanlegefunktion, wenn sie mindestens
3 Sekunden lang gedrückt wird.
• Zum Blättern durch die S8 AutoSet Spirit-Menüs und
-Untermenüs und zur Einstellung eines höheren Wertes.
• Zum Blättern durch die S8 AutoSet Spirit-Menüs und
-Untermenüs und zur Einstellung eines niedrigeren Wertes.
DEUTSCH
Linke Taste
Rechte Taste
• Führt die Funktion aus, die der Leittext auf dem über der
Taste befindlichen LCD-Display angibt. Der Leittext umfasst
Menü, Ändern und Übernehmen.
• Führt die Funktion aus, die der Leittext auf dem über der
Taste befindlichen LCD-Display angibt. Der Leittext umfasst
Beenden und Abbrechen.
VERWENDUNG DES BEDIENFELDES
65
Page 70

Im Bereitschaftsmodus bleiben alle Tasten des S8-Systems beleuchtet. Während der
Behandlung schaltet sich die Tastenbeleuchtung 2 Minuten nach der letzten
Menüauswahl automatisch ab und die Start-/Stopptaste leuchtet gedimmt weiter.
ÄNDERN DER EINSTELLUNGEN
Sie können die Einstellungen des S8 AUTOSET SPIRIT mit Hilfe des Bedienfeldes und des
LCD-Displays ändern. Befindet sich das
können Sie sich eine Reihe von Bildschirmen (in einem Menü) auf dem LCD-Display
anzeigen lassen, um die Einstellungen für eine bestimmte Funktion aufzurufen und zu
ändern.
Ihr Arzt stellt das Menü entweder auf die Standard- oder Detaildatenansicht ein.
Weitere Informationen finden Sie unter „Verwendung des Menüs „Standard““ auf
Seite 69 und „Verwendung des Detailmenüs“ auf Seite 71.
ZUGANG ZU DEN MENÜ-BILDSCHIRMEN
Auf der Bereitschaftsanzeige (RAMPE oder AUSREGELZEIT) Ihres S8 AUTOSET SPIRIT
wird unten links das Wort „Menü“ angezeigt. Um ein S8 AUTOSET SPIRIT Menü
auszuwählen, drücken Sie die linke Taste.
NAVIGATION DURCH DAS MENÜ
Navigieren Sie durch die Menüpunkte anhand der Pfeil-nach-oben- und Pfeilnach-unten-Tasten.
ÄNDERN EINER EINSTELLUNGSOPTION
Wenn Sie am gewünschten Menüpunkt angekommen sind:
1. Drücken Sie die linke Taste (Ändern).
2. Drücken Sie die Pfeil-nach-oben- oder Pfeil-nach-unten-Taste, bis die
gewünschte Einstellungsoption angezeigt wird.
3. Drücken Sie die linke Taste (Übernehmen), um die Einstellungsoption
auszuwählen.
Wenn Sie den Menüpunkt ohne Änderung einer Option schließen möchten, drücken
Sie die rechte Taste (Abbrechen).
BEENDEN EINES MENÜS
Drücken Sie die rechte Taste (Beenden). Daraufhin gelangen Sie zurück zum
Bereitschaftsbildschirm (RAMPE oder AUSREGELZEIT).
BEENDEN EINES MENÜPUNKTES INNERHALB EINES MENÜS
Drücken Sie die rechte Taste (Beenden).
S8 AUTOSET SPIRIT im Bereitschaftsmodus,
66
RAMPE UND AUSREGELZEIT
Wurde Ihr S8 AUTOSET SPIRIT von Ihrem Arzt auf den CPAP-Modus eingestellt,
erscheint nach der Begrüßungsmeldung der Bildschirm RAMPE. Wurde Ihr
S
PIRIT auf den AutoSet-Modus eingestellt, wird nach der Begrüßungsmeldung der
Bildschirm AUSREGELZEIT angezeigt.
S8 AUTOSET
Page 71

Tabelle 2: Rampen- und Ausregelungsfunktionen
Bildschirm Funktion Einstellungsoptionen
Rampe
(nur im CPAPModus)
Ausregelzeit
(nur im AutoSetModus)
Wählt die Rampenzeit aus.
Die Rampenzeit ist der Zeitraum,
in dem das S8 AutoSet Spirit von
einem niedrigen Druck auf den
verschriebenen
Behandlungsdruck ansteigt.
Auswahl der Ausregelzeit.
Die Ausregelzeit ist der Zeitraum,
in dem das S8 AutoSet Spirit
einen niedrigen Druck hält,
bevor es mit der Anpassung des
Druckes an bestimmte
Atmungsereignisse beginnt.
AUS – 45 min, 5-MinutenSchritte
AUS – 45 min, 5-MinutenSchritte
Hinweis: Die maximale Rampen- oder Ausregelzeit kann bei unter 45 Minuten liegen, je
nachdem, welche maximale Zeit Ihr Arzt eingestellt hat.
ÄNDERN DER RAMPEN- BZW. AUSREGELZEIT
Die aktuelle Rampen- bzw. Ausregelzeit wird auf dem Bereitschaftsbildschirm rechts
angezeigt. Um die Zeit zu ändern, drücken Sie die Pfeil-nach-oben- oder Pfeil-
nach-unten-Taste, bis die gewünschte Rampen- bzw. Ausregelzeit angezeigt wird.
DEUTSCH
VERWENDUNG DES BEDIENFELDES
67
Page 72

68
Page 73

VERWENDUNG DES MENÜS „STANDARD“
Abbildung 1 zeigt das Menü „Standard“.
CPAP
WILLKOMMEN
>>>>>>
RAMPE: 10Min
Menü
EDR EINST.: 1
Ändern Beend.
NUTZG Std
: 08000
Beend.
NUTZG: 1000/1068
Beend.
MASKE: ULTRA
Ändern Beend.
SW: SX3960200
Beend.
AUTOSET
WILLKOMMEN
>>>>>>
AUSREGELZEIT: 10
Menü
NUTZG Std
: 08000
Beend.
NUTZG: 1000/1068
Beend.
MASKE: ULTRA
Ändern Beend.
SW: SX3960200
Beend.
M
Abbildung 1 : Bildschirme des Menüs „Standard“: CPAP- und AutoSet-Modi
Sie können vom Bereitschaftsbildschirm (RAMPE oder AUSREGELZEIT) aus durch
Drücken der linken Taste (Menü) auf das Menü „Standard“ zugreifen.
ÄNDERN DER EINSTELLUNG FÜR DIE DRUCKREDUZIERUNG WÄHREND DER
XSPIRATION (EDR)
E
Hinweis: Die EDR ist nicht in allen Regionen erhältlich.
Möglicherweise hat Ihr Arzt Ihr Gerät darauf eingestellt, im CPAP-Modus den Druck
bei der Exspiration zu reduzieren. Dadurch kann etwaiges Unbehagen beim Ausatmen
vermindert werden. Es stehen vier Einstellungen zur Verfügung:
• AUS (keine EDR)
• 1 (niedrigste EDR)
• 2 (mittlere EDR)
• 3 (höchste EDR).
Der Bildschirm EDR EINST erscheint nur, wenn der Arzt eine EDR eingestellt hat.
Wenn Sie die EDR Einstellung ändern möchten, wählen Sie „Ändern“ aus (linke
Taste). Drücken Sie die Pfeil-nach-oben- oder Pfeil-nach-unten-Taste, bis die
gewünschte Einstellung angezeigt wird.
AUSWAHL DES MASKENTYPS
Gehen Sie zu MASKE und wählen Sie „Ändern“ aus (linke Taste). Drücken Sie die
Pfeil-nach-oben- oder Pfeil-nach-unten-Taste, bis der gewünschte Maskentyp
angezeigt wird.
DEUTSCH
VERWENDUNG DES MENÜS „STANDARD“
69
Page 74

Die folgende Tabelle zeigt die jeweilige Einstellung, die für die verschiedenen
Maskentypen ausgewählt werden sollte.
Tabelle 3: Einstellungen für Maskentypen
Einstellungen
ULTRA Ultra Mirage Nasenmaske
MIR FULL Mirage Full Face Maske
ACTIVA Mirage Activa Nasenmaske
SWIFT Mirage Swift Nasenpolstersystem
MIRAGE Die Mirage Nasenmaske
STANDARD Mirage Vista Nasenmaske
Maske
Mirage Full Face Maske Serie 2
Ultra Mirage Full Face Maske
Modularnasenmaske
Papillon
WEITERE AUFRUFBARE INFORMATIONEN
Sie können außerdem Ihre Gesamtbehandlungsstunden (NUTZG STD), die Anzahl
der Behandlungssitzungen mit dem
S8 AUTOSET SPIRIT während eines bestimmten
Zeitraums (NUTZG) und die aktuelle Software-Version auf Ihrem Gerät aufrufen
(SW).
70
Page 75

VERWENDUNG DES DETAILMENÜS
Abbildung 2 zeigt das Detailmenü.
CPAP
WILLKOMMEN
>>>>>>
RAMPE: 10Min
Menü
EINSTELLUNGEN
Zugang Beend.
ERGEBNISSE
Zugang Beend.
OPTIONEN
Zugang Beend.
AUTOSET
WILLKOMMEN
>>>>>>
AUSREGELZEIT: 10M
Menü
EDR EINST.: 1
Ändern Beend.
MASKE: ULTRA
Ändern Beend.
SCHLAUCHLÄNGE: 2m
Ändern Beend.
AL-BEF: KEINER
Ändern Beend.
SMARTSTART: EIN
Ändern Beend.
LECK.-ALARM: AUS
Ändern Beend.
NUTZG Std:
0
Beend.
NUTZG: 1000/1068
Beend.
SPRACHE: DEUTSCH
Ändern Beend.
8000
AUTOSETCPAP
MASKE: ULTRA
Ändern Beend.
SCHLAUCHLÄNGE: 2m
Ändern Beend.
AL-BEF: KEINER
Ändern Beend.
SMARTSTART: EIN
Ändern Beend.
LECK.-ALARM: AUS
Ändern Beend.
DEUTSCH
WARTUNG
Zugang Beend.
Abbildung 2 : Bildschirme im Detailmenü
SN: 12345678912
Beend.
PCB: 123456789123
4567
Beend.
SW: SX3960200
Beend.
VERWENDUNG DES DETAILMENÜS
71
Page 76

Sie können vom Bereitschaftsbildschirm (RAMPE oder AUSREGELZEIT) aus durch
Drücken der linken Taste (Menü) auf das Detailmenü zugreifen. Es erscheint der
Bildschirm EINSTELLUNGEN.
DAS MENÜ „EINSTELLUNGEN“
Wählen Sie im Menü „Einstellungen“ „Übernehmen“ (linke Taste) aus, um die
Optionen in diesem Menü aufzurufen.
ÄNDERN DER EINSTELLUNG FÜR DIE DRUCKREDUZIERUNG WÄHREND DER
XSPIRATION (EDR)
E
Hinweis: Die EDR ist nicht in allen Regionen erhältlich.
Möglicherweise hat Ihr Arzt Ihr Gerät darauf eingestellt, im CPAP-Modus den Druck
bei der Exspiration zu reduzieren. Dadurch kann etwaiges Unbehagen beim Ausatmen
vermindert werden. Es stehen vier Einstellungen zur Verfügung:
• AUS (keine EDR)
• 1(niedrigste EDR)
• 2
• 3 (höchste EDR).
Wenn Sie die EDR Einstellung ändern möchten und entsprechende Zugriffsrechte
haben, gehen Sie zu EDR EINST und wählen Sie „Ändern“ aus (linke Taste). Drücken
Sie die Pfeil-nach-oben- oder Pfeil-nach-unten-Taste, bis die gewünschte
Einstellung angezeigt wird.
AUSWAHL DES MASKENTYPS
Gehen Sie zu MASKE und wählen Sie „Ändern“ aus (linke Taste). Drücken Sie die
Pfeil-nach-oben- oder Pfeil-nach-unten-Taste, bis der gewünschte Maskentyp
angezeigt wird.
Die folgende Tabelle zeigt die jeweilige Einstellung, die für die verschiedenen
Maskentypen ausgewählt werden sollte.
Tabelle 4: Einstellungen für Maskentypen
72
Einstellungen
ULTRA Ultra Mirage Nasenmaske
MIR FULL Mirage Full Face Maske
ACTIVA Mirage Activa Nasenmaske
SWIFT Mirage Swift Nasenpolstersystem
MIRAGE Die Mirage Nasenmaske
STANDARD Mirage Vista Nasenmaske
Maske
Mirage Full Face Maske Serie 2
Ultra Mirage Full Face Maske
Modularnasenmaske
Papillon
Page 77

ÄNDERN DER SCHLAUCHLÄNGE
Gehen Sie zu SCHLAUCHLÄNGE und wählen Sie „Ändern“ aus (linke Taste).
Drücken Sie die Pfeil-nach-oben- oder Pfeil-nach-unten-Taste, bis die
gewünschte Einstellungsoption angezeigt wird.
HINZUFÜGEN EINES ATEMLUFTBEFEUCHTERS UND EINER FRONTABDECKUNG
Gehen Sie zu AL-BEF: und wählen Sie „Ändern“ aus (linke Taste). Drücken Sie die
Pfeil-nach-oben- oder Pfeil-nach-unten-Taste, bis die gewünschte Einstellung
angezeigt wird. Sie können das Gerät mit oder ohne Frontabdeckung benutzen.
ÄNDERN DER SMARTSTART-EINSTELLUNG
Bei aktivierter SmartStart-Funktion schaltet sich das Gerät automatisch ein, sobald Sie
in die Maske atmen.
Gehen Sie zu SMARTSTART und wählen Sie „Ändern“ aus (linke Taste). Drücken Sie
die Pfeil-nach-oben- oder Pfeil-nach-unten-Tasten, um die Funktion zu
aktivieren (EIN) bzw. zu deaktivieren (AUS).
ÄNDERN DER EINSTELLUNG DES LECKAGEALARMS
Der Leckagealarm macht auf große Leckage aufmerksam.
Gehen Sie zu LECK.-ALARM: und wählen Sie „Ändern“ aus (linke Taste). Drücken
Sie die Pfeil-nach-oben- oder Pfeil-nach-unten-Tasten, um die Funktion zu
aktivieren (EIN) bzw. zu deaktivieren (AUS).
DAS MENÜ „ERGEBNISSE“
Wählen Sie im Menü „Ergebnisse“ „Übernehmen“ (linke Taste) aus, um die Optionen
in diesem Menü aufzurufen.
Hinweis: Unter Umständen hat Ihr Arzt Ihr Gerät so konfiguriert, dass Ihre Smart Daten
angezeigt werden. Weitere Informationen über Smart Daten erhalten Sie von Ihrem Arzt.
AUFRUFEN DER NUTZUNGSINFORMATIONEN
Sie können außerdem Ihre Gesamtbehandlungsstunden und die Anzahl der
Behandlungssitzungen (NUTZG Std.) mit dem
bestimmten Zeitraums (NUTZG) aufrufen.
S8 AUTOSET SPIRIT während eines
DEUTSCH
DAS MENÜ „OPTIONEN“
Wählen Sie im Menü „Optionen“ „Übernehmen“ (linke Taste) aus, um die Optionen
in diesem Menü aufzurufen.
ÄNDERN DER SPRACHEINSTELLUNG
Gehen Sie zu SPRACHE und wählen Sie „Ändern“ aus (linke Taste). Drücken Sie die
Pfeil-nach-oben- oder Pfeil-nach-unten-Taste, bis die gewünschte Sprache
angezeigt wird.
DAS MENÜ „WARTUNG“
Wählen Sie im Menü „Wartung“ „Übernehmen“ (linke Taste) aus, um die Optionen
in diesem Menü aufzurufen.
Sie können sich die zur Zeit auf Ihrem Gerät installierte Software Version (SW), die
VERWENDUNG DES DETAILMENÜS
73
Page 78

Seriennummer der Leiterplatte (PCB) und die Seriennummer Ihres Gerätes (SN)
anzeigen lassen.
MELDUNGEN AUF DEM LCD-DISPLAY DES S8 AUTOSET SPIRIT
Ihr Arzt hat möglicherweise Ihr S8 AUTOSET SPIRIT so eingestellt, dass es Sie an wichtige
Ereignisse erinnert, wie z. B. wann Sie sich mit Ihrem Arzt in Verbindung setzen sollen
oder Ihre Datenkarte einführen müssen (falls Ihr Gerät Datenkarten-befähigt ist).
Die Erinnerungsmeldung wird auf dem LCD-Display angezeigt und ist nur sichtbar,
wenn keine Behandlung stattfindet. Die LCD-Beleuchtung blinkt, wenn eine Meldung
angezeigt wird.
Ihr Arzt kann die folgenden Erinnerungsmeldungen auf Ihrem LCD-Display einstellen.
Meldung Beschreibung Maßnahme
KARTE
EINFÜHREN
MASKE
ERSETZEN
KONTAKT
ANRUFEN
FILTER
AUSWECHSELN
Kann angezeigt
werden, wenn Ihr
Gerät Datenkartenbefähigt ist.
Kann angezeigt
werden, wenn Ihre
Maske ersetzt
werden muss.
Kann angezeigt
werden, um Sie
daran zu erinnern,
Ihren Arzt
anzurufen,
beispielsweise, um
diesen über den
Verlauf Ihrer
Behandlung zu
informieren.
Kann angezeigt
werden, um Sie
daran zu erinnern,
den Luftfilter Ihres
Gerätes
auszuwechseln.
Führen Sie Ihre Datenkarte ein (siehe Abschnitt
H der Illustrationsseite) und befolgen Sie die
Anweisungen Ihres Arztes. Danach erlischt die
Anzeige auf dem LCD-Display. Alternativ dazu
kann die Anzeige durch Drücken der linken
Taste (OK) gelöscht werden.
Drücken Sie die linke Taste (OK), um die
Meldung vom LCD-Display zu löschen, und
ersetzen Sie Ihre Maske durch eine neue.
Drücken Sie die linke Taste (OK), um die
Meldung vom LCD-Display zu löschen, und
setzen Sie sich mit Ihrem Arzt in Verbindung.
Drücken Sie die linke Taste (OK), um die
Meldung vom LCD-Display zu löschen, und
wechseln Sie den Filter aus.
74
Page 79

Meldung Beschreibung Maßnahme
WARTUNG
FÄLLIG
Kundenspezifische
Meldungen
Kann angezeigt
werden, um Sie
daran zu erinnern,
Ihr Gerät zur
Wartung
aufzugeben.
Ihr Arzt kann auch
andere
Erinnerungsmeldungen
einstellen,
beispielsweise, um
Sie daran zu
erinnern, das Gerät
zurückzubringen
oder eine
bestimmte Person
bzw. Telefonnummer anzurufen.
Drücken Sie die linke Taste (OK), um die
Meldung vom LCD-Display zu löschen.
Drücken Sie die linke Taste (OK), um die
Meldung vom LCD-Display zu löschen.
DEUTSCH
VERWENDUNG DES DETAILMENÜS
75
Page 80

76
Page 81

S8 MODULE
Hinweis: Nehmen Sie die Module nicht ab, während das S8 AutoSet Spirit an eine
Stromquelle angeschlossen ist.
Ihr
S8 AUTOSET SPIRIT ist mit einem von zwei Modulen ausgestattet - entweder mit
einer Modulschachtabdeckung oder mit einem
VERWENDUNG EINER MODULSCHACHTABDECKUNG
Siehe Illustrationen in Abschnitt F der Illustrationsseite.
Die Modulschachtabdeckung ist eine Schutzabdeckung für Ihr
können Sie je nach Bedarf abnehmen und wieder anschließen, z. B. wenn Sie ein
anderes Modul verwenden möchten.
Um die Modulschachtabdeckung zu entfernen, nehmen Sie diese von der Rückseite des
S8 AUTOSET SPIRIT ab, um den Datenkommunikationsanschluss (F-1) freizulegen.
Um die Modulschachtabdeckung anzuschließen, drücken Sie diese auf den
Datenkommunikationsanschluss, bis sie einrastet (F-2).
Hinweis: Um den Datenkommunikationsanschluss zu schützen, stellen Sie sicher, dass
stets ein Modul am Gerät angeschlossen ist.
VERWENDUNG DES RESSCAN DATENKARTENMODULS
Siehe Illustrationen in Abschnitt G der Illustrationsseite.
Das
RESSCAN Datenkartenmodul ist ein Zubehörteil des S8 AUTOSET SPIRIT. Mit Hilfe
des Datenkartenmoduls und einer
S8 AUTOSET SPIRIT herunterladen und Einstellungen aktualisieren. Das Modul und die
Karte erlauben Ihrem Arzt einen bequemen Zugriff auf Ihre Behandlungsdaten und
geben ihm die Möglichkeit, neue Geräteeinstellungen vorzunehmen, ohne dass Sie das
Haus verlassen müssen.
RESSCAN
RESSCAN Datenkartenmodul.
S8 AUTOSET SPIRIT. Diese
Datenkarte können Sie Daten des
DEUTSCH
ANBRINGUNG DES MODULS
Um das Datenkartenmodul anzubringen, drücken Sie es in den Datenkommunikationsanschluss auf der Rückseite Ihres
(G-1).
S8 AUTOSET SPIRIT, bis es mit einem Klicken einrastet
ENTFERNEN DES MODULS
Um das Datenkartenmodul zu entfernen, ziehen Sie es aus der Rückseite des
S8 AUTOSET SPIRIT heraus (G-2).
Hinweis: Um den Datenkommunikationsanschluss zu schützen, stellen Sie sicher, dass
stets ein Modul am Gerät angeschlossen ist.
VERWENDUNG DER DATENKARTE ZUR DATENERFASSUNG
Siehe Illustrationen in Abschnitt H der Illustrationsseite.
Zur Kontrolle Ihrer Behandlung wird Ihr Arzt Sie bitten, die Daten von Ihrem
S8 AUTOSET SPIRIT auf Ihrer Datenkarte zu speichern und ihm diese zuzuschicken.
S8 MODULE
77
Page 82

Die Datenkarte wird in einem praktischen Rückumschlag zur Verfügung gestellt.
Auf eine Datenkarte kopierte Daten sind weiterhin auf dem
S8 AUTOSET SPIRIT
gespeichert und verfügbar.
Das Kopieren von Daten auf eine Datenkarte dauert ca. 30 Sekunden.
1 EINFÜHREN DER DATENKARTE
•
Schalten Sie das S8 AUTOSET SPIRIT ein und warten Sie, bis der
Bereitschaftsbildschirm erscheint (RAMPE oder AUSREGELZEIT).
• Führen Sie die Datenkarte mit dem Pfeil nach oben in den Schlitz am
Datenkartenmodul (H-1) ein.
• Führen Sie die Karte langsam bis zum Anschlag ein (H-2). Anschließend
erscheinen einige Meldungen auf dem LCD-Display.
2 KOPIEREN DER DATEN AUF DIE DATENKARTE
•
Das Kopieren der Daten startet automatisch, sobald die Datenkarte in das
Datenkartenmodul eingeführt wurde.
• Während die Daten auf die Karte kopiert werden, erscheint die Meldung
„Karte erkannt. Bitte warten.“ auf dem LCD-Display des
S8 AUTOSET SPIRIT.
Das Kopieren dauert bis zu 30 Sekunden.
• Sobald alle Daten kopiert wurden, erscheint die Meldung „Kopie fertig. Karte
entnehmen.“ auf dem LCD-Display.
• Nehmen Sie die Datenkarte aus dem Datenkartenmodul heraus.
3 ENTFERNEN DER DATENKARTE
Halten Sie die Datenkarte an einem Ende fest und ziehen Sie sie aus dem
Datenkartenmodul heraus (H-3).
4 AUFBEWAHRUNG DER DATENKARTE
Bewahren Sie Ihre Datenkarte im Rückumschlag auf, wenn Sie sie nicht verwenden.
5 VERSENDEN DER DATENKARTE AN IHREN ARZT
Für den sicheren Transport der Datenkarte ist ein gefütterter Briefumschlag
bereitgestellt. Versenden der Datenkarte an Ihren Arzt:
1. Stecken Sie die Datenkarte in die Tasche des bereitgestellten Rückumschlages.
Falten Sie den Rückumschlag.
2. Stecken Sie den Rückumschlag mit der Datenkarte in den gefütterten
Briefumschlag und verschließen Sie diesen.
3. Vergewissern Sie sich, dass der gefütterte Briefumschlag mit dem Namen und der
Anschrift Ihres Arztes versehen ist und schicken Sie den Umschlag umgehend
zurück.
78
AKTUALISIERUNG VON EINSTELLUNGEN MIT HILFE DER DATENKARTE
Wenn Ihr Arzt Ihnen eine Datenkarte mit neuen Geräteeinstellungen geschickt hat:
• Führen Sie die Datenkarte im Bereitschaftsmodus (RAMPE oder AUSREGELZEIT)
in das Datenkartenmodul ein. Der Aktualisierungsvorgang beginnt sofort.
Page 83

• Während dessen erscheint die Meldung „Karte erkannt. Bitte warten.“ auf dem
LCD-Display. Der Aktualisierungsvorgang dauert bis zu 30 Sekunden.
• Wenn die Einstellungen erfolgreich aktualisiert wurden, erscheint die Meldung
„Einst. übernommen. Karte entnehmen.“ auf dem LCD-Display.
Hinweis: Diese Meldung erscheint nur einmal. Wird die Datenkarte nach dem
Aktualisieren Ihrer Einstellungen erneut eingeführt, erscheint diese Meldung nicht mehr.
• Nehmen Sie die Datenkarte aus dem Datenkartenmodul heraus.
• Bewahren Sie Ihre Datenkarte im Rückumschlag auf, wenn Sie sie nicht
verwenden.
WARNUNG
!
Wenn Ihr Arzt Sie gebeten hat, diese Datenkarte zur Aktualisierung der
Einstellungen auf Ihrem Gerät zu verwenden und die Meldung „Einst.
übernommen.“ nicht erscheint, setzen Sie sich umgehend mit Ihrem Arzt in
Verbindung.
DEUTSCH
S8 MODULE
79
Page 84

80
Page 85

REINIGUNG UND WARTUNG
Die in diesem Abschnitt beschriebenen Reinigungs- und Wartungsabläufe sollten
regelmäßig durchgeführt werden. Vollständige Informationen finden Sie in der
Bedienungsanleitung Ihrer Maske.
TÄGLICHE REINIGUNG
MASKE
Reinigen Sie die Maske entsprechend den Anweisungen in der mitgelieferten
Bedienungsanleitung.
ATEMLUFTSCHLAUCH
Nehmen Sie den Atemluftschlauch vom S8 AUTOSET SPIRIT und ggf. vom
Atemluftbefeuchter ab und lagern Sie die beiden Schläuche sowie die Maske bis zur
nächsten Benutzung an einem sauberen, trockenen Ort auf.
ATEMLUFTBEFEUCHTER
Wenn Sie einen Atemluftbefeuchter verwenden, nehmen Sie ihn vom
S8 AUTOSET SPIRIT ab und reinigen Sie ihn gemäß den Anweisungen in der
Bedienungsanleitung des Gerätes.
WÖCHENTLICHE REINIGUNG
1. Nehmen Sie den Atemluftschlauch vom S8 AUTOSET SPIRIT und von der Maske ab.
2. Waschen Sie den Atemluftschlauch in warmem Wasser mit einem milden
Reinigungsmittel. Gut abspülen und hängend trocknen lassen.
3. Setzen Sie die Maske und das Kopfband vor der nächsten Benutzung entsprechend
den Anweisungen in der Bedienungsanleitung wieder zusammen.
4. Schließen Sie die Atemluftschläuche wieder an der Luftauslassöffnung und an der
Maske an.
DEUTSCH
REGELMÄSSIGE REINIGUNG
1. Reinigen Sie das Gehäuse des S8 AUTOSET SPIRIT mit einem feuchten Tuch und
einem milden Reinigungsmittel.
2. Überprüfen Sie die Luftfilter auf Verstopfungen oder Löcher (siehe „Auswechseln
des Luftfilters“ auf Seite 82).
WARNUNG
!
• Achtung Stromschlaggefahr! Tauchen Sie das Gerät bzw. das Stromkabel nicht
ins Wasser. Ziehen Sie immer zuerst den Stecker aus der Steckdose, bevor Sie
das Gerät reinigen, und vergewissern Sie sich, dass es trocken ist, bevor Sie es
wieder an den Strom anschließen.
• Die Maske und der Atemluftschlauch unterliegen normalem Verschleiß.
Überprüfen Sie sie daher regelmäßig auf eventuelle Beschädigungen.
REINIGUNG UND WARTUNG
81
Page 86

AUSWECHSELN DES LUFTFILTERS
Auswechseln des Luftfilters:
1. Entfernen Sie die Luftfilterabdeckung hinten am
2. Nehmen Sie den alten Luftfilter heraus und entsorgen Sie ihn.
3. Setzen Sie einen neuen Filter mit der blauen Seite nach außen ein.
4. Schließen Sie die Luftfilterabdeckung wieder.
Vergewissern Sie sich einmal pro Monat, dass der Filter weder durch Schmutz blockiert
ist noch Löcher aufweist. Bei normaler Benutzung des
Luftfilter alle sechs Monate ausgewechselt werden (in staubigen Umgebungen öfter).
S8 AUTOSET SPIRIT.
Luftfilterabdeckung
S8 AUTOSET SPIRIT muss der
WARNUNG
!
• Den Luftfilter nicht waschen! Er ist weder wasch- noch wiederverwendbar.
• Die Luftfilterabdeckung schützt das System, falls versehentlich Flüssigkeiten
über dem System verschüttet werden. Vergewissern Sie sich stets, dass Luftfilter
und Luftfilterabdeckung ordnungsgemäß angebracht sind.
Hinweis: Der Luftfilter sollte alle drei Monate ausgewechselt werden.
WARTUNG
VORSICHT
!
• Versuchen Sie nicht, das Gehäuse des S8 AutoSet Spirit zu öffnen. Im Inneren
des Gerätes befinden sich keine vom Anwender auszuwechselnden bzw. zu
reparierenden Bauteile.
• Inspektionen und Reparaturen dürfen nur von einem authorisierten
Kundendienst durchgeführt werden. Unter gar keinen Umständen sollten Sie
versuchen, das Atemtherapiegerät selbst zu warten oder zu reparieren.
Dieses Produkt (
einem autorisierten ResMed Service Center generalüberholt werden. Bis dahin sollte
das Gerät einen sicheren und verlässlichen Betrieb bereitstellen, sofern es
entsprechend den von ResMed mitgelieferten Anweisungen betrieben und regelmäßig
gewartet wird. Die entsprechenden Garantiehinweise von ResMed liegen dem Gerät
beim Erstkauf bei. Gehen Sie mit dem Gerät, wie bei allen elektrischen Geräten, im
Falle einer Störung äußerst vorsichtig um und lassen Sie es von einem autorisierten
ResMed Wartungsdienst untersuchen.
Sollte das Gerät nicht ordnungsgemäß funktionieren, lesen Sie den Abschnitt
„Fehlersuche“ auf Seite 85.
S8 AUTOSET SPIRIT) sollte 5 Jahre nach dem Herstellungsdatum von
82
Page 87

HÄUFIG GESTELLTE FRAGEN
WIE FÜHLT SICH DAS ATMEN MIT DEM S8 AUTOSET SPIRIT AN?
Bei der ersten Benutzung des S8 AUTOSET SPIRIT kann das Atmen gegen den Luftstrom
unter Umständen etwas unangenehm sein. Das ist normal. Sie werden im Schlaf ganz
normal weiter atmen. Lassen Sie sich Zeit, sich an das Gefühl zu gewöhnen.
WAS MUSS ICH TUN, WENN ICH NACHTS AUFSTEHEN MUSS?
Wenn Sie in der Nacht aufstehen müssen, nehmen Sie Ihre Maske ab und
unterbrechen Sie die Behandlung. Vergessen Sie aber nicht, Ihre Maske wieder
aufzusetzen und die Behandlung wieder zu starten, sobald Sie wieder im Bett sind.
WAS KANN ICH TUN, WENN ICH MERKE, DASS LUFT AUS DER MASKE AUSTRITT?
Die Behandlung mit dem Atemtherapiegerät ist am wirksamsten, wenn die Maske gut
und bequem sitzt. Leckagen können die Behandlung beeinträchtigen. Daher ist es
wichtig, etwaige Luftaustritte zu eliminieren. Versuchen Sie beispielsweise, den
Maskensitz zu korrigieren und die Bänder zu verstellen.
Wenn Sie eine Nasenmaske verwenden, versuchen Sie, Ihren Mund während der
Behandlung geschlossen zu halten. Leckagen am Mund können die Wirksamkeit Ihrer
Behandlung beeinträchtigen. Bei kontinuierlichen Mundleckagen können eine Full Face
Maske oder ein Kinnriemen hilfreich sein. Weitere Informationen erhalten Sie von
Ihrem Arzt oder Fachhändler.
Wenn Sie eine Full Face Maske verwenden und Probleme haben, einen guten
Maskensitz zu erzielen, wenden Sie sich an Ihre Schlafklinik oder Ihren Fachhändler.
Unter Umständen benötigen Sie eine andere Größe oder ein anderes Maskenmodell.
Außerdem kann die Maskenanlegefunktion bei der richtigen Anpassung Ihrer Maske
hilfreich sein. Siehe „Benutzung der Maskenanlegefunktion“ auf Seite 61.
GIBT ES IRGENDETWAS BESONDERES ZU BEDENKEN, BEVOR ICH DIE MASKE
ANLEGE?
Waschen Sie Ihr Gesicht und entfernen Sie überschüssige Hautfette, bevor Sie die
Maske aufsetzen. Dadurch sitzt die Maske besser, und gleichzeitig wird die
Lebensdauer des Maskenkissens verlängert.
Benutzen Sie keine Feuchtigkeitscreme, wenn Sie eine Maske tragen.
MEIN MUND TROCKNET WÄHREND DER BEHANDLUNG AUS – WAS KANN ICH
TUN?
Besonders im Winter kann es sein, dass Sie während der Behandlung unter
Trockenheit von Nase, Mund oder Hals leiden. Oftmals kann ein Atemluftbefeuchter
bei diesem Problem helfen. Fragen Sie bitte Ihren Arzt um Rat.
MEINE NASE IST WÄHREND DER BEHANDLUNG GEREIZT – WAS KANN ICH TUN?
Während der ersten Behandlungswochen kann es sein, dass Sie häufig niesen müssen
bzw. Ihre Nase läuft oder verstopft ist. In vielen Fällen hilft bei Nasenreizungen ein
Atemluftbefeuchter. Fragen Sie bitte Ihren Arzt oder Lieferanten um Rat.
DEUTSCH
HÄUFIG GESTELLTE FRAGEN
83
Page 88

ANN ICH MIT DEM S8 AUTOSET SPIRIT VERREISEN?
K
BENUTZUNG IM AUSLAND
Ihr S8 AUTOSET SPIRIT Atemtherapiegerät ist mit einem internen Netzteil ausgestattet,
mit dem Sie das Gerät auch in anderen Ländern benutzen können. Er kann bei 100240 V und 50/60 Hz betrieben werden. Spezielle Einstellungen sind nicht notwendig,
Sie benötigen jedoch evtl. einen Adapter für die entsprechende Steckdose.
AUTOMATISCHER DRUCKAUSGLEICH
Ihr S8 AUTOSET SPIRIT nimmt automatisch notwendige Druckanpassungen aufgrund
von Höhenunterschieden bis zu 2591 m üNN vor.
IM FLUGZEUG
Bitte konsultieren Sie den medizinischen Dienst Ihrer Fluggesellschaft, wenn Sie
beabsichtigen, Ihr
entspricht den Normanforderungen des US FCC Teil 15, Klasse B, sofern keine
externen Datenkabel verwendet werden.
Hinweis: Verwenden Sie Ihr
und Landens.
S8 AUTOSET SPIRIT im Flugzeug zu benutzen. Das S8 AUTOSET SPIRIT
S8 AUTOSET SPIRIT im Flugzeug nicht während des Startens
KANN ICH DAS S8 AUTOSET SPIRIT AUCH BENUTZEN, WENN KEIN
ECHSELSTROM (AC) ZUR VERFÜGUNG STEHT?
W
Ja. Benutzen Sie einen ResMed S8 Gleichstromkonverter, um das S8 AUTOSET SPIRIT an
eine 12 V oder 24 V Gleichstromquelle anzuschließen. Wenn Sie weitere
Informationen wünschen, wenden Sie sich an Ihren Fachhändler oder ResMed.
WARNUNG
!
Das Gerät darf nicht gleichzeitig an eine Gleichstrom- und an eine
Wechselstromquelle angeschlossen sein.
84
Page 89

FEHLERSUCHE
Wenn Sie ein Problem mit dem Gerät haben, versuchen Sie bitte zunächst, es mit Hilfe
einer der folgenden Maßnahmen zu beheben. Kann das Problem nicht beseitigt
werden, wenden Sie sich bitte an Ihren Fachhändler oder direkt an ResMed. Versuchen
Sie nicht, das Gerät zu öffnen.
Problem Mögliche Ursache Maßnahme
Keine Anzeige. Stromkabel ist nicht
angeschlossen.
Luftstrom, der vom
S8 AutoSet Spirit
zugeführt wird, ist
unzureichend.
Das S8 AutoSet Spirit
startet nicht, wenn Sie
in die Maske atmen.
Die Rampen- oder Ausregelzeit
ist aktiviert.
Luftfiltereinsatz ist verschmutzt. Wechseln Sie den Luftfiltereinsatz
Knick oder Loch im
Atemluftschlauch.
Der Atemluftschlauch ist nicht
richtig angeschlossen.
Die Maske bzw. das Kopfband
sitzt nicht richtig.
Der/die Verschlussstopfen der
Zugangsöffnung/en an der Maske
fehlt/fehlen.
Der für die Behandlung
erforderliche Druck hat sich
unter Umständen geändert.
Das Stromkabel ist nicht richtig
angeschlossen.
Die Steckdose ist defekt. Versuchen Sie, das Gerät an eine
SmartStart ist nicht aktiviert. Aktivieren Sie SmartStart.
Der Leckagealarm wurde
aktiviert, wodurch SmartStart
automatisch deaktiviert wird.
Prüfen Sie, ob das Stromkabel an
Ihrem S8 AutoSet Spirit
angeschlossen und ggf. der
Schalter an der Steckdose
eingeschaltet ist.
Warten Sie, bis der Luftdruck
gestiegen ist oder ändern Sie die
Rampen- oder Ausregelzeit.
aus.
Richten Sie den Atemluftschlauch
gerade oder wechseln Sie ihn
aus.
Überprüfen Sie den
Atemluftschlauch.
Korrigieren Sie den Sitz der
Maske bzw. des Kopfbandes.
Setzen Sie diesen/diese wieder
ein.
Lassen Sie den Druck von Ihrem
Arzt verstellen.
Schließen Sie beide Enden des
Stromkabels ordnungsgemäß an.
andere Steckdose anzuschließen.
Deaktivieren Sie den
Leckagealarm, um SmartStart zu
aktivieren.
DEUTSCH
FEHLERSUCHE
85
Page 90

Problem Mögliche Ursache Maßnahme
Das S8 AutoSet Spirit
stoppt nicht, wenn Sie
die Maske abnehmen.
Obwohl SmartStart
aktiviert ist, stoppt das
Atemtherapiegerät
nicht automatisch,
wenn Sie die Maske
abnehmen.
Sie verwenden eine Mirage- oder
Ultra Mirage Full Face Maske.
Der Atemzug war nicht tief
genug, um SmartStart
auszulösen.
Übermäßig große Leckage. Korrigieren Sie den Sitz der
SmartStart/Stop ist deaktiviert. Aktivieren Sie SmartStart/Stop.
Sie verwenden einen nicht
kompatiblen Atemluftbefeuchter
oder ein unpassendes
Maskensystem.
SmartStart kann bei einer Full
Face Maske nicht eingesetzt
werden, da das Anti-AsphyxieVentil keinen ausreichend hohen
Druck beim Ausatmen zulässt.
Atmen Sie tief ein und dann
durch die Maske aus.
Maske bzw. des Kopfbandes.
Es fehlen möglicherweise die
Verschlusskappen der Öffnungen
an der Maske. Setzen Sie diese
wieder ein.
Der Atemluftschlauch ist nicht
richtig angeschlossen. Schließen
Sie beide Enden fest an.
Knick oder Loch im
Atemluftschlauch. Richten Sie
den Atemluftschlauch gerade
oder wechseln Sie ihn aus.
Verwenden Sie ausschließlich
von ResMed empfohlene und
hergestellte Ausrüstung.
86
Der Druck steigt
übermäßig an.
Sie reden, husten, halten die Luft
an (z. B. wenn Sie sich im Bett
umdrehen) bzw. atmen
absichtlich auf eine
ungewöhnliche Art und Weise.
Das Maskenkissen vibriert auf
der Haut. Das Maskenkissen sitzt
nicht richtig.
Das Maskenkissen sitzt nicht
richtig und verursacht eine
übermäßige Leckage.
Vermeiden Sie es zu reden,
nachdem Sie die Nasenmaske
aufgesetzt haben, und atmen Sie
so normal wie möglich.
Korrigieren Sie den Sitz des
Kopfbandes.
Korrigieren Sie den Sitz des
Kopfbandes oder setzen Sie den
Einsatz noch einmal neu ein.
Page 91

Problem Mögliche Ursache Maßnahme
Fehlermeldung:
Schlauch
prüfen!!
Drücken Sie dann
eine beliebige
Taste.
Fehlermeldung:
SYSTEMFEHLER
Service anford.!
Fehlermeldung:
Große Leckage
bei der letzten
Behandlung
Knick oder Loch im
Atemluftschlauch.
Der Regler des
Atemluftbefeuchters ist zu hoch
eingestellt, was zu einer
Ansammlung von Wasser im
Atemluftschlauch führt.
Der Atemluftschlauch ist lose
oder verstopft.
Defektes Bauteil. Geben Sie Ihr S8 AutoSet Spirit in
Sie hatten während der letzten
Nacht eine übermäßig große
Leckage.
Richten Sie den Atemluftschlauch
gerade, oder wechseln Sie ihn
aus.
Drehen Sie den Regler des
Atemluftbefeuchters niedriger
und lassen Sie das Wasser aus
dem Atemluftschlauch
herausfließen.
Stellen Sie sicher, dass der
Atemluftschlauch sicher an Ihrer
Maske und am Luftauslass an der
Vorderseite des S8 AutoSet Spirit
angebracht ist.
Wenn Sie den Atemluftschlauch
überprüft haben, drücken Sie die
Start-/Stopptaste um das Gerät zu
starten.
Wird die Meldung weiterhin
angezeigt, ziehen Sie den
Netzstecker aus der Steckdose
und stecken Sie ihn anschließend
wieder ein, um das Gerät neu zu
starten.
Reparatur.
Stellen Sie sicher, dass Ihr
Atemluftschlauch
ordnungsgemäß angeschlossen
ist und Ihre Maske keine
übermäßig große Leckage
aufweist.
Passen Sie Ihre Maske mit Hilfe
der Maskenanlegefunktion an.
Erscheint diese Meldung noch
einmal, verständigen Sie bitte
Ihren Arzt.
DEUTSCH
FEHLERSUCHE
87
Page 92

Problem Mögliche Ursache Maßnahme
Fehlermeldung:
STARKE
LECKAGE!!!
Maskensitz korr.
Fehlermeldung:
Exxxx (wobei xxxx
einen Fehler definiert)
Während Sie
versuchen, die
Einstellungen mit Hilfe
der Datenkarte zu
aktualisieren, erscheint
die folgende Meldung
auf dem LCD-Display:
Kartenfehler.
Karte entnehmen.
Sie hatten über 20 Sekunden
lang übermäßig große Leckagen.
Defektes Bauteil. Geben Sie Ihr S8 AutoSet Spirit in
Die Datenkarte wurde nicht
richtig eingeführt.
Die Datenkarte wurde nicht ganz
eingeführt.
Sie haben möglicherweise die
Datenkarte entfernt, bevor die
Einstellungen auf den
S8 AutoSet Spirit kopiert werden
konnten.
Bei der Karte handelt es sich
nicht um eine ResScan
Datenkarte.
Stellen Sie sicher, dass Ihr
Atemluftschlauch
ordnungsgemäß angeschlossen
ist und Ihre Maske keine
übermäßig große Leckage
aufweist.
Passen Sie Ihre Maske mit Hilfe
der Maskenanlegefunktion an.
Erscheint diese Meldung noch
einmal, verständigen Sie Ihren
Arzt.
Reparatur.
Vergewissern Sie sich, dass die
Datenkarte mit dem Pfeil nach
oben und zum Gerät hin weisend
in das Gerät eingeführt wurde.
Stellen Sie sicher, dass das Gerät
eingeschaltet ist und sich im
Bereitschaftsmodus befindet,
bevor Sie die Datenkarte
einführen.
Führen Sie die Datenkarte so weit
wie möglich in den Schlitz des
Datenkartenmoduls ein.
Führen Sie die Datenkarte erneut
ein und warten Sie, bis die
Meldung „Einst.
übernommen. Karte
entnehmen.“ auf dem LCD-
Display erscheint.
Verwenden Sie ausschließlich
eine ResScan Datenkarte.
88
Während Sie
versuchen, die
Einstellungen mit Hilfe
der Datenkarte zu
aktualisieren, erscheint
die folgende Meldung
auf dem LCD-Display:
Kartenfehler.
Karte entnehmen.
Die Datenkarte wurde nicht
richtig eingeführt.
Bei der Karte handelt es sich
nicht um eine ResScan
Datenkarte.
Vergewissern Sie sich, dass die
Datenkarte mit dem Pfeil nach
oben und zum Gerät hin weisend
eingeführt wurde.
Verwenden Sie eine ResScan
Datenkarte, wie in dieser
Bedienungsanleitung angegeben.
Page 93

Problem Mögliche Ursache Maßnahme
Während Sie
versuchen, die
Einstellungen mit Hilfe
der Datenkarte zu
aktualisieren, erscheint
die folgende Meldung
auf dem LCD-Display:
Einst. ungültig.
Karte entnehmen.
Während Sie
versuchen, die
Einstellungen mit Hilfe
der Datenkarte zu
aktualisieren, erscheint
die folgende Meldung
auf dem LCD-Display:
Einstell.
Fehler.
Karte entnehmen.
Während Sie
versuchen, die
Einstellungen mit Hilfe
der Datenkarte zu
aktualisieren, erscheint
die folgende Meldung
NICHT auf dem LCDDisplay:
Einstell.
übernommen
Karte entnehmen
Sie haben die Datenkarte
entnommen, bevor der
Datenkopiervorgang
abgeschlossen war.
Die ID-Angaben auf der
Datenkarte stimmen nicht mit
denen auf Ihrem Gerät überein.
Die Datenkarte weist einen
Datenfehler auf.
Die Einstellungen wurden nicht
aktualisiert.
Führen Sie die Datenkarte erneut
ein und warten Sie, bis die
Meldung „Kopie fertig.
Karte entnehmen.“ auf dem
LCD-Display erscheint.
Setzen Sie sich umgehend mit
Ihrem Arzt in Verbindung.
DEUTSCH
Setzen Sie sich umgehend mit
Ihrem Arzt in Verbindung.
Setzen Sie sich umgehend mit
Ihrem Arzt in Verbindung.
FEHLERSUCHE
89
Page 94

90
Page 95

TECHNISCHE DATEN
S8 AUTOSET SPIRIT (OHNE ZUBEHÖR)
Leistung: Betriebsdruckbereich: 4 bis 20 cm H2O
Abmessungen (H x B x T): 112 mm x 164 mm x 145 mm
Gewicht: 1,3 kg
Stromversorgung
• Eingangsbereich für S8 AUTOSET SPIRIT mit HUMIDAIRE 3i: 100-240 V, 50/60 Hz;
110 V, 400 Hz; 2,5A <140 VA (110 W) (maximale Leistungsaufnahme). Höchste
Momentanleistungsaufnahme <340 VA.
• Die Gleichstromleistung finden Sie in der Bedienungsanleitung des ResMed S8
Gleichstromkonverters. Verwenden Sie für den Gleichstromeingang ausschließlich
den ResMed S8 Gleichstromkonverter von ResMed.
Der tatsächliche Stromverbrauch variiert aufgrund verschiedener Faktoren wie z. B.
verwendetes Zubehör, Höhe über dem Meeresspiegel und Umgebungstemperatur.
In der folgenden Tabelle sind einige Werte zum Stromverbrauch unter normalen
Behandlungsbedingungen (Ventilator unter Verwendung eines 2 m langen Schlauches
und einer
aufgeführt.
ULTRA MIRAGE Maske, eingestellt auf 0,5 Liter und 15 Atemzüge/min)
DEUTSCH
Gerät
S8 AutoSet Spirit 5 18 7,6
Druck
(cm H2O)
10 23 11,6
15 30 15,9
20 39 20,7
Strom
(VA)
Leistung
(W)
Netzanschluss für HumidAire 3i
Ausgangsbereich: 100-240 V, 50/60 Hz; 110 V, 400 Hz; 2,0 A
Luftfiltereinsatz: Zwei Lagen pulvergebundenes Polyestervlies
Luftschlauch: Flexibler Kunststoff, 2 m
Luftauslass: Der 22 mm weite konische Luftauslass entspricht der Norm EN 1281-1
IEC 60601-1 Klassifikationen: Klasse II (Doppelisolierung), Typ CF
Geräuschpegel: Schalldruckpegel wird bei 10 cm H
O und in 1 m Entfernung
2
gemäß ISO17510 mit <30 dBA gemessen.
ZUBEHÖR
DATENKARTE
Abmessungen (L x B x H): 65,04 mm x 22,15 mm x 0,85 mm
TECHNISCHE DATEN
91
Page 96

DATENKARTENMODUL
Abmessungen (H x B x T): 49,7 mm x 42,2 mm x 12 mm
ALLE GERÄTE (FALLS ZUTREFFEND)
Gehäuse: Flammenhemmendes, technisches Thermoplast
Umgebungsbedingungen für Betrieb
Betriebstemperatur: +5 °C bis +40 °C
Betriebsluftfeuchtigkeit: 10 %–95 % ohne Kondensation
Lagerungs- und Transporttemperaturen: -20 °C bis +60 °C
Lagerungs- und Transportfeuchtigkeit: 10 %–95 % ohne Kondensation
Betriebshöhe: Meeresspiegel bis 2591 m üNN
Elektromagnetische Verträglichkeit
Das Produkt entspricht allen zutreffenden elektromagnetischen
Verträglichkeitsanforderungen (EMV) gemäß IEC60601-1-2 für Wohn-, kommerzielle
und Leichtindustriebereiche. Weitere Hinweise dazu finden Sie unter „Richtlinie und
Erklärung des Herstellers über elektromagnetische Emissionen und Verträglichkeit“ auf
Seite 93.
Hinweis: Der Hersteller behält sich das Recht vor, diese Technischen Daten ohne
Vorankündigung zu ändern.
AUF DEM PRODUKT ERSCHEINENDE SYMBOLE
Achtung: Bitte lesen Sie die beiliegenden Unterlagen.
92
Typ CF Ausrüstung
Klasse II Ausrüstung
Spritzwassergeschützt
Gefährliche Spannung
Start-/Stopptaste und Maskensitz
Page 97

RICHTLINIE UND ERKLÄRUNG DES HERSTELLERS ÜBER ELEKTROMAGNETISCHE
MISSIONEN UND VERTRÄGLICHKEIT
E
Richtlinie und Erklärung des Herstellers über elektromagnetischen Emissionen
Das S8 ist für die Verwendung in der unten angegebenen elektromagnetischen Umgebung vorgesehen.
Der Kunde bzw. Benutzer des S8 muss sicherstellen, dass das Gerät in einer solchen Umgebung
verwendet wird.
Emissionstest Compliance
Elektromagnetische Umgebung Richtlinie
HF-Emissionen CISPR11 Gruppe 1 Das S8 verwendet für seine internen
HF-Emissionen CISPR11 mit
Serielladapter
HF-Emissionen CISPR11 mit USBAdapter
Harmonische Emissionen
IEC 61000-3-2
Spannungsschwankungen/Flicker
Emissionen IEC 61000-3-3
* Klasse B für alle Systemkonfigurationen, außer wenn ein PC über einen Serielladapter an das S8
angeschlossen ist. In diesem Fall ist das System Klasse A-kompatibel. Die Klasse A eignet sich für alle
Einrichtungen außer für zu Hause sowie für Einrichtungen, die direkt an das öffentliche
Niederspannungsnetz angeschlossen sind, das private Haushalte versorgt.
Medizinische elektrische Ausrüstung bedarf besonderer Vorsichtsmaßnahmen hinsichtlich der
elektromagnetischen Verträglichkeitsanforderungen (EMV) und muss gemäß den EMV-Hinweisen in
dieser Bedienungsanleitung installiert und in Betrieb genommen werden.
Warnungen : Das S8 sollte nicht neben, auf oder unter anderer Ausrüstung in Betrieb genommen
werden.
Sollte die Aufstellung neben, auf oder unter anderen Geräten dennoch notwendig sein, muss
sichergestellt werden, dass das S8 in der beabsichtigten Aufstellungskonfiguration ordnungsgemäß
funktioniert.
Die Verwendung von anderem als dem hier angegebenen Zubehör (z. B. Atemluftbefeuchter) wird nicht
empfohlen. Dies kann zu verstärkten Emissionen bzw. zur reduzierten Verträglichkeit des S8 führen.
Klasse B* Das S8 kann in allen Einrichtungen
Klasse B
Klasse A
Entspricht den
Bestimmungen
Funktionen ausschließlich HF-Energie.
Deshalb sind die HF-Emissionen des
Gerätes sehr niedrig. Die
Wahrscheinlichkeit, dass sie Störungen
in elektronischen Geräten in der Nähe
auslösen, ist sehr unwahrscheinlich.
sowie zu Hause und in Einrichtungen
verwendet werden, die direkt an das
öffentliche Niederspannungsnetz
angeschlossen sind, das private
Haushalte versorgt.
DEUTSCH
TECHNISCHE DATEN
93
Page 98

Richtlinie und Erklärung des Herstellers über elektromagnetische Verträglichkeit
Das S8 ist für die Verwendung in der unten angegebenen elektromagnetischen Umgebung vorgesehen.
Der Kunde bzw. Benutzer des S8 muss sicherstellen, dass das Gerät in einer solchen Umgebung
verwendet wird.
Verträglichkeitstest
Elektrostatische
Entladung (ESE)
IEC 61000-4-2
Elektrischer
schneller
Übergangsvorgang
IEC 61000-4-4
Stoßleistung
IEC 61000-4-5
Spannungseinbrüche,
kurze
Unterbrechungen
und Spannungsschwankungen in
den Eingangsleitungen.
IEC 61000-4-11
Netzfrequenz
(50/60 Hz)
Magnetfeld
IEC 61000-4-8
HINWEIS: Ut ist die AC-Netzspannung vor dem Einsatz der Testebene.
IEC60601-1-2
Tes te be ne
±6 kV Kontakt
±8 kV Luft
±2 kV für
Stromversorgungsleitung
±1 kV für
Eingangs-/
Ausgangsleitung
±1 kV
Differenzialmodus
±2 kV
Normalmodus
<5 % Ut
(>95 % Einbruch in
Ut) für 0,5 Zyklen
40 % Ut
(60 % Einbruch in
Ut) für 5 Zyklen
70 % Ut
(30 % Einbruch in
Ut) für 25 Zyklen
<5 % Ut
(>95 % Einbruch in
Ut) für 5 Sekunden
3 A/m 3 A/m Magnetische
Normerfüllungsgrad
±6 kV Kontakt
±8 kV Luft
±2 kV
Trifft nicht zu
±1 kV
Differenzialmodus
±2 kV
Normalmodus
<12 V
(>95 % Einbruch in
240 V) für 0,5
Zyklen
96 V
(60 % Einbruch in
240 V) für 5 Zyklen
168 V
(30 % Einbruch in
240 V) für 25 Zyklen
<12 V
(>95 % Einbruch in
240 V) für 5
Sekunden
Elektromagnetische
Umgebung - Richtlinie
Der Fußboden sollte aus
Holz, Beton oder
Keramikfliesen sein. Ist der
Fußboden mit synthetischem
Material ausgelegt, sollte die
relative Luftfeuchtigkeit
mindestens 30 % betragen.
Die Qualität der
Stromversorgung muss der
einer normalen Geschäftsbzw. Krankenhausumgebung
entsprechen.
Die Qualität der
Stromversorgung muss der
einer normalen Geschäftsbzw. Krankenhausumgebung
entsprechen.
Die Qualität der
Stromversorgung muss der
einer normalen Geschäftsbzw. Krankenhausumgebung
entsprechen.
Muss das S8 auch bei
Unterbrechungen der
Stromzufuhr ununterbrochen
in Betrieb bleiben, sollte es
an eine unterbrechungsfreie
Stromversorgung
angeschlossen werden.
Stromfrequenzfelder sollten
sich auf einem für normale
Geschäfts- bzw.
Krankenhausumgebungen
typischen Niveau befinden.
94
Page 99

Richtlinie und Erklärung des Herstellers über elektromagnetische Verträglichkeit
Das S8 ist für die Verwendung in der unten angegebenen elektromagnetischen Umgebung vorgesehen. Der
Kunde bzw. Benutzer des S8 muss sicherstellen, dass das Gerät in einer solchen Umgebung verwendet wird.
Verträglichkeitstest
Geleitete HFSignale
IEC 61000-4-6
Gestrahlte HFSignale
IEC 61000-4-3
IEC60601-1-2
Tes te be ne
3 Vrms
150 kHz bis 80
MHz
10 V/m
80 MHz bis 2,5
GHz
Normerfüllungsgrad
3 Vrms d = 1,17 √P
10 V/m d = 0,35 √P 80 MHz bis 800 MHz
Elektromagnetische Umgebung Richtlinie
Bei der Verwendung von tragbarer und mobiler
HF-Kommunikationsausrüstung sollte der
empfohlene Abstand zum S8 und den Kabeln
eingehalten werden, der sich aus der für die
Frequenz des Senders geltenden Gleichung
ergibt.
Empfohlener Abstand
d = 0,70 √P 800 MHz bis 2,5 GHz
wobei entsprechend dem Hersteller des Senders
P die maximale Ausgangsleistung des Senders in
Watt (W) und d den empfohlenen Abstand in
Metern (m) darstellt.
Die Feldstärke der festen HF-Sender, die durch
eine elektromagnetische Prüfung ermittelt wird,
a
in jedem Frequenzbereich unter der
muss
Compliance-Ebene liegen.
Störungen können in der Nähe von
Ausrüstungsgegenständen auftreten, die
folgenderweise gekennzeichnet sind:
b
DEUTSCH
HINWEIS 1: Bei 80 MHz und 800 MHz trifft der höhere Frequenzbereich zu.
HINWEIS 2: Diese Richtwerte treffen möglicherweise nicht auf alle Situationen zu. Die elektromagnetische
Ausbreitung hängt von der Absorption und Reflexion von Strukturen, Objekten und Personen ab.
a
Die Feldstärke von festen Sendern wie Basisstationen für Radios, Mobil- und schnurlosen Telefonen sowie
Landfunkradios, Amateurradios, AM- und FM-Radiosendern und Fernsehsendern kann nicht mit Sicherheit
theoretisch vorhergesagt werden. Zur Beurteilung der elektromagnetischen Umgebung von festen HF-Sendern
sollte eine elektromagnetische Prüfung durchgeführt werden. Überschreitet die gemessene Feldstärke am
Standort, an dem das S8 verwendet wird, die entsprechende HF-Normerfüllungsebene (siehe oben), muss das S8
auf normale Betriebstätigkeit hin beobachtet werden. Wird eine normwidrige Funktionsweise festgestellt, sind
eventuell zusätzliche Maßnahmen wie eine Neuausrichtung bzw. Umstellung des S8 notwendig.
b
Im Frequenzbereich 150 kHz bis 80 MHz darf die Feldstärke 10 V/m nicht überschreiten.
TECHNISCHE DATEN
95
Page 100

Empfohlene Abstände zwischen tragbarer und mobiler HF-Kommunikationsausrüstung und dem
S8
Das S8 ist für die Verwendung in einer Umgebung vorgesehen, in der gestrahlte HF-Störungen kontrolliert
werden. Der Kunde bzw. Benutzer des S8 kann zur Verhinderung von elektromagnetischen Störungen beitragen,
indem er gemäß der Empfehlung unten, die sich nach der maximalen Ausgangsleistung der
Kommunikationsausrüstung richtet, einen minimalen Abstand zwischen der tragbaren und mobilen HFAusrüstung (Sender) und dem S8 einhält.
Abstand je nach der Frequenz des Senders
m
Maximale Nennleistung
des Senders
W
0,01 0,17 0,04 0,07
0,1 0,37 0,11 0,22
1 1,17 0,35 0,7
10 3,69 1,11 2,21
100 11,70 3,50 7,0
Für Sender mit einer maximalen Ausgangsleistung, die nicht oben aufgeführt ist, kann der empfohlene Abstand d
in Metern (m) mit Hilfe der entsprechenden Gleichung für die Frequenz des Senders bestimmt werden, wobei P
die maximale Ausgangsleistung des Senders in Watt (W) gemäß dem Hersteller des Senders darstellt.
HINWEIS 1: Bei 80 MHz und 800 MHz trifft der Abstand für den höheren Frequenzbereich zu.
HINWEIS 2: Diese Richtwerte treffen möglicherweise nicht auf alle Situationen zu. Die elektromagnetische
Ausbreitung hängt von der Absorption und Reflexion von Strukturen, Objekten und Personen ab.
150 kHz bis 80 MHz
d = 1,17 √P
80 MHz bis 800 MHz
d = 0,35 √P
800 MHz bis 2,5 GHz
d = 0,7 √P
96
 Loading...