

Page 1
How to use
your Nox A1
™
ambulatory recordings
Noxturnal version 5.1
ResMed.com/NoxA1
Page 2

Contents
Nox A1 system ……………………………………………………………………………………………………………………………………
Configure a recording ………………………………………………………………………………………………………………………………
Patient hook-up ……………………………………………………………………………………………………………………………………
Check signals ………………………………………………………………………………………………………………………………………
Clean devices and accessories …………………………………………………………………………………………………………………
Score a recording
Download data ……………………………………………………………………………………………………………………………………
Analyse data ……………………………………………………………………………………………………………………………………… page 42
Generate a report …………………………………………………………………………………………………………………………………
Open an existing recording ………………………………………………………………………………………………………………………
Troubleshooting ……………………………………………………………………………………………………………………………………
Consumables and accessories ……………………………………………………………………………………………………………………
page 3
page 7
page 14
page 26
page 38
page 41
page 51
page 53
page 54
page 59
2
2
Page 3
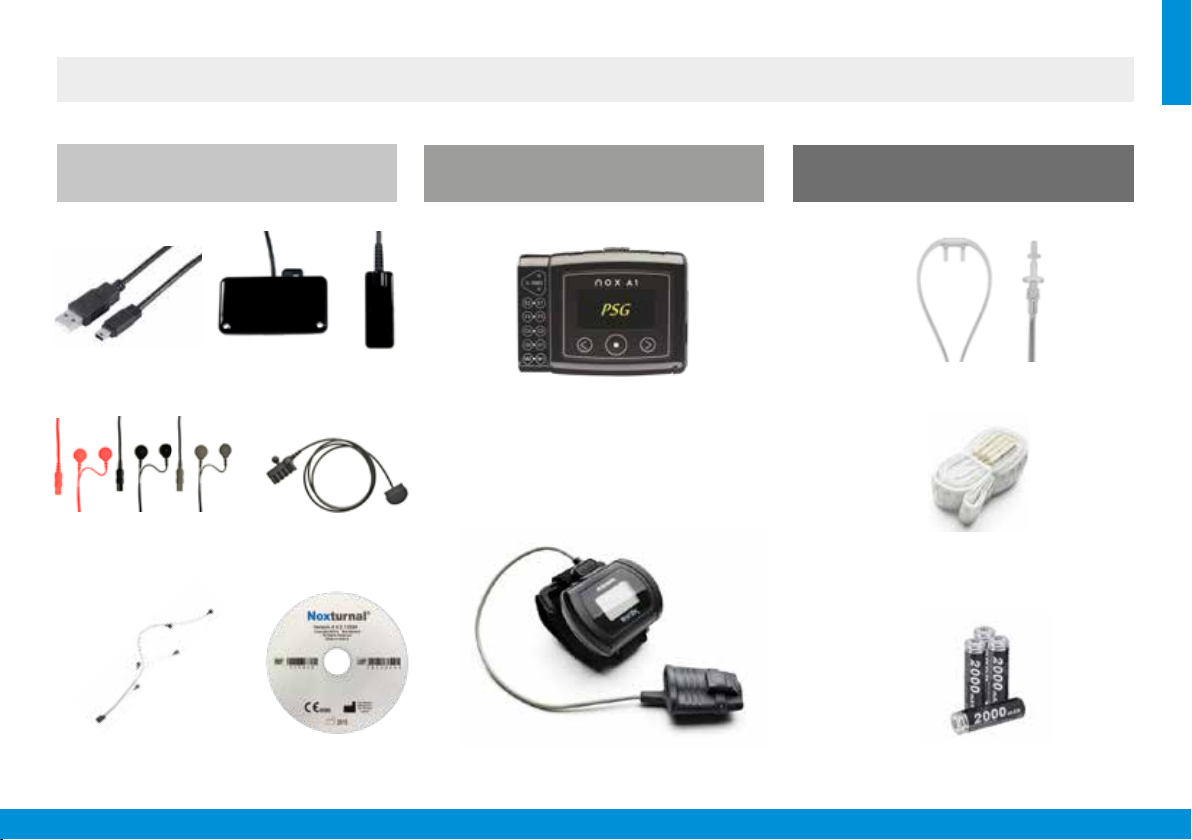
Nox A1 system
Accessories Devices Consumables
USB cable
EKG and PLM cables EEG head cable
electrode cable x2
Abdomen cable Nasal cannula with filter x2
Noxturnal software CDEEG 5 lead gold
Nox A1 Recorder
Nonin 3150 oximeter
and SpO
sensor size M
2
Disposable RIP belts
(Sizes: XSx1, Sx1, Mx1, Lx1, XLx1)
Battery 1.5V AA x2
Battery 1.5V AAA x4
3
Page 4
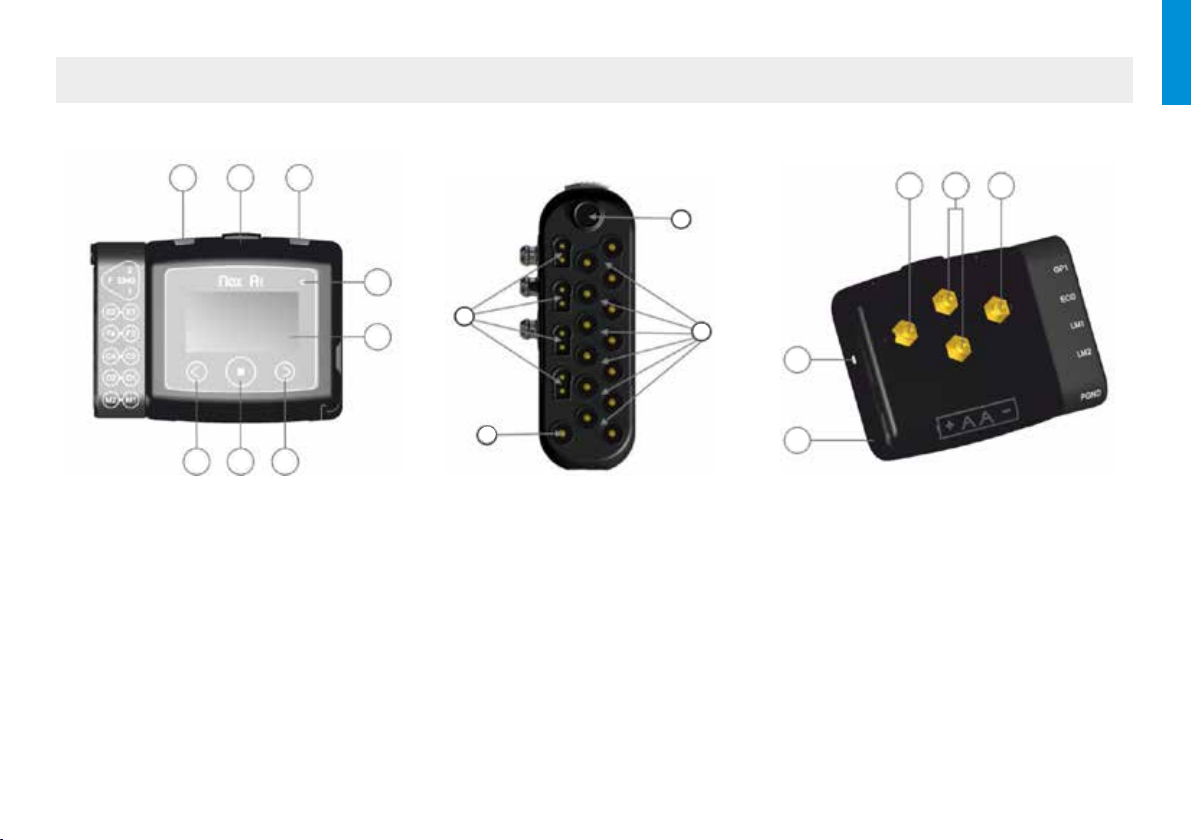
Nox A1 system
5 6 5
7
1
4 2 3
NUMBER FUNCTION
1 Display
2 Push button -
3 Push button -
4 Push button -
Turn on the device
Forward
Backward
5 Clip strap loops
6 Microphone and light sensor -
sounds and light
7 Device status indicator light
8 Pressure lock -
Connects to external nasal cannula/
mask pressure tube
11
10
Records respiratory
8
9
13
12
9 Unipolar input -
EEG channels
10 Reference ground input
11 Bipolar inputs -
12 Battery lid -
13 Battery lid pin -
14 Metal snaps -
15 Metal snaps -
EKG and PLM inputs
Covers the battery and the USB connector
Keeps battery compartment closed
Connect to thorax RIP belt
Connect to abdomen cable
14
15 14
4
Page 5
Nox A1 system
• Options available
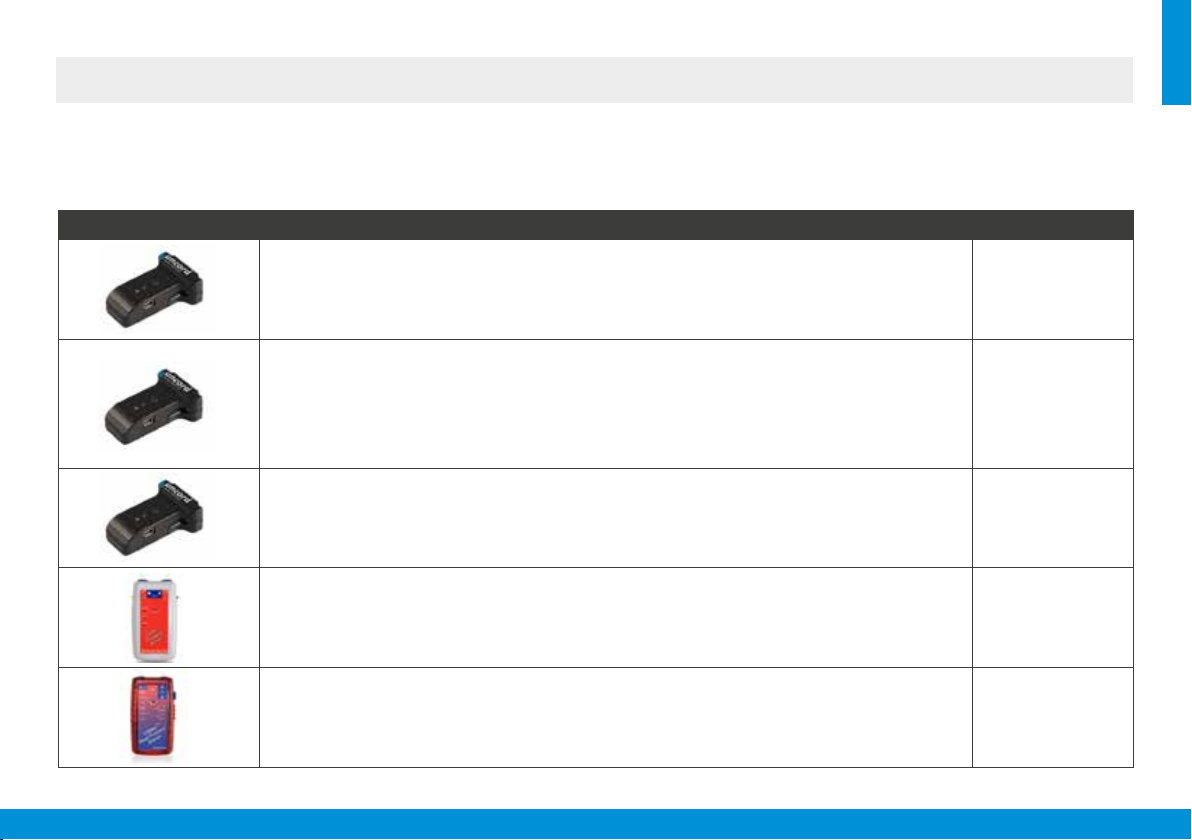
The Nox A1 device can be used with the following external devices.
Device Function Part number
Bluetooth Nox W7 Link Kit - A
Enables data transfer between the Nox A1 and ResMed AirSense
therapy devices. Can be connected to AirSense/AirCurve devices via an adapter.
Signals available: Flow, Pressure, Leak.
Bluetooth Nox W7 Link Kit - R
Enables data transfer between the Nox A1 and ResMed S9
the Nox A1 and selected Radiometer
S9 devices via an adapter. Can be connected to Radiometer devices via an extension cable.
Signals available with the ResMed S9: Flow, Pressure, Leak.
Signals available with the Radiometer: ptCO
Bluetooth Nox W7 Link Kit - S
Enables data transfer between the Nox A1 and SenTec
to the serial port of the SenTec monitor.
Signals available with the SenTec: ptCO
Differential pressure sensor Braebon
Can be connected to one of the bipolar inputs of the Nox A1. Records patient flow when
using a therapy device. For pressures up to 20 cmH
Differential pressure sensor Braebon 0580PES
Can be connected to one of the bipolar inputs of the Nox A1. Records patient flow when
using a therapy device. For pressures up to 50 cmH
Contact your ResMed representative for more details.
™
10 / AirCurve™ 10
™
™
devices (TCM4 and TCM40). Can be connected to
, SpO2, Pulse.
2
, SpO2, Pulse, Pulsation Index.
2
™
PT1 0580
O.
2
O.
2
therapy devices or between
™
Digital Monitor. Can be connected
7075367
7073481
7073480
7073482
7075368
5
Page 6
Nox A1 system
• Ambulatory study
Configure
a recording
Insert
batteries
Patient
hook-up
Check
signals
Clean
devices and
accessories
Download
data
6
Page 7

Congure a recording
7
Page 8
Congure a recording
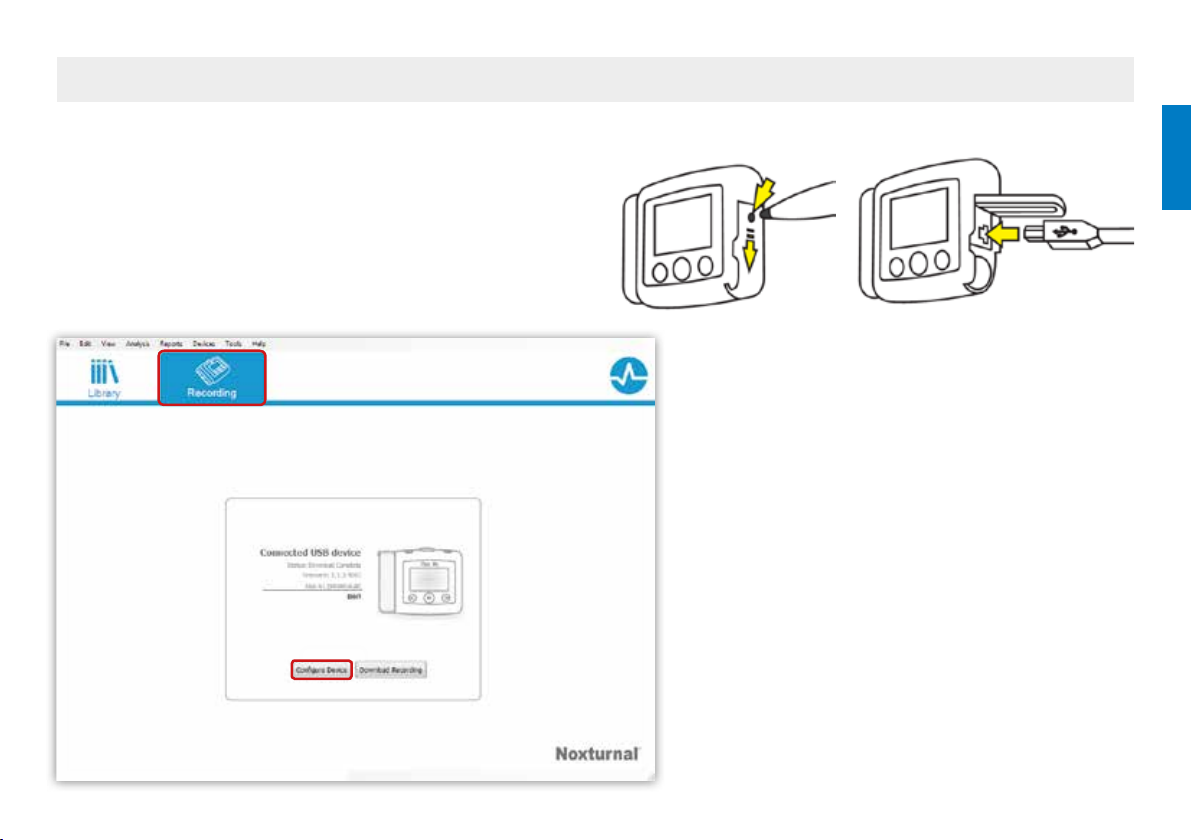
• Connect the Nox A1
Open Noxturnal software on your computer.
Open the battery lid of the Nox A1 using the opening tool
provided and connect the device to the USB port of the computer.
In Noxturnal software, click on Recording >
Configure device to open the configuration
wizard.
8
Page 9
Congure a recording
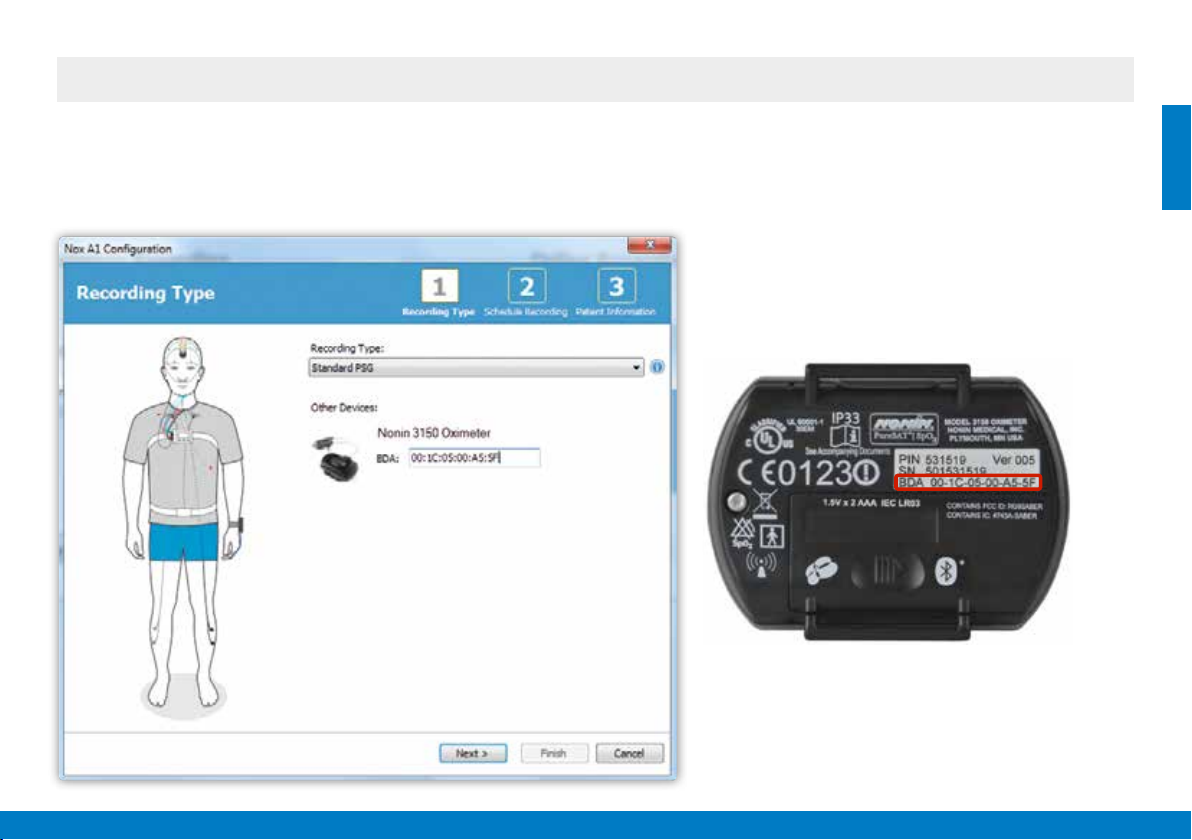
• Step 1: Select a recording type
Choose a suitable recording type from the drop-down list.
Enter the BDA number shown on the
back of your oximeter.
Click on Next to continue.
9
Page 10
Congure a recording
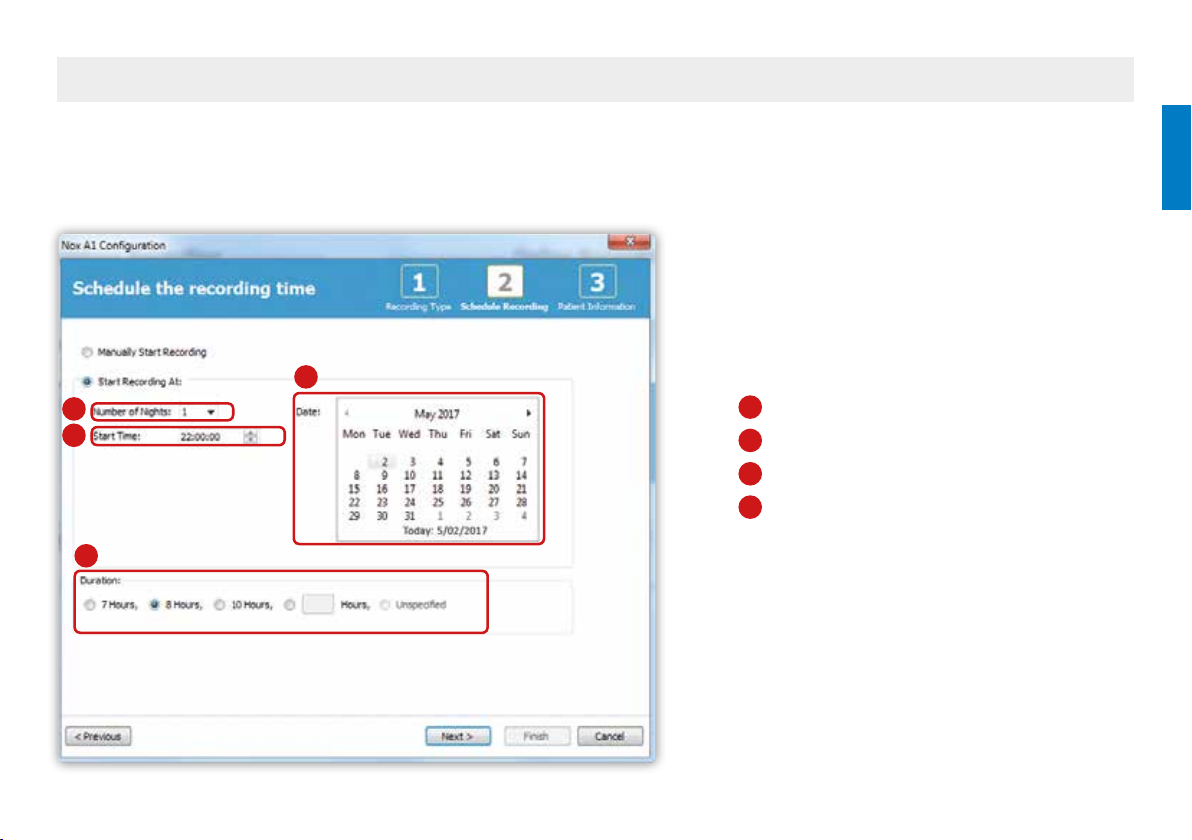
• Step 2: Schedule recording
“Start Recording At” option is recommended.
3
1
2
4
Select
1
The number of nights
2
The start time
3
The date
4
The duration
Click on Next to continue.
10
Page 11
Congure a recording
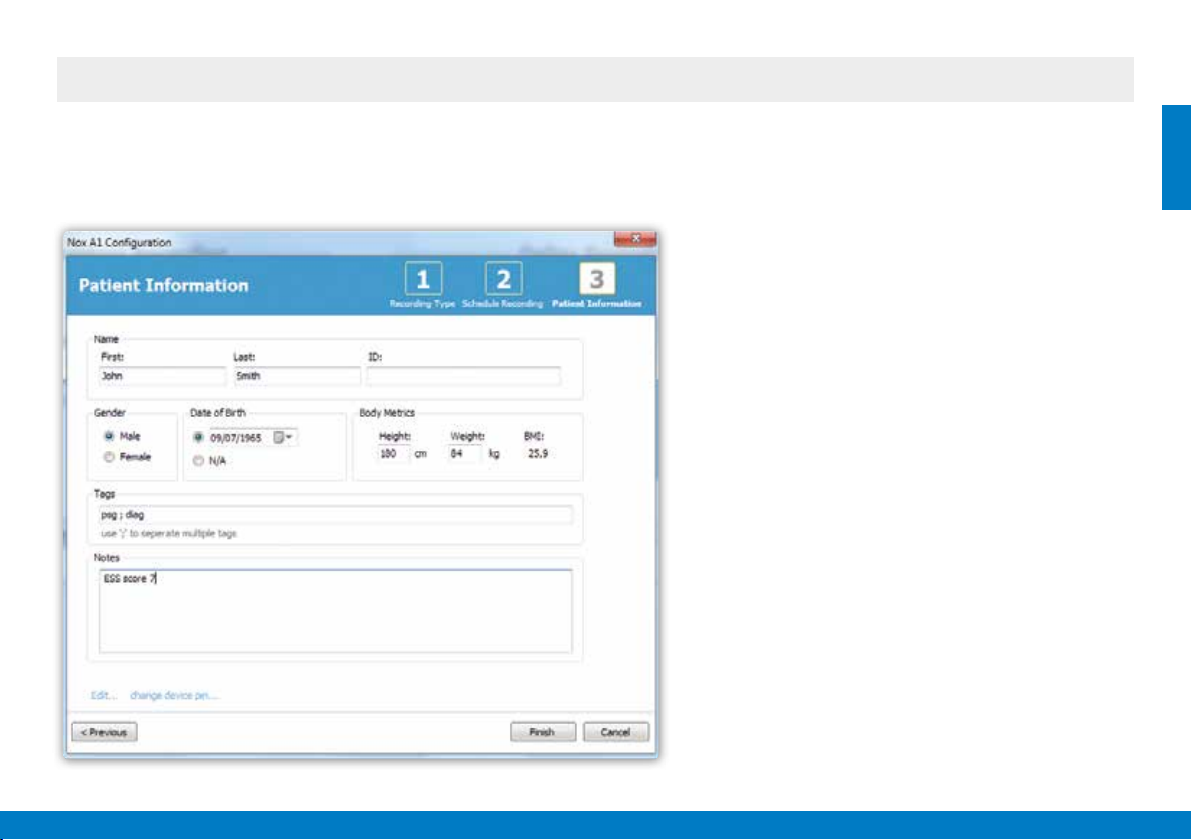
• Step 3: Enter patient information
Add information on the patient’s identity and physical characteristics.
Add at least patient’s First and Last names or
patient ID before finishing.
The Tags fields can be used to link keywords to
the patient in order to easily find him later in the
recordings library.
Use the Edit... button to enter more detailed
information about your patient before the hookup.
Click on Finish.
11
Page 12
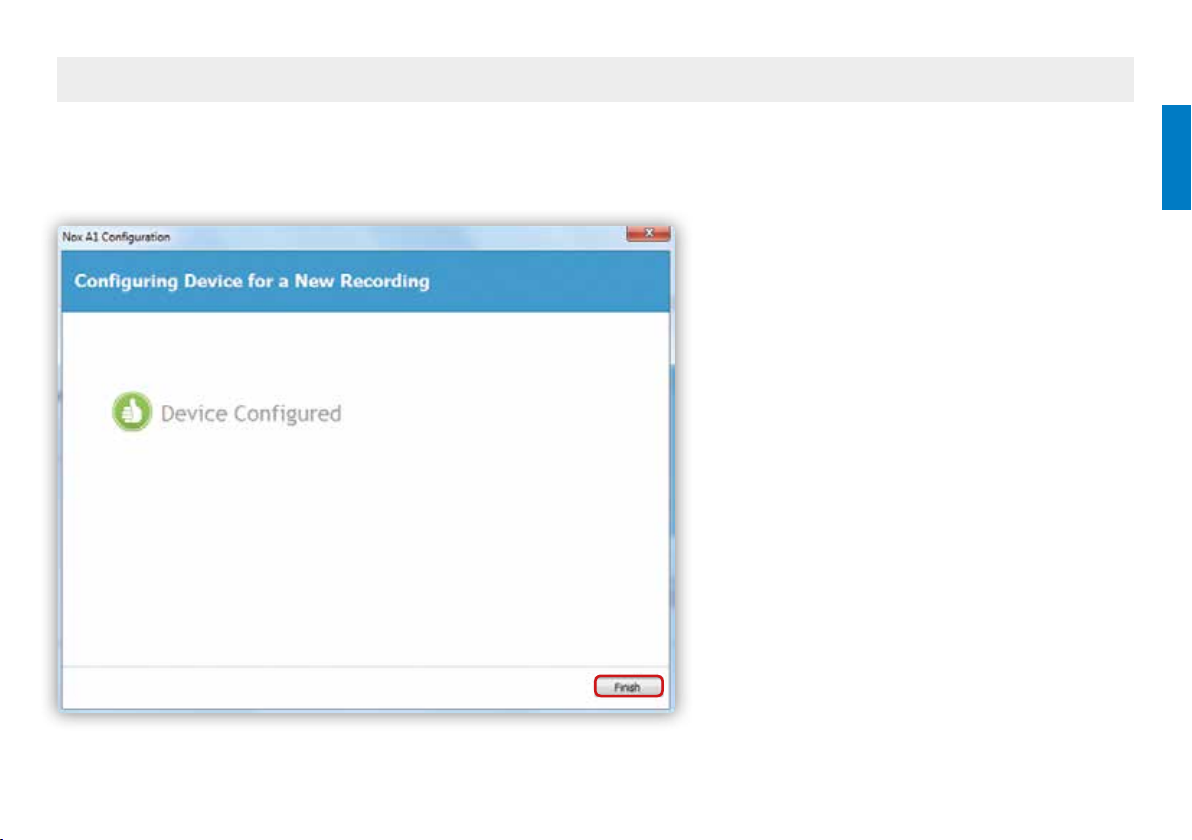
Congure a recording
• End configuration
Click on Finish to close this window
and disconnect the device.
12
Page 13
Congure a recording
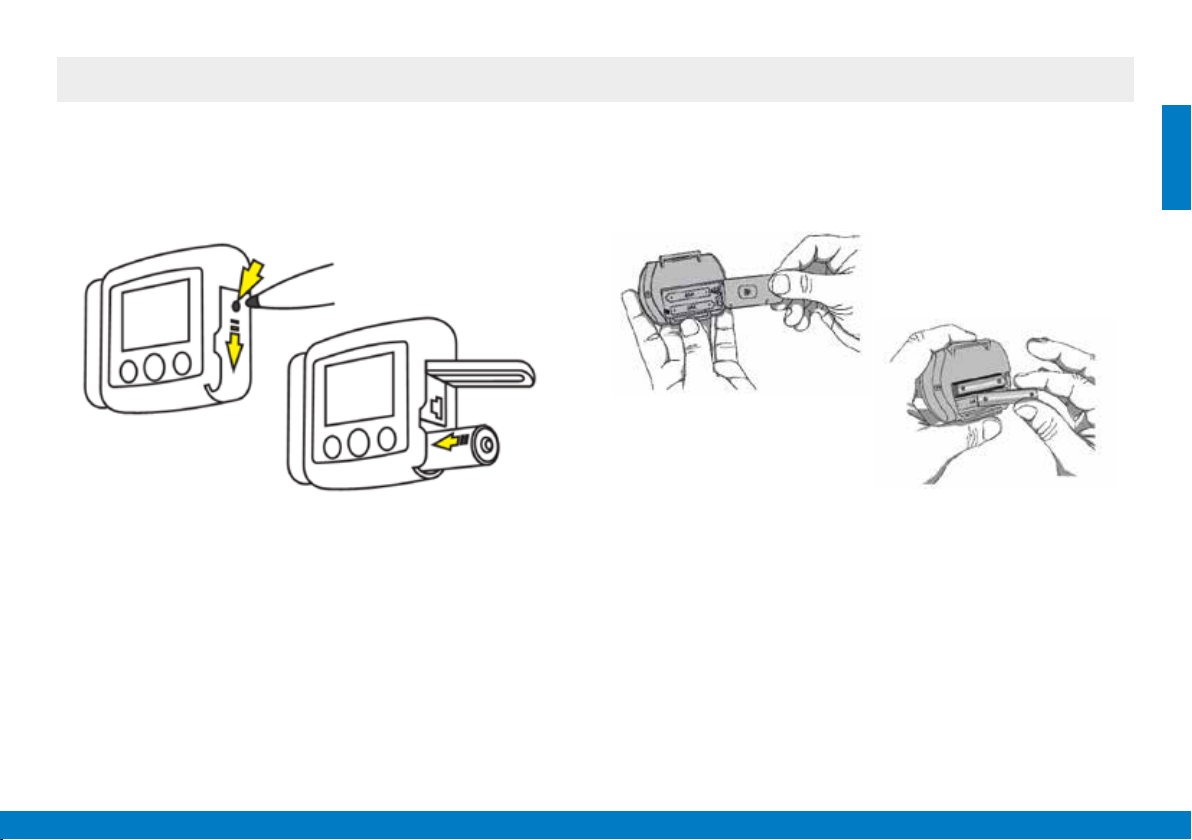
• Insert batteries
Insert a new lithium battery or a fully recharged NiMh battery into the Nox A1 device.
For the Nox A1: 1 AA battery
• Lithium batteries are recommended. They last for up to 15h of
recording. Replace them after each recording.
• NiMh batteries that are recommended for the Nox A1 device
are 2700mAh Powerex or 2500mAh Panasonic Eneloop pro.
They last for 8 to 10 hours of recording.
Alkaline batteries are not compatible with the Nox A1
device.
For the Nonin 3150 oximeter: 2 AAA batteries
• Alkaline batteries last for up to 24h. It is recommended
that they are replaced every 2 recordings.
• Rechargeable batteries should be recharged completely
before every recording.
13
Page 14
Patient hook-up
14
Page 15
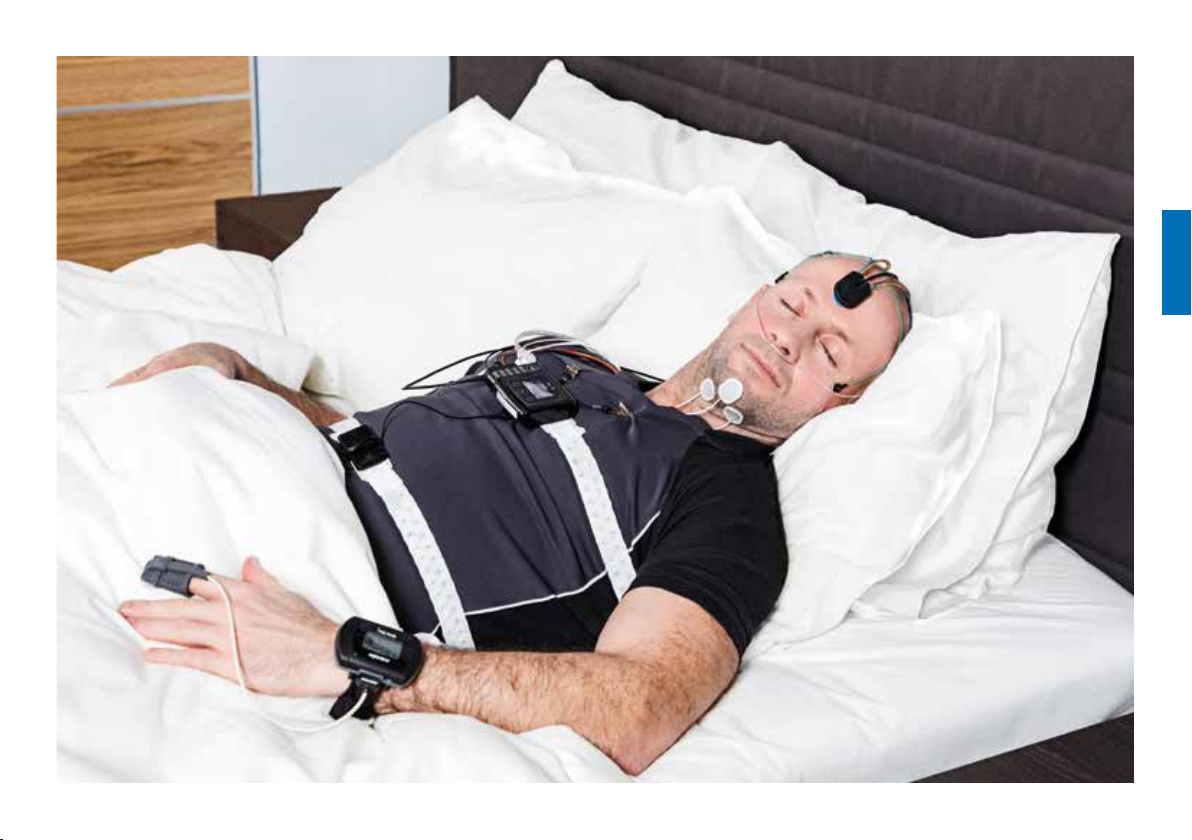
Patient hook-up
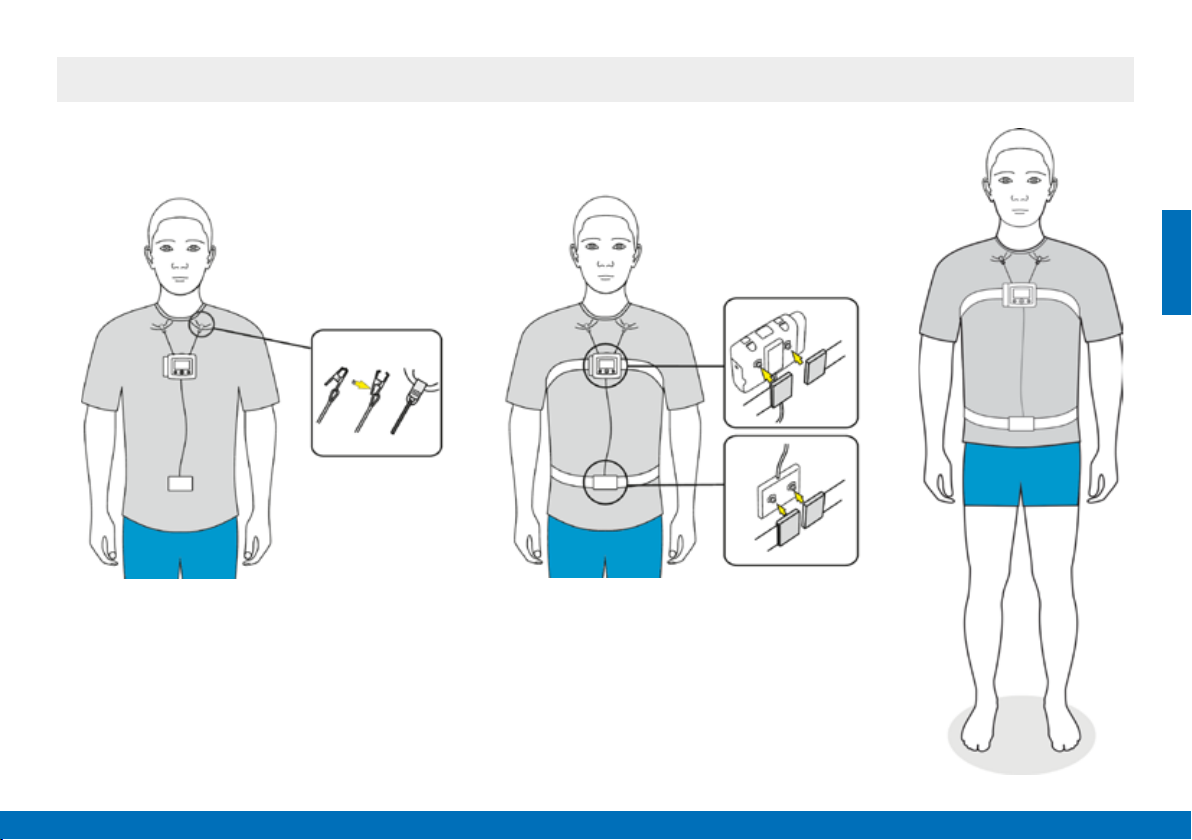
Attach the device and the belts
•
2
1
3
1 - Clip the abdomen cable to the back
of the device and snap the clips
onto the patient’s pyjamas.
2 - Wrap the RIP belt around the patient’s
thorax and snap it at the back of the
device.
3 - Repeat this for the abdomen belt and
snap it to the cable.
15
Page 16
Patient hook-up
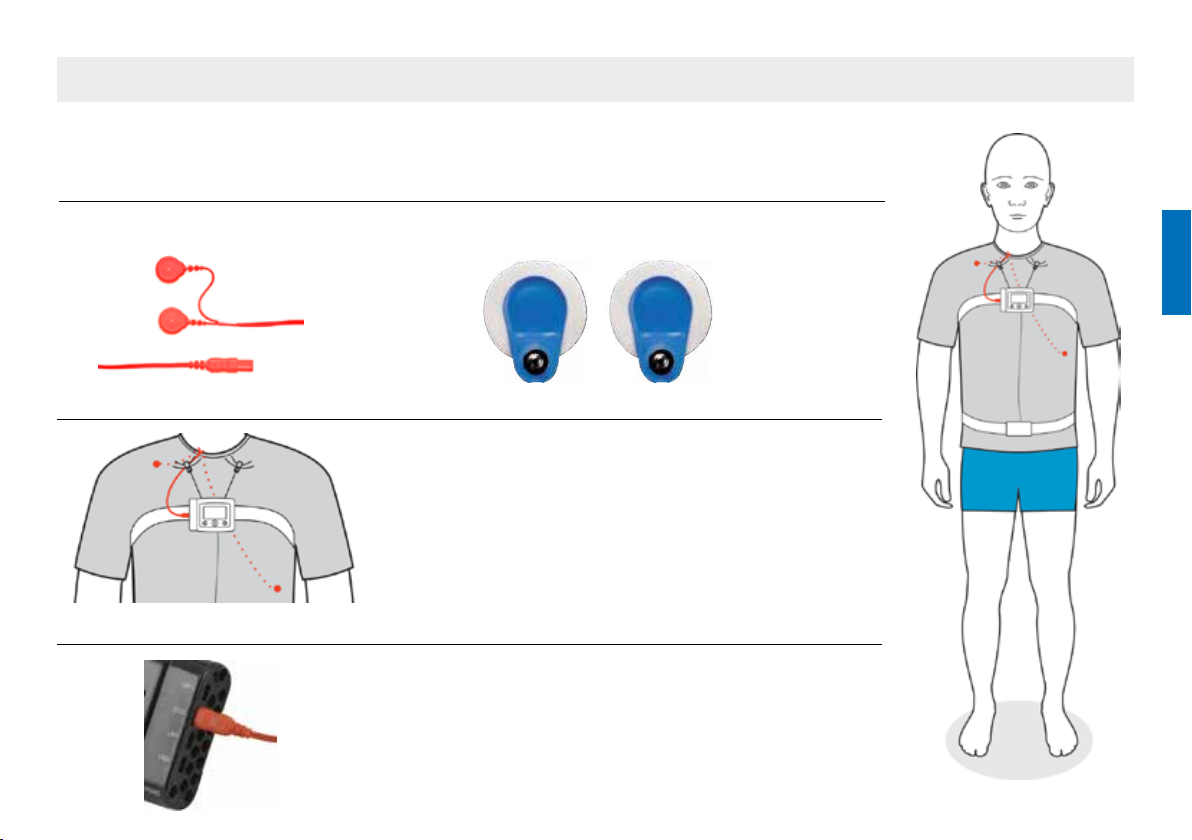
• Place the EKG cable
Equipment needed:
EKG snap-on lead wire - Orange (PN 7072172)
Electrode site:
Connection to the Nox A1:
2 disposable adhesive electrodes (PN 7075209)
Scrub the patient’s skin with NuPrep before
placing the adhesive electrodes.
Under the right clavicle.
th
On the 7
The EKG cable must be plugged into the bipolar
EKG channel.
left rib.
16
Page 17
Patient hook-up
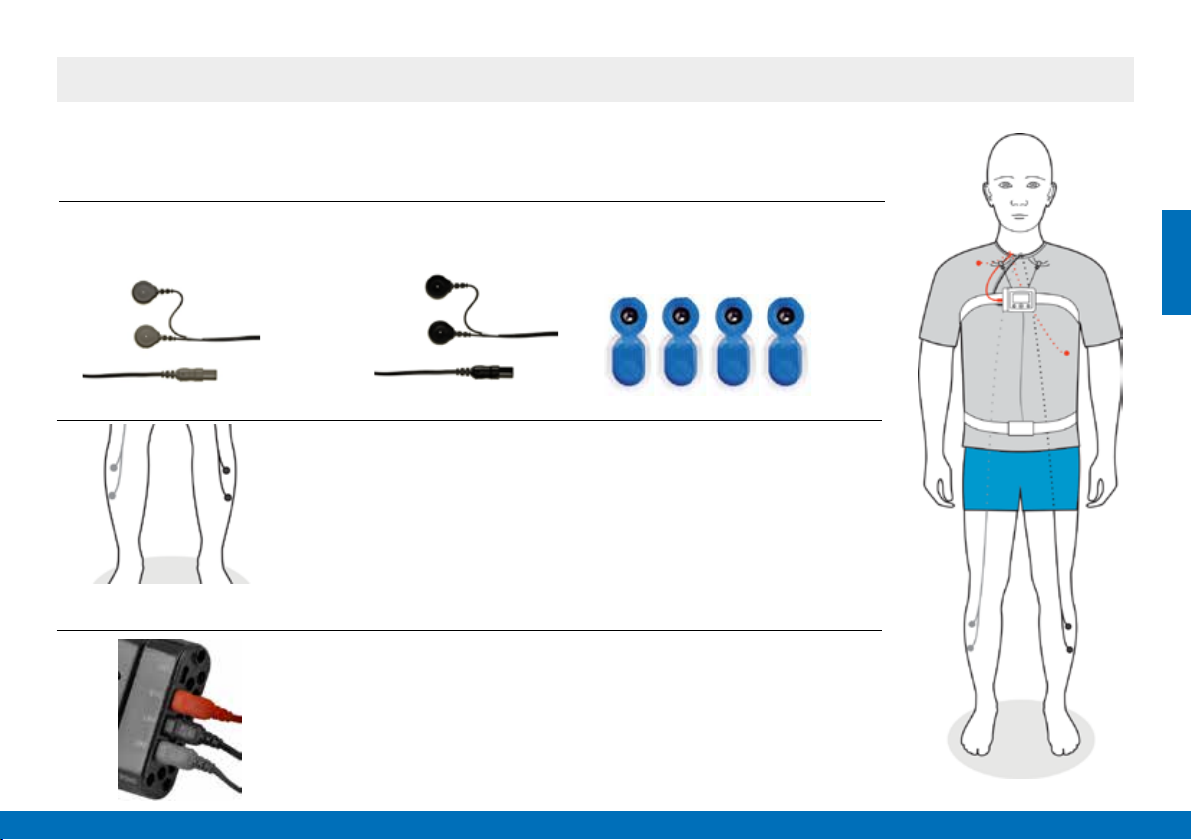
• Place the PLM cables
Equipment needed:
PLM snap-on lead wire
Grey (PN 7073438)
Electrode site:
Connection to the Nox A1:
PLM snap-on lead wire
Black (PN 7073439)
Scrub the patient’s skin with NuPrep before placing
the adhesive electrodes.
Electrodes must be placed on the tibialis anterior muscle.
If needed, secure the electrodes with tape and/or a Surgilast net.
Connect the black cable (left leg) to the LM1 bipolar input and
the grey cable (right leg) to the LM2 bipolar input.
4 disposable adhesive electrodes
(PN 631526)
17
Page 18
Patient hook-up
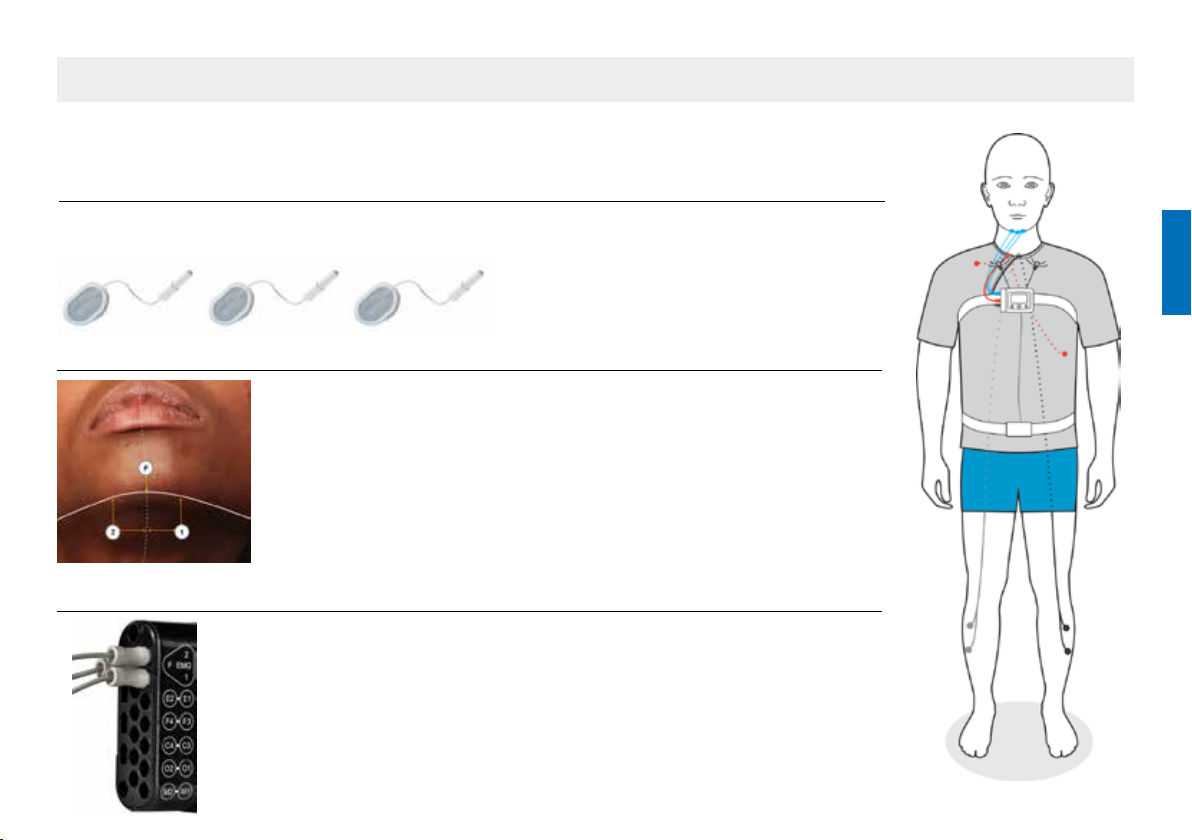
• Place the chin EMG electrodes
Equipment needed:
3 disposable adhesive electrodes (PN 7073775)
Electrode site:
Scrub the patient’s skin with NuPrep before placing the adhesive
electrodes.
F - On the midline and 1 cm above the inferior border of the mandible.
1 - 2 cm below the inferior border of the mandible and 2 cm right
of the midline.
2 - 2 cm below the inferior border of the mandible and 2 cm left
of the midline.
Connection to the Nox A1:
Connect corresponding electrodes to the inputs F, 1 and 2.
18
Page 19
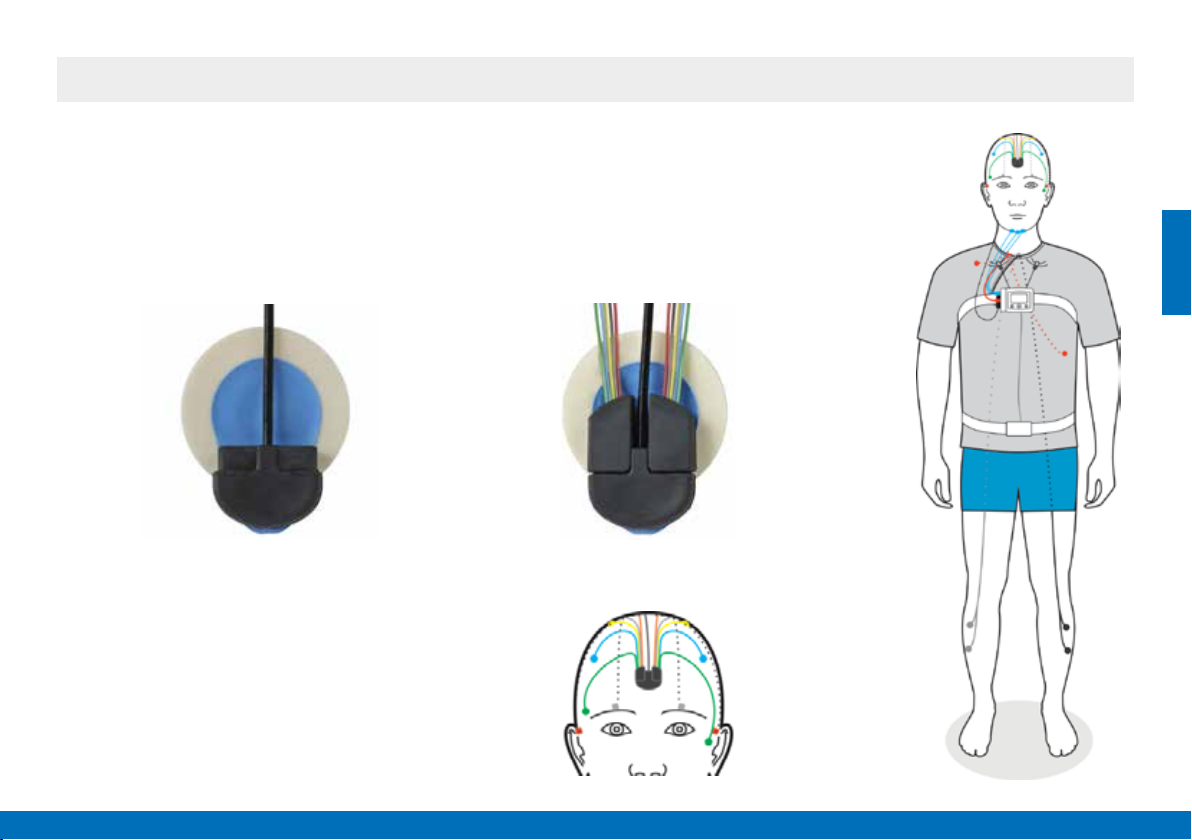
Patient hook-up
• Place the EEG head cable
Before attaching the electrodes, it is important to properly position the ground reference
of the EEG head cable.
1 - Choose a snap-on electrode and place
the EEG head cable as shown below:
2 - Scrub the patient’s forehead with
NuPrep and attach the electrode to
the forehead by gently pressing on the
white ring of the electrode.
3 - Connect the 2 EEG lead cables as
shown below:
4 - Pre-position the cups on the head.
19
Page 20

Patient hook-up
• Place the electrodes (10/20 system)
E1 and E2 are respectively 1 cm below the left eye and 1 cm above the right eye.
O1 and O2 are 3 cm below the occipital protuberance and 3 cm from the midline.
C3 and C4 are on the pre-auricular points axis and 7 cm from the midline.
M1 and M2 are respectively on the left and the right mastoids behind the ear.
F3 and F4 are 1 cm before the hair line and 4 cm from the midline.
20
Page 21

Patient hook-up
• Attach the EEG electrodes
Equipment needed:
NuPrep abrasive gel
(PN 7073511)
Ten20 conductive paste
(PN 7073512)
EC2 electrode cream
(PN 7073513)
Cotton bud and gauze
1 - Scrub the different electrode sites with NuPrep and a cotton bud.
Remove excess gel with gauze.
2 - Fill the cups with Ten20 conductive paste and place them
on the correct spots.
3 - Place a small amount of EC2 cream on a piece of gauze.
Place the gauze over the cup and onto the patient’s scalp
so the cup stays in place.
21
Page 22

Patient hook-up
• Attach the nasal cannula
Gently position the nasal
cannula in the nostrils with
the prongs facing inwards.
You can put a little piece of tape on the cannula on either cheek to hold it securely in place.
• Connect the nasal cannula with the filter to the pressure input of the Nox A1.
Pull the cannula tubing over
the ears.
Slide the bolo up under the
chin so it is snug but not too
tight.
22
Page 23

Patient hook-up
• Attach the oximeter
1
2
1 - Place the oximeter on the patient’s left wrist if they
are right-handed or on their right wrist if they are
left-handed.
2 - Then place the probe on the index finger. The
fingertip should reach the end of the probe but
should not go past it.
Push the grey activation button if the device doesn’t start automatically.
3 - Wrap tape around the finger to secure
the sensor cable.
3
23
Page 24

Patient hook-up
• Therapy device option: pressure tubing installation
Make sure you use an appropriate recording type.
Equipment needed:
- Pressure tubing (PN 7072092)
- Nasal cannula filter (PN 7072097)
- Mask adapter (PN 26915)
Connect the pressure tubing to the mask and the Nox A1:
1 - Insert a filter into the pressure input of the Nox A1, where you would usually insert the nasal cannula.
2 - Screw the male luer-lock connector of the pressure tubing into the filter.
3 - Connect the female luer-lock connector of the tubing to the pressure port of the mask adapter.
Set-up picture:
1
2
3
24
Page 25

Patient hook-up
• Therapy device option: Braebon differential pressure sensor installation
Equipment needed:
- Differential pressure sensor kit (PN 7073482)
- 2 hydrophobic filters for each recording (PN 7073746)
- 2 AAA batteries for the differential pressure sensor (last for 30 to 50 recordings of 8 hours)
Install the differential pressure sensor
Make sure that 2 fresh AAA batteries are inserted and that you are using 2 new filters.
1 - Connect the green part of the flow sensor to the therapy device output.
2 - Connect the transparent part of the flow sensor to the patient tubing.
3 - Connect the red and black cable to input 1 or 2 of the Nox A1.
4 - Connect the white cable to the black and red cable and plug it into the Airflow input
of the differential pressure sensor.
5 - Put the gain of the differential pressure sensor on LOW.
6 - Switch the differential pressure sensor ON just before the recording. It will automatically
stop after 10 hours of recording.
Set-up picture:
25
Page 26

Check signals
26
Page 27

Check signals
Check signals with an Android tablet
•
The app is available on Google Play. Find it by searching Noxturnal or by flashing the QR code at the right.
The Noxturnal app allows you to:
- Completely configure a recording (also possible via Noxturnal PC software with the USB cable)
- View sensor status and perform impedance checks in real time
- Perform biocalibration
- View live signals
- Check Nox A1 status and parameters (battery status, device profile, start time, etc.)
How to use:
Turn on the Nox A1 and open the app. Check that the app is in Ambulatory Mode (if needed, change the app mode in the
settings
Find your device on the list of available devices (check the serial number to ensure it is the right device) and click on it to select.
). A list of all devices previously connected to the tablet will be displayed.
Click here if your device doesn’t appear in the list.
27
Page 28

Check signals
Overview
•
Start/Stop a recording
Disconnect from the Nox A1
PATIENT
Enter or modify patient information.
CONFIG
Choose recording type and recording start date and time.
SENSORS
Check signal quality and impedance.
BIOCAL
Perform biocalibration.
TRACES
View live signals.
DEVICE
View information about the device and the recording.
Save modifications
Create a new recording
28
Page 29

Check signals
Verify the recording configuration
•
On this tab you can:
• Verify and/or choose the recording type
• Enable or disable the audio playback
• Verify or choose the Bluetooth address of your oximeter
• Enter the start date and time of the recording
Save modifications
29
Page 30

Check signals
Check signal impedance
•
The Sensors tab gives an overview of the status of all sensors.
The colour code is:
Sensor well-placed / Good impedance value
Correct impedance value
Sensor incorrectly placed / Bad impedance value
Note:
electrodes. If the patient hook-up wasn’t completely finished when the Nox
A1 was turned ON, you should start an impedance check as indicated below
to obtain a reliable value.
Once the global verification is complete, click on the icon at the bottom left to
start an impedance check and visualise the impedance of each EEG signal.
shows the worst rating impedance value of all EEG
30
Page 31

Check signals
Check signal impedance
•
Click on Start impedance check.
Wait for about 10 sec for the impedances to be displayed.
Note: ExG signal quality is degraded during an impedance check.
The test ends when you change tab or when you disconnect from the device.
31
Page 32

Check signals
Check signal impedance
•
Fair connection
Good connection
Bad connection
Cable colour
Impedance:
0-5kΩ: Good connection
5-20kΩ: Fair connection
>20kΩ: Bad connection
>100kΩ: No contact
Re-attach the electrode if the impedance colour
is red or black.
32
Page 33

Check signals
Biocalibration
•
Biocalibration is a visual check of the quality of every respiratory and ExG
signal.
Note: The recording must be ON to access biocalibration. Signals and events
will be saved in the device and included in the night recording.
Click on Start recording to record signals and score biocalibration events.
33
Page 34

Check signals
Biocalibration
•
Choose the biocalibration task
Click on Score event if the result is as expected.
For example:
• Task
Hold breath for 10 seconds.
• Expected result:
All respiration gauges run flat.
Choose the biocalibration procedure. (You can create your own
procedure using the Noxturnal software).
Change time base.
Choose signals to display.
34
Page 35

Check signals
View signals
•
Reset default scale.
Automatically adjust signals scale.
Use two fingers to zoom in on the signals and the scale.
Press twice on a signal to change its height and scale.
35
Page 36

Check signals
Check device status and configuration
•
Before closing the app, check all information on the device tab, especially:
• Device time
• Scheduled recording start time
Click on to disconnect the Nox A1 from the app.
36
Page 37

Check signals
End of the signal check
•
Push the central button to turn on the device and check that:
- The device time is correct
- The battery level is high enough
- The countdown corresponds to the recording start time
Device time Battery indicator
Countdown
Once checks are complete, the patient can go home. No action from them is required.
37
Page 38

Clean devices and accessories
38
Page 39

Clean devices and accessories
Clean the devices (recorder and oximeter) and the accessories between each patient according to the procedure below.
Effort belts and nasal cannula are single use and must be changed between each patient.
Procedure
Nox A1
Abdomen
cable
EKG/PLM
cable
EEG head
cable
EEG lead
Oximeter
3150
SpO2
sensor
The use of any other cleaning agent, especially ammonium chloride, is strongly discouraged as there is a high risk it will shorten the lifespan of
the device and its accessories.
To disinfect the different components, the following cleaning agents can be used:
• 70-90% isopropanol
• Super Sani-Cloth Plus disinfection wipes
• Sodium hypochlorite diluted with water at 1:500 (bleach)
Clean these elements with a soft cloth dampened with hospital grade cleaner that is not corrosive to plastic
or metal. Do not pour or spray any liquids onto the device, and do not allow any liquids to enter any openings
on the device. Do not immerse the cables in liquid and avoid contact between the cleaning agent and the
connectors.
Clean the gold cup electrode cables with alcohol free soap. A toothbrush can be used to scrub the cups to
remove paste and debris. Be careful not to scrub too aggressively to avoid damaging the gold plating.
Wipe the device with a soft cloth dampened with a 10% bleach / 90% water solution (household bleach
[containing less than 10% sodium hypochlorite]). Do not use undiluted bleach or any cleaning agent other than
those recommended here, as permanent damage could result.
Unplug the probe from the pulse oximeter before cleaning. To clean the probe, wipe all patient contact
surfaces with a soft cloth dampened with a mild detergent, isopropyl alcohol, or a 10% bleach / 90% water
solution (household bleach [containing less than 10% sodium hypochlorite]).
Do not sterilise in an autoclave or immerse the sensor in liquid of any kind. Do not pour or spray any liquids
onto the sensor. Do not use caustic or abrasive cleaning agents on the sensor. Do not use cleaning agents
containing ammonium chloride. Use of these chemicals may shorten the life of the product.
39
Page 40

Score a recording
40
Page 41
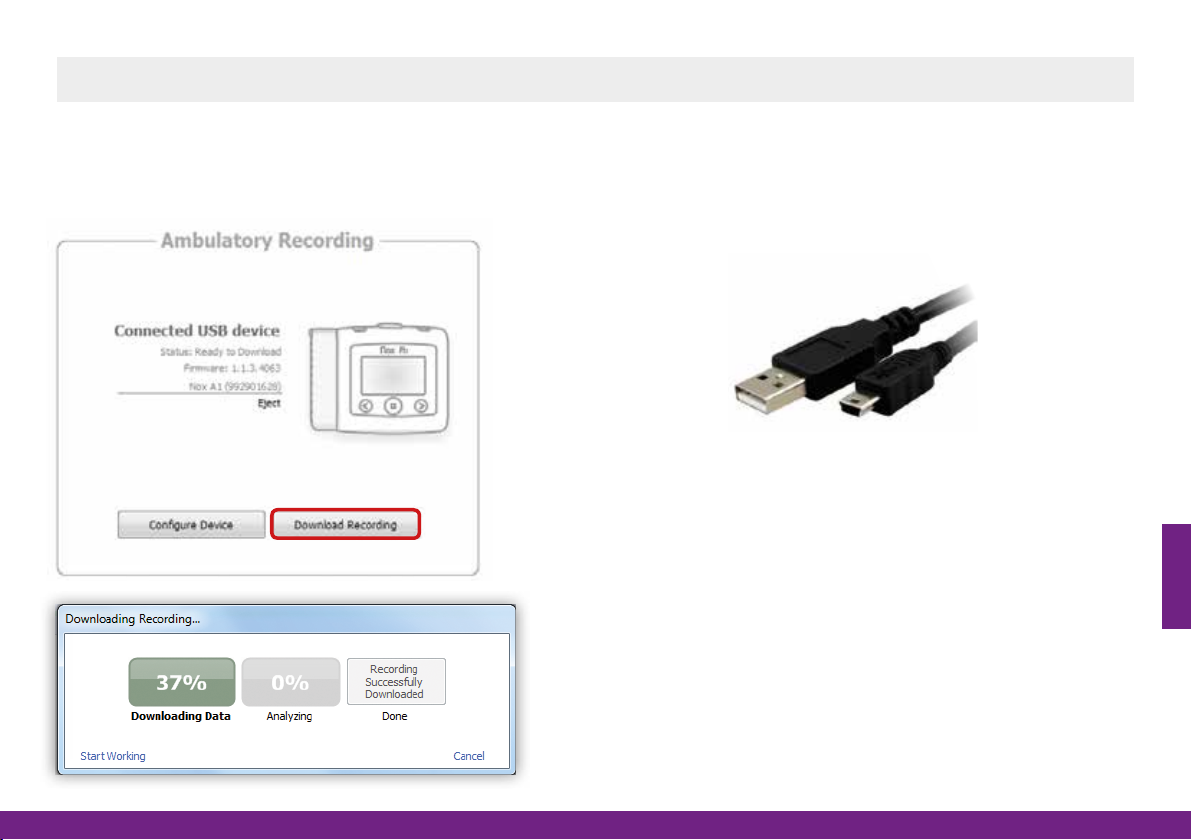
Download data
Download a recording
•
Connect the device to the computer using the USB cable and click on Download Recording.
Noxturnal automatically starts downloading and analysing data.
Download and analysis progress is displayed.
The process should take about 10 minutes.
41
Page 42

Analyse data
Results page
•
The recording results page is arranged as follows:
1
4
2
6
3
5
Patient information
1
Sleep stages
2
Severity indicator
3
Signals and events
4
overview
Analysis statistics
5
Commands
6
42
Page 43

Analyse data
Change patient information
•
Click on Edit or on the patient icon
to complete or modify patient information.
43
Page 44

Analyse data
Define start and end of analysis
•
Move the markers highlighted below to manually define the start and end of the analysis.
Recording statistics on the right side are automatically adjusted after every modification.
You will find the same markers on every signal sheet.
44
Page 45

Analyse data
Exclude part of the recording
•
Click and drag your mouse in the Periods area below and select Score Invalid Data.
To delete an invalid data period, click on the red hatched area and click on Delete period.
45
Page 46

Analyse data
Check signal quality
•
Check the quality of recorded signals by running the mouse over the Quality icon.
If the signal quality is poor, the validity of the overall
recording should be questioned.
Click on View Signals to start scoring.
SpO2 Quality
Please note that if problematic areas of the study are
excluded the signal quality will increase and study will
be considerably improved.
On the right side of the page, the “Signal quality”
percentage shows the lowest quality rating obtained
across all 4 signals.
Airflow Quality Abdomen Quality Thorax Quality
Signal Quality
46
Page 47

Analyse data
Configure your workspace: select and arrange signals
•
Click on the Signals & Data tab on the right side of your screen and select the signals to display.
Check the boxes of the signals
you want to display.
To move signals in the workspace, click on them when the
mouse is shaped like a hand and drag them up and down.
47
Page 48

Analyse data
Configure your workspace: create a workspace layout
•
Click on
and select New Workspace Layout to create a personalised layout.
Enter a name and click on OK.
Your new workspace layout
is now in the drop down list.
You can load it, modify it
and save the changes using
the menu.
48
Page 49

Analyse data
Score events
•
To score an event, click and drag over the zone of interest and type the
st
1
letter of the event:
To delete or modify an event, use one of the following methods:
- Click on the event and press the Delete key
- Hold the Alt key and click on the event
- Right click on the event and select the intended option
To score sleep stages, click on the automatically scored stage and use the numeric
keypad to confirm or change it.
Keyboard
shortcut
O Obstructive apnea
C Central apnea
M Mixed apnea
H Hypopnea
D Desaturation
Event
0 Wake
1
2
3
5
N1
N2
N3
REM
49
Page 50

Analyse data
Use filters and reading scale
•
Signals High-pass filter Low-pass filter Usual reading scale
EEG (C3, C4, F3, F4, O1, O2, M1 and M2) 0.3 Hz 35 Hz 70 μv/cm
EOG (E1 and E2) 0.3 Hz 35 Hz 100 μv/cm
EMG (Chin 1-F and 1-2, left/right leg) 10 Hz 100 Hz 100 μv/cm
EKG 0.3 Hz 70 Hz Automatic
Right click on the ExG signal and choose the corresponding filter in the menu Filter > Filter presets.
You can manually adjust filter values in the menu Filter out frequencies below/above.
50
Page 51

Generate a report
Add a screenshot
•
To take a screenshot of a recording, click on the Bookmark tab at the bottom left of your screen.
Click on Add bookmark, enter a description of the screenshot and click on OK.
If you don’t want this screenshot to appear in the report, uncheck
the corresponding box or delete the bookmark.
51
Page 52

Generate a report
• Write an interpretation and generate a report
Click on the patient icon
Once your interpretation is written, click on OK at the bottom right to confirm.
Then go to the Report menu and select the appropriate report.
and then on Interpretation Notes to access the writing window.
52
Page 53

Open an existing recording
Click on Library to access existing recordings.
Use the Search for… field to find your patients more quickly.
53
Page 54

Troubleshooting
54
Page 55

Troubleshooting
• For any issue not listed below, please contact your ResMed representative.
All impedances are black
Solution 1 Conduct an impedance test and wait for a few seconds
Solution 2 Check the M1, M2 electrode sites and the conductive paste of the reference ground electrode on the patient’s forehead
There is no SpO
Solution 1 Check that the BDA number is the same as the one on the back of your Nonin 3150 oximeter
Solution 2 Press the grey activation button on the left top of the oximeter for two seconds
I can’t connect to the Nox A1
Solution 1 Remove and re-insert again the battery into the Nox A1 and try again
EEG signals appear to be erroneous
Solution 1 Check the signal impedance. If they are red or black, check the placement of the electrodes
Solution 2 Check that the software filters are ON (right click on the signal > Filter > Filter presets)
My patient’s details do not appear in the library
Solution 1 Right click on My Recordings and select Check for new Recordings
Solution 2 Right click on My Recordings and select Rescan Location
signal on the screen
2
55
Page 56

Troubleshooting: Reset a Nox A1
If you are experiencing issues, follow the procedure below to reset a Nox A1:
1. Plug the USB cable into the computer.
2. Open the battery door of the Nox A1.
3. Push and hold the central and right buttons simultaneoustly.
4. Plug the mini USB cable into the device.
5. Make sure that the word Erasing is displayed on the screen of the Nox A1.
56
Page 57

Troubleshooting: Reset a Nonin 3150 WristOx2 oximeter
If the Nonin 3150 WristOx2 oximeter does not perform as expected, it is recommended that you follow the reset process described
below:
1. Remove the two batteries and disconnect the probe from the oximeter.
2. Wait for 1 minute and reinsert the batteries.
3. Press and hold down the grey activation button for 3 seconds until the screen turns on.
4. Reconnect the probe.
5. The device is now reset.
57
Page 58

Noxturnal toolbar
Button Description
Open the menu to add new sheets and to personalise your workspace layout
Create a new workspace
Open a recording
Undo the last action
Open the recording properties
Change the time interval of your window
Automatically adjust the size of signals to fit into the window
Automatically adjust the scale of each signal
Open the advanced menu of the sheet
Activate audio playback of the recording
Open scoring menu
Activate single click scoring
Show or hide the top pane
Show or hide the bottom pane
Search for a signal or an event
Go back to the previous result
Go to the next result
Open Noxturnal user guide
58
Page 59

Consumables and accessories
59
Page 60

Consumables and accessories
Consumables kits
7072596 Nox RIP Belts and Cannula Kit (Abdomen cable, Nasal cannulas x80, RIP Belts: Sx20 -Mx40 -Lx20)
7072597 Nox RIP Belts and Cannula Kit (Abdomen cable, Nasal cannulas x80, RIP Belts Mx80)
Nasal cannulas and airflow sensors
7072074 Nox Cannula with filter - x40 - Adult
7075340 Paediatric Nasal Pressure Monitoring Cannula - 60 cm - x50
7072097 Nox Filter Tube Connector - x50
7072096 Nox Cannula with luer-lock - x50 - Adult
7073860 Reusable thermistor for adult
Disposable effort belts
7072086 Nox RIP Belts Disposable - x20 - Pediatric
7072077 Nox RIP Belts Disposable - x20 - S
7072078 Nox RIP Belts Disposable - x20 - M
7072079 Nox RIP Belts Disposable - x20 - L
7073504 Nox RIP Belts Disposable - x14 - XL
Disposable adhesive electrodes
631526 Single-use snap-on electrodes Ambu BlueSensor N - 44.8x22 mm - EMG/PLM - x25
7075209 Single -use snap- on electrodes Ambu BlueSensor R - 57x48 mm - EKG - x25
7073775 Single- use electrodes 15 mm connector Ambu Neuroline 715 - 22x30 mm - EMG - x12
Paste and cream for electrode placement
70 73511 NuPrep EKG & EEG abrasive gel - 3 tubes
7073512 Ten20 Conductive EEG paste - 3 pots
7073513 EC2 electrode cream - 10 tubes
60
Page 61

Consumables and accessories
Cables and SpO2 sensors
7073514 EEG Head Cable - Adult
707 3441 EEG 5 Lead Gold Electrode Cable
7072172 Snap- on double lead - 100 cm - Orange - EKG
7073438 Snap-on double lead - 150 cm - Grey - PLM
7073439 Snap-on double lead - 150 cm - Black - PLM
7072161 Soft sensor for Nonin WristOx2 - Small
7072162 Sof t sensor for Nonin WristOx2 - Medium
7072163 Soft sensor for Nonin WristOx2 - Large
Titration option
7073482 Nox Differential Pressure Sensor Kit
7073740 Pneumoflow Sensor
707 3741 Differential Pressure Connector Cable - 2 m
7073745 Nox A1 Adaptor Cable for Differential Pressure - 30 cm
7073743 Flow Straight Connector (transparent part)
7073744 Flow Straight Adapter (green part)
7073746 PT1 Hydrophobic Filters - x5 0
7072092 Mask Tubing - 180 cm
Spare parts
7072588 Batter y Lid
7075307 Nox Clips - x2
7073323 Nonin 3150 Wrist Band
7072098 Nox abdomen cable
7073972 Nonin 3150 Enclosure battery door
7073515 Bat tery lid key
61
Page 62

For more information,
please refer to the Nox A1 user manual.
ResMed diagnostics support service: diag.support.eu@ResMed.com
DISTRIBUTED BY: See ResMed.com for ResMed locations worldwide. AirSense, AirCurve and S9 are trademarks and / or registered trademarks of the ResMed family of companies. Nox and SenTec products are distributed by ResMed.
For information about the manufacturers of Nox and SenTec devices, please contact ResMed, authorised distributor. Product availability may vary across regions. Specifications may change without notice. © 2017 ResMed Ltd. 708108/3 2018-07
ResMed.com/NoxA1
62
 Loading...