

Page 1

Ultra Mirage™
608138
NON-VENTED FULL FACE MASK
Clinical Guide
English •Deutsch •Français •Italiano
•
Español
Português •Nederlands
608138/3
07 04
Ultra Mirage NVFFM
CLINICAL
EUR 1
Global leaders in sleep and respiratory medicine www.resmed.com
Page 2
ResMed Ltd (Manufacturer) 1 Elizabeth Macarthur Drive Bella Vista NSW 2153 Australia
ResMed Corp (US Designated Agent) 14040 Danielson Street Poway CA 92064-6857 USA
ResMed (UK) Ltd (EU Authorized Representative) 65 Milton Park Abingdon Oxfordshire OX14 4RX UK
ResMed Offices Australia, Austria, Brazil, Finland, France, Germany, Hong Kong, Japan, Malaysia, Netherlands,
New Zealand, Norway, Singapore, Spain, Sweden, Switzerland, UK, USA (see www.resmed.com for contact
details).
Ultra Mirage Non-vented Full Face Mask
Protected by patents: AU 710733, AU 741003, AU 766623, AU 775051, CA 2261790, DE 29724224, EP 0956069,
EP 1187647, EP 1187650, EP 1479406, JP 3686609, NZ 513052, NZ 526165, NZ 526166, NZ 526168, US 6112746,
US 6119693 , US 6357441, US 6374826, US 6463931, US 6513526, US 6532961, US 6581602, US 6634358,
US 6701927, US 6860269, US 6871649, US 7069933. Other patents pending.
Protected by design registrations: AU 157902, AU 302719, CN 200330102703.8, CN 200330102704.2, EP 098348, JP
1212687, JP 1214582, US D493885, US D519207. Others pending.
Ultra Mirage and Mirage are trademarks of ResMed Ltd and Mirage is registered in U.S. Patent and Trademark
Office.
CIDEX and STERRAD are trademarks of Johnson & Johnson. Alconox is a trademark of Alconox Inc. Neodisher
Medizyme is a trademark of Chemische Fabrik Dr Weigert. Aniosyme and Anioxyde are trademarks of Laboratoires
Anios.
© 2007 ResMed Ltd.
Page 3
A
© 200
7 ResMed Ltd.
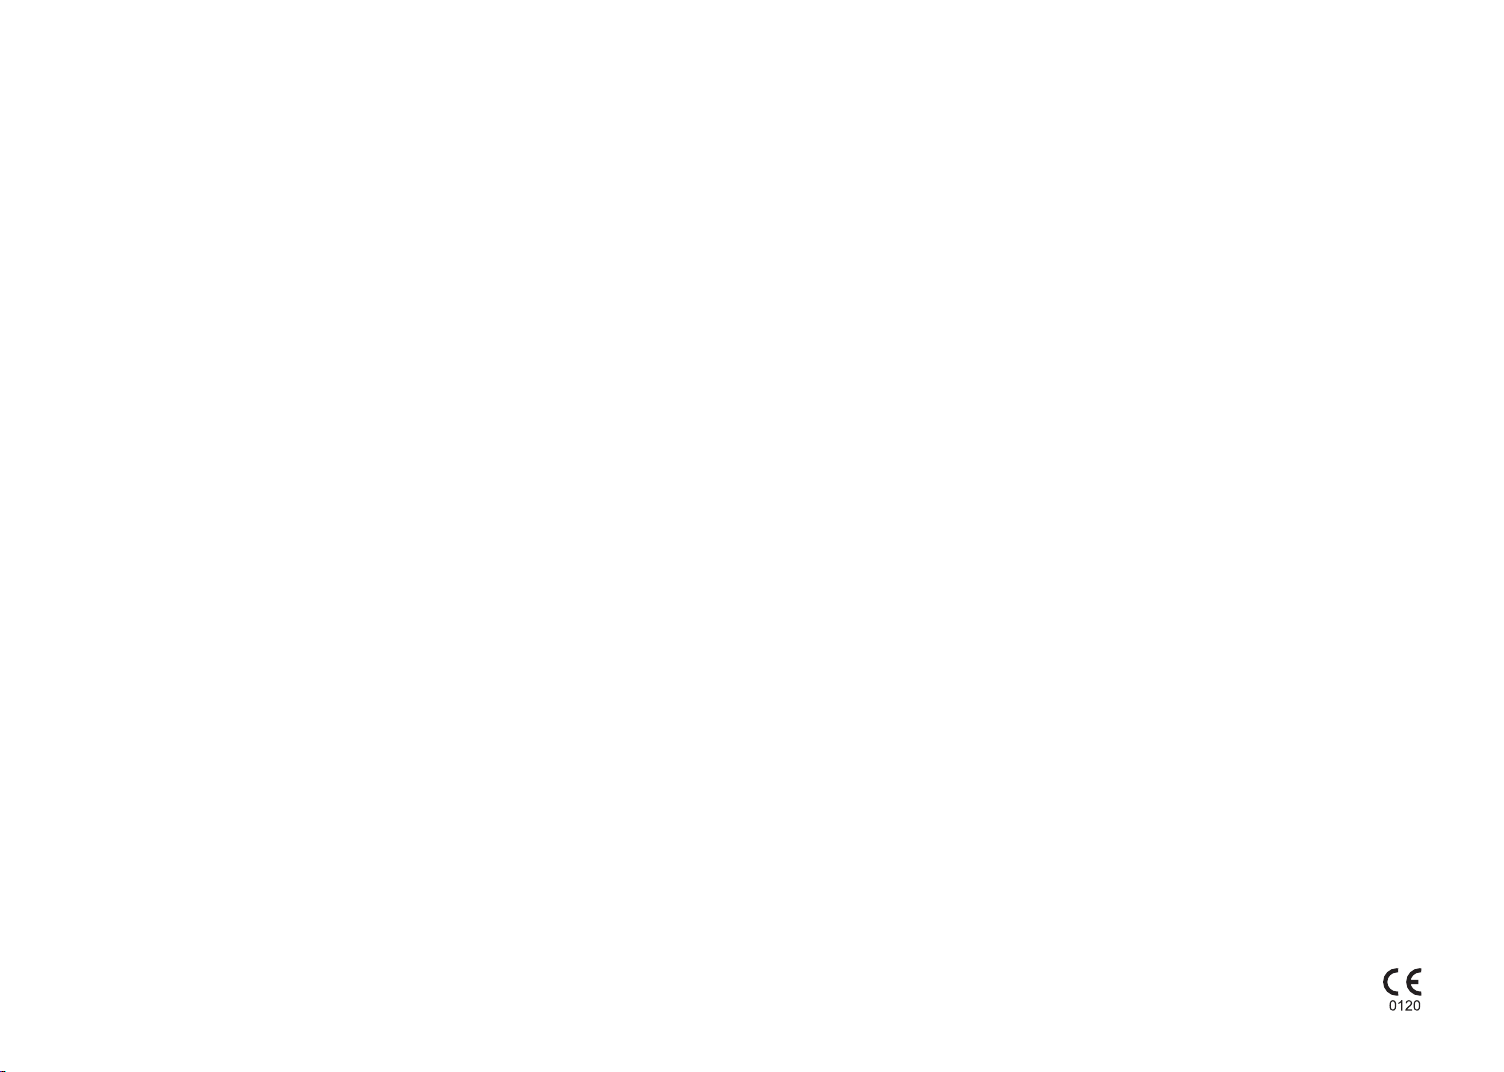
Mask Parts / Teile der Maske / Composants du masque / Parti della
maschera / Piezas de la mascarilla / Peças da máscara /
Maskeronderdelen
Forehead support / Stirnbauteil / Support
frontal / Supporto frontale / Apoyo para la
frente / Suporte da testa / Voorhoofdsteun
Luer lock ports cap /
Anschlusskappen für
Luer-Verbindungsstück / Bouchon(s)
d'entrée de raccord Luer / Tappi porte
con connessione Luer / Tapas de
puerto Luer lock / Tampas das portas
com fecho do tipo Luer /
Poortkap(pen) met luer-vergrendeling
Forehead support pad / Stirnpolster / Tampon du support frontal /
Imbottitura del supporto frontale / Almohadilla del apoyo para la
frente / Almofada do suporte da testa / Kussentje van
voorhoofdsteun
Mask frame / Maskenhalter /
Entourage rigide / Telaio della
maschera / Armazón de la
mascarilla / Armação da máscara /
Maskerframe
Cushion clip / Clip des
Maskeneinsatzes / Clip de
la bulle / Fermaglio del
cuscinetto / Traba de la
almohadilla / Dispositivo de
fixação da almofada / Klem
voor kussentje
Mask cushion / Maskeneinsatz /
Bulle du masque / Cuscinetto della
maschera / Almohadilla de la mascarilla /
Almofada da máscara / Maskerkussentje
Upper Velcro
™
straps / Die oberen
Velcro-Bänder / Bandes Velcro
supérieures / Cinghie laterali
superiori (Velcro) / Correas laterales
superiores (Velcro) / Correias Velcro
laterais superiores / Bovenste Velcro
klittenbandbevestiging
Headgear clip /
Kopfbandclip / Clip du
harnais / Fermaglio del
copricapo / Broche del
arnés / Dispositivo de
fixação do arnês para a
cabeça / Hoofdbandklem
Lower Velcro straps / Die unteren
Velcro-Bänder / Bandes Velcro inférieures /
Cinghie laterali inferiori (Velcro) / Correas
laterales inferiores (Velcro) / Correias Velcro
laterais inferiores / Onderste Velcro
klittenbandbevestiging
Elbow / Kniestück / Coude /
Gomito / Codo / Cotovelo / Bocht
Elbow retainer / Kniestückhalter / Anneau
de retenue du coude / Fermo del gomito /
Retenedor del codo / Retentor do cotovelo /
Bochthouder
B
B-1 B-2
B-3 B-4
B-5 B-6
©
2007 ResMed Lt
d.
1
3
4
2
Forehead support tab / Stirnbauteillasche /
languette du support frontal / Linguetta del
supporto frontale / Lengüeta del apoyo para la
frente / Dispositivo de fixação do suporte da
testa / Tab van de voorhoofdsteun
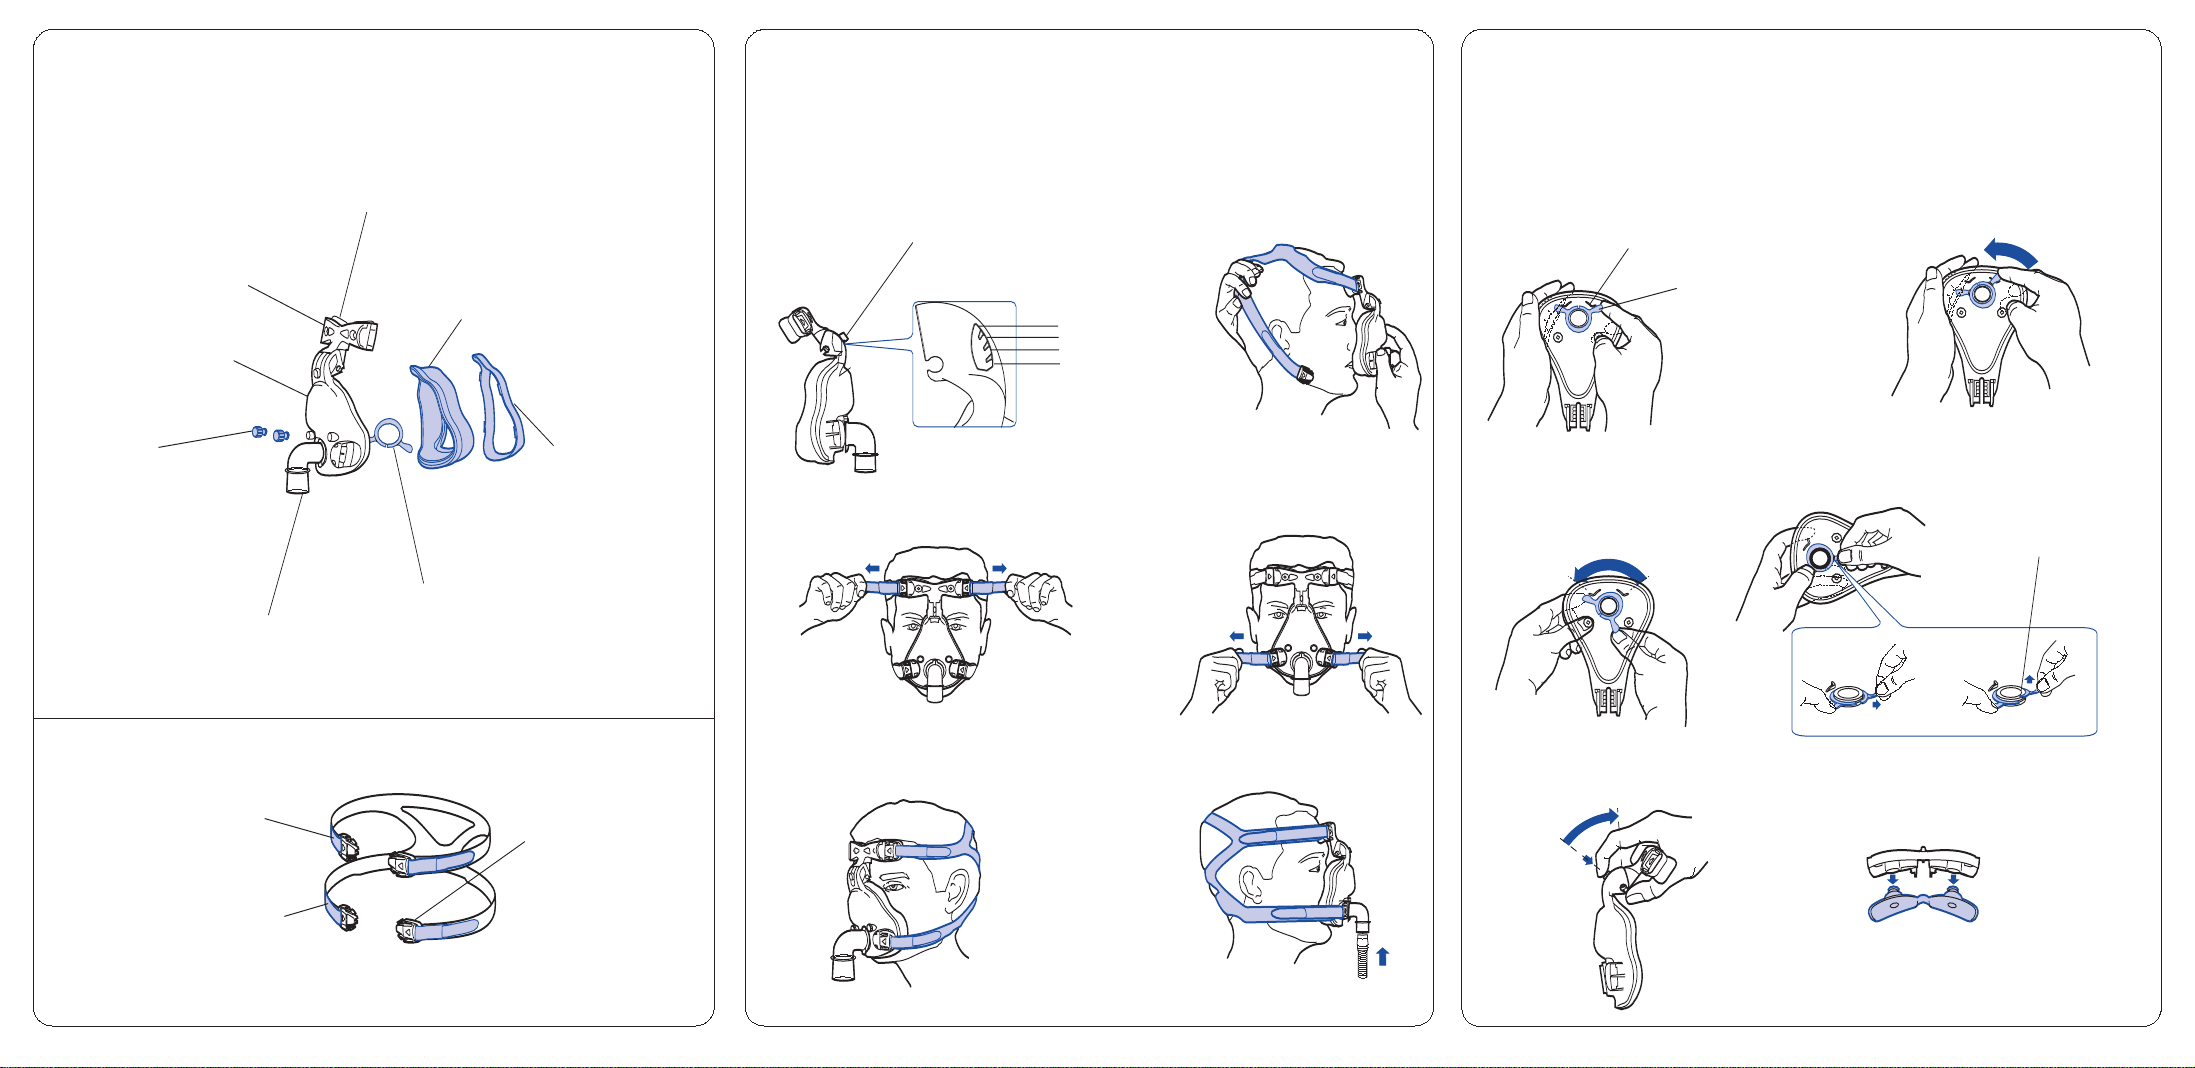
Fitting the Mask / Anlegen der Maske / Mise en place du masque /
Come indossare la maschera / Colocación de la mascarilla / Colocação
da máscara / Het masker opzetten
C-2
C-3
C-4
C-6
C
C-1
L-shaped ridge / L-förmige Leiste / Bord en L /
Costa sinistra a L / Borde en forma de L / Saliência
em forma de L / L-vormige rand
LIFT / HEBEN /
SOULEVER /
SOLLEVARE /
LEVANTE / LEVANTE /
OMHOOGDOEN
Elbow retainer / Kniestückhalter /
Anneau de retenue du coude /
Fermo del gomito / Retenedor del
codo / Retentor do cotovelo /
Bochthouder
PUSH / DRÜCKEN / POUSSER /
SPINGERE / EMPUJE /
EMPURRE / DUWEN
a
b
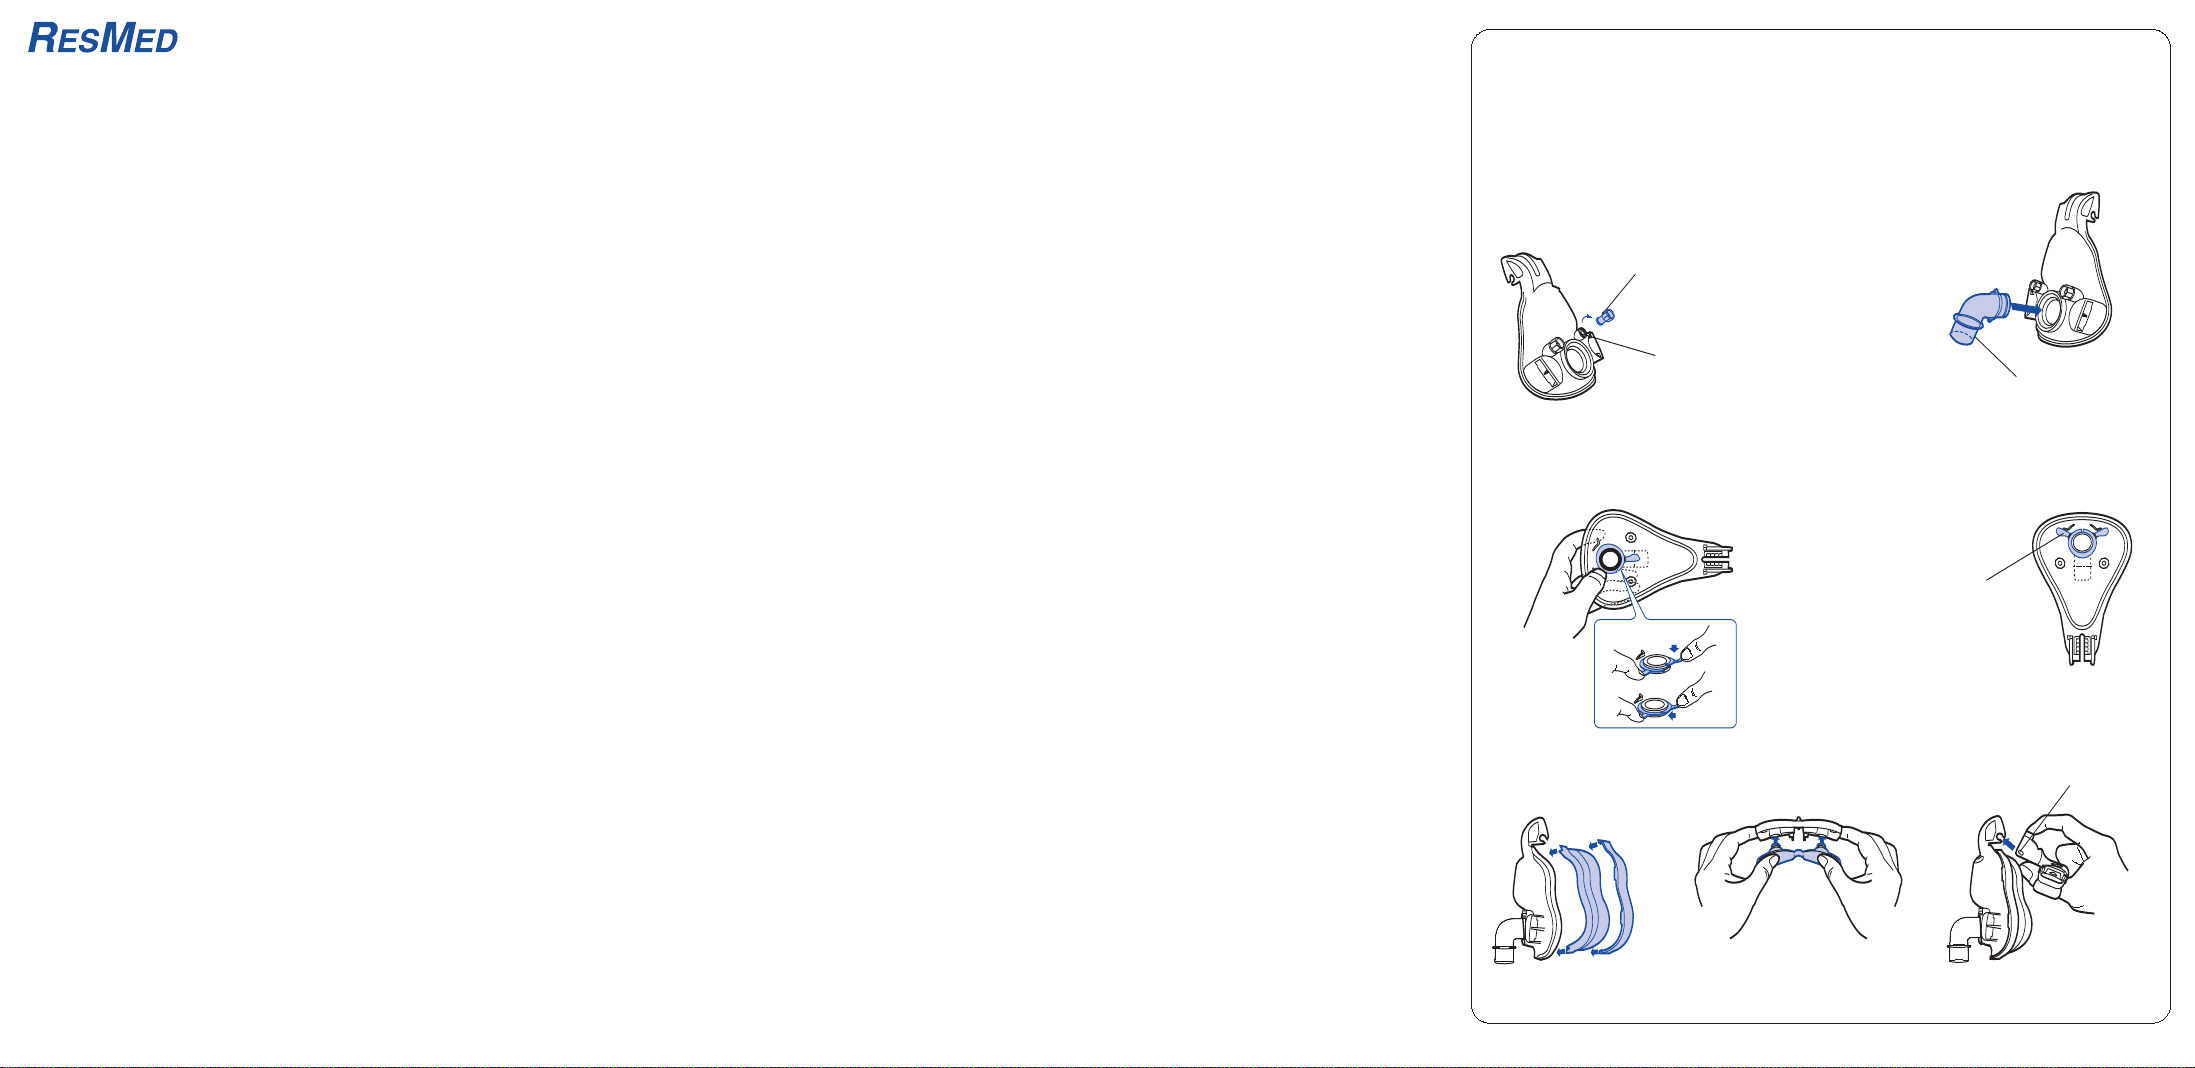
Disassembling for Cleaning / Demontage zu Reinigungszwecken /
Démontage pour le nettoyage / Smontaggio per la pulizia /
Desmontaje para la limpieza / Desmontagem para limpeza /
Demontage voor reiniging
©
2007 ResMed Lt
d.
C-5
b
a
Page 4
Note: For complete instructions, read the text section in conjunction with the illustrations on
this sheet.
Hinweis: Vollständige Anweisungen finden Sie im Textabschnitt und in den Illustrationen auf
diesem Blatt.
Remarque : pour les instructions complètes, veuillez lire le texte du guide avec cette fiche
d'illustrations.
Nota: Per istruzioni complete, leggere la sezione con il testo insieme alle illustrazioni su questo
foglio.
Nota: Para tener instrucciones completas, lea el texto en conjunto con las figuras de esta hoja.
Nota: Para obter as instruções completas, leia a secção de texto em conjunção com as
ilustrações deste folheto.
Opm.: Raadpleeg voor een volledige beschrijving het tekstgedeelte en de bijbehorende
illustraties op dit blad.
Illustrations Sheet / Illustrationsblatt / Fiche d'Illustrations / Fogolio delle Illustrazioni /
Hoja de Figuras / Folheto de Ilustrações / Illustratieblad
Ultra MirageTM
NON-VENTED FULL FACE MASK
Component of: 608138/3
D-1
D-6
D-3
a
b
D-5
D-2
D-4
D
D-7
©
2007 ResMed Lt
d.
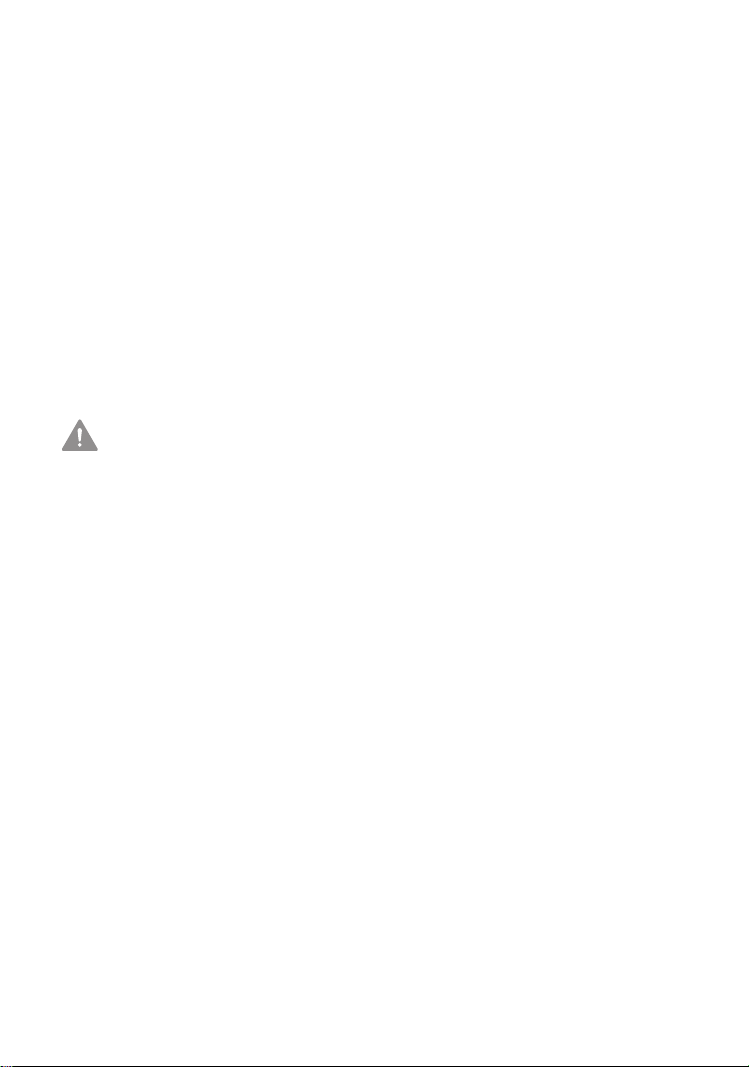
Reassembling the Mask / Wiederzusammenbau der Maske /
Remontage du masque / Riassemblaggio della maschera / Montaje de
la mascarilla / Montagem da máscara / Het masker opnieuw monteren
Luer lock ports cap /
Anschlusskappen für
Luer-Verbindungsstück / Bouchon(s)
d'entrée de raccord Luer / Tappi porte
con connessione Luer / Tapas de puerto
Luer lock / Tampas das portas com
fecho do tipo Luer / Poortkap(pen) met
luer-vergrendeling
Mask port / Anschlussöffnung /
Port(s) du masque / Porta della
maschera / Puerto(s) de la mascarilla /
Orifício da máscara / Masterpoort(en)
Elbow / Kniestück / Coude /
Gomito / Codo / Cotovelo /
Bocht
Elbow retainer / Kniestückhalter /
Anneau de retenue du coude /
Fermo del gomito / Retenedor del
codo / Retentor do cotovelo /
Bochthouder
Pivot / Zapfen / Pivot /
Perno / Pivote / Pino /
Scharnier
Page 5

Ultra Mirage™
NON-VENTED FULL FACE MASK
The Ultra Mirage NV (non-vented) Full Face Mask is a non-invasive device used
for channelling air flow with or without supplemental oxygen.
Intended Use
The Ultra Mirage NV Full Face Mask is intended to be used with active-exhaustvalve ventilator systems, to provide ventilatory assistance to patients with
respiratory insufficiency and respiratory failure.
The Ultra Mirage NV Full Face Mask is to be used on adult patients (>30 kg),
requiring non-life-support ventilatory assistance.
The Ultra Mirage NV Full Face Mask is intended for single-patient re-use in the
home or multipatient re-use in the hospital/institutional environment.
. WARNINGS AND CAUTIONS
• The Ultra Mirage NV Full Face Mask, must not be used without qualified
supervision for patients who are unable to remove the mask by themselves.
• This mask is not for use on patients with impaired laryngeal reflexes or other
conditions predisposing to aspiration in the event of regurgitation or
vomiting.
• The mask should not be worn unless the ventilator system is turned on and
operating properly.
• At a fixed rate of supplemental oxygen flow (if used), the inhaled oxygen
concentration will vary depending on the pressure settings, patient
breathing pattern, mask size selection and the mask leak.
• If oxygen is used with the ventilator, the oxygen flow must be turned off
when the ventilator is not operating.
Explanation: When the ventilator is not in operation, and the oxygen flow
is left on, oxygen delivered into the ventilator tubing may accumulate within
English
1
Page 6
the ventilator enclosure. Oxygen accumulated in the ventilator enclosure
will create a risk of fire. This warning applies to most types of ventilators.
• Please refrain from smoking while oxygen is in use.
About the Mask
• The mask system does not contain latex, PVC or DEHP materials. If the
patient has ANY reaction to any part of the mask system, discontinue use
and investigate the possible causes.
• ResMed has tinted the Ultra Mirage NV Full Face Mask elbow blue to
identify it as a non-vented mask for use with active exhaust non-invasive
ventilator systems only.
• The mask has a standard female 22 mm tapered fitting (ISO5356-1) for
external connection to the ventilator.
• Refer to the section “Technical Specifications” of this guide for information
about mask leak, dead space and resistance.
CAUTION
The mask must be cleaned and disinfected/sterilized if it is used between
patients. Refer to the section “Cleaning the Mask between Patients” for
details.
Parts of the Mask
See section A on the illustrations sheet.
Fitting the Mask
Note: Refer to the relevant ventilator system operating instructions for detailed
information about connecting the mask.
See section B on the illustrations sheet.
The Ultra Mirage NV Full Face Mask is supplied fully assembled.
1 Move the forehead support tab to Position 3. (Refer illustration B-1 for
location of Positon 3.)
2 Disconnect one lower headgear clip. Place the mask on the face and pull the
headgear over the patient’s head (B-2). Ensure that the upper straps pass
across the forehead and the lower straps below the ears.
3 Reattach the headgear clip to the mask frame.
4 Gently tighten the upper headgear straps (B-3).
5 Gently tighten the lower headgear straps (B-4).
2
Page 7

The pads of the forehead support should sit comfortably on the forehead
when the mask is in place. If the pads are at an angle and not completely
seated on the forehead, change the position of the forehead support tab.
Note: Do not overtighten the headgear straps as this may cause discomfort,
cushion creases and mask leak. The Ultra Mirage NV Full Face Mask has
been designed to provide a comfortable seal without the need to
overtighten the headgear.
6 The fitted mask should look like this (B-5).
7 Connect the main air tubing to the elbow (B-6). Then connect the free end
of the air tubing to the ventilator and turn the ventilator on. If the patient
experiences air leaks around the cushion, it may be necessary to gently
tighten the headgear straps.
8 If the patient is unable to get a proper seal:
• reposition the mask by lifting it and placing the cushion comfortably on
the face.
• adjust the position of the forehead support tab by testing all four
positions and finding the one that best prevents leaks.
• gently tighten the headgear straps.
Notes:
• If it is not possible to resolve any leaks, your patient may require another
mask frame and/or another cushion size.
• As with all mask ventilation systems, significant leak may occur between
the mask and the patient's face. The leak may vary depending on such
factors as the patient's position and sleep stage. Variation in leak may
significantly affect patient ventilation, potentially producing profound
hypoventilation or hyperventilation. The magnitude of this effect depends on
the ventilator's ability to compensate for leak.
• Leak or variation in the leak may cause mistriggering of the ventilator.
English
Removing the Mask
To remove the Ultra Mirage NV Full Face Mask, disconnect one of the lower
headgear clips and pull the mask and headgear up over the patient’s head.
Note: The headgear clips are easy to locate and disconnect. They allow the
quick removal of the mask from the face in the event of an emergency.
3
Page 8

Disassembling for Cleaning
See section C on the illustrations sheet.
1 Detach the mask from the air tubing.
2 Disconnect the headgear clips to release them from the mask frame. It is
not necessary to remove the headgear clips from the headgear.
3 Remove the ports caps from the mask frame.
4 Detach the cushion assembly from the mask frame by depressing the
cushion clip at the base of the mask frame and gently pulling it off. This
releases the cushion and cushion clip.
Then, separate the cushion from the cushion clip.
5 To detach the elbow from the frame, lift (C-1) and push (C-2) the right wing
of the elbow retainer over the right L-shaped ridge on the mask frame.
6 Rotate the elbow retainer to the position shown in C-3. The elbow retainer
is now in the correct position for removal.
7 To remove the elbow retainer, hold one wing of the elbow retainer down,
and firmly pull the other wing out (C-4a) and then up (C-4b) over the top of
the elbow. Remove the elbow retainer and elbow from the mask frame.
8 To remove the forehead support from the mask, press the tab (C-5a) and
move it upwards until it is possible to slide it off the mask frame (C-5b).
9 Pull firmly at the base of the forehead support pad plugs to release the pads
from the forehead support (C-6).
Cleaning the Mask in the Home
Notes:
• Wash your hands before cleaning the mask.
• It is important to always handwash the headgear.
• The headgear may be washed without being disassembled from the
headgear clips.
Daily/After each use
Handwash the mask components in warm (approx 30ºC) water for one minute
using mild soap or detergent. Rinse the components well with drinking quality
water and allow them to air dry out of direct sunlight.
Weekly
Handwash the headgear in warm (approx. 30ºC) water using mild soap or
detergent. Rinse well and allow to air dry out of direct sunlight.
4
Page 9
CAUTION
• Do not use bleach, chlorine, alcohol, or aromatic-based solutions,
moisturizing or antibacterial soaps, or scented oils to clean any of the mask
components. These solutions may cause damage and reduce the life of the
product.
• Do not expose any part of the mask system or tubing to direct sunlight as it
may cause the product to deteriorate.
• The headgear is sensitive to heat and must not be ironed.
• If any visible deterioration of a mask component is apparent (cracking,
crazing, tears, etc), the mask component should be discarded and replaced.
Cleaning the Mask between Patients
All mask components can be disinfected/sterilized using validated procedures.
The following table presents a summary of the validated procedures for
disinfection/sterilization of the system. Refer to the website
www.resmed.com/masks/sterilization for details.
Methods Pre-disinfection/
Chemical Detergent
Thermal Detergent
STERRAD
Notes:
• Testing by ResMed has shown that the components can withstand 15 cycles of
disinfection/sterilization for the methods listed in the table.
• When using detergents, disinfectants or sterilization agents, always follow the
manufacturer’s instructions.
sterilization
eg, Aniosyme
Alconox
eg, Neodisher
or Alconox
™
Detergent
eg, Alconox
™
™
DDI or
™
Medizyme
To clean the headgear between patients use the method described in the
previous section “Cleaning the Mask in the Home”.
Disinfection/Sterilization
Solution (any one)
• Peracetic acid 0.15% (eg, Anioxyde
• Ortho-phthalaldehyde 0.55% (eg, CIDEX
• Glutaraldehyde 3.4% (eg, CIDEX Plus
Temperature-time (any one)
• 70°C for 100 minutes
• 75°C for 30 minutes
• 80°C for 10 minutes
• 90°C for 1 minute
• 93°C for 10 minutes
System
STERRAD Sterilization System
™
1000)
™
™
OPA)
)
English
5
Page 10

Reassembling the Mask
See section D on the illustrations sheet.
1 Twist the luer lock port caps onto the mask ports (D-1).
2 Hold the mask frame and the elbow firmly together (D-2).
3 To attach the elbow retainer, fit one side of the elbow retainer against the
groove of the elbow. While holding one wing of the elbow retainer down
(D-3a), press the other wing down until the elbow retainer clicks into place
(D-3b).
4 Rotate the elbow retainer to its original position (D-4).
5 Check that you have fitted the elbow and elbow retainer correctly by firmly
pulling the elbow away from the frame. If the elbow is fitted correctly, it
should not separate from the frame.
If the elbow comes away from the frame, try refitting the elbow retainer as
described in Steps 3 and 4. If the elbow still comes away from the frame
when you pull on it, you may need to replace the elbow retainer with a new
one.
6 Fit the grooved edge of the mask cushion to the mask frame. Fit the top
section first, then work your way around the mask, pushing the cushion
onto the frame, ensuring a good seal has been achieved.
Then push the cushion clip over the cushion and onto the mask frame,
ensuring it clicks into place in all locations (D-5).
7 Attach the forehead pads to the forehead support by inserting the pad plugs
into the two holes on the back of the forehead support (D-6). Push the pads
firmly against the forehead support to ensure that the pads fit securely into
the forehead support.
8 Connect the forehead support to the mask frame. Slide the pivots into the
pivot slot on the mask frame (D-7). Depress the forehead support tab and
move it into any of the tab positions.
9 Insert the headgear clips into the slots on the mask frame. The headgear
label should face outward and be near the patient’s neck when fitted.
Disposal
The Ultra Mirage NV Full Face Mask does not contain any hazardous
substances and may be disposed of with your normal household refuse.
6
Page 11

Technical Specifications
When determining ventilator settings, and in particular the tidal volume for
volume cycled ventilators, make appropriate allowances for mask dead space
and leak.
Unintentional Mask Leak
The Unintentional Mask Leak comprises leak between the cushion-frame and
elbow-frame interfaces.
English
Pressure
(cm H2O)
4–20 6
Maximum Leak
(L/min)
Dead Space
Dead space is the empty volume of the mask up to the elbow.
The dead space of the mask varies according to cushion sizes but is less than
260 mL.
Standards
CE designation in accordance with EC directive 93/42/EEC, class IIa.
EN ISO 14971, ISO 5356-1, ISO 594-1, ISO 10993-1 and ISO 13485.
Operating Pressure
0 to 40 cm H2O
Resistance
Drop in pressure measured
at 50 L/min: 0.5 cm H2O
at 100 L/min: 1.5 cm H
O
2
Dimensions
The dimensions of the mask (Medium) are:
H = 200mm, W = 100mm and D = 100mm
7
Page 12
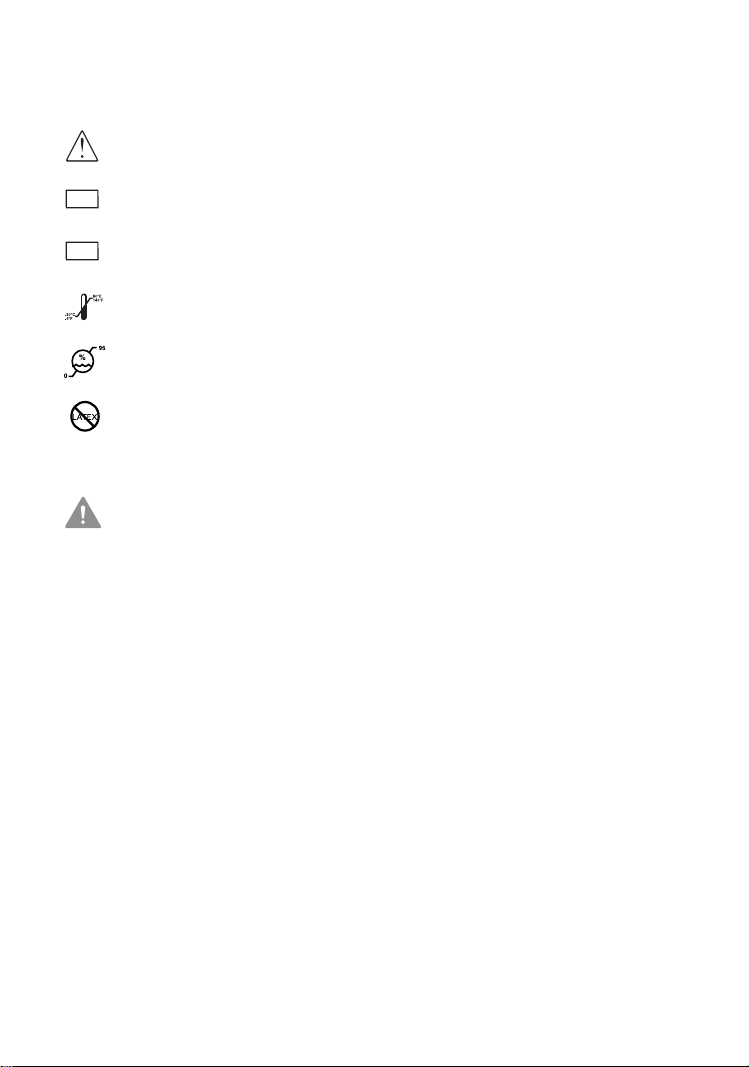
Symbols
System and Packaging
Caution, consult accompanying documents
Lot number
LOT
Part number
REF
Temperature limitation
Humidity limitation
Does not contain latex
Clinical Guide
Indicates a Warning or Caution and alerts you to a possible injury or
explains special measures for the safe and effective use of the device.
Ordering Information
Part No. Item
System
60643 UM NVFFM System Small, Standard – Europe 1
60642 UM NVFFM System Small, Shallow – Europe 1
60645 UM NVFFM System Medium, Standard – Europe 1
60644 UM NVFFM System Medium, Shallow – Europe 1
60647 UM NVFFM System Large, Standard – Europe 1
60646 UM NVFFM System Large, Shallow – Europe 1
Replacement Parts
16604 Cushion, Small, Standard (1 pk.)
16671 Cushion, Small, Shallow (1 pk.)
16605 Cushion, Medium, Standard (1 pk.)
16672 Cushion, Medium, Shallow (1 pk.)
16606 Cushion, Large, Standard (1 pk.)
16673 Cushion, Large, Shallow (1 pk.)
8
Page 13

Part No. Item
16674 Cushion clip, Small (1 pk.)
16675 Cushion clip, Medium (1 pk.)
16676 Cushion clip, Large (1 pk.)
60678 Elbow (1 pk.)
60683 Elbow retainer (1 pk.)
60681 Luer lock ports caps (2 pk.)
60682 Luer lock ports caps (10 pk.)
60115 Headgear clip (2 pk.)
60116 Headgear clip (10 pk.)
60123 Forehead pad (1 pk.)
60124 Forehead pad (10 pk.)
60675 Mask Frame, Small (1 pk.)
60676 Mask Frame, Medium (1 pk.)
60677 Mask Frame, Large (1 pk.)
60673 Forehead Support (1 pk.)
60917 Headgear (1 pk.)
Europe 1 - English, German, French, Italian, Spanish, Portuguese, Dutch.
Limited Warranty
ResMed warrants that your ResMed mask system, including its components:
mask frame, cushion, headgear, tubing and other accessories (“Product”) shall
be free from defects in material and workmanship for a period of ninety (90)
days from the date of purchase by the initial consumer.
For further details refer to the Warranty.
English
Note: Translations are based on the English version in this guide. However, there may be
minor variations based on the disinfection/sterilization procedures applicable in some
countries. ResMed has reviewed these changes and all procedures included here have been
validated.
9
Page 14

10
Page 15
Ultra Mirage™
FULL FACE MASKE NON-VENTED
Die Ultra Mirage NV (ohne Luftauslassöffnungen) Full Face Maske ist eine
nicht-invasive Maske, mit der dem Patienten ein Luftfluss mit oder ohne
zusätzlichen Sauerstoff zugeführt werden kann.
Verwendungszweck
Die Ultra Mirage NV Full Face Maske ist für den Gebrauch mit
Beatmungsgeräten mit aktivem Luftauslassventil ausgelegt und stellt
Patienten mit respiratorischer Insuffizienz oder respiratorischem Versagen
Atemunterstützung bereit.
Die Ultra Mirage NV Full Face Maske ist für erwachsene Patienten vorgesehen
(>30 kg), die Atemunterstützung, aber kein Lebenserhaltungssystem
benötigen.
Die Ultra Mirage NV Full Face Maske sollte zu Hause nur von einem Patienten,
kann aber im Krankenhaus von mehreren Patienten verwendet werden und ist
in beiden Fällen wiederverwendbar.
. WARNUNGEN UND VORSICHTSHINWEISE
• Wird die Ultra Mirage NV Full Face Maske bei Patienten verwendet, die
nicht in der Lage sind, die Maske selbst abzunehmen, ist die Überwachung
durch qualifiziertes Pflegepersonal erforderlich.
• Die Maske sollte ebenfalls nicht bei Patienten verwendet werden, die unter
beeinträchtigten Kehlkopfreflexen oder anderen Zuständen leiden, die bei
Regurgitation oder Erbrechen zur Aspiration prädisponieren.
• Die Maske darf nur verwendet werden, wenn das Beatmungsgerät
eingeschaltet ist und ordnungsgemäß funktioniert.
• Wird eine konstante Menge an zusätzlichem Sauerstoff zugeführt, ist die
Konzentration des eingeatmeten Sauerstoffs je nach Druckeinstellung,
Atemmuster des Patienten, Maskengröße und Maskenleckagen
unterschiedlich.
Deutsch
11
Page 16

•
Wenn dieses System mit Sauerstoff verwendet wird, sollte darauf geachtet
werden, dass die Sauerstoffzufuhr abgeschaltet wird, wenn das Gerät außer
Betrieb ist.
Erläuterung: Wenn die Sauerstoffzufuhr auch dann eingeschaltet ist, wenn
das Gerät außer Betrieb ist, kann sich Sauerstoff, der in die Schläuche des
Atemtherapiegerätes geleitet wurde, im Gehäuse ansammeln und damit
eine Brandgefahr darstellen. Diese Warnung trifft auf die meisten Arten von
Atemtherapiegeräten zu.
• Während der Verwendung von Sauerstoff bitte nicht rauchen.
Die Maske
• Das Maskensystem ist latex-, PVC- und DEHP-frei. Wenn der Patient auf
einen der Maskenbestandteile in IRGENDEINER WEISE allergisch reagiert,
unterbrechen Sie die Behandlung und suchen Sie nach den möglichen
Ursachen.
• Das Kniestück der Ultra Mirage NV Full Face Maske ist blau, um die Maske
einwandfrei als Maske ohne Luftauslassöffnungen auszuweisen, die
ausschließlich mit Beatmungsgeräten mit aktivem Luftauslass für nicht-
invasive Beatmung verwendet werden darf.
• Die Maske ist mit einem weiblichen, 22 mm langen, kegelförmigen
Standardanschlussstück (ISO5356-1) für den externen Anschluss an das
Atemtherapiegerät ausgestattet.
• Informationen über Maskenleckagen, Totraum und Widerstand finden Sie in
diesem Handbuch im Abschnitt „Technische Daten“.
VORSICHT
Zur Vorbereitung auf einen neuen Patienten muss die Maske gereinigt und
desinfiziert/sterilisiert werden. Weitere Informationen dazu finden Sie im
Abschnitt „Reinigung der Maske zur Vorbereitung auf einen neuen Patienten“.
Teile der Maske
Siehe Abschnitt A des Illustrationsblattes.
Anlegen der Maske
Hinweis: Anweisungen zum Anschließen der Maske finden Sie in der
Bedienungsanleitung des jeweils verwendeten Atemtherapiegerätes
(siehe Abschnitt B des Illustrationsblattes).
Die Ultra Mirage NV Full Face Maske wird vollständig zusammengebaut
geliefert.
12
Page 17

1 Schieben Sie die Lasche des Stirnbauteils in Position 3. (Wo sich die Position
3 befindet, sehen Sie in der Abbildung (B-1)
2 Öffnen Sie einen unteren Kopfbandclip. Legen Sie die Maske auf das
Gesicht des Patienten und ziehen Sie das Kopfband über seinen Kopf (B-2).
Achten Sie darauf, dass die oberen Seitenbänder auf der Stirn und die
unteren unter Ihren Ohren sitzen.
3 Schließen Sie den Kopfbandclip wieder am Maskenrahmen an.
4 Ziehen Sie dann die oberen Kopfbänder vorsichtig an (B-3).
5 Ziehen Sie dann die unteren Kopfbänder vorsichtig an (B-4).
Die Maske sitzt richtig, wenn die Stirnpolster Ihre Stirn leicht berühren.
Sitzen die Polster nicht vollständig auf der Stirn, müssen Sie unter
Umständen die Position des Stirnbauteilsteges ändern.
Hinweis: Ziehen Sie die Kopfbänder jedoch nicht zu fest an, da dies zu
Unbehagen, Falten im Maskenkissen und Maskenleckagen führen kann.
Die Ultra Mirage NV Full Face Maske sollte einen angenehmen Sitz bieten,
ohne dass das Kopfband zu fest angezogen werden muss.
6 Eine korrekt angelegte Maske sollte so aussehen (B-5).
7 Schließen Sie den Luftschlauch am Drehadapter an (B-6). Schließen Sie
dann das freie Ende des Luftschlauches an Ihr Beatmungsgerät an, und
schalten Sie das Beatmungsgerät ein. Wenn der Patient einen Luftaustritt
um das Maskenkissen spürt, müssen ggf. die Kopfbänder etwas angezogen
werden.
8 Wenn durch das leichte Anziehen der Kopfbänder kein besserer Sitz erzielt
werden kann, dann:
• muss der Maskensitz korrigiert werden, indem das Maskenkissen
angehoben und bequem auf dem Gesicht platziert wird.
• müssen alle vier Positionen des Stirnbauteilsteges geprüft und die
Position ausgewählt werden, die am besten Maskenleckagen
verhindert.
• müssen die Kopfbänder vorsichtig angezogen werden.
Hinweise:
• Halten die Leckagen auch weiterhin an, benötigt Ihr Patient möglicherweise
einen anderen Maskenrahmen bzw. eine andere Maskenkissengröße.
• Wie bei allen Maskensystemen können zwischen der Maske und dem
Gesicht des Patienten bedeutende Leckagen auftreten. Die Leckagen
können je nach Schlafposition und -stadium unterschiedlich sein. Diese
Variationen können einen großen Einfluss auf die Beatmung des Patienten
haben und möglicherweise sogar starke Hypoventilation oder
Hyperventilation hervorrufen. Das Ausmaß dieser Auswirkungen hängt von
der Fähigkeit des Beatmungsgerätes ab, Leckagen auszugleichen.
Deutsch
13
Page 18

•
Leckagen oder Leckagevariationen können zu Fehlauslösungen des
Atemtherapiegerätes führen.
Abnehmen der Maske
Nehmen Sie die Ultra Mirage NV Full Face Maske ab, indem Sie eines der
unteren Kopfbandclips öffnen und die Maske zusammen mit dem Kopfband
über den Kopf ziehen.
Hinweis: Die Kopfbandclips sind leicht zu finden und lassen sich ganz einfach
öffnen. Sie ermöglichen das schnelle Abnehmen der Maske im Notfall.
Auseinanderbau zu Reinigungszwecken
Siehe Abschnitt C des Illustrationsblattes.
1 Nehmen Sie die Maske vom Luftschlauch ab.
2 Öffnen Sie die Kopfbandclips am Maskenrahmen. Die Kopfbandclips
müssen nicht vom Kopfband abgenommen werden.
3 Nehmen Sie die Anschlusskappen vom Maskenrahmen ab.
4 Nehmen Sie das Maskenkissen vom Maskenrahmen ab, indem Sie den
Maskenkissenclip an der Basis des Maskenrahmens herunterdrücken und
dann vorsichtig abziehen. Dadurch wird das Maskenkissen mit dem
Maskenkissenclip vom Maskenrahmen entriegelt.
Nehmen Sie dann das Maskenkissen vom Maskenkissenclip ab.
5 Um das Kniestück vom Halter abzunehmen, heben Sie (C-1) an und drücken
Sie den rechten Flügel des Kniestückhalters (C-2) über die rechte L-förmige
Leiste am Maskenrahmen.
6 Drehen Sie den Kniestückhalter in die in Abbildung C-3 gezeigte Position.
Nun befindet sich der Kniestückhalter in der richtigen Position, um
abgenommen zu werden.
7 Um den Kniestückhalter abzunehmen, halten Sie einen Flügel des
Kniestückhalters herunter, und ziehen Sie den anderen Flügel kräftig heraus
(C-4a) und dann nach oben (C-4b) über das Kniestück. Nehmen Sie den
Kniestückhalter und das Ventil vom Maskenrahmen ab.
8 Um das Stirnbauteil von der Maske abzunehmen, drücken Sie die Lasche
(C-5a) herunter und nach oben, bis Sie sie vom Maskenrahmen weg
schieben können (C-5b).
9 Ziehen Sie kräftig an dem Stirnpolster bzw. Polsterstöpsel des Stirnbauteils,
um das Stirnpolster vom Stirnbauteil zu lösen (C-6).
14
Page 19

Reinigung der Maske zu Hause
Hinweise:
• Waschen Sie sich vor dem Reinigen der Maske die Hände.
• Das Kopfband darf nur von Hand gewaschen werden.
• Das Kopfband kann gewaschen werden, ohne dass es vorher auseinander
gebaut werden muss.
Täglich/Nach jedem Gebrauch
Waschen Sie die Maskenbestandteile eine Minute lang mit der Hand in
warmer Seifenlauge (ca. 30 °C). Spülen Sie die Maskenteile gut mit
Trinkwasser ab und lassen Sie sie vor direktem Sonnenlicht geschützt an der
Luft trocknen.
Wöchentlich
Waschen Sie das Kopfband mit der Hand in warmer Seifenlauge (ca. 30 °C).
Spülen Sie es gut ab und lassen Sie es vor direktem Sonnenlicht geschützt an
der Luft trocknen.
VORSICHT
• Verwenden Sie für die Reinigung der Maskenbestandteile weder chlor- oder
alkoholhaltige Reinigungsmittel noch feuchtigkeitsspendende oder
antibakterielle Seifen oder Duftöle. Diese Mittel können das Material
beschädigen und somit die Lebensdauer des Produktes verkürzen.
• Alle Teile des Maskensystems bzw. alle Schläuche sollten vor direkter
Sonneneinstrahlung geschützt werden, da diese schädigend für das Produkt
sein kann.
• Das Kopfband ist wärmeempfindlich und darf nicht gebügelt werden.
• Weist eines der Maskenteile sichtbare Verschleißerscheinungen auf (wie
z. B. Brüche oder Risse), sollte dieses Teil entfernt und durch ein neues
ersetzt werden.
Deutsch
Reinigung der Maske zur Vorbereitung auf einen
neuen Patienten
Alle Maskenbestandteile können mit Hilfe von anerkannten Verfahren
desinfiziert/sterilisiert werden.
In der folgenden Tabelle finden Sie eine Auflistung der anerkannten Verfahren für
die Desinfektion/Sterilisation des Maskensystems. Weitere Informationen dazu
finden Sie auf unserer Webseite unter www.resmed.com/masks/sterilization.
15
Page 20

Methoden Vordesinfektion/
Chemische Reinigungsmittel
Thermische Reinigungsmittel
STERRAD
Hinweise:
• Von ResMed durchgeführte Tests haben gezeigt, dass die Maskenbestandteile unter
Einhaltung der obigen Methoden 15 thermalen Desinfektions-/Sterilisationszyklen
standhalten können.
• Folgen Sie bei der Verwendung von Reinigungs-, Desinfektions- oder Sterilisationsmitteln
immer den Anweisungen der Hersteller.
Sterilisation
z. B. Aniosyme
™
Alconox
z. B. Neodisher
Medizyme oder Alconox
™
Reinigungsmittel
z. B. Alconox
™
DDI oder
™
Desinfektion/Sterilisation
Lösung (eine von beiden)
• Peressigsäure 0,15% (z. B. Anioxyde
• Ortho-Phthalaldehyd 0,55% (z. B. CIDEX
• Glutaraldehyd 3,4% (z. B. CIDEX Plus
Temperatur-Zeit-Kombination (eine davon)
• 70 °C – 100 Minuten
• 75 °C – 30 Minuten
• 80 °C – 10 Minuten
• 90 °C – 1 Minute
• 93 °C – 10 Minuten
System
STERRAD Sterilisationssystem
™
™
1000)
™
)
OPA)
Reinigen Sie das Kopfband zur Vorbereitung auf einen neuen Patienten wie im
vorherigen Abschnitt „Reinigung der Maske zu Hause“ beschrieben.
Wiederzusammenbau der Maske
Siehe Abschnitt D des Illustrationsblattes.
1 Setzen Sie die Anschlusskappen für das Luer-Verbindungsstück auf die
Maskenanschlüsse (D-1).
2 Halten Sie den Maskenrahmen und das Kniestück fest zusammen (D-2).
3 Um den Kniestückhalter anzubringen, legen Sie eine Seite des
Kniestückhalters an die Rille des Kniestücks. Halten Sie einen Flügel des
Kniestückhalters herunter (D-3a) und drücken Sie den anderen herunter, bis
der Kniestückhalter einrastet (D-3b).
4 Drehen Sie den Kniestückhalter in seine ursprüngliche Position (D-4).
5 Prüfen Sie den ordnungsgemäßen Sitz des Kniestücks und des
Kniestückhalters, indem Sie kräftig am Kniestück ziehen. Bei korrektem Sitz
sollte sich das Kniestück nicht vom Maskenrahmen lösen.
Löst es sich dennoch, versuchen Sie, den Kniestückhalter nochmals, wie in
Schritt 3 und 4 beschrieben, anzubringen. Lässt sich das Kniestück weiterhin
vom Halter lösen, wenn Sie daran ziehen, benötigen Sie unter Umständen
einen neuen Kniestückhalter.
6 Bringen Sie den eingekerbten Rand des Maskenkissens am Maskenrahmen
an. Legen Sie den oberen Abschnitt zuerst an, drücken Sie dann das Kissen
um die ganze Maske herum auf den Maskenrahmen und vergewissern Sie
sich, dass es gut sitzt.
16
Page 21

Drücken Sie anschließend den Clip des Maskenkissens über das
Maskenkissen auf den Maskenrahmen, bis es rundherum einrastet (D-5).
7 Befestigen Sie die Stirnpolster am Stirnbauteil, indem Sie die Polsterstöpsel
in die beiden Löcher an der Rückseite des Stirnbauteils einführen (D-6).
Drücken Sie die Polster fest auf das Stirnbauteil, um einen sicheren Sitz zu
gewährleisten.
8 Bringen Sie das Stirnbauteil am Maskenrahmen an. Setzen Sie die Zapfen
in die Zapfenschlitze am Maskenrahmen ein (D-7). Drücken Sie den Steg
des Stirnbauteils herunter und schieben Sie ihn in eine der Stegpositionen.
9 Stecken Sie die Kopfbandclips in die Schlitze am Maskenrahmen. Das
Etikett am Kopfband muss nach außen zeigen und bei angelegter Maske in
Ihrem Nackenbereich sitzen.
Entsorgung
Die Ultra Mirage NV Full Face Maske enthält keine Gefahrstoffe und kann mit
dem normalen Haushaltsabfall entsorgt werden.
Technische Daten
Berücksichtigen Sie bei den Einstellungen des Beatmungsgerätes und
insbesondere des Atemzugvolumens für volumengesteuerte
Beatmungsgeräte den Maskentotraum und Leckagen.
Unbeabsichtigte Maskenleckagen
Zu den unbeabsichtigten Maskenleckagen zählen Leckagen zwischen dem
Polstergestell und den Kniestück-Rahmen-Schnittstellen.
Deutsch
Druck
(cm H
O)
2
4–20 6
Maximale
Leckage
(l/min)
Totraum
Der Totraum ist das Leervolumen der Maske bis zum Winkeladapter.
Der Totraum der Maske variiert je nach Maskenkissengröße, ist jedoch immer
kleiner als 260 ml.
Normen
CE-Kennzeichnung gemäß EU-Richtlinie 93/42/EWG, Klasse IIa.
EN ISO 14971, ISO 5356-1, ISO 594-1, ISO 10993-1 und ISO 13485.
Betriebsdruck
0 bis 40 cm H2O
17
Page 22
Widerstand
Druckabfall gemessen bei
50 l/min: 0,5 cm H
bei 100 l/min: 1,5 cm H
O
2
O
2
Abmessungen
Die Abmessungen der Maske betragen (Medium):
H = 200 mm, B = 100 mm und T = 100 mm
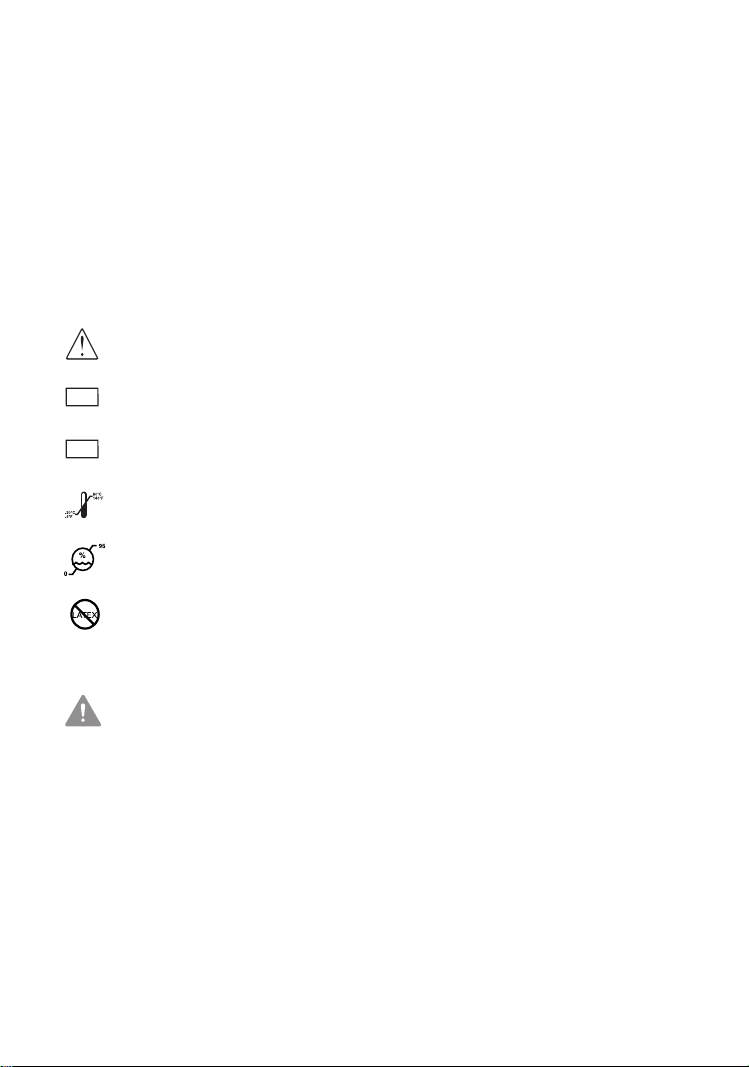
Symbole
System und Verpackung
Achtung: Bitte lesen Sie die beiliegenden Unterlagen.
Chargennummer
LOT
Teilenummer
REF
Temperaturbeschränkung
Luftfeuchtigkeitsbeschränkung
Enthält kein Latex
Klinisches Handbuch
Warnung oder Vorsichtshinweis, der auf eine mögliche
Verletzungsgefahr hinweist oder eine spezielle Maßnahmen für eine
sichere und effiziente Benutzung des Gerätes erklärt.
18
Page 23

Bestellinformationen
Te il e n r. A rt i k el
System
60643 UM NVFFM System Small, Standard
60642 UM NVFFM System Small, Shallow
60645 UM NVFFM System Medium, Standard
60644 UM NVFFM System Medium, Shallow
60647 UM NVFFM System Large, Standard
60646 UM NVFFM System Large, Shallow
Ersatzteile
16604 Maskenkissen, Small, Standard (1 Stk/Pck.)
16671 Maskenkissen, Small, Shallow (1 Stk/Pck.)
16605 Maskenkissen, Medium, Standard (1 Pck.)
16672 Maskenkissen, Medium, Shallow (1 Pck.)
16606 Maskenkissen, Large, Standard (1 Stk/Pck.)
16673 Maskenkissen, Large, Shallow (1 Stk/Pck.)
16674 Maskenkissenclip, Small (1 Stk/Pck.)
16675 Maskenkissenclip, Medium (1 Stk/Pck.)
16676 Maskenkissenclip, Large (1 Stk/Pck.)
60678 Kniestück (1 Pck.)
60683 Kniestückhalter (1 Stk/Pck.)
60681 Anschlusskappen für Luer-Verbindungsstück (2 Stk/Pck.)
60682 Anschlusskappen für Luer-Verbindungsstück (10 Stk/Pck.)
60115 Kopfbandclip (2 Stk/Pck.)
60116 Kopfbandclip (10 Stk/Pck.)
60123 Stirnpolster (1 Stk/Pck.)
60124 Stirnpolster (10 Stk/Pck.)
60675 Maskenrahmen, Small (1 Stk/Pck.)
60676 Maskenrahmen, Medium (1 Stk/Pck.)
60677 Maskenrahmen, Large (1 Stk/Pck.)
60673 Stirnbauteil (1Stk/Pck.)
60917 Kopfband (1 Stk./Pck.)
Europa 1 – Englisch, Deutsch, Französisch, Italienisch, Spanisch, Portugiesisch,
Holländisch.
– Europa 1
– Europa 1
– Europa 1
– Europa 1
– Europa 1
– Europa 1
Deutsch
19
Page 24

Beschränkte Garantie
ResMed sichert mit einer Haftungsperiode von neunzig (90) Tagen ab Datum
des Kaufes durch den Erstkäufer zu, dass Ihr Maskensystem von ResMed,
einschließlich aller Komponenten wie Maskenrahmen, Maskenkissen,
Kopfband, Schläuche und anderes Zubehör („Produkt“), frei von Material- und
Verarbeitungsfehlern ist.
Weitere Einzelheiten entnehmen Sie bitte den Garantiebedingungen.
Hinweis: Die originale Version dieser Bedienungsanleitung ist die englische, die als Vorlage
für die Übersetzungen in alle andere Sprachen diente. Die Texte können jedoch aufgrund der
verschiedenen Desinfektions-/Sterilisationsverfahren in verschiedenen Ländern geringfügige
Unterschiede aufweisen. ResMed hat diese Unterschiede geprüft und alle hier beschriebenen
Verfahren wurden bestätigt.
20
Page 25

Ultra Mirage™
MASQUE FACIAL NON VENTILE (SANS FUITE INTENTIONNELLE)
Le masque facial Ultra Mirage NV (non ventilé) sans fuite intentionnelle est une
interface non invasive utilisée pour l’apport d’air sous pression au patient, avec
ou sans oxygène additionnel.
Usage prévu
Le masque facial Ultra Mirage NV est prévu pour une utilisation avec des
systèmes de ventilation non invasifs à valve expiratoire externe, dans le but
d’assister les patients insuffisants respiratoires.
Le masque facial Ultra Mirage NV doit être utilisé pour les patients adultes
(> 30 kg) requérant une suppléance ventilatoire non fonctionnelle.
Le masque facial Ultra Mirage NV est prévu pour un usage multiple par un seul
patient à domicile ou pour un usage multiple par plusieurs patients en milieu
hospitalier.
. AVERTISSEMENTS ET PRECAUTIONS
• Le masque facial Ultra Mirage NV ne doit pas être utilisé sans le contrôle
d’une personne qualifiée, si le patient n’est pas en mesure d’enlever le
masque de lui-même.
• Ce masque ne doit pas être utilisé chez les patients présentant une
altération du réflexe laryngé ou d’autres conditions les prédisposant à une
aspiration en cas de régurgitation ou de vomissement.
• Le masque ne doit être porté que si le ventilateur est sous tension et s’il
fonctionne correctement.
• Lorsque de l’oxygène additionnel (le cas échéant) est délivré à un débit fixe,
la concentration de l’oxygène inhalé varie en fonction des réglages de
pression, de la fréquence respiratoire du patient, de la taille de masque
sélectionnée ainsi que du niveau de fuites non intentionnelles au masque.
• Si de l’oxygène est utilisé avec le ventilateur, l’alimentation en oxygène doit
être fermée lorsque le ventilateur n’est pas en mode de fonctionnement.
Français
21
Page 26

Explication : lorsque le ventilateur n’est pas en marche et que
l’alimentation en oxygène n’est pas fermée, l’oxygène délivré dans le circuit
du ventilateur peut s’accumuler dans l’appareil et créer un risque d’incendie.
Cet avertissement vaut pour la plupart des ventilateurs.
• Eviter de fumer lorsque de l’oxygène est utilisé.
A propos du masque
• Le masque ne contient pas de latex, de PVC ni de DEHP. En cas de réaction
QUELCONQUE à l’un des composants du masque, arrêtez le traitement et
recherchez les causes possibles d’une telle réaction.
• ResMed a teinté le coude du masque facial Ultra Mirage NV en bleu pour
vous aider à identifier qu’il s’agit d’un masque « non ventilé » (sans fuite
intentionnelle) destiné uniquement à être utilisé avec des systèmes de
ventilation non invasifs à valve expiratoire externe.
• Le masque possède un raccord femelle conique standard de 22 mm
(ISO5356-1) pour raccordement externe au ventilateur.
• Veuillez vous référer à la section « Caractéristiques » de ce guide pour les
informations concernant les fuites au masque, l’espace mort et la
résistance.
ATTENTION
Le masque doit être nettoyé et désinfecté/stérilisé entre les patients. Veuillez
vous référer à la section « Nettoyage du masque entre les patients » pour plus
de détails.
Composants du masque
Voir la section A de la fiche d’illustrations.
Mise en place du masque
Remarque : pour des informations détaillées sur le raccordement du masque,
veuillez vous référer au mode d’emploi du ventilateur.
Voir la section B de la fiche d’illustrations.
Le masque facial Ultra Mirage NV est fourni entièrement assemblé.
1 Mettez la languette du support frontal dans la position 4. (Veuillez vous
référer à l’illustration B-1 pour l’emplacement de la position 4.)
2 Détachez un des clips inférieurs du harnais. Mettez le masque sur le visage
et passez le harnais par-dessus la tête du patient (B-2). Veillez à ce que les
sangles supérieures reposent sur le front et à ce que les sangles inférieures
passent sous les oreilles.
3 Fixez à nouveau le clip du harnais à l’entourage rigide.
22
Page 27

4 Serrez légèrement les sangles supérieures du harnais (B-3).
5 Serrez légèrement les sangles inférieures du harnais (B-4).
Les tampons du support frontal devraient reposer confortablement sur le
front du patient lorsque le masque est en place. S’ils sont inclinés et ne
reposent pas entièrement sur le front, changez la position du support
frontal.
Remarque : ne serrez pas trop les sangles du harnais au risque de rendre
le masque inconfortable, de créer des plis dans la bulle ou d’entraîner des
fuites. Le masque facial Ultra Mirage NV a été conçu pour procurer une
étanchéité confortable sans serrage excessif des sangles du harnais.
6 Une fois ajusté, le masque devrait se présenter comme indiqué (B-5).
7 Raccordez le circuit respiratoire principal au coude (B-6). Raccordez ensuite
l’extrémité libre du circuit respiratoire au ventilateur et mettez celui-ci en
marche. En cas de fuites au niveau de la bulle, il peut s’avérer nécessaire de
légèrement serrer les sangles du harnais.
8 Si le patient ne parvient pas à obtenir une étanchéité appropriée :
• repositionnez le masque en le soulevant et en plaçant la bulle
confortablement sur le visage.
• ajustez la position du support frontal en testant les quatre positions
disponibles pour trouver celle qui permet le mieux d’éviter les fuites.
• serrez légèrement les sangles du harnais.
Remarques :
• Si vous ne réussissez pas à remédier aux fuites, cela peut signifier que votre
patient a besoin d'un autre entourage rigide et/ou d'une autre taille de bulle.
• Comme c’est le cas avec tous les systèmes de ventilation par masque, des
fuites importantes peuvent apparaître entre le masque et le visage du
patient. La fuite peut varier en fonction de certains facteurs, tels que la
position du patient ou sa phase de sommeil. Les variations de fuite peuvent
perturber significativement la ventilation apportée au patient et même
entraîner une hypoventilation ou hyperventilation importante. L'ampleur de
ces effets dépend de la capacité du ventilateur à compenser les fuites.
• Les fuites, ou toute variation de fuite, peuvent entraîner un déclenchement
intempestif du ventilateur.
Français
23
Page 28

Retrait du masque
Pour retirer le masque facial Ultra Mirage NV, détachez l’un des clips inférieurs
du harnais et tirez sur le masque et le harnais pour les faire passer par-dessus
la tête du patient.
Remarque : les clips du harnais sont faciles à trouver et à détacher. Ils
permettent de retirer le masque rapidement en cas d'urgence.
Démontage pour le nettoyage
Voir la section C de la fiche d’illustrations.
1 Détachez le circuit respiratoire du masque.
2 Détachez les clips du harnais pour les libérer de l’entourage rigide. Il n’est
pas nécessaire de démonter les clips du harnais.
3 Retirez les bouchons d’entrée des ports de l’entourage rigide.
4 Détachez la bulle de l’entourage rigide en appuyant sur le clip se trouvant à
sa base, et en tirant légèrement la bulle.
Ensuite, détachez le clip de la bulle.
5 Pour détacher le coude de l’entourage rigide, soulevez l’aile droite de
l’anneau de retenue du coude (C-1) et poussez-la (C-2) par-dessus le bord
droit en L de l’entourage rigide.
6 Faites tourner l’anneau de retenue du coude pour le mettre dans la position
indiquée à la Figure C-3. L’anneau de retenue du coude est maintenant dans
la position correcte pour son retrait.
7 Pour retirer l’anneau de retenue du coude, maintenez une de ses ailes en
place en appuyant dessus et tirez l’autre vers l’extérieur (C-4a), puis vers le
haut (C-4b) pour la faire passer par-dessus le coude. Retirez l’anneau de
retenue du coude et le coude de l’entourage rigide.
8 Pour retirer le support frontal du masque, appuyez sur la languette
(C-5a), puis déplacez le support frontal vers le haut jusqu’à ce qu’il soit
possible de le retirer de l’entourage rigide (C-5b).
9 Tirez fermement sur la base des tiges du tampon du support frontal pour
retirer le tampon du support (C-6).
24
Page 29

Nettoyage du masque à domicile
Remarques:
• Lavez-vous les mains avant de nettoyer le masque.
• Il est important de toujours laver le harnais à la main.
• Il est possible de nettoyer le harnais sans avoir à le détacher de ses clips.
Quotidien/Après chaque utilisation
Lavez les composants du masque à la main dans de l’eau tiède (env. 30ºC)
pendant une minute à l’aide d’un savon ou d’un détergent doux. Rincez les
composants soigneusement à l’eau potable et laissez-les sécher à l’abri de la
lumière directe du soleil.
Hebdomadaire
Lavez le harnais à la main dans de l’eau tiède (env. 30ºC) à l’aide d’un savon ou
d’un détergent doux. Rincez soigneusement et laissez-le sécher à l’abri de la
lumière directe du soleil.
ATTENTION
• Ne pas utiliser d’eau de Javel, de chlore, d’alcool, de solutions à base
d’aromates, ni de savons hydratants ou antibactériens, ni d’huiles
parfumées pour le lavage des composants du masque. Ils risquent
d’endommager le produit et de réduire sa durée de vie.
• Ne pas exposer les composants du masque ni le circuit respiratoire à la
lumière directe du soleil au risque de les abîmer.
• Le harnais est sensible à la chaleur et ne doit pas être repassé.
• En cas de détérioration visible d’un des composants du masque (par ex.
fissures, fendillements, déchirures, etc.), le composant en question doit
être jeté et remplacé.
Français
Nettoyage du masque entre les patients
Tous les composants du masque peuvent être désinfectés/stérilisés suivant
les procédures validées.
Le tableau suivant donne un récapitulatif des procédures validées de
désinfection/stérilisation pour le masque. Veuillez vous référer au site Internet
www.resmed.com/masks/sterilization pour plus de détails.
25
Page 30

Méthodes Pré-désinfection/
Chimique Détergent
Thermique Détergent
stérilisation
par ex. Aniosyme
™
Alconox
par ex. Neodisher
Medizyme ou Alconox
™
DDI ou
™
Désinfection/Stérilisation
Solution (au choix)
• Acide peracétique à 0,15 % (par ex.
Anioxyde
• Ortho-phthalaldéhyde à 0,55 % (par ex.
CIDEX
• Glutaraldéhyde à 3,4 % (par ex. CIDEX Plus
Température-durée (au choix)
• 100 minutes à 70°C
• 30 minutes à 75°C
• 10 minutes à 80°C
• 1 minute à 90°C
™
™
OPA)
1000)
™
)
• 10 minutes à 93°C.
STERRAD
Remarques :
• Les essais réalisés par ResMed ont montré que les composants peuvent résister à
• Suivez impérativement les instructions du fabricant lors de l'utilisation de détergents, de
™
Détergent
par ex. Alconox
15 cycles de désinfection/stérilisation suivant les méthodes listées dans ce tableau.
désinfectants ou d'agents de stérilisation.
Système
Appareil de stérilisation STERRAD
Pour nettoyer le harnais entre les patients, suivez l’une des méthodes décrites
dans la section précédente « Nettoyage du masque à domicile ».
Remontage du masque
Voir la section D de la fiche d’illustrations.
1 Vissez les bouchons d’entrée des raccords Luer sur les ports du masque
(D-1).
2 Tenez bien en place l’entourage rigide avec le coude inséré (D-2).
3 Pour fixer l’anneau de retenue du coude, mettez un côté de l’anneau contre
la rainure du coude. Tout en maintenant une des ailes de l’anneau de
retenue du coude en place (D-3a), appuyez sur l’autre jusqu’à ce que
l’anneau se verrouille en place (D-3b).
4 Faites tourner l’anneau pour le mettre dans sa position initiale (D-4).
5 Vérifiez que le coude et l’anneau de retenue sont bien en place en tirant
fermement sur le coude. Vous pouvez considérer que le coude est
correctement en place s’il ne se détache pas de l’entourage rigide.
Si le coude se détache de l’entourage rigide, essayez de remettre en place
l’anneau de retenue du coude comme indiqué aux étapes 3 et 4. Si le coude
se détache toujours de l’entourage rigide lorsque vous tirez dessus, vous
devrez peut-être remplacer l’anneau de retenue du coude par un nouvel
anneau.
6 Fixez le bord à rainure de la bulle du masque à l’entourage rigide.
Commencez par monter la section supérieure, puis le contour du masque
26
Page 31

tout en poussant la bulle sur l’entourage rigide et en vous assurant d’obtenir
une bonne étanchéité.
Fixez ensuite le clip de la bulle à l’entourage rigide en le faisant passer
par-dessus la bulle tout en vous assurant qu’il se verrouille partout en
position (D-5).
7 Fixez le tampon frontal au support frontal en insérant les tiges du tampon
dans les deux trous prévus à cet effet au dos du support frontal (D-6).
Pressez fermement le tampon contre le support frontal pour vous assurer
qu’il est bien en place.
8 Remettez le support frontal sur l’entourage rigide. Mettez les pivots dans
les fentes de l’entourage rigide prévues à cet effet (D-7). Appuyez sur la
languette du support frontal et mettez-la dans la position qui vous convient.
9 Insérez les clips du harnais dans les fentes de l’entourage rigide prévues à
cet effet. L’étiquette du harnais doit être tournée vers l’extérieur et se
trouver près du cou du patient lorsque le masque est en place.
Elimination
Le masque facial Ultra Mirage NV peut être jeté avec les ordures ménagères.
Caractéristiques
Lors de la détermination des réglages du ventilateur, et en particulier du
volume courant pour les ventilateurs dont le cycle dépend du volume, vous
devez tenir compte de l’espace mort du masque et des fuites.
Fuites au masque non intentionnelles
Les fuites au masque non intentionnelles sont celles qui se produisent entre
la bulle et l’entourage ou entre le coude et l’entourage.
Français
Pression
(cm H
O)
2
4–20 6
Fuite maximale
(l/min)
Espace mort
L’espace mort correspond au volume vide entre le masque et le coude.
L’espace mort du masque varie en fonction de la taille de bulle mais est
inférieur à 260 ml.
27
Page 32

Normes
Marquage CE conformément à la directive CE 93/42/CEE, Classe IIa.
EN ISO 14971, ISO 5356-1, ISO 594-1, ISO 10993-1 et ISO 13485.
Pression de fonctionnement
0 à 40 cm H2O
Résistance
Chute de pression mesurée
à 50 l/min : 0,5 cm H
à 100 l/min : 1,5 cm H
O
2
O
2
Dimensions
Les dimensions du masque (Médium) sont les suivantes :
H = 200mm, l = 100mm et P = 100mm
Symboles
Masque et emballage
Attention, veuillez consulter la documentation jointe
Numéro de lot
LOT
Code produit
REF
Limites de température
Limites d’humidité
Ne contient pas de latex
Guide clinique
Indique un avertissement ou une précaution et vous met en garde
contre le risque de blessure ou explique des mesures particulières
permettant d’assurer une utilisation efficace et sûre de l’appareil.
28
Page 33

Informations de commande
Code
produit
Masque
60643 Masque facial Ultra Mirage NV Petit, Standard
60642 Masque facial Ultra Mirage NV Petit, Shallow
60645 Masque facial Ultra Mirage NV Médium, Standard
60644 Masque facial Ultra Mirage NV Médium, Shallow
60647 Masque facial Ultra Mirage NV Large, Standard
60646 Masque facial Ultra Mirage NV Large, Shallow
Pièces de rechange
16604 Bulle, Petite, Standard (par 1)
16671 Bulle, Petite, Shallow (par 1)
16605 Bulle, Médium, Standard (par 1)
16672 Bulle, Médium, Shallow (par 1)
16606 Bulle, Large, Standard (par 1)
16673 Bulle, Large, Shallow (par 1)
16674 Clip de la bulle, Petit (par 1)
16675 Clip de la bulle, Médium (par 1)
16676 Clip de la bulle, Large (par 1)
60678 Coude (par 1)
60683 Anneau de retenue du coude (par 1)
60681 Bouchons d’entrée des raccords Luer (par 2)
60682 Bouchons d’entrée des raccords Luer (par 10)
60115 Clip du harnais (par 2)
60116 Clip du harnais (par 10)
60123 Tampon frontal (par 1)
60124 Tampon frontal (par 10)
60675 Entourage rigide, Petit (par 1)
60676 Entourage rigide, Médium (par 1)
60677 Entourage rigide, Large (par 1)
60673 Support frontal (par 1)
60917 Harnais (par 1)
Article
– Europe 1
– Europe 1
– Europe 1
– Europe 1
– Europe 1
– Europe 1
Europe 1 – Anglais, allemand, français, italien, espagnol, portugais, néerlandais.
Français
29
Page 34

Garantie limitée
ResMed garantit votre masque ResMed, y compris ses composants, à savoir
l’entourage rigide, la bulle, le harnais, le circuit respiratoire et les autres
accessoires (« Produit »), contre tout défaut de matériaux et de main-d’œuvre
pour une période de quatre-vingt-dix (90) jours à compter de la date d’achat par
le client d’origine.
Pour plus de détails, veuillez vous référer à la garantie.
Remarque : les traductions sont basées sur la version anglaise de ce guide.
Néanmoins, des variations mineures peuvent exister en fonction des procédures de
désinfection/stérilisation en vigueur dans chaque pays. ResMed a évalué ces variations et
toutes les procédures incluses ont été validées.
30
Page 35

Ultra Mirage™
MASCHERA COMPLETA NON VENTILATA
La maschera completa Ultra Mirage NV (non ventilata) è un dispositivo noninvasivo usato per incanalare un flusso d'aria con o senza l'aggiunta di
ossigeno.
Indicazioni per l’uso
La maschera completa Ultra Mirage NV è destinata all'uso con sistemi di
ventilazione dotati di valvola di esalazione attiva allo scopo di fornire un
supporto ventilatorio ai pazienti affetti da insufficienza respiratoria e
scompenso respiratorio.
La maschera completa Ultra Mirage NV va utilizzata su pazienti adulti (>30 kg)
che necessitano di assistenza respiratoria ma non di supporto delle funzioni
vitali.
La maschera completa Ultra Mirage NV è riutilizzabile su un solo paziente a
domicilio o riutilizzabile su più pazienti in ambiente di tipo ospedaliero.
. AVVERTENZE E PRECAUZIONI
• La maschera completa Ultra Mirage NV va utilizzata con la supervisione di
personale qualificato qualora il paziente non sia in grado di togliersi la
maschera.
• La maschera non deve essere utilizzata su pazienti con riflessi laringei ridotti
o che presentino altre condizioni tali da comportare il rischio di aspirazione
in caso di rigurgito o vomito.
• La maschera va indossata solo quando il sistema di ventilazione è acceso e
funziona correttamente.
• Ad un flusso fisso di ossigeno supplementare (ove utilizzato), la
concentrazione dell’ossigeno inspirato varia a seconda delle impostazioni di
pressione, dell’andamento della respirazione del paziente, della misura della
maschera e del suo coefficiente di perdite.
Italiano
31
Page 36

•
Se si fa uso di ossigeno insieme al ventilatore, il flusso di ossigeno va chiuso
quando il ventilatore non è in funzione.
Spiegazione: Se si lascia aperto l’ossigeno a ventilatore spento, la quantità
d’ossigeno erogata nel tubo del ventilatore può accumularsi all’interno del
suo involucro. L’ossigeno accumulato all’interno dell’involucro del ventilatore
comporta un rischio di incendio. Questa avvertenza vale per la maggior parte
dei ventilatori.
• Si prega di non fumare quando l’ossigeno è in uso.
Informazioni sulla maschera
• La maschera non contiene lattice, PVC o DEHP. Qualora il paziente riscontri
una QUALSIASI reazione allergica in seguito al contatto con componenti
della maschera, interrompere l’uso e indagare sulle possibile cause.
• ResMed ha colorato di blu il gomito della maschera completa Ultra Mirage
NV in modo da contrassegnarla come maschera non ventilata indicata
esclusivamente per l’uso con sistemi di ventilazione non invasiva provvisti
di valvola di esalazione attiva.
• La maschera è dotata di una connessione femmina rastremata standard da
22 mm (ISO5356-1) per la connessione esterna con il ventilatore.
• Per dettagli su perdite, spazio morto e resistenza della maschera, si rimanda
alla sezione "Specifiche tecniche" di questa guida.
PRECAUZIONE
La maschera va pulita e disinfettata/sterilizzata se riutilizzata con un altro
paziente. Vedere la sezione “Pulizia della maschera tra un paziente e l'altro” per
maggiori dettagli.
Parti della maschera
Vedere la sezione A del foglio delle illustrazioni.
Come indossare la maschera
Nota: Consultare le istruzioni dell’apparecchio di ventilazione che si sta
utilizzando per informazioni dettagliate sul collegamento della maschera.
Vedere la sezione B del foglio delle illustrazioni.
La maschera completa Ultra Mirage NV viene fornita completamente
assemblata.
1 Spostare la linguetta del supporto frontale nella posizione 3. (Vedere
l'illustrazione B-1 per localizzare la posizione 3.)
32
Page 37

2 Staccare uno dei fermagli inferiori del copricapo. Sistemare la maschera sul
viso e far passare il copricapo sopra la testa del paziente (B-2). Assicurarsi
che le cinghie superiori passino sulla fronte e quelle inferiori sotto le
orecchie.
3 Riattaccare il fermaglio del copricapo al telaio della maschera.
4 Stringere con delicatezza le cinghie superiori del copricapo (B-3).
5 Stringere con delicatezza le cinghie inferiori del copricapo (B-4).
Le imbottiture del supporto frontale devono poggiare in modo confortevole
sulla fronte quando la maschera è in posizione. Se le imbottiture sono storte
e non aderiscono completamente sulla fronte, modificare la posizione della
linguetta del supporto frontale.
Nota: Non stringere eccessivamente le cinghie del copricapo, in quanto ciò
potrebbe causare fastidio, perdite dalla maschera e pieghettature nel
cuscinetto. La maschera completa Ultra Mirage NV è stata progettata per
offrire una tenuta confortevole senza che si debba stringere
eccessivamente il copricapo.
6 Una volta indossata, la maschera dovrebbe avere il seguente aspetto (B-5).
7 Collegare il tubo principale dell'aria al gomito (B-6). Collegare quindi
l’estremità libera del tubo al ventilatore, e accendere il ventilatore stesso. Se
il paziente avverte perdite d’aria intorno al cuscinetto, potrebbe essere
necessario stringere con delicatezza le cinghie del copricapo.
8 Se il paziente non è in grado di ottenere la necessaria tenuta:
• riposizionare la maschera sollevandola e sistemando il cuscinetto in
modo confortevole sul viso.
• regolare la posizione della linguetta del supporto frontale provando tutte
e quattro le posizioni fino ad avere individuato quella più efficace nel
prevenire le perdite d'aria.
• stringere con delicatezza le cinghie del copricapo.
Note:
• Se non fosse possibile prevenire le perdite d'aria, il paziente potrebbe dover
ricorrere ad un altro telaio di maschera e/o a un cuscinetto di diversa misura.
• Come in tutti i sistemi di ventilazione tramite maschera, possono verificarsi
forti perdite d’aria tra la maschera ed il viso del paziente. Tali perdite possono
variare a seconda di fattori come la posizione del paziente e lo stadio del
sonno. Queste variazioni a loro volta possono incidere in maniera rilevante
sulla ventilazione del paziente, fino a produrre significativi fenomeni di
ipoventilazione o iperventilazione. La portata di tali effetti dipende dalla
capacità del ventilatore di compensare le perdite.
• Perdite o variazioni nel coefficiente di perdite possono causare errori nel
trigger del ventilatore.
Italiano
33
Page 38

Come rimuovere la maschera
Per rimuovere la maschera completa Ultra Mirage NV, staccare uno dei fermagli
inferiori del copricapo e sfilare maschera e copricapo dalla testa del paziente.
Nota: I fermagli del copricapo sono facili da localizzare e staccare. Essi
permettono di rimuovere rapidamente la maschera dal viso in caso di
emergenza.
Smontaggio per la pulizia
Vedere la sezione C del foglio delle illustrazioni.
1 Staccare la maschera dal tubo dell’aria.
2 Staccare i fermagli del copricapo in modo da separare il telaio della
maschera dal copricapo. Non è necessario staccare i fermagli dal copricapo.
3 Rimuovere i tappini delle prese dal telaio della maschera.
4 Staccare il complesso del cuscinetto dal telaio della maschera premendo
l’apposito fermaglio alla base del telaio della maschera e tirando con
delicatezza il cuscinetto. Ciò farà sì che il cuscinetto e il suo fermaglio si
stacchino.
A questo punto separare il cuscinetto dal fermaglio.
5 Per staccare il gomito dal telaio, sollevare (C-1) e spingere (C-2) l’aletta
destra del fermo del gomito oltre la costa a L destra sul telaio della
maschera.
6 Ruotare il fermo del gomito in modo che si trovi nella posizione mostrata in
figura C-3. È in questa posizione che il fermo del gomito è pronto per essere
rimosso.
7 Per rimuovere il fermo del gomito, tenere ferma una delle alette e tirare
l’altra con fermezza all’infuori (C-4a) e quindi verso l’alto (C-4b) fin sopra la
sommità del gomito. Staccare il fermo del gomito e il gomito dal telaio della
maschera.
8 Per staccare il supporto frontale dalla maschera, premere la linguetta (C-5a)
e spostarla verso l’alto fino a che non incontra più resistenza ed è possibile
sfilarla dal telaio (C-5b).
9 Tirare con fermezza in corrispondenza della base dei tasselli delle
imbottiture del supporto frontale in modo da separare le imbottiture dal
supporto (C-6).
34
Page 39

Pulizia della maschera a domicilio
Note:
• Lavarsi le mani prima di pulire la maschera.
• È importante che il copricapo sia sempre lavato a mano.
• Il copricapo può essere lavato senza essere separato dai suoi fermagli.
Operazioni quotidiane/dopo ciascun uso
Lavare a mano i componenti della maschera in acqua calda (circa 30ºC) per un
minuto usando un sapone o detergente delicato. Sciacquare con cura i
componenti in acqua potabile e lasciarli asciugare all'aria e al riparo dalla luce
solare diretta.
Operazioni settimanali
Lavare a mano il copricapo in acqua calda (circa 30ºC) usando un sapone o
detergente delicato. Sciacquare bene e lasciare asciugare all'aria e al riparo
dalla luce solare diretta.
PRECAUZIONE
• Per la pulizia di tutti i componenti della maschera è sconsigliato l’uso di
soluzioni a base di candeggina, cloro, alcool o aromi, oli profumati, o saponi
idratanti o antibatterici. Tali soluzioni possono causare danni al prodotto e
ridurne la durata.
• Non esporre i componenti della maschera o della tubazione alla luce solare
diretta, in quanto potrebbero deteriorarsi.
• Il copricapo è sensibile al calore e non va stirato.
• In caso di deterioramento visibile (ad esempio incrinature, screpolature,
strappi, ecc.) di un componente della maschera, esso va gettato e sostituito.
Pulizia della maschera tra un paziente e l'altro
Tutti i componenti della maschera possono essere disinfettati/sterilizzati
secondo le procedure omologate.
La tabella seguente presenta una sintesi delle procedure omologate di
disinfezione/sterilizzazione della maschera. Per maggiori dettagli vedere il sito
www.resmed.com/masks/sterilization
.
35
Italiano
Page 40

Metodi Pre-disinfezione/
Chimico Detergente
Te rm i c a Detergente
sterilizzazione
es., Aniosyme
™
Alconox
es. Neodisher
o Alconox
™
™
DDI o
Medizyme
Disinfezione/sterilizzazione
Soluzione (una qualsiasi)
• Acido peracetico allo 0,15% (es.
Anioxyde
• Ortoftalaldeide allo 0,55% (es. CIDEX
• Aldeide glutarica allo 3,4% (es. CIDEX Plus
Temperatura-tempo (una combinazione qualsiasi)
• 70°C per 100 minuti
• 75°C per 30 minuti
• 80°C per 10 minuti
• 90°C per 1 minuto
™
1000)
™
OPA)
™
)
• 93°C per 10 minuti
STERRAD
Note:
• I collaudi eseguiti da ResMed hanno mostrato che i componenti della maschera sono in
• Seguire sempre le istruzioni del fabbricante quando si usano agenti detergenti, disinfettanti
™
Detergente
es. Alconox
grado di sopportare 15 cicli di disinfezione/sterilizzazione secondo i metodi elencati nella
tabella.
o sterilizzanti.
Sistema
Sistema di sterilizzazione STERRAD
Per pulire il copricapo tra un paziente e l’altro, seguire la procedura descritta
nella sezione precedente, “Pulizia della maschera a domicilio”.
Riassemblaggio della maschera
Vedere la sezione D del foglio delle illustrazioni.
1 Avvitare gli apposti coperchi con connessioni luer sulle porte della maschera
(D-1).
2 Premere con fermezza l’uno contro l’altra il telaio e il gomito (D-2).
3 Per fissare il fermo del gomito, inserirne uno dei lati nella scanalatura del
gomito. Tenendo premuta una delle alette del fermo del gomito (D-3a),
premere l’altra aletta finché il fermo del gomito scatta in posizione (D-3b).
4 Ruotare il fermo del gomito in modo che si trovi nella sua posizione originale
(D-4).
5 Assicurarsi di avere inserito correttamente il gomito e il fermo del gomito
tirando con fermezza il gomito nella direzione opposta rispetto al telaio. Se
il gomito è inserito correttamente, esso non si staccherà dal telaio.
Se invece il gomito dovesse staccarsi, riprovare ad inserire il fermo del
gomito seguendo le istruzioni ai punti 3 e 4. Se il gomito dovesse staccarsi
nuovamente quando si tenta di tirarlo, potrebbe essere necessario
sostituire il fermo del gomito.
6 Inserire il lato scanalato del cuscinetto nel telaio della maschera. Inserire
prima la parte superiore e seguire il contorno della maschera, spingendo il
cuscinetto nel telaio e verificandone la tenuta.
36
Page 41

Fissare quindi il fermaglio del cuscinetto al cuscinetto stesso e al telaio della
maschera, assicurandosi che scatti in posizione lungo tutto il suo profilo
(D-5).
7 Attaccare le imbottiture frontali al supporto frontale inserendo i loro tasselli
nei due fori sulla parte posteriore del supporto (D-6). Spingere con fermezza
le imbottiture contro il supporto frontale, in modo da assicurare che siano
ben salde.
8 Riattaccare il supporto frontale al telaio della maschera. Far scorrere i perni
nell’apposita scanalatura sul telaio della maschera (D-7). Premere la
linguetta e posizionare il supporto frontale in una delle quattro fessure a
disposizione.
9 Inserire i fermagli del copricapo nelle scanalature sul telaio della maschera.
Una volta indossato il copricapo, la sua etichetta dovrà essere rivolta verso
l’esterno e trovarsi vicina al collo del paziente.
Smaltimento
La maschera completa Ultra Mirage NV non contiene sostanze pericolose e
può essere smaltita insieme ai normali rifiuti domestici.
Specifiche tecniche
Nel determinare le impostazioni iniziali del ventilatore, e in particolare il volume
corrente per gli apparecchi a logica di volume, tenere in considerazione lo
spazio morto e le perdite d’aria dalla maschera.
Perdite d’aria involontarie dalla maschera
Le perdite d'aria involontarie dalla maschera comprendono le perdite nei punti
di contatto tra cuscinetto e maschera e tra gomito e telaio.
Italiano
Pressione
(cm H
O)
2
4–20 6
Valore massimo
di perdite
(l/min)
Spazio morto
Lo spazio morto è il volume vuoto della maschera fino al gomito.
Lo spazio morto della maschera varia secondo le misure dei cuscinetti, ma è
comunque inferiore a 260 ml.
Standard
Certificazione CE in osservanza della direttiva comunitaria 93/42/CEE,
classe IIa.
EN ISO 14971, ISO 5356-1, ISO 594-1, ISO 10993-1 e ISO 13485.
37
Page 42

Pressione operativa
da 0 a 40 cm H2O
Resistenza
Caduta di pressione misurata
a 50 l/min: 0,5 cm H
a 100 l/min: 1,5 cm H
O
2
O
2
Dimensioni
Le dimensioni della maschera (misura media) sono:
A = 200mm, L = 100mm e P = 100mm
Simboli
Sistema e confezione
Attenzione, consultare la documentazione allegata.
Numero partita
LOT
Numero parte
REF
Limitazione della temperatura
Limitazione dell'umidità
Non contiene lattice
Guida clinica
Indica un’avvertenza o precauzione e mette in guardia dal pericolo di
lesioni o illustra le misure da prendere per garantire il buon
funzionamento e la sicurezza dell’apparecchio.
Informazioni per le ordinazioni
Codice Descrizione
Maschera
60643 Maschera completa UM NV Small, Standard
60642 Maschera completa UM NV Small, Shallow
60645 Maschera completa UM NV Medium, Standard
38
– Europa 1
– Europa 1
– Europa 1
Page 43

Codice Descrizione
60644 Maschera completa UM NV Medium, Shallow
60647 Maschera completa UM NV Large, Standard
60646 Maschera completa UM NV Large, Shallow
Parti di ricambio
16604 Cuscinetto, Small, Standard (1 cfz.)
16671 Cuscinetto, Small, Shallow (1 cfz.)
16605 Cuscinetto, Medium, Standard (1 cfz.)
16672 Cuscinetto, Medium, Shallow (1 cfz.)
16606 Cuscinetto, Large, Standard (1 cfz.)
16673 Cuscinetto, Large, Shallow (1 cfz.)
16674 Fermaglio del cuscinetto, Small (1 cfz.)
16675 Fermaglio del cuscinetto, Medium (1 cfz.)
16676 Fermaglio del cuscinetto, Large (1 cfz.)
60678 Gomito (1 cfz.)
60683 Fermo del gomito (1 cfz.)
60681 Tappi porte con connessione luer (2 cfz.)
60682 Tappi porte con connessione luer (10 cfz.)
60115 Fermaglio del copricapo (2 cfz.)
60116 Fermaglio del copricapo (10 cfz.)
60123 Imbottitura frontale (1 cfz.)
60124 Imbottitura frontale (10 cfz.)
60675 Telaio della maschera, Small (1 cfz.)
60676 Telaio della maschera, Medium (1 cfz.)
60677 Telaio della maschera, Large (1 cfz.)
60673 Imbottiture del supporto frontale (1 cfz.)
60917 Copricapo (1 cfz.)
– Europa 1
– Europa 1
– Europa 1
Europa 1 – Inglese, tedesco, francese, italiano, spagnolo, portoghese, olandese.
Italiano
39
Page 44

Garanzia Limitata
ResMed garantisce la maschera e i suoi componenti, vale a dire telaio,
cuscinetto, copricapo, tubazione e altri accessori (“il prodotto”), da difetti dei
materiali o di fabbricazione per un periodo di novanta (90) giorni a partire dalla
data di acquisto da parte del cliente originale.
Per maggiori dettagli vedere la Garanzia.
Nota: Le traduzioni sono basate sulla versione inglese di questa guida. Tuttavia, potrebbero
esservi piccole discrepanze dovute alle procedure di disinfezione/sterilizzazione in uso in
alcuni Paesi. ResMed ha esaminato queste differenze e tutte le procedure incluse sono state
omologate.
40
Page 45

Ultra Mirage™
MASCARILLA FACIAL SIN ORIFICIOS DE VENTILACIÓN
La Mascarilla Facial Ultra Mirage NV (sin orificios de ventilación) es un
dispositivo no invasivo utilizado para canalizar el flujo de aire con o sin oxígeno
suplementario.
Uso indicado
La Mascarilla Facial Ultra Mirage NV ha sido concebida para ser utilizada con
sistemas de ventilación con válvula de escape activo de gases con el fin de
proporcionar asistencia ventilatoria a pacientes con insuficiencia respiratoria o
problemas de respiración.
La Mascarilla Facial Ultra Mirage NV debe usarse en pacientes adultos (>30 kg)
que necesiten asistencia ventilatoria artificial (que no sea de apoyo vital).
La Mascarilla Facial Ultra Mirage NV se ha diseñado para que un paciente
pueda utilizarla en repetidas ocasiones en su domicilio o para poder ser
reutilizada en hospitales o instituciones entre varios pacientes.
. ADVERTENCIAS Y PRECAUCIONES
• La Mascarilla Facial Ultra Mirage NV no debe usarse sin que exista un
control por parte de personal cualificado en el caso de pacientes que no
puedan quitarse la mascarilla por sí mismos.
• No se debe utilizar esta mascarilla en pacientes con reflejos laríngeos
reducidos u otras condiciones que lo predispongan a la aspiración en caso
de regurgitar o vomitar.
• La mascarilla no deberá llevarse a menos que el sistema de ventilación esté
encendido y funcionando correctamente.
• A un caudal fijo de oxígeno complementario (si se usa), la concentración de
oxígeno inhalado variará dependiendo de los parámetros de presión, el
patrón respiratorio del paciente, el tamaño de la mascarilla elegida y la
cantidad de fuga de aire.
Español
41
Page 46

•
Si se utiliza oxígeno con el ventilador, el flujo del mismo deberá cerrarse
cuando el ventilador no esté funcionando.
Explicación: Mientras el ventilador no esté funcionando, si se deja abierto
el flujo de oxígeno, el oxígeno suministrado al tubo de ventilación puede
acumularse dentro del ventilador. El oxígeno acumulado dentro del
ventilador conlleva un riesgo de incendio. Esta advertencia se aplica a la
mayoría de los tipos de ventiladores.
• Evite fumar mientras se está usando oxígeno.
Acerca de la Mascarilla
• El sistema de la mascarilla no contiene materiales de látex, PVC o DEHP. Si
el paciente presenta CUALQUIER reacción ante alguna de las partes del
sistema de la mascarilla, suspenda su uso e investigue las posibles causas.
• ResMed ha teñido el codo de la Mascarilla Facial Ultra Mirage NV de azul
para identificarla como mascarilla sin orificios de ventilación para ser
utilizada únicamente con sistemas de ventilación no invasivos con escape
activo de gases.
• La mascarilla tiene un conector hembra cónico de 22 mm estándar
(ISO5356-1) para su conexión externa al ventilador.
• Consulte la sección "Especificaciones técnicas" de esta guía para obtener
más información sobre la resistencia, el espacio muerto y fugas de la
mascarilla.
PRECAUCIÓN
La mascarilla debe limpiarse y desinfectarse o esterilizarse si va a ser utilizada
entre varios pacientes. Consulte la sección “Limpieza de la mascarilla entre
pacientes” para obtener más información.
Piezas de la mascarilla
Véase la sección A de la hoja de figuras.
Colocación de la mascarilla
Nota: Consulte las instrucciones de funcionamiento del sistema de ventilación
para obtener información detallada sobre la conexión de la mascarilla.
Véase la sección B de la hoja de figuras.
La Mascarilla Facial Ultra Mirage NV viene completamente montada.
1 Desplace la almohadilla del apoyo para la frente hasta la posición 3. (Véase
la figura B-1 para ubicar la posición 3.)
42
Page 47

2 Desabroche uno de los broches inferiores del arnés. Coloque la mascarilla
sobre la cara y coloque el arnés tirando de él por encima de la cabeza del
paciente (Fig. B-2). Asegúrese de que las correas superiores pasen sobre
la frente y de que las correas inferiores queden por debajo de las orejas.
3 Vuelva a enganchar el broche del arnés al armazón de la mascarilla.
4 Ajuste con suavidad las correas superiores del arnés (Fig. B-3).
5 Ajuste con suavidad las correas inferiores del arnés (Fig. B-4).
Las almohadillas del apoyo para la frente deben ajustarse de forma cómoda
en la frente cuando la mascarilla esté colocada en su sitio. Si las
almohadillas tienen ángulos y no se ajustan completamente en la frente, se
debe cambiar la posición de la lengüeta del apoyo para la frente.
Nota: No ajuste excesivamente las correas del arnés, ya que esto puede
resultar incómodo y provocar pliegues en la almohadilla y fugas por la
mascarilla. La Mascarilla Facial Ultra Mirage NV ha sido diseñada para
proporcionar un cierre cómodo sin necesidad de ajustar el arnés en exceso.
6 La mascarilla puesta debe verse así (Fig. B-5).
7 Conecte el tubo de aire principal al codo (Fig. B-6). Después conecte el
extremo libre del tubo de aire al ventilador y enciéndalo. Si el paciente sufre
fugas de aire alrededor de la almohadilla, puede que sea necesario apretar
suavemente las correas del arnés.
8 Si el paciente no puede ajustar la mascarilla correctamente:
• recoloque la mascarilla levantándola y colocando la almohadilla de forma
cómoda sobre la cara,
• ajuste la posición de la lengüeta del apoyo para la frente; pruebe las
cuatro posiciones hasta encontrar la que mejor prevenga el riesgo de
fugas, y
• ajuste suavemente las correas del arnés.
Notas:
• Si no es posible evitar las fugas, puede que el paciente necesite otro
armazón de mascarilla u otro tamaño de almohadilla.
• Al igual que con todos los sistemas de ventilación por mascarilla, se puede
dar una fuga considerable entre la mascarilla y la cara del paciente. La fuga
puede variar dependiendo de factores tales como la postura del paciente y
la fase del sueño. La variación en la fuga puede afectar la ventilación del
paciente de manera considerable, pudiendo incluso producir una
hiperventilación o una hipoventilación profundas. La gravedad de este
efecto dependerá de la capacidad del ventilador para compensar la fuga.
• La fuga o la variación en la fuga puede provocar una activación errónea del
ventilador.
Español
43
Page 48

Extracción de la mascarilla
Para extraer la Mascarilla Facial Ultra Mirage NV, desabroche uno de los
broches inferiores del arnés y tire de la mascarilla y del arnés hacia arriba, por
encima de la cabeza del paciente.
Nota: Los broches del arnés son fáciles de localizar y de desabrochar. Permiten
extraer con rapidez la mascarilla de la cara en caso de emergencia.
Desmontaje para la limpieza
Véase la sección C de la hoja de figuras.
1 Desconecte la mascarilla del tubo de aire.
2 Desenganche los broches del arnés para separarlos del armazón de la
mascarilla. No es necesario retirar los broches del arnés.
3 Retire los tapones de los puertos del armazón de la mascarilla.
4 Separe la almohadilla del armazón presionando la traba de la almohadilla en
la base del armazón de la mascarilla y tirando con cuidado para separarla.
Esto liberará la almohadilla y la traba de la almohadilla.
Después, separe la almohadilla de la traba de la almohadilla.
5 Para separar el codo del armazón, eleve (Fig. C-1) y empuje (Fig. C-2) el ala
derecha del retenedor del codo pasándola por encima del borde derecho en
forma de L del armazón de la mascarilla.
6 Haga girar el retenedor del codo hasta la posición que se muestra en la
figura C-3. El retenedor del codo se encuentra ahora en la posición correcta
para ser retirado.
7 Para retirar el retenedor del codo, mantenga presionada una de las alas del
retenedor mientras tira firmemente de la otra primero hacia afuera
(Fig. C-4a) y luego hacia arriba (Fig. C-4b), por encima de la parte superior
del codo. Retire el retenedor del codo y el codo del armazón de la mascarilla.
8 Para retirar el apoyo para la frente de la mascarilla, presione la lengüeta
(Fig. C-5a) y desplácela hacia arriba hasta que se pueda deslizar y separar
del armazón de la mascarilla (Fig. C-5b).
9 Tire con firmeza de la base de los tapones de las almohadillas para la frente
para separar las almohadillas del apoyo para la frente (Fig. C-6).
44
Page 49

Limpieza de la mascarilla en el domicilio
Notas:
• Lávese las manos antes de limpiar la mascarilla.
• Es importante lavar siempre a mano el arnés.
• Se puede lavar el arnés sin desmontarlo de los broches.
Diariamente o después de cada uso
Lave los componentes de la mascarilla a mano en agua tibia (aprox. 30 °C) con
jabón o detergente suave durante un minuto. Enjuague bien todas las piezas
con agua potable y déjelas secar al aire alejadas de la luz directa del sol.
Semanalmente
Lave el arnés para la cabeza a mano en agua tibia (aprox. 30 °C) con jabón o
detergente suave. Enjuáguelo y déjelo secar al aire alejado de la luz directa del
sol.
PRECAUCIÓN
• No utilice soluciones a base de lejía, cloro, alcohol o aromas, jabones
hidratantes o antibacterianos, o aceites perfumados para limpiar los
componentes de la mascarilla. Estas soluciones pueden causar daños o
reducir la vida útil del producto.
• No exponga ninguna pieza del sistema de mascarilla o tubo de aire a la luz
directa del sol, ya que esto podría deteriorar el producto.
• El arnés es sensible al calor y nunca debe plancharse.
• Si se advierte algún signo de deterioro visible (como grietas, rajaduras,
roturas, etc.) en uno de los componentes de la mascarilla, dicho
componente debería ser desechado y cambiado por uno nuevo.
Español
Limpieza de la mascarilla entre pacientes
Todos los componentes de la mascarilla pueden desinfectarse o esterilizarse
utilizando los procedimientos recomendados y comprobados.
La tabla siguiente muestra un resumen de los procedimientos recomendados
y comprobados para desinfectar o esterilizar el sistema. Para obtener más
información al respecto, consulte la página Web
www.resmed.com/masks/sterilization.
45
Page 50

Métodos Previo a la desinfección o
Desinfección
química
Desinfección
térmica
STERRAD
Notas:
• Las pruebas realizadas por ResMed han demostrado que los componentes pueden
soportar 15 ciclos de desinfección o esterilización con los métodos indicados en la tabla.
• Siga siempre las instrucciones del fabricante para la utilización de detergentes,
desinfectantes o agentes esterilizantes.
esterilización
Detergente
p. ej., Aniosyme
™
Alconox
Detergente
p. ej., Neodisher
Medizyme o Alconox
™
Detergente
p. ej., Alconox
™
DDI o
™
Desinfección o esterilización
Solución (cualquiera)
• Ácido peracético 0,15% (p. ej., Anioxyde
• Ortoftalaldehído 0,55% (p. ej., CIDEX
• Glutaraldehído 3,4% (p. ej., CIDEZ Plus
Tiempo de temperatura (cualquiera)
• 70 °C durante 100 minutos
• 75 °C durante 30 minutos
• 80 °C durante 10 minutos
• 90 °C durante 1 minuto
• 93 °C durante 10 minutos
Sistema
Sistema de esterilización STERRAD
™
™
OPA)
™
)
1000)
Para limpiar el arnés entre pacientes, emplee el método descrito en la sección
previa “Limpieza de la mascarilla en el domicilio”.
Montaje de la mascarilla
Véase la sección D en la hoja de figuras.
1 Inserte los tapones de puerto Luer haciéndolos girar sobre los puertos de la
mascarilla (Fig. D-1).
2 Sujete de forma conjunta el armazón de la mascarilla y el codo firmemente
(Fig. D-2).
3 Para fijar el retenedor del codo, inserte un lado del retenedor contra la ranura
del codo. Mientras mantiene presionada una de las alas del retenedor del
codo (Fig. D-3a), presione la otra ala hasta que el retenedor del codo quede
fijo en su posición (Fig. D-3b).
4 Haga girar el retenedor del codo hasta su posición original (Fig. D-4).
5 Compruebe que haya colocado correctamente el codo y el retenedor del
codo tirando firmemente del codo para separarla del armazón. Si el codo
está colocado de forma correcta, no se separará del armazón.
Si el codo se separara del armazón, intente volver a colocar el retenedor del
codo como se ha descrito en los pasos 3 y 4. Si el codo vuelve a separarse
del armazón al tirar de él, es probable que deba cambiar el retenedor del
codo por uno nuevo.
6 Coloque el borde ranurado de la almohadilla sobre el armazón de la
mascarilla. Encaje la sección superior primero y después siga el contorno de
la mascarilla presionando la almohadilla para que se acople al armazón,
asegurándose de que consigue un buen ajuste.
46
Page 51

Después presione la traba de la almohadilla por encima de la almohadilla y
contra el armazón, asegurándose de que quede fija en posición en todo su
contorno (Fig. D-5).
7 Coloque las almohadillas para la frente en el apoyo para la frente
introduciendo los tapones de las almohadillas en los dos orificios de la parte
trasera del apoyo para la frente (Fig. D-6). Presione las almohadillas
firmemente contra el apoyo para la frente para asegurar que las almohadillas
están firmemente ajustadas en dicho apoyo.
8 Conecte el apoyo para la frente al armazón de la mascarilla. Introduzca los
pivotes en las ranuras del armazón de la mascarilla (Fig. D-7). Presione la
lengüeta del apoyo para la frente y deslícela hacia una de sus posiciones.
9 Introduzca los broches del arnés en las ranuras del armazón de la mascarilla.
Una vez colocado el arnés, la etiqueta de éste debe quedar en el lado
exterior y cerca del cuello del paciente.
Desecho
La Mascarilla Facial Ultra Mirage NV no contiene sustancias peligrosas y puede
desecharse junto con los residuos domésticos normales.
Especificaciones técnicas
Al determinar los ajustes del ventilador y, en especial, el volumen corriente en
el caso de los ventiladores con ciclaje de volumen, tenga en cuenta las
cantidades apropiadas de espacio muerto y fuga de la mascarilla.
Fugas accidentales de la mascarilla
Las fugas accidentales de la mascarilla incluyen las fugas producidas entre las
interfaces de la estructura de la almohadilla y el codo.
Español
Presión
(cm H
O)
2
4–20 6
Fuga máxima
(l/min)
Espacio muerto
El espacio muerto es el volumen vacío dentro de la mascarilla hasta la altura
del codo.
El espacio muerto de la mascarilla varía según el tamaño de la almohadilla, pero
es inferior a 260 ml.
47
Page 52

Normas
Designación CE conforme a la directiva CE 93/42/CEE, clase IIa.
EN ISO 14971, ISO 5356-1, ISO 594-1, ISO 10993-1 y ISO 13485.
Presión de funcionamiento
0 a 40 cm H2O
Resistencia
Caída de presión medida
a 50 l/min: 0,5 cm H
a 100 l/min: 1,5 cm H
O
2
O
2
Dimensiones
Las dimensiones de la mascarilla (mediana) son:
Altura = 200 mm, anchura = 100 mm y profundidad = 100 mm
Símbolos
Sistema y embalaje
Precaución: consulte los documentos adjuntos
Número de lote
LOT
Número de pieza
REF
Límite de temperatura
Límite de humedad
No contiene látex
Manual clínico
Indica advertencia o precaución, y le avisa sobre una posible lesión o le
describe medidas especiales que deben adoptarse para utilizar el
dispositivo de modo seguro y eficaz.
48
Page 53

Información para solicitudes de envío
Núm. de
pieza
Sistema
60643 Sistema de Mascarilla Facial Ultra Mirage NV Pequeña, estándar
60642 Sistema de Mascarilla Facial Ultra Mirage NV Pequeña, plana
60645 Sistema de Mascarilla Facial Ultra Mirage NV Mediana, estándar
60644 Sistema de Mascarilla Facial Ultra Mirage NV Mediana, plana
60647 Sistema de Mascarilla Facial Ultra Mirage NV Grande, estándar
60646 Sistema de Mascarilla Facial Ultra Mirage NV Grande, plana
Repuestos
16604 Almohadilla Pequeña, estándar (paq. 1)
16671 Almohadilla Pequeña, plana (paq. 1)
16605 Almohadilla Mediana, estándar (paq. 1)
16672 Almohadilla Mediana, plana (paq. 1)
16606 Almohadilla Grande, estándar (paq. 1)
16673 Almohadilla Grande, plana (paq. 1)
16674 Traba de la almohadilla Pequeña (paq. 1)
16675 Traba de la almohadilla Mediana (paq. 1)
16676 Traba de la almohadilla Grande (paq. 1)
60678 Codo (paq. 1)
60683 Retenedor del codo (paq. 1)
60681 Tapones de puerto Luer (paq. 2)
60682 Tapones de puerto Luer (paq. 10)
60115 Broche del arnés (paq. 2)
60116 Broche del arnés (paq. 10)
60123 Almohadilla para la frente (paq. 1)
60124 Almohadilla para la frente (paq. 10)
60675 Armazón de la mascarilla Pequeño (paq. 1)
60676 Armazón de la mascarilla Mediano (paq. 1)
60677 Armazón de la mascarilla Grande (paq. 1)
60673 Apoyo para la frente (paq. 1)
60917 Arnés (paq. 1)
Artículo
– Europa 1
– Europa 1
– Europa 1
– Europa 1
– Europa 1
– Europa 1
Europa 1 – Inglés, Alemán, Francés, Italiano, Español, Portugués, Holandés.
Español
49
Page 54

Garantía limitada
ResMed garantiza que el sistema de mascarilla ResMed, incluidos el armazón,
la almohadilla, el arnés, el tubo y los demás accesorios (el “producto”) no
tendrá defectos de material ni de mano de obra durante un periodo de noventa
(90) días a partir de la fecha de compra por parte del consumidor inicial.
Para obtener información más detallada, consulte la Garantía.
Nota: Las traducciones se basan en la versión inglesa de esta guía. Sin embargo, puede que
existan pequeñas variaciones a causa de los procedimientos de desinfección y esterilización
que se aplican en los diferentes países. ResMed ha analizado estos cambios y todos los
procedimientos que se incluyen aquí han sido convalidados.
50
Page 55

Ultra Mirage™
MÁSCARA FACIAL NON-VENTED
A Máscara Facial Ultra Mirage NV (não-ventilada) é um dispositivo não-invasivo
usado para dirigir o fluxo de ar com ou sem oxigénio suplementar.
Função
A Máscara Facial Ultra Mirage NV destina-se a ser utilizada com sistemas de
ventilação de respiradouro activo, para assistir os pacientes que sofrem de
insuficiência respiratória e falha respiratória.
A Máscara Facial Ultra Mirage NV destina-se a ser utilizada em pacientes
adultos (>30 kg), que necessitam de apoio respiratório não vital.
A Máscara Facial Ultra Mirage NV destina-se a ser utilizada repetidamente por
um único paciente em casa ou repetidamente por vários pacientes num
hospital/clínica.
. AVISOS E PRECAUÇÕES
• A Máscara Facial Ultra Mirage NV só deve ser usada sob supervisão
qualificada quando o paciente for incapaz de remover a máscara por si
próprio.
• Esta máscara não deve ser usada em pacientes com reflexos laríngeos
incapacitados ou outras condições que predispõem a aspiração no caso de
regurgitação ou vómito.
• A máscara só deve ser usada quando o sistema de ventilação estiver ligado
e a funcionar correctamente.
• Aquando da existência dum caudal fixo do fluxo suplementar de oxigénio
(caso este esteja a ser utilizado), a concentração de oxigénio inalado pode
variar consoante os ajustes de pressão, o padrão de respiração do paciente,
a selecção da máscara e o regime de fuga.
• Se utilizar oxigénio com o ventilador, o fluxo de oxigénio deve ser desligado
quando o ventilador não estiver em funcionamento.
Explicação: Quando o dispositivo não estiver em funcionamento e o fluxo
Português
51
Page 56

de oxigénio é mantido, o oxigénio fornecido através da tubagem do
ventilador pode acumular-se dentro do ventilador. A acumulação de oxigénio
no ventilador irá criar um risco de incêndio. Este aviso aplica-se à maioria
dos sistemas de ventilação.
• Evite fumar quando o oxigénio estiver a ser utilizado.
A Máscara
• O sistema de máscara não contém materiais em látex, PVC ou DEHP. Se o
paciente sofrer QUALQUER reacção a qualquer uma das partes do sistema
de máscara, esta deve deixar de ser usada e as possíveis causas da reacção
devem ser investigadas.
• A ResMed coloriu o cotovelo da Máscara Facial Ultra Mirage NV de azul de
forma a identificá-la como uma máscara não-ventilada a ser usada apenas
com sistemas de ventilação não invasivos com respiradouro activo.
• A máscara possui um conector cónico fêmea de 22 mm (ISO5356-1) para
uma conexão externa ao ventilador.
• Consulte a secção “Especificações Técnicas” deste manual para obter mais
informações sobre a fuga, espaço morto e resistência da máscara.
PRECAUÇÃO
A máscara deve ser limpa e desinfectada/esterilizada caso seja utilizada por
vários pacientes. Consulte a secção “Limpeza da máscara entre pacientes”
para obter mais informações.
Partes da máscara
Ver secção A no folheto de ilustrações.
Colocação da máscara
Nota: Consulte as instruções de funcionamento do sistema de ventilação
relevante para obter mais informações sobre a ligação da máscara.
Ver secção B no folheto de ilustrações.
A Máscara Facial Ultra Mirage NV é fornecida já montada.
1 Mova a patilha do suporte da testa para a posição 3. (Consulte a ilustração
B-1 para ver onde se encontra a posição 3.)
2 Desconecte um dos clipes inferiores do arnês. Coloque a máscara sobre a
face e puxe o arnês sobre a cabeça do paciente (B-2). Certifique-se de que
as correias superiores passam sobre a testa e de que as inferiores passam
debaixo das orelhas.
3 Volte a conectar o clipe do arnês à armação da máscara.
4 Aperte as correias superiores do arnês com cuidado (B-3).
52
Page 57

5 Aperte as correias inferiores do arnês com cuidado (B-4).
As almofadas do suporte da testa devem repousar confortavelmente sobre
a testa quando a máscara estiver no seu lugar. Se as almofadas não
assentarem perfeitamente sobre a testa e repousarem em ângulo, mude a
posição da patilha do suporte da testa.
Nota: Não aperte as correias em demasia uma vez que tal poderá causar
desconforto, vincos na almofada e fugas de ar pela máscara. A Máscara
Facial Ultra Mirage NV foi desenhada de forma a oferecer uma vedação
confortável sem que haja a necessidade de apertar o arnês em demasia.
6 Após ser montada, a máscara deverá ter o seguinte aspecto (B-5).
7 Conecte o tubo de ar principal ao cotovelo (B-6). Em seguida, conecte a
extremidade livre do tubo de ar ao ventilador e ligue-o. Se o paciente sentir
fugas de ar ao redor da almofada, poderá ter de apertar ligeiramente as
correias do arnês.
8 Se o paciente não for capaz de obter uma vedação adequada:
• reposicione a máscara levantando-a e posicionando a almofada
confortavelmente sobre a face.
• ajuste a posição da patilha do suporte da testa experimentando cada
uma das quatro posições até encontrar aquela que melhor evita as
fugas.
• aperte as correias do arnês com cuidado.
Notas:
• Se a fuga de ar pela máscara persistir, o paciente poderá ter de obter uma
armação da máscara ou tamanho de almofada diferentes.
• Do mesmo modo que todos os sistemas de ventilação, podem ocorrer
fugas significantes entre a máscara e a face do paciente. A fuga pode variar
de acordo com vários factores tais como a posição de repouso do paciente
e a fase do sono. A variação da fuga pode afectar significativamente a
ventilação do paciente, podendo causar hipoventilação ou hiperventilação
profundas. A magnitude deste efeito depende da capacidade do ventilador
para compensar a fuga.
• A fuga, ou uma variação da fuga, pode causar a activação incorrecta do
ventilador.
Português
Remoção da máscara
Para remover a Máscara Facial Ultra Mirage NV, desconecte um dos clipes
inferiores do arnês e puxe a máscara e o arnês sobre a cabeça do paciente.
Nota: Os clipes do arnês são fáceis de localizar e desconectar. Estes clipes
permitem a rápida remoção da máscara da face em caso de emergência.
53
Page 58

Desmontagem para limpeza
Ver secção C no folheto de ilustrações.
1 Separe a máscara da tubagem de ar.
2 Desaperte os clipes do arnês para os soltar da armação da máscara. Não é
necessário remover os clipes do arnês.
3 Remova as tampas das portas da armação da máscara.
4 Separe o conjunto de almofada da armação da máscara premindo o clipe da
almofada que se encontra na base da armação da máscara e puxando-o para
fora cuidadosamente. Esta acção irá libertar a almofada e o clipe da
almofada.
Em seguida, separe a almofada do clipe da almofada.
5 Para separar o cotovelo da armação, levante (C-1) e empurre (C-2) a asa
direita do retentor do cotovelo sobre a aresta em forma de L na armação da
máscara.
6 Gire o retentor do cotovelo para a posição indicada em C-3. O retentor do
cotovelo encontra-se agora na posição correcta de remoção.
7 Para remover o retentor do cotovelo, empurre uma das asas do retentor do
cotovelo para baixo ao mesmo tempo que puxa firmemente a outra asa para
fora (C-4a) e para cima (C-4b) sobre o topo do cotovelo. Remova o retentor
do cotovelo e o cotovelo da armação da máscara.
8 Para remover o suporte da testa da máscara, prima a patilha (C-5a) e mova-
o para cima até que o possa deslizar da armação da máscara (C-5b).
9 Puxe com firmeza na base das tampas das almofadas do suporte da testa
para soltar as almofadas do suporte da testa (C-6).
Limpeza da máscara em casa
Notas:
• Lave as mãos antes de limpar a máscara.
• É importante lavar sempre à mão o arnês.
• O arnês pode ser lavado sem ser desmontado dos clipes do arnês.
Diariamente/Após cada utilização
Lave à mão os componentes da máscara em água morna (aprox. 30ºC) durante
um minuto usando um detergente ou sabão suave. Enxagúe bem os
componentes com água potável e deixe-os secar fora da luz directa do sol.
Semanalmente
Lave à mão o arnês em água morna (aprox. 30ºC) usando um detergente ou
sabão suave. Enxagúe bem e deixe-o secar fora da luz directa do sol.
54
Page 59

PRECAUÇÃO
• Não utilize soluções com bases de lixívia, cloro, álcool ou aromáticas,
agentes hidratantes ou antibacterianos ou óleos perfumados na limpeza
dos componentes da máscara. Estas soluções podem causar danos que
irão reduzir a vida útil do produto.
• Não exponha qualquer uma das peças do sistema de máscara ou da
tubagem a luz directa do sol uma vez que tal poderia deteriorar o produto.
• O arnês é sensível ao calor e não deve ser passado a ferro.
• Se for observada a deterioração de qualquer um dos componentes da
máscara (quebrado, rachado, rompido, etc.), o componente da máscara
deve ser substituído.
Limpeza da máscara entre pacientes
Todos os componentes da máscara podem ser desinfectados/esterilizados
usando procedimentos validados.
A tabela seguinte apresenta um sumário dos procedimentos validados para a
limpeza e desinfecção do sistema de máscara. Consulte o website
www.resmed.com/masks/sterilization para obter mais informações.
Métodos Limpeza antes da
Químico Detergente
Té rm i co Detergente
STERRAD
Notas:
• Os testes realizados pela ResMed mostram que os componentes da máscara podem
resistir até 15 ciclos de desinfecção/esterilização seguindo os métodos listados na tabela.
• Quando estiver a usar detergentes, desinfectantes ou agentes de esterilização, siga
sempre as instruções do fabricante.
desinfecção/esterilização
p. ex., Aniosyme
™
Alconox
p. ex., Neodisher
Medizyme ou Alconox
™
Detergente
p. ex., Alconox
™
DDI ou
™
Para limpar o arnês entre pacientes, use o método descrito na secção anterior:
“Limpeza da Máscara em Casa”.
Desinfecção/Esterilização
Solução (qualquer uma)
• 0,15% de ácido peracético (p. ex.,
Anioxyde
™
100 0)
• 0,55% de ortoftalaldeído (p. ex., CIDEX
• 3,4% de glutaraldeído (p. ex., CIDEX Plus
Temperatura-tempo (qualquer uma)
• 70°C durante 100 minutos
• 75°C durante 30 minutos
• 80°C durante 10 minutos
• 90°C durante 1 minuto
• 93°C durante 10 minutos
Sistema
Sistema de Esterilização STERRAD
™
OPA)
™
)
Português
55
Page 60

Montagem da máscara
Ver a secção D no folheto de ilustrações.
1 Enrosque as tampas das portas com conector de tipo Luer nas portas da
máscara (D-1).
2 Segure firmemente a armação da máscara e o cotovelo (D-2).
3 Para fixar o retentor do cotovelo, ajuste um dos lados do retentor do
cotovelo sobre o sulco no cotovelo. Enquanto que empurra uma das asas
do retentor do cotovelo para baixo (D-3a), empurre a outra asa para baixo
até que o retentor do cotovelo se encaixe em lugar (D-3b).
4 Gire o retentor do cotovelo para a sua posição original (D-4).
5 Verifique que o cotovelo e o retentor do cotovelo foram encaixados
correctamente, puxando firmemente o cotovelo para fora da armação. Se o
cotovelo tiver sido instalado correctamente, o mesma não se deverá
separar da armação.
Se o cotovelo se soltar da armação, experimente voltar a colocar o retentor
do cotovelo tal como é descrito nos passos 3 e 4. Se mesmo assim o
cotovelo se soltar da armação quando o puxa, poderá ter de substituir o
retentor do cotovelo com um novo.
6 Assente a extremidade com sulco da almofada da máscara sobre a armação
da máscara. Comece por ajustar a secção superior, continuando em seguida
a assentar o restante da almofada à volta da máscara, empurrando para este
efeito a almofada sobre a armação da máscara e certificando-se da
obtenção de uma boa vedação.
Em seguida, empurre o clipe da almofada por cima da almofada e sobre a
armação da máscara, certificando-se de que este é bem encaixado em
todos os pontos de encaixe (D-5).
7 Fixe as almofadas da testa ao suporte da testa inserindo as tampas das
almofadas nos dois orifícios que se encontram na parte de trás do suporte
da testa (D-6). Empurre as almofadas firmemente contra o suporte da testa
certificando-se de que estas foram bem presas ao suporte da testa.
8 Conecte o suporte da testa à armação da máscara. Deslize os pernos para
a ranhura destinada aos pernos na armação da máscara (D-7). Prima a
patilha do suporte da testa e mova-a para uma das posições da patilha.
9 Introduza os clipes do arnês nas ranhuras da armação da máscara. A
etiqueta do arnês dever-se-á encontrar virada para fora e perto do pescoço
do paciente depois da máscara ser colocada.
Eliminação
A Máscara Facial Ultra Mirage NV não contém substâncias perigosas e pode
ser eliminada com o lixo doméstico.
56
Page 61

Especificações técnicas
Quando estiver a determinar os parâmetros do ventilador, e em particular o
volume corrente para ventiladores activados por volume, tome em conta o
espaço morto e a fuga na máscara.
Fuga na máscara acidental
A fuga na máscara acidental inclui a fuga entre a armação da máscara e a
armação do cotovelo.
Pressão
(cm H2O)
4–20 6
Fuga máxima
(l/min)
Espaço morto
O espaço morto é o volume vazio da máscara até ao cotovelo.
O espaço morto da máscara varia de acordo com os tamanhos de almofada,
sendo no entanto menor que 260 ml.
Normas
Marca CE de acordo com a directiva CE 93/42/CEE, classe IIa.
EN ISO 14971, ISO 5356-1, ISO 594-1, ISO 10993-1 e ISO 13485.
Pressão de funcionamento
0 a 40 cm H2O
Resistência
Queda na leitura de pressão
a 50 l/min: 0,5 cm H2O
a 100 l/min: 1,5 cm H
O
2
Dimensões
As dimensões da máscara (média) são:
A = 200 mm, L = 100 mm e P = 100 mm
Português
57
Page 62

Símbolos
Sistema e embalagem
Precaução, consulte os documentos anexos
Número de lote
LOT
Número de referência
REF
Limitação de temperatura
Limitação de humidade
Não contém látex
Manual Clínico
Representa um Aviso ou uma Precaução e alerta-o da possibilidade de
ferimentos ou explica cuidados especiais a ter para o uso seguro e
eficaz do dispositivo.
Informações para encomendas
Número de
referência
Sistema
60643 Sistema MF UM NV Pequeno, Standard
60642 Sistema MF UM NV Pequeno, Fino
60645 Sistema MF UM NV Médio, Standard
60644 Sistema MF UM NV Médio, Fino
60647 Sistema MF UM NV Grande, Standard
60646 Sistema MF UM NV Grande, Fino
Peças de substituição
16604 Almofada, Pequena, Standard (1 emb.)
16671 Almofada, Pequena, Fina (1 emb.)
16605 Almofada, Média, Standard (1 emb.)
16672 Almofada, Média, Fina (1 emb.)
16606 Almofada, Grande, Standard (1emb.)
Item
– Europa 1
– Europa 1
– Europa 1
– Europa 1
58
– Europa 1
– Europa 1
Page 63

Número de
referência
16673 Almofada, Grande, Fina (1 emb.)
16674 Clipe da almofada, Pequeno (1 emb.)
16675 Clipe da almofada, Médio (1 emb.)
16676 Clipe da almofada, Grande (1 emb.)
60678 Cotovelo (1 emb.)
60683 Retentor do cotovelo (1 emb.)
60681 Tampa de porta com conector de tipo Luer (2 emb.)
60682 Tampa de porta com conector de tipo Luer (10 emb.)
60115 Clipe do arnês (2 emb.)
60116 Clipe do arnês (10 emb.)
60123 Almofada da testa (1 emb.)
60124 Almofada da testa (10 emb.)
60675 Armação da máscara, Pequena (1 emb.)
60676 Armação da máscara, Média (1 emb.)
60677 Armação da máscara, Grande (1 emb.)
60673 Suporte da testa (1 emb.)
60917 Arnês (1 emb.)
Europa 1 – Ingles, Alemão, Francês, Italiano, Espanhol, Português, Holandês.
Item
Garantia Limitada
A ResMed garante que o seu sistema ResMed, incluindo todos os seus
componentes: armação da máscara, almofada, arnês, tubagem e outros
acessórios (“Produto”), está livre de defeitos de material e mão-de-obra
durante um período de noventa (90) dias a partir da data de compra pelo
consumidor original.
Para mais informações, consulte a Garantia.
Português
Nota: As traduções são baseadas na versão inglesa deste guia. No entanto, é possível que
haja pequenas variações no que diz respeito aos procedimentos de desinfecção/esterilização
aplicáveis em certos países. A ResMed realizou a revisão destas alterações e todos os
procedimentos aqui indicados foram validados.
59
Page 64

60
Page 65

Ultra Mirage™
NIET-GEVENTILEERD VOLGELAATSMASKER
Het Ultra Mirage NV (niet-geventileerd) volgelaatsmasker is een niet-invasief
apparaat voor het kanaliseren van de luchtstroom met of zonder aanvullende
zuurstof.
Bedoeld gebruik
Het Ultra Mirage volgelaatsmasker is bedoeld voor gebruik met actieve
uitlaatklep-ventilatiesystemen en biedt ventilatieondersteuning aan patiënten
met ademhalingsinsufficiëntie en respiratoir falen.
Het Ultra Mirage NV volgelaatsmasker wordt gebruikt bij volwassen patiënten
(>30 kg) die ventilatieondersteuning nodig hebben die niet voor life-support
doeleinden is.
Het Ultra Mirage NV volgelaatsmasker is in de thuissituatie bedoeld voor
gebruik door één patiënt en in ziekenhuis/instellingsomgeving voor hergebruik
door meerdere patiënten.
. WAARSCHUWINGEN EN OPMERKINGEN
• Het Ultra Mirage NV volgelaatsmasker mag niet zonder gekwalificeerd
toezicht worden gebruikt door patiënten die het masker niet zelf kunnen
verwijderen.
• Het masker mag niet worden gebruikt door patiënten met verminderde
laryngeale reflexen of andere aandoeningen die de neiging kunnen doen
ontstaan tot aspiratie bij regurgitatie of braken.
• Het masker mag alleen worden gebruikt als het ventilatiesysteem is
ingeschakeld en op correcte wijze functioneert.
• Bij een vaste mate van zuurstofvoorziening (indien gebruikt) varieert de
ingeademde zuurstofconcentratie afhankelijk van de drukinstelling, het
ademhalingspatroon van de patiënt, de gekozen maskermaat en de mate
van maskerlekkage.
Nederlands
61
Page 66

•
Als de ventilator wordt gebruikt in combinatie met zuurstof, moet de
zuurstoftoevoer worden uitgeschakeld wanneer de ventilator niet aan staat.
Uitleg: Wanneer de ventilator buiten gebruik is en de zuurstoftoevoer
ingeschakeld wordt gelaten, kan de zuurstof uit de ventilatieslang zich in het
ventilatorlichaam ophopen. Dergelijke opgehoopte zuurstof is
brandgevaarlijk. Deze waarschuwing geldt voor de meeste ventilatortypes.
• Niet roken terwijl de zuurstof is ingeschakeld.
Omtrent het masker
• Het maskersysteem bevat geen latex-, PVC- of DEHP- materialen. Stop bij
ELKE reactie van de patiënt op een maskeronderdeel het gebruik en
onderzoek de mogelijke oorzaken.
• ResMed heeft de bocht van het Ultra Mirage NV volgelaatsmasker een
blauwe kleur gegeven ten teken dat het een niet-geventileerd masker
betreft dat uitsluitend bedoeld is voor gebruik bij niet-invasieve
ventilatiesystemen met een actieve uitlaatklep.
• Voor de externe aansluiting van de ventilator is het masker standaard
voorzien van een 22 mm conische aansluiting (ISO5356-1) met binnendraad.
• Raadpleeg voor informatie omtrent maskerlekkage, dode ruimte en
weerstand het hoofdstuk “Technische specificaties” in deze handleiding.
VOORZICHTIG
Het masker moet worden gereinigd en gedesinfecteerd/gesteriliseerd als het
door verschillende patiënten wordt gebruikt. Raadpleeg het hoofdstuk “Het
reinigen van het masker tussen twee patiënten door” voor bijzonderheden.
Onderdelen van het masker
Raadpleeg deel A van het illustratieblad.
Het masker opzetten
Opmerking: Raadpleeg voor gedetailleerde informatie over het aansluiten van
het masker de bedieningshandleiding van het betreffende masker.
Raadpleeg deel B van het illustratieblad.
Het Ultra Mirage NV volgelaatsmasker wordt volledig gemonteerd geleverd.
1 Zet de tab van de voorhoofdsteun naar positie 3. (Raadpleeg illustratie B-1
voor de locatie van positie 3.)
62
Page 67

2 Maak een onderste hoofdbandclip los. Zet het masker op het gezicht en trek
de hoofdbanden over het hoofd van de patiënt (B-2). Let erop dat de
bovenste banden over het voorhoofd lopen en de onderste banden onder de
oren zitten.
3 Maak de hoofdbandclip vast aan het maskerframe.
4 Trek voorzichtig de bovenste banden aan (B-3).
5 Trek voorzichtig de onderste banden aan (B-4).
Het kussentje van de voorhoofdsteun moet comfortabel op het voorhoofd
rusten wanneer het masker op zijn plaats zit. Verander de positie van het
kussentje als het scheef zit en niet volledig op het voorhoofd rust.
Opmerking: Zet de hoofdbanden niet te strak vast, want dit kan ongemak,
vouwen in de kussentjes en maskerlekkage veroorzaken. Het Ultra Mirage
NV volgelaatsmasker is ontwikkeld voor een comfortabele afdichting zonder
dat de hoofdbanden te strak hoeven te worden aangetrokken.
6 Het geplaatste masker moet er als volgt uitzien (B-5).
7 Sluit de hoofdluchtslang aan op de bocht (B-6). Sluit daarna het losse eind
van de luchtslang aan op de ventilator en zet de ventilator aan. Als de patiënt
luchtlekkage ervaart rondom het kussentje, moeten de hoofdbanden
wellicht enigszins worden aangetrokken.
8 Als het niet lukt een goede afdichting bij de patiënt te bereiken,
• plaats dan het masker opnieuw door het op te tillen en het kussentje
comfortabel op het gezicht te plaatsen.
• stel de positie van de voorhoofdsteun in door alle vier posities te testen
en degene te zoeken waarbij lekkage het beste wordt voorkomen.
• trek de hoofdbanden voorzichtig aan.
Opmerkingen:
• Als het niet mogelijk is lekkage op te lossen heeft uw patiënt wellicht een
ander maskerfame en/of een andere afmeting van het kussentje nodig.
• Net als bij alle maskerventilatiesystemen kan zich tussen het masker en het
gezicht van de patiënt aanzienlijke lekkage voordoen. De lekkage kan
variëren afhankelijk van factoren als positie en slaapfase van de patiënt.
Variatie in lekkage kan de ventilatie van de patiënt in aanzienlijke mate
beïnvloeden en mogelijk aanzienlijke hypoventilatie of hyperventilatie
veroorzaken. De mate waarin dit zich voordoet is afhankelijk van het
vermogen tot lekkagecompensatie van de ventilator.
• Lekkage of lekkagevariatie kan leiden tot onjuiste activering van de
ventilator.
Nederlands
63
Page 68

Het masker verwijderen
Om het Ultra Mirage NV Full volgelaatsmasker te verwijderen een van de
onderste hoofdbandclips losmaken en de hoofdband over het hoofd van de
patiënt.
Opmerking: De hoofdbandclips zijn gemakkelijk te bereiken en los te maken.
Daardoor kan het masker in geval van nood snel van het gezicht worden
verwijderd.
Demontage voor reiniging
Raadpleeg deel C van het illustratieblad.
1 Maak het masker los van de luchtslang.
2 Maak de hoofdbandclips los, zodat deze vrijkomen van het maskerframe.
Het is niet nodig de hoofdbandclips van het maskerframe te verwijderen.
3 Verwijder de poortkappen van het maskerframe.
4 Maak het kussentje los van het maskerframe door de kussenclip op de
framebasis in te drukken. Trek dan het masker voorzichtig los. Zo komen het
kussentje en de clip vrij.
Haal dan de clip van het kussentje.
5 Om de bocht van het frame los te maken de rechtervleugel van de
bochthouder omhoogdoen (C-1) en over de L-vormige rand van het
maskerframe (C-2) duwen.
6 Draai de bochthouder naar de positie die is aangegeven in C-3. De
bochthouder is nu in de juiste positie om te worden verwijderd.
7 Houd, om de bochthouder te verwijderen, één vleugel ervan ingedrukt en
trek de andere vleugel krachtig los (C-4a) en daarna omhoog (C-4b) over de
top van de bocht. Verwijder de bochthouder en de bocht van het
maskerframe.
8 Om de voorhoofdsteun van het masker te verwijderen de tab (C-5a)
indrukken en deze omhoog bewegen totdat u hem van het maskerframe
kunt schuiven (C-5b).
9 Trek stevig aan de basis van de pluggen van het voorhoofdkussentje om de
kussentjes vrij te maken van de voorhoofdsteun (C-6).
64
Page 69

Het reinigen van het masker in de thuissituatie
Opmerkingen:
• Was altijd uw handen alvorens het masker te reinigen.
• Het is van belang om de hoofdband altijd op de hand te wassen.
• De hoofdbanden kunnen worden gewassen zonder te worden
gedemonteerd van de hoofdbandclips.
Dagelijks/Na ieder gebruik
Was de maskeronderdelen op de hand gedurende een minuut in een warme
(ca. 30°C) milde zeep- of reinigingsmiddeloplossing. De onderdelen goed
spoelen in leidingwater en laten drogen, maar niet in direct zonlicht.
Wekelijks
Was de hoofdbanden op de hand gedurende een minuut in een warme
(ca. 30°C) milde zeep- of reinigingsmiddeloplossing. Goed uitspoelen en laten
drogen, niet in direct zonlicht.
VOORZICHTIG
• Gebruik voor reiniging van de maskeronderdelen geen bleekmiddel, chloor,
alcohol, oplossingen op basis van aroma’s, nachtcrème, antibacteriële zeep
of geurolie. Deze oplossingen kunnen schade veroorzaken en de levensduur
van het product bekorten.
• Stel geen enkel onderdeel van het maskersysteem of de slangen bloot aan
direct zonlicht, omdat dat ten koste gaat van de levensduur van het product.
• De hoofdbanden zijn gevoelig voor hitte en mogen niet worden gestreken.
• Als er sprake is van zichtbare gebreken van een maskeronderdeel
(scheuren, haarscheuren, barsten, enz.), dient dit te worden weggegooid en
vervangen.
Het reinigen van het masker tussen twee
patiënten door
Alle maskeronderdelen kunnen worden gedesinfecteerd/gesteriliseerd
volgens gevalideerde procedures.
In de onderstaande tabel staat een overzicht van de gevalideerde procedures
voor desinfectie/sterilisatie van het systeem. Raadpleeg voor meer gegevens:
www.resmed.com/masks/sterilization
.
65
Nederlands
Page 70

Methoden Voorafgaand aan
Chemisch Reinigingsmiddel
Thermisch Reinigingsmiddel
STERRAD
Opmerkingen:
• Testen door ResMed hebben aangetoond dat de onderdelen van het masker bij de in de
tabel weergegeven methoden15 desinfectie/sterilisatie-cycli kunnen weerstaan.
• Volg altijd de instructies van de fabrikant op wanneer u desinfectie- of sterilisatiemiddelen
gebruikt.
desinfectie/sterilisatie
bijv. Aniosyme
™
Alconox
bijv. Neodisher
Medizyme of Alconox
™
Reinigingsmiddel
bijv. Alconox
™
DDI of
™
Desinfectie/Sterilisatie
Oplossing (een van deze)
• Perazijnzuur 0,15% (bijv. Anioxyde
• Orthophthalaldehyde 0,55% (bijv. CIDEX™
OPA)
• Glutaraldehyde 3,4% (bijv. CIDEX Plus
Temperatuur – Tijd (een van deze)
• 70°C gedurende 100 minuten
• 75°C gedurende 30 minuten
• 80°C gedurende 10 minuten
• 90°C gedurende 1 minuut
• 93°C gedurende 10 minuten
Systeem
STERRAD sterilisatiesysteem
™
1000)
™
)
Volg, om de hoofdbanden te reinigen voor overgang naar de volgende patiënt,
de methode die wordt beschreven in het vorige hoofdstuk “Het reinigen van
het masker in de thuissituatie”.
Het masker opnieuw monteren
Raadpleeg deel D van het illustratieblad.
1 Draai de poortkappen met luer-vergendeling op de maskerpoorten (D-1).
2 Houd het maskerframe en de bocht samen stevig vast (D-2).
3 Om de bochthouder te bevestigen één zijde van de bochthouder tegen de
groef van de bocht duwen. Terwijl u één vleugel van de bochthouder indrukt
(D-3a), drukt u op de andere vleugel, totdat de bochthouder op zijn plaats
klikt (D-3b).
4 Draai de bochthouder naar zijn oorspronkelijke positie (D-4).
5 Controleer of u de bocht en de bochthouder correct hebt gemonteerd door
de bocht van het frame af te trekken. Als de bocht correct is bevestigd, mag
deze niet loskomen van het frame.
Als dat wel het geval is, probeer dan de bochthouder nogmaals te
bevestigen zoals beschreven in de stappen 3 en 4. Als de bocht nog steeds
kan loskomen van het frame wanneer u eraan trekt, moet de bochthouder
wellicht worden vervangen.
6 Monteer de groefrand van het maskerkussentje in het maskerframe.
Bevestig eerst de bovenkant, ga dan verder rondom het masker en duw het
kussentje in het frame, waarbij u zorgt voor een goede afdichting.
66
Page 71

Duw daarna de kussenclip over het kussen heen op het maskerframe. Let
er daarbij op dat de clip overal op zijn plaats klikt (D-5).
7 Bevestig de voorhoofdkussentjes op de voorhoofdsteun door de
kussenplugs in de beide openingen op de achterzijde van de
voorhoofdsteun te duwen (D-6). Duw de kussentjes stevig tegen de
voorhoofdsteun, om te verzekeren dat deze goed vastzitten op de
voorhoofdsteun.
8 Sluit de voorhoofdsteun aan op het maskerframe. Schuif de scharnieren in
de scharniersleuf op het maskerframe (D-7). Druk de tab van de
voorhoofdsteun in en beweeg deze naar een van de tabposities.
9 Steek de hoofdbandclips in de sleuven op het maskerframe. Het label op de
hoofdband moet naar buiten zijn gericht en zich ter hoogte van uw nek
bevinden wanneer de banden zijn geplaatst.
Verwijdering
Het Ultra Mirage NV volgelaatsmasker bevat geen schadelijke stoffen en kan
met het normale huishoudafval worden verwijderd.
Technische specificaties
Houd bij het bepalen van ventilatorinstellingen, in het bijzonder het teugvolume
van volumegestuurde ventilators, rekening met de betreffende dode ruimte en
lekkage van het masker.
Onbedoelde maskerlekkage
Onbedoelde maskerlekkage betreft lekkage tussen de raakvlakken van het
kussenframe en het bochtframe.
Druk
O)
(cm H
2
4–20 6
Maximale
lekkage
(L/min)
Dode ruimte
Met ´dode ruimte´ wordt het lege volume van het masker tot aan de bocht
bedoeld.
De dode ruimte van het masker varieert al naar gelang de afmetingen van het
kussentje, maar is minder dan 260 mL.
67
Nederlands
Page 72

Normen
CE-keurmerk overeenkomstig EU-richtlijn 93/42/EEG, klasse IIa.
EN ISO 14971, ISO 5356-1, ISO 594-1, ISO 10993-1 and ISO 13485.
Werkdruk
0 tot 40 cm H2O
Weerstand
Drukverval gemeten
bij 50 L/min: 0,5 cm H
bij 100 L/min: 1,5 cm H
O
2
O
2
Afmetingen
De afmetingen van het masker (Medium) zijn:
H = 200mm, B = 100mm en D = 100mm
Symbolen
Systeem en verpakking
Voorzichtig, raadpleeg bijbehorende documenten
Partijnummer
LOT
Artikelnummer
REF
Temperatuurbeperking
Vochtigheidsbeperking
Bevat geen latex
Klinische handleiding
Geeft 'Waarschuwing' of 'Voorzichtig' aan en vestigt uw aandacht op de
kans op letsel of geeft uitleg over maatregelen voor een veilig en
doelmatig gebruik van het apparaat.
68
Page 73

Bestelinformatie
Onderdeelnummer.
Systeem
60643 UM NVFFM-systeem Small, Standaard
60642 UM NVFFM-systeem Small, Vlak
60645 UM NVFFM-systeem Medium, Standaard
60644 UM NVFFM-systeem Medium, Vlak
60647 UM NVFFM-systeem Large, Standaard
60646 UM NVFFM-systeem Large, Vlak
Vervangingsonderdelen
16604 Kussentje, Small, Standaard (1 st.)
16671 Kussentje, Small, Vlak (1 st.)
16605 Kussentje, Medium, Standaard (1 st.)
16672 Kussentje, Medium, Vlak (1 st.)
16606 Kussentje, Large, Standaard (1 st.)
16673 Kussentje, Large, Vlak (1 st.)
16674 Clip voor kussentje, Small (1 st.)
16675 Clip voor kussentje, Medium (1 st.)
16676 Clip voor kussentje, Large (1 st.)
60678 Bocht (1 st.)
60683 Bochthouder (1 st.)
60681 Luer poortvergrendelingen (2 st.)
60682 Luer poortvergrendelingen (10 st.)
60115 Hoofdbandclip (2 st.)
60116 Hoofdbandclip (10 st.)
60123 Voorhoofdsteun (1 st.)
60124 Voorhoofdsteun (10 st.)
60675 Maskerframe, Small (1 st.)
60676 Maskerframe, Medium (1 st.)
60677 Maskerframe, Large (1 st.)
60673 Voorhoofdsteun (st.)
60917 Hoofdband (1 st.)
Onderdeel
– Europa 1
– Europa 1
– Europa 1
– Europa 1
– Europa 1
– Europa 1
Europa 1 – Engels, Duits, Frans, Italiaans, Spaans, Portugees, Nederlands.
Nederlands
69
Page 74

Beperkte garantie
ResMed garandeert dat uw ResMed-maskersysteem, met inbegrip van de
onderdelen maskerframe, kussentje, hoofdbanden, slangen en andere
accessoires (hierna te noemen het Product), vrij is van fouten in materialen en
vakmanschap voor een periode van negentig (90) dagen vanaf de datum van
aanschaf door de eerste consument.
Voor meer bijzonderheden verwijzen wij u naar de garantie.
Opmerking: Vertalingen zijn gebaseerd op basis van de Engelse versie van deze gids. Er
kan echter sprake zijn van minieme variaties als gevolg van de desinfectie/sterilisatieprocedures die in sommige landen gelden. ResMed heeft al deze wijzigingen beoordeeld en
alle hierin vervatte procedures zijn gevalideerd.
70
 Loading...