

Page 1

English | Français
User guide
|
Español
|
Português
Page 2

ENGLISH
Welcome
The AirCurve™ 10 ASV is a positive airway pressure device that belongs to the adaptive
servo-ventilator category.
WARNING
Read this entire guide before using the device.
CAUTION
In the US, Federal law restricts this device to sale by or on the order of a physician.
AirCurve 10 ASV indications for use
The AirCurve 10 ASV device is indicated for the treatment of patients weighing more than 66 lb
(30 kg) with obstructive sleep apnea (OSA), central and/or mixed apneas, or periodic breathing. It is
intended for home and hospital use.
The humidifier is intended for single patient use in the home environment and re-use in a
hospital/institutional environment.
Contraindications
ASV therapy is contraindicated in patients with chronic, symptomatic heart failure (NYHA 2-4) with
reduced left ventricular ejection fraction (LVEF ≤ 45%) and moderate to severe predominant central
sleep apnea.
Positive airway pressure therapy may be contraindicated in some patients with the following
pre-existing conditions:
• severe bullous lung disease
• pneumothorax or pneumomediastinum
• pathologically low blood pressure, particularly if associated with intravascular volume depletion
• dehydration
• cerebrospinal fluid leak, recent cranial surgery, or trauma.
Adverse effects
You should report unusual chest pain, severe headache, or increased breathlessness to your
prescribing physician. An acute upper respiratory tract infection may require temporary
discontinuation of treatment.
The following side effects may arise during the course of therapy with the device:
• drying of the nose, mouth, or throat
• nosebleed
• bloating
• ear or sinus discomfort
• eye irritation
• skin rashes.
English 1
Page 3

At a glance
1
Air outlet
5
Water tub
2
Air filter cover
6
Screen
3
Power inlet
7
Adapter cover
4
Serial number and device number
8
SD card cover
The AirCurve 10 includes the following:
• Device with HumidAir
• Water tub
• Air tubing
• Power supply unit
• Travel bag
• SD card (already inserted).
Contact your care provider for a range of accessories available for use with the device including:
• Air tubing (heated and non-heated): ClimateLineAir
• Water tub: Standard water tub, cleanable water tub (can be disinfected)
• Filter: Hypoallergenic filter, standard filter
• Air10
™
DC/DC converter
• SD card reader
• Air10 oximeter adapter
• Air10 USB adapter.
About your device
™
integrated humidifier
™
, SlimLine™, Standard
2
Page 4

About the control panel
Press to start/stop therapy.
Start/Stop button
Press and hold for three seconds to enter power save
mode.
Turn to navigate the menu and press to select an option.
Dial
Home button Press to return to the Home screen.
Different icons may be displayed on the screen at different times including:
Ramp Time
Humidity
Humidifier warming
Humidifier cooling
Turn to adjust a selected option and press to save your
change.
Wireless signal strength (green)
Wireless transfer not enabled (gray)
No wireless connection
Airplane Mode
English 3
Page 5

Setup
CAUTION
Do not overfill the water tub as water may enter the device and air tubing.
1. Place the device on a stable level surface.
2. Plug the power connector into the rear of the device. Connect one end of the power cord into
the power supply unit and the other end into the power outlet.
3. Connect the air tubing firmly to the air outlet located on the rear of the device.
4. Open the water tub and fill it with distilled water up to the maximum water level mark.
Do not fill the water tub with hot water.
5. Close the water tub and insert it into the side of the device.
6. Connect the free end of the air tubing firmly onto the assembled mask.
See the mask user guide for detailed information.
Recommended masks are available on www.resmed.com.
4
Page 6

Starting therapy
The pressure bar shows the inspiratory and expiratory pressures in green.
Usage hours–Indicates the number of hours of therapy you received last
1. Fit your mask.
2. Press Start/Stop or breathe normally if SmartStart is enabled.
You will know that therapy is on when the Sleep Report screen is displayed.
The green bar will expand and contract as you breathe in and out.
The screen will go black automatically after a short period of time. You can press Home or the dial to
turn it back on. If power is interrupted during therapy, the device will automatically restart therapy
when power is restored.
The AirCurve 10 device has a light sensor that adjusts the screen brightness based on the light in
the room.
Stopping therapy
1. Remove your mask.
2. Press Start/Stop or if SmartStart is enabled, therapy will stop automatically after a few seconds.
The Sleep Report now gives you a summary of your therapy session.
session.
Mask Seal–Indicates how well your mask sealed:
Good mask seal.
Needs adjusting, see Mask Fit.
Humidifier–Indicates if your humidifier is working properly:
Humidifier working.
Humidifier might be faulty, contact your care provider.
If set by your care provider, you will also see:
Events per hour–Indicates the number of apneas and hypopneas experienced per hour.
More Info–Turn the dial to scroll down to view more detailed usage data.
English 5
Page 7

Power save mode
Highlight My Options and press the dial to see your
Your AirCurve 10 device records your therapy data. In order to allow it to transmit the data to your
care provider, you should not unplug the device. However, you can put it into power save mode to
save electricity.
To enter power save mode:
• Press and hold Start/Stop for three seconds.
The screen goes black.
To exit power save mode:
• Press Start/Stop once.
The Home screen is displayed.
My Options
Your AirCurve 10 device has been set up for your needs by your care provider, but you may find you
want to make small adjustments to make your therapy more comfortable.
current settings. From here, you can personalize your
options.
Ramp Time
Designed to make the beginning of therapy more comfortable, Ramp Time is the period during
which the pressure increases from a low start pressure to the prescribed treatment pressure.
You can set your Ramp Time to Off or between 5 to 45 minutes.
To adjust Ramp Time:
1. In My Options, turn the dial to highlight Ramp
Time and then press the dial.
2. Turn the dial to adjust the ramp time to your
preferred setting and press the dial to save the
change.
Humidity Level
The humidifier moistens the air and is designed to make therapy more comfortable. If you are
getting a dry nose or mouth, turn up the humidity. If you are getting any moisture in your mask, turn
down the humidity.
You can set the Humidity Level to Off or between 1 and 8, where 1 is the lowest humidity setting
and 8 is the highest humidity setting.
6
Page 8

To adjust the Humidity Level:
Leak Alert
When Leak Alert is enabled, the device beeps if the mask leaks too much air
SmartStart
When SmartStart is enabled, therapy starts automatically when you breathe
Mask
This option shows your mask type setting. If you use more than one type of
Run Warmup
This option allows you to pre-heat the water before starting therapy, so that
1. In My Options, turn the dial to highlight Humidity
Level and then press the dial.
2. Turn the dial to adjust the humidity level and press
the dial to save the change.
If you continue to get a dry nose or mouth, or moisture in your mask, consider using ClimateLineAir
heated air tubing. ClimateLineAir together with Climate Control delivers more comfortable therapy.
Mask Fit
Mask Fit is designed to help you assess and identify possible air leaks around your mask.
To check Mask Fit:
1. Fit the mask as described in the mask user guide.
2. In My Options, turn the dial to highlight Run Mask Fit and then press the
dial.
The device starts blowing air.
3. Adjust the mask, mask cushion and headgear until you get a Good result.
To stop Mask Fit, press the dial or Start/Stop. If you are unable to get a good mask seal, talk to your
care provider.
More options
Your care provider may have given you access to personalize a few more options.
or if you remove the mask during therapy.
into your mask. When you remove your mask, it stops automatically after few
seconds.
English 7
mask, adjust this setting when switching between masks.
the air is not cold or dry at the beginning of therapy.
Page 9

Caring for your device
It is important that you regularly clean your AirCurve 10 device to make sure you receive optimal
therapy. The following sections will help you with disassembling, cleaning, checking and
reassembling your device.
Disassembling
1. Hold the water tub at the top and bottom, press it gently and pull it away from the device.
2. Open the water tub and discard any remaining water.
3. Hold the cuff of the air tubing and gently pull it away from the device.
4. Hold both the cuff of the air tubing and the swivel of the mask, then gently pull apart.
Cleaning
You should clean the device weekly as described. Refer to the mask user guide for detailed
instructions on cleaning your mask.
1. Wash the water tub and air tubing in warm water using mild detergent.
Do not wash in a dishwasher or washing machine.
2. Rinse the water tub and air tubing thoroughly and allow to dry out of direct sunlight and/or heat.
3. Wipe the exterior of the device with a dry cloth.
8
Page 10

Checking
You should regularly check the water tub, air tubing and the air filter for any damage.
1. Check the water tub:
• Replace it if it is leaking or has become cracked, cloudy or pitted.
• Replace it if the seal is cracked or torn.
• Remove any white powder deposits using a solution of one part household vinegar to
10 parts water.
2. Check the air tubing and replace it if there are any holes, tears or cracks.
3. Check the air filter and replace it at least every six months. Replace it more often if there are any
holes or blockages by dirt or dust.
To replace the air filter:
1. Open the air filter cover and remove the old air filter.
The air filter is not washable or reusable.
2. Place a new air filter onto the air filter cover and then close it.
Make sure the air filter is fitted at all times to prevent water and dust from entering the device.
Reassembling
When the water tub and air tubing are dry, you can reassemble the parts.
1. Connect the air tubing firmly to the air outlet located on the rear of the device.
2. Open the water tub and fill it with distilled room temperature water up to the maximum water
level mark.
3. Close the water tub and insert it into the side of the device.
4. Connect the free end of the air tubing firmly onto the assembled mask.
Therapy data
Your AirCurve 10 device records your therapy data for you and your care provider so they can view
and make changes to your therapy if required. The data is recorded and then transferred to your care
provider wirelessly or via an SD card.
Wireless
Your AirCurve 10 device is equipped with cellular communication. This allows your therapy data to
be wirelessly transmitted to your care provider to enhance the quality of your treatment. It also
allows therapy settings to be updated in a more timely manner or your device software to be
upgraded. The Wireless signal strength icon
the signal strength.
displayed at the top right of your screen indicates
English 9
Page 11

The data is usually transmitted after therapy has stopped. In order to make sure that your data is
transferred, leave your device connected to the power outlet at all times and make sure that it is not
in Airplane Mode.
Notes:
• Therapy data might not be transmitted if you use it outside of the country or region of purchase.
• Devices with cellular communication might not be available in all regions.
SD card
An alternative way for your therapy data to be transferred to your care provider is via the SD card.
Your care provider may ask you to send the SD card by mail or to bring it in. When instructed by
your care provider, remove the SD card.
Do not remove the SD card from the device when the SD light is flashing.
To remove the SD card:
1. Open the SD card cover.
2. Push in the SD card to release it. Remove the SD card from the device.
Place the SD card in the protective folder and send it back to your care provider.
For more information on the SD card refer to the SD card protective folder provided with your
device.
Note: The SD card should not be used for any other purpose.
Traveling
You can take your AirCurve 10 device with you wherever you go. Just keep the following in mind:
• Use the travel bag provided to prevent damage to the device.
• Empty the water tub and pack it separately in the travel bag.
• Make sure you have the appropriate power cord for the region you are traveling to. For
information on purchasing, contact your care provider.
• If you are using an external battery, you should turn off the humidifier in order to maximize the
life of your battery. Do this by turning the Humidity Level to Off.
Traveling by plane
Your AirCurve 10 device may be taken on board as carry-on luggage. Medical devices do not count
toward your carry-on luggage limit.
You can use your AirCurve 10 device on a plane as it meets the Federal Aviation Administration
(FAA) requirements. Air travel compliance letters can be downloaded and printed from
www.resmed.com.
10
Page 12

When using the device on a plane:
Problem/possible cause
Solution
• Make sure the water tub is completely empty and inserted into your device. The device will not
work without the water tub inserted.
• Turn on Airplane Mode.
To turn on Airplane Mode:
1. In My Options, turn the dial to highlight Airplane
Mode and then press the dial.
2. Turn the dial to select On and then press the dial to
save the change.
The Airplane Mode icon
is displayed at the top
right of the screen.
CAUTION
Do not use the device with water in the water tub on a plane due to the risk of inhalation of
water during turbulence.
Troubleshooting
If you have any problems, have a look at the following troubleshooting topics. If you are not able to
fix the problem, contact your care provider or ResMed. Do not try to open the device.
General troubleshooting
Air is leaking from around my mask
Mask may be fitted incorrectly. Make sure your mask is fitted correctly. See your mask user
I am getting a dry or blocked nose
Humidity level may be set too low. Adjust the Humidity Level.
I am getting droplets of water on my nose, in the mask and air tubing
Humidity level may be set too high. Adjust the Humidity Level.
guide for fitting instructions or use the Mask Fit function to
check your mask fit and seal.
If you have ClimateLineAir heated air tubing, see the
ClimateLineAir user guide.
If you have ClimateLineAir heated air tubing, see the
ClimateLineAir user guide.
My mouth is very dry and uncomfortable
Air may be escaping through your mouth. Increase the Humidity Level.
Air pressure in my mask seems too high (it feels like I am getting too much air)
Ramp may be turned off. Use the Ramp Time option.
English 11
You may need a chin strap to keep your mouth closed or a
full face mask.
Page 13

Problem/possible cause
Solution
Air pressure in my mask seems too low (it feels like I am not getting enough air)
Device message/possible cause
Solution
Ramp may be in progress. Wait for air pressure to build up or turn Ramp Time off.
My screen is black
Backlight on the screen may have turned off. It turns off
Press Home or the dial to turn it back on.
automatically after a short period of time.
Power may not be connected. Connect the power supply and make sure the plug is fully
inserted.
I have stopped therapy, but the device is still blowing air
Device is cooling down. Device blows a small amount of air in order to avoid
condensation in the air tubing. It will stop automatically after
20 minutes.
My water tub is leaking
Water tub may not be assembled correctly. Check for damage and reassemble the water tub correctly.
Water tub may be damaged or cracked. Contact your care provider for a replacement.
My therapy data has not been sent to my care provider
Wireless coverage may be poor. Make sure that the device is placed where there is coverage
(ie, on your bedside table, not in a drawer or on the floor).
The Wireless signal strength icon
indicates good
coverage when all bars are displayed, and poor coverage
when fewer bars are displayed.
The No wireless connection icon
is displayed on the
top right of the screen. No wireless network available.
Make sure that the device is placed where there is coverage
(ie, on your bedside table, not in a drawer or on the floor).
If instructed to do so, send the SD card to your care provider.
The SD card also contains your therapy data.
Device may be in Airplane Mode. Turn off Airplane Mode, see Traveling by plane.
Data transfer is not enabled for your device. Contact your care provider to enable the data transfer
service.
My screen and buttons are flashing
Software upgrade is in progress. Software upgrade takes approximately 10 minutes to
complete.
Device messages
High leak detected, check your water tub, tub seal or side cover
Water tub may not be inserted properly. Make sure the water tub is correctly inserted.
Water tub seal may not be inserted properly. Open the water tub and make sure that the seal is correctly
12
inserted.
Page 14

Device message/possible cause
Solution
High leak detected, connect your tubing
Air tubing may not be connected properly. Make sure the air tubing is firmly connected at both ends.
Mask may be fitted incorrectly. Make sure your mask is fitted correctly. See your mask user
guide for fitting instructions or use the Mask Fit function to
check your mask fit and seal.
Tubing blocked, check your tubing
Air tubing may be blocked. Check the air tubing and remove any blockages. Press the
dial to clear the message and then press Start/Stop to
restart the device.
SD card error, remove your card and press Start to begin therapy
SD card may not be inserted correctly. Remove and reinsert the SD card.
Read only card, please remove, unlock and re-insert SD card
SD card switch may be in the lock (read-only) position.
Move the switch on the SD Card from the lock position
to the unlock position
and then re-insert it.
System fault, refer to user guide, Error 004
Device may have been left in a hot environment. Allow to cool before re-use. Disconnect the power supply
and then reconnect it to restart the device.
Air filter may be blocked. Check the air filter and replace it if there are any blockages.
Disconnect the power supply and then reconnect it to restart
the device.
Air tubing may be blocked. Check the air tubing and remove any blockages. Press the
dial to clear the message and then press Start/Stop to
restart the device.
There may be water in the air tubing. Empty the water from the air tubing. Disconnect the power
supply and then reconnect it to restart the device.
All other error messages, for example, System fault, refer to user guide, Error 0XX
An unrecoverable error has occurred on the device. Contact your care provider. Do not open the device.
English 13
Page 15

Reassembling parts
Some parts of your device are designed to easily come off in order to avoid damage to the parts or
the device. You can easily reassemble them as described below.
To insert the water tub seal:
1. Place the seal into the lid.
2. Press down along all edges of the seal until it is firmly in place.
To reassemble the water tub lid:
1. Insert one side of the lid into the pivot hole of the base.
2. Slide the other side down the ridge until it clicks into place.
General warnings and cautions
WARNING
• Make sure that you arrange the air tubing so that it will not twist around the head or neck.
• Make sure the power cord and plug are in good condition and the equipment is not
damaged.
• Keep the power cord away from hot surfaces.
• If you notice any unexplained changes in the performance of the device, if it is making
unusual sounds, if the device or the power supply are dropped or mishandled, or if the
enclosure is broken, discontinue use and contact your care provider or your ResMed
Service Center.
• Do not open or modify the device. There are no user serviceable parts inside. Repairs and
servicing should only be performed by an authorized ResMed service agent.
• Beware of electrocution. Do not immerse the device, power supply or power cord in water.
If liquids are spilled into or onto the device, unplug the device and let the parts dry. Always
unplug the device before cleaning and make sure that all parts are dry before plugging it
back in.
14
Page 16

• Supplemental oxygen must not be used while smoking or in the presence of an open
flame.
• Always make sure that the device is turned on and airflow generated before the oxygen
supply is turned on. Always turn the oxygen supply off before the device is turned off, so
that unused oxygen does not accumulate within the device enclosure and create a risk of
fire.
• Do not perform any maintenance tasks while the device is in operation.
• The device should not be used adjacent to or stacked with other equipment. If adjacent or
stacked use is necessary, the device should be observed to verify normal operation in the
configuration in which it will be used.
• The use of accessories other than those specified for the device is not recommended. They
may result in increased emissions or decreased immunity of the device.
CAUTION
• Use only ResMed parts and accessories with the device. Non-ResMed parts may reduce the
effectiveness of the treatment and/or damage the device.
• Use only vented masks recommended by ResMed or by the prescribing doctor with this
device. Fitting the mask without the device blowing air can result in rebreathing of exhaled
air. Make sure that the mask vent holes are kept clear and unblocked to maintain the flow
of the fresh air into the mask.
• Be careful not to place the device where it can be bumped or where someone is likely to
trip over the power cord.
• Blocking the air tubing and/or air inlet of the device while in operation could lead to
overheating of the device.
• Keep the area around the device dry, clean and clear of anything (eg, clothes or bedding)
that could block the air inlet or cover the power supply unit.
• Do not place the device on its side as water might get into the device.
• Incorrect system setup may result in incorrect mask pressure reading. Ensure the system is
correctly set up.
• Do not use bleach, chlorine, alcohol, or aromatic-based solutions, moisturizing or
antibacterial soaps or scented oils to clean the device, the water tub or air tubing. These
solutions may cause damage or affect the humidifier performance and reduce the life of
the products.
• If you use the humidifier, always place the device on a level surface lower than your head
to prevent the mask and air tubing from filling with water.
• Leave the water tub to cool for ten minutes before handling to allow the water to cool and
to make sure that the water tub is not too hot to touch.
• Make sure that the water tub is empty before transporting the device.
English 15
Page 17

Technical specifications
90W power supply unit
DC output:
24V 3.75A
Peak power consumption:
104W (108VA)
Environmental conditions
Operating temperature:
+41°F to +95°F (+5°C to +35°C)
Note: The air flow for breathing produced by this therapy
(104°F/40°C) the device remains safe.
Operating humidity:
10 to 95% relative humidity, non-condensing
Operating altitude:
Sea level to 8,500' (2,591 m); air pressure range 1013 hPa to
738 hPa
Storage and transport temperature:
-4°F to +140°F (-20°C to +60°C)
Storage and transport humidity:
5 to 95% relative humidity, non-condensing
Electromagnetic compatibility
The AirCurve 10 complies with all applicable electromagnetic compatibility requirements (EMC) according to
IEC 60601-1:2005 classification
Sensors
Pressure sensor:
Internally located at device outlet, analog gauge pressure
Flow sensor:
Internally located at device inlet, digital mass flow type, -70
to +180 L/min
Maximum single fault steady pressure
Device will shut down in the presence of a single fault if the steady state pressure exceeds:
30 cm H2O for more than 6 sec or 40 cm H2O for more than 1 sec.
Sound
Pressure level measured according to ISO 17510-1:2007 (CPAP mode):
Standard:
26.6 dBA with uncertainty of 2 dBA
SlimLine:
34.6 dBA with uncertainty of 2 dBA
Declared dual-number noise emission values in accordance with ISO 4871:1996.
Physical - device and water tub
Dimensions (H x W x D):
4.57" x 10.04" x 5.91"
Air outlet (complies with ISO 5356-1:2004):
22 mm
Weight (device and standard water tub):
44 oz (1248 g)
Weight (device and cleanable water tub):
44 oz (1248 g)
Housing construction:
Flame retardant engineering thermoplastic
AC input range: 100–240V, 50–60Hz 1.0–1.5A, Class II
115V, 400Hz 1.5A, Class II (nominal for aircraft use)
Typical power consumption: 53W (57VA)
device can be higher than the temperature of the room.
Under extreme ambient temperature conditions
IEC60601-1-2:2007, for residential, commercial and light industry environments. It is recommended that mobile
communication devices are kept at least 1 m away from the device.
Information regarding the electromagnetic emissions and immunity of this ResMed device can be found on
www.resmed.com, on the Products page under Service and Support.
Class II (double insulation), Type BF, Ingress protection IP22.
type, -5 to +45 cm H2O
SlimLine: 26.6 dBA with uncertainty of 2 dBA
Power level measured according to ISO 17510-1:2007 (CPAP mode):
Standard: 34.6 dBA with uncertainty of 2 dBA
(116 mm x 255 mm x 150 mm)
16
Page 18

Water capacity:
To maximum fill line 380 mL
Standard water tub - material:
Injection molded plastic, stainless steel and silicone seal
Cleanable water tub - material:
Injection molded plastic, stainless steel and silicone seal
Temperature
Maximum heater plate:
154°F (68°C)
Cut-out:
165°F (74°C)
Maximum gas temperature:
≤ 106°F (≤ 41°C)
Air filter
Hypoallergenic:
Material: Acrylic and polypropylene fibers in a polypropylene
dust
Aircraft use
ResMed confirms that device meets the Federal Aviation Administration (FAA) requirements (RTCA/DO-160, section 21,
Wireless module
Technology used:
3G (USA and Canada only)
IC ID: 9103A-AIR103G (USA and Canada only)
FCC ID: 2ACHL-AIR103G
Operating pressure range
ASV, ASVAuto:
4 to 25 cm H2O
CPAP
4 to 20 cm H2O
Supplemental Oxygen
Maximum flow:
15 L/min (CPAP, ASV); 4 L/min (ASVAuto)
Pneumatic flow path
8. Inlet filter
Design life
Device, power supply unit:
5 years
Standard water tub, air tubing:
6 months
General
The patient is an intended operator.
Standard: Material: Polyester non woven fiber
Average arrestance: >75% for ~7 micron dust
carrier
Efficiency: >98% for ~7-8 micron dust; >80% for ~0.5 micron
category M) for all phases of air travel.
2G GSM (all regions except USA and Canada
The AirCurve 10 device complies with Industry Canada license-exempt RSS standards.
The AirCurve 10 device should be used at a minimum distance of 0.8” (2 cm) from the body during operation.
Additional information regarding IC compliance for this device can be found on www.resmed.com/downloads/devices.
The AirCurve 10 device complies with FCC Rules.
The AirCurve 10 device should be used at a minimum distance of 0.8” (2 cm) from the body during operation.
Additional information regarding the FCC Rules for this device can be found on www.resmed.com/downloads/devices.
1. Flow sensor
2. Blower
3. Pressure sensor
4. Mask
5. Air tubing
6. Water tub
7. Device
Cleanable water tub: 2.5 years
English 17
Page 19

Humidifier performance
Mask Pressure
RH output %
Nominal system output AH1, BTPS2
Setting 4
Setting 8
Setting 4
Setting 8
3
85
100 6 >10
10
85
100 6 >10
25
85
90 6 >10
Air tubing
Material
Length
Inner diameter
ClimateLineAir
Flexible plastic and electrical components
6'6" (2 m)
0.6" (15 mm)
Standard
Flexible plastic
6'6" (2 m)
0.75" (19 mm)
Value
Range
Display resolution
Mask pressure
4–25 cm H2O
0.1 cm H2O
Leak
0–120 L/min
1 L/min
Respiratory rate
0–50 BPM
1 BPM
Value
Accuracy1
Pressure measurement:
Flow and flow derived values1:
Leak2
±12 L/min or 20% of reading, whichever is greater, 0 to 60 L/min
2,3
Respiratory rate
2,3
±1.0 BPM
2,3
The following settings have been tested at 71.6°F (22°C) ambient temperature:
cm H2O
4 85 100 6 >10
20 85 90 6 >10
1
AH - Absolute Humidity in mg/L
2
BTPS - Body Temperature Pressure Saturated
Air tubing
SlimLine Flexible plastic 6' (1.8 m) 0.6" (15 mm)
Heated air tubing temperature cut-out: ≤ 106°F (≤ 41°C)
Notes:
• The manufacturer reserves the right to change these specifications without notice.
• The electrical connector end of the heated air tubing is only compatible with the air outlet at the device end and should
not be fitted to the mask.
• Do not use electrically conductive or antistatic air tubing.
• The temperature and relative humidity settings displayed are not measured values.
Displayed values
Pressure sensor at air outlet:
Flow derived values:
Tidal volume 0–4000 mL 1 mL
Minute ventilation 0–30 L/min 0.1 L/min
Mask pressure2 ±[0.5 cm H2O + 4% of measured value]
Flow ±6 L/min or 10% of reading, whichever is greater, at 0 to 150 L/min positive flow
Tidal volume
Minute ventilation
1
Results are expressed at ATPD (Ambient Temperature and Pressure, Dry).
2
Accuracy may be reduced by the presence of leaks, supplemental oxygen, tidal volumes <100 mL or minute ventilation <3 L/min.
3
Measurement accuracy verified as per ISO 10651-1:2004 for Home Care Ventilatory Support Devices (Figure 101 and Table 101) using
nominal ResMed mask vent flows.
18
±20%
±20%
Page 20

Pressure accuracy
Standard air tubing
SlimLine air tubing
Without humidification
± 0.5 cm H2O
± 0.5 cm H2O
Device without humidification and Standard air tubing / Device with humidification and Standard air tubing
Pressure (cm H2O)
10 BPM
15 BPM
20 BPM
4
0.5 / 0.5
0.5 / 0.5
0.8 / 0.8
8
0.5 / 0.5
0.5 / 0.5
0.8 / 0.8
12
0.5 / 0.5
0.5 / 0.5
0.8 / 0.8
16
0.5 / 0.5
0.5 / 0.5
0.8 / 0.8
25
0.3 / 0.3
0.5 / 0.4
0.7 / 0.7
Pressure (cm H2O)
10 BPM
15 BPM
20 BPM
8
0.5 / 0.5
0.5 / 0.5
0.8 / 0.8
16
0.5 / 0.5
0.5 / 0.5
0.8 / 0.8
25
0.4 / 0.3
0.6 / 0.5
0.8 / 0.8
Maximum static pressure variation at 10 cm H
O according to ISO 17510-1:2007
2
With humidification ± 0.5 cm H2O ± 0.5 cm H2O
Maximum dynamic pressure variation according to ISO 17510-1:2007
20 0.5 / 0.5 0.5 / 0.5 0.8 / 0.8
Device without humidification and SlimLine air tubing / Device with humidification and SlimLine air tubing
4 0.5 / 0.5 0.5 / 0.5 0.8 / 0.8
12 0.5 / 0.5 0.5 / 0.5 0.8 / 0.8
20 0.5 / 0.5 0.5 / 0.5 0.8 / 0.8
Symbols
The following symbols may appear on the product or packaging.
Read instructions before use. Indicates a warning or caution. Follow instructions before
use.
Manufacturer. European Authorized Representative. Batch code.
Catalog number. Serial number. Device number. On / Off. Device weight.
Protected against finger sized objects and against dripping water when tilted up to 15 degrees
from specified orientation.
Humidity limitation. Temperature limitation. Non-ionising radiation. China pollution
control logo 1.
China pollution control logo 2. Prescription only (In the US, Federal
law restricts these devices to sale by or on the order of a physician).
water level.
limitation.
Use distilled water only. Operating altitude. Atmospheric pressure
Complies with RTCA DO-160 section 21, category M.
Direct current. Type BF applied part. Class II equipment.
Maximum
English 19
Page 21

Environmental information
•
90 days
•
6 months
• Clip-type finger pulse sensors
1 year
• CPAP, bilevel and ventilation devices (including external power supply units)
2 years
This device should be disposed of separately, not as unsorted municipal waste. To dispose of your
device, you should use appropriate collection, reuse and recycling systems available in your region.
The use of these collection, reuse and recycling systems is designed to reduce pressure on natural
resources and prevent hazardous substances from damaging the environment.
If you need information on these disposal systems, please contact your local waste administration.
The crossed-bin symbol invites you to use these disposal systems. If you require information on
collection and disposal of your ResMed device please contact your ResMed office, local distributor
or go to www.resmed.com/environment.
Servicing
The AirCurve 10 device is intended to provide safe and reliable operation when operated in
accordance with the instructions provided by ResMed. ResMed recommends that the AirCurve 10
device be inspected and serviced by an authorized ResMed Service Centre if there is any sign of
wear or concern with device function. Otherwise, service and inspection of the products generally
should not be required during their design life.
Limited warranty
ResMed Pty Ltd (hereafter 'ResMed') warrants that your ResMed product shall be free from
defects in material and workmanship from the date of purchase for the period specified below.
P
roduct Warranty period
Mask systems (including mask frame, cushion, headgear and tubing)—excluding
single-use devices
• Accessories—excluding single-use devices
• Flex-type finger pulse sensors
• Humidifier water tubs
Batteries for use in ResMed internal and external battery systems
• CPAP and bilevel device data modules
• Oximeters and CPAP and bilevel device oximeter adapters
• Humidifier cleanable water tubs
• Titration control devices
• Humidifiers
• Battery accessories
• Portable diagnostic/screening devices
This warranty is only available to the initial consumer. It is not transferable.
If the product fails under conditions of normal use, ResMed will repair or replace, at its option, the
defective product or any of its components.
This Limited Warranty does not cover: a) any damage caused as a result of improper use, abuse,
modification or alteration of the product; b) repairs carried out by any service organization that has
not been expressly authorized by ResMed to perform such repairs; and c) any damage or
contamination due to cigarette, pipe, cigar or other smoke.
Warranty is void on product sold, or resold, outside the region of original purchase.
20
Page 22

Warranty claims on defective product must be made by the initial consumer at the point of
purchase.
This warranty replaces all other expressed or implied warranties, including any implied warranty of
merchantability or fitness for a particular purpose. Some regions or states do not allow limitations on
how long an implied warranty lasts, so the above limitation may not apply to you.
ResMed shall not be responsible for any incidental or consequential damages claimed to have
resulted from the sale, installation or use of any ResMed product. Some regions or states do not
allow the exclusion or limitation of incidental or consequential damages, so the above limitation may
not apply to you.
This warranty gives you specific legal rights, and you may also have other rights which vary from
region to region. For further information on your warranty rights, contact your local ResMed dealer
or ResMed office.
Further information
If you have any questions or require additional information on how to use the device, contact your
care provider.
English 21
Page 23

FRANÇAIS
Bienvenue
L'appareil AirCurve™ 10 ASV est un appareil de ventilation à pression positive de la classe des
servo-ventilateurs adaptatifs.
AVERTISSEMENT
Veuillez lire le présent guide entièrement avant d’utiliser cet appareil.
ATTENTION
Selon la loi fédérale américaine, cet appareil ne peut être vendu aux USA que par un médecin
ou sur prescription médicale.
Indications d'utilisation pour l'appareil AirCurve 10 ASV
L'appareil AirCurve 10 ASV est indiqué pour le traitement des patients de plus de 30 kg (66 lb) atteints
du syndrome d'apnées obstructives du sommeil (SAOS), d'apnée centrale et/ou mixte ou de
respiration périodique. Cet appareil est destiné à un usage à domicile ou en milieu hospitalier.
L'humidificateur est conçu pour un usage unique à domicile et pour un usage multiple dans un hôpital
ou dans un autre établissement.
Contre-indications
Le traitement ASV est contre-indiqué chez les patients atteints d’une insuffisance cardiaque
chronique symptomatique (New York Heart Association 2-4), ayant une faible fraction d’éjection du
ventriculaire gauche (FÉVG ≤ 45 %) et souffrant d’une apnée centrale du sommeil prédominante de
gravité modérée à grave.
Le traitement par pression positive est contre-indiqué chez certains patients présentant l'une des
pathologies préexistantes suivantes :
• affection pulmonaire bulleuse grave;
• pneumothorax ou pneumomédiastin
• tension artérielle pathologiquement basse, en particulier si associée à une déplétion du volume
intravasculaire
• déshydratation
• fuite de liquide céphalo-rachidien, récent traumatisme ou intervention chirurgicale crânienne.
Effets secondaires
Les patients doivent avertir leur médecin traitant en cas de douleurs thoraciques inhabituelles, de
maux de tête sévères ou d’une dyspnée accrue. Une infection aiguë des voies respiratoires
supérieures peut nécessiter l'arrêt temporaire du traitement.
Les effets secondaires suivants peuvent apparaître au cours du traitement sous VPAP :
• sécheresse nasale, buccale ou de la gorge;
• saignements de nez;
• ballonnements;
• gêne au niveau de l’oreille ou des sinus;
• irritation des yeux;
• érythèmes cutanés.
Français 1
Page 24

Description rapide
1
Sortie d’air
5
Réservoir d'eau
2
Couvercle du logement du filtre à air
6
Écran
3
Entrée d'alimentation électrique
7
Couvercle de l'adaptateur
4
Numéro de série et numéro de l'appareil
8
Panneau du lecteur pour carte SD
L’appareil AirCurve 10 comprend les accessoires suivants :
• Appareil avec humidificateur HumidAir
• Réservoir d’eau
• Circuit respiratoire
• Module d’alimentation
• Sac de transport
• Carte SD (déjà insérée)
Communiquer avec le fournisseur de soins pour connaître la gamme d'accessoires pouvant être
utilisés avec l'appareil, notamment :
• Circuit respiratoire (chauffant et non chauffant) : ClimateLineAir
• Réservoir d’eau : Réservoir d'eau standard, réservoir d'eau nettoyable (peut être désinfecté)
• Filtre : Filtre hypoallergénique, filtre standard
• Convertisseur CC/CC Air10
™
• Lecteur de carte SD
• Adaptateur d’oxymètre Air10
• Adaptateur USB Air10.
Présentation de l'appareil
™
intégré
™
, SlimLine™, standard
2
Page 25

Présentation du panneau de contrôle
Appuyer sur cette touche pour démarrer/arrêter le
Tourner la molette pour naviguer dans le menu et appuyer
Touche On/Off
Molette de réglage
Touche accueil Appuyer sur cette touche pour revenir à l’écran d’accueil.
Différentes icônes peuvent s’afficher à l’écran à différents moments, notamment :
Durée de rampe
Humidité
Réchauffement de
l'humidificateur
Refroidissement de
l'humidificateur
Appuyer sur cette touche et la maintenir enfoncée
pendant trois secondes pour activer le mode d’économie
d’énergie.
dessus pour sélectionner une option.
Tourner la molette pour régler l’option sélectionnée et
appuyer dessus pour enregistrer la modification.
Puissance du signal sans fil (vert)
Transfert sans fil non activé (gris)
Aucune connexion sans fil
Mode avion
traitement.
Français 3
Page 26

Installation
ATTENTION
Ne pas trop remplir le réservoir d’eau sans quoi de l’eau risque de s’écouler dans l’appareil et
dans le circuit respiratoire.
1. Placer l’appareil sur une surface plane stable.
2. Brancher le connecteur à l’arrière de l’appareil. Brancher une extrémité du cordon d’alimentation
dans le module d’alimentation et l’autre extrémité dans une prise de courant.
3. Raccorder fermement le circuit respiratoire à la sortie d’air située à l’arrière de l’appareil.
4. Ouvrir le réservoir d’eau et le remplir d’eau distillée jusqu’au repère de niveau d’eau maximal.
Ne pas remplir le réservoir d’eau chaude.
5. Fermer le réservoir d’eau et l’insérer sur le côté de l’appareil.
6. Raccorder fermement l’extrémité libre du circuit respiratoire au système de masque assemblé.
Consulter le guide de l’utilisateur du masque pour obtenir des renseignements détaillés.
Une liste des masques recommandés se trouve à l’adresse www.resmed.com.
4
Page 27

Démarrage du traitement
La barre de pression affiche les pressions inspiratoires et expiratoires en vert.
Heures d'utilisation–Indique le nombre d'heures de traitement reçues au
1. Mettre le masque.
2. Appuyer sur la touche On/Off ou respirer normalement si la fonction SmartStart est activée.
L'affichage de l'écran Rap. somm. indique que le traitement est en marche.
La barre verte s'agrandira et se rétrécira lorsque vous inspirerez et expirerez.
L’écran s’éteindra automatiquement après un bref délai. Pour le rallumer, appuyer sur Accueil ou sur
la molette de réglage. En cas de panne de courant au cours du traitement, l’appareil redémarrera
automatiquement lorsque le courant reviendra.
L'appareil AirCurve 10 comporte un capteur de luminosité qui ajuste la luminosité de l'écran en
fonction de la lumière ambiante.
Arrêt du traitement
1. Retirer le masque.
2. Appuyer sur la touche On/Off ou, si la fonction SmartStart est activée, le traitement s'arrêtera
automatiquement après quelques secondes.
Le Rap. somm. présente alors un résumé de la séance de traitement.
cours de la dernière séance.
Étanchéité masque–Indique le degré d'étanchéité du masque :
Bonne étanchéité masque.
Un ajustement est nécessaire, consulter la section Ajustement masque.
Humidificateur–Indique si l'humidificateur fonctionne correctement :
L'humidificateur fonctionne.
L'humidificateur est peut-être défectueux, communiquer avec le fournisseur de soins.
S'ils ont été réglés par le fournisseur de soins, les paramètres suivants seront également affichés :
Événements par heure–Indique le nombre d'apnées et d'hypopnées qui sont survenues par heure.
Infos détaillées–Tourner la molette de réglage et faire défiler pour voir des données détaillées sur
l'utilisation.
Français 5
Page 28
Mode d'économie d'énergie
Mettre en surbrillance Mes options et appuyer sur la
L'appareil AirCurve 10 enregistre les données de traitement. Afin de lui permettre de transmettre ces
données au fournisseur de soins, il ne faut pas débrancher l'appareil. Cependant, on peut le mettre en
mode d'économie d'énergie pour économiser de l'électricité.
Pour activer le mode d'économie d'énergie :
• Appuyer sur la touche On/Off et la maintenir enfoncée pendant trois secondes.
L'écran s'éteint.
Pour quitter le mode d'économie d'énergie :
• Appuyer une fois sur la touche On/Off.
L'écran Accueil s'affiche.
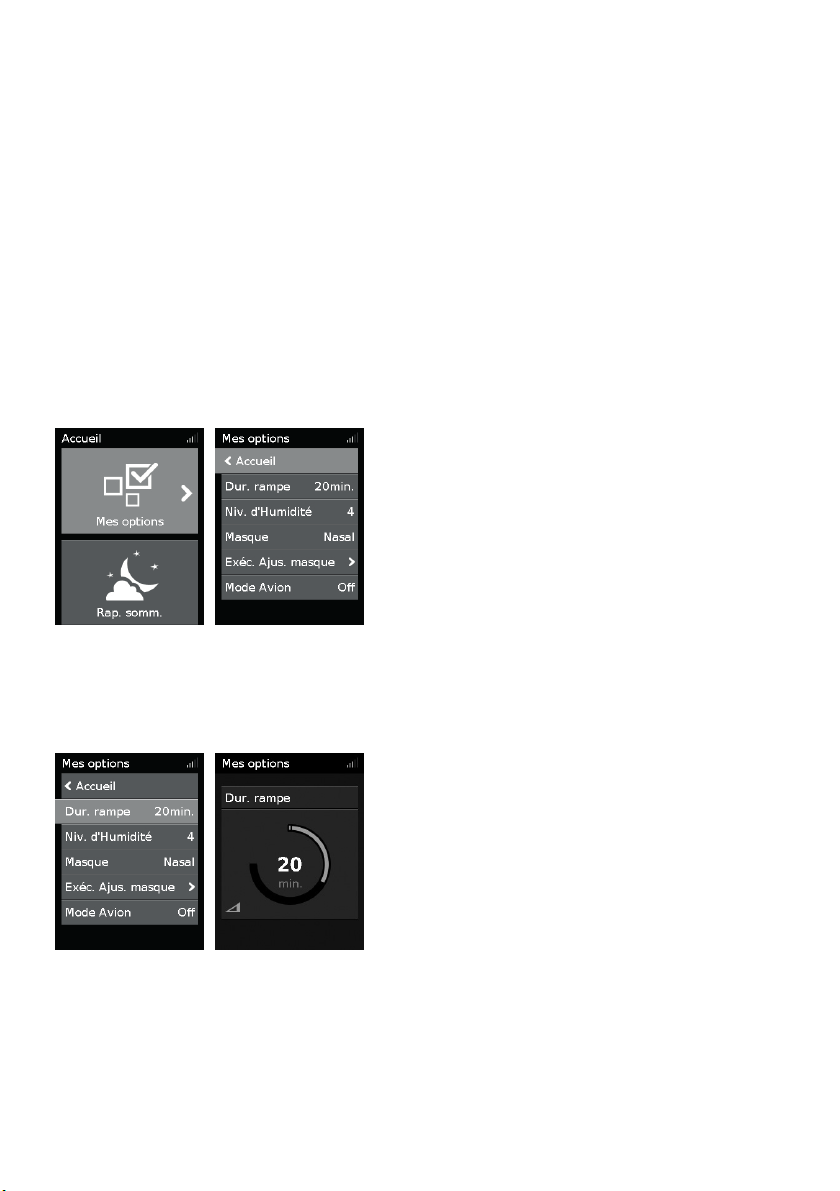
Mes options
L'appareil AirCurve 10 a été réglé par le fournisseur de soins pour convenir aux besoins de
l'utilisateur; il se pourrait cependant que l'utilisateur veuille apporter de légers ajustements afin de
rendre le traitement plus confortable.
molette de réglage pour voir les réglages actuels. Dans
cet écran, il est possible de personnaliser les options.
Durée de rampe
Conçue pour rendre le début du traitement plus confortable, la durée de rampe est la période durant
laquelle la pression passe d'une faible pression de départ à la pression de traitement prescrite.
Vous pouvez régler votre durée de rampe (Dur. rampe) à Off ou entre 5 et 45 minutes.
Pour régler la durée de rampe :
1. Dans Mes options, tourner la molette de réglage
pour mettre en surbrillance Dur. rampe, puis appuyer
sur la molette.
2. Tourner la molette de réglage pour ajuster la durée
de rampe au réglage souhaité et appuyer sur la
molette pour enregistrer la modification.
Niveau d'humidité
L'humidificateur humidifie l'air de façon à rendre le traitement plus confortable. En cas de sécheresse
du nez ou de la bouche, augmenter le niveau d'humidité. Si de la condensation se forme dans le
masque, baisser le niveau d'humidité.
Vous pouvez régler la fonction Niv. d'humidité à Off ou entre 1 et 8, 1 étant le réglage d'humidité le
plus faible et 8 étant le plus élevé.
6
Page 29

Pour régler le niveau d'humidité :
Alarme fuite
Lorsque la fonction Alarme fuite est activée, l'appareil émet un bip si le
SmartStart
Lorsque la fonction SmartStart est activée, le traitement démarre
Masque
Cette option indique le réglage du type de masque. Si plus d'un type de
Lancer préchauffag
Cette option permet de préchauffer l'eau avant de démarrer le traitement, afin
1. Dans Mes options, tourner la molette de réglage
pour mettre en surbrillance Niv. d'Humidité, puis
appuyer sur la molette.
2. Tourner la molette de réglage pour régler le niveau
d'humidité, puis appuyer sur la molette pour
enregistrer la modification.
Si la sécheresse du nez ou de la bouche ou la condensation dans le masque persiste, envisager
d'utiliser un circuit respiratoire chauffant ClimateLineAir. L'utilisation de ClimateLineAir avec la
fonction Climate Control rend l'administration du traitement plus confortable.
Ajustement masque
La fonction Ajus. masque est conçue pour permettre d'évaluer et de détecter les fuites d'air possibles
autour du masque.
Pour vérifier l'ajustement du masque :
1. Ajustez votre masque tel qu'indiqué dans le guide d'utilisateur du masque.
2. Dans Mes options, tourner la molette de réglage pour mettre en
surbrillance Exéc. Ajus. masque, puis appuyer sur la molette.
L'appareil commencera à souffler de l'air.
3. Ajuster le masque, la bulle du masque et le harnais jusqu'à l'obtention d'un
Bon ajustement.
Pour désactiver la fonction d'ajustement du masque, appuyer sur la molette de réglage ou sur la
touche On/Off. S'il est impossible d'obtenir une bonne étanchéité du masque, consulter le
fournisseur de soins.
Options supplémentaires
Le fournisseur de soins a peut-être accordé à l'utilisateur l'accès permettant de personnaliser
quelques autres options.
masque laisse échapper trop d'air ou si vous retirez le masque au cours du
traitement.
automatiquement lorsque l'utilisateur respire dans le masque. Lorsque le
masque est retiré, le traitement arrête automatiquement après quelques
Français 7
secondes.
masque est utilisé, il faut ajuster ce réglage lorsqu'on change de masque.
que l'air ne soit pas trop froid ou trop sec au début du traitement.
Page 30

Entretien de l'appareil
Il est important de nettoyer périodiquement l'appareil AirCurve 10 afin d'assurer l'administration d'un
traitement optimal. Les sections suivantes décrivent comment démonter, nettoyer, vérifier et
remonter l'appareil.
Démontage
1. Tenir le réservoir d'eau par le haut et le bas, appuyer légèrement dessus et le tirer hors de
l'appareil.
2. Ouvrir le réservoir d'eau et jeter toute l'eau restante.
3. Prendre le manchon du circuit respiratoire et l'enlever délicatement de l'appareil.
4. Prendre le manchon du circuit respiratoire et l'articulation du masque et les séparer délicatement.
Nettoyage
L'appareil doit être nettoyé chaque semaine de la façon décrite. Consulter le guide de l'utilisateur du
masque pour obtenir des instructions détaillées sur le nettoyage du masque.
1. Nettoyer le réservoir d’eau et le circuit respiratoire avec de l’eau tiède et un détergent doux.
Ne pas laver le circuit respiratoire dans un lave-vaisselle ou une laveuse.
2. Rincer soigneusement le réservoir d’eau et le circuit respiratoire et les laisser sécher à l’abri de la
lumière directe du soleil et de la chaleur.
3. Nettoyer l’extérieur de l’appareil à l’aide d’un linge sec.
8
Page 31

Vérification
Il faut vérifier périodiquement si le réservoir d’eau, le circuit respiratoire et le filtre à air sont
endommagés.
1. Vérifier le réservoir d’eau :
• Remplacer le réservoir d’eau s’il fuit ou s’il est fissuré, terne ou abîmé.
• Le remplacer si le joint est fissuré ou déchiré.
• Enlever les résidus de poudre blanche en utilisant une solution comprenant une mesure de
vinaigre domestique pour dix mesures d’eau.
2. Vérifier le circuit respiratoire et le remplacer s’il est troué, déchiré ou fissuré.
3. Vérifier le filtre à air et le remplacer au moins tous les six mois. Le remplacer plus souvent s’il est
troué ou s’il est obstrué par de la saleté ou de la poussière.
Pour remplacer le filtre à air :
1. Ouvrir le panneau du filtre à air et retirer le filtre à air usagé.
Il n’est ni lavable ni réutilisable.
2. Mettre un nouveau filtre à air sur le panneau du filtre à air et fermer le panneau.
S'assurer que le filtre à air est bien installé en tout temps afin d'éviter que l'eau et la poussière
pénètre dans l'appareil.
Remontage
Lorsque le réservoir d’eau et le circuit respiratoire sont secs, les pièces peuvent être remontées.
1. Raccorder fermement le circuit respiratoire à la sortie d’air située à l’arrière de l’appareil.
2. Ouvrir le réservoir d’eau et le remplir d’eau distillée à température ambiante jusqu’au repère de
niveau d’eau maximal.
3. Fermer le réservoir d’eau et l’insérer sur le côté de l’appareil.
4. Raccorder fermement l’extrémité libre du circuit respiratoire au système de masque assemblé.
Donnée de traitement
L'appareil AirCurve 10 enregistre les données de traitement pour l'utilisateur et pour le fournisseur de
soins, pour qu'il puisse analyser le traitement et y apporter des modifications au besoin. Les données
sont enregistrées et ensuite transmises au fournisseur de soins par un réseau sans fil ou par le biais
d'une carte SD.
Français 9
Page 32

Transmission sans fil
L'appareil AirCurve 10 est doté de la fonctionnalité de communication par réseau cellulaire. Cela
permet la transmission sans fil des données de traitement au fournisseur de soins afin de rehausser
la qualité du traitement. Cela permet également la mise à jour des paramètres de traitement dans de
plus brefs délais ou la mise à niveau du logiciel de l'appareil. L'icône d'intensité du signal sans fil
affichée dans le coin supérieur droit de l'écran indique l'intensité du signal.
Les données sont généralement transmises après l'arrêt du traitement. Afin de s'assurer que les
données sont transmises, laisser l'appareil branché à une prise de courant en tout temps et veiller à
ce qu'il ne soit pas en Mode Avion.
Remarques :
• Il est possible que les données de traitement ne soient pas transmises si l'appareil est utilisé à
l'extérieur du pays ou de la région où il a été acheté.
• Il est possible que les appareils dotés d'un module de communication par réseau cellulaire ne
soient pas offerts dans toutes les régions.
Carte SD
Une autre façon de transmettre les données de traitement au fournisseur de soins consiste à utiliser
la carte SD. Le fournisseur de soins peut demander à l'utilisateur de lui envoyer périodiquement la
carte SD par la poste ou de la lui apporter. Lorsque le fournisseur de soins le demande, retirer la carte
SD.
Ne pas retirer la carte SD de l’appareil lorsque la lumière SD clignote.
Pour retirer la carte SD :
1. Ouvrir le panneau de la carte SD.
2. Appuyer sur la carte SD pour la libérer. Retirer la carte SD de l'appareil.
Placer la carte SD dans l'enveloppe de protection et la renvoyer au fournisseur de soins.
Pour de plus amples renseignements sur le retrait et l’insertion de la carte, se référer à l’enveloppe de
protection de la carte SD fournie avec l'appareil.
Remarque : La carte SD ne doit pas être utilisée à d'autres fins.
Voyage
On peut apporter l'appareil AirCurve 10 partout où l'on va. Il suffit d'observer les consignes
suivantes :
• Utiliser le sac de transport fourni pour éviter d’endommager l’appareil.
• Vider le réservoir d’eau et le ranger séparément dans le sac de transport.
• S'assurer d'avoir le bon cordon d'alimentation pour la destination choisie. Pour savoir comment
s'en procurer un, communiquer avec le fournisseur de soins.
10
Page 33

• Si une batterie externe est utilisée, l'humidificateur doit être éteint afin de maximiser l'autonomie
Problème/Cause possible
Solution
de la batterie. Pour ce faire, mettre le Niv. d'Humidité à Off.
Voyage en avion
L'appareil AirCurve 10 peut être pris à bord, comme bagage à main. Cet appareil médical ne compte
pas dans le calcul de la limite imposée pour les bagages à main.
L'appareil AirCurve 10 peut être utilisé en avion, puisqu'il est conforme aux exigences de la Federal
Aviation Administration (FAA). Une lettre de conformité pour le voyage en avion peut être téléchargée
et imprimée au www.resmed.com.
Lorsque l'appareil est utilisé en avion :
• S'assurer que le réservoir d'eau est complètement vide et qu'il est inséré dans l'appareil.
L'appareil ne fonctionnera pas si le réservoir d'eau n'est pas installé.
• Activer le Mode Avion.
Pour activer le mode avion :
1. Dans Mes options, tourner la molette de réglage
pour mettre en surbrillance le Mode Avion, puis
appuyer sur la molette.
2. Tourner la molette de réglage pour sélectionner On,
puis appuyer sur la molette pour enregistrer la
modification.
L'icône du mode Avion apparaît en haut à droite
de l'écran.
ATTENTION
Ne pas utiliser l'appareil en avion s'il y a de l'eau dans le réservoir d'eau en raison du risque
d'inhalation d'eau en cas de turbulence.
Stratégie de dépannage
Si des problèmes surviennent, consulter les rubriques de dépannage suivantes. S'il est impossible de
résoudre le problème, communiquer avec le fournisseur de soins ou avec ResMed. Ne pas essayer
d’ouvrir l’appareil.
General troubleshooting
Il y a une fuite d'air provenant du masque.
Le masque n'est peut-être pas ajusté correctement. S'assurer que le masque est ajusté correctement. Consulter le
guide de l'utilisateur du masque pour obtenir des instructions
sur l'ajustement du masque ou utiliser la fonction Ajus.
masque pour vérifier l'ajustement et l'étanchéité du masque.
J'ai le nez sec ou bouché
L'humidité est peut-être réglée à un niveau trop bas. Ajuster le niveau d'humidité.
Si un circuit respiratoire chauffant ClimateLineAir est utilisé,
consulter le guide de l'utilisateur de ClimateLineAir.
Français 11
Page 34

Problème/Cause possible
Solution
J'ai des gouttelettes d'eau sur le nez, dans le masque et dans le circuit respiratoire
L'humidité est peut-être réglée à un niveau trop élevé. Ajuster le niveau d'humidité.
Si un circuit respiratoire chauffant ClimateLineAir est utilisé,
consulter le guide de l'utilisateur de ClimateLineAir.
J'ai la bouche très sèche et j'ai une sensation désagréable dans la bouche
De l'air s'échappe peut-être par la bouche. Augmenter le niveau d'humidité.
L'utilisation d'une mentonnière pour maintenir la bouche
fermée ou d'un masque facial complet pourrait être
nécessaire.
La pression d'air dans le masque semble trop élevée (j'ai l'impression de recevoir trop d'air)
La fonction de rampe est peut-être désactivée. Utiliser l'option Durée de rampe.
La pression d'air dans le masque semble trop basse (j'ai l'impression de ne pas recevoir assez d'air)
La fonction de rampe est peut-être en cours. Attendre que la pression d’air se forme ou désactiver la durée
de rampe.
L'écran est noir
Le rétroéclairage de l'écran s'est peut-être éteint. Il s'éteint
automatiquement après un bref délai.
Appuyer sur Accueil ou sur la molette de réglage pour le
rallumer.
L'alimentation n'est peut-être pas branchée. Brancher le module d'alimentation et s'assurer que la fiche
est insérée complètement.
J'ai arrêté le traitement, mais l'appareil souffle toujours de l'air
L'appareil se refroidit. L'appareil souffle une petite quantité d'air afin d'éviter la
formation de condensation dans le circuit respiratoire. Il
arrêtera automatiquement après 20 minutes.
Le réservoir d'eau fuit
Le réservoir d’eau n’est peut-être pas bien monté. Vérifier que le réservoir d’eau n’est pas endommagé et le
remonter correctement.
Le réservoir d’eau est peut-être endommagé ou fissuré. Communiquer avec le fournisseur de soins pour qu'il le
remplace.
Mes données de traitement n'ont pas été transmises à mon fournisseur de soins
La couverture sans fil est peut-être mauvaise. S'assurer que l'appareil se trouve dans une zone de
couverture (p. ex, sur votre table de chevet et pas dans un
tiroir ou sur le plancher).
L'icône d'intensité du signal sans fil
couverture est bonne lorsque toutes les barres sont affichées
et une mauvaise couverture lorsqu'un nombre inférieur de
barres est affiché.
12
indique que la
Page 35

Problème/Cause possible
Solution
L'icône Aucune connexion sans fil apparaît en haut à
Message de l’appareil/Cause possible
Solution
droite de l'écran. Aucun réseau sans fil n'est disponible.
S'assurer que l'appareil se trouve dans une zone de
couverture (p. ex, sur votre table de chevet et pas dans un
tiroir ou sur le plancher).
Envoyer la carte SD au fournisseur de soins, si on vous le
demande. La carte SD contient aussi vos données
thérapeutiques.
L’appareil est peut-être en Mode Avion. Éteindre le Mode Avion, voir Voyager en avion.
Le transfert de données n’est pas activé sur votre appareil. Communiquez avec votre fournisseur de soins pour activer le
service de transfert de données.
L'écran et les boutons clignotent
La mise à niveau du logiciel est en cours. Il faut environ 10 minutes pour que la mise à niveau du
logiciel s'effectue.
Device messages
Fuite importante, connectez réservoir ou capot latéral
Le réservoir d'eau n'est peut-être pas installé correctement. S'assurer que le réservoir d'eau est installé correctement.
Le joint du réservoir d'eau n'est peut-être pas inséré
correctement.
Fuite élevée détectée, raccorder le circuit
Le circuit respiratoire n'est peut-être pas raccordé
correctement.
Le masque n'est peut-être pas ajusté correctement. S'assurer que le masque est ajusté correctement. Consulter le
Ouvrir le réservoir d'eau et vérifier que le joint est inséré
correctement.
Vérifier que le circuit respiratoire est raccordé fermement aux
deux extrémités.
guide de l'utilisateur du masque pour obtenir des instructions
sur l'ajustement du masque ou utiliser la fonction Ajus.
masque pour vérifier l'ajustement et l'étanchéité du masque.
Circuit respiratoire bouché, veuillez le vérifier
Le circuit respiratoire est peut-être obstrué. Vérifier le circuit respiratoire et retirer tout élément qui
l’obstrue. Appuyer sur la molette pour effacer le message,
puis appuyer sur Marche/Arrêt pour relancer l’appareil.
Erreur carte SD. Retirez-la, puis appuyez sur Marche pour lancer le traitement
La carte SD n'est peut-être pas insérée correctement. Retirer et réinsérer la carte SD.
Carte lecture seule, veuillez enlever, déverr. et réinsérer carte SD
Le loquet de la carte SD est peut-être en position verrouillée
(lecture seule).
Français 13
Déplacer le loquet de la carte SD de la position
verrouillée
à la position d’écriture et réinsérer la carte.
Page 36

Message de l’appareil/Cause possible
Solution
Erreur système. Voir manuel utilisateur, section Erreur 004
L’appareil a peut-être été laissé dans un environnement
chaud.
Laissez le refroidir avant de le réutiliser. Débrancher puis
rebrancher le module d’alimentation pour redémarrer
l’appareil.
Le filtre à air est peut-être obstrué. Vérifier le filtre à air et le remplacer s'il est obstrué.
Débrancher puis rebrancher le module d’alimentation pour
redémarrer l’appareil.
Le circuit respiratoire est peut-être obstrué. Vérifier le circuit respiratoire et retirer tout élément qui
l’obstrue. Appuyer sur la molette pour effacer le message,
puis appuyer sur Marche/Arrêt pour relancer l’appareil.
Il y a peut-être de l'eau dans le circuit respiratoire. Vider l'eau du circuit respiratoire. Débrancher puis rebrancher
le module d’alimentation pour redémarrer l’appareil.
Tous les autres messages d’erreur, par exemple, Erreur système. Voir manuel utilisateur, section Erreur 0XX
Une erreur irréparable s'est produite sur l'appareil. Communiquer avec le fournisseur de soins. Ne pas essayer
d’ouvrir l’appareil.
Remontage des pièces
Certaines pièces de l'appareil sont conçues pour s'enlever facilement pour éviter d'endommager ces
pièces ou l'appareil. Il est facile de les remonter de la façon décrite ci-dessous.
Pour insérer le joint du réservoir d'eau :
1. Placer le joint dans le couvercle.
2. Appuyer sur tous les côtés du joint jusqu'à ce qu'il s'enclenche.
14
Page 37

Pour remonter le couvercle du réservoir d'eau :
1. Insérer un côté du couvercle dans le trou de centrage de la base.
2. Glisser l'autre côté dans la crête jusqu'à ce qu'il s'enclenche.
Avertissements et précautions d'ordre général
AVERTISSEMENT
• Veiller à installer le circuit respiratoire de façon à éviter qu'il s'enroule autour de la tête ou
du cou.
• S'assurer que le cordon d’alimentation et la fiche sont en bon état et que l’équipement n’est
pas endommagé.
• Tenir le cordon d’alimentation à l’écart de toute surface chaude.
• Si vous remarquez tout changement inexpliqué dans la performance de l'appareil, si
l'appareil produit des sons inhabituels, si vous échappez ou manipulez incorrectement
l'appareil ou le module d'alimentation ou si le boîtier est brisé, cessez l'utilisation de
l'appareil et communiquez avec le centre de service ResMed de votre région.
• Ne pas essayer d’ouvrir ou de modifier l’appareil. Il ne contient aucune pièce pouvant être
entretenue par l’utilisateur. Les réparations et l’entretien doivent être effectués par un
technicien agréé ResMed uniquement.
• Risque d’électrocution. Ne pas immerger l’appareil, le module d'alimentation ou le cordon
d'alimentation dans de l'eau. Si du liquide est renversé dans l'appareil ou sur celui-ci,
débrancher l'appareil et laisser les pièces sécher. Toujours débrancher l'appareil avant de le
nettoyer et s'assurer que toutes les pièces sont sèches avant de le rebrancher.
• Ne pas fumer ni approcher de flamme nue de l’appareil lors de l’utilisation d’oxygène
d'appoint.
• Toujours s'assurer que l’appareil est en marche et que le débit d’air généré avant
l’alimentation en oxygène est en marche. Toujours éteindre l’alimentation en oxygène avant
d’éteindre l'appareil d'aide inspiratoire afin d'éviter que l'oxygène inutilisé s'accumule dans
l'appareil et crée un risque d'incendie.
• Ne pas effectuer de tâches d’entretien lorsque l’appareil est en fonction.
• L'appareil ne doit pas être utilisé à côté d'autres pièces d'équipement ou empilé sur d’autres
pièces d'équipement. S’il est impossible de l’utiliser autrement, assurez-vous que l'appareil
fonctionne normalement lorsqu’il est placé à l’endroit où il sera utilisé.
• Il est déconseillé d’utiliser des accessoires autres que ceux qui sont indiqués dans ce manuel.
Ils risquent d’augmenter les émissions ou de réduire l’immunité de l'appareil.
ATTENTION
• Utiliser uniquement des pièces et des accessoires de ResMed avec l'appareil. L'utilisation de
pièces ne provenant pas de ResMed peut diminuer l'efficacité du traitement et/ou
endommager l'appareil.
Français 15
Page 38

• Avec cet appareil, utiliser uniquement les masques avec évent (avec fuite intentionnelle)
Module d’alimentation 90 W
Calibre de signal d’entrée CA :
100–240 V, 50–60 Hz 1,0–1,5 A, classe II
Tension de sortie CC :
24 V 3,75 A
Consommation de courant typique :
53 W (57 VA)
Consommation énergétique maximale :
104 W (108 VA)
Conditions ambiantes
Température de fonctionnement :
de +5 °C à +35 °C (+41 °F à +95 °F)
Remarque : La température du débit d’air produit par cet
Humidité de fonctionnement :
de 10 % à 95 % d’humidité relative (sans condensation)
Altitude de fonctionnement :
du niveau de la mer à 2 591 m (8 500 pi); intervalle de
Température de stockage et de transport :
-20 °C à +60 °C (-4 °F à +140 °F)
Humidité de stockage et de transport :
de 5 % à 95 % d’humidité relative (sans condensation)
Compatibilité électromagnétique
www.resmed.com, à la page Produits, sous Service et soutien technique.
recommandés par ResMed ou par le médecin prescripteur. La mise en place d'un masque
sans que l'appareil souffle de l'air peut entraîner une réinhalation de l'air expiré. S'assurer
que les orifices de ventilation du masque sont libres et ne sont pas obstrués, pour maintenir
l'influx d'air frais dans le masque.
• Veiller à placer l'appareil de façon à éviter que quelqu'un puisse buter dedans, le faire
tomber ou se prendre les pieds dans le cordon d'alimentation.
• L'obstruction du circuit respiratoire et/ou de l'entrée d'air de l’appareil pendant le
fonctionnement risque de causer une surchauffe de l'appareil.
• S'assurer que la zone autour de l’appareil est sèche et propre et enlever la literie, les
vêtements ou autres objets qui pourraient bloquer l’entrée d’air ou couvrir le module
d’alimentation.
• Ne pas placer l'appareil sur le côté pour éviter l'accumulation d'eau dans l'appareil.
• Une mauvaise configuration du système peut engendrer une mauvaise lecture de la
pression du masque. Assurez-vous que le système soit correctement installé.
• Ne pas utiliser d’eau de Javel, de chlore, d’alcool, de solutions parfumées, de savons
hydratants ou antibactériens ou d'huiles parfumées pour nettoyer l'appareil, le réservoir
d'eau ou le circuit respiratoire. Ces solutions risquent d’endommager l'humidificateur ou de
nuire à son fonctionnement et de réduire la durée de vie des produits.
• Si l'humidificateur est utilisé, toujours placer l'appareil sur une surface plane à un niveau
inférieur à celui de la tête afin d’éviter que le masque et le circuit respiratoire se remplissent
d'eau.
• Laisser le réservoir refroidir pendant dix minutes avant de le manipuler afin de laisser l'eau
refroidir et de s'assurer que le réservoir n'est pas trop chaud au toucher.
• Vérifier que le réservoir est vide avant de transporter l'appareil.
Caractéristiques techniques
115 V, 400 Hz 1,5 A, classe II (courant nominal pour une
utilisation en avion)
appareil de thérapie et inspiré par le patient peut être
supérieure à la température ambiante. En cas d’exposition à
une température ambiante extrême (40 °C/104 °F), l’appareil
reste sécuritaire.
pression d’air de 1 013 hPa à 738 hPa
L’appareil AirCurve 10 est conforme à toutes les exigences de compatibilité électromagnétique (CEM) applicables,
conformément à CEI 60601-1-2:2007, pour les environnements commerciaux et résidentiels et pour l’industrie légère. Il est
recommandé que les appareils de communications mobiles soient gardés à au moins 1 m de l’appareil.
Pour des renseignements sur les émissions et l’immunité électromagnétiques de cet appareil ResMed, visiter le site
16
Page 39

Classification IEC 60601-1:2005
Classe II (double isolation), type BF, indice de protection contre la pénétration de liquides IP22.
Capteurs
Capteur de pression :
Situé à l’intérieur de la sortie de l’appareil, type de pression
relative analogique, de -5 à +45 cm H2O
Capteur de débit :
Intégré à l’entrée de l’appareil, capteur numérique de débit
Pression maximale délivrée en cas de défaillance dans des conditions uniformes de fonctionnement
30 cm H2O pendant plus de 6 s ou 40 cm H2O pendant plus de 1 s.
Volume
Niveau de pression mesuré conformément à la norme ISO 17510-1:2007 (mode CPAP) :
Standard :
26,6 dBA avec une incertitude de 2 dBA
Niveau de puissance mesuré conformément à la norme ISO 17510-1:2007 (mode CPAP) :
SlimLine :
34,6 dBA avec une incertitude de 2 dBA
Standard :
34,6 dBA avec une incertitude de 2 dBA
Valeurs d’émission sonore à deux chiffres déclarées conformément à la norme ISO 4871:1996.
Physique – appareil et réservoir d’eau
Dimensions (L x l x H) :
116 mm x 255 mm x 150 mm
Sortie d’air (conforme à la norme ISO 5356-1:2004) :
22 mm
Poids (appareil et réservoir d’eau standard) :
1 248 g (44 oz)
Poids (appareil et réservoir d’eau lavable) :
1 248 g (44 oz)
Boîtier :
Thermoplastique ignifuge
Capacité en eau :
Jusqu’au repère de niveau maximal 380 ml
Matériau, réservoir d’eau standard :
Plastique moulé par injection, acier inoxydable et joint de
Matériau, réservoir d’eau nettoyable :
Plastique moulé par injection, acier inoxydable et joint de
silicone
Température
Température maximale de la plaque chauffante :
68 °C (154 °F)
Température maximale du gaz :
≤ 41 °C (≤ 106 °F)
Filtre à air
Standard :
Matériel : Fibre de polyester non tissée
Hypoallergénique :
Matériel : Fibres acryliques et de polypropylène dans un
Utilisation en avion
ResMed confirme que cet appareil est conforme aux exigences de la Federal Aviation Administration (FAA) (RTCA/DO-160,
section 21, catégorie M) pour tout ce qui touche au transport aérien.
Module sans fil
Technologie utilisée :
3G (États-Unis et Canada seulement)
massique, de -70 à +180 l/min
L’appareil s’éteindra en cas de défaillance unique si la pression en conditions uniformes de fonctionnement est supérieure à :
SlimLine : 26,6 dBA avec une incertitude de 2 dBA
(4,6 po x 9,6 po x 5,9 po)
silicone
Coupe-circuit : 74 °C (165 °F)
Captation moyenne : >75 % pour la poussière de ~7 microns
support en polypropylène
Efficacité : >98 % pour la poussière de ~7-8 microns; >80 %
pour la poussière de 0,5 micron
2G GSM (toutes les régions en dehors des États-Unis et du
Français 17
Canada)
Page 40

ID de la IC : 9103A-AIR103G (États-Unis et Canada seulement)
L’appareil est conforme aux normes RSS exemptes de licence d’Industrie Canada.
www.resmed.com/downloads/devices.
ID de la FCC : 2ACHL-AIR103G
Le dispositif est conforme aux règlements de la FCC.
Calibre de pression de fonctionnement
CPAP
4 à 20 cm H2O
Oxygène d'appoint
Débit maximal :
15 l/min (CPAP, ASV); 4 l/min (ASVAuto)
Trajectoire de l’air
8. Filtre d’entrée
Durée de vie théorique
Appareil, module d’alimentation :
5 ans
Réservoir d’eau standard, circuit respiratoire :
6 mois
Général
Conçu pour être utilisé par le patient.
Pression du masque
Humidité relative (%)
Valeur nominale de sortie du système HA1,
Réglage 4
Réglage 8
Réglage 4
Réglage 8
3
85
100 6 >10
4
85
100 6 >10
10
85
100 6 >10
20
85
90 6 >10
25
85
90 6 >10
Circuit respiratoire
Matériel
Longueur
Diamètre intérieur
ClimateLineAir
Composantes plastiques et électriques flexibles
2 m (6,6 pi)
15 mm (0,6 po)
SlimLine
Plastique flexible
1,8 m (6 pi)
15 mm (0,6 po)
Normal
Plastique flexible
2 m (6,6 pi)
19 mm (0,75 po)
La distance minimale entre l’appareil et le corps doit être de 2 cm pendant le fonctionnement de l’appareil.
Des informations supplémentaires concernant la conformité IC de cet appareil sont disponibles en consultant
Le dispositif doit être utilisé à une distance minimale de 0.8 po (2 cm) du corps lorsqu’il fonctionne.
Le site www.resmed.com/downloads/devices contient des renseignements supplémentaires au sujet des règlements de la
FCC applicables à ce dispositif.
ASV, ASVAuto : 4 à 25 cm H2O
1. Capteur de débit
2. Turbine
3. Capteur de pression
4. Masque
5. Circuit respiratoire
6. Réservoir d’eau
7. Appareil
Réservoir d’eau lavable : 2,5 ans
Rendement de l'humidificateur
Les réglages suivants ont été testés à une température ambiante de 22 °C (71,6 °F) :
cm H2O
1
HA – Humidité absolue en mg/l
2
BTPS - de l'anglais Body Temperature Pressure Saturated (à la pression et à la température corporelles et saturé de vapeur d'eau)
Physiques
18
BTPS2
Page 41

Coupe-circuit de la température du circuit respiratoire chauffant : ≤ 41 °C (≤ 106 °F)
Valeur
Calibre
Résolution d'affichage
Pression du masque
4-25 cm H2O
0,1 cm H2O
Fuite
0–120 l/min
1 l/min
Fréquence respiratoire
0–50 RPM
1 RPM
Valeur
Précision1
Mesure de la pression
Débit et valeurs dérivés du débit1 :
Fuite2
±12 l/min ou 20 % de la lecture, selon la valeur la plus élevée, à un débit situé
entre 0 et 60 l/min
Fréquence respiratoire
2,3
±1,0 RPM
Remarques :
• Le fabricant se réserve le droit de modifier ces caractéristiques sans notification préalable.
• L’extrémité du connecteur électrique du circuit respiratoire chauffant n’est compatible qu’avec la sortie d’air de l’appareil
et ne doit pas être fixée au masque.
• Ne pas utiliser de circuits respiratoires conductifs d’électricité ou antistatiques.
• Les valeurs de température et d’humidité relative indiquées ne sont pas mesurées.
Valeurs affichées
Capteur de pression à la sortie d'air :
Valeurs issues du débit :
Volume courant 0–4000 ml 1 ml
Ventilation minute 0–30 l/min 0,1 l/min
Pression du masque2 ±[0,5 cm H2O + 4 % de la valeur mesurée]
min. ±6 l/min ou 10 % de la lecture, selon la valeur la plus élevée, à un débit positif
situé entre 0 et 150 l/min
Volume courant
Ventilation minute
1
Les résultats sont exprimés en ATPD (de l’anglais Ambient Temperature and Pressure, Dry; Température et pression ambiantes, sèches)
2
La précision peut être réduite par la présence de fuites, d’oxygène d’appoint, de volumes courants <100 ml ou de ventilation minute <3 l/min.
3
Précision des mesures vérifiée conformément à la norme ISO 10651-1:2004 pour les dispositifs d'assistance respiratoire à domicile
(Figure 101 et Tableau 101) en utilisant les débits de ventilation du masque ResMed.
2,3
±20 %
2,3
±20 %
Français 19
Page 42

Précision de la pression
Circuit respiratoire standard
Circuit respiratoire SlimLine
Sans humidification
± 0.5 cm H2O
± 0.5 cm H2O
Appareil sans humidification et avec circuit respiratoire standard / Appareil avec humidification et avec circuit respiratoire
Pression (cm H2O)
10 BPM
15 BPM
20 BPM
4
0,5 /0,5
0,5 / 0,5
0,8 / 0,8
8
0,5 / 0,5
0,5 / 0,5
0,8 / 0,8
12
0,5 / 0,5
0,5 / 0,5
0,8 / 0,8
16
0,5 / 0,5
0,5 / 0,5
0,8 / 0,8
25
0,3 / 0,3
0,5 / 0,4
0,7 /0,7
Pression (cm H2O]
10 BPM
15 BPM
20 BPM
8
0,5 / 0,5
0,5 / 0,5
0,8 / 0,8
16
0,5 / 0,5
0,5 / 0,5
0,8 / 0,8
25
0,4 / 0,3
0,6 / 0,5
0,8 / 0,8
Variation de la pression statique maximale à 10 cm H
O conformément à la norme ISO 17510-1:2007
2
Avec humidification ± 0.5 cm H2O ± 0.5 cm H2O
Variation de la pression dynamique maximale conformément à la norme ISO 17510-1:2007
standard
20 0,5 / 0,5 0,5 / 0,5 0,8 / 0,8
Appareil sans humidification et avec circuit respiratoire SlimLine/ Appareil avec humidification et avec circuit respiratoire
SlimLine
4 0,5 / 0,5 0,5 / 0,5 0,8 / 0,8
12 0,5 / 0,5 0,5 / 0,5 0,8 / 0,8
20 0,5 / 0,5 0,5 / 0,5 0,8 / 0,8
Symboles
Les symboles suivants peuvent apparaître sur le produit ou l'emballage.
Lire les instructions avant l'utilisation. Indique un avertissement ou une précaution.
Suivre les instructions avant l'utilisation. Fabricant. Représentant européen
autorisé.
l’appareil.
Code de lot. Numéro de référence. Numéro de série. Numéro de
Marche/Arrêt. Poids de l'appareil. Protégé des objets de la taille d'un doigt et
de l'eau qui s'écoule lorsqu'il est penché jusqu'à un angle de 15 degrés par rapport à l'orientation
indiquée.
Courant continu. Pièce appliquée de type BF. Équipement de classe II.
Limite d’humidité. Limite de température. Rayonnement non ionisant. Logo 1 de
contrôle de la pollution pour la Chine.
Logo 2 de contrôle de la pollution pour la Chine.
Sur ordonnance uniquement (selon la loi fédérale américaine, cet appareil ne peut être
vendu aux États-Unis que par un médecin ou sur prescription médicale).
maximal.
de pression atmosphérique.
RTCA.
20
Utiliser uniquement de l'eau distillée. Altitude de fonctionnement. Limite
Conforme à la section 21, catégorie M de la norme DO-160 de la
Niveau d'eau
Page 43

Renseignements relatifs à l'environnement
• Masques (y compris l'entourage rigide, la bulle, le harnais et le circuit) — à
90 jours
• Batteries à utiliser dans les systèmes de batterie interne et externe de ResMed
6 mois
•
1 an
• Appareils de CPAP, appareils à deux niveaux et appareils de ventilation (y compris
2 ans
Cet appareil doit être éliminé séparément et non avec les déchets municipaux qui ne sont pas triés.
Pour éliminer votre appareil, utilisez les systèmes de collecte, de réutilisation et de recyclage offerts
dans votre région. L’utilisation de ces systèmes de collecte, de réutilisation et de recyclage est
conçue pour réduire l’impact sur les ressources naturelles et empêcher les substances dangereuses
de nuire à l’environnement.
Si vous souhaitez obtenir des renseignements sur ces systèmes d’élimination, veuillez communiquer
avec votre administration des déchets locale. Le symbole de la poubelle barrée vous invite à utiliser
ces systèmes d’élimination. Si vous souhaitez obtenir des renseignements sur la collecte et
l’élimination de votre appareil ResMed, veuillez communiquer avec votre bureau ResMed ou votre
distributeur local ou consulter le site www.resmed.com/environment.
Entretien
L’appareil AirCurve 10 est conçu pour fonctionner de façon sécuritaire et fiable lorsqu’il est utilisé
conformément au mode d’emploi fourni par ResMed. ResMed recommande de faire inspecter et
réparer l’appareil AirCurve 10 par un centre de service ResMed autorisé en cas de signes d’usure ou
de préoccupations liées au fonctionnement de cet appareil. Autrement, les réparations et l’inspection
de ces produits ne devraient normalement pas être requises au cours de leur durée de vie théorique.
Garantie limitée
ResMed Pty Ltd (désignée ci-après « ResMed ») garantit votre produit ResMed contre tout défaut de
matériaux et de main-d’œuvre pour la période spécifiée ci-après à compter de la date d’achat.
P
roduit Période de garantie
l’exception des dispositifs à usage unique
• Accessoires — à l’exception des dispositifs à usage unique
• Capteurs digitaux de pouls flexibles
• Réservoirs d’eau d’humidificateur
Capteurs digitaux de pouls de type clip
• Modules de transmission de données pour les appareils à deux niveaux et les
appareils de CPAP
• Oxymètres et adaptateurs d’oxymètre pour les appareils à deux niveaux et les
appareils de CPAP
• Réservoirs d'eau nettoyables pour humidificateur
• Appareils de commande de la titration
les modules d’alimentation externes)
• Humidificateurs
• Accessoires de batteries
• Dispositifs portables de diagnostic et dépistage
Seul le client initial est couvert par la présente garantie. Celle-ci n’est pas cessible.
En cas de défaillance du produit dans des conditions normales d’utilisation, ResMed, à son entière
discrétion, répare ou remplace le produit défectueux ou toute pièce.
Français 21
Page 44

La présente garantie limitée ne couvre pas : a) tout dommage résultant d'une utilisation incorrecte,
d'un usage abusif ou d'une modification ou d'une transformation opérée sur le produit; b) les
réparations et l’entretien effectués par tout service de réparation sans l'autorisation expresse de
ResMed; c) tout dommage ou contamination causé par de la fumée de cigarette, de pipe, de cigare
ou autre.
La garantie est annulée pour les produits vendus ou revendus dans un pays autre que celui où ils ont
été achetés à l'origine.
Les réclamations au titre de la garantie pour les produits défectueux doivent être présentées au lieu
d'achat par le client initial.
La présente garantie remplace toute autre garantie expresse ou implicite, y compris toute garantie
implicite de qualité marchande ou d’adéquation à un usage particulier. Certains pays ou États
n’autorisent pas les limitations de durée pour les garanties implicites; il est donc possible que la
limitation susmentionnée ne s’applique pas à votre cas.
La société ResMed ne peut être tenue responsable de tout dommage accessoire ou indirect résultant
de la vente, de l’installation ou de l’utilisation de tout produit ResMed. Certains pays ou États
n’autorisent ni l’exclusion ni la limitation des dommages accessoires ou indirects; il est donc possible
que la limitation susmentionnée ne s’applique pas à votre cas.
La présente garantie vous octroie des droits reconnus par la loi. Vous pouvez également détenir
d’autres droits qui varient en fonction du pays où vous habitez. Pour de plus amples informations sur
vos droits de garantie, veuillez contacter votre fournisseur ou ResMed.
Renseignements complémentaires
Pour toute question ou demande de renseignements supplémentaires sur l'utilisation de l'appareil,
communiquer avec le fournisseur de soins.
22
Page 45

ESPAÑOL
Bienvenida
El AirCurve™ 10 ASV es un dispositivo de presión positiva en las vías respiratorias que pertenece a la
categoría de servo-ventilador adaptable.
ADVERTENCIA
Lea la totalidad de la guía antes de utilizar este dispositivo.
PRECAUCIÓN
En EE.UU., la ley federal exige que este dispositivo sea vendido únicamente por un médico o
por su orden.
Indicaciones de uso de AirCurve 10 ASV
El dispositivo AirCurve 10 ASV está indicado para el tratamiento de la apnea obstructiva del sueño
(AOS), apneas centrales o mixtas, o respiración periódica en pacientes que pesan más de
30 kg (66 libras). Está diseñado para uso doméstico y hospitalario.
El humidificador está diseñado para uso en un solo paciente en el hogar y para la reutilización en un
entorno hospitalario o institucional.
Contraindicaciones
El tratamiento ASV está contraindicado en pacientes con insuficiencia cardíaca sintomática crónica
(New York Heart Association 2-4) con fracción de eyección ventricular izquierda reducida (FEVI ≤ 45
%) y apnea central del sueño predominante moderada o grave.
La terapia con presión positiva en las vías respiratorias puede estar contraindicada en algunos
pacientes con las siguientes afecciones preexistentes:
• enfermedad pulmonar bullosa grave
• neumotórax o neumomediastino
• presión arterial patológicamente baja, especialmente si está asociada con una disminución del
volumen intravascular
• deshidratación
• fuga de líquido cefalorraquídeo, cirugía craneal reciente o traumatismo
Efectos adversos
Debe informar a su médico tratante sobre cualquier dolor torácico inusual, una cefalea grave o un
aumento en su dificultad respiratoria. Una infección aguda en las vías respiratorias superiores puede
requerir la suspensión temporal del tratamiento.
Durante el curso del tratamiento con el dispositivo pueden aparecer los siguientes efectos
colaterales:
• resequedad de la nariz, boca o garganta
• epistaxis
• distensión gástrica
• molestia sinusal o del oído
• irritación ocular
• erupciones cutáneas
Español 1
Page 46

Sinopsis
1
Salida de aire
5
Cubeta de agua
2
Cubierta del filtro de aire
6
Pantalla
3
Entrada de alimentación
7
Cubierta del adaptador
4
Número de serie y número del dispositivo
8
Cubierta de la tarjeta SD
El dispositivo AirCurve 10 incluye lo siguiente:
• Dispositivo con humidificador HumidAir
• Cubeta de agua
• Tubo de aire
• Fuente de alimentación
• Bolso para viaje
• Tarjeta SD (ya insertada)
Contacte a su proveedor de atención para consultarle sobre una variedad de accesorios disponibles
para ser usados con el dispositivo, entre ellos:
• Tubo de aire (térmico y no térmico): ClimateLineAir
• Cubeta de agua: Cubeta de agua estándar, cubeta de agua lavable (puede ser desinfectada)
• Filtro: Filtro hipoalergénico, filtro estándar
• Conversor AC/DC Air10
™
• Lector de tarjetas SD
• Adaptador del medidor de oxígeno Air10
• Adaptador USB Air10
Acerca del dispositivo
™
integrado
™
, SlimLine™, Estándar
2
Page 47

Acerca del panel de control
Presiónelo para iniciar o detener el tratamiento.
Gírelo para navegar el menú y presiónelo para seleccionar
Botón Ence/Apag
Disco
Botón de inicio Oprima para volver a la pantalla Inicio.
Pueden aparecer diferentes íconos en la pantalla en distintos momentos, entre ellos:
Período rampa
Humedad
El humidificador está
calentando
El humidificador está
enfriando
Presione y mantenga presionado durante tres segundos
para ingresar en el modo ahorro de energía.
una opción.
Gírelo para ajustar la opción seleccionada y presiónelo
para guardar el cambio.
Intensidad de la señal inalámbrica (verde)
Transferencia inalámbrica sin activar (gris)
No hay conexión inalámbrica
Modo avión
Español 3
Page 48

Instalación
PRECAUCIÓN
No sobrepase el nivel máximo de llenado de la cubeta, ya que el agua podría ingresar al
dispositivo y al tubo de aire.
1. Coloque el dispositivo en una superficie plana estable.
2. Enchufe el conector de alimentación en la parte trasera del dispositivo. Conecte un extremo del
cable de alimentación en la fuente de alimentación y el otro extremo en la toma de corriente.
3. Conecte el tubo de aire firmemente a la salida de aire ubicada en la parte trasera del dispositivo.
4. Abra la cubeta de agua y llénela con agua destilada hasta que alcance la marca de nivel máximo.
No llene la cubeta de agua con agua caliente.
5. Cierre la cubeta de agua e insértela en el costado del dispositivo.
6. Conecte el extremo libre del tubo de aire firmemente al sistema de mascarilla ensamblado.
Consulte la guía de usuario de la mascarilla para obtener información más detallada.
Las mascarillas recomendadas están disponibles en www.resmed.com.
4
Page 49

Inicio del tratamiento
La barra de presión muestra las presiones inspiratoria y espiratoria en verde. La
Uso por hora –Indica la cantidad de horas de tratamiento que recibió durante
1. Ajuste su mascarilla.
2. Presione Ence/Apag o respire normalmente si SmartStart está activado.
Sabrá que ha iniciado el tratamiento cuando se muestra la pantalla Inf. Sueño.
barra verde se expande y se contrae cuando usted inspira y espira.
La pantalla se volverá negra automáticamente después de un período corto de tiempo. Puede
presionar Inicio o el disco para volver a encenderla. Si se interrumpe la alimentación durante el
tratamiento, el dispositivo reinicia el tratamiento automáticamente una vez restaurada la energía.
El dispositivo AirCurve 10 posee un sensor de luz que ajusta el brillo de la pantalla de acuerdo con la
iluminación en la sala.
Cómo detener el tratamiento
1. Retire la mascarilla.
2. Presione Ence/Apag o si está activado el SmartStart, el tratamiento se detendrá automáticamente
después de unos segundos.
El Inf. Sueño ahora le da un resumen de la sesión de tratamiento.
la última sesión.
Sellado de la mascar. –Indica qué tan bien está sellada la mascarilla:
Buen sellado de la mascarilla.
Necesita ajustes; consulte Ajus masc.
Humidificador–Indica si su humidificador está funcionando correctamente:
El humidificador está funcionando.
El humidificador puede estar averiado, contacte a su proveedor de atención.
Si fue configurado por su proveedor de atención, también verá:
Eventos por hora–Indica la cantidad de apneas e hipopneas experimentadas por hora.
Más información–Gire el disco para desplazarse hacia abajo para ver más información detallada de
uso.
Español 5
Page 50

Modo ahorro de energía
Resalte Mis opciones y presione el disco para ver su
El dispositivo AirCurve 10 registra los datos del tratamiento Para permitir que transmita los datos a su
proveedor de atención, no debe desenchufar el dispositivo. Sin embargo, puede ponerlo en el modo
de ahorro de energía para ahorrar electricidad.
Para activar el modo ahorro de energía:
• Presione y mantenga presionado Ence/Apag durante tres segundos.
La pantalla se volverá negra.
Para salir del modo ahorro de energía:
• Presione Ence/Apag una vez.
Aparece la pantalla Inicio.
Mis opciones
Su proveedor de atención ha configurado el dispositivo AirCurve 10 según sus necesidades, pero es
posible hacer pequeños ajustes para hacer más cómodo el tratamiento.
configuración actual. Desde aquí, puede personalizar sus
opciones.
Período rampa
El período de rampa, diseñado para brindar comodidad durante el comienzo del tratamiento, es un
período durante el cual la presión aumenta desde una presión de inicio baja hasta alcanzar la presión
de tratamiento.
Puede configurar su período de rampa en Apag, o entre 5 y 45 minutos.
Para ajustar el período de rampa:
1. En Mis opciones, gire el disco para resaltar el Per.
rampa y después presione el disco.
2. Gire el disco para ajustar el período de rampa en su
configuración preferida y presiónelo para guardar el
cambio.
Nivel de humedad
El humidificador humedece el aire y está diseñado para hacer que el tratamiento sea más cómodo. Si
se le está secando la nariz o la boca, aumente la humedad. Si se está humedeciendo la mascarilla,
reduzca la humedad.
Usted puede configurar el Nivel Humedad en Apag o entre 1 y 8, donde 1 corresponde a la
configuración de humedad más baja y 8, a la más alta.
6
Page 51

Para ajustar el nivel de humedad:
Alerta fuga
Cuando la función Alerta fuga está activada, el dispositivo emite un pitido si la
SmartStart
Cuando SmartStart está activado, el tratamiento comienza automáticamente
Mascarilla
Esta opción muestra la configuración del tipo de mascarilla. Si utiliza más de un
Ejecutar calent.
Esta opción le permite precalentar el agua antes de comenzar el tratamiento,
1. En Mis opciones, gire el disco para resaltar el Nivel
Humedad y después presione el disco.
2. Gire el disco para ajustar el nivel de humedad y
presiónelo para guardar el cambio.
Si continua teniendo la nariz o la boca secas, o humedad en su mascarilla, puede utilizar un tubo de
aire térmico ClimateLineAir que, junto con Climate Control, ofrece un tratamiento más cómodo.
Ajustar mascarilla
Ajus masc está diseñado para ayudarlo a evaluar e identificar las posibles fugas de aire en la
mascarilla.
Para verificar el ajuste de la mascarilla:
1. Colóquese la mascarilla según se describe en la guía de usuario de la
mascarilla.
2. En Mis opciones, gire el disco para resalta Ajust. mascarilla y después
presione el disco.
El dispositivo comienza a ventilar aire.
3. Ajuste la mascarilla, la almohadilla de la mascarilla y el arnés hasta que logre
un resultado bueno.
Para detener Ajus masc, presione el disco o Ence/Apag. Si no puede lograr un buen sellado de la
mascarilla, hablé con su proveedor de atención.
Más opciones
El proveedor de atención puede haberle dado acceso para personalizar algunas otras opciones.
mascarilla tiene una fuga de demasiado aire o si usted se quita la mascarilla
durante el tratamiento.
cuando inhala en la mascarilla. Cuando se quita la mascarilla, se detiene
automáticamente después de unos segundos.
Español 7
tipo de mascarilla, ajuste esta configuración cuando cambia de mascarilla.
para que el aire no esté frío o seco al inicio del tratamiento.
Page 52

Cómo cuidar su dispositivo
Es importante que limpie regularmente el dispositivo AirCurve 10 para asegurarse de que recibe un
tratamiento óptimo. Las siguientes secciones lo ayudarán con el deseensamblado, limpieza, revisión y
reensamblado del dispositivo.
Desensamblado
1. Sostenga la cubeta de agua desde arriba y abajo, presiónela suavemente y retírela del dispositivo.
2. Abra la cubeta de agua y descarte el agua restante.
3. Sostenga el mango del tubo de aire y suavemente retírelo del dispositivo.
4. Sostenga el mango del tubo de aire y la conexión giratoria de la mascarilla y después quítelas
suavemente.
Limpieza
Debe limpiar el dispositivo semanalmente según se describe. Consulte la guía de usuario de la
mascarilla para obtener instrucciones detalladas sobre cómo limpiar la mascarilla.
1. Lave la cubeta de agua y el tubo de aire en agua tibia con un detergente suave.
No los lave en lavadoras de ropa o de platos.
2. Enjuague bien la cubeta de agua y el tubo de aire y déjelos secar fuera de la luz solar directa o el
calor.
3. Limpie el exterior del dispositivo con un paño seco.
Revisión
Debe revisar regularmente la cubeta de agua, el tubo de aire y el filtro de aire para comprobar que no
estén dañados.
1. Revise la cubeta de agua:
• Cámbiela si presenta fugas o se ha agrietado, está turbia o llena de hoyos.
• Cámbiela si el sellado está agrietado o rasgado.
8
Page 53

• Limpie los depósitos de polvo blanco utilizando una solución de una parte de vinagre doméstico
en 10 partes de agua.
2. Revise el tubo de aire y cámbielo si hay orificios, rasgaduras o grietas.
3. Revise el filtro de aire y cámbielo al menos cada seis meses. Cámbielo más seguido si hay orificios
u obstrucciones por suciedad o polvo.
Para cambiar el filtro de aire:
1. Abra la cubierta del filtro y quite el antiguo filtro de aire.
El filtro de aire no es lavable ni reutilizable.
2. Coloque un nuevo filtro de aire en la cubierta del filtro de aire y ciérrela.
Asegúrese de que se coloca siempre para evitar que entre agua y polvo en el dispositivo.
Reensamblado
Cuando la cubeta de agua y el tubo de agua están secos, puede reensamblar las partes.
1. Conecte el tubo de aire firmemente a la salida de aire ubicada en la parte trasera del dispositivo.
2. Abra la cubeta de agua y llénela con agua destilada a temperatura ambiente hasta la marca de nivel
de agua máxima.
3. Cierre la cubeta de agua e insértela en el costado del dispositivo.
4. Conecte el extremo libre del tubo de aire firmemente al sistema de mascarilla ensamblado.
Datos del tratamiento
El dispositivo AirCurve 10 registra los datos del tratamiento para que usted y su proveedor de
atención puedan verlos y hacer cambios en su tratamiento si es necesario. Los datos se registran y
después se transfieren a su proveedor de atenciónpor red inalámbrica o a través de una tarjeta SD.
Comunicación inalámbrica
Su dispositivo AirCurve 10 está equipado con comunicación celular. Permite que los datos de su
terapia se transmitan de forma inalámbrica a su proveedor de asistencia sanitaria para mejorar la
calidad de su tratamiento. También permite la actualización de los ajustes de la terapia de forma más
puntual o la actualización del software de su dispositivo. El ícono
inalámbrica aparece en el extremo superior derecho de la pantalla para indicar la intensidad de la
señal.
Los datos generalmente se transmiten después de que se detiene el tratamiento. Para asegurarse de
que sus datos sean transferidos, deje su dispositivo conectado a la toma de corriente en todo
momento y asegúrese de que no esté en Modo avión.
Notas:
• Es posible que los datos del tratamiento no se transmitan si lo utiliza fuera del país o región de
compra.
• Los dispositivos con comunicación celular pueden no estar disponibles en todas las regiones.
Español 9
de intensidad de la señal
Page 54

Tarjeta SD
Otra manera de transmitir los datos del tratamiento a su proveedor de atención es a través de la
tarjeta SD. Su proveedor de atención puede pedirle que envíe la tarjeta SD por correo o que se la
lleve. Cuando se lo pida su proveedor de atención, quite la tarjeta SD.
No quite la tarjeta SD del dispositivo cuando la luz SD se encienda intermitentemente.
Para quitar la tarjeta SD:
1. Abra la cubierta de la tarjeta SD.
2. Empuje la tarjeta SD para liberarla. Retire la tarjeta SD del dispositivo.
Coloque la tarjeta SD en la funda de protección y envíesela de nuevo a su proveedor de atención.
Para obtener más información sobre la tarjeta SD, consulte la funda de protección de la tarjeta SD
proporcionada con el dispositivo.
Nota: La tarjeta SD no debe utilizarse para ningún otro fin.
Viajes
Puede llevar el dispositivo AirCurve 10 con usted a donde vaya. Solo tenga en cuenta lo siguiente:
• Utilice la bolsa de viaje proporcionada para evitar daños al dispositivo.
• Vacíe la cubeta de agua y guárdela por separado en la bolsa de viaje.
• Asegúrese de que tiene el cable de alimentación correcto para la región a la que viaja. Para obtener
información sobre compras, contacte a su proveedor de atención.
• Si está utilizando una batería externa, debe apagar el humidificador para aprovechar al máximo la
vida útil de la batería. Hágalo cambiando el Nivel Humedad a Apag.
Viajes en avión
Su dispositivo AirCurve 10 puede llevarse a bordo como equipaje de mano. Los dispositivos médicos
no se incluyen dentro del límite de equipaje de mano.
Puede utilizar el dispositivo AirCurve 10 en un avión ya que cumple con los requisitos de
Administración Federal de Aviación (FAA). Se pueden descargar e imprimir las cartas para el
cumplimiento de normas de aeronavegación de www.resmed.com
Cuando utilice el dispositivo en un avión:
• Asegúrese de que la cubeta de agua está completamente vacía e insertada en el dispositivo. El
dispositivo no funcionará si la cubeta de agua no está insertada.
• Active el Modo avión.
10
Page 55

Para encender el Modo avión:
Problema/causa posible
Solución
1. En Mis opciones, gire el disco para resaltar el Modo
avión y después presione el disco.
2. Gire el disco para seleccionar Ence y después
presiónelo para guardar el cambio.
Aparece el ícono del Modo avión
en el extremo
superior derecho de la pantalla.
PRECAUCIÓN
No utilice el dispositivo con agua en la cubeta de agua en un avión debido al riesgo de
inhalación de agua durante una turbulencia.
Solución de problemas
Si tiene algún problema, consulte los siguientes temas de solución de problemas. Si no puede
solucionar el problema, contacte a su proveedor de atención o a ResMed. No intente abrir el
dispositivo.
Solución general de problemas
Hay una fuga de aire alrededor de mi mascarilla
Es posible que la mascarilla no esté correctamente ajustada. Asegúrese de que su mascarilla esté correctamente ajsutada.
Vea la guía de usuario de la mascarilla para obtener
instrucciones de ajuste o utilice la función Ajuste de la
mascarilla para verificar el ajuste y sellado de la mascarilla.
Se me está secando y congestionando la nariz
Es posible que el nivel de humedad esté configurado muy
bajo.
Para ajustar el nivel de humedad:
Si tiene un tubo de aire térmicoClimateLineAir, consulte la
guía de usuario del ClimateLineAir.
Me caen gotas de agua sobre la nariz, en la mascarilla y en el tubo de aire
Es posible que el nivel de humedad esté configurado muy
alto.
Para ajustar el nivel de humedad:
Si tiene un tubo de aire térmicoClimateLineAir, consulte la
guía de usuario del ClimateLineAir.
Siento la boca seca e incómoda
Es posible que se esté escapando aire a través de la boca Aumente el nivel de humedad.
Puede necesitar un mentonera para mantener la boca cerrada
o una mascarilla facial completa.
La presión de aire en mi mascarilla parece muy alta (siento que estoy recibiendo demasiado aire)
Es posible que la rampa esté desactivada. Utilice la opción Per. rampa.
Español 11
Page 56

Problema/causa posible
Solución
La presión de aire en mi mascarilla parece demasiado baja (siento que no estoy recibiendo suficiente aire)
Es posible que la rampa continúe activada. Espere a que la presión del aire se acumule o apague el
período de rampa.
Mi pantalla está negra
Es posible que se haya apagado la retroiluminación de la
Presione Inicio o el disco para volver a encenderla.
pantalla. Se apaga automáticamente después de un corto
período de tiempo.
Es posible que no esté enchufado. Conecte la fuente de alimentación y asegúrese de que el
enchufe está completamente conectado.
He detenido el tratamiento pero el dispositivo todavía ventila aire
El dispositivo se está enfriando. El dispositivo ventila una pequeña cantidad de aire para
evitar la condensación en el tubo de aire. Se detendrá
automáticamente después de 20 minutos.
La cubeta de agua tiene una fuga
La cubeta de agua puede no estar montada correctamente. Verifique que la cubeta de agua no esté dañada y vuelva a
montarla correctamente.
La cubeta de agua puede estar dañada o agrietada. Comuníquese con su proveedor de atención para efectuar el
cambio.
Los datos de mi tratamiento no han sido enviados a mi proveedor de atención
Es posible que la cobertura inalámbrica sea mala. Asegúrese de que el dispositivo esté colocado en un lugar
donde haya cobertura (por ejemplo, en su mesa de luz, no en
un cajón o en el piso).
El ícono
de intensidad de la señal inalámbrica indica que
la cobertura es buena cuando aparecen todas las barras y que
la cobertura es mala cuando aparecen menos barras.
El ícono
que indica que no hay conexión inalámbrica
aparece en el extremo superior derecho de la pantalla. No
hay red inalámbrica disponible.
Asegúrese de que el dispositivo esté colocado en un lugar
donde haya cobertura (por ejemplo, en su mesa de luz, no en
un cajón o en el piso).
Si recibe la instrucción de hacerlo, envíe la tarjeta SD a su
proveedor de atención. La tarjeta SD también contiene los
datos de su tratamiento.
Es posible que el dispositivo esté en Modo avión. Apague el Modo avión, consulte la sección Viajes en avión.
La transferencia de datos no está habilitada para su
dispositivo.
Comuníquese con su proveedor de atención sanitaria para
habilitar el servicio de transferencia de datos.
La pantalla y los botones parpadean.
La actualización de software está en progreso. La actualización de software toma aproximadamente 10
minutos en completarse.
12
Page 57

Mensajes sobre el dispositivo
Mensaje del dispositivo/causa posible
Solución
Fuga grave, conecte la cubeta de agua o cubierta lateral
Es posible que la cubeta de agua no esté correctamente
insertada.
Es posible que el sellado de la cubeta de agua no esté
correctamente insertado.
Fuga elevada, conecte los tubos
Es posible que el tubo de aire no esté bien conectado. Asegúrese de que el tubo de aire esté firmemente conectado
Es posible que la mascarilla no esté correctamente ajustada. Asegúrese de que su mascarilla esté correctamente ajsutada.
Tubo obstruido, revise el tubo
Es posible que el tubo de aire esté bloqueado. Revise el tubo de aire y elimine las obstrucciones. Oprima el
Error en tarjeta SD, retírela y oprima Iniciar para comenzar el tratamiento
Es posible que la tarjeta SD no esté correctamente
insertada.
Tarj de sólo lectura, retírela, desbloquee y reinserte tarj SD
Es posible que el interruptor de la tarjeta SD esté en la
posición de bloqueo (de solo lectura).
Asegúrese de que la cubeta de agua esté correctamente
insertada.
Abra la cubeta de agua y asegúrese de que el sellado está
correctamente insertado.
a ambos extremos.
Vea la guía de usuario de la mascarilla para obtener
instrucciones de ajuste o utilice la función Ajuste de la
mascarilla para verificar el ajuste y sellado de la mascarilla.
disco para borrar el mensaje y luego oprima Ence/Apag para
reiniciar el dispositivo.
Quítela y vuelva a insertarla.
Mueva el interruptor de la posición de bloqueo
posición de escritura
de la tarjeta SD y después
a la
reinsértela.
Falla del sistema, consulte el manual del usuario, Error 004
Es posible que se haya dejado el dispositivo en un ambiente
con temperatura elevada.
Permita que se enfríe antes de utilizarlo de nuevo.
Desconecte la fuente de alimentación y después vuelva a
conectarlo para poner nuevamente en marcha el dispositivo.
Es posible que el filtro de aire esté bloqueado. Revise el filtro de aire y cámbielo si hay alguna obstrucción.
Desconecte la fuente de alimentación y después vuelva a
conectarlo para poner nuevamente en marcha el dispositivo.
Es posible que el tubo de aire esté bloqueado. Revise el tubo de aire y elimine las obstrucciones. Oprima el
disco para borrar el mensaje y luego oprima Ence/Apag para
reiniciar el dispositivo.
Puede haber agua en el tubo de aire. Vacíe el agua del tubo de aire. Desconecte la fuente de
alimentación y después vuelva a conectarlo para poner
nuevamente en marcha el dispositivo.
Español 13
Page 58

Mensaje del dispositivo/causa posible
Solución
Todos los demás mensajes de error, por ejemplo Falla del sistema, consulte el manual del usuario, Error 0XX
Se produjo un error irrecuperable en el dispositivo. Comuníquese con su proveedor de atención. No abra el
dispositivo.
Cómo reensamblar piezas
Algunas piezas del dispositivo están diseñadas para ser retiradas fácilmente para evitar que se dañen
las piezas o el dispositivo. Puede reensamblarlas fácilmente como se describe a continuación.
Para insertar el sellado de la cubeta de agua:
1. Coloque el sellado en la tapa.
2. Presione hacia abajo todos los bordes del sellado hasta que encaje firmemente en su lugar.
Para reensamblar la tapa de la cubeta de agua:
1. Inserte un lado de la tapa en el orificio circular de la base.
2. Deslice el otro lado hacia abajo por el reborde hasta que encaje en su lugar.
14
Page 59

Advertencias y precauciones generales
ADVERTENCIA
• Asegúrese de acomodar el tubo de aire para que no se tuerza alrededor de la cabeza o el
cuello.
• Asegúrese de que el cable de alimentación y el enchufe estén en buenas condiciones y de
que el equipo no esté dañado.
• Mantenga el cable de alimentación alejado de superficies calientes.
• Si observa algún cambio inexplicable en el funcionamiento de este dispositivo, si emite
sonidos inusuales, si el dispositivo o la fuente de alimentación se caen o se tratan
indebidamente, o si la caja está rota, suspenda su uso y comuníquese con su proveedor de
atención o centro de servicio ResMed.
• No abra ni modifique el dispositivo. El interior no contiene piezas que el usuario pueda
reparar. Las reparaciones y el servicio técnico deben ser efectuados únicamente por un
agente de servicio autorizado de ResMed.
• Peligro de electrocución. No sumerja el dispositivo, la fuente de alimentación ni el cable de
alimentación en agua. Si se derraman líquidos dentro o sobre el dispositivo, desenchúfelo y
deje que se sequen las piezas. Siempre desenchufe el dispositivo antes de limpiarlo, y
asegúrese de que todas las piezas estén secas antes de enchufarlo.
• El oxígeno suplementario no debe utilizarse mientras esté fumando o en presencia de una
llama abierta.
• Siempre asegúrese de que el dispositivo esté encendido y de que se genere flujo de aire
antes de encender el suministro de oxígeno. Siempre apague el suministro de oxígeno antes
de apagar el dispositivo para evitar que el oxígeno no utilizado se acumule dentro de la caja
del dispositivo y se genere peligro de incendio.
• No realice ninguna tarea de mantenimiento mientras el dispositivo esté funcionando.
• El dispositivo no se debe utilizar junto a otro equipo ni colocado encima o debajo de él. Si
dicha proximidad o el hecho de que esté colocado encima o debajo de otro equipo fuera
necesario, el dispositivo deberá ser observado para verificar que funciona con normalidad
en la configuración en la que será utilizado.
• No se recomienda el uso de accesorios distintos a los especificados para el dispositivo.
Podrían causar un aumento de las emisiones o una disminución de la inmunidad del
dispositivo.
PRECAUCIÓN
• Utilice solo piezas y accesorios ResMed con el dispositivo. Las piezas que no sean ResMed
pueden reducir la eficacia del tratamiento y/o dañar el dispositivo.
• Utilice solo las mascarillas con ventilación recomendadas por ResMed o por el médico que
le recetó este dispositivo. Si se ajusta la mascarilla sin que el dispositivo ventile el aire, es
posible que se vuelva a inspirar el aire exhalado. Asegúrese de que los orificios de
ventilación estén limpios y desbloqueados para mantener el flujo de aire fresco dentro de la
mascarilla.
• Tenga cuidado de no colocar el dispositivo en un lugar donde pueda ser golpeado o donde
alguien pueda tropezar con el cable de alimentación.
• El dispositivo podría sobrecalentarse si se obstruye el tubo o la entrada de aire mientras está
funcionando.
• Asegúrese de que el área alrededor del dispositivo esté seca y limpia, y que no haya
sábanas, ropa ni otros objetos que pudieran bloquear la entrada de aire o cubrir la fuente de
alimentación.
• No coloque el dispositivo sobre su costado porque puede entrarle agua.
• La configuración incorrecta del sistema puede resultar en una lectura incorrecta de la
presión en la mascarilla. Asegúrese de que el sistema esté correctamente configurado.
Español 15
Page 60

• No utilice lejía, cloro, alcohol o soluciones aromáticas, jabones hidratantes o antibacterianos
Fuente de alimentación de 90 W
Rango de entrada de CA:
100–240 V, 50–60 Hz 1,0–1,5 A, Clase II
115 V, 400 Hz 1,5 A, Clase II (nominal para uso en avión)
Consumo típico de energía:
53 W (57 VA)
Consumo máximo de energía
104 W (108 VA)
Condiciones ambientales
Temperatura de funcionamiento:
de +5 °C a +35 °C (de +41 °F a +95 °F)
Nota: El flujo de aire para la respiración generado por este
Humedad de funcionamiento:
10% a 95% de humedad relativa sin condensación
Altitud de funcionamiento:
Nivel del mar a 2591 m (8500 '); rango de presión de aire de
Temperatura de almacenamiento y transporte:
de -20 °C a +60 °C (-4 °F a +140 °F)
Humedad de almacenamiento y transporte:
5% a 95% de humedad relativa sin condensación
Compatibilidad electromagnética
www.resmed.com, en la sección de servicio y asistencia que se halla dentro de la página de productos.
IEC 60601-1:2005 classification
Clase II (doble aislamiento), Tipo BF, Grado de protección IP22
Sensores
Sensor de presión:
Ubicado internamente en la salida del dispositivo, medidor
Sensor de flujo:
Situado internamente en la entrada del dispositivo, flujo
másico digital, de -70 a +180 l/min
Presión máxima de régimen permanente suministrada en caso de falla individual
El dispositivo se apagará en caso de una falla individual si la presión de régimen permanente excede los:
ni aceites perfumados para limpiar el dispositivo, la cubeta de agua o el tubo de aire. Estas
soluciones podrían causar daños o afectar el rendimiento del humidificador y reducir la vida
útil de estos productos.
• Si utiliza el humidificador, siempre coloque el dispositivo en una superficie plana por debajo
de su cabeza para evitar que la mascarilla y el tubo de aire se llenen de agua.
• Deje que el cubeta de aguase enfríe durante diez minutos antes de utilizarlo, para permitir
que el agua se enfríe y el cubeta de agua no esté muy caliente para tocarlo.
• Asegúrese de que la cubeta de agua esté vacía antes de transportar el dispositivo.
Especificaciones técnicas
Salida de CC: 24 V 3,75 A
dispositivo de tratamiento puede alcanzar una temperatura
superior a la temperatura ambiente. El dispositivo sigue
siendo seguro en condiciones de temperaturas ambiente
extremas (40 ºC / 104 ºF ).
1013 hPA a 738 hPa
El dispositivo AirCurve 10 cumple con todos los requisitos correspondientes en materia de compatibilidad electromagnética
(EMC, por sus siglas en inglés) de acuerdo con la CEI 60601-1-2:2007, para entornos residenciales, comerciales y de industria
ligera. Se recomienda que los dispositivos de comunicación móviles se conserven a por lo menos 1 m de distancia del
dispositivo.
Se puede obtener información acerca de las emisiones electromagnéticas y de la inmunidad de este equipo de ResMed en
de presión análogo, -5 a +45 cm H2O
30 cm H2O durante más de 6 s o 40 cm H2O durante más de 1 s.
16
Page 61

Sonido
Nivel de presión medido según la norma ISO 17510-1:2007 (modo CPAP):
Estándar:
26,6 dBA con incertidumbre de 2 dBA
SlimLine
34,6 dBA con incertidumbre de 2 dBA
Valores de números duales declarados de emisión sonora según la norma ISO 4871:1996
Físicas (dispositivo y cubeta de agua)
Dimensiones (altura x ancho x profundidad):
116 mm x 255 mm x 150 mm
Salida de aire (cumple con la norma ISO 5356-1:2004)
22 mm
Peso (dispositivo y cubeta de agua estándar):
1248 g (44 oz)
Peso (dispositivo y cubeta de agua lavable):
1248 g (44 oz)
Construcción de la carcasa:
Termoplástico de ingeniería ignífuga
Capacidad de agua:
Hasta la línea de llenado máximo 380 ml
Cubeta de agua estándar (material):
Plástico moldeado por inyección, acero inoxidable y sellado
Cubeta de agua lavable (material):
Plástico moldeado por inyección, acero inoxidable y sellado
de silicona
Temperatura
Máxima de la placa del calentador:
68 °C (154 °F)
Temperatura máxima del gas:
≤ 41 °C (≤ 106 °F)
Filtro de aire
Estándar:
Material: Fibra de poliéster no entrelazada
Hipoalergénico:
Material: Fibras de acrílico y polipropileno, con vehículo de
Uso en aviones
ResMed confirma que el dispositivo cumple con los requisitos de la Administración Federal de Aviación (FAA) (RTCA/DO-160,
sección 21, categoría M), en relación con todas las fases de los viajes aéreos.
Módulo inalámbrico
Tecnología utilizada:
3G (EE. UU y Canadá únicamente)
2G GSM (todas las regiones excepto EE. UU. y Canadá)
sitio www.ResMed.com/downloads/devices.
SlimLine 26,6 dBA con incertidumbre de 2 dBA
Nivel de energía medido según la norma ISO 17510-1:2007 (modo CPAP):
Estándar: 34,6 dBA con incertidumbre de 2 dBA
(4.57" x 10.04" x 5.91")
de silicona
Corte: 74 °C (165 °F)
Arrestancia promedio: >75% para polvo de ~7 micrones
polipropileno
Eficacia: >98% para polvo de ~7-8 micrones; >80% para
polvo de ~0,5 micrones
Este product contiene un Módulo inalámbrico GSM/GPRS
Marca: TELIT
Modelo: GE910-QUAD
IFETEL: RTITEGE13-0729
La operación de este equipo está sujeta a las siguientes dos condiciones:
1. es posible que este equipo o dispositivo no cause interferencia perjudicial y
2. este equipo debe aceptar cualquier interferencia, incluyendo la que pueda causar su propia operación no deseada.
Identificación de la FCC (Comisión Federal de Comunicaciones de los EE. UU.): 2ACHL-AIR103G
El dispositivo AirCurve 10 cumple con la reglamentación de la FCC.
El dispositivo AirCurve 10 debe guardar una distancia mínima de 2 cm (0,8 pulgadas) del cuerpo durante su funcionamiento.
Información adicional acerca de los reglamentos de la Comisión Federal de Comunicaciones (FCC) se puede encontrar en el
Español 17
Page 62

Rango de presión de funcionamiento
CPAP
4 a 20 cm H2O
Oxígeno suplementario
Flujo máximo:
15 l/min (CPAP, ASV); 4 l/min (ASVAuto)
Trayecto de flujo neumático
1 Sensor de flujo
Vida útil esperada
Dispositivo, fuente de alimentación:
5 años
Cubeta de agua lavable:
2,5 años
Cubeta de agua estándar, tubo de aire
6 meses
Información general
El paciente es un operador previsto.
Presión en la
% de HR de salida
Salida nominal del sistema HA1, BTPS2
Configuración 4
Configuración 8
Configuración 4
Configuración 8
3
85
100 6 >10
4
85
100 6 >10
10
85
100 6 >10
20
85
90 6 >10
25
85
90 6 >10
Tubo de aire
Material
Longitud
Diámetro interno
ClimateLineAir
Plástico flexible y componentes eléctricos
2 m (6' 6")
15 mm (0,6 ")
SlimLine
Plástico flexible
1,8 m (6 ')
15 mm (0,6 ")
Estándar
Plástico flexible
2 m (6' 6")
19 mm (0,75 ")
Corte de temperatura del tubo de aire térmico: ≤ 41 °C (≤ 106 °F)
ASV, ASVAuto: 4 a 25 cm H2O
2 Ventilador
3 Sensor de presión
4 Mascarilla
5 Tubo de aire
6 Cubeta de agua
7 Dispositivo
8 Filtro de entrada
Rendimiento del humidificador
La siguiente configuración ha sido evaluada a una temperatura ambiente de 22° C (71,6° F):
mascarilla
cm H
O
2
1
HA- humedad absoluta en mg/l.
2
BTPS- temperatura corporal, presión ambiente saturada.
Tubo de aire
Notas:
• El fabricante se reserva el derecho de cambiar estas especificaciones sin previo aviso.
• El extremo del tubo de aire térmico que tiene el conector eléctrico sólo es compatible con la salida de aire del dispositivo
y no debe conectarse a la mascarilla.
• No use tubos de aire antiestáticos o que conduzcan electricidad.
• Las configuraciones de temperatura y de humedad relativa que aparecen en pantalla no son valores medidos.
18
Page 63

Valores mostrados
Valor
Rango
Resolución de los valores
mostrados
Sensor de presión en la salida de aire:
Presión en la mascarilla
4–25 cm H2O
0,1 cm H2O
Valores derivados del flujo
Fuga
0–120 l/min
1 l/min
Volumen corriente
0–4000 ml
1 ml
Frecuencia respiratoria
0–50 RPM
1 RPM
Ventilación minuto
0–30 l/min
0,1 l/min
Valor
Exactitud1
Medición de presión:
Presión en la mascarilla2
±[0,5 cm H2O + 4% del valor medido]
Flujo y valores derivados del flujo1:
Flujo
±6 l/min o el 10% de la lectura, lo que sea mayor, con un flujo positivo mínimo de
Fuga2
±12 l/min o el 20% de la lectura, lo que sea mayor, 0 a 60 l/min
Volumen corriente
2,3
±20%
Frecuencia respiratoria
2,3
±1,0 RPM
Ventilación minuto
2,3
±20%
Tubo de aire Estándar
Tubo de aire SlimLine
Con humidificación
±0,5 cm H2O
±0,5 cm H2O
Dispositivo sin humidificación y tubo de aire Estándar / Dispositivo con humidificación y tubo de aire Estándar
Presión (cm H2O)
10 RPM
15 RPM
20 RPM
4
0,5 / 0,5
0,5 / 0,5
0,8 / 0,8
12
0,5 / 0,5
0,5 / 0,5
0,8 / 0,8
16
0,5 / 0,5
0,5 / 0,5
0,8 / 0,8
20
0,5 / 0,5
0,5 / 0,5
0,8 / 0,8
Dispositivo sin humidificación y tubo de aire SlimLine / Dispositivo con humidificación y tubo de aire SlimLine
Presión (cm H2O)
10 RPM
15 RPM
20 RPM
4
0,5 / 0,5
0,5 / 0,5
0,8 / 0,8
8
0,5 / 0,5
0,5 / 0,5
0,8 / 0,8
12
0,5 / 0,5
0,5 / 0,5
0,8 / 0,8
16
0,5 / 0,5
0,5 / 0,5
0,8 / 0,8
20
0,5 / 0,5
0,5 / 0,5
0,8 / 0,8
25
0,4 / 0,3
0,6 / 0,5
0,8 / 0,8
0 a 150 l/min
1
Los resultados se expresan en ATPD (Temperatura ambiente y presión, seco).
2
La exactitud puede verse reducida por la presencia de fugas, oxígeno suplementario, volúmenes corrientes <100 ml o ventilación minuto
<3 l/min.
3
La exactitud de las mediciones fue verificada conforme a la norma ISO 10651-1:2004 para los dispositivos de soporte ventilatorio para
atención en el hogar (Home Care Ventilatory Support Devices) (Figura 101 y Tabla 101) usando los flujos nominales de ventilación de la
mascarilla ResMed.
Exactitud de la presión
Variación máxima de la presión estática a 10 cm H
O, según la norma ISO 17510-1:2007
2
Sin humidificación ±0,5 cm H2O ±0,5 cm H2O
Variación máxima de la presión dinámica, según la norma ISO 17510-1:2007
8 0,5 / 0,5 0,5 / 0,5 0,8 / 0,8
25 0,3 / 0,3 0,5 / 0,4 0,7 / 0,7
Español 19
Page 64

Símbolos
Los símbolos que figuran a continuación pueden aparecer en el producto o en el envoltorio.
Lea las instrucciones antes de usarlo. Indica una advertencia o precaución. Siga las
instrucciones antes de usarlo.
Fabricante. Representante autorizado en Europa
Código de lote. Número de catálogo. Número de serie. Número del
dispositivo.
Encender / Apagar. Peso del dispositivo. Protegido contra objetos del tamaño
de un dedo y contra el derrame de agua cuando se lo inclina hasta 15 grados de la orientación
especificada.
de humedad.
contaminación en China .
Corriente continua. Pieza aplicada tipo BF. Equipo de clase II. Límites
Límites de temperatura. Radiación no ionizante. Logotipo 1 de control de la
Logotipo 2 de control de la contaminación en China . Solo
con receta (en EE. UU., la ley federal exige que estos dispositivos sean vendidos únicamente por un
médico o por una orden médica).
destilada.
RTCA DO-160 sección 21, categoría M.
Altitud de funcionamiento. Limitación de presión atmosférica. Cumple con
Nivel máximo del agua. Utilice solo agua
Información medioambiental
Este dispositivo debe desecharse por separado, no como residuo municipal sin clasificar. Para
desechar su dispositivo, debe hacer uso del sistema adecuado de recolección, reutilización o reciclaje
que haya disponible en su región. El uso de estos sistemas de recolección, reutilización o reciclaje
tiene por objeto reducir la presión sobre los recursos naturales e impedir que sustancias peligrosas
dañen el medio ambiente.
Si necesita información sobre estos sistemas de eliminación, póngase en contacto con la
administración de residuos de su localidad. El símbolo de cubo de basura tachado lo invita a usar
estos sistemas de eliminación. Si necesita información para la recolección y eliminación de su
dispositivo de ResMed, póngase en contacto con su oficina de ResMed o su distribuidor local, o visite
www.resmed.com/environment.
Servicio técnico
El dispositivo AirCurve 10 está diseñado para funcionar de manera segura y confiable, siempre que se
use de acuerdo con las instrucciones suministradas por ResMed. ResMed recomienda que un centro
de servicio autorizado de ResMed inspeccione y le dé servicio al dispositivo AirCurve 10, si existe
alguna señal de desgaste o alguna inquietud respecto a su funcionamiento. De lo contrario, por lo
general no es necesario revisar ni realizar mantenimiento de los productos durante su vida útil
esperada.
20
Page 65

Garantía limitada
• Sistemas de mascarilla (incluye armazón de la mascarilla, almohadilla, arnés y
90 días
• Baterías para usarse en sistemas de ResMed que funcionan con baterías internas y
6 meses
•
1 año
• Dispositivos CPAP, binivel y de ventilación (incluidas fuentes de alimentación
2 años
ResMed Pty Ltd (en adelante, "ResMed") garantiza que el producto ResMed que usted posee estará
libre de todo defecto de material y mano de obra a partir de la fecha de adquisición durante el plazo
estipulado a continuación.
roducto Plazo de la garantía
P
tubos)—excluidos los dispositivos de un solo uso
• Accesorios—excluidos los dispositivos de un solo uso
• Sensores de pulso digital tipo flexible
• Cubetas de agua del humidificador
externas
Sensores de pulso digital tipo clip
• Módulos de datos de dispositivos CPAP y binivel
• Oxímetros y adaptadores de oxímetros de dispositivos CPAP y binivel
• Cubetas de agua lavables para humidificadores
• Dispositivos de control del ajuste de la dosis
externas)
• Humidificadores
• Accesorios de la batería
• Dispositivos portátiles de diagnóstico/detección
Esta garantía solo es válida para el consumidor inicial. No es transferible.
Si el producto falla bajo condiciones de utilización normales, ResMed reparará o reemplazará, a opción
suya, el producto defectuoso o cualquiera de sus componentes.
Esta garantía limitada no cubre: a) ningún daño provocado por la utilización indebida, abuso,
modificación o alteración del producto; b) reparaciones llevadas a cabo por cualquier organización
dedicada a la reparación que no haya sido expresamente autorizada por ResMed para efectuar dichas
reparaciones; y c) ningún daño o contaminación provocados por humo de cigarrillo, pipa, cigarro u
otras fuentes de humo.
La garantía queda anulada si el producto se vende o revende fuera de la región de compra original.
Las reclamaciones de garantía con respecto a productos defectuosos deben ser realizadas por el
consumidor original en el punto de compra.
Esta garantía reemplaza cualquier otra garantía expresa o implícita, incluida cualquier garantía implícita
de comerciabilidad o idoneidad para un propósito en particular. Algunas regiones o estados no
permiten que se establezcan limitaciones sobre la duración de una garantía implícita, por lo que es
posible que lo anterior no sea aplicable en su caso.
ResMed no se responsabilizará de ningún daño incidental o emergente que se reclame como
resultado de la venta, instalación o uso de cualquier producto de ResMed. Algunas regiones o
estados no permiten la exclusión ni limitación de daños incidentales o emergentes, por lo que es
posible que lo anterior no sea aplicable en su caso.
Esta garantía le otorga derechos jurídicos específicos, y es posible que usted tenga otros derechos
que pueden variar de una región a otra. Para obtener más información sobre los derechos que le
otorga esta garantía, comuníquese con el distribuidor de ResMed o con la oficina de ResMed locales.
Español 21
Page 66

Información adicional
Si tiene preguntas o necesita más información sobre cómo usar el dispositivo, comuníquese con su
proveedor de atención.
22
Page 67

PORTUGUÊS
Bem-vindo
O AirCurve™ 10 ASV é um dispositivo de pressão positiva nas vias aéreas que pertence à categoria de
servo-ventilador adaptável.
AVISO
Leia todo o manual antes de utilizar este dispositivo.
PRECAUÇÃO
Nos EUA, a lei federal limita a venda deste dispositivo a médicos ou por ordem destes.
Indicações de uso para AirCurve 10 ASV
O dispositivo AirCurve 10 ASV é indicado para o tratamento de pacientes com peso superior a 30 kg
com apneia obstrutiva do sono (AOS), apneia central e/ou mista ou respiração periódica. Ele é
indicado para uso domiciliar e hospitalar.
O umidificador deve ser usado por um único paciente no ambiente doméstico e pode ser reutilizado
em ambiente hospitalar/institucional.
Contraindicações
A terapia SVA é contraindicada em pacientes com insuficiência cardíaca sintomática crônica (New
York Heart Association 2-4) com fração de ejeção do ventrículo esquerdo reduzida (LVEF ≤ 45%) e
apneia do sono central predominante de moderada a grave.
A terapia por pressão positiva nas vias respiratórias pode ser contraindicada em alguns pacientes com
as seguintes doenças preexistentes:
• doença pulmonar bolhosa grave
• pneumotórax ou pneumomediastino
• pressão arterial patologicamente baixa, principalmente se associada à depleção do volume
intravascular
• Desidratação
• vazamento de líquido cerebrospinal, trauma ou cirurgia craniana recente.
Efeitos adversos
Caso sinta dor torácica atípica, dor de cabeça forte ou maior dificuldade de respiração, informe ao
médico que prescreveu a terapia. Uma infecção aguda no trato respiratório superior pode exigir a
interrupção temporária do tratamento.
Os seguintes efeitos colaterais podem ocorrer durante o tratamento com o dispositivo:
• ressecamento do nariz, boca ou garganta
• hemorragia nasal
• inchaço
• mal-estar no ouvido ou seio nasal
• irritação nos olhos
• erupções cutâneas.
Português 1
Page 68

Visão Geral
1
Saída de ar
5
Câmara de água
2
Tampa do filtro de ar
6
Tela 3 Entrada de energia
7
Tampa do adaptador
4
Número de série e número do dispositivo
8
Tampa do cartão SD
O AirCurve 10 inclui o seguinte:
• Dispositivo com umidificador integrado HumidAir
• Câmara de água
• Tubulação de ar
• Unidade de fonte de alimentação
• Bolsa de transporte
• Cartão SD (já inserido).
Entre em contato com o profissional que cuida de sua saúde para conhecer a linha de acessórios
disponíveis para uso com o dispositivo, incluindo:
• Tubulação de ar (aquecida e não aquecida): ClimateLineAir
• Câmara de água: Câmara de água standard, câmara de água lavável (pode ser desinfetada)
• Filtro: Filtro hipoalergênico, filtro standard
• Conversor CC/CC Air10
™
• Leitor de cartão SD
• Adaptador de oxímetro Air10
• Adaptador USB Air10.
Sobre o seu dispositivo
™
™
, SlimLine™, Standard
2
Page 69

Sobre o painel de controle
Pressione para iniciar/parar a terapia.
Gire para navegar no menu e pressione para selecionar
Botão Iniciar/Parar
Botão giratório
Botão Início Pressione para voltar à tela Início.
Ícones diferentes podem ser exibidos na tela em diferentes momentos, incluindo:
Tempo de Rampa
Umidade
Aquecimento do umidificador
Resfriamento do umidificador
Pressione e mantenha pressionado por três segundos
para entrar no modo de economia de energia.
uma opção.
Gire para ajustar uma opção selecionada e pressione para
armazenar sua mudança.
Intensidade do sinal da rede sem fio (verde)
Transferência por rede sem fio não habilitada
(cinza)
Conexão sem fio não encontrada
Modo avião
Português 3
Page 70

Instalação
PRECAUÇÃO
Não encha demais o reservatório de água para evitar que a água entre no dispositivo e na
tubulação de ar.
1. Coloque o dispositivo em uma superfície plana estável.
2. Conecte o conector de energia na parte posterior do dispositivo. Conecte uma extremidade do
cabo de alimentação à unidade de alimentação e a outra extremidade à tomada de energia.
3. Conecte a tubulação de ar firmemente à saída de ar localizada na parte posterior do dispositivo.
4. Abra a câmara de água e encha-a com água destilada até a marca de nível máximo de água.
Não encha a câmara de água com água quente.
5. Feche a câmara de água e insira-a na lateral do dispositivo.
6. Conecte firmemente a extremidade livre da tubulação de ar à máscara montada.
Consulte o manual do usuário da máscara para informações detalhadas.
As máscaras recomendadas estão disponíveis em www.resmed.com.
4
Page 71

Iniciar a terapia
A barra de pressão mostra as pressões inspiratória e expiratória em verde. A
Horas de uso–Indica o número de horas de terapia que você recebeu na última
1. Ajuste sua máscara.
2. Pressione Iniciar/Parar ou respire normalmente se o SmartStart estiver ativo.
Você saberá que a terapia está ligada quando a tela Relat. Sono for exibida.
barra verde se expande e contrai quando você inspira e expira.
A tela ficará preta automaticamente após um curto período de tempo. Você pode pressionar Início ou
o botão giratório para religá-la. Se a energia for interrompida durante a terapia, o dispositivo reiniciará
a terapia automaticamente quando a energia for restaurada.
O dispositivo AirCurve 10 tem um sensor de luz que ajusta o brilho da tela de acordo com a luz do
ambiente.
Parar a terapia
1. Remova sua máscara.
2. Pressione Iniciar/Parar ou, caso o SmartStart esteja ativo, a terapia parará automaticamente após
alguns segundos.
O Relat. Sono agora lhe proporciona um resumo da sua sessão de terapia.
sessão.
Vedação da máscara–Indica a qualidade de vedação da sua máscara:
Boa vedação da máscara.
Precisa de ajuste, consulte Ajuste da máscara.
Umidificador–Indica se o seu umidificador está funcionando adequadamente:
Umidificador funcionando.
Umidificador pode estar com problema, entre em contato com o profissional que cuida da sua
saúde.
Caso seja configurado pelo profissional que cuida de sua saúde, você também verá:
Eventos por hora–Indica o número de apneias e hipoapneias ocorridas por hora.
Mais Info–Gire o botão giratório para rolar para baixo para visualizar dados mais detalhados sobre
utilização.
Português 5
Page 72

Modo de economia de energia
Destaque Minhas opções pressione o botão giratório
Seu dispositivo AirCurve 10 registra seus dados da terapia. Para permitir que você transmita os dados
ao profissional que cuida da sua saúde, você não deve retirar o dispositivo da tomada. Entretanto,
você pode colocá-lo no modo de economia de energia para economizar energia.
Para entrar no modo de economia de energia:
• Mantenha o botão Iniciar/Parar pressionado por três segundos.
A tela fica preta.
Para sair do modo de economia de energia:
• Pressione uma vez o botão Iniciar/Parar.
A tela Início é exibida.
Minhas opções
Seu dispositivo AirCurve 10 foi configurado para suas necessidades pelo profissional que cuida de sua
saúde, mas você pode desejar fazer pequenos ajustes para tornar sua terapia mais confortável.
para visualizar suas configurações atuais. Deste ponto,
você pode personalizar suas opções.
Tempo de Rampa
Projetado para tornar o início da terapia mais confortável, o Tempo de rampa é o período em que a
pressão aumenta de uma baixa pressão inicial para a pressão prescrita para o tratamento.
Você pode definir seu Tempo de rampa para Desl. ou entre 5 e 45 minutos.
Para ajustar o Tempo de rampa:
1. Em Minhas opções, gire o botão giratório para
destacar T. rampa e então pressione o botão
giratório.
2. Gire o botão giratório para ajustar o tempo de rampa
para sua configuração de preferência e pressione o
botão giratório para armazenar a mudança.
Nível de umidade
O umidificador umedece o ar e foi projetado para tornar a terapia mais confortável. Se seu nariz ou
boca estiver ficando seco, aumente a umidade. Se você estiver recebendo umidade em sua máscara,
diminua a umidade.
Você pode configurar a Umidade como Desl ou entre 1 e 8, sendo que 1 é a configuração mais baixa
de umidade e 8 é a mais alta.
6
Page 73

Para ajustar o Nível de umidade:
Alerta de fuga
Quando o alerta de fuga está ativado, o dispositivo emite um sinal sonoro se
SmartStart
Quando o SmartStart está habilitado, a terapia inicia automaticamente quando
Másc
Esta opção exibe sua configuração tipo de máscara. Se você usa mais de um
Exec aquecimento
Esta opção permite pré-aquecer a água antes de iniciar a terapia, de modo que
1. Em Minhas opções, gire o botão giratório para
destacar Umidade e então pressione o botão
giratório.
2. Gire o botão giratório para ajustar o nível de umidade
e pressione o botão giratório para armazenar a
mudança.
Se seu nariz ou boca continuar a ficar seco, ou receber umidade em sua máscara, considere usar a
tubulação ClimateLineAir de ar aquecido. ClimateLineAir juntamente com o Climate Control resultam
em uma terapia mais confortável.
Ajuste da Máscara
O Ajuste Másc foi projetado para ajudar você a avaliar e identificar possíveis fugas de ar ao redor da
máscara.
Para verificar o Ajuste da máscara:
1. Ajuste a máscara conforme descrito no manual do usuário da máscara.
2. Em Minhas opções, gire o botão giratório para destacar Ajustar máscara e
então pressione o botão giratório.
O dispositivo começa a ventilar ar.
3. Ajuste a máscara, a almofada da máscara e o arnês até obter um resultado
Bom.
Para interromper o Ajuste Másc, pressione o botão giratório ou Iniciar/Parar. Se você não conseguir
obter boa vedação de máscara, fale com o profissional que cuida da sua saúde.
Mais opções
O profissional que cuida da sua saúde pode ter lhe dado acesso para que personalize mais algumas
opções.
houver muita fuga de ar pela máscara ou se você retirar a máscara durante a
terapia.
você respira na máscara. Quando você remove sua máscara, ele para
Português 7
automaticamente após alguns segundos.
tipo de máscara, ajuste esta configuração quando trocar de máscara.
o ar não esteja frio ou seco no início da terapia.
Page 74

Cuidar de seu dispositivo
É importante que você limpe regularmente seu dispositivo AirCurve 10 para certificar-se de obter uma
terapia ideal. As seções que seguem irão ajudá-lo na desmontagem, limpeza, verificação e
remontagem de seu dispositivo.
Desmontagem
1. Segure o reservatório de água no topo e na base, pressione-o gentilmente e retire-o do dispositivo.
2. Abra o reservatório de água e descarte a água restante.
3. Segure a luva da tubulação de ar e gentilmente puxe-a para longe do dispositivo.
4. Segure ambas a luva da tubulação de ar e a articulação da máscara, em seguida separe-as
gentilmente.
Limpeza
Você deve limpar o dispositivo semanalmente, conforme descrito. Consulte o manual do usuário da
máscara para instruções detalhadas sobre a limpeza de sua máscara.
1. Lave a câmara de água e a tubulação de ar em água morna e detergente suave.
Não lave em máquinas de lavar roupas ou máquinas de lavar louça.
2. Enxague a câmara de água e a tubulação de ar completamente e deixe secar fora da luz direta do
sol e/ou longe de calor.
3. Limpe o exterior do dispositivo com um pano seco.
8
Page 75

Verificação
Você deve verificar a câmara de água, a tubulação de ar e o filtro de ar regularmente em busca de
qualquer dano.
1. Verifique a câmara de água:
• Substitua a câmara de água caso esteja vazando ou tenha rachado, esteja opaca ou quebrada.
• Substitua-a caso a vedação esteja quebrada ou rasgada.
• Limpe depósitos de pó branco usando uma solução de uma parte de vinagre doméstico para
10 partes de água.
2. Verifique a tubulação de ar e substitua-a caso haja buracos, rasgos ou rachados.
3. Verifique o filtro de ar e substitua-o pelo menos a cada seis meses. Substitua-o com mais
frequência caso haja orifícios ou bloqueios por sujeira ou pó.
Para substituir o filtro de ar:
1. Abra a tampa do filtro de ar e remova o filtro de ar antigo.
O filtro de ar não é lavável nem reutilizável.
2. Coloque um novo filtro de ar na tampa do filtro de ar e em seguida feche-a.
Certifique-se de que o filtro de ar esteja sempre encaixado para evitar que água e pó entrem no
dispositivo.
Remontagem
Quando a câmara de água e a tubulação de ar estiverem secas, você pode remontar as peças.
1. Conecte a tubulação de ar firmemente à saída de ar localizada na parte posterior do dispositivo.
2. Abra a câmara de água e encha-a com água destilada em temperatura ambiente até a marca de
nível máximo de água.
3. Feche a câmara de água e insira-a na lateral do dispositivo.
4. Conecte firmemente a extremidade livre da tubulação de ar à máscara montada.
Português 9
Page 76

Dados da terapia
Seu dispositivo AirCurve 10 registra seis dados da terapia para você e o profissional que cuida de sua
saúde, de modo que vocês possam visualizar e efetuar mudanças em sua terapia, caso necessário.
Os dados são registrados e depois transferidos para o profissional que cuida da sua saúde através de
rede sem fio ou via um cartão SD.
Rede sem fio
O dispositivo AirCurve 10 é equipado com comunicação via celular. Isso possibilita que os dados da
terapia sejam transmitidos sem fio para o profissional que cuida da sua saúde a fim de aumentar a
qualidade do seu tratamento. Isso também possibilita que as configurações da terapia sejam
atualizadas de forma mais rápida ou que o software do dispositivo seja atualizado. O ícone de
intensidade do sinal da rede sem fio
sinal.
Os dados geralmente são transmitidos após a terapia ser interrompida. Para garantir que seus dados
sejam transferidos, deixe seu dispositivo conectado à tomada elétrica todo o tempo e certifique-se de
que ele não esteja no modo avião.
Observações:
• Os dados da terapia podem não ser transmitidos se você usá-lo fora do país ou região de compra
do dispositivo.
• Os dispositivos com comunicação por celular podem não estar disponíveis em todas as regiões.
Cartão SD
Uma forma alternativa para a transferência dos dados de sua terapia ao profissional que cuida de sua
saúde é via cartão SD. O profissional que cuida de sua saúde pode lhe pedir para enviar o cartão SD
pelo correio ou para leva-lo até ele. Quando instruído pelo profissional que cuida de sua saúde,
remova o cartão SD.
Não retire o cartão SD do dispositivo quando a luz SD estiver piscando.
Para remover o cartão SD:
exibido na parte superior direita da tela indica a qualidade do
1. Abra a tampa do cartão SD.
2. Empurre o cartão SD para liberá-lo. Retire o cartão SD do dispositivo.
Coloque o cartão SD no estojo de proteção e envio-o para o profissional que cuida de sua saúde.
Para mais informações sobre o cartão SD, consulte o estojo de proteção do cartão SD fornecido com
o dispositivo.
Observação: O cartão SD não deve ser usado para nenhuma outra finalidade.
10
Page 77

Viagens
Problema/Causa possível
Solução
Você pode levar o seu dispositivo AirCurve 10 com você onde quer que vá. Apenas mantenha em
mente o que segue:
• Utilize a bolsa de viagem fornecida para evitar dano ao dispositivo.
• Esvazie a câmara de água e empacote-a separadamente na bolsa de viagem.
• Certifique-se de que tenha o cabo de alimentação adequado para a região para onde está viajando.
Para informações sobre compra, entre em contato com o profissional que cuida de sua saúde.
• Se você estiver usando uma bateria externa, você deve desligar o umidificador para maximizar a
vida de sua bateria. Faça-o girando o Nível de umidade para Desl.
Viagem de avião
Seu dispositivo AirCurve 10 pode ser levado a bordo como bagagem de mão. Dispositivos médicos
não são incluídos no limite de bagagem de mão.
Você pode usar seu dispositivo AirCurve 10 em um avião, uma vez que ele atende às exigências da
Federal Aviation Administration (FAA). Cartas com declaração de cumprimento de exigências em
viagens aéreas podem ser baixadas e impressas a partir do website www.resmed.com.
Ao usar o dispositivo em um avião:
• Certifique-se de que o reservatório de água esteja completamente vazio e inserido no dispositivo.
O dispositivo não funcionará sem o reservatório de água inserido.
• Ative o Modo avião.
Para ativar o modo avião:
1. Em Minhas opções, gire o botão giratório para
destacar Modo avião e então pressione o botão
giratório.
2. Gire o botão giratório para selecionar Lig e então
pressione o botão giratório para armazenar a
mudança.
O ícone Modo avião
direito da tela.
é exibido no canto superior
PRECAUÇÃO
Não use o dispositivo com água no reservatório de água no avião devido ao risco de inalação
de água durante turbulência.
Resolução de problemas
Caso você tenha qualquer problema, consulte a seguinte lista de tópicos de resolução de problemas.
Caso você não consiga resolver o problema, entre em contato com o profissional que cuida de sua
saúde ou com a ResMed. Não tente abrir o dispositivo.
Resolução de problemas gerais
Há vazamento de ar em torno da máscara
A máscara pode estar mal ajustada. Certifique-se de que sua máscara esteja corretamente
ajustada. Consulte o manual do usuário da máscara para
instruções de ajuste ou utilize a função Ajuste de Máscara
para verificar o encaixe e vedação da máscara.
Português 11
Page 78

Problema/Causa possível
Solução
Meu nariz está ficando seco e entupido
A configuração do Nível de umidade pode estar muito baixa. Para ajustar o Nível de umidade.
Se você possuir ClimateLineAir tubulação de ar aquecida,
consulte o manual do usuário de ClimateLineAir.
Há gotas de água em meu nariz, na máscara e na tubulação de ar
A configuração do Nível de umidade pode estar muito alta. Para ajustar o Nível de umidade.
Se você possuir ClimateLineAir tubulação de ar aquecida,
consulte o manual do usuário de ClimateLineAir.
Minha boca está muito seca e desconfortável
Pode estar ocorrendo escape de ar pela sua boca. Aumente o Nível de umidade.
Talvez você precise uma faixa no queixo para manter sua
boca fechada ou uma máscara facial.
A pressão de ar na minha máscara parece muito alta (parece que estou recebendo muito ar)
Rampa pode estar desligado. Utilize a opção T. rampa.
A pressão de ar na minha máscara parece muito baixa (parece que não estou recebendo ar suficiente)
Rampa pode estar sendo executado. Aguarde o aumento da pressão do ar ou desligue T. rampa.
Minha tela está preta
A luz de fundo da tela pode estar desligada. Ela desliga
Pressione Início ou o botão giratório para ligá-la novamente.
automaticamente após um breve período de tempo.
A fonte de alimentação pode não estar conectada. Conecte a fonte de alimentação e certifique-se de que o
plugue esteja totalmente inserido.
Eu interrompi a terapia, mas o dispositivo ainda está ventilando ar
O dispositivo está esfriando. O dispositivo ventila uma pequena quantidade de ar para
evitar a condensação na tubulação de ar. Ela vai parar
automaticamente após 20 minutos.
Meu reservatório de água está vazando
A câmara de água pode não estar montada corretamente. Verifique se está danificada e remonte a câmara de água
corretamente.
A câmara de água pode estar avariada ou rachada. Contate o profissional que cuida da sua saúde para uma
substituição.
Os dados da minha terapia não foram enviados ao profissional que cuida da minha saúde
A rede sem fio pode não estar com bom sinal. Certifique-se de que o dispositivo seja colocado onde haja
sinal (ou seja, na mesa de cabeceira, não em uma gaveta ou
no chão).
O ícone de intensidade do sinal da rede sem fio
que o sinal está bom quando todas as barras são exibidas e
que o sinal está ruim quando poucas barras são exibidas.
12
indica
Page 79

Problema/Causa possível
Solução
O ícone Conexão sem fio não encontrada é exibido no
Mensagem do dispositivo/causa possível
Solução
canto superior direito da tela. Não há redes sem fio
disponíveis.
Certifique-se de que o dispositivo seja colocado onde haja
sinal (ou seja, na mesa de cabeceira, não em uma gaveta ou
no chão).
Envie o cartão SD para o profissional que cuida da sua saúde,
se ele solicitar. O cartão SD também contém os dados da sua
terapia.
O dispositivo pode estar no Modo avião. Desative o Modo avião e consulte Viagens de avião.
A transferência de dados não está habilitada no seu
dispositivo.
Entre em contato com o seu prestador de cuidados de saúde
para habilitar o serviço de transferência de dados.
A tela e os botões estão piscando
O software está sendo atualizado. A atualização do software demora aproximadamente 10
minutos para ser concluída.
Mensagens do dispositivo
Fuga elevada detectada; conecte a câmara de água ou tampa lateral
O reservatório de água pode não estar adequadamente
inserido.
A vedação do reservatório de água pode não estar inserida
corretamente.
Fuga alta detectada, conecte sua tubulação
A tubulação de ar pode não ter sido devidamente conectada. Certifique-se de que a tubulação de ar esteja firmemente
A máscara pode estar mal ajustada. Certifique-se de que sua máscara esteja corretamente
Certifique-se de que o reservatório de água esteja
corretamente inserido.
Abra o reservatório de água e certifique-se de que a vedação
seja corretamente inserida.
conectada em ambas as extremidades.
ajustada. Consulte o manual do usuário da máscara para
instruções de ajuste ou utilize a função Ajuste de Máscara
para verificar o encaixe e vedação da máscara.
Tubo obstruído; verifique o tubo
A tubulação de ar pode estar bloqueada. Verifique a tubulação de ar e remova eventuais obstruções.
Pressione o botão giratório para apagar a mensagem e,
depois, pressione Iniciar/Parar para reiniciar o dispositivo.
Erro no cartão SD; remova o cartão e pressione Início para começar a terapia
O cartão SD pode não ter sido introduzido corretamente. Remova e insira novamente o Cartão SD.
Cartão somente leitura. Remova, destrave e reinsira o cartão SD
A chave do cartão SD pode estar na posição bloqueada
(somente leitura).
Português 13
Mude a chave do cartão SD da posição bloqueada
posição desbloqueada
e insira-o novamente.
para a
Page 80

Mensagem do dispositivo/causa possível
Solução
Falha do sistema; consulte o manual do usuário Erro 004
O dispositivo pode ter sido deixado em um ambiente quente. Deixe esfriar antes de reutilizar. Desconecte a fonte de
energia e em seguida volte a conectá-la para reiniciar o
dispositivo.
O filtro de ar pode estar bloqueado. Verifique o filtro de ar e substitua-o se houver obstruções.
Desconecte a fonte de energia e em seguida volte a
conectá-la para reiniciar o dispositivo.
A tubulação de ar pode estar bloqueada. Verifique a tubulação de ar e remova eventuais obstruções.
Pressione o botão giratório para apagar a mensagem e,
depois, pressione Iniciar/Parar para reiniciar o dispositivo.
Pode haver água na tubulação de ar. Esvazie a água da tubulação de ar. Desconecte a fonte de
energia e em seguida volte a conectá-la para reiniciar o
dispositivo.
Para todas as outras mensagens de erro, como por exemplo, Falha do sistema; consulte o manual do usuário
Erro 0XX
Ocorreu um erro irrecuperável no dispositivo. Contate o profissional que cuida da sua saúde. Não abra o
dispositivo.
Remontagem de peças
Algumas peças de seu dispositivo foram projetadas para saírem facilmente para evitar danos às peças
ou ao dispositivo. Você pode remontá-las facilmente, conforme descrito abaixo.
Para inserir a vedação do reservatório de água:
1. Coloque a vedação na tampa.
2. Pressione ao longo de toda a borda da vedação até que ela encaixe firmemente no local.
14
Page 81

Para remontar a tampa do reservatório de água:
1. Insira um lado da tampa no orifício de articulação da base.
2. Deslize o outro lado para baixo até que clique demonstrando o encaixe.
Avisos e precauções gerais
AVISO
• Certifique-se de posicionar a tubulação de ar de modo que ela não se enrosque em sua
cabeça ou pescoço.
• Certifique-se de que o cabo de energia e o plugue estejam em boas condições e que o
equipamento não esteja danificado.
• Mantenha o cabo de energia longe de superfícies quentes.
• Se você perceber quaisquer alterações inexplicáveis no desempenho do dispositivo, se ele
estiver emitindo sons incomuns, se o dispositivo ou a fonte de alimentação forem
derrubados ou mal utilizados, ou se o gabinete estiver quebrado, interrompa o uso e entre
em contato com o profissional que cuida de sua saúde ou com seu Centro de Serviços da
ResMed.
• Não abra nem modifique o dispositivo. Não existem peças dentro dele que possam ser
reparadas pelo usuário. A manutenção e os reparos só devem ser realizados por técnicos
autorizados pela ResMed.
• Tome cuidado com descargas elétricas. Não mergulhe o dispositivo, a fonte de alimentação
nem o cabo de energia em água. Caso líquidos sejam derramados sobre o dispositivo ou
para dentro dele, retire o dispositivo da tomada e deixe as peças secarem. Sempre retire o
dispositivo da tomada antes de limpar e certifique-se de que todas as peças estejam secas
antes de religar o dispositivo à tomada.
• O oxigênio suplementar não deve ser utilizado ao fumar ou próximo a uma chama.
• Sempre certifique-se de que o dispositivo esteja ligado e o fluxo de ar esteja sendo gerado
antes de o fornecimento de oxigênio ser ligado. Sempre desligue o fornecimento de
oxigênio antes de o dispositivo ser desligado, de modo que o oxigênio não utilizado não se
acumule no gabinete do dispositivo e crie risco de incêndio.
• Não execute nenhuma tarefa de manutenção enquanto o dispositivo estiver em
funcionamento.
• O dispositivo não deve ser utilizado próximo ou em cima de outro equipamento. Se for
necessário utilizar o dispositivo próximo ou em cima de outro equipamento, deve
verificar-se o correto funcionamento do mesmo com o tipo de configuração a ser usada.
• O uso de acessórios que não aqueles especificados para o dispositivo não é recomendado.
Estes poderão resultar num aumento de emissões ou na diminuição da imunidade do
dispositivo.
Português 15
Page 82

PRECAUÇÃO
Fonte de alimentação de 90 W
Intervalo de entrada AC:
100–240 V, 50–60 Hz 1,0-1,5 A, Classe II
Saída CC:
24V 3,75A
Consumo normal de energia:
53 W (57 VA)
Consumo de energia de pico:
104 W (108 VA)
Condições ambientais
Temperatura de funcionamento:
+5 °C a +35 °C (+41 °F a +95 °F)
Observação: O fluxo de ar para respiração produzido por
Umidade de funcionamento:
10% a 95% de umidade relativa, sem condensação
Altitude de funcionamento:
Nível do mar até 2.591 m (8.500 '); faixa de pressão
Temperatura de armazenamento e transporte:
-4 °F a +140 °F (-20 °C a +60 °C)
Umidade de armazenamento e transporte:
5% a 95% de umidade relativa, sem condensação
• Utilize apenas peças e acessórios ResMed com o dispositivo. Peças que não são ResMed
podem reduzir a eficiência do tratamento e/ou danificar o dispositivo.
• Com este dispositivo, utilize somente máscaras com orifícios de ventilação recomendadas
pela ResMed ou prescritas pelo médico. Conectar a máscara sem que o dispositivo esteja
ventilando ar pode resultar na respiração do ar exalado. Certifique-se de que os orifícios de
ventilação da máscara estejam livres e desbloqueados para manter o fluxo de ar fresco na
máscara.
• Cuidado para não colocar o dispositivo em local em que seja possível derrubá-lo ou onde
haja probabilidade de tropeçar no cabo de energia.
• A obstrução da tubulação de ar e/ou da entrada de ar do dispositivo durante o
funcionamento pode acarretar o superaquecimento do dispositivo.
• Assegure-se de que a área próxima ao dispositivo esteja seca e limpa, sem qualquer coisa
(p.ex., roupa de cama ou roupas) que possa bloquear a entrada de ar ou cobrir a fonte de
alimentação.
• Não coloque o dispositivo de lado, pois água poderá entrar no mesmo.
• A configuração incorreta do sistema pode resultar em leitura incorreta de pressão na
máscara. Certifique-se de que o sistema seja corretamente configurado.
• Não utilize soluções a base de alvejante, cloro, álcool ou substâncias aromáticas, nem
sabonetes hidratantes, bactericidas ou óleos perfumados para limpar o dispositivo, o
reservatório de água ou a tubulação de ar. Esses produtos podem danificar ou afetar o
desempenho do umidificador e reduzir a vida útil do equipamento.
• Caso utilize o umidificador, sempre coloque o dispositivo sobre uma superfície plana mais
baixa do que sua cabeça para evitar que a tubulação de ar e a máscara encham de água.
• Deixe o reservatório de água esfriar por dez minutos antes de manusear para permitir que a
água esfrie e certificar-se de que o reservatório de água não esteja muito quente para ser
tocado.
• Certifique-se de que o reservatório de água esteja vazio antes de transportar o dispositivo.
Especificações técnicas
16
115 V, 400 Hz 1,5 A, Classe II (nominal para uso em
aeronave)
este dispositivo terapêutico pode ter temperatura mais alta
do que a temperatura ambiente. O dispositivo permanece
seguro sob condições extremas de temperatura ambiente
(40 °C/104 °F).
atmosférica de 1013 hPa a 738 hPa
Page 83

Compatibilidade eletromagnética
O produto AirCurve 10 encontra-se em conformidade com todos os requisitos de compatibilidade eletromagnética (EMC) de
Classificação IEC 60601-1:2005
Sensores
Sensor de pressão:
Localizado internamente na saída do dispositivo, medidor de
pressão do tipo analógico, -5 a +45 cm H2O
Sensor de fluxo:
Localizado internamente na entrada do dispositivo, digital do
Pressão máxima de falha única em estado estável
30 cm H2O por mais de 6 s ou 40 cm H2O por mais de 1 s.
Som
Nível de pressão medido em conformidade com ISO 17510-1:2007 (modo CPAP):
Standard:
26,6 dBA com incerteza de 2 dBA
SlimLine:
34,6 dBA com incerteza de 2 dBA
Valores de emissão de ruído de dois dígitos declarados em conformidade com ISO 4871:1996
Físico – dispositivo e câmara de água
Dimensões (A x L x P):
116 mm x 255 mm x 150 mm
(4,57" x 10,04" x 5,91")
Saída de ar (em conformidade com a ISO 5356-1:2004):
22 mm
Peso (dispositivo e câmara de água padrão):
1248 g (44 oz)
Construção do gabinete:
Termoplástico de engenharia retardador de chamas
Capacidade de água:
Até a linha de enchimento máximo 380 mL
Câmara de água padrão - material:
Plástico moldado por injeção, aço inoxidável e vedação de
silicone
Câmara de água lavável- material:
Plástico moldado por injeção, aço inoxidável e vedação de
silicone
Temperatura
Máxima da placa de aquecimento
68 °C (154 °F)
Corte:
74 °C (165 °F)
Temperatura máxima do gás:
≤ 41 °C (≤ 106 °F)
Filtro de ar
Standard:
Material: Fibra de poliéster não entrelaçada
~7 mícrons
acordo com a CEI 60601-1-2:2007, para áreas residenciais, comerciais e de indústria leve. Recomenda-se que aparelhos de
comunicação móvel sejam mantidos a uma distância mínima de 1 m do dispositivo.
As informações sobre imunidade e emissões eletromagnéticas deste dispositivo ResMed podem ser encontradas em
www.resmed.com, na página Products (Produtos), em Service and Support (Serviço e Suporte).
Classe II (isolamento duplo), Tipo BF, grau de proteção contra elementos exteriores IP22.
tipo fluxo de massa, -70 a +180 L/min
O dispositivo se desligará na presença de uma única falha se a pressão de estado estável exceder:
SlimLine: 26,6 dBA com incerteza de 2 dBA
Nível de energia medido em conformidade com ISO 17510-1:2007 (modo CPAP):
Standard: 34,6 dBA com incerteza de 2 dBA
Peso (dispositivo e câmara de água lavável): 1248 g (44 oz)
Capacidade média de retenção: >75% para partículas de
Hipoalergênico: Material: Fibras de polipropileno e acrílicas em substrato de
polipropileno
Eficiência: >98% para partículas de ~7-8 mícrons; >80% para
partículas de ~0,5 mícron
Português 17
Page 84

Uso em aeronaves
A ResMed confirma que o dispositivo cumpre com os requerimentos da Federal Aviation Administration (FAA) (RTCA/DO-160,
seção 21, categoria M) para todas as fases das viagens aéreas.
Módulo sem fio
Tecnologia usada:
3G (somente EUA e Canadá)
2G GSM (todas as regiões, exceto EUA e Canadá)
Faixa de pressão operacional
SVA, SVAAuto:
4 a 25 cm H2O
Oxigênio suplementar
Fluxo máximo:
15 L/min (CPAP, SVA); 4 L/min (SVAAuto)
Circuito do fluxo de ar
1. Sensor de fluxo
Vida útil
Câmara de água lavável:
2,5 anos
Geral
O paciente pode operar o dispositivo.
Pressão na Máscara
% Saída de UR
Saída do sistema nominal AH1, BTPS2
Configuração 4
Configuração 8
Configuração 4
Configuração 8
3
85
100 6 >10
4
85
100 6 >10
10
85
100 6 >10
20
85
90 6 >10
25
85
90 6 >10
FCC ID: 2ACHL-AIR103G
O dispositivo AirCurve 10 está de acordo com as Normas da FC
C.
O AirCurve 10 deve ser usado a uma distância mínima de 2 cm do corpo durante seu funcionamento. Informações adicionais
relacionadas às normas da FCC para este dispositivo podem ser encontradas em www.resmed.com/downloads/devices.
CPAP 4 a 20 cm H2O
2. Ventilador
3. Sensor de pressão
4. Másc
5. Tubulação de ar
6. Câmara de água
7. Dispositivo
8. Filtro de entrada
Dispositivo, fonte de alimentação: 5 anos
Câmara de água padrão, tubulação de ar: 6 meses
Desempenho do umidificador
As configurações a seguir foram testadas na temperatura ambiente de 22 °C :
cm H2O
1
UA - Umidade Absoluta em mg/l.
2
BTPS - temperatura corporal, pressão ambiente, saturado.
18
Page 85

Tubulação de ar
Tubulação de ar
Material
Comprimento
Diâmetro interno
ClimateLineAir
Plástico flexível e componentes elétricos
2 m (6'6")
15 mm (0,6")
SlimLine
Plástico flexível
1,8 m (6’)
15 mm (0,6")
Standard
Plástico flexível
2 m (6'6")
19 mm (0,75")
Temperatura de corte do tubo de ar aquecido: ≤ 106°C (≤ 41°F)
Valor
Faixa
Resolução de exibição
Pressão na máscara
4–25 cm H2O
0,1 cm H2O
Fuga
0-120 L/min
1 L/min
Frequência respiratória
0–50 RPM
1 RPM
Valor
Precisão1
Medição da pressão:
Fluxo e valores derivados do fluxo1:
Fuga2
±12 L/min ou 20% da leitura, o que for maior, de 0 a 60 L/min
Frequência respiratória
2,3
±1,0 RPM
Observações:
• O fabricante reserva-se o direito de alterar estas especificações sem aviso prévio.
• O terminal do conector elétrico da tubulação de ar aquecida é compatível apenas com a saída de ar no dispositivo e não
deve ser encaixado na máscara.
• Não use tubulações de ar condutoras de eletricidade ou antiestáticas.
• As configurações de temperatura e umidade relativa exibidas não são valores medidos.
Valores exibidos
Sensor de pressão na saída de ar:
Valores derivados do fluxo:
Volume corrente 0–4000 mL 1 mL
Ventilação por minuto 0–30 L/min 0,1 L/min
Pressão na máscara2 ±[0,5 cm H2O + 4% do valor medido]
Fluxo ±6 L/min ou 10% da leitura, o que for maior, de 0 a 150 L/min de fluxo positivo
Volume corrente
Ventilação por minuto
1
Os resultados estão expressos em ATPD (Temperatura e pressão ambiente, seco).
2
A precisão pode ser reduzida pela presença de fugas, oxigênio suplementar, volumes correntes <100 mL ou ventilação por minuto <3 L/min.
3
Precisão da medição verificada de acordo com a ISO 10651-1:2004 para dispositivos de suporte ventilatório para assistência domiciliar (Home
Care Ventilatory Support Devices) (Figura 101 e Tabela 101), usando fluxos de ventilação nominais na máscara ResMed.
Português 19
2,3
±20%
2,3
±20%
Page 86

Precisão da pressão
Tubulação de ar Standard
SlimLine air tubing
Sem umidificação
±0,5 cm H2O
±0,5 cm H2O
Dispositivo sem umidificação e tubulação de ar Standard / Dispositivo com umidificação e tubulação de ar Standard.
Pressão (cm H2O)
10 RPM
15 RPM
20 RPM
4
0,5 / 0,5
0,5 / 0,5
0,8 / 0,8
8
0,5 / 0,5
0,5 / 0,5
0,8 / 0,8
12
0,5 / 0,5
0,5 / 0,5
0,8 / 0,8
16
0,5 / 0,5
0,5 / 0,5
0,8 / 0,8
25
0,3 / 0,3
0,5 / 0,4
0,7 / 0,7
Pressão (cm H2O)
10 RPM
15 RPM
20 RPM
8
0,5 / 0,5
0,5 / 0,5
0,8 / 0,8
16
0,5 / 0,5
0,5 / 0,5
0,8 / 0,8
25
0,4 / 0,3
0,6 / 0,5
0,8 / 0,8
Variação máxima da pressão estática a 10 cm H
O de acordo com ISO 17510-1:2007
2
Com umidificação ±0,5 cm H2O ±0,5 cm H2O
Variação máxima da pressão dinâmica de acordo com ISO 17510-1:2007
20 0,5 / 0,5 0,5 / 0,5 0,8 / 0,8
Dispositivo sem umidificação e tubulação de ar SlimLine / Dispositivo com umidificação e tubulação de ar SlimLine
4 0,5 / 0,5 0,5 / 0,5 0,8 / 0,8
12 0,5 / 0,5 0,5 / 0,5 0,8 / 0,8
20 0,5 / 0,5 0,5 / 0,5 0,8 / 0,8
Símbolos
Os símbolos a seguir podem aparecer no produto ou embalagem.
Leia as instruções antes de usar. Indica um aviso ou precaução. Siga as instruções antes
de usar.
Peso do dispositivo. Protegido contra objetos de tamanho de um dedo e contra gotejamento
de água quando inclinada em até 15 graus a partir da orientação especificada.
contínua.
China .
médica (Nos EUA, a lei federal limita a venda destes dispositivos a médicos ou por ordem destes.)
funcionamento.
seção 21, categoria M.
Fabricante. Representante europeu autorizado. Código de lote.
Número do produto. Número de série. Número do dispositivo. Lig / Desl.
Corrente
Peça de aplicação tipo BF. Equipamento de Classe II Limite de umidade.
Limite de temperatura. Radiação não ionizante. Logotipo 1 de controle de poluição na
Logotipo 2 de controle de poluição na China . Somente com prescrição
Nível máximo de água. Utilize apenas água destilada. Altitude de
Limitação da pressão atmosférica. Está de acordo com o RTCA DO-160
20
Page 87

Informações ambientais
• Sistemas de máscara (incluindo armação da máscara, almofada, capacete e
90 dias
•
6 meses
• Sensores de pulso para dedo de tipo clipe
1 ano
• Dispositivos CPAP, de dois níveis e de ventilação (incluindo fontes de alimentação
2 anos
Este dispositivo deve ser eliminado separadamente e não como resíduo urbano indiferenciado. Para
eliminar o dispositivo, use os sistemas adequados de coleta, reutilização e reciclagem disponíveis na
sua região. O uso destes sistemas de coleta, reutilização e reciclagem tem o propósito de poupar os
recursos naturais e evitar danos ao ambiente causados por substâncias perigosas.
Se necessitar de informações sobre estes sistemas de descarte de resíduos, entre em contato com o
serviço de coleta de resíduos de sua localidade. O símbolo de reciclagem indica o uso destes
sistemas de descarte de resíduos. Se necessitar de mais informações sobre coleta e descarte do
dispositivo ResMed, entre em contacto com os escritórios da ResMed ou o distribuidor local, ou
visite www.resmed.com/environment.
Manutenção
O dispositivo AirCurve 10 foi projetado para proporcionar um funcionamento seguro e confiável
quando utilizado de acordo com as instruções fornecidas pela ResMed. Caso haja algum sinal de
desgaste ou alguma preocupação com o funcionamento do dispositivo, a ResMed recomenda que o
dispositivo AirCurve 10 seja examinado e consertado por uma Assistência Técnica autorizada da
ResMed. Caso contrário, não deve haver necessidade de conserto ou revisão do dispositivo durante
sua vida útil projetada.
Garantia limitada
A ResMed Pty Ltd (daqui por diante 'ResMed') garante que este produto de sua fabricação está livre
de defeitos de material e mão de obra pelo período de tempo abaixo especificado, a partir da data de
compra.
roduto Período da garantia
P
tubulação)—exceto dispositivos de utilização única
• Acessórios—exceto dispositivos de utilização única
• Sensores de pulso para dedo de tipo flexível
• Reservatórios de água de umidificadores
Baterias para utilização em sistemas de bateria ResMed internos e externos
• Módulos de dados de dispositivos CPAP e de dois níveis
• Oxímetros e adaptadores para oxímetros de dispositivos CPAP e de dois níveis de
pressão
• Reservatórios de água laváveis para umidificadores
• Dispositivos de controle de titulação
externa)
• Umidificadores
• Acessórios de baterias
• Dispositivos portáteis de diagnóstico/rastreio
Esta garantia só se aplica ao consumidor inicial. Não é transferível.
Se o produto sofrer avarias nas condições normais de utilização, a ResMed procederá, a seu critério, à
reparação ou substituição do produto defeituoso ou de qualquer um dos seus componentes.
Esta garantia limitada não cobre: a) danos provocados por uso incorreto, uso abusivo, modificação ou
Português 21
Page 88

alteração do produto; b) consertos efetuados por empresas de assistência técnica que não tenham
sido expressamente autorizadas pela ResMed para efetuar tais serviços; e c) danos ou
contaminações provocado(a)s por fumaça de cigarro, cachimbo, charuto ou outras fontes.
A garantia deixa de ser válida se o produto for vendido, ou revendido, fora da região da compra
original.
Os pedidos de reparo ou substituição de um produto defeituoso no âmbito da garantia devem ser
feitos pelo consumidor original no local de compra.
Esta garantia substitui todas as outras, explícitas ou implícitas, incluindo qualquer garantia implícita de
comerciabilidade ou de adequabilidade para um determinado fim. Algumas regiões ou estados não
permitem limitações de tempo sobre a duração de uma garantia implícita, pelo que a limitação acima
pode não se aplicar ao seu caso.
A ResMed não será responsabilizada por quaisquer danos incidentais ou consequentes reivindicados
como decorrentes da venda, instalação ou uso de qualquer produto ResMed. Algumas regiões ou
estados não permitem a exclusão ou limitação de danos incidentais ou consequentes, pelo que a
limitação acima pode não se aplicar ao seu caso.
Esta garantia confere-lhe direitos legais específicos e pode haver outros direitos que variam de região
para região. Para mais informações sobre seus direitos de garantia, entre em contato com o
revendedor local da ResMed ou os escritórios da ResMed.
Informações adicionais
Se você tiver dúvidas ou se precisar de informações adicionais sobre como usar o dispositivo, contate
o profissional que cuida da sua saúde.
22
Page 89

378957
ResMed Pty Ltd
1 Elizabeth Macarthur Drive Bella Vista NSW 2153 Australia
See www.resmed.com for other ResMed locations worldwide. For patent information, see www.resmed.com/ip. AirCurve, Air10, ClimateLine,
HumidAir and SlimLine are trademarks of ResMed Ltd. SlimLine and ClimateLine are registered in U.S. Patent and Trademark Office. SD Logo is a
trademark of SD-3C, LLC. © 2020 ResMed. 378957/1 2020-12
ResMed.com
 Loading...