

Page 1
User guide
|
English
378013r7 Covers.indd 2 23/06/2014 5:36:53 PM
Page 2

378013r7 Covers.indd 3 23/06/2014 5:36:53 PM
Page 3

ENGLISH
Welcome
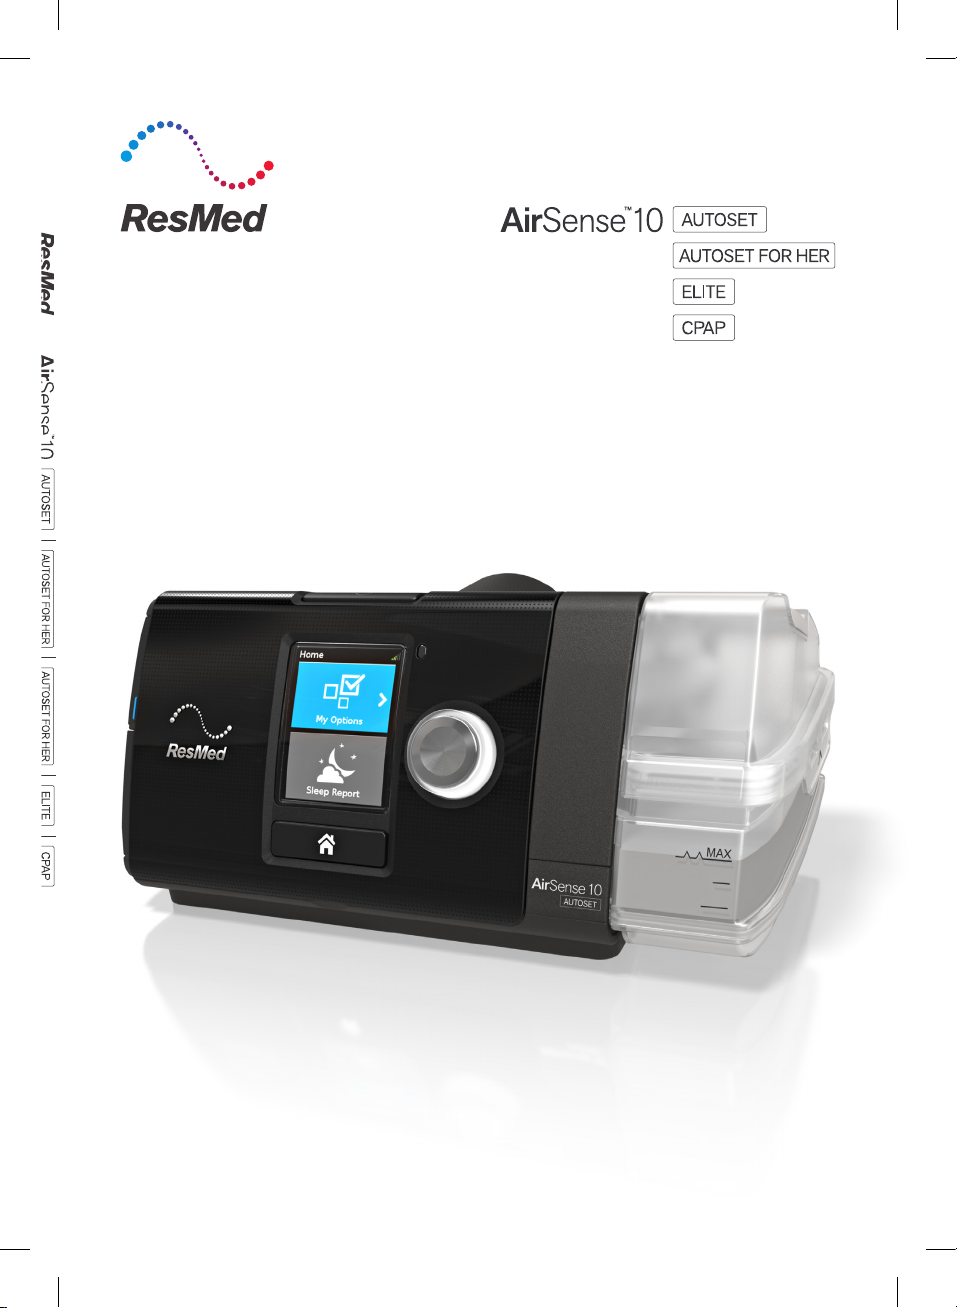
The AirSense™ 10 AutoSet™ and AirSense 10 AutoSet for Her are ResMed's premium auto-adjusting
pressure devices. The AirSense 10 Elite and AirSense 10 CPAP are ResMed's Continuous Positive
Airway Pressure (CPAP) devices.
WARNING
Read this entire guide before using the device.
CAUTION
In the US, Federal law restricts this device to sale by or on the order of a physician.
Indications for use
AirSense 10 AutoSet
The AirSense 10 AutoSet self-adjusting device is indicated for the treatment of obstructive sleep
apnea (OSA) in patients weighing more than 66 lb (30 kg). It is intended for home and hospital use.
The humidifier is intended for single patient use in the home environment and re-use in a
hospital/institutional environment.
AirSense 10 AutoSet for Her
The AirSense 10 AutoSet for Her self-adjusting device is indicated for the treatment of obstructive
sleep apnea (OSA) in patients (female patients with mild to moderate OSA when using AutoSet for
Her treatment mode) weighing more than 66 lb (30 kg). It is intended for home and hospital use.
The humidifier is intended for single patient use in the home environment and re-use in a
hospital/institutional environment.
AirSense 10 Elite
The AirSense 10 Elite device is indicated for the treatment of obstructive sleep apnea (OSA) in
patients weighing more than 66 lb (30 kg). It is intended for home and hospital use.
The humidifier is intended for single patient use in the home environment and re-use in a
hospital/institutional environment.
AirSense 10 CPAP
The AirSense 10 CPAP device is indicated for the treatment of obstructive sleep apnea (OSA) in
patients weighing more than 66 lb (30 kg). It is intended for home and hospital use.
The humidifier is intended for single patient use in the home environment and re-use in a
hospital/institutional environment.
English 1
Page 4

Contraindications
Positive airway pressure therapy may be contraindicated in some patients with the following
pre-existing conditions:
• severe bullous lung disease
• pneumothorax
• pathologically low blood pressure
• dehydration
• cerebrospinal fluid leak, recent cranial surgery, or trauma.
Adverse effects
You should report unusual chest pain, severe headache, or increased breathlessness to your
prescribing physician. An acute upper respiratory tract infection may require temporary
discontinuation of treatment.
The following side effects may arise during the course of therapy with the device:
• drying of the nose, mouth, or throat
• nosebleed
• bloating
• ear or sinus discomfort
• eye irritation
• skin rashes.
At a glance
The AirSense 10 includes the following:
• Device with HumidAir integrated humidifier
• Water tub
• Air tubing
• Power supply unit
• Travel bag
• SD card (already inserted).
Contact your care provider for a range of accessories available for use with the device including:
• Air tubing (heated and non-heated): ClimateLineAir
• Water tub: Standard water tub, cleanable water tub (can be disinfected)
• Filter: Hypoallergenic filter, standard filter
• Air10
™
DC/DC converter
• SD card reader
• Air10 oximeter adapter
• Air10 USB adapter.
™
, SlimLine™, Standard
2
Page 5
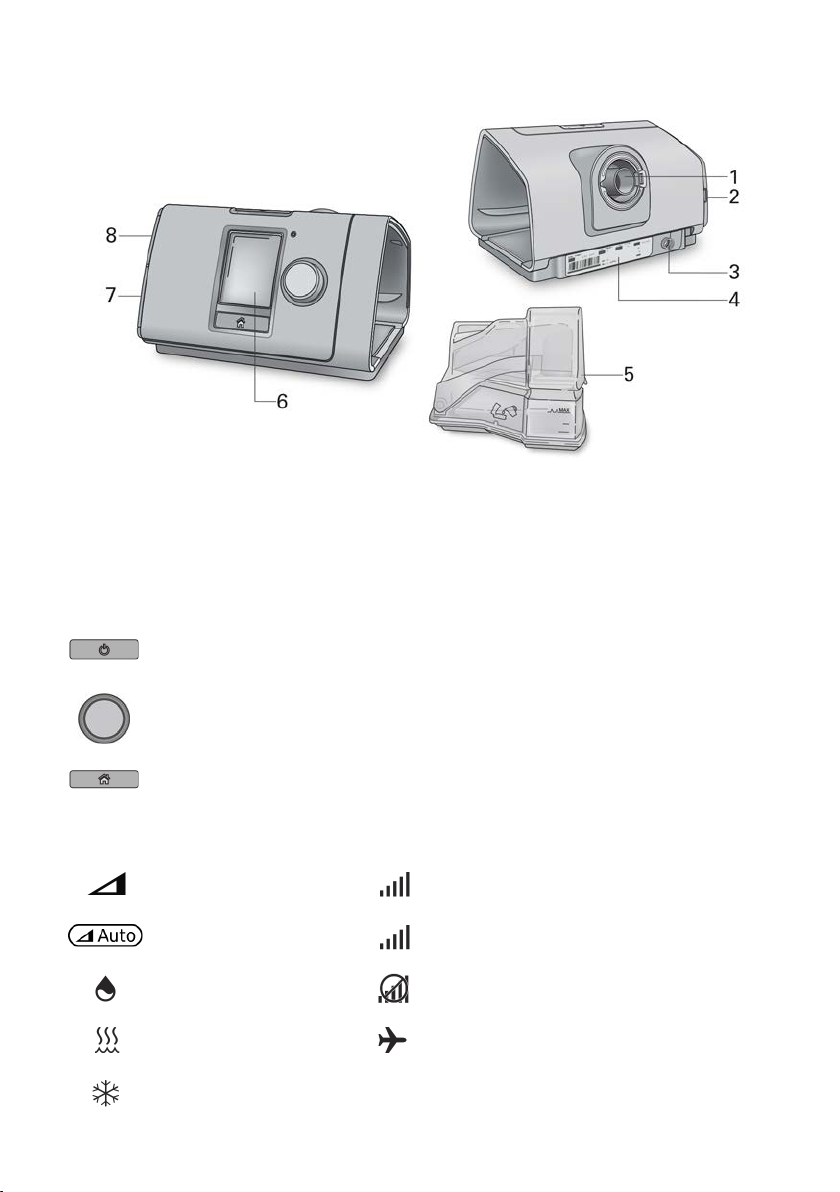
About your device
1
Air outlet
5
Water tub
2
Air filter cover
6
Screen
3
Power inlet
7
Adapter cover
4
Serial number and device number
8
SD card cover
Press to start/stop therapy.
About the control panel
Start/Stop button
Dial
Home button Press to return to the Home screen.
Different icons may be displayed on the screen at different times including:
Ramp Time
Ramp Time Auto
Humidity
Press and hold for three seconds to enter power save
mode.
Turn to navigate the menu and press to select an option.
Turn to adjust a selected option and press to save your
change.
Wireless signal strength (green)
Wireless transfer not enabled (gray)
No wireless connection
Humidifier warming
Humidifier cooling
English 3
Airplane Mode
Page 6
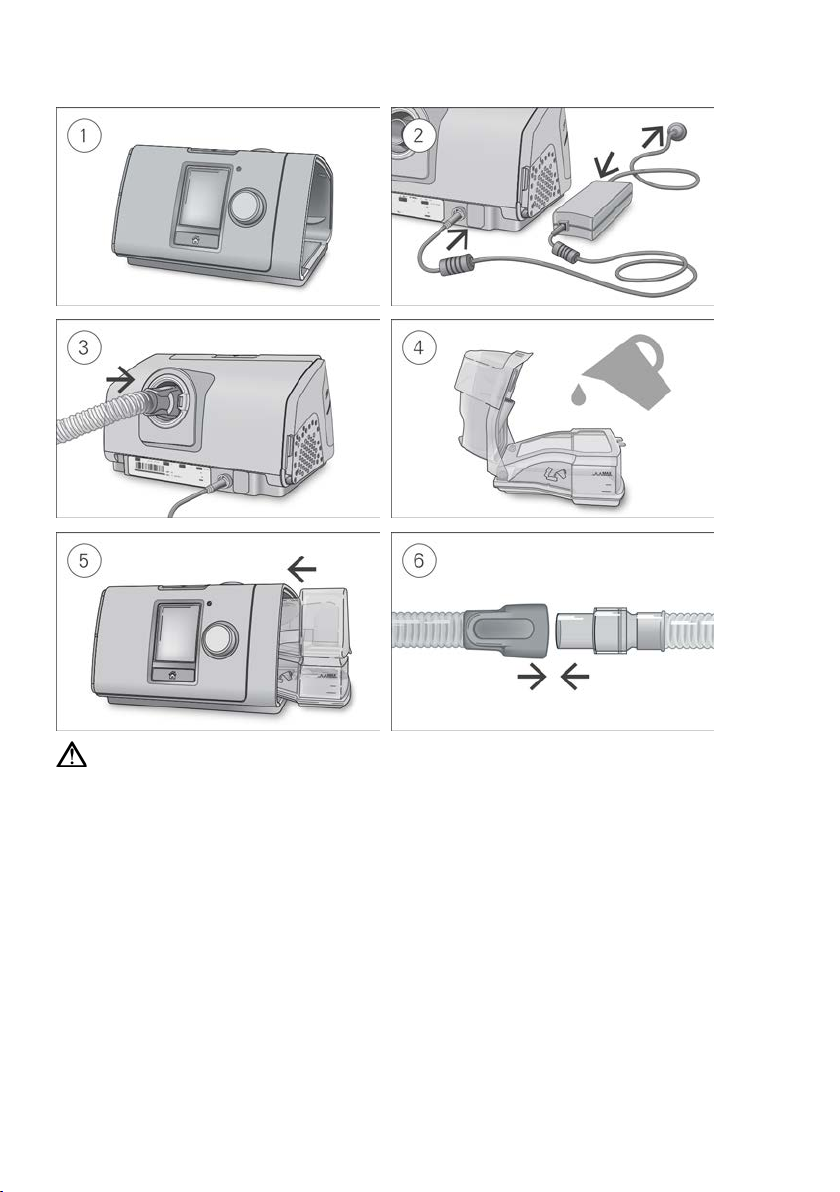
Setup
CAUTION
Do not overfill the water tub as water may enter the device and air tubing.
1. Place the device on a stable level surface.
2. Plug the power connector into the rear of the device. Connect one end of the power cord into
the power supply unit and the other end into the power outlet.
3. Connect the air tubing firmly to the air outlet located on the rear of the device.
4. Open the water tub and fill it with distilled water up to the maximum water level mark.
Do not fill the water tub with hot water.
5. Close the water tub and insert it into the side of the device.
6. Connect the free end of the air tubing firmly onto the assembled mask.
See the mask user guide for detailed information.
Recommended masks are available on www.resmed.com.
4
Page 7
Starting therapy
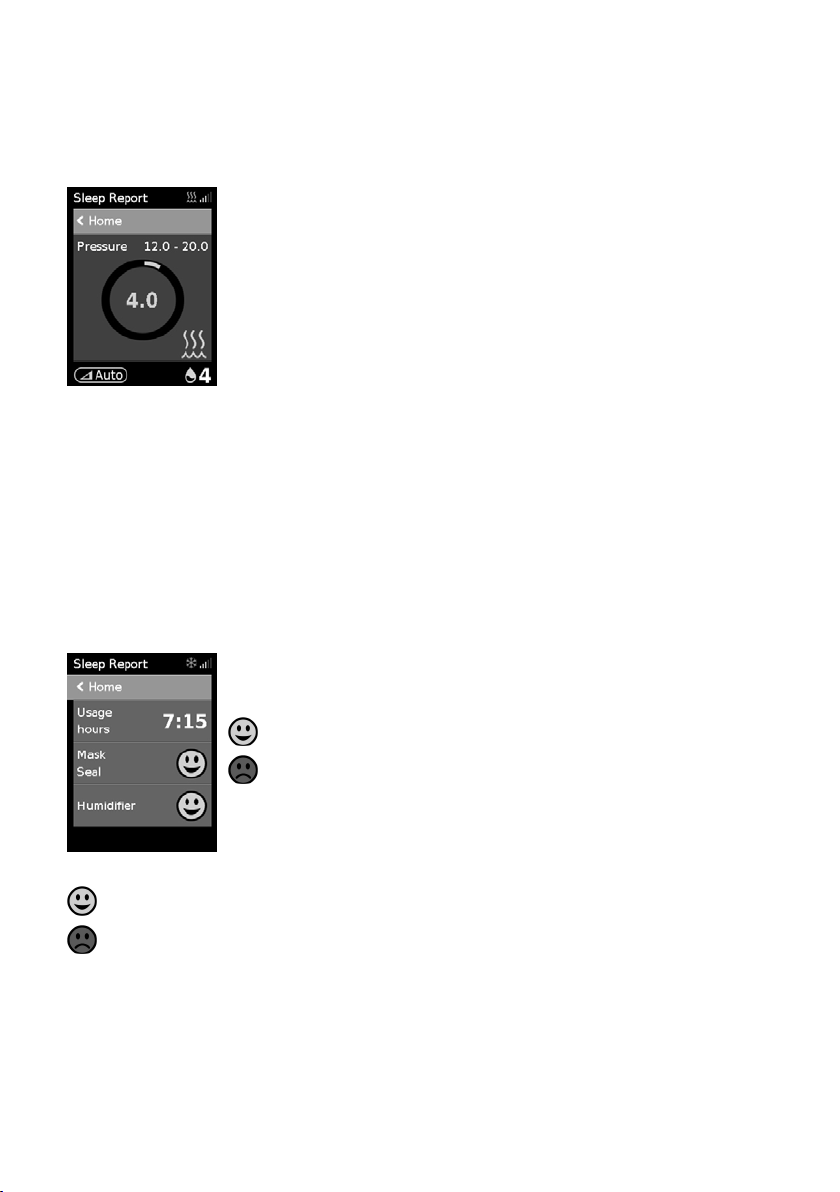
The current treatment pressure is shown in green.
Usage hours–Indicates the number of hours of therapy you received last
1. Fit your mask.
2. Press Start/Stop or breathe normally if SmartStart is enabled.
You will know that therapy is on when the Sleep Report screen is displayed.
During ramp time the pressure is gradually increasing and you will see a
spinning circle. Once the prescribed treatment pressure is reached, the entire
circle will be green.
The screen will go black automatically after a short period of time. You can press Home or the dial to
turn it back on. If power is interrupted during therapy, the device will automatically restart therapy
when power is restored.
The AirSense 10 device has a light sensor that adjusts the screen brightness based on the light in
the room.
Stopping therapy
1. Remove your mask.
2. Press Start/Stop or if SmartStart is enabled, therapy will stop automatically after a few seconds.
The Sleep Report now gives you a summary of your therapy session.
session.
Mask Seal–Indicates how well your mask sealed:
Good mask seal.
Needs adjusting, see Mask Fit.
Humidifier–Indicates if your humidifier is working properly:
Humidifier working.
Humidifier might be faulty, contact your care provider.
If set by your care provider, you will also see:
Events per hour–Indicates the number of apneas and hypopneas experienced per hour.
More Info–Turn the dial to scroll down to view more detailed usage data.
English 5
Page 8
Power save mode
Highlight My Options and press the dial to see your
Your AirSense 10 device records your therapy data. In order to allow it to transmit the data to your
care provider, you should not unplug the device. However, you can put it into power save mode to
save electricity.
To enter power save mode:
• Press and hold Start/Stop for three seconds.
The screen goes black.
To exit power save mode:
• Press Start/Stop once.
The Home screen is displayed.
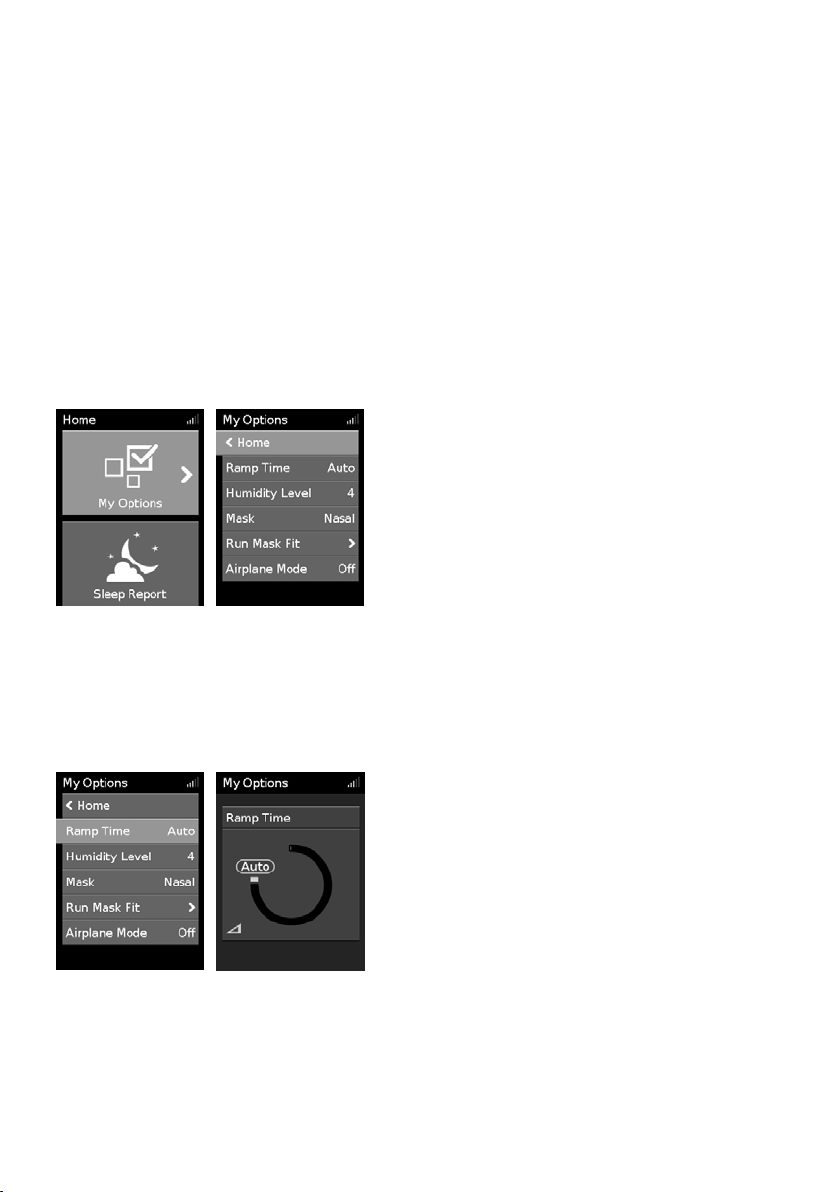
My Options
Your AirSense 10 device has been set up for your needs by your care provider, but you may find you
want to make small adjustments to make your therapy more comfortable.
current settings. From here, you can personalize your
options.
Ramp Time
Designed to make the beginning of therapy more comfortable, Ramp Time is the period during
which the pressure increases from a low start pressure to the prescribed treatment pressure.
You can set your Ramp Time to Off, 5 to 45 minutes or Auto. When Ramp Time is set to Auto, the
device will detect when you have fallen asleep and then automatically rise to the prescribed
treatment pressure.
To adjust Ramp Time:
1. In My Options, turn the dial to highlight Ramp
Time and then press the dial.
2. Turn the dial to adjust the ramp time to your
preferred setting and press the dial to save the
change.
6
Page 9

Humidity Level
Pressure Relief
When Pressure Relief is enabled, you may find it easier to breathe out. This
SmartStart
When SmartStart is enabled, therapy starts automatically when you breathe
Mask
This option shows your mask type setting. If you use more than one type of
Run Warmup
This option allows you to pre-heat the water before starting therapy, so that
The humidifier moistens the air and is designed to make therapy more comfortable. If you are
getting a dry nose or mouth, turn up the humidity. If you are getting any moisture in your mask, turn
down the humidity.
You can set the Humidity Level to Off or between 1 and 8, where 1 is the lowest humidity setting
and 8 is the highest humidity setting.
To adjust the Humidity Level:
1. In My Options, turn the dial to highlight Humidity
Level and then press the dial.
2. Turn the dial to adjust the humidity level and press
the dial to save the change.
If you continue to get a dry nose or mouth, or moisture in your mask, consider using ClimateLineAir
heated air tubing. ClimateLineAir together with Climate Control delivers more comfortable therapy.
Mask Fit
Mask Fit is designed to help you assess and identify possible air leaks around your mask.
To check Mask Fit:
1. Fit the mask as described in the mask user guide.
2. In My Options, turn the dial to highlight Run Mask Fit and then press the
dial.
The device starts blowing air.
3. Adjust the mask, mask cushion and headgear until you get a Good result.
To stop Mask Fit, press the dial or Start/Stop. If you are unable to get a good mask seal, talk to your
care provider.
More options
Your care provider may have given you access to personalize a few more options.
can help you get used to therapy.
into your mask. When you remove your mask, it stops automatically after few
seconds.
English 7
mask, adjust this setting when switching between masks.
the air is not cold or dry at the beginning of therapy.
Page 10

Caring for your device
It is important that you regularly clean your AirSense 10 device to make sure you receive optimal
therapy. The following sections will help you with disassembling, cleaning, checking and
reassembling your device.
Disassembling
1. Hold the water tub at the top and bottom, press it gently and pull it away from the device.
2. Open the water tub and discard any remaining water.
3. Hold the cuff of the air tubing and gently pull it away from the device.
4. Hold both the cuff of the air tubing and the swivel of the mask, then gently pull apart.
Cleaning
You should clean the device weekly as described. Refer to the mask user guide for detailed
instructions on cleaning your mask.
1. Wash the water tub and air tubing in warm water using mild detergent.
Do not wash in a dishwasher or washing machine.
2. Rinse the water tub and air tubing thoroughly and allow to dry out of direct sunlight and/or heat.
3. Wipe the exterior of the device with a dry cloth.
Checking
You should regularly check the water tub, air tubing and the air filter for any damage.
1. Check the water tub:
• Replace it if it is leaking or has become cracked, cloudy or pitted.
• Replace it if the seal is cracked or torn.
• Remove any white powder deposits using a solution of one part household vinegar to
10 parts water.
8
Page 11

2. Check the air tubing and replace it if there are any holes, tears or cracks.
3. Check the air filter and replace it at least every six months. Replace it more often if there are any
holes or blockages by dirt or dust.
To replace the air filter:
1. Open the air filter cover and remove the old air filter.
The air filter is not washable or reusable.
2. Place a new air filter onto the air filter cover and then close it.
Make sure the air filter is fitted at all times to prevent water and dust from entering the device.
Reassembling
When the water tub and air tubing are dry, you can reassemble the parts.
1. Connect the air tubing firmly to the air outlet located on the rear of the device.
2. Open the water tub and fill it with distilled room temperature water up to the maximum water
level mark.
3. Close the water tub and insert it into the side of the device.
4. Connect the free end of the air tubing firmly onto the assembled mask.
Therapy data
Your AirSense 10 device records your therapy data for you and your care provider so they can view
and make changes to your therapy if required. The data is recorded and then transferred to your care
provider wirelessly or via an SD card.
Wireless
Your AirSense 10 device is equipped with cellular communication. This allows your therapy data to
be wirelessly transmitted to your care provider to enhance the quality of your treatment. It also
allows therapy settings to be updated in a more timely manner or your device software to be
upgraded to ensure you receive the best possible therapy solution. The Wireless signal strength
displayed at the top right of your screen indicates the signal strength.
icon
The data is usually transmitted after therapy has stopped. In order to make sure that your data is
transferred, leave your device connected to the mains power at all times and make sure that it is not
in Airplane Mode.
Notes:
• Therapy data might not be transmitted if you use it outside of the country or region of purchase.
• Devices with cellular communication might not be available in all regions.
English 9
Page 12

SD card
An alternative way for your therapy data to be transferred to your care provider is via the SD card.
Your care provider may ask you to send the SD card by mail or to bring it in. When instructed by
your care provider, remove the SD card.
Do not remove the SD card from the device when the SD light is flashing.
To remove the SD card:
1. Open the SD card cover.
2. Push in the SD card to release it. Remove the SD card from the device.
Place the SD card in the protective folder and send it back to your care provider.
For more information on the SD card refer to the SD card protective folder provided with your
device.
Note: The SD card should not be used for any other purpose.
Traveling
You can take your AirSense 10 device with you wherever you go. Just keep the following in mind:
• Use the travel bag provided to prevent damage to the device.
• Empty the water tub and pack it separately in the travel bag.
• Make sure you have the appropriate power cord for the region you are traveling to. For
information on purchasing, contact your care provider.
• If you are using an external battery, you should turn off the humidifier in order to maximize the
life of your battery. Do this by turning the Humidity Level to Off.
Traveling by plane
Your AirSense 10 device may be taken on board as carry-on luggage. Medical devices do not count
toward your carry-on luggage limit.
You can use your AirSense 10 device on a plane as it meets the Federal Aviation Administration
(FAA) requirements. Air travel compliance letters can be downloaded and printed from
www.resmed.com.
When using the device on a plane:
• Make sure the water tub is completely empty and inserted into your device. The device will not
work without the water tub inserted.
• Turn on Airplane Mode.
10
Page 13

To turn on Airplane Mode:
Problem/possible cause
Solution
1. In My Options, turn the dial to highlight Airplane
Mode and then press the dial.
2. Turn the dial to select On and then press the dial to
save the change.
The Airplane Mode icon
is displayed at the top
right of the screen.
CAUTION
Do not use the device with water in the water tub on a plane due to the risk of inhalation of
water during turbulence.
Troubleshooting
If you have any problems, have a look at the following troubleshooting topics. If you are not able to
fix the problem, contact your care provider or ResMed. Do not try to open the device.
General troubleshooting
Air is leaking from around my mask
Mask may be fitted incorrectly. Make sure your mask is fitted correctly. See your mask user
I am getting a dry or blocked nose
Humidity level may be set too low. Adjust the Humidity Level.
I am getting droplets of water on my nose, in the mask and air tubing
Humidity level may be set too high. Adjust the Humidity Level.
guide for fitting instructions or use the Mask Fit function to
check your mask fit and seal.
If you have ClimateLineAir heated air tubing, see the
ClimateLineAir user guide.
If you have ClimateLineAir heated air tubing, see the
ClimateLineAir user guide.
My mouth is very dry and uncomfortable
Air may be escaping through your mouth. Increase the Humidity Level.
Air pressure in my mask seems too high (it feels like I am getting too much air)
Ramp may be turned off. Use the Ramp Time option.
Air pressure in my mask seems too low (it feels like I am not getting enough air)
Ramp may be in progress. Wait for air pressure to build up or turn Ramp Time off.
English 11
You may need a chin strap to keep your mouth closed or a
full face mask.
Page 14

Problem/possible cause
Solution
My screen is black
Backlight on the screen may have turned off. It turns off
Press Home or the dial to turn it back on.
automatically after a short period of time.
Power may not be connected. Connect the power supply and make sure the plug is fully
inserted.
I have stopped therapy, but the device is still blowing air
Device is cooling down. Device blows a small amount of air in order to avoid
condensation in the air tubing. It will stop automatically after
20 minutes.
My water tub is leaking
Water tub may not be assembled correctly. Check for damage and reassemble the water tub correctly.
Water tub may be damaged or cracked. Contact your care provider for a replacement.
My therapy data has not been sent to my care provider
Data transfer is not enabled for your device. Contact your care provider to enable the data transfer
service.
Wireless coverage may be poor. Make sure that the device is placed where there is coverage
(ie, on your bedside table, not in a drawer or on the floor).
The Wireless signal strength icon
indicates good
coverage when all bars are displayed, and poor coverage
when fewer bars are displayed.
The No wireless connection icon
is displayed on the
top right of the screen. No wireless network available.
Make sure that the device is placed where there is coverage
(ie, on your bedside table, not in a drawer or on the floor).
If instructed to do so, send the SD card to your care provider.
The SD card also contains your therapy data.
Device may be in Airplane Mode. Turn off Airplane Mode, see Traveling by plane.
Data transfer is not enabled for your device. Contact your care provider to enable the data transfer
service.
My screen and buttons are flashing
Software upgrade is in progress. Software upgrade takes approximately 10 minutes to
complete.
12
Page 15

Device messages
Device message/possible cause
Solution
High leak detected, connect your water tub, tub seal or side cover
Water tub may not be inserted properly. Make sure the water tub is correctly inserted.
Water tub seal may not be inserted properly. Open the water tub and make sure that the seal is correctly
High leak detected, connect your tubing
Air tubing may not be connected properly. Make sure the air tubing is firmly connected at both ends.
Mask may be fitted incorrectly. Make sure your mask is fitted correctly. See your mask user
Tubing blocked, check your tubing
inserted.
guide for fitting instructions or use the Mask Fit function to
check your mask fit and seal.
Air tubing may be blocked. Check the air tubing and remove any blockages. Press the
dial to clear the message and then press Start/Stop to
restart the device.
SD card error, remove your card and press Start to begin therapy
SD card may not be inserted correctly. Remove and reinsert the SD card.
Read only card, please remove, unlock and re-insert SD card
SD card switch may be in the lock (read-only) position.
Move the switch on the SD Card from the lock position
to the unlock position
and then re-insert it.
System fault, refer to user guide, Error 004
Device may have been left in a hot environment. Allow to cool before re-use. Disconnect the power supply
and then reconnect it to restart the device.
Air filter may be blocked. Check the air filter and replace it if there are any blockages.
Disconnect the power supply and then reconnect it to restart
the device.
Air tubing may be blocked. Check the air tubing and remove any blockages. Press the
dial to clear the message and then press Start/Stop to
restart the device.
There may be water in the air tubing. Empty the water from the air tubing. Disconnect the power
supply and then reconnect it to restart the device.
All other error messages, for example, System fault, refer to user guide, Error 0XX
An unrecoverable error has occurred on the device. Contact your care provider. Do not open the device.
English 13
Page 16

Reassembling parts
Some parts of your device are designed to easily come off in order to avoid damage to the parts or
the device. You can easily reassemble them as described below.
To insert the water tub seal:
1. Place the seal into the lid.
2. Press down along all edges of the seal until it is firmly in place.
To reassemble the water tub lid:
1. Insert one side of the lid into the pivot hole of the base.
2. Slide the other side down the ridge until it clicks into place.
General warnings and cautions
WARNING
• Make sure that you arrange the air tubing so that it will not twist around the head or neck.
• Make sure the power cord and plug are in good condition and the equipment is not
damaged.
• Keep the power cord away from hot surfaces.
• If you notice any unexplained changes in the performance of the device, if it is making
unusual sounds, if the device or the power supply are dropped or mishandled, or if the
enclosure is broken, discontinue use and contact your care provider or your ResMed
Service Center.
• Do not open or modify the device. There are no user serviceable parts inside. Repairs and
servicing should only be performed by an authorized ResMed service agent.
• Beware of electrocution. Do not immerse the device, power supply or power cord in water.
If liquids are spilled into or onto the device, unplug the device and let the parts dry. Always
unplug the device before cleaning and make sure that all parts are dry before plugging it
back in.
14
Page 17

• Supplemental oxygen must not be used while smoking or in the presence of an open
90W power supply unit
AC input range:
100–240V, 50–60Hz 1.0–1.5A, Class II
115V, 400Hz 1.5A, Class II (nominal for aircraft use)
Typical power consumption:
53W (57VA)
Environmental conditions
Operating temperature:
+41°F to +95°F (+5°C to +35°C)
Note: The air flow for breathing produced by this therapy
Operating humidity:
10 to 95% relative humidity, non-condensing
Operating altitude:
Sea level to 8,500' (2,591 m); air pressure range 1013 hPa to
Storage and transport temperature:
-4°F to +140°F (-20°C to +60°C)
Storage and transport humidity:
5 to 95% relative humidity, non-condensing
flame.
• Always make sure that the device is turned on and airflow generated before the oxygen
supply is turned on. Always turn the oxygen supply off before the device is turned off, so
that unused oxygen does not accumulate within the device enclosure and create a risk of
fire.
• Do not perform any maintenance tasks while the device is in operation.
CAUTION
• Use only ResMed parts and accessories with the device. Non-ResMed parts may reduce the
effectiveness of the treatment and/or damage the device.
• Use only vented masks recommended by ResMed or by the prescribing doctor with this
device. Fitting the mask without the device blowing air can result in rebreathing of exhaled
air. Make sure that the mask vent holes are kept clear and unblocked to maintain the flow
of the fresh air into the mask.
• Be careful not to place the device where it can be bumped or where someone is likely to
trip over the power cord.
• Blocking the air tubing and/or air inlet of the device while in operation could lead to
overheating of the device.
• Keep the area around the device dry, clean and clear of anything (eg, clothes or bedding)
that could block the air inlet or cover the power supply unit.
• Do not place the device on its side as water might get into the device.
• Incorrect system setup may result in incorrect mask pressure reading. Ensure the system is
correctly set up.
• Do not use bleach, chlorine, alcohol, or aromatic-based solutions, moisturizing or
antibacterial soaps or scented oils to clean the device, the water tub or air tubing. These
solutions may cause damage or affect the humidifier performance and reduce the life of
the products.
• If you use the humidifier, always place the device on a level surface lower than your head
to prevent the mask and air tubing from filling with water.
• Leave the water tub to cool for ten minutes before handling to allow the water to cool and
to make sure that the water tub is not too hot to touch.
• Make sure that the water tub is empty before transporting the device.
Technical specifications
DC output: 24V 3.75A
Peak power consumption: 104W (108VA)
English 15
device can be higher than the temperature of the room.
Under extreme ambient temperature conditions
(104°F/40°C) the device remains safe.
738 hPa
Page 18

Electromagnetic compatibility
The AirSense 10 complies with all applicable electromagnetic compatibility requirements (EMC) according to
www.resmed.com, on the Products page under Service and Support.
IEC 60601-1:2005 classification
Class II (double insulation), Type BF, Ingress protection IP22.
Sensors
Pressure sensor:
Internally located at device outlet, analog gauge pressure
type, -5 to +45 cm H2O
to +180 L/min
Maximum single fault steady pressure
Device will shut down in the presence of a single fault if the steady state pressure exceeds:
Sound
SlimLine:
27 dBA with uncertainty of 2 dBA
SlimLine or Standard and humidification:
29 dBA with uncertainty of 2 dBA
SlimLine:
35 dBA with uncertainty of 2 dBA
SlimLine or Standard and humidification:
37 dBA with uncertainty of 2 dBA
Physical - device and water tub
Air outlet (complies with ISO 5356-1:2004):
22 mm
Weight (device and standard water tub):
44 oz (1248 g)
Weight (device and cleanable water tub):
44 oz (1248 g)
Housing construction:
Flame retardant engineering thermoplastic
Water capacity:
To maximum fill line 380 mL
Cleanable water tub - material:
Injection molded plastic, stainless steel and silicone seal
Temperature
Maximum heater plate:
154°F (68°C)
Cut-out:
165°F (74°C)
Maximum gas temperature:
≤ 106°F (≤ 41°C)
Air filter
Hypoallergenic:
Material: Acrylic and polypropylene fibers in a polypropylene
dust
IEC60601-1-2:2007, for residential, commercial and light industry environments. It is recommended that mobile
communication devices are kept at least 1 m away from the device.
Information regarding the electromagnetic emissions and immunity of this ResMed device can be found on
Flow sensor: Internally located at device inlet, digital mass flow type, -70
30 cm H2O for more than 6 sec or 40 cm H2O for more than 1 sec.
Pressure level measured according to ISO 17510-1:2007 (CPAP mode):
Standard: 27 dBA with uncertainty of 2 dBA
Power level measured according to ISO 17510-1:2007 (CPAP mode):
Standard: 35 dBA with uncertainty of 2 dBA
Declared dual-number noise emission values in accordance with ISO 4871:1996.
Dimensions (H x W x D): 4.57" x 10.04" x 5.91"
(116 mm x 255 mm x 150 mm)
Standard water tub - material: Injection molded plastic, stainless steel and silicone seal
Standard: Material: Polyester non woven fiber
Average arrestance: >75% for ~7 micron dust
carrier
Efficiency: >98% for ~7-8 micron dust; >80% for ~0.5 micron
16
Page 19

Aircraft use
ResMed confirms that device meets the Federal Aviation Administration (FAA) requirements (RTCA/DO-160, section 21,
category M) for all phases of air travel.
Wireless module
Technology used:
3G (Canada and USA)
FCC ID: 2ACHL-AIR103G
Additional information regarding IC compliance for this device can be found on www.resmed.com/downloads/devices.
Operating pressure range
AutoSet, AutoSet For Her, Elite, CPAP
4 to 20 cm H2O
Supplemental oxygen
Maximum flow:
4 L/min
Pneumatic flow path
8. Inlet filter
Design life
Device, power supply unit:
5 years
Standard water tub, air tubing:
6 months
General
The patient is an intended operator.
Mask Pressure
RH output %
Nominal system output AH1, BTPS2
Setting 4
Setting 8
Setting 4
Setting 8
4
85
100 6 >10
10
85
100 6 >10
20
85
90 6 >10
Air tubing
Material
Length
Inner diameter
ClimateLineAir
Flexible plastic and electrical components
6'6" (2 m)
0.6" (15 mm)
SlimLine
Flexible plastic
6' (1.8 m)
0.6" (15 mm)
Standard
Flexible plastic
6'6" (2 m)
0.75" (19 mm)
2G GSM (all regions except USA and Canada)
The AirSense 10 device complies with FCC Rules.
The AirSense 10 device should be used at a minimum distance of 0.8" (2 cm) from the body during operation. Additional
information regarding the FCC Rules for this device can be found on www.resmed.com/downloads/devices
.
IC ID: 9103A-AIR103G
The device complies with Industry Canada license-exempt RSS standards.
The device should be used at a minimum distance of 2 cm from the body during operation.
1. Flow sensor
2. Blower
3. Pressure sensor
4. Mask
5. Air tubing
6. Water tub
7. Device
Cleanable water tub: 2.5 years
Humidifier performance
The following settings have been tested at 71.6°F (22°C) ambient temperature:
cm H2O
1
AH - Absolute Humidity in mg/L
2
BTPS - Body Temperature Pressure Saturated
Air tubing
English 17
Page 20

Heated air tubing temperature cut-out: ≤ 106°F (≤ 41°C)
Value
Range
Display resolution
Mask pressure
4–20 cm H20
0.1 cm H2O
Leak
0–120 L/min
1 L/min
Value
Accuracy
Mask pressure2
±[0.5 cm H20 + 4% of measured value]
Flow
±6 L/min or 10% of reading, whichever is greater, at 0 to 150 L/min positive flow
Standard air tubing
SlimLine air tubing
Without humidification
± 0.5 cm H2O
± 0.5 cm H2O
With humidification
± 0.5 cm H2O
± 0.5 cm H2O
Device without humidification and Standard air tubing / Device with humidification and Standard air tubing
Pressure (cm H2O)
10 BPM
15 BPM
20 BPM
4
0.5 / 0.5
0.5 / 0.5
0.8 / 0.8
8
0.5 / 0.5
0.5 / 0.5
0.8 / 0.8
12
0.5 / 0.5
0.5 / 0.5
0.8 / 0.8
20
0.5 / 0.5
0.5 / 0.5
0.8 / 0.8
Device without humidification and SlimLine air tubing / Device with humidification and SlimLine air tubing
Pressure (cm H2O)
10 BPM
15 BPM
20 BPM
4
0.5 / 0.5
0.5 / 0.5
0.8 / 0.8
8
0.5 / 0.5
0.5 / 0.5
0.8 / 0.8
12
0.5 / 0.5
0.5 / 0.5
0.8 / 0.8
16
0.5 / 0.5
0.5 / 0.5
0.8 / 0.8
Notes:
• The manufacturer reserves the right to change these specifications without notice.
• The electrical connector end of the heated air tubing is only compatible with the air outlet at the device end and should
not be fitted to the mask.
• Do not use electrically conductive or antistatic air tubing.
• The temperature and relative humidity settings displayed are not measured values.
Displayed values
Pressure sensor at air outlet:
Flow derived values:
Pressure measurement1:
Flow and flow derived values1:
Leak2 ±12 L/min or 20% of reading, whichever is greater, 0 to 60 L/min
1
Results are expressed at ATPD (Ambient Temperature and Pressure, Dry).
2
Accuracy may be reduced by the presence of leaks, supplemental oxygen, tidal volumes <100 mL or minute ventilation <3 L/min.
Pressure accuracy
Maximum static pressure variation at 10 cm H
O according to ISO 17510-1:2007
2
Maximum dynamic pressure variation according to ISO 17510-1:2007
16 0.5 / 0.5 0.5 / 0.5 0.8 / 0.8
20 0.5 / 0.5 0.5 / 0.5 0.8 / 0.8
18
Page 21

Symbols
• Mask systems (including mask frame, cushion, headgear and tubing)—excluding
90 days
• Batteries for use in ResMed internal and external battery systems
6 months
• Clip-type finger pulse sensors
1 year
The following symbols may appear on the product or packaging.
Read instructions before use. Indicates a warning or caution. Follow instructions before
use.
Manufacturer. European Authorized Representative. Batch code.
Catalog number. Serial number. Device number. On / Off. Device weight.
Protected against finger sized objects and against dripping water when tilted up to 15 degrees
from specified orientation.
Direct current. Type BF applied part. Class II equipment.
Humidity limitation. Temperature limitation. Non-ionising radiation. China pollution
control logo 1.
law restricts these devices to sale by or on the order of a physician).
water level.
limitation.
China pollution control logo 2. Prescription only (In the US, Federal
Maximum
Use distilled water only. Operating altitude. Atmospheric pressure
Complies with RTCA DO-160 section 21, category M.
Environmental information
This device should be disposed of separately, not as unsorted municipal waste. To dispose of your
device, you should use appropriate collection, reuse and recycling systems available in your region.
The use of these collection, reuse and recycling systems is designed to reduce pressure on natural
resources and prevent hazardous substances from damaging the environment.
If you need information on these disposal systems, please contact your local waste administration.
The crossed-bin symbol invites you to use these disposal systems. If you require information on
collection and disposal of your ResMed device please contact your ResMed office, local distributor
or go to www.resmed.com/environment.
Servicing
The AirSense 10 device is intended to provide safe and reliable operation when operated in
accordance with the instructions provided by ResMed. ResMed recommends that the AirSense 10
device be inspected and serviced by an authorized ResMed Service Centre if there is any sign of
wear or concern with device function. Otherwise, service and inspection of the products generally
should not be required during their design life.
Limited warranty
ResMed Ltd (hereafter 'ResMed') warrants that your ResMed product shall be free from defects in
material and workmanship from the date of purchase for the period specified below.
Product Warranty period
single-use devices
• Accessories—excluding single-use devices
• Flex-type finger pulse sensors
• Humidifier water tubs
• CPAP and bilevel device data modules
English 19
Page 22

Product Warranty period
•
• CPAP, bilevel and ventilation devices (including external power supply units)
2 years
Oximeters and CPAP and bilevel device oximeter adapters
• Humidifier cleanable water tubs
• Titration control devices
• Humidifiers
• Battery accessories
• Portable diagnostic/screening devices
This warranty is only available to the initial consumer. It is not transferable.
If the product fails under conditions of normal use, ResMed will repair or replace, at its option, the
defective product or any of its components.
This Limited Warranty does not cover: a) any damage caused as a result of improper use, abuse,
modification or alteration of the product; b) repairs carried out by any service organization that has
not been expressly authorized by ResMed to perform such repairs; and c) any damage or
contamination due to cigarette, pipe, cigar or other smoke.
Warranty is void on product sold, or resold, outside the region of original purchase.
Warranty claims on defective product must be made by the initial consumer at the point of
purchase.
This warranty replaces all other expressed or implied warranties, including any implied warranty of
merchantability or fitness for a particular purpose. Some regions or states do not allow limitations on
how long an implied warranty lasts, so the above limitation may not apply to you.
ResMed shall not be responsible for any incidental or consequential damages claimed to have
resulted from the sale, installation or use of any ResMed product. Some regions or states do not
allow the exclusion or limitation of incidental or consequential damages, so the above limitation may
not apply to you.
This warranty gives you specific legal rights, and you may also have other rights which vary from
region to region. For further information on your warranty rights, contact your local ResMed dealer
or ResMed office.
Further information
If you have any questions or require additional information on how to use the device, contact your
care provider.
20
Page 23

378013r7 Covers.indd 4 23/06/2014 5:36:53 PM
Page 24

ResMed.com
378013
ResMed Ltd
1 Elizabeth Macarthur Drive
Bella Vista NSW 2153 Australia
See www.resmed.com for other ResMed locations worldwide. For patent information, see www.resmed.com/ip. Air10, AirSense, AutoSet,
ClimateLine, HumidAir and SlimLine are trademarks of ResMed Ltd. AutoSet, SlimLine and ClimateLine are registered in U.S. Patent and
Trademark Office. SD Logo is a trademark of SD-3C, LLC. © 2014 ResMed Ltd. 378013/FCC
DISTRIBUTED BY
ResMed Corp 9001 Spectrum Center Boulevard San Diego CA 92123 USA
ResMed (UK) Ltd 96 Jubilee Ave Milton Park Abingdon Oxfordshire OX14 4RW UK
2015-04
378013r7 Covers.indd 5 23/06/2014 5:36:53 PM
 Loading...