

Page 1
Global leaders in sleep and respiratory medicine www.resmed.com
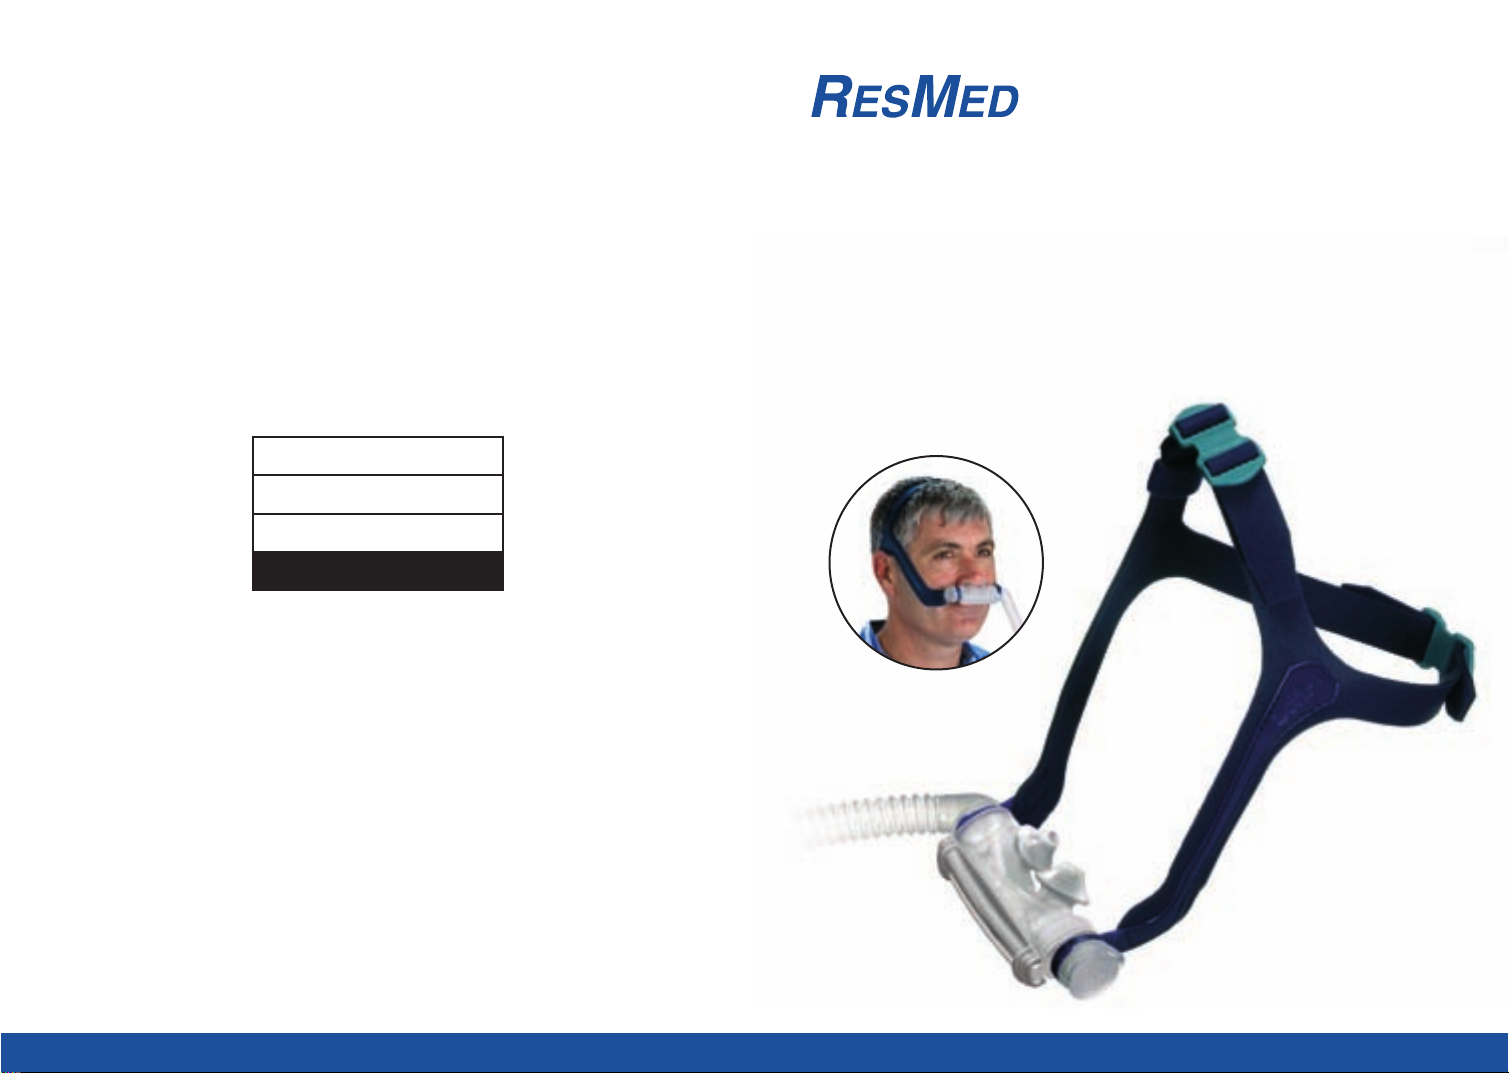
Mirage Swift™II
NASAL PILLOWS SYSTEM
User Guide
English •Deutsch •Français •Italiano
Español
•
Português •Svenska
60891/1
06 04
MIRAGE SWIFT II
USER
ROW
Page 2

ResMed Ltd (Manufacturer) 1 Elizabeth MacArthur Drive Bella Vista NSW 2153 Australia
ResMed Corp (US Designated Agent) 14040 Danielson Street Poway CA 92064-6857 USA
ResMed (UK) Ltd (EU Authorized Representative) 65 Milton Park Abingdon Oxfordshire OX14 4RX UK
ResMed Offices Australia, Austria, Finland, France, Germany, Hong Kong, Japan, Malaysia, Netherlands,
New Zealand, Singapore, Spain, Sweden, Switzerland, UK, USA (see www.resmed.com for contact details).
Mirage Swift II Nasal Pillows System
Protected by patents: AU 724360, US 6561191. Other patents pending.
Protected by design registrations: AU 301936, AU 301937, AU 301938, AU 301939, AU 301940, AU 301941,
AU 301942, AU 301943, AU 302271, AU 302804, CN 200430102460.2, CN 200430102461.7, CN 200430102463.6,
CN 200430102464.0, CN 200430102465.5, CN 200430102466.X, CN200430102467.4, CN 200430102468.9,
EP 259056, HK 0412683.5, JP 1243021, JP 1243024, JP 1243272, JP 1243273, JP 1243274, JP 1243027,
JP 1243025, JP 1242455, JP 1242456, JP1243026, JP 1243475. Other designs pending.
Mirage, Mirage Swift, AutoSet CS 2 and VPAP Adapt SV are trademarks of ResMed Ltd and Mirage, Swift,
AutoSet CS and VPAP are registered in U.S. Patent and Trademark Office.
© 2006 ResMed Ltd.
Page 3
Tube retainer /
Schlauchhalter / Bague de
fixation du tuyau /
Dispositivo di fissaggio del
tubo / Retenedor del tubo /
Retentor do tubo /
Slanghållare
1
5
5
4
3
2b 2a
1
3
4b
2b
4
5
6
2
3
4a
1
B
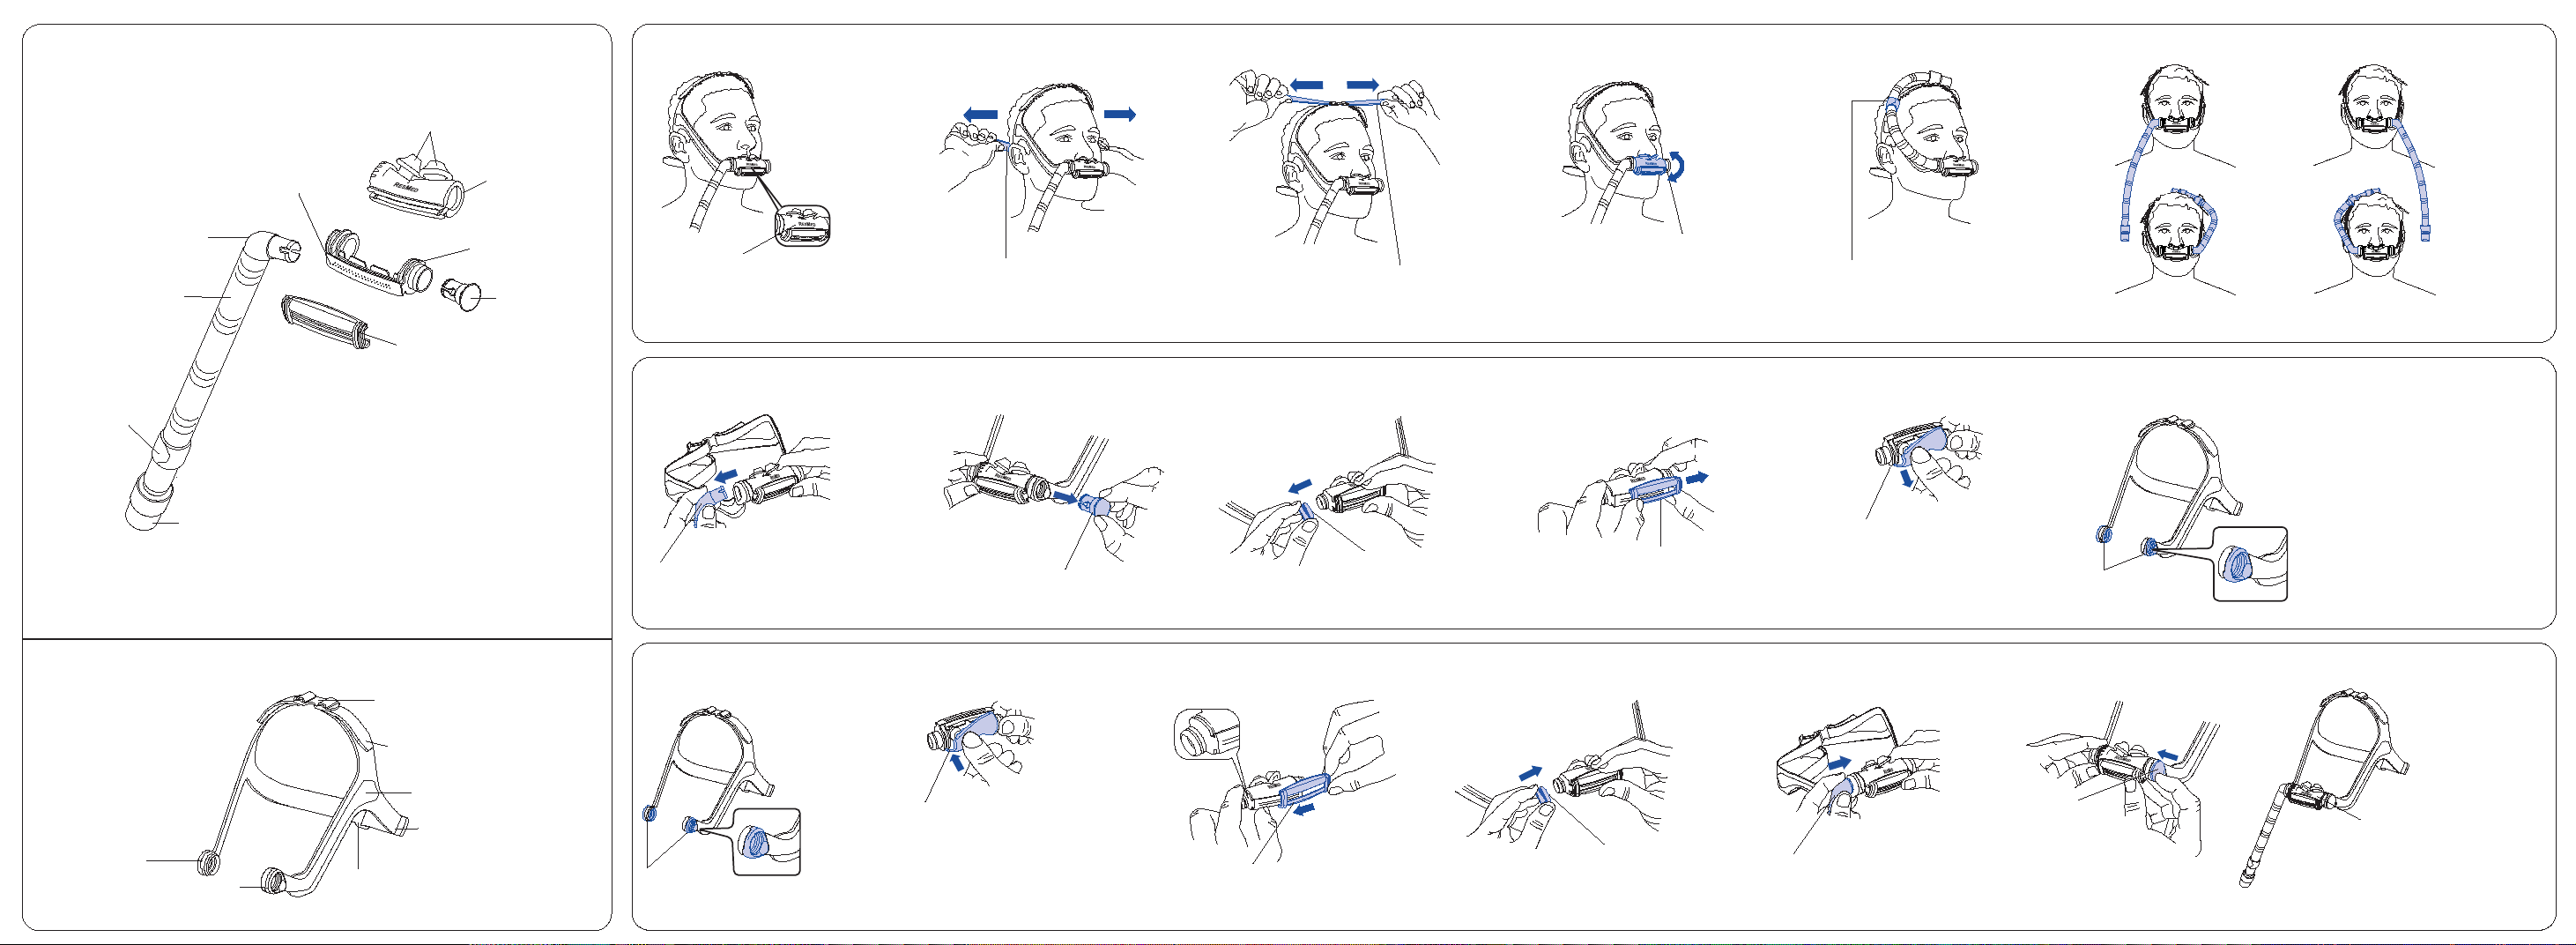
Fitting the Mirage Swift II / Anlegen der Mirage Swift II / Mise en place du masque narinaire Mirage Swift II / Applicazione del sistema Mirage Swift II / Colocación del sistema Mirage Swift II / Colocação da Mirage Swift II / Passa in Mirage Swift II
D
Reassembling the Mirage Swift II / Wiederzusammenbau der Mirage Swift II / Remontage du masque narinaire Mirage Swift II / Riassemblaggio del sistema Mirage Swift II / Montaje del sistema Mirage Swift II / Como voltar a montar a Mirage Swift II / Montera Mirage Swift II
C
Disassembling for Cleaning / Demontage der Maske zu Reinigungszwecken / Démontage pour le nettoyage / Smontaggio per la pulizia / Desmontaje para la limpieza / Desmontagem para limpeza / Ta isär för rengöring
Headgear / Kopfband / Harnais / Copricapo / Arnés para la cabeza / Arnês / Hätta
A
Parts of the Mirage Swift™ II / Teile der Mirage Swift™ II / Composants du
Mirage Swift
™
II / Parti del sistema Mirage Swift™ II / Partes del Mirage Swift™ II /
Componentes do Mirage Swift
™
II / Delar i Mirage Swift™ II
Pillow sleeve assembly (pillow sleeve, frame and clip) /
Nasenpolsterhaltersatz (Nasenpolsterhalter, Maskenhalter und Clip) / Corps du
masque (coussin, entourage rigide et barrette) / Blocco cuscinetti (rivestimento,
telaio e fermaglio) / Conjunto del manguito de la almohadilla (manguito, armazón y
broche) / Conjunto de manga da almofada (manga da almofada, armação e clipe) /
Näskuddemontering (näskuddehållare, ram och klämma)
Short tube assembly (elbow, short tube and swivel) / Verbindungsschlauch (Kniestück, kurzer Schlauch und
Drehadapter) / Ensemble tuyau court (coude, tuyau court et pièce pivotante) / Blocco tubo corto (gomito, tubo corto e
giunto rotante) / Conjunto del tubo corto (codo, tubo corto y pieza giratoria) / Conjunto de tubo curto (cotovelo, tubo
curto e peça giratória) / Montering för kort slang (båge, kort slang och svängtapp)
Short tube / Verbindungsschlauch /
Tuyau court / Tubo corto / Tubo
corto / Tubo curto / Kort slang
Elbow / Kniestück / Coude / Gomito /
Codo / Cotovelo / Båge
Vent holes / Luftauslassöffnungen / Orifices de ventilation /
Fori per l'esalazione / Orificios de ventilación /
Respiradouros / Ventilöppningar
Top buckle / Obere Schnalle / Boucle supérieure /
Fibbia superiore / Presilla superior / Fivela superior /
Spänne på hjässan
Top strap / Oberes Band / Sangle supérieure /
Cinghia superiore / Correa superior / Correia
superior / Den övre remmen
Panel / Streifen / Partie latérale / Pannello /
Panel / Painel / Panel
Back strap / Hinteres Band / Sangle
arrière / Cinghia posteriore / Correa
posterior / Correia traseira / Den
bakre remmen
Back buckle / Hintere Schnalle / Boucle arrière /
Fibbia posteriore / Presilla posterior / Fivela traseira /
Spänne på baksidan
Seal ring (x2) / Dichtungsring (2 Stck.) / Bague
d'étanchéité (x2) / Guarnizione ad anello (x2) / Junta
(x2) / Anel de vedação (x2) / Förseglingsring (x2)
Headgear ring / Kopfbandring /
Anneau du harnais / Anello
copricapo / Anillo del arnés / Anel
do arnês / Hättans ring
ResMed logo faces outward / ResMed-Logo zeigt nach außen /
Logo ResMed tourné vers l'extérieur / Logo ResMed rivolto verso
l'esterno / El logotipo de ResMed se dirige hacia afuera /
O logotipo da ResMed está virado para fora / ResMed logotypen
pekar utåt
Adjust back straps / Einstellen der hinteren
Bänder / Ajustez les sangles arrières / Regolare
le cinghie posteriori / Ajuste las correas
posteriores / Ajuste as correias traseiras /
Justera de bakre remmarna
Adjust top straps / Einstellen der oberen
Bänder / Ajustez les sangles supérieures /
Regolare le cinghie superiori / Ajuste las
correas superiores / Ajuste as correias
superiores / Justera de övre remmarna
Rotate pillow sleeve assembly for comfort and seal / Drehen Sie
den Nasenpolsterhalter in die richtige Position für komfortablen und
sicheren Sitz / Faites pivoter le corps du masque pour obtenir un
ajustement confortable et une étanchéité efficace / Ruotare il blocco dei
cuscinetti nasali per migliorare comfort e tenuta / Rote el conjunto del
manguito de la almohadilla para un ajuste cómodo y sin fugas / Gire o
conjunto de manga da almofada para uma melhor vedação e maior
conforto / Rotera näskuddemonteringen för komfort och försegling
Tube retainer (optional) / Schlauchhalter
(optional) / Bague de fixation du tuyau (facultative) /
Dispositivo di fissaggio del tubo (facoltativo) /
Retenedor del tubo (opcional) / Retentor do tubo
(opcional) / Slanghållare (valfri)
Optional tube positions / Optionale Schlauchpositionen / Positions
possibles pour le tuyau / Posizioni alternative del tubo / Posiciones posibles
del tubo / Posições opcionais do tubo / Alternativa slangpositioner
Elbow / Kniestück / Coude /
Gomito / Codo / Cotovelo / Båge
Cap / Verschlusskappe / Bouchon /
Coperchio / Tapa / Tampa / Lock
Headgear ring / Kopfbandring / Anneau du harnais /
Anello copricapo / Anillo del arnés / Anel do arnês /
Hättans ring
Slide clip / Clip / Faites glisser la
barrette / Far scorrere il fermaglio /
Deslice el broche / Deslize o clipe /
Klämma
Pillow sleeve / Nasenpolsterhalter /
Coussin / Rivestimento dei cuscinetti /
Manguito de la almohadilla / Manga da
almofada / Näskuddehållare
Note: The seal rings do not need to be removed for cleaning. /
Hinweis: Die Dichtungsringe müssen zur Reinigung nicht entfernt werden /
Remarque : vous n'avez pas besoin de retirer les bagues d'étanchéité du
harnais pour le nettoyage. / Nota: Non occorre staccare le guarnizioni ad
anello per la pulizia. / Nota: Para la limpieza no es necesario retirar las
juntas. / Nota: Os anéis de vedação não necessitam de ser removidos para
limpeza. / Obs! Förseglingsringarna behöver inte tas bort för rengöring,
Seal rings / Dichtungsringe /
Bagues d'étanchéité / Guarnizioni
ad anello / Juntas / Anéis de
vedação / Förseglingsringar
Seal rings /
Dichtungsringe / Bagues d'étanchéité /
Guarnizioni ad anello / Juntas / Anéis de
vedação / Förseglingsringar
2a
Pillow sleeve / Nasenpolsterhalter / Coussin /
Rivestimento dei cuscinetti / Manguito de la
almohadilla / Manga da almofada /
Näskuddehållare
Slide clip / Clip / Faites glisser la barrette /
Far scorrere il fermaglio / Deslice el broche /
Deslize o clipe / Klämma
Elbow / Kniestück / Coude / Gomito / Codo /
Cotovelo / Båge
Cap /
Verschlusskappe /
Bouchon /
Coperchio / Tapa /
Tampa / Lock
Pillow sleeve /
Nasenpolsterhalter /
Coussin / Rivestimento
dei cuscinetti / Manguito
de la almohadilla /
Manga da almofada/
Näskuddehållare
Frame / Maskenhalter /
Entourage rigide / Telaio /
Armazón / Armação / Ram
Cap / Verschlusskappe /
Bouchon / Coperchio /
Tapa / Tampa / Lock
Nasal pillows / Nasenpolster / Masque narinaire / Cuscinetti nasali /
Almohadillas nasales / Almofadas nasais / Näskuddar
Clip / Clip / Barrette / Fermaglio / Broche /
Clipe / Klämma
Swivel / Drehadapter / Pièce pivotante / Giunto rotante / Pieza giratoria /
Peça giratória / Svängtapp
©
2
00
6
Res
Med
L
td
.
©
2
00
6
Res
Med
L
td
.
©
2
00
6
Res
Med
L
td
.
© 2006 ResMed Ltd.
Headgear ring / Kopfbandring / Anneau du harnais /
Anello copricapo / Anillo del arnés / Anel do arnês /
Hättans ring
ResMed logo faces away from
headgear / ResMed-Logo zeigt vom
Kopfband weg / Logo ResMed tourné
dans la direction opposée au harnais /
Logo ResMed rivolto in direzione
opposta al copricapo / El logotipo de
ResMed queda en sentido contrario al
arnés / O logotipo da ResMed está
virado para fora do arnés / ResMed
logotypen pekar bort från hättan
Page 4
2b2a
1
A
B
C
D
3b3a
©
2
006 ResMed
Ltd.
Note: The headgear does not need to be taken apart for cleaning. Headgear reassembly instructions are provided here as additional information. / Hinweis: Das Kopfband muss zur Reinigung nicht auseinander genommen werden. Anweisungen zum Wiederzusammenbau des
Kopfbandes wurden dieser Anleitung als zusätzliche Informationen hinzugefügt. / Remarque : il n'est pas nécessaire de démonter le harnais pour le nettoyage. Les instructions de remontage sont fournies à titre indicatif. / Nota: Non occorre smontare il copricapo prima
della pulizia. Le istruzioni per il riassemblaggio del copricapo sono fornite qui come spiegazione extra. / Nota: El arnés no necesita ser desmontado para su limpieza. Las instrucciones para el montaje del arnés se proporcionan únicamente como información adicional. /
Nota: Não necessita de desmontar o arnês antes de proceder à limpeza. As instruções de montagem do arnês são oferecidas como informações adicionais. / Obs! Hättan behöver inte tas isär för rengöring. Monteringsanvisningarna för hättan medföljer som extra information.
Back straps / Hintere Bänder / Sangles arrières / Cinghie posteriori /
Correas posteriores / Correias traseiras / De bakre remmarna
Top straps / Obere Bänder / Sangles supérieures / Cinghie superiori /
Correas superiores / Correias superiores / De övre remmarna
Back buckle / Hintere Schnalle / Boucle arrière / Fibbia posteriore /
Presilla posterior / Fivela traseira / Spänne på baksidan
Back straps / Hintere Bänder / Sangles arrières / Cinghie posteriori /
Correas posteriores / Correias traseiras / De bakre remmarna
Top buckle / Obere Schnalle / Boucle supérieure / Fibbia superiore /
Presilla superior / Fivela superior / Spänne på hjässan
Top straps / Obere Bänder / Sangles supérieures / Cinghie superiori /
Correas superiores / Correias superiores / De övre remmarna
Note: For complete instructions, read the text section in conjunction with the illustrations on
this sheet.
Hinweis: Vollständige Anweisungen finden Sie im Textabschnitt und in den Illustrationen auf
diesem Blatt.
Remarque : pour les instructions complètes, veuillez lire le texte du guide avec cette fiche
d'illustrations.
Nota: Per istruzioni complete, leggere la sezione con il testo insieme alle illustrazioni su questo
foglio.
Nota: Para tener instrucciones completas, lea el texto en conjunto con las figuras de esta hoja.
Nota: Para obter as instruções completas, leia a secção de texto em conjunção com as
ilustrações deste folheto.
Obs! Läs textavsnittet tillsammans med illustrationerna på det här bladet för fullständiga
anvisningar.
Illustrations Sheet / Illustrationsblatt / Fiche D'Illustrations / Fogolio delle Illustrazioni /
Hoja de Figuras / Folheto de Ilustrações / Illustrationsblad
E
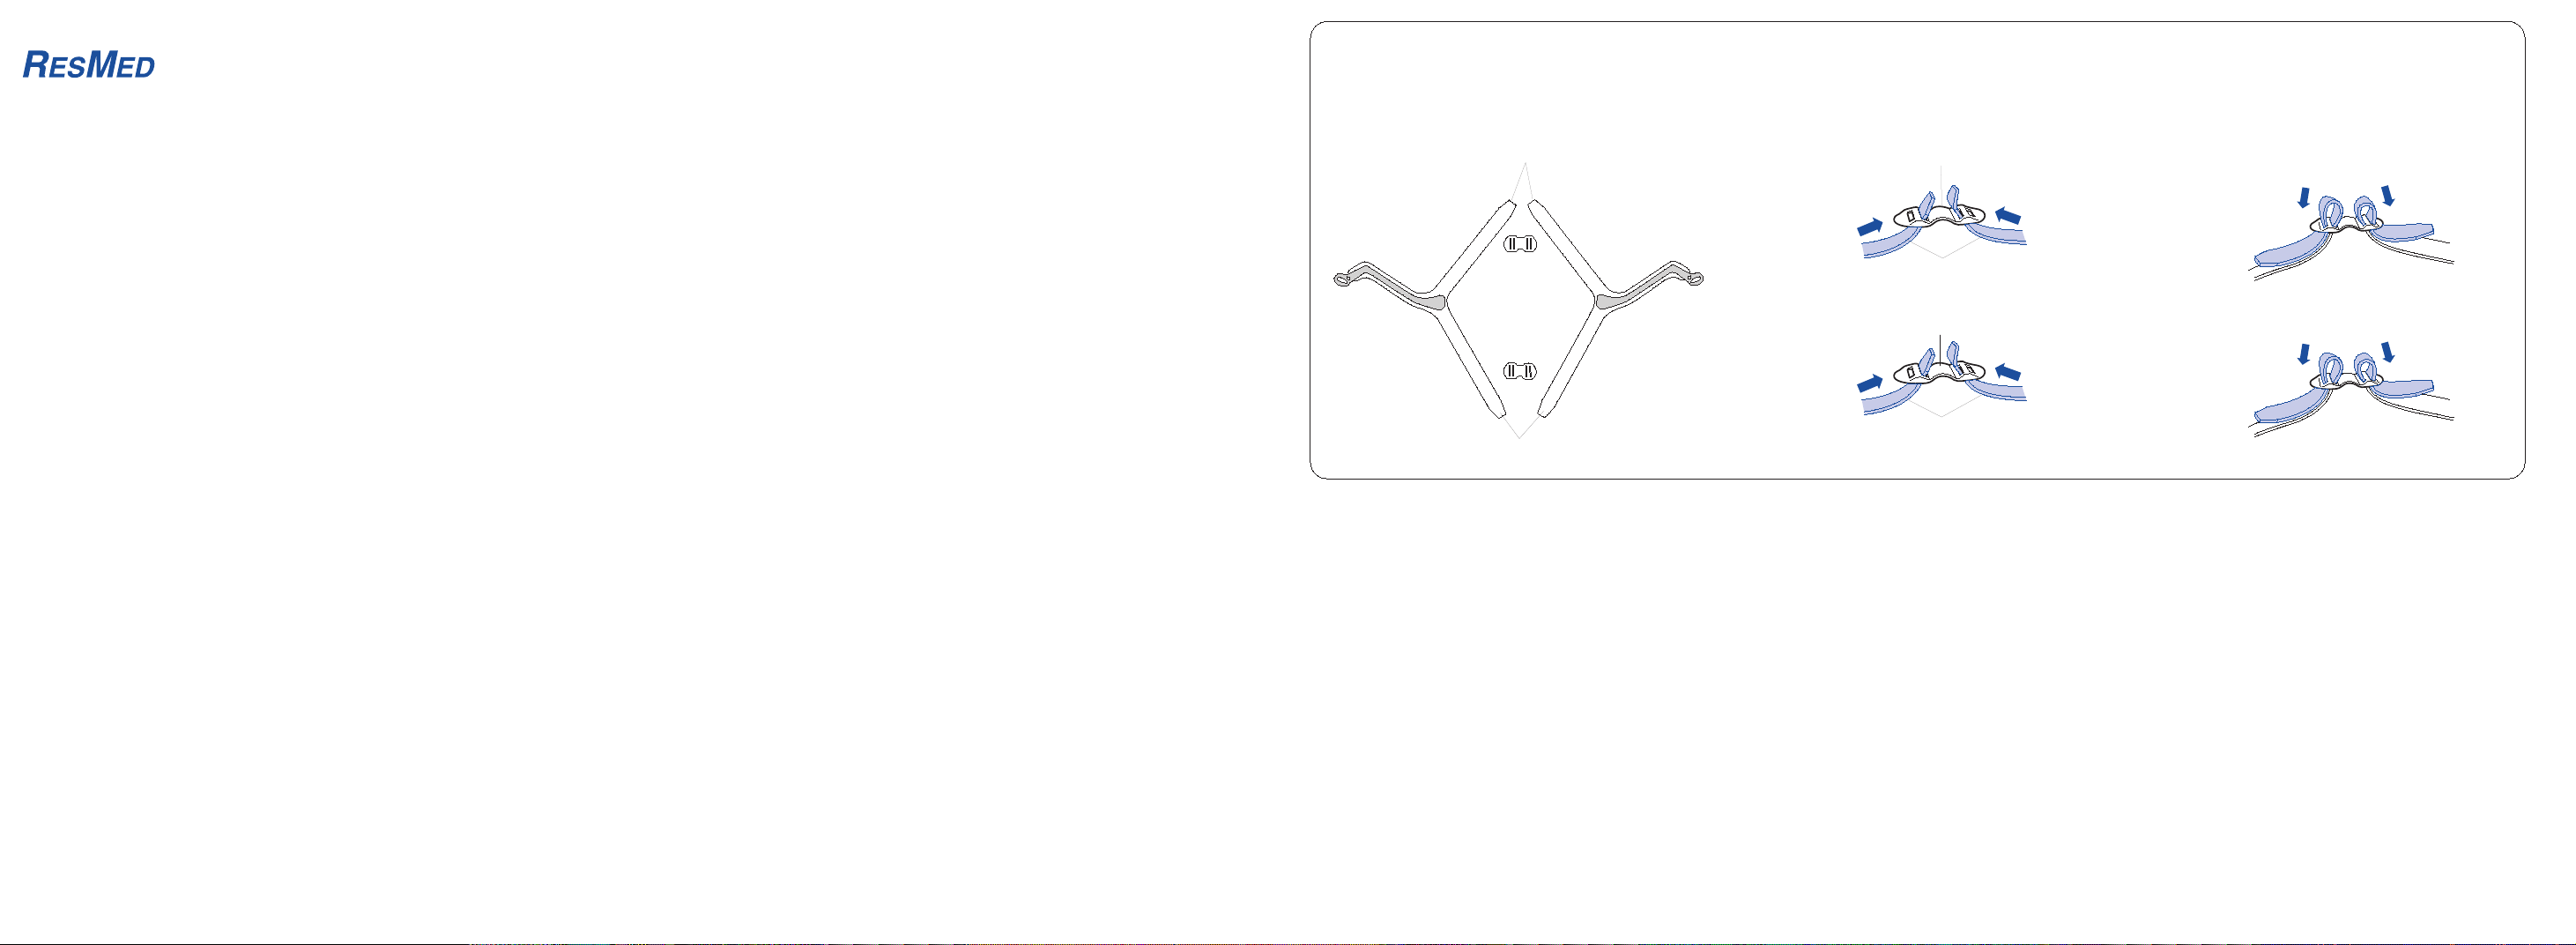
Reassembling the Headgear / Wiederzusammenbau des Kopfbandes / Remontage du harnais / Riassemblaggio del copricapo / Montaje del arnés /
Como voltar a montar o arnês / Montera hättan
Mirage SwiftTM II
NASAL PILLOWS SYSTEM
Component of: 60891/1
Page 5
Mirage Swift™ II
NASAL PILLOWS SYSTEM
Thank you for choosing ResMed’s Mirage Swift II Nasal Pillows System.
The nasal pillows system is light, flexible and quiet. It is designed to minimize
contact with your face, thus ensuring that you feel comfortable during therapy.
This user guide provides you with the information you need for the correct use
of your system.
Intended Use
The Mirage Swift II is intended for multipatient use by adult patients
(>30 kg) prescribed continuous positive airway pressure or bilevel therapy for
use in home, hospitals or clinics.
Note: The Mirage Swift II is not compatible for use with ResMed
™
AutoSet CS
Medical Information
Note: The Mirage Swift II does not contain latex, PVC, or DEHP materials. If
you have ANY reaction to any part of the system, discontinue use and consult
your sleep therapist.
2 and VPAP™ Adapt SV devices.
English
. Warnings and Cautions
• This system should be used only with flow generators (CPAP or bilevel)
recommended by your physician or respiratory therapist. It should not be
used unless the flow generator is turned on and operating properly. The vent
holes should never be blocked.
Explanation of the Warning: Flow generators are intended to be used with
special interfaces with connectors which have vent holes (vent holes are
located on the frame—see section A on the illustrations sheet) or separate
exhalation devices to allow continuous flow of air out of the interface. When
the flow generator is turned on and functioning properly, new air from the
flow generator flushes the exhaled air out through the attached exhalation
1
Page 6

port. However, when the flow generator is not operating (eg, power failure),
not enough fresh air will be provided through the system, and exhaled air
may be rebreathed. In this situation, remove the Mirage Swift II
immediately.
• The exhaust vent flow is lower at lower system pressures (see section
“Technical Specifications” for Pressure-Flow Curve details). If the system
pressure during expiration is too low, there may not be enough exhaust vent
flow to completely flush the air delivery hose of exhaled air before the start
of the next inspiration.
• Discontinue using the Mirage Swift II if you frequently experience nasal
irritation, and consult your physician.
• The Mirage Swift II must be cleaned and disinfected/sterilized if it is used
between patients. See section “Cleaning the Mirage Swift II between
Patients” for details.
• If oxygen is used with the flow generator, the oxygen flow must be turned
off when the flow generator is not operating.
Explanation of the Warning: When the flow generator is not in operation,
and the oxygen flow is left on, oxygen delivered into the ventilator tubing
may accumulate within the flow generator enclosure. Oxygen accumulated
in the flow generator enclosure will create a risk of fire. This warning applies
to most types of flow generators.
• Please refrain from smoking while oxygen is in use.
Note: At a fixed flow rate of supplemental oxygen flow, the inhaled oxygen
concentration will vary, depending on the pressure settings, patient
breathing pattern, interface selection and the leak rate.
Parts of the Mirage Swift II
See section A on the illustrations sheet.
Fitting the Mirage Swift II
Note: Refer to your flow generator manual for details on settings and
operational information.
See section B on the illustrations sheet.
1 Put the headgear on your head and place the nasal pillows below your nose.
Make sure the top strap passes over the top of your head. Make sure the
ResMed logo on the pillow sleeve faces outward; away from your face
(B-1).
2 Insert the nasal pillows into your nostrils. Gently tighten the headgear
straps; first the back straps (B-2a) and then the top straps (B-2b). Alternate
the adjustment of each set of straps, so that the headgear panels rest
2
Page 7

between the eye and the ear. The pillow sleeve should rest comfortably
above your upper lip.
3 Adjust the angle of the nasal pillows. To do this, rotate the pillow sleeve
assembly forward or backward so that the nasal pillows sit comfortably
inside your nostrils (B-3).
4 Tube Retainer (optional).
Use the tube retainer if you prefer to have the short tube assembly secured
to the headgear in the up position (B-4).
5 The short tube assembly can be attached in four different ways (B-5).
Note: The short tube assembly and cap can be connected to either side of
the pillow sleeve. See “Disassembling for Cleaning” and “Reassembling
the Mirage Swift II” for instructions on how to remove and attach the short
tube assembly and cap.
6 Connect one end of the main air tubing to your flow generator and the other
end to the swivel. Turn your flow generator on.
Notes:
• Flow generator mask setting: If available, select “Swift”; otherwise
select “Mirage” as the mask option when using the Mirage Swift II with
ResMed flow generators that have mask setting options.
• SmartStop feature: This feature may not operate effectively when using
the Mirage Swift II with some ResMed flow generators that have the
SmartStop feature. This is particularly relevant when using the small size
pillow sleeve.
If you feel air leaks, readjust the angle of the nasal pillows to get a better
seal. You may need to readjust the headgear straps. Do not overtighten the
headgear straps.
If you are unable to resolve any leaks you may need an alternative pillow
sleeve size.
7 Take time to adjust the following to achieve a secure and comfortable fit:
• headgear straps
• angle of the pillow sleeve assembly
• position of the short tube assembly.
English
Removing the Mirage Swift II
To remove the Mirage Swift II, pull the pillow sleeve assembly away from your
nose and lift the headgear off your head. You do not need to loosen the
headgear straps.
3
Page 8

Disassembling for Cleaning
See section C on the illustrations sheet.
Before disassembling the Mirage Swift II, disconnect the flow generator
tubing. To do this, hold the swivel and pull it away from the flow generator
tubing.
CAUTION
Do not pull on the short tube or the flow generator tubing as they may get
damaged.
• To disassemble the Mirage Swift II for daily cleaning, follow steps 1–3.
• To disassemble the Mirage Swift II for weekly cleaning, follow steps 1–5.
1 Detach the short tube assembly. To do this, hold the elbow and pull it away
from the seal ring (C-1).
Note: The short tube assembly cannot be taken apart.
2 Remove the cap by pulling it away from the seal ring (C-2).
3 Detach the headgear ring from the pillow sleeve assembly. Simply pull the
headgear rings from the ends of the frame (C-3).
4 Disassemble the pillow sleeve assembly. To do this, slide off the clip (C-4a)
and then peel the pillow sleeve off the frame (C-4b).
Note: When sliding the clip, hold it at one end, not in the middle.
5 The seal rings do not need to be removed from the headgear (C-5).
Cleaning the Mirage Swift II in the Home
Notes:
• Wash your hands before cleaning the mask.
• Wash the headgear before first time use, as the dye may run. It is important
to always handwash the headgear.
• The headgear may be washed without being disassembled.
Daily
Handwash the pillow sleeve assembly, short tube assembly and cap in warm
(approx. 30°C), soapy water for one minute. Use pure soap. Rinse the
components well with drinking quality water and allow to air dry out of direct
sunlight and heat.
Note: Ensure that the vent holes are not blocked. Use a soft bristle brush to
clean the vent.
4
Page 9

Weekly
Handwash the headgear, tube retainer and all components in warm,
(approx. 30°C), soapy water. Use pure soap. Rinse the components well and
allow them to air dry out of direct sunlight.
. CAUTION
• Do not use solutions containing bleach, chlorine, alcohol, aromatics,
moisturizers, antibacterial agents, or scented oils to clean any part of
the system or air tubing. These solutions may cause damage and
reduce the life of the product.
• Exposing any part of the system or tubing to direct sunlight or heat
may cause deterioration.
• If any visible deterioration of a component is apparent (cracking,
crazing, tears etc), the component should be discarded and replaced.
Cleaning the Mirage Swift II between Patients
All system components other than the short tube assembly can be disinfected/
sterilized using validated procedures. Clinicians should refer to the Masks
Disinfection/Sterilization Guide for details.
The short tube assembly should not be reused. It should be replaced between
patients.
To clean the headgear between patients use the method described in the
previous section “Cleaning the Mirage Swift II in the Home”.
Reassembling the Mirage Swift II
English
CAUTION
Components of the Mirage Swift II pillow sleeve assembly (pillow sleeve,
frame and clip—see section A on the illustration sheet) are not compatible
for use with Mirage Swift components. Combining these components
from the two systems may result in rebreathing of exhaled air.
See section D on the illustrations sheet.
1 Make sure both seal rings are properly fitted to the headgear rings (D-1).
2 Assemble the pillow sleeve assembly. To do this:
a Wrap the pillow sleeve around the frame. Then insert the pillow sleeve
edges into the groove of the frame (D-2a).
b Hold the clip at one end and then slide it onto the frame to secure the
pillow sleeve in place (D-2b).
5
Page 10

Note: If the clip does not slide easily, check that the pillow sleeve edge is
fitted flush to the groove of the frame.
3 Attach the headgear ring to the pillow sleeve assembly. To do this, firmly
push the headgear rings onto the ends of the frame (D-3). When attaching
the pillow sleeve assembly make sure:
• the headgear panels are facing out
• the nasal pillows are pointing upwards
• the ResMed logo faces out—away from the headgear.
Make sure the pillow sleeve assembly is properly fitted to the headgear
before going on to the next step.
4 Attach the short tube assembly to your preferred side of the pillow sleeve
assembly. To do this, push the elbow into the seal ring until it clicks into
place (D-4).
5 Insert the cap into the other seal ring until it clicks into place (D-5).
6 The assembled system should look like this (D-6). Make sure the ResMed
logo on the pillow sleeve faces out—away from the headgear.
Additional Information
Reassembling the Headgear
See section E on the illustrations sheet.
If taken apart, the headgear has four parts:
A: Left strap; B: Right strap; C: Back buckle; D: Top buckle.
1 Lay out the four parts of the headgear as shown in (E-1). The panels must
face up.
Note: Before threading the straps, make sure that the buckles are positioned
as shown in (E-2) and (E-3).
2 Thread the back straps through the back buckle (part C) as shown in
(E-2a) and (E-2b).
3 Thread the top straps through the top buckle (part D) as shown in
(E-3a) and (E-3b).
Disposal
The Mirage Swift II Nasal Pillows System does not contain any hazardous
substances and may be disposed of with your normal household refuse.
6
Page 11

Technical Specifications
Pressure–Flow Curve
English
60
50
40
30
20
10
Vent Flow Rate (L/min)
0
4 6 8 10 12 14 16 18 20
Mask Pressure (cm H2O)
Pressure
(cm H
2
O)
Flow
(± 6.0 L/min)
420
829
12 37
16 43
20 49
Note: As a result of manufacturing variations, the vent flow may vary from the
values listed in the table.
Dead Space Information
Dead space is the empty volume of the pillow sleeve and short tube assembly
up to the swivel.
The dead space of the Mirage Swift II for all pillow sleeve sizes is 91 mL.
Standards
CE designation in accordance with EC directive 93/42/EEC, class IIa.
EN ISO 14971, ISO 5356-1, ISO 10993-1 and EN ISO 17510-2.
Therapy Pressure
4 to 20 cm H2O
Resistance
Drop in pressure measured (average for three pillow sleeve sizes)
at 50 L/min: 0.4 cm H
at 100 L/min: 1.6 cm H2O
O
2
7
Page 12

Symbols
System and Packaging
Caution, consult accompanying documents
Lot number
LOT
Part number
REF
User Guide
Indicates a Warning or Caution and alerts you to a possible injury or
explains special measures for the safe and effective use of the device.
Ordering Information
Part No. Item
System
60513 Mirage Swift II Nasal Pillow System - EUR
60514 Mirage Swift II Nasal Pillow System - ANZ
60515 Mirage Swift II Nasal Pillow System - AP
60516 Mirage Swift II Nasal Pillow System - UK
60518 Mirage Swift II Nasal Pillow System - FRA
Replacement Parts
60541 Pillow sleeve, Small (1 pk.)
60542 Pillow sleeve, Medium (1 pk.)
60543 Pillow sleeve, Large (1 pk.)
60523 Headgear buckle (4 pk.)
60524 Seal ring (10 pk.)
60525 Cap (1 pk.)
60526 Headgear (1 pk.)
60536 Frame with Clip and Cap (1 pk.)
60528 Short tube assembly (1 pk.)
60529 Short tube assembly (10 pk.)
60530 Tube retainer (3 pk.)
60545 Mirage Swift II Bag (1 pk.)
60537 Frame System with Pillow sleeve (excluding headgear), Small
60538 Frame System with Pillow sleeve (excluding headgear), Medium
8
Page 13

Part No. Item
60539 Frame System with Pillow sleeve (excluding headgear), Large
60540 Clip (1 pk.)
Accessories
61121 Distal pressure port (1 pk.)
61124 Distal pressure port (10 pk.)
Limited Warranty
ResMed warrants that your ResMed system, including its components—
frame, pillow sleeve, headgear, tubing and other accessories (“Product”)—
shall be free from defects in material and workmanship for a period of ninety
(90) days from the date of purchase by the initial consumer.
For further details refer to the Warranty.
English
Note: Translations are based on the English version in this guide. However,
there may be minor variations based on the disinfection/sterilization procedures applicable in some countries. ResMed has reviewed these changes and
all procedures included here have been validated.
9
Page 14

10
Page 15
Mirage Swift™ II
NASENPOLSTER
Herzlichen Glückwunsch zu Ihren ResMed Mirage Swift II Nasenpolstern.
Die Nasenpolster sind leicht, flexibel und geräuscharm. Sie wurden so
konzipiert, dass der Kontakt mit Ihrem Gesicht möglichst gering ist, um so eine
für Sie angenehme Therapie zu gewährleisten.
Diese Bedienungsanleitung enthält Informationen, die Sie zur korrekten
Benutzung des Systems benötigen.
Verwendungszweck
Mirage Swift II ist wiederverwendbar und für erwachsene Patienten
(>30 kg) ausgelegt, die mit kontinuierlich positivem Atemwegsdruck oder der
Bilevel-Therapie zu Hause, im Krankenhaus oder in Schlafkliniken behandelt
werden.
™
Hinweis: Die Mirage Swift II ist nicht mit ResMed AutoSet CS
Adapt SV Geräten kompatibel.
Medizinische Hinweise
Hinweis: Mirage Swift II ist frei von Latex, PVC und DEHP. Wenn Sie gegen
eines der Maskenbestandteile in IRGENDEINER WEISE allergisch sind,
unterbrechen Sie die Behandlung und konsultieren Sie Ihren
Schlaftherapeuten.
2 und VPAP™
Deutsch
. Warnungen und Vorsichtshinweise
• Die Nasenpolster sollten nur mit dem von Ihrem Arzt oder
Atemtherapeuten empfohlenen CPAP- oder Bilevel-System verwendet
werden. Sie duerfen nur verwendet werden, wenn das Atemtherapiegerät
eingeschaltet ist und ordnungsgemäß funktioniert. Die
Luftauslassöffnungen dürfen niemals blockiert sein.
11
Page 16

Erläuterung zur Warnung: Atemtherapiegeräte sind für die Verwendung
mit Spezialmasken vorgesehen, die mit integrierten (in die Maske – siehe
Abschnitt A des Illustrationsblattes) oder separat anzuschließenden Luftauslass-öffnungen ausgestattet sind, um einen kontinuierlichen Luftfluss
aus der Maske heraus zu gewährleisten. Wenn das Atemtherapiegerät
eingeschaltet ist und ordnungsgemäß funktioniert, führt die vom Gerät in
die Maske strömende frische Luft die ausgeatmete Luft durch die montierten Luftauslassöffnungen aus der Maske heraus. Ist das Atemtherapiegerät jedoch nicht in Betrieb (z. B. bei einem Stromausfall), wird
unzureichend frische Luft durch das System geführt und es kann zur Rückatmung ausgeatmeter Luft kommen. Nehmen Sie in diesem Fall sofort die
Mirage Swift II ab.
• Der Luftfluss durch die Luftauslassöffnungen ist bei niedrigerem
Systemdruck geringer (Details zur Druck-Fluss-Kurve finden Sie in Abschnitt
„Technische Daten“). Ist der Systemdruck beim Ausatmen zu niedrig, kann
es sein, dass der Luftfluss durch die Auslassöffnungen nicht ausreicht, um
die ausgeatmete Luft vor dem nächsten Einatmen vollständig aus dem
Luftzufuhrschlauch zu führen.
• Wenn Sie während der Behandlung mit der Mirage Swift II häufig unter
Nasenreizungen leiden, konsultieren Sie Ihren Arzt.
• Die Mirage Swift II muss bei Verwendung durch mehrere Patienten vor dem
Wechsel gereinigt und desinfiziert/sterilisiert werden. Weitere Hinweise
finden Sie in Abschnitt „Reinigung der Mirage Swift II zur Vorbereitung auf
einen neuen Patienten“.
• Wenn das Atemtherapiegerät mit Sauerstoff verwendet wird, muss die
Sauerstoffzufuhr abgeschaltet werden, wenn das Gerät außer Betrieb ist.
Erläuterung zur Warnung: Wenn die Sauerstoffzufuhr bei
ausgeschaltetem Atemtherapiegerät eingeschaltet bleibt, kann sich in den
Atemluftschlauch geführter Sauerstoff im Gehäuse des
Atemtherapiegerätes ansammeln. Im Gehäuse des Atemtherapiegerätes
angesammelter Sauerstoff kann eine Brandgefahr darstellen. Diese
Warnung trifft auf die meisten Arten von Atemtherapiegeräten zu.
• Während der Verwendung von Sauerstoff bitte nicht rauchen.
Hinweis: Wird eine konstante Menge an zusätzlichem Sauerstoff zugeführt,
ist die Konzentration des eingeatmeten Sauerstoffes je nach
Druckeinstellung, Atemmuster des Patienten, Maskentyp und Luftfluss
durch die Luftauslassöffnungen unterschiedlich.
Bestandteile der Mirage Swift II
Siehe Abschnitt A des Illustrationsblattes.
12
Page 17

Anlegen der Mirage Swift II
Hinweis: Informationen zu Einstellungen und Betrieb finden Sie in der
Bedienungsanleitung zu Ihrem Atemtherapiegerät.
Siehe Abschnitt B des Illustrationsblattes.
1 Ziehen Sie das Kopfband über den Kopf und positionieren Sie die
Nasenpolster unter Ihrer Nase. Achten Sie darauf, dass das obere Band
direkt über Ihren Kopf verläuft. Stellen Sie sicher, dass das ResMed-Logo
am Nasenpolsterhalter nach außen, d. h. von Ihrem Gesicht weg, zeigt
(B-1).
2 Platzieren Sie die Nasenpolster an den Nasenlöchern. Ziehen Sie das
Kopfband leicht an; zuerst die hinteren (B-2a) und dann die oberen Bänder
(B-2b). Gehen Sie bei dem Anziehen der Bänder abwechselnd vor, so dass
die Kopfbandstreifen stets an den Schläfen liegen. Der Nasenpolsterhalter
sollte bequem oberhalb der Lippen aufliegen.
3 Justieren Sie den Neigungswinkel der Nasenpolster durch leichtes Vor- oder
Zurückdrehen des Nasenpolsterhalters, bis die Nasenpolster bequem an
Ihren Nasenlöchern anliegen (B-3).
4 Schlauchhalter (optional).
Wenn Sie den kurzen Schlauch nach oben verlaufend am Kopfband
anbringen möchten, benutzen Sie dazu den Schlauchhalter (B-4).
5 Der kurze Schlauch kann auf vier verschiedene Weisen angebracht werden
(B-5).
Hinweis: Der kurze Schlauch und die Verschlusskappe können an beiden
Seiten der Nasenpolster befestigt werden. Anweisungen zum Entfernen
und Befestigen des kurzen Schlauches mit Verschlusskappe finden Sie
unter „Demontage zu Reinigungszwecken“ und „Wiederzusammenbau der
Mirage Swift II“.
6 Schließen Sie ein Ende des Hauptschlauches an Ihr Atemtherapiegerät und
das andere Ende am Drehadapter an. Schalten Sie das Atemtherapiegerät
ein.
Hinweise:
• Maskeneinstellungen am Atemtherapiegerät: Wenn Sie die Mirage
Swift II mit einem ResMed-Atemtherapiegerät verwenden, das über eine
Maskenoption verfügt, wählen Sie nach Möglichkeit „Swift“, ansonsten
„Mirage“ als Maskeneinstellung aus.
• SmartStop-Funktion: Wird die Mirage Swift II mit einem ResMed-
Atemtherapiegerät mit SmartStop-Funktion verwendet, ist diese
Funktion unter Umständen nicht 100%ig effektiv. Dies gilt insbesondere,
wenn die Nasenpolster in Größe „Small“ verwendet werden.
Deutsch
13
Page 18

Wenn Luft unbeabsichtigt entweicht und die Nasenpolster eine Leckage
aufweisen, korrigieren Sie den Winkel der Nasenpolster, bis Sie einen
besseren Sitz erzielen. Unter Umständen müssen die Kopfbänder verstellt
werden. Ziehen Sie die Kopfbänder nicht zu stramm an.
Wenn Sie die Leckagen nicht beheben können, sollten Sie Nasenpolster in
einer anderen Größe versuchen.
7 Nehmen Sie sich ausreichend Zeit für die folgenden Einstellungen, um
einen sicheren und bequemen Sitz zu erreichen:
• Kopfbänder
• Neigungswinkel des Nasenpolsterhalters
• Position des kurzen Schlauches
Abnehmen der Mirage Swift II
Nehmen Sie die Mirage Swift II ab wie eine Mütze, indem Sie den
Nasenpolsterhalter von der Nase weg und das Kopfband über den Kopf ziehen.
Die Kopfbänder müssen Sie dazu nicht lockern.
Demontage zu Reinigungszwecken
Siehe Abschnitt C des Illustrationsblattes.
Nehmen Sie vor der Demontage der Mirage Swift II den Schlauch des
Atemtherapiegerätes ab. Ziehen Sie dazu den Drehadapter vom Schlauch.
VORSICHT
Ziehen Sie weder am kurzen Schlauch noch am Schlauch des
Atemtherapiegerätes, da diese dadurch beschädigt werden könnten.
• Zur täglichen Reinigung demontieren Sie die Mirage Swift II entsprechend
den folgenden Schritten 1-3.
• Zur wöchentlichen Reinigung demontieren Sie die Mirage Swift II
entsprechend den folgenden Schritten 1-5.
1 Nehmen Sie den kurzen Schlauch ab. Ziehen Sie dazu das Kniestück vom
Dichtungsring ab (C-1).
Hinweis: Der kurze Schlauch kann nicht auseinander genommen werden.
2 Ziehen Sie die Verschlusskappe vom Dichtungsring ab (C-2).
3 Nehmen Sie den Kopfbandring vom Nasenpolsterhalter ab, indem Sie sie
einfach von den Enden des Halters herunterziehen (C-3).
4 Nehmen Sie den Nasenpolsterhalter auseinander. Ziehen Sie dazu den Clip
ab (C-4a) und anschließend das Nasenpolster vom Halter (C-4b).
Hinweis: Halten Sie den Clip beim Verschieben nicht in der Mitte, sondern
an einem Ende fest.
5 Die Dichtungsringe müssen nicht vom Kopfband entfernt werden (C-5).
14
Page 19

Reinigung der Mirage Swift II zu Hause
Hinweise:
• Waschen Sie sich vor dem Reinigen der Maske die Hände.
• Waschen Sie das Kopfband vor der ersten Benutzung, da es abfärben
könnte. Das Kopfband darf nur von Hand gewaschen werden.
• Das Kopfband kann gewaschen werden, ohne dass es vorher demontiert
werden muss.
Täglich
Waschen Sie den Nasenpolsterhalter, den kurzen Schlauch und die Kappe mit
der Hand eine Minute lang in einer warmen Seifenlauge (ca. 30 °C).
Verwenden Sie dazu Kernseife. Spülen Sie die Teile gründlich in Trinkwasser ab
und lassen Sie sie vor direktem Sonnenlicht und Hitzeeinwirkung geschützt an
der Luft trocknen.
Hinweis: Stellen Sie sicher, dass die Luftauslassöffnungen nicht blockiert sind.
Verwenden Sie zur Reinigung der Luftauslassöffnungen eine weiche Bürste.
Wöchentlich
Waschen Sie das Kopfband, den Schlauchhalter und alle Maskenteile mit der
Hand in einer warmen Seifenlauge (ca. 30 °C). Verwenden Sie dazu Kernseife.
Spülen Sie die Maskenteile gut ab und lassen Sie sie vor direktem Sonnenlicht
geschützt an der Luft trocknen.
. VORSICHTSHINWEISE
• Verwenden Sie weder Bleichmittel, noch chlor- oder alkoholhaltige
Reinigungsmittel, aromatische Lösungen, feuchtigkeitsspendende
oder antibakterielle Mittel oder Duftöle für die Reinigung der einzelnen
Maskensystemteile bzw. des Luftschlauches. Diese Mittel können das
Material beschädigen und somit die Lebensdauer des Produktes
verkürzen.
• Direkte Sonneneinstrahlung oder Hitze können zu vorzeitigem
Verschleiß des Systems und der Schläuche führen.
• Weist eines der Maskenteile sichtbare Verschleißerscheinungen auf
(wie z. B. Brüche oder Risse), sollte es entfernt und durch ein neues
ersetzt werden.
Deutsch
15
Page 20

Reinigung der Mirage Swift II zur Vorbereitung
auf einen neuen Patienten
Alle Systemkomponenten, ausgenommen der kurze Schlauch, können unter
Anwendung gültiger Verfahren desinfiziert/sterilisiert werden. Weitere
Einzelheiten können vom Arzt in den Hinweisen zur Desinfektion/Sterilisation
von Masken nachgelesen werden.
Der kurze Schlauch sollte nicht wiederverwendet werden. Dieser sollte vor
dem Wechsel auf einen neuen Patienten ausgewechselt werden.
Reinigen Sie das Kopfband zur Vorbereitung auf einen neuen Patienten auf die
im vorherigen Abschnitt „Reinigung der Mirage Swift II zu Hause“
beschriebene Weise.
Wiederzusammenbau der Mirage Swift II
VORSICHT
Teile der Mirage Swift II Nasenpolster (Nasenpolsterhalter, Halter und
Clip – siehe Abschnitt A des Illustrationsblattes) sind nicht mit den Mirage
Swift Teilen kompatibel. Die Kombination der Teile dieser beiden
Systeme kann zur Rückatmung ausgeatmeter Luft führen.
Siehe Abschnitt D des Illustrationsblattes.
1 Achten Sie darauf, dass beide Dichtungsringe ordnungsgemäß an den
Kopfbandringen angebracht sind (D-1).
2 Setzen Sie die Maske zusammen. Gehen Sie dazu folgendermaßen vor:
a Wickeln Sie den Nasenpolsterhalter um den Halter. Drücken Sie dann
die Ränder des Nasenpolsterhalters in die Rille am Halter (D-2a).
b Halten Sie den Clip an einem Ende fest und schieben Sie ihn auf den
Halter, um den Nasenpolsterhalter in Position zu halten (D-2b).
Hinweis: Wenn sich der Clip nur schwer schieben lässt, vergewissern Sie
sich, dass der Nasenpolsterhalter richtig in der Rille des Halters sitzt.
3 Befestigen Sie den Kopfbandring am Nasenpolsterhalter. Drücken Sie dazu
die Kopfbandringe fest auf die Enden des Halters (D-3). Stellen Sie beim
Befestigen des Nasenpolsterhalters Folgendes sicher:
• dass die Kopfbandversteifungen nach außen zeigen
• dass die Nasenpolster nach oben zeigen
• dass das ResMed-Logo nach außen zeigt – vom Kopfband weg
Vergewissern Sie sich, dass der Nasenpolsterhalter ordnungsgemäß am
Kopfband angebracht ist, bevor Sie zum nächsten Schritt gehen.
16
Page 21

4 Befestigen Sie den kurzen Schlauch auf der von Ihnen bevorzugten Seite
des Nasenpolsterhalters. Drücken Sie dazu das Kniestück in den
Dichtungsring, bis es einrastet (D-4).
5 Drücken Sie die Verschlusskappe in den anderen Dichtungsring, bis sie
einrastet (D-5).
6 Das fertig zusammengebaute System sollte wie in Abbildung (D-6) gezeigt
aussehen. Stellen Sie sicher, dass das ResMed-Logo am Nasenpolster nach
außen zeigt – vom Kopfband weg.
Weitere Informationen
Wiederzusammenbau des Kopfbandes
Siehe Abschnitt E des Illustrationsblattes.
Das Kopfband besteht aus vier Teilen:
A: Linkes Band; B: Rechtes Band; C: Hintere Schnalle; D: Obere Schnalle.
1 Legen Sie die vier Teile des Kopfbandes wie in Abbildung (E-1) aus. Die
Nasenpolsterversteifungen müssen nach oben zeigen.
Hinweis: Bevor Sie die Bänder durch die Schnallen ziehen, stellen Sie sicher,
dass die Schnallen wie in den Abbildungen (E-2) und (E-3) ausgerichtet sind.
2 Ziehen Sie die hinteren Bändern wie in den Abbildungen (E-2a) und (E-2b)
gezeigt durch die hintere Schnalle (Teil C).
3 Ziehen Sie die oberen Bändern wie in den Abbildungen (E-3a) und (E-3b)
gezeigt durch die obere Schnalle (Teil D).
Entsorgung
Die Mirage Swift II Nasenpolster enthalten keine Gefahrstoffe und kann mit
dem normalen Haushaltsabfall entsorgt werden.
Deutsch
17
Page 22

Technische Daten
Druck-Fluss-Kurve
60
50
40
30
20
10
Durchflussrate an den
Luftauslassöffnungen (l/min)
0
4 6 8 10 12 14 16 18 20
Maskendruck (cm H2O)
Druck
(cm H
O)
2
Durchfluss
(± 6,0 l/min)
420
829
12 37
16 43
20 49
Hinweis: Aufgrund von leichten Variationen bei der Herstellung kann der
Luftfluss von den in der Tabelle genannten Werten abweichen.
Informationen zum Totraum
Der Totraum ist das Leervolumen vom Nasenpolsterhalter und kurzen Schlauch
bis zum Drehadapter.
Der Totraum der Mirage Swift II beträgt bei allen Nasenpolsterhaltergrößen
91 ml.
Normen
CE-Kennzeichnung gemäß EU-Richtlinie 93/42/EWG, Klasse IIa.
EN ISO 14971, ISO 5356-1, ISO 10993-1 und EN ISO 17510-2.
Behandlungsdruck
4 bis 20 cm H2O
Widerstand
Gemessene Drucksenkung (Durchschnitt für drei Polstermanschettengrößen)
Bei 50 l/min: 0,4 cm H2O
Bei 100 l/min: 1,6 cm H
O
2
18
Page 23

Symbole
System und Verpackung
Achtung – Bitte lesen Sie die beiliegenden Unterlagen
Produktionslos
LOT
Artikelnummer
REF
Bedienungsanleitung
Weist auf eine Warnung oder einen Vorsichtshinweis hin und macht Sie
auf eine mögliche Verletzungsgefahr aufmerksam bzw. erklärt spezielle
Maßnahmen für die sichere und wirksame Verwendung des Gerätes.
Bestellinformationen
Artikelnr. Artikel
System
60513 Mirage Swift II Nasenpolster – EUR
60514 Mirage Swift II Nasenpolster – ANZ
60515 Mirage Swift II Nasenpolster – AP
60516 Mirage Swift II Nasenpolster – UK
60518 Mirage Swift II Nasenpolster – FRA
Ersatzteile
60541 Nasenpolsterhalter, Small (1 Stk/Pck.)
60542 Nasenpolsterhalter, Medium (1 Stk/Pck.)
60543 Nasenpolsterhalter, Large (1 Stk/Pck.)
60523 Kopfbandclip (4 Stk/Pck.)
60524 Dichtungsring (10 Stk/Pck.)
60525 Verschlusskappen (1 Stk/Pck.)
60526 Kopfband (1 Stk/Pck.)
60536 Halter mit Clip und Verschlusskappe (1 Stk/Pck.)
60528 Kurzer Schlauch (1 Stk/Pck.)
60529 Kurzer Schlauch (10 Stk/Pck.)
60530 Schlauchhalter (3 Stk/Pck.)
60545 Mirage Swift II Tasche (1 Stk/Pck.)
60537 Maskensystem mit Nasenpolsterhalter (ohne Kopfband), Small
Deutsch
19
Page 24

Artikelnr. Artikel
60538 Maskensystem mit Nasenpolsterhalter (ohne Kopfband), Medium
60539 Maskensystem mit Nasenpolsterhalter (ohne Kopfband), Large
60540 Clip (1 Stk/Pck.)
Zubehör
60549 Mirage Swift II Druckanschlussstecker (1 Stck/Pck.)
60550 Mirage Swift II Druckanschlussstecker (10 Stck/Pck.)
61121 Distaler Druckanschluss (1 Stk/Pck.)
61124 Distaler Druckanschluss (10 Stk/Pck.)
Beschränkte Garantie
ResMed sichert für eine Haftungsperiode von neunzig (90) Tagen ab dem
Datum des Kaufs durch den ersten Käufer zu, dass Ihr ResMed
Maskensystem, einschließlich aller Komponenten wie Maskenhalter,
Nasenpolsterhalter, Kopfband, Schläuche und anderes Zubehör („Produkt“),
frei von Material- und Verarbeitungsfehlern ist.
Weitere Einzelheiten entnehmen Sie bitte den Garantiebedingungen.
Hinweis: Die originale Version dieser Bedienungsanleitung ist die englische,
von der alle anderen übersetzt wurden. Die Texte können jedoch aufgrund der
verschiedenen Desinfektions-/Sterilisationsverfahren in verschiedenen
Ländern geringfügige Unterschiede aufweisen. ResMed hat diese
Unterschiede geprüft und alle hier beschriebenen Verfahren wurden bestätigt.
20
Page 25

Mirage Swift™ II
MASQUE NARINAIRE
Merci d'avoir choisi le masque narinaire Mirage Swift II ResMed.
Ce masque narinaire est léger, flexible et silencieux. Il a été conçu pour
minimiser le contact avec votre visage afin d'améliorer votre confort pendant
le traitement.
Ce guide utilisateur vous donne toutes les informations dont vous avez besoin
pour utiliser votre masque correctement.
Usage prévu
Le masque narinaire Mirage Swift II peut être utilisé sur plusieurs patients et
est prévu pour le traitement par pression positive continue ou à deux niveaux
de pression des patients adultes (poids > 30 kg) à domicile ou en milieu
hospitalier.
Remarque : le masque narinaire Mirage Swift II n'est pas compatible avec les
appareils AutoSet CS
Informations médicales
Remarque : le masque narinaire Mirage Swift II ne contient pas de latex, de
PVC ni de DEHP. En cas de réaction QUELCONQUE à l'un des composants du
masque, arrêtez le traitement et consultez votre spécialiste du sommeil.
. Avertissements et précautions
• Ce masque doit être utilisé uniquement avec les appareils (de PPC ou d'aide
inspiratoire avec PEP) recommandés par votre médecin ou votre thérapeute
respiratoire. Il ne doit être porté que si l'appareil est sous tension et s'il
fonctionne correctement. Les orifices de ventilation ne doivent jamais être
obstrués.
™
2 et VPAP™ Adapt SV ResMed.
Français
21
Page 26

Explication de cet avertissement : les appareils sont prévus pour une
utilisation avec des interfaces spéciales possédant des raccords avec
orifices de ventilation (les orifices de ventilation se trouvent sur l'entourage
– voir la section A de la fiche d'illustrations) ou avec des dispositifs de
ventilation séparés afin de permettre l'écoulement continu de l'air hors de
l'interface. Lorsque l'appareil est sous tension et qu'il fonctionne
correctement, de l'air propre provenant de l'appareil expulse l'air expiré via
les orifices de ventilation. Cependant, lorsque l'appareil n'est pas en
marche (p. ex. en cas d'absence secteur), l'air peut ne pas être renouvelé
dans le masque et l'air expiré peut être réinhalé. Dans ce cas, retirer le
masque narinaire Mirage Swift II immédiatement.
• Le débit aux orifices de ventilation diminue avec les pressions au masque
(veuillez vous référer à la section « Caractéristiques » pour plus
d'informations détaillées sur la courbe Pression/Débit). Lorsque la pression
au masque est trop basse durant l'expiration, le débit aux orifices de
ventilation peut s'avérer insuffisant pour expulser tout l'air expiré du circuit
respiratoire avant le début de l'inspiration suivante.
• En cas d'irritation nasale fréquente, cesser d'utiliser le masque narinaire
Mirage Swift II et consulter votre médecin.
• Le masque Mirage Swift II doit être nettoyé et désinfecté/stérilisé entre les
patients. Voir la section « Nettoyage du masque narinaire Mirage Swift II
entre patients » pour de plus amples informations.
• Lors de l'utilisation d'oxygène avec l'appareil, l'alimentation en oxygène doit
être fermée lorsque l'appareil n'est pas en mode de fonctionnement.
Explication de cet avertissement : lorsque l'appareil n'est pas en marche
et que l'alimentation en oxygène n'est pas fermée, l'oxygène délivré dans
le circuit du ventilateur peut s'accumuler dans l'appareil. L'oxygène
accumulé dans le boîtier d'un appareil crée un risque d'incendie. Ceci est
vrai pour la plupart des appareils.
• Eviter de fumer lorsque de l'oxygène est utilisé.
Remarque : lorsque de l'oxygène additionnel est délivré à un débit fixe, la
concentration de l'oxygène inhalé varie en fonction des réglages de
pression, de la respiration du patient, de l'interface sélectionnée ainsi que
du niveau de fuite.
Composants du masque narinaire Mirage Swift II
Voir la section A de la fiche d'illustrations.
22
Page 27

Mise en place du masque narinaire Mirage Swift II
Remarque : veuillez vous reporter au manuel de l'appareil pour de plus amples
informations sur les réglages et le fonctionnement.
Voir la section B de la fiche d'illustrations.
1 Mettez le harnais sur votre tête et placez le masque narinaire sous votre
nez. Vérifiez que les sangles supérieures passent bien par-dessus votre
tête. Veillez à ce que le logo ResMed du coussin soit tourné vers
l'extérieur et non vers votre visage (B-1).
2 Positionnez le coussin du masque à l'entrée de vos narines. Serrez
légèrement les sangles du harnais, d'abord celles de derrière (B-2a), puis
celles du haut (B-2b). Ajustez chaque jeu de sangles l'un après l'autre de
manière à ce que les parties latérales du harnais reposent entre vos yeux et
vos oreilles. Le coussin du masque devrait reposer confortablement
au-dessus de votre lèvre supérieure.
3 Ajustez l'angle de votre masque narinaire. Pour cela, faites pivoter le corps
du masque vers l'avant ou l'arrière afin qu'il repose à l'entrée de vos narines
sans que cela vous gêne (B-3).
4 Bague de fixation du tuyau (facultative).
Vous avez la possibilité d'utiliser la bague de fixation pour fixer le tuyau court
au harnais à la verticale (B-4).
5 Le tuyau court peut se fixer dans quatre positions différentes (B-5).
Remarque : le tuyau court et le bouchon peuvent se fixer d'un côté ou de
l'autre du coussin. Voir « Démontage pour le nettoyage » et « Remontage
du masque narinaire Mirage Swift II » pour les instructions de retrait et de
fixation du tuyau court et du bouchon.
6 Raccordez une extrémité du circuit respiratoire à votre appareil et l'autre
extrémité à la pièce pivotante. Mettez votre appareil en marche.
Remarques :
• Réglage de l'appareil : lorsque vous utilisez le masque narinaire Mirage
Swift II avec des appareils ResMed possédant une fonction de sélection
du masque, sélectionnez « Swift » si cette option est disponible, sinon
sélectionnez « Mirage ».
• Fonction SmartStop : cette fonction peut ne pas fonctionner
correctement sur certains appareils ResMed lorsqu'un masque Mirage
Swift II est utilisé. Ceci est particulièrement vrai lorsque le coussin en
taille petite est utilisé.
Si vous sentez des fuites d'air, réajustez l'angle du masque narinaire pour
obtenir une meilleure étanchéité. Vous devrez peut-être réajuster les
sangles du harnais. Ne les serrez pas trop !
Si les fuites persistent, essayez une autre taille de coussin.
23
Français
Page 28

7 Afin d'obtenir un ajustement à la fois stable et confortable, prenez le temps
de procéder à l'ajustement des éléments suivants :
• sangles du harnais
• angle du corps du masque
• position du tuyau court.
Retrait du masque narinaire Mirage Swift II
Pour retirer le masque narinaire Mirage Swift II, tirez sur le corps du masque et
faites passer le harnais par-dessus votre tête. Vous n'avez pas besoin de
desserrer les sangles du harnais.
Démontage pour le nettoyage
Voir la section C de la fiche d'illustrations.
Avant de démonter le masque narinaire Mirage Swift II, détachez le circuit
respiratoire de l'appareil. Pour cela, retirez la pièce pivotante du circuit
respiratoire en tirant dessus.
ATTENTION
Ne pas tirer sur le tuyau court ni sur le circuit respiratoire de l'appareil au
risque de les endommager.
• Pour démonter le masque narinaire Mirage Swift II avant de le nettoyer
chaque jour, suivez les étapes 1 à 3.
• Pour démonter le masque narinaire Mirage Swift II avant de le nettoyer
chaque semaine, suivez les étapes 1 à 5.
1 Détachez le tuyau court. Pour cela, retirez le coude de la bague d'étanchéité
en tirant dessus (C-1).
Remarque : les éléments du tuyau à air court ne peuvent pas être
désolidarisés.
2 Retirez le bouchon de la bague d'étanchéité en tirant dessus (C-2).
3 Retirez l'anneau du harnais du corps du masque. Tirez simplement sur les
anneaux du harnais pour les retirer des extrémités de l'entourage (C-3).
4 Démontez le corps du masque. Pour cela, faites glisser la barrette (C-4a)
pour la retirer et dégagez le coussin de l'entourage (C-4b).
Remarque : lorsque vous faites glisser la barrette, tenez-la par le bout et
non par le milieu.
5 Vous n'avez pas besoin de retirer les bagues d'étanchéité du harnais (C-5).
24
Page 29

Nettoyage du masque narinaire Mirage Swift II à
domicile
Remarques :
• Lavez-vous les mains avant de nettoyer le masque.
• Lavez le harnais avant la première utilisation car il risque de déteindre. Il est
important de toujours laver le harnais à la main.
• Il n'est pas nécessaire de démonter le harnais pour le nettoyer.
Quotidien
Nettoyez le corps du masque, le tuyau court et le bouchon à la main dans de
l'eau tiède (env. 30°C) savonneuse pendant une minute. Utilisez du savon pur.
Rincez les composants soigneusement à l'eau potable et laissez sécher à l'abri
de la lumière directe du soleil et de la chaleur.
Remarque : vérifiez que les orifices de ventilation ne sont pas obstrués.
Utilisez une brosse à poils doux pour nettoyer les orifices.
Hebdomadaire
Lavez le harnais, la bague de fixation du tuyau et tous les composants à la main
dans de l'eau tiède (env. 30°C) savonneuse.
Utilisez du savon pur. Rincez tous les composants soigneusement et
laissez-les sécher à l'abri de la lumière directe du soleil.
. ATTENTION
• Ne pas utiliser de solutions contenant de l'eau de Javel, du chlore, de
l'alcool ou des aromates, ni des agents hydratants ou antibactériens ni
d'huiles parfumées pour nettoyer les composants du masque ou le
circuit respiratoire. Ils risquent d'endommager le produit et de réduire
sa durée de vie.
• L'exposition d'un quelconque composant du masque ou du circuit
respiratoire à la lumière directe du soleil ou à la chaleur peut
endommager le composant en question.
• En cas de détérioration visible d'un des composants (p. ex. fissures,
fendillements, déchirures, etc.), le composant en question doit être jeté
et remplacé.
Français
25
Page 30

Nettoyage du masque narinaire Mirage Swift II
entre patients
Tous les composants du masque, à l'exception du tuyau court, peuvent être
désinfectés/stérilisés en suivant les procédures validées correspondantes. Les
cliniciens doivent se référer au Guide de désinfection/stérilisation des
masques pour de plus amples informations.
Le tuyau court ne peut pas être réutilisé. Il doit être remplacé entre chaque
patient.
Pour nettoyer le harnais entre chaque patient, utilisez la méthode décrite à la
section précédente intitulée « Nettoyage du masque narinaire Mirage Swift II
à domicile ».
Remontage du masque narinaire Mirage Swift II
ATTENTION
Les composants du corps du masque Mirage Swift II (coussin, entourage
et barrette – voir section A de la fiche d'illustrations) ne peuvent pas être
utilisés avec les composants du masque narinaire Mirage Swift.
L'utilisation combinée des composants de ces deux masques peut
entraîner une réinhalation de l'air expiré.
Voir la section D de la fiche d'illustrations.
1 Vérifiez que les deux bagues d'étanchéité sont correctement en place sur
les anneaux du harnais (D-1).
2 Remontez le corps du masque. Pour cela :
a Passez le coussin sur l'entourage. Ensuite, glissez les bords du coussin
dans la rainure de l'entourage (D-2a).
b Tenez la barrette par une extrémité, puis faites-la glisser sur l'entourage
pour maintenir le coussin en place (D-2b).
Remarque : si la barrette ne glisse pas facilement, vérifiez que les bords du
coussin sont bien à niveau avec la rainure de l'entourage.
3 Fixez l'anneau du harnais au corps du masque. Pour cela, passez les deux
extrémités de l'entourage dans les anneaux du harnais (D-3) en poussant
fermement. Lors de la fixation du corps du masque, vérifiez que :
• les parties latérales du harnais sont tournées vers l'extérieur ;
• le coussin pointe vers le haut ;
• le logo ResMed est tourné vers l'extérieur, dans la direction opposée au
harnais.
Vérifiez que le corps du masque est correctement fixé au harnais avant
de passer à l'étape suivante.
26
Page 31

4 Fixez le tuyau court du côté du corps du masque que vous avez choisi. Pour
cela, introduisez le coude dans la bague d'étanchéité jusqu'à ce qu'il se
verrouille en position (D-4).
5 Mettez le bouchon dans l'autre bague d'étanchéité jusqu'à ce qu'il se
verrouille en position (D-5).
6 Une fois assemblé, votre masque devrait se présenter comme indiqué
(D-6). Vérifiez que le logo ResMed du coussin est bien tourné vers
l'extérieur, dans la direction opposée au harnais.
Informations supplémentaires
Remontage du harnais
Voir la section E de la fiche d'illustrations.
Une fois démonté, le harnais se compose de quatre pièces :
A : Sangle gauche ; B : Sangle droite ; C : Boucle arrière ; D : Boucle supérieure.
1 Posez les quatre pièces du harnais comme indiqué (E-1). Les parties
latérales doivent être tournées vers le haut.
Remarque : avant de passer les sangles dans les boucles, vérifiez que ces
dernières sont positionnées comme indiqué aux figures (E-2) et (E-3).
2 Faites passer les sangles arrières dans la boucle arrière (pièce C) comme
indiqué aux figures (E-2a) et (E-2b).
3 Faites passer les sangles supérieures dans la boucle supérieure (pièce D)
comme indiqué aux figures (E-3a) et (E-3b).
Elimination
Le masque narinaire Mirage Swift II ne contient aucune substance dangereuse
et peut être jeté avec les ordures ménagères normales.
Français
27
Page 32

Caractéristiques
Courbe Pression/Débit
60
50
40
30
20
10
0
4 6 8 10 12 14 16 18 20
Débit aux orifices de ventilation (l/min)
Pression au masque (cm H2O)
Pression
(cm H
2
O)
Débit
(± 6,0 l/min)
420
829
12 37
16 43
20 49
Remarque : en raison des variations de fabrication, le débit aux orifices de
ventilation peut différer des valeurs indiquées dans le tableau.
Information concernant l'espace mort
L'espace mort correspond au volume vide du coussin et du tuyau court jusqu'à
la pièce pivotante.
L'espace mort pour toutes les tailles de coussin du Mirage Swift II est de
91 ml.
Normes
Marquage CE conformément à la directive CE 93/42/CEE, Classe IIa.
EN ISO 14971, ISO 5356-1, ISO 10993-1 et EN ISO 17510-2.
Pression de traitement
4 à 20 cm H2O
Résistance
Chute de pression mesurée (moyenne des trois tailles de coussin)
à 50 l/min : 0,4 cm H2O
à 100 l/min : 1,6 cm H
O
2
28
Page 33

Symboles
Masque et emballage
Attention, veuillez consulter la documentation jointe.
Numéro de lot
LOT
No. de pièce
REF
Guide utilisateur
Indique un avertissement ou une précaution et vous met en garde
contre le risque de blessure ou explique des mesures particulières
permettant d'assurer une utilisation efficace et sûre de l'appareil.
Informations de commande
No. de
pièce
Masque
60513 Masque narinaire Mirage Swift II - EUR
60514 Masque narinaire Mirage Swift II - Australie/Nouvelle-Zélande
60515 Masque narinaire Mirage Swift II - Asie/Pacifique
60516 Masque narinaire Mirage Swift II - Royaume-Uni
60518 Masque narinaire Mirage Swift II - FRA
Pièces de rechange
60541 Coussin, Petit (par 1)
60542 Coussin, Médium (par 1)
60543 Coussin, Large (par 1)
60523 Boucle du harnais (par 4)
60524 Bague d'étanchéité (par 10)
60525 Bouchon (par 1)
60526 Harnais (par 1)
60536 Entourage avec barrette et bouchon (par 1)
60528 Tuyau à air court (par 1)
60529 Tuyau à air court (par 10)
60530 Bague de fixation (par 3)
60545 Etui du masque narinaire Mirage Swift II (par 1)
60537 Entourage avec coussin (sans harnais), Petit
Article
Français
29
Page 34

No. de
pièce
60538 Entourage avec coussin (sans harnais), Médium
60539 Entourage avec coussin (sans harnais), Large
60540 Barrette (par 1)
Accessoires
61121 Port de pression distal (par 1)
61124 Port de pression distal (par 10)
Article
Garantie limitée
ResMed garantit votre masque ResMed, y compris ses composants –
entourage, coussin, harnais, circuit respiratoire et autres accessoires
(« Produit ») – contre tout défaut de matériaux et de main-d'œuvre pour une
période de quatre-vingt-dix jours (90) à compter de la date d'achat par le client
d'origine.
Pour plus de détails, veuillez vous référer à la garantie.
Remarque : les traductions sont basées sur la version anglaise de ce guide.
Néanmoins, des variations mineures peuvent exister en fonction des
procédures de désinfection/stérilisation en vigueur dans chaque pays.
ResMed a évalué ces variations et toutes les procédures incluses ont été
validées.
30
Page 35

Mirage Swift™ II
CUSCINETTI NASALI
Grazie per avere scelto i cuscinetti nasali Mirage Swift II di ResMed.
Essi sono leggeri, flessibili e silenziosi, e sono realizzati per ridurre al minimo il
contatto con il vostro viso, assicurando una terapia più confortevole.
Questa guida per l’utente fornisce tutte le informazioni necessarie per fare un
uso corretto dei cuscinetti.
Indicazioni per l’uso
I cuscinetti nasali Mirage Swift II sono di tipo multipaziente e sono destinati a
pazienti adulti (>30 kg) cui sia stata prescritta la terapia a pressione positiva
continua alle vie aeree o bilevel da somministrarsi a domicilio, negli ospedali o
nelle cliniche.
Nota: I cuscinetti Mirage Swift II non sono compatibili con gli apparecchi
™
AutoSet CS
Informazioni mediche
Nota: I cuscinetti Mirage Swift II non contengono lattice, PVC o materiali
contenenti DEHP. In caso di reazioni allergiche di QUALSIASI tipo a un
componente del sistema, interrompere l’uso e consultare il proprio specialista
nella cura dei disturbi del sonno.
. Avvertenze e precauzioni
• I cuscinetti nasali vanno utilizzati solo con i generatori di flusso (CPAP o
bilevel) consigliati dal proprio medico o specialista nella cura dei disturbi
respiratori. Essi vanno utilizzati solo quando il generatore di flusso è acceso
e funziona correttamente. I fori per l’esalazione non devono mai essere
ostruiti.
2 e VPAP™ Adapt SV di ResMed.
Italiano
31
Page 36

Spiegazione dell’avvertenza: I generatori di flusso sono concepiti per
essere utilizzati con speciali interfacce dotate di connettori con fori per
l’esalazione (tali fori si trovano sul telaio – vedere la sezione A del foglio
delle illustrazioni) o dispositivi separati per l’esalazione tali da permettere la
fuoriuscita continua dell’aria dall’interfaccia. Quando il generatore di flusso
è acceso e funziona correttamente, il flusso di nuova aria da esso generato
permette di eliminare l’aria espirata attraverso la porta per l’esalazione ad
esso collegata. Tuttavia, quando il generatore di flusso non è in funzione (ad
esempio a causa di un’interruzione della corrente), il flusso di nuova aria
attraverso il sistema diventa insufficiente e può verificarsi la reinalazione
dell’aria precedentemente espirata. In questa evenienza occorre rimuovere
immediatamente i cuscinetti Mirage Swift II.
• Alle pressioni più basse, il flusso di esalazione risulta inferiore (vedere la
sezione “Specifiche tecniche” per i dettagli della curva di pressione e
flusso). Se durante l’espirazione la pressione del sistema risulta troppo
bassa, il flusso di esalazione potrebbe essere insufficiente a espellere l’aria
espirata dal tubo di somministrazione dell’aria prima dell’inspirazione
successiva.
• In caso di frequenti irritazioni nasali, interrompere l’uso dei cuscinetti Mirage
Swift II e consultare il medico.
• I cuscinetti Mirage Swift II vanno puliti e disinfettati/sterilizzati se si intende
utilizzarli con un altro paziente. Per maggiori dettagli, vedere la sezione
“Pulizia del sistema Mirage Swift II tra un paziente e l’altro”.
• Se si utilizza il generatore di flusso insieme ad ossigeno, è necessario
spegnere il flusso d’ossigeno quando il generatore di flusso non è in
funzione.
Spiegazione dell’avvertenza: Se si lascia acceso l’ossigeno a generatore
di flusso spento, la quantità d’ossigeno erogata nel tubo del ventilatore può
accumularsi all’interno del generatore di flusso. L’ossigeno accumulato
all’interno dell’involucro del generatore di flusso comporta un rischio di
incendio. Questa avvertenza vale per la maggior parte dei generatori di
flusso.
• Si prega di non fumare quando l’ossigeno è in uso.
Nota: Ad un flusso fisso di ossigeno supplementare, la concentrazione
dell’ossigeno inspirato varia a seconda delle impostazioni di pressione,
dell’andamento della respirazione del paziente, dell’interfaccia scelta e del
coefficiente di perdite.
Parti del sistema Mirage Swift II
Vedere la sezione A del foglio delle illustrazioni.
32
Page 37

Applicazione del sistema Mirage Swift II
Nota: Consultare il manuale del generatore di flusso per informazioni
dettagliate sulle sue impostazioni e il suo uso.
Vedere la sezione B del foglio delle illustrazioni.
1 Sistemarsi il copricapo sulla testa e posizionare i cuscinetti nasali sotto il
naso. Assicurarsi che la cinghia superiore passi sopra la testa. Assicurarsi
che il logo ResMed sul rivestimento dei cuscinetti sia rivolto verso
l’esterno, e non verso il viso (B-1).
2 Inserire i cuscinetti nasali nelle narici. Stringere con delicatezza le cinghie del
copricapo; prima quelle posteriori (B-2a) e quindi quelle superiori (B-2b).
Alternare la regolazione di ciascun gruppo di cinghie in modo che i pannelli
del copricapo poggino tra l’occhio e l’orecchio. Il rivestimento dei cuscinetti
deve poggiare in maniera confortevole sopra il labbro superiore.
3 Regolare l’angolazione dei cuscinetti nasali. Per farlo, ruotare il blocco del
rivestimento dei cuscinetti in avanti o all’indietro in modo che i cuscinetti
poggino in maniera confortevole nelle narici (B-3).
4 Dispositivo di fissaggio del tubo (facoltativo).
Usare il dispositivo di bloccaggio del tubo se si preferisce assicurare il blocco
del tubo corto al copricapo nella posizione elevata (B-4).
5 Il blocco del tubo corto può essere collegato in quattro modi differenti (B-5).
Nota: Il blocco del tubo corto e il coperchio possono essere collegati
indifferentemente alle due estremità del rivestimento dei cuscinetti. Vedere
“Smontaggio per la pulizia” e “Riassemblaggio del sistema Mirage Swift II”
per istruzioni su come rimuovere e attaccare il blocco del tubo corto e il
coperchio.
6 Collegare un’estremità del tubo principale dell’aria al generatore di flusso e
l’altra estremità al giunto rotante. Accendere il generatore di flusso.
Note:
• Impostazione di maschera del generatore di flusso: Se disponibile,
selezionare l’opzione di maschera “Swift”, altrimenti selezionare
“Mirage” quando si utilizzano i cuscinetti nasali Mirage Swift II con
generatori di flusso ResMed che consentono di selezionare il tipo di
maschera in uso.
• Funzione SmartStop: La funzione SmartStop può non funzionare in
modo efficace quando si usano i cuscinetti Mirage Swift II insieme ad
alcuni generatori di flusso ResMed dotati di questa funzione. Ciò vale
particolarmente quando si utilizza un rivestimento di misura piccola.
Italiano
33
Page 38

Se si avvertono perdite d’aria, modificare l’inclinazione dei cuscinetti nasali
in modo da migliorare la tenuta. Potrebbe essere necessario a questo scopo
regolare le cinghie del copricapo. Non stringere eccessivamente le cinghie
del copricapo.
Se non si è in grado di porre rimedio alle perdite, provare un rivestimento di
diversa misura.
7 Intervenire sui seguenti componenti fino ad aver ottenuto una tenuta
confortevole e sicura:
• cinghie del copricapo;
• angolazione del blocco del rivestimento dei cuscinetti;
• posizione del blocco del tubo corto.
Rimozione dei cuscinetti Mirage Swift II
Per rimuovere i cuscinetti Mirage Swift II, allontanare il blocco del rivestimento
dal naso e sfilarsi il copricapo dalla testa. Non è necessario allentare le cinghie
del copricapo.
Smontaggio per la pulizia
Vedere la sezione C del foglio delle illustrazioni.
Prima di smontare i cuscinetti Mirage Swift II, staccare il tubo del generatore
di flusso. Per farlo, afferrare il giunto rotante e staccarlo dal tubo del generatore
di flusso.
PRECAUZIONE
Non tirare il tubo corto o il tubo del generatore di flusso in quanto
potrebbero danneggiarsi.
• Per smontare il sistema Mirage Swift II prima della pulizia quotidiana,
seguire i passaggi da 1 a 3.
• Per smontare il sistema Mirage Swift II prima della pulizia settimanale,
seguire i passaggi da 1 a 5.
1 Staccare il blocco del tubo corto. Per farlo, afferrare il gomito e staccarlo
dalla guarnizione ad anello (C-1).
Nota: Il blocco del tubo corto non può essere smontato.
2 Rimuovere il coperchio separandolo dalla guarnizione ad anello (C-2).
3 Staccare l’anello del copricapo dal blocco del rivestimento dei cuscinetti. Per
farlo basta semplicemente tirare gli anelli del copricapo in modo da separarli
dall’estremità del telaio (C-3).
4 Smontare il blocco del rivestimento dei cuscinetti. Per farlo, liberare il
fermaglio (C-4a) e staccare il rivestimento dal telaio (C-4b).
34
Page 39

Nota: Quando si fa scorre il fermaglio, afferrarlo a una estremità e non nel
mezzo.
5 Non occorre staccare le guarnizioni ad anello dal copricapo (C-5).
Pulizia del sistema Mirage Swift II a domicilio
Note:
• Lavarsi le mani prima di pulire la maschera.
• Lavare il copricapo prima di utilizzarlo per la prima volta, in quanto esso
potrebbe scolorire. È importante che il copricapo sia sempre lavato a mano.
• Il copricapo può essere lavato senza essere smontato.
Operazioni quotidiane
Lavare il blocco del rivestimento dei cuscinetti, il blocco del tubo corto e il
coperchio con acqua calda (circa 30°C) e sapone per un minuto. Utilizzare
sapone puro. Sciacquare con cura i componenti in acqua potabile e lasciarli
asciugare all’aria e al riparo dalla luce solare o da fonti di calore.
Nota: Assicurare che i fori per l’esalazione non siano ostruiti. Usare una
spazzola a setole morbide per la pulizia del foro per l’esalazione.
Operazioni settimanali
Lavare a mano i componenti del copricapo, il dispositivo di fissaggio del tubo e
gli altri componenti del sistema in acqua calda (circa 30°C) e sapone.
Utilizzare sapone puro. Sciacquare accuratamente i componenti e lasciarli
asciugare all’aria e al riparo dalla luce solare diretta.
. ATTENZIONE
• Per la pulizia delle parti del sistema o del tubo dell’aria è sconsigliato
l’uso di soluzioni a base di candeggina, cloro, alcool o aromi, oli
profumati, o prodotti idratanti o antibatterici. Tali soluzioni possono
causare danni al prodotto e ridurne la durata.
• Non esporre i componenti del sistema o della tubazione alla luce o a
fonti di calore in quanto potrebbero deteriorarsi.
• In caso di deterioramento visibile (ad esempio incrinature, cavillature,
strappi, ecc.) di un componente, esso va gettato e sostituito.
Italiano
35
Page 40

Pulizia del sistema Mirage Swift II tra un paziente
e l’altro
Tutti i componenti del sistema a parte il blocco del tubo corto possono essere
disinfettati/sterilizzati secondo le procedure omologate. Per maggiori dettagli si
invita il medico a consultare la Guida alla disinfezione e alla sterilizzazione delle
maschere.
Il blocco del tubo corto non va riutilizzato. Esso deve essere sostituito fra un
paziente e l’altro.
Per pulire il copricapo tra un paziente e l’altro, usare il metodo descritto nella
sezione precedente “Pulizia del sistema Mirage Swift II a domicilio”.
Riassemblaggio del sistema Mirage Swift II
PRECAUZIONE
I componenti del blocco del rivestimento dei cuscinetti del sistema Mirage
Swift II (rivestimento, telaio e fermaglio – vedere la sezione A del foglio
delle illustrazioni) non sono compatibili con i componenti del sistema
Mirage Swift. Combinare i componenti dei due sistemi può causare la
reinalazione dell’aria già espirata.
Vedere la sezione D del foglio delle illustrazioni.
1 Assicurarsi che entrambe le guarnizioni ad anello siano sempre applicate
correttamente agli anelli del copricapo (D-1).
2 Assemblare il blocco del rivestimento dei cuscinetti. Per farlo, procedere
come segue:
a Avvolgere il rivestimento intorno al telaio. Inserire gli orli del
rivestimento nella scanalatura del telaio (D-2a).
b Afferrare il fermaglio a una estremità e inserirlo sul telaio in modo da
impedire al rivestimento di sfilarsi (D-2b).
Nota: Se il fermaglio non scorre con facilità, verificare che l’orlo del
rivestimento dei cuscinetti sia inserito a filo nella scanalatura del telaio.
3 Fissare l’anello del copricapo al blocco del rivestimento dei cuscinetti. Per
farlo, spingere con fermezza gli anelli del copricapo sulle estremità del telaio
(D-3). Durante questa operazione, assicurarsi che
• i pannelli del copricapo siano rivolti verso l’esterno;
• i cuscinetti nasali puntino verso l’alto;
• il logo ResMed sia rivolto verso l’esterno – in direzione opposta al
copricapo.
36
Page 41

Assicurarsi che il blocco del rivestimento dei cuscinetti sia fissato
correttamente al copricapo prima di procedere con il passaggio successivo.
4 Attaccare il tubo corto al lato che si preferisce del rivestimento dei
cuscinetti. Per farlo, inserire il gomito nella guarnizione ad anello fino ad aver
udito il click di posizionamento (D-4).
5 Inserire il coperchio nell’altra guarnizione ad anello fino ad aver udito il click
di posizionamento (D-5).
6 Una volta assemblato, il sistema dovrebbe assumere questo aspetto (D-6).
Assicurarsi che il logo ResMed sul rivestimento dei cuscinetti sia rivolto
verso l’esterno – in direzione opposta al copricapo.
Altre informazioni
Riassemblaggio del copricapo
Vedere la sezione E del foglio delle illustrazioni.
Quando è smontato, il copricapo consiste di quattro parti:
A: Cinghia sinistra; B: Cinghia destra; C: Fibbia posteriore; D: Fibbia superiore.
1 Disporre le quattro parti del copricapo come mostrato in (E-1). I pannelli
devono essere rivolti verso l’alto.
Nota: Prima di infilare le cinghie, assicurarsi che le fibbie siano posizionate
come mostrato in (E-2) e (E-3).
2 Infilare le cinghie posteriori nella fibbia posteriore (parte C) come mostrato
in (E-2a) e (E-2b).
3 Infilare le cinghie superiori nella fibbia superiore (parte D) come mostrato in
(E-3a) e (E-3b).
Italiano
Smaltimento
Il sistema Mirage Swift II non contiene sostanze pericolose è può essere
smaltito insieme ai normali rifiuti domestici.
37
Page 42

Specifiche tecniche
Curva di pressione–flusso
60
50
40
30
20
10
Flusso d’esalazione (l/min)
0
4 6 8 10 12 14 16 18 20
Pressione alla maschera (cm H2O)
Pressione
(cm H
O)
2
Flusso
(± 6,0 l/min)
420
829
12 37
16 43
20 49
Nota: A causa di variazioni di fabbricazione, il flusso di esalazione può risultare
diverso dai valori elencati nella tabella.
Informazioni sullo spazio morto
Lo spazio morto è il volume vuoto nel blocco del rivestimento dei cuscinetti e
nel blocco del tubo corto fino al giunto rotante.
Lo spazio morto del sistema Mirage Swift II per tutte le misure dei cuscinetti è
di 91 ml.
Standard
Designazione CE in osservanza della direttiva comunitaria 93/42/CEE, classe
IIa.
EN ISO 14971, ISO 5356-1, ISO 10993-1 e EN ISO 17510-2.
Pressione terapeutica
da 4 a 20 cm H2O
Resistenza
Caduta di pressione misurata (media per le tre misure dei rivestimenti)
a 50 l/min: 0,4 cm H2O
a 100 l/min: 1,6 cm H
O
2
38
Page 43

Simboli
Sistema e confezione
Attenzione, consultare la documentazione allegata
Numero partita
LOT
Numero parte
REF
Guida per l’utente
Indica un’avvertenza o precauzione e mette in guardia dal pericolo di
lesioni o illustra le misure da prendere per garantire il buon
funzionamento e la sicurezza dell’apparecchio.
Informazioni per le ordinazioni
N° parte Parte
Sistema
60513 Cuscinetti nasali Mirage Swift II - EUR
60514 Cuscinetti nasali Mirage Swift II - ANZ
60515 Cuscinetti nasali Mirage Swift II - AP
60516 Cuscinetti nasali Mirage Swift II - UK
60518 Cuscinetti nasali Mirage Swift II - FRA
Parti di ricambio
60541 Rivestimento cuscinetti, Small (1 cfz.)
60542 Rivestimento cuscinetti, Medium (1 cfz.)
60543 Rivestimento cuscinetti, Large (1 cfz.)
60523 Fibbia copricapo (4 cfz.)
60524 Guarnizione ad anello (10 cfz.)
60525 Coperchio (1 cfz.)
60526 Copricapo (1 cfz.)
60536 Telaio con fermaglio e coperchio (1 cfz.)
60528 Blocco del tubo corto (1 cfz.)
60529 Blocco del tubo corto (10 cfz.)
60530 Dispositivo di bloccaggio del tubo (3 cfz.)
60545 Borsa per Mirage Swift II (1 cfz.)
60537 Telaio con rivestimento (escluso copricapo), Small
Italiano
39
Page 44

N° parte Parte
60538 Telaio con rivestimento (escluso copricapo), Medium
60539 Telaio con rivestimento (escluso copricapo), Large
60540 Fermaglio (1 cfz.)
Accessori
61121 Porta di pressione distale (1 cfz.)
61124 Porta di pressione distale (10 cfz.)
Garanzia Limitata
ResMed garantisce questo sistema, compresi i suoi componenti – telaio,
rivestimento dei cuscinetti, copricapo, tubazione e altri accessori (di seguito “il
prodotto”) – da difetti dei materiali o di fabbricazione per un periodo di novanta
(90) giorni a partire dalla data di acquisto da parte del cliente originale.
Per maggiori dettagli vedere la Garanzia.
Nota: Le traduzioni sono basate sulla versione inglese di questa guida.
Tuttavia, potrebbero esservi piccole discrepanze dovute alle procedure di
disinfezione/sterilizzazione in uso in alcuni paesi. ResMed ha esaminato
queste differenze e tutte le procedure incluse sono state omologate.
40
Page 45

Sistema Mirage Swift™ II
SISTEMA DE ALMOHADILLAS NASALES
Gracias por escoger el sistema de almohadillas nasales Mirage Swift II de
ResMed.
Este sistema de almohadillas nasales es ligero, flexible y silencioso. Está
diseñado para minimizar el contacto con la cara y, en consecuencia, garantiza
su comodidad durante el tratamiento.
La presente guía del usuario proporciona la información necesaria para la
correcta utilización del sistema.
Uso indicado
El sistema Mirage Swift II está diseñado para ser usado por parte de múltiples
pacientes adultos (>30 kg) a los que se ha prescrito un tratamiento binivel o de
presión positiva continua en las vías respiratorias en hospitales, clínicas o en
su propio domicilio.
Nota: El sistema Mirage Swift II no es compatible con los dispositivos de
ResMed AutoSet CS
Información médica
Nota: El sistema Mirage Swift II no contiene látex, PVC ni DEHP. Si presenta
CUALQUIER TIPO de reacción a alguna parte del sistema, interrumpa su uso
y consulte a su terapeuta del sueño.
. Advertencias y precauciones
• Este sistema sólo se debe usar con generadores de aire (binivel o CPAP)
recomendados por su médico o terapeuta respiratorio. Sólo se debe utilizar
si el generador de aire está encendido y su funcionamiento es correcto. Los
orificios de ventilación nunca deben estar obstruidos.
™
2 y VPAP™ Adapt SV.
Español
41
Page 46

Explicación de la advertencia: Los generadores de aire están diseñados
para utilizarse con interfaces especiales que dispongan de conectores con
orificios de ventilación (situados en el armazón, consulte la sección A de la
hoja de figuras) o dispositivos para la exhalación independientes que
permitan la salida de un flujo de aire continuo de la interfaz. Mientras el
generador de aire esté encendido y su funcionamiento sea correcto, el aire
fresco del generador empujará el aire espirado a través del puerto de
exhalación adjunto. Sin embargo, cuando el generador de aire no esté en
funcionamiento (por ejemplo, a causa de un corte en el suministro
eléctrico), el sistema no proporcionará suficiente aire fresco y es posible
que se vuelva a respirar el aire espirado. Ante esta situación, retire el
sistema Mirage Swift II de inmediato.
• El flujo de salida es menor a presiones menores del sistema (consulte la
sección “Especificaciones técnicas” para obtener más detalles acerca de la
curva de presión-flujo). Si la presión del sistema durante la espiración es
demasiado baja, puede que no haya un flujo de salida suficiente como para
expeler totalmente el aire espirado del tubo de suministro de aire antes del
comienzo de la siguiente inspiración.
• Si experimenta irritación nasal con frecuencia, suspenda el uso del sistema
Mirage Swift II y consulte a su médico.
• Es necesario limpiar y desinfectar/esterilizar el sistema Mirage Swift II si lo
utilizan diversos pacientes. Consulte la sección “Limpieza del sistema
Mirage Swift II para su utilización por parte de distintos pacientes” para
obtener más detalles.
• Si se utiliza oxígeno con el generador de aire, es necesario apagar el flujo de
oxígeno cuando el generador de aire no esté en funcionamiento.
Explicación de la advertencia: Cuando el generador de aire no está en
funcionamiento y el flujo de oxígeno se deja encendido, el oxígeno
suministrado al tubo del ventilador se puede acumular dentro del generador
de aire. Este oxígeno acumulado en el interior constituye un riesgo de
incendio. Esta advertencia se aplica a la mayoría de tipos de generadores de
aire.
• Evite fumar mientras se está usando oxígeno.
Nota: A un caudal fijo de oxígeno suplementario, la concentración de
oxígeno inhalado presentará diferencias en función de las configuraciones
de presión programadas, el ritmo respiratorio del paciente, la interfaz
elegida y el volumen de fuga.
Piezas del sistema Mirage Swift II
Consulte la sección A de la hoja de figuras.
42
Page 47

Colocación del sistema Mirage Swift II
Nota: Consulte el manual de su generador de aire para obtener más detalles
acerca de las configuraciones y la información de funcionamiento.
Consulte la sección B de la hoja de figuras.
1 Coloque el arnés en la cabeza y las almohadillas nasales debajo de la nariz.
Verifique que la correa superior pase por la parte superior de la cabeza.
Asegúrese de que el logotipo de ResMed del manguito de la
almohadilla se dirija hacia afuera, en sentido contrario a su cara (B-1).
2 Inserte las almohadillas nasales en las narinas. Ajuste suavemente las
correas del arnés; primero las posteriores (B-2a) y luego las delanteras
(B-2b). Alterne el ajuste de las correas de manera que los paneles del arnés
se apoyen entre el ojo y la oreja. El manguito de la almohadilla debe quedar
apoyado de forma cómoda entre el labio superior y la nariz.
3 Ajuste el ángulo de las almohadillas nasales. Para ello, gire el conjunto del
manguito de la almohadilla hacia adelante o hacia atrás de modo que las
almohadillas nasales se apoyen cómodamente dentro de las narinas (B-3).
4 Retenedor del tubo (opcional).
Use el retenedor del tubo en caso de que prefiera tener el conjunto del tubo
corto adosado al arnés en la posición superior (B-4).
5 El conjunto del tubo corto se puede acoplar de cuatro maneras distintas
(B-5).
Nota: El conjunto del tubo corto y la tapa se pueden conectar a ambos lados
del manguito de la almohadilla. Consulte “Desmontaje para efectuar la
limpieza” y “Procedimiento para volver a montar el sistema Mirage Swift II”
para obtener instrucciones sobre cómo retirar y acoplar el conjunto del tubo
corto y la tapa.
6 Conecte un extremo del tubo de aire principal al generador de aire y el otro
extremo a la pieza giratoria. Ponga en marcha el generador de aire.
Notas:
• Configuración de la mascarilla del generador de aire: Si está
disponible, seleccione la opción “Swift”; de lo contrario, seleccione
“Mirage” como opción de la mascarilla cuando utilice el sistema
Mirage Swift II con generadores de aire de ResMed que dispongan de
opciones de configuración de la mascarilla.
• Función SmartStop: El funcionamiento de esta opción puede presentar
anomalías cuando el sistema Mirage Swift II se utilice con algunos
generadores de aire de ResMed que dispongan de la función SmartStop.
Se trata de una circunstancia especialmente pertinente cuando se está
utilizando el manguito de la almohadilla de tamaño pequeño.
Español
43
Page 48

Si percibe fugas de aire, vuelva a ajustar el ángulo de las almohadillas
nasales hasta lograr un mejor ajuste a prueba de fugas. Es probable que
tenga que volver a ajustar las correas del arnés. Dichas correas no deben
quedar demasiado apretadas.
Si no puede solucionar las fugas, entonces tal vez necesite otro tamaño de
manguito.
7 Tómese el tiempo necesario para ajustar los siguientes elementos para
lograr un ajuste seguro y cómodo:
• las correas del arnés
• el ángulo del conjunto del manguito de la almohadilla
• la posición del conjunto del tubo corto.
Procedimiento para retirar el sistema
Mirage Swift II
Para retirarlo, tire del conjunto del manguito de la almohadilla para separarlo de
la nariz y saque el arnés. No es necesario aflojar las correas del arnés.
Desmontaje para efectuar la limpieza
Consulte la sección C de la hoja de figuras.
Antes de desmontar el sistema Mirage Swift II, desconecte el tubo del
generador de aire. Para ello, sujete la pieza giratoria y sepárela del tubo del
generador de aire.
PRECAUCIÓN
No tire del tubo corto ni del tubo del generador de aire, ya que podrían
resultar dañados.
• Para desmontar el sistema Mirage Swift II y efectuar la limpieza diaria, siga
los pasos 1–3.
• Para desmontar el sistema Mirage Swift II y efectuar la limpieza semanal,
siga los pasos 1–5.
1 Separe el conjunto del tubo corto. Para ello, sujete el codo y sepárelo de la
junta (C-1).
Nota: El conjunto del tubo corto no se puede desmontar.
2 Retire la tapa separándola de la junta (C-2).
3 Separe el anillo del arnés del conjunto del manguito de la almohadilla. Basta
con tirar de los anillos del arnés desde los extremos del armazón (C-3).
4 Desmonte el conjunto del manguito de la almohadilla. Para ello, deslice el
broche (C-4a) y luego separe el manguito del armazón (C-4b).
44
Page 49

Nota: Cuando deslice el broche, sujételo por un extremo, nunca por el
medio.
5 No es necesario retirar las juntas del arnés (C-5).
Limpieza del sistema Mirage Swift II en el hogar
Notas:
• Lávese las manos antes de limpiar la mascarilla.
• Lave el arnés antes de usarlo por primera vez, ya que puede desteñir.
Es importante lavar siempre a mano el arnés.
• Puede lavar el arnés sin tener que desmontarlo.
Diaria
Lave a mano el conjunto del manguito de la almohadilla, el conjunto del tubo
corto y la tapa en agua templada (aprox. 30° C) con jabón durante un minuto.
Use jabón puro. Enjuague bien todos los componentes con agua potable y
déjelos secar al aire alejados de la luz solar directa y de fuentes de calor.
Nota: Verifique que los orificios de ventilación no estén obstruidos. Utilice un
cepillo de cerdas suaves para limpiarlos.
Semanal
Lave a mano el arnés, el retenedor del tubo y todos los componentes en agua
templada (aprox. 30° C) con jabón. Use jabón puro. Enjuague bien todos los
componentes y déjelos secar al aire alejados de la luz solar directa.
. PRECAUCIÓN
• No utilice soluciones que contengan lejía, cloro, alcohol, sustancias
aromáticas, hidratantes, agentes antibacterianos ni aceites
perfumados para limpiar las piezas del sistema ni los tubos de aire.
Estas soluciones pueden causar daños o reducir la vida útil del
producto.
• La exposición de cualquier pieza o tubo del sistema a la luz solar
directa o a fuentes de calor puede provocar su deterioro.
• Si se advierte algún signo de deterioro visible (como grietas, rajaduras,
roturas, etc.) en uno de los componentes, dicho componente debería
ser desechado y sustituido por uno nuevo.
45
Español
Page 50

Limpieza del sistema Mirage Swift II para su
utilización por parte de distintos pacientes
Todos los componentes del sistema aparte del conjunto del tubo pequeño se
pueden desinfectar/esterilizar mediante procedimientos validados. Para
obtener más detalles, los médicos deben consultar la Guía de desinfección/
esterilización de las mascarillas.
El conjunto del tubo corto no se debe reutilizar. Es necesario sustituirlo cada
vez que se cambie de paciente.
Para limpiar el arnés para que lo utilice otro paciente, sírvase del método que
se describe en la sección anterior “Limpieza del sistema Mirage Swift II en el
hogar”.
Procedimiento para volver a montar el sistema
Mirage Swift II
PRECAUCIÓN
Los componentes del conjunto del manguito de la almohadilla del
sistema Mirage Swift II (manguito, armazón y broche, consulte la sección
A de la hoja de figuras) no son compatibles con los componentes del
sistema Mirage Swift. La combinación de los componentes de estos dos
sistemas puede suponer la reinhalación del aire espirado.
Consulte la sección D de la hoja de figuras.
1 Verifique que ambas juntas estén correctamente colocadas en los anillos
del arnés (D-1).
2 Monte el conjunto del manguito de la almohadilla. Para ello:
a Envuelva el manguito alrededor del armazón. A continuación, inserte los
bordes del manguito en la ranura del armazón (D-2a).
b Sujete el broche por un extremo y luego deslícelo sobre el armazón para
fijar el manguito en su lugar (D-2b).
Nota: Si el broche no se desliza con facilidad, verifique que el borde del
manguito esté alineado con la ranura del armazón.
3 Fije el anillo del arnés al conjunto del manguito de la almohadilla. Para ello,
empuje con firmeza los anillos sobre los extremos del armazón (D-3).
Al acoplar el conjunto del manguito de la almohadilla, verifique que:
• los paneles del arnés queden hacia fuera
• las almohadillas nasales queden mirando hacia arriba
• el logotipo de ResMed quede en sentido contrario al arnés.
46
Page 51

Antes de proceder al siguiente paso, verifique que el conjunto del manguito
de la almohadilla esté correctamente acoplado al arnés.
4 Conecte el conjunto del tubo corto en el lado del conjunto del manguito que
usted prefiera. Para ello, empuje el codo sobre la junta hasta que se ajuste
en su lugar (D-4).
5 Inserte la tapa en la otra junta hasta que se ajuste en su lugar (D-5).
6 El sistema montado debería presentar este aspecto (D-6). Verifique que el
logotipo de ResMed del manguito de la almohada quede en sentido
contrario al arnés.
Información adicional
Procedimiento para volver a montar del arnés
Consulte la sección E de la hoja de figuras.
Si se desmonta, el arnés tiene cuatro partes:
A: Correa izquierda; B: Correa derecha; C: Presilla posterior; D: Presilla superior.
1 Despliegue las cuatro partes del arnés como se muestra en (E-1).
Los paneles deben estar hacia arriba.
Nota: Antes de enhebrar las correas, verifique que las presillas estén
posicionadas tal como se muestra en (E-2) y (E-3).
2 Enhebre las correas posteriores en la presilla posterior (parte C) tal como se
muestra en (E-2a) y (E-2b).
3 Enhebre las correas superiores en la presilla superior (parte D) tal como se
muestra en (E-3a) y (E-3b).
Eliminación
El sistema de almohadillas nasales Mirage Swift II no contiene sustancias
peligrosas y se puede desechar junto con los residuos domésticos normales.
Español
47
Page 52

Especificaciones técnicas
Curva de presión/flujo
60
50
40
30
20
10
0
4 6 8 10 12 14 16 18 20
Caudal del flujo de ventilación (l/min)
Presión de la mascarilla (cm H2O)
Presión
(cm H
O)
2
Flujo
(± 6,0 l/min)
420
829
12 37
16 43
20 49
Nota: Como consecuencia de variaciones en la fabricación, el flujo de
ventilación puede presentar diferencias respecto a los valores que se recogen
en la tabla.
Información sobre el espacio muerto
El espacio muerto es el volumen vacío dentro del manguito de la almohadilla y
dentro del conjunto del tubo corto hasta la altura de la pieza giratoria.
El espacio muerto del sistema Mirage Swift II es de 91 ml para todos los
tamaños de manguitos.
Normas
Designación CE conforme a la directiva CE 93/42/CEE, clase IIa.
EN ISO 14971, ISO 5356-1, ISO 10993-1 y EN ISO 17510-2.
Presión del tratamiento
De 4 a 20 cm H2O
Resistencia
Caída de presión medida (media para tres tamaños del manguito de la
almohadilla)
a 50 l/min: 0,4 cm H2O
a 100 l/min: 1,6 cm H2O
48
Page 53

Símbolos
Sistema y embalaje
Precaución, consultar la documentación adjunta
Número de lote
LOT
Número de pieza
REF
Guía del usuario
Indica una advertencia o precaución y le alerta de posibles lesiones o
explica medidas especiales para una utilización segura y eficaz del
dispositivo.
Información de pedido
Núm. de
pieza
Sistema
60513 Sistema de almohadillas nasales Mirage Swift II - EUR
60514 Sistema de almohadillas nasales Mirage Swift II - ANZ
60515 Sistema de almohadillas nasales Mirage Swift II - AP
60516 Sistema de almohadillas nasales Mirage Swift II - UK
60518 Sistema de almohadillas nasales Mirage Swift II - FRA
Repuestos
60541 Manguito de la almohadilla pequeño (paq. 1)
60542 Manguito de la almohadilla mediano (paq. 1)
60543 Manguito de la almohadilla grande (paq. 1)
60523 Presilla del arnés (paq. 4)
60524 Junta (paq. 10)
60525 Tapa (paq. 1)
60526 Arnés (paq. 1)
60536 Armazón con broche y tapa (paq. 1)
60528 Conjunto del tubo corto (paq. 1)
60529 Conjunto del tubo corto (paq. 10)
60530 Retenedor del tubo (paq. 3)
60545 Bolsa Mirage Swift II (paq. 1)
Artículo
Español
49
Page 54

Núm. de
pieza
60537 Sistema de armazón con manguito de la almohadilla (excluido el arnés)
60538 Sistema de armazón con manguito de la almohadilla (excluido el arnés)
60539 Sistema de armazón con manguito de la almohadilla (excluido el arnés)
60540 Broche (paq. 1)
Accesorios
61121 Puerto de presión distal (paq. 1)
61124 Puerto de presión distal (paq. de 10)
Artículo
pequeño
mediano
grande
Garantía limitada
ResMed garantiza que el sistema ResMed, incluidos el armazón, el manguito
de la almohadilla, el arnés, el tubo y los demás accesorios (el “producto”), no
presentarán defectos de material ni de mano de obra durante un período de
noventa (90) días a partir de la fecha de compra por parte del consumidor inicial.
Para más detalles, consulte la Garantía.
Nota: Las traducciones se basan en la versión en inglés de esta guía. Sin
embargo, pueden existir pequeñas variaciones a causa de los procedimientos
de desinfección y esterilización que se aplican en algunos países. ResMed ha
analizado estos cambios y todos los procedimientos que se incluyen en el presente documento se han validado.
50
Page 55

Mirage Swift™ II
SISTEMA DE ALMOFADAS NASAIS
Obrigado por ter escolhido o sistema de almofadas nasais Mirage Swift II da
ResMed.
O sistema de almofadas nasais é leve, flexível e silencioso. Este sistema foi
desenhado para minimizar o contacto com a sua face, proporcionando um
maior conforto durante a terapia.
Este guia do utilizador proporciona-lhe as informações necessárias para a
utilização correcta do sistema.
Função
A Mirage Swift II destina-se a ser usada por pacientes adultos múltiplos
(>30 kg) aos quais foi prescrito o tratamento por pressão contínua e positiva
das vias respiratórias ou por sistemas de dois níveis no hospital, na clínica ou
em casa.
™
Nota: A Mirage Swift II não é compatível com os dispositivos AutoSet CS
e VPAP™ Adapt SV da ResMed.
Informação médica
Nota: A Mirage Swift II não contém materiais em látex, PVC ou DEHP. Se
sofrer qualquer reacção a qualquer uma das partes do sistema, deixe de usar
e consulte o seu médico de doenças do sono.
. Avisos e Precauções
• Este sistema só deverá ser utilizado com geradores de fluxo de CPAP ou de
dois níveis recomendados pelo seu médico ou terapeuta de doenças
respiratórias. O sistema só deve ser usado quando o gerador de fluxo
estiver ligado e a funcionar correctamente. Os respiradouros jamais deverão
ser bloqueados.
2
Português
51
Page 56

Explicação do aviso: Os geradores de fluxo são destinados a serem
utilizados com máscaras especiais com conectores que possuem orifícios
de ventilação (localizados na armação – ver secção A no folheto de
ilustrações) ou portas de exalação independentes de modo a
proporcionarem a saída de um fluxo contínuo de ar da máscara. Quando o
gerador de fluxo estiver ligado e a funcionar correctamente, o ar fresco
proveniente do gerador de fluxo elimina o ar expirado através da porta de
ventilação da máscara. Contudo, quando o gerador de fluxo não se
encontrar em funcionamento (p. ex., devido a uma falha de energia), não
existe a possibilidade de fornecer suficiente ar fresco através do sistema,
sendo que o ar exalado poderá vir a ser respirado de novo. Se isto
acontecer, remova o sistema Mirage Swift II imediatamente.
• O fluxo através da porta de exalação é menor quando as pressões no
sistema são mais baixas (consulte a secção “Especificações técnicas” para
mais informações sobre a curva de pressão/fluxo). Se a pressão no sistema
durante a exalação for demasiadamente baixa, poderá não haver fluxo de ar
suficiente através do orifício de ventilação para expelir completamente o ar
exalado do tubo de fornecimento de ar antes do início da próxima inspiração.
• Deixe de usar o sistema Mirage Swift II se experimentar irritação nasal
frequentemente e entre em contacto com o seu médico.
• O sistema Mirage Swift II deve ser limpo e desinfectado/esterilizado caso
seja utilizado por vários pacientes. Consulte a secção “Limpeza do sistema
Mirage Swift II entre pacientes” para obter mais informações.
• Se utilizar oxigénio com o gerador de fluxo, o fluxo de oxigénio deverá ser
desligado quando o gerador de fluxo não estiver em funcionamento.
Explicação do aviso: quando o gerador de fluxo não estiver em
funcionamento e o fluxo de oxigénio é mantido, o oxigénio fornecido através
da tubagem do ventilador pode acumular-se dentro do gerador de fluxo. A
acumulação de oxigénio no gerador de fluxo irá criar um risco de incêndio.
Este aviso aplica-se à maioria dos modelos de geradores de fluxo.
• Evite fumar quando o oxigénio estiver a ser utilizado.
Nota: aquando da existência de um caudal fixo do fluxo suplementar de
oxigénio, a concentração de oxigénio inalado pode variar consoante os
parâmetros de pressão, o padrão de respiração do paciente, a selecção do
interface e o regime de fuga.
Componentes do Mirage Swift II
Ver secção A no folheto de ilustrações.
52
Page 57

Colocação do Mirage Swift II
Nota: Consulte o manual do seu gerador de fluxo para mais informações sobre
os parâmetros e informações de funcionamento.
Ver secção B no folheto de ilustrações.
1 Coloque o arnês sobre a cabeça e ajuste as almofadas nasais de modo a que
estas se encontrem debaixo do seu nariz. Certifique-se de que a correia
superior passa sobre o topo da sua cabeça. Certifique-se de que o
logótipo da ResMed na manga da almofada fica virado para fora da
face (B-1).
2 Introduza as almofadas nasais nas suas narinas. Com cuidado, aperte as
correias do arnês; primeiro as correias traseiras (B-2a) e em seguida as
correias superiores (B-2b). Ajuste as correias alternadamente de modo a
que os paineis do arnês assentem entre o olho e a orelha. A manga da
almofada deve repousar confortavelmente acima do seu lábio superior.
3 Ajuste o ângulo das almofadas nasais. Para o fazer, gire o conjunto da manga
da almofada para a frente ou para trás de modo a que as almofadas nasais
assentem confortavelmente dentro das suas narinas (B-3).
4 Retentor do tubo (opcional).
Use o retentor do tubo se preferir que o conjunto de tubo curto seja fixo ao
arnês na vertical (B-4).
5 O conjunto de tubo curto pode ser fixo numa de quatro maneiras (B-5).
Nota: O conjunto de tubo curto e a tampa podem ser conectados a um dos
lados da manga da almofada. Consultar “Desmontagem para limpeza” e
“Montagem do sistema Mirage Swift II” para obter instruções em como
colocar e retirar o conjunto de tubo curto e a tampa.
6 Conecte uma das extremidades do tubo de ar principal ao seu gerador de
fluxo e a outra extremidade à peça giratória. Ligue o gerador de fluxo.
Notas:
• Parâmetro de máscara no gerador de fluxo: Seleccione “Swift” se
esta se encontrar disponível, caso contrário, seleccione “Mirage” como
opção de máscara quando se estiver a usar o sistema Mirage Swift II com
geradores de fluxo da ResMed com opções de máscaras.
• Característica SmartStop: Esta característica pode não funcionar
eficazmente quando se estiver a usar o sistema Mirage Swift II com
certos geradores de fluxo da ResMed que possuem a característica
SmartStop. Este facto é particularmente importante quando se estiver a
usar a manga de almofada pequena.
Português
53
Page 58

Se sentir fugas de ar, volte a ajustar o ângulo das almofadas nasais para
obter uma melhor vedação. Poderá ter de voltar a ajustar as correias do
arnês. Não aperte as correias do arnês em demasia.
Se for incapaz de resolver o problema de fugas, poderá ter de usar um
tamanho de manga de almofada diferente.
7 Ajuste o seguinte com cuidado de forma a poder obter um ajuste
confortável e seguro:
• correias do arnês
• ângulo do conjunto da manga da almofada
• posição do conjunto de tubo curto.
Remoção do Mirage Swift II
Para remover o Mirage Swift II, remova o conjunto da manga da almofada,
afastando-o do seu nariz, e retire o arnês da sua cabeça. Não necessita de
desapertar as correias do arnês.
Desmontagem para limpeza
Ver a secção C no folheto de ilustrações.
Antes de desmontar o Mirage Swift II, desconecte a tubagem do gerador de
fluxo. Para o fazer, agarre a peça giratória e puxe-a para fora da tubagem do
gerador de fluxo.
PRECAUÇÃO
Não puxe pelo tubo curto ou gerador de fluxo uma vez que os pode
danificar.
• Para desmontar o Mirage Swift II para uma limpeza diária, siga os passos
1–3.
• Para desmontar o Mirage Swift II para uma limpeza semanal, siga os
passos 1–5.
1 Separe o conjunto de tubo curto. Para o fazer, agarre o cotovelo e puxe-o
para fora do anel de vedação (C-1).
Nota: O conjunto de tubo curto não pode ser desmontado.
2 Remova a tampa puxando-a para fora do anel de vedação (C-2).
3 Separe o anel do arnês do conjunto da manga da almofada. Para isso, basta
simplesmente puxar os aneis do arnês das extremidades da armação (C-3).
4 Desmonte o conjunto da manga da almofada. Para o fazer, retire o clipe
(C-4a) e em seguida remova a manga da almofada da armação (C-4b).
Nota: Quando estiver a retirar o clipe, segure-o numa das extremidades e
não na parte central.
5 Os aneis de vedação não necessitam de ser removidos do arnês (C-5).
54
Page 59

Limpeza do sistema Mirage Swift II em casa
Notas:
• Lave as mãos antes de limpar a máscara.
• Lave o arnês antes de o utilizar pela primeira vez, uma vez que a tinta poderá
escorrer. É importante lavar sempre à mão o arnês.
• O arnês pode ser lavado sem ser desmontado.
Diariamente
Lave à mão o conjunto da manga da almofada, o conjunto de tubo curto e a
tampa em água morna (aprox. 30°C) e detergente durante um minuto. Use um
sabão puro. Enxague bem os componentes com água potável e deixe-os secar
ao ar fora de calor e da luz directa do sol.
Nota: verifique que os respiradouros não se encontram obstruídos. Use uma
escova de pêlos suaves para limpar o respiradouro.
Semanalmente
Lave à mão o arnês, o retentor do tubo e todos os componentes em água
morna (aprox. 30°C) e detergente. Use um sabão puro. Enxague bem os
componentes e deixe-os secar fora da luz directa do sol.
. PRECAUÇÃO
• Não utilize soluções com bases de lixívia, cloro, álcool ou aromáticas,
agentes hidratantes ou antibacterianos ou óleos perfumados na
limpeza das peças do sistema de máscara ou da tubagem de ar. Estas
soluções podem causar danos que irão reduzir a vida útil do produto.
• A exposição de qualquer uma das partes do sistema ou tubagem a luz
directa do sol pode deteriorar o produto.
• Se for observada a deterioração de qualquer um dos componentes
(quebrado, rachado, rompido, etc.), o componente deve ser
substituído.
Português
Limpeza do sistema Mirage Swift II entre
pacientes
Todos os componentes do sistema, com a excepção do conjunto de tubo
curto, podem ser desinfectados usando procedimentos validados. O pessoal
médico deverá consultar o Guia de Desinfecção/Esterilização de Máscaras para
mais informações.
O conjunto de tubo curto não deve ser reutilizado. Este deve ser substituído
quando o sistema for utilizado por outros pacientes.
55
Page 60

Para limpar o arnês entre pacientes, use o método descrito na secção anterior
“Limpeza do sistema Mirage Swift II em casa”.
Montagem do sistema Mirage Swift II
PRECAUÇÃO
Os componentes da manga da almofada do Mirage Swift II (manga da
almofada, armação e clipe - ver secção A no folheto de ilustrações) não
são compatíveis com os componentes do Mirage Swift. A combinação
dos componentes dos dois sistemas pode resultar na respiração de ar
exalado.
Ver a secção D no folheto de ilustrações.
1 Certifique-se de que ambos aneis de vedação se encontram
adequadamente instalados nos aneis do arnês (D-1).
2 Monte o conjunto da manga da almofada. Para o fazer:
a Enrole a manga da almofada à volta da armação. Em seguida, introduza
as extremidades da manga da almofada no sulco da armação (D-2a).
b Segure uma extremidade do clipe e em seguida empurre-o sobre a
armação para prender a manga da almofada no seu lugar (D-2b).
Nota: Se o clipe não entrar facilmente, verifique que a extremidade da
manga da almofada está bem assente sobre o sulco da armação.
3 Fixe o anel do arnês ao conjunto da manga da almofada. Para o fazer,
empurre firmemente os aneis do arnês sobre as extremidades da armação
(D-3). Quando estiver a fixar o conjunto de manga de almofada, certifiquese do seguinte:
• os paineis do arnês estão virados para fora
• as almofadas nasais estão viradas para cima
• o logótipo da ResMed está virado para fora do arnês.
Certifique-se de que o conjunto da manga da almofada está bem instalado
no arnês antes de passar ao passo seguinte.
4 Fixe o conjunto de tubo curto ao seu lado preferido do conjunto de manga
da almofada. Para o fazer, empurre o cotovelo no anel de vedação até que
este encaixe no seu lugar (D-4).
5 Introduza a tampa no outro anel de vedação até que esta encaixe no seu
lugar (D-5).
6 Quando montado, o sistema terá o aspecto seguinte (D-6). Certifique-se de
que o logótipo da ResMed na manga da almofada está virado para fora do
arnês.
56
Page 61

Informações adicionais
Montagem do arnês
Ver secção E no folheto de ilustrações.
O arnês é composto por quatro componentes:
A: Correia esquerda; B: Correia direita; C: Fivela traseira; D: Fivela superior.
1 Disponha os quatro componentes do arnês tal como é ilustrado na figura
E-1. Os paineis devem estar virados para cima.
Nota: Antes de introduzir as correias, certifique-se de que as fivelas são
posicionadas tal como é ilustrado em E-2 e E-3.
2 Introduza as correias traseiras na fivela traseira (componente C) tal como é
ilustrado em E-2a e E-2b.
3 Introduza as correias superiores na fivela superior (componente D) tal como
é ilustrado em E-3a e E-3b.
Eliminação
O Sistema de Almofadas Nasais Mirage Swift II não contém substâncias
perigosas e pode ser eliminado com o lixo doméstico.
Especificações técnicas
Curva de Pressão/Fluxo
60
50
40
30
20
10
0
4 6 8 10 12 14 16 18 20
Taxa de fluxo de ventilação (l/min)
Pressão na máscara (cm H2O)
Pressão
(cm H
O)
2
420
829
12 37
16 43
20 49
Fluxo
(± 6,0 l/min)
Nota: Como resultado de diferenças de fabrico, o fluxo de ventilação poderá
não ser igual aos valores listados no quadro.
Informação acerca do espaço morto
O espaço morto é o volume vazio da manga da almofada e conjunto de tubo
curto até à peça giratória.
O espaço morto do sistema Mirage Swift II para todos os tamanhos de mangas
de almofada é de 91 ml.
57
Português
Page 62

Normas
Marca CE de acordo com a directiva CE 93/42/CEE, classe IIa.
EN ISO 14971, ISO 5356-1, ISO 10993-1 e EN ISO 17510-2.
Pressão de terapia
4 a 20 cm H2O
Resistência
Medição da queda de pressão (média de três tamanhos de manga de
almofada)
a 50 l/min: 0,4 cm H
O
2
a 100 l/min: 1,6 cm H2O
Símbolos
Sistema e embalagem
Precaução, consulte documentos anexos
Número de lote
LOT
Número de peça
REF
Manual do Utilizador
Representa um Aviso ou uma Precaução e alerta-o da possibilidade de
ferimentos ou explica cuidados especiais a ter para o uso seguro e
eficaz do dispositivo.
58
Page 63

Informações para encomendas
Número
de peça
Sistema
60513 Sistema de almofadas nasais Mirage Swift II - EUR
60514 Sistema de almofadas nasais Mirage Swift II - ANZ
60515 Sistema de almofadas nasais Mirage Swift II - AP
60516 Sistema de almofadas nasais Mirage Swift II - GBR
60518 Sistema de almofadas nasais Mirage Swift II - FRA
Peças de substituição
60541 Manga da almofada, pequena (1 emb.)
60542 Manga da almofada, média (1 emb.)
60543 Manga da almofada, grande (1 emb.)
60523 Fivela para arnês (4 emb.)
60524 Anel de vedação (10 emb.)
60525 Tampa (1 emb.)
60526 Arnês (1 emb.)
60536 Armação com clipe e tampa (1 emb.)
60528 Conjunto de tubo curto (1 emb.)
60529 Conjunto de tubo curto (10 emb.)
60530 Retentor do tubo (3 emb.)
60545 Saco de transporte para a Mirage Swift II (1 emb.)
60537 Sistema de armação com manga da almofada (excluindo arnês) -
60538 Sistema de armação com manga da almofada (excluindo arnês) -
60539 Sistema de armação com manga da almofada (excluindo arnês) -
60540 Clipe (1 emb.)
Acessórios
61121 Porta de pressão distal (1 emb.)
61124 Porta de pressão distal (10 emb.)
Item
pequeno
médio
grande
Português
59
Page 64

Garantia Limitada
A ResMed garante que o seu sistema ResMed, incluindo todos os seus
componentes: armação, manga da almofada, arnês, tubagem e outros
acessórios (“Produto”) está livre de defeitos de material e mão-de-obra
durante um período de noventa (90) dias a partir da data de compra pelo
consumidor original.
Para mais informações, consulte a Garantia.
Nota: As traduções são baseadas na versão inglesa deste guia. No entanto, é
possível que hajam pequenas variações no que diz respeito aos
procedimentos de desinfecção/esterilização aplicáveis em certos países. A
ResMed realizou a revisão destas alterações e todos os procedimentos aqui
indicados foram validados.
60
Page 65

Mirage Swift™ II
NASAL PILLOWS SYSTEM
Tack för att du har valt ResMeds Mirage Swift II Nasal Pillows System.
Systemet är lätt, smidigt och tyst och är avsett att ge minimal beröring med
ansiktet - en garanti för behaglig behandling. Denna guide ger alla de
upplysningar du behöver för att använda systemet på rätt sätt.
Avsedd användning
Mirage Swift II är avsedd för patienter (>30 kg) som har ordinerats övertryckseller bilevelbehandling i hemmet, på sjukhus eller kliniker. Masken är avsedd
för flergångsbruk och kan användas mellan olika patienter.
Obs! Mirage Swift II kan inte användas med ResMed AutoSet CS™ 2 och
VPAP™ Adapt SV utrustningar.
Medicinisk information
Obs! Mirage Swift II innehåller inte latex, PVC eller DEHP (dietylhexylftalat).
Om du har NÅGON reaktion mot en del i systemet, bör du avbryta
användningen och rådgöra med din sömnterapeut.
. Varningar & säkerhetsföreskrifter
• Detta system bör endast användas med flödesgeneratorer (CPAP- eller
bilevelsystem) som rekommenderas av din läkare eller andningsterapeut.
Systemet får endast användas när flödesgeneratorn är påkopplad och
fungerar ordentligt. Ventilöppningarna får aldrig blockeras.
Förklaring: Flödesgeneratorer är avsedda att användas med speciella
anslutningar vars kopplingsdon är försedda med ventilöppningar
(öppningarna finns i maskramen, – se A på illustrationsbladet) eller separata
utandningsventiler som möjliggör ett kontinuerligt utflöde av luft. När
flödesgeneratorn är påkopplad och fungerar ordentligt, kommer ny luft från
flödesgeneratorn att driva bort utandad luft genom den anslutna
utandningsporten. När flödesgeneratorn däremot inte är i arbete (t.ex. vid
Svenska
61
Page 66

ett strömavbrott) kommer en otillräcklig mängd ny luft att tillföras via
systemet och utandad luft kan komma att andas in på nytt. Om detta
inträffar, bör du omedelbart ta bort Mirage Swift II.
• Utloppsventilflödet är lägre vid lägre systemtryck (du finner ett tryck-/
flödesdiagram för mer information i avsnittet ”Tekniska specifikationer”).
Om systemtrycket är alltför lågt under utandningen, kan utloppsventilflödet
eventuellt vara otillräckligt för att driva bort all utandad luft från
lufttillförselslangen före nästa inandningsstart.
• Använd inte Mirage Swift II om du ofta blir irriterad i näsan. Rådgör i sådana
fall med din läkare.
• Mirage Swift II måste rengöras och desinfekteras/steriliseras om masken
används mellan olika patienter. Se avsnittet ”Rengöra Mirage Swift II mellan
olika patienter” för mer information.
• Om syrgas används med flödesgeneratorn, måste syrgasflödet stängas av
när flödesgeneratorn inte är i gång.
Förklaring: Om syrgasflödet fortsätter när flödesgeneratorn inte är i drift,
kan den syrgas som levereras in i luftslangen byggas upp inne i
flödesgeneratorn vilket kan utgöra en brandrisk. Denna varning gäller för de
flesta flödesgeneratorer.
• Rökning får inte förekomma under syrgastillförseln.
Obs! Vid en fast flödeshastighet av tilläggssyre kommer den inandade
syrgaskoncentrationen att variera beroende på tryckinställningarna,
patientens andningsmönster, eventuella anslutningar så väl som graden av
läckage.
Delar i Mirage Swift II
Se A på illustrationsbladet.
Passa in Mirage Swift II
Obs! Se bruksanvisningen för din flödesgenerator för mer information om
inställningar och drift.
Se B på illustrationsbladet.
1 Sätt hättan på huvudet. Placera näskuddarna under näsan. Se till den övre
remmen förs över hjässan och att ResMed logotypen på kuddhållaren
pekar utåt och bort från ansiktet (B-1).
2 För in näskuddarna i näsborrarna. Strama försiktigt åt hättans remmar, först
de bakre remmarna (B-2a) och sedan de övre remmarna (B-2b). Justera de
bakre och de övre remmarna växelvis till hättans paneler vilar mellan öga och
öra. Näskuddehållaren bör sitta bekvämt ovanför överläppen.
62
Page 67

3 Justera näskuddarnas vinkel genom att rotera kuddmonteringen framåt eller
bakåt tills kuddarna sitter bekvämt inne i näsborrarna (B-3).
4 Slanghållare (valfri)
Använd slanghållaren om du föredrar att monteringen för den korta slangen
sätts fast på hättan i en uppåtriktad position (B-4).
5 Monteringen för den korta slangen kan sättas fast på fyra olika sätt (B-5).
Obs! Den korta slangen och locket kan sättas fast på endera sida av
kuddhållaren. Se avsnitten ”Ta isär Mirage Swift II för rengöring” och
”Montera Mirage Swift II” för anvisningar om hur du tar bort och sätter fast
monteringen för den korta slangen och locket.
6 Koppla huvudluftslangens ena ända till flödesgeneratorn och den andra
ändan till svängtappen. Sätt på flödesgeneratorn.
Obs!
• Flödesgeneratorns maskinställningar: Välj ”Swift” som
maskinställning om den inställningen erbjuds. I annat fall väljer du
”Mirage” som maskoption när du använder Mirage Swift II med de
flödesgeneratorer från ResMed som har olika maskinställningsoptioner.
• SmartStop: SmartStop fungerar eventuellt inte effektivt när man
använder Mirage Swift II med vissa ResMed flödesgeneratorer med
SmartStop-funktion. Detta är speciellt betydelsefullt när man använder
små kuddhållare.
Om du tycker att det läcker ut luft, kan du justera om vinkeln på näskuddarna
för att få en bättre försegling. Du kanske kommer att behöva justera om
remmarna på hättan. Dra inte åt remmarna alltför stramt.
Om du inte kan få bukt med läckorna kanske du borde prova en kuddhållare
i en annan storlek.
7 För att du ska få en stadig och god passform bör du ta god tid på dig för att
justera:
• remmarna på hättan
• kuddmonteringens vinkel
• den korta luftslangens position.
Ta bort Mirage Swift II
För att ta bort Mirage Swift II drar du bort kuddmonteringen från näsan. Lyft
sedan bort hättan från huvudet. Du behöver inte lossa på remmarna på hättan.
63
Svenska
Page 68

Ta isär Mirage Swift II för rengöring
Se C på illustrationsbladet.
Koppla bort flödesgeneratorns luftslang innan du tar isär delarna i
Mirage Swift II. Gör så här: håll fast svängtappen och dra bort den från
flödesgeneratorslangen.
SE UPP!
Dra inte i den korta slangen eller i flödesgeneratorslangen eftersom de lätt
kan skadas.
• Följ steg 1-3 för anvisningar om hur du tar isär Mirage Swift II för daglig
rengöring.
• Följ steg 1-5 för anvisningar om hur du tar isär Mirage Swift II för den
rengöring som bör utföras varje vecka.
1 Ta bort monteringen för den korta slangen genom att ta tag i maskbågen och
dra bort den från förseglingsringen (C-1).
Obs! Du kan inte ta isär monteringen för den korta slangen.
2 Ta bort locket från förseglingsringen (C-2).
3 Ta bort ringen på hättan från kuddmonteringen. Dra helt enkelt bort ringarna
på hättan från ramens ändar (C-3).
4 Ta isär kuddmonteringen genom att skjuta bort klämman (C-4a) och dra
sedan bort kuddhållaren från ramen (C-4b).
Obs! Håll klämman i ena änden, inte i mitten, när du skjuter bort den.
5 Du behöver inte ta bort förseglingsringarna från hättan (C-5).
Rengöra Mirage Swift II i hemmet
Obs!
• Tvätta händerna innan du rengör masken.
• Tvätta hättan före första användningen eftersom färgen kan fälla. Det är
viktigt att du alltid tvättar hättan för hand.
• Du kan tvätta hättan utan att ta isär den.
Varje dag
Handtvätta kuddmonteringen, monteringen för den korta slangen och locket i
varmt (c:a 30°C) tvålvatten i en minut. Använd ren tvål. Skölj delarna ordentligt
i dricksvatten och låt dem lufttorka men utsätt dem inte för direkt solljus och
hetta.
Obs! Se till att ventilöppningarna inte är blockerade. Använd en mjuk borste för
att rengöra ventilen.
64
Page 69

Varje vecka
Handtvätta hättan, slanghållaren och alla delarna i varmt (c:a 30°C) tvålvatten
Använd ren tvål. Skölj delarna ordentligt och låt dem lufttorka men utsätt dem
inte för direkt solljus.
. SE UPP!
• Använd inte lösningar som innehåller blekmedel, klor, alkohol eller
aromatiska ämnen, fuktighetsbevarande eller bakteriedödande medel
eller parfymerade oljor för att rengöra någon del i systemet eller
luftslangen. Sådana lösningar kan vara skadliga och förkorta
produktens livslängd.
• Utsätt inga delar av systemet eller slangen för direkt solljus eller hetta
eftersom detta kan ha skadlig inverkan.
• Om du kan se några uppenbara defekter (sprickor, krakelering, revor
osv.) bör den defekta delen kasseras och bytas ut.
Rengöra Mirage Swift II mellan olika patienter
Alla systemkomponenter med undantag för monteringen för den korta slangen
kan desinfekteras/steriliseras enligt godkänt förfaringssätt. Klinisk personal
hänvisas till Guide för desinfektion/sterilisering för ytterligare information.
Monteringen för den korta slangen får ej återanvändas och bör bytas ut för en
ny patient.
För anvisningar om hur man rengör hättan mellan olika patienter hänvisas till
föregående avsnitt ”Rengöra Mirage Swift II i hemmet”.
Montera Mirage Swift II
SE UPP!
Delar i Mirage Swift II kuddmontering (kuddhållare, ram och klämma – se
A på illustrationsbladet) kan inte användas med delar i Mirage Swift. Om
man kombinerar delar från de två systemen riskerar man återinandning
av redan utandad luft.
Se D på illustrationsbladet.
1 Se till att båda förseglingsringarna sitter rätt inpassade i ringarna på hättan
(D-1).
2 För att färdigställa kuddmonteringen:
a Vira kuddhållaren runt ramen. Sätt sedan in kuddkanterna i skåran på
ramen (D-2a).
b Skjut över klämman på ramen så att den kan hålla kuddhållaren på plats
(D-2b).
65
Svenska
Page 70

Obs! Om du har svårigheter med att skjuta över klämman bör du se till att
kanten på kuddhållaren verkligen sitter inne i skåran på ramen.
3 Sätt fast kuddhållaren vid ringen på hättan genom att skjuta in ringarna på
hättan i ramens ändar med fast hand (D-3). När du sätter fast
kuddmonteringen måste du se till att:
• hättans paneler är utåtriktade
• att näskuddarna är uppåtriktade
• att ResMed logotypen pekar utåt och bort från hättan.
Se till att du har satt fast kuddmonteringen ordentligt på hättan innan du går
vidare till nästa steg.
4 Sätt fast monteringen för den korta slangen på den sida av
kuddmonteringen som du föredrar. Gör så här: skjut in bågen i
förseglingsringen tills den klickar in sig på rätt plats (D-4).
5 Sätt in locket i den andra förseglingsringen tills det klickar in sig på rätt plats
(D-5).
6 Det färdigmonterade systemet bör se ut så här (D-6). Se till att ResMed
logotypen på kuddhållaren pekar utåt och bort från hättan.
Övrig information
Sätta ihop hättan
Se E på illustrationsbladet.
Om hättan tas isär, består den av fyra delar:
A: Vänster rem; B: Höger rem; C: Spänne på baksidan; D: Spänne på hjässan.
1 Placera de fyra delarna som visas på bilden (E-1). Panelerna måste vara
uppåtvända.
Obs! Innan du trär remmarna måste du se till att spännena sitter enligt (E-2)
och (E-3).
2 Trä de bakre remmarna genom spännet på baksidan (del C) enligt (E-2a) och
(E-2b).
3 Trä de övre remmarna genom spännet uppe på hjässan (del D) enligt (E-3a)
och (E-3b).
Bortskaffning av produkten
Mirage Swift II Nasal Pillows System innehåller inga farliga ämnen och kan
kasseras tillsammans med vanligt hushållsavfall.
66
Page 71

Tekniska specifikationer
Tryck-/flödesdiagram
60
50
40
30
20
10
Ventilflödestakt (l/min)
0
4 6 8 10 12 14 16 18 20
Masktryck (cm H2O)
Tr yck
(cm H
O)
2
Flöde
(± 6,0 l/min)
420
829
12 37
16 43
20 49
Obs! Till följd av tillverkningsvariationer kan ventilflödet skilja sig något från de
värden som anges i tabellen.
Information om dead space
Dead space är den tomma volymen i kuddhållaren och monteringen för den
korta slangen upp till svängtappen.
Dead space i Mirage Swift II för alla kuddhållarstorlekar är 91 ml.
Standarder
CE märkning enligt EG direktiv 93/42/EEC, klass II a.
EN ISO 14971, ISO 5356-1, ISO 10993-1 och EN ISO 17510-2.
Behandlingstryck
4 till 20 cm H2O
Motstånd
Uppmätt tryckfall (genomsnitt för tre kuddhållarstorlekar)
vid 50 l/min: 0,4 cm H
vid 100 l/min: 1,6 cm H2O
O
2
67
Svenska
Page 72

Symboler
System och förpackning
Se upp! Läs medföljande dokumentation
Partinummer
LOT
Delnummer
REF
Guide för användaren
Anger varning eller säkerhetsföreskrift och gör användaren
uppmärksam på möjlig personskada eller förklarar speciella åtgärder för
säker och effektiv användning av utrustningen.
Beställningsinformation
Artikelnr. Del
System
60513 Mirage Swift II Nasal Pillow System - EUR
60514 Mirage Swift II Nasal Pillow System - ANZ
60515 Mirage Swift II Nasal Pillow System - AP
60516 Mirage Swift II Nasal Pillow System - UK
60518 Mirage Swift II Nasal Pillow System - FRA
Utbytesdelar
60541 Kuddhållare, Small (1 st.)
60542 Kuddhållare, Medium (1 st.)
60543 Kuddhållare, Large (1 st.)
60523 Spänne för hättan (4 st.)
60524 Förseglingsring (10 st.)
60525 Lock (1 st.)
60526 Hätta (1 st.)
60536 Ram med klämma och lock (1 st.)
60528 Montering för kort slang (1 st.)
60529 Montering för kort slang (10 st.)
60530 Slanghållare (3 st.)
60545 Mirage Swift II väska (1 st.)
60537 Ramsystem med kuddhållare (utan hätta), Small
68
Page 73

Artikelnr. Del
60538 Ramsystem med kuddhållare (utan hätta), Medium
60539 Ramsystem med kuddhållare (utan hätta), Large
60540 Klämma (1 st.)
Tillbehör
61121 Distal tryckport (1 st.)
61124 Distal tryckport (10 st.)
Begränsad garanti
ResMed garanterar att ditt ResMed system, inkl. ingående komponenter –
ram, kuddmontering, hätta, slang och andra tillbehör (”Produkten”) – skall vara
felfri med avseende på material och utförande under en period på nittio (90)
dagar från det datum då den första kunden inköpte produkten.
Se Garantin för ytterligare information.
Obs! Översättningar baseras på den engelska versionen av denna guide.
Vissa mindre variationer kan eventuellt förekomma till följd av de
desinfektions-/steriliseringsmetoder som gäller i vissa länder. ResMed har
granskat dessa ändringar och alla de tillvägagångssätt som anges här har
godkänts.
69
Svenska
Page 74

Page 75

Page 76

 Loading...