

Page 1
Global leaders in sleep and respiratory medicine www.resmed.com
608140
Ultra Mirage NVFFM
AMER ML
CLINICAL
608140/2
06 11
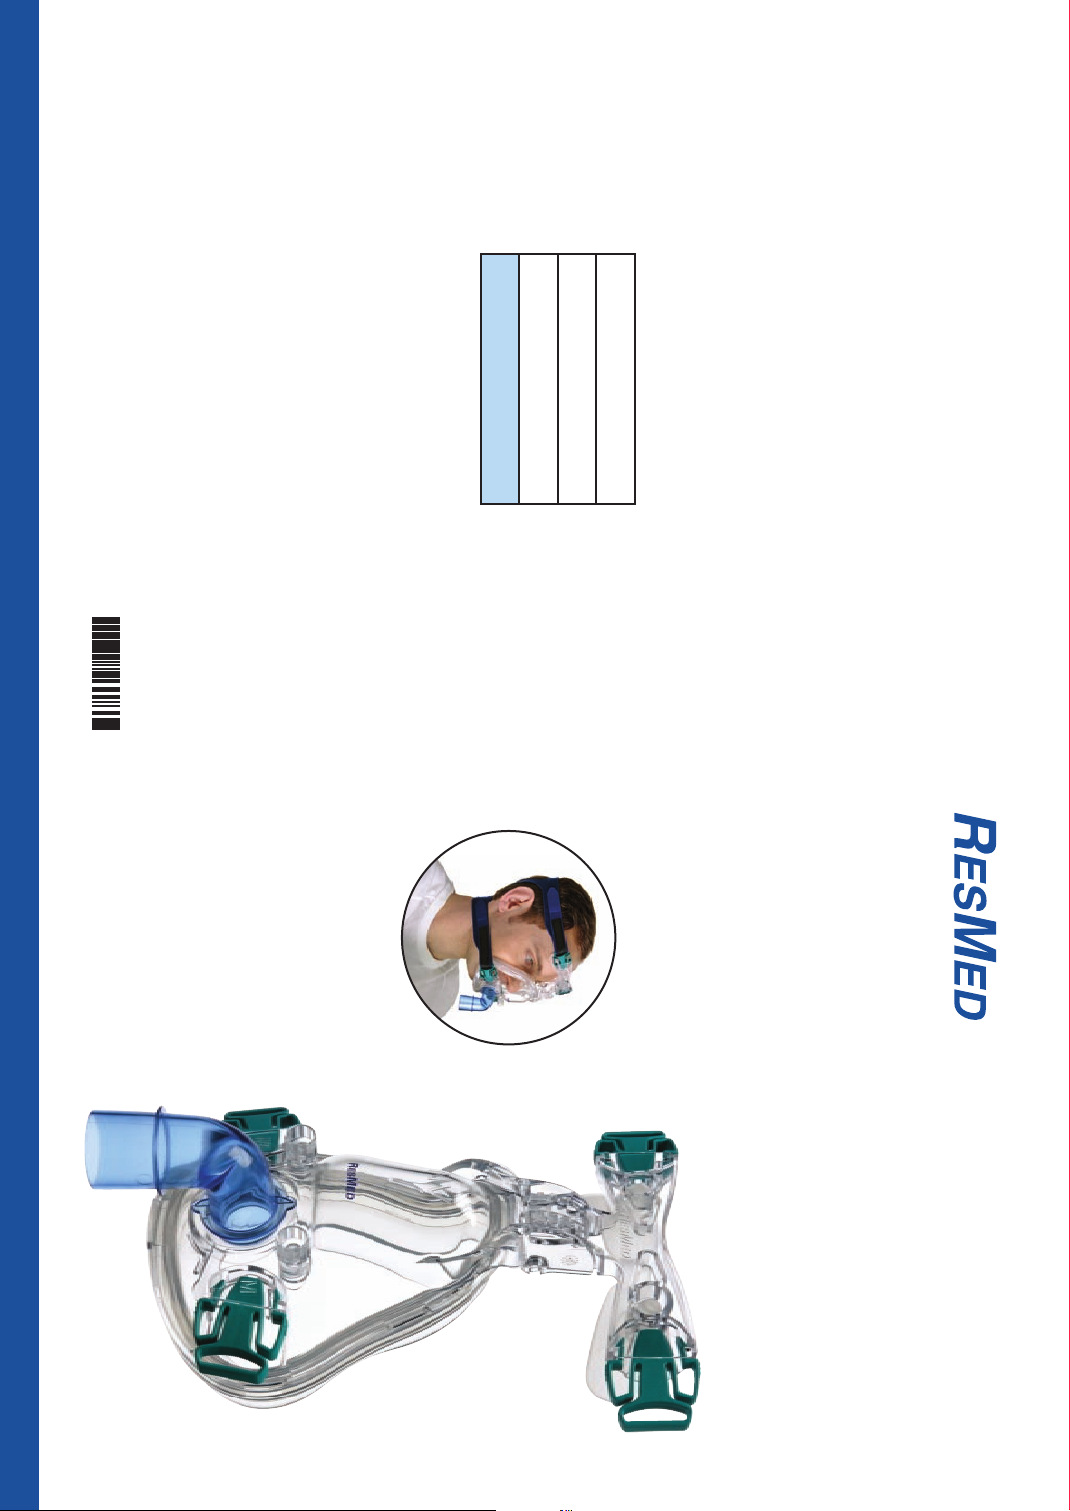
Ultra Mirage™
NON-VENTED FULL FACE MASK
Clinical Guide
English
•
Français
•
Español
•
Português
Page 2

© 2006 ResMed Ltd.
of Alconox Inc.
ResMed Ltd (Manufacturer) 1 Elizabeth Macarthur Drive Bella Vista NSW 2153 Australia
ResMed Corp (US Designated Agent) 14040 Danielson Street Poway CA 92064-6857 USA
ResMed (UK) Ltd (EU Authorized Representative) 65 Milton Park Abingdon Oxfordshire OX14 4RX UK
ResMed Offices Australia, Austria, Brazil, Finland, France, Germany, Hong Kong, Japan, Malaysia, Netherlands,
New Zealand, Singapore, Spain, Sweden, Switzerland, UK, USA (see www.resmed.com for contact details).
Ultra Mirage Non-vented Full Face Mask
Protected by patents: AU 710733, AU 741003, AU 766623, AU 775051, CA 2261790, DE 29724224, EP 0956069,
EP 1187647, EP 1187650, EP 1479406, JP 3686609, NZ 513052, NZ 526165, NZ 526166, NZ 526168, US 6112746,
US 6119693 , US 6357441, US 6374826, US 6463931, US 6513526, US 6532961, US 6581602, US 6634358,
US 6701927, US 6860269, US 6871649, US 7069933. Other patents pending. Protected by design registrations:
AU 157902, AU 302719, CN 200330102703.8, CN 200330102704.2, EP 098348, JP 1212687, JP 1214582,
US D493885, US D519207.
Ultra Mirage and Mirage are trademarks of ResMed Ltd and Mirage is registered in U.S. Patent and Trademark
Office.
Dove is a trademark of Unilever. CIDEX and STERRAD are trademarks of Johnson & Johnson. Alconox is a trademark
Page 3
A
© 200
6 ResMed Ltd.
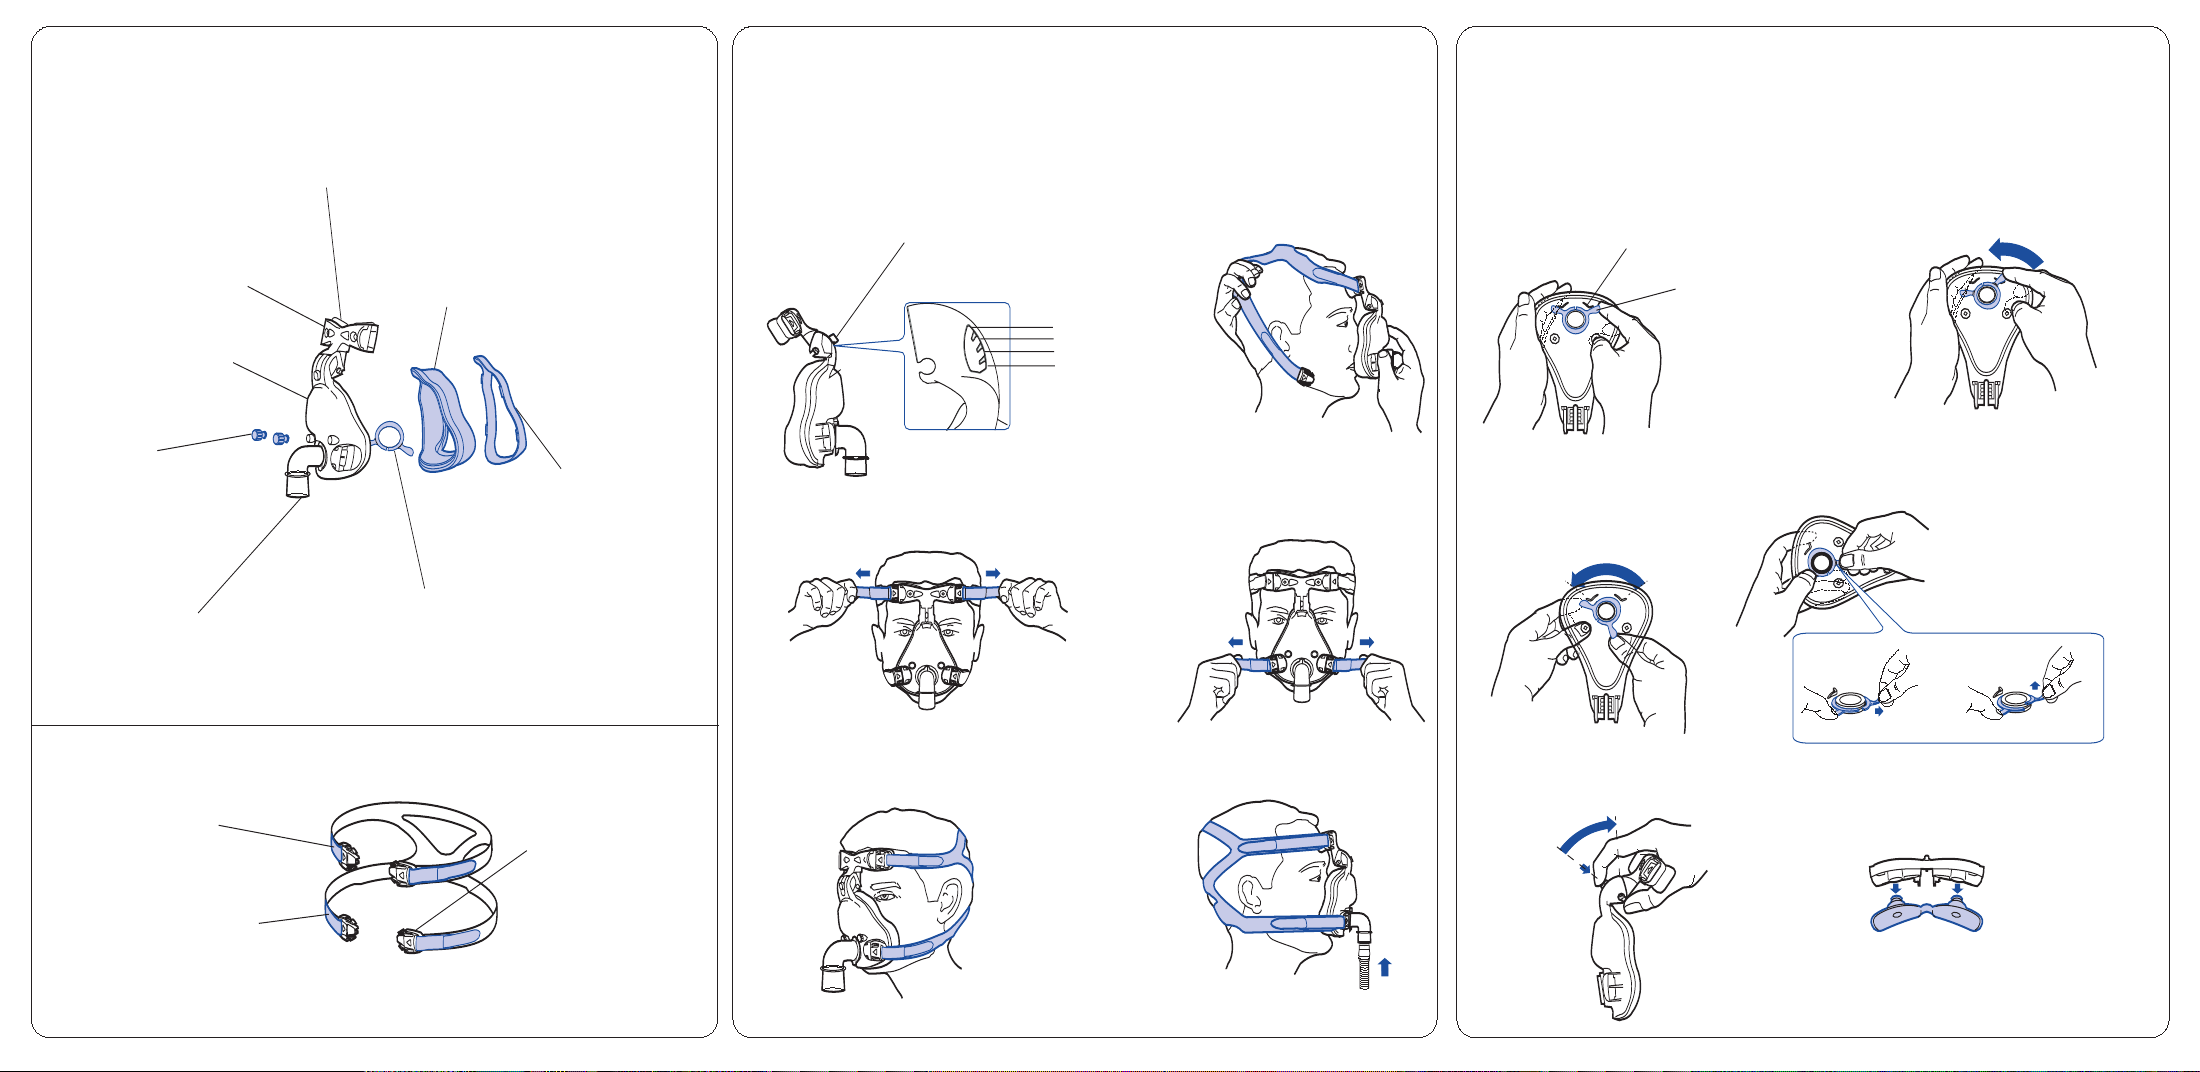
Mask Parts / Composants du masque / Piezas de la mascarilla /
Peças da máscara
Forehead support / Support frontal /
Apoyo para la frente / Suporte da testa
Luer lock ports cap / Bouchon(s)
d'entrée de raccord Luer / Tapas de
puerto Luer lock / Tampas das portas
com fecho do tipo Luer
Forehead support pad / Tampon du support frontal / Almohadilla del
apoyo para la frente / Almofada do suporte da testa
Mask frame / Entourage rigide /
Armazón de la mascarilla /
Armação da máscara
Cushion clip / Clip de la bulle /
Traba de la almohadilla / Presilha da
almofada
Mask cushion / Bulle du masque /
Almohadilla de la mascarilla / Almofada
da máscara
Upper Velcro
™
straps /
Bandes Velcro supérieures /
Correas laterales superiores
(Velcro) / Correias Velcro laterais
superiores
Headgear clip / Clip du
harnais / Broche del arnés /
Presilha do arnês para a
cabeça
Lower Velcro straps / Bandes Velcro
inférieures / Correas laterales
inferiores (Velcro) / Correias Velcro
laterais inferiores
Elbow / Coude / Codo / Cotovelo
Elbow retainer / Anneau de retenue du
coude / Retenedor del codo / Retentor
do cotovelo
B
B-1 B-2
B-3 B-4
B-5 B-6
©
2006 R
esM
ed Lt
d.
1
3
4
2
Forehead support tab / Languette du support
frontal / Lengüeta del apoyo para la frente /
Tira do suporte da testa
Fitting the Mask / Mise en place du masque / Colocación de la
mascarilla / Colocação da máscara
C-2
C-3
C-4
C-6
C
C-1
L-shaped ridge / Bord en L / Borde en
forma de L / Saliência em forma de L
LIFT / SOULEVER /
LEVANTE / LEVANTE
Elbow retainer / Anneau de
retenue du coude / Retenedor del
codo / Retentor do cotovelo
PUSH / POUSSER /
EMPUJE / EMPURRE
a
b
Disassembling for Cleaning / Démontage pour le nettoyage /
Desmontaje para la limpieza / Desmontagem para limpeza
©
2006 ResM
ed Lt
d.
C-5
b
a
Page 4
Note: For complete instructions, read the text section in conjunction with the illustrations on
this sheet.
Remarque : pour les instructions complètes, veuillez lire le texte du guide avec cette fiche
d'illustrations.
Nota: Para tener instrucciones completas, lea el texto en conjunto con las figuras de esta hoja.
Nota: Para obter as instruções completas, leia a secção de texto em conjunção com as
ilustrações desta folha.
Illustrations Sheet / Fiche d'Illustrations / Hoja de figuras / Folha de Ilustrações
Ultra MirageTM
NON-VENTED FULL FACE MASK
Component of: 608140/2
D-1
D-6
D-3
a
b
D-5
D-2
D-4
D
D-7
©
2006 ResM
ed Lt
d.
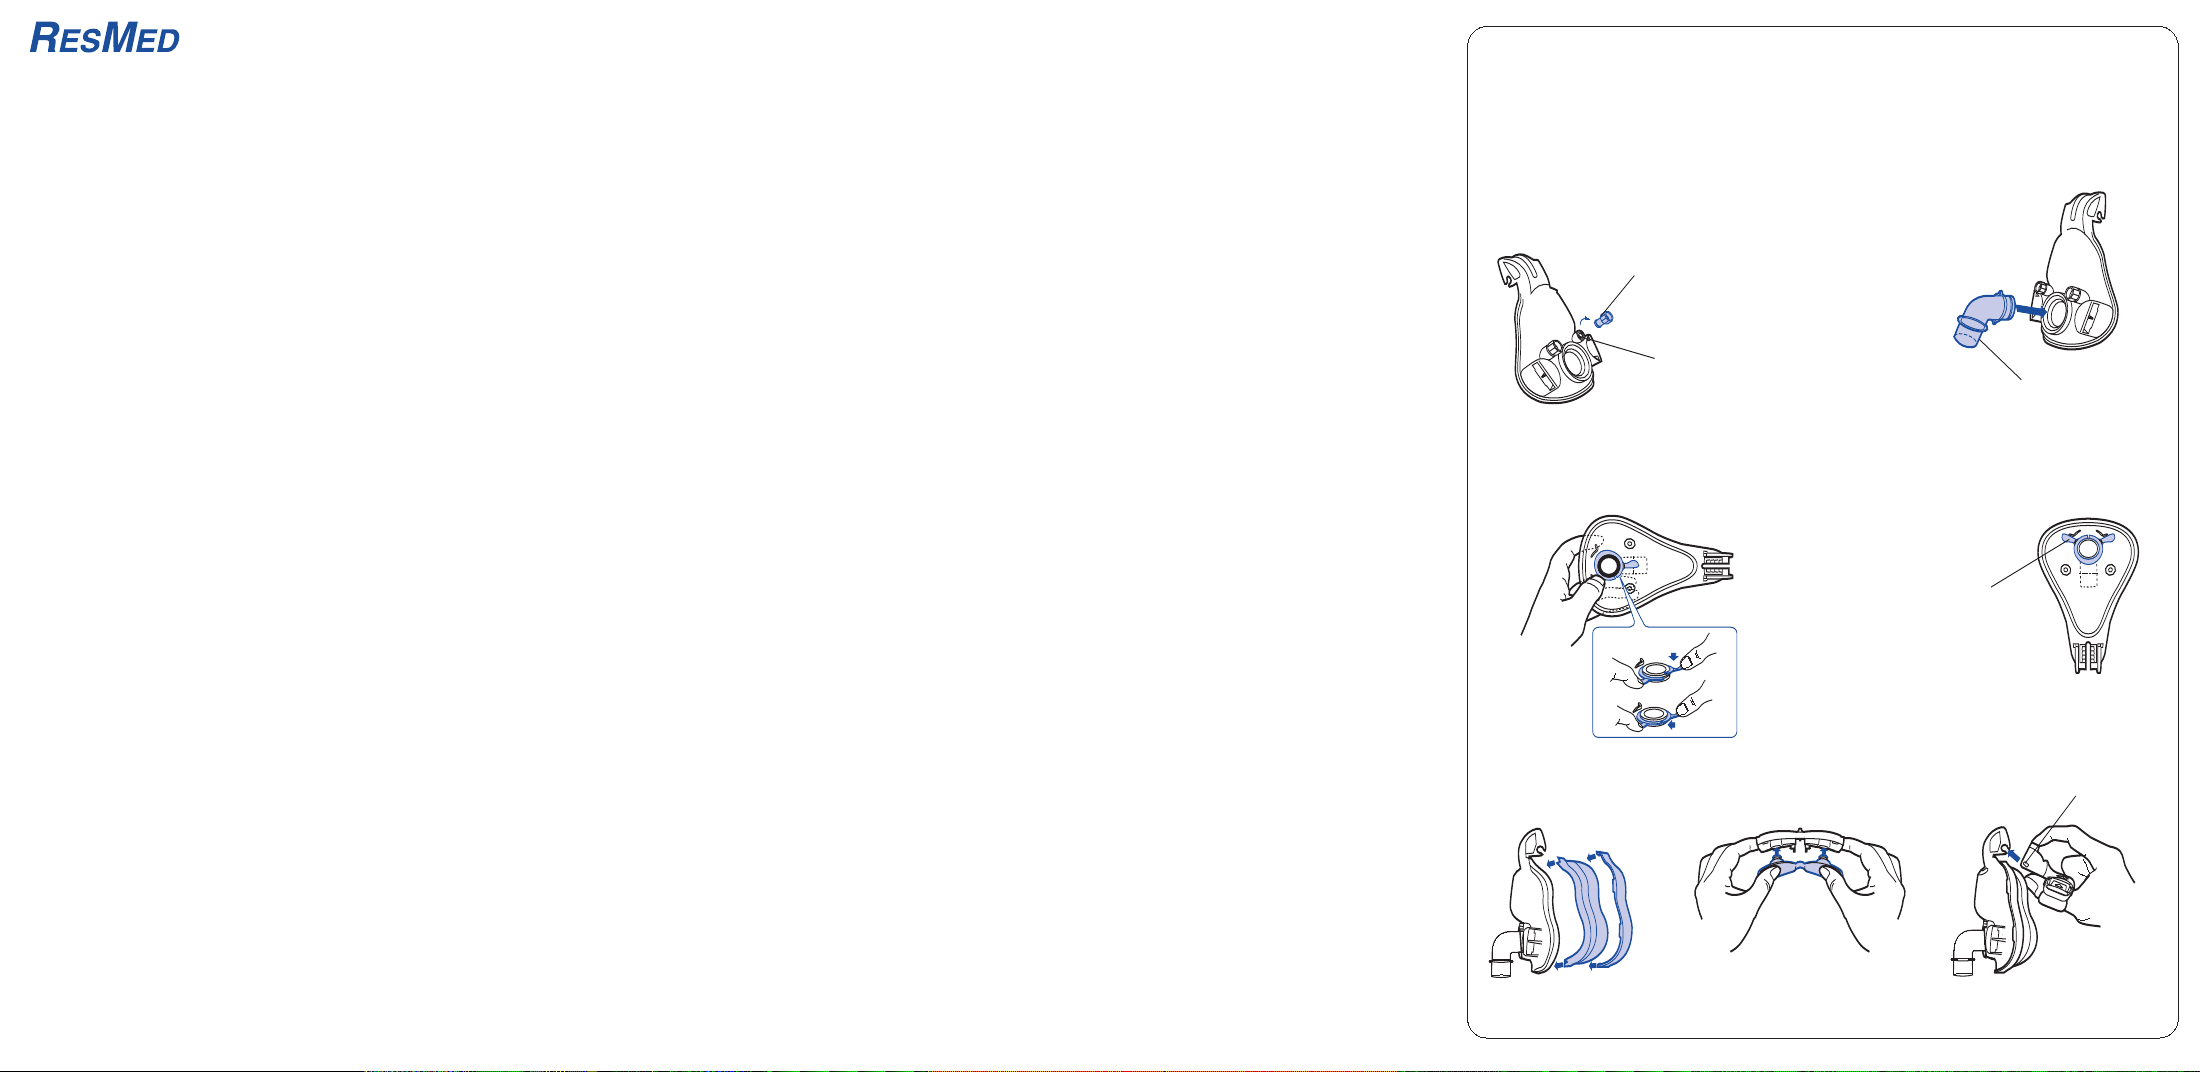
Reassembling the Mask / Remontage du masque / Montaje de la
mascarilla / Montagem da máscara
Luer lock ports cap / Bouchon(s)
d'entrée de raccord Luer / Tapones de
puerto Luer / Tampas das portas com
fecho do tipo Luer
Mask port / Port(s) du masque /
Puerto(s) de la mascarilla / Porta da
máscara
Elbow / Coude / Codo /
Cotovelo
Elbow retainer / Anneau de
retenue du coude / Retenedor del
codo / Retentor do cotovelo
Pivot / Pivot /
Pivote / Perno
Page 5
Ultra Mirage™
NON-VENTED FULL FACE MASK
The Ultra Mirage NV (non-vented) Full Face Mask is a non-invasive device used
for channelling air flow with or without supplemental oxygen.
Intended Use
The Ultra Mirage NV Full Face Mask is intended to be used with active-exhaustvalve ventilator systems, to provide ventilatory assistance to patients with
respiratory insufficiency and respiratory failure.
The Ultra Mirage NV Full Face Mask is to be used on adult patients
(>66 lb/30 kg), requiring non-life-support ventilatory assistance.
The Ultra Mirage NV Full Face Mask is intended for single-patient re-use in the
home or multipatient re-use in the hospital/institutional environment.
CAUTION
In the USA, federal law restricts this device to sale by, or on the order of, a
physician.
English
. WARNINGS AND CAUTIONS
• The Ultra Mirage NV Full Face Mask, must not be used without qualified
supervision for patients who are unable to remove the mask by themselves.
• This mask is not for use on patients with impaired laryngeal reflexes or other
conditions predisposing to aspiration in the event of regurgitation or
vomiting.
• The mask should not be worn unless the ventilator system is turned on and
operating properly.
• At a fixed rate of supplemental oxygen flow (if used), the inhaled oxygen
concentration will vary depending on the pressure settings, patient
breathing pattern, mask size selection and the mask leak.
1
Page 6

•
If oxygen is used with the ventilator, the oxygen flow must be turned off
when the ventilator is not operating.
Explanation: When the ventilator is not in operation, and the oxygen flow
is left on, oxygen delivered into the ventilator tubing may accumulate within
the ventilator enclosure. Oxygen accumulated in the ventilator enclosure
will create a risk of fire. This warning applies to most types of ventilators.
• Please refrain from smoking while oxygen is in use.
About the Mask
• The mask system does not contain latex, PVC or DEHP materials. If the
patient has ANY reaction to any part of the mask system, discontinue use
and investigate the possible causes.
• ResMed has tinted the Ultra Mirage NV Full Face Mask elbow blue to
identify it as a non-vented mask for use with active exhaust non-invasive
ventilator systems only.
• The mask has a standard female 22 mm tapered fitting (ISO5356-1) for
external connection to the ventilator.
• Refer to the section “Technical Specifications” of this guide for information
about mask leak, dead space and resistance.
CAUTION
The mask must be cleaned and disinfected/sterilized if it is used between
patients. Refer to the section “Cleaning the Mask between Patients” for
details.
Parts of the Mask
See section A on the illustrations sheet.
Fitting the Mask
Note: Refer to the relevant ventilator system operating instructions for detailed
information about connecting the mask.
See section B on the illustrations sheet.
The Ultra Mirage NV Full Face Mask is supplied fully assembled.
1 Move the forehead support tab to Position 3. (Refer illustration B-1 for
location of Positon 3.)
2 Disconnect one lower headgear clip. Place the mask on the face and pull the
headgear over the patient’s head (B-2). Ensure that the upper straps pass
across the forehead and the lower straps below the ears.
3 Reattach the headgear clip to the mask frame.
4 Gently tighten the upper headgear straps (B-3).
2
Page 7

5 Gently tighten the lower headgear straps (B-4).
The pads of the forehead support should sit comfortably on the forehead
when the mask is in place. If the pads are at an angle and not completely
seated on the forehead, change the position of the forehead support tab.
Note: Do not overtighten the headgear straps as this may cause discomfort,
cushion creases and mask leak. The Ultra Mirage NV Full Face Mask has
been designed to provide a comfortable seal without the need to
overtighten the headgear.
6 The fitted mask should look like this (B-5).
7 Connect the main air tubing to the elbow (B-6). Then connect the free end
of the air tubing to the ventilator and turn the ventilator on. If the patient
experiences air leaks around the cushion, it may be necessary to gently
tighten the headgear straps.
8 If the patient is unable to get a proper seal:
• reposition the mask by lifting it and placing the cushion comfortably on
the face.
• adjust the position of the forehead support tab by testing all four
positions and finding the one that best prevents leaks.
• gently tighten the headgear straps.
Notes:
• If it is not possible to resolve any leaks, your patient may require another
mask frame and/or another cushion size.
• As with all mask ventilation systems, significant leak may occur between
the mask and the patient's face. The leak may vary depending on such
factors as the patient's position and sleep stage. Variation in leak may
significantly affect patient ventilation, potentially producing profound
hypoventilation or hyperventilation. The magnitude of this effect depends on
the ventilator's ability to compensate for leak.
• Leak or variation in the leak may cause mistriggering of the ventilator.
English
Removing the Mask
To remove the Ultra Mirage NV Full Face Mask, disconnect one of the lower
headgear clips and pull the mask and headgear up over the patient’s head.
Note: The headgear clips are easy to locate and disconnect. They allow the
quick removal of the mask from the face in the event of an emergency.
3
Page 8

Disassembling for Cleaning
See section C on the illustrations sheet.
1 Detach the mask from the air tubing.
2 Disconnect the headgear clips to release them from the mask frame. It is
not necessary to remove the headgear clips from the headgear.
3 Remove the port caps from the mask frame.
4 Detach the cushion assembly from the mask frame by depressing the
cushion clip at the base of the mask frame and gently pulling it off. This
releases the cushion and cushion clip.
Then, separate the cushion from the cushion clip.
5 To detach the elbow from the frame, lift (C-1) and push (C-2) the right wing
of the elbow retainer over the right L-shaped ridge on the mask frame.
6 Rotate the elbow retainer to the position shown in C-3. The elbow retainer
is now in the correct position for removal.
7 To remove the elbow retainer, hold one wing of the elbow retainer down,
and firmly pull the other wing out (C-4a) and then up (C-4b) over the top of
the elbow. Remove the elbow retainer and elbow from the mask frame.
8 To remove the forehead support from the mask, press the tab (C-5a) and
move it upwards until it is possible to slide it off the mask frame (C-5b).
9 Pull firmly at the base of the forehead support pad plugs to release the pads
from the forehead support (C-6).
Cleaning the Mask in the Home
Notes:
• Wash your hands before cleaning the mask.
• It is important to always handwash the headgear.
• The headgear may be washed without being disassembled from the
headgear clips.
Daily/After each use
Handwash the mask components in warm (approx. 86°F/30°C) water using
mild soap or detergent. Rinse the components well and allow them to air dry
out of direct sunlight.
TM
The mask components have been tested using Dove
Weekly
Handwash the headgear in warm (approx. 86°F/30°C) water using mild soap or
detergent. Rinse well and allow it to air dry out of direct sunlight.
Unscented beauty bar.
4
Page 9
CAUTION
• Do not use bleach, chlorine, alcohol, or aromatic-based solutions,
moisturizing or antibacterial soaps, or scented oils to clean any of the mask
components. These solutions may cause damage and reduce the life of the
product.
• Do not expose any part of the mask system or tubing to direct sunlight as it
may cause the product to deteriorate.
• The headgear is sensitive to heat and must not be ironed.
• If any visible deterioration of a mask component is apparent (cracking,
crazing, tears, etc), the mask component should be discarded and replaced.
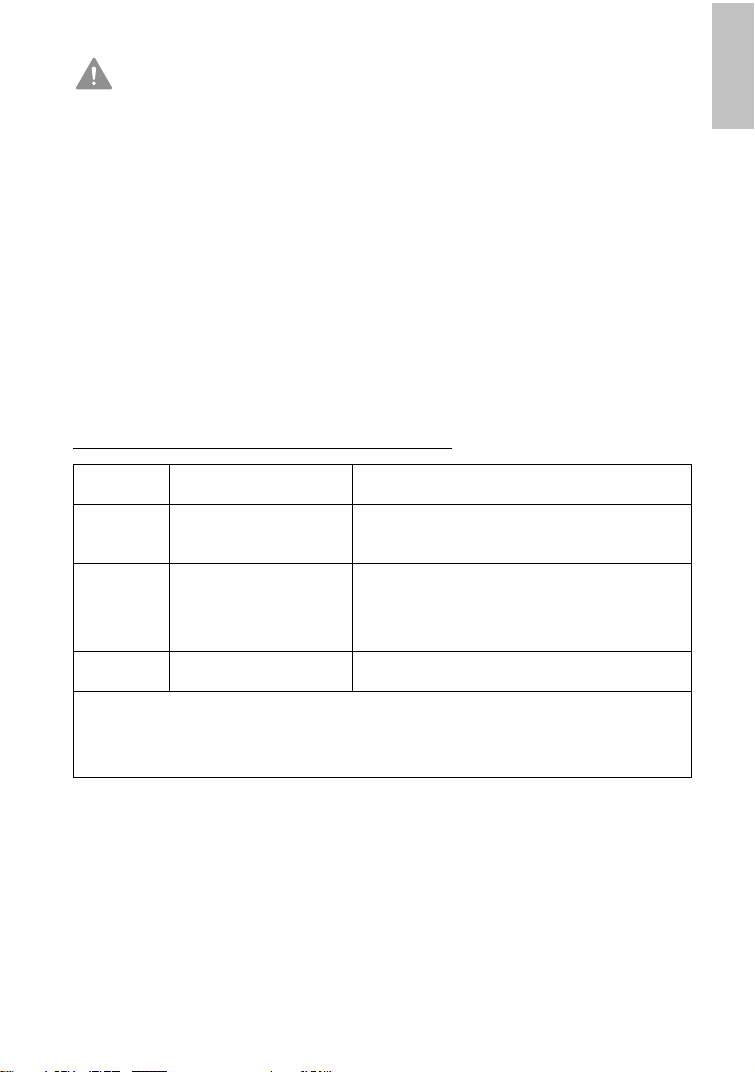
Cleaning the Mask between Patients
All mask components can be disinfected/sterilized using validated procedures.
The following table presents a summary of the validated procedures for
disinfection/sterilization of the system. Refer to the website
www.resmed.com/masks/sterilization/americas for details.
English
Methods Pre-disinfection/
Chemical Detergent
Thermal Detergent
sterilization
eg, Alconox
eg, Alconox
™
Disinfection/Sterilization
Solution (any one)
• Ortho-phthalaldehyde 0.55% (eg, CIDEX
• Glutaraldehyde 3.4% (eg, CIDEX Plus
Temperature-time (any one)
• 158°F (70°C) for 100 minutes
• 167°F (75°C)for 30 minutes
™
™
)
• 176°F (80°C) for 10 minutes
• 194°F (90°C) for 1 minute
STERRAD
Notes:
• Testing by ResMed has shown that the components can withstand 15 cycles of
• When using detergents, disinfectants or sterilization agents, always follow the
™
Detergent
eg, Alconox
disinfection/sterilization for the methods listed in the table.
manufacturer’s instructions.
System
STERRAD Sterilization System
To clean the headgear between patients use the method described in the
previous section “Cleaning the Mask in the Home”.
5
OPA)
Page 10

Reassembling the Mask
See section D on the illustrations sheet.
1 Twist the luer lock port caps onto the mask ports (D-1).
2 Hold the mask frame and the elbow firmly together (D-2).
3 To attach the elbow retainer, fit one side of the elbow retainer against the
groove of the elbow. While holding one wing of the elbow retainer down
(D-3a), press the other wing down until the elbow retainer clicks into place
(D-3b).
4 Rotate the elbow retainer to its original position (D-4).
5 Check that you have fitted the elbow and elbow retainer correctly by firmly
pulling the elbow away from the frame. If the elbow is fitted correctly, it
should not separate from the frame.
If the elbow comes away from the frame, try refitting the elbow retainer as
described in Steps 3 and 4. If the elbow still comes away from the frame
when you pull on it, you may need to replace the elbow retainer with a new
one.
6 Fit the grooved edge of the mask cushion to the mask frame. Fit the top
section first, then work your way around the mask, pushing the cushion
onto the frame, ensuring a good seal has been achieved.
Then push the cushion clip over the cushion and onto the mask frame,
ensuring it clicks into place in all locations (D-5).
7 Attach the forehead pads to the forehead support by inserting the pad plugs
into the two holes on the back of the forehead support (D-6). Push the pads
firmly against the forehead support to ensure that the pads fit securely into
the forehead support.
8 Connect the forehead support to the mask frame. Slide the pivots into the
pivot slot on the mask frame (D-7). Depress the forehead support tab and
move it into any of the tab positions.
9 Insert the headgear clips into the slots on the mask frame. The headgear
label should face outward and be near the patient’s neck when fitted.
Disposal
The Ultra Mirage NV Full Face Mask does not contain any hazardous
substances and may be disposed of with your normal household refuse.
6
Page 11

Technical Specifications
When determining ventilator settings, and in particular the tidal volume for
volume cycled ventilators, make appropriate allowances for mask dead space
and leak.
Unintentional Mask Leak
The Unintentional Mask Leak comprises leak between the cushion-frame and
elbow-frame interfaces.
English
Pressure
(cm H2O)
4–20 6
Maximum Leak
(L/min)
Dead Space
Dead space is the empty volume of the mask up to the elbow.
The dead space of the mask varies according to cushion sizes but is less than
260 mL.
Standards
CE designation in accordance with EC directive 93/42/EEC, class IIa.
EN ISO 14971, ISO 5356-1, ISO 594-1, ISO 10993-1 and ISO 13485.
Operating Pressure
0 to 40 cm H2O
Resistance
Drop in pressure measured
at 50 L/min: 0.5 cm H2O
at 100 L/min: 1.5 cm H2O
Dimensions
The dimensions of the mask (Medium) are:
H = 200mm, W = 100mm and D = 100mm
7
Page 12
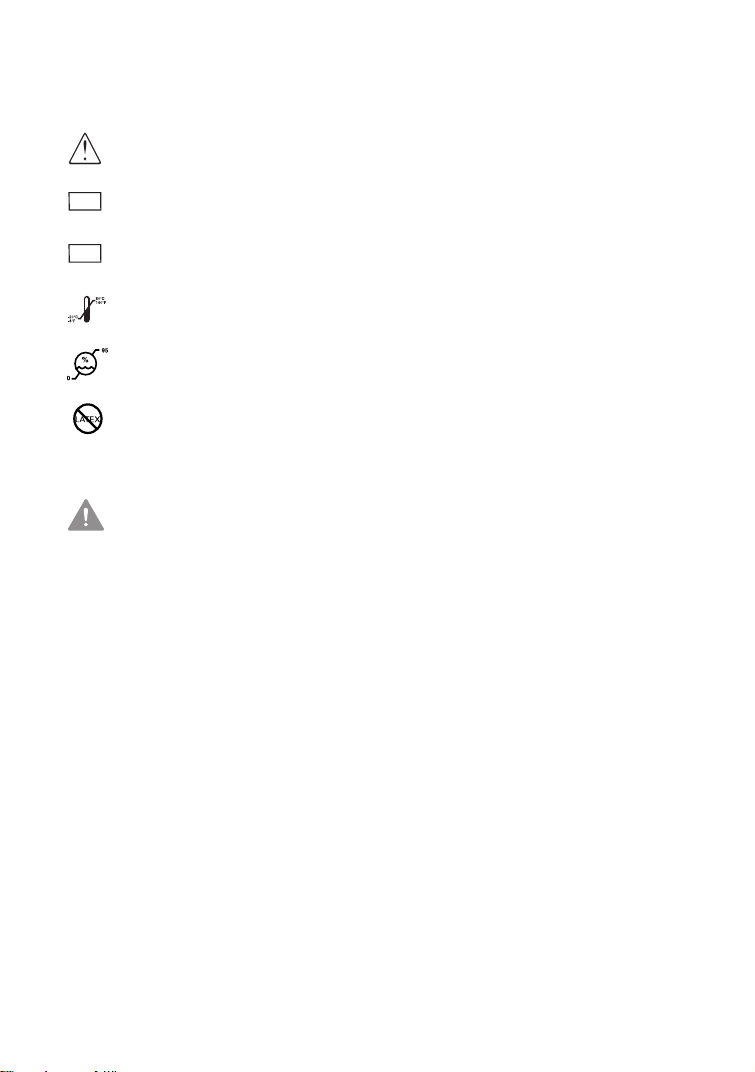
Symbols
System and Packaging
Caution, consult accompanying documents
Lot number
LOT
Part number
REF
Temperature limitation
Humidity limitation
Does not contain latex
Clinical Guide
Indicates a Warning or Caution and alerts you to a possible injury or
explains special measures for the safe and effective use of the device.
Ordering Information
Part No. Item
System
60637 UM NVFFM System Small, Standard
60636 UM NVFFM System Small, Shallow
60639 UM NVFFM System Medium, Standard
60638 UM NVFFM System Medium, Shallow
60641 UM NVFFM System Large, Standard
60640 UM NVFFM System Large, Shallow
Replacement Parts
16604 Cushion, Small, Standard (1 pk.)
16671 Cushion, Small, Shallow (1 pk.)
16605 Cushion, Medium, Standard (1 pk.)
16672 Cushion, Medium, Shallow (1 pk.)
16606 Cushion, Large, Standard (1 pk.)
16673 Cushion, Large, Shallow (1 pk.)
8
Page 13

Part No. Item
16674 Cushion clip, Small (1 pk.)
16675 Cushion clip, Medium (1 pk.)
16676 Cushion clip, Large (1 pk.)
60678 Elbow (1 pk.)
60683 Elbow retainer (1 pk.)
60681 Luer lock ports caps (2 pk.)
60682 Luer lock ports caps (10 pk.)
60115 Headgear clip (2 pk.)
60116 Headgear clip (10 pk.)
60123 Forehead pad (1 pk.)
60124 Forehead pad (10 pk.)
60675 Mask Frame, Small (1 pk.)
60676 Mask Frame, Medium (1 pk.)
60677 Mask Frame, Large (1 pk.)
60673 Forehead Support (1 pk.)
60917 Headgear (1 pk.)
Limited Warranty
ResMed warrants that your ResMed mask system, including its components:
mask frame, cushion, headgear, tubing and other accessories (“Product”) shall
be free from defects in material and workmanship for a period of ninety (90)
days from the date of purchase by the initial consumer.
For further details refer to the Warranty.
English
9
Page 14

10
Page 15

Ultra Mirage™
MASQUE FACIAL NON VENTILÉ (SANS FUITE INTENTIONNELLE)
Le masque facial Ultra Mirage NV (non ventilé) sans fuite intentionnelle est une
interface non invasive utilisée pour l’apport d’air sous pression au patient, avec
ou sans oxygène additionnel.
Usage prévu
Le masque facial Ultra Mirage NV est prévu pour une utilisation avec des
systèmes de ventilation non invasifs à valve expiratoire externe, dans le but
d’assister les patients insuffisants respiratoires.
Le masque facial Ultra Mirage NV doit être utilisé pour les patients adultes
(> 66 lb/30 kg) requérant une suppléance ventilatoire non fonctionnelle.
Le masque facial Ultra Mirage NV est prévu pour un usage multiple par un seul
patient à domicile ou pour un usage multiple par plusieurs patients en milieu
hospitalier.
ATTENTION
Selon la loi fédérale américaine, ce dispositif ne peut être vendu aux U.S.A. que
par un médecin ou sur prescription médicale.
. AVERTISSEMENTS ET PRÉCAUTIONS
• Le masque facial Ultra Mirage NV ne doit pas être utilisé sans le contrôle
d’une personne qualifiée, si le patient n’est pas en mesure d’enlever le
masque de lui-même.
• Ce masque ne doit pas être utilisé chez les patients présentant une
altération du réflexe laryngé ou d’autres conditions les prédisposant à une
aspiration en cas de régurgitation ou de vomissement.
• Le masque ne doit être porté que si le ventilateur est sous tension et s’il
fonctionne correctement.
Français
11
Page 16

•
Lorsque de l’oxygène additionnel (le cas échéant) est délivré à un débit fixe,
la concentration de l’oxygène inhalé varie en fonction des réglages de
pression, de la fréquence respiratoire du patient, de la taille de masque
sélectionnée ainsi que du niveau de fuites non intentionnelles au masque.
• Si de l’oxygène est utilisé avec le ventilateur, l’alimentation en oxygène doit
être fermée lorsque le ventilateur n’est pas en mode de fonctionnement.
Explication : lorsque le ventilateur n’est pas en marche et que
l’alimentation en oxygène n’est pas fermée, l’oxygène délivré dans le circuit
du ventilateur peut s’accumuler dans l’appareil et créer un risque d’incendie.
Cet avertissement vaut pour la plupart des ventilateurs.
• Éviter de fumer lorsque de l’oxygène est utilisé.
À propos du masque
• Le masque ne contient pas de latex, de PVC ni de DEHP. En cas de réaction
QUELCONQUE à l’un des composants du masque, arrêtez le traitement et
recherchez les causes possibles d’une telle réaction.
• ResMed a teinté le coude du masque facial Ultra Mirage NV en bleu pour
vous aider à identifier qu’il s’agit d’un masque « non ventilé » (sans fuite
intentionnelle) destiné uniquement à être utilisé avec des systèmes de
ventilation non invasifs à valve expiratoire externe.
• Le masque possède un raccord femelle conique standard de 22 mm
(ISO5356-1) pour raccordement externe au ventilateur.
• Veuillez vous référer à la section « Caractéristiques » de ce guide pour les
informations concernant les fuites au masque, l’espace mort et la
résistance.
ATTENTION
Le masque doit être nettoyé et désinfecté/stérilisé entre les patients. Veuillez
vous référer à la section « Nettoyage du masque entre les patients » pour plus
de détails.
Composants du masque
Voir la section A de la fiche d’illustrations.
Mise en place du masque
Remarque : pour des informations détaillées sur le raccordement du masque,
veuillez vous référer au mode d’emploi du ventilateur.
Voir la section B de la fiche d’illustrations.
12
Page 17

Le masque facial Ultra Mirage NV est fourni entièrement assemblé.
1 Mettez la languette du support frontal dans la position 3. (Veuillez vous
référer à l’illustration B-1 pour l’emplacement de la position 3.)
2 Détachez un des clips inférieurs du harnais. Mettez le masque sur le visage
et passez le harnais par-dessus la tête du patient (B-2). Veillez à ce que les
sangles supérieures reposent sur le front et à ce que les sangles inférieures
passent sous les oreilles.
3 Fixez à nouveau le clip du harnais à l’entourage rigide.
4 Serrez légèrement les sangles supérieures du harnais (B-3).
5 Serrez légèrement les sangles inférieures du harnais (B-4).
Les tampons du support frontal devraient reposer confortablement sur le
front du patient lorsque le masque est en place. S’ils sont inclinés et ne
reposent pas entièrement sur le front, changez la position du support
frontal.
Remarque : ne serrez pas trop les sangles du harnais au risque de rendre
le masque inconfortable, de créer des plis dans la bulle ou d’entraîner des
fuites. Le masque facial Ultra Mirage NV a été conçu pour procurer une
étanchéité confortable sans serrage excessif des sangles du harnais.
6 Une fois ajusté, le masque devrait se présenter comme indiqué (B-5).
7 Raccordez le circuit respiratoire principal au coude (B-6). Raccordez ensuite
l’extrémité libre du circuit respiratoire au ventilateur et mettez celui-ci en
marche. En cas de fuites au niveau de la bulle, il peut s’avérer nécessaire de
légèrement serrer les sangles du harnais.
8 Si le patient ne parvient pas à obtenir une étanchéité appropriée :
• repositionnez le masque en le soulevant et en plaçant la bulle
confortablement sur le visage.
• ajustez la position du support frontal en testant les quatre positions
disponibles pour trouver celle qui permet le mieux d’éviter les fuites.
• serrez légèrement les sangles du harnais.
Remarques :
• Si vous ne réussissez pas à remédier aux fuites, cela peut signifier que votre
patient a besoin d'un autre entourage rigide et/ou d'une autre taille de bulle.
• Comme c’est le cas avec tous les systèmes de ventilation par masque, des
fuites importantes peuvent apparaître entre le masque et le visage du
patient. La fuite peut varier en fonction de certains facteurs, tels que la
position du patient ou sa phase de sommeil. Les variations de fuite peuvent
perturber significativement la ventilation apportée au patient et même
Français
13
Page 18

entraîner une hypoventilation ou hyperventilation importante. L'ampleur de
ces effets dépend de la capacité du ventilateur à compenser les fuites.
• Les fuites, ou toute variation de fuite, peuvent entraîner un déclenchement
intempestif du ventilateur.
Retrait du masque
Pour retirer le masque facial Ultra Mirage NV, détachez l’un des clips inférieurs
du harnais et tirez sur le masque et le harnais pour les faire passer par-dessus
la tête du patient.
Remarque : les clips du harnais sont faciles à trouver et à détacher. Ils
permettent de retirer le masque rapidement en cas d'urgence.
Démontage pour le nettoyage
Voir la section C de la fiche d’illustrations.
1 Détachez le circuit respiratoire du masque.
2 Détachez les clips du harnais pour les libérer de l’entourage rigide. Il n’est
pas nécessaire de démonter les clips du harnais.
3 Retirez les bouchons d’entrée des ports de l’entourage rigide.
4 Détachez la bulle de l’entourage rigide en appuyant sur le clip se trouvant à
sa base, et en tirant légèrement la bulle.
Ensuite, détachez le clip de la bulle.
5 Pour détacher le coude de l’entourage rigide, soulevez l’aile droite de
l’anneau de retenue du coude (C-1) et poussez-la (C-2) par-dessus le bord
droit en L de l’entourage rigide.
6 Faites tourner l’anneau de retenue du coude pour le mettre dans la position
indiquée à la Figure C-3. L’anneau de retenue du coude est maintenant dans
la position correcte pour son retrait.
7 Pour retirer l’anneau de retenue du coude, maintenez une de ses ailes en
place en appuyant dessus et tirez l’autre vers l’extérieur (C-4a), puis vers le
haut (C-4b) pour la faire passer par-dessus le coude. Retirez l’anneau de
retenue du coude et le coude de l’entourage rigide.
8 Pour retirer le support frontal du masque, appuyez sur la languette
(C-5a), puis déplacez le support frontal vers le haut jusqu’à ce qu’il soit
possible de le retirer de l’entourage rigide (C-5b).
9 Tirez fermement sur la base des tiges du tampon du support frontal pour
retirer le tampon du support (C-6).
14
Page 19

Nettoyage du masque à domicile
Remarques:
• Lavez-vous les mains avant de nettoyer le masque.
• Il est important de toujours laver le harnais à la main.
• Il est possible de nettoyer le harnais sans avoir à le détacher de ses clips.
Quotidien/Après chaque utilisation
Lavez les composants du masque à la main dans de l'eau tiède (env. 86ºF/30ºC)
à l'aide d'un savon ou d'un détergent doux. Rincez tous les composants
soigneusement et laissez-les sécher à l'abri de la lumière directe du soleil.
Les composants du masque ont été testés à l'aide d'un savon sans parfum
TM
.
Dove
Hebdomadaire
Lavez le harnais à la main dans de l'eau tiède (env. 86ºF/30ºC) à l'aide d'un
savon ou d'un détergent doux. Rincez soigneusement et laissez-le sécher à
l'abri de la lumière directe du soleil.
ATTENTION
• Ne pas utiliser d’eau de Javel, de chlore, d’alcool, de solutions à base
d’aromates, ni de savons hydratants ou antibactériens, ni d’huiles
parfumées pour le lavage des composants du masque. Ils risquent
d’endommager le produit et de réduire sa durée de vie.
• Ne pas exposer les composants du masque ni le circuit respiratoire à la
lumière directe du soleil au risque de les abîmer.
• Le harnais est sensible à la chaleur et ne doit pas être repassé.
• En cas de détérioration visible d’un des composants du masque (par ex.
fissures, fendillements, déchirures, etc.), le composant en question doit
être jeté et remplacé.
Français
Nettoyage du masque entre les patients
Tous les composants du masque peuvent être désinfectés/stérilisés suivant
les procédures validées.
Le tableau suivant donne un récapitulatif des procédures validées de
désinfection/stérilisation pour le masque. Veuillez vous référer au site Internet
www.resmed.com/masks/sterilization/americas pour plus de détails.
15
Page 20

Méthodes Pré-désinfection/
Chimique Détergent
Thermique Détergent
STERRAD
Remarques :
• Les essais réalisés par ResMed ont montré que les composants peuvent résister à
15 cycles de désinfection/stérilisation suivant les méthodes listées dans ce tableau.
• Suivez impérativement les instructions du fabricant lors de l'utilisation de détergents, de
désinfectants ou d'agents de stérilisation.
stérilisation
par ex., Alconox™
par ex., Alconox
™
Détergent
par ex., Alconox
Désinfection/Stérilisation
Solution (au choix)
• Ortho-phthalaldéhyde à 0,55 %
(par ex. CIDEX™ OPA)
• Glutaraldéhyde à 3,4 % (par ex. CIDEX Plus™)
Température-durée (au choix)
• 100 minutes à 158°F (70°C)
• 30 minutes à 167°F (75°C)
• 10 min utes à 176° F (8 0°C )
• 1 minute à 194°F (90°C).
Système
Appareil de stérilisation STERRAD
Pour nettoyer le harnais entre les patients, suivez l’une des méthodes décrites
dans la section précédente « Nettoyage du masque à domicile ».
Remontage du masque
Voir la section D de la fiche d’illustrations.
1 Vissez les bouchons d’entrée des raccords Luer sur les ports du masque
(D-1).
2 Tenez bien en place l’entourage rigide avec le coude inséré (D-2).
3 Pour fixer l’anneau de retenue du coude, mettez un côté de l’anneau contre
la rainure du coude. Tout en maintenant une des ailes de l’anneau de
retenue du coude en place (D-3a), appuyez sur l’autre jusqu’à ce que
l’anneau se verrouille en place (D-3b).
4 Faites tourner l’anneau pour le mettre dans sa position initiale (D-4).
5 Vérifiez que le coude et l’anneau de retenue sont bien en place en tirant
fermement sur le coude. Vous pouvez considérer que le coude est
correctement en place s’il ne se détache pas de l’entourage rigide.
Si le coude se détache de l’entourage rigide, essayez de remettre en place
l’anneau de retenue du coude comme indiqué aux étapes 3 et 4. Si le coude
se détache toujours de l’entourage rigide lorsque vous tirez dessus, vous
devrez peut-être remplacer l’anneau de retenue du coude par un nouvel
anneau.
6 Fixez le bord à rainure de la bulle du masque à l’entourage rigide.
Commencez par monter la section supérieure, puis le contour du masque
tout en poussant la bulle sur l’entourage rigide et en vous assurant d’obtenir
une bonne étanchéité.
16
Page 21

Fixez ensuite le clip de la bulle à l’entourage rigide en le faisant passer
par-dessus la bulle tout en vous assurant qu’il se verrouille partout en
position (D-5).
7 Fixez le tampon frontal au support frontal en insérant les tiges du tampon
dans les deux trous prévus à cet effet au dos du support frontal (D-6).
Pressez fermement le tampon contre le support frontal pour vous assurer
qu’il est bien en place.
8 Remettez le support frontal sur l’entourage rigide. Mettez les pivots dans
les fentes de l’entourage rigide prévues à cet effet (D-7). Appuyez sur la
languette du support frontal et mettez-la dans la position qui vous convient.
9 Insérez les clips du harnais dans les fentes de l’entourage rigide prévues à
cet effet. L’étiquette du harnais doit être tournée vers l’extérieur et se
trouver près du cou du patient lorsque le masque est en place.
Élimination
Le masque facial Ultra Mirage NV ne contient aucune matière dangereuse
et peut être jeté avec les ordures ménagères.
Caractéristiques
Lors de la détermination des réglages du ventilateur, et en particulier du
volume courant pour les ventilateurs dont le cycle dépend du volume, vous
devez tenir compte de l’espace mort du masque et des fuites.
Fuites au masque non intentionnelles
Les fuites au masque non intentionnelles sont celles qui se produisent entre
la bulle et l’entourage ou entre le coude et l’entourage.
Français
Pression
(cm H
O)
2
4–20 6
Fuite maximale
(l/min)
Espace mort
L’espace mort correspond au volume vide entre le masque et le coude.
L’espace mort du masque varie en fonction de la taille de bulle mais est
inférieur à 260 ml.
17
Page 22

Normes
Marquage CE conformément à la directive CE 93/42/CEE, Classe IIa.
EN ISO 14971, ISO 5356-1, ISO 594-1, ISO 10993-1 et ISO 13485.
Pression de fonctionnement
0 à 40 cm H2O
Résistance
Chute de pression mesurée
à 50 l/min : 0,5 cm H
O
2
à 100 l/min : 1,5 cm H2O
Dimensions
Les dimensions du masque (Médium) sont les suivantes :
H = 200mm, l = 100mm et P = 100mm
Symboles
Masque et emballage
Attention, veuillez consulter la documentation jointe
Numéro de lot
LOT
Code produit
REF
Limites de température
Limites d’humidité
Ne contient pas de latex
Guide clinique
Indique un avertissement ou une précaution et vous met en garde
contre le risque de blessure ou explique des mesures particulières
permettant d’assurer une utilisation efficace et sûre de l’appareil.
18
Page 23

Informations de commande
Code
produit
Masque
60637 Masque facial Ultra Mirage NV Petit, Standard
60636 Masque facial Ultra Mirage NV Petit, Shallow
60639 Masque facial Ultra Mirage NV Médium, Standard
60638 Masque facial Ultra Mirage NV Médium, Shallow
60641 Masque facial Ultra Mirage NV Large, Standard
60640 Masque facial Ultra Mirage NV Large, Shallow
Pièces de rechange
16604 Bulle, Petite, Standard (par 1)
16671 Bulle, Petite, Shallow (par 1)
16605 Bulle, Médium, Standard (par 1)
16672 Bulle, Médium, Shallow (par 1)
16606 Bulle, Large, Standard (par 1)
16673 Bulle, Large, Shallow (par 1)
16674 Clip de la bulle, Petit (par 1)
16675 Clip de la bulle, Médium (par 1)
16676 Clip de la bulle, Large (par 1)
60678 Coude (par 1)
60683 Anneau de retenue du coude (par 1)
60681 Bouchons d’entrée des raccords Luer (par 2)
60682 Bouchons d’entrée des raccords Luer (par 10)
60115 Clip du harnais (par 2)
60116 Clip du harnais (par 10)
60123 Tampon frontal (par 1)
60124 Tampon frontal (par 10)
60675 Entourage rigide, Petit (par 1)
60676 Entourage rigide, Médium (par 1)
60677 Entourage rigide, Large (par 1)
60673 Support frontal (par 1)
60917 Harnais (par 1)
Article
Français
19
Page 24

Garantie limitée
ResMed garantit votre masque ResMed, y compris ses composants, à savoir
l’entourage rigide, la bulle, le harnais, le circuit respiratoire et les autres
accessoires (« Produit »), contre tout défaut de matériaux et de main-d’œuvre
pour une période de quatre-vingt-dix (90) jours à compter de la date d’achat par
le client d’origine.
Pour plus de détails, veuillez vous référer à la garantie.
20
Page 25

Ultra Mirage™
MASCARILLA FACIAL SIN ORIFICIOS DE VENTILACIÓN
La Mascarilla Facial Ultra Mirage NV (sin orificios de ventilación) es un
dispositivo no invasivo utilizado para canalizar el flujo de aire con o sin oxígeno
suplementario.
Uso indicado
La Mascarilla Facial Ultra Mirage NV ha sido concebida para ser utilizada con
sistemas de ventilación con válvula de escape activo de gases con el fin de
proporcionar asistencia ventilatoria a pacientes con insuficiencia respiratoria o
problemas de respiración.
La Mascarilla Facial Ultra Mirage NV debe usarse en pacientes adultos
(>66 lb/30 kg) que necesiten asistencia ventilatoria que no sea de apoyo vital.
La Mascarilla Facial Ultra Mirage NV está diseñada para que un único paciente
pueda usarla en repetidas ocasiones en su domicilio o para utilizarse en varios
pacientes en hospitales o instituciones.
PRECAUCIÓN
En EE.UU., la ley federal exige que este dispositivo sea vendido únicamente
por un médico o por su orden.
. ADVERTENCIAS Y PRECAUCIONES
• La Mascarilla Facial Ultra Mirage NV no debe usarse sin que exista un
control por parte de personal calificado en el caso de pacientes que no
puedan quitarse la mascarilla por sí mismos.
• No se debe utilizar esta mascarilla en pacientes con reflejos laríngeos
reducidos u otras condiciones que lo predispongan a la aspiración en caso
de regurgitar o vomitar.
• No debe tenerse puesta la mascarilla a menos que el sistema de ventilación
esté encendido y funcionando correctamente.
Español
21
Page 26

•
A un caudal fijo de oxígeno complementario (si se usa), la concentración de
oxígeno inhalado variará dependiendo de los parámetros de presión, el
patrón respiratorio del paciente, el tamaño de la mascarilla elegida y la
cantidad de fuga de aire.
• Si se utiliza oxígeno con el ventilador, el flujo del mismo deberá cerrarse
cuando el ventilador no esté funcionando.
Explicación: Mientras el ventilador no esté funcionando, si se deja abierto
el flujo de oxígeno, el oxígeno suministrado al tubo de ventilación puede
acumularse dentro del ventilador. El oxígeno acumulado dentro del
ventilador conlleva un riesgo de incendio. Esta advertencia se aplica a la
mayoría de los tipos de ventiladores.
• Evite fumar mientras se está usando oxígeno.
Acerca de la mascarilla
• El sistema de la mascarilla no contiene materiales de látex, PVC o DEHP. Si
el paciente presenta CUALQUIER reacción ante alguna de las partes del
sistema de la mascarilla, suspenda su uso e investigue las posibles causas.
• ResMed ha teñido el codo de la Mascarilla Facial Ultra Mirage NV de azul
para identificarla como mascarilla sin orificios de ventilación para ser
utilizada únicamente con sistemas de ventilación no invasivos con escape
activo de gases.
• La mascarilla tiene un conector hembra cónico de 22 mm estándar
(ISO5356-1) para su conexión externa al ventilador.
• Consulte la sección "Especificaciones técnicas" de esta guía para obtener
más información sobre la resistencia, el espacio muerto y fugas de la
mascarilla.
PRECAUCIÓN
La mascarilla debe limpiarse y desinfectarse o esterilizarse si va a ser utilizada
entre varios pacientes. Consulte la sección “Limpieza de la mascarilla entre
pacientes” para obtener más información.
Piezas de la mascarilla
Véase la sección A de la hoja de figuras.
Colocación de la mascarilla
Nota: Consulte las instrucciones de funcionamiento del sistema de ventilación
para obtener información detallada sobre la conexión de la mascarilla.
Véase la sección B de la hoja de figuras.
22
Page 27

La Mascarilla Facial Ultra Mirage NV viene completamente montada.
1 Desplace la lengüeta del apoyo para la frente hasta la posición 3. (Véase la
figura B-1 para ubicar la posición 3.)
2 Desabroche uno de los broches inferiores del arnés. Coloque la mascarilla
sobre la cara y coloque el arnés tirando de él por encima de la cabeza del
paciente (Fig. B-2). Asegúrese de que las correas superiores pasen sobre
la frente y de que las correas inferiores queden por debajo de las orejas.
3 Vuelva a enganchar el broche del arnés al armazón de la mascarilla.
4 Ajuste con suavidad las correas superiores del arnés (Fig. B-3).
5 Ajuste con suavidad las correas inferiores del arnés (Fig. B-4).
Las almohadillas del apoyo para la frente deben ajustarse de forma cómoda
en la frente cuando la mascarilla esté colocada en su sitio. Si las
almohadillas tienen ángulos y no se ajustan completamente en la frente, se
debe cambiar la posición de la lengüeta del apoyo para la frente.
Nota: No ajuste excesivamente las correas del arnés, ya que esto puede
resultar incómodo y provocar pliegues en la almohadilla y fugas por la
mascarilla. La Mascarilla Facial Ultra Mirage NV ha sido diseñada para
proporcionar un cierre cómodo sin necesidad de ajustar el arnés en exceso.
6 La mascarilla puesta debe verse así (Fig. B-5).
7 Conecte el tubo de aire principal al codo (Fig. B-6). Después conecte el
extremo libre del tubo de aire al ventilador y enciéndalo. Si el paciente sufre
fugas de aire alrededor de la almohadilla, puede que sea necesario apretar
suavemente las correas del arnés.
8 Si el paciente no puede ajustar la mascarilla correctamente:
• recoloque la mascarilla levantándola y colocando la almohadilla de forma
cómoda sobre la cara,
• ajuste la posición de la lengüeta del apoyo para la frente; pruebe las
cuatro posiciones hasta encontrar la que mejor prevenga el riesgo de
fugas, y
• ajuste suavemente las correas del arnés.
Notas:
• Si no es posible evitar las fugas, puede que el paciente necesite otro
armazón de mascarilla u otro tamaño de almohadilla.
• Al igual que con todos los sistemas de ventilación por mascarilla, se puede
dar una fuga considerable entre la mascarilla y la cara del paciente. La fuga
puede variar dependiendo de factores tales como la postura del paciente y
la fase del sueño. La variación en la fuga puede afectar la ventilación del
paciente de manera considerable, pudiendo incluso producir una
Español
23
Page 28

hiperventilación o una hipoventilación profundas. La gravedad de este
efecto dependerá de la capacidad del ventilador para compensar la fuga.
• La fuga o la variación en la fuga puede provocar una activación errónea del
ventilador.
Extracción de la mascarilla
Para extraer la Mascarilla Facial Ultra Mirage NV, desabroche uno de los
broches inferiores del arnés y tire de la mascarilla y del arnés hacia arriba, por
encima de la cabeza del paciente.
Nota: Los broches del arnés son fáciles de localizar y de desabrochar. Permiten
extraer con rapidez la mascarilla de la cara en caso de emergencia.
Desmontaje para la limpieza
Véase la sección C de la hoja de figuras.
1 Desconecte la mascarilla del tubo de aire.
2 Desenganche los broches del arnés para separarlos del armazón de la
mascarilla. No es necesario retirar los broches del arnés.
3 Retire los tapones de los puertos del armazón de la mascarilla.
4 Separe la almohadilla del armazón presionando la traba de la almohadilla en
la base del armazón de la mascarilla y tirando con cuidado para separarla.
Esto liberará la almohadilla y la traba de la almohadilla.
Después, separe la almohadilla de la traba de la almohadilla.
5 Para separar el codo del armazón, eleve (Fig. C-1) y empuje (Fig. C-2) el ala
derecha del retenedor del codo pasándola por encima del borde derecho en
forma de L del armazón de la mascarilla.
6 Haga girar el retenedor del codo hasta la posición que se muestra en la
figura C-3. El retenedor del codo se encuentra ahora en la posición correcta
para ser retirado.
7 Para retirar el retenedor del codo, mantenga presionada una de las alas del
retenedor mientras tira firmemente de la otra primero hacia afuera
(Fig. C-4a) y luego hacia arriba (Fig. C-4b), por encima de la parte superior
del codo. Retire el retenedor del codo y el codo del armazón de la mascarilla.
8 Para retirar el apoyo para la frente de la mascarilla, presione la lengüeta
(Fig. C-5a) y desplácela hacia arriba hasta que se pueda deslizar y separar
del armazón de la mascarilla (Fig. C-5b).
9 Tire con firmeza de la base de los tapones de las almohadillas para la frente
para separar las almohadillas del apoyo para la frente (Fig. C-6).
24
Page 29

Limpieza de la mascarilla en el domicilio
Notas:
• Lávese las manos antes de limpiar la mascarilla.
• Es importante lavar siempre a mano el arnés.
• Se puede lavar el arnés sin desmontarlo de los broches.
Diariamente o después de cada uso
Lave los componentes de la mascarilla a mano en agua tibia (aprox. 30ºC/86ºF)
con jabón o detergente suave. Enjuague bien los componentes y déjelos secar
al aire alejados de la luz directa del sol.
Los componentes de la mascarilla se probaron con una barra de jabón sin
aroma Dove
Semanalmente
Lave el arnés a mano en agua tibia (aprox. 30ºC/86ºF) con jabón o detergente
suave. Enjuáguelo bien y déjelo secar al aire alejado de la luz directa del sol.
• No utilice soluciones a base de lejía, cloro, alcohol o aromas, jabones
hidratantes o antibacterianos, o aceites perfumados para limpiar los
componentes de la mascarilla. Estas soluciones pueden causar daños o
reducir la vida útil del producto.
• No exponga ninguna pieza del sistema de mascarilla o tubo de aire a la luz
directa del sol, ya que esto podría deteriorar el producto.
• El arnés es sensible al calor y nunca debe plancharse.
• Si se advierte algún signo de deterioro visible (como grietas, rajaduras,
roturas, etc.) en uno de los componentes de la mascarilla, dicho
componente debería ser desechado y cambiado por uno nuevo.
TM
.
PRECAUCIÓN
Español
Limpieza de la mascarilla entre pacientes
Todos los componentes de la mascarilla pueden desinfectarse o esterilizarse
utilizando los procedimientos recomendados y comprobados.
La tabla siguiente muestra un resumen de los procedimientos recomendados
y comprobados para desinfectar o esterilizar el sistema. Para obtener más
información, consulte el sitio en Internet
www.resmed.com/masks/sterilization/americas.
25
Page 30

Métodos Previo a la des infección o
Químicos Detergente
Té rm i c os Detergente
STERRAD
Notas:
• Las pruebas realizadas por ResMed han demostrado que los componentes pueden
soportar 15 ciclos de desinfección o esterilización con los métodos indicados en la tabla.
• Siga siempre las instrucciones del fabricante para la utilización de detergentes,
desinfectantes o agentes esterilizantes.
esterilización
p. ej., Alconox
p. ej., Alconox
™
Detergente
p. ej., Alconox
™
Desinfección o esterilización
Solución (cualquiera)
• Ortoftalaldehído 0,55% (p. ej., CIDEX™ OPA)
• Glutaraldehído 3,4% (p. ej., CIDEX Plus™)
Tiempo de temperatura (cualquiera)
• 70 °C (158 °F) durante 100 minutos o
• 75 °C (167 °F) durante 30 minutos o
• 80 °C (176 °F) durante 10 minutos o
• 90 °C (194 °F) durante 1 minuto.
Sistema
Sistema de esterilización STERRAD
Para limpiar el arnés entre pacientes, emplee el método descrito en la sección
previa “Limpieza de la mascarilla en el domicilio”.
Montaje de la mascarilla
Véase la sección D en la hoja de figuras.
1 Inserte los tapones de puerto Luer haciéndolos girar sobre los puertos de la
mascarilla (Fig. D-1).
2 Sujete de forma conjunta el armazón de la mascarilla y el codo firmemente
(Fig. D-2).
3 Para fijar el retenedor del codo, inserte un lado del retenedor contra la ranura
del codo. Mientras mantiene presionada una de las alas del retenedor del
codo (Fig. D-3a), presione la otra ala hasta que el retenedor del codo quede
fijo en su posición (Fig. D-3b).
4 Haga girar el retenedor del codo hasta su posición original (Fig. D-4).
5 Compruebe que haya colocado correctamente el codo y el retenedor del
codo tirando firmemente del codo para separarlo del armazón. Si el codo
está colocado de forma correcta, no se separará del armazón.
Si el codo se separara del armazón, intente volver a colocar el retenedor del
codo como se describió en los pasos 3 y 4. Si el codo vuelve a separarse del
armazón al tirar de él, es probable que deba cambiar el retenedor del codo
por uno nuevo.
6 Coloque el borde ranurado de la almohadilla sobre el armazón de la
mascarilla. Encaje la sección superior primero y después siga el contorno de
la mascarilla presionando la almohadilla para que se acople al armazón,
asegurándose de que consigue un buen ajuste.
26
Page 31

Después presione la traba de la almohadilla por encima de la almohadilla y
contra el armazón, asegurándose de que quede fija en posición en todo su
contorno (Fig. D-5).
7 Coloque las almohadillas para la frente en el apoyo para la frente
introduciendo los tapones de las almohadillas en los dos orificios de la parte
trasera del apoyo para la frente (Fig. D-6). Presione las almohadillas
firmemente contra el apoyo para la frente para asegurar que las almohadillas
están firmemente ajustadas en dicho apoyo.
8 Conecte el apoyo para la frente al armazón de la mascarilla. Introduzca los
pivotes en las ranuras del armazón de la mascarilla (Fig. D-7). Presione la
lengüeta del apoyo para la frente y deslícela hacia una de sus posiciones.
9 Introduzca los broches del arnés en las ranuras del armazón de la mascarilla.
Una vez colocado el arnés, la etiqueta de éste debe quedar en el lado
exterior y cerca del cuello del paciente.
Desecho
La Mascarilla Facial Ultra Mirage NV no contiene sustancias peligrosas y puede
desecharse junto con los residuos domésticos normales.
Especificaciones técnicas
Al determinar los ajustes del ventilador y, en especial, el volumen corriente en
el caso de los ventiladores con ciclaje de volumen, tenga en cuenta las
cantidades apropiadas de espacio muerto y fuga de la mascarilla.
Fugas accidentales de la mascarilla
Las fugas accidentales de la mascarilla incluyen las fugas producidas entre las
interfaces de la estructura de la almohadilla y el codo.
Español
Presión
(cm H2O)
4–20 6
Fuga máxima
(l/min)
Espacio muerto
El espacio muerto es el volumen vacío dentro de la mascarilla hasta la altura
del codo.
El espacio muerto de la mascarilla varía según el tamaño de la almohadilla, pero
es inferior a 260 ml.
27
Page 32

Normas
Designación CE conforme a la directiva CE 93/42/CEE, clase IIa.
EN ISO 14971, ISO 5356-1, ISO 594-1, ISO 10993-1 y ISO 13485.
Presión de funcionamiento
0 a 40 cm H2O
Resistencia
Caída de presión medida
a 50 l/min: 0,5 cm H
O
2
a 100 l/min: 1,5 cm H2O
Dimensiones
Las dimensiones de la mascarilla (mediana) son:
altura = 200 mm, anchura = 100 mm y profundidad = 100 mm
Símbolos
Sistema y embalaje
Precaución: consulte los documentos adjuntos
Número de lote
LOT
Número de pieza
REF
Límite de temperatura
Límite de humedad
No contiene látex
Manual clínico
Indica advertencia o precaución, y le avisa sobre una posible lesión o le
describe medidas especiales que deben adoptarse para utilizar el
dispositivo de modo seguro y eficaz.
28
Page 33

Información para solicitudes de envío
Núm. de
pieza
Sistema
60637 Sistema de Mascarilla Facial Ultra Mirage NV Pequeña, estándar
60636 Sistema de Mascarilla Facial Ultra Mirage NV Pequeña, plana
60639 Sistema de Mascarilla Facial Ultra Mirage NV Mediana, estándar
60638 Sistema de Mascarilla Facial Ultra Mirage NV Mediana, plana
60641 Sistema de Mascarilla Facial Ultra Mirage NV Grande, estándar
60640 Sistema de Mascarilla Facial Ultra Mirage NV Grande, plana
Repuestos
16604 Almohadilla Pequeña, estándar (paq. 1)
16671 Almohadilla Pequeña, plana (paq. 1)
16605 Almohadilla Mediana, estándar (paq. 1)
16672 Almohadilla Mediana, plana (paq. 1)
16606 Almohadilla Grande, estándar (paq. 1)
16673 Almohadilla Grande, plana (paq. 1)
16674 Traba de la almohadilla Pequeña (paq. 1)
16675 Traba de la almohadilla Mediana (paq. 1)
16676 Traba de la almohadilla Grande (paq. 1)
60678 Codo (paq. 1)
60683 Retenedor del codo (paq. 1)
60681 Tapones de puerto Luer (paq. 2)
60682 Tapones de puerto Luer (paq. 10)
60115 Broche del arnés (paq. 2)
60116 Broche del arnés (paq. 10)
60123 Almohadilla para la frente (paq. 1)
60124 Almohadilla para la frente (paq. 10)
60675 Armazón de la mascarilla Pequeño (paq. 1)
60676 Armazón de la mascarilla Mediano (paq. 1)
60677 Armazón de la mascarilla Grande (paq. 1)
60673 Apoyo para la frente (paq. 1)
60917 Arnés (paq. 1)
Artículo
Español
29
Page 34

Garantía limitada
ResMed garantiza que el sistema de mascarilla ResMed, incluidos el armazón,
la almohadilla, el arnés, el tubo y los demás accesorios (el “producto”) no
tendrá defectos de material ni de mano de obra durante un periodo de noventa
(90) días a partir de la fecha de compra por parte del consumidor inicial.
Para obtener información más detallada, consulte la Garantía.
30
Page 35

Ultra Mirage™
MÁSCARA FACIAL NÃO VENTILADA
A Máscara Facial Não Ventilada Ultra Mirage é um dispositivo não invasivo
utilizado para canalizar o fluxo de ar com ou sem suplemento de oxigênio.
Função
A Máscara Facial Não Ventilada Ultra Mirage deve ser utilizada com sistemas
de ventilação de válvula exaustora ativa, a fim de proporcionar ventilação
auxiliar a pacientes com insuficiência ou falha respiratória.
A Máscara Facial Não Ventilada Ultra Mirage deve ser utilizada em pacientes
adultos (pesando mais de 66 lb / 30 kg), que necessitem de ventilação
suplementar não vital.
A Máscara Facial Não Ventilada Ultra Mirage é projetada para reutilização no
ambiente doméstico (um paciente), ou no ambiente hospitalar / institucional
(vários pacientes).
PRECAUÇÃO
Nos EUA, a lei federal limita a venda deste dispositivo a médicos ou por ordem
destes.
. ADVERTÊNCIAS E PRECAUÇÕES
• A Máscara Facial Não Ventilada Ultra Mirage não deve ser utilizada, sem
supervisão qualificada, por pacientes que sejam incapazes de remover a
máscara sozinhos.
• A máscara não deve ser utilizada em pacientes que apresentem deficiência
de reflexos laríngeos ou outras condições que possam provocar aspiração
no caso de regurgitação ou vômito.
• A máscara não deve ser usada sem que o sistema de ventilação esteja
ligado e operando adequadamente.
Português
31
Page 36

•
Caso seja utilizado um fluxo de oxigênio suplementar constante, a
concentração de oxigênio inspirado variará dependendo dos ajustes de
pressão, do padrão respiratório do paciente, da escolha do tamanho da
máscara, e da fuga através da mesma.
• Caso haja utilização de oxigênio com o ventilador, deve-se desligar o fluxo
de oxigênio quando o ventilador não estiver operando.
Explicação: quando o ventilador não estiver em funcionamento e o fluxo de
oxigênio estiver ligado, o oxigênio canalizado para o tubo do ventilador pode
se acumular dentro do corpo do ventilador. O oxigênio acumulado dentro do
corpo do ventilador gera risco de incêndio. Esta advertência se aplica à
maioria dos ventiladores.
• Favor abster-se de fumar durante a utilização de oxigênio.
Sobre a Máscara
• A máscara não contém materiais feitos de látex, PVC ou DEHP. Se o
paciente apresentar QUALQUER reação a algum componente da máscara,
o uso da mesma deve ser interrompido, e devem-se investigar as causas
possíveis.
• A ResMed fabricou o cotovelo da Máscara Facial Não Ventilada Ultra Mirage
em cor azul para identificá-la como uma máscara não ventilada para ser
utilizada apenas com sistemas de ventilação não invasivos com exaustão
ativa.
• A máscara possui um ajuste cônico fêmea padrão de 22 mm (ISO5356-1)
para conectá-la externamente ao ventilador.
• Consulte a seção “Especificações Técnicas” deste manual para obter
informações sobre a fuga da máscara, espaço morto e resistência.
PRECAUÇÃO
A máscara tem que ser limpa e desinfetada/esterilizada se for utilizada entre
pacientes. Consulte a seção "Limpeza da Máscara entre Pacientes" para obter
mais informações.
Peças da Máscara
Consulte a seção A na folha de ilustrações.
32
Page 37

Colocação da Máscara
Nota: Consulte as instruções de operação pertinentes ao sistema de
ventilação para obter informações detalhadas sobre a conexão da máscara.
Consulte a seção B na folha de ilustrações.
A Máscara Facial Não Ventilada Ultra Mirage é fornecida inteiramente
montada.
1 Mova a tira do suporte da testa para a Posição 3. (Consulte a ilustração B-1
para localizar a Posição 3.)
2 Desconecte uma das presilhas inferiores do arnês. Ponha a máscara no
rosto do paciente e coloque o arnês na cabeça (B-2). Assegure-se que as
tiras superiores passem através da testa e as tiras inferiores passem sob as
orelhas do paciente.
3 Volte a prender a presilha do arnês à armação da máscara.
4 Aperte suavemente as tiras superiores do arnês (B-3).
5 Aperte suavemente as tiras inferiores do arnês (B-4).
As almofadas do suporte da testa devem repousar confortavelmente na
testa do paciente quando a máscara estiver ajustada no lugar. Se as
almofadas estiverem tortas ou mal ajustadas à testa do paciente, mude a
posição da tira do suporte da testa.
Nota: não aperte em excesso as tiras do arnês, pois isto pode causar
desconforto, vincos e fugas. A Máscara Facial Não Ventilada Ultra Mirage foi
projetada para proporcionar uma vedação confortável sem a necessidade de
se dar um aperto excessivo.
6 Após o ajuste, a máscara deverá ter a aparência da figura (B-5).
7 Conecte o tubo de ar principal ao cotovelo (B-6). Em seguida, conecte a
extremidade livre do tubo de ar ao ventilador e ligue-o. Se houver fuga de ar
em torno da almofada, pode ser necessário um ligeiro aperto às tiras do
arnês.
8 Caso a vedação não esteja adequada:
• Erga um pouco a máscara e posicione a almofada confortavelmente no
rosto.
• Ajuste a posição da tira do suporte da testa atuando nas quatro posições
até descobrir aquela que melhor impede as fugas.
• Aperte delicadamente as tiras do arnês.
Notas:
• Se não for possível impedir as fugas, poderá ser necessário uma outra
armação para a máscara e/ou uma almofada de tamanho diferente.
Português
33
Page 38

•
Isto porque podem ocorrer fugas significativas entre a máscara e o rosto do
paciente em qualquer sistema de ventilação. A intensidade da fuga pode
variar dependendo de fatores tais como a posição do paciente e o estágio
do sono. A variação da fuga pode afetar bastante a ventilação do paciente,
podendo produzir hipoventilação ou hiperventilação profundas. A magnitude
deste efeito depende da capacidade do ventilador de compensar a fuga.
• A fuga ou a variação do mesmo pode originar mau funcionamento do
ventilador.
Remoção da Máscara
Para remover a Máscara Facial Não Ventilada Ultra Mirage, solte uma das
presilhas inferiores do arnês e puxe o equipamento por cima da cabeça do
paciente.
Nota: As presilhas do arnês são fáceis de localizar e de soltar, permitindo uma
rápida remoção da máscara do rosto do paciente em caso de emergência.
Desmontagem para Limpeza
Consulte a seção C na folha de ilustrações.
1 Separe a máscara do tubo de ar.
2 Desconecte as presilhas do arnês para soltá-las da armação da máscara.
Não é necessário remover as presilhas do arnês.
3 Remova as tampas das portas da armação da máscara.
4 Separe o conjunto das almofadas da armação da máscara pressionando a
presilha da almofada localizada na base da armação da máscara, e puxe com
delicadeza. Este procedimento solta a almofada e a presilha.
Em seguida, separe a almofada da presilha.
5 Para separar o cotovelo da armação, erga (C-1) e empurre (C-2) a aba direita
do retentor do cotovelo por sobre a saliência em formato de L da armação
da máscara.
6 Gire o retentor do cotovelo até a posição mostrada na figura C-3. O retentor
está agora na posição correta para sua remoção.
7 Para remover o retentor do cotovelo, mantenha abaixada uma das abas do
retentor, e puxe firmemente a outra aba para fora (C-4a) e para cima (C-4b)
por sobre o topo do cotovelo. Remova o retentor do cotovelo e o cotovelo
da armação da máscara.
8 Para remover o suporte da testa, pressione a tira (C-5a) e mova-a para cima
até que se possa deslizá-la para fora da armação da máscara (C-5b).
9 Puxe com firmeza a base dos tampões da almofada do suporte da testa para
soltar as almofadas do suporte da testa (C-6).
34
Page 39

Limpeza da Máscara no Lar
Notas:
• Lave suas mãos antes de realizar a limpeza da máscara.
• É importante sempre lavar o arnês à mão.
• O arnês pode ser lavado sem ser desmontado das presilhas.
Diariamente / Após cada utilização
Lave os componentes da máscara em água morna (aproximadamente 86°F /
30°C) utilizando sabão ou detergente suave. Enxágüe bem os componentes e
deixe-os secar ao ar, longe da luz solar direta.
Os componentes da máscara foram testados com o uso do sabonete de
beleza Dove
Semanalmente
Lave os componentes da máscara em água morna (aproximadamente 86°F /
30°C) utilizando sabão ou detergente suave. Enxágüe bem os componentes e
deixe-os secar ao ar, longe da luz solar direta.
TM
Unscented (sem perfume).
PRECAUÇÃO
• Não utilize água sanitária, cloro, álcool ou soluções aromáticas, sabões
antibacterianos ou umedecedores, ou óleos perfumados para limpar os
componentes da máscara, pois tais substâncias podem danificar o produto
e reduzir sua vida útil.
• As partes do sistema da máscara ou do tubo de ar não devem ser
diretamente expostas à luz solar, pois isto pode causar a deterioração do
produto.
• O arnês é sensível ao calor e não deve ser passado a ferro.
• Se houver qualquer deterioração aparente de algum componente da
máscara (rachaduras, fendas, rasgos, etc), o mesmo deverá ser substituído.
Limpeza da Máscara entre Pacientes
Todos os componentes podem ser desinfetados / esterilizados através de
procedimentos recomendados.
A tabela abaixo apresenta um resumo dos procedimentos recomendados para
a desinfecção e esterilização do sistema. Consulte o site
www.resmed.com/masks/sterilization/americas para obter mais detalhes.
35
Português
Page 40

Métodos Pré-desinfecção e Pré-
Método
Químico
Método
Té rm i c o
STERRAD
Notas:
• Os testes realizados pela ResMed demonstraram que os componentes podem suportar
15 ciclos de desinfecção / esterilização pelos métodos mostrados na tabela.
• Ao se utilizarem detergentes, desinfetantes ou agentes esterilizantes, as instruções do
fabricante devem ser sempre seguidas.
esterilização
Detergente
(por exemplo, Alconox
Detergente
(por exemplo, Alconox)
™
Detergente
(por exemplo, Alconox)
Desinfecção e Esterilização
Solução (qualquer uma delas)
™)
• Ortoftalaldeído a 0,55% (por exemplo, CIDEX
OPA)
• Glutaraldeído a 3,4% (por exemplo, CIDEX
™
Plus
)
Temperatura-tempo (qualquer um deles)
• 158º F (70º C) por 100 minutos
• 167º F (75º C) por 30 minutos
• 176º F (80º C) por 10 minutos
• 194º F (90º C) por 1 minuto
Sistema
Sistema de Esterilização STERRAD
™
Para a limpeza do arnês após a utilização por um paciente, use o método
descrito na seção “Limpeza da Máscara no Lar”.
Montagem da Máscara
Consulte a seção D na folha de ilustrações.
1 Gire as tampas das portas com fecho do tipo Luer nas portas da máscara
(D-1).
2 Junte firmemente a armação da máscara e o cotovelo (D-2).
3 Para prender o retentor do cotovelo, posicione um dos lados do retentor na
ranhura do cotovelo. Mantenha uma das abas do retentor do cotovelo
abaixada (D-3a) e pressione a outra aba para baixo até que o retentor se
ajuste no local (D-3b).
4 Gire o retentor até sua posição original (D-4).
5 Verifique se o cotovelo e o retentor estão presos corretamente, puxando
firmemente o cotovelo para fora da armação da máscara. Se o cotovelo
estiver bem preso, não irá se soltar.
Se ele se soltar, tente prender o retentor novamente conforme descrito nas
Etapas 3 e 4. Se o cotovelo ainda se soltar da armação da máscara ao ser
puxado, pode ser necessária a substituição do retentor do cotovelo.
6 Ajuste a extremidade sulcada da almofada da máscara à armação da
máscara. Prenda a parte superior em primeiro lugar, em seguida empurre a
almofada sobre a armação, assegurando uma boa vedação.
A seguir, empurre a presilha da almofada sobre a mesma e sobre a armação
da máscara, assegurando-se que ela esteja ajustada em todos os setores
(D-5).
36
Page 41

7 Prenda as almofadas da testa ao suporte inserindo as tampas das almofadas
nos dois orifícios localizados na parte traseira do suporte da testa (D-6).
Empurre as almofadas firmemente contra o suporte da testa para assegurar
um ajuste adequado.
8 Prenda o suporte da testa à armação da máscara. Deslize os pernos para
dentro das ranhuras da armação da máscara (D-7). Pressione a tira do
suporte da testa e mova-o até uma das posições de ajuste.
9 Insira as presilhas do arnês nas ranhuras da armação da máscara. O rótulo
do arnês deve estar virado para fora e estar próximo ao pescoço do paciente
quando ajustado.
Descarte
A Máscara Facial Não Ventilada Ultra Mirage não contém substâncias
perigosas e pode ser descartada juntamente com o lixo doméstico.
Especificações Técnicas
Quando da determinação dos ajustes do ventilador, em particular o volume do
fluxo de ventilação, deve haver tolerâncias para o espaço morto da máscara e
fugas.
Fuga Acidental da Máscara
Este sistema engloba a fuga entre as interfaces armação-almofada e cotoveloarmação.
Português
Pressão
(cm H2O)
4–20 6
Fuga Máxima
(l/min)
Espaço Morto
O espaço morto é o volume vazio que vai da máscara até o cotovelo.
O espaço morto varia de acordo com o tamanho das almofadas, mas é menor
que 260 ml.
Normas
Designação CE de acordo com a diretiva 93/42/EEC, classe IIa.
EN ISO 14971, ISO 5356-1, ISO 594-1, ISO 10993-1 e ISO 13485.
Pressão de Funcionamento
0 a 40 cm H2O
37
Page 42

Resistência
Queda de pressão medida
a 50 l/min: 0,5 cm H
a 100 l/min: 1,5 cm H
O
2
O
2
Dimensões
As dimensões da máscara (média) são:
Altura = 200 mm, Largura = 100 mm e Profundidade = 100 mm
Símbolos
Sistema e Embalagem
Atenção, consulte os documentos que acompanham este manual
Número de lote
LOT
Número da peça
REF
Limitação de temperatura
Limitação de umidade
Não contém látex
Guia Clínico
Indica Advertência ou Precaução, alertando o usuário para possíveis
ferimentos, e define medidas especiais para a utilização segura e eficaz
do dispositivo.
Informações sobre Pedidos
Número
da Peça
Sistema
60637 Sistema UM NVFFM Pequeno, Padrão
60636 Sistema UM NVFFM Pequeno, Fino
60639 Sistema UM NVFFM Médio, Padrão
60638 Sistema UM NVFFM Médio, Fino
60641 Sistema UM NVFFM Grande, Padrão
Item
38
Page 43

Número
da Peça
60640 Sistema UM NVFFM Grande, Fino
Peças de Reposição
16604 Almofada Pequena, Padrão (1 cx.)
16671 Almofada Pequena, Fina (1 cx.)
16605 Almofada Média, Padrão (1 cx.)
16672 Almofada Média, Fina (1 cx.)
16606 Almofada Grande, Padrão (1 cx.)
16673 Almofada Grande, Fina (1 cx.)
16674 Presilha da almofada Pequena (1 cx.)
16675 Presilha da almofada Média (1 cx.)
16676 Presilha da almofada Grande (1 cx.)
60678 Cotovelo (1 cx.)
60683 Retentor de cotovelo (1 cx.)
60681 Tampas das portas com fecho do tipo Luer (2 cx.)
60682 Tampas das portas com fecho do tipo Luer (10 cx.)
60115 Presilha do arnês (2 cx.)
60116 Presilha do arnês (10 cx.)
60123 Almofada para testa (1cx.)
60124 Almofada para testa (10 cx.)
60675 Armação da máscara, Pequena (1 cx.)
60676 Armação da máscara, Média (1 cx.)
60677 Armação da máscara, Grande(1 cx.)
60673 Suporte para testa (1 cx.)
60917 Arnês (1 cx.)
Item
Português
Garantia Limitada
A ResMed garante que seu sistema de máscara ResMed, incluindo os
componentes: armação, almofada, arnês, tubo e outros acessórios ("Produto")
estará livre de defeitos de material e mão-de-obra por um período de noventa
(90) dias a partir da data de compra pelo consumidor inicial.
Para saber mais detalhes, consulte a Garantia.
39
Page 44

40
 Loading...