

ReplayTV RTV5160 User's Guide
®
ReplayTV 5000
User’s Guide

Package Contents
• ReplayTV Digital Video Recorder • Coaxial cable
• Remote control • Audio/Video cable
• Two AA batteries • Telephone cable
• User Guide • Serial cable
• Quick Setup Guide • 9 to 15 pin serial cable adapter*
• Infrared (IR) blaster cable • RJ-11 to 9-pin adapter*
*Use if the serial cable is not compatible with your satellite receiver.
Copyright/Trademarks
© 2002 SONICblue Incorporated. All rights reserved. Printed in China.
ReplayTV, ReplayTV Service, ReplayZones, QuickSkip, AutoSkip and Show Organizer are trademarks of SONICblue Incorporated. All other product or brand names as they appear are trademarks or registered trademarks of their respective holders.
This document contains proprietary information of SONICblue Incorporated (the “Company”). No part of this document may be copied, reproduced, transmitted, distributed, transcribed, stored in a retrieval
system, modified or translated into any other language or computer language, or sublicensed, in any form or by any means—electronic, mechanical, magnetic, optical, chemical, manual or otherwise—without the prior written consent of the Technical Support Manager at the Company, 2841 Mission College Blvd., Santa Clara, CA 95054. Further, this document may not be disseminated (or otherwise made
available) using telecommunications lines or frequencies except in a Limited Access Environment and only to persons authorized by the Company to receive and use this document and the information contained therein. For purposes of this copyright, the term “Limited Access Environment” shall mean a computer network (including, without limitation, a local area network, a wide area network or an intranet)
that restricts access to personnel in a reliable fashion (which, at a minimum, shall require each user to enter a unique password in order to access the network) that can reasonably be expected to prevent
access to the document by persons other than authorized users. In addition the training and instructional procedures described in this document are confidential and proprietary intelligence of the Company
and may not be copied or used except as permitted by the Company. Any unauthorized or otherwise improper use of this document or any of its material by any person will subject that person to liability for
damages.
The Company shall not be liable for any errors contained herein or for any damages arising out of or related to this document or the information contained therein, even if the Company has been advised of
the possibility of such damages.
This document is intended for informational and instructional purposes only. The Company reserves the right to make changes in the specifications and other information contained in this document without
prior notification.
It is the intent of SONICblue that this product be used in full compliance with the copyright laws of the United States. It is your responsibility to comply with such laws. Unauthorized recording of copyrighted television programs or providing copies of such programs to others may, in certain circumstances, violate copyright law and prior permission from copyright owners may be required for certain public performances and certain commercial uses.
P/N 41005017
ReplayTV 5000
ii

Table of Contents
1 - Getting Started 1
Welcome .......................................................................................................................................................................................................1
• Before you Begin..............................................................................................................................................................................................1
• Feature Updates from the ReplayTV Service...................................................................................................................................................1
• Feature Highlights ............................................................................................................................................................................................2
Remote Control Overview...........................................................................................................................................................3
Front Panel Overview......................................................................................................................................................................4
Rear Panel Overview........................................................................................................................................................................5
• Turning on ReplayTV.......................................................................................................................................................................................6
• Putting ReplayTV in Standby Mode ................................................................................................................................................................6
About Service Activation..............................................................................................................................................................6
2 - Connections 7
Basic Connections ...............................................................................................................................................................................7
Planning your Setup .........................................................................................................................................................................9
• Incorporating ReplayTV into your Entertainment System...............................................................................................................................9
• Checking your Satellite Receiver .....................................................................................................................................................................9
• Connecting ReplayTV to an A/V Receiver ......................................................................................................................................................9
• Connecting ReplayTV to a VCR....................................................................................................................................................................10
• Connecting a Video Camera or VCR to ReplayTV .......................................................................................................................................10
• Connecting Cable Box and Satellite Receiver Controllers.............................................................................................................................10
• Completing the On-screen Setup....................................................................................................................................................................12
Home Network Connections ...................................................................................................................................................12
• Connecting ReplayTV to an Existing Network..............................................................................................................................................12
• Router Setup ...................................................................................................................................................................................................15
• Using ReplayTV with Firewall Software .......................................................................................................................................................17
• Entering Networking Information Manually on ReplayTV ...........................................................................................................................17
• Determining the ReplayTV IP Address..........................................................................................................................................................17
• Determining the ReplayTV MAC (Media Access Control) Address.............................................................................................................18
iii

• Finding the Router IP Address .......................................................................................................................................................................18
• Finding your Computer’s Network Information ............................................................................................................................................19
3 - Setup 21
About Menu Navigation ...............................................................................................................................................................21
Main Menu .................................................................................................................................................................................................22
Setup Menu ..............................................................................................................................................................................................23
• ReplayTV Name.............................................................................................................................................................................................23
• Internet Identity and Address Book................................................................................................................................................................23
• Default Record Options..................................................................................................................................................................................23
• Default Playback Options...............................................................................................................................................................................23
• Network and Input Settings ............................................................................................................................................................................23
• Video Output Settings ....................................................................................................................................................................................23
• Screen Saver and Pause Screen ......................................................................................................................................................................23
• Parental Control..............................................................................................................................................................................................24
• Add or Remove Channels...............................................................................................................................................................................24
• MyReplayTV Registration .............................................................................................................................................................................24
• Privacy Policy.................................................................................................................................................................................................24
• System Information ........................................................................................................................................................................................25
Remote Control Setup...................................................................................................................................................................25
• Remote Control Setup Codes .........................................................................................................................................................................26
• Setup Codes for TV/VCR Combinations .......................................................................................................................................................28
• Setup Codes for TV/DVD Combinations.......................................................................................................................................................28
4 - Basic Operations 29
Basic Operations.................................................................................................................................................................................29
• Show Watching Options.................................................................................................................................................................................29
• Show Recording Options................................................................................................................................................................................29
Controlling Live Television.......................................................................................................................................................30
• Pausing live TV and Recorded Shows ...........................................................................................................................................................30
• Using Rewind and Fast Forward ....................................................................................................................................................................30
• Using Multispeed Slow Motion......................................................................................................................................................................31
• Using Frame Advance ....................................................................................................................................................................................31
• Using Instant Replay ......................................................................................................................................................................................32
ReplayTV 5000
iv

• Using QuickSkip ............................................................................................................................................................................................32
• Using Jump.....................................................................................................................................................................................................32
Accessing the Channel Guide ................................................................................................................................................33
• Using the Channel Guide................................................................................................................................................................................34
Recording Shows................................................................................................................................................................................36
• Setting Record Options...................................................................................................................................................................................37
Find Shows ...............................................................................................................................................................................................38
Replay Zones ..........................................................................................................................................................................................39
• To Record a Show from a Replay Zone:........................................................................................................................................................39
Using Manual Record .....................................................................................................................................................................40
• Changing the Default Record Options ...........................................................................................................................................................40
• Cancelling a Recording ..................................................................................................................................................................................41
• Resolving Conflicting Recordings .................................................................................................................................................................42
• Replay Channels.............................................................................................................................................................................................42
• Recording Tips ...............................................................................................................................................................................................44
Using the Replay Guide ...............................................................................................................................................................45
• Navigating the Replay Guide .........................................................................................................................................................................46
• Category Options............................................................................................................................................................................................46
• Replay Channel Options.................................................................................................................................................................................46
• Replay Show Options .....................................................................................................................................................................................47
• Watching a Recorded Show ...........................................................................................................................................................................47
• Preserving an Episode of a Show ...................................................................................................................................................................47
• Saving Recordings to Videotape ....................................................................................................................................................................48
5 - Advanced Features 49
Watching Shows Recorded on other ReplayTVs ................................................................................................49
• Playing Shows from Another In-home ReplayTV .........................................................................................................................................49
• Selecting Local/Remote Replay Guides.........................................................................................................................................................50
Sending Recordings to other ReplayTVs....................................................................................................................51
• Adding other ReplayTV users to your Internet Address Book ......................................................................................................................51
• Sending Shows ...............................................................................................................................................................................................51
• Using the Received Category .........................................................................................................................................................................52
• Accessing the Internet Address Book.............................................................................................................................................................52
v

COMMERCIAL ADVANCE..............................................................................................................................................................53
• Setting COMMERCIAL ADVANCE Default ...............................................................................................................................................53
• Turning COMMERCIAL ADVANCE on and off .........................................................................................................................................54
Screen Saver and Pause Screen .........................................................................................................................................54
• Installing ReplayTV Photo Transfer ..............................................................................................................................................................55
• Using the Photo Viewer..................................................................................................................................................................................56
Remote Control Shortcuts ........................................................................................................................................................57
• Show-watching Shortcuts...............................................................................................................................................................................57
• Channel Guide Shortcuts................................................................................................................................................................................57
• Replay Guide Shortcuts..................................................................................................................................................................................57
• Find Shows On-screen Keyboard Shortcuts...................................................................................................................................................58
• Slide Show Control Shortcuts ........................................................................................................................................................................58
• Channel Surfing Display Shortcuts ................................................................................................................................................................58
• Record Options Screen Shortcuts...................................................................................................................................................................58
6 - Help 59
Troubleshooting ..................................................................................................................................................................................59
• Customer Service Information .......................................................................................................................................................................59
• Frequently Asked Questions...........................................................................................................................................................................59
Glossary.......................................................................................................................................................................................................62
Technical Specifications..............................................................................................................................................................63
Limited Warranty and Software License ...................................................................................................................64
• Warranty .........................................................................................................................................................................................................64
• Software License Agreement .........................................................................................................................................................................65
Activation and Service Agreement ..................................................................................................................................67
Privacy Policy.........................................................................................................................................................................................69
• Your Privacy is Important to Us.....................................................................................................................................................................69
• Privacy Policy Q&A.......................................................................................................................................................................................70
FCC and Industry Canada Compliance.........................................................................................................................73
• FCC Rules, Part 68.........................................................................................................................................................................................73
Safety.............................................................................................................................................................................................................74
• Important Safety Instructions .........................................................................................................................................................................74
• Safety/Regulatory Information.......................................................................................................................................................................76
ReplayTV 5000
vi

Chapter 1 Getting Started
:: Welcome
Congratulations on your purchase of the ReplayTV 5000. In case warranty service is required, please take a moment to attach your
receipt to this user’s guide and write down your Serial Number, located on the back panel of the ReplayTV 5000.
Serial Number: __________________________________.
Additional system information for your new ReplayTV 5000, including the Serial Number, can be found by performing the following steps:
1 Press Menu to display the ReplayTV Main Menu.
2 Select Setup.
3 Select System Information.
Before you Begin
Make sure you have connected ReplayTV to your television and other components. Refer to the Quick Setup Guide or “Connections” on page 7 for instructions.
Started
Connections Getting
SetupBasic
After you have experienced the exciting new world of personal television, you will never watch plain old television again. No videotapes. No hassles. No compromises. Pause live television. With ReplayTV, it’s easy to quickly find and automatically record your
favorite television shows, so you can watch them whenever you want—on your schedule, not somebody else’s. Also, ReplayTV is
the first digital video recorder (DVR) that allows you to share content among multiple units in a home network. You can even send
your recordings over the Internet with friends and family who are using ReplayTV.
Feature Updates from the ReplayTV Service
New features are occasionally delivered through the Ethernet and telephone connections (whichever you use). When this occurs
you may encounter screens that look a little different from those in this guide or you may find differences in the features covered. A
message will be sent to your ReplayTV notifying you when new features are available. Choose Messages from the Main Menu to
read about the new features.
For the very latest user’s guide and new feature instructions, visit www.sonicblue.com/replaytv
Operations
Features
Advanced
Help
1

Feature Highlights
• Control live television. Pause, rewind, fast forward, play in slow motion, or watch an instant replay—all without missing a single scene. See “Controlling Live Television” on page 30.
• Automatically record every episode of your favorite shows, or constantly find and record shows that interest you. Schedule a
recording once and ReplayTV does the rest. See “Recording Shows” on page 36.
• Jump past commercials or recorded scenes you don’t want to watch with QuickSkip™. See “Using QuickSkip” on page 32.
• Watch your shows commercial free. Use the COMMERCIAL ADVANCE feature to skip commercial messages during playback of recorded and delayed shows. See “COMMERCIAL ADVANCE” on page 53.
• COMMERCIAL ADVANCE lets you decide whether or not to
watch commercial messages during playback of a recorded television broadcast. If you enable the feature it will skip most commercial messages. You can turn it off or on at any time by
pressing the Commercial Advance button.
• Locate shows that you want to watch without searching through pages of program schedules. The Find Shows feature locates
shows based on specific titles, actors, directors, and topics that you choose. See “Find Shows” on page 38.
• Send recordings over the Internet. ReplayTV is broadband enabled, so you can send your recordings to other ReplayTV 4000s/
4500s* and 5000s over the Internet by connecting ReplayTV to your home network. The Ethernet connection is also used to
download Channel Guide information via broadband. It must be connected at all times. See “Sending Recordings to other
ReplayTVs” on page 51.
• Watch shows recorded on other ReplayTVs. If you have more than one ReplayTV, you can watch shows in one room that were
recorded in another. See “Watching Shows Recorded on other ReplayTVs” on page 49.
• Transfer digital photos from your PC to your ReplayTV to create and view slide shows of your vacation or other photo collections. Additionally, you can display your photos when you press Pause or when the screen saver starts. See “Screen Saver and
Pause Screen” on page 54.
* Software support for video sharing and streaming between
ReplayTV 5000 models and ReplayTV 4000/4500 models will be
available in the future. Please check “www.sonicblue.com/
replaytv” for update information.
ReplayTV 5000
2

:: Remote Control Overview
1TV (Power) Power TV on or off. (See page 26 to program the remote to operate your
TV.)
2ReplayTV (Power) Power ReplayTV on or off.
30-9 Tune to channels; jump to a channel in the Channel Guide.
4Enter Display a current show’s menu while in the Channel Guide.
5 Channel Guide Display TV listings.
6Zones Search TV listings by category.
7 Arrow (Navigation) Buttons Move on-screen highlight.
8Select Choose on-screen options; view channel surfing display while watching live TV.
9Exit Exit on-screen menus.
10 Play/Slow Play/slow motion.
11 QuickSkip Skip 30 seconds of a recorded or delayed show.
12 Fast Forward Fast forward recorded or delayed show; frame-by-frame advance while
paused.
13 Stop Stop playback of show.
14 Return to Live Return to live TV while watching a show delayed.
15 Channel Y/B Change channels; move one screen at a time up or down in guides and
menus.
16 Mute Mute the volume of the programmed TV.
17 Volume +/- Adjust the volume of the programmed TV.
18 Display Program information about current show.
19 Commercial Advance Turn COMMERCIAL ADVANCE on and off for the current
show.
20 Rewind Rewind show.
21 Instant Replay Return 7 seconds and replay a segment.
22 Pause Pause live TV and recorded shows.
23 Record Record show from Channel Guide or while viewing live TV.
24 Menu Display ReplayTV Main Menu.
25 Replay Guide Play your recorded shows.
26 Jump Jump between a recorded show and live TV, two live TV shows, or two recorded shows.
Started
Connections Getting
SetupBasic
Operations
Features
Advanced
Help
3
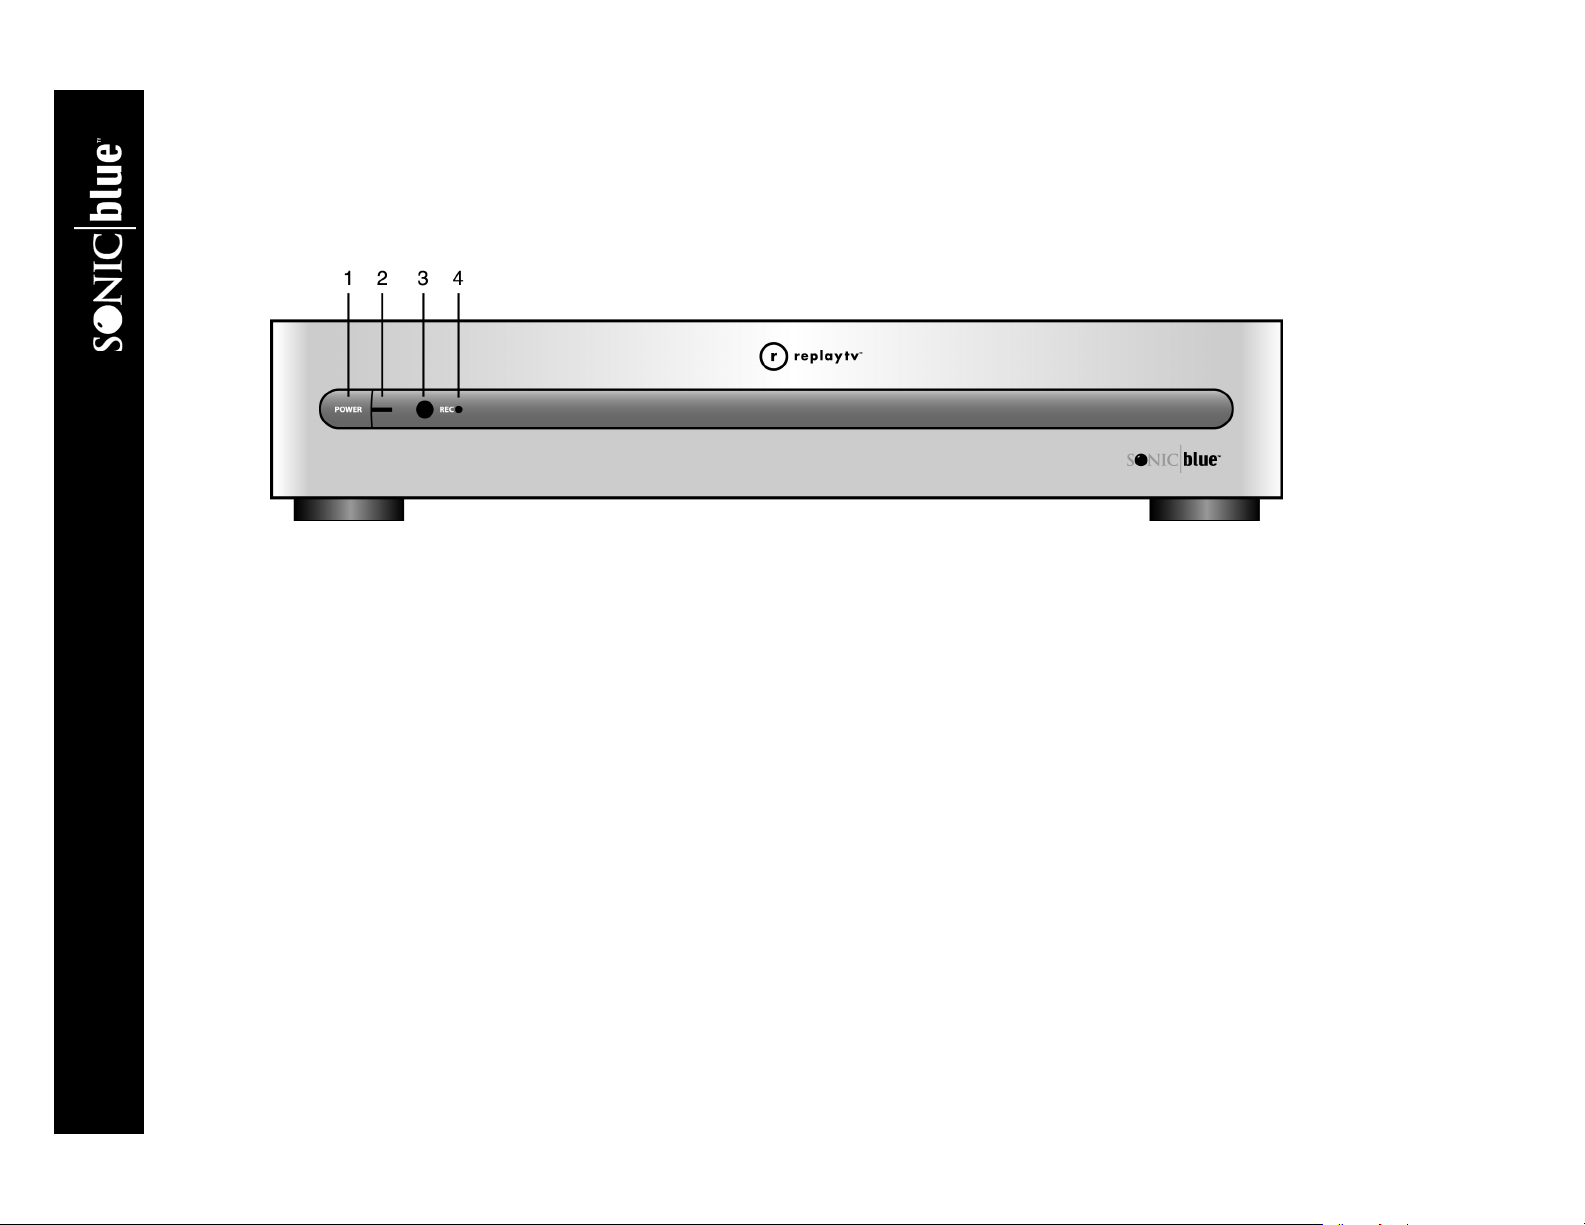
:: Front Panel Overview
1 POWER button Manually switches between On and Standby modes.
2 POWER light Lights when ReplayTV is on.
3 IR Receiver Point remote control here when operating your ReplayTV.
4 REC (Recording) light Lights when ReplayTV is recording a show.
ReplayTV 5000
4
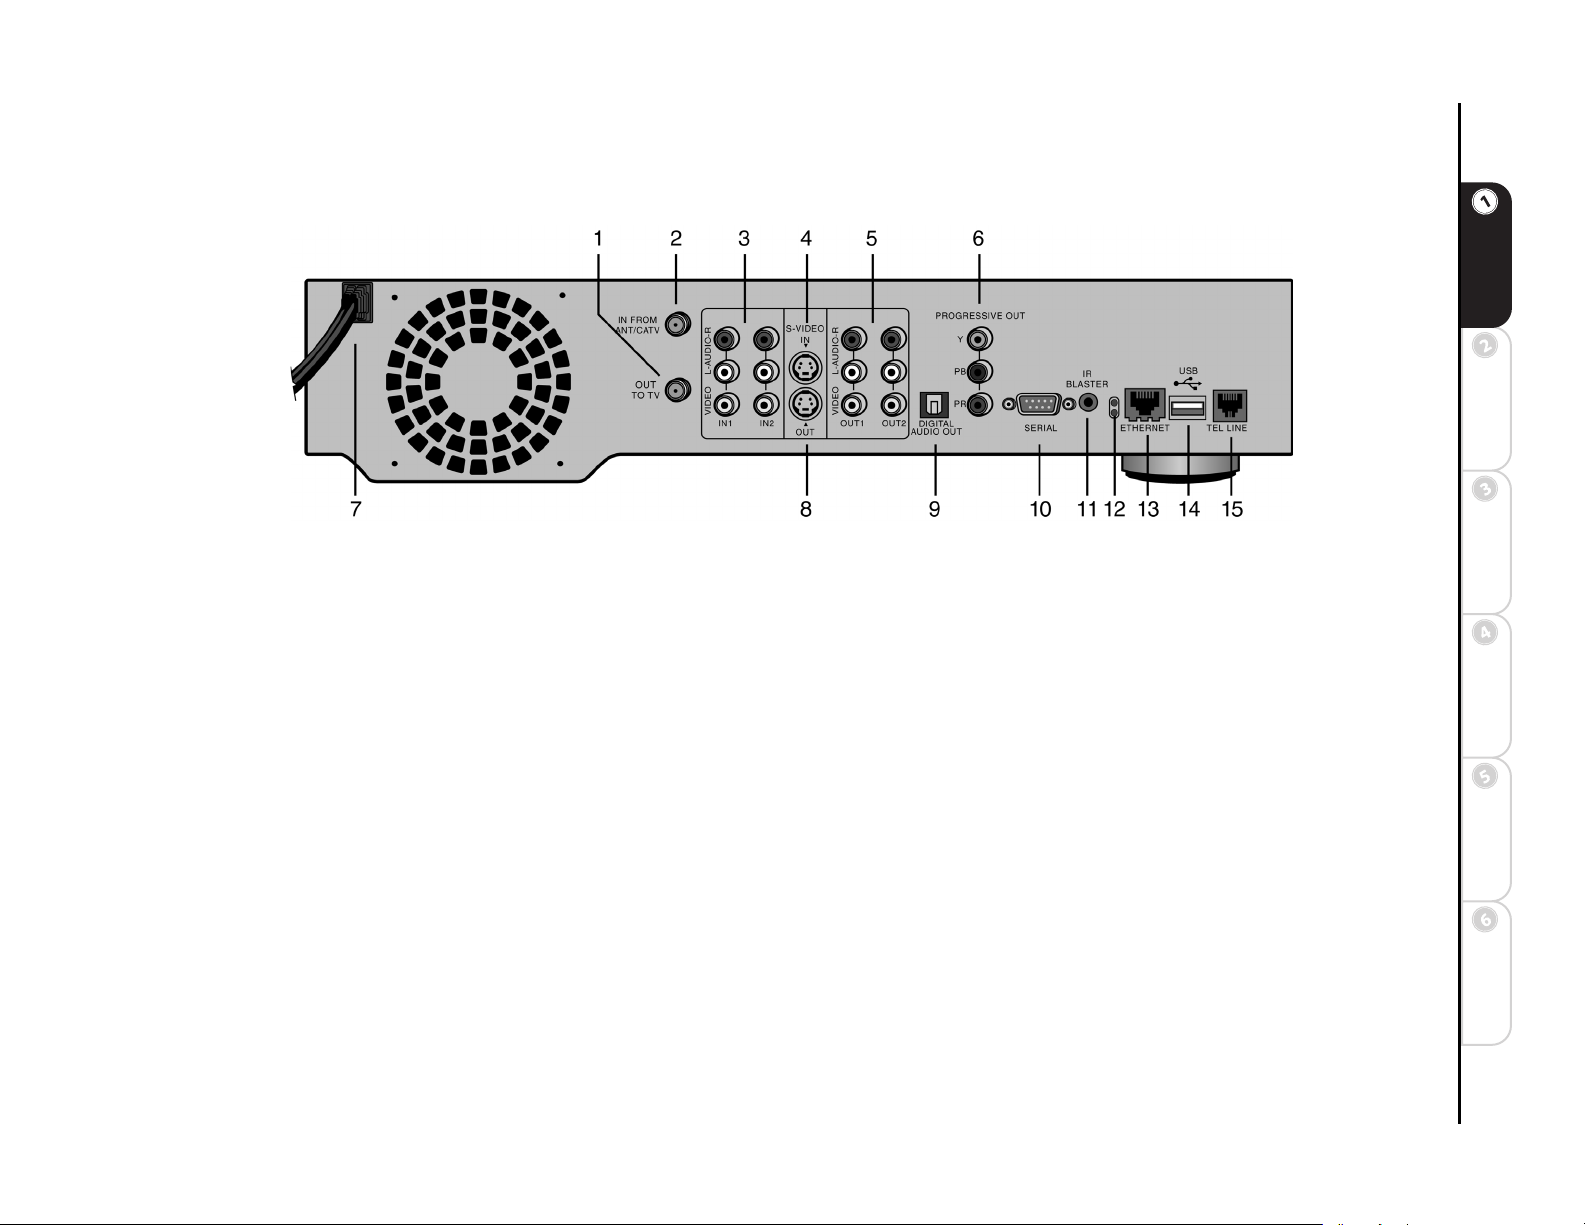
:: Rear Panel Overview
Started
Connections Getting
1 OUT TO TV Connect to a television VHF/UHF jack with coaxial cable.
2 IN FROM ANT/CATV Connect an antenna, cable TV coaxial cable, or cable box with coaxial cable.
3 VIDEO/AUDIO IN 1/IN 2 Connect to the Audio/Video outputs of a cable box or satellite receiver using standard audio/
video cables.
4 S-VIDEO IN Connect to a cable box or satellite receiver that has S-Video Out. The Audio/Video IN 2 connectors must be
used with S-Video to receive sound. Please note that S-Video In is part of Line 2.
5 VIDEO/AUDIO OUT 1/OUT 2 Connect to the Audio/Video inputs of a television, monitor or A/V receiver using stan-
dard audio/video cables.
6 PROGRESSIVE OUT Connect to a television, monitor or A/V receiver that has Progressive Video In.
7 POWER CORD Connect to an electrical outlet.
8S-VIDEO OUT Connect to a television, monitor or A/V receiver that has S-Video In. Please note that Video Out 1, Video
Out 2 and S-Video are active at all times.
9 DIGITAL AUDIO OUT (OPTICAL) Connect to an audio/video receiver equipped with an optical input.
10 SERIAL CONTROL Connect to a satellite receiver that has a Serial port. This allows ReplayTV to change the channels on
the satellite receiver. The IR Blaster is not needed if the satellite receiver has Serial Out.
11 IR BLASTER Connect and affix the IR emitter over the infrared detector on a cable box or satellite receiver. This allows
ReplayTV to change the channels on these devices.
12 NETWORK ACTIVITY AND LINK LIGHTS Indicate the status of ReplayTV when using the Ethernet port. The green
light indicates that ReplayTV is connected to the network. The yellow light indicates network activity; i.e., data is being transferred to or from the unit.
SetupBasic
Operations
Features
Advanced
Help
5

13 ETHERNET (10/100BaseT) Connect to a broadband home network, including a router, hub or switch.
14 USB PORT Currently inactive, but in the future will support USB 1.1 connectivity for wireless USB (802.11b) network
devices and room-to-room video streaming between ReplayTV 5000 models and earlier ReplayTV 4000/4500 models. Please
check “www.sonicblue.com/replaytv” for update information.
15 TEL LINE Connect directly to a wall jack.
Turning on ReplayTV
1 Press the ReplayTV Power button on the ReplayTV remote control.
Or
2 Press the POWER button on the ReplayTV front panel.
Putting ReplayTV in Standby Mode
ReplayTV is in standby mode when it is plugged in with the power turned off. ReplayTV will record even if it is in standby
mode.
1 Press the ReplayTV Power button on the remote control.
Or
2 Press the POWER button on the ReplayTV front panel.
:: About Service Activation
A service activation fee is required to begin using your new ReplayTV 5000 Series Digital Video Recorder (“ReplayTV”).You can
choose from two payment options: a one-time fee or monthly payments. Only the ReplayTV unit containing the serial number that
you register is paid for and activated through this process. Other ReplayTV units will require separate activation fee payments.
There is a grace period after your initial connection to the ReplayTV Service, during which time you can use ReplayTV without
having to activate the service. If you do not complete the service activation process and pay the service activation fee, your
ReplayTV will cease to operate until the service is activated and the fee is paid. Please activate your service before the grace period
expires.
An activation key for your ReplayTV will be displayed during the on-screen setup process. To activate the service and pay the activation fee, have the activation key ready and go to our Web site at www.sonicblue.com/replaytv or call 1-800-480-7149.
ReplayTV 5000
6
Chapter 2 Connections
:: Basic Connections
This chapter describes how to connect ReplayTV to your TV and other devices, including your home network. You will find
detailed connection options not found on the Quick Setup Guide. If you have not already, take a look at the Quick Setup Guide
before reading this chapter.
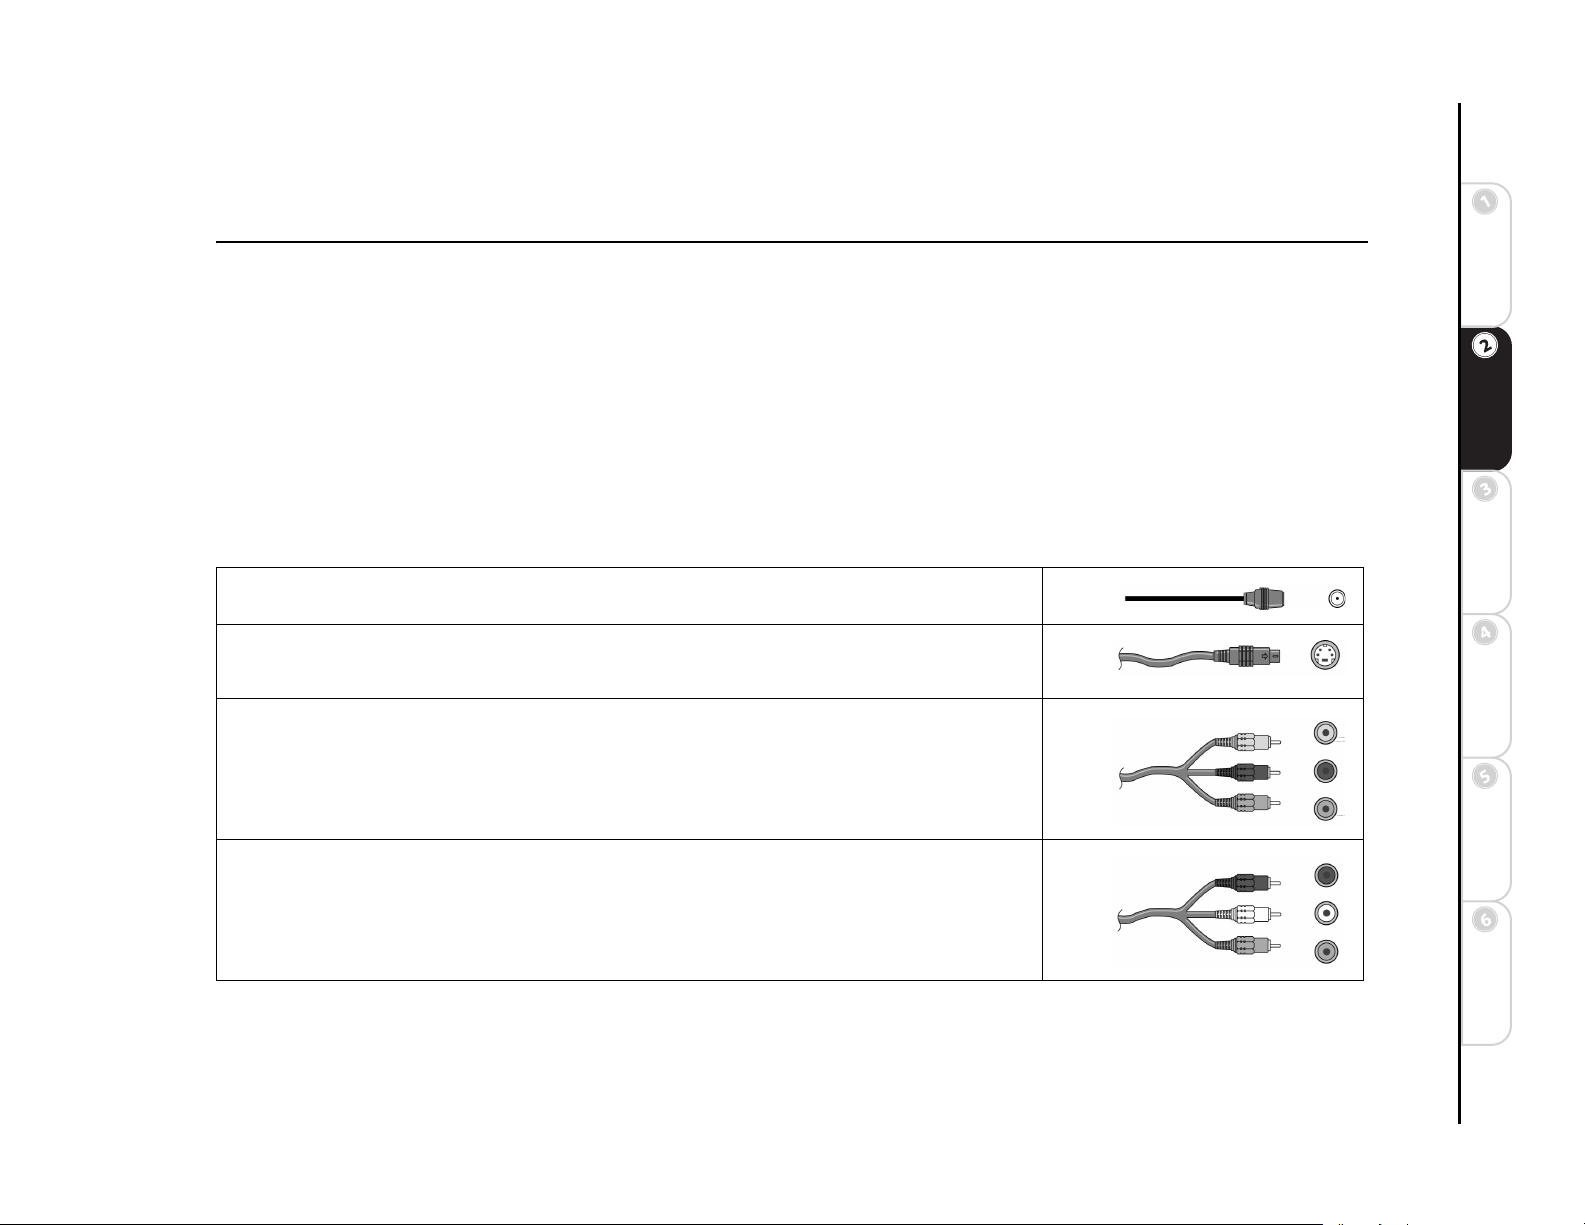
Cable Overview
You may not need to use all the cables provided with ReplayTV. Your setup will depend on the components (Cable box, satellite
receiver, VCR, home network, etc.) you use. During setup, you may be called upon to identify one or more of the following cables:
Started
Connections Getting
Coaxial cable (included) delivers the signals broadcast by your cable TV company, or local stations. You can
also use this supplied cable to connect ReplayTV directly to your television.
S-Video cable (not included) delivers high quality video signals between ReplayTV and your television or
monitor. Older-model TVs may not support S-Video. Because S-Video cable only provides the video signal, it
must be used in combination with both of the audio plugs (red and white) on an A/V cable.
Component Video cables (not included) connect from the Progressive Out (Y, Pb, Pr) jacks on ReplayTV to
deliver high quality video signals to your television or monitor. Older-model TVs may not have a Progressive
input. Because component video cables only provide the video signal, they must be used in combination with
both of the audio plugs (red and white) on an A/V cable.
A/V cable (included) delivers audio and video signals between ReplayTV and your television or monitor. The
red and white plugs deliver stereo audio. The yellow plug delivers video.
SetupBasic
Operations
Features
Advanced
Help
7
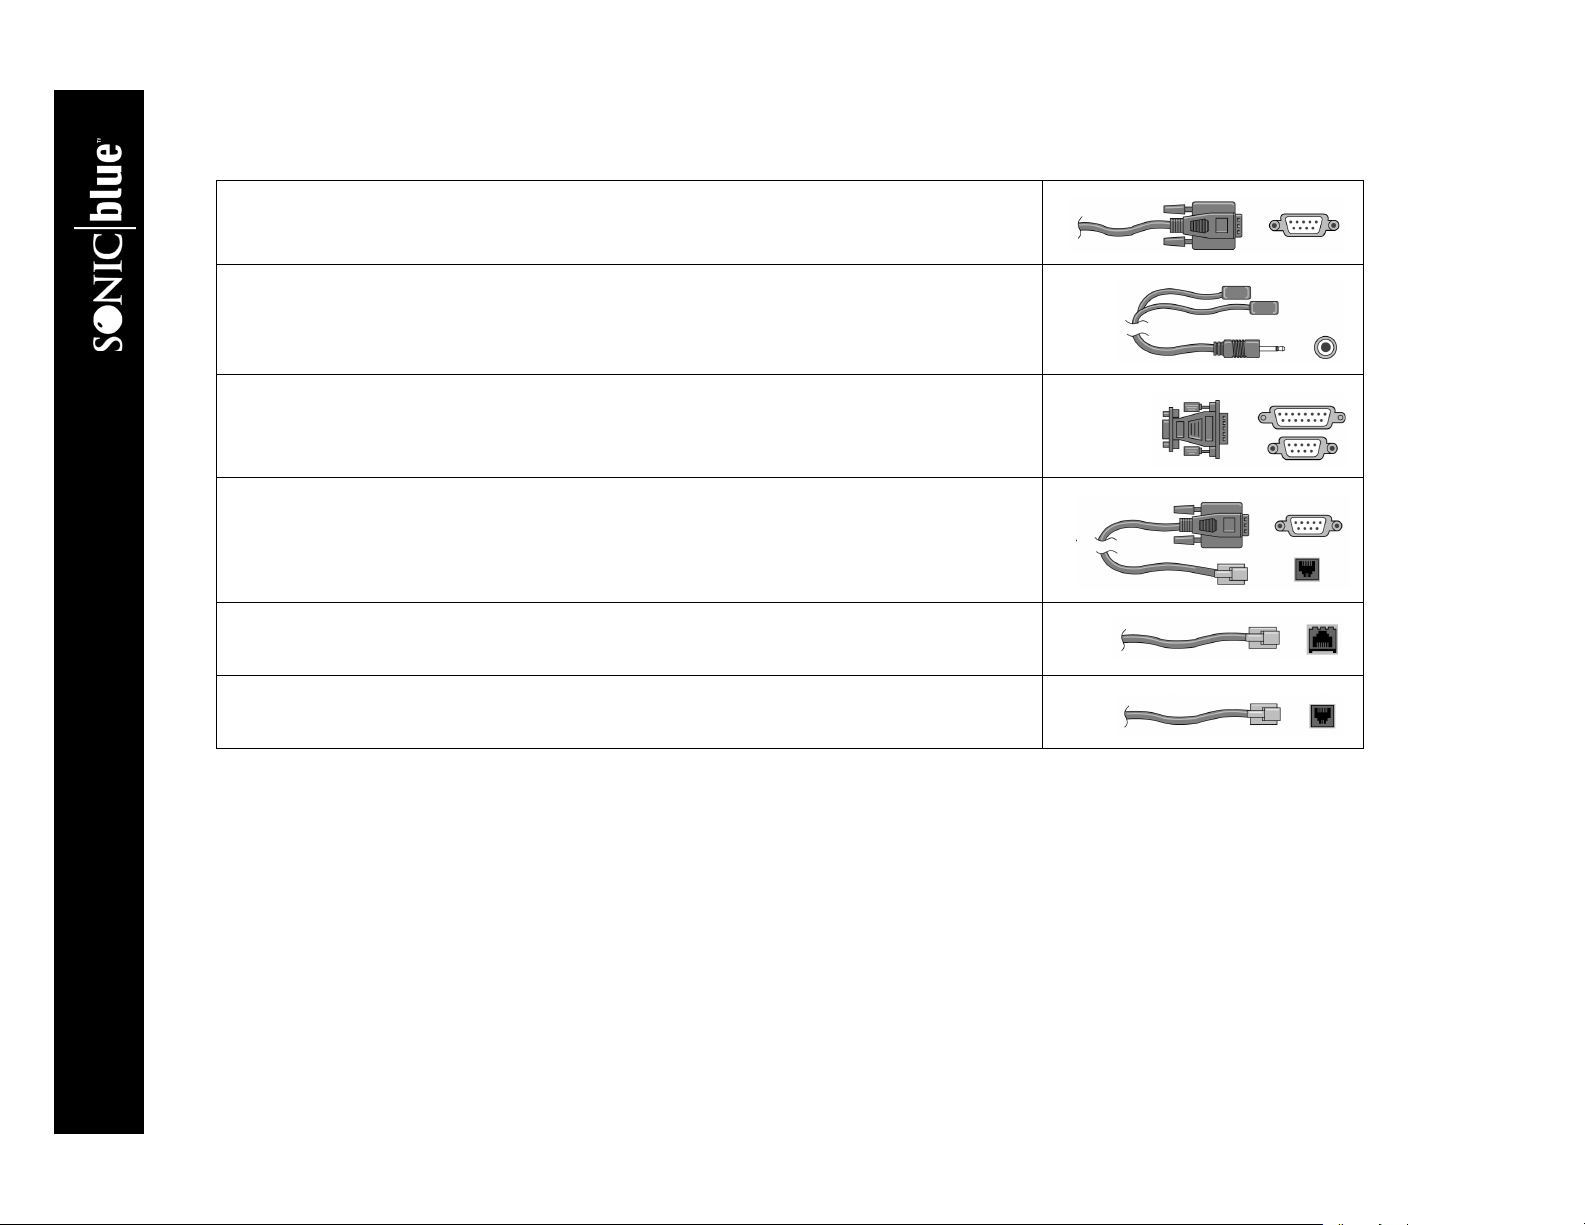
Serial cable (included) lets ReplayTV change the channels on satellite receivers, many if which use serial
cables for communication. The RJ-11 to 9-pin adapter connects to this cable, if it is used.
IR blaster cable (included) lets ReplayTV change the channels on your cable box or satellite receiver if it does
not support the serial cable. The IR blaster emitters need to be affixed directly over the IR detector on your satellite receiver or cable box. See “Connecting the IR Blaster” on page 10.
9-pin to 15-pin adapter (included) connects your satellite receiver to ReplayTV if the satellite receiver uses a
15-pin serial cable.
RJ-11 to 9-pin adapter (included) connects your satellite receiver to ReplayTV if the satellite receiver uses a
telephone cable in place of a serial cable. RCA models DRD221RD, DRD222RD, DRD223RD, and DS2122RD
all require use of this adapter.
Ethernet cable (not included) connects to the ETHERNET jack on ReplayTV, allowing you to connect
ReplayTV to a broadband network. If you have a home network, you should leave ReplayTV connected to it at
all times, because ReplayTV will use it to receive Channel Guide listings.
Telephone cable (included) connects from the TEL LINE jack on ReplayTV to a wall jack. Leave the cable
connected to ReplayTV at all times to receive the daily Channel Guide listings.
ReplayTV 5000
8
:: Planning your Setup
Read this section before incorporating ReplayTV into your entertainment system.
Incorporating ReplayTV into your Entertainment System
ReplayTV controls and records the television signals you receive (satellite, cable, antenna, or a combination of all three). The signal(s) connect directly to the ReplayTV inputs. The outputs from ReplayTV connect to a television, monitor, or A/V receiver. You
can also connect a VCR to ReplayTV and save shows you have recorded to videotape. See “Saving Recordings to Videotape” on
page 48 for more information. ReplayTV is not intended to record signals sent by DVD players and video game systems. Connect
DVD players and video game systems directly to your television, not to ReplayTV.
Checking your Satellite Receiver
ReplayTV receives broadcast signals from satellite receivers through S-Video or A/V cables. ReplayTV can send channel-changing
signals to your satellite receiver through the supplied serial cable or IR blaster. It is recommended that you connect your ReplayTV
to your satellite receiver using a serial cable. Use the IR blaster if your satellite receiver does not have a serial port.
If the remote control for your satellite receiver has a “UHF” label, or if your satellite receiver uses a small antenna, your satellite
receiver is radio controlled. ReplayTV does not support radio-controlled receivers. Check your receiver’s owner’s manual to see if
serial or infrared controls are supported.
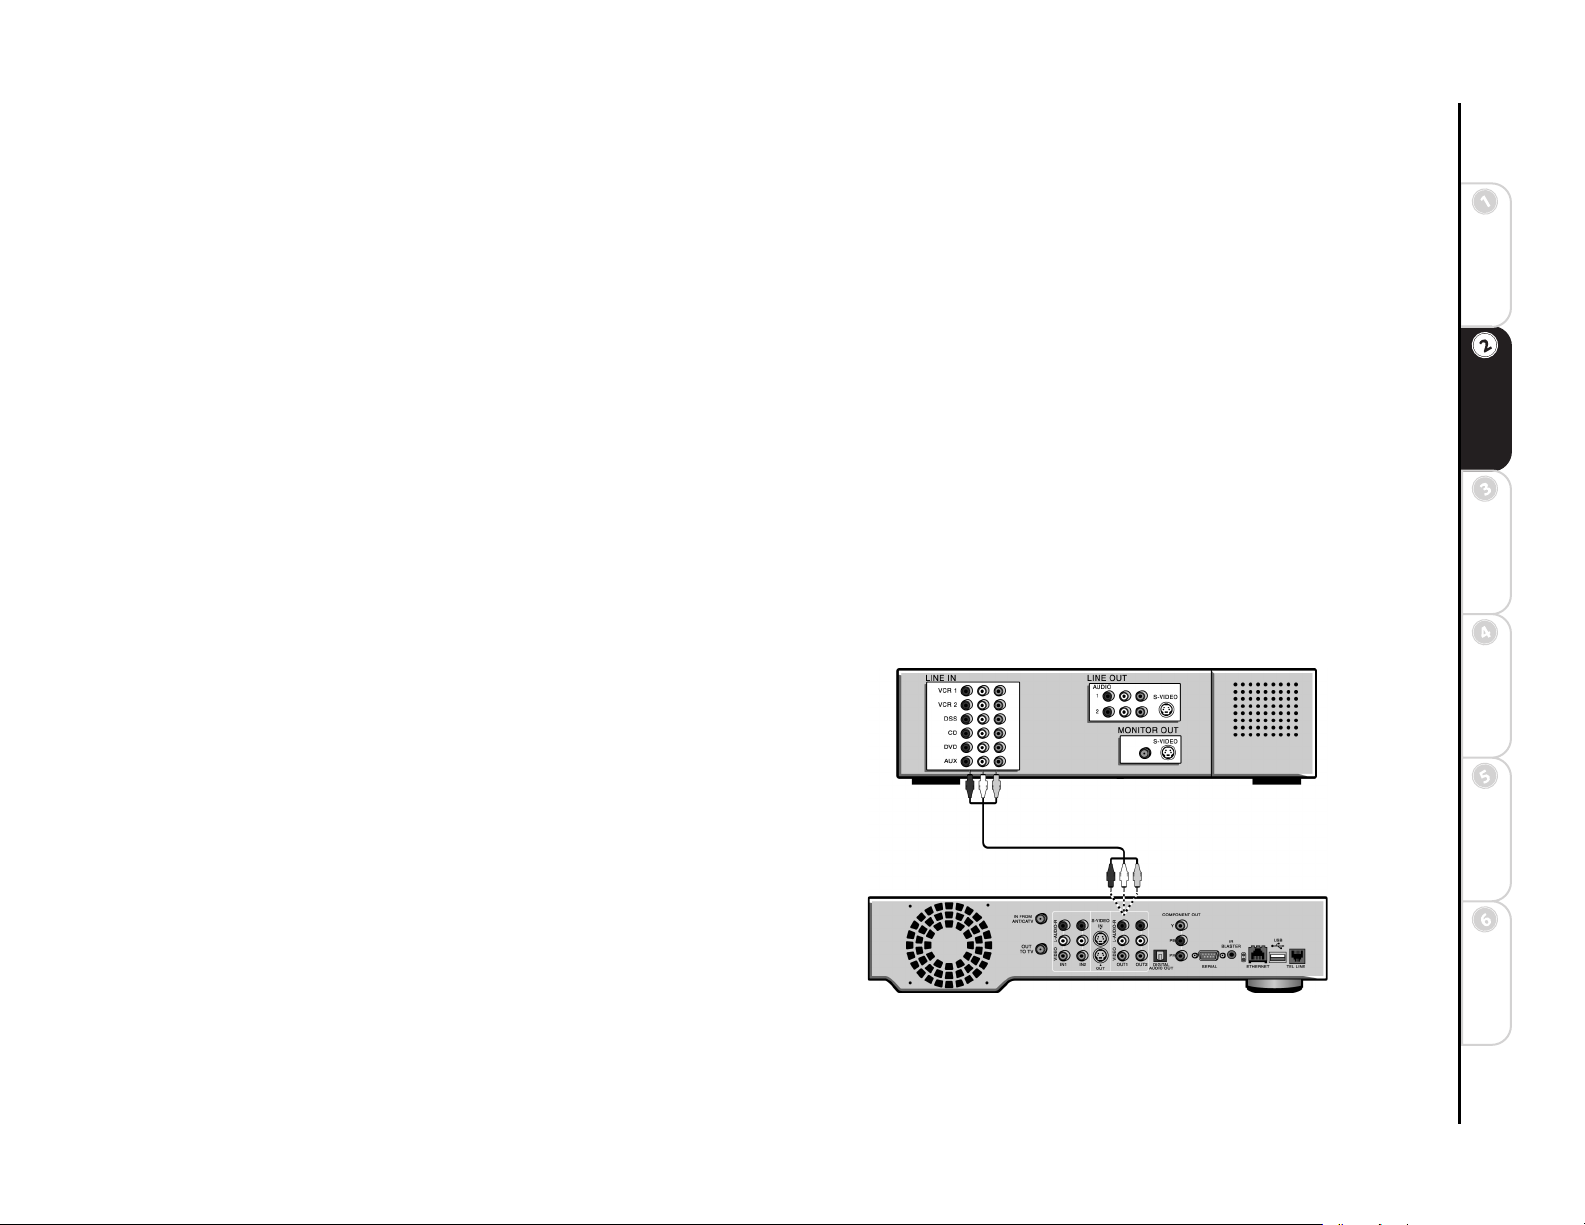
Connecting ReplayTV to an A/V
Receiver
1 Connect the incoming television signal to ReplayTV. Refer to the
Quick Setup Guide for detailed instructions.
2 Connect an A/V cable from the OUTPUT jacks on ReplayTV to the
AUDIO/VIDEO IN jacks on your A/V receiver, matching like colors. Use an S-Video cable if your receiver has S-Video In.
3 Refer to the Quick Setup Guide to complete the remaining connec-
tions.
Started
Connections Getting
SetupBasic
Operations
Features
Advanced
Help
9
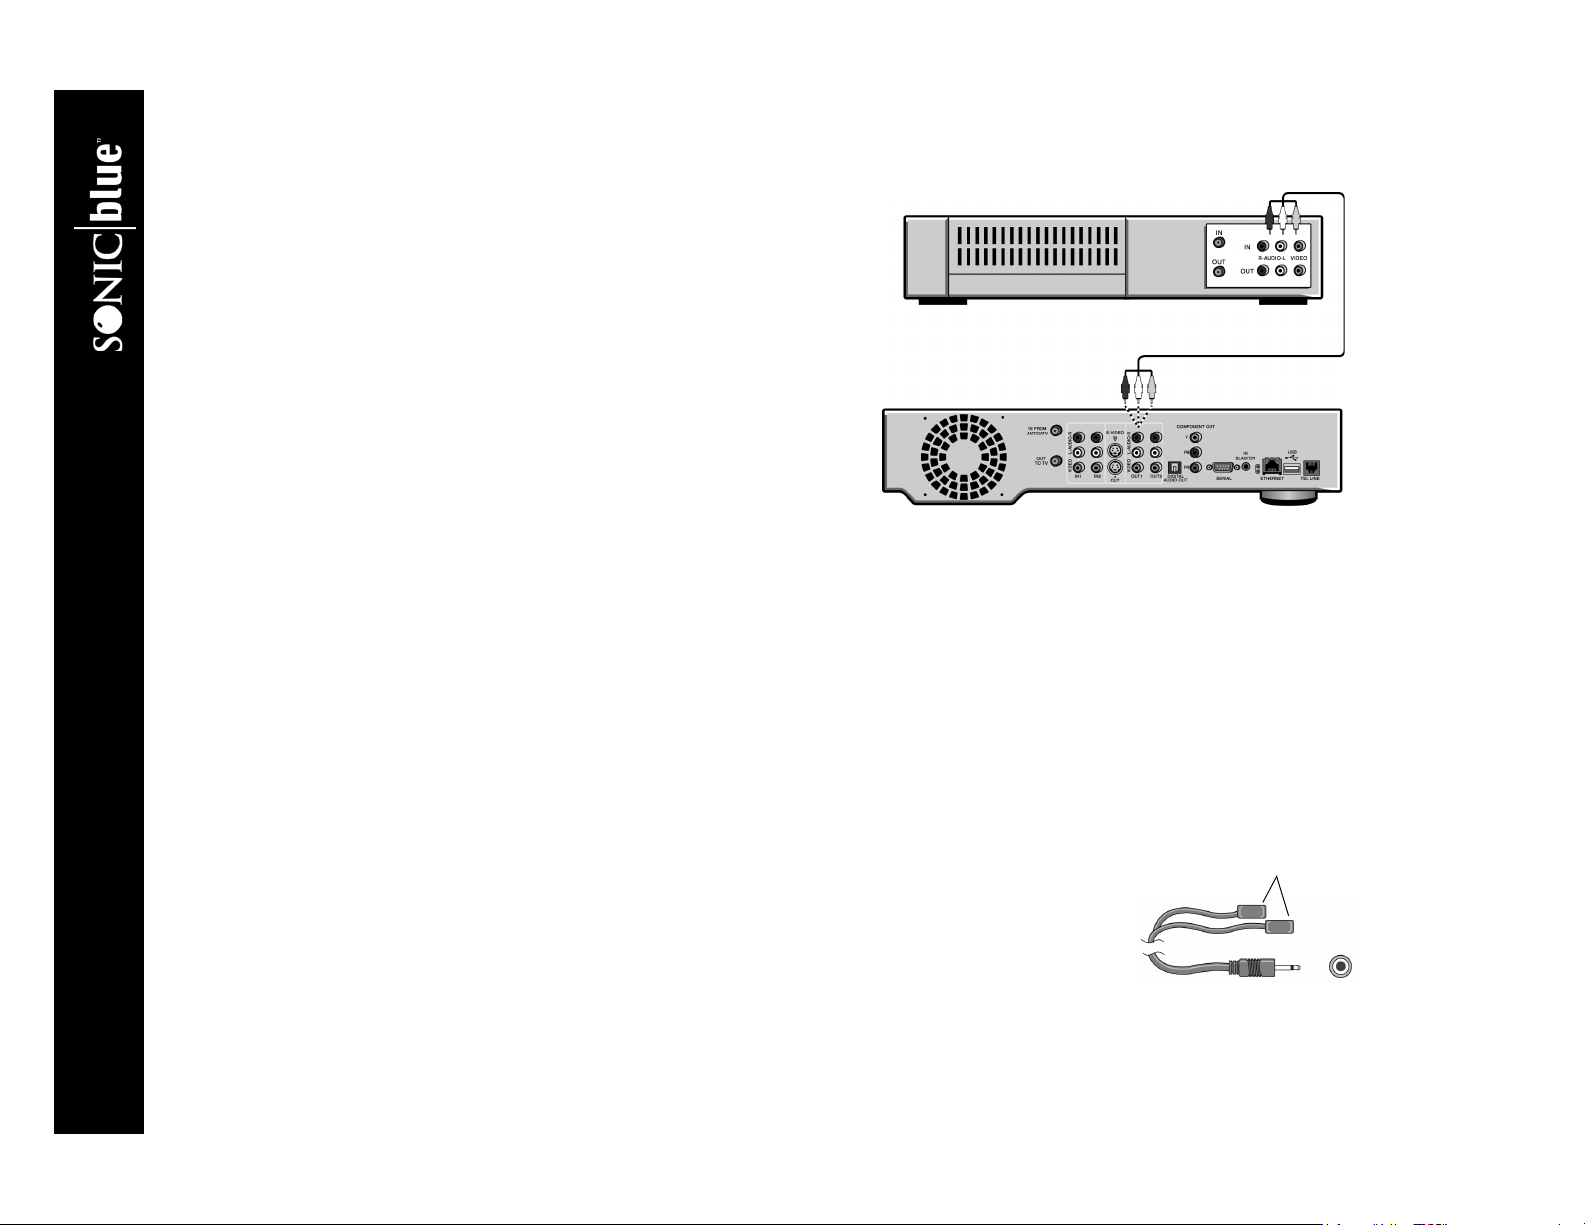
Connecting ReplayTV to a VCR
Connect ReplayTV to a VCR if you want to watch or save your recordings on videotape. Deleting recordings from the Replay Guide will preserve hard drive space.
• Connect an A/V cable from the OUTPUT jacks on ReplayTV to the
AUDIO/VIDEO IN jacks on your VCR, matching like colors.
Connecting a Video Camera or VCR to
ReplayTV
• You can connect a video camera or VCR from its Outputs to the
Inputs on ReplayTV and record the content onto ReplayTV using
the Manual Record feature. See “Using Manual Record” on
page 40.
Connecting Cable Box and Satellite Receiver Controllers
If you connect a cable box or satellite receiver to ReplayTV, you will need to attach a controller cable so ReplayTV can change the
channels on either of these components. The controller, either a serial cable or an IR blaster cable, will act as a remote control for
these components.
Connecting the Serial Cable
If your satellite receiver or cable box supports serial cable, use the provided serial cable as a controlling cable. Connect the serial
cable to the SERIAL connector on ReplayTV and to the serial port on your cable box or satellite receiver. If your receiver uses a 15pin serial connector, use the supplied 15-pin to 9-pin adapter. If you have a satellite receiver that uses telephone cable in place of
serial cable, you will need to use the RJ-11 to 9-pin adapter to connect the satellite receiver to ReplayTV. RCA models DRD221RD,
DRD222RD, DRD223RD, and DS2122RD will all require this adapter.
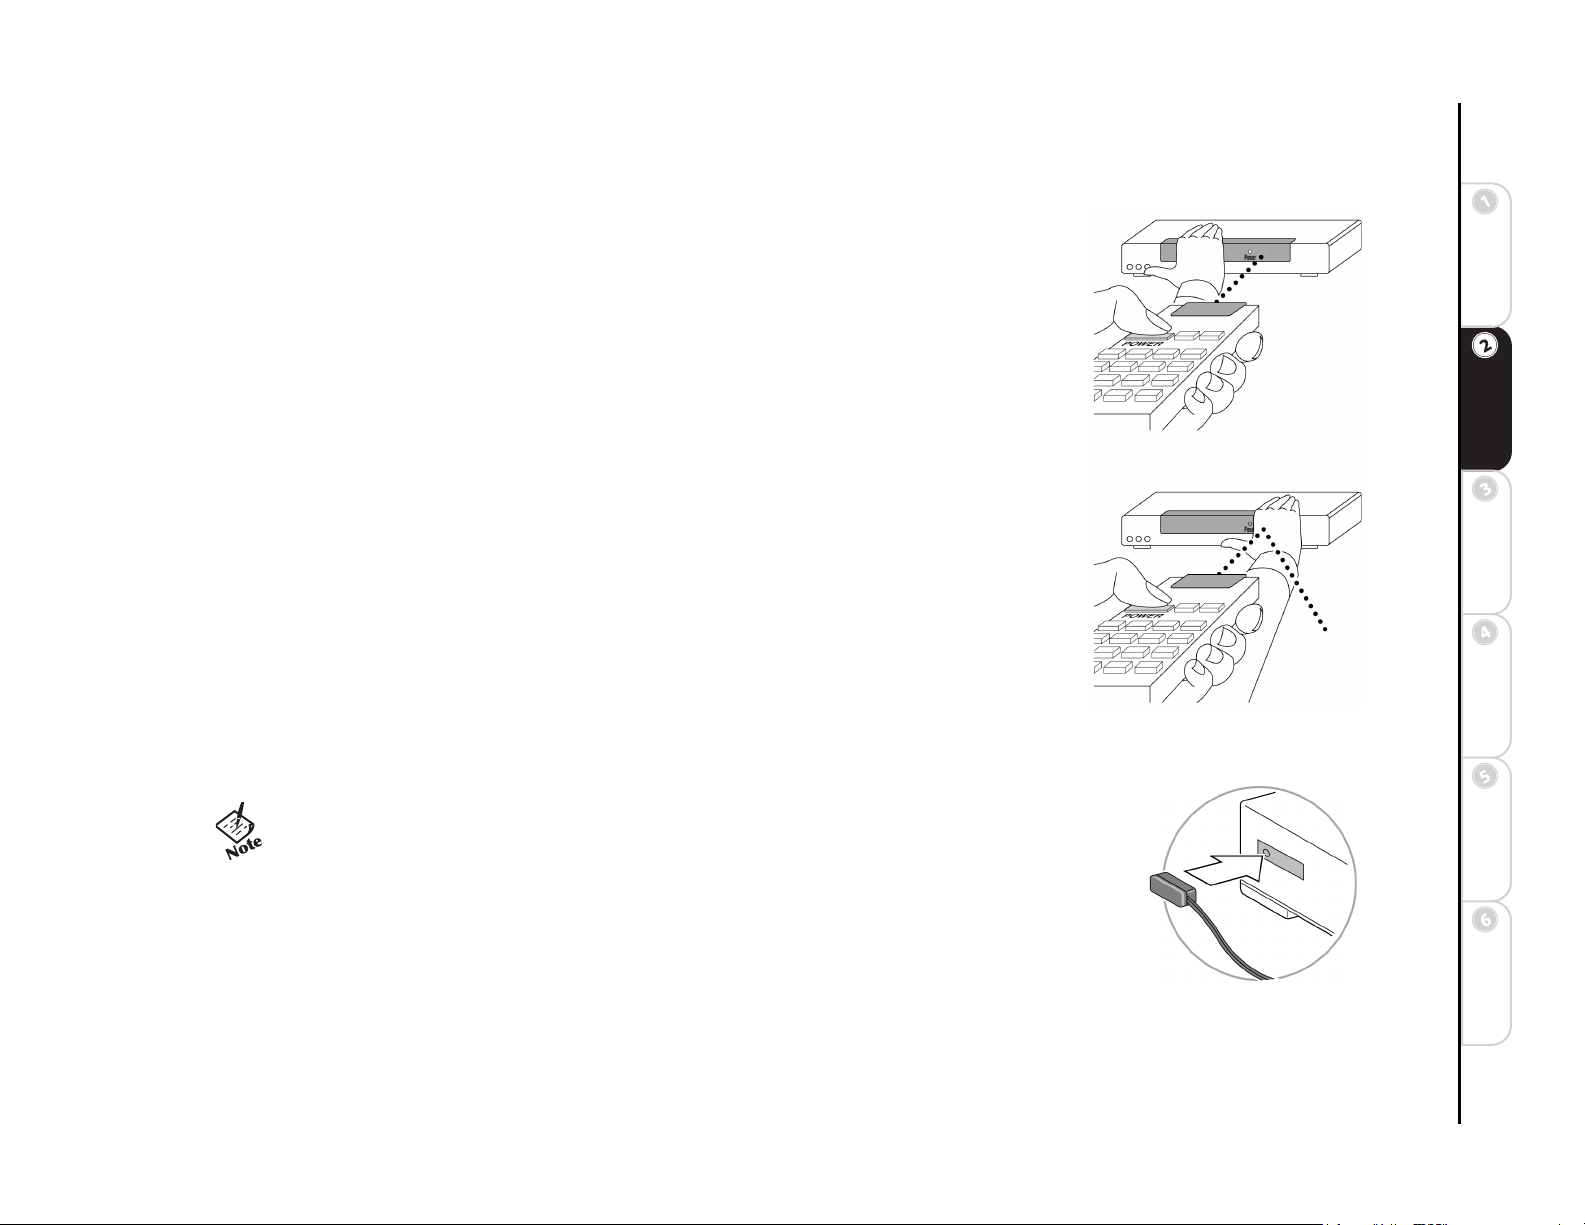
Connecting the IR Blaster
Use the IR blaster if your satellite receiver or cable box does not support serial cable.
Locate the infrared detector on your cable box or satellite receiver
The infrared emitter at the end of the IR blaster must be placed directly over the infrared detector on
your cable box or satellite receiver. The infrared detector receives the signals from the ReplayTV
remote control.
ReplayTV 5000
10
Infrared Emitters
If the infrared detector on the unit is not labeled, follow these steps:
1 Refer to the owner’s manual of your cable box or satellite receiver. It may be shown there.
2 Look for an area of dark, nearly opaque plastic on the front of the unit. If you find this area,
look closely into it. You may be able to see the infrared detector behind it. If it is visible, you
should see a small square frame with a reddish area in the center. This is the infrared detector.
Skip to “Connect and affix the IR blaster.”
3 Shine a flashlight through the dark plastic area on the front of the unit. If you see the infrared
detector, skip to “Connect and affix the IR blaster.”
4 Using the remote control for your cable box or satellite receiver, turn the power on and off.
Do not use the ReplayTV remote control.
5 With the remote control in one hand, place the other hand over one section of the front of the
unit.
6 Try to turn the power on and off. If you succeed, your hand is not covering the infrared detec-
tor.
7 Move your hand to a different place on the front of the unit and repeat steps 5 and 6. Keep
repeating in this manner until you cannot turn the power on and off. At this point, your hand
is covering the infrared detector.
Connect and affix the IR blaster
1 Plug the IR blaster into the IR BLASTER connector on the back of ReplayTV.
2 Peel off the protective cover from one of the emitters on the IR blaster. This will expose the
adhesive material on the infrared emitter for placement onto your cable box or satellite
receiver.
3 Affix the adhesive side of the infrared emitter to the dark plastic area directly over the center
of the infrared detector.
Locating the infrared detector
Started
Connections Getting
SetupBasic
Operations
• If you only want ReplayTV to control one device, hide the
unused emitter behind the equipment, away from any detectors.
After you have connected the IR blaster, you will need to provide ReplayTV with the setup code number for your cable box or satellite receiver. You will do this during the on-screen Quick Setup process.
Affixing the IR blaster
11
Features
Advanced
Help

Completing the On-screen Setup
After completing all the connections to your components and home network (if you chose to do so), you will need to complete
ReplayTV’s on-screen setup process. The setup process requires you to indicate the following:
• If you are using a broadband or modem connection
• Your Zip code so ReplayTV will receive the correct channels for your area
• The components connected and the cables used to complete the connections
• The setup code for your cable box or satellite receiver, if used, so ReplayTV can change the channels on these components
:: Home Network Connections
If you have a home network, you can connect ReplayTV to it using the ETHERNET connection. This connection will allow you to
send recordings to other ReplayTV 4000/4500* and 5000 users, watch shows recorded on another ReplayTV in your home, and
transfer photos from your PC to ReplayTV. The following sections provide instructions for setting up ReplayTV to use the networking features. Refer to “Advanced Features” on page 49 to learn how to use the features.
ReplayTV needs its own IP address to communicate with other devices on your network. It will automatically search for an IP
address during the first-time Quick Setup process. If an IP address is not automatically found, you will have to enter it manually.
* Software support for video sharing and streaming between ReplayTV 5000 models and ReplayTV 4000/4500
models will be available in the future. Please check “www.sonicblue.com/replaytv” for update information.
If you connect ReplayTV directly to the phone jack in your home, the photo, send show, and in-home networking
features are not available.
Connecting ReplayTV to an Existing Network
1 If you are connecting ReplayTV to a broadband network, plug an Ethernet cable into the ETHERNET jack on ReplayTV and to
an available Ethernet jack on your network (on a wall, hub, switch, or router).
2 Turn ReplayTV on. It will automatically request an IP address from the network. You will see the Quick Setup screen.
If ReplayTV does not find a DHCP server, it will present you with a screen to manually configure the network connection.
• You will need to enter the IP address, Subnet Mask, Gateway address and DNS Server address. It is recommended that you
use the DNS entries provided by your ISP and not the IP address of your router. See “Entering Networking Information
Manually on ReplayTV” on page 17 if necessary.
3 After a successful test, you will be asked to enter your ZIP code and continue with setup.
4 If you have firewall software installed or a router with a built-in firewall, you should verify the router is configured properly.
See “Configuring Ports for Sending Recordings” on page 16.
ReplayTV 5000
12
Connecting ReplayTV to a Cable Modem
Using a router to connect ReplayTV to your cable modem is recommended. The router will allow you to share your cable modem
without needing additional IP addresses from your Internet Service Provider (ISP). Also, your ISP may require that you log on or
use special software on your PC in order to access the Internet. Consult your ISP for requirements. Refer to the following connection examples for details.
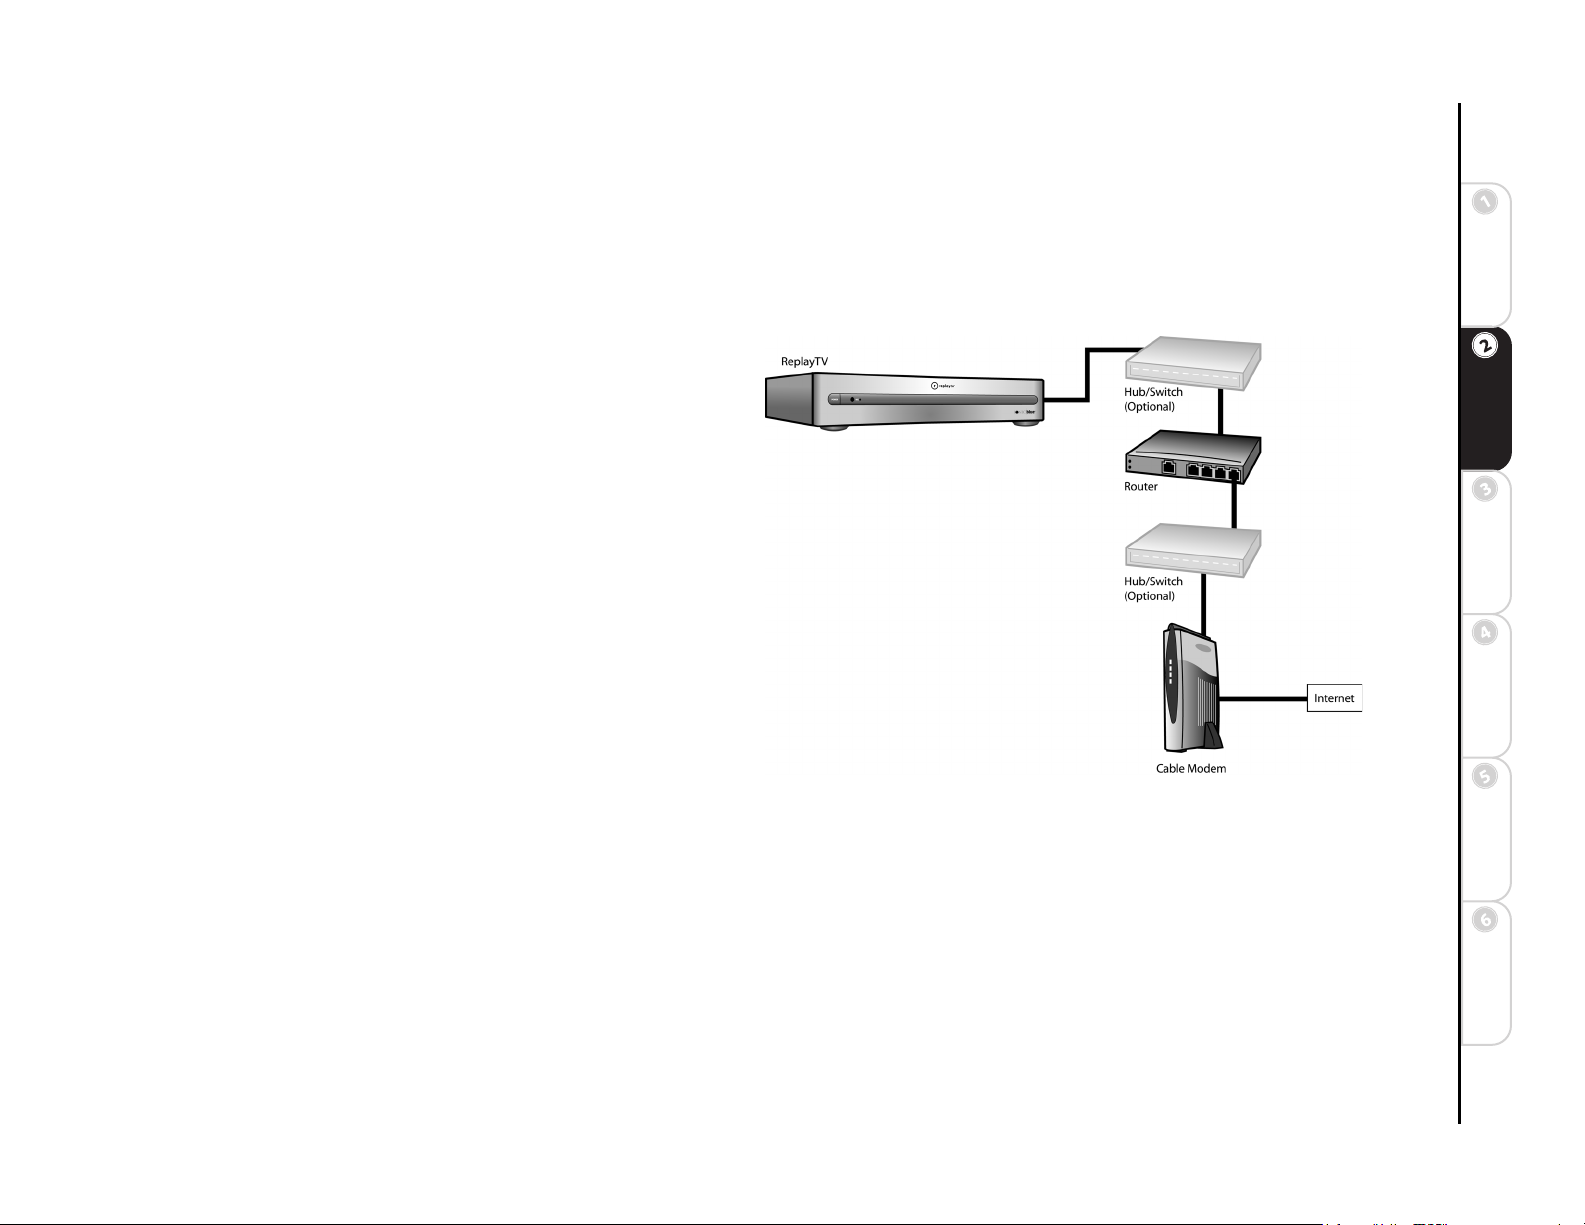
Connecting to a router
1 Use a recommended router that your ISP supports and
connect it directly to your cable modem. (See “Recommended Routers” on page 15.) If you have a single-port
router, you will also need a hub or a switch to connect
more than one device to the router. Verify that the router
is configured properly for ReplayTV. See “Configuring
Ports for Sending Recordings” on page 16.
2 Turn on your router. Refer to the router’s user guide to
set up the router. The default configuration of the router
is normally sufficient. By default, most routers have
DHCP (Dynamic Host Configuration Protocol) enabled
for automatically assigning IP addresses.
3 You can connect ReplayTV directly to the router, or to a
hub or switch that is connected to the router. Refer to
“Connecting ReplayTV to an Existing Network” on
page 12 to complete the setup.
Started
Connections Getting
SetupBasic
Operations
13
Features
Advanced
Help
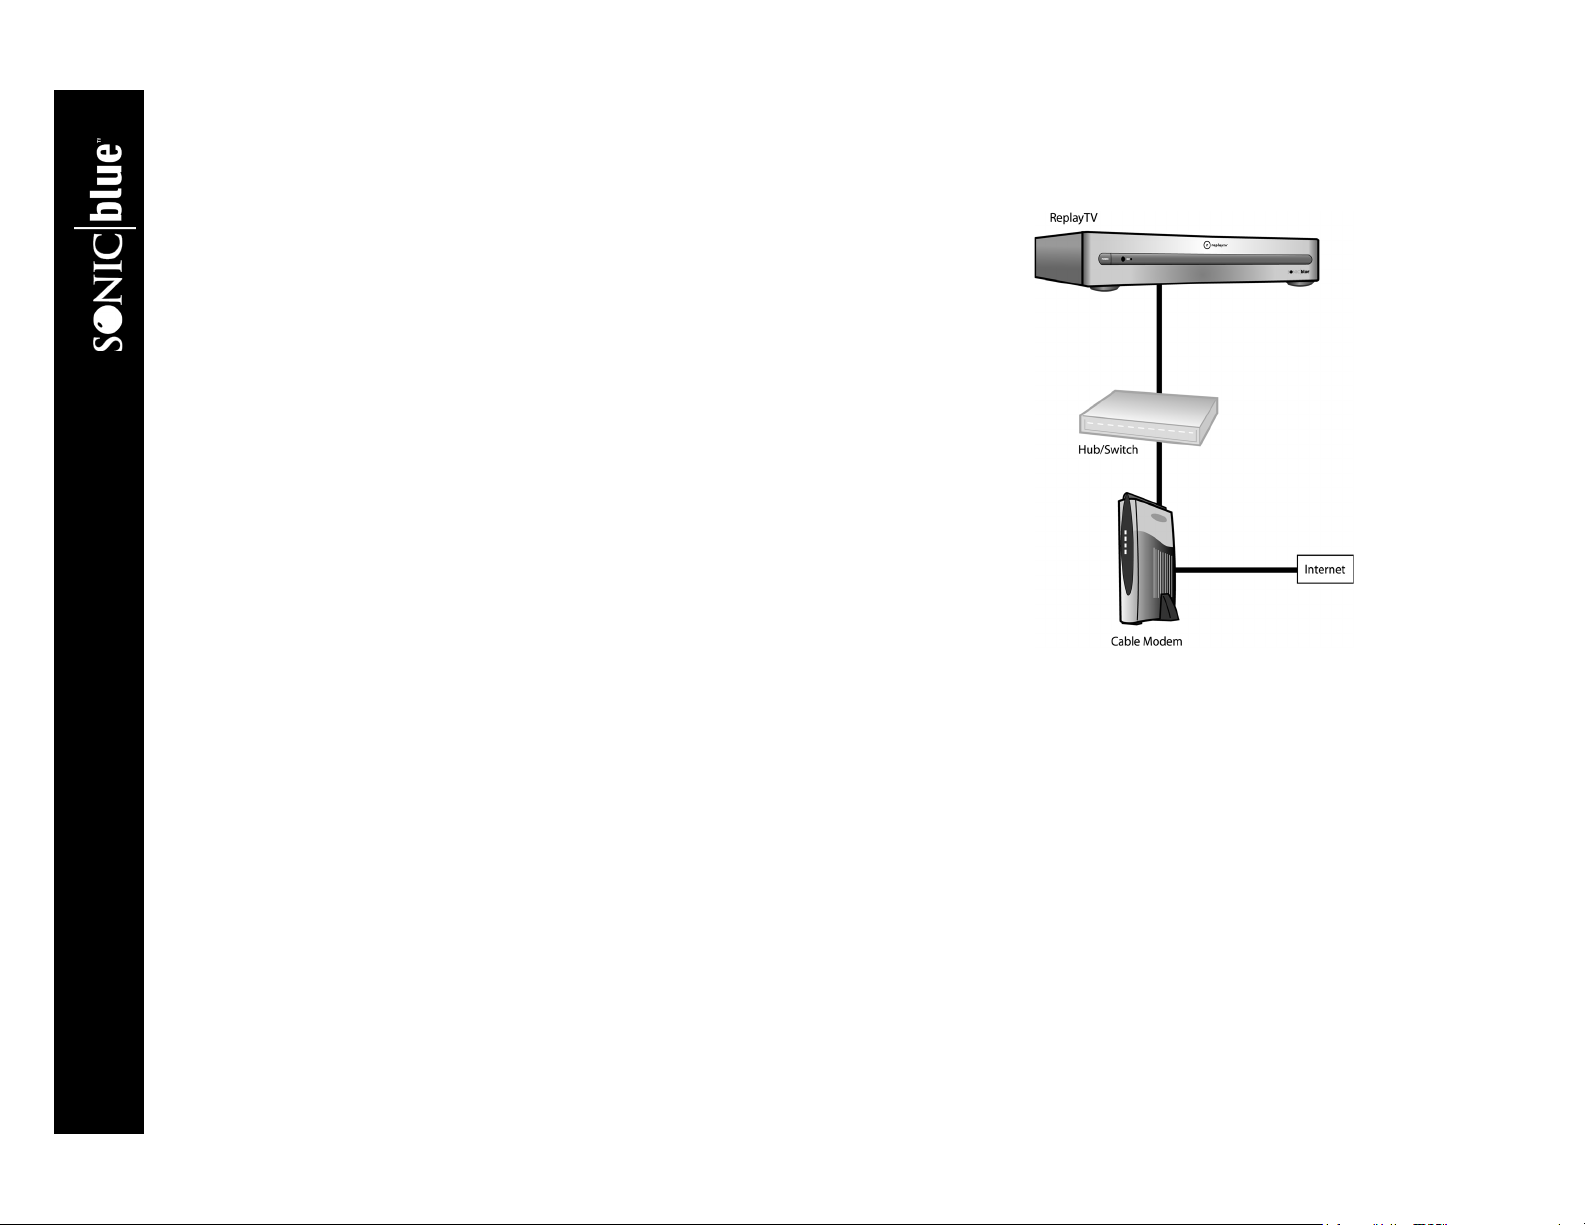
Connecting to a hub or switch (no router)
If you are connecting ReplayTV directly to a hub or switch that is connected to your
cable modem, you will need an IP address from your ISP for ReplayTV. Before setting
up ReplayTV, you should verify with your ISP that a device like ReplayTV is supported. You may need to specify the IP address on ReplayTV.
1 Verify that there is no special software or log on required for Internet access.
2 Verify that no settings other than the IP address, Subnet Mask, Gateway address, and
DNS Server address are required. (For example, some broadband connections require
that a DNS suffix be entered on your PC for Internet access to work.)
3 Check to see if your ISP requires the MAC address of devices like ReplayTV for Inter-
net connectivity. (Some ISPs require the MAC address of a network device in order to
automatically assign it an IP address. See “Determining the ReplayTV MAC (Media
Access Control) Address” on page 18.)
4 Refer to “Connecting ReplayTV to an Existing Network” on page 12 to complete the
setup.
Connecting directly to a cable modem
If you are connecting ReplayTV directly to a cable modem, you need to have an additional IP address from your ISP for ReplayTV. Before setting up ReplayTV, you should
verify with your ISP that a device like ReplayTV is supported. You may need to specify the IP address on ReplayTV.
1 Verify that there is no special software or log on required for Internet access.
2 Verify that no settings other than the IP address, Subnet Mask, Gateway address, and DNS Server address are required. (For
example, some broadband connections require that a DNS suffix be entered on your PC for Internet access to work.)
3 Check to see if your ISP requires the MAC address of devices like ReplayTV for Internet connectivity. (Some ISPs require the
MAC address of network devices in order to automatically assign it an IP address. See “Determining the ReplayTV MAC
(Media Access Control) Address” on page 18.)
4 Refer to “Connecting ReplayTV to an Existing Network” on page 12 to complete the setup.
ReplayTV 5000
14

Connecting ReplayTV to a DSL Modem
Connecting ReplayTV to a DSL modem is the same as connecting it to a cable modem with a few exceptions. Refer to “Connecting
ReplayTV to a Cable Modem” on page 13 with the following additions.
• The DSL modem you own might be a DSL router. If you are not sure, contact your ISP or DSL modem provider. If it is a router,
it can automatically assign an IP address to ReplayTV. If you have PPPoE (Point-to-Point Protocol over Ethernet) DSL (you
have to log on through software before you can access the Internet), you cannot connect ReplayTV directly to your DSL
modem unless it is also a router. PPPoE accounts require that the user log on with a username and password. Software is normally provided for your computer to do this. If you purchase a router to use with your PPPoE account, verify that it supports
PPPoE.
Router Setup
The default settings for routers are normally sufficient for ReplayTV to connect to the ReplayTV Service for the daily Channel
Guide listings and occasional software updates. Follow the instructions below if you are experiencing connection issues or if you
intend to share your recordings with other ReplayTVs.
Started
Connections Getting
Recommended Routers
Make Model
Netgear RT311
Netgear RP114
SMC Barricade SMC7004BR
Linksys BEFW11S4
1 If you are not manually specifying the IP address on ReplayTV, verify that DHCP is enabled on your router. You should specify
the IP address of ReplayTV if you are sharing recordings. Some routers will allow you to automatically assign the same IP
address to devices like ReplayTV. It is recommended that you enable this feature for ReplayTV, if it is available to you.
2 Verify that DNS is enabled on your router and the proper DNS entries have been added. These would have been provided by
your ISP. If the IP address of the router is specified (this is the external IP address), double-check the DNS entries from your
ISP.
3 Verify that the router does not block ReplayTV’s IP address. This setting can normally be found in the advanced section under
“access” controls. Some routers have a table listing which IP addresses are allowed to use the router for Internet access.
4 Verify that TCP ports 53 (DNS), 123 (NTP), 80 (HTTP) are open. Your router documentation should indicate whether or not
those ports are blocked by default.
15
SetupBasic
Operations
Features
Advanced
Help

5 When you first go to the ReplayTV Internet Address Book, you are asked to open a port number on your router. This is only
required if you will be sending recordings to other ReplayTVs. The port number must be associated with the IP address of
ReplayTV. If you have multiple ReplayTVs, each must use a different port to share recordings.
Configuring Ports for Sending Recordings
Sending recording to other ReplayTVs requires a port to be forwarded through your router (or firewall) for incoming network connections. You can normally specify the incoming port number, port type, destination IP address, and port status when configuring a
port. The following are example configuration settings. Refer to your router documentation for more complete instructions.
• Incoming Port Number: This can be any port that is not in use by another application. It is recommended that you choose a
high port number like 29000.
• Port Type: your choices are normally Both, TCP, and UDP. Choose TCP.
• Destination IP address: Enter the IP address that the port should be associated with or mapped to. This will be the IP address
of ReplayTV. It is recommended that you specify the IP address of ReplayTV for sending recordings.
• Port Status: Enable or Disable. Choose Enable.
In the Advanced section of your router setup software, you may find either a Port Forwarding or Virtual Server section. On this
page, you will need to enter the port information described above.
Filters and Rules
Some routers allow you to create filters and define rules for opening ports and forwarding IP information. Within these rules
and filters, you would enter the same information as you would on a Port Forwarding or Virtual Server page.
Depending on your router, it might be necessary to add the IP address of ReplayTV to the DMZ host page. This will place
ReplayTV outside of the firewall. This may be necessary if the router is not properly routing the information it receives to
ReplayTV. Check your router manual for more details on when using DMZ is appropriate.
ReplayTV 5000
16

Using ReplayTV with Firewall Software
Sending recording to other ReplayTVs requires a port to be forwarded through your router (or firewall) for incoming network connections. If you have a firewall on your computer or network, it needs to be configured properly or ReplayTV will not be able to
receive Channel Guide listings and software updates from the ReplayTV Service. If you do not know how to open ports on your
firewall software, refer to the documentation that shipped with the software.
1 Verify that TCP ports 53 (DNS), 123 (NTP), 80 (HTTP) are open. Your firewall documentation should indicate whether or not
those ports are blocked by default.
2 Verify that the IP address that ReplayTV uses is not blocked.
3 If you are sharing recordings with other ReplayTVs, you will need to open a port to receive shows. When you first go to the
ReplayTV Internet Address Book, you are asked to open a port number on your router. This is the port that needs to be open
on your firewall software. It is recommended that you use a high port number like 29000.
Entering Networking Information Manually on ReplayTV
1 Press Menu on the remote control and choose Setup.
2 Choose Network and Input Settings from the Setup menu.
3 Choose Change Network.
4 Choose Change from Automated to Manual and enter the information.
Determining the ReplayTV IP Address
The IP address you specify on ReplayTV must be in the same range as the IP addresses of other computers or devices on the same
network, but not identical. For example, if the IP address of your computer is 192.168.0.1 with a Subnet Mask of 255.255.255.0,
then the ReplayTV IP address may be 192.168.0.x, where x can be any number from 2 to 254. No other device on your network can
use the same IP address as ReplayTV.
Started
Connections Getting
SetupBasic
Operations
What you base the ReplayTV information on depends on the configuration of your network.
• If ReplayTV is connected to a router, then you need to collect the network information from the router or a PC connected to the
router. It does not matter if there is a hub between ReplayTV and the router.
• If ReplayTV is connected to a Cable Modem or DSL Modem, then the network information you need is provided by your ISP.
You will need to purchase a separate IP address for ReplayTV.
• If ReplayTV is connected directly to your PC or through a hub, then you need the network information from the network card.
17
Features
Advanced
Help

Determining the ReplayTV MAC (Media Access Control) Address
Every Ethernet device has a unique hardware number. Follow these steps to find the ReplayTV Mac address.
1 Go to the DOS or Command prompt on your PC.
2 Type “Ping (ReplayTV’s IP address)” and press Enter.
3 Type “Arp -a” and press Enter.
You will see a list of hardware addresses and associated IP addresses. Look for the hardware address associated with
ReplayTV’s IP address.
Finding the Router IP Address
Your router will have both a WAN (External) and LAN (Internal) IP address. If you are specifying the IP address on ReplayTV, the
information you will use to set up ReplayTV will come from the LAN settings.
• Check the documentation that shipped with your router. It normally has the default IP settings.
• If supported, use Netscape or Internet Explorer to look at the configuration settings on your router. For most routers, all you
need to do is enter the IP address of the router into your Web browser.
• Use the included software that shipped with your router to check its IP settings.
• If you have a PC connected to the router, you can use IPCONFIG or WINIPCFG on your PC to get the IP information you will
need. See “Finding your Computer’s Network Information” on page 19 for further details.
ReplayTV 5000
18

Finding your Computer’s Network Information
If your home network does not have a DHCP server (a router, for example), you will need to manually set the IP address on
ReplayTV. You can use the network information from your computer to determine what the IP address should be. Following are
steps to find this information for common computer systems.
Windows 9x or Millennium
1 Go to the Start menu on your PC and select Run.
2 Type WINIPCFG and select OK.
3 Select the correct network adapter from the menu.
The network adapter from which you collect information must be connected to ReplayTV or to the same network (e.g., hub or
router) as ReplayTV.
Windows 2000
•Go to the Command prompt on your PC and type IPCONFIG /all.
The network adapter from which you collect information must be connected to ReplayTV or to the same network (e.g., hub or
router) as ReplayTV.
Started
Connections Getting
Windows XP
1 Go to the network and dialup connections folder.
2 Select the appropriate LAN connection.
3 Double-click on the LAN connection.
4 Click on the Support button. The information for that adapter will display in the window.
The network adapter from which you collect information must be connected to ReplayTV or to the same network (e.g., hub or
router) as ReplayTV.
Windows NT
•Go to the Command prompt on your PC and type IPCONFIG /all
The network adapter from which you collect information must be connected to ReplayTV or to the same network (e.g., hub or
router) as ReplayTV.
Macintosh
These instructions do not apply to Mac OS X.
1 Go to the Apple menu.
2 Select Control Panels.
3 Select TCP/IP. The information you need is located here: IP address, Subnet Mask, Gateway address (router), DNS address.
Some older Macintosh computers may have a MacTCP control panel instead of a TCP/IP control panel.
19
SetupBasic
Operations
Features
Advanced
Help

ReplayTV 5000
20
 Loading...