

ReplayTV 5500 User Manual
ReplayTV_5500
User's Guide
÷
Replay'IV5.5 UG.hook Page il I:riday, August I, 2003 10:58 AM
Package Contents
ReptayTV Digital Video Recorder
Remote Control
Two AA Batteries
User Guide
RF Cable
A/V (RCA) Cable
Telephone Cable
Infrared (IR) Blaster Cable
Quick Setup Guide
Additional cables for controlling satellite receivers are available at www.replaytv.com. You can also purchase a wireless phone
jack if there is no available phone .jack near your entertainment system.
Copyright/Trademarks
_; 2003 Digital Networks North America, Inc. All rights reserved. Printed in Mala} sia.
Repla_ TV, Repl&_ TV Service, Repla} Zones, and QuickSklp are lrademarks or registered trademarks of Digital Netwo_s North America, Inc. ("DNN A"). All other produci or brand names as lhey appem"
al_ tr'adetttarks or regi_ered trademarks of tbelr respective holders.
3_als document contains proprietary in_rmarion of DNNA (_e "Company"). No part ofthls d_ument ma_ be copied, reproduced, transmitted, distributed, transcribed, stood in a retrieval sysiem, modified
or translated into any other language or computer language, or stlblicensed, in any form or by ally means electronlc, mecbanlcaI, magnetlc, o_ical, cbemlcal, tttanual or otberwis_ without lhe prior writ*
ten consem of_e lecbnlcal Support Manager a{ the Compaw, 2600 San rFomas Exp_ssway, Santa Ct_'a, CA 95051-0953. Furthe_ _is documen{ ma_ not be disseminated (or otheta_ ise made available)
tlsi ng telecoltlmunlcatlons fines or fi'equencles exce_ in a Limlted Access Environmen{ and only to persons authorized by the Company {o recelve and use this document and the in forlllatlon comalned
therein, For purposes of tbls cop) rlgbt, the term "Limited Access Envlromnent" shall mean a computer netwo_ (including, w fihout limitation, a local m_a network, a wide area network or an intranet) that
restricts access to personnel in a tellable _asblon (whlcb, a{ a {tllnlm urn, shall require each user Io enter a unique password in order to access foe nelwork) that can reasonabIy be expected to prevent access
to the document by persons other than authorized users. In addition _e training and inslrucrional procedures described in lhls document are confidential and proprleta_ intelligence of the Corn pa W and may
not be copied or used exce_ as pemtitted by lhe Company, Any unau_oril_zd or otherwise improper use of this documem or any of its material by any person will stl_ect that person to liabl fit) for dmnages.
Ihe Com[xm} shall not be liable for an} errors coniained berein or for any danlages arising out of or related to this document or the in formarion contained therein, even iftbe Compan} has been advised of
the pesslbility of such damages.
INs documem is intended tbr intbrmalional and instructional purposes only. Ihe Corn pan} reserves tbe right to make changes in tbe specifications and other informatfon contained in this document _ ithout
prior notification.
It is the intern of DNNA tba this product be used in f_ll compliance with he cop}rlght la_s oflhe United States. It is your responsibift} to c nnply _fih such Imps. Unau horized recording ol copyrlgbted
television programs or providing copies of such programs to others may, in certain circumstances, violate cop} rlgbt law and prior permission from copyright owners may be requlred fbr certain publlc per-
formances and certain comt_erclal uses.
P/N41005032C
ii
÷
Page iii I;rlday, August I, 2003 10:58 AM
Table of Contents
1 - Getting Started 1
Welcome ........................................................................................................................................................................................................
• Before you Begin .............................................................................................................................................................................................. 1
• Feature Updates from the ReplayTV Service ................................................................................................................................................... 1
• Feature Highlights ............................................................................................................................................................................................ 2
Remote Control Overview ........................................................................................................................................................... 3
Front Panel Overview ......................................................................................................................................................................4
Rear Panel Overview ........................................................................................................................................................................5
• Turning on ReplayTV ....................................................................................................................................................................................... 6
• Putting ReplayTV in Standby Mode ................................................................................................................................................................ 6
2 - Connections 7
Basic Connections ...............................................................................................................................................................................7
Planning your Setup .........................................................................................................................................................................9
Incorporating ReplayTV into your Entertainment System ............................................................................................................................... 9
Checking your Satellite Receiver ..................................................................................................................................................................... 9
Connecting RcplayTV to an A/V Receiver ...................................................................................................................................................... 9
Connecting RcplayTV to a VCR .................................................................................................................................................................... 10
Connecting a Video Camera or VCR to RcplayTV ....................................................................................................................................... 10
Connecting Cable Box and Satellite Receiver Conlrolle_ ............................................................................................................................. 10
Completing the On-screen Setup .................................................................................................................................................................... 12
Home Network Connections ...................................................................................................................................................12
Connecting ReplayTV to an Existing Network .............................................................................................................................................. 12
Router Setup ................................................................................................................................................................................................... 16
Entering Networking Information Manually on ReplayTV ........................................................................................................................... 16
Determining the ReplayTV IP Address .......................................................................................................................................................... 17
Determining the ReplayTV MAC (Media Access Control) Address ............................................................................................................. 17
Finding the Router IP Address ....................................................................................................................................................................... 17
Finding your Computer's Network Information ............................................................................................................................................ 18
III
÷
Replay'IV5.5 UG.book Page iv I-'rid_, August I, 2003 10:58 AM
3 - Setup 19
About Menu Navigation ...............................................................................................................................................................19
Main Menu .................................................................................................................................................................................................20
Setup Menu ..............................................................................................................................................................................................21
• ReplayTV Nanle ............................................................................................................................................................................................. 21
• Del_ault Record Options .................................................................................................................................................................................. 21
• Network and Input Settings ............................................................................................................................................................................ 21
Video Output Settings .................................................................................................................................................................................... 21
Screen Saver and Pause Screen ...................................................................................................................................................................... 21
Parental Control .............................................................................................................................................................................................. 22
Add or Remove Channels ............................................................................................................................................................................... 22
MyReplayTV Registration ............................................................................................................................................................................. 22
Privacy Policy ................................................................................................................................................................................................. 22
System Information ........................................................................................................................................................................................ 23
Remote Control Setup ...................................................................................................................................................................23
• Remote Control Setup Codes ......................................................................................................................................................................... 24
• Setup Codes for TV/VCR Combinalions ....................................................................................................................................................... 26
• Setup Codes for TV/DVD Combinations ....................................................................................................................................................... 26
4 - Basic Operations 27
Basic Operations .................................................................................................................................................................................27
• Show Walching Options ................................................................................................................................................................................. 27
• Show Recording Options ................................................................................................................................................................................ 27
Controlling Live Television .......................................................................................................................................................28
Pausing live TV and Recorded Shows ........................................................................................................................................................... 28
Using Rewind and Fast Forward .................................................................................................................................................................... 28
Using Multispeed Slow Motion ...................................................................................................................................................................... 29
Using Frame Advance .................................................................................................................................................................................... 30
Using Instant Replay ...................................................................................................................................................................................... 30
Using QuickSkip ............................................................................................................................................................................................ 30
Using Jump ..................................................................................................................................................................................................... 31
Channel Guide .......................................................................................................................................................................................32
• Using the Channel Guide ................................................................................................................................................................................ 33
iv
÷
@Replay'[ V5.5 UG.book
Page\ ];rlda3,Augus{ 1,2003 10:58AM
Recording Shows ................................................................................................................................................................................35
• Setting the Recording Options ........................................................................................................................................................................ 36
Find Shows ...............................................................................................................................................................................................38
Replay Zones ..........................................................................................................................................................................................39
• To Record a Show from a Replay Zone: ........................................................................................................................................................ 39
Using Manual Record .....................................................................................................................................................................4o
• Changing the Default Recording Options ...................................................................................................................................................... 40
• Cancelling a Recording .................................................................................................................................................................................. 41
• Replay Channels ............................................................................................................................................................................................. 41
• Resolving Conflicting Recordings ................................................................................................................................................................. 42
Replay Guide ...........................................................................................................................................................................................43
• Navigaling the Replay Guide ......................................................................................................................................................................... 44
Calegory Options ............................................................................................................................................................................................ 44
Replay Channel Options ................................................................................................................................................................................. 44
Replay Show Options ..................................................................................................................................................................................... 45
Walching a Recorded Show ........................................................................................................................................................................... 45
Keeping an Episode of a Show ....................................................................................................................................................................... 45
Shows at Risk of Deletion .............................................................................................................................................................................. 46
Saving Recordings to Videotape .................................................................................................................................................................... 46
5 - Advanced Features 47
Watching Shows Recorded on other ReplayTVs ................................................................................................47
• Playing Shows frolil Another In-home ReplayTV ......................................................................................................................................... 47
• Viewing Olher In-home Replay Guides ......................................................................................................................................................... 48
Screen Saver and Pause Screen ......................................................................................................................................... 49
• Installing ReplayTV Photo Transfer .............................................................................................................................................................. 49
• Using the Photo Viewer .................................................................................................................................................................................. 50
Remote Control Shortcuts ........................................................................................................................................................51
Show-walching Shortcuts ............................................................................................................................................................................... 51
Channel Guide Shortcuts ................................................................................................................................................................................ 51
Replay Guide Shortcuts .................................................................................................................................................................................. 52
Find Shows On-screen Keyboard Shortculs ................................................................................................................................................... 52
Slide Show Control Shortcuts ........................................................................................................................................................................ 52
Channel Surfing Display Shortcuts ................................................................................................................................................................ 52
V
÷
Replay'IV5.5 UG.book Page vl I-'rid_, August I, 2003 10:58 AM
• Record Options Screen Shortcuts ................................................................................................................................................................... 52
6 - Help 53
Troubleshooting ..................................................................................................................................................................................53
• Customer Service Informalion ....................................................................................................................................................................... 53
• Frequently Asked Questions ........................................................................................................................................................................... 53
Glossary .......................................................................................................................................................................................................58
Technical Specifications ..............................................................................................................................................................59
Limited Warranty and Software License ...................................................................................................................60
• Warranty ......................................................................................................................................................................................................... 60
• Software License Agreement ......................................................................................................................................................................... 61
Activation and Service Agreement ..................................................................................................................................63
Privacy Policy .........................................................................................................................................................................................65
• Your Privacy is Important to Us ..................................................................................................................................................................... 65
• Privacy Policy Q&A ....................................................................................................................................................................................... 66
FCC Compliance ...................................................................................................................................................................................69
• FCC Rules, Part 68 ......................................................................................................................................................................................... 70
Safety ............................................................................................................................................................................................................. 71
• Important safety Instructions ......................................................................................................................................................................... 71
• Safety/Regulatory Information ....................................................................................................................................................................... 73
vi
÷
Page l I;rlda3,Augus{ 1,2003 10:58AM
Chapter 1 Getting Started
•".Welcome
Congratulations on your purchase of the ReplayTV 5500. In case warranty service is required, please take a moment to attach your
receipt to this user's guide and write down your Serial Nmnber, located on the back panel of the ReplayTV 5500.
Serial Number:
Additional system information for your new ReplayTV 5500, including the Serial Numbel, can be found by performing the follow-
ing steps:
1 Press Menu to display the ReplayTV Main Menu.
2 Select Setup.
3 Select System Information.
Before you Begin
Make sure you have connected ReplayTV to your television and other components. Refer to the QuickSetup Guide or
"Connections" on page 7 for instructions.
Feature Updates from the ReplayTV Service
New features are occasionally delivered through the Ethernet and telephone connections (whichever you use). When this occurs
you may encounter screens that look a little different from those in this guide or you may find differences in the features covered. A
message will be sent to your ReptayTV notifying you when new features are available. Choose Messages from the Main Menu to
read about the new features.
For the vei2¢ latest user's guide and new feature instructions, visit www.reptaytv.com
1
÷
Replay'lVS.5 UG.book Page 2 ]:rlda3, August I, 2003 10:58 AM
Feature Highlights
After you have experienced the exciting new world of personal television, you will never watch plain old television again. No vid-
eotapes. No hassles. No compromises. Pause live television. With ReplayTV, it's easy to quickly find and automatically record
your favorite television shows, so you can watch them whenever you want--on your schedule, not somebody else's. Also,
ReptayTV allows you to share content among multiple units in a home network.
Control live television. Pause, rewind, fast forward, play in slow motion, or watch an instant replay--all without missing a sin-
gle scene. See "Controlling Live Television" on page 28.
Automatically record every episode of your favorite shows, or constantly find and record shows that interest you. Schedule a
recording once and ReptayTV does the rest. See "Recording Shows" on page 35.
Use QuickSkip to jump past recorded segments 30 seconds at a time. See "Using QuickSkip" on page 30.
No need to channel surf any more. Use the Channel Guide to see what's on now and what's coming up later without repeatedly
changing channels. See "Using the Channel Guide" on page 33.
Locate shows that you want to watch without searching through pages of program schedules. The Find Shows feature locates
shows based on specific titles, actors, directors, and topics that you choose. See "Find Shows" on page 38.
Use an Ethernet connection to download Channel Guide information via broadband. It must be connected at all times. See
"Home Network Connections" on page 12.
Watch shows recorded on other ReplayTVs in your home. If you have more than one ReplayTV, you can watch shows in one
room that were recorded in another. OI, start watching a show in one room, then continue watching the show in another room,
right from where you left off. See "Watching Shows Recorded on other ReptayTVs" on page 47.
Transfer digital photos from your PC to your ReplayTV to create and view slide shows of your vacation or other photo collec-
tions. Additionally, you can display your photos when you press Pause or when the screen saver starts. See "Using the Photo
Viewer" on page 50.
2
÷

Page 3 Frldaj, Augus{ I, 2003 10:58 AM
:: Remote Control Overview
1 TV (Power) Power TV on or off. (See page 23 to program the remote to operate your
TV.)
2 ReplayTV (Power) Switch between On and Standby modes.
3 0-9 Tune to channels; jump to a channel in the Channel Guide.
4 Enter Display a current show's menu while in the Channel Guide.
5 Channel Guide Display TVlistings.
6 Zones Search TV listings by category.
7 Arrow (Navigation) Buttons Move on-screen highlight.
8 Select Choose on-screen options; view channel surfing display while watching live TV.
9 Exit Exit on-screen menus.
10 Play/Slow Play/slow motion.
11 QuickSkip Skip 30 seconds of a recorded or delayed show.
12 Fast Forward Fast forward recorded or delayed show; frame-by-frame advance while
paused.
13 Stop Stop playback of show.
14 Return to Live Return to live TV while watching a show delayed.
15 Channel +/- Change channels; move one screen at a time up or down in guides and
menus.
16 Mute Mute the volume of the programmed TV.
17 Volume +/- Adjust the volume of the programmed TV.
18 Display See program infomaation about current show.
19 Input Switch among ReplayTV's inputs.
20 Rewind Rewind show.
21 Instant Replay Retm'n 7 seconds and replay a segment.
22 Pause Pause live TV and recorded shows.
23 Record Record show from Channel Guide or while viewing live TV.
24 Menu Display ReptayTV Main Menu.
25 Replay Guide List of your recorded shows.
26 Jump Jump between a recorded show and live TV, two live TV shows, or two recorded shows.
÷
3
ii{iiiii_}i_i'
0.

:: Front Panel Overview
1 2 3 4
1 POWER button Manually switches between On and Standby modes.
2 POWER light Lights when ReplayTV is on,
3 IR Receiver Point remote control here when operating your ReplayTV,
4 REC (Recording) light Lights when ReplayTV is recording a show,
4
÷
@Replay'[ V5.5 UG.book
Page 5 I;rlda), Augus{ I, 2003 10:58 AM
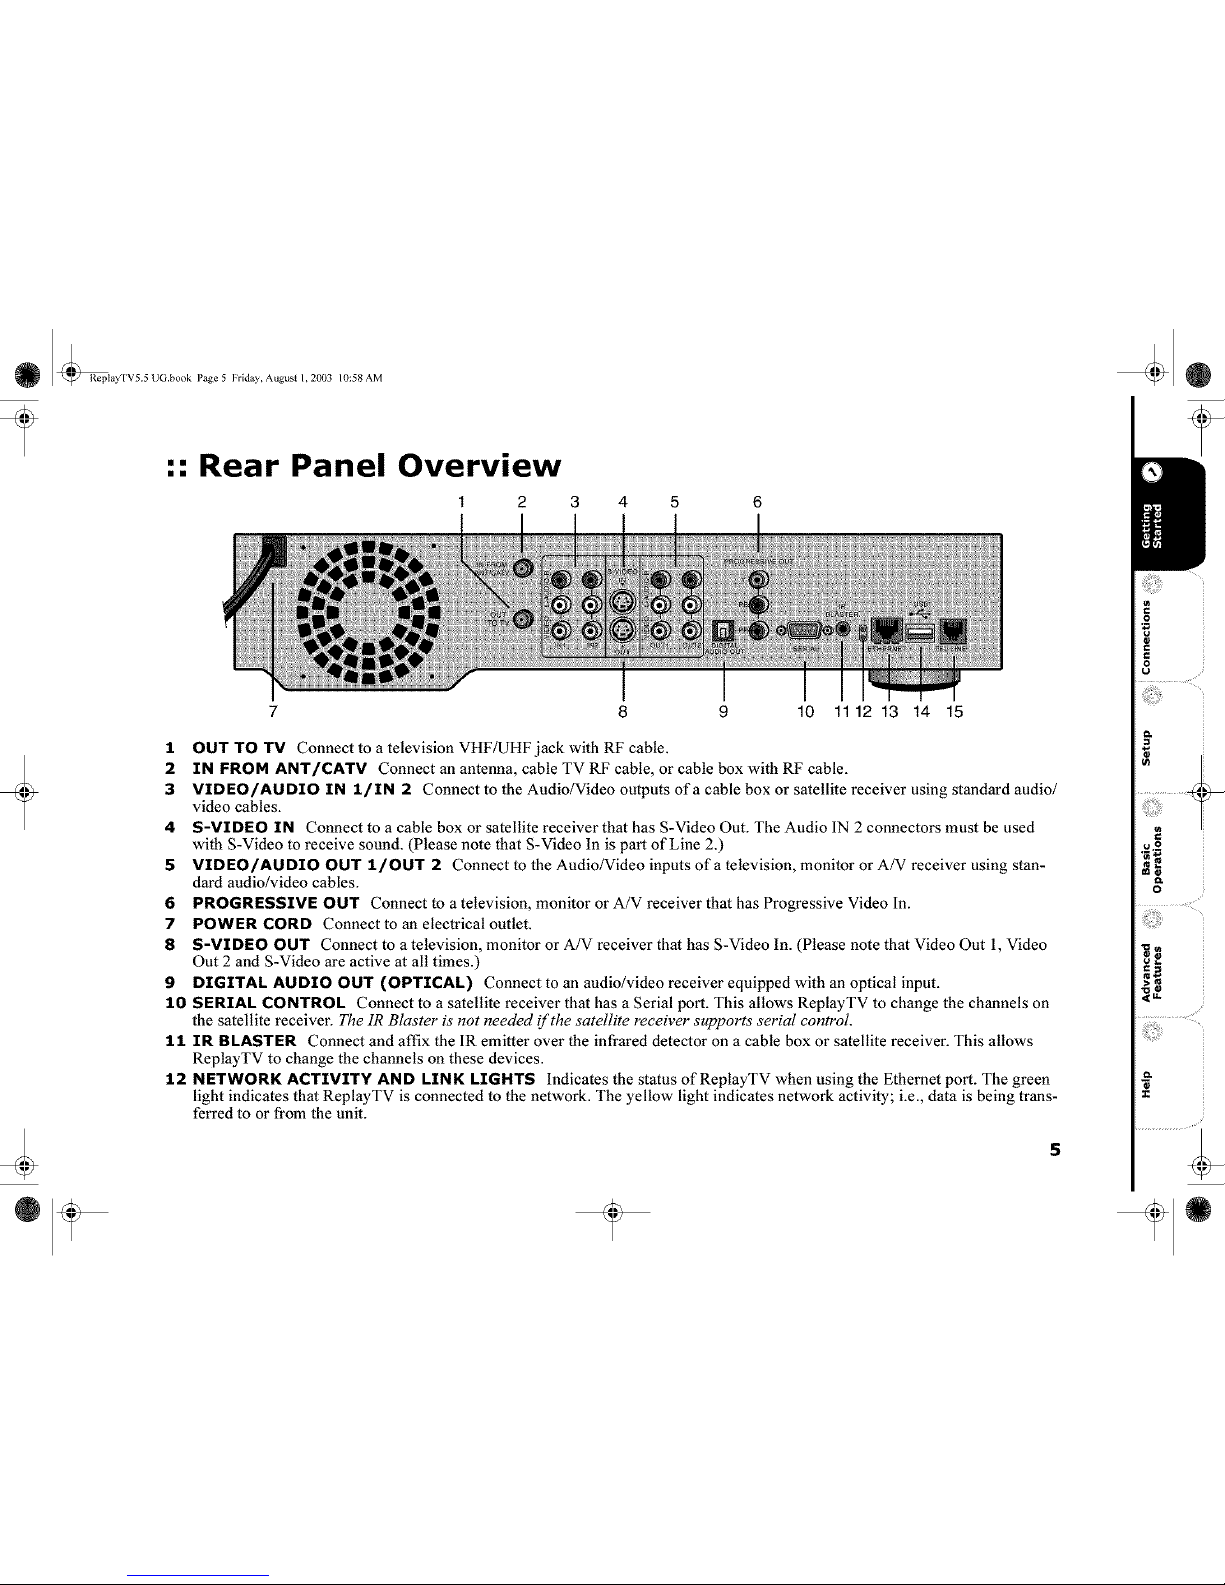
:: Rear Panel Overview
1 2 3 4 5 6
8 9 10 11 12 13 14 15
:It OUT TO TV Connect to a television VHF/UHF jack with RF cable.
2 IN FROM ANT/CATV Connect an antenna, cable TV RF cable, or cable box with RF cable.
3 VIDEO/AUDIO IN l/IN 2 Connect to the Audio/Video outputs of a cable box or satellite receiver using standard audio/
video cables.
4 S-VIDEO IN Connect to a cable box or satellite receiver that has S-Video Out. The Audio IN 2 connectors must be used
with S-Video to receive sound. (Please note that S-Video In is part of Line 2.)
5 VIDEO/AUDIO OUT 1/OUT 2 Connect m the Audio/Video inputs of a television, monitor or A/V receiver using stan-
dard audio/video cables.
6 PROGRESSIVE OUT Connect m a television, monitor or A/V receiver that has Progressive Video In.
7 POWER CORD Connect to an electrical outlet.
8 S-VIDEO OUT Connect to a television, monitor or A/V receiver that has S-Video In. (Please note that Video Out 1, Video
Out 2 and S-Video are active at all times.)
9 DIGITAL AUDIO OUT (OPTICAL) Connect to an audio/video receiver equipped with an optical input.
:tO SERIAL CONTROL Connect to a satellite receiver that has a Serial port. This allows ReplayTV to change the channels on
the satellite receiver. The 1R Blaster is not needed if the satellite receiver supports serial control.
11 IR BLASTER Connect and affix the IR emitter over the infrared detector on a cable box or satellite receiver. This allows
ReptayTV to change the channels on these devices.
12 NETWORK ACTIVITY AND LINK LIGHTS Indicates the status of ReplayTV when using the Ethernet port. The green
light indicates that ReplayTV is connected to the network. The yellow light indicates network activity; i.e., data is being trans-
fela'ed to or from the unit.
5
÷
ii{iiiii_}i_i'
Replay'lVS.5 UG.book Page 6 ]:rlda), Augusi I, 2003 10:58 AM
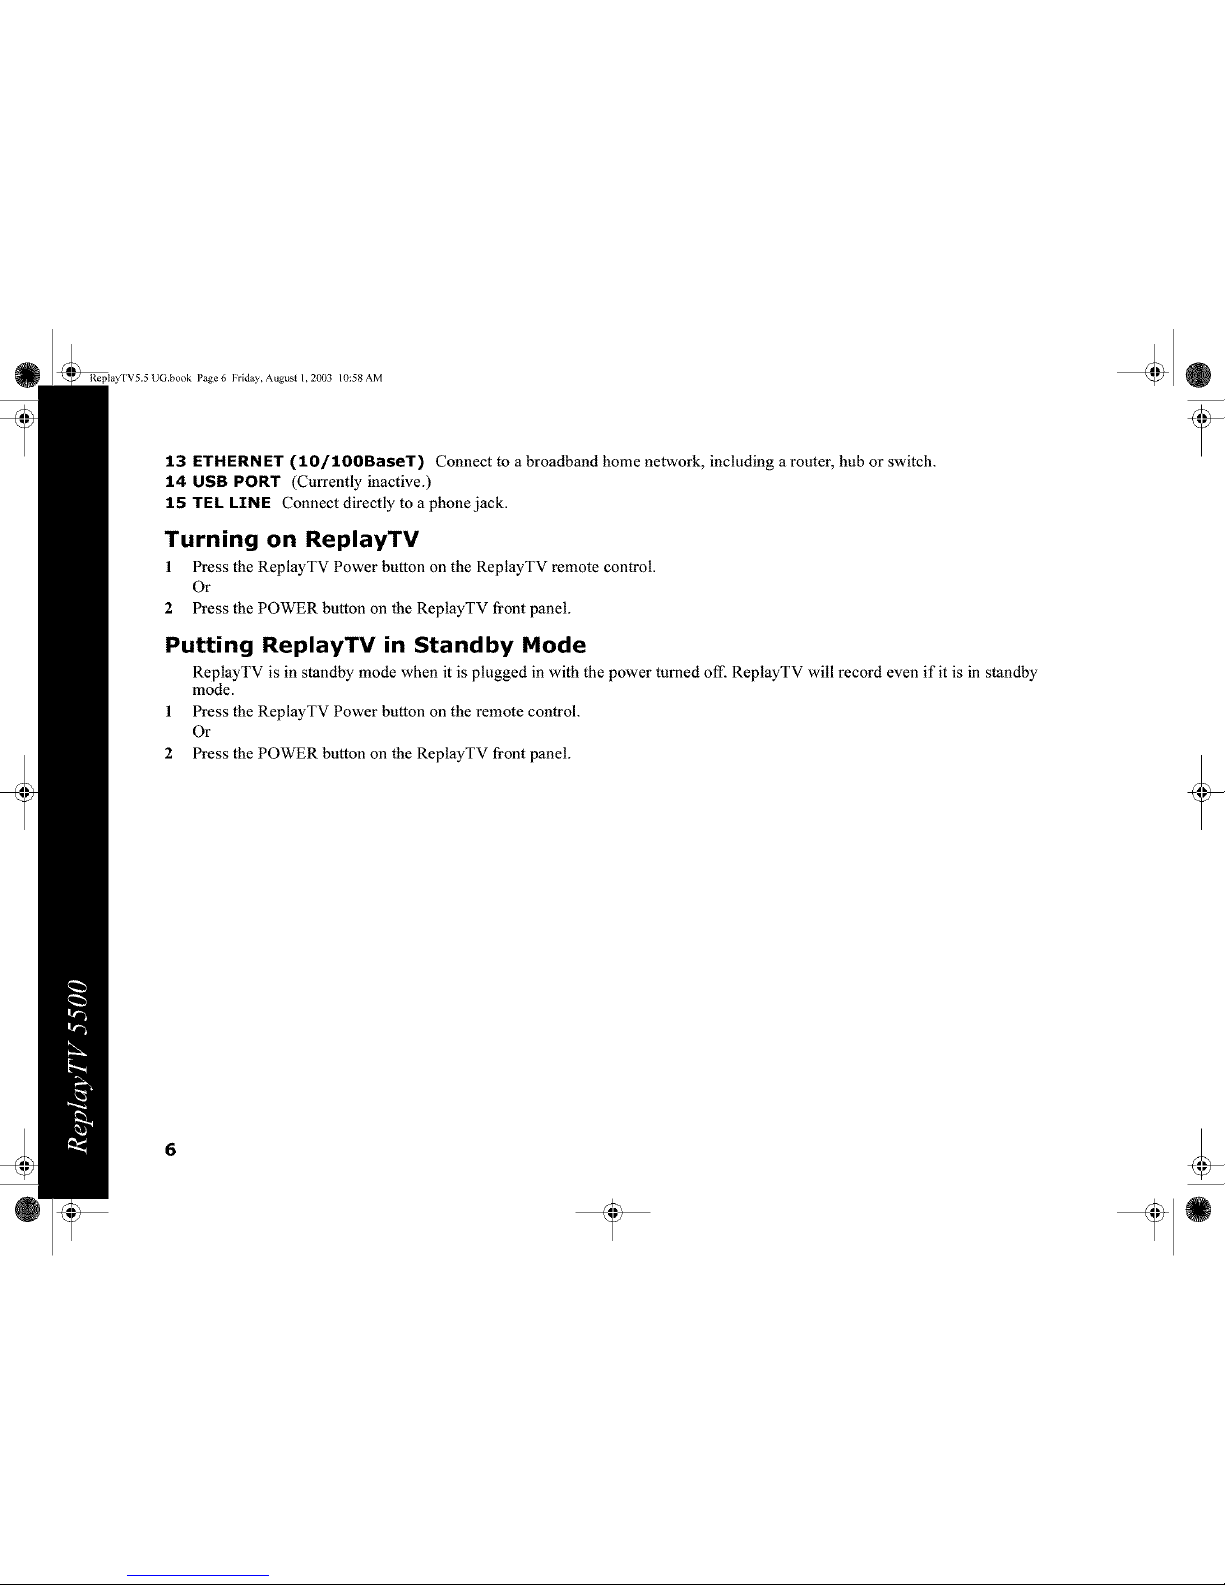
13 ETHERNET (10/100BaseT) Connect to a broadband home network, including a router, hub or switch.
14 USB PORT (Currently inactive.)
15 TEL LINE Connect directly to a phone jack.
Turning on ReplayTV
1 Press the ReplayTV Power button on the ReptayTV remote control.
Or
2 Press the POWER button on the ReptayTV front panel.
Putting ReplayTV in Standby Mode
ReplayTV is in standby mode when it is plugged in with the power turned off. ReptayTV will record even if it is in standby
mode.
1 Press the ReplayTV Power button on the remote control.
Or
2 Press the POWER button on the ReptayTV front panel.
6
÷
Page 7 Frlda3, Augus{ I, 2003 10:58 AM
Chapter 2
Connections
:: Basic Connections
This chapter describes how to connect ReplayTV to your TV and other devices, including your home network. You will find
detailed connection options not found on the QuickSetup Guide. If you have not already, take a look at the Quick Setup Guide
before reading this chapter.
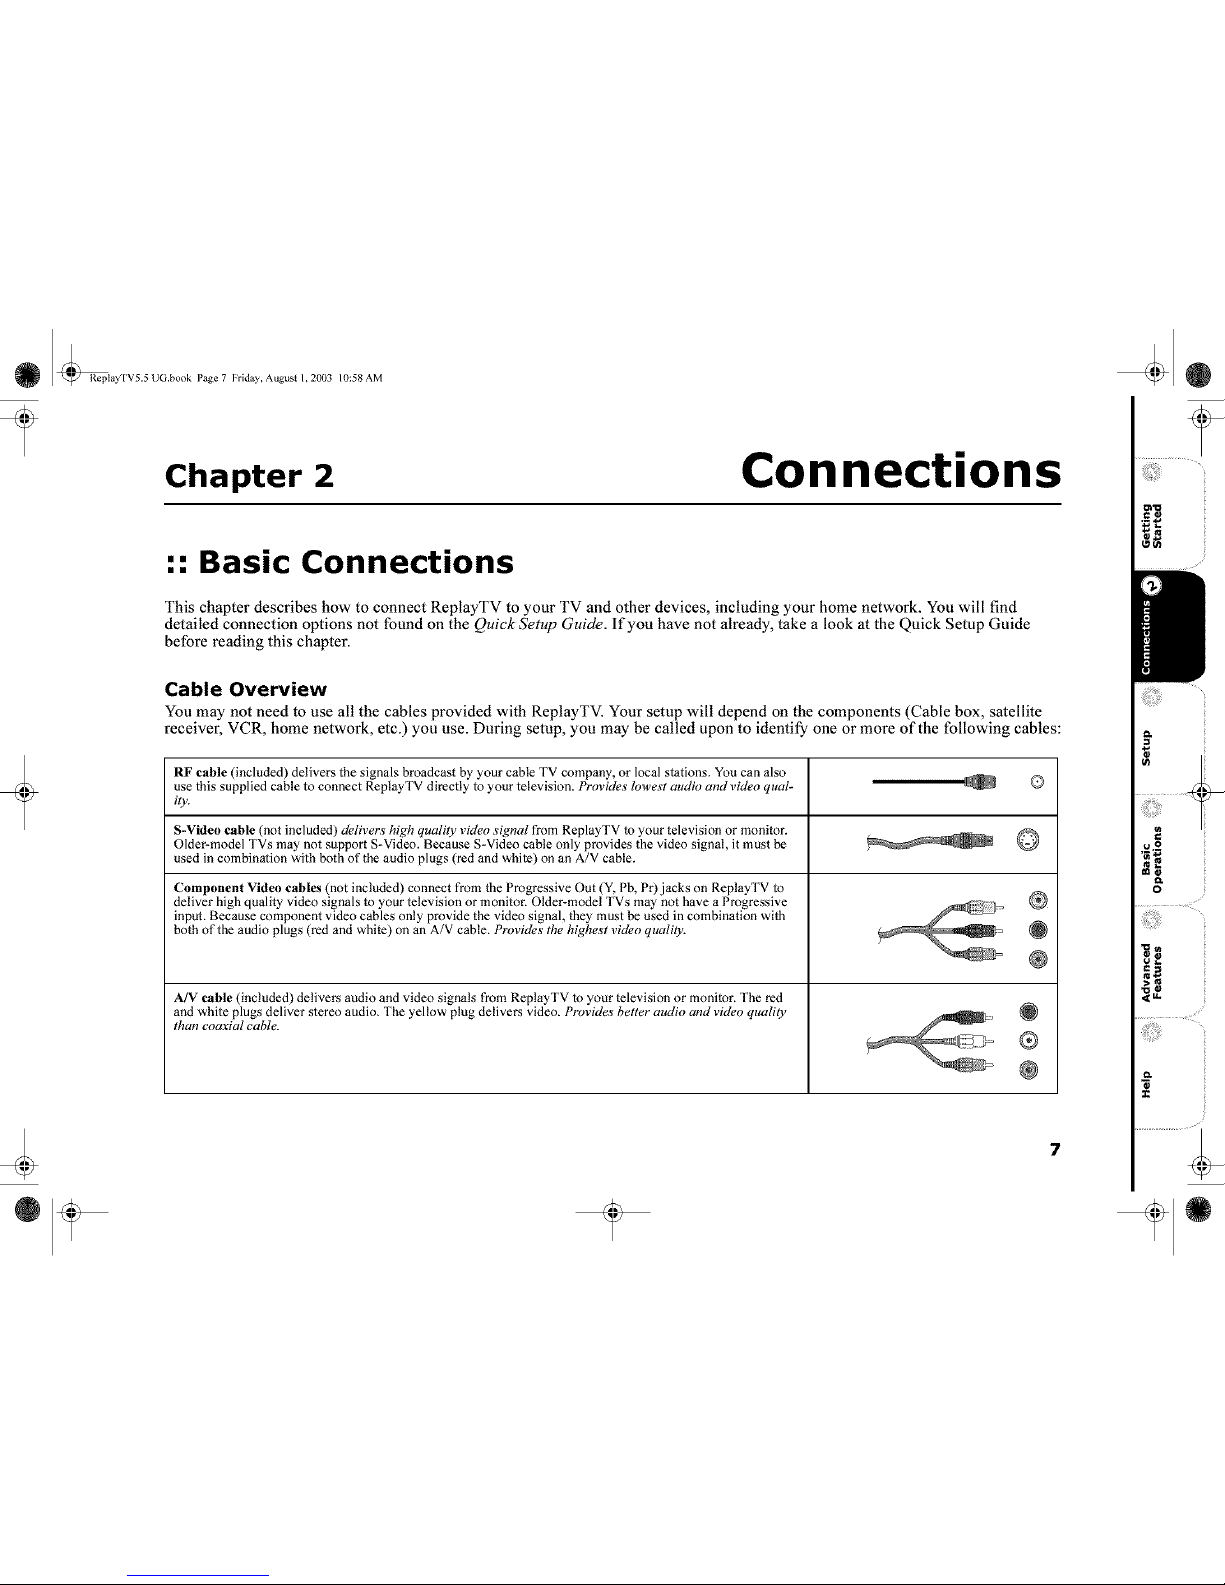
Cable Overview
You may not need to use all the cables provided with ReplayTV. Your setup will depend on the components (Cable box, satellite
receiver, VCR, home network, etc.) you use. During setup, you may be called upon to identify one or more of the following cables:
RF cable (included) delivers the signals broadcast by your cable TV company, or local stations. You can also
use lhis supplied cable to connect Replay'IV directly lo your television. Provides lmvest audio and video qual-
ity.
S-Video cable (not included) delivers high quality video signal from ReplayTV to your television or monitor.
Older-model TVs may not support S-Video. Because S-Video cable only provides the video signal, it must be
used in combinalion with both of the audio plugs (red and while) on an A/V cable.
Component Video cables (not included) connect from the Progressive Out (Y, Pb, Pr) jacks on ReplayTV to
deliver high quality video signals to your television or monitor. Older-model TVs may not have a Progressive
input. Because component video cables only provide the video signal, they must be used in combination with
both of the audio plugs (red and white) on an A/V cable. Provides the highest video quality.
A/V cable (included) delivers audio and video signals from ReplayTV to your television or monitor. The red
and white plugs deliver stereo audio. The yellow plug delivers video. Provides better audio and video quality
than eoaxial cable.
7
÷
uO
o
Replay'IVS.5 UG.book Page 8 Frlda3, August I, 2003 10:58 AM
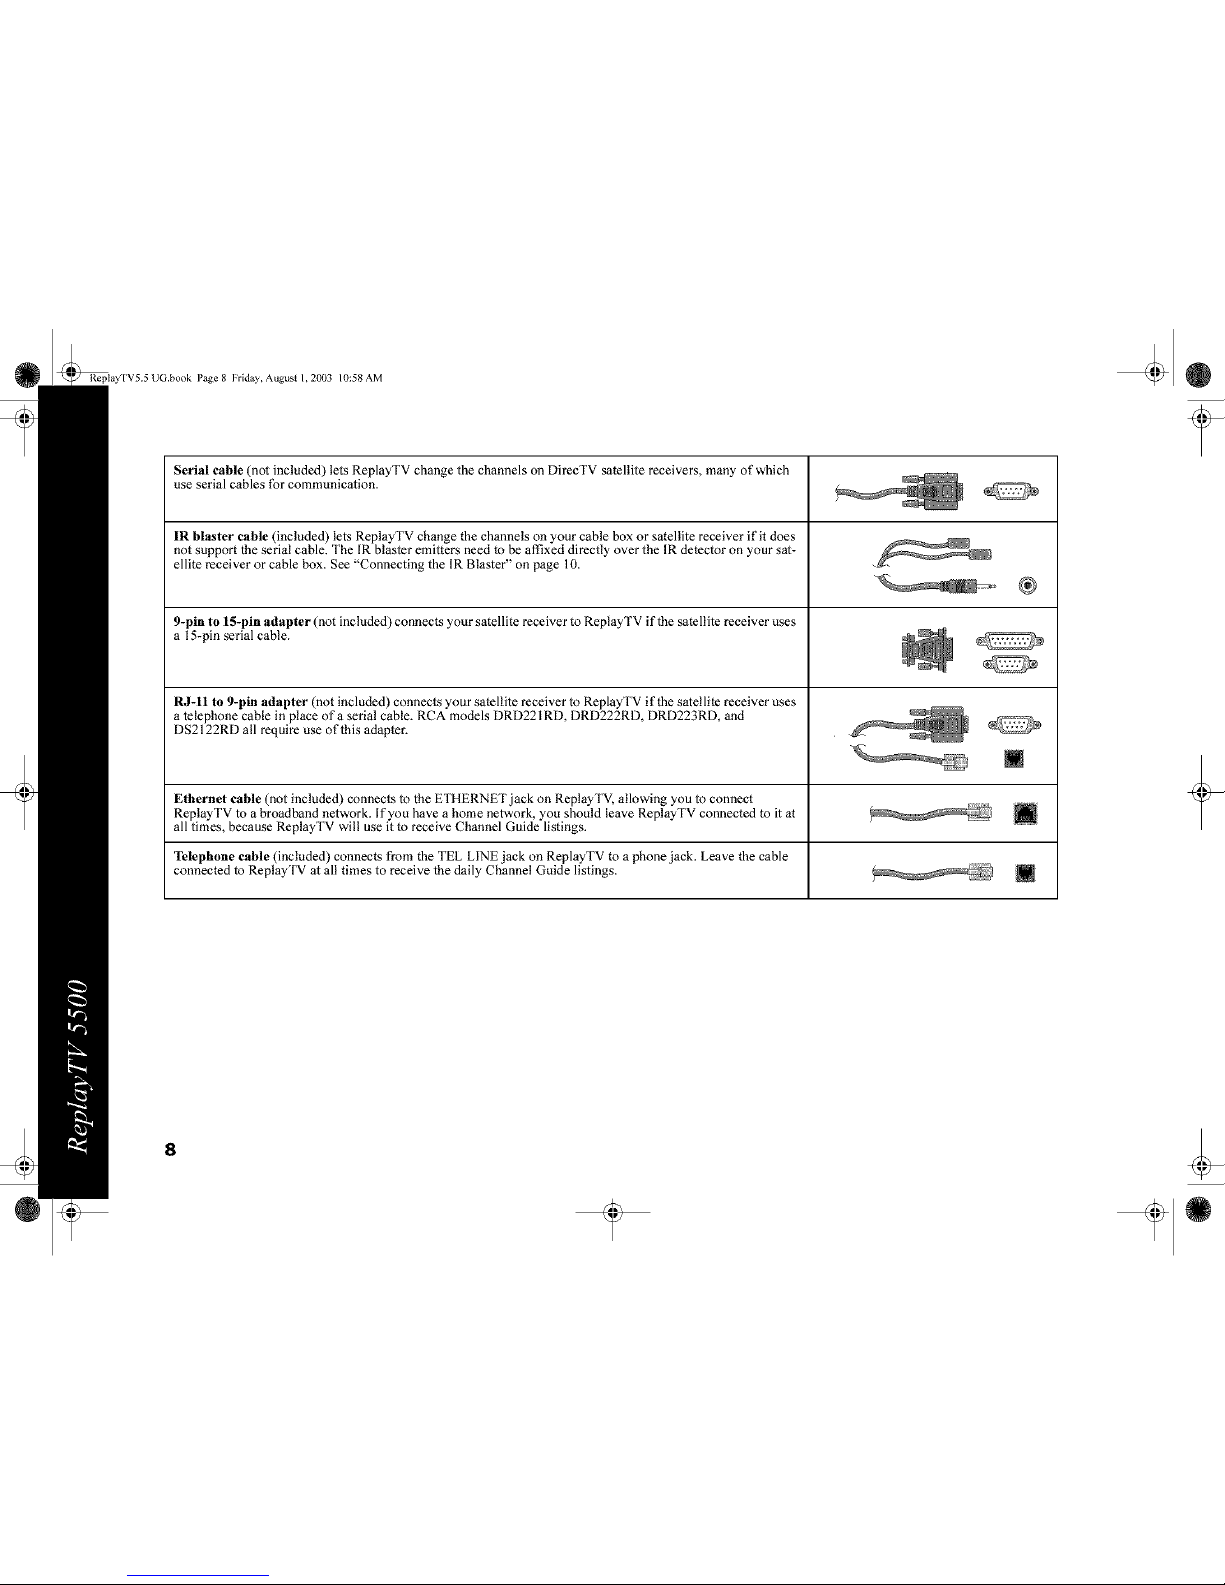
Serial cable (not included) lets ReplayTV change the channels on DirecTV satellite receivers, many of which
use serial cables for communication.
IR blaster cable (included) lets ReplayTV change the channels on your cable box or satellite receiver if it does
not support the serial cable. The IR blaster emitters need to be al_]xed directly over the IR detector on your sat-
ellite receiver or cable box. See "Connecting the IR Blaster" on page 10.
9-pin to 15-pin adapter (not included) connects your satellite receiver to ReplayTV if the satellite receiver uses
a 15-pin serial cable.
RJ-11 to 9-pin adapter (not included) connects your satellite receiver to ReplayTV if the satellite receiver uses
a telephone cable in place of a serial cable. RCA models DRD221RD, DRD222RD, DRD223RD, and
DS2122RD all require use of this adapter.
M
Ethernet cable (not included) connects to the ETHERNET jack on ReplayTV, allowing you to connect
ReplayTV to a broadband network. If you have a home network, you should leave ReplayTV connected to it at m
all times, because ReplayTV will use it to receive Channel Guide listings.
Telephone cable (included) connects from the TEL LINE jack on ReplayTV to a phone jack. Leave the cable
connected to Replay'iV at all times to receive the daily Channel Guide listings. []
8
÷
@Replay'l V5.5 UG.book
Page9 I;rlda),Augusi 1,2003 10:58AM
:: Planning your Setup
Read this section before incorporating ReplayTV into your entertainment system.
Incorporating ReplayTV into your Entertainment System
ReptayTV controls and records the television signals you receive (satellite, cable, antenna, or a combination of all three). The sig-
nal(s) connect directly m the ReplayTV inputs. The outputs from ReplayTV connect to a television, monitm, or A/V receiver. You
can also connect a VCR to ReptayTV and save shows you have recorded to videotape. See "Saving Recordings to Videotape" on
page 46 for more information. ReptayTV is not intended to record signals sent by DVD players and video game systems. Connect
DVD players and video game systems directly to your television, not to ReptayTV.
Checking your Satellite Receiver
ReplayTV receives broadcast signals from satellite receivers through S-Video or A/V cables. ReptayTV can send channel-changing
signals to your satellite receiver through a serial cable or the supplied IR blaster. Use the IR blaster if your DirecTV satellite
receiver does not have a serial port or support serial control.
If the remote control for your satellite receiver has a "UHF" label, or if your satellite receiver uses a small antenna, your satellite
receiver is radio controlled. DISH Network satellite receivers are either UHF only, UHF and IR (infrared), or IR only. ReptayTV
does not support UHF-only receivers. Serial control is not supported by DISH receivers.
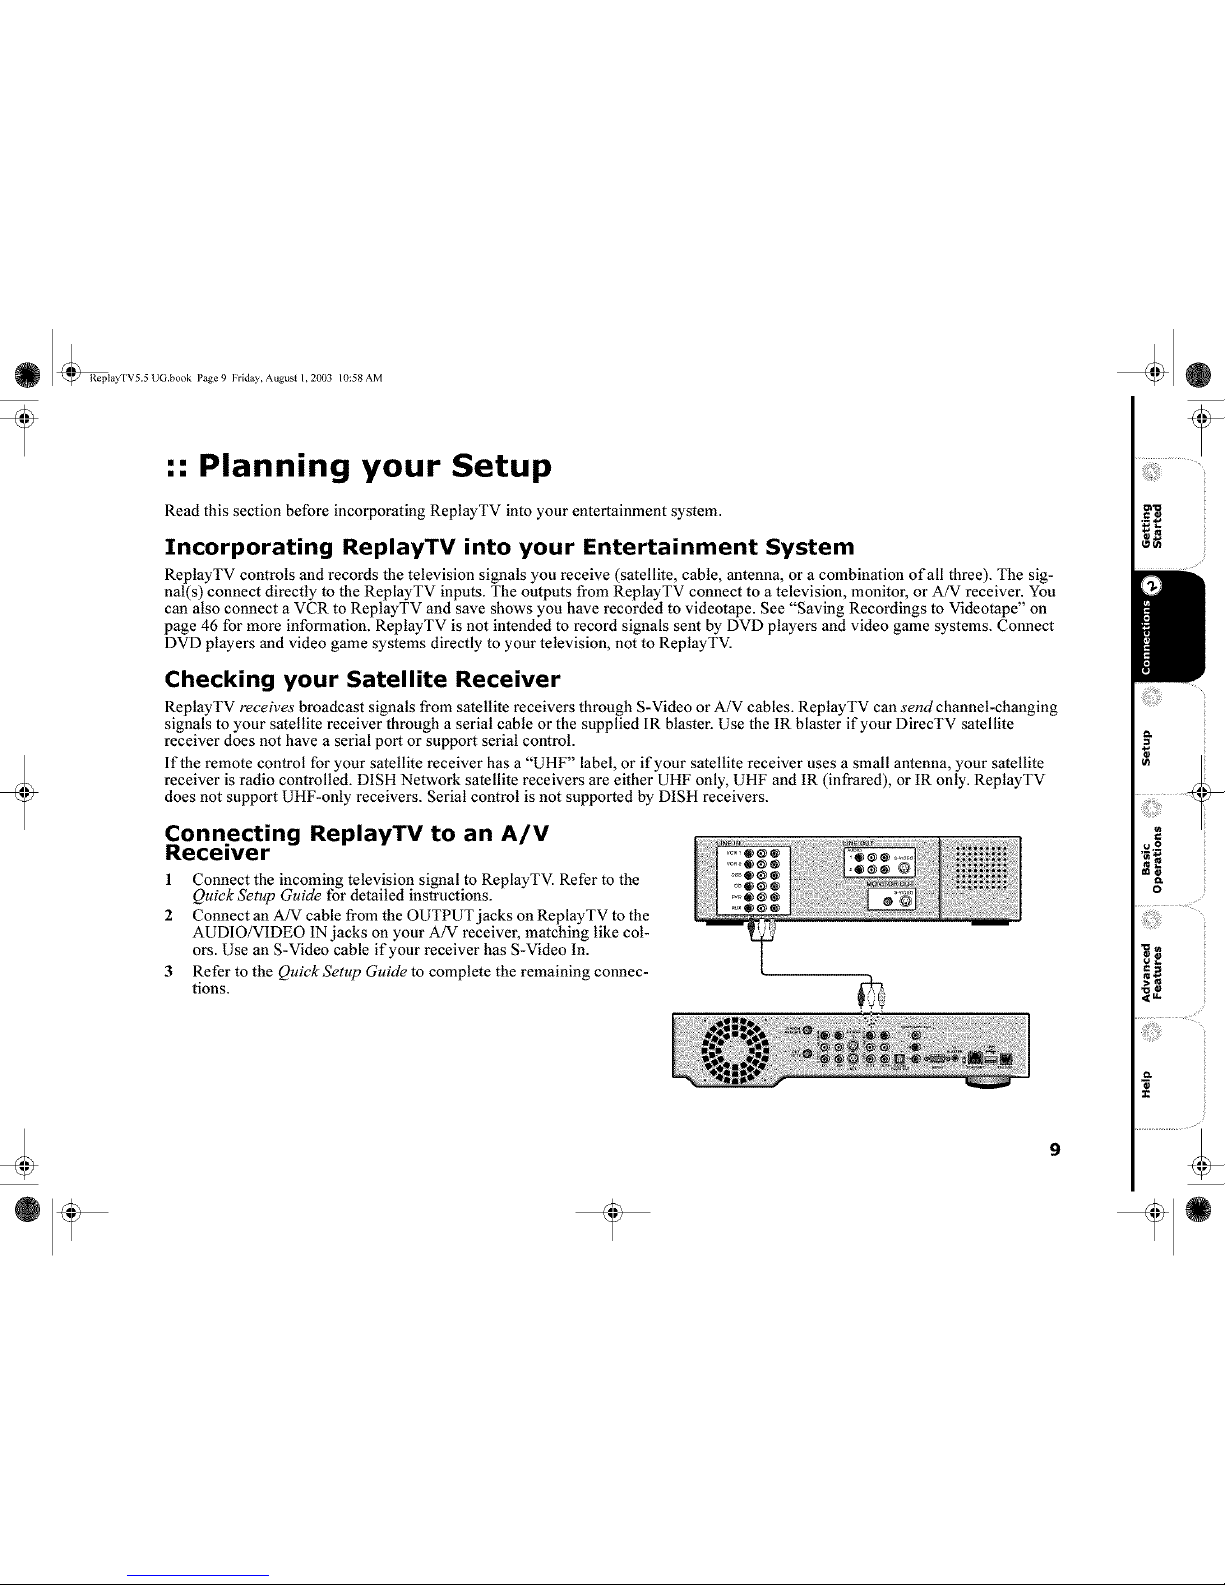
Connecting ReplayTV to an A/V
Receiver
1 Connect the incoming television signal to ReplayTV. Refer to the
Quick Setup Guide for detailed instructions.
2 Connect an A/V cable from the OUTPUT jacks on ReplayTV to the
AUDIO/VIDEO IN jacks on your A/V receivel, matching like col-
ors. Use an S-Video cable if your receiver has S-Video In.
3 Refer to the Quick Setup Guide to complete the remaining connec-
tions.
9
÷
uO
o

P.eplay'IV5.5 UG.book Page 10 I:rida), August I. 2003 10:58 AM
Connecting ReplayTV to a VCR
Connect ReplayTV to a VCR if you want to watch or save your record-
ings on videotape. Deleting recordings from the Replay Guide wilt pre-
serve hard drive space.
Connect an A/V cable from the OUTPUT jacks on ReplayTV to the
AUDIO/VIDEO IN jacks on your VCR, matching like colors.
Set the VCR to its A/V input instead of channel 3 or 4 to record
shows from ReplayTV if you use A/V cables.
Connecting a Video Camera or VCR to
eplayTV
You can connect a video camera or VCR from its Outputs to the
Inputs on ReplayTV and record the content onto ReptayTV using
the Manual Record featm'e. See "Using Manual Record" on
page 40.
Connecting Cable Box and Satellite Receiver Controllers
If you connect a cable box or satellite receiver to ReplayTV, you will need to attach a controller cable so ReplayTV can change the
channels on either of these components. The controtlel, either a serial cable or the supplied IR blaster cable, will act as a remote
control for these components. Serial control is only supported by DirecTV receivers.
Connecting the Serial Cable
If your satellite receiver supports serial cable, use a serial cable as a controlling cable. Connect the serial cable to the SERIAL con-
nector on ReplayTV and to the serial port on your cable box or satellite receiver. If your receiver uses a 15-pin serial connectol, use
a t5-pin to 9-pin adaptei: If you have a satellite receiver that uses telephone cable in place of serial cable, you will need to use an
RJ-11 to 9-pin adapter to connect the satellite receiver to ReplayTV. RCA models DRD221RD, DRD222RD, DRD223RD, and
DS2122RD will all require this adapter. (Serial cables and adapters are available at www.replaytv.com.)
Connecting the IR Blaster
Use the IR blaster if your satellite receiver or cable box does not support serial cable.
Locate the infrared detector on your cable box or satellite receiver
The infrared emitter at the end of the IR blaster must be placed directly over the infrared detector on
your cable box or satellite receiver. The infrared detector receives the signals from the ReptayTV
remote control.
Infrared Emitters
10
÷
Page II I:rida3, August I, 2003 10:58 AM
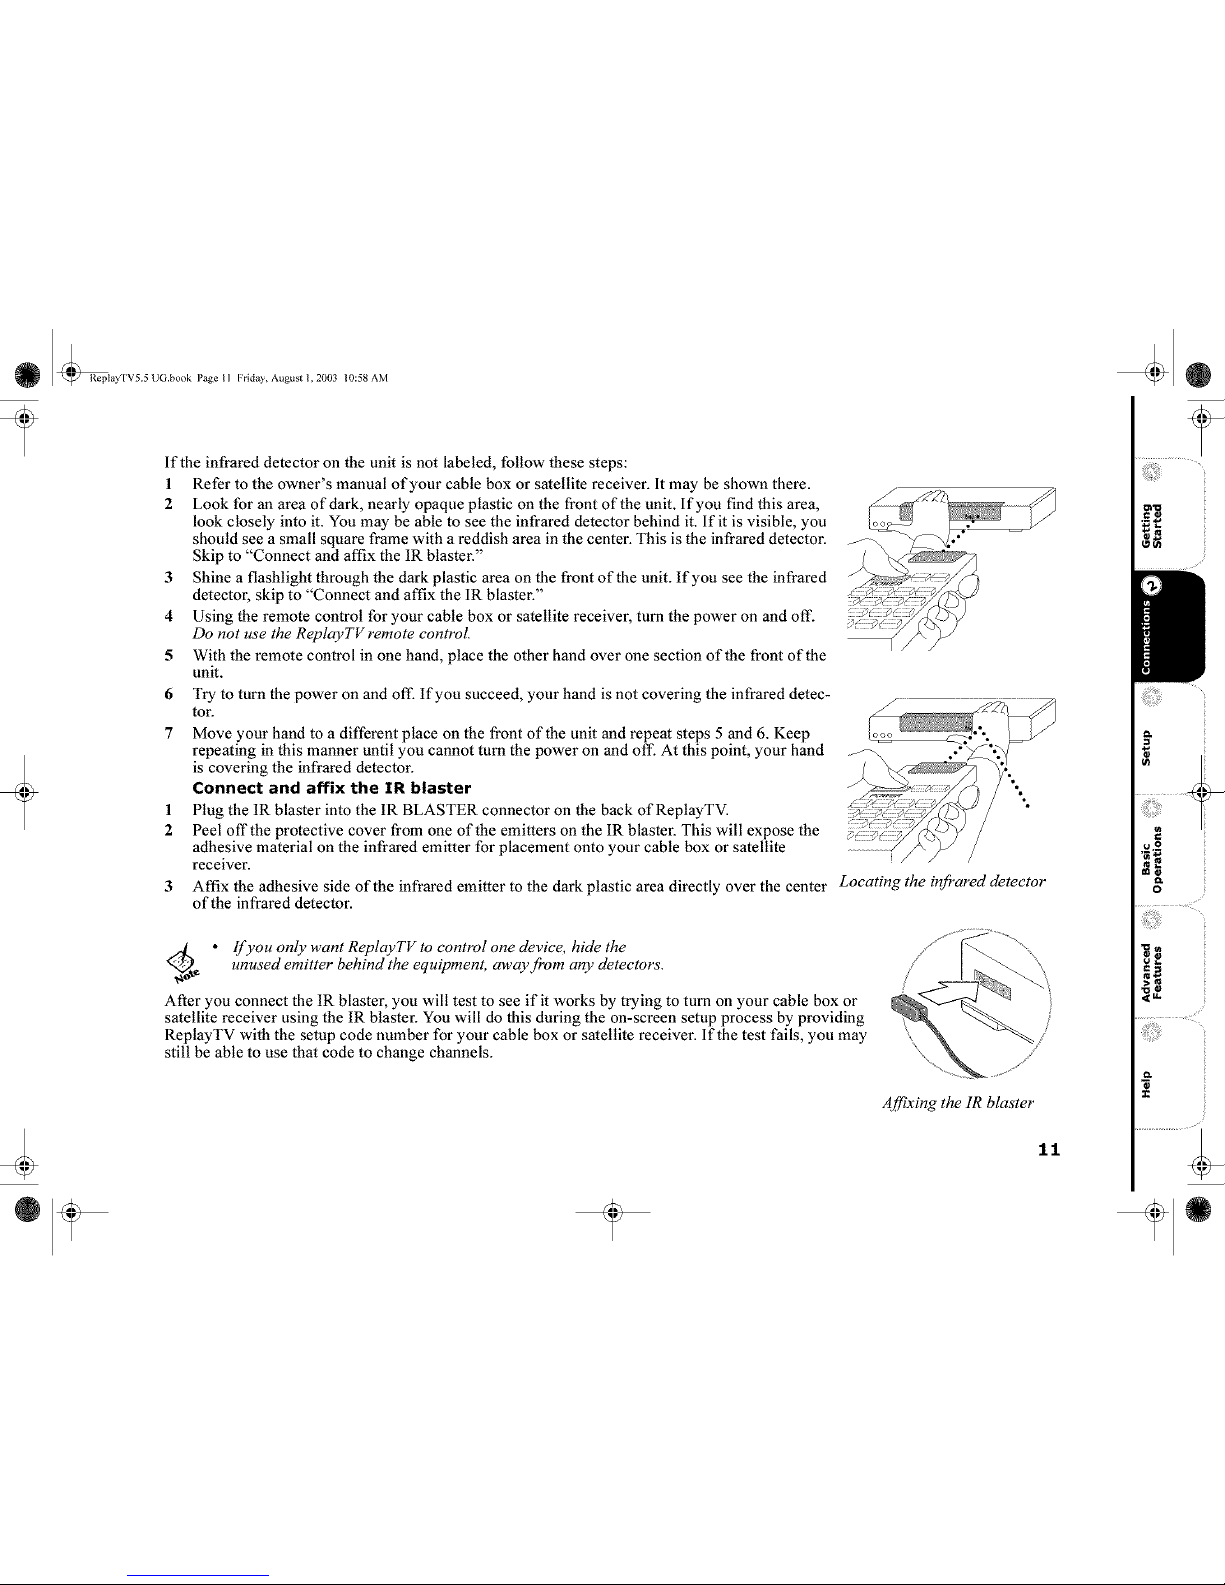
If the infrared detector on the unit is not labeled, follow these steps:
1 Refer to the owner's manual of your cable box or satellite receiver. It may be shown there.
2 Look for an area of dark, nearly opaque plastic on the front of the unit. If you find this area,
look closely into it. You may be able to see the infrared detector behind it. If it is visible, you
should see a small square frame with a reddish area in the center. This is the infrared detector.
Skip to "Connect and affix the IR btastm:"
3 Shine a flashlight through the dark plastic area on the front of the unit. If you see the infrared
detector, skip to "Connect and affix the IR blaster."
4 Using the remote control for your cable box or satellite receiver, turn the power on and off'.
Do not use the ReplayTVremote control.
5 With the remote control in one hand, place the other hand over one section of the front of the
unit.
6
7
1
2
3
Try to turn the power on and off. If you succeed, your hand is not covering the infrared detec-
tor.
Move your hand to a different place on the front of the unit and repeat steps 5 and 6. Keep
repeating in this manner until you cannot turn the power on and off. At this point, your hand
is covering the infrared detector.
Connect and affix the IR blaster
Plug the IR blaster into the IR BLASTER connector on the back of ReptayTV.
Peel offthe protective cover from one of the emitters on the IR blaster. This will expose the
adhesive material on the infrared emitter for placement onto your cable box or satellite
receiver.
Affix the adhesive side of the infrared emitter to the dark plastic area directly over the center Locating the infrared detector
of the infrared detector.
_, • If you only want ReplayTV to control one device, hide the
unused emitter behind the equipment, away,from any detectors.
After you connect the IR blaster, you will test to see if it works by trying to turn on your cable box or
satellite receiver using the IR blaster. You will do this during the on-screen setup process by providing
ReplayTV with the setup code number for your cable box or satellite receiver. If the test fails, you may
still be able to use that code to change channels.
A,lCfixing the 1R blaster
11
÷
uo
0,
o
Replay'IV5.5 UG.book Page 12 I-'rida), August I, 2003 10:58 AM
Completing the On-screen Setup
After completing all the connections to yore" components and home network (if you chose to do so), you will need to complete
ReptayTV's on-screen setup process. The setup process requires you to indicate the following:
If you are using a broadband or modem connection
Your ZIP code so ReplayTV will receive the correct channels for your area
The brand of your cable box or satellite receiver connected and the cables used to complete the connections
The setup code for your cable box or satellite receiver, if used, so ReplayTV can change the channels on these components
:: Home Network Connections
If you have a home network, you can connect ReplayTV to it using the ETHERNET connection. This connection will allow you to
watch shows recorded on another ReplayTV in your home, and transfer photos from your PC to ReplayTV. The following sections
provide instructions for setting up ReplayTV to use the networking features. Refer to "Advanced Features" on page 47 to learn how
to use the features.
ReptayTV needs its own IP address to communicate with other devices on your network. It will automatically search for an IP
address during the first-time Quick Setup process. If an IP address is not automatically found, you will have to enter it manually.
See "Entering Networking Information Manually on ReplayTV" on page 16.
Connecting ReplayTV to an Existing Network
1 If you are connecting ReplayTV to a broadband network, plug an Ethelqaet cable into the ETHERNET jack on ReplayTV and to
an available Ethernet .jack on your network (on a wall, hub, switch, or router).
2 Turn ReptayTV on. You wilt see the Quick Setup screen in a few minutes. ReplayTV wilt automatically request an IP address
from the network.
3 After a successful test, you will be asked to enter your ZIP code and continue with setup.
4 If you have firewall software installed or a router with a built-in firewall, the default settings should work fine. See "Router
Setup" on page 16.
5 If ReplayTV does not find a DHCP server (nolanally your router), you will need to manually set up the network connection.
You will need to enter the following information manually:
IP address, Subnet Mask, Gateway address and DNS Server address.
12
÷
Page 13 I-'rida3, August I, 2003 10:58 AM
Connecting ReplayTV to a Cable Modem
Using a router to connect ReptayTV to your cable modem is recommended. The router will allow you to share your cable modem
without needing additional IP addresses from your Internet Service Provider (ISP). If your ISP requires that you log on or use spe-
cial software on your PC in order to access the Internet, you wilt need a router. Consult your ISP for requirements. Refer to the fol-
lowing connection examples for details.
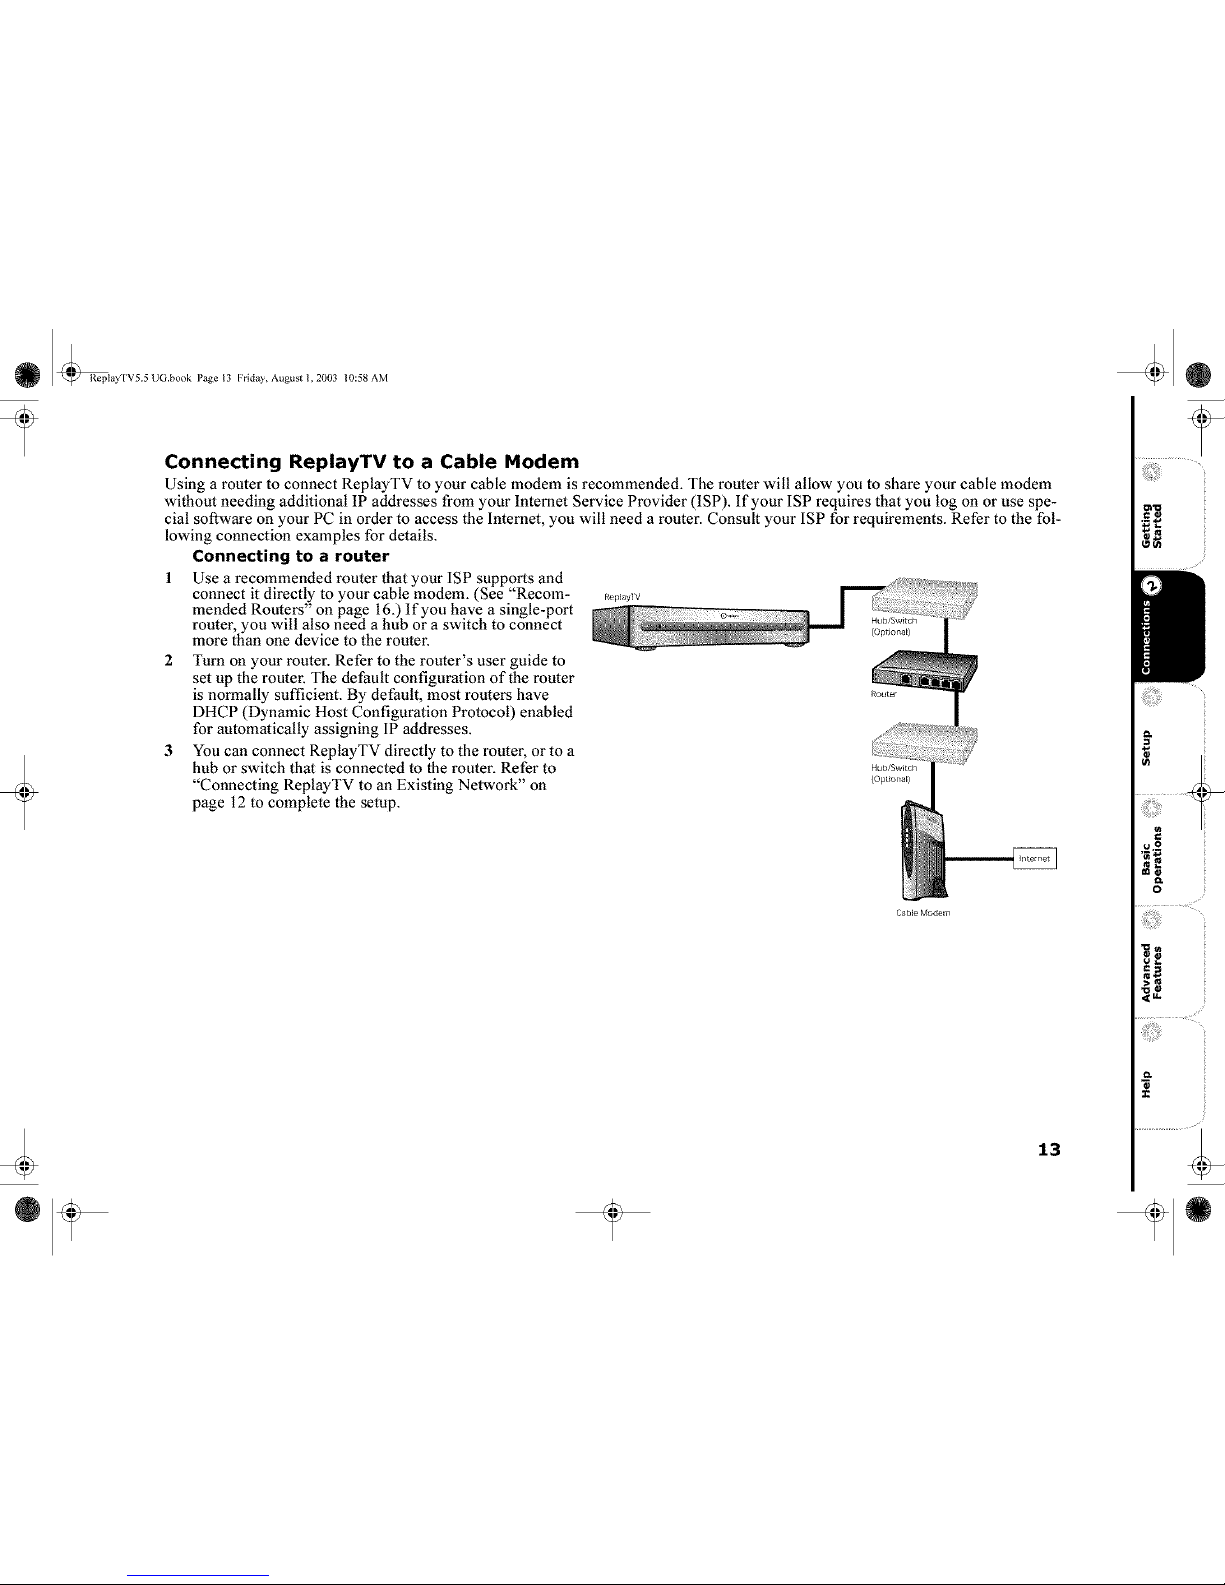
Connecting to a router
1 Use a recommended router that your ISP supports and
connect it direct!,y to your cable modem. (See Recom-
mended Routers on page 16.) If you have a single-port
router, you will also need a hub or a switch to connect
more than one device to the router
2 Turn on your router. Refer to the router's user guide to
set up the router The default configuration of the router
is normally sufficient. By default, most routers have
DHCP (Dynamic Host Configuration Protocol) enabled
for automatically assigning IP addresses.
3 You can connect ReptayTV directly to the router, or to a
hub or switch that is connected to the router. Refer to
"Connecting ReplayTV to an Existing Network" on
page 12 to complete the setup.
Rt playlV
Cable Modem
13
÷
u2
o
Replay'IV5.5 UG.book Page 14 I:rida3, August I, 2003 10:58 AM
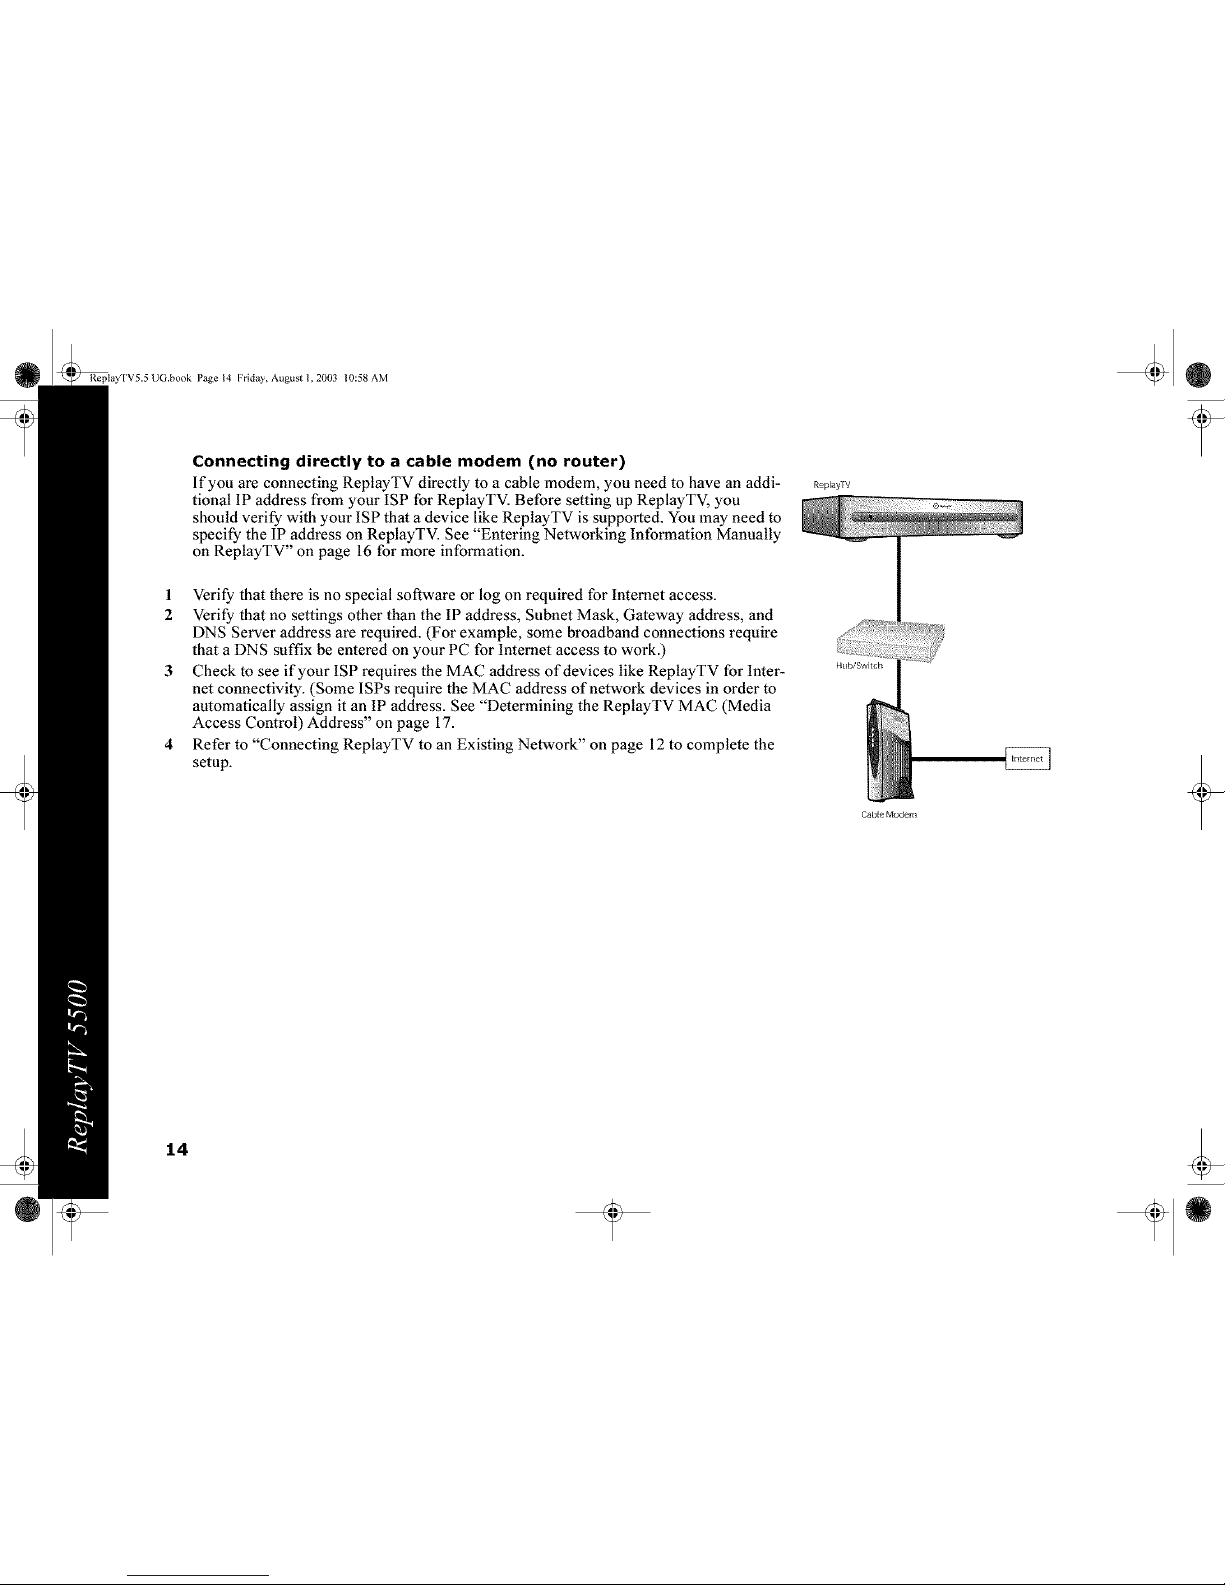
Connecting directly to a cable modem (no router)
If you are connecting ReplayTV directly to a cable modem, you need to have an addi-
tional IP address from your ISP for ReptayTV. Before setting up ReplayTV, you
should verify with your ISP that a device like ReplayTV is supported. You may need to
specify the IP address on ReplayTV. See "Entering Networking Information Manually
on ReptayTV" on page 16 for more information.
ReplayTV
1 Verify that there is no special software or log on required for Internet access.
2 Verify that no settings other than the IP address, Subnet Mask, Gateway address, and
DNS Server address are required. (For example, some broadband connections require
that a DNS suffix be entered on your PC for Internet access to work.)
3 Check to see if your ISP requires the MAC address of devices like ReptayTV for Inter-
net connectivity. (Some ISPs require the MAC address of network devices in order to
automatically assign it an IP address. See "Determining the ReptayTV MAC (Media
Access Control) Address" on page 17.
4 Refer to "Connecting ReplayTV to an Existing Network" on page 12 to complete the
setup.
Hub/Switch
Cable Modem
14
÷
Page 15 I:rida3, August I, 2003 10:58 AM
Connecting ReplayTV to a DSL Modem
Connecting ReplayTV to a DSL modem is the same as connecting it to a cable modem with a few exceptions. Refer to "Connecting
ReptayTV to a Cable Modem" on page 13 with the following additions.
The DSL modem you own might be a DSL router. If you are not sure, contact your ISP or DSL modem provider. If it is a
routel, it can automatically assign an IP address to ReplayTV. If you have PPPoE (Point-to-Point Protocol over Ethernet) DSL
(you have to log on through software before you can access the Internet), you cannot connect ReplayTV directly to your DSL
modem unless it is also a router. PPPoE accounts require that the user log on with a username and password. Software is nor-
mally provided for your computer to do this. If you purchase a router to use with your PPPoE account, verify that it supports
PPPoE.
Using In-Home Video Sharing and Photo Viewer Without a Home Network
It's easy to copy pictures to ReplayTV or watch shows recorded on another ReplayTV in your home. To connect two or more
ReplayTVs, or to connect ReplayTV to your PC, you will need to purchase a hub or switch and an Ethernet cable for each
ReptayTV. You may also need to purchase an Ethernet network card for your PC.
Watching shows on another ReplayTV
1 Plug both ReplayTVs into your hub/switch.
2 Set up both ReplayTVs to connect using the phone line.
Once both are set up, they will automatically "find" each other on your network. See "Watching Shows Recorded on other Replay-
TVs" on page 47.
1
2
Copying pictures from a PC to ReplayTV
Plug your PC and ReplayTV into your hub/switch,
Manually enter the network settings for the network card in your PC.
When set up to use the phone line, ReplayTV defaults to the following IP address range: 192,168,0,x. Set the IP address and
Subnet mask on your PC to 192.168,0.100 and 255,255.255.0, If you don't know how to enter the IP address on your network
card, consult Windows Help or the documentation for your network card. See "Installing ReplayTV Photo Transfer" on page 49
to view photos on your ReplayTV.
15
÷
u2
o
:¢

Replay'IV5.5 UG.book Page 16 I:rldab, August I, 2003 10:58 AM
Router Setup
Any router should work with ReplayTV, Default router settings are normally sufficient for ReplayTV to connect to the ReptayTV
Service. Refer to the following information only if you are experiencing connection issues.
Recommended Routers
Make Model
Netgear RT311
Netgear RP 114
SMC Barricade SMC7004BR
Linksys BEFWl IS4
1 DHCP is enabled by default on most routers. Verify that it is enabled.
2 TCP ports 53 (DNS), 123 (NTP), and 80 (http) are normally open by default.Verify that they are open on your router. If your
PC that is connected to the same router can browse the Web, you can normally assume that ports 53 and 80 are open.
Entering Networking Information Manually on ReplayTV
The manual entry screen will display ifReptayTV is unable to obtain an IP address automatically during first-time setup.
1 Press Menu on the remote control and choose Setup.
2 Choose Network and Input Settings from the Setup menu.
3 Choose Change Network.
4 Choose Change from Automated to Manual and enter the information.
16
÷

Page 17 I-'rida3, August I, 2003 10:58 AM
Determining the ReplayTV IP Address
The IP address you specify on ReptayTV must be in the same range as the IP addresses of other computers or devices on the same
network, but not identical. For example, if the IP address of your computer is 192.168.0.1 with a Subnet Mask of 255.255.255.0,
then the ReplayTV IP address may be 192.168.0.x, where x can be any number from 2 m 254. No other device on your network can
use the same IP address as ReptayTV. See "Finding your Computer's Network Information" on page 18.
What you base the ReplayTV information on depends on the configuration of your network.
IfReplayTV is connected to a routel, then you need to collect the network information from the router or a PC connected to the
router. It does not matter if there is a hub between ReplayTV and the router.
If ReptayTV is connected to a cable modem or DSL modem, then the network information you need is provided by your ISR
You will need a separate IP address for ReplayTV.
If ReptayTV is connected directly to your PC or through a hub, then you need the network information from the network card.
Determining the ReplayTV MAC (Media Access Control) Address
Every Ethernet device has a unique hardware number Follow these steps to find the ReplayTV MAC address.
1 Go to the DOS or Command prompt on your PC.
2 Type "Ping (ReplayTV's IP address)" and press Enter.
3 Type "Arp -a" and press Enter.
You will see a list of hardware addresses and associated IP addresses. Look for the hardware address associated with
ReptayTV's IP address.
Finding the Router IP Address
Your router will have both a WAN (External) and LAN (Internal) IP address. If you are specifying the IP address on ReplayTV, the
infon'nation you will use m set up ReptayTV will come from the LAN settings.
Check the documentation that shipped with your router. It nonnatly has the default IP settings.
If supported, use Netscape or Internet Explorer to look at the configuration settings on your router. For most routers, all you
need m do is enter the IP address of the router into your Web browser.
Use the included software that shipped with your router to check its IP settings.
If you have a PC connected to the router, you can use IPCONFIG or WINIPCFG on your PC to get the IP information you will
need. See "Finding your Computer's Network Infon'nation" on page 18 for further details.
17
÷
u o
o
Replay'IV5.5 UG.book Page 18 Frid_3, Augusl I, 2003 10:58 AM
Finding your Computer's Network Information
If your home network does not have a DHCP server (a routm, for example), you will need to manually set the IP address on
ReptayTV. You can use the network infoi_aation from your computer to determine what the IP address should be. Following are
steps to find this information for common computer systems.
Windows 9x or Millennium
1 Go to the Start menu on your PC and select Run.
2 Type WINIPCFG and select OK.
3 Select the correct network adapter from the menu.
The network adapter from which you collect infoI'mation must be connected to ReplayTV or to the same network (e.g., hub or
router) as ReptayTV.
Windows 2000
Go to the Command prompt on your PC and type IPCONFIG/all.
The network adapter from which you collect infoI'mation must be connected to ReplayTV or to the same network (e.g., hub or
router) as ReplayTV.
Windows XP
1 Go to the network and dialup connections foldei:
2 Select the appropriate LAN connection.
3 Doubte-clickon the LAN connection.
4 Click on the Support button. The infoI_aation for that adapter will display in the window.
The network adapter from which you collect infoI'mation must be connected to ReplayTV or to the same network (e.g., hub or
router) as ReplayTV.
Windows NT
Go to the Command prompt on your PC and type IPCONFIG/all
The network adapter from which you collect infoI'mation must be connected to ReplayTV or to the same network (e.g., hub or
router) as ReplayTV.
Macintosh
These instructions do not apply to Mac OS X.
1 Go tothe Apple menu.
2 Select Control Panels.
3 Select TCP/IE The information you need is located here: IP address, Subnet Mask, Gateway address (router), DNS address.
Some older Macintosh computers may have a MacTCP control panel instead ofa TCP/IP control panel.
18
÷
Page 19 I:rida3, August I, 2003 10:58 AM
Chapter 3
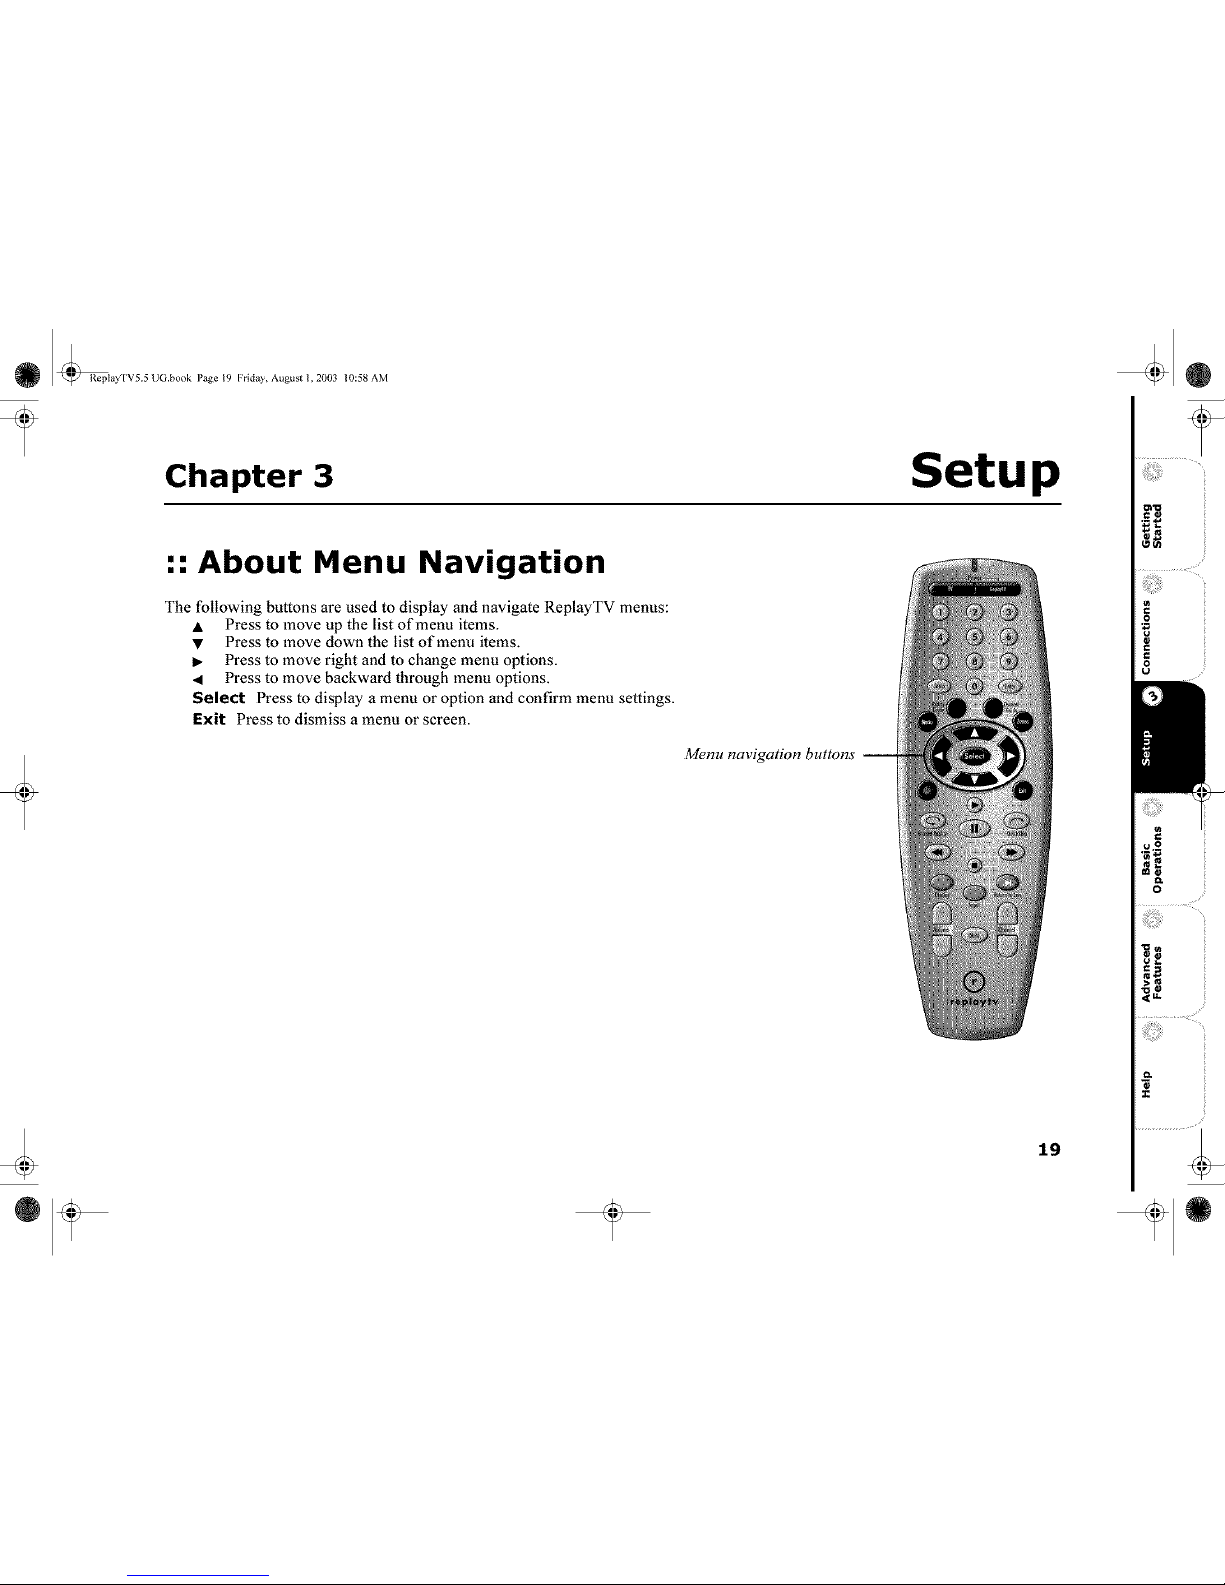
•".About Menu Navigation
The following buttons are used to display and navigate ReplayTV menus:
• Press to move up the list of menu items.
• Press to move down the list of menu items.
I_ Press to move right and to change menu options.
• Press to move backward through menu options.
Select Press to display a menu or option and confirm menu settings.
Exit Press to dismiss a menu or screen.
Menu navigation buttons
÷
Setup
19
i uo i
o
 Loading...