

Page 1
OPERATION MANUAL
P3500 • P3501
Dual Channel Power Amplifiers
PK-xxx-A
Plug-In Controller Modules
Page 2

P3500/P3501 OPERATION MANUAL
Cautions
CAUTION
TO AV OID ELECTRIC SHOCK, DO NOT
INSERT FINGERS OR OBJECTS INTO
ANY OPENINGS IN THE CABINET
WARNING: TO PREVENT FIRE OR ELECTRIC
SHOCK, DO NOT EXPOSE THIS EQUIPMENT TO
RAIN OR MOISTURE
Explanation of Graphical Symbols
The lightning flash with arrowhead symbol,
within an equilateral triangle, is intended to alert
the use to the presence of uninsulated "dangerous Voltage" within the product's enclosure that
may be of sufficient magnitude to constitute a
risk of electric shock to humans.
The exclamanation point,within an equilateral
triangle is intended to alert the users to the presence of important operating and maintenance
(servicing) instructions in the literature accompanying the product.
Sicherheitsvorschriften
VORSICHT
UM ELEKTRISCHEN SCHLAG ZU
VERMEIDEN, KEINE FINGER ODER
GEGENSTÄNDE IN ÖFFNUNNGEN DES
GEHÄUSES STECKENN
WARNUNG: ZUR VERMEIDUNG VON FEUER
ODER ELEKRISCHEN SCHLÄGEN DAS GERÄT
NICHT MIT REGEN ODER FEUCHTIGKEIT IN
BERÜHRUNG BRINGEN
Erklärung der graphischen Symbole
Der Blitz mit nach untenzielendem Pfeil in einem
gleichseitigen Dreieck weist den Benutzer auf
das Vorhandensein einer unisolierten,
"gefährlichen Spannung" im Gehäuse hin, die
stark genug sein kann, einer Person einen
gefährlichen elektrischen Schlag zu versetzen.
Das Ausrufezeichen in einem gleichseitigen
Dreieck weist den Benutzer auf wichtige
Betriebs- und Wartungsvorschriften in den
beiliegenden Unterlagen des Gerätes hin.
CAUTION
RISK OF ELECTRIC SHOCK
DO NOT OPEN
CAUTION: TO REDUCE THE RISK OF ELECTRIC
SHOCK, DO NOT REMO VE THE CO VER. NO USERSERVICEABLE PAR TS INSIDE. REFER SERVICING
TO QUALIFIED SERVICE PERSONNEL
CAUTION
RISK OF ELECTRIC SHOCK:
OPEN ONLY IF QUALIFIED AS
SERVICE PERSONNEL
To reiterate the abo ve warnings: servicing instructions
are for use by qualified personnel only . To av oid electric
shock, do not perform any servicing other than that contained in the Operation Instructions unless you are qualified to do so. Refer all servicing to qualified personnel.
VORSICHT
GEF AHR EINES ELEKTRISCHEN
SCHLAGES NICHT ÖFFNEN
VORSICHT! UM DAS RISIKO EINES
ELEKTRISCHEN SCHLAGES ZU VERMINDERN,
ABDECKUNG NICHT ENTFERNEN. KEINE
BENUTZER BEDIENUNGSTEILE IM INNERN.
BEDIENUNG NUR DURCH QUALIFIZIERTES
BEDIENUNGSPERSONAL.
VORSICHT
GEF AHR EINES ELEKTRISCHEN
SCHLAGES: NUR VON QU ALIFIZIEREM
WAR TUNGSPERSONAL ZU ÖFFNEN
Eindrigliche Warnung: Wartungsvorschriften dienen
nur der Benutzung durch qualifizieres Personal. Zur
V ermeidung eines elektrischen Schlages keine anderen als
die in den Betriebsvorschriften beschriebenen
Wartungsarbeiten ausführen, es sei denn Sie sind dafür
qualifiziert. W artungsarbeiten sind n ur von qualifiziertem
Wartungspersonal auszuführen.
2
Page 3

W arning Messa ges 2
Table of Contents 3
Introduction 4
Technical Specifications 5
Front Panel Features
Protection LED's 6
Signal LED's 6
Output LED's 6
Standby LED 7
Output Attenuators 7
On/Off Switch 7
Rear Panel Features
AC Power Cord 8
Output Connections 8
Input Connections 9
Mode Selector 9
Mono Mode 9
Stereo Mode 9
Bridge Mode 9
P3500/P3501 OPERATION MANUAL
Table of Contents
Loudspeaker Controller Modules
P3500 Modules 10
PK-xxx-A Controller 10
PK-BLANK-A "blank" 10
Block Diagrams
P3500 Amplifier 1 1
P3501 Amplifier 1 1
Amplifier Set-Up and Operation
Mounting 12
Cooling 12
Wire Size 1 2
Performance Verification 1 2
Trouble Shooting 1 3
System Block Diagrams
Typical Stereo System 1 4
Typical Two-Way System 1 4
Typical Bridge Mode Operation 1 5
Typical 3-Way/4-Way system 15
(using 2 controllers)
Typical 4-Way System 1 6
(Using 3 controllers)
3
Page 4

P3500/P3501 OPERATION MANUAL
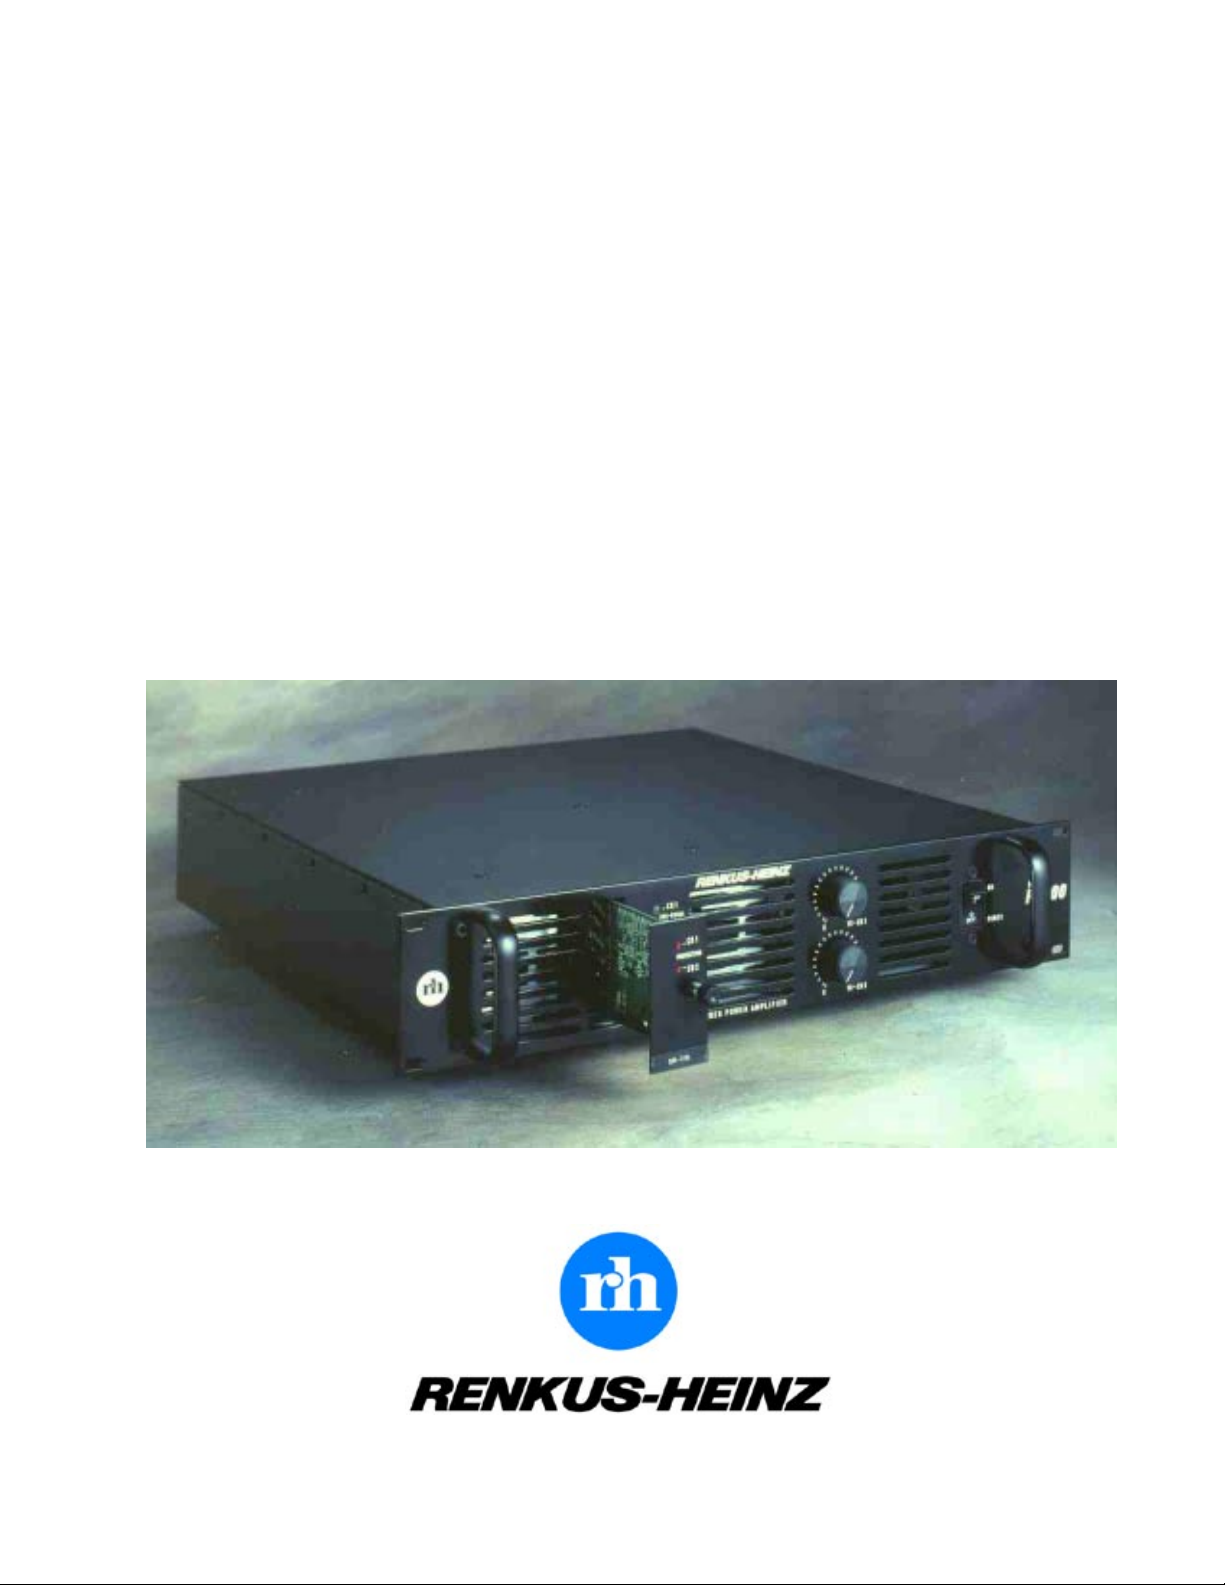
Congratulations on your purchase of a Renkus-Heinz model P3500 or P3501 dualchannel, professional power amplifier.
Your Renkus-Heinz amplifier has been designed to provide years of trouble-free, high
performance operation. We hope you enjoy it.
If you purchased the model P3500, your amplifier will include either a PK-xxx-A
loudspeaker controller module or a PK-BLANK-A 'blank" card (see pages 8 to 13 for
details).
The PK-xxx-A is a dual channel controller module that is a dedicated companion to
a specific Renkus-Heinz loudspeaker. It provides protection circuitry, electronic
crossover circuitry and response optimization for its associated loudspeakers.
Introduction
The PK-BLANK-A "blank" card is used when a controller module is not included.
Caution: If your amplifier includes a PK-xxx-A, it is configured for use with a
particular loudspeaker model and should not be used with any other model. Use
of the wrong loudspeaker may result in loudspeaker damage.
Your Renkus-Heinz amplifier was completely tested and inspected before leaving our
factory and should have arrived in perfect condition. Please carefully inspect your
amplifier and its shipping carton for any noticeable damage, and if any damage is
found, immediately notify the shipping company.
Only the consignee may institute a claim with the carrier for any damage incurred
during shipping. Be sure to save the carton and all packing materials for the carrier's
inspection.
It is also a good idea to save the carton and packing material even though the amplifier arrived in good condition. If shipping the amplifer should ever be required, it
should be shipped only in its original factory packing.
Important:
Your Renkus-Heinz amplifier contains no user-serviceable parts and all service
should be referred to qualified service personnel. We recommend that it be returned
to the factory in its original packing carton if factory service is required.
4
Page 5

Technical Specifications
P3500/P3501 OPERATION MANUAL
(20 Hz to 20 kHz
OUTPUT RATINGS:
< 0.25% THD)
FREQUENCY RESPONSE:
THD (at 1kHz) DISTORTION:
SMPTE IMD:
HUM & NOISE:
CROSSTALK:
INPUT SENSITIVITY:
INPUT IMPEDANCE:
VOLTAGE GAIN:
SLEW RATE:
DAMPING FACTOR:
MAX. VOLTAGE SWING:
POWER REQUIREMENTS:
FEATURES:
500 w/ch at 8 ohms
750 w/ch at 4 ohms
1000 w/ch at 2 ohms
2000 watts, 4 ohms bridged
+0.0, -.5 dB, 20 Hz to 20 kHz @ RPO
< 0.1% at RPO (4 ohms)
< 0.2 %, 500 w at 8 ohms
-100 dB (referred to RPO @ 8 ohms, 20 Hz to 20 kHz)
> 60 dB @ 400 Hz
1.5 V for RPO (at 8 ohms)
20 K ohms, balanced
42
> 35 v/usec
>100 for loads of 2 ohms or greater, 20 Hz to 20 kHz
+/-105 V Peak @ 8 ohms RPO
110/120/220/240 VAC, 50/60 Hz (1400 VA)
Temperature, DC @ output, and short circuit protection
Delayed turn-on w/output muting
Subsonic and ultrasonic filters
Anti clip circuit
AC circuit breaker (no fuse)
Signal & Status LEDs
COOLING:
CONSTRUCTION:
FINISH:
CONTROLS:
FRONT MOUNTED:
REAR MOUNTED:
CONNECTORS:
DIMENSIONS (H X W X D):
NET/SHIPPING WEIGHT:
ASSOC. EQUIPMENT:
P3500:
5
2 rear-to-front 3-speed fans
Closed box construction; 16 ga steel chassis, 3/16" aluminum
face panel
Black (powder coat)
Input level, power on/off,
Stereo/mono/bridging switch
Inputs; 3-pin female XLR (pin 2 +)
Outputs; 4-pin Neutrik, binding posts
Looping (controller outputs); 3-pin male XLR (pin 2 +)
3 1/2" H x 19" W x 17 1/4" D (behind panel)
(8.9 x 48.2 x 43.2 cm)
60 lbs (27.2 kg) / 65 lbs (29.5 kg)
PK-xxx-A plug-in controller module
PK-BLANK-A blank card
Page 6

P3500/P3501 OPERATION MANUAL
Front Panel Featur es
Protection
LED's
OUTPUT
- CH 1
GRN-SIGNAL
RED-CLIP
- CH 2
- STANDBY
- CH 1
GRN-ON
RED-OFF
- CH 2
3
STEREO POWER AMP
4
-CH1
PROTECTION
-CH2
SR7/9
1
2
1. Plug-In Module/Protection LED's (on P3500 only)
If your amplifier is a model P3500, it will include either a PK-xxx-A loudspeaker controller
module or a PK-BLANK-A 'blank" card. If the module is a PK-xxx-A, the model number of the
associated loudspeaker will be included on the face of the module as shown in the above
drawing. PK-BLANK-A cards carry no loudspeaker model number . Both the PK-xxx-A and PKBLANK-A have two LED's (one for each amplifier channel) as shown above. These LED's
light up (turn red) whenever the loudspeaker protective circuits are activated. The P3501
amplifier has no provisions for plug-in loudspeaker controller modules and does not have these
two LED's.
Signal LED's
Output LED's
Note: The following instructions apply to both the P3500 and P3501.
2. Signal LED's
The two Signal LED's (one for each amplifier channel) glow green to indicate the presense of an
audio signal in the amplifier and red to indicate clipping. Occasional operation of the red clip
indication (flickering of the red light) is an indication of optimum system utilization. Extended
illumination of the red clip light is a sign the system is being overdriven and should be avoided.
3. Output LED's
The two Output LED's (one for each amplifier channel) indicate the status of the amplifier's
protective circuits by glowing red whenever one or more of the amplifier protective circuits has
been activated. The amplifier contains separate over-temperature, DC on output and shortedload protective circuitry for each channel. Whenever a fault is detected, the offending channel
is "shut down" and the status light turned red to call attention to the problem. The overtemperature and shorted output protective circuits are self restoring and the channel will return
to normal operation as soon as the problem is corrected. The circuit that protects against DC on
the output is not self restoring and the channel will remain "off" until the circuit is reset by
turning the amplifier "off" and then "on".
Note: If the status LED's remain red after the circuit is reset, the amplifer needs to be looked at
6
Page 7

0 10 - CH1
ON
OFF
ON
POWER
P3500/P3501 OPERATION MANUAL
Front Panel Featur es
MODEL
P3500
LIFIER
0 10 - CH2
5 6
by service personnel.
It is normal for the Status LED's to be red when the amplifier is first turned on. They will then
turn to green as a sign the amplifier is on and operating satisfactorily.
4. Standby LED
The Standby LED is active only when the amplifier is being operated under computer control.
When the amplifier is being used in this fashion, the LED will glow green to indicate the amplifier is turned on, but operating in the "standby" mode.
5. Output Attenuators
The two Output Attenuators control the gain of their respective amplifier channel in all operating
modes. When they are turned fully clockwise, the amplifier will have a voltage gain of 42 (a 1.5
volt input signal will give rated power). As a general rule, setting the attenuators in the full
clockwise position provides maximum amplifier headroom; setting the attenuators at a lower
level maximizes the system signal/noise ratio.
Standby LED
Output
Attenuator
Important - - When the amplifier is being operated in the bridging output mode, both attenuators
must be set in the same position to avoid a mismatch in the signal level being sent to each
channel.
6. Power On/Off Switch and Circuit Breaker
This switch is used to turn power to the amplifier "on" and "off". It also acts as a protective
power line fuse (circuit breaker) and in case of overload will automatically turn the power "off".
If the switch shuts "off" during normal use, push it back to the "on" position just one time. If it
will not stay "on", the amplifier needs service. Do not attempt to operate the amplifier by
holding the switch in the "on" position.
Before connecting the amplifier, check the AC voltage requirement and make certain the unit is
connected to the proper voltage. Failure of the unit will result if a 120 volt amplifier is connected
to a 220 volt power line.
7
On/Off Switch
&
Circuit Breaker
Page 8

P3500/P3501 OPERATION MANUAL
Rear Panel Features
AC Power
Cord
AVIS
RISQUE DE CHOC ELECTRIQUE
NE PAS OUVRIR
WARNING:
TO REDUCE THE RISK OF
ELECTRIC SHOCK DO NOT
EXPOSE THIS EQUIPMENT
TO RAIN OR MOISTURE
cc
RENKUS-HEINZ
IRVINE, CALIFORNIA MADE IN USA
~ 50/60 Hz
1
2
CAUTION
RISK OF ELECTRIC SHOCK
DO NOT OPEN
BRIDGE MONO -
OUTPUT +
CH 2
P2 +
P2 -
(HIGH)
CHANNEL 2
(HIGH) -
3
OUTPUT
4 5
P3500
CH 1
P1 +
P1 -
(LOW)
+ BRIDGE MONO
750 W / 4 ohm each channel
120V AC 50-60 Hz, 12 A
RENKUS-HEINZ
+ OUTPUT
CHANNEL 1
- (LOW)
Made in USA
6
1. A C Po wer Cord
A line cord with appropriate matching connector is supplied with the amplifier.
Before connecting the amplifier, check the AC voltage requirement listed on the name plate and
make certain the unit is connected to the proper voltage. Failure of the unit will result if a 120 volt
amplifier is connected to a 220 volt power line.
Output
Connections
2. Blank Plate
The blank plate covers space reserved for an optional computer control module.
3. Channel 2 Output Connectors
The two binding posts marked 2- & 2+ are the output connectors for the Channel # 2 amplifier
Terminal Post 2+ (the top red post) is considered the "hot" terminal while terminal 2- (the bottom
black post) is "neutral".
4. Neutrik Output Connector
Provides single-connector, quick-disconnect facilities for both amplifier channels. Note that the
number designations for the binding posts correspond to the connector pin numbers.
5. Channel 1 Output Connector
The two binding posts marked 1- & 1+ are the output connectors for the Channel # 1 amplifier
Terminal Post 1+ (the top red post) is considered the "hot" terminal while terminal 1- (the bottom
black post) is "neutral".
Note: The two top binding post terminals are the two output terminals when the amplifier is being
operated in Bridge mode. Both are 'hot" and should not be grounded.
6. Name Plate
Provides the model number of the amplifier and lists its power and line voltage requirements.
7. Looping or Processed Outputs
These 3-pin male XLR connectors provide balanced low impedance outputs from the controller
(processor) module for use in driving additional amplifiers or amplifier channels. Pin 1 is chassis
ground, Pin 2 is the + (plus) or "hot" signal line and pin 3 is the - (minus) side. In a P3500 amplifier, these outputs are processed signals (controller output signals). In a P3501 amplifier, they are
"looping" input circuits.
8
Page 9

CH1 OUTPUT -LINE LEVEL- INPUT CH1
L
O
O
P
I
N
G
/
P
R
O
C
E
S
S
E
D
MONO STEREO BRIDGE
L
O
O
P
I
N
G
/
P
R
O
C
E
S
S
E
D
CH2 OUTPUT -LINE LEVEL- INPUT CH2
P1 G
P2 +
P3 -
P3500/P3501 OPERATION MANUAL
Rear Panel Features
7
8
9
8. Input Connectors
The audio inputs on the P3500 and P3501 are electronically balanced and use standard 3-pin
female XLR connectors. We recommend the use of pin 2 as "hot" and pin 3 as "neutral". Pin 1 is
chassis ground. When the amplifier is connected to a balanced source, the shield may either be
lifted or connected at the source end. The choice should be made on the basis of minimum hum.
With an unbalanced source, connect the signal to pin 2, the shield to source ground (pin 1) and
tie pins 1 & 3 together..
Note: Either pin 2 or pin 3 can be connected to the signal, but the other pin must be connected
to source ground. Improper operation results when only pin 2 or only pin 3 and pin 1 (ground)
are used for an unbalanced input.
9. "Mode" Selector
Allows the amplifier to be operated in either "stereo", "mono" or "bridged mono" modes.
Stereo Mode
When the Mode selector is positioned in the Stereo Mode (center position), the two amplifier
channels operate independently as a stereo amplifier; i.e., input connector #1 drives amplifier
channel #1 and input connector #2 drives amplifier channel #2. The outputs are separate and in
phase. Both input attenuators are active to allow different level settings for each channel.
Input
Connections
Output Mode
Selector
Mono Mode
In the Mono Mode (far right position), input # 2 is disabled and the two amplifier channels
operate in parallel from a single input (input # 1). This eliminates the need to install a jumper
cable to operate the amplifiers in parallel. The outputs are separate and in phase and both input
attenuators are active to permit different level settings for each channel. Do not parallel the
amplifier outputs!
Bridge Mode
This mode allows the two amplifier outputs to be strapped or "bridged" to produce a single
output with double the power capabilites of a single channel. Both channels are driven from a
single input (input # 1), but out of phase. Input #2 is disabled. Both input attenuators are active
and must be set to the same level. Note that in bridging mode both sides of the output should be
considered hot and should not be grounded.
9
Page 10

P3500/P3501 OPERATION MANUAL
Loudspeaker Controller Modules
PK-xxx-A Controller Module
P3500 Modules
If you hav a model P3500 amplifier, it will include either a plug-in PK-xxx-A loudspeaker
controller module (see above photograph) or a PK-BLANK-A "blank" card. If the module is a
PK-xxx-A controller module, the model number of the associated loudspeaker will be labeled on
the front of the module below the two loudspeaker protection LED's. If the module is a PKBLANK-A "blank" card, there will be no loudspeaker model number on the face of the module.
PK-xxx-A Loudspeaker Controller Module
PK-xxx-A controller modules are loudspeaker specific modules (the xxx is associated with the
model number of the associated loudspeaker). The modules provide protective circuitry for that
specific loudspeaker model along with electronic crosssover, response smoothing and, where
appropriate, low/mid frequency time alignment. The protective circuitry protects the transducers
from overheating (thermal overload) and the damage caused by high level transients. Protection
against damage from over excursion, a problem associated with low frequency drivers is also
provided.
The operating parameters of PK-xxx-A controller modules are preset during manufacture to
match a specific loudspeaker and are not user adjustable. Do not attempt to change or modify
them in any way.
PK-BLANK-A
Blank Module
PK-BLANK-A cards are used when a controller module is not needed.
Note:
If your amplifier is a P3501, it will not have facilities for a plug in module and will not include
the two loudspeaker protection LED's found on the P3500.
10
Page 11

P3500/P3501 OPERATION MANUAL
P3500/P3501 Block Diagrams
Block diagrams of the P3500 and P3501 are shown below.
Please notice that in the P3500, the Channel 1 and Channel 2 Looping/Processed Outputs are
"processed" signals that can be used to drive other amplifiers.
Ch. 1
Input
Ch. 2
Input
Mono
Stereo
Bridge
Diff.
Amp.
Diff.
Amp.
High Pass
Filter
High Pass
Filter
Parametric
EQ
Parametric
EQ
Delay
Circuit
Delay
Circuit
Low Pass
Filter
Low Pass
Filter
Excursion
Limiter
Excursion
Limiter
Vol. Control
Vol. Control
Peak
Limiter
Peak
Limiter
Block Diagram
P3500 Amplifier with PK-xxx-A Controller Module
Thermal
Limiter/
Anti-Clip
Thermal
Limiter/
Anti-Clip
Amplifier
Ch. 1
Amp.
Diff.
Amp.
Ch. 2
Amp.
Diff.
Amp.
P3500
Channel 1
output to
loudspeakers
Channel 1
Looping/
Processed
Output
Channel 2
output to
loudspeakers
Channel 2
Looping/
Processed
Output
In the P3501, these 2 outputs are strictly "looping" outputs that provide an easy means of
parallelling the inputs of multiple amplifiers.
Ch. 1
Input
Ch. 2
Input
Mono
Stereo
Bridge
Diff.
Amp.
Diff.
Amp.
Vol. Control
Vol. Control
Anti-Clip
Anti-Clip
Ch. 1
Amp.
Ch. 2
Amp.
loudspeakers
loudspeakers
Block Diagram
P3501 Amplifier
Channel 1
output to
Channel 1
Looping/
Processed
Output
Channel 2
output to
Channel 2
Looping/
Processed
Output
P3501
Amplifier
11
Page 12

P3500/P3501 OPERATION MANUAL
Amplifier Setup and Operation
Mounting
Cooling
Wire Size
The P3500 and P3501 amplifiers are designed to be mounted in a standard 19" rack. It has 4
front panel mounting screws and rear panel mounting ears. Because of its depth and weight it is
imperative that the amplifier be supported at the rear in any portable application.
Both amplifiers are fan cooled and it is important that an ample supply of air is provided at the
amplifier rear and a free air exhaust space is provided in front of the amplifier. The two internal
fans provide adequate cooling when the rack has an open back and the front is not obstructed.
Closed back racks may need to be pressurized and provided with an air intake fan to ensure an
adequate supply of cooling air to the internal amplifier fans.
Multiple amplifiers may be stacked directly on top of each other. Their is no need to separate
them with a blank (spacer) panel. Keep in mind that almost all amplifiers radiate a 50/60 Hz
magnetic hum field from their power transformers. It is prudent to provide at least one rackspace between any signal processing equipment and the nearest amplifier to reduce the possibility of induced hum.
Using higher wattage amplifiers than actually needed is acceptable when the P3500 and a
PK-xxx-A loudspeaker controller module are used as the protective circuits included in the
plug-in module will keep peak power levels within the acceptable limits for each driver.
The size of the speaker wiring needed depends on the length of the cable. We generally recommend the use of 12 AWG for cables up to 30 meters (approximately 100 feet) in length.
The following table shows the signal loss in 30 meters of cable driving a 4 ohm load:
Wire Gauge (AWG) 10 12 14 16 18
Signal Loss (dB) .44 .69 1.07 1.65 2.49
Verification of Proper Operation
Before applying power to the system, trace and verify all connections.
Caution: Operating the System at full level can damage your hearing. Wear ear protectors and
do not position yourself in front of the loudspeakers.
Make certain Mode selector(s) are set in the desired mode and that outputs are properly connected. Loudspeaker damage may occur if, for example, the Sub outputs are connected to the
high frequency drivers and not to the Subs!
Set the power amplifier gain controls to their minimum position.
Turn on the power amplifiers and slowly turn the amplifier level controls to their maximum
position one at a time. While you are doing this, verify that as the amplifier gain is increased the
appropriate response is obtained (i.e. the sub channel is connected to the subwoofers). Moderate
level audio should be heard from the loudspeakers.
Gradually increase the signal level while observing the Signal LED's. As the level increases they
should begin to flicker red. As the level continues to increase they will be on for longer periods
of time. Do not operate the system at a level where the pr otection LED’s are illuminated
continuously.
12
Page 13

P3500/P3501 OPERATION MANUAL
Trouble Shooting
Possible Cause
Indicates the amplifier is turned "off" or not receiving power. Check for proper connection of the
power cord to a suitable outlet and verify proper voltage.
Make sure the amplifier is turned "on".
Indicates the amplifier is not receiving a signal or is receiving a very low signal. Check that the
source is sending a signal and that the interconnecting wiring is not faulty.
Indicates the amplifier is being overdriven. Reduce system level and/or avoid extreme equalization. Add more amplifiers and/or loudspeakers to the system.
Indicates that the protective circuitry for that channel has been activated. Check for a shorted
line on that channel. Turn the amplifier "off" and then "on" again to see if the protective circuitry
will reset. If it does, overheating was probably the problem and the temperature has dropped to a
safe level.
Indicates that the loudspeaker connected to that channel was receiving too much power and the
controllers' protective circuitry has been activated and reduced the signal level. Turn down the
signal level
Fault
Status LED's are
not lit
Signal LED's are
not lit; no sound
Signal LED's are red
continuously
a single Status LED is
glowing red; no sound
from one channel
a red Protection LED is
lit; weak sound from
one channel
The power switch is a combination power switch/circuit breaker. Not staying "on" is an indication the amplifier has failed and needs service. Remove the amplifier from operation (disconnect
it) and have it serviced. Do not attempt to operate it by holding the switch "on" as this may cause
extensive damage.
Amplifier inputs may be incorrectly connected - check input connections; amplifier expects
input across pins 1 & 2.
Blown drivers in loudspeaker system.
Excessive signal at the amplifier input.
220 volt amplifier operating on 120 volts.
13
Power Switch won't
stay "on"
Low gain from one or
both outputs
Distorted sound
Page 14

P3500/P3501 OPERATION MANUAL
Channel 2 (stereo right) from signal source (mixer output)
Channel 1 (stereo left) from signal source (mixer output)
CAUTION
AVIS
RISK OF ELECTRIC SHOCK
RISQUE DE CHOC ELECTRIQUE
DO NOT OPEN
NE PAS OUVRIR
WARNING:
TO REDUCE THE RISK OF
ELECTRIC SHOCK DO NOT
EXPOSE THIS EQUIPMENT
TO RAIN OR MOISTURE
BRIDGE MONO -
cc
OUTPUT +
CHANNEL 2
RENKUS-HEINZ
IRVINE, CALIFORNIA MADE IN USA
~ 50/60 Hz
This arrangement is used in stereo
loudspeaker systems having passive
loudspeakers, such as the SR5 and
TRC121. Notice that the amplifiers
Mode Selector switch is set in the
Stereo mode.
Although this drawing shows only the
binding posts being used for the output
connections, the Neutrik connector
directly above the binding posts could
also be used.
(HIGH) -
CH 2
P2 +
P2 -
(HIGH)
OUTPUT
P3500
750 W / 4 ohm each channel
CH 1
120V AC 50-60 Hz, 12 A
P1 +
P1 -
(LOW)
+ BRIDGE MONO
+ OUTPUT
CHANNEL 1
- (LOW)
RENKUS-HEINZ
Made in USA
CH1 OUTPUT -LINE LEVEL- INPUT CH1
L
O
O
P
I
N
G
/
P
R
O
C
E
S
S
E
D
MONO STEREO BRIDGE
L
O
O
P
I
N
G
/
P
R
O
C
E
S
S
E
D
CH2 OUTPUT -LINE LEVEL- INPUT CH2
To additional amplifiers (when needed)
P1 G
P2 +
P3 -
From signal source (mixer output)
CAUTION
AVIS
RISK OF ELECTRIC SHOCK
RISQUE DE CHOC ELECTRIQUE
DO NOT OPEN
NE PAS OUVRIR
WARNING:
TO REDUCE THE RISK OF
ELECTRIC SHOCK DO NOT
EXPOSE THIS EQUIPMENT
TO RAIN OR MOISTURE
cc
RENKUS-HEINZ
IRVINE, CALIFORNIA MADE IN USA
~ 50/60 Hz
This arrangement is used with active
2-way loudspeaker systems, such as
the SR5A, and with 3-way systems
having a built-in mid/high crossover,
such as the SR6 and SR7. Notice
that the Mode Selector switch is set
in the Mono mode.
Although this drawing shows only the
binding posts being used for the output
connections, the Neutrik connector
directly above the binding posts could
also be used.
(HIGH)
BRIDGE MONO -
OUTPUT +
CHANNEL 2
(HIGH) -
CH 2
P2 +
P2 -
To Ch. 2 (stereo left) loudspeaker(s)
Typical Stereo System Wiring Diagram
OUTPUT
P3500
750 W / 4 ohm each channel
CH 1
120V AC 50-60 Hz, 12 A
P1 +
P1 -
(LOW)
+ BRIDGE MONO
+ OUTPUT
CHANNEL 1
- (LOW)
RENKUS-HEINZ
Made in USA
To Ch.1(stereo right) loudspeaker(s)
CH1 OUTPUT -LINE LEVEL- INPUT CH1
L
O
O
P
I
N
G
/
P
R
O
C
E
S
S
E
D
MONO STEREO BRIDGE
L
O
O
P
I
N
G
/
P
R
O
C
E
S
S
E
D
CH2 OUTPUT -LINE LEVEL- INPUT CH2
P1 G
P2 +
P3 -
Highs
Lows
To additional amplifiers (when needed)
Highs
Lows
Typical Two-Way System Wiring Diagram
14
Page 15

P3500/P3501 OPERATION MANUAL
From signal source (mixer output)
CAUTION
AVIS
RISK OF ELECTRIC SHOCK
RISQUE DE CHOC ELECTRIQUE
DO NOT OPEN
NE PAS OUVRIR
WARNING:
TO REDUCE THE RISK OF
ELECTRIC SHOCK DO NOT
EXPOSE THIS EQUIPMENT
TO RAIN OR MOISTURE
cc
(HIGH)
BRIDGE MONO -
OUTPUT +
CH 2
P2 +
P2 -
CHANNEL 2
RENKUS-HEINZ
IRVINE, CALIFORNIA MADE IN USA
~ 50/60 Hz
Notes:
1. Notice that the Mode Selector is
set in the Bridge mode.
(HIGH) -
From signal source (mixer output)
CAUTION
AVIS
RISK OF ELECTRIC SHOCK
RISQUE DE CHOC ELECTRIQUE
DO NOT OPEN
NE PAS OUVRIR
WARNING:
TO REDUCE THE RISK OF
ELECTRIC SHOCK DO NOT
EXPOSE THIS EQUIPMENT
TO RAIN OR MOISTURE
cc
RENKUS-HEINZ
IRVINE, CALIFORNIA MADE IN USA
~ 50/60 Hz
This arrangement works in systems
having 3-way loudspeakers, such as
the CE-3TA, and subwoofers. Notice
that both Mode Selector switches
are set in the Mono mode.
This arrangement can also be used in
3-way systems that dont have subs
or in systems having 2-way loudspeakers and subs. In these systems,
the Low/Sub amplifier is often run in
the bridge mode.
BRIDGE MONO -
OUTPUT +
CHANNEL 2
(HIGH) -
CH 2
P2 +
P2 -
(HIGH)
OUTPUT
P3500
750 W / 4 ohm each channel
CH 1
120V AC 50-60 Hz, 12 A
P1 +
P1 -
(LOW)
+ BRIDGE MONO
+ OUTPUT
RENKUS-HEINZ
Made in USA
CHANNEL 1
- (LOW)
Although this drawing shows only the binding
posts being used for the outputconnections,
the Neutrik connectordirectly above the binding
posts could also be used.
CH1 OUTPUT -LINE LEVEL- INPUT CH1
L
O
O
P
I
N
G
/
P
R
O
C
E
S
S
E
D
MONO STEREO BRIDGE
L
O
O
P
I
N
G
/
P
R
O
C
E
S
S
E
D
CH2 OUTPUT -LINE LEVEL- INPUT CH2
To additional amplifiers (when needed)
Bridge output to associated loudspeakers,
usually Subs
T ypical Bridge Mode System Wiring Diagram
OUTPUT
P3500
750 W / 4 ohm each channel
CH 1
120V AC 50-60 Hz, 12 A
P1 +
P1 -
(LOW)
+ BRIDGE MONO
+ OUTPUT
CHANNEL 1
- (LOW)
RENKUS-HEINZ
Made in USA
CH1 OUTPUT -LINE LEVEL- INPUT CH1
L
O
O
P
I
N
G
/
P
R
O
C
E
S
S
E
D
MONO STEREO BRIDGE
L
O
O
P
I
N
G
/
P
R
O
C
E
S
S
E
D
CH2 OUTPUT -LINE LEVEL- INPUT CH2
Highs
Mids
Mids
Highs
Lows
Lows
P1 G
P2 +
P3 -
P1 G
P2 +
P3 -
To additional amplifiers (when needed)
Mids, Highs and Lows to active 3-way
loudspeaker systems
To additional amplifiers (when needed)
From signal source (mixer output
AVIS
RISQUE DE CHOC ELECTRIQUE
NE PAS OUVRIR
WARNING:
TO REDUCE THE RISK OF
ELECTRIC SHOCK DO NOT
EXPOSE THIS EQUIPMENT
TO RAIN OR MOISTURE
cc
)
CAUTION
RISK OF ELECTRIC SHOCK
DO NOT OPEN
(HIGH)
BRIDGE MONO -
OUTPUT +
CH 2
P2 +
P2 -
CHANNEL 2
RENKUS-HEINZ
IRVINE, CALIFORNIA MADE IN USA
~ 50/60 Hz
Although this drawing shows only the
binding posts being used for the output connections, the Neutrik connector
directly above the binding posts could
also be used.
(HIGH) -
OUTPUT
P3500
750 W / 4 ohm each channel
CH 1
120V AC 50-60 Hz, 12 A
P1 +
P1 -
(LOW)
+ BRIDGE MONO
+ OUTPUT
RENKUS-HEINZ
Made in USA
CHANNEL 1
- (LOW)
Typical 3/4-Way System W iring Diagram
(using only 2 Controller Modules)
15
CH1 OUTPUT -LINE LEVEL- INPUT CH1
L
O
O
P
I
N
G
/
P
R
O
C
E
S
S
E
D
MONO STEREO BRIDGE
L
O
O
P
I
N
G
/
P
R
O
C
E
S
S
E
D
CH2 OUTPUT -LINE LEVEL- INPUT CH2
Sub
Sub
To additional amplifiers (when needed
To associated subwoofer in 4-way
systems
P1 G
P2 +
P3 -
)
Page 16

P3500/P3501 OPERATION MANUAL
From signal source (mixer output)
CAUTION
AVIS
RISK OF ELECTRIC SHOCK
RISQUE DE CHOC ELECTRIQUE
NE PAS OUVRIR
WARNING:
TO REDUCE THE RISK OF
ELECTRIC SHOCK DO NOT
EXPOSE THIS EQUIPMENT
TO RAIN OR MOISTURE
BRIDGE MONO -
cc
DO NOT OPEN
OUTPUT +
CH 2
P2 +
P2 -
(HIGH)
OUTPUT
CHANNEL 2
RENKUS-HEINZ
IRVINE, CALIFORNIA MADE IN USA
~ 50/60 Hz
This arrangement works in systems
having 3-way loudspeakers, such as
the CE-3TA, and subwoofers. Notice
that both Mode Selector switches
are set in the Mono mode.
This arrangement can also be used in
3-way systems that dont have subs
or in systems having 2-way loudspeakers and subs. In these systems,
the Low/Sub amplifier can also be run
in the bridge mode.
(HIGH) -
From signal source (mixer output)
CAUTION
AVIS
RISK OF ELECTRIC SHOCK
RISQUE DE CHOC ELECTRIQUE
DO NOT OPEN
NE PAS OUVRIR
WARNING:
TO REDUCE THE RISK OF
ELECTRIC SHOCK DO NOT
EXPOSE THIS EQUIPMENT
TO RAIN OR MOISTURE
BRIDGE MONO -
cc
OUTPUT +
CHANNEL 2
RENKUS-HEINZ
IRVINE, CALIFORNIA MADE IN USA
~ 50/60 Hz
Although this drawing shows only the binding
posts being used for the output connections,
the Neutrik connector directly above the
binding posts could also be used.
From signal source (mixer output)
CAUTION
AVIS
RISK OF ELECTRIC SHOCK
RISQUE DE CHOC ELECTRIQUE
DO NOT OPEN
NE PAS OUVRIR
WARNING:
TO REDUCE THE RISK OF
ELECTRIC SHOCK DO NOT
EXPOSE THIS EQUIPMENT
TO RAIN OR MOISTURE
BRIDGE MONO -
cc
OUTPUT +
CHANNEL 2
RENKUS-HEINZ
IRVINE, CALIFORNIA MADE IN USA
~ 50/60 Hz
(HIGH) -
(HIGH) -
CH 2
P2 +
P2 -
(HIGH)
CH 2
P2 +
P2 -
(HIGH)
OUTPUT
OUTPUT
P3500
750 W / 4 ohm each channel
CH 1
120V AC 50-60 Hz, 12 A
P1 +
P1 -
(LOW)
+ BRIDGE MONO
+ OUTPUT
CHANNEL 1
- (LOW)
P3500
750 W / 4 ohm each channel
CH 1
120V AC 50-60 Hz, 12 A
P1 +
P1 -
(LOW)
+ BRIDGE MONO
+ OUTPUT
CHANNEL 1
- (LOW)
P3500
750 W / 4 ohm each channel
CH 1
120V AC 50-60 Hz, 12 A
P1 +
P1 -
(LOW)
+ BRIDGE MONO
+ OUTPUT
CHANNEL 1
- (LOW)
RENKUS-HEINZ
Made in USA
RENKUS-HEINZ
Made in USA
RENKUS-HEINZ
Made in USA
CH1 OUTPUT -LINE LEVEL- INPUT CH1
L
O
O
P
I
N
G
/
P
R
O
C
E
S
S
E
D
MONO STEREO BRIDGE
L
O
O
P
I
N
G
/
P
R
O
C
E
S
S
E
D
CH2 OUTPUT -LINE LEVEL- INPUT CH2
Highs
Mids
To additional amplifiers (when needed)
Mids
Highs
Lows
Mids, Highs and Lows to active 3-way
loudspeaker systems
Lows
CH1 OUTPUT -LINE LEVEL- INPUT CH1
L
O
O
P
I
N
G
/
P
R
O
C
E
S
S
E
D
MONO STEREO BRIDGE
L
O
O
P
I
N
G
/
P
R
O
C
E
S
S
E
D
CH2 OUTPUT -LINE LEVEL- INPUT CH2
Lows
Lows
CH1 OUTPUT -LINE LEVEL- INPUT CH1
L
O
O
P
I
N
G
/
P
R
MONO STEREO BRIDGE
L
O
O
P
I
N
G
/
P
R
CH2 OUTPUT -LINE LEVEL- INPUT CH2
To additional amplifiers (when needed)
O
C
E
S
S
E
D
O
C
E
S
S
E
D
P1 G
P2 +
P3 -
P1 G
P2 +
P3 -
P1 G
P2 +
P3 -
The Bridge mode is most often used with
high power subwoofers such as the BPS12-2
and BPS15-2. Notice that the Mode Selector
is set in the Bridge mode.
Typical 4-Way System Wiring Diagram
(using three Controller Modules)
16
17191 Armstrong Ave. Tel 714-250-0166
Irvine, CA, 92614 Fax 714-250-1035
To additional amplifiers (when needed)
Bridge output to associated Subs
RH 371 3/98
 Loading...