

Page 1

Wireless Laser
Barcode Scanner
iLS 6300BU
User’s Manual
Page 2

FCC Compliance
This equipment has been tested and found to comply with the limits for a Class A
digital device, pursuant to Part 15 of the FCC Rules. These limits are designed to
provide reasonable protection against harmful interference when the equipment is
operated in a commercial environment. This equipment generates, uses, and can
radiate radio frequency energy and, if not installed and used in accordance with the
instructions manual, may cause harmful interference to radio communications.
Operation of this equipment in a residential area is likely to cause harmful
interference in which case the user will be required to correct the interference at
his own expense.
Changes or modifications not expressly approved by the party responsible for
compliance could void the user‘s authority to operate the equipment.
Limited Warranty
No warranty of any kind is made in regard to this material, including, but not
limited to, implied warranties of merchantability or fitness for any particular
purpose. We are not liable for any errors contained herein or for incidental or
consequential damages in connection with furnishing, performance or use of this
material. We shall be under no liability in respect of any defect arising from fair
wear and tear, willful damage, negligence, abnormal working conditions, failure to
follow the instructions and warnings, or misuse or alteration or repair of the
products without written approval.
Page 3

Table of Contents
1. INTRODUCTION……………………………………………………………………………….2~3
2. I NSTALLATION………………………………………………………………………………...4~5
3. SET UP FROM BAR CODE LABEL…………………………………………………….…..…..7
Transmission Speed…….………………………………………………..…………….…8
Wireless Auto-commection.…………………………………………………….……...8
Power-Saving Mode…………….…………………………………………………..…….8
Battery Fully Charged Alarm….…………………………………………………….….9
Low Battery Voltage Alarm….…………………………………………………….……9
Keyboard Country…….……….………………………………………………………….10
Multi-Interface Functions….…………………………………………………….…11~12
Symbologies On/Off………………………………………………………….....….13~15
Symbologies Set Up……………………………………………………………….…16~21
Edit Setup Bar Codes……………………………………….……………….…….……. 22
Macro/Special Keys Setup Bar Codes…………………………………….………...23
Termination String Setup Bar Codes………………………………………………..24
1
Page 4

Introduction
2
Page 5

Our 1D Wireless Laser barcode scanner combines the best scanning performance
and value. The device provides an accurate, easy, and fast method of data entry and
data storage for computerized information systems. It is easy to install and does not
require Software or drivers to operate.
Our Wireless Laser barcode scanner is a powerful and reliable handheld scanner
without compromise.
All the operating parameters are programmed by bar code programming menu and
stored in non-volatile RAM which can retain the settings after power is turned off.
3
Page 6
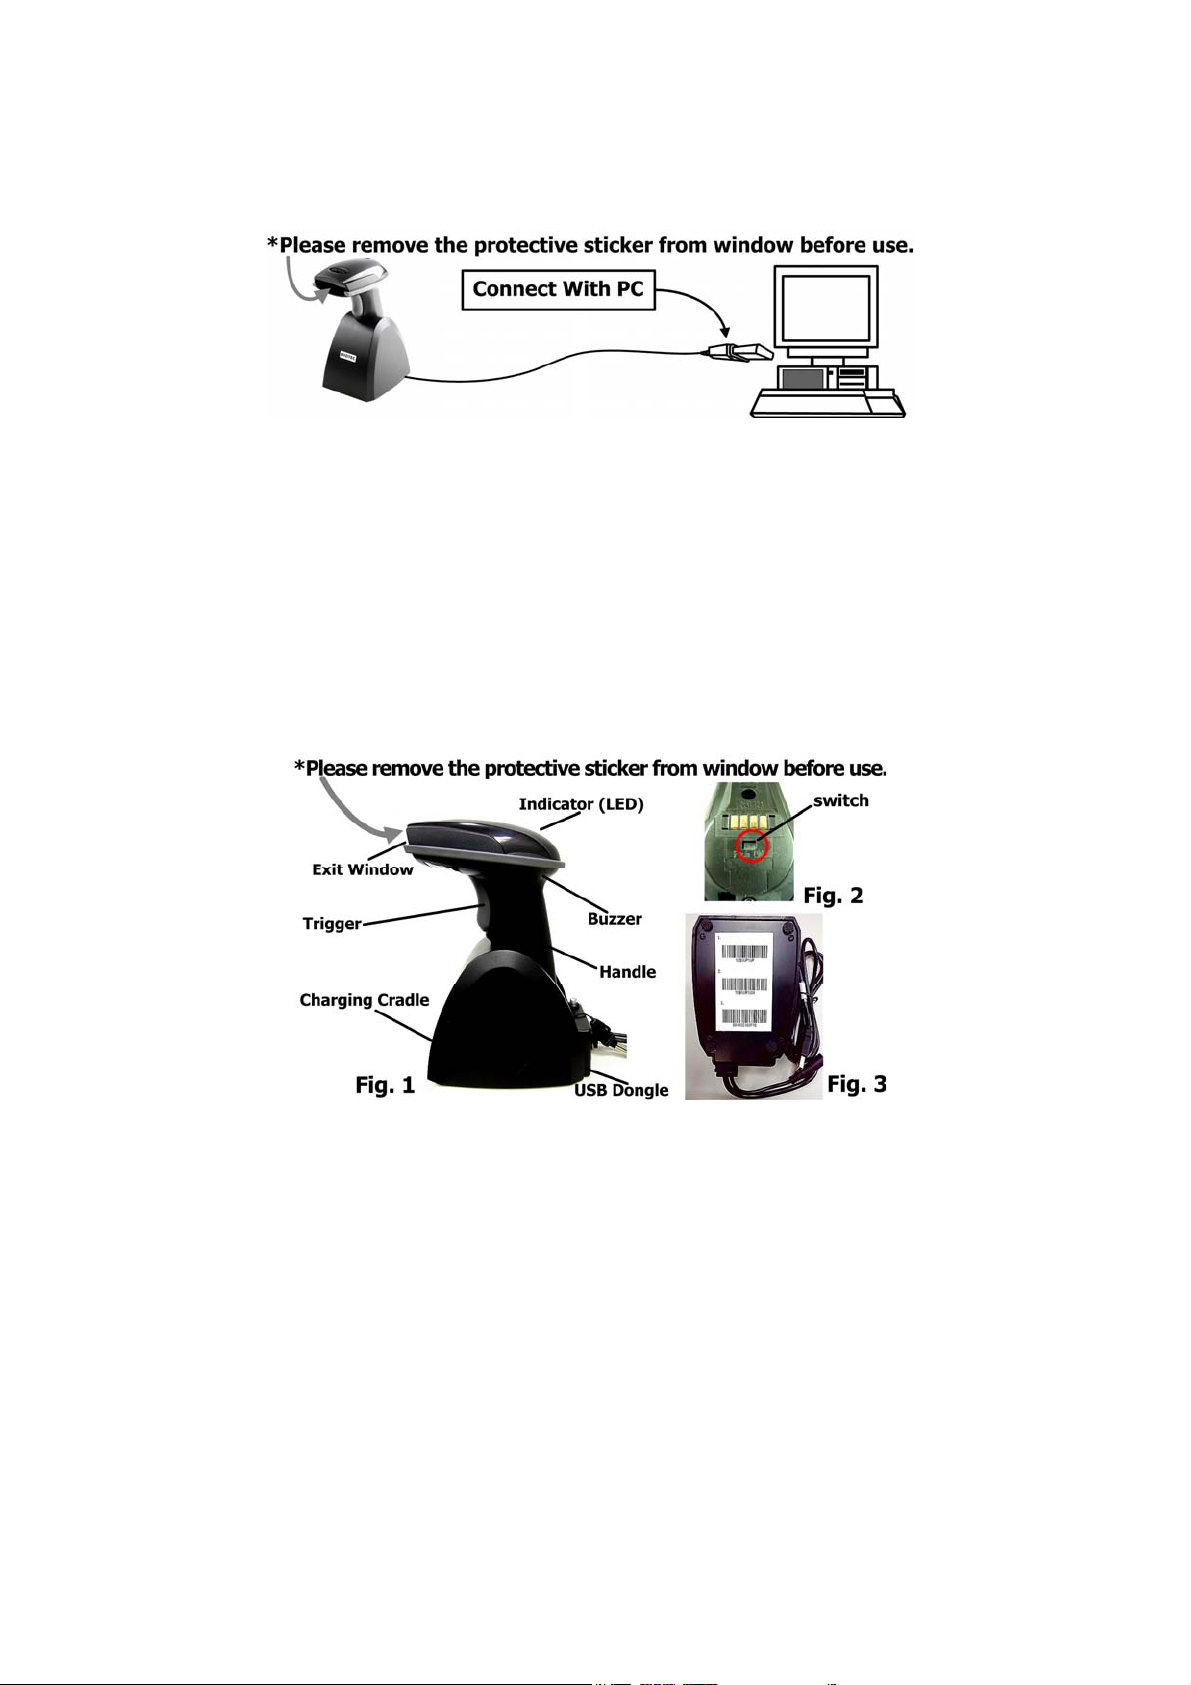
Installation
Insert the plug on the free end of the Communications Cable into the appropriate
connector on the host as below described:
Cable Connection:
1. Please switch ON and charge scanner for 4~5 hours at first time before use,
scanner switch shown on Fig. 2.
2. After switch ON, the Orange LED will flash following with 3 beep-sounds. The
RED LED will be OFF while it links to cradle within 2.4GHz radio range.
3. If RED LED is continual ON, please re-plug USB cable, then, scan the 3 barcodes
on the bottom of cradle sequentially. (Shown on Fig. 3 from 1 to 3). If you are
unable to complete this setting within 1 minute, please re-plug USB cable &
re-start the scanner, and try again.
4. Charging issue: Cradle works as charger when putting scanner on it. Even if the
scanner's battery is full, the cradle will continue to supply power to the scanner.
We suggest you to remove scanner from cradle when scanner is charged fully.
4
Page 7

Indicator Information
Orange continual ON Full charged
Orange LED Flash Charging / Low battery
Red LED ON Not read
Red LED Continual ON Off line / out of service
Green LED ON Good read
z When the battery voltage is too low, the Orange LED will flash and with one beep
sound. Please charge it immediately before the machine mandatorily shutdown. When
it shutdown, please full charge then repower on scanner.
z When OFF line/ out of service the 1D Engine will OFF and scanner will not work.
z Under power-saving mode, there will not be LED indication
Reset Configuration to Defaults
If you are unsure of the scanner configuration or have scanned the incorrect
codes, please scan the following three barcodes. This will reset the scanner to
its factory defaults.
5
Page 8

Tip
Do not hold the scanner directly over a barcode at 90˚. Scanning light bounces
directly back into the scanner from the barcode label is known as specular
reflection which will create a "dead zone" where decoding is difficult. Practice a
few times to find what range of angles works best.
Maintenance
Cleaning the scan window is the only maintenance required. A dirty window
may affect scanning accuracy.
Wipe the scanner window gently with a lens tissue or other material suitable for
cleaning optical material.
Do not spray water or other cleaning liquids directly onto the window.
6
Page 9

Setup from Bar Code Label
7
Page 10

T
ransmission Speed
High-speed transmission for PC uses.
Slow-speed transmission for PC use (Default).
Wireless Auto-connection
Wireless Auto-connection ON: When out of range, it
will keep trying to connect to device.
Wireless Auto-connection OFF: When out of range, it
will stop auto-connecting after sending signal for
connecting twenty times. When back to the range,
kindly presses trigger to connect to the device
(Default).
Power-Saving Mode
Power-Saving Mode can extend the usage time of battery. There are 5
modes can be chosen. When Scanner goes into Power-Saving Mode, user
can press "SCAN/Trigger" button, it will wake up and begin to scan.
Power-saving mode OFF
Enter power-saving mode after no usage
for 1 minute (Default)
Enter power-saving mode after no usage
for 5 minute
Enter power-saving mode after no usage
for 15 minute
Enter power-saving mode after no usage
for 30 minute
z When in charging, scanner will not enter power-saving mode automatically.
8
Page 11

Battery Fully Charged Alarm
ON
OFF (Default)
Low Battery Voltage Alarm
ON (Default)
OFF
z Under power-saving mode, there will not be LED indication when in charging.
9
Page 12

Keyboard Country (For USB HID only)
Scan the appropriate country code below to program the keyboard
for your country or language. As a general rule, the following
characters are not supported by the scanner for countries other
than the United States: @ | $ # { } [ ] = / ‘ \ < > ~
USA
(Original setting)
Norway
Germany
Italian
France
Vietnam
Sweden
Denmark
Switzerland
Spain
Portugal
Hungary
10
Page 13

Multi-Interface Functions – 1
GOOD READ BEEP TONE – NONE
DECODE OPTIONS REVERSE
IMAGE – ENABLE
DECODE OPTIONS SEND
BAR CODE ID - DISABLE
DECODE OPTIONS SEND
BAR CODE ID - RESET
BUZZER /
LED
GOOD READ BEEP TONE - RESET
IMAGE
DECODE OPTIONS REVERSE
IMANGE - DISABLE
CODE ID
DECODE OPTIONS SEND
BAR CODE ID – AS A PREFIX
DECODE OPTIONS SEND
BAR CODE ID – AS A SUFFIX
11
Page 14

Multi-Interface Functions – 2
SCAN MODE – SINGLE SCAN
SCAN MODE – MULTISCAN
LASER/CCD TIMEOUT
– 5 SECONDS
READING
MODE
SCAN MODE – SINGLE
SCAN NO TRIGGER
SCAN MODE – MULTISCAN
SCAN MODE - PULSE
LASER/CCD TIMEOUT
NO TRIGGER
– 2 SECONDS
LASER/CCD PULSE RATE - 7
LASER/CCD PULSE RATE - 3
12
Page 15

Symbologies On/Off - 1
CODE 11 - ENABLE
FULL ASCII ENABLE
CODE 39 ENABLE
CODE 11
CODE 39
CODE 11 - DISABLE
CODE 39 DISABLE
FULL ASCII DISABLE
13
Page 16

CODE 93 - ENABLE
Symbologies On/Off - 2
CODE 93
CODE 93 - DISABLE
CODE 128 - ENABLE
CODE 128 ISBT - ENABLE
CODABAR - ENABLE
I2OF5 - ENABLE
CODE 128
CODABAR
INTERLEAVED 2
OF 5
CODE 128 - DISABLE
CODE 128 ISBT - DISABLE
CODABAR - DISABLE
I2OF5 - DISABLE
ID2OF5 - ENABLE
INDUSTRIAL 2 OF 5
ID2OF5 - DISABLE
Page 17

Symbologies On/Off - 3
MSI - ENABLE
MSI
MSI - DISABLE
UPC-A ENABLE
UPC-E ENABLE
EAN-13 ENABLE
EAN-8 ENABLE
UPC/EAN
UPC-A DISABLE
UPC-E DISABLE
EAN-13 DISABLE
EAN-8 DISABLE
15
Page 18

CODE 11 ID CHARACTER – “m”
Symbologies Set Up - 1
CODE 11
CODE 11 ID CHARACTER – “Z”
CODE 11 DOUBLE CHECK
CODE 39 SS CHAR - NONE
CODE 39 SEND START/
STOP CHARS ENABLE
CODE 39 ID CHARACTER ‛a’
- ENABLE
CODE 39
CODE 11 DOUBLE CHECK
CODE 39 SS CHAR ‛+’
CODE 39 SEND START/
STOP CHARS DISABLE
CODE 39 ID CHARACTER ‛Z’
- DISABLE
CODE 39 DOUBLE CHECK
ENABLE
CODE 39 DOUBLE CHECK
DISABLE
16
Page 19

CODE 93 ID CHARACTER – “h”
Symbologies Set Up – 2
CODE 93
CODE 93 ID CHARACTER – “Z”
CODE 93 DOUBLE CHECK
- ENABLE
CODE 128 ID CHARACTER – ‛g’
CODE 128 DOUBLE CHECK
- ENABLE
CODABAR SEND START/STOP CHARS -
ENABLE
CODE 128
CODABAR
CODE 93 DOUBLE CHECK
- DISABLE
CODE128 ID CHARACTER - ‛Z’
CODE 128 DOUBLE CHECK
- DISABLE
CODABAR SEND START/STOP CHARS -
DISABLE
CODABAR WIDE GAPS ALLOWED
- ENABLE
CODABAR WIDE GAPS ALLOWED
- DISABLE
17
Page 20

CODABAR ID CHARACTER –‛k’
Symbologies Set Up – 3
CODABAR
CODABAR ID CHARACTER –‛Z’
CODABAR DOUBLE CHECK
- ENABLE
I2OF5 CHECK DIGIT - DISABLE
I2OF5 ID CHARACTER – ‛i’
I2OF5 DOUBLE CHECK
- ENABLE
ID2OF5 BAR START/STOP
- ENABLE
CODABAR DOUBLE CHECK -
DISABLE
Interleaved 2 of 5
I2OF5 CHECK DIGIT - ENABLE
I2OF5 ID CHARACTER – ‛Z’
I2OF5 DOUBLE CHECK
- DISABLE
Industrial 2 of 5 ID2OF5 BAR START/STOP
- DISABLE
ID2OF5 ID CHARACTER - ‛j’
18
ID2OF5 ID CHARACTER - ‛Z’
Page 21

Symbologies Set Up – 4
ID2OF5 DOUBLE CHECK - ENABLE
MSI CHECK DIGIT – MOD 10
MSI ISBN ID CHARACTER –‛f’
MSI DOUBLE CHECK - ENABLE
EXPAND UPC-E TO UPC-A
ENABLE
MSI
UPC/EAN
ID2OF5 DOUBLE CHECK - DISABLE
MSI CHECK DIGIT –RESET
MSI ISBN ID CHARACTER –‛Z’
MSI DOUBLE CHECK - DISABLE
EXPAND UPC-E TO UPC-A
DISABLE
EXPAND UPC-A TO EAN-13
ENABLE
CONVERT EAN-13 TO ISBN
ENABLE
19
EXPAND UPC-A TO EAN-13
DISABLE
CONVERT EAN-13 TO ISBN
DISABLE
Page 22

SEND UPC-A CHECK DIGIT
ENABLE
Symbologies Set Up – 5
SEND UPC-A CHECK DIGIT
DISABLE
SEND UPC-E CHECK DIGIT
ENABLE
SEND EAN-13 CHECK DIGIT
ENABLE
SEND EAN-8 CHECK DIGIT
ENABLE
UPC-A ID CHARACTER ‛b’
UPC-E ID CHARACTER ‛c’
SEND UPC-E CHECK DIGIT
DISABLE
SEND EAN-13 CHECK DIGIT
DISABLE
SEND EAN-8 CHECK DIGIT
DISABLE
UPC-A ID CHARACTER ‛Z’
UPC-E ID CHARACTER ‛Z’
EAN-13 ID CHARACTER ‛e’
20
EAN-13 ID CHARACTER ‛Z’
Page 23

Symbologies Set Up – 6
EAN-8 ID CHARACTER ‛d’
ISBN ID CHARACTER ‛f’
UPC/EAN SUPPLEMENTS
- DISABLE
UPC/EAN SUPPLEMENTS
– 5 DIGIT ONLY
UPC/EAN DOUBLE CHECK
ENABLE
EAN-8 ID CHARACTER ‛Z’
UPC/EAN
ISBN ID CHARACTER ‛Z’
UPC/EAN SUPPLEMENTS
– 2 DIGIT ONLY
UPC/EAN SUPPLEMENTS
UPC/EAN DOUBLE CHECK
– 2 & 5 DIGIT
DISABLE
21
Page 24

EDIT SETUP BAR CODES
EDIT #1 – STRIP 1 LEADING CHARACTER
ON ALL BAR CODES THAT START WITH
‛12345’
EDIT #1 - OFF
EDIT #2 – STRIP 1 TRAILING CHARACTER
EDIT #1 – FILTER LEADING SPACES
EDIT – FILTER ALL ‛-’ CHARACTERS
EDIT - INSERT LEADING ZERO
EDIT #2 – OFF
EDIT #1 - OFF
EDIT – DISABLE FILTER OF ALL ‛-’ CHARS
EDIT – DISABLE INSERT LEADING ZERO
22
Page 25

MACRO/SPECIAL KEYS SETUP BAR CODES
MACRO #1 – FIND ‛1’ AND REPLACE WITH
‛ONE’
MACRO #1 - DISABLED
MACRO #2 – FIND ‛2’ AND REPLACE WITH
‛TWO’ FOR CODE 39 ONLY
MACRO – FIND ‛0’ AND REPLACE WITH ‛A’
SPECIAL KEY –MAP F3 TO ‛0’
SPECIAL KEY – MAP KEYPAD ENTER TO ‛2’
MACRO #2 - DISABLED
MACRO – FIND ‛0’ AND REPLACE WITH ‛A’ -
DISABLE
SPECIAL KEY – DISABLE F3 KEY MAPPING
SPECIAL KEY – DISABLE KEYPAD ENTER
MAPPING
23
Page 26

TERMINATION STRING SETUP BAR CODES
STRING #1 – TERMINATION CHAR - CR
STRING #1 - DISABLE
STRING #2– CODE 128 TERMINATION CHAR
- CR
STRING – CODE 39 TERMINATION CHAR
- TAB
STRING #2– CODE 128 TERMINATION CHAR
- REMOVED
STRING – CODE 39 TERMINATION CHAR
– TAB - REMOVED
24
 Loading...