

• Sollten Sie noch Fragen haben, die in dieser Bedienungsanleitung nicht
beantwortet werden, wenden Sie sich an unseren technischen Kundendienst oder
an andere Fachleute.
Bedienungsanleitung
Mechanische Gaming Tastatur RF-GT-X4
Best.-Nr. 1647063
Bestimmungsgemäße Verwendung
Das Produkt ist zum Anschluss an einen Computer vorgesehen. Die Tastatur dient dort
zur Eingabe von Daten bzw. zur Steuerung des Betriebssystems. Die Datenübertragung
zwischen der Tastatur und dem Computer erfolgt über USB. Die Tastatur ist mit verschiedenen
Beleuchtungsmodi ausgestattet. Als Besonderheit verfügt die Tastatur über 12 Tasten mit
Multimedia-Funktionen. Die auf der CD mitgelieferte Software erlaubt die Einstellung von
Funktionen und Tastenbelegungen.
Eine Verwendung ist nur in geschlossenen Räumen, also nicht im Freien erlaubt. Der Kontakt
mit Feuchtigkeit, z.B. im Badezimmer u.ä. ist unbedingt zu vermeiden.
Aus Sicherheits- und Zulassungsgründen dürfen Sie das Produkt nicht umbauen und/oder
verändern. Falls Sie das Produkt für andere Zwecke verwenden, als zuvor beschrieben, kann
das Produkt beschädigt werden. Außerdem kann eine unsachgemäße Verwendung Gefahren
wie z.B. Kurzschluss, Brand, etc. hervorrufen. Lesen Sie sich die Bedienungsanleitung
genau durch und bewahren Sie diese auf. Reichen Sie das Produkt nur zusammen mit der
Bedienungsanleitung an dritte Personen weiter.
Das Produkt entspricht den gesetzlichen, nationalen und europäischen Anforderungen. Alle
enthaltenen Firmennamen und Produktbezeichnungen sind Warenzeichen der jeweiligen
Inhaber. Alle Rechte vorbehalten.
Lieferumfang
• Tastatur
• Software CD
• Bedienungsanleitung
Aktuelle Bedienungsanleitungen
Laden Sie aktuelle Bedienungsanleitungen über den Link www.conrad.com/downloads
herunter oder scannen Sie den abgebildeten QR-Code. Befolgen Sie die Anweisungen auf
der Webseite.
Symbol-Erklärung
Das Symbol mit dem Ausrufezeichen im Dreieck weist auf wichtige Hinweise in
dieser Bedienungsanleitung hin, die unbedingt zu beachten sind.
Das Pfeil-Symbol ist zu nden, wenn Ihnen besondere Tipps und Hinweise zur
Bedienung gegeben werden sollen.
Sicherheitshinweise
Lesen Sie sich die Bedienungsanleitung aufmerksam durch und beachten Sie
insbesondere die Sicherheitshinweise. Falls Sie die Sicherheitshinweise und
die Angaben zur sachgemäßen Handhabung in dieser Bedienungsanleitung
nicht befolgen, übernehmen wir für dadurch resultierende Personen-/
Sachschäden keine Haftung. Außerdem erlischt in solchen Fällen die
Gewährleistung/Garantie.
a) Allgemein
• Das Produkt ist kein Spielzeug. Halten Sie es von Kindern und Haustieren fern.
• Lassen Sie das Verpackungsmaterial nicht achtlos liegen. Dieses könnte für
Kinder zu einem gefährlichen Spielzeug werden.
• Schützen Sie das Produkt vor extremen Temperaturen, direktem Sonnenlicht,
starken Erschütterungen, hoher Feuchtigkeit, Nässe, brennbaren Gasen,
Dämpfen und Lösungsmitteln.
• Setzen Sie das Produkt keiner mechanischen Beanspruchung aus.
• Wenn kein sicherer Betrieb mehr möglich ist, nehmen Sie das Produkt außer
Betrieb und schützen Sie es vor unbeabsichtigter Verwendung. Der sichere
Betrieb ist nicht mehr gewährleistet, wenn das Produkt:
- sichtbare Schäden aufweist,
- nicht mehr ordnungsgemäß funktioniert,
- über einen längeren Zeitraum unter ungünstigen Umgebungsbedingungen
gelagert wurde oder
- erheblichen Transportbelastungen ausgesetzt wurde.
• Gehen Sie vorsichtig mit dem Produkt um. Durch Stöße, Schläge oder dem Fall
aus bereits geringer Höhe wird es beschädigt.
• Beachten Sie auch die Sicherheitshinweise und Bedienungsanleitungen der
übrigen Geräte, an die das Produkt angeschlossen wird.
• Wenden Sie sich an eine Fachkraft, wenn Sie Zweifel über die Arbeitsweise, die
Sicherheit oder den Anschluss des Produkts haben.
• Lassen Sie Wartungs-, Anpassungs- und Reparaturarbeiten ausschließlich von
einem Fachmann bzw. einer Fachwerkstatt durchführen.
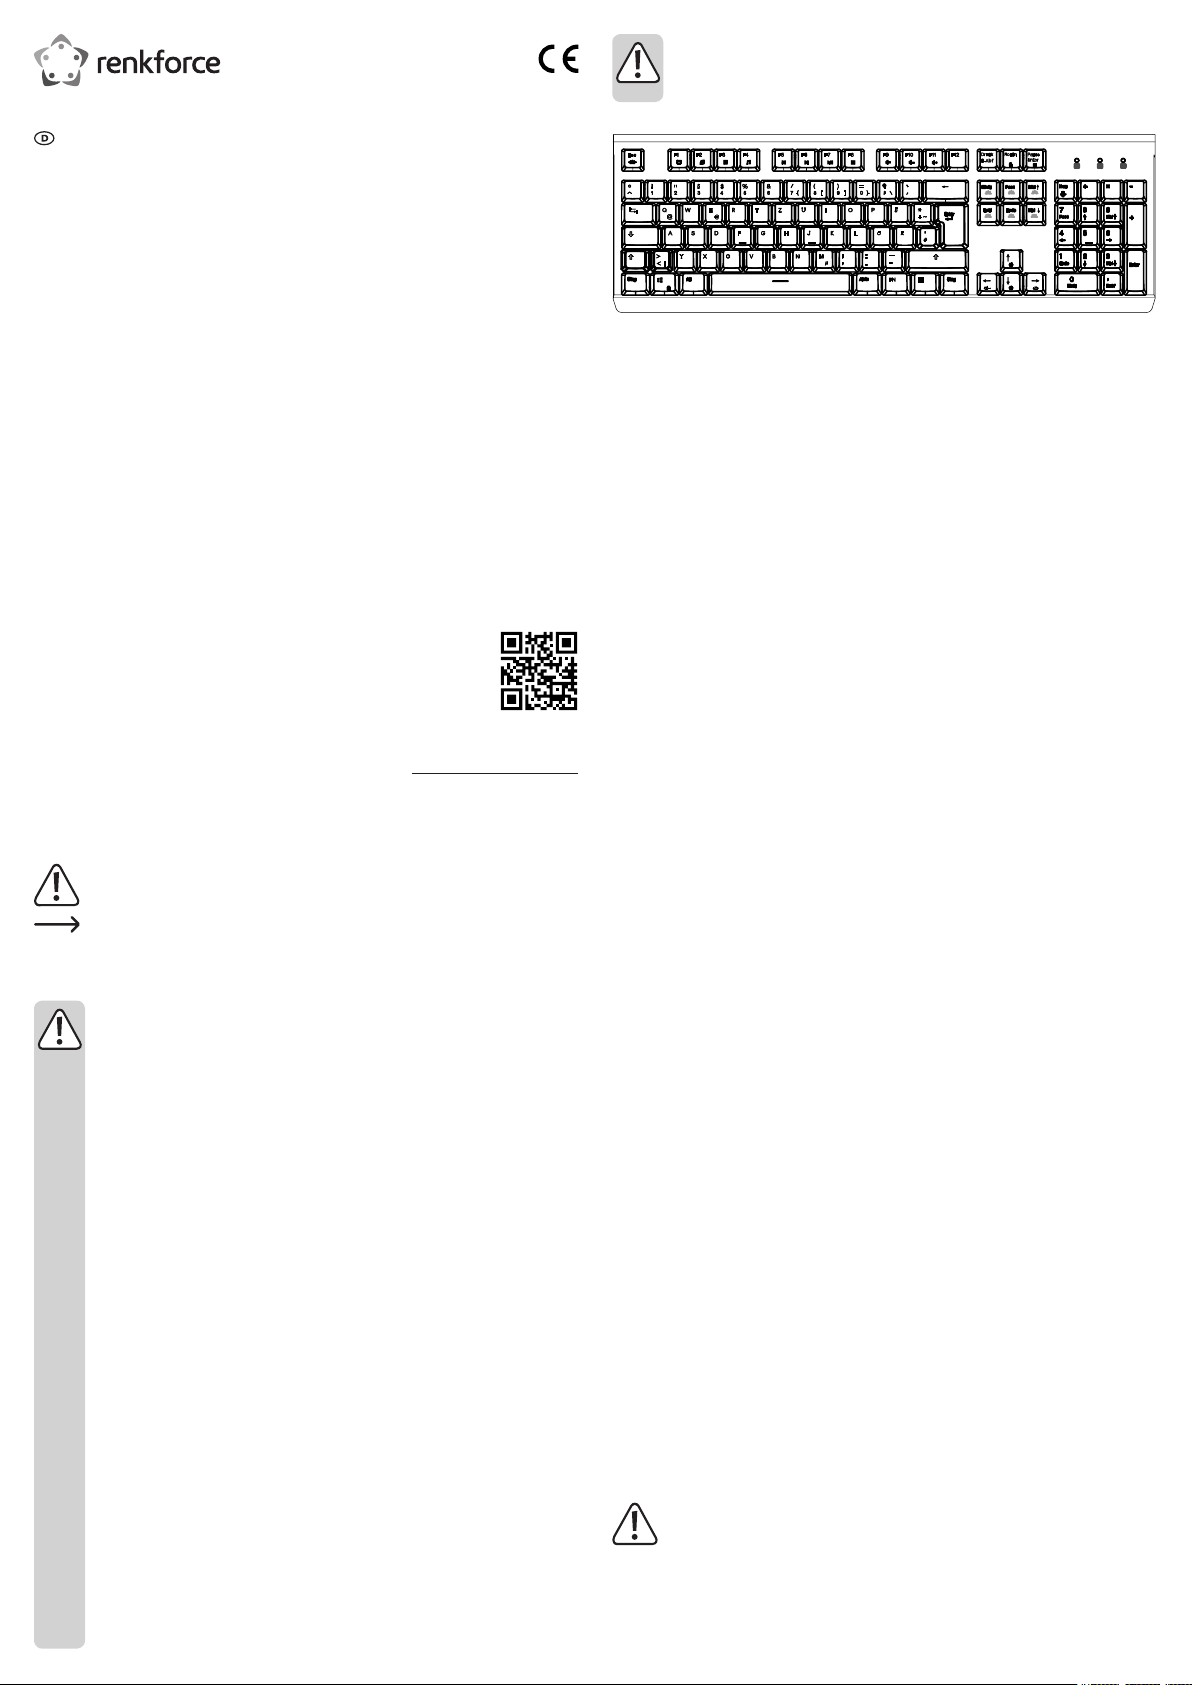
Bedienelemente
Dies ist eine grasche Kurzübersicht aller Tasten. Die Sondertastenkombinationen sind im
Abschnitt „Multimedia-Funktionen und Funktionstastenbelegung“ näher erklärt. Die anderen
Tasten sind die Standardtasten nach der im deutschsprachigen Raum üblicherweise
verwendeten QWERTZ-Belegung.
Multimedia-Funktionen und Funktionstastenbelegung
Multimedia-Funktionen
FN+F1 Computer FN+F4 Mediaplayer
FN+F2 Home FN+F5 vorheriger
FN+F3 Rechner
starten
Beleuchtungs- und Tastenfunktionen
FN+Einfg schaltet einen
FN+Pos1 schaltet einen
FN+Bild ↑ schaltet einen
FN+Entf schaltet einen
FN+Bild ↓ schaltet einen
FN+Ende Beleuchtung anpassen
FN+ESC Tastenbeleuchtung ein-/
FN+WIN Windows sperren/
starten
Titel
FN+F6 nächster Titel FN+F9 Ton aus
Beleuchtungsmodus
Beleuchtungsmodus
Beleuchtungsmodus
Beleuchtungsmodus
Beleuchtungsmodus
(Beleuchtung blinkt,
Auto-Speichern nach
30 Sekunden ohne
Aktivität)
ausschalten
entsperren
FN+F7 Play/Pause FN+F10 Lautstärke
FN+F8 Stop FN+F11 Lautstärke
FN+FL sechs Tasten Anti-Ghosting
FN+PB alle Tasten Anti-Ghosting
FN+↑ Helligkeit erhöhen
FN+↓ Helligkeit verringern
FN+← Lichtwechselgeschwindigkeit
FN+→ Lichtwechselgeschwindigkeit
FN+ ←F1,
F3, F5
FN+W tauscht die Funktionen der
verringern
erhöhen
Auf Grundeinstellung
zurücksetzen
Tasten W, A, S, D mit den
Funktionen der Pfeiltasten ↑,
←,↓,→.
verringern
erhöhen
Inbetriebnahme
a) Tastatur anschließen
• Verbinden Sie den USB-A-Stecker der Tastatur mit einem freien USB-Port Ihres Computers.
Der Computer braucht dabei nicht ausgeschaltet zu werden.
• Das Betriebssystem ndet daraufhin neue Hardware und installiert die benötigten Treiber;
diese sind zum Teil Bestandteil des Betriebssystems (z.B. mindestens Windows® XP).
b) Software installieren und benutzen
Die zugehörige Software erlaubt das Festlegen und Ändern der Einzeltastenbelegung
mit anderen Tastenfunktionen, z.B. der Buchstabe „R“ als Funktion für die Taste „1“. Das
Zusammenfassen von aufeinander folgenden Tastenkombinationen in Makros, die dann
durch Druck einer Taste gestartet werden können, ist gleichfalls möglich. Tasten können auch
Multimedia-Funktionen zugewiesen werden.
• Legen Sie die Software-CD in ein CD-ROM Laufwerk, welches an Ihre Computer
angeschlossen ist.
• Klicken Sie auf die Installationsdatei des Setup-Programms, um es zu installieren. Folgen Sie
den weitern Installationsanweisungen auf dem Bildschirm und schließen Sie die Installation
ab.
• Starten Sie die Einstellsoftware durch Anklicken der Verknüpfung. Sie können jetzt die
Einstellungen der Tastatur vornehmen.
Die Tastatur muss am Computer angeschlossen sein, um die Einstellfunktionen der
Software nutzen zu können.
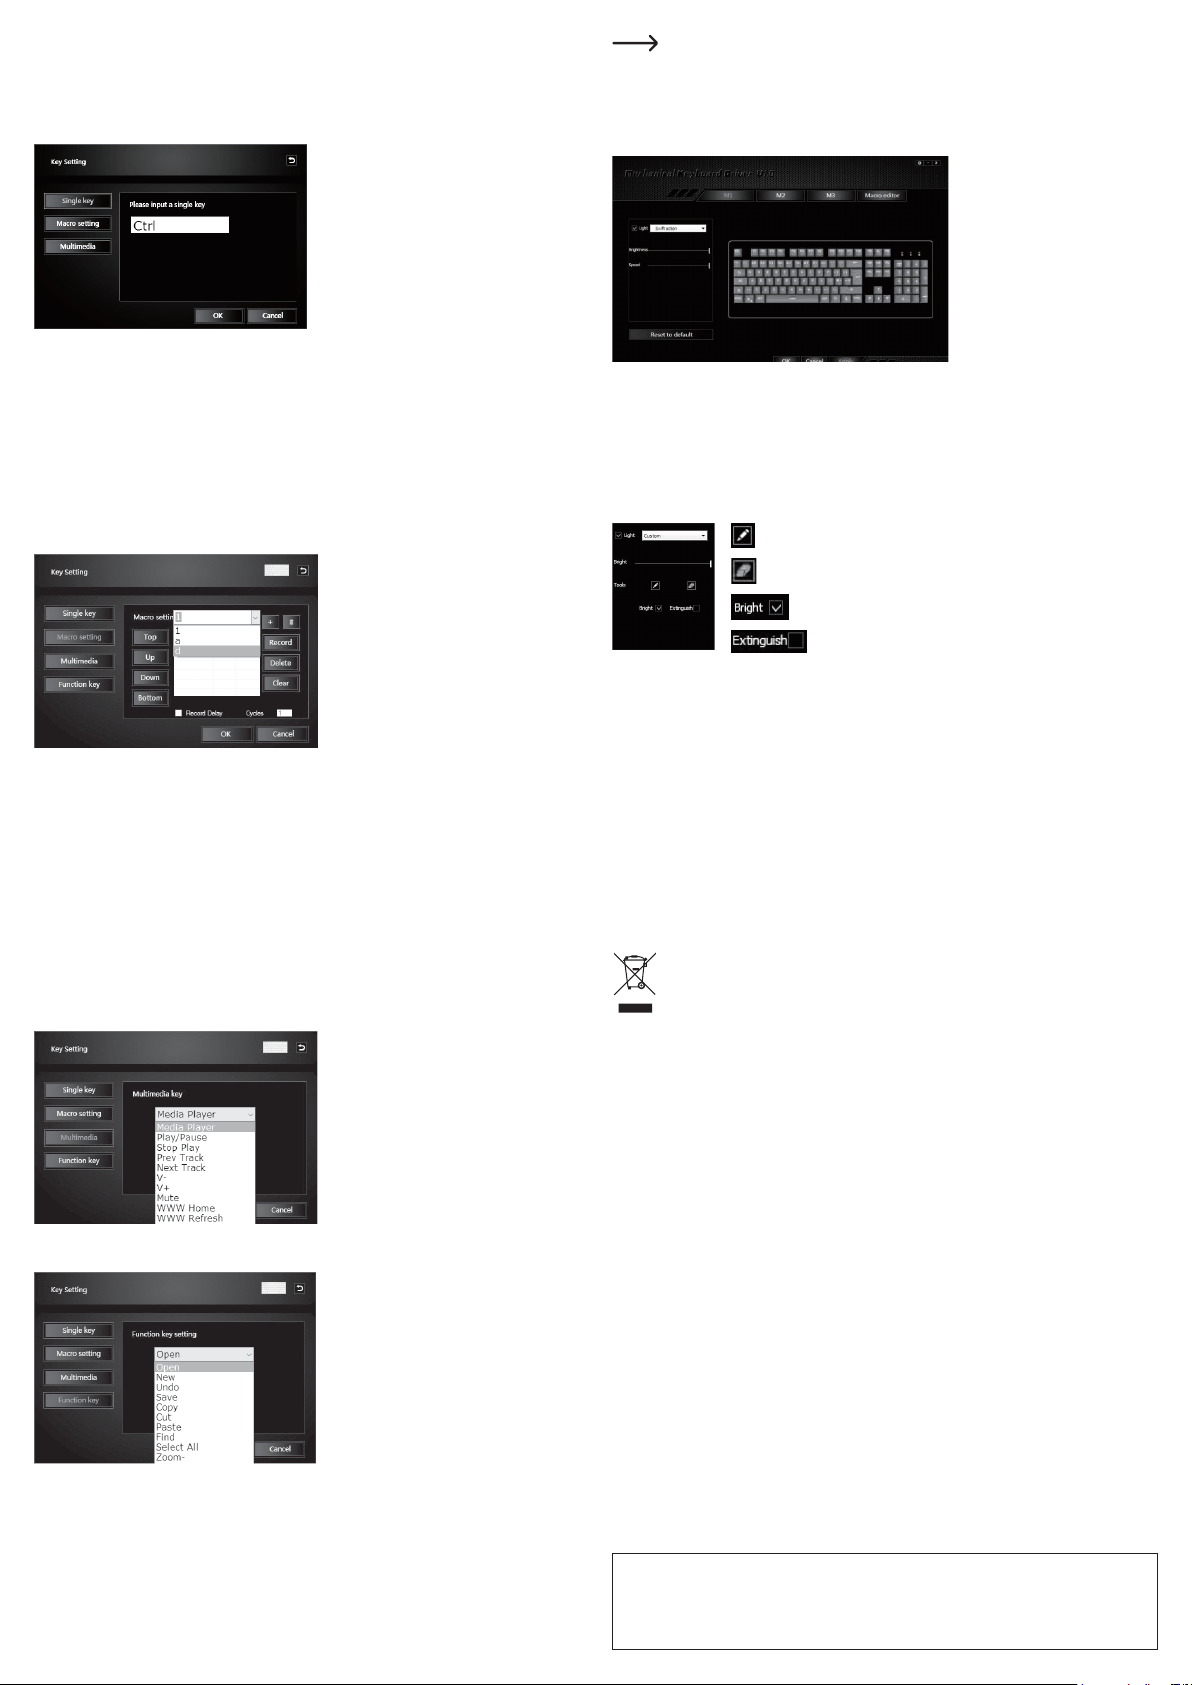
Tasteneinstellung (Single key)
Die Tastatur wird in Grundeinstellung geliefert. Sie können für eine Taste der Tastatur eine
benutzerdenierte Belegung festlegen und als Prol speichern. Sie müssen die Prole jedoch
dazu mittels der mitgelieferten Software kongurieren. Zur Einstellung eines Prols gehen Sie
wie folgt vor:
• Wählen Sie ein Prol M1, M2 oder M3
durch Anklicken mit dem Cursor aus.
• Wählen Sie eine Taste aus dem virtuellen
Tastaturmodell im Softwarefenster aus.
Eine Eingabezeile im Fenster öffnet sich.
• Wählen Sie die Taste zum Umdenieren
durch Drücken auf der physischen
Tastatur aus. Die neue Denition der
Taste erscheint in der Eingabezeile.
• Bestätigen Sie Ihre Wahl mit „OK“ und
drücken auf die Softwaretaste „Apply“.
Die Taste im virtuellen Tastaturmodell ist
jetzt mit der auf der physischen Tastatur
gedrückten neu deniert.
Tasteneinstellung (Macro setting)
• Wählen Sie ein Prol M1, M2 oder M3 durch Anklicken des entsprechenden Tabs mit dem
Cursor aus.
• Wählen Sie eine Taste aus dem virtuellen Tastaturmodell im Softwarefenster aus. Eine
Eingabezeile im Fenster öffnet sich. Wählen Sie die Einstellung „Macro setting“.
• Wählen Sie den Namen eines Makros für
die zu belegende Taste aus. Sind noch
keine Makros vorhanden, erstellen Sie
selbst eines.
• Vergeben Sie einen Namen und benutzen
die Softwaretasten zum Aufnehmen der
Makros.
• Sie können auch den Makro-Editor direkt
aus dem Tab „Macro editor“ starten.
• Bestätigen Sie das ausgewählte Makro mit „OK“, und drücken auf die Softwaretaste „Apply“.
Die Taste ist jetzt mit einem Makro deniert.
• Bestimmen Sie ein Makro mit der Taste „+“ und tippen ggf. einen Namen ein. Löschen Sie
ein Makro mit der Papierkorbtaste.
• Wählen Sie ein Makro aus dem Drop-Down-Menü aus und beginnen die Aufnahme mit der
Taste „Record“, ein nochmaliges Drücken dieser Taste beendet die Aufnahme und speichert
das Makro.
• Löschen Sie Schritte innerhalb des Makros mit „Delete“, oder „Clear“ und navigieren Sie
mit „Top“ „Up“ „Down“ und „Bottom“. Des Weiteren können Sie Verzögerung zwischen zwei
Tastenanschlägen „Record Delay“ und die Zyklen „Cycles“ einstellen.
Tasteneinstellung (Multimedia)
• Wählen Sie ein Prol M1, M2 oder M3 durch Anklicken des entsprechenden Tabs mit dem
Cursor aus.
• Wählen Sie eine Taste aus dem virtuellen
Tastaturmodell im Softwarefenster aus.
Eine Eingabezeile im Fenster öffnet sich.
Wählen Sie die Einstellung „Multimedia“.
• Wählen Sie im Drop-Down-Menü eine
Multimediafunktion für die Taste aus.
• Bestätigen Sie das ausgewählte
Makro mit „OK“, und drücken auf die
Softwaretaste „Apply“. Die Taste ist jetzt
mit einer Multimedia-Funktion deniert.
Tasteneinstellung (Function key)
• Wählen Sie ein Prol M1, M2 oder M3
durch Anklicken des entsprechenden
Tabs mit dem Cursor aus.
• Wählen Sie eine Taste aus dem virtuellen
Tastaturmodell im Softwarefenster aus.
• Eine Eingabezeile im Fenster öffnet sich.
Wählen Sie die Einstellung „Function
key“.
Sie können die Tastaturbelegungen für jedes der insgesamt 3 Belegungsprole
(M1, M2 und M3) nach Ihren Wünschen einstellen. Wiederholen Sie dazu diese
Einstellungsvorgänge in gleicher Weise für die übrigen Prole. Sie können nach der
Einstellung durch Wechsel des Prols schnell und problemlos eine von Ihnen selbst
eingestellte Belegung der Tastatur zu wählen.
Lichteffektprogramm einstellen
• Setzen Sie einen Haken bei „Light“, um die Lichteffektprogramme einstellen zu können.
• Im Drop-Down-Menü rechts davon können Sie zwischen acht verschieden benannten
Lichtwechseleffekten auszuwählen.
• Mit dem Schieber im Punkt „Brightness“ stellen Sie die Helligkeit ein.
• Mit dem Schieber im Punkt „Speed“ stellen Sie die Geschwindigkeit des Farbwechsels ein.
• Im Lichteffektprogramm „custom“ können Sie außerdem:
- die Beleuchtung einer einzelnen Taste einschalten
- die Beleuchtung einer einzelnen Taste ausschalten
- für alle Tasten gleichzeitig die Beleuchtung einschalten
- die Beleuchtung ganz ausschalten
Zurücksetzen
• Mit „Reset to default“ setzen Sie die Einstellungen eines Prols auf die werksseitigen
Voreinstellungen zurück.
• Bestätigen Sie das Zurücksetzen.
Pege und Reinigung
• Trennen Sie das Produkt vor jeder Reinigung von der Stromversorgung.
• Verwenden Sie auf keinen Fall aggressive Reinigungsmittel, Reinigungsalkohol oder
andere chemische Lösungen, da dadurch das Gehäuse angegriffen oder gar die Funktion
beeinträchtigt werden kann.
• Verwenden Sie ein trockenes, faserfreies Tuch zur Reinigung des Produkts.
Entsorgung
Elektronische Geräte sind Wertstoffe und gehören nicht in den Hausmüll. Entsorgen
Sie das Produkt am Ende seiner Lebensdauer gemäß den geltenden gesetzlichen
Bestimmungen.
Sie erfüllen damit die gesetzlichen Verpichtungen und leisten Ihren Beitrag zum Umweltschutz.
Technische Daten
Stromversorgung .......................... via USB, 5 V/DC 500 mA
Tastaturlayout ............................... 105 Standard-Tasten, deutsch, 12 Multimedia-Funktionen
Tastenlebensdauer ....................... 50.000.000 Zyklen
Systemvoraussetzungen .............. Windows® XP (Home, Pro, mit SP1, SP2, SP3) (32 Bit),
Vista™ (32 Bit), 7 (32/64 Bit), 8.0 (32/64 Bit), 8.1 (32/64
Bit), 10.0 (32/64 Bit), RT
Betriebsbedingungen .................... 0 bis +45 ºC, 10 – 90 % relative Luftfeuchte (nicht
kondensierend)
Lagerbedingungen ........................ 0 bis +65 ºC, 10 – 90 % relative Luftfeuchte (nicht
kondensierend)
Abmessungen (L x B x H) ............. 444 x 146 x 41 mm
Gewicht ......................................... 1 kg
• Wählen Sie eine Funktion für die Taste aus dem Drop-Down-Menü „Function key setting“.
• Bestätigen Sie die Funktion mit „OK“, und drücken auf die Softwaretaste „Apply“. Die Taste
ist jetzt mit der gewählten Funktion deniert.
Dies ist eine Publikation der Conrad Electronic SE, Klaus-Conrad-Str. 1, D-92240 Hirschau (www.conrad.com).
Alle Rechte einschließlich Übersetzung vorbehalten. Reproduktionen jeder Art, z. B. Fotokopie, Mikroverlmung, oder
die Erfassung in elektronischen Datenverarbeitungsanlagen, bedürfen der schriftlichen Genehmigung des Herausgebers.
Nachdruck, auch auszugsweise, verboten. Die Publikation entspricht dem technischen Stand bei Drucklegung.
Copyright 2018 by Conrad Electronic SE. *1647063_v1_0718_02_DS_m_2L_(1)
Operating instructions
RF-GT-X4 Mechanical gaming keyboard
Item no. 1647063
Product overview
Intended use
This keyboard connects to a computer and can be used to enter data or control the operating
system. Data is transmitted between the keyboard and the computer via USB. The keyboard
has a number of lighting modes. It also features 12 function keys with multimedia functions. The
software on the CD allows you to congure the functions and key assignments.
This product is intended for indoor use only. Do not use it outdoors. Contact with moisture
(e.g. in bathrooms) must be avoided under all circumstances.
For safety and approval purposes, you must not rebuild and/or modify this product. Using the
product for purposes other than those described above may damage the product. In addition,
improper use can cause hazards such as a short circuit or re. Read the instructions carefully
and store them in a safe place. Only make this product available to third parties together with
its operating instructions.
This product complies with statutory, national and European regulations. All company and
product names are trademarks of their respective owners. All rights reserved.
Package contents
• Keyboard
• Software CD
• Operating instructions
Up-to-date operating instructions
To download the latest operating instructions, visit www.conrad.com/downloads or scan the QR
code on this page. Follow the instructions on the website.
Explanation of symbols
The symbol with an exclamation mark in a triangle is used to highlight important
information in these operating instructions. Always read this information carefully.
The arrow symbol indicates special information and advice on how to use the
product.
Safety instructions
Read the operating instructions and safety information carefully. If you do
not follow the safety information and information on proper handling in these
operating instructions, we will assume no liability for any resulting personal
injury or damage to property. Such cases will invalidate the warranty/
guarantee.
a) General information
• The device is not a toy. Keep it out of the reach of children and pets.
• Do not leave packaging material lying around carelessly. It may become a
dangerous toy for children.
• Protect the product from extreme temperatures, direct sunlight, strong jolts, high
humidity, moisture, ammable gases, vapours and solvents.
• Do not place the product under any mechanical stress.
• If it is no longer possible to operate the product safely, stop using it and prevent
unintended use. Safe operation can no longer be guaranteed if the product:
- is visibly damaged,
- is no longer working properly,
- has been stored for extended periods in poor ambient conditions or
- has been subjected to any serious transport-related stress.
• Always handle the product carefully. Jolts, impacts or a fall even from a low height
may damage the product.
• Always observe the safety information and operating instructions of any other
devices which are connected to the product.
• Consult a technician if you are not sure how to use or connect the product, or if
you have concerns about safety.
• Maintenance, modications and repairs must be done by a technician or a
specialist repair centre.
• If you have questions which remain unanswered by these operating instructions,
contact our technical support service or other technical personnel.
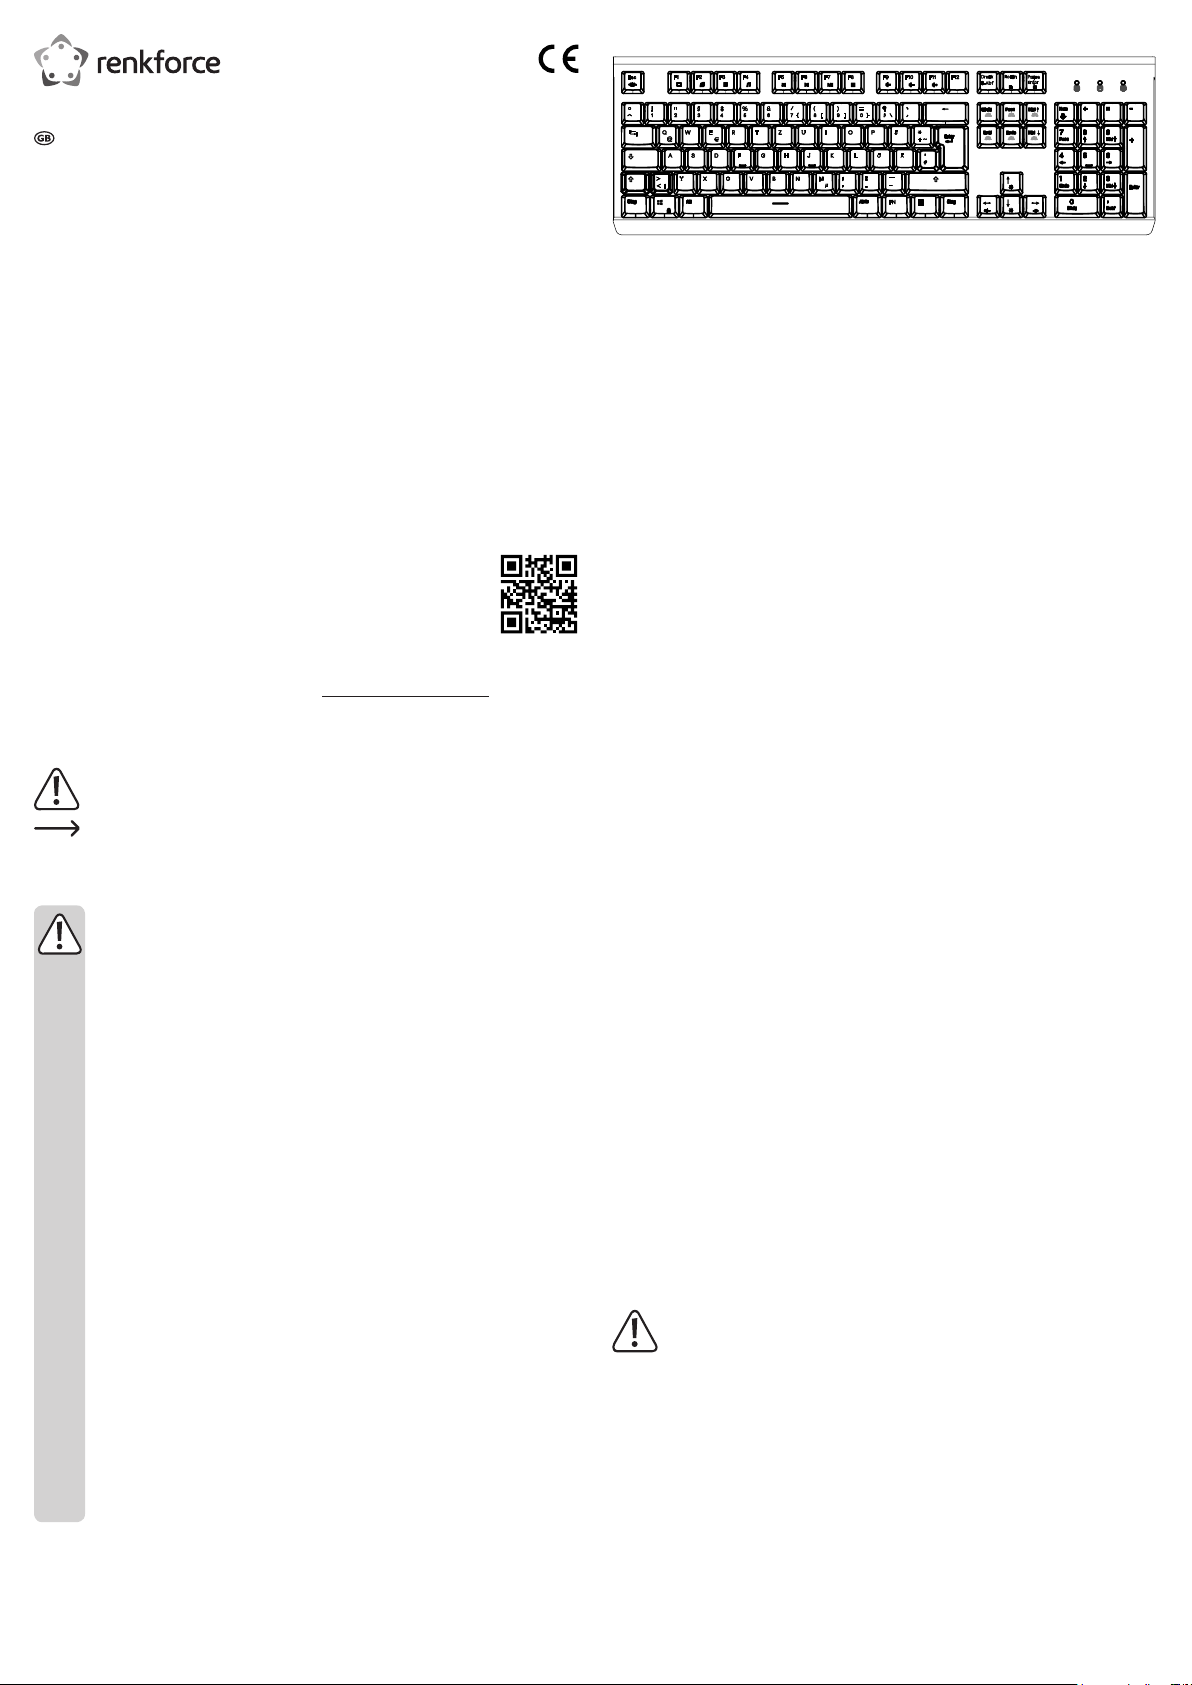
This is a graphical overview of all keys. The function key combinations are explained in more
detail in "Multimedia functions and function key assignment". The other keys are standard keys
that follow the standard QWERTZ layout used in German-speaking countries.
Multimedia functions and function key assignment
Multimedia functions
FN+F1 Computer FN+F4 Launch
FN+F2 Home FN+F5 Previous
FN+F3 Start
computer
Lighting and key functions
FN+Einfg Switches the lighting
FN+Pos1 Switches the lighting
FN+Bild ↑ Switches the lighting
FN+Entf Switches the lighting
FN+Bild ↓ Switches the lighting
FN+Ende Adjust the light effects
FN+ESC Switch key backlight
FN+WIN Lock/unlock Windows FN+W Swaps the functions of the W, A,
media player
track
FN+F6 Next track FN+F9 Mute
mode
mode
mode
mode
mode
(Light ashes, settings
are automatically saved
after 30 seconds of
inactivity)
on/off
FN+F7 Play/pause FN+F10 Decrease
FN+F8 Stop FN+F11 Increase
FN+FL Anti-ghosting for six keys
FN+PB Anti-ghosting for all keys
FN+↑ Increase brightness
FN+↓ Decrease brightness
FN+← Decrease light change speed
FN+→ Increase light change speed
FN+ ←F1,
F3, F5
Restore default settings
S and D keys with the functions
of the arrow keys (↑, ←, ↓, →).
volume
volume
Operation
a) Connecting the keyboard
• Connect the USB-A plug on the keyboard to a USB port on your computer. You do not need
to switch the computer off.
• The operating system will detect new hardware and install the required drivers; these are
often included with the operating system (e.g. Windows® XP or later).
b) Installing/using the software
The software allows you to dene and change each key assignment to another key function
(e.g. use "R" as the "1" key). Successive key combinations can be grouped into macros, which
can be started by pressing a single key. Keys can also be assigned to multimedia functions.
• Insert the software CD into a CD-ROM drive connected to your computer.
• Click on the installation le of the setup program to install the software. Follow the onscreen
instructions to complete the installation.
• Click on the shortcut to start the software. You can now congure the settings for the
keyboard.
The keyboard must be connected to the computer in order to use the software's
conguration functions.

Key setting (single key)
The keyboard is shipped in the default conguration. You can congure a user-dened
assignment for each key and save it as a prole. Proles must be congured using the software
provided. Follow the steps below to congure a prole:
• Select a prole (M1, M2 or M3) by clicking
with the cursor.
• Select a key from the virtual keyboard
model in the software window. A text box
will open.
• Select the key that you wish to redene
by pressing the physical keyboard. The
new denition for the key will appear in
the text box.
• Conrm your selection with "OK" and
click on "Apply". The key on the virtual
keyboard model is now dened with the
key that you pressed on the physical
keyboard.
Key setting (macro setting)
• Select a prole (M1, M2 or M3) by clicking on the respective tabs with the cursor.
• Select a key from the virtual keyboard model in the software window. A text box will open.
Select "Macro setting".
• Select the name of the macro for the key
that you wish to assign. If no macros are
available, you can create one yourself.
• Assign a name and use the software keys
to record the macros.
• You can also start the macro editor
directly from the "Macro editor" tab.
• Conrm the selected macro with "OK" and click "Apply". The key is now dened with a
macro.
• Determine a macro with the "+" key and enter a name, if necessary. Use the waste bin key
to delete a macro.
• Select a macro from the drop-down menu and start recording with the "Record" key. Pressing
this key again ends recording and saves the macro.
• Delete steps within the macro with "Delete" or "Clear" and navigate with "Top", "Up", "Down"
and "Bottom". You can also congure a delay between two key presses ("Record delay") and
the cycles ("Cycles").
Key setting (multimedia)
• Select a prole (M1, M2 or M3) by clicking on the respective tabs with the cursor.
• Select a key from the virtual keyboard
model in the software window. A text box
will open. Select the “Multimedia” setting.
• In the drop-down menu, select a
multimedia function for the key.
• Conrm the selected macro with "OK"
and click "Apply". The key is now dened
with a multimedia function.
Key setting (function key)
• Select a prole (M1, M2 or M3) by clicking
on the respective tabs with the cursor.
• Select a key from the virtual keyboard
model in the software window.
• A text box will open. Select the "Function
key" setting.
Conguring the light effects
• Check the box next to "Light" to congure the light effect modes.
• You can choose from eight different light effects from the right-hand drop-down menu.
• Use the slider next to "Brightness" to adjust the brightness.
• Use the slider next to "Speed" to adjust the speed of the colour change.
• In the "Custom" light effect mode, you can also:
- Switch on the light for an individual key
- Switch off the light for an individual key
- Switch on the lights for all keys at the same time
- Switch off all lights
Restoring the default settings
• Use the "Reset to default" option to reset the settings for a prole to the factory defaults.
• Conrm the reset.
Care and cleaning
• Always disconnect the product from the power supply before cleaning it.
• Never use aggressive detergents, rubbing alcohol or other chemical solutions, as these could
damage the housing or stop the product from functioning properly.
• Use a dry, lint-free cloth to clean the product.
Disposal
Electronic devices are recyclable waste and must not be placed in household
waste. At the end of its service life, dispose of the product according to the relevant
statutory regulations.
You thus full your statutory obligations and contribute to protection of the environment.
Technical data
Power supply ................................ via USB, 5 V/DC 500 mA
Keyboard layout ............................ 105 standard keys, German layout, 12 multimedia
functions
Key lifespan .................................. 50,000,000 cycles
System requirements .................... Windows® XP (Home, Pro, with SP1, SP2, SP3) (32 bit),
Vista™ (32 bit), 7 (32/64 bit), 8.0 (32/64 bit), 8.1 (32/64 bit),
10.0 (32/64 bit), RT
Operating conditions ..................... 0 to +40 °C, 10–90 % relative humidity (non-condensing)
Storage conditions ........................ 0 to +65 °C, 10–90 % relative humidity (non-condensing)
Dimensions (L x W x H) ................ 444 x 146 x 41 mm
Weight .......................................... 1 kg
• Select a function for the key from the "Function key setting" drop-down menu.
• Conrm the function with “OK” and click "Apply". The button is now dened with the selected
function.
You can congure the key assignments for each of the three proles (M1, M2 and
M3) as desired. Repeat these settings for the other proles. After conguring the
settings, you can change the prole to quickly select a user-dened keyboard
assignment.
This is a publication by Conrad Electronic SE, Klaus-Conrad-Str. 1, D-92240 Hirschau (www.conrad.com).
All rights including translation reserved. Reproduction by any method (e.g. photocopying, microlming or the capture in
electronic data processing systems) requires prior written approval from the editor. Reprinting, also in part, is prohibited.
This publication represent the technical status at the time of printing.
Copyright 2018 by Conrad Electronic SE. *1647063_v1_0718_02_DS_m_2L_(1)
 Loading...