

D
Bedienungsanleitung
Raspberry Pi® RS232 Erweiterungsplatine
Best.-Nr.
Bestimmungsgemäße Verwendung
Das Produkt erweitert Ihren Raspberry Pi® um einen seriellen RS232-Port.
Es ist für den Anschluss an die GIPO-Ausgänge TX und RX des Raspberry Pi® vorge-
sehen.
Es ist keine Treiberinstallation erforderlich.
Die Spannungsversorgung erfolgt über Ihren Raspberry Pi® (4-Pin Anschluss) oder
über die Steuerleitung RI an der seriellen Buchse.
Lesen Sie sich diese Bedienungsanleitung vollständig und aufmerksam durch, sie
enthält viele wichtige Informationen zum Betrieb und Bedienung. Beachten Sie alle
Sicherheitshinweise!
Lieferumfang
• Erweiterungsplatine
• 4-Pin Kabel (180 mm Länge)
• 4x Schraube M2,5
• 4x Mutter
• 4x Abstandshalter
• Bedienungsanleitung
1. Öffnen Sie die Internetseite www.conrad.com/downloads in
einem Browser oder scannen Sie den rechts abgebildeten
QR-Code.
2. Wählen Sie den Dokumententyp und die Sprache aus und geben Sie dann die entsprechende Bestellnummer in das Suchfeld ein. Nach dem Start des Suchvorgangs können Sie die
gefundenen Dokumente herunterladen.
Sicherheitshinweise
Bei Schäden, die durch Nichtbeachten dieser Bedienungsanleitung verur-
Bei Sach- oder Personenschäden, die durch unsachgemäße Handhabung
Sehr geehrte Kundin, sehr geehrter Kunde,
die folgenden Sicherheits- und Gefahrenhinweise dienen nicht nur zum
• Bei Berührung und beim Anschluss der Platine sind geeignete Schutz-
• Das Produkt ist nur für trockene, geschlossene Innenräume geeignet. Es
• Schützen Sie das Produkt vor Kälte, Hitze, direkter Sonneneinstrahlung,
• Gehen Sie vorsichtig mit dem Produkt um; durch Stöße, Schläge oder dem
• Das Produkt ist kein Spielzeug und gehört nicht in Kinderhände. Platzieren
• Lassen Sie das Gerät, sowie das Verpackungsmaterial nicht achtlos lie-
1420550
Aktuelle Bedienungsanleitungen:
sacht werden, erlischt die Gewährleistung/Garantie. Für Folgeschäden
übernehmen wir keine Haftung!
oder Nichtbeachten der Sicherheitshinweise verursacht werden, übernehmen wir keine Haftung. In solchen Fällen erlischt die Gewährleistung/
Garantie!
Schutz Ihrer Gesundheit, sondern auch zum Schutz des Geräts. Lesen Sie
sich bitte die folgenden Punkte aufmerksam durch:
maßnahmen gegen statische Aufladung zu treffen (z.B. Erdungsband,
nichtleitende Unterlage usw.).
darf nicht feucht oder nass werden, andernfalls kann es beschädigt werden.
Staub und Schmutz.
Fall aus bereits geringer Höhe wird es beschädigt.
Sie das Produkt so, dass es von Kindern nicht erreicht werden kann.
gen, dieses könnte für Kinder zu einem gefährlichen Spielzeug werden.
Anschluss und Inbetriebnahme
• Befestigen Sie als erstes die Erweiterungsplatine, soweit möglich, an Ihrem Raspberry Pi® oder an dem Gehäuse, wo Sie diese einbauen wollen.
Achten Sie auf jeden Fall besonders darauf, dass die Erweiterungsplatine,
z.B. durch Kontakt zu Ihrem Raspberry Pi®, keinen Kurzschluss verursacht!
• Falls Ihr Raspberry Pi® eingeschaltet ist,
schalten Sie diesen zuerst aus und entfernen die Spannungsversorgung.
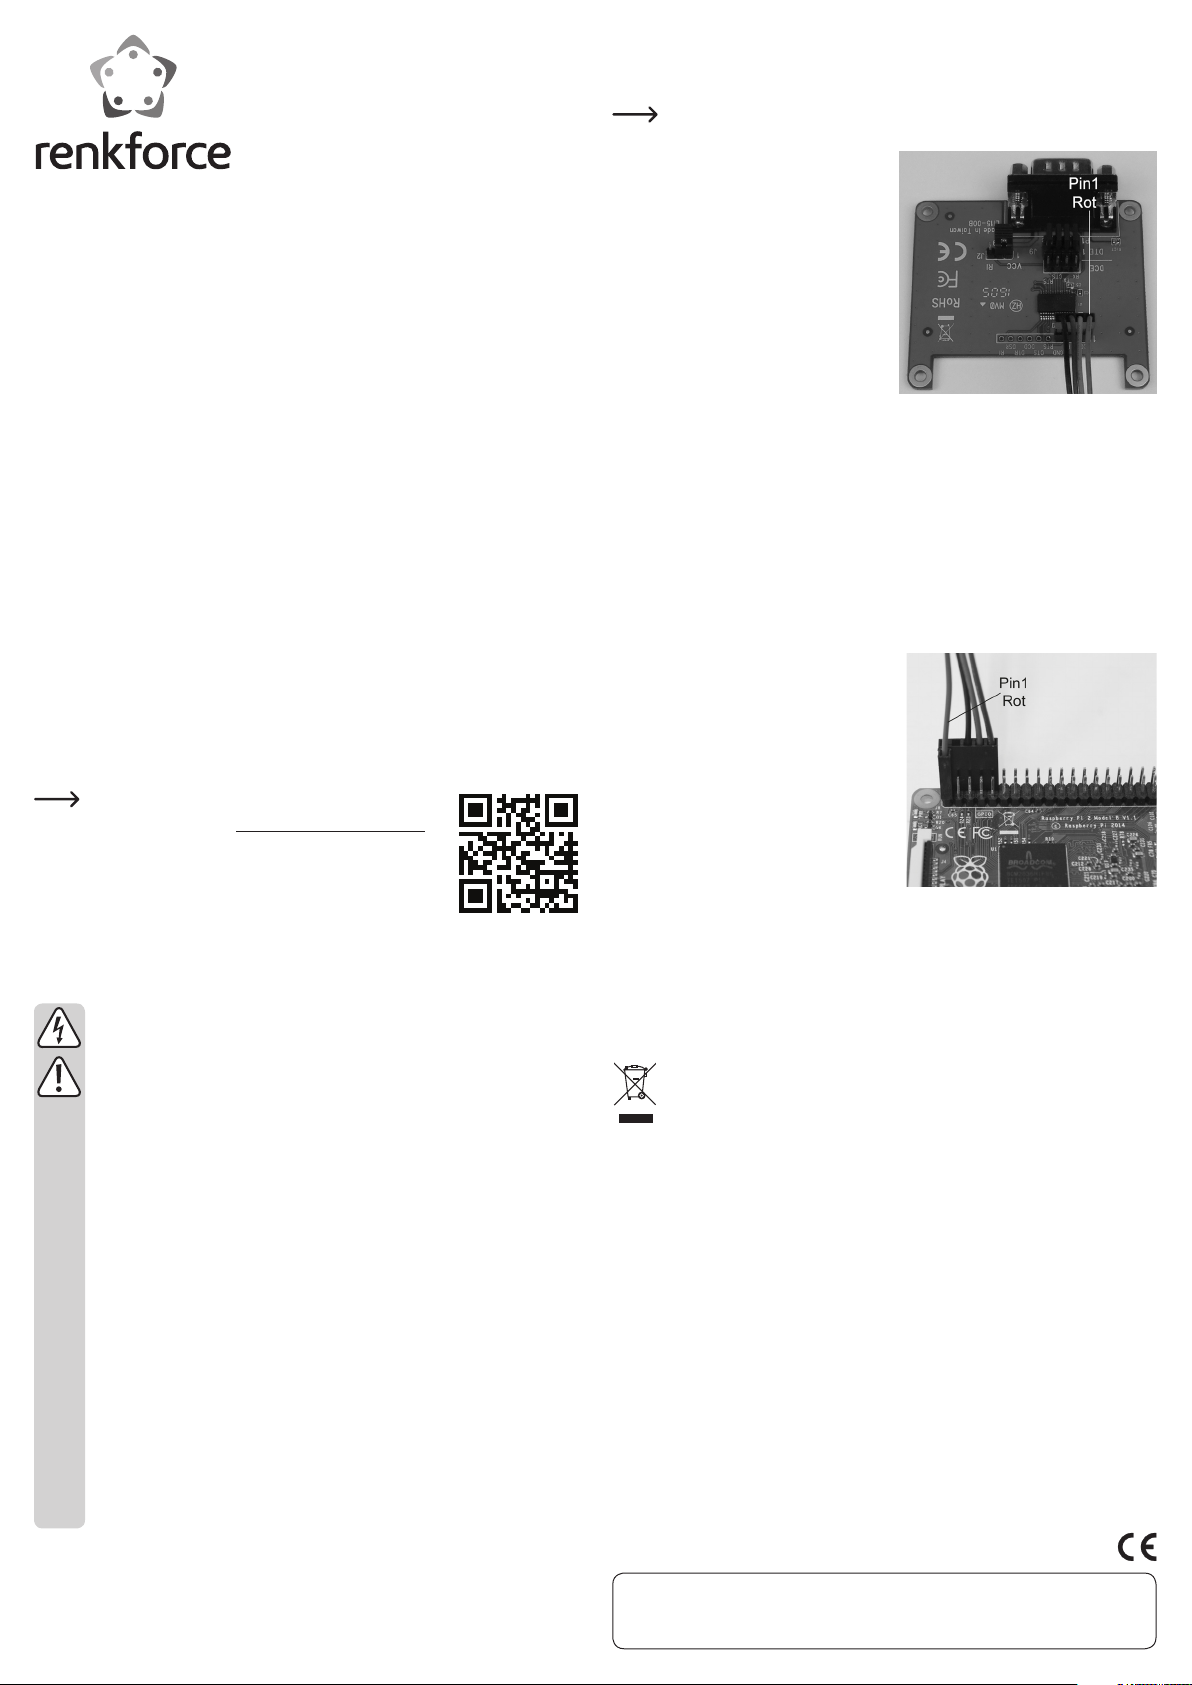
• Verbinden Sie den 4-poligen Stecker des
beiliegenden Anschlusskabels mit der
4-poligen Anschlussleiste der RS232Platine.
Achten Sie dabei auf die richtige Bele-
gung. Die Ausrichtung des Steckers auf
der Platine muss wie auf dem rechten
Bild sein.
(VCC = Rot (Pin1 von rechts) = 3,3 V/DC;
TX = Grün (Pin2 von rechts) = Datenleitungen; RX = Braun (Pin3 von rechts) = Datenleitungen; GND = Schwarz (Pin4 von
rechts) = Masse)
• Mit dem 4 Jumpern J9 können Sie das TX und RX Signal auf der 9-poligen Buchse
vertauschen. In der Standardeinstellung DTE (TX am Pin2 und RX am Pin3) brücken
alle 4 Jumper den jeweils mittleren Pin auf den Pin in Richtung 9-poliger Buchse.
Wenn Sie die Einstellung auf DCE (TX am Pin3 und RX am Pin2) wechseln wollen,
stecken Sie alle 4 Jumper so um, dass jeweils der mittlere Pin auf den äußeren in
Richtung 4-Pin Anschluss gebrückt wird.
• Mit dem Jumper J2 können Sie die Spannungsversorgung von VCC (3,3 V/DC vom
Raspberry Pi®) auf die Steuerleitung RI am Pin9 der 9-poligen Buchse umschalten.
Ändern Sie einfach die Stellung des Jumpers von VCC auf RI.
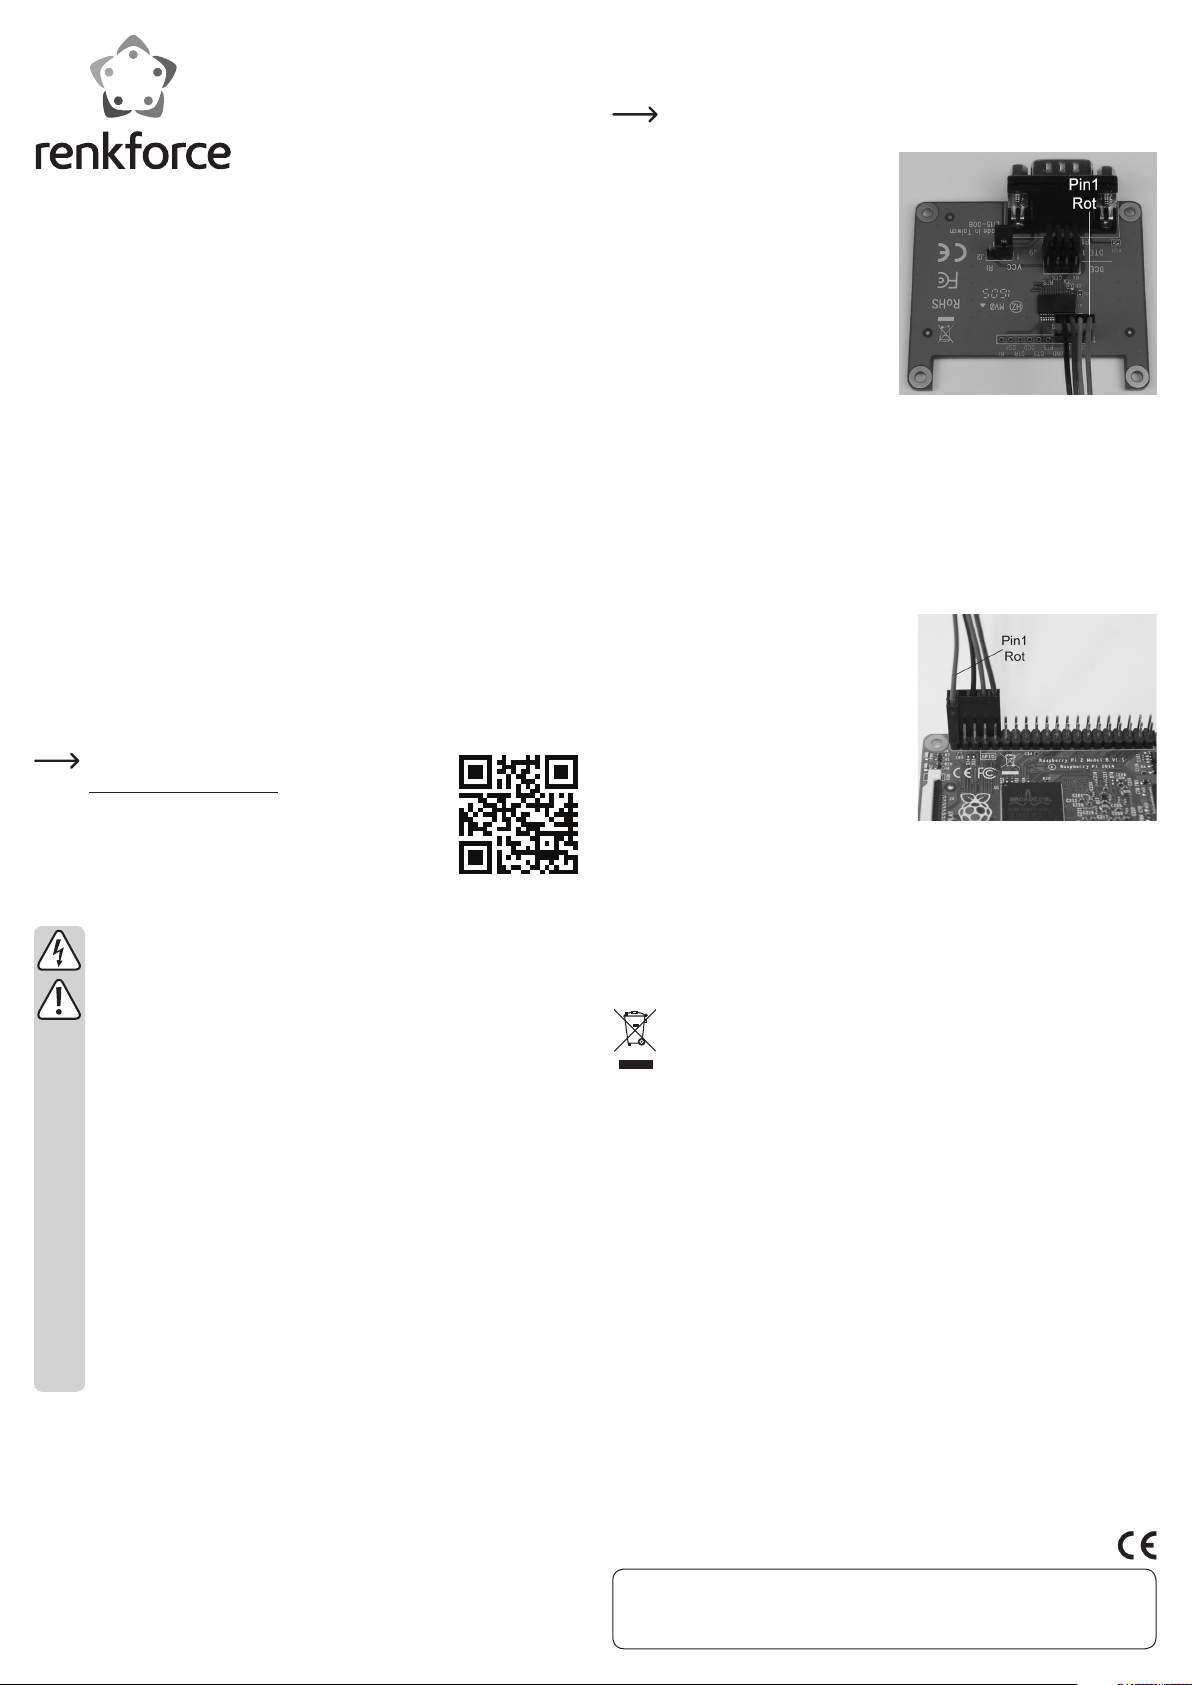
• Verbinden Sie den 5+1-poligen Stecker des
beiliegenden Anschlusskabels mit den
GIPO Anschlüssen von Ihrem Raspberry
Pi®.
Achten Sie dabei wieder auf die richtige
Belegung. Die Ausrichtung des Steckers
auf dem Raspberry Pi® muss so wie auf
dem rechten Bild sein. Der 5-polige Stecker muss auf Pin2 bis Pin10 des Raspberry Pi®, der einzelne Pin1 (rot) vom Kabel
muss auf den Pin1 vom Raspberry Pi®.
(Rot = Pin1 (links vorne im Bild) (3,3 V/
DC); Schwarz = Pin6 (Masse); Grün = Pin8 (GIPO14, TXD0 (UART)); Braun = Pin10
(GIPO15, RXD0 (UART))
• Die RS232-Platine wird von Ihrem Raspberry Pi® automatisch erkannt und installiert.
Ein externer Treiber ist nicht erforderlich.
Je nach Betriebssystem kann es aber sein, dass Sie die Schnittstelle zuerst im Sys-
tem anmelden bzw. konfigurieren müssen.
Entsorgung
Elektronische und elektrische Produkte dürfen nicht in den Hausmüll.
Entsorgen Sie das unbrauchbar gewordene Produkt gemäß den geltenden
gesetzlichen Bestimmungen.
Technische Daten
Spannungsversorgung ...................... über 4-Pin Anschluss oder RI
Betriebsspannung.............................. 3,3 V/DC, (2,7 - 5,25 V/DC)
Unterstützte Betriebssysteme .........
Anschlüsse.......................................... RS232 9-polig; 4-Pin Anschluss
Max. Baud-Rate ................................. 320 KBit
Abmessungen (B x T x H).................. 66 x 56 x 19 mm
Gewicht................................................ 20 g (nur die Platine inkl. Jumper)
Betriebsbedingungen ........................ 5 °C bis +50 °C; 20% bis 80% relative Luftfeuchte
Lagerbedingungen ............................. -25 °C bis +70 °C; 15% bis 90% relative Luftfeuchte
Windows® XP ab SP1 (nur 32 Bit); Windows VistaTM,
Windows® 7, Windows® 8.1, Windows® 10, (32 und
64 Bit); Windows® RT; MacOS; Linux
Dies ist eine Publikation der Conrad Electronic SE, Klaus-Conrad-Str. 1, D-92240 Hirschau (www.conrad.com).
Alle Rechte einschließlich Übersetzung vorbehalten. Reproduktionen jeder Art, z. B. Fotokopie, Mikroverfilmung, oder die Erfassung in
elektronischen Datenverarbeitungsanlagen, bedürfen der schriftlichen Genehmigung des Herausgebers. Nachdruck, auch auszugsweise, verboten. Die Publikation entspricht dem technischen Stand bei Drucklegung.
© Copyright 2016 by Conrad Electronic SE.
G
Operating instructions
Raspberry Pi® RS232 expansion board
Item no.
Intended Use
The product extends your Raspberry Pi® by one serial RS232 port.
It is designed for connection to TX and RX GIPO outputs of Raspberry Pi®.
A driver installation is not necessary.
Power is supplied by your Raspberry Pi® (4-pin connection) or through the RI control
wire on the serial port.
Read these operating instructions carefully. They contain important information about
operation and use. Observe all safety instructions!
Package Contents
• Expansion card
• 4-pin cable (180 mm length)
• 4x screws M2.5
• 4x nuts
• 4x spacers
• Operating instructions
1. Open www.conrad.com/downloads in a browser or scan the
displayed QR code.
2. Select document type and language and enter the item number into the search field. After submitting the query you can
download displayed records.
Safety Instructions
The warranty will be void in the event of damage caused by failure to ob-
We do not assume any liability for personal injuries and material damages
Dear customer,
the following safety instructions and hazard warnings are intended not only
• When touching or connecting the board, appropriate safety precautions
• The product is only suitable for dry, enclosed indoor areas. It must not get
• Protect the product from cold, heat, direct sunlight, dust and dirt.
• Handle the product with care; it may be damaged by impacts, blows, or
• The product is not a toy and it should be kept out of the reach of children.
• Do not leave packaging material carelessly lying around, since it could
1420550
Up-to-date operating instructions:
serve these safety instructions. We do not assume any liability for any resulting damage!
caused by the improper use or non-compliance with the safety instructions.
In such cases, the warranty will be null and void!
to protect your health but also to protect the device. Please read the following points carefully:
against static charge should be taken (e.g., earth connection, insulating
support, etc.).
damp or wet, as this would damage it.
accidental falls, even from a low height.
Position the product so it is out of the reach of children.
become a dangerous plaything for children.
Connection and Start-up
• First of all, fasten the expansion card, if possible, to your Raspberry Pi® or to the
housing where you want to install it.
In any case, make sure especially that the expansion card does not cause a
short circuit (e.g., through contact with your Raspberry Pi®)!
• If your Raspberry Pi® is switched on, first
switch it off, disconnect and remove the
voltage supply.
• Connect the 4-pin plug of the connecting
cable included with the 4-pin terminal
strip of the RS232 board.
Please pay attention to the correct al-
location. Orientation of the plug on the
board should be like on the right figure.
(VCC = red (Pin1 from right) = 3,3 V/DC;
TX = green (Pin2 from right) = data lines;
RX = brown (Pin3 from right) = data lines;
GND = black (Pin4 from right) = earth)
• Using the 4 J9 jumpers, you can switch the TX and RX signal to the 9-pin socket. In
the standard setting DTE (TX at Pin2 and RX at Pin3), all 4 jumpers bridge the respective centre pin to the pin in the direction of the 9-pin socket.
If you want to change the setting to DCE (TX at Pin3 and RX at Pin2), rearrange all 4
jumpers so that the centre pin is always bridged to the outside pin in the direction of
the 4-pin connection.
• Using the J2 jumper, you can switch the power supply from VCC (3,3 V/DC from the
Raspberry Pi®) on the RI control wire to Pin9 of the 9-pin socket. Simply change the
setting of the jumper from VCC to RI.
• Connect the 5+1-pin plug of the provided
connection cable to the GIPO connectors of
your Raspberry Pi®.
And again, pay attention to the correct al-
location. Orientation of the plug on the Raspberry Pi® should be about the same as on
the right figure. The 5-pin plug belongs to
pin2 to pin10 of the Raspberry Pi®, the individual pin1 (red) of the cable belongs to pin1
of the Raspberry Pi®.
(Red = pin1 (left front in figure) (3.3 V/DC);
black = Pin6 (earth); green = Pin8 (GIPO14,
TXD0 (UART)); brown = Pin10 (GIPO15, RXD0 (UART))
• The RS232 board will be automatically recognized and installed by your Raspberry
Pi®. An external driver is not necessary.
Depending on the operating system, it may be necessary to register and configure
the port in the operating system first.
Disposal
Electrical and electronic equipment does not belong in the regular household
waste.
Dispose of the waste product in accordance with the applicable legal regu-
lations.
Technical Data
Power supply ...................................... through 4-pin connector or RI
Operating voltage............................... 3,3 V/DC, (2.7 - 5.25 V/DC)
Supported operating systems .......... Windows® XP from SP1 (only 32 bit), Windows
Vista™, Windows® 7, Windows® 8.1; Windows® 10
(32 and 64 bit); Windows® RT; MacOS, Linux
Connectors .......................................... 9-pole RS232; 4-pin connector
Max. baud rate ................................... 320 kbps
Dimensions (W x H x D)..................... 66 x 56 x 19 mm
Weight .................................................. 20 g (card only, incl. jumpers)
Operating conditions ......................... 5 °C to +50 °C; 20% to 80% relative humidity
Storage conditions............................. -25 °C to +70 °C; 15% to 90% relative humidity
This is a publication by Conrad Electronic SE, Klaus-Conrad-Str. 1, D-92240 Hirschau (www.conrad.com).
All rights including translation reserved. Reproduction by any method, e.g. photocopy, microfilming, or the capture in electronic data
processing systems require the prior written approval by the editor. Reprinting, also in part, is prohibited. This publication represent
the technical status at the time of printing.
© Copyright 2016 by Conrad Electronic SE.

F
Mode d‘emploi
Carte d’extension Raspberry Pi® RS232
N° de commande
Utilisation conforme
Ce produit ajoute un port en série RS232 à votre Raspberry Pi® .
Il est prévu pour le raccordement aux sorties GIPO TX et RX du Raspberry Pi®.
Aucune installation de pilote n‘est requise.
L‘alimentation en tension a lieu via votre Raspberry Pi® (connecteur à 4 broches) ou
bien via la ligne de commande RI à la douille en série.
Lisez attentivement l’intégralité du présent mode d’emploi qui contient un grand nom-
bre d’informations importantes concernant la commande et le fonctionnement du produit. Respectez toutes les consignes de sécurité !
Étendue de la livraison
• Carte d’extension
• Câble à 30 broches (180 mm longueur)
• 4 vis M2,5
• 4 écrous
• 4 entretoises
• Mode d‘emploi
Mode d‘emploi actualisé :
1. Ouvrez la page Internet www.conrad.com/downloads dans
votre navigateur ou scannez le code QR indiqué à droite.
2. Sélectionnez le type de document et la langue puis saisissez
le numéro de commande correspondant dans le champ de
recherche. Une fois la recherche commencée, vous pouvez
télécharger les documents trouvés.
Consignes de sécurité
Tout dommage causé par le non-respect du présent mode d‘emploi entraîne
l‘annulation de la garantie. Nous déclinons toute responsabilité pour les
dommages consécutifs !
De même, nous déclinons toute responsabilité en cas de dommages maté-
riels ou corporels résultant d‘une mauvaise manipulation de l‘appareil ou
d‘un non-respect des consignes de sécurité. Dans de tels cas, la garantie
prend fin !
Chère cliente, cher client,
les consignes de sécurité et les avertissements qui suivent ne sont pas
uniquement destinés à protéger votre santé mais également à protéger
l‘appareil. Veuillez lire attentivement les points suivants :
• En cas de contact et lors du raccordement de la platine, il convient de
prendre des mesures de précaution appropriées contre les charges
d‘électricité statique (p. ex. ruban de mise à la terre, support non conducteur, etc.).
• Le produit ne doit être utilisé qu‘à l‘intérieur de locaux fermés et secs. Le
produit ne doit être ni humide ni mouillé, cela l‘endommagerait.
• Protégez le produit du froid, de la chaleur, de la lumière directe du soleil,
de la poussière et de la saleté.
• Cet appareil doit être manipulé avec précaution ; les coups, les chocs ou
une chute, même de faible hauteur, peuvent l‘endommager.
• Le produit n‘est pas un jouet et ne doit pas arriver dans des mains
d‘enfants. Placez le produit de manière à le mettre hors de portée des
enfants.
• Ne laissez jamais traîner le matériel d‘emballage sans surveillance, il
pourrait constituer un jouet dangereux pour les enfants.
1420550
Raccordement et mise en service
• Fixez tout d‘abord la platine d‘extension, si possible sur votre Raspberry Pi® ou sur
le boîtier où vous souhaitez la monter.
Veillez en tous cas à ce que la platine d‘extension ne cause pas de court-
circuit, par ex. par un contact avec votre Raspberry Pi® !
• Si votre Raspberry Pi® est en service, éteignez-le d‘abord et coupez l‘alimentation
électrique.
• Reliez la fiche 4 pôles du câble de raccordement fourni à la barre de connexion à 4
pôles de la platine RS232.
Veillez à ce que la polarité soit correcte.
L‘orientation de la fiche sur la platine doit
correspondre à ce qui est représenté sur
l‘image.
(VCC = rouge (broche1 de droite) = 3,3 V/DC ;
TX = vert (broche 2 de droite) = conducteurs de données ; RX = brun (broche
3 de droite) = conducteurs de données ;
GND = noir (broche 4 de droite) = masse)
• Avec les 4 cavaliers J9 vous pouvez échanger le signal TX et RX sur la douille
9 pôles. Dans le réglage par défaut DTE (TX à la broche 2 et RX à la broche 3), les
4 cavaliers relient chaque broche centrale à la broche en direction de la douille à
9 pôles.
Si vous souhaitez modifier le réglage sur DCE (TX à la broche 3 et RX à la broche 2),
branchez les 4 cavaliers de sorte que la broche centrale soit reliée à la connexion à
4 broches vers l‘extérieur.
• Le cavalier J2 permet de commuter l‘alimentation en tension de VCC (3,3 V/DC du
Raspberry Pi®) sur la ligne de commande RI à la broche 9 de la douille à 9 broches.
Modifiez simplement la position du cavalier de VCC sur RI.
• Reliez la fiche 5+1 pôles du câble de raccordement fourni aux connecteurs GIPO
de votre Raspberry Pi®.
Veillez à ce que la polarité soit correcte.
L‘orientation de la fiche sur Raspberry Pi®
doit correspondre à ce qui est représenté sur l‘image. Le connecteur à 5 broches
doit être placé sur les broches 2 à 10 du
Raspberry Pi®, la broche 1 (rouge) du câble doit se placer sur la broche 1 du Raspberry Pi®.
(Rouge = broche 1 (devant à gauche sur
l‘image) (3,3 V/DC); noir = broche 6 (masse) ; vert = broche 8 (GIPO14, TXD0 (UART)) ;
brun = broche 10 (GIPO15 , RXD0 (UART))
• La platine RS232 est détectée et installée automatiquement par votre Raspberry Pi®.
Un pilote externe n‘est pas nécessaire.
Selon le système d‘exploitation il est possible que vous deviez enregistrer ou confi-
gurer l‘interface dans le système.
Élimination
Les appareils électriques et électroniques ne doivent pas être jetés avec les
ordures ménagères.
Si le produit est devenu inutilisable, il convient alors de procéder à son éli-
mination conformément aux dispositions légales en vigueur.
Caractéristiques techniques
Alimentation électrique....................via connexion 4 broches ou RI
Tension de service ............................3,3 V/DC, (2,7 - 5,25 V/DC)
Systèmes d‘exploitation
pris en charge.................................... Windows® XP à partir de SP1 (32 bits seule-
ment) ; Windows VistaTM, Windows® 7, Windows®
8.1, Windows® 10, (32 et 64 bits) ; Windows® RT ;
MacOS ; Linux
Connecteurs.......................................RS232 9 pôles ; connecteur 4 broches
Débit max. en bauds ........................320 kbits
Dimensions (L x P x H) ......................66 x 56 x 19 mm
Poids.................................................... 20 g (la platine uniquement y compris les cavaliers)
Conditions de fonctionnement ........ de 5 °C à +50 °C ; de 20% à 80% d‘humidité relative
de l‘air
Conditions de stockage.................... de -25 °C à +70 °C, de 15% à 90% d‘humidité relative
Ceci est une publication de Conrad Electronic SE, Klaus-Conrad-Str. 1, D-92240 Hirschau (www.conrad.com).
Tous droits réservés, y compris de traduction. Toute reproduction, quelle qu‘elle soit (p. ex. photocopie, microfilm, saisie dans des
installations de traitement de données) nécessite une autorisation écrite de l‘éditeur. Il est interdit de le réimprimer, même par extraits.
Cette publication correspond au niveau technique du moment de la mise sous presse.
© Copyright 2016 by Conrad Electronic SE.

O
Gebruiksaanwijzing
Raspberry Pi® RS232 uitbreidingskaart
Bestelnr.
Beoogd gebruik
Het product breidt uw Raspberry Pi® uit met een seriële RS232-poort.
Deze is bedoeld voor de aansluiting op de GIPO-uitgangen en TX en RX van de Ras-
pberry Pi®.
Een installatie van een besturingsprogramma is niet noodzakelijk.
De stroomaansluiting gebeurt via uw Raspberry Pi® (4-pin aansluiting) of de stroom-
kabel RI op de seriële poort.
Lees deze gebruiksaanwijzing volledig en zorgvuldig door; deze bevat veel belangrijke
instructies voor het gebruik en de bediening. Neem alle veiligheidsvoorschriften in
acht!
Inhoud van de verpakking
• Uitbreidingskaart
• 4-Pinkabel (180 mm lengte)
• 4x Schroef M2,5
• 4x Moeren
• 4x Afstandhouders
• Gebruiksaanwijzing
1. Open www.conrad.com/downloads in een browser of scan
de afgebeelde QR-code.
2. Kies het documententype en de taal en vul het productnummer in het zoekveld in. Nadat u de zoekopdracht heeft uitgevoerd, kunt u de weergegeven documenten downloaden.
Veiligheidsvoorschriften
Bij schade die wordt veroorzaakt door het niet in acht nemen van deze
Wij aanvaarden geen aansprakelijkheid voor materiële schade of persoon-
Geachte klant,
de volgende veiligheidsvoorschriften en informatie over de gevaren dienen
• Neem bij het aanraken en het aansluiten van de printplaat passende be-
• Het product is uitsluitend geschikt voor droge, gesloten ruimten bin-
• Bescherm het product tegen kou, hitte, direct zonlicht, stof en vuil.
• Behandel het product voorzichtig; door stoten, schokken of een val - zelfs
• Het product is geen speelgoed en dient uit de buurt van kinderen te wor-
• Laat het apparaat alsmede het verpakkingsmateriaal niet rondslingeren,
1420550
Geactualiseerde gebruiksinstructies:
gebruiksaanwijzing, vervalt het recht op waarborg/garantie. Voor gevolgschade aanvaarden wij geen enkele aansprakelijkheid.
lijk letsel veroorzaakt door ondeskundig gebruik of het niet opvolgen van
de veiligheidsaanwijzingen! In dergelijke gevallen vervalt de waarborg/
garantie!
niet alleen ter bescherming van uw eigen gezondheid, maar ook ter bescherming van het apparaat. Lees onderstaande punten aandachtig door:
schermende maatregelen tegen statische ontlading (bijv. een aardingsband of een niet-geleidende ondergrond).
nenshuis. Het product mag niet vochtig of nat worden, anders kan het
beschadigd raken.
van geringe hoogte - kan het beschadigd raken.
den gehouden. Plaats het product zodanig dat kinderen er niet bij kunnen.
dit kan voor kinderen gevaarlijk speelgoed zijn.
Aansluiting en ingebruikname
• Bevestig voor zover mogelijk eerst de uitbreidingskaart op uw Raspberry Pi® of op
de behuizing waarop u deze wilt inbouwen.
Zorg er te allen tijde voor dat de uitbreidingskaart, bijv. door contact met uw
Raspberry Pi®, geen kortsluiting veroorzaakt!
• Mocht uw Raspberry Pi® aan staan, zet deze dan eerst uit en verwijder de voeding.
• Sluit de 4-polige stekker van de meegeleverde aansluitkabel aan op de 4-polige
klemkader van de RS232-printplaat.
Let hierbij op de juiste bezetting. Zie voor
de richting van de stekker op de printplaat de rechter afbeelding.
(VCC = rood (pin1 van rechts) = 3,3 V/DC;
TX = groen (pin 2 van rechts) = datakabels; RX = bruin (pin 3 van rechts) = datakabels; GND = zwart (pin 4 van rechts) =
massa)
• Met de 4 jumpers J9 kunt U het TX- en RX-signaal op de 9-polige stekker uitwisselen. In de standaardinstelling DTE (TX op pin 2 en RX op pin 3) verbinden alle 4 de
jumpers de middelste pin op de pin in de richting van de 9-polige stekker.
Wanneer u de instelling op DCE (TX op pin 3 en RX op pin 2) wilt wisselen, verwisselt
u alle 4 de jumper zo, dat de pin die zich nu in het midden bevindt met de buitenste
in de richting van de 4-pin wordt verbonden.
• Met de jumper J2 kunt u de stroomaanvoer van VCC (5 V/DC van de Raspberry Pi®)
op de stroomkabel RI op pin9 van de 9-polige stekker omschakelen. Verander gewoon de instelling van de jumper van VCC op RI.
• Sluit de 5+1-polige stekker van de meegeleverde aansluitkabel aan op de GIPOaansluitingen van uw Raspberry Pi®.
Let hierbij weer op de juiste bezetting. De
richting van de stekker op de Raspberry
Pi® moet ongeveer zo zijn als op de rechter afbeelding. De 5-polige stekker moet
op Pin2 tot Pin10 van de Raspberry Pi®, de
enkele Pin1 (rood) van de kabel moet op
de Pin1 van de Raspberry Pi®.
(rood = Pin1 (links voor in beeld)
(3,3 V/DC); zwart = pin 6 (massa); groen =
pin 8 (GIPO14, TXD0 (UART)); bruin = pin 10 (GIPO15, RXD0 (UART))
• De RS232-printplaat wordt door uw Raspberry Pi® automatisch herkend en geïnstalleerd. Een extern stuurprogramma is niet vereist.
Afhankelijk van het besturingssysteem kan het echter voorkomen, dat u de interface
eerst in het systeem moet aanmelden resp. configureren.
Afvalverwijdering
Elektronische en elektrische producten mogen niet via het normale huisvuil
worden verwijderd.
Is het product niet meer bruikbaar? Verwijder dan het product in over-
eenstemming met de geldende wettelijke bepalingen.
Technische gegevens
Voeding ........................................................ via 4-pin aansluiting
Bedrijfsspanning ........................................ 5 V/DC, (2,7 - 5,25 V/DC)
Ondersteunde besturingssystemen ........ Windows® XP ab SP1 (alleen 32 Bit); Win-
dows VistaTM, Windows® 7, Windows® 8.1,
Windows® 10, (32 en 64 Bit); Windows® RT;
MacOS; Linux
Aansluitingen .............................................. RS232 9-polig; 4-pin aansluiting
Max. Baud-rate .......................................... 320 KBit
Afmetingen (B x D x H) .............................. 66 x 56 x 19 mm
Gewicht........................................................ 20 g (alleen de printplaat)
Bedrijfsomgeving ....................................... 5 °C tot +50 °C; 20% tot 80% relatieve lucht-
vochtigheid
Opslagvoorwaarden .................................. -25 °C tot +70 °C; 15% tot 90% relatieve lucht-
vochtigheid
Dit is een publicatie van Conrad Electronic SE, Klaus-Conrad-Str. 1, D-92240 Hirschau (www.conrad.com).
Alle rechten, vertaling inbegrepen, voorbehouden. Reproducties van welke aard dan ook, bijvoorbeeld fotokopie, microverfilming of de
registratie in elektronische gegevensverwerkingsapparatuur, vereisen de schriftelijke toestemming van de uitgever. Nadruk, ook van
uittreksels, verboden. De publicatie voldoet aan de technische stand bij het in druk bezorgen.
© Copyright 2016 by Conrad Electronic SE. V3_0516_02/VTP
 Loading...