

Renishaw OMM-S SPRINT, OSI-S SPRINT Installation Manual

OSI-S interface and OMM-S receiver
Installation guide
H-5465-8540-05-A

Renishaw part no: H-5465-8540-05-A
First issued: 06.2014
Revised: 03.2019
© 2014–2019 Renishaw plc. All rights reserved.
This document may not be copied or reproduced
in whole or in part, or transferred to any other
media or language, by any means, without the
prior written permission of Renishaw.
The publication of material within this document
does not imply freedom from the patent rights of
Renishaw plc.

i
Contents
Before you begin .............................................................1.1
Before you begin ............................................................1.1
Disclaimer ..............................................................1.1
Trade marks .............................................................1.1
Warranty ................................................................1.1
Changes to equipment .....................................................1.1
CNC machines ...........................................................1.1
Care of the system components .............................................1.1
Patents .................................................................1.2
OSI-S EU declaration of conformity .............................................1.3
OMM-S EU declaration of conformity ............................................1.3
WEEE directive .............................................................1.3
REACH regulation ...........................................................1.3
FCC information to the user (USA only) ..........................................1.3
Safety ....................................................................1.4
OSI-S with OMM-S system basics ............................................2.1
Introduction ................................................................2.1
OSI-S with OMM-S system ....................................................2.2
OSI-S components ..........................................................2.3
Status LED ..............................................................2.3
OSI-S dimensions ...........................................................2.4
OSI-S specification ..........................................................2.5
OMM-S components .........................................................2.6
Power LED (red) ..........................................................2.6
Transmitter (Tx) LED (yellow) and receiver (Rx) LED (green) .......................2.6
OMM-S dimensions ..........................................................2.7
OMM-S specification .........................................................2.7
Optional mounting bracket dimensions ...........................................2.7

OSI-S/OMM-S installation guide
ii
Contents
System installation ...........................................................3.1
Installing the OSI-S and OMM-S ................................................3.1
Typical installation ........................................................3.1
Installing the OSI-S .......................................................3.2
Mounting the OSI-S .......................................................3.3
System performance with the OSP60 probe ....................................3.4
OSI-S output waveforms ...................................................3.5
Example connection diagram ................................................3.6
Cables and connectors. . . . . . . . . . . . . . . . . . . . . . . . . . . . . . . . . . . . . . . . . . . . . . . . . . . . . 3.7
Installing the OMM-S ......................................................3.8
Mounting the OMM-S ......................................................3.9
Cable sealing ...........................................................3.10
Fitting flexible conduit .....................................................3.10
Maintenance .................................................................4.1
OSI-S maintenance ..........................................................4.1
OMM-S maintenance ........................................................4.1
Cleaning the interface ........................................................4.1
Removing the OMM-S window .................................................4.2
Fitting the OMM-S window ....................................................4.2
Fault-finding .................................................................5.1
Parts list .....................................................................6.1

1.1
Before you begin
Changes to equipment
Renishaw reserves the right to change equipment
specifications without notice.
CNC machines
CNC machine tools must always be operated by
fully trained personnel in accordance with the
manufacturer’s instructions.
Care of the system components
Keep system components clean and treat with
care. Do not apply labels to the front of the
OMM-S window or otherwise obstruct the window.
Before you begin
Disclaimer
RENISHAW HAS MADE CONSIDERABLE
EFFORTS TO ENSURE THE CONTENT OF THIS
DOCUMENT IS CORRECT AT THE DATE OF
PUBLICATION BUT MAKES NO WARRANTIES
OR REPRESENTATIONS REGARDING
THE CONTENT. RENISHAW EXCLUDES
LIABILITY, HOWSOEVER ARISING, FOR ANY
INACCURACIES IN THIS DOCUMENT.
Trade marks
RENISHAW and the probe symbol used in the
RENISHAW logo are registered trade marks of
Renishaw plc in the United Kingdom and other
countries. apply innovation and names and
designations of other Renishaw products and
technologies are trade marks of Renishaw plc or
its subsidiaries.
All other brand names and product names used
in this document are trade names, trade marks, or
registered trade marks of their respective owners.
Warranty
Equipment requiring attention under warranty
must be returned to your equipment supplier.
Unless otherwise specifically agreed in writing
between you and Renishaw, if you purchased
the equipment from a Renishaw company, the
warranty provisions contained in Renishaw’s
CONDITIONS OF SALE apply. You should consult
these conditions in order to find out the details
of your warranty but, in summary, the main
exclusions from the warranty are if the equipment
has been:
• neglected, mishandled or inappropriately used;
or
• modified or altered in any way except with the
prior written agreement of Renishaw.
If you purchased the equipment from any other
supplier, you should contact them to find out what
repairs are covered by their warranty.

OSI-S/OMM-S installation guide
1.2
Before you begin
CN 100461049
CN 101166953
CN 101432592
CN 101622513
CN 103822603
CN 1278095
EP 1368615
EP 1440286
EP 1709498
EP 1877732
EP 2016370
EP 2115387
EP 2267563
EP 2447665
IN 2007/125306
IN WO2006/114603
JP 4062515
JP 5244786
JP 5274775
JP 5658863
JP 5905189
JP 6058109
JP 6058110
TW I424164
US 6810597
US 6909983
US 7055367
US 7866056
US 7885777
US 7900367
US 7970488
Patents
Features of the OMM-S and OSI-S, and other
similar Renishaw products, are the subject of one
or more of the following patents and/or patent
applications:
1.3
Before you begin
C
OSI-S
EU declaration of conformity
Renishaw plc declares under its sole responsibility
that the OSI-S is in conformity with all relevant
Union legislation.
The full text of the EU declaration of conformity is
available at:
www.renishaw.com/mtpdoc
OMM-S
EU declaration of conformity
Renishaw plc declares under its sole responsibility
that the OMM-S is in conformity with all relevant
Union legislation.
The full text of the EU declaration of conformity is
available at:
www.renishaw.com/mtpdoc
C
FCC information to the user
(USA only)
47 CFR Section 15.19
These devices comply with Part 15 of the FCC
Rules. Operation is subject to the following two
conditions:
1. These devices may not cause harmful
interference, and
2. These devices must accept any interference
received, including interference that may
cause undesired operation.
47 CFR Section 15.21
The user is cautioned that any changes or
modifications not expressly approved by
Renishaw plc or authorised representative could
void the user’s authority to operate the equipment.
47 CFR Section 15.105
This equipment has been tested and found to
comply with the limits for a Class A digital device,
pursuant to part 15 of the FCC Rules. These limits
are designed to provide reasonable protection
against harmful interference when the equipment
is operated in a commercial environment. This
equipment generates, uses, and can radiate
radio frequency energy and, if not installed
and used in accordance with the instruction
manual, may cause harmful interference to radio
communications. Operation of this equipment
in a residential area is likely to cause harmful
interference in which case the user will be
required to correct the interference at his own
expense.
WEEE directive
The use of this symbol on Renishaw products
and/or accompanying documentation indicates
that the product should not be mixed with
general household waste upon disposal. It is the
responsibility of the end user to dispose of this
product at a designated collection point for waste
electrical and electronic equipment (WEEE) to
enable reuse or recycling. Correct disposal of
this product will help to save valuable resources
and prevent potential negative effects on the
environment. For more information, please contact
your local waste disposal service or Renishaw
distributor.
REACH regulation
Information required by Article 33(1) of Regulation
(EC) No. 1907/2006 (“REACH”) relating to
products containing substances of very high
concern (SVHCs) is available at:
www.renishaw.com/REACH

OSI-S/OMM-S installation guide
1.4
Before you begin
Safety
Information to the user
In all applications involving the use of machine
tools or CMMs, eye protection is recommended.
The OMM-S has a glass window. Handle with care
if broken to avoid injury.
Information to the machine supplier/
installer
It is the machine supplier’s responsibility to ensure
that the user is made aware of any hazards
involved in operation, including those mentioned
in Renishaw product literature, and to ensure
that adequate guards and safety interlocks are
provided.
Under certain circumstances, the probe signal
may falsely indicate a probe seated condition. Do
not rely on probe signals to halt the movement of
the machine.
Information to the equipment installer
All Renishaw equipment is designed to comply
with the relevant EU and FCC regulatory
requirements. It is the responsibility of the
equipment installer to ensure that the following
guidelines are adhered to, in order for the product
to function in accordance with these regulations:
• any interface MUST be installed in a position
away from any potential sources of electrical
noise, i.e. power transformers, servo drives etc;
• all 0V/ground connections should be
connected to the machine “star point” (the “star
point” is a single point return for all equipment
ground and screen cables). This is very
important and failure to adhere to this can
cause a potential difference between grounds;
• all screens must be connected as outlined in
the user instructions;
• cables must not be routed alongside high
current sources, i.e. motor power supply cables
etc. or be near high-speed data lines;
• cable lengths should always be kept to a
minimum.
Equipment operation
If this equipment is used in a manner not specified
by the manufacturer, the protection provided by
the equipment may be impaired.
Optical safety
These products contain LEDs that emit both
visible and invisible light.
OSI-S and OMM-S are ranked Risk Group:
Exempt (safe by design).
These products were evaluated and classified
using the following standard:
BS EN 62471:2008 The photobiological
(IEC 62471:2006) safety of lamps and lamp
systems.
Renishaw recommends that you do not stare at or
look directly into any LED device, irrespective of
its risk classification.

2.1
Introduction
The OSI-S interface and OMM-S receiver are,
respectively, the machine interface and optical
receiver for use with the high-speed on-machine
contact scanning system for CNC machine tools,
an innovative high-speed analogue scanning
system that offers a new concept in part
measurement on machine tools.
The OSI-S manages data communications
between the components of the system and
the machine tool. Typically, it is mounted in the
controller cabinet so that it is close to the machine
I/O, from which it receives signals to synchronise
its operation with the running NC code. It is
connected via Ethernet to the controller’s PC front
end (or external data processor) to stream the
probe deflection data.
The OMM-S, which is powered directly by
the OSI-S, is designed to be mounted in the
machine environment and provide line-of-sight
communication with the OSP60 probe. When the
OSP60 probe is scanning, the stylus position data
is continuously streamed to the OMM-S. The data
stream is decoded by the OSI-S interface, where
it is buffered until requested by the software.
A second OMM-S can be connected to the OSI-S
to extend range, for example, in applications with
exceptionally long spindle travel; in applications
with rotating heads; or on large machines where
line-of-sight is difficult to maintain with a single
receiver.
The OMM-S can operate in one of four
transmission power levels that can be set within
the software. The power level of the OMM-S need
only be adjusted when it is likely that conflict could
occur from systems on adjacent machines.
Both the OMM-S and OSI-S use front panel
LEDs to provide a visual indication of their current
status.
All user-configuration settings of the OSI-S and
OMM-S, including optical transmission power
and I/O polarity, are adjusted using the scanning
software. No physical switches or adjustments are
required.
The OSI-S and OMM-S are only compatible with
the OSP60 probe, due to the sophisticated nature
of the optical transmission protocol.
OSI-S with OMM-S system basics
OSI-S/OMM-S installation guide
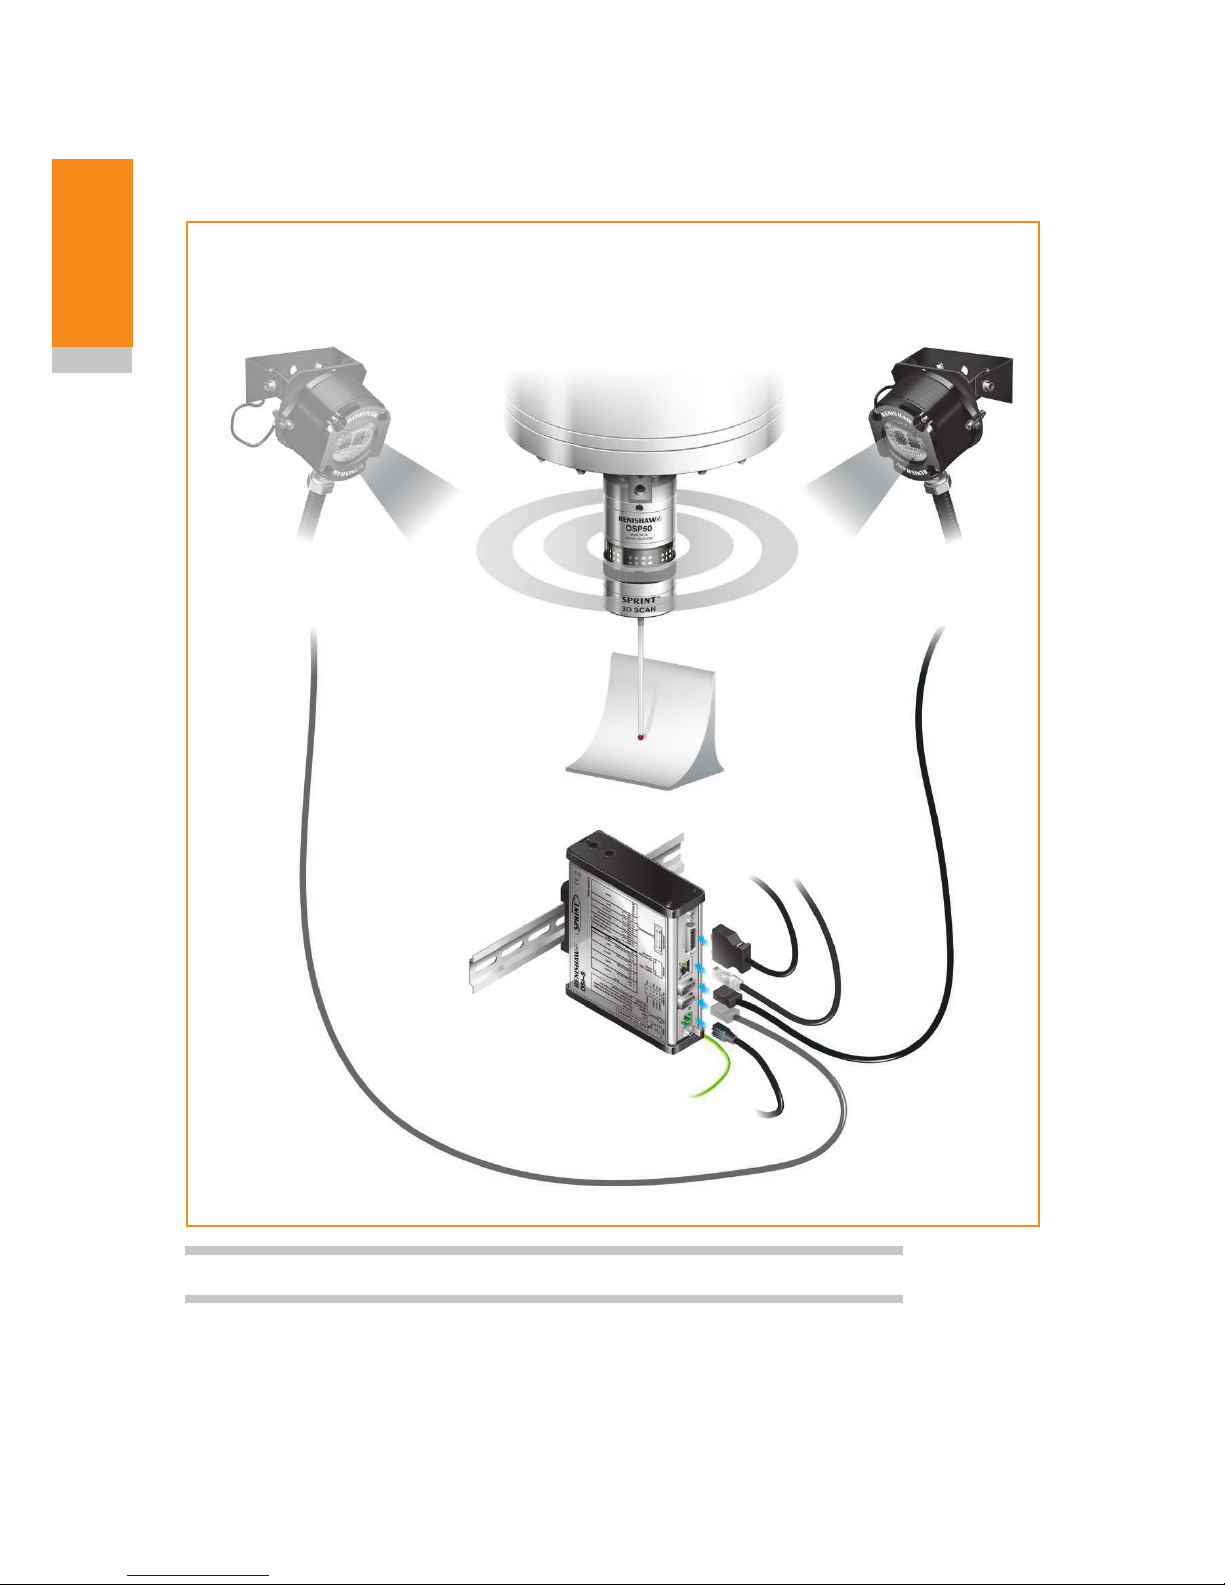
2.2
OSI-S with
OMM-S system
basics
OSI-S with OMM-S system
OMM-S (2)
(Optional)
OMM-S (1)
OSI-S
NC I/O
Earth
Powe r
OSP60
Controller’s PC front
end (or external
data processor)
IMPORTANT: Ensure OMM-S body is earthed to machine.
 Loading...