

Page 1

Timing Commander™ Software for VersaClock® 5 5P49V5901
USER GUIDE
Glossary
IDT Timing Commander Software – Executable file that will execute a personality, connect to a timing chip on an evaluation
board, and read or write Settings files.
Personality – Encrypted file with an extension .tcp. Used by IDT Timing Commander Software to determine the characteristics
for a specific family of timing devices. A personality file may refer to a single device or an entire family of similar devices. Please
contact IDT to obtain the most current version of a personality file for the devices of interest.
Settings File – Text file with extension .tcs. Written or read by IDT Timing Commander Software to save or restore a particular
setup for a specific version of a device personality and version of IDT Timing Commander Software. Settings files created with
newer versions of IDT Timing Commander Software or a device personality may not be compatible when read into older version
of IDT Timing Commander Software, or, if an older version of the personality is installed. Forward compatibility (older settings
files read by newer software and/or personality) will be maintained.
Bit Set – A single variable stored within the registers of the device. A bit set may use only part of a register or many span multiple
registers, but is thought of as a single field. For example, a 20-bit output divider ratio may be defined as a single bit set of length
20-bits, but may be stored in Register 0x4A, bits [3:0], Register 0x4B, bits [7:0] and Register 0x4c, bits [7:0].
Metadata – Variable used within the personality, but not stored directly in device registers. For example an input frequency is
generally not stored anywhere in a device's registers, but must be known to calculate register settings for the device.
Tooltip – context-sensitive pop-up that appears briefly as the mouse pointer hovers over an icon or element on the screen. These
are intended to provide useful information about the specific item being pointed to.
Val ue – When referring to any field that the user can edit, Value means the current internally-represented value of that field.
Default Value – When referring to any field that the user can edit, Default Value means the value recommended by the
personality for that field, taking into account the settings in other fields in the device. Changes of other fields may result in a
change to the Default Value. Whenever a field is unlocked, Default Value = Value. Only by locking a field can a user set a field
to a Value other than the Default Value or prevent a field's Value from changing if Default Value changes.
Display Value – A field may be controlled by a personality to display its Value or Default Value in a more meaningful way. For
example, if the Value is defined in MHz, but the actual value is 0.008MHz, the personality may choose to display this to the user
as 8KHz. In another example, if a bit set represents a divider ratio that can only be an even number and so does not implement
the Least Significant bit, the personality may choose to show a divider ratio of 2 when the bit set value is 1 (i.e., 1 increment of
divide-by-2).
REVISION D 10/02/15 1 ©2015 Integrated Device Technology, Inc.
Page 2
TIMING COMMANDER™ SOFTWARE FOR VERSACLOCK® 5 - 5P49V5901
1
2
3
456
789
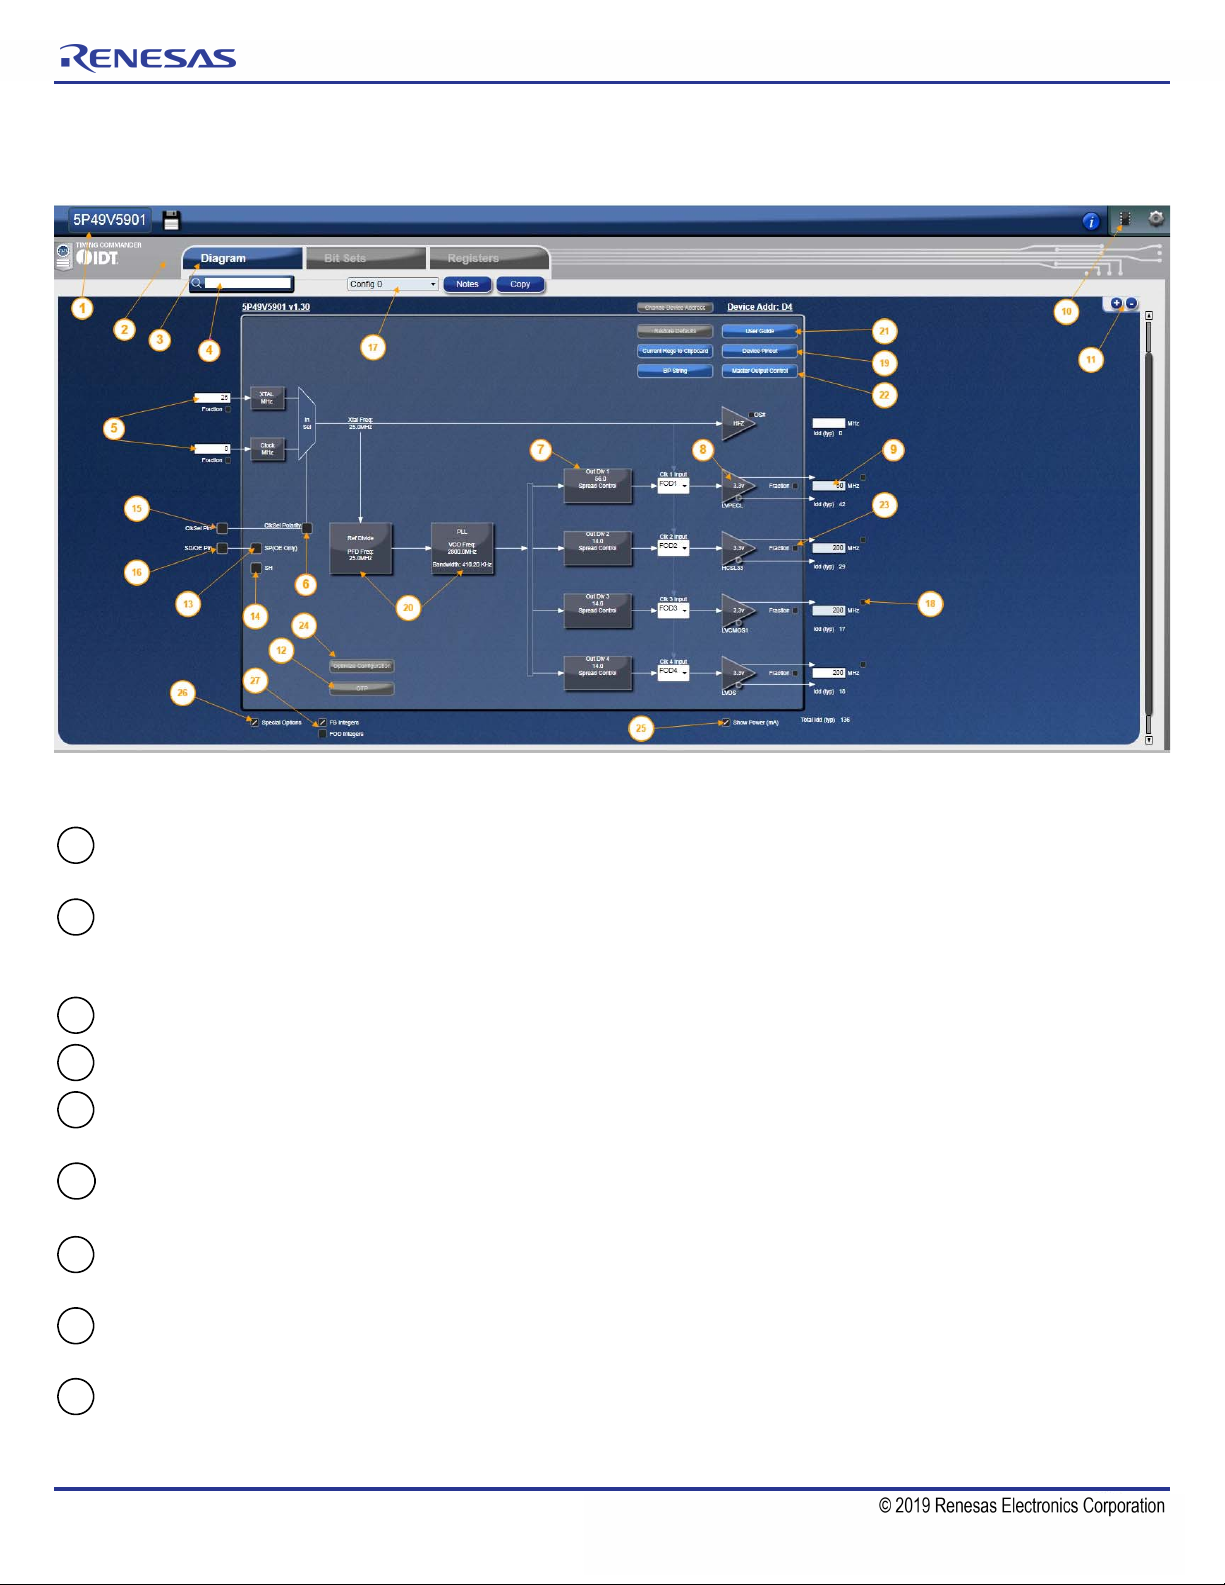
Areas of the Screen
A block diagram is displayed when a Settings File is loaded with a personality of a device. There are differential areas in the block
diagram as shown and explained below.
Figure 1. Areas of Screen when a Settings File is Loaded or New Settings File is Selected
Device ID – This indicates the specific device being selected. Clicking on this will bring up a menu that allows the settings
to be viewed and other file related activity (i.e., Save As) to be performed.
Error/Warning Panel – This section will expand and contract depending number of errors and/or warning messages, if
any. Clicking on the Warning or Error Tab hide or reveal this section. Note the arrow at the end of each error or warning.
Clicking on the arrow will take to the view or popup where the field that flags the error or warning is generated.
View Selection – Clicking on these tabs will bring up the different views of the chip setup.
Search – Any field or diagram element can be highlighted by typing in its name in the Search box.
Input Frequency – the two boxes are where crystal and input clock frequencies are entered, respectively. (Refer to
Figures 5~5b).
Clock Selection – Clicking on it will bring up input reference source selection. Checking it activates the CLKin as a primary
source. Refer to section “4. Input Clock Selection”. (Refer to Figures 5~5b).
Spread Spectrum Control – Clicking on this box will bring up a popup window in which spread spectrum for this output
clock is configured. There is one for each output (except OUT0). Refer to Section “Spread Spectrum”.
Output Signal Type Control – Clicking on this box will bring up a popup window in which the signal type, voltage, slew
rate and phase skew of this output clock is configured. Refer to Figures 8~10 for details.
Output Frequency – The box where intended output frequency in MHz is entered. Once a frequency is entered, click
outside the box for the value to take effect. IDT Timing Commander Software will use the frequency (together with input
frequency) to adjust PLL and output divider to generate the intended output frequency.
REVISION D 10/02/15 2
Page 3

TIMING COMMANDER™ SOFTWARE FOR VERSACLOCK® 5 - 5P49V5901
101112
1314151617181920212223
24
252627
Connect to chip – If an evaluation board is connected through USB port, clicking on the round button will bring up a
window where an I
2
C slave address can be selected; then clicking on the chip symbol to read or write the device's
registers. See Figure 10 for details.
Zoom – Clicking on “+” sign will increase the zoom level of the main window. Clicking on “-” sign will zoom out.
OTP Program button – Clicking on this button will allow you to program the device. Note that OTP programming is
one-time only. See “11. OTP Programming” section.
Shutdown and OE polarity – By changing polarity along with the SD/OE pin settings, it affects the OE of the outputs.
Enable Global Shutdown – Puts device in global shutdown mode, if Shutdown and OE polarity is high.
ClkSel Pin – Input clock select, selects the active input reference source in the manual switchover mode.
SD/OE Pin – Enables/disables the outputs (OE) or powers down the chip (SD). The SH bit controls the configuration of
the SD/OE pin.
Select Configuration drop down – Allows user to select between configuration [0:3].
Critical Output box – By checking this button, the output selected will be given priority for best performance based on
using an all integer divider solution.
Device Pinout – This button will open up a pinout diagram for the part selected to program.
Reference divider and VCO blocks – Clicking on these boxes enable customize control by accessing internal
parameters.
User Guide – clicking this button will open this current document
Master Output Control – This new feature will enable the user to enter all output types at once.
Fraction checkbox – the box is intended to use a fraction value for either the input or the output frequency. (Refer to
Figure 5c and Figure 11a).
Optimize button – Clicking on these boxes enable customize control by accessing internal parameters. See section
“Optimization Button”.
Show power box – By checking this box a power consumption estimate will show up under each output and show total
current consumption for the device. See section “Estimated Power Feature”.
Special Option – By checking this box this will bring the new buttons in the view. See Figure 11e for details.
FOD/FB integers – option will appear under the special options using non integer values in the Feedback and Fractional
Output dividers blocks.
REVISION D 10/02/15 3
Page 4
TIMING COMMANDER™ SOFTWARE FOR VERSACLOCK® 5 - 5P49V5901
Getting Started
Follow the steps below to start a new setting or open an existing Settings File and configure the device to meet your timing
requirements.
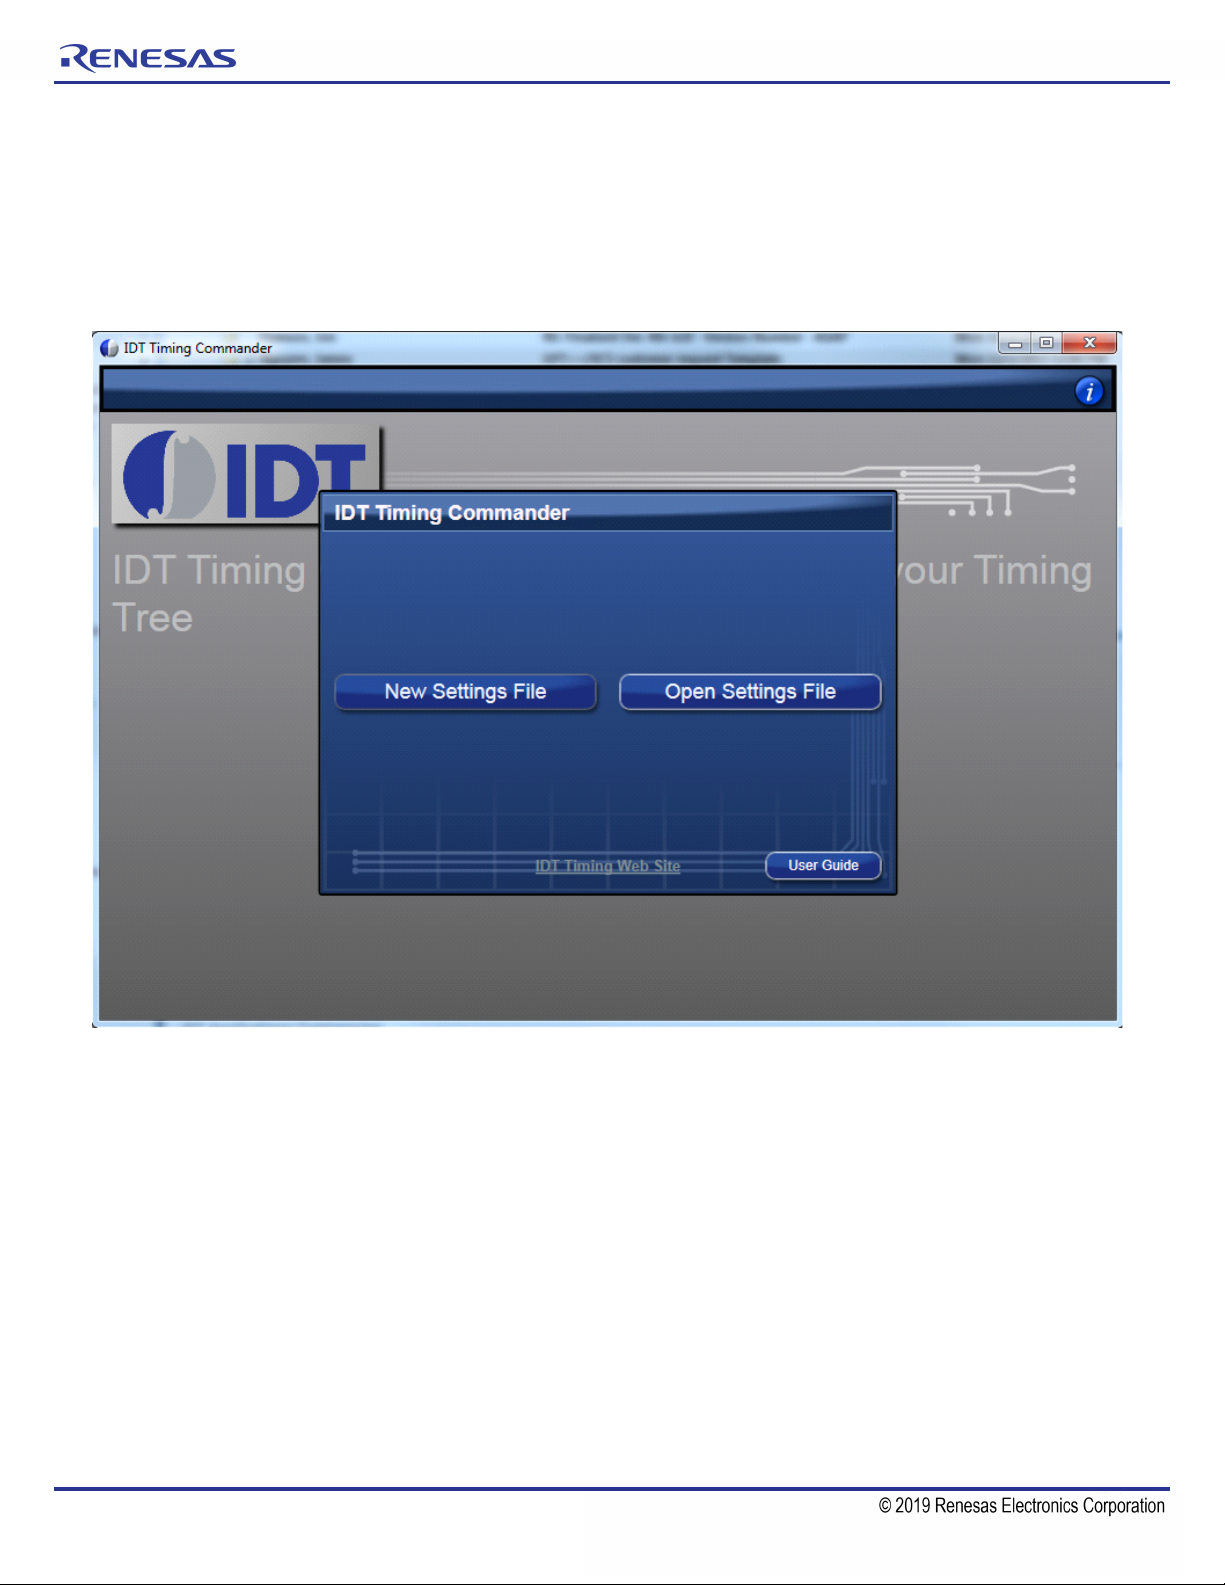
1. Launching Timing Commander GUI software for the first time, you will see the following window:
Figure 2. Launching Timing Commander for the First Time
A settings file (.tcs) is a text file where the device input and output requirements are stored. From this window, an existing
setting file can be opened to restore a configuration, or a new setting file can be created.
2. Clicking on “New Setting File” button, a personality file (.tcp) will be requested and can be opened by browsing to the folder
where a personality file is stored. Once the personality file is opened (click OK), the following page will be displayed, where
the correct VC5 product can be selected (see Figure 3). As soon as the product is selected, then the configuration window for
the selected product will appear as in Figure 4.
REVISION D 10/02/15 4
Page 5
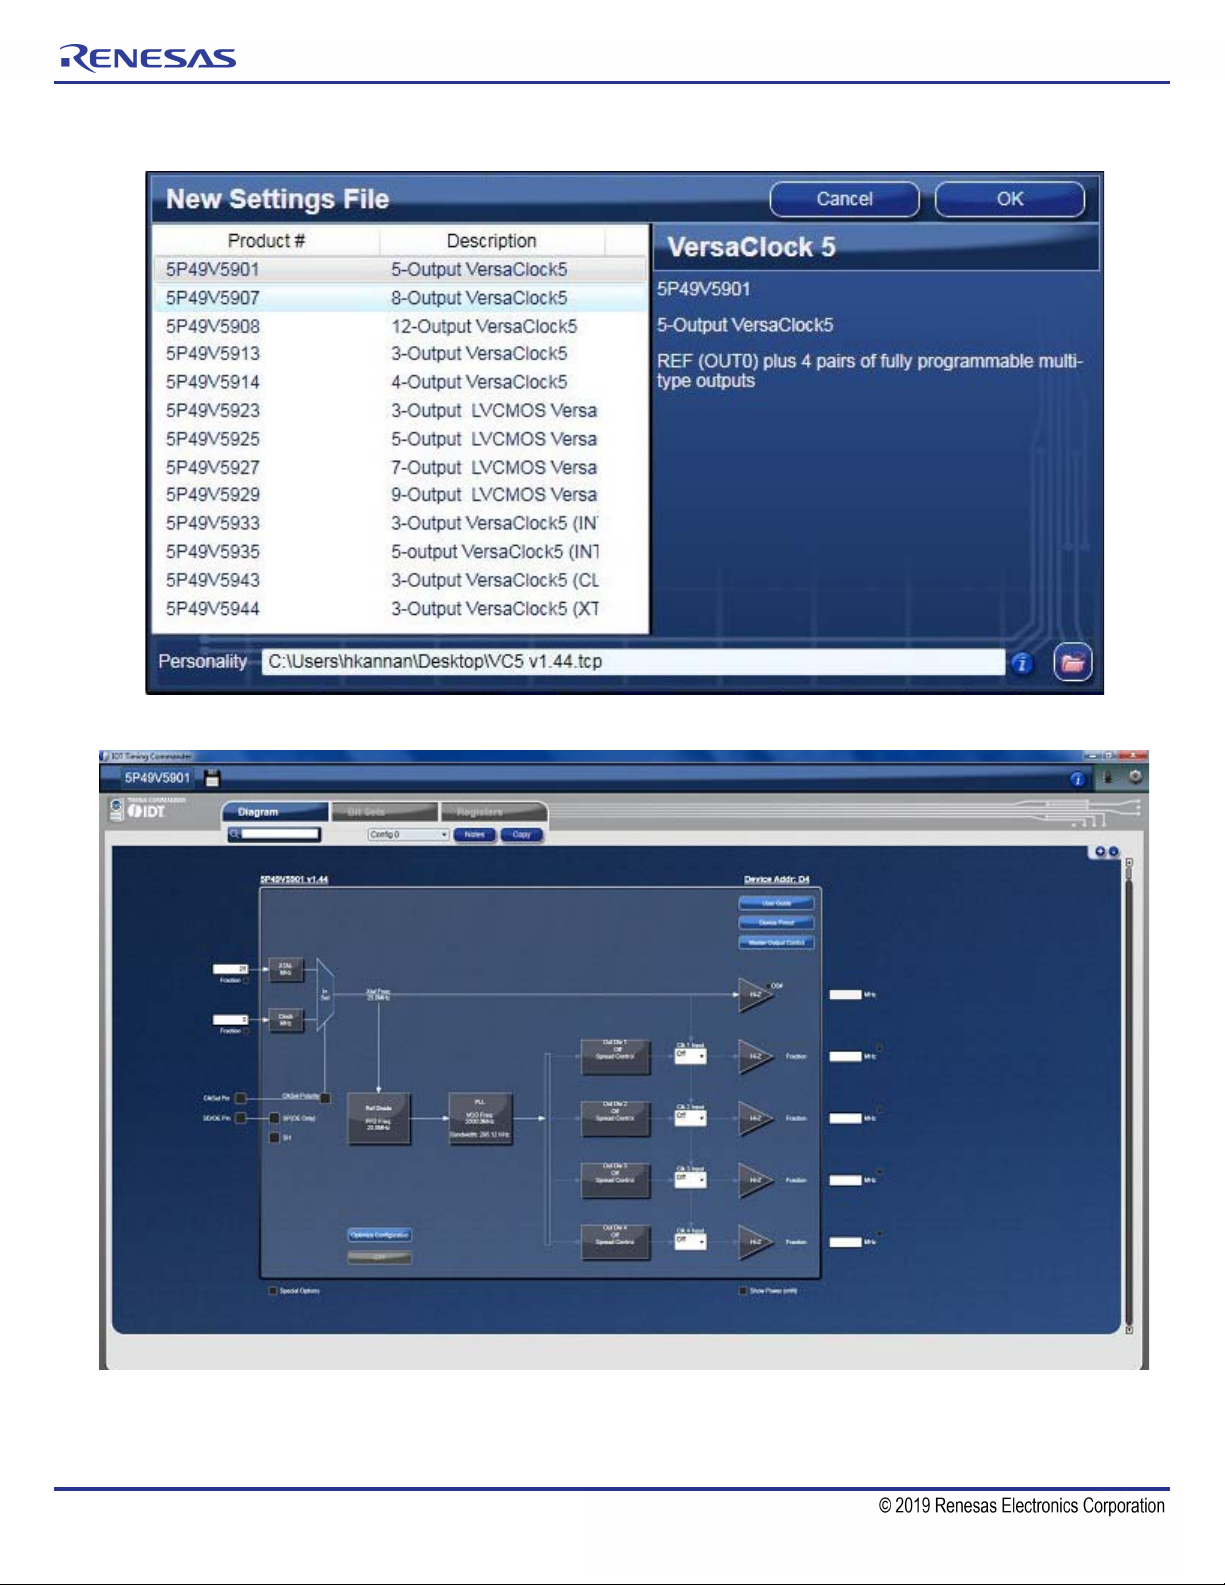
Figure 3. Choose Correct VersaClock 5 Part Number
TIMING COMMANDER™ SOFTWARE FOR VERSACLOCK® 5 - 5P49V5901
Figure 4. Configuration Window for Configuring VC5
In the above configuration window, input source and frequencies can be selected and entered. Output frequencies can be
entered. The GUI will automatically configure the PLL to generate desired outputs, based on the Reference divider and Feedback
Divider settings.
REVISION D 10/02/15 5
Page 6
TIMING COMMANDER™ SOFTWARE FOR VERSACLOCK® 5 - 5P49V5901
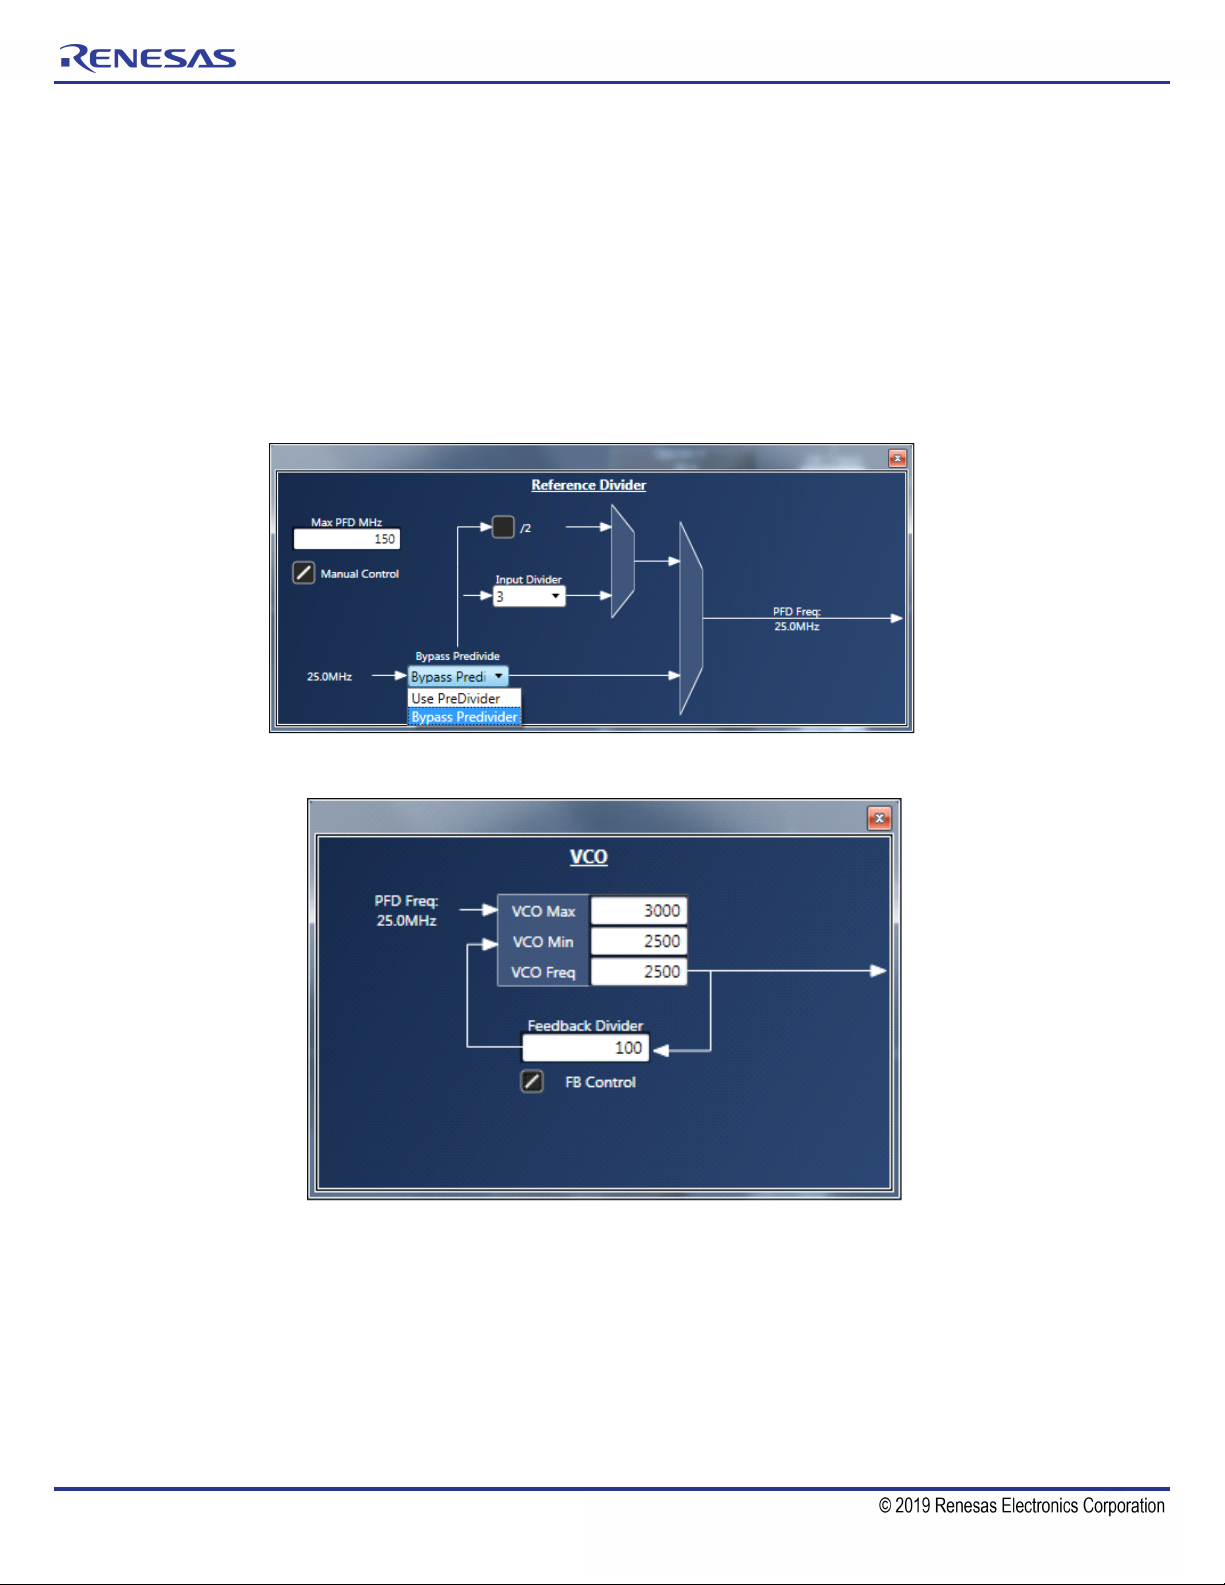
3. Ref Divider and PLL VCO block diagrams – By clicking on the Ref divide diagram, the user can get access to the ref divider
window and change the divider setting by checking the manual control box (see Figure 4a below). By default, timing
commander bypasses the pre-divider for wider PFD frequency that improves performance.
By clicking on the PLL diagram the user can get access to the VCO frequency and the FB divider value (see Figure 4b below).
By checking the FB control box, the user can change the value of the feedback divider. Another way is to change the VCO
frequency. If VCO frequency is changed then the FB control needs to be unchecked. Min frequency for VCO is 2500MHz and
Max Frequency is 3000MHz.
Note: If input frequency is set to 200MHz, a predivider value needs to be selected after checking manual control in reference
divider window. For outputs higher than 312.5MHz, the VCO frequency needs to be set to 2525 or appropriately higher value.
Figure 4a. Reference Divider Window
Figure 4b. PLL/VCO Window
4. Input Clock Selection
Input source can be selected between a crystal and an external reference clock. The frequency of the crystal or a clock can
be entered in the white boxes on the left side of the diagram window.
Selecting an input reference is done by checking the "Prim SRC" bit box along with the setting of the CLK Sel pin. By default,
Crystal is selected. Please note, when selecting clock source, it's recommended to open XTAL Configuration and CLK Enable
window at the same time by clicking on box "XTAL MHz" and box "Clock MHz", respectively. Figure 5 below shows a
side-by-side view of all 3 windows.
When Crystal is selected, "En Xtal" is checked and "EN_BUFIN" is unchecked. When changing input source from crystal to
CLK, manually uncheck "En Xtal" and check "EN_BUFIN" to complete clock selection process.
REVISION D 10/02/15 6
Page 7
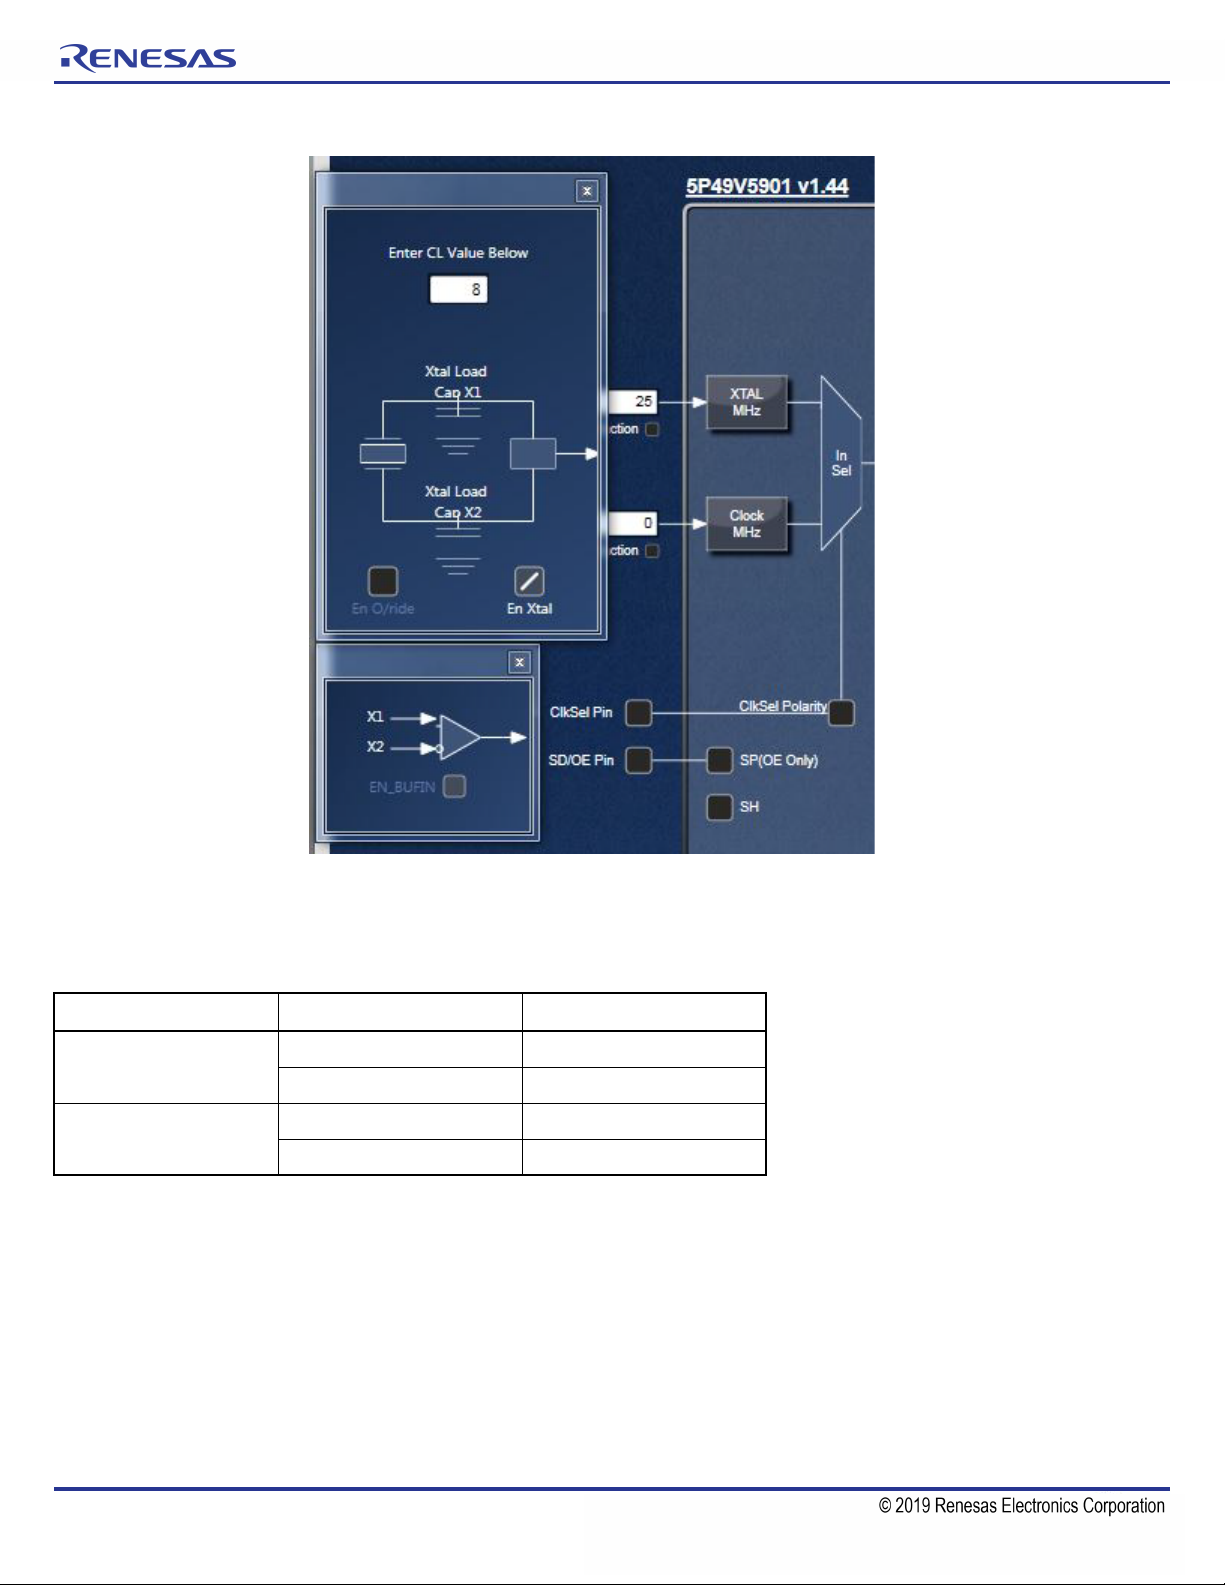
Figure 5. Input Reference Selection
TIMING COMMANDER™ SOFTWARE FOR VERSACLOCK® 5 - 5P49V5901
There are situations where both crystal and CLK are used as input sources. In this case, check both “En Xtal” and
“EN_BUFIN”. Then use CLKSEL pin to select crystal or CLK source to be used as the input reference. The Truth Table is listed
in table 1 below.
Table 1. Input Source Selection by CLKSEL Pin
Primary Source CLKSEL Pin Source Selected
Crystal
CLK
Same frequency should be used for Xtal and CLKin when both are used for the same configuration.
LOW Crystal/XIN
HIGH CLKIN
LOW CLKIN
HIGH Crystal/XIN
REVISION D 10/02/15 7
Page 8
TIMING COMMANDER™ SOFTWARE FOR VERSACLOCK® 5 - 5P49V5901
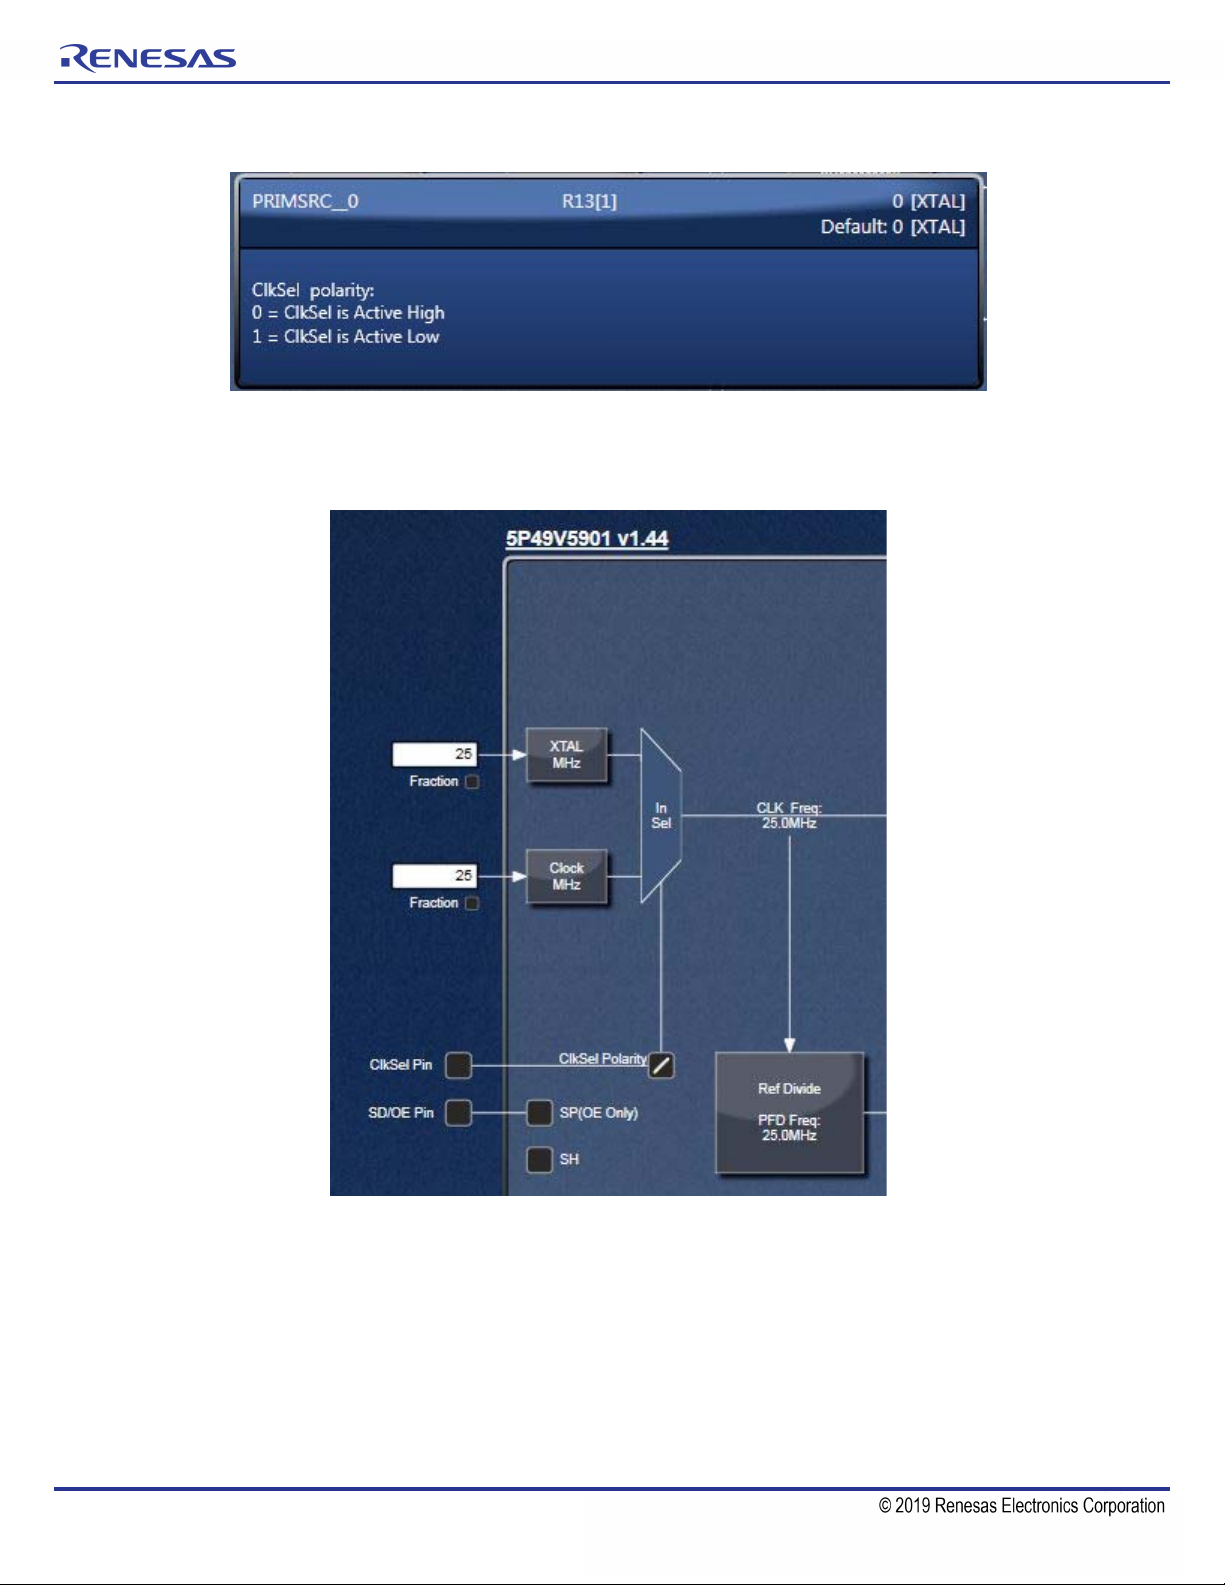
Figure 5a. Primary Source Selection
The CLKSelPol check box needs to be checked if using the CLK is selected as primary source and if CLK sel pin low like in
Figure 5b. The timing commander will display the selected source based on the selection. The En_Buff box will be then enabled.
Figure 5b. Input clock Pin Selection
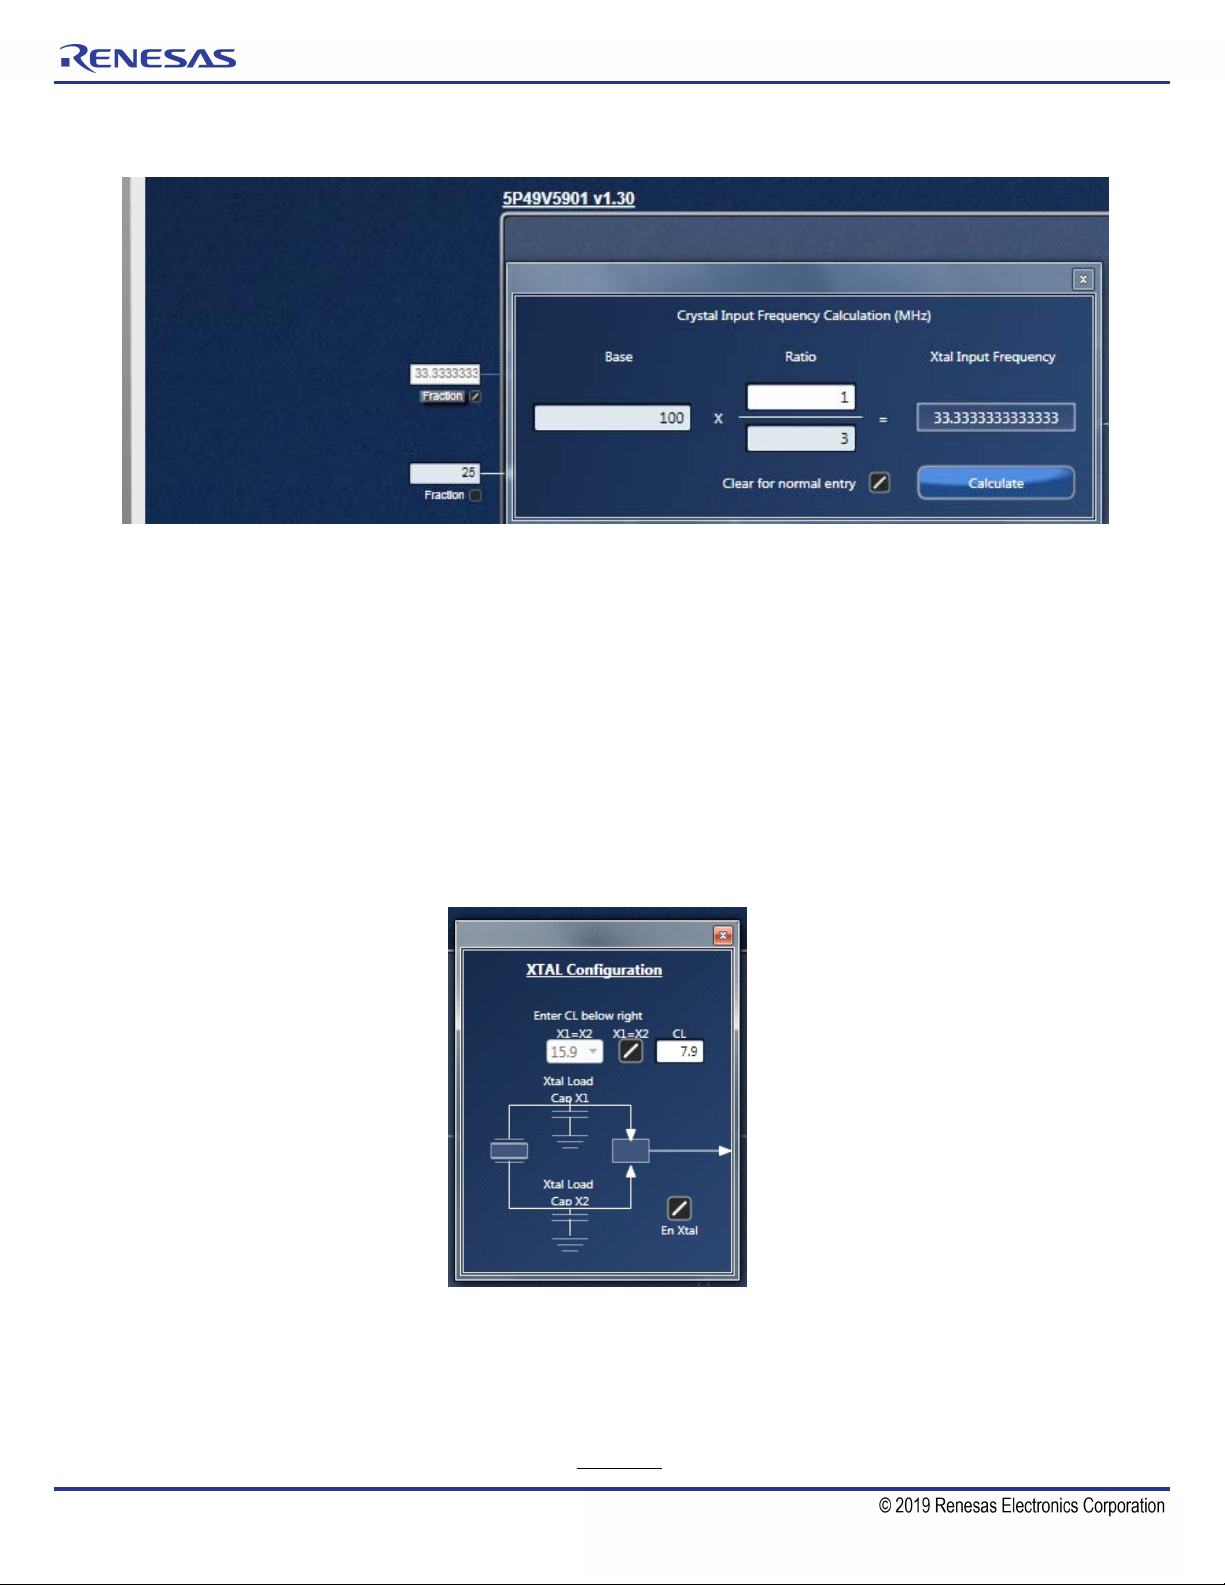
5. Input Frequency Fraction box – - Input clock can be entered as a fraction if fraction box is checked and Fraction word is
clicked as shown in figured 5c below. The calculation button will give the final frequency that will be entered in the input box.
The fraction can be used for both Xtal and CLKin inputs.
REVISION D 10/02/15 8
Page 9
TIMING COMMANDER™ SOFTWARE FOR VERSACLOCK® 5 - 5P49V5901
Figure 5c. Input Fraction Box
6. Internal Capacitance Configuration – The 5P49V5901 has built in capacitance for crystal load capacitance tuning. In XTAL
Configuration window (see Figure 6), X1 and X2 represent the capacitance the device can add to each leg of the crystal
connected to XIN/REF and XOUT pins.
The user can enter the value of the XTAL CL indicated by the Xtal manufacturer. TC will calculate the necessary values for
the internal capacitors. The calculation assumes a Cstray of 1.5pF for external board capacitance. The TC will change the
entered CL value to the closest realized value that the internal caps can achieve based on real measurements.
Example for a XTAL CL of 8pF:
• X1=X2=16pF would be the total value required.
• X1=X2=15.9pF is what consists of 9pF fixed and 6.9pF Xtal load caps.
More details on the register programming can be found in the VC5 Register programming guide.
Figure 6. XTAL CL Value into Timing Commander
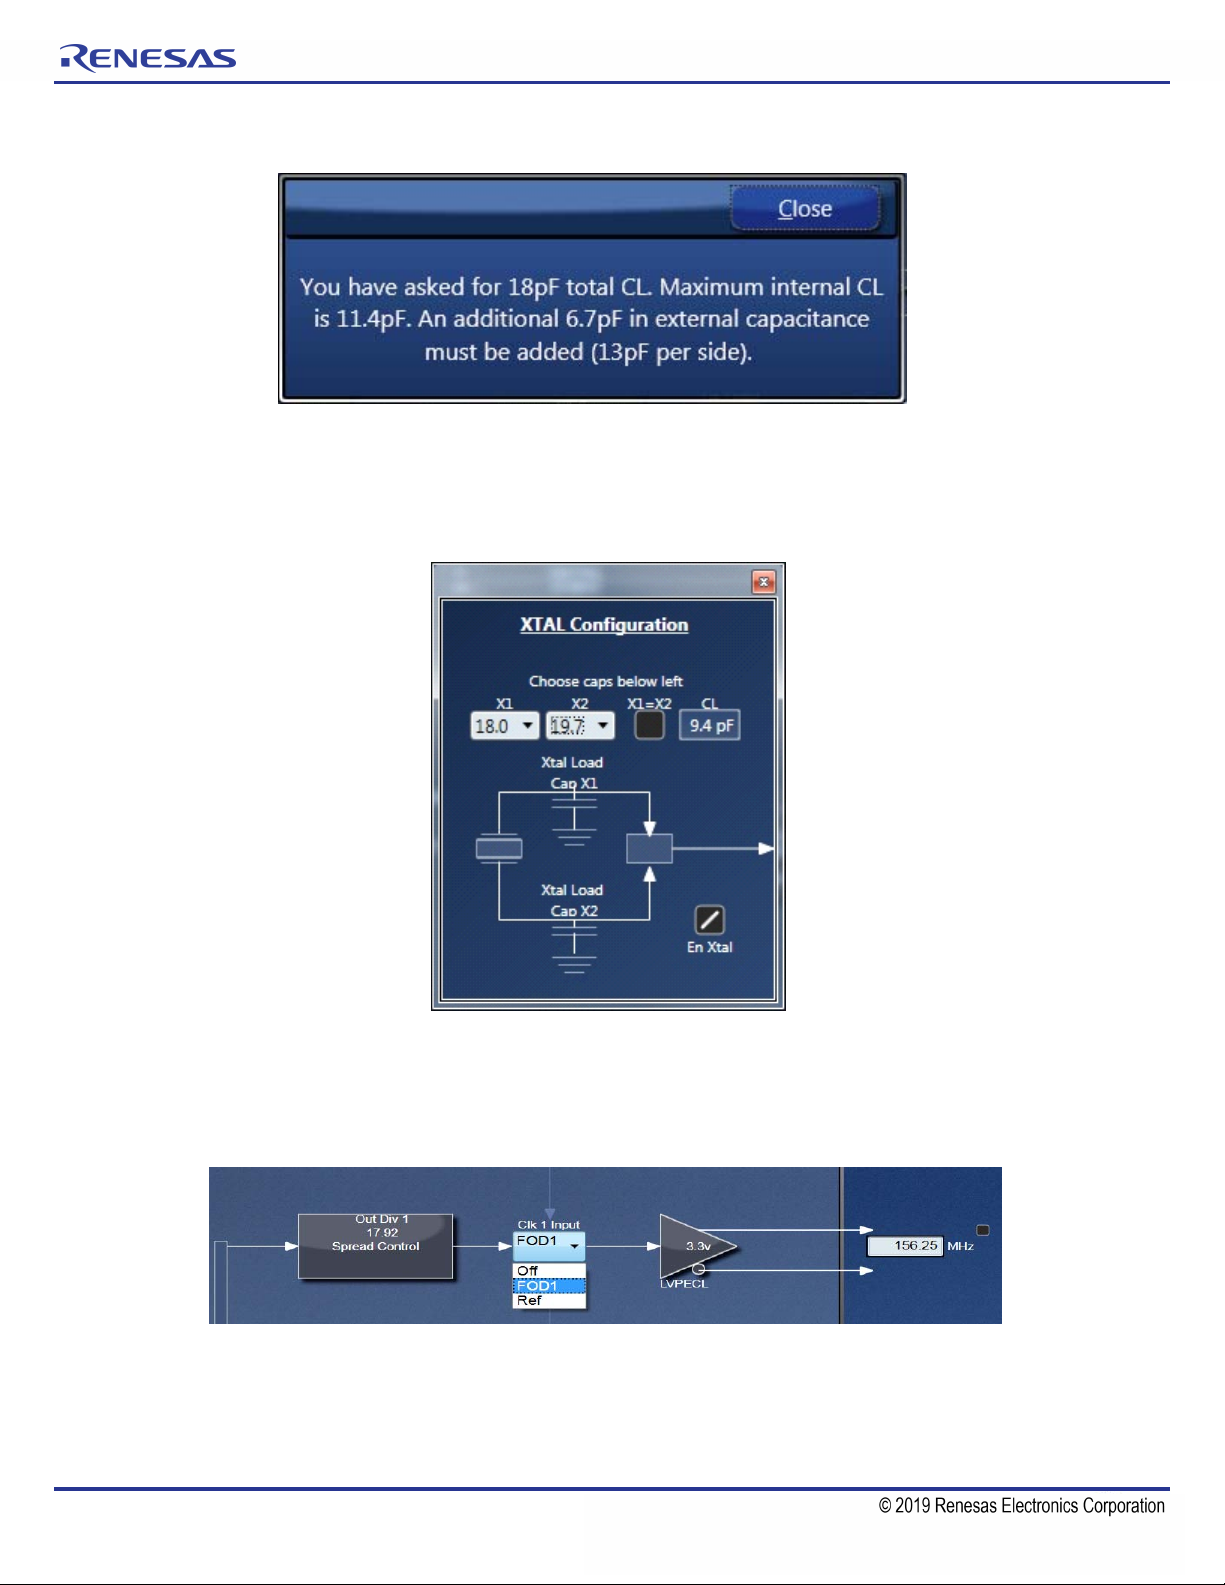
The max CL that can be created in the IC is 11.4pF. When entering a larger value, Timing Commander will display a window
advising how much capacitance to add externally to each crystal pin to achieve the desired CL value (see Figure 6a). TC is
rounding the values to a integer value for the advisable external capacitors.
Example for a XTAL CL of 18pF:
• X1=X2=36pF would be the total value required
• X1=X2=22.7pF is achieved internally in the VC5 and externally the amount required is 13.3pF (rounded to 13pF)
REVISION D 10/02/15 9
Page 10
TIMING COMMANDER™ SOFTWARE FOR VERSACLOCK® 5 - 5P49V5901
Figure 6a. Xtal Caps Setting Warning Message
The user can still select the caps if the X1=X2 box is not checked. The Xtal CL then will be calculated automatically (Figure 6b.).
Different values of X1 and X2 can be individually selected, although in almost all applications, an equal amount of capacitance
for X1 and X2 (X1 = X2) is recommended.
Figure 6b. Independent Xtal Caps Settings
7. Output Selection and Configuration – There are 5 outputs in 5P49V5901, of which OUT0 is a buffered output of the input
source with a single-ended signal format, OUT1~4 can each be configured as one differential pair, or two individual
single-ended outputs with programmable slew relationships. Output1 is displayed below as an example.
Figure 7. Output Configuration (1)
By clicking “Clk 1 Input” box, a clock source can be selected for Output1 between FOD1 and Ref. By default, this box is
showing “Off” if no output frequency is entered in the output frequency box. Once a frequency is entered, it will be
automatically switched to “FOD1” (FOD stands for Fractional Output Divider) which essentially means the output is sourced
from VCO frequency of the PLL. Input reference frequency (Ref) can also be selected as the source for Output1. This box
works in the same way for other outputs.
REVISION D 10/02/15 10
Page 11

TIMING COMMANDER™ SOFTWARE FOR VERSACLOCK® 5 - 5P49V5901
Figure 8. Output Configuration (2)
Clicking on the triangle box brings about output frequency configurations: Output type, Slew rate, Output voltage and Skew.
Output Signal Type
• LVCMOS: single-ended low-voltage CMOS
• LVPECL: differential LVPECL
• LVCMOS1: OUT1 is LVCMOS; OUT1B is disabled
• HCSL33: differential HCSL 3.3V
• LVDS: differential LVDS
• LVCMOS2: OUT1 is disabled; OUT1B is LVCMOS
• LVCMOSD: OUT1 and OUT1B are each LVCMOS with 180 degrees out of phase
• HCSL25: differential HCSL 2.5V
• LVCMOSX2: OUT1 and OUT1B are both LVCMOS and in phase
Slew Rate
• 1X: This selection corresponds to a slew rate of 1.9V/ns
• 0.9X: This selection corresponds to a slew rate of 1.8V/ns, or 90% of 1X
• 0.85X: This selection corresponds to a slew rate of 1.7V/ns, or 85% of 1X
• 0.8X: This selection corresponds to a slew rate of 1.6V/ns, or 80% of 1X
Output Voltages
• 1.8V
• 2.5V
• 3.3V
Selecting an output voltage in settings will configure the drive level of the output. In the PCB board, a matching voltage needs
to be used for this particular output.
Skew
• For outputs that share a common output divide value, there will be the ability to skew outputs by quadrature values to
minimize interaction on the PCB. The skew on each output can be adjusted from 0 to 360 degrees. Skew is adjusted in
units equal to 1/32 of the VCO period. So, for 100MHz output and a 2800MHz VCO, you can select how many 11.161pS
units you want added to your skew (resulting in units of 0.402 degrees). For example, 0, 0.402, 0.804, 1.206, 1.408, and so
on. The granularity of the skew adjustment is always dependent on the VCO period and the output period.
REVISION D 10/02/15 11
Page 12

TIMING COMMANDER™ SOFTWARE FOR VERSACLOCK® 5 - 5P49V5901
• If a skew value is entered to adjust phase relationship between two or more output pairs, they must be configured in the
same signal type, i.e., LVCMOSD. If signal is cascaded, for example, CLK1 or “ref” is selected as the source for OUT2,
skew control will be disabled.
Figure 9. Output Configuration (3)
Spread Spectrum
There is a spread spectrum control for each output (except OUT0). Clicking on “Spread Control” box will bring up a small window
for how spread spectrum is configured: the frequency of the modulation (in kHz), down or center spread and the amount of the
spread. Please note the amount of spread in percentage represent the peak-peak amount. For example, if center spread is
selected, an amount of 0.5% will be translated as ±0.25%.
Figure 10. Spread Spectrum Control Window
Output Frequency Fraction Box
The fraction box when selected and after clicking on the Fraction word will show the following window per figure 11a. The user
can enter a fraction to enable usage of the maximum decimal number in the FOD bits for maximum accuracy.
Uncheck the Enable Spread box if not using spread spectrum.
REVISION D 10/02/15 12
Page 13

TIMING COMMANDER™ SOFTWARE FOR VERSACLOCK® 5 - 5P49V5901
Figure 11a. Output Fraction Window
Master Output Control Window
This window enables the user to view current settings of all outputs at once and change all of them if Global variable is changed.
Figure 11b. Master Output Control Window
Estimated Power Feature
REVISION D 10/02/15 13
Page 14

TIMING COMMANDER™ SOFTWARE FOR VERSACLOCK® 5 - 5P49V5901
if checked the box called Show Power will show an estimated current consumption for every output and also a total current
consumption in mA (see Figure 11c).
Figure 11c. Show Power Estimator Box
Optimization Button
The optimization button will optimize the VCO value and FOD values for the output frequencies selected by the user. The
algorithm will search for an all FOD integer solution then it will look at fractional solution. It includes the PLL loop filter optimization
as well.
The button will become gray (see Figure 11d) when optimization is done or nor more optimization is possible. The time that the
optimization runs can vary depending on the complexity of the frequencies combinations.
Figure 11d. Optimization Button
REVISION D 10/02/15 14
Page 15

TIMING COMMANDER™ SOFTWARE FOR VERSACLOCK® 5 - 5P49V5901
Special Options
By checking the special option box in the left bottom corner the 4 following buttons will appear in the right top corner: BP string,
Current regs to Clipboard, Restore defaults, Change Device Address. At the bottom the FB integer box and FOD Integer box will
appear. The FeedBack divider values are by default set to integer by un-checking the box the user can set it to non integer value.
By checking the FOD integers values that will force the Fractional Output dividers to be in integer mode. This is an option given
to the user.
Figure 11e. Special Options
When connected to the device it is possible to change the I2C address by clicking on the Change Device Address button. This
is permanent change that cannot be reversed.
A message appears asking the user to confirm if I2C address needs to be changed as shown in Figure 11f.
Figure 11f. Device Address Change Message
Restore Defaults button enable to restore the default values into the device.
The Current Regs to Clipboard button copies all the current registers values from one configuration to the clipboard to be
copied somewhere else. A message will pop up to confirm that the specific configuration register has been copied ot the clip
board. It consist of one line of string containing each register value in hexadecimal.
REVISION D 10/02/15 15
Page 16

TIMING COMMANDER™ SOFTWARE FOR VERSACLOCK® 5 - 5P49V5901
See example below from register x00 to register x69:
61 FF 00 00 00 00 00 00 00 FF 01 C0 00 B6 B4 92 40 0C 81 82 00 03 8C 06 40 00 00 00 9F FF E0 80 00 81 02 00 00 00 0000
00 00 04 00 00 00 C0 00 00 81 01 00 00 00 00 00 00 00 04 00 00 00 60 00 00 81 00 00 00 00 00 00 00 00 04 00 00 00 A000
00 81 00 00 00 00 00 00 00 00 04 00 00 01 90 00 5B 01 1B 01 7B 01 3B 01 FF FC
The BP String button will show a formatted string (as shown in Figure11g) that matches the BP programmer requirements to
program a device with the bits reflecting the selection made by the user for the 4 configurations.
Figure 11g. BP Micro Programmer String
REVISION D 10/02/15 16
Page 17

TIMING COMMANDER™ SOFTWARE FOR VERSACLOCK® 5 - 5P49V5901
7. Enter Project Details – By clicking on the Versaclock5 part number, a window will pop up where many things can be done
like open settings file, new settings file, save as, and also enter project details. These should be filled out for proper
documentation.
Figure 12. Project Details Information and File Tools
8. Save the Settings File – After the configuration is complete, click on the disk symbol at the upper left corner to save the setting
file, as shown below.
Figure 13. Save the Setting File
9. Connecting to the Chip – If a VC5 evaluation board is connected, the settings can be written to the chip registers through
2
I
C interface. In GUI software, the connection to the chip can be made by clicking on the round button at upper right corner of
the GUI, as shown in Figure 14.
REVISION D 10/02/15 17
Page 18

Figure 14. Connection Settings for Connecting to the Chip
TIMING COMMANDER™ SOFTWARE FOR VERSACLOCK® 5 - 5P49V5901
Use the default values in Connection Settings window and click OK to close it. Then click the chip symbol in the corner to bring
out read/write command. When the connection is functioning, the area will turn green with “read” or “write” indicators. See
Figure 15. The arrow pointing out of the chip means “reading from the chip”; the arrow pointing into the chip means “writing
to the chip”.
Figure 15. Read from or Writing to Device Registers
10. SD/OE Polarity and Global Shutdown– There are buttons in the left side of the window, as shown below. They have a global
impact on the device's operation.
REVISION D 10/02/15 18
Page 19

TIMING COMMANDER™ SOFTWARE FOR VERSACLOCK® 5 - 5P49V5901
Figure 16. Buttons for Global Shutdown and SD/OE Polarity Control
The CLKSEL and SD/OE pins are simulated, the way that the input reference is simulated. That allows the user to see how
the part will behave according to the pin states in combination with the bit settings. If the En Global Shutdown (SD) bit is 1,
then applying voltage to the SD/OE pin will cause a "global shutdown". It just puts all the outputs into a HI-Z state. It doesn't
shut down power to the part. The PLL and dividers are still running. If the SD bit is 0, then SD/OE Polarity (SP bit) determines
whether the SD/OE pin is active high (SP=0) or active low (SP=1).If it's active high, it puts the outputs into a HI-LO (off) state
(OUT0 is single ended and just HI), unless the OE bit of an output is low. In which case nothing happens to that output. As
long as the SD/OE pin is not active (remembering that active high or low depends on the SP bit), the OE bits on each output
do nothing. But when SP is active, then a low OE bit will keep its output active. (OE is active low.) Unless the OS# bit is 0. That
will always turn an output off (HI-Z).
Pin 7 (SD/OE) of the device is a dual-function pin. When SH bit (bit 0 of register 0x10) is "1", this pin is SD (shutdown) and
when SH bit is "0", this pin is OE (output enable). The active polarity of the pin when it's configured as OE is determined by
SP bit (bit 1 of register 0x10). Thus, if the checkbox SD/OE Polarity is Please refer to Table 4 in 5P49V5901A datasheet for
output status control details.
SH is unchecked by default. If checked, it enables a global shutdown.
11. OTP Programming
When a configuration is ready for programming, the chip can be programmed right within the Timing Commander GUI
software. Clicking on OTP button will bring up OTP Programming window in which one or more configurations can be selected
for programming into the device. If All box is checked, all 4 configurations will be programmed. The following figure shows the
OTP programming selection window.
Figure 17. OTP Programming within Timing Commander GUI
REVISION D 10/02/15 19
Page 20

TIMING COMMANDER™ SOFTWARE FOR VERSACLOCK® 5 - 5P49V5901
To write to OTP, follow these steps:
1. Connect to the part. The "OTP" button becomes enabled. The "Active" and "Configuration" indicator lights will be displayed,
and be illuminated or dark as appropriate. The green "Active" light means that the "OTP Burned" bit (R0[7]) has been
burned. The red "Configuration" lights are illuminated as appropriate: if on, that configuration in the OTP has been burned.
Click the "OTP" button.
Note: Ensure that the device has a reference crystal or clock input before burning.
2. In the OTP dialog, check the box of the configuration to be burned. The "Burn" button will then be activated.
3. Click the "Burn" button. If the selected configuration has not been optimized, there will be a warning. A configuration which
has already been burned cannot be burned again.
4. A confirmation message will appear once the burn is complete and successful.
Figure 17a. OTP Active Indicator Lights
Figure 18. Confirmation Message after OTP Burn
For loading one or more configurations from a burned part into the VC5 GUI ("load OTP") follow these steps:
1. Before reading back, cycle the power on the part and set the input crystal and/or clock frequencies in the GUI to those in
the original configuration(s). This must be done manually because there is no way to store this information on the part
itself. If there is more than one configuration, this step must be repeated for each one.
2. Connect to the part. The "OTP" button becomes enabled. The "Active" and "Configuration" indicator lights will be displayed,
and be illuminated or dark as appropriate. The green "Active" light means that the "OTP Burned" bit (R0[7]) has been
burned. The red "Configuration" lights are illuminated as appropriate: if on, that configuration in the OTP has been burned.
3. Click the "OTP" button.
4. In the OTP dialog, check the boxes of the configurations to be loaded. If there are four configurations, there is an "All"
checkbox for convenience. If you check a box corresponding to an unburned configuration, there will be a warning. Loading
an unburned configuration will load all ones into the GUI and make a mess.
5. Click "Load".
After the loading is complete, the configuration dropdown control at the top can be used to select a specific configuration for
display. If the part is still connected, the selected configuration settings will be written to the I2C registers on the part.
Finally, the design of the GUI expects the user to first enter the desired input frequency, followed by the desired output
frequency on each clock out. The appropriate register values are then calculated so as to make this happen. If the user then
changes the input frequency, the solution is automatically recalculated to produce the same outputs. If the input frequency is
changed after settings have been calculated, the output frequencies do not change in proportion. They are treated as targets,
and everything else is adjusted to achieve those targets. This is why the input frequencies must be entered before reading
back a part.
REVISION D 10/02/15 20
Page 21

TIMING COMMANDER™ SOFTWARE FOR VERSACLOCK® 5 - 5P49V5901
VersaClock 5 Derivative Parts
Additional Derivative VersaClock5 parts are now available; to program them they can be selected from the drop down menu. To
the right, you can find a description of the part.
Figure 19. Drop Down Menu to Select Derivative Parts and Description of Part
Figure 20. 5P49V5913: 2 Universal and 1 LVCMOS Reference Outputs VersaClock5 Part
As shown in Figure 19, the Timing Commander window looks a lot like the 5P49V5901 device window, all buttons and
functionality are identical - the only difference is the output and number of outputs.
REVISION D 10/02/15 21
Page 22

TIMING COMMANDER™ SOFTWARE FOR VERSACLOCK® 5 - 5P49V5901
Figure 21. 5P49V5914 – 3 Universal-Output VersaClock 5 Part
Figure 22. 5P49V5923 – 3-Output LVCMOS Only Versaclock 5 Part
REVISION D 10/02/15 22
Page 23

TIMING COMMANDER™ SOFTWARE FOR VERSACLOCK® 5 - 5P49V5901
Figure 23. 5P49V925 – 5-Output LVCMOS Only Versaclock 5 Part
Figure 24. 5P49V5927 – 7-Output LVCMOS Only Versaclock 5 Part
REVISION D 10/02/15 23
Page 24

TIMING COMMANDER™ SOFTWARE FOR VERSACLOCK® 5 - 5P49V5901
Figure 25. 9-Output 5P49V5929 LVCMOS Only Versaclock 5 Part
Figure 26. 3-Output 5P49V5933: 2 Universal Output Pairs and 1 ref LVCMOS Outputs with integrated Xtal
The Xtal is integrated into the package therefore the control of the xtal caps are disabled. The CLK buffer would enable
automatically when the user select the CLKin as input.
REVISION D 10/02/15 24
Page 25

TIMING COMMANDER™ SOFTWARE FOR VERSACLOCK® 5 - 5P49V5901
Figure 27. 5-Output 5P49V5935: 4 Universal Output Pairs and 1 ref LVCMOS Outputs with integrated Xtal
The Xtal is integrated into the package therefore the control of the Xtal caps are disabled. The CLK buffer would enable
automatically when the user select the CLKin as input.
Figure 28. 3-Output 5P49V5944: 2 Universal Output Pairs and 1 ref LVCMOS Outputs with Xin Only (20 pin)
REVISION D 10/02/15 25
Page 26

TIMING COMMANDER™ SOFTWARE FOR VERSACLOCK® 5 - 5P49V5901
Figure 29. 3-Output 5P49V5943: 2 Universal Output Pairs and 1 ref LVCMOS Outputs with CLKin Only (20
pin)
Figure 30. 7-Output 5P49V5907: 3 Universal Output Pairs and 4 LP-HSCL Outputs, and One Reference
LVCMOS Output
The device has 2 enable pins for the LP-HCSL differential outputs that are simulated on the timing commander. They are enabled
by default.
REVISION D 10/02/15 26
Page 27

TIMING COMMANDER™ SOFTWARE FOR VERSACLOCK® 5 - 5P49V5901
Figure 31. 11-Output 5P49V5908: 3 Universal Output Pairs and 8 LP-HSCL Outputs, and One Reference
LVCMOS Output
The device has 2 enable pins for the LP-HCSL differential outputs that are simulated on the timing commander. They are enabled
by default.
REVISION D 10/02/15 27
Page 28

TIMING COMMANDER™ SOFTWARE FOR VERSACLOCK® 5 - 5P49V5901
Getting Further Help
IDT Timing Commander Software is designed to be used interactively. Context-sensitive “tooltips” will appear when the mouse
pointer is hovered-over any icon or entry box on the screen. These tooltips will provide information on what function the icon
performs and/or limits on values that can be entered into the field. Figure 32 shows an example of such a tooltip indicating an
output frequency field when the mouse pointer is hovering over it.
Figure 32. Tooltip Appears when the Mouse Pointer is Hovering Over any Block in the Window
The About icon on the top-right corner of the screen (blue button with a letter “i”) can be used to generate an E-mail to IDT for
assistance (See Figure 33), including the option to attach a log file that provides IDT with information on the sequence of
operations performed by the user in this session to assist in resolving the user's concern.
Figure 33. From About icon, an E-mail can be Generated to IDT with Option of Attaching a Log File
REVISION D 10/02/15 28
Page 29

TIMING COMMANDER™ SOFTWARE FOR VERSACLOCK® 5 - 5P49V5901
Icons Descriptions
Main Screen Icons
About – This icon allows the user to see the version numbers of the IDT Timing Commander Software and the personality
currently in use. It also allows the user to contact IDT via Email, with or without attaching a log file to assist in resolution
of any issues.
Error Tab – Indicates one or more errors are present. Click on this icon to open the Error/Warning Panel if it is not
open.
Warning Tab – Indicates one or more errors are present. Click on this icon to open the Error/Warning Panel if it
is not open.
Connection Setup – Clicking on this icon will allow setup of Chip Connect parameters.
Chip Connect – Clicking on this icon will cause an attempt to establish a connection with a device in a USB-attached
evaluation board (EVB). The device will be tested to determine if it is the device referred to in this personality or not.
Write to Chip – Clicking on this icon when located in the top-right corner of the screen will write all registers values to
the chip. Clicking on this icon beside a register in Register View will write out only that register to the connected chip.
Read from Chip – Clicking on this icon when located in the top-right corner of the screen will read all register values
from the chip and replace the internal bit set Values with them, even if they are locked. Clicking on the icon beside a
register in Register View will read only this register's Value.
Icons Associated with Data Entry Boxes
Error – There is an error associated with the field this icon is attached to. Hovering over the field with the mouse will bring
up a tooltip with more details on the error. The error can also be viewed via the Error/Warning Panel portion of the screen
(Error/Warning Panel may need to be expanded by clicking on the Error or Warning tab). Note that a Settings file may
not be saved while there are unsolved errors.
Warning – There is a warning associated with the field this icon is attached to. Hovering over the field with the mouse
will bring up a tooltip with more details on the warning. The warning can also be viewed via the Error/Warning Panel
portion of the screen (Error/Warning Panel may need to be expanded by clicking on the Error or Warning tab). Warnings
do not prevent saving of a Settings file.
Modified – Alerts the user that the value in this field has been modified, either by the user or by the personality from its
original value. Clicking on this icon will return the Value to the previous setting and remove the alert.
Revert – When this icon is clicked the state will revert back to the previous setting or value entered in the field.
REVISION D 10/02/15 29
Page 30

TIMING COMMANDER™ SOFTWARE FOR VERSACLOCK® 5 - 5P49V5901
Types of Data Entry Boxes
Check Box – This data entry format is used for binary values that may only be set to 0 (box cleared) or 1 (box checked).
Bit-by-bit – This data entry format is used when it makes most sense to set each bit individually. Each
bit may be set to 1 or 0 only.
Combo Box – This data entry format provides a drop-down menu of selections. Selection values may be
fixed or may be adjusted by the personality in response to other fields changing.
Text Entry – This data entry format allows direct keyboard entry of values. Values will be checked against the
programmed data type for the field as they are typed.
Read-Only – This field is read-only. It may not be accessible to the user at all or may have a writable version at
another (single) location in the diagram or bit set views.
REVISION D 10/02/15 30
Page 31

TIMING COMMANDER™ SOFTWARE FOR VERSACLOCK® 5 - 5P49V5901
Corporate Headquarters
6024 Silver Creek Valley Road
San Jose, CA 95138 USA
Sales
1-800-345-7015 or 408-284-8200
Fax: 408-284-2775
Support
www.idt.com/go/support
www.IDT.com
DISCLAIMER Integrated Device Technology, Inc. (IDT) and its subsidiaries reserve the right to modify the products and/or specifications described herein at any time and at IDT’s sole discretion. All information in this document,
including descriptions of product features and performance, is subject to change without notice. Performance specifications and the operating parameters of the described products are determined in the independent state and are not
guaranteed to perform the same way when installed in customer products. The information contained herein is provided without representation or warranty of any kind, whether express or implied, including, but not limited to, the
suitability of IDT’s products for any particular purpose, an implied warranty of merchantability, or non-infringement of the intellectual property rights of others. This document is presented only as a guide and does not convey any
license under intellectual property rights of IDT or any third parties.
IDT’s products are not intended for use in applications involving extreme environmental conditions or in life support systems or similar devices where the failure or malfunction of an IDT product can be reasonably expected to signifi-
cantly affect the health or safety of users. Anyone using an IDT product in such a manner does so at their own risk, absent an express, written agreement by IDT.
Integrated Device Technology, IDT and the IDT logo are registered trademarks of IDT. Product specification subject to change without notice. Other trademarks and service marks used herein, including protected names, logos and
designs, are the property of IDT or their respective third party owners.
Copyright 2015. All rights reserved.
Page 32

IMPORTANT NOTICE AND DISCLAIMER
RENESAS ELECTRONICS CORPORATION AND ITS SUBSIDIARIES (“RENESAS”) PROVIDES TECHNICAL
SPECIFICATIONS AND RELIABILITY DATA (INCLUDING DATASHEETS), DESIGN RESOURCES (INCLUDING
REFERENCE DESIGNS), APPLICATION OR OTHER DESIGN ADVICE, WEB TOOLS, SAFETY INFORMATION, AND
OTHER RESOURCES “AS IS” AND WITH ALL FAULTS, AND DISCL AIMS ALL WARRANTIES, EXPRESS OR IMPLIED,
INCLUDING, WITHOUT LIMITATION, ANY IMPLIED WARRANTIES OF MERCHANTABILITY, FITNESS FOR A
PARTICULAR PURPOSE, OR NON-INFRINGEMENT OF THIRD PARTY INTELLECTUAL PROPERTY RIGHTS.
These resources are intended for developers skilled in the art designing with Renesas products. You are solely responsible
for (1) selecting the appropriate products for your application, (2) designing, validating, and testing your application, and (3)
ensuring your application meets applicable standards, and any other safety, security, or other requirements. These
resources are subject to change without notice. Renesas grants you permission to use these resources only for
development of an application that uses Renesas products. Other reproduction or use of these resources is strictly
prohibited. No lic ense is granted to any other Renesas intellectual property or to any third party intellectual property.
Renesas disclaims responsibility for, and you will fully indemnify Renesas and its representatives against, any claims,
damages, costs, losses, or liabilities arising out of your use of these resourc es. Renesas' products are provided only subject
to Renesas' Terms and Conditions of Sale or other applicable terms agreed to in writing. No use of any Renesas resources
expands or otherwise alters any applicable warranties or warranty disclaimers for these products.
Corporate Headquarters
TOYOSU FORESIA, 3-2-24 Toyosu,
Koto-ku, Tokyo 135-0061, Japan
www.renesas .com
Trademarks
Renesas and the Renesas logo are trademarks of Renesas
Electronics Corporation. All trademarks and registered
trademarks are the property of their respective owners.
(Rev.1.0 Mar 2020)
Contact Information
For further information on a product, technology, the most
up-to-date version of a document, or your nearest sales
office, please visit:
www.renesas .com/contact/
© 2020 Renesas Electronics Corporation. All rights reserved.
 Loading...