

Renesas Synergy DK-S7G2, Synergy PK-S5D9, Synergy PE-HMI1, Synergy SK-S7G2 Quick Start Manual
Page 1

Application Note
R11AN0031EU0102
Renesas Synergy™ Platform
Rev.1.02
Getting Started with NetX™ Duo DHCP
Introduction
Mar 31, 2017
This application note describes how to install, build, and run a simple DH CP client application along with Web Server
application on a Renesas Synergy development board, using the Renesas e
Package (SSP), and the Express Logic NetX Duo network s tack.
2
studio ISDE, Renesas Synergy Software
Goals and Objectiv es
The goal of this application note is to help you install, build, and run the exa mple a pplication.
While running using your PC, you can view the DHCP IP address leased by the DHCP server through a Serial Terminal
program such as Putty or Tera Term. Using the IP address leased from the DHCP server, you can also view the Web
server running on the board.
The example application supports both IPv4 and IPv6. Using your PC, you can view the web serve r applicati on running
on your board in a browser, and watch the application run by observing variables being updated when you refresh the
browse r win d ow.
The web server displays an IPv6 address at the bottom of the screen. You can ping the IPv6 address from a command
window on your PC.
Prerequisites
As the user of this application note, you are assumed to have some experience with the Renesas e2 studio ISDE and
SSP, as well as IAR E W and SSC. Before you perform the procedure in this application note, you should follow the
procedure in your board’s Quick Start Guide to build and run the ‘Blinky’ project. By doing so, you will become
familiar with e
The user of this application note is assumed to have some experience with TCP/IP and basic knowledge of networking.
2
studio and the SSP, and ensure that the debug connection to your board is functioning properly.
Required Resources
The example application targets Renesas Synergy S7G2 devices. To bui ld and run the example a pplication, you will
need:
• A Renesas Synergy DK-S7G2 (v3.0), SK-S7G2, PK-S5D9, or PE-HMI1 board
• A PC running Microsoft
2
e
studio ISDE v5.3.1 or greater, or IAR EW for Synergy v7.71.1 or greater
Synergy Software Package (SSP) 1.2.0 or Synergy Standalone configurator (SSC) 5.3.1.
You can download the required Renesas software from the Renesas Synergy Gallery
(https://synergygallery.renesas.com).
The PC must also have USB 2.0 and an Internet connection. In addition, a DHCP server must be available on your
network.
®
Windows® 7 with the following Renesas software installed:
Time Required
You can install, build, and run the example application in under 30 minutes. The high-level steps involved are:
1. Connect to the target board.
2. Import, configure, and build the project.
3. Determine the IP address chosen by the DHCP server.
4. Run the example application.
5. Verify the IP address leased by the DHCP server can be observed at a serial terminal.
R11AN0031EU0102 Rev.1.02 Page 1 of 14
Mar 31, 2017
Page 2

Renesas Synergy™ Platform Getting Started with NetX™ Duo DHCP
Contents
1. Connecting to the Board .......................................................................................................... 3
2
2. Importing the Project into e
studio .......................................................................................... 4
3. Determining the IP Address leased by the DHCP Server ......................................................... 5
4. Running the NetX Duo DHCP Application ................................................................................ 6
5. Next Steps ............................................................................................................................... 9
6. Appendix ............................................................................................................................... 10
R11AN0031EU0102 Rev.1.02 Page 2 of 14
Mar 31, 2017
Page 3

Renesas Synergy™ Platform Getting Started with NetX™ Duo DHCP
1. Connecting to the Board
To configure and connect your target board:
1. Follow the procedure in your target board’s Quick Start Guide to set up the J-link debugger connection from your
PC to the JTAG connector on the target board, and power-up the board.
2. Connect an Ethernet cable from an existing upli nk network (coming from the Uplink switch) to the desktop Ethernet
switch.
Note: For the DK-S7G2 board, set the DIPSW S5 ENET1 switch to On, and use the Main Board Ethernet 1 port
only.
3. Connect an Ethernet cable from the Synergy kit to the deskt op Ethernet switch.
4. Connect an Ethernet cable from the PC to the desktop Ethernet switch.
5. Connect the USB CDC console from Synergy board to the PC.
6. Connect USB flash drive to the USB host connector on the Synergy board.
7. The connectivity diagram for the application supported on the boards is shown in Figure 1.1.
Figure 1.1 Sample Hardware setup for DHCP Application
R11AN0031EU0102 Rev.1.02 Page 3 of 14
Mar 31, 2017
Page 4
Renesas Synergy™ Platform Getting Started with NetX™ Duo DHCP
2. Importing the Project into e2 studio
Follow the procedure in the Synergy Project Import Guide (r11an0023eu0116_synergy_ssp.pdf) to import, build, and
debug the project. When prompted to select the debug configuration, select NETX_Duo_DHCP_Webserver Debug
(under Renesas GDB Hardware Debugging).
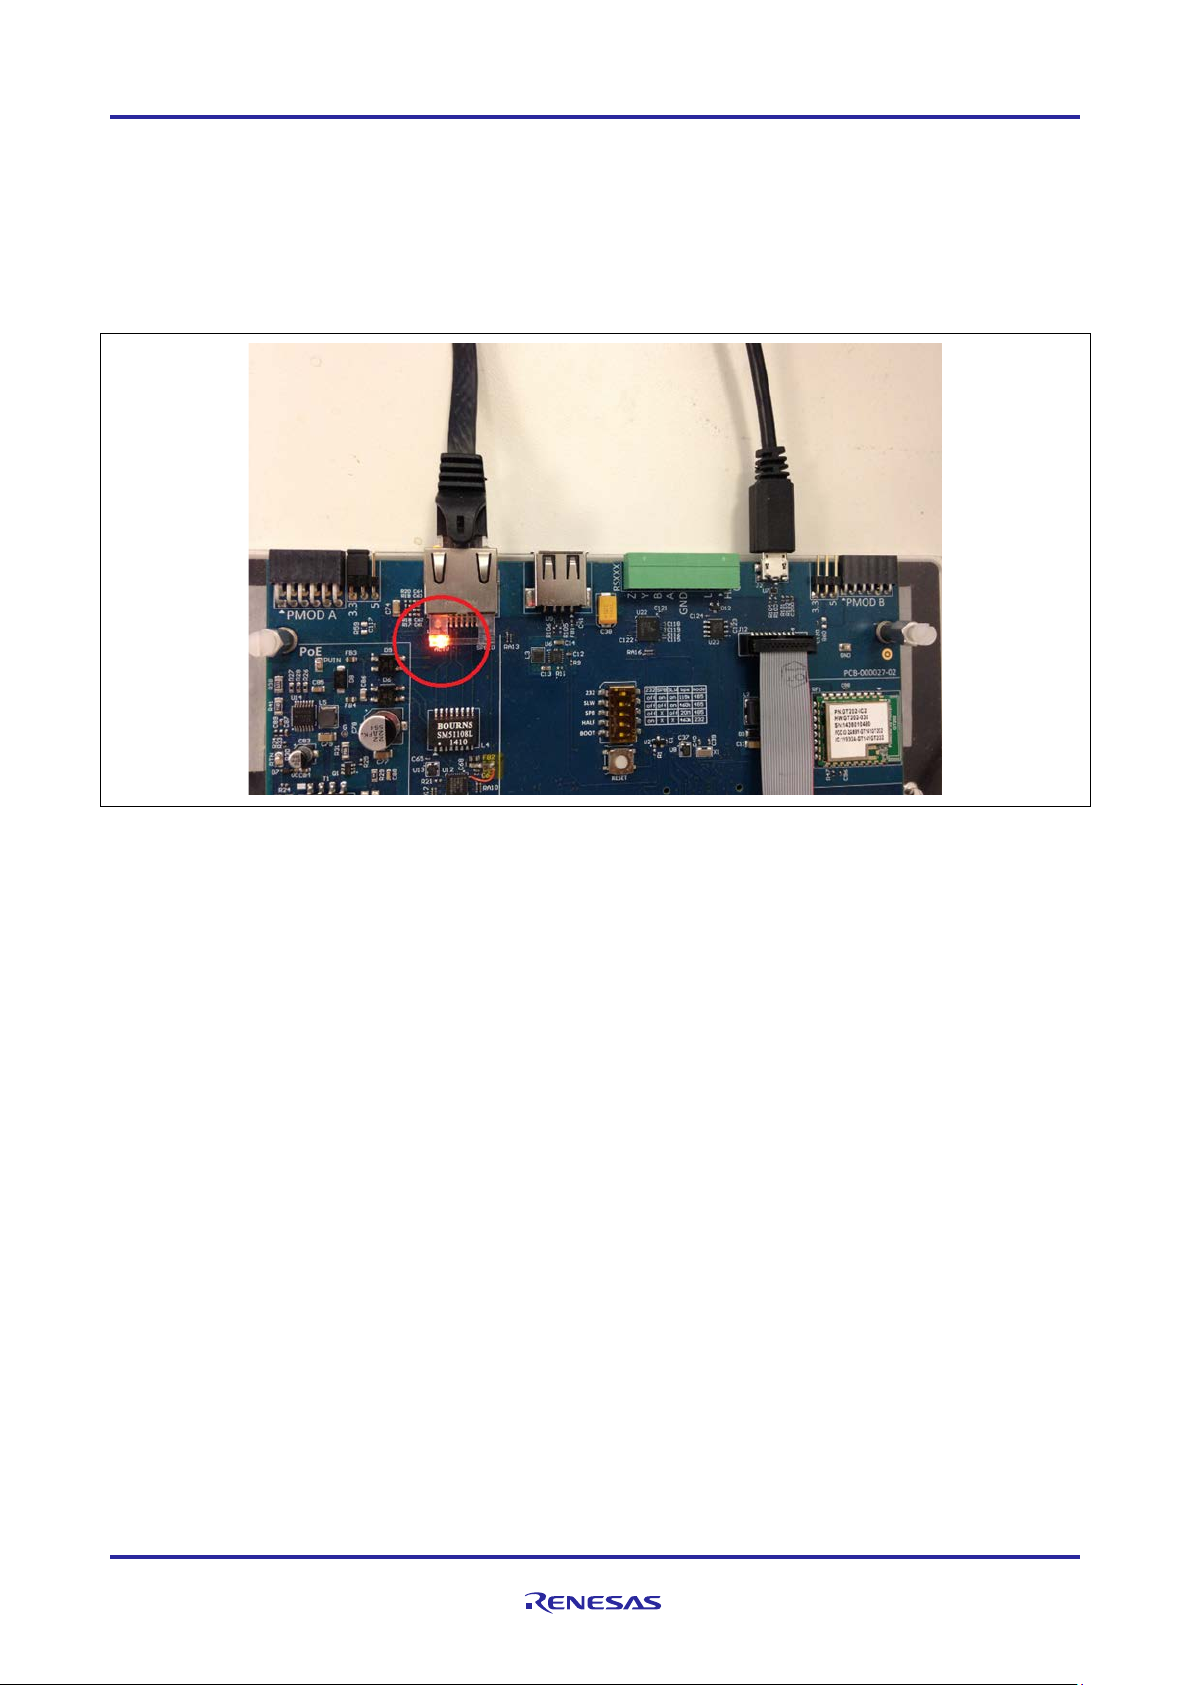
If you properly configured, built, and ran the application, you should see the orange light illuminated on the board near
the Ethernet connector on the PE-HMI1 and DK-S7G2, as shown in Figure 2.1. The LEDs on the SK-S7G2 and PKS5D9 are on the connector side of the Ethernet port itself, and not on the board.
Figure 2.1 Ethernet Active LED (PE-HMI1 Shown)
R11AN0031EU0102 Rev.1.02 Page 4 of 14
Mar 31, 2017
Page 5
Renesas Synergy™ Platform Getting Started with NetX™ Duo DHCP
3. Determining the IP Address leased by the DHCP Server
The application contacts the local DHCP server in the network to obtain an IP address. Once this address is obtained,
the application sends a text representation of the address over the USB connection to a terminal program (for example,
Tera Term) on the PC.
The USB connection is a standard CDC/ACM device, which requires a driver file to operate. 32-bit and 64-bit versions
of this file can be found in the Append ix section. To install the drivers:
1. Create the two files named in the appendix, to a folder on your PC and copy/paste the contents into each of the files.
The CDC/ACM device shows up in the Device Mana ger of your PC under the Other devices group as EL
Composite device.
2. Right click on this device and select update driver software.
3. When prompted for the location of the drivers, browse to the location of the two files you created in step 1. Once the
driver is updated, a new COM device shows up in the Device Manager.
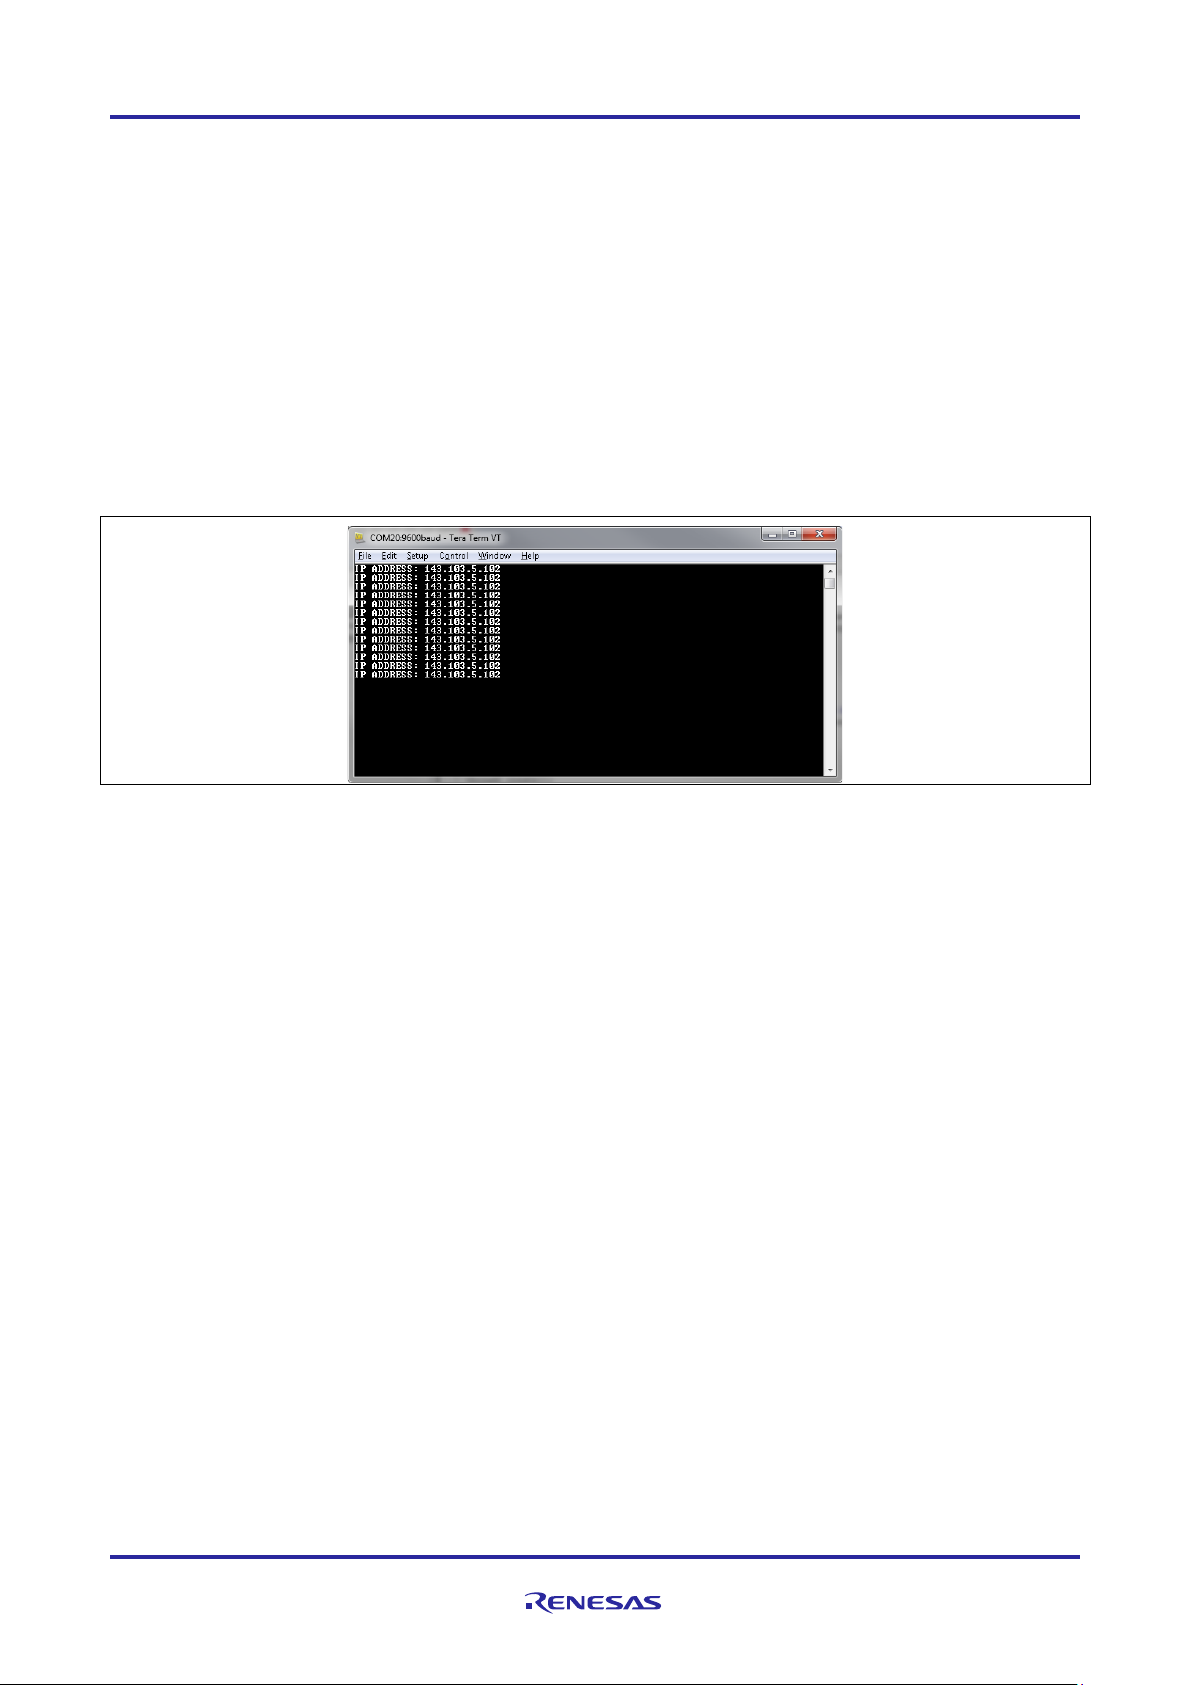
4. Use a terminal program (for example, Tera Term) to open that COM device. The baud rate is 9600.
Once your terminal program is open, your IP address is periodically printed to the terminal window.
Figure 3.1 Console displaying DHCP leased IP address for the board
R11AN0031EU0102 Rev.1.02 Page 5 of 14
Mar 31, 2017
Page 6

Renesas Synergy™ Platform Getting Started with NetX™ Duo DHCP
4. Running the NetX Duo DHCP Application
In order t o run the application on the Synergy board (PE-HMI1, SK-S7G2, DK-S7G2, or PK-S5D9), you need to insert
the USB drive to the USB connector (USB Mass storage) as shown in Figure 4.1, Figure 4.2, and Figure 4.3).
Figure 4.1 USB Drive, USB CDC Console, J-link and Ethernet Connection for DK-S7G2 Board
Figure 4.2 USB Drive, USB CDC Console, J-link and Ethernet Connection for PE-HMI Board
R11AN0031EU0102 Rev.1.02 Page 6 of 14
Mar 31, 2017
Page 7

Renesas Synergy™ Platform Getting Started with NetX™ Duo DHCP
Figure 4.3 USB Drive, USB CDC Console, J-link and Ethernet Connection for SK-S7G2/PK-S5D9
Board
If you properly configured, built, and ran the appl i cation, you should see the orange light consta ntly illuminated on the
board near Ethernet connector. A flashing green light in the same connector indicates data traffic. Figure 4.4 shows the
orange and gr een Ethernet Status LEDs on a DK-S7G2 board. The other kits function the same.
Figure 4.4 Ethernet Connectivity Status LED
R11AN0031EU0102 Rev.1.02 Page 7 of 14
Mar 31, 2017
Page 8

Renesas Synergy™ Platform Getting Started with NetX™ Duo DHCP
1. Open a command prompt on your PC and enter the command ping followed by the IP addres s that is displayed in
your terminal window (for example, ping 143.103.5.102). You should see a vie w as shown in Figure 4.5. This
verifies that the board got the IP address from the DHCP server.
Figure 4.5 Pinging the Board’s IPv4 Address
2. In a web browser on your host PC, enter your IP address in the text field where you normally place a URL, like
www.google.com. You should see t he view as seen in Figure 4.6.
Figure 4.6 Hosted Webpage
3. The local IPv6 address of the board is displayed on the bottom of the webpage. In this example, the address is
fe800000:00000000:2c090aff:fe0076c8. Return to the command prompt and execute the pi ng command o f the IPv6
address. In this example, the command would be ping fe80::2c09:aff:fe00:76c8.
Figure 4.7 Pinging the Board's IPv6 Address
4. To load the web page using the IPv6 address, enter the address in the address bar with the form
[fe80::2c09:aff:fe00:76c8], including the brackets.
R11AN0031EU0102 Rev.1.02 Page 8 of 14
Mar 31, 2017
Page 9

Renesas Synergy™ Platform Getting Started with NetX™ Duo DHCP
Figure 4.8. Hosted Webpage using IPv6 Address
Note: The example application only supports IPv6 link local addresses. If you need an IPv6 address outside of your
local network, you must add the processing to set the address for the application.
5. Click the Terminate button to close the debugger.
5. Next Steps
After you run the example application, you can learn more about how the application works, and the API calls involved
by examining the application source code.
You can also download additional Synergy example applicat i ons from the following U RL:
https://synergygallery.renesas.com/ssp/support#read
R11AN0031EU0102 Rev.1.02 Page 9 of 14
Mar 31, 2017
Page 10

Renesas Synergy™ Platform Getting Started with NetX™ Duo DHCP
6. Appendix
32-bit and 64-bit versions of the driver file required to operate the USB connection in a standard CDC/ACM device, are
described in this section.
CDC_ACM_Template_Win7_64bit.inf
;************************************************************
; Windows USB CDC ACM Setup File
; Copyright (c) 2000 Microsoft Corporation
[Version]
Signature="$Windows NT$"
Class=Ports
ClassGuid={4D36E978-E325-11CE-BFC1-08002BE10318}
Provider=%MFGNAME%
LayoutFile=layout.inf
CatalogFile=%MFGFILENAME%.cat
DriverVer=11/15/2007,5.1.2600.0
[Manufacturer]
%MFGNAME%=DeviceList, NTamd64
[DestinationDirs]
DefaultDestDir=12
;-----------------------------------------------------------------------------; Windows 2000/XP/Vista-32bit Sections
;------------------------------------------------------------------------------
[DriverInstall.nt]
include=mdmcpq.inf
CopyFiles=DriverCopyFiles.nt
AddReg=DriverInstall.nt.AddReg
[DriverCopyFiles.nt]
usbser.sys,,,0x20
[DriverInstall.nt.AddReg]
HKR,,DevLoader,,*ntkern
HKR,,NTMPDriver,,%DRIVERFILENAME%.sys
HKR,,EnumPropPages32,,"MsPorts.dll,SerialPortPropPageProvider"
[DriverInstall.nt.Services]
AddService=usbser, 0x00000002, DriverService.nt
[DriverService.nt]
DisplayName=%SERVICE%
R11AN0031EU0102 Rev.1.02 Page 10 of 14
Mar 31, 2017
Page 11

Renesas Synergy™ Platform Getting Started with NetX™ Duo DHCP
ServiceType=1
StartType=3
ErrorControl=1
ServiceBinary=%12%\%DRIVERFILENAME%.sys
;-----------------------------------------------------------------------------; Vista-64bit Sections
;------------------------------------------------------------------------------
[DriverInstall.NTamd64]
include=mdmcpq.inf
CopyFiles=DriverCopyFiles.NTamd64
AddReg=DriverInstall.NTamd64.AddReg
[DriverCopyFiles.NTamd64]
%DRIVERFILENAME%.sys,,,0x20
[DriverInstall.NTamd64.AddReg]
HKR,,DevLoader,,*ntkern
HKR,,NTMPDriver,,%DRIVERFILENAME%.sys
HKR,,EnumPropPages32,,"MsPorts.dll,SerialPortPropPageProvider"
[DriverInstall.NTamd64.Services]
AddService=usbser, 0x00000002, DriverService.NTamd64
[DriverService.NTamd64]
DisplayName=%SERVICE%
ServiceType=1
StartType=3
ErrorControl=1
ServiceBinary=%12%\%DRIVERFILENAME%.sys
;-----------------------------------------------------------------------------; Vendor and Product ID Definitions
;-----------------------------------------------------------------------------; When developing your USB device, the VID and PID used in the PC side
; application program and the firmware on the microcontroller must match.
; Modify the below line to use your VID and PID. Use the format as shown below.
; Note: One INF file can be used for multiple devices with different VID and PIDs.
; For each supported device, append ",USB\VID_xxxx&PID_yyyy" to the end of the line.
;-----------------------------------------------------------------------------[SourceDisksFiles]
[SourceDisksNames]
[DeviceList]
%DESCRIPTION%=DriverInstall, USB\VID_0000&PID_0000
R11AN0031EU0102 Rev.1.02 Page 11 of 14
Mar 31, 2017
Page 12

Renesas Synergy™ Platform Getting Started with NetX™ Duo DHCP
[DeviceList.NTamd64]
%DESCRIPTION%=DriverInstall, USB\VID_0000&PID_0000
;-----------------------------------------------------------------------------; String Definitions
;-----------------------------------------------------------------------------;Modify these strings to customize your device
;-----------------------------------------------------------------------------[Strings]
MFGFILENAME="CDC_vista"
DRIVERFILENAME ="usbser"
MFGNAME="ExpressLogic"
DESCRIPTION="Communications Port"
SERVICE="USB RS-232 Emulation Driver"
CDC_ACM_Template_Win7_32bit.inf
; CDC_ACM.inf
;
; INF file for ExpressLogic simple CDC/ACM class
;
; 1) Replace VID/PID to your own in [MYCORP] section
; VID_vvvv&PID_pppp
; vvvv, pppp: four digit hex number of VID and PID, respectively
;
; 2) Replace 'MYCORP' to your own abbreviated one (without space)
; ex ExpressLogic
; - Replace all MYCORP in this inf file
;
; 3) Replace 'MYDEV000' to your device model number (without space)
; ex CDC ACM Example
; - Replace all MYDEV000 in this inf file
;
; 4) Edit the strings in [Strings] section
;
[Version]
Signature="$Windows NT$"
Class=Ports
ClassGuid={4D36E978-E325-11CE-BFC1-08002BE10318}
Provider=%MYCORP%
LayoutFile=layout.inf
DriverVer=08/04/2004,5.1.2600.2180
[Manufacturer]
%MYCORP%=MYCORP
[MYCORP]
R11AN0031EU0102 Rev.1.02 Page 12 of 14
Mar 31, 2017
Page 13

Renesas Synergy™ Platform Getting Started with NetX™ Duo DHCP
%MYDEV000%= MYDEV000,USB\VID_0000&PID_0000
[DestinationDirs]
FakeModemCopyFileSection=12
DefaultDestDir = 12
[MYDEV000.NT]
include=mdmcpq.inf
CopyFiles=FakeModemCopyFileSection
AddReg=MYDEV000.NT.AddReg
[MYDEV000.NT.Services]
AddService = usbser, 0x00000002, Service_Inst
[Service_Inst]
DisplayName = %Serial.SvcDesc%
ServiceType = 1 ; SERVICE_KERNEL_DRIVER
StartType = 3 ; SERVICE_DEMAND_START
ErrorControl = 1 ; SERVICE_ERROR_NORMAL
ServiceBinary = %12%\usbser.sys
LoadOrderGroup = Base
[MYDEV000.NT.AddReg]
HKR,,NTMPDriver,,*ntkern
HKR,,NTMPDriver,,usbser.sys
HKR,,EnumPropPages32,,"MsPorts.dll,SerialPortPropPageProvider"
HKR,,PortSubClass,1,01
[Strings]
MYCORP = "ExpressLogic" ; Your company name
MYDEV000 = "CDC ACM example device" ; Device description
Serial.SvcDesc = "CDC ACM Driver" ; Device driver description
R11AN0031EU0102 Rev.1.02 Page 13 of 14
Mar 31, 2017
Page 14

Renesas Synergy™ Platform Getting Started with NetX™ Duo DHCP
Website and Support
Support: https://synergygallery.renesas.com/support
Technical Contact Details:
• America: https://renesas.zendesk.com/anonymous_requests/new
• Europe: https://www.renesas.com/en-eu/support/contact.html
• Japan: https://www.renesas.com/ja-jp/support/contact.html
All trademarks and registered trademarks are the property of their respective owners.
R11AN0031EU0102 Rev.1.02 Page 14 of 14
Mar 31, 2017
Page 15

Rev.
Date
Description
Page
Summary
1.00
May 10, 2016
-
Initial version
1.01
Nov 18, 2016
-
Minor format changes
1.02
Mar 31, 2017
All
Updated for SSP 1.2.0
Revision History
Page 16

Notice
1. Descriptions of circuits, software and other related information in this document are provided only to illustrate the operation of semiconductor products and application examples. You are fully responsible for
the incorporation or any other use of the circuits, software, and information in the design of your product or system. Renesas Electronics disclaims any and all liability for any losses and damages incurred by
you or third parties ar is ing from the use of t hes e c ir c uits, software, or information.
2. Renesas Electronics hereby expressly disclaims any warranties against and liability for infringement or any other disputes involving patents, copyrights, or other intellectual property rights of third parties, by or
arising from the use of Renesas Electronics products or technical information described in this document, including but not limited to, the product data, drawing, chart, program, algorithm, application
examples.
3. No license, express, im plied or otherwise, is granted her eby under any patents, copyright s or other intellectual property rights of Renesas E lec tronics or others.
4. You shall not alter, modify, copy, or otherwise misappropriate any Renesas Electronics product, whether in whole or in part. Renesas Electronics disclaims any and all liability for any losses or damages
incurred by you or third par ties arising from suc h alteration, modification, copy or otherwis e m is appr opr iation of Renesas Electr onic s pr oduc ts.
5. Renesas Electronics products are classified according to the following two quality grades: "Standard" and "High Quality". The intended applications for each Renesas Electronics product depends on the
product’s quality grade, as indicated below.
"Standard": Computers; office equipment; communications equipment; test and measurement equipment; audio and visual equipment; home electronic appliances; machine tools; personal electronic
equipment; and industrial r obots etc.
"High Quality" : Transportation equipment ( automobiles, trains, s hips , etc.); traffic cont r ol ( traffic lights) ; large-scale communication equipment; key f inanc ial terminal systems; safety cont r ol equipm ent; etc.
Renesas Electronics products are neither intended nor authorized for use in products or systems that may pose a direct threat to human life or bodily injury (artificial life support devices or systems, surgical
implantations etc.), or may cause serious property damages (space and undersea repeaters; nuclear power control systems; aircraft control systems; key plant systems; military equipment; etc.). Renesas
Electronics disclaims any and all liability for any damages or losses incurred by you or third parties arising from the use of any Renesas Electronics product for which the product is not intended by Renesas
Electronics.
6. When using the Renesas Electronics products, refer to the latest product information (data sheets, user’s manuals, application notes, "General Notes for Handling and Using Semiconductor Devices" in the
reliability handbook, etc.), and ensure that usage conditions are within the ranges specified by Renesas Electronics with respect to maximum ratings, operating power supply voltage range, heat radiation
characteristics, installation, etc. Renesas Electronics disclaims any and all liability for any malfunctions or failure or accident arising out of the use of Renesas Electronics products beyond such specified
ranges.
7. Although Renesas Electronics endeavors
to improve the quality and reliability of Renesas Electronics products, semiconductor products have specific characteristics such as the occurrence of failure at a
certain rate and malfunctions under certain use conditions. Further, Renesas Electronics products are not subject to radiation resistance design. Please ensure to implement safety measures to guard them
against the possibility of bodily injury, injury or damage caused by fire, and social damage in the event of failure or malfunction of Renesas Electronics products, such as safety design for hardware and
software including but not limited to redundancy, fire control and malfunction prevention, appropriate treatment for aging degradation or any other appropriate measures by your own responsibility as warranty
for your products /system. B ec aus e the evaluation of microcom puter software alone is v er y difficult and not prac t ic al, please evaluate the saf ety of the final produc ts or systems m anufactured by you.
8. Please contact a Renesas Electronics sales office for details as to environmental matters such as the environmental compatibility of each Renesas Electronics product. Please investigate applicable laws and
regulations that regulate the inclusion or use of controlled substances, including without limitation, the EU RoHS Directive carefully and sufficiently and use Renesas Electronics products in compliance with all
these applicable laws and regulations. Renesas Electronics dis c laim s any and all liability for damages or losses oc c ur r ing as a r es ult of your noncompliance wit h applic able laws and r egulations.
9. Renesas Electronics products and technologies shall not be used for or incorporated into any products or systems whose manufacture, use, or sale is prohibited under any applicable domestic or foreign laws
or regulations. You shall not use Renesas Electronics products or technologies for (1) any purpose relating to the development, design, manufacture, use, stockpiling, etc., of weapons of mass destruction,
such as nuclear weapons, chemical weapons, or biological weapons, or missiles (including unmanned aerial vehicles (UAVs)) for delivering such weapons, (2) any purpose relating to the development,
design, manufacture, or use of conventional weapons, or (3) any other purpose of disturbing international peace and security, and you shall not sell, export, lease, transfer, or release Renesas Electronics
products or technologies to any third party whether directly or indirectly with knowledge or reason to know that the third party or any other party will engage in the activities described above. When exporting,
selling, transferring, etc., Renesas Electronics products or technologies, you shall comply with any applicable export control laws and regulations promulgated and administered by the governments of the
countries assert ing jur is dic tion over the parties or transactions.
10. Please acknowledge and agree that you shall bear all the losses and damages which are incurred from the misuse or violation of the terms and conditions described in this document, including this notice,
and hold Renesas Electronics har m les s , if such misuse or v iolation results from y our r es ale or m ak ing Renes as E lec tronics products av ailable any third party.
11. This document s hall not be reprinted, reproduc ed or duplic ated in any form, in whole or in part, without prior wr itten consent of Renesas E lec tronics.
12. Please contact a Renes as E lec tronics sales offic e if you have any questions regar ding the information cont ained in this document or Renesas Elec tronics products.
(Note 1) " Renes as E lec tronics" as used in t his doc um ent means Renesas Electr onic s Cor por ation and also includes its majority-owned subsidiaries.
(Note 2) " Renes as E lec tronics product(s ) " means any product developed or m anufactured by or for Renes as E lec tronics.
http://www.renesas.com
Refer to "http://www.renesas.com/" for the latest and detailed information.
Renesas Electronics America Inc.
2801 Scott Boulevard Santa Clara, CA 95050-2549, U.S.A.
Tel: +1-408-588-6000, Fax: +1-408-588-6130
Renesas Electronics Canada Limited
9251 Yonge Street, Suite 8309 Richmond Hill, Ontario Canada L4C 9T3
Tel: +1-905-237-2004
Renesas Electronics Europe Limited
Dukes Meadow, Millboard Road, Bourne End, Buckinghamshire, SL8 5FH, U.K
Tel: +44-1628-585-100, Fax: +44-1628-585-900
Renesas Electronics Europe GmbH
Arcadiastrasse 10, 40472 Düsseldorf, Germany
Tel: +49-211-6503-0, Fax: +49-211-6503-1327
Renesas Electronics (China) Co., Ltd.
Room 1709, Quantum Plaza, No.27 ZhiChunLu Haidian District, Beijing 100191, P.R.China
Tel: +86-10-8235-1155, Fax: +86-10-8235-7679
Renesas Electronics (Shanghai) Co., Ltd.
Unit 301, Tower A, Central Towers, 555 Langao Road, Putuo District, Shanghai, P. R. China 200333
Tel: +86-21-2226-0888, Fax: +86-21-2226-0999
Renesas El ectronics Hong Kong Limited
Unit 1601-1611, 16/F., Tower 2, Grand Century Place, 193 Prince Edward Road West, Mongkok, Kowloon, Hong Kong
Tel: +852-2265-6688, Fax: +852 2886-9022
Renesas Electronics Taiwan Co., Ltd.
13F, No. 363, Fu Shing North Road, Taipei 10543, Taiwan
Tel: +886-2-8175-9600, Fax: +886 2-8175-9670
Renesas Electronics Singapore Pte. Ltd.
80 Bendemeer Road, Unit #06-02 Hyflux Innovation Centre, Singapore 339949
Tel: +65-6213-0200, Fax: +65-6213-0300
Renesas Electronics Malaysia Sdn.Bhd.
Unit 1207, Block B, Menara Amcorp, Amcorp Trade Centre, No. 18, Jln Persiaran Barat, 46050 Petaling Jaya, Selangor Darul Ehsan, Malaysia
Tel: +60-3-7955-9390, Fax: +60-3-7955-9510
Renesas Electronics India Pvt. Ltd.
No.777C, 100 Feet Road, HAL II Stage, Indiranagar, Bangalore, India
Tel: +91-80-67208700, Fax: +91-80-67208777
Renesas Electronics Korea Co., Ltd.
12F., 234 Teheran-ro, Gangnam-Gu, Seoul, 135-080, Korea
Tel: +82-2-558-3737, Fax: +82-2-558-5141
SALES OFFICES
© 2017 Renesas Electronics Corporation. All rights reserved.
Colophon 6.0
(Rev.3.0-1 November 2016)
 Loading...