

Page 1
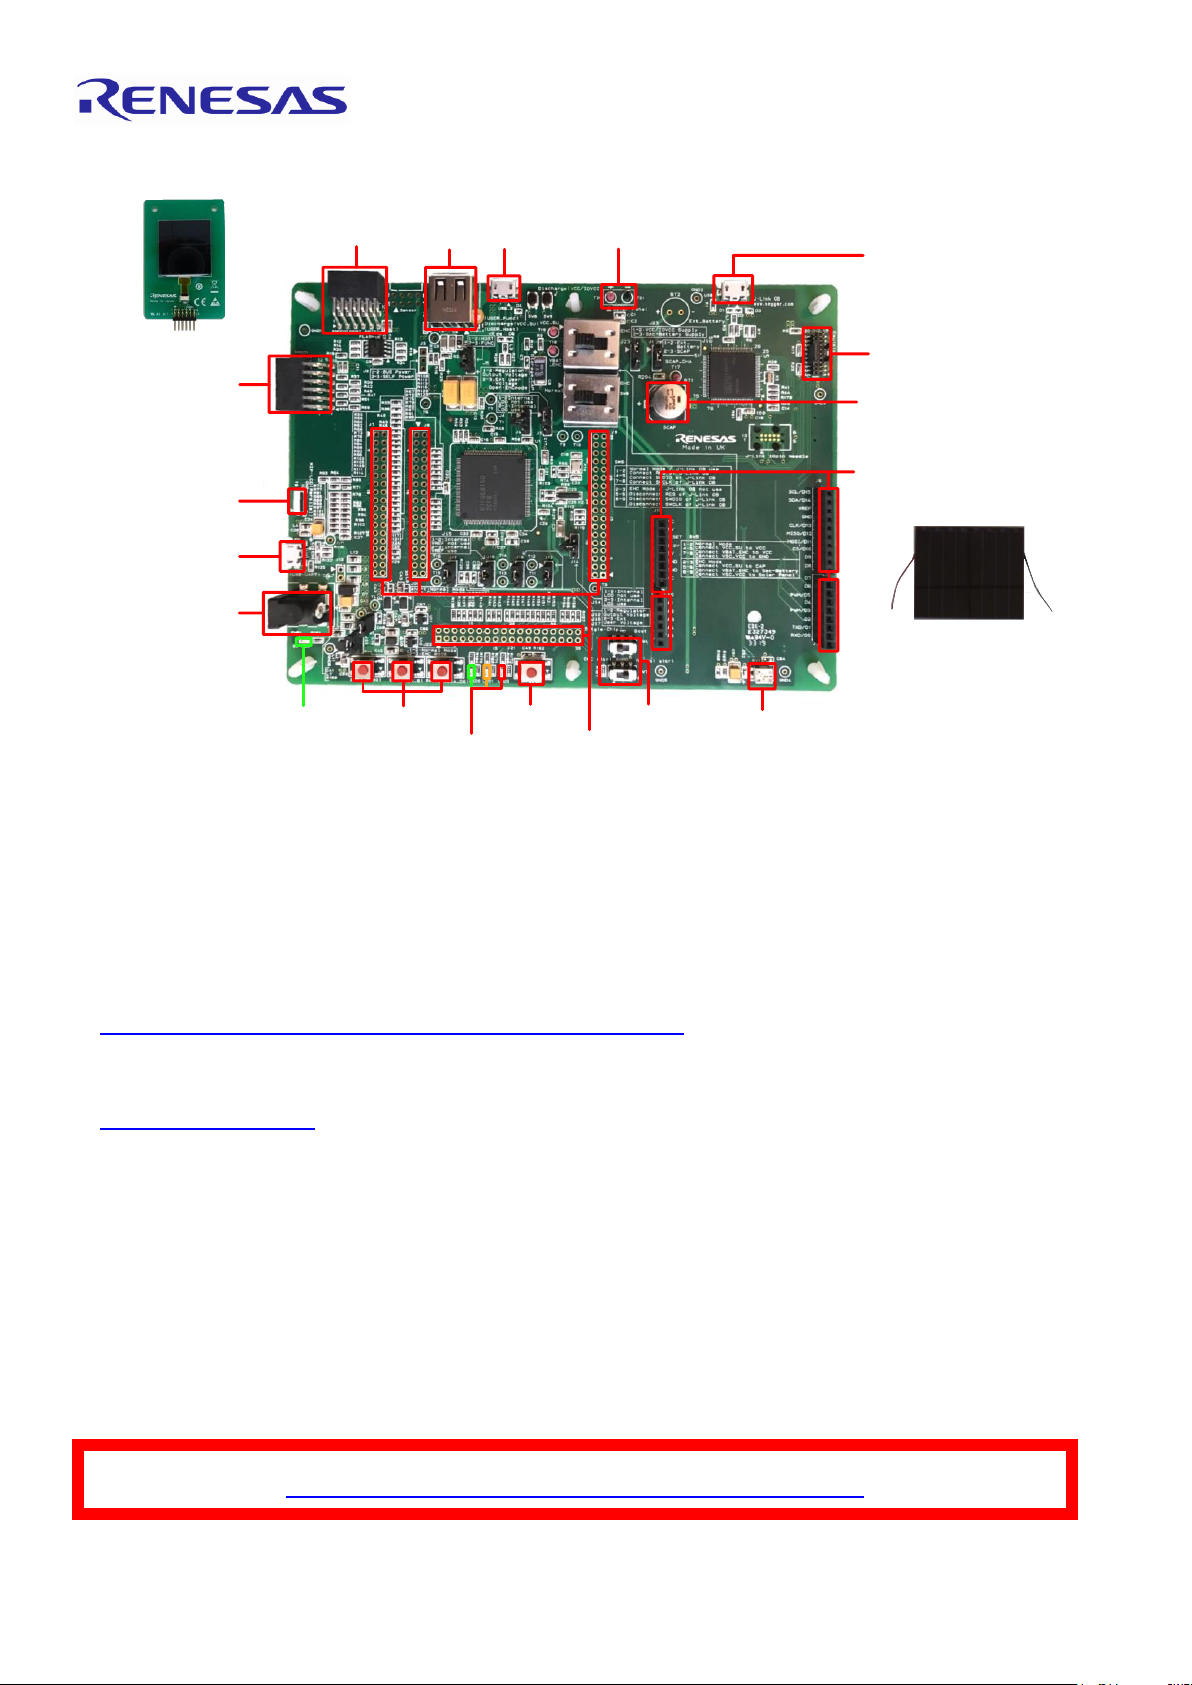
Solar Panel
Interface
Potentiometer
RE01 Headers
Pmod2
Connector
Emulator
Connector
Quick Start Guide
Evaluation Kit RE01 1500KB
DC Power Jack
(5V)
User Switches
Reset Switch
USB
Host
J-Link OB
Connector
USB Serial
MIP-LCD(Parallel)
Connector
Pmod1
Connector
USB
Func
MD Switches
User LEDs
Power LED
Super Capacitor
Arduino UNO Interface
MIP-LCD
Expansion Board
Solar Panel
Note: An active internet connection is required for downloading IAR Embedded Workbench® and sample code.
Use IAR Embedded Workbench® Ver 8.40.2 or above.
1. Installation of IAR Embedded Workbench
®
a. Free version of IAR Embedded Workbench
®
are available for download from the following link. There are time
limited (30days) version and code size limited version. The sample code provided on the Renesas website can be
run on a code size limited version.
https://www.iar.com/iar-embedded-workbench/#!?architecture=Arm
If you would like to purchase the full version, please contact us in the following URL.
https://www.iar.com/buy/
b. Run the downloaded installer. Follow the instructions to install IAR Embedded Workbench
®
. During installation, it is
necessary to select the driver corresponding to the emulator to be used. Since J-Link OB is used this document,
select the J-Link driver.
2. Download Sample Code
c. The sample code is available for download from the following URL. Download to the root of any drive on your PC. In
this document, R_GDT driver sample code (Using CMSIS Driver Package) (R01AN4755EJ) is used as a
representative example. Download the R_GDT driver sample code (Using CMSIS Driver Package) (R01AN4755EJ).
d. When the download is complete, unzip the file.
https://www.renesas.com/ek-re01-1500kb
Page 2

3. Connection
e. Ensure that the MIP-LCD expansion board is fitted to the connector marked ‘PMOD1’ on the main board.
f. Connect the Micro USB connector end of supplied USB cable to the J-Link OB connector on the main board.
g. Connect the other end of the USB cable to the USB port on your PC. The main board power LED will turn on.
4. Importing Sample Code into IAR Embedded Workbench®
IAR Embedded Workbench® integrates various tools such as compiler, assembler, debugger and editor into a common
graphical user interface.
h. Start IAR Embedded Workbench
®
:
Windows™ 7: Start Menu > All Programs > IAR EW for Arm X.XX.X > IAR EW for Arm X.XX.X
Windows™ 8.1 & 8: From Apps View , IAR EW for Arm X.XX.X > IAR EW for Arm X.XX.X
Windows™ 10: Start Menu > All Apps > IAR EW for Arm X.XX.X > IAR EW for Arm X.XX.X
X.XX.X shows the version.
i. Click the "Open Workspace..." from "File" in the menu. When the "Open Workspace" dialog is displayed, select a
workspace file for sample code and click <Open>. For the R_GDT driver sample code (Using CMSIS Driver
Package) (R01AN4755EJ), select the workspace file (an4755_hal_gdt_mono_re.eww) in the
an4755_hal_gdt_mono_re folder. Depending on the version of IAR Embeded Workbench used, there is a request to
convert the workspace file. In that case, there is no problem in converting to the latest format.
Main Board
MIP-LCD Expansion Board
Page 3

5. Debug
j. Click the <Make> button.
k. Click the <Download and Debug> button to download the program to the target and start debugging.
l. After downloading the code, click the <Go> button. The image is displayed on the MIP-LCD.
m. Pressing the user switch (one of SW1 to SW3) on the main board changes the image on the MIP-LCD. The
following is the image after pressing SW3.
n. Click the <Break> button. The program will stop and show the line of code of the current program counter.
o. When debugging is complete, click the <Stop debugging> button.
6. Energy Harvesting
To use the energy harvesting function with this board, refer to the application note "Maintenance free power
management by RE energy harvesting controller" (R01AN4837EJ). The following is the connection of the corresponding
application note.
Page 4

7. Next Steps
Other sample codes and application notes are available on the Renesas website. It is available from the following URL.
https://www.renesas.com/ek-re01-1500kb
The following is the examples of the sample codes and application notes.
⚫ USART Asynchronous Communication Sample Code (Using CMSIS Driver Package) (R01AN4699EJ)
⚫ I2C Single-Master Communication Sample Code (Using CMSIS Driver Package) (R01AN4697EJ)
⚫ S14AD Scan Conversion Sample Code (Using CMSIS Driver Package) (R01AN4701EJ)
⚫ Low Power Mode Transition Example (R01AN4710EJ)
⚫ DMAC Repeat Transfer Sample Code (Using CMSIS Driver Package) (R01AN4703EJ)
⚫ DTC Normal Transfer Sample Code (Using CMSIS Driver Package) (R01AN4704EJ)
8. User Manuals
The user's manual of this product is available from the following URL.
https://www.renesas.com/ek-re01-1500kb
⚫ RE01 Group Products with 1.5-Mbyte Flash Memory User’s Manual: Hardware (R01UH0796EJ)
⚫ Evaluation Kit RE01 1500KB main board schematics (R20UT4563EJ)
⚫ Evaluation Kit RE01 1500KB MIP-LCD expansion board schematics (R20UT4564EJ)
⚫ Evaluation Kit RE01 1500KB user’s manual (R20UT4561EJ)
The manual for IAR Embedded Workbench® is available from the User guides for IAR Information Center for ARM®,
which is displayed when IAR Embedded Workbench
®
is launched.
9. Support
Online technical support and information is available at: https://www.renesas.com/ek-re01-1500kb
Technical Contact Details
America: techsupport.america@renesas.com
Europe: https://www.renesas.com/eu/en/support/contact.html
Global & Japan: https://www.renesas.com/support/contact.html
Technical support for IAR Embedded Workbench® can be accessed from the IAR Information Center Support for Arm®,
which is displayed when IAR Embedded Workbench® is launched.
© 2019 Renesas Electronics Corporation. All rights reserved.
Website: https://www.renesas.com/
D016274_11_S01 _V01
R20UT4562EJ0100
Jul 9, 2019
 Loading...