

Page 1

Application Note
Renesas Synergy™ Platform
NetX™ DHCP Client Module Guide
Introduction
This module guide will enable you to effectively use a module in your own design. Upon completion of this
guide, you will be able to add this module to your own design, configure it correctly for the target application
and write code, using the included application project code as a reference and efficient starting point.
References to more detailed API descriptions and suggestions of other application projects that demonstrate
more advanced uses of the module are av ailab le in the Renesas Syner gy™ Knowledge Base (as described
in the References Section at the end of this document) and should be valuable resources for creating more
complex designs.
The Dynamic Host Configuration Protocol (DHCP) is an extremely useful protocol to obtain an IP address
and network parameters. The DHCP is designed to extend the basic functionality of the BOOTP (which is
limited to static address configuration) to include a completely dynamic IP address allocation through leasing
an IP address to a client for a specified period of time. The DHCP can also be configured to allocate IP
addresses in a static manner, like the BOOTP. An application’s IP address is one of the supplied parameters
for the NetX
application, either statically or through the user configuration. When the application does not know or care
what its IP address is, the NetX is initialized with a zero IP address ; a DHCP client component added to NetX
can then obtain an IP address.
™
component. Supplying the IP address poses no problem if the IP address is known to the
This document provides an overview of the key elements related to the NetX DHCP Client module
implementation on the Renesas Synergy Platform. This document’s primary focus is on the addition and
configuration of the NetX DHCP Client module to a Renesas Synergy Platform project. For details on the
operation of this module, consult the document, NetX™ Dynamic Host Configuration Protocol for Clients
User’s Guide for the Renesas Synergy™ Platform. It is part of X-Ware™ Component Documents for
Renesas Synergy™ zip file available from the Synergy Gallery (https://www.renesas.com/synergy/software).
Contents
1. NetX DHCP Client Module Features ........................................................................................ 2
2. NetX DHCP Client Module APIs Over view ............................................................................... 2
3. NetX DHCP Client Module Operational Overview .................................................................... 4
3.1 NetX DHCP Client Module Important Operational Notes and Limitations .............................................. 5
4. Including the NetX DHCP Client Module in an Application ....................................................... 6
5. Configuring the NetX DHCP Client Module .............................................................................. 7
5.1 Configuration Settings for the NetX DHCP Client Lower-Level Modules ................................................ 8
5.2 NetX DHCP Client Module Clock Configuration .................................................................................... 11
5.3 NetX DHCP Client Module Pin Configuration ....................................................................................... 11
6. Using the NetX DHCP Client Module in an Application .......................................................... 11
7. The NetX DHCP Client Module Application Project................................................................ 12
8. Customizing the NetX DHCP Client Module for a Target Application ..................................... 15
9. Running the NetX DHCP Client Module Application Project ................................................... 16
10. NetX DHCP Client Module Conclus io n .................................................................................. 18
11. NetX DHCP Client Module Next St ep s................................................................................... 18
12. Reference Information ........................................................................................................... 19
R11AN0138EU0103 Rev.1.03 Page 1 of 21
May.02.19
Page 2
Renesas Synergy™ Platform NetX™ DHCP Client Module Guid e
Function Name
Example API Call and Description
nx_dhcp_create
nx_dhcp_create(&my_dhcp, &my_ip, "My DHCP");
nx_dhcp_clear_broadcast_flag
nx_dhcp_clear_broadcast_flag(&my_dhcp,
Clear broadcast flag on Client messages.
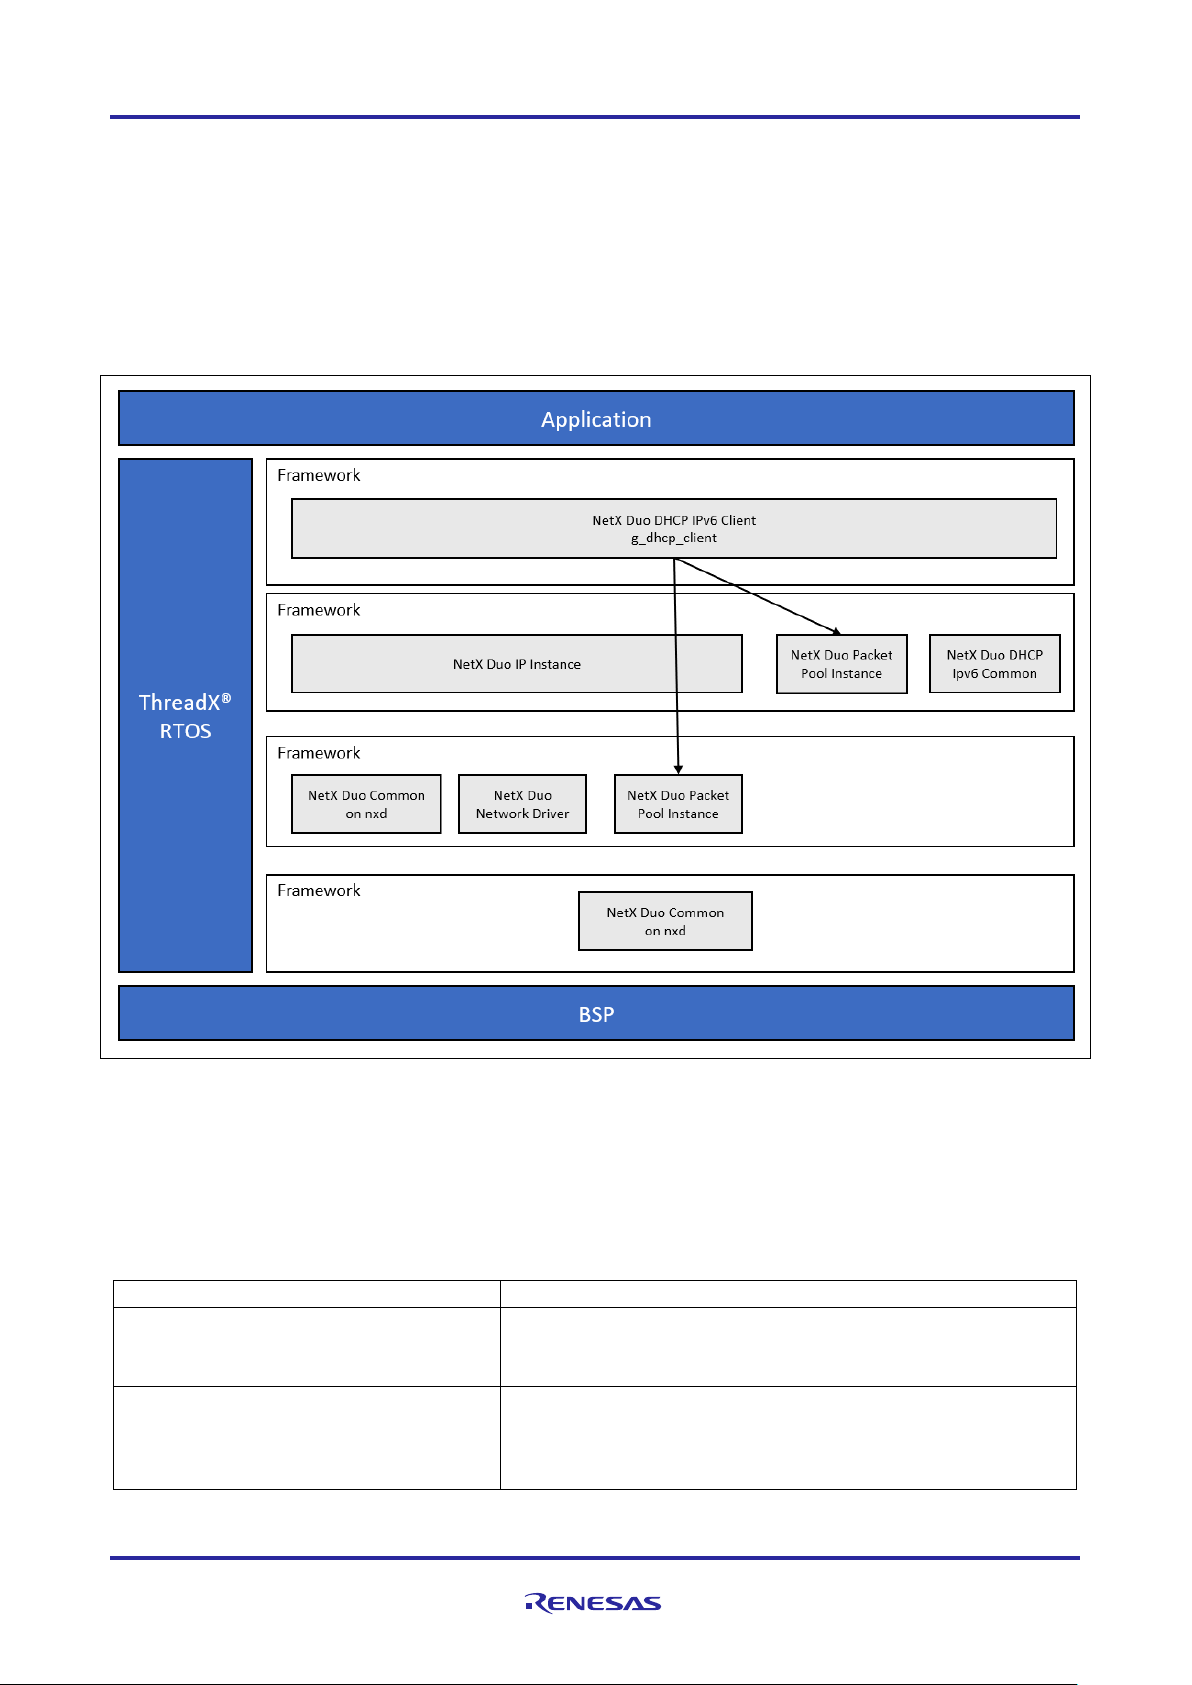
1. NetX DHCP Client Module Features
• The NetX DHCP Client module is compliant with RFC2132, RFC2131, and related RFCs.
• The module provides high-level APIs to:
Create and delete a DHCP client instance
Start, stop, and reinitialize the DHCP client (to restart the DHCP client protocol)
Request a specific IP Address from the server
Specify the network interfac e to run the DHCP client o n
Supply an application-created packet pool to the DHCP client
Figure 1. NetX DHCP Client Module Block Diagram
2. NetX DHCP Client Module APIs Overview
The NetX DHCP Client module defines APIs for creating and starting the DHCP client. Internally, the DHCP
client handles all communication with the DHCP server to obtain an IP address. The following table lists the
complete set of module APIs with an example API call and a brief description of each. A status return values
table follows the API summary table.
Table 1. NetX DHCP Client Module API Summary
Create a DHCP instance.
NX_TRUE);
R11AN0138EU0103 Rev.1.03 Page 2 of 21
May.02.19
Page 3

Renesas Synergy™ Platform NetX™ DHCP Client Module Guid e
Function Name
Example API Call and Description
nx_dhcp_delete
nx_dhcp_delete(&my_dhcp);
nx_dhcp_decline
nx_dhcp_decline(&my_dhcp);
Send Decline message to server.
nx_dhcp_force_renew
nx_dhcp_force_renew(&my_dhcp);
Handle Server force renew message.
nx_dhcp_packet_pool_set
nx_packet_pool_create(&dhcp_pool, "DHCP Client
creates its own packet pool.
nx_dhcp_release
nx_dhcp_release(&my_dhcp);
Send Release message to server.
nx_dhcp_reinitialize
nx_dhcp_reinitialize(&my_dhcp);
and gateway registered with the IP instance.
nx_dhcp_request_client_ip
nx_dhcp_request_client_ip(&my_dhcp,
Request a specific IP address.
nx_dhcp_send_request
nx_dhcp_send_request(&my_dhcp,
allowed).
nx_dhcp_server_address_get
nx_dhcp_server_address_get(&dhcp_0,
Retrieve DHCP Client’s DHCP server address.
nx_dhcp_set_interface_index
nx_dhcp_set_interface_index(&my_dhcp, 1);
Specify the network interface to run DHCP Client.
nx_dhcp_start
nx_dhcp_start(&my_dhcp);
Start DHCP processing.
nx_dhcp_state_change_notify
nx_dhcp_state_change_notify(&my_dhcp,
Notify application of DHCP state change.
nx_dhcp_stop
nx_dhcp_stop(&my_dhcp);
Stop DHCP processing.
nx_dhcp_user_option_retrieve
nx_dhcp_user_option_retrieve(&my_dhcp,
Retrieve the specified DHCP option.
nx_dhcp_user_option_convert
nx_dhcp_user_option_convert(dns_ip_string);
Convert four bytes to ULONG.
The following services require that Persistent client state be enabled
nx_dhcp_suspend
nx_dhcp_suspend(&g_dhcp_client0);
Suspend the DHCP Client thread.
Delete a DHCP instance.
Packet Pool",
NX_DHCP_PACKET_PAYLOAD, pointer, (15 *
NX_DHCP_PACKET_PAYLOAD));
nx_dhcp_create(&dhcp_0, &ip_0, "janetsdhcp1");
nx_dhcp_packet_pool_set(&my_dhcp,
packet_pool_ptr);
Set the DHCP Client packet pool. By default, the DHCP Client
Clear DHCP client network parameters and clear IP address
IP(192,168,0,6), NX_TRUE);
NX_DHCP_TYPE_INFORMREQUEST);
Send DHCP message to server (only INFORM_REQUEST is
&server_address);
my_state_change);
NX_DHCP_OPTION_DNS_SVR,
dns_ip_string, &size);
R11AN0138EU0103 Rev.1.03 Page 3 of 21
May.02.19
Page 4

Renesas Synergy™ Platform NetX™ DHCP Client Module Guid e
Function Name
Example API Call and Description
nx_dhcp_resume
nx_dhcp_resume (&g_dhcp_client0);
Resume the DHCP Client thread.
nx_dhcp_client_update_time_remaining
nx_dhcp_client_update_time_remaining(*g_dhcp_c
nx_dhcp_client_create_record
nx_dhcp_client_create_record(&g_dhcp_client0)
Client based on Client lease data.
nx_dhcp_client_restore_record
nx_dhcp_client_restore_record(&g_dhcp_client,
time remaining on its lease.
Name
Description
NX_SUCCESS
Successful API call.
NX_PTR_ERROR*
Invalid pointer input.
NX_THREADS_ONLY_CALLER_CHECKING*
Invalid caller of this service.
NX_INVALID_INTERFACE
NetX is not enabled on the input interface
NX_NOT_ENABLED
Not enabled to set the DHCP Client packet pool.
NX_DHCP_NOT_STARTED
DHCP Client not started.
NX_DHCP_NOT_BOUND
The IP address has not been leased so the current
operation is not allowed.
NX_DHCP_INVALID_MESSAGE
Illegal message type to send.
NX_DHCP_BAD_INTERFACE_INDEX*
An invalid network interface supplied
NX_DHCP_UNKNOWN_OPTION
Unknown DHCP option to extract from DHCP server
response
NX_DHCP_INVALID_IP_REQUEST*
Invalid address for the DHCP Client to request
NX_DHCP_INVALID_PAYLOAD
Packet pool for the DHCP Client has insufficient payload
NX_DHCP_ALREADY_STARTED
DHCP Client thread task has already started
NX_DHCP_PARSE_ERROR
Unable to parse requested option from Server response
NX_DHCP_DEST_TO_SMALL
Supplied buffer too small to hold the requested option
data for user requesting option data
lient0, 1000)
This updates the time remaining on the IP lease by the input
time in timer ticks, such as the time interval while the DHCP
Client thread was suspended.
This fills in a client record structure associated with the DHCP
client_record_ptr, time_elapsed)
The Client record points to data to restore to the DHCP Client
itself, and time elapsed is subtracted from the DHCP Client
Note: For details on operation and definitions for the function data structures, typedefs, defines, API data,
API structures and function variables review the associated Express Logic User’s Manual accessible
as described in the Reference section later in this document.
Table 2. Status Return Values
Note: Lower-level drivers may return common error codes. Refer to the SSP User’s Man u al API
References for the associated module for a definition of all relevant status return values.
*These error codes are returned on ly if error checking is enabled. For details on error checking
services in NetX, refer to the NetX User Guide for the Renesas S yner gy™ Platform.
3. NetX DHCP Client Module Operational Over view
The DHCP Client module handles all the details in obtaining an IP address, registering it with the IP instance,
and renewing the IP address lease before the lease expires.
A NetX IP instance is created; it has a zero IP address and is enabled for User Datagram Protocol (UDP)
and the Address Resolution Protocol (ARP), respectively. The Reverse ARP (RARP) s hou ld not be ena bl ed;
a DHCP Client is then created. Its creation creates an UDP socket for sending and receiving DHCP
messages. By default, the DHCP Client creates its own packet pool based on the settings Minimum packet
payload size and Number of packets in packet pool (see the following table). The Minimum Client
R11AN0138EU0103 Rev.1.03 Page 4 of 21
May.02.19
Page 5

Renesas Synergy™ Platform NetX™ DHCP Client Module Guid e
packet payload size must be large enough to include DHCP data, IP, UDP headers, and the physical frame
header.
• For Ethernet networks, this minimum payload is 592 bytes, which is the default setting of Minimum
Client packet payload size.
• For other network types (such as Wi-Fi), the frame-header size is larger, and minimum size must be
increased correspondingly.
When the packet pool is created, the DHCP Client verifies that the packet payload is not less than the
minimum required payload size.
The DHCP Client can request a specific IP address using the nx_dhcp_request_client_ip service and
supply a non-zero IP address before starting the DHCP Client. Normally, the request is useful for a device
previously assigned an IP address that wishes to keep the same IP address. Note the server is not obligated
to accommodate this request.
When the DHCP Client is started, it binds the socket to a DHCP port (by default 68) and begins sending and
receiving packets through that socket. When the client is assigned an IP address, it automatically registers
the IP address with NetX. The server supplies the network mask and network gateway, and the DHCP Client
module updates NetX with that information.
When the server assigns the Client an IP address, it may also supply other network information, such as the
DNS server and the NTP server. The application can obtain those values using the
nx_dhcp_user_option_retrieve service.
The DHCP Client keeps track of the time remaining on the IP lease. It automatically sends Renew requests
to the DHCP Server when time to renew. If the server is no longer on the network, or is otherwise not
responding, the client sends broadcast requests to any DHCP Server on the network. If the lease expires
without a renewal or rebinding, the client is returned to the NX_DHCP_STATE_INIT state. The device may
continue to use the IP address. If a DHCP Server is later available, and the device is able to request an IP
address, it must no longer use the old IP address.
In busy networks, a DHCP Client socket queue can fill up with non-specific DHCP broadcast packets
intended for other DHCP Client hosts. If the DHCP Client socket receive-queue fills up, any packets intended
for the device may get dropped. To avoid this problem, the DHCP Client continually clears non-specific
broadcast packets from the socket.
3.1 NetX DHCP Client Module Important Operational Notes and Limitations
3.1.1 NetX DHCP Client Module Operational Notes
Instead of the DHCP Client module creating the packet pool, the developer may prefer to supply a previously
created packet pool. To do so, enable the Use application packet pool option, then use the
nx_dhcp_packet_pool_set service to set the DHCP Client’s packet pool.
The DHCP Client verifies that the packet payload is not less than the minimum required packet size.
The IP address offered to the client should be tested for ‘uniqueness’ on the local network, since the DHCP
protocol does not require the server to check. To configure the DHCP Client to check, enable the Se nd ARP
probe option.
The DHCP Client sends a series of ARP “probes” with its assigned IP address out on the network. If any host
responds to these ARP requests/probes, the DHCP Client automatically sends a DECLINE message to the
server and restarts the DHCP protocol to request another IP address. Otherwise, the DHCP Client proceeds
to the bound state. The states of the client in the DHCP pr otocol are:
NX_DHCP_STATE_NOT_STARTED
NX_DHCP_STATE_INIT
NX_DHCP_STATE_SELECTING
NX_DHCP_STATE_REQUESTING
NX_DHCP_STATE_BOUND
NX_DHCP_STATE_RENEWING
NX_DHCP_STATE_REBINDING
R11AN0138EU0103 Rev.1.03 Page 5 of 21
May.02.19
Page 6

Renesas Synergy™ Platform NetX™ DHCP Client Module Guid e
Resource
ISDE
Tab
Stacks Selection Sequence
g_dhcp_client0 NetX DHCP Client
Threads
New Stack> X-Ware> NetX> Protocols> NetX DHCP
Client
Note: If ARP probe is enabled, the NetX DHCP Client enters a temporary state called
NX_DHCP_STATE_ADDRESS_PROBING before the NX_DHCP_STATE_BOUND state.
The application can detect if the DHCP Client has completed (has an IP address) in a couple of ways. First, it
can call the nx_ip_status_check service with the NX_IP_ADDRESS_RESOLVED option. Alternatively, it
can use the nx_dhcp_state_change_notify service which notifies the application when the DHCP
Client state changes. When the DHCP Client reaches the bound state, (state == NX_DHCP_STATE_BOUND) it
has a valid IP address.
If there is a need to stop the DHCP Client thread task, call the nx_dhcp_stop service. To restart the Client,
first call the nx_dhcp_reinitialize service to clear the DHCP Client data and also clear network
parameters registered with N etX . Then, the DHCP Client is restarted with the nx_dhcp_start call.
3.1.2 NetX DHCP Client Module Limitations
• The DHCP Client does not support the INFORM_REQUEST message. The application can send this
message out using the nx_dhcp_send_request service, but the data from the Server is not extracted
and saved to the DHCP Client.
• The options supported nx_dhcp_user_option_retrieve are limited to the followi ng:
NX_DHCP_OPTION_SUBNET_MASK
NX_DHCP_OPTION_TIME_OFFSET
NX_DHCP_OPTION_GATEWAYS
NX_DHCP_OPTION_TIMESVR
NX_DHCP_OPTION_DNS_SVR
NX_DHCP_OPTION_NTP_SVR
NX_DHCP_OPTION_DHCP_LEASE
NX_DHCP_OPTION_DHCP_SERVER
NX_DHCP_OPTION_RENEWAL
NX_DHCP_OPTION_REBIND
• Refer to the following documents (also listed in the References Section) for additional limitations for this
module: NetX Dynamic Host Configuration Protocol for Clients User’s Guide for the Renesas Synergy™
Platform Latest SSP Release Notes.
4. Including the NetX DHCP Client Module in an Application
This section descr ibes how to include the NetX DH CP Client module in an applicati on using the Synergy
Software Platform (SSP) Configurator in your Integrated Solution Development Environment (ISDE).
Note: It is assumed you are familiar the steps to creating a project, adding threads, adding a stack to a
thread, and configuring a block within the stack. If you are unfamiliar with any of these items, refer to
the SSP User’s Manual to learn how to manage each of these important steps in creating SSP-based
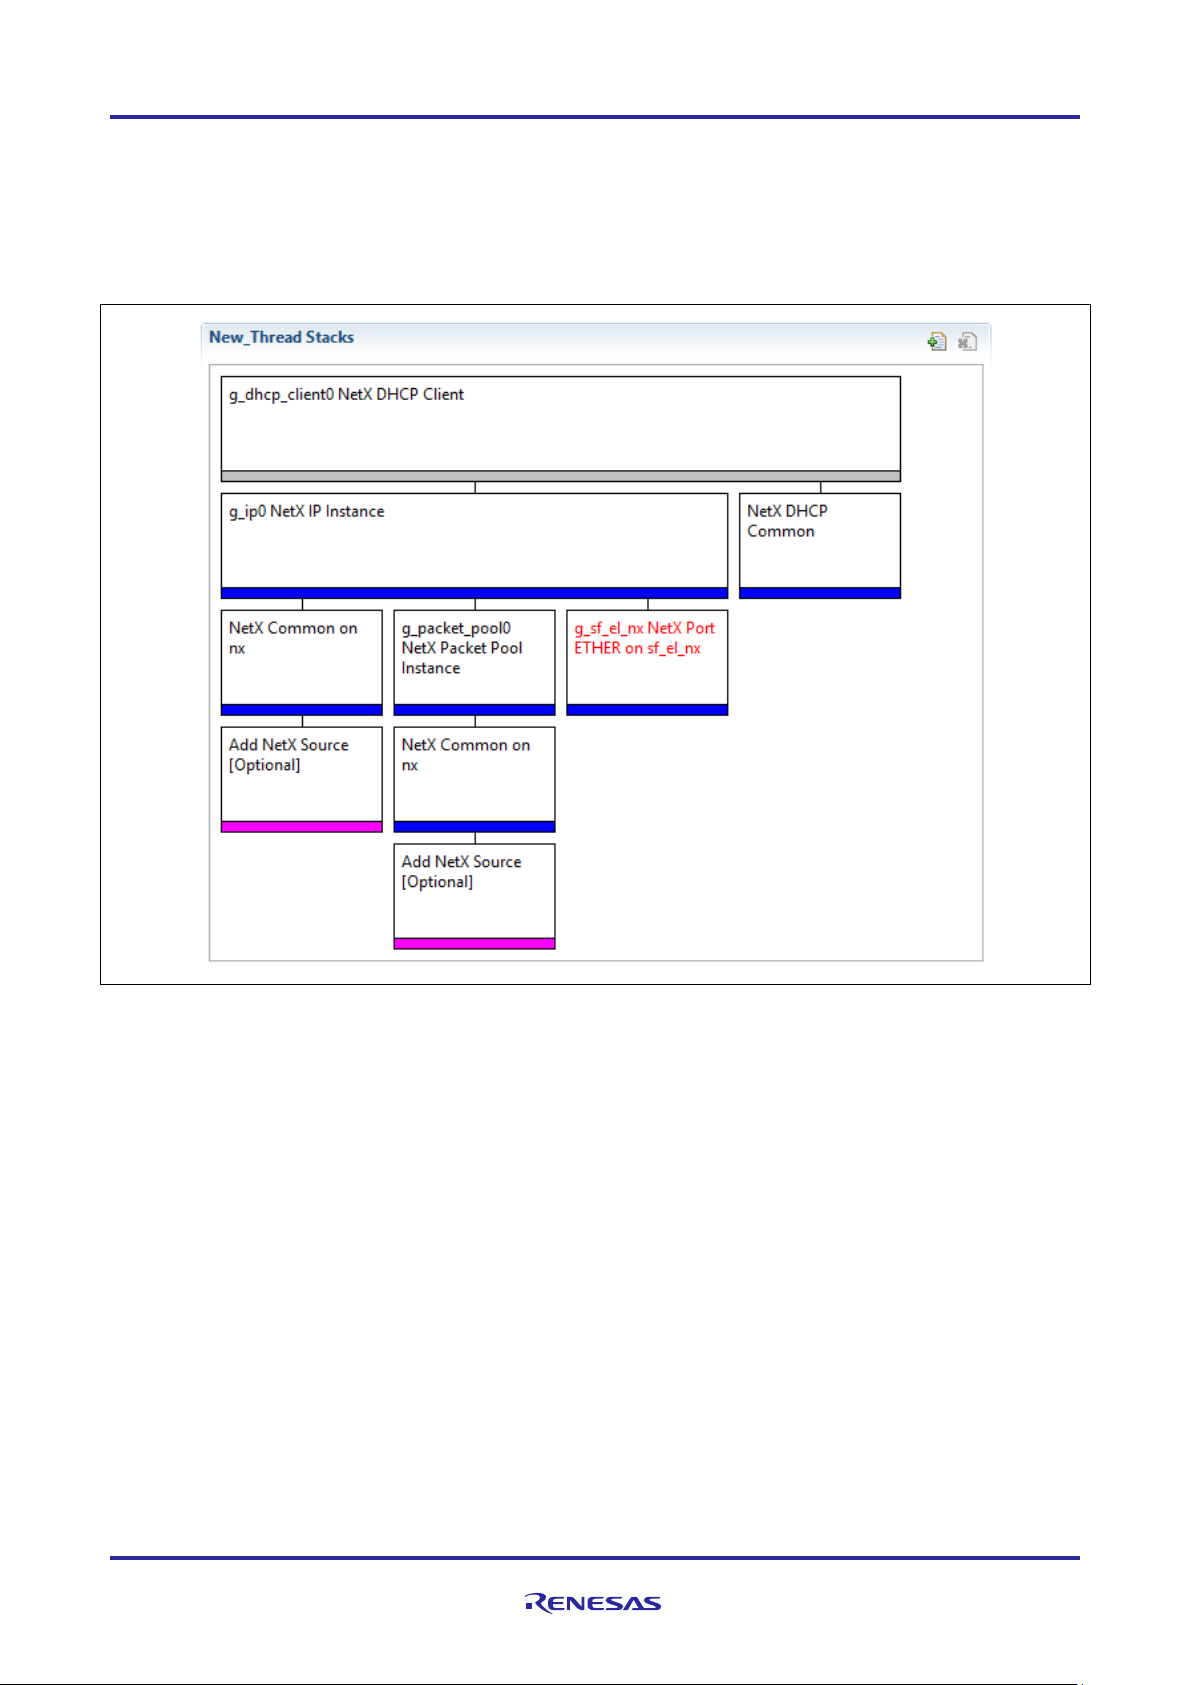
To add the NetX DHCP Client module to an application, simply add it to a thread using the stacks selection
sequence listed in the following table. (The default name for the NetX DHCP Client is g_dhcp_client0.
This name can be changed in the associated Properties window.)
Table 3. NetX DHCP Client Module Selection Sequence
When the NetX DHCP Client module on g_dhcp_client0 is added to the thread stack as shown in the
following figure, the configurator automatically adds the needed lower-level NetX components and dri ver s. A
applications.
R11AN0138EU0103 Rev.1.03 Page 6 of 21
May.02.19
Page 7
Renesas Synergy™ Platform NetX™ DHCP Client Module Guid e
driver or NetX component needing additional configuration is box-text highlighted in Red. Modules with a
Gray band are individual standalone modules. Modules with a Blue band are shared or common; they only
need to be added once to be used by multiple stacks. Modules with a Pink band can require additional lower
level drivers. Sometimes these drivers are opt ion al or recom mended, and this information is indicated with
the inclusion of this text in the block. If additional lower-level dri vers are required, the module description
includes Add in the text. Clicking a Pink-banded module brings up the New icon and displays possible
choices for selection.
Figure 2. NetX DHCP Client Module Stack
5. Configuring the NetX DHCP Client Module
The NetX DHCP Client module must be configured by the user for the desired operation. The SSP
configuration window automatically identifies (by highlighting the block in red) any required configuration
selections, such as interrupts or operating m odes, configured for lo wer-level modules to enabl e successful
operation. Only properties that can be changed without causing conflict are available for modification.
Properties that are locked with a lock icon in the Properties wi ndow in the ISDE are not available for changes.
This approach simplifies the configuration process and makes it much less error-prone than previous ‘manual’
approaches to configuration. The available configuration settings and defaults for all the user-accessible
properties are given in the properties tab within the SSP Configurator and are shown in the following tables for
easy reference.
One of the properties m ost often identified as requiring a change is the interrupt priority; this configuratio n
setting is available within the Properties window of the associated module. Simply select the indicated module
to view it in the properties wind o w; the interrupt settings are often towards the bottom of the properties list, so
scroll down until the y becom e availabl e. Also no te th at the interrupt prior ities list ed in t he Properties window
in the ISDE indicate the validity of the setting based on the MCU targeted (CM4 or CM0+). This level of detail
is not included in the following configuration pr operties tables b ut is eas ily visib le when configuri ng interruptpriority levels in the ISDE.
R11AN0138EU0103 Rev.1.03 Page 7 of 21
May.02.19
Page 8

Renesas Synergy™ Platform NetX™ DHCP Client Module Guid e
Parameter
Value
Description
Internal thread priority
3
Internal thread priority selection
Internal thread stack size
4096
Internal thread stack size (bytes)
Timeout between DHCP
1
Timeout between DHCP
selection
Packet allocate timeout
1
Packet allocate timeout (seconds)
Use BOOTP
Enable, Disable
Default: Disable
Use BOOTP selection
Send ARP probe
Enable, Disable
Send ARP probe selection
Packet ARP probe timeout
(seconds)
10
Packet ARP probe timeout
(seconds) selection
Maximum retransmission
64
Maximum retransmission timeout
Minimum renew timeout
(seconds)
60
Minimum renew timeout (seconds)
selection
Minimum retransmission
4
Minimum retransmission timeout
Client packet payload size
(bytes)
592
Client packet payload size (bytes)
selection
Number of packets in internal
5
Number of packets in internal
Server message check interval
Disabled = 0xFFFFFFF
0xFFFFFFF
Server message check interval
Disabled = 0xFFFFFFF selection
Persistent client state
Enable, Disable
Persistent client state selection
Use application packet pool
Enable, Disable
Default: Disable
Use application packet pool
Maximum message size
Enable, Disable
Maximum message size support
DHCP options buffer size
(bytes)
312
DHCP options buffer size (bytes)
selection
Name
g_dhcp_client0
Module name
Note: You may want to open your ISDE, create the NetX DHCP Client Framework, and explore the property
settings while reviewing the configuration settings in the following table. This helps to orient you and
Table 4. Configuration Settings for the NetX DHCP Client Module
can be a useful hands-on approach to learning the ins and outs of developing with the SSP.
(bytes)
messages processed (seconds)
(seconds)
timeout (seconds)
timeout (seconds)
packet pool
selection
messages processed (seconds)
selection
Default: Disable
(seconds) selection
(seconds) selection
packet pool selection
(unit = processing interval).
Default: Disable
support
Note: The above configuration setting examples and defaults are for a project using the S7G2 Synergy
MCU group. Other MCUs may have different default values and available configuration settings.
Default: Disable
(unit = processing interval).
selection
selection
5.1 Configuration Settings for the NetX DHCP Client Lower-Level Modules
In some cases, settings other than the defaults for lower-level modules can be desirable. For example, it
might be useful to select different Ethernet interface pins and resets. The configurable properties for the
lower-level stack modules are provided in the following tables for completeness and as a reference.
Most property settings for lower-level modules can be determined by inspection of the associated Properties
window from the SSP configurator. Typically, only a small number of settings must be modified from the
default for lower-level modules, as indicated via the red text in the thread stack block.
R11AN0138EU0103 Rev.1.03 Page 8 of 21
May.02.19
Page 9

Renesas Synergy™ Platform NetX™ DHCP Client Module Guid e
ISDE Property
Value
Description
Name
g_ip0
Module name
IPv4 Address (use commas for
separation)
0,0,0,0
IPv4 Address selection
Subnet Mask (use commas for
separation)
255,255,255,0
Subnet Mask selection
IP Helper Thread Stack Size (bytes)
2048
IP Helper Thread Stack Size (bytes) selection
IP Helper Thread Priority
3
IP Helper Thread Priority selection
ARP
Enable
ARP selection
ARP Cache Size in Bytes
520
ARP Cache Size in Bytes selection
Reverse ARP
Enable, Disable
Reverse ARP selection
TCP
Enable, Disable
Default: Enable
TCP selection
UDP
Enable
UDP selection
ICMP
Enable, Disable
Default: Enable
ICMP selection
IGMP
Enable, Disable
IGMP selection
IP fragmentation
Enable, Disable
Default: Disable
IP fragmentation selection
ISDE Property
Value
Description
Type of Service for
Normal, Minimum delay, Maximum data,
Default: Normal
Type of service UDP requests
Fragmentation option
Don't fragment, Fragment okay
Default: Don't fragment
Fragment option selection
Time to live
128
Time to live selection
Packet Queue depth
5
Packet queue depth selection
Notice that some of the configuration properties must be set to a certain value for proper framework
operation and are locked to prevent user modification. The following tables identify all the settings available
within the properties section for this module.
Table 5. Configuration Settings for the NetX IP Instance
Default: Disable
Default: Enable
Note: The above configuration setting examples and defaults are for a project using the S7G2 Synergy
MCU group. Other MCUs may have different default values and available configuration settings.
Table 6. Configuration Settings for the NetX DHCP Common Instance
UDP requests
Note: The above configuration setting examples and defaults are for a project using the S7G2 Synergy
MCU group. Other MCUs may have different default values and available configuration settings.
Maximum reliability, Minimum cost
selection
R11AN0138EU0103 Rev.1.03 Page 9 of 21
May.02.19
Page 10

Renesas Synergy™ Platform NetX™ DHCP Client Module Guid e
ISDE Property
Value
Description
Name
g_packet_pool0
Module name
Packet Size in Bytes
640
Packet size selection
Number of Packets in Pool
16
Number of packets in pool selection
ISDE Property
Value
Description
Parameter Checking
BSP, Enabled, Disabled
Default: BSP
Enable or disable the parameter
Channel 0 Phy Reset Pin
IOPORT_PORT_09_PIN_03
Channel 0 Phy reset pin selection
Channel 0 MAC Address
0x00002E09
Channel 0 MAC address high bits
Channel 0 MAC Address
Low Bits
0x0A0076C7
Channel 0 MAC address low bits
selection
Channel 1 Phy Reset Pin
IOPORT_PORT_07_PIN_06
Channel 1 Phy reset pin selection
Channel 1 MAC Address
High Bits
0x00002E09
Channel 1 MAC address high bits
selection
Channel 1 MAC Address
0x0A0076C8
Channel 1 MAC address low bits
Number of Receive Buffer
Descriptors
8
Number of receive buffer
descriptors selection
Number of Transmit Buffer
Descriptors
32
Number of transmit buffer
descriptors selection
Ethernet Interrupt Priority
Priority 0 (highest), Priority 1:2,
Default: Disabled
Ethernet interrupt priority selection
Name
g_sf_el_nx
Module name
Channel
0
Channel selection
Callback
NULL
Callback selection
ISDE Property
Value
Description
Name
g_packet_pool1
Module name
Packet Size in Bytes
640
Packet size selection
Number of Packets in Pool
16
Number of packets in pool selection
ISDE Property
Value
Description
No configurable settings
Table 7. Configuration Settings for the NetX Packet Pool Instance
Note: The above configuration setting examples and defaults are for a project using the S7G2 Synergy
MCU group. Other MCUs may have different default values and available configuration settings.
Table 8. Configuration Settings for the NetX Port ETHER
checking
High Bits
Low Bits
Priority 3 (CM4: valid, CM0+: lowestnot valid if using ThreadX), Priority
4:14 (CM4: valid, CM0+: invalid),
Priority 15 (CM4 lowest - not valid if
using ThreadX, CM0+: invalid)
Note: The above configuration setting examples and defaults are for a project using the S7G2 Synergy
MCU group. Other MCUs may have different default values and available configuration settings.
Table 9. Configuration Settings for the NetX Packet Pool Insta nce (when added as new)
selection
selection
Note: The above configuration setting examples and defaults are for a project using the S7G2 Synergy
MCU group. Other MCUs may have different default values and available configuration settings.
Table 10. Configuration Settings for the NetX Common Instance
Note: The above configuration setting examples and defaults are for a project using the S7G2 Synergy
R11AN0138EU0103 Rev.1.03 Page 10 of 21
May.02.19
MCU group. Other MCUs may have different default values and available configuration settings.
Page 11
Renesas Synergy™ Platform NetX™ DHCP Client Module Guid e
Resource
ISDE Tab
Pin selection Sequence
ETHERC
Pins
Select Peripherals > Connectivity:ETHERC > ETHERC1.RMII
Property
Value
Description
Operation Mode
Disabled, Custom, RMII
(Default: Disabled)
Select RMII as the Operation Mode for
ETHERC1
Pin Group Selection
Mixed, _A only
Pin group selection
REF50CK
P701
REF50CK Pin
TXD0
P700
TXD0 Pin
TXD1
P406
TXD1 Pin
TXD_EN
P405
TXD_EN Pin
RXD0
P702
RXD0 Pin
RXD1
P703
RXD1 Pin
RX_ER
P704
RX_ER Pin
CRS_DV
P705
CRS_DV Pin
MDC
P403
MDC Pin
MDIO
P404
MDIO Pin
5.2 NetX DHCP Client Module Clock Configura tion
The ETHERC peripheral module uses PCLKA as its clock source. The PCLKA frequency is set by using the
SSP configurator clock tab prior to a build, or by using the CGC Interface at run-time.
5.3 NetX DHCP Client Module Pin Configur ation
The ETHERC peripheral module uses pins on the MCU to communicate to external devices. I/O pins must
be selected and configured as required by the external device. The following pin selection table identifies a
method to select the pins within the SSP configuration window, with the pin configuration table identifying an
example selection for the I2C.
Note: The operation mode selection determines what peripheral signals are available and thus what MCU
Table 11. Pin Selection for the ETHERC Module
Note: The selection sequence assumes ETHERC1 is the desired hardware target for the driver.
Table 12. Pin Configuration Settings for the ETHERC1
pins are required.
(Default: _A only)
Note: The table lists configuration setting examples and defaults for a project using the S7G2 Synergy MCU
group and the SK-S7G2 Kit. Other Synergy Kits and MCUs may have different available pin
configuration settings.
6. Using the NetX DHCP Client Module in an Application
The following example assumes a system that is already established with a working and enabled IP, ARP,
and UDP, and the link running. The typical steps in using the NetX DHCP Client module in an application
are:
1. Set the DHCP features for the DHCP Client (request specific IP address, clear the broadcast flag, set the
interface on which DHCP Client runs) before starting the DHCP Client. [Optional]
2. Start the DHCP with the nx_dhcp_start API
3. Wait for IP Address resolution by calling nx_ip_status_check (a NetX library service call) or check for the
bound state in the DHCP Client state-change callback function.
4. A valid IP Address is now on lease and the application can start using NetX services for sending and
receiving packets.
5. The DHCP Client will automatically request IP lease renewal based on the time remaining on the IP
lease (as long as the DHCP Client thread task is still running). [Optional]
R11AN0138EU0103 Rev.1.03 Page 11 of 21
May.02.19
Page 12

Renesas Synergy™ Platform NetX™ DHCP Client Module Guid e
Resource
Revision
Description
e2 studio
7.3.0 or later
Integrated Solution Development Environment
SSP
1.6.0 or later
Synergy Software Platform
IAR EW for Renesas Synergy
8.23.3 or later
IAR Embedded Workbench® for Renesas Synergy™
SSC
7.3.0 or later
Synergy Standalone Configurator
SK-S7G2
v3.0 to v3.3
Starter Kit
6. To stop the DHCP Client thread task, call nx_dhcp_stop. To restart the DHCP Client call
nx_dhcp_reinitialize and then call nx_dhcp_start. [Optional]
7. Add or modify the existing DHCP Client settings. [Optional]
The following figure shows these common steps in a typical operational flow diagram.
Figure 3. Flow Diagram of a Typical NetX DHCP Client Module Application
7. The NetX DHCP Client Module Application Project
The application project associated with this module guide demonstrates comm on steps in using the N etX
DHCP C lient m odule in a full design. The project can be found using th e link provided in the References
Section at the end of this document. You may want to import and open the application project within the ISDE
and view the NetX DHC P Client configuration s ettings for the m odule. You can also read over the code in
(DHCPv4_Client_Netx_MG.c) which is used to illustrate the NetX DHCP Client module APIs in a complete
design.
This application project demonstrates the typical use of the NetX DHCP Client module APIs. The application
project configures the DHCP Client with some common optional features before starting the DHCP Client
thread task. The application project waits to be assigned a valid IP address, and once this happens, it tests
the IP address by pinging on the DHCP and DNS servers.
The DHCPv4_Client_Netx_MG.c file is located in the project once it has been imported into the ISDE.
Note that this is not the auto-generated code file dhcp_thread_entry.c. The dhcp_thread_entry calls a
function defined in DHCPv4_Client_Netx_MG.c file to run a DHCP Client session.
The following table identifies target versions for the associated software and hardware used by the
Application Project.
Table 13. Software and Hardware Resources Used by the Application Project
R11AN0138EU0103 Rev.1.03 Page 12 of 21
May.02.19
Page 13

Renesas Synergy™ Platform NetX™ DHCP Client Module Guid e
The application project requires connecting a USB micro cable on the J19 connector to a PC to display the
output to the Renesas debug virtual console and DHCP Client device that is connected to a network with a
DHCP Server through the RJ45 connector (J11). Optionally, the application project can use a packet capture
program, such as Wireshark, that is running on a local PC. The following figure shows the application project
as a simple flow diagram.
Figure 4. NetX DHCP Client Module Application Project Flow Diagram
The DHCPv4_Client_Netx_MG.c file is located in the project once it has been imported into the ISDE. You
can open this file within the ISDE and use the description provided to learn key uses of the APIs.
The progress of the DHCP protocol can also be viewed using a packet trace capture (such as Wireshark)
running on any PC located on the same network. No special configuration is required since the DHCP
packets in this application are broadcast and visible to all the hosts on the network.
At the top of the dhcp_thread_entry(), the application waits a few seconds to allow the IP thread task
and the network driver to initialize. Both need to know a few things about each other before the NetX library
calls work correctly. Note that the nx_ip_status_check service is not used with
NX_IP_ADDRESS_RESOLVED, and this is because currently the application has a zero IP address. Next, the
thread entry function calls the run_dhcp_client_session function to actually run the session.
DHCP Client Properties
The application project uses all the default settings for the NetX DHCP Client properties and has limited
debug output (semi hosting).
Using the DHCP State Change Callback
Before starting the DHCP Client, run_dhcp_client_session registers a DHCP state-change callback
R11AN0138EU0103 Rev.1.03 Page 13 of 21
May.02.19
Page 14

Renesas Synergy™ Platform NetX™ DHCP Client Module Guid e
function using the nx_dhcp_state_change_notify service. This enables application thread to be notified
of the DHCP state changes. The advantage of this callback is the application thread need not wait or poll the
IP instance for a valid IP address (such as when the NX_DHCP_STATE_BOUND is achie ve d), and can perform
other tasks instead. The callback function in this application only checks for the bound state.
Starting the DHCP Client Thread Task
The DHCP Client is started using the nx_dhcp_start service. This service binds the client socket to the
DHCP port, and activates the client thread and timer. The application thread then periodically 1) checks if the
client is bound yet, and 2) relinquishes control to other threads to run before checking again.
Note that there is an upper limit to how long it waits to reach the bound state. This maximum wait is set by
the WAIT_TO_BE_BOUND macro defined in DHCPv4_Client_Netx_MG.h as (2*NX_IP_PERIODIC_RATE).
NX_IP_PERIODIC_RATE is used in NetX to convert timer ticks to seconds and automatically set internally in
the Synergy environment.
DHCP Services Available in the Bound State
If the application is notified and the DHCP Client is bound before this wait time-out expires, the
run_dhcp_client_session queries the DHCP Client for the server IP address using the
nx_dhcp_server_address_get service. It gets its own IP address from the NetX service
nx_ip_address set. At this point, the application can start sending and receiving non-broadcast packets.
To demonstrate a valid IP address, run_dhcp_client_session pings the DHCP Server.
Once bound to an IP address, the DHCP Client thread task keeps track of the time remaining on the IP lease
while it is running. When the lease is near to expiration, the DHCP Client thread automatically initiates
renewing the IP lease at the appropriate time. In this application, the DHCP Client is intentionally stopped so
this does not happen.
Stopping and Restarting the DHCP Client the First Time
There may be instances where the application wants to stop the DHCP Client. For example, if the client
needs to be powered down, detects it is on another network, or the lease time assigned is longer than the
host needs (so there is no need to keep a thread running.) Before it can be restarted, the client must be
stopped and reinitialized.
The application calls the nx_dhcp_stop service to suspend the DHCP Client thread task, unbinds the
DHCP Client socket, and deactivates the DHCP Client timer. Also, it puts the DHCP Client in a state to be
restarted. At this point, there is no DHCP Client thread activity. The activity does not clear network
parameters, so the application can still send and receive packets with the assigned IP address as the
source.
To clear network parameters from NetX, (parameters such as the IP address, network mask, and the
gateway), then run_dhcp_client_session, which calls the nx_dhcp_reinitialize service. This
process also clears the network parameters registered with the DHCP Client record.
The run_dhcp_client_session resets the is_bound flag and restarts the DHCP Client by calling the
nx_dhcp_start service as before. This time it calls nx_ip_status_check to check whether it has received
another IP address lease. Again, there is maximum wait limit set to wait for another IP address to be
assigned. Note: there is no guarantee the server would assign the same IP address to the device.
On reaching the bound state a second time, run_dhcp_client_session queries the DHCP Client for the
DNS Server using the nx_dhcp_user_option_retrieve service. This service can also be used to query
the DHCP Client for IP lease time and other network information (see Section 3.1.2 for a list of options
supported.)
To verify a valid IP address, the run_dhcp_client_session pings the DNS Server.
Stopping and Deleting the DHCP Client
Before stopping the DHCP Client the second time, the run_dhcp_client_session releases the IP
address using the nx_dhcp_release service. This service is not required but is considered good network
behavior to let the DHCP Server know the address is now available for other hosts. The DHCP Client can
only release an IP address if it is bound to that IP address.
All DHCP Client activity is stopped with the nx_dhcp_stop call. The DHCP Client itself is then deleted,
(including the DHCP timer, threads, and UDP socket) by calling the nx_dhcp_delete service.
R11AN0138EU0103 Rev.1.03 Page 14 of 21
May.02.19
Page 15

Renesas Synergy™ Platform NetX™ DHCP Client Module Guid e
To verify if any errors occurred, the run_dhcp_client_session checks the error_counter variable for a
non-zero value. This value increments each time an error occurs. If it is zero, NX_SUCCESS returns;
otherwise, a non-zero error status is returned. The debug output using semi-hosting also records a trace of
the DHCP session in the Renesas Debug Virtual Console.
DHCPv4_Client_Netx_MG.c also defines the DHCP state change callback function,
my_notify_callback. This callback simply checks each notification for the state to be
NX_DHCP_STATE_BOUND (bound state), and then sets a flag for run_dhcp_client_session to check
whether an IP lease has been assigned. Note that this flag must be cleared between stopping and restarting
the DHCP Client thread, since it is only a true/false value, not a counter.
Note: It is assumed you are familiar with using printf() the Debug Console in the SSP. If you are
unfamiliar with this, refer to the How do I Use Printf() with the Debug Console in the Synergy
Software Package Kn o wle dge Bas e artic l e, available in the References Section at the end of this
document. You can see results via the watch variables in the debug mode.
8. Customizing the NetX DHCP Client Module for a Ta rget Application
A brief descriptio n of DHCP Client configuration setti ngs commonly cha nged in a DHCP Client application s
follows. The details are given in the context of this application project:
Requesting a Specific IP address
The application may wish to request a specific IP address from the DHCP Server. If so, it should call the
nx_dhcp_request_client_ip API before nx_dhcp_start is called in this application project. This is
often useful for a device that wants to keep the same IP address. By setting the third input in this API,
skip_discover_message, to NX_TRUE, the application is requesting that the DISCOVER and OFFER
steps be omitted (a normal transaction is DISCOVER -> OFFER -> REQUEST -> ACK). This reduces the
DHCP protocol to one REQUEST message from the Client and one ACK message from the Server. It is up
to the Server to accommodate either or both requests. In the event it does not, the DHCP Client
automatically reverts to the normal four-step process.
Supplying a user-defined packet pool for the DH CP Client
The application may wish to supply the packet pool to the DHCP Client rather than the Client creating its own
packet pool which it is defaulted to do. The advantages of using separate packet pools for different
components of an application is that memory can be optimized for the expected usage. It also simplifies
tracking down packet-pool leaks, and/or problems with packet-pool depletion.
To do so, enable the Use application packet pool property of the DHCP Client stack element, then create a
separate packet pool from the one used by the IP instance (usually designated g_packet_pool0.) Click on
the + icon in the Thread Stack elements and choose X-Ware -> NetX -> Netx Packet Pool Inst an ce; this
creates a packet pool for the DHCP Client. Note that the packet pool payload must be a minimum of 576
bytes plus the size of the Ethernet frame header.
Before calling the nx_dhcp_start API, register the new packet pool (which defaults to g_packet_pool1)
with the DHCP Client by calling the nx_dhcp_packet_pool_set API. Note that it is up to the application
to delete the packet pool when it no longer has use for it. The DHCP Client deletes the packet pool only if it
created it in the first place.
Enabling ARP Probes
The RFC 2131 recommends that a device using DHCP to obtain an IP address verify that it is not in use by
another host. This check is done by sending ARP probes out immediately after being assigned the IP
address. If no hosts respond to these probes, the device can assume the address is not in use. NetX DHCP
Client performs this service if the Sending ARP Probes property is enabled on the DHCP Client stack
element. The DHCP Client is set with a callback that NetX uses to notify the DHCP Client of an ARP conflict.
This allows the DHCP Client to verify the uniqueness of an IP address before promoting the DHCP Client to
the bound state. If another host does respond, then the DHCP Client sends a DECLINE message to the
Server and automatically restarts the DHCP protocol at the INIT state.
Note that if Sending ARP Probes is enabled, the application must expect to wait longer to achieve the
bound state. The number of probes is specified by the ARP probe count property and defaults to 2. The
interval to wait for a response (and before sending the next probe) is specified by the ARP probe wait time
that defaults to 1 second. (There is also a random delay imposed on the wait time.) The minimum and
R11AN0138EU0103 Rev.1.03 Page 15 of 21
May.02.19
Page 16

Renesas Synergy™ Platform NetX™ DHCP Client Module Guid e
maximum wait time is specified by Maximum ARP probe wait time (seconds) and Maximum ARP probe wait
time (seconds) properties which default to 1 and 2 seconds, respectively. Using these defaults, the
WAIT_TO_BE_BOUND defined in DHCPv4_Client_Netx_MG.h should be adjusted to
(4*NX_IP_PERIODIC_RATE) to allow enough time for the ARP Probe process to complete and the DHCP
Client to achieve the bound state.
Accessing DHCP Servers behind a Router
The NetX DHCP Client has a clear broadcast flag service intended to allow a device to access a server
behind a router, such as outside the local network. This flag can only happen if the DHCP Server sends
unicast packets through the router to the client. But since the device has no IP address, it would normally be
unable to receive a unicast OFFER or ACK from the server. However, the NetX IP layer does accept
packets with a zero destination IP address. Therefore, the packet is forwarded up to the UDP layer and onto
the DHCP Client itself. The DHCP Client can signal the server to send unicast packets by calling
nx_dhcp_clear_broadcast_flag service with the clear_flag input set to NX_TRUE.
More Uses of the State Change Callback
In the event the application fails to achieve the bound state, the callback function in this application can be
expanded to check other states the DHCP Client has achieved. This may help resolve the reason why a
DHCP session failed to progress to the bound state. For example, if the DHCP Client does not reach at least
the NX_DHCP_STATE_REQUESTING, it has not received any server responses. If it reached the
NX_DHCP_STATE_ARP_PROBING, and then is reset to the NX_DHCP_STATE_INIT again, that indicates the
IP address assigned was not unique and the client has started the protocol over again.
Note that NX_DHCP_STATE_INIT is set each time the application calls nx_dhcp_start. If this state is
reached again, it indicates a failure in one of the initialization states leading to the bound state, and the DHCP
Client automatically resets the state to the NX_DHCP_STATE_INIT state.
Modification in the maximum number of DNS servers and gateways on the network.
MAX_GATEWAYS and MAX_DNS_SERVERS are set to 5, which means the API call to read number of DNS and
gateways can successfully read maximum of 5 DNS servers and 5 gateways on the network, if there are
more number of DNS or gateways on the network then the call nx_dhcp_user_option_retrieve will
return the error NX_DHCP_DEST_TO_SMALL error, in that case increase the size of the buffers as there are
more numbers of DNS or gateways on the networks.
9. Running the NetX DHCP Client Module Application Projec t
To run the NetX DHCP Client Module Application Project and to see it executed on a target kit, you can
simply import it into your ISDE, compile, and run debug. Refer to the Renesas Synergy™ Project Import Guide
(r11an0023eu0121-synergy-ssp-import-guide.pdf) incl uded in this package) f or instructions on im porting the
project into e
To implement the NetX DHCP Client module application in a new project, follow the steps for defining,
configuring, auto-generating files, adding code, compiling, and debugging on the target kit. Following these
steps is a hands-on approach that can help make the development process with the SSP more practical,
while just reading over this guide will tend to be more theoretical.
Note: The following steps are described in sufficient detail for someone experienced with the basic flow
To create and run the CGC Application Project, use the following steps:
1. Create a new Renesas Synergy project for the S7G2-SK called DHCP_Client_App.
2. Select the Threads tab.
3. Add a thread for the DHCP Client application and set the Name to dhcp_thread (to generate the
dhcp_thread_entry.c file).
4. Set the “Stack size” property to 2048 and the “Priority” (thread priority) of this thread to 3. This thread
should be lower priority than the IP instance thread for optimal performance. So, if the IP thread is set to
the highest priority, e.g. 1, this application thread should be set to anything greater than 3 (the lower the
priority, the higher the number).
2
studio or IAR EW for Synergy and building/running the application.
through the Synergy development process. If these steps are not familiar, refer to the first few
chapters of the SSP Us er ’s Manual for a description of how to accomplish these steps.
R11AN0138EU0103 Rev.1.03 Page 16 of 21
May.02.19
Page 17

Renesas Synergy™ Platform NetX™ DHCP Client Module Guid e
Note that IP thread priority is set in the “IP Helper Thread Priority” property of the g_ip0/NetX IP instance
component.
5. In the thread stack pane, click on the + icon and choose X-Ware -> NetX -> Protocols -> NetX DHCP
Client.
6. Set the properties for the DHCP Client instance and the NetX Port ETHER driver.
Make sure to set the Ethernet Interrupt Priority; its default value is disabled.
SK-S7G2 board only: Choose Channel 1; the Channel 1 Phy Reset Pin should be
IOPORT_PORT_08_PIN_06. These properties default to 0 and IOPORT_PORT_07_PIN_06.
7. Click the Generate Project Content button.
8. Add the code from the supplied project file, dhcp_thread_entry.c into the generated
dhcp_thread_entry.c file.
9. Right click on the project and choose New > Source File.
10. Enter the name of the new source file, for example, DHCP_client_app.c.
11. Copy the code from the supplied project file, DHCPv4_Client_Netx_MG.c file into this file.
12. Right click on the project and choose New -> Header F ile. Enter the name of the new header file, such
as DHCP_client_app.h. Copy the code from the supplied project file, DHCPv4_Client_Netx_MG.h
file into this file.
13. Right click the project and choose Build Project
14. Right click the project and choose Debug as -> Renesas GDB Hardware Debugging.
15. Connect to the host PC via a micro USB cable to J19 on SK-S7G2.
16. Connect SK-S7G2 to the network running a DHCP server via ethernet cable on port J11.
17. Run the application.
18. The output can be viewed in the Renesas Debug Console:
Figure 6. Example Output from NetX DHCP Client Module Application Project
R11AN0138EU0103 Rev.1.03 Page 17 of 21
May.02.19
Page 18

Renesas Synergy™ Platform NetX™ DHCP Client Module Guid e
10. NetX DHCP Client Module Conclusion
This module guide has provi ded all the b ack ground inf or m ation needed t o select, add, conf igur e and use th e
module in an exam ple project. Man y of these steps (in particular prepar ing NetX with the required services
such as enabling UDP, establishing an IP instance, and defining the driver interface for NetX) were time
consuming and error-pr one activities in pre vious generatio ns of embedded s ystems. Furthermore, access to
the DHCP Client element properties box simplifies customizing the DHCP Client properties, rather than
tracking down the configuration options in the source code header files and manually setting their value. The
Renesas Synerg y Platfor m m akes these steps muc h less time consum ing and rem oves the common er rors,
like conflicting configuration settings or the incorrect selection of lower-level drivers. The use of high-level APIs
(as demonstrated in the application project) illustrates additional devel opment tim e savin gs b y allowing work
to begin at a high level and avoiding t he tim e r equired in o lder dev elopm ent env ironm ents to use or, in s om e
cases, create, lower-level dr ivers.
At the same time, the application project shows the use of calling DHCP Client services directly. At some point,
an application m ay need to write the entire pr oject dir ectly fr om sour ce code to ful ly custom ize the proj ect to
the application. That proc ess will be much easier after working through this applica tion project and gaining
some familiarity with the NetX DHCP Client.
11. NetX DHCP Client Module Next Steps
After you have mastered a simple DHCP Client module project, you may want to review more complex
examples.
Maintaining the DHCP Client when power cycling and suspending the Client
If your application requires the ability to restore the DHCP Client after the device is powered off, you would
need to use the DHCP Client Restore State feature. DHCP Clients with short IP leases in particular would
need to save and restore the DHCP Client record to insure timely renewal of an IP address. This application
is a good example of combining the convenience of developing on the Renesas Synergy Platform with
customized coding by the developer to maximize DHCP Client capabilities.
You enable this feature by setting the Persistent client state property to Enabled. Before powering off, the
client record must be extracted and saved to non-volatile memory. A client record is created using this
service:
UINT _nx_dhcp_client_create_record(NX_DHCP *dhcp_ptr)
On powering up, the saved client record is restored by calling this service from the application thread:
UINT _nx_dhcp_client_restore_record(NX_DHCP *dhcp_ptr, NX_DHCP_CLIENT_RECORD
*client_record_ptr, ULONG time_elapsed)
In some usage cases, the DHCP Client thread may only need to be suspended and resumed. To keep the
time remaining on the client lease up to date, the client lease time remaining needs to be updated for the
time interval that the DHCP Client thread task is suspended. To be able to do so requires persistent client
state to be enabled. In this case, however, no record need be extracted of the DHCP Client, only the time
remaining on the lease needs to be updated.
The services for suspending and resuming the DHCP Client thread are:
UINT _nx_dhcp_suspend(NX_DHCP *dhcp_ptr)
UINT _nx_dhcp_resume(NX_DHCP *dhcp_ptr)
The service for updating the DHCP Client lease time remaining is:
UINT _nx_dhcp_client_update_time_remaining(NX_DHCP *dhcp_ptr, ULONG
time_elapsed)
Contact Renesas Synerg y Support for additional details on managing the DHCP Client around power cycles
and suspension of the DHCP Client.
Running the DHCP Client on a Secondary Interface
To support a secondary interface, add a NetX Source element to the project and set its Maximum Physical
Interfaces property to 2 (if only one secondary interface exists). The application must then register the
R11AN0138EU0103 Rev.1.03 Page 18 of 21
May.02.19
Page 19

Renesas Synergy™ Platform NetX™ DHCP Client Module Guid e
interface with the NetX IP instance by calling the nx_ip_interface_attach service. (Note that the board
must have two network Ethernet connections.)
Set the interface index by calling the nx_dhcp_set_interface_index service before starting the DHCP
Client. The NetX DHCP Client defaults to the primary interface (index = 0). The
nx_dhcp_set_interface_index service sets the DHCP Client to the network interface specified by the
index input. In the case of one secondary interface, this would be 1.
After the DHCP Client and NetX are set up for the secondary interface, the DHCP Client session is run no
differently from a DHCP Client on a primary interface.
Contact Renesas Synerg y Support for additional details in setting up the DHCP Client on a secondary
interface.
12. Reference Information
SSP User’s Manual: Available in html format in the SSP distribution package and as a pdf from the Renesas
Synergy Gallery.
Links to all the most up-to-date NetX DHCP client module reference materials and resources are available
on the Synergy Knowledge Base: https://en-support.renesas.com/knowledgeBase/16977452.
R11AN0138EU0103 Rev.1.03 Page 19 of 21
May.02.19
Page 20

Renesas Synergy™ Platform NetX™ DHCP Client Module Guid e
Website and Support
Visit the following vanity URLs to learn about key elements of the Synergy Platform, download components
and related documentation, and get support.
Synergy Software www.renesas.com/synergy/software
Synergy Software Package www.renesas.com/synergy/ssp
Software add-ons www.renesas.com/synergy/addons
Software glossary www.renesas.com/synergy/softwareglossary
Development tools www.renesas.com/synergy/tools
Synergy Hardware www.renesas.com/synergy/hardware
Microcontrollers www.renesas.com/synergy/mcus
MCU glossary www.renesas.com/synergy/mcuglossary
Parametric search www.renesas.com/synergy/parametric
Kits www.renesas.com/synergy/kits
Synergy Solutions Gallery www.renesas.com/synergy/solutionsgallery
Partner projects www.renesas.com/synergy/partnerprojects
Application projects www.renesas.com/synergy/applicationprojects
Self-service support resources:
Documentation www.renesas.com/synergy/docs
Knowledgebase www.renesas.com/synergy/knowledgebase
Forums www.renesas.com/synergy/forum
Training www.renesas.com/synergy/training
Videos www.renesas.com/synergy/videos
Chat and web ticket www.renesas.com/synergy/resourcelibrary
R11AN0138EU0103 Rev.1.03 Page 20 of 21
May.02.19
Page 21

Renesas Synergy™ Platform NetX™ DHCP Client Module Guid e
Rev.
Date
Description
Page
Summary
1.00
Jun.07.17
—
Initial version
1.01
Nov.22.17
—
Update to Hardware and Software Resources Table.
Editing and release.
1.02
Jan.07.19
—
Updated versions and configuration settings
1.03
May.02.19
-
Updated config file and code change for SSP 1.6.0
Revision History
R11AN0138EU0103 Rev.1.03 Page 21 of 21
May.02.19
Page 22

Corporate Headquarters
Contact information
www.renesas.com
Trademarks
of their respective owners.
Notice
1. Descriptions of circuits, software and other related information in this document are provided only to illustrate the operation of semiconductor products
and application examples. You are fully responsible for the incorporation or any other use of the circuits, software, and information in the design of your
product or system. Renesas Electronics disclaims any and all liability for any losses and damages incurred by you or third parties arisi n g from the use
of these circuits, software, or information.
2. Renesas Electronics hereby expressly disclaims any warranties against and liability for infringement or any other claims involving patents, copyrights,
or other intellectual property rights of third parties, by or arising from the use of Renesas Electronics products or technical information described in this
document, including but not limited to, the product data, drawings, charts, programs, algorithms, and application e xam ples .
3. No license, express, implied or otherwise, is granted hereby under any patents, copyrights or other intellectual property rights of Renesas Electronics
or others.
4. You shall not alter, modify, copy, or reverse engineer any Renesas Electronics product, whether in whole or in part. Renesas Electronics disclaims any
and all liability for any losses or damages incurred by you or third parties arising from such alteration, modification, copying or reverse engineering.
5. Renesas Electronics products are classified according to the following two quality grades: “Standard” and “High Quality”. The intended applications for
each Renesas Electronics product depends on the product’s quality grade, as indicated below.
"Standard": Computers; office equipment; communications equipment; test and measurement equipment; audio and visual equipment; home
"High Quality": Transportation equipment (automobiles, trains, ships, etc.); traffic control (traffic lights); large-scale communication equipment; key
Unless expressly designated as a high reliability product or a product for harsh environments in a Renesas Electronics data sheet or other Renesas
Electronics document, Renesas Electronics products are not intended or authorized for use in products or systems that may pose a direct threat to
human life or bodily injury (artificial life support devices or systems; surgical implantations; etc.), or may cause serious property damage (space
system; undersea repeaters; nuclear power control systems; aircraft control systems; key plant systems; military equipment; etc.). Renesas Electronics
disclaims any and all liability for any damages or losses incurred by you or any third parties arising from the use of any Renesas Electronics product
that is inconsistent with any Renesas Electronics data sheet, user’s manual or other Renesas Electronics document.
6. When using Renesas Electronics products, refer to the latest product information (data sheets, user’s manuals, application notes, “General Notes for
Handling and Using Semiconductor Devices” in the reliability handbook, etc.), and ensure that usage conditions are within the ranges specified by
Renesas Electronics with respect to maximum ratings, operating power supply voltage range, heat dissipation characteristics, installation, etc. Renesas
Electronics disclaims any and all liability for any malfunctions, failure or accident arising out of the use of Renesas Electronics products outside of such
specified ranges.
7. Although Renesas Electronics endeavors to improve the quality and reliability of Renesas Electronics products, semiconductor products have specific
characteristics, such as the occurrence of failure at a certain rate and malfunctions under certain use conditions. Unless designated as a high reliability
product or a product for harsh environments in a Renesas Electronics data sheet or other Renesas Electronics document, Renesas Electronics
products are not subject to radiation resistance design. You are responsible for implementing safety measures to guard against the possibility of bodily
injury, injury or damage caused by fire, and/or danger to the public in the event of a failure or malfunction of Renesas Electronics products, such as
safety design for hardware and software, including but not limited to redundancy, fire control and malfunction prevention, appropriate treatment for
aging degradation or an y other appropriate measures. Because the evaluation of microcomputer software alone is very difficult and impractical, you are
responsible for evaluating the safety of the final products or systems manufactured by you.
8. Please contact a Renesas Electronics sales office for details as to environmental matters such as the environmental compatibility of each Renesas
Electronics product. You are responsible for carefully and sufficiently investigating applicable laws and regulations that regulate the inclusion or use of
controlled substances, including without limitation, the EU RoHS Directive, and using Renesas Electronics products in compliance with al l these
applicable laws and regulations. Renesas Elec tro ni cs di scl aim s an y a nd all liabi li t y for dama ges or losses occurring as a result of your noncompliance
with applicable laws and regulations.
9. Renesas Electronics products and technologies shall not be used for or incorporated into any products or systems whose manufacture, use, or sale is
prohibited under any applicable domestic or foreign laws or regulations. You shall comply with any applicable export control laws and regulations
promulgated and administered by the governments of any countries asserting jurisdiction over the parties or transactions.
10. It is the responsibility of the buyer or distributor of Renesas Electronics products, or any other party who distributes, disposes of, or otherwise sells or
transfers the product to a third party, to notify such third party in advance of the contents and conditions set forth in this document.
11. This document shall not be reprinted, reproduced or duplicated in any form, in whole or in part, without prior written consent of Renesas Electronics.
12. Please contact a Renesas Electronics sales office if you have any questions regarding the information contained in this document or Renesas
Electronics products.
(Note1) “Renesas Electronics” as used in this document means Renesas Electronics Corporation and also includes its directly or indirectly controlled
(Note2) “Renesas Electronics product(s)” means any product developed or manufactured by or for Renesas Electronics.
subsidiaries.
electronic appliances; machine tools; personal electronic equipment; industrial robots; etc.
financial terminal systems; safety control equipment; etc.
(Rev.4.0-1 Novembe r 201 7)
TOYOSU FORESIA, 3-2-24 Toyosu,
Koto-ku, Tokyo 135-0061, Japan
Renesas and the Renesas logo are trademarks of Renesas Electronics
Corporation. All trademarks and registered trademarks are the property
For further information on a product, technology, the most up-to-date
version of a document, or your ne are s t sales office, please visit:
www.renesas.com/contact/.
© 2019 Renesas Electronics Corporation. All rights reserved.
 Loading...